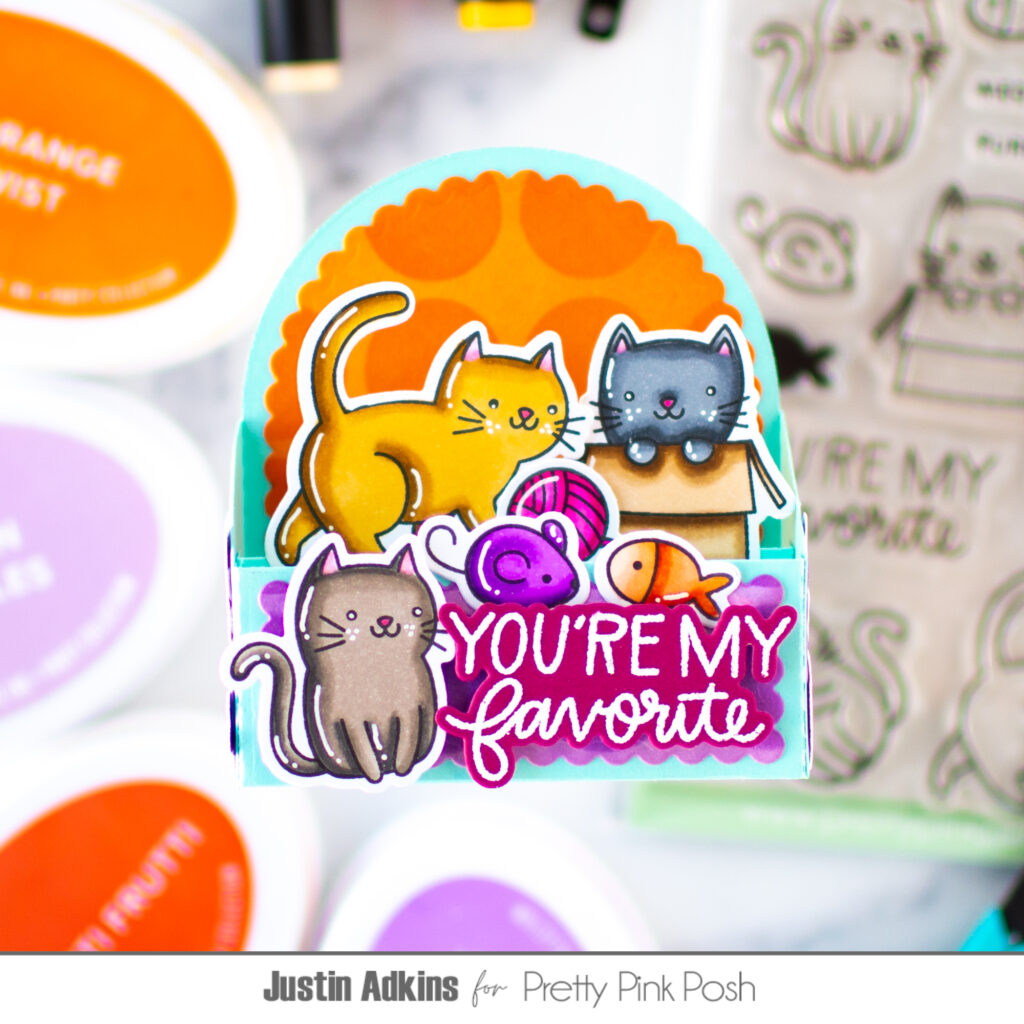
Hello, crafty friends! It’s Justin Adkins, and today I’m sharing a fun and dimensional project that’s sure to make you paws and smile—a scalloped box card featuring the adorable Cuddly Cats! This card is full of playful layers, bright color, and just the right amount of kitten charm.
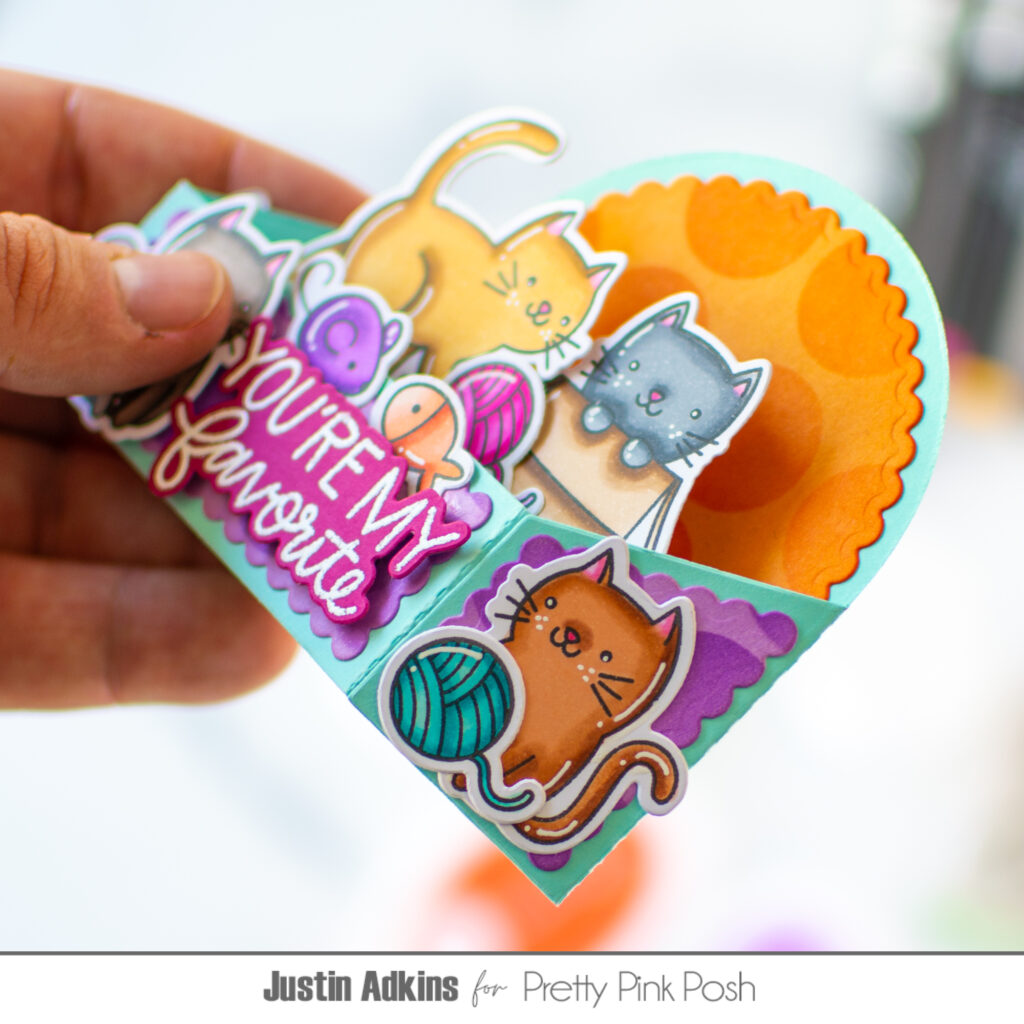
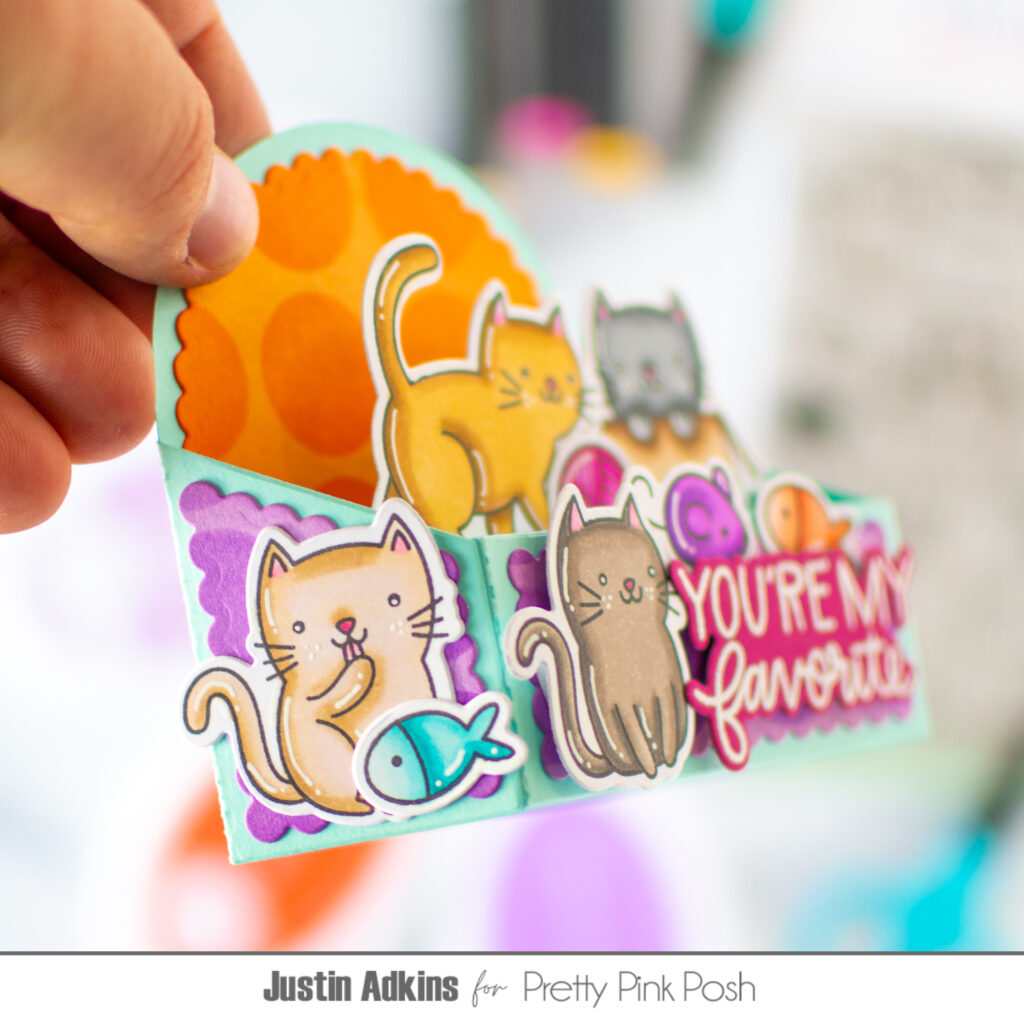
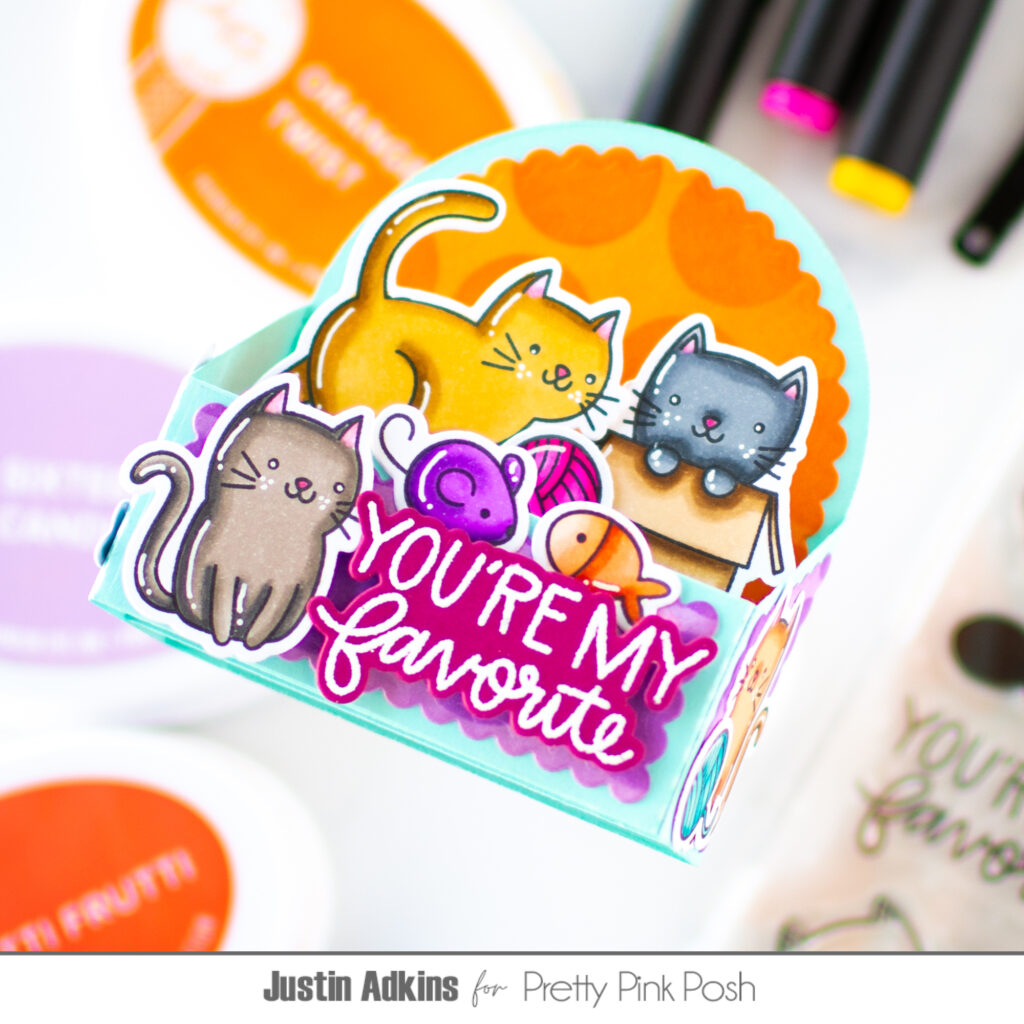
This project is all about dimension and color! The Scallop Box Card Die Set creates that standout structure, giving the design a playful, interactive feel. I used the Circle Grid Stencil with bright inks to build a bold, layered background that really makes those sweet kitties pop.
The images from the Cuddly Cats stamp set were colored with OLO Markers for a soft, blended look, and then arranged inside the box to create a cozy little scene—complete with toys and lots of personality. Adding foam strips helps give everything that extra lift, making the card feel full of life(and a little cattitude!).
This card is a purr-fect mix of fun techniques and dimensional design, and it’s such a joy to create! Don’t forget to check out the full video tutorial for all the tips and tricks to recreate this project.
Be sure to follow me on Instagram and YouTube at @justanotebyjustin for even more crafting inspiration!
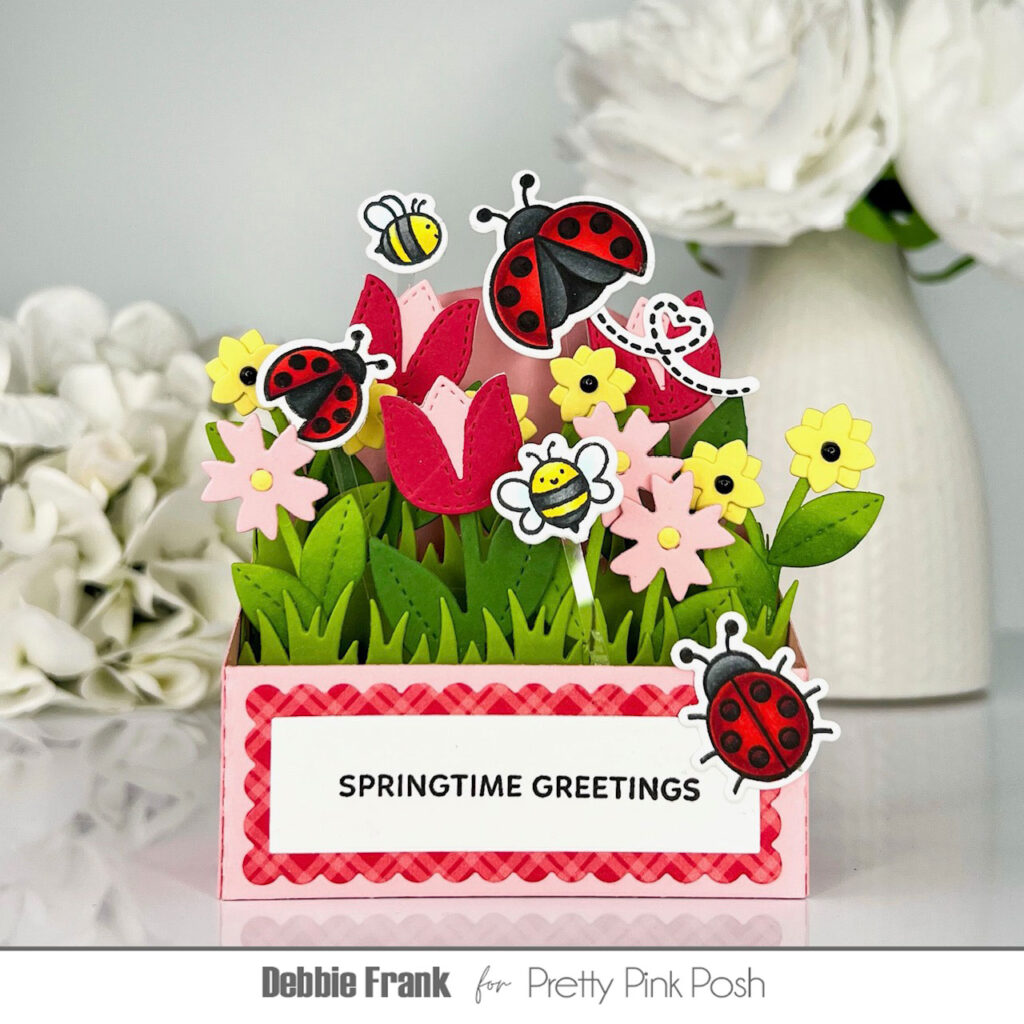
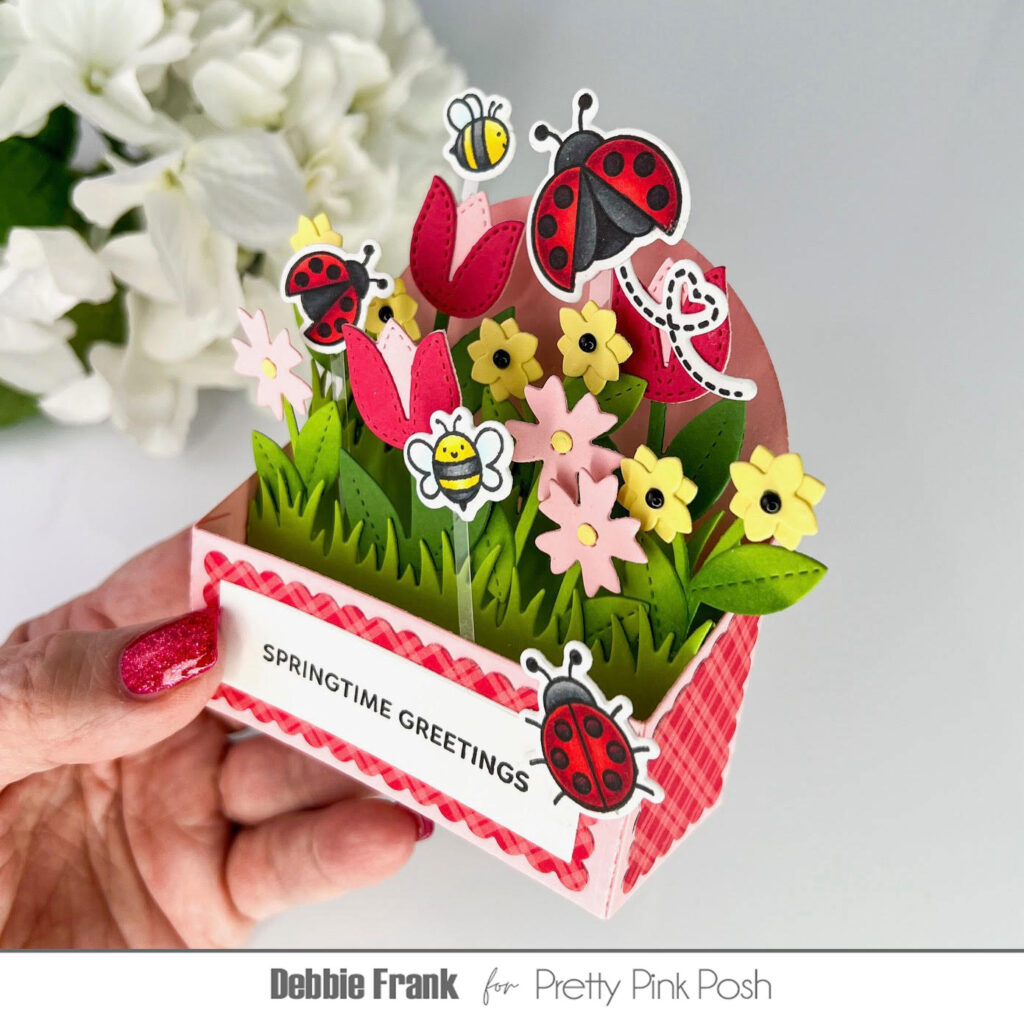
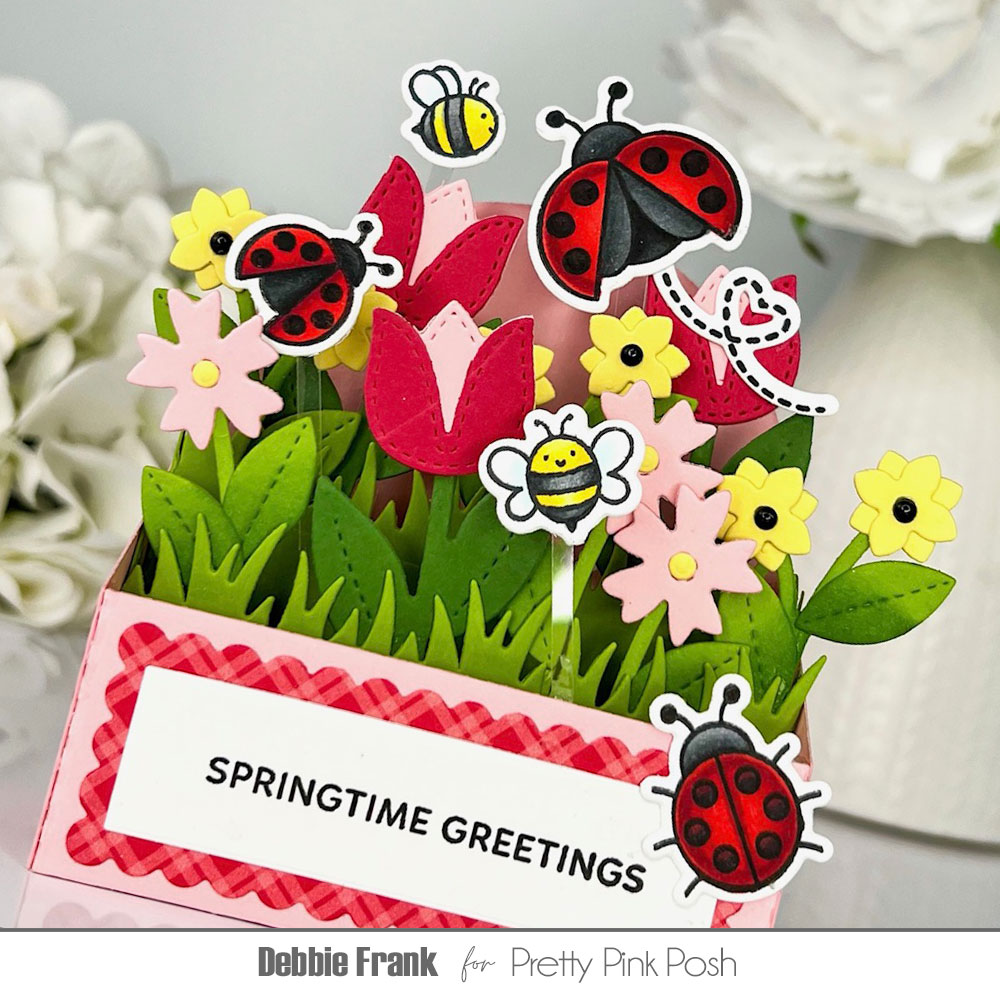
Hi friends, Debbie here with the adorableLovely Ladybug stamp setfrom Pretty Pink Posh! I’m definitely ready for summer with all the flowers blooming and the cute flying insects! Bees are way cuter on paper than for real, though!
The Scallop Box Card Diesis perfect way to really show off a flower filled garden card.
Started off by stamping and copic coloring the ladybugs and die-cut them out with the Coordinating Dies. Next, I attached a trail to the back of the larger flying ladybug.
To decorate the Scalloped Box card, I went through my stash and found the perfect pattern paper for the ladybugs. I added the pattern paper to the front, sides and the back but not the inside of the scallop box card.
Having the yellow in the combination, I decided to bring back the Bee Friends stamp set. Stamping out two of the smaller bees and adhering 1/4inch acetate strips to the back of the bees and two of the ladybugs.
With the Spring Mug Additions Diesand the Stitched Spring Flower Dies I die-cut out the flowers in pink, reds, and yellow for my garden. Then with the Grass Border Die I die-cut out two grass strips. Then with the Insert dies from the Scallop Box set, I off set the cutting plate to die-cut the grass again but not cut off the blades.
I assembled my box card and attached the flowers and stems to the back of the grass. Then in between or above the flowers I attached the acetate ladybugs and bees. I used the Black Onyx Pearls for the center of the yellow flowers.
With the Sentiment Strips: Easter set, I stamped out the “Springtime Greetings” and trimmed it out to fit onto the scallop pattern paper. Then attached a crawling ladybug to the front of the box.
I had to go outside to photograph my adorable Scalloped Box Card because it was such a beautiful sunny day.
Thanks for stopping by and hope you have a wonderful crafty day!
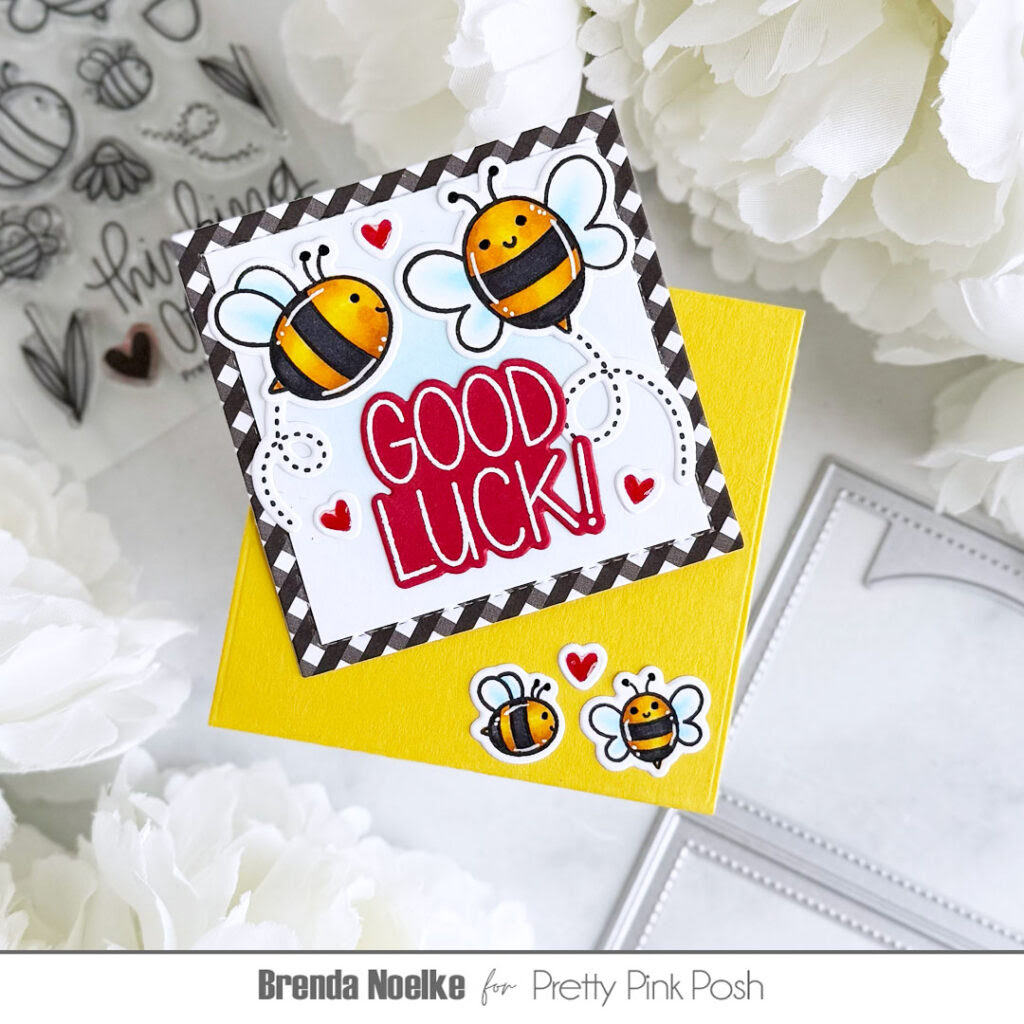
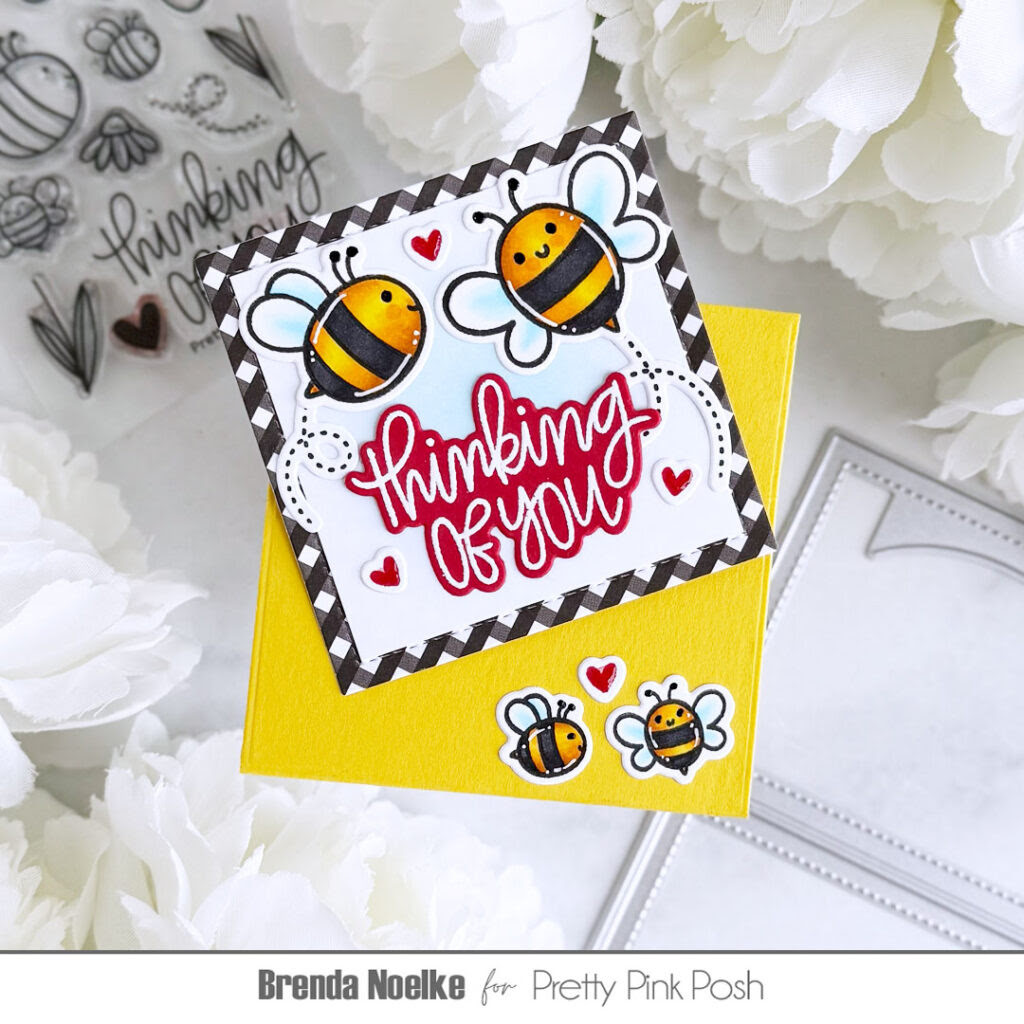
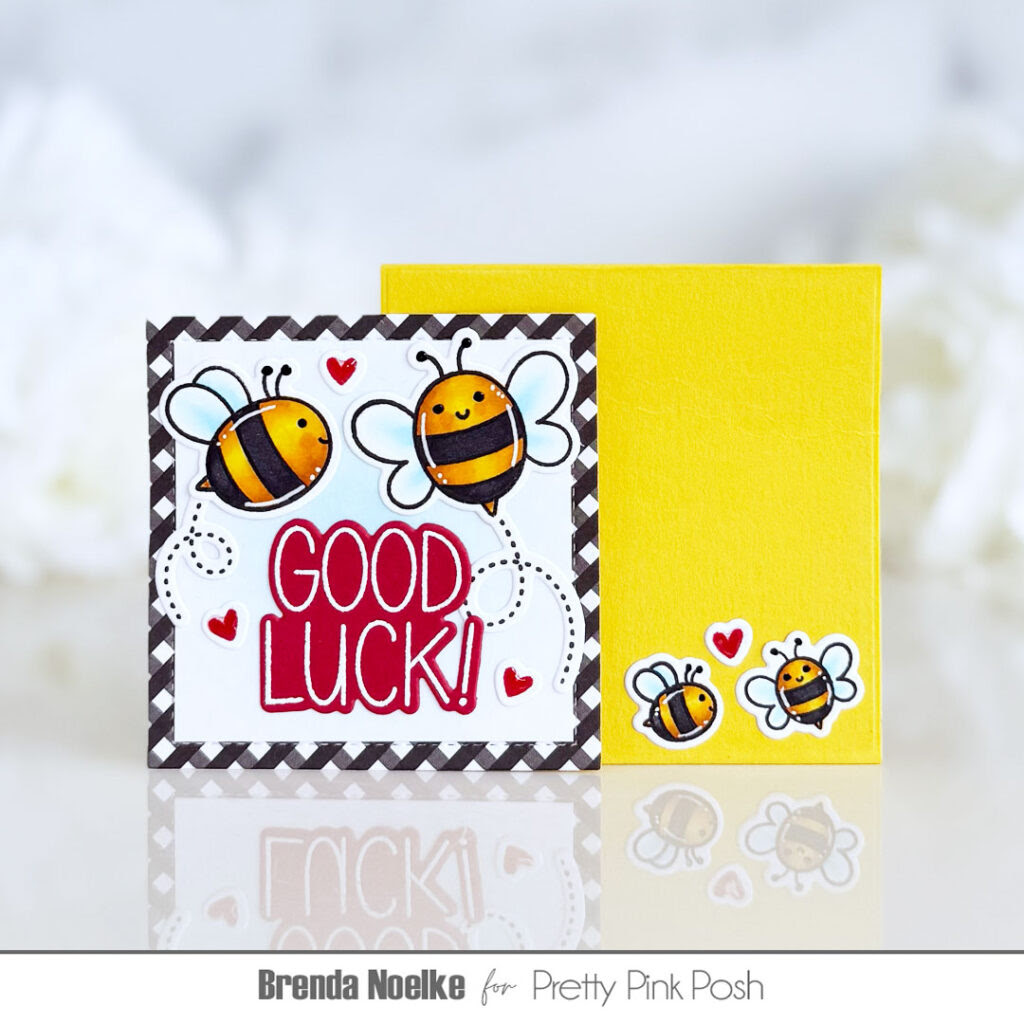
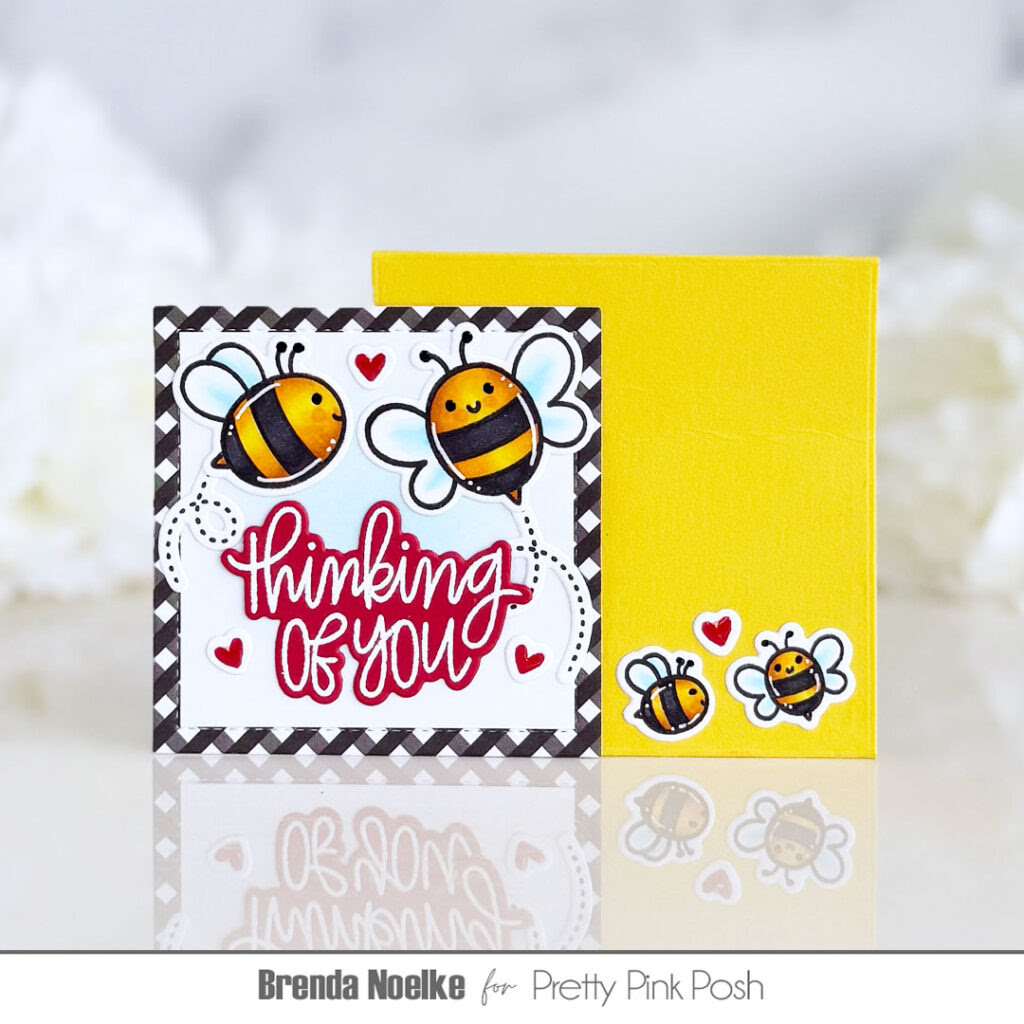
Hello, Pretty Pink Posh friends! Brenda here with a couple of note cards that would be perfect to tuck in a lunch box before a big test or add to a floral arrangement to let someone know that you’re thinking of them! The Bee Friends Stamps & Coordinating Dies pair perfectly with the Sweet Note Die Set to create these sweet note cards and envelopes that are sure to brighten anyone’s day!
I began by stamping the bees and trails in the Bee Friends Stamp Set onto white cardstock with Copic-friendly black ink. I colored them with Copic markers, then used the Coordinating Dies to cut them out. I added a bit of shine to the eyes with a black glaze pen and used a white gel pen to add in some highlights.
Next, I die-cut the envelopes from yellow cardstock and the square from black and white gingham using dies from the Sweet Note Die Set. The envelope dies were folded along the score lines and the folds were reinforced with a bone folder. I adhered each side together with liquid glue, being sure to use a very thin bead of glue.
I trimmed white cardstock squares to fit just inside the stitched edge of the gingham panel and added a bit of Tumbled Glass Distress Ink to the centers of the panel with a blending brush, then adhered them to the gingham panel.
The sentiments, from the Bee Friends and Lucky to Know You Stamp Sets, were white heat embossed onto red cardstock and cut out with theBee Friends and Lucky to Know YouCoordinating Dies. The larger bees and trails were adhered with liquid glue. I added the small bees to the front of the envelopes.
There are two sizes of solid hearts in the Bee Friends Stamp Set. I decided to use these as embellishments so they wouldn’t be too bulky to fit into the envelopes. The smaller heart was stamped onto white cardstock several times with red dye ink and cut out with the Coordinating Die. They were adhered to the note cards and envelopes with liquid glue. I added Glossy Accents to add a bit of shine to all of the hearts and that finished off these sweet note cards and envelopes.
That does it for me today!! Thank you so much for stopping by!
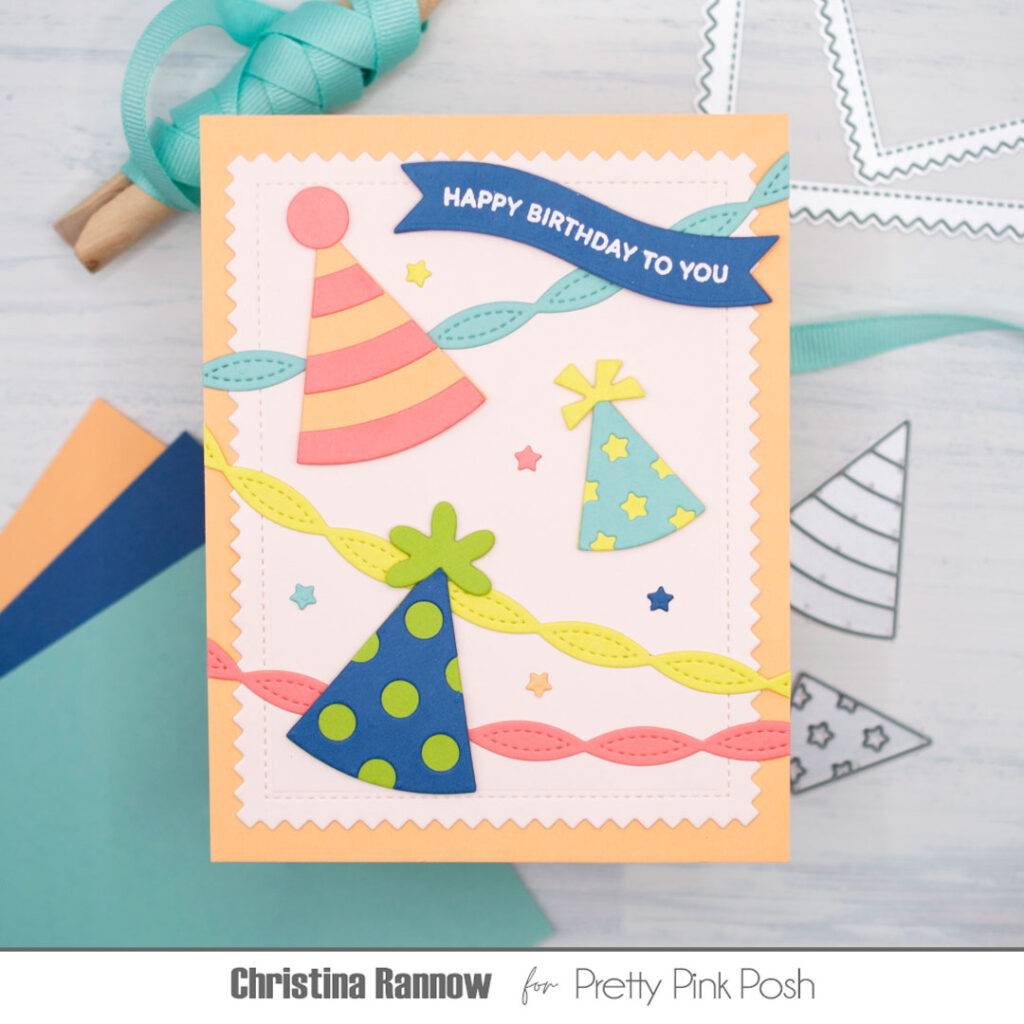
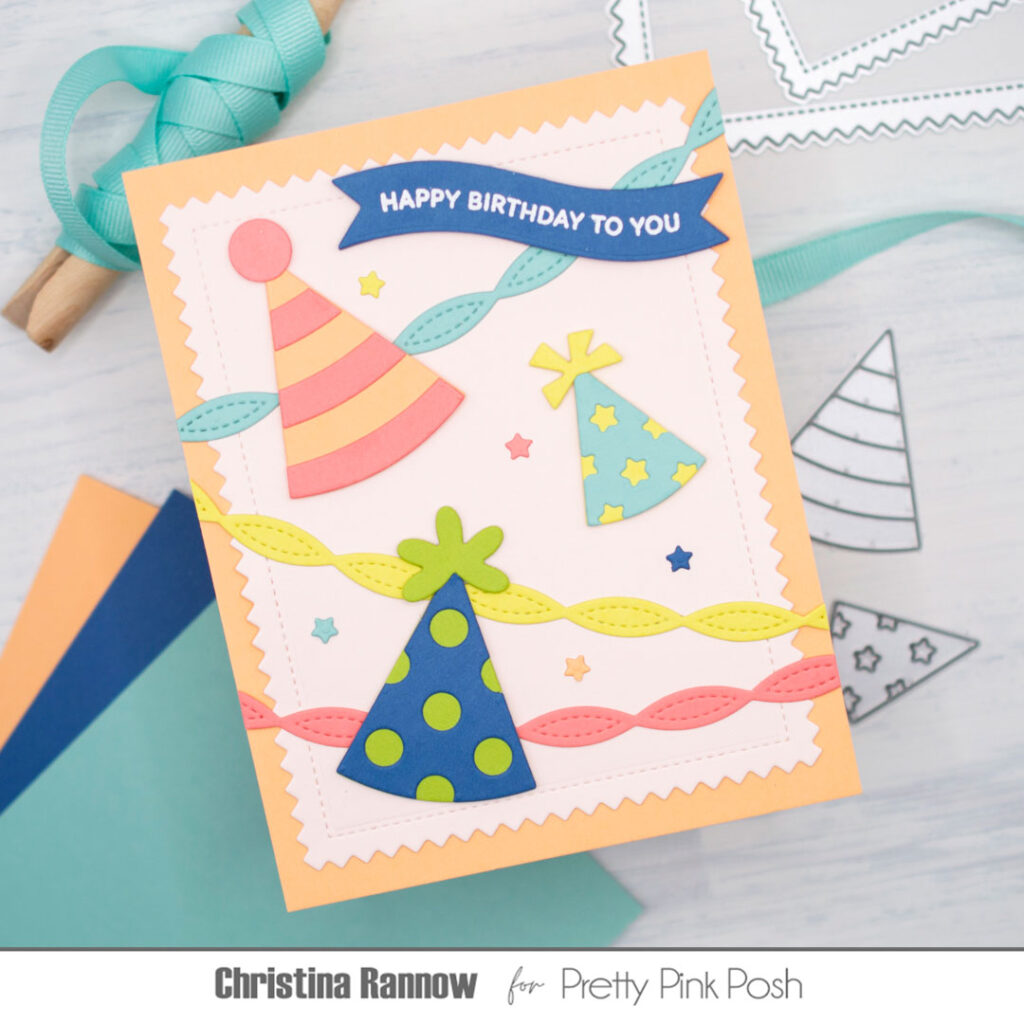
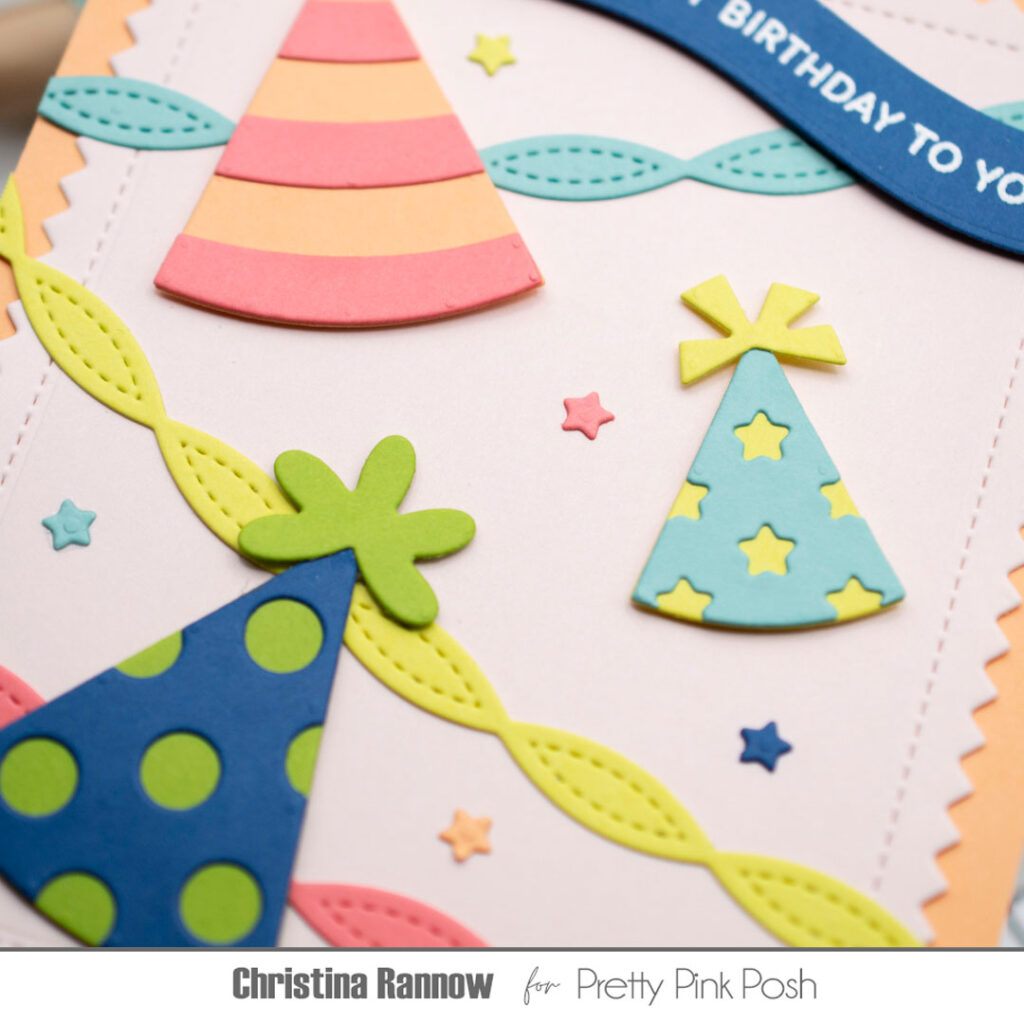
Hi friends! It’s Christina, and I have a simple die-cut birthday card to share with you today featuring some crafty essentials that I reach for time and time again. The Streamer Dies, the Pinking Rectangles, and any of the wavy banners get a workout in my craft room because they are so versatile and can be used for almost any occasion; plus, they add just the right amount of whimsical flair to your card designs. I combined these essentials with the Party Hats Dies for a classic birthday card that’s easy to put together. Let’s get started!
I started by choosing a color palette and cardstock for my design. I ended up with pink, blue, and apricot, with a touch of yellow and green. I decided to use the apricot colors for the background and layered the largestPinking Rectangleonto an A2 cardstock panel.
Next, I die-cut the party hats and played with different color combinations until I was happy with the results. The possibilities are endless with theseParty Hats, and with this design, you could easily mass-produce these cards to fill your birthday card stash.
With the Party Hats assembled, I die-cut the Streamers from the same colors and arranged everything onto the layered background panel. I used some of the stars from die-cutting the smaller hat several times as embellishments for an even more festive look. The final steps were to add a sentiment that I heat-embossed with white embossing powder on a wavy banner and then attach everything to a side-fold card base.
I hope I’ve inspired you to create something with your favorite crafty essentials! See you again soon!
Hello Crafty Friends! It is Hanh here with you today. Happy Stencil Theme Week! There are so many fun stencils over at the Pretty Pink Posh Shop.
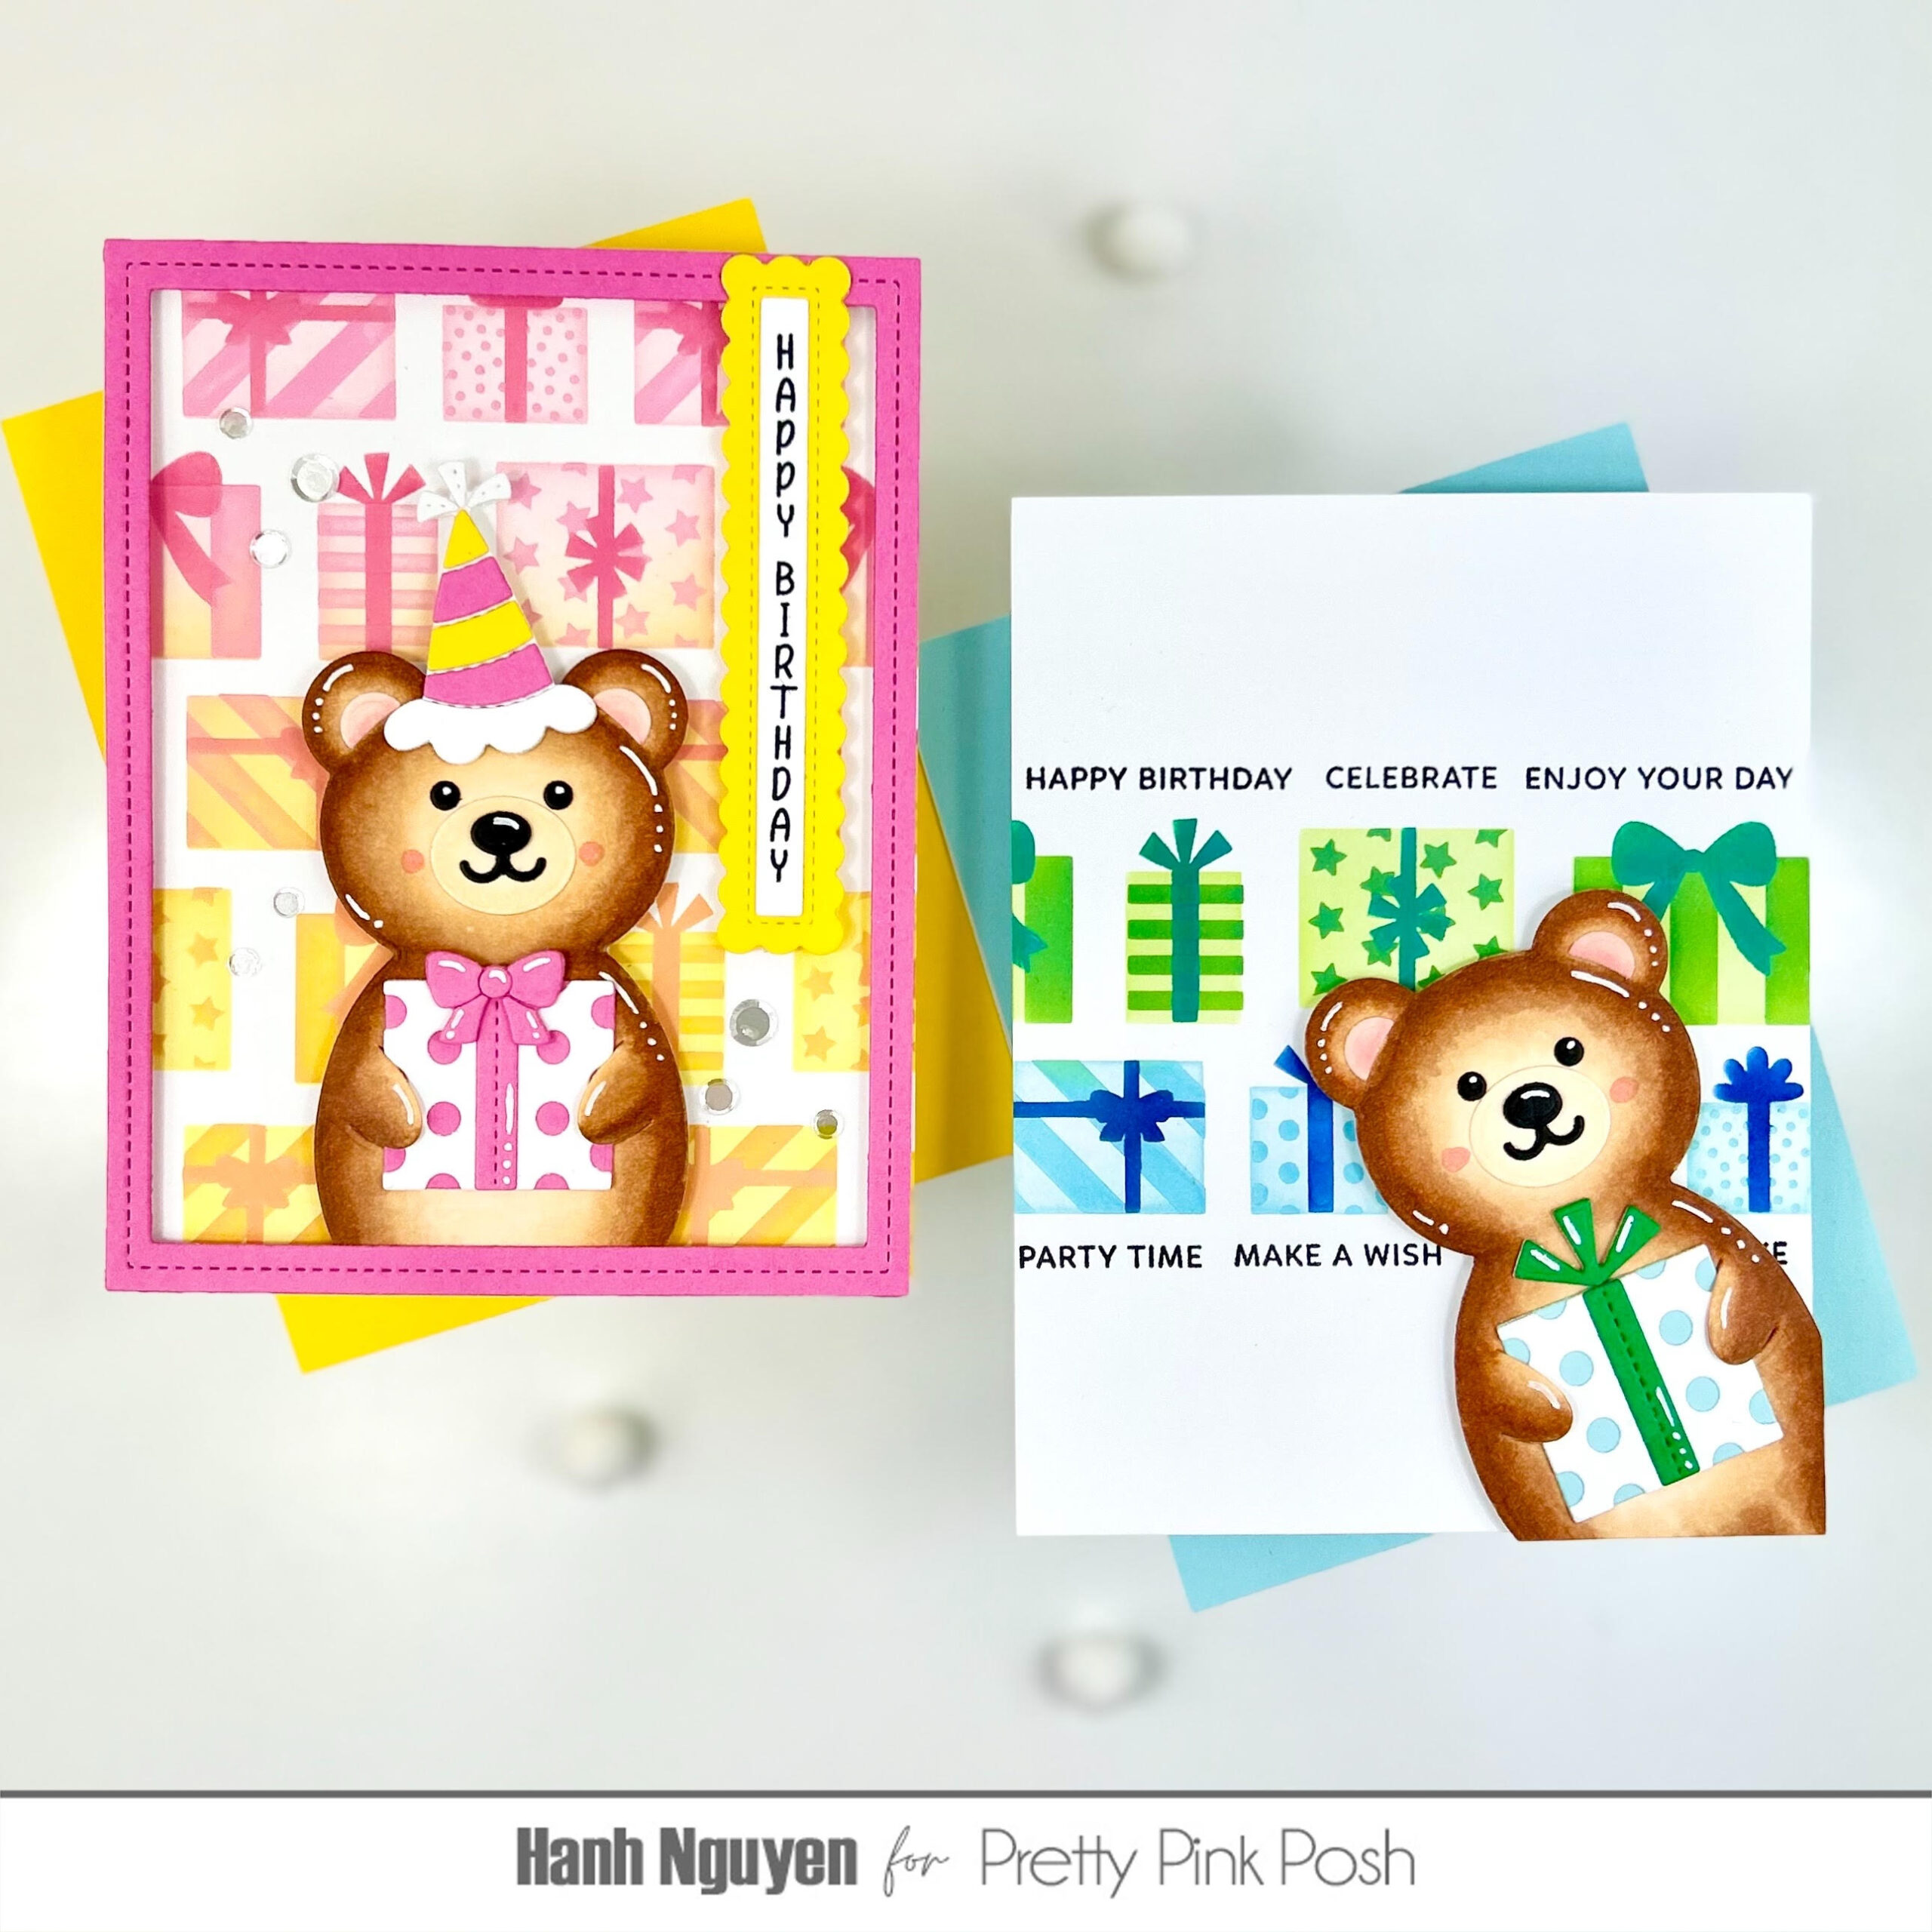
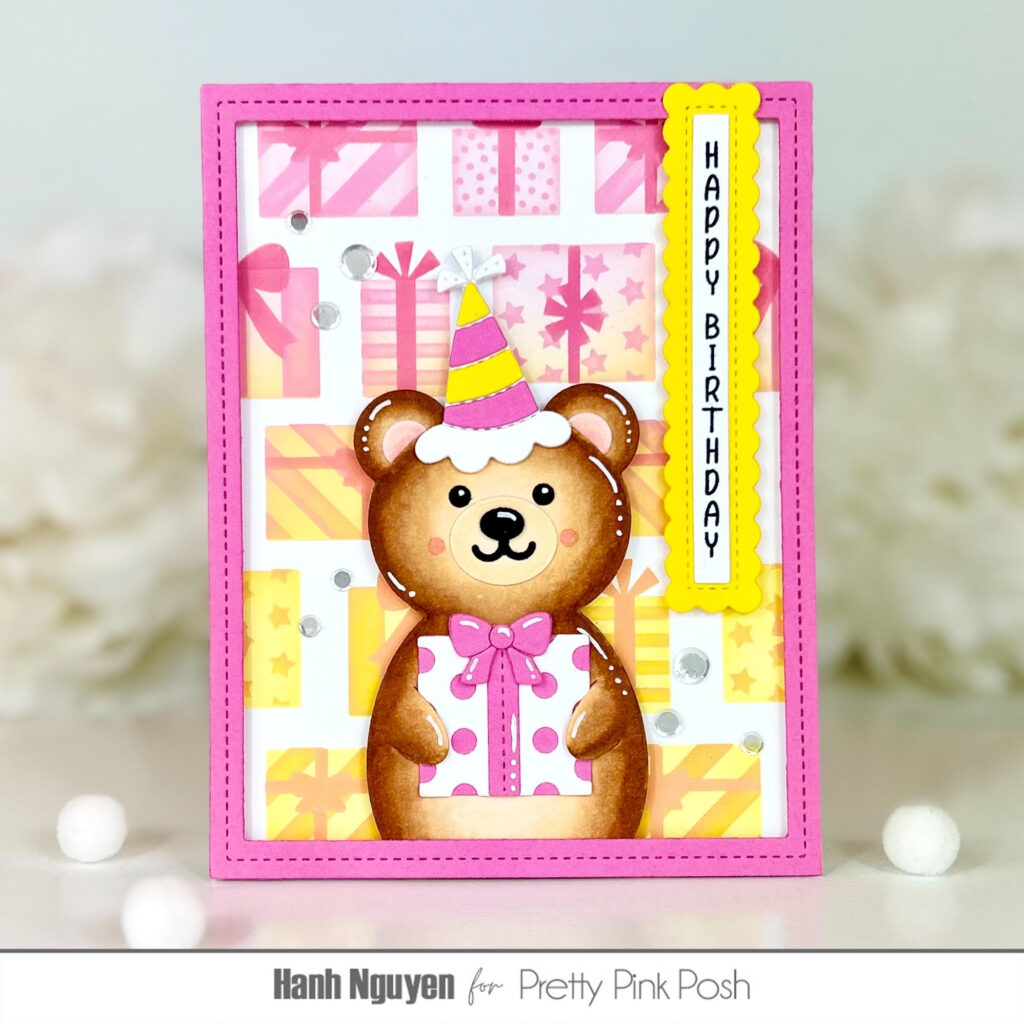
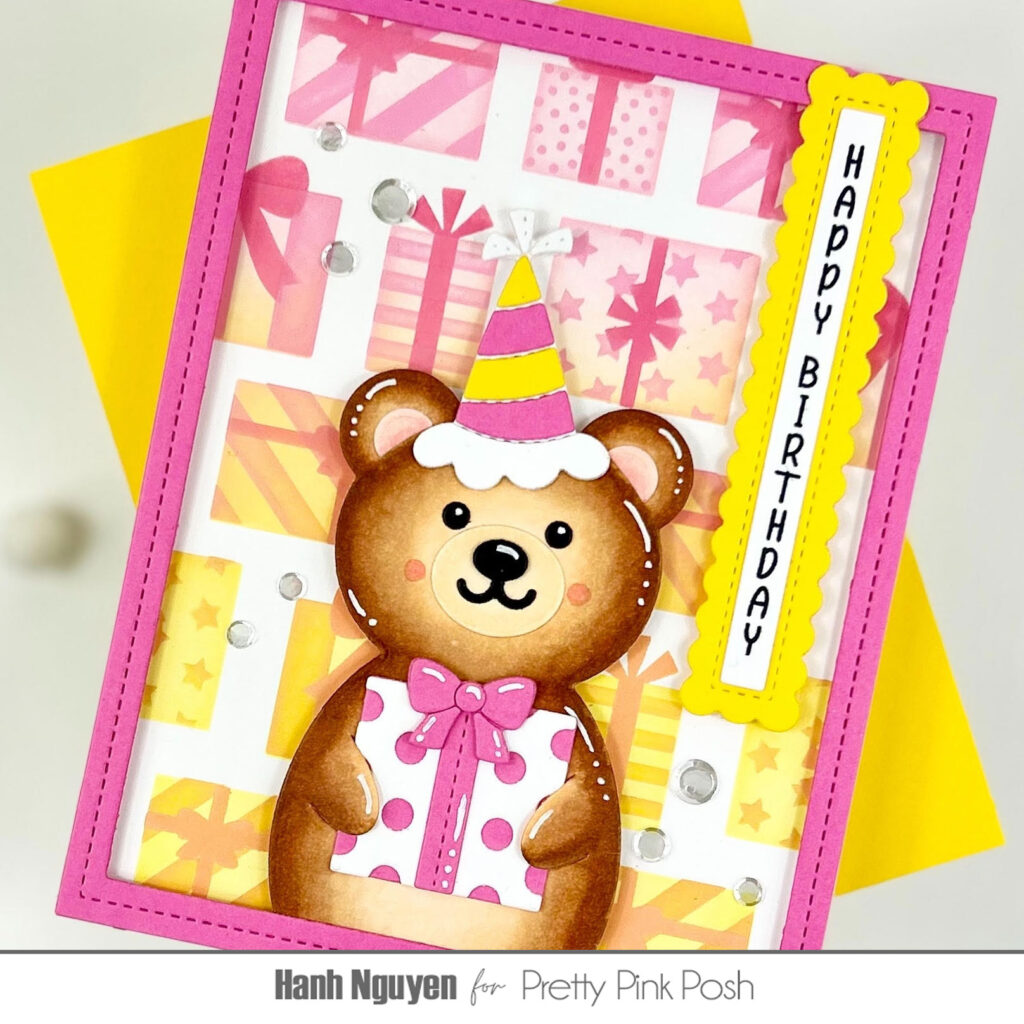
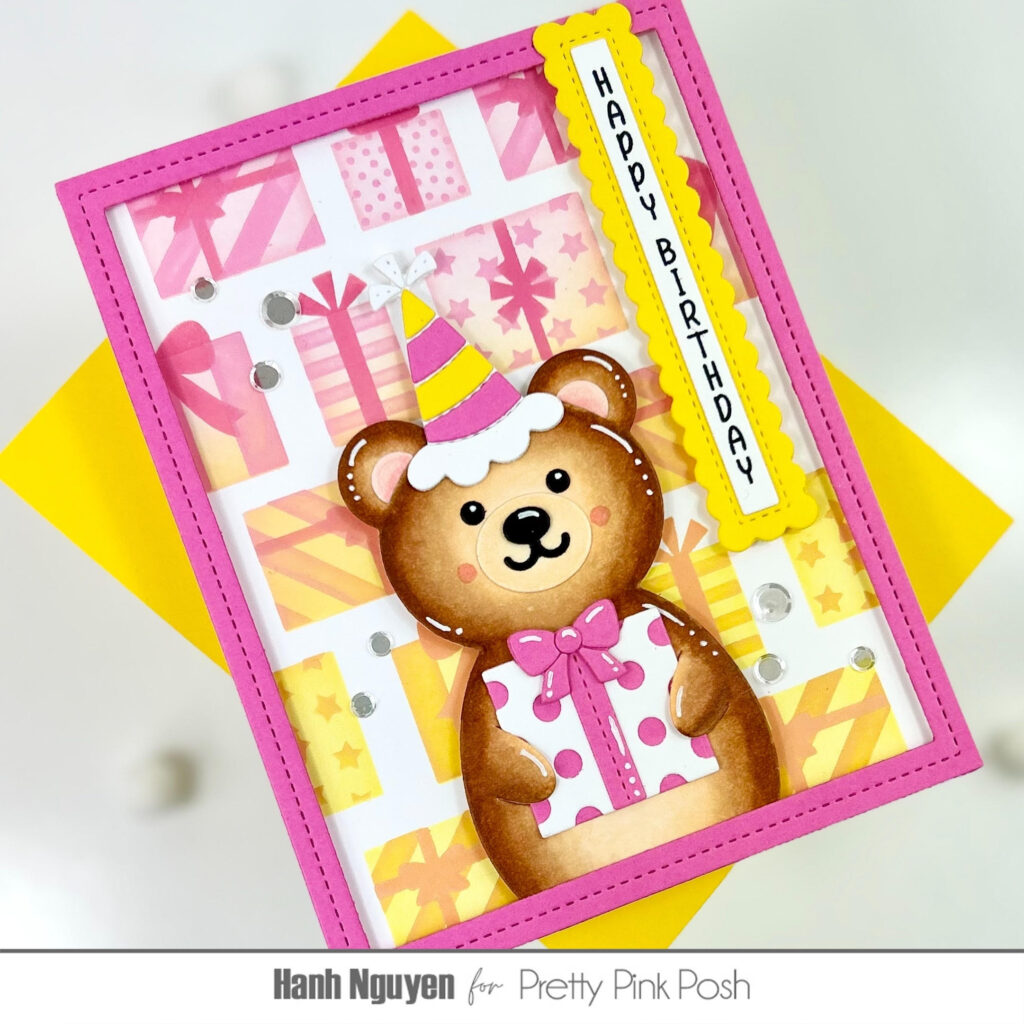
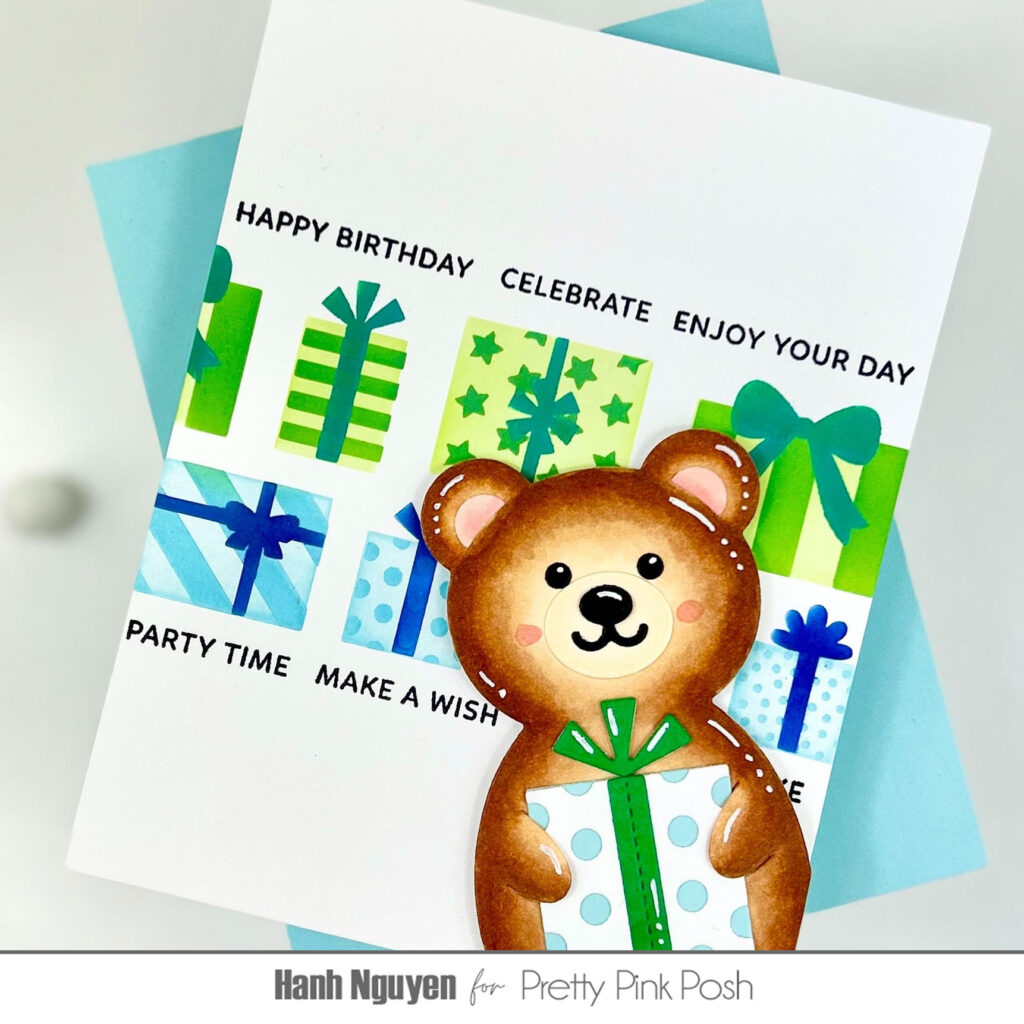
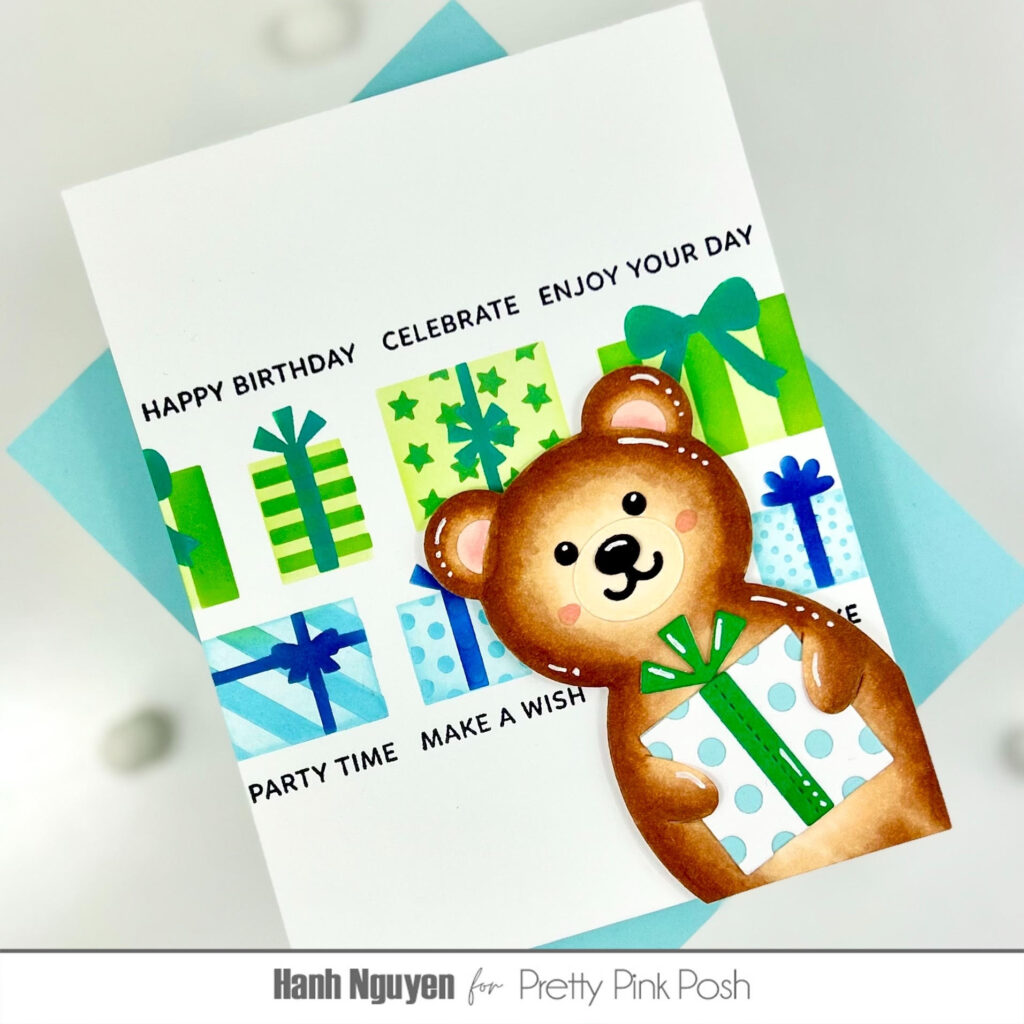
Today I am excited to showcase the Layered Presents Stencils. This versatile stencil set can be used for so many different occasions. I had so much fun playing with it that I created two birthday cards to share with you today. So let’s get started.
For my first card, I used all three layers of theLayered Presents Stencils to ink blend a full background on a piece of white cardstock. I started with the gift box stencil and Spun Sugar and Mustard Seed Distress Oxide inks. Next I used the stencil to add details to the wrapping paper with Kitsch Flamingo and Fossilized Amber Distress Oxide inks. Finally, I used the last stencil to add the bows with Picked Raspberry and Wild Honey Distress Oxide inks. I set the panel aside to dry as I worked on the rest of the card.
I diecut a bear, party hat and present using the Bear Holder Dies, Birthday Mug Additions Dies and Build a Gift Dies out of white, pink, yellow and black cardstock. The bear was colored with Copic markers. I assembled the diecuts and highlighted with a white gel pen.
For the sentiment, I stamped the “Happy Birthday” from the Upright Greetings: Birthday stamp set with Memento Tuxedo Black ink onto a piece of white cardstock. I used the Sentiment Strip Dies to diecut the sentiment and well as a scallop strip out of yellow cardstock. I layered and adhered the two strips.
I used the Fancy Cake Dies to diecut a stitched frame out of pink cardstock. Foam tape was used to adhere the bear, frame and sentiment strip to the panel. The panel was adhered to a white A2 cardbase (4.25” x 5.5”). I finished the card with a few Sparkling Clear Confetti Mix.
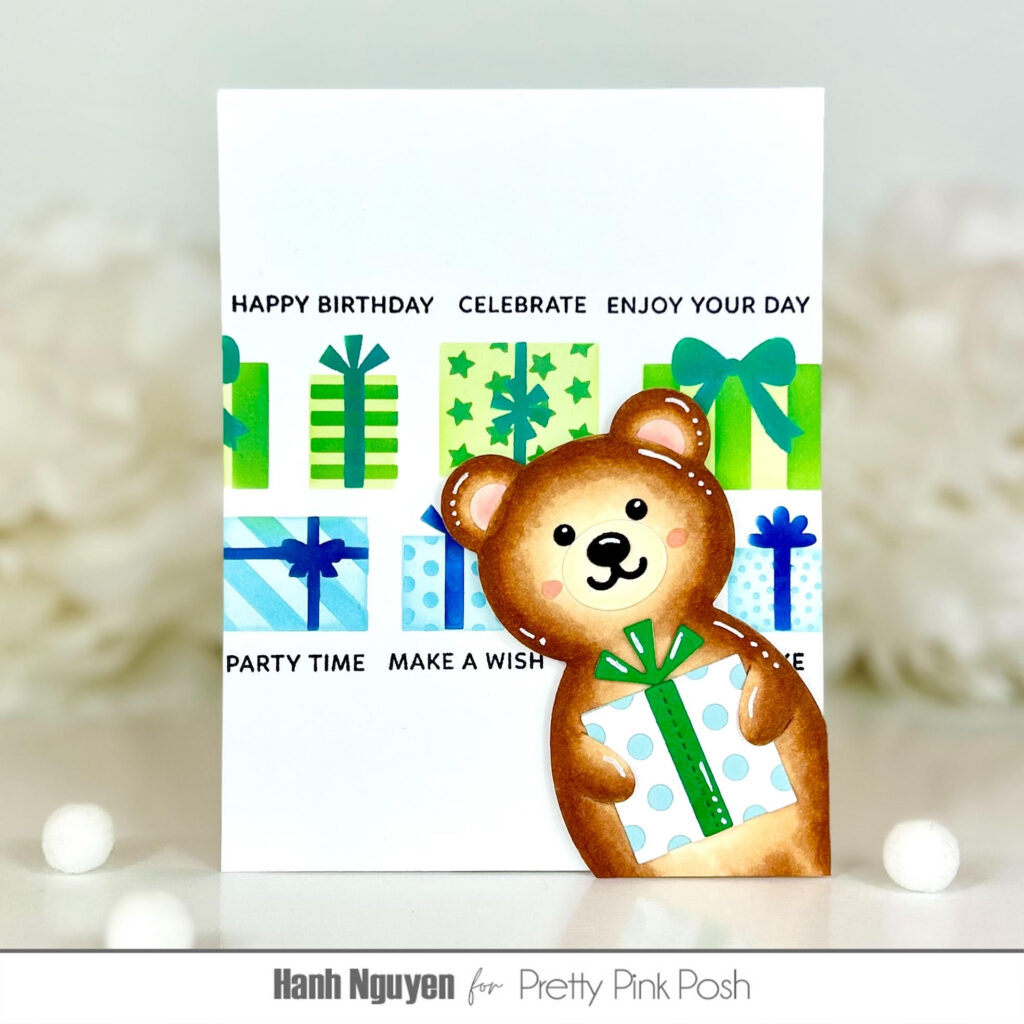
For my second card, I wanted to create a masculine birthday card. I decided to keep the design clean and simple with only two rows of presents. I love that you can easily mask off and use these stencils to ink only a portion of the background. This time I used some Post-It sticky notes to mask off part of the Layered Presents Stencils and work on one row at a time to keep the colors pure. I ink blended the layers in the same manner as I did in the first card. The gift box stencil with a very soft layer of Mowed Lawn and Tumbled Glass Distress Oxide inks. The pattern stencil with the same two colored inks but with a heavier hand when ink bleeding. And for the bow stencil, I used Pine Needles and Prize Ribbon Distress Oxide inks.
For the sentiments, I used the Sentiment Strips: Birthday stamp set to stamp several of the sentiments along the top and bottom borders of the presents with Memento Tuxedo Black ink.
I used the same dies as with the first card to diecut and color in the bear and present. I assembled them and adhered them onto the panel with some foam tape for a bit of dimension and interest.
I appreciate you taking the time to stop by and visit today. I hope you liked my cards and are inspired to try out some of these fun layered stencils. Be sure to head on over to the Pretty Pink Posh Shop to check out all of the different options available in the Stencil Section.
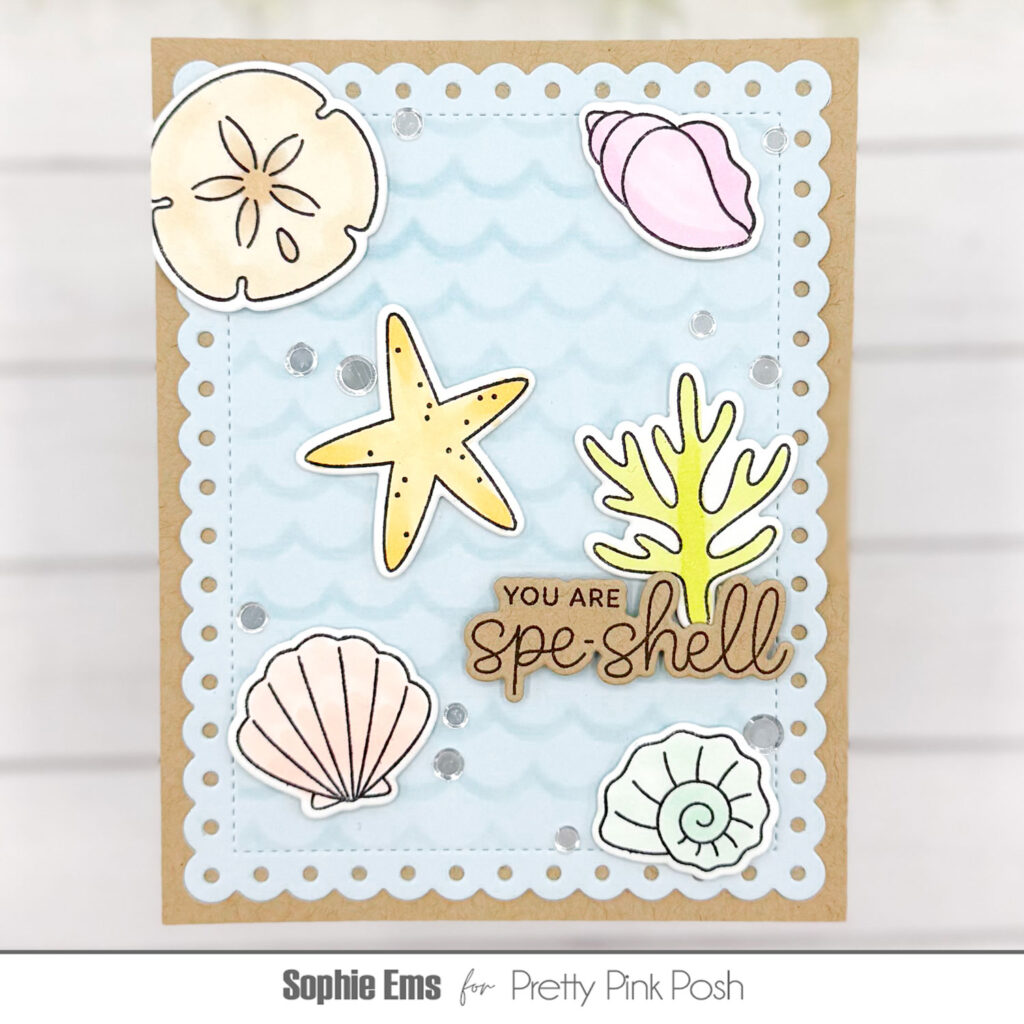
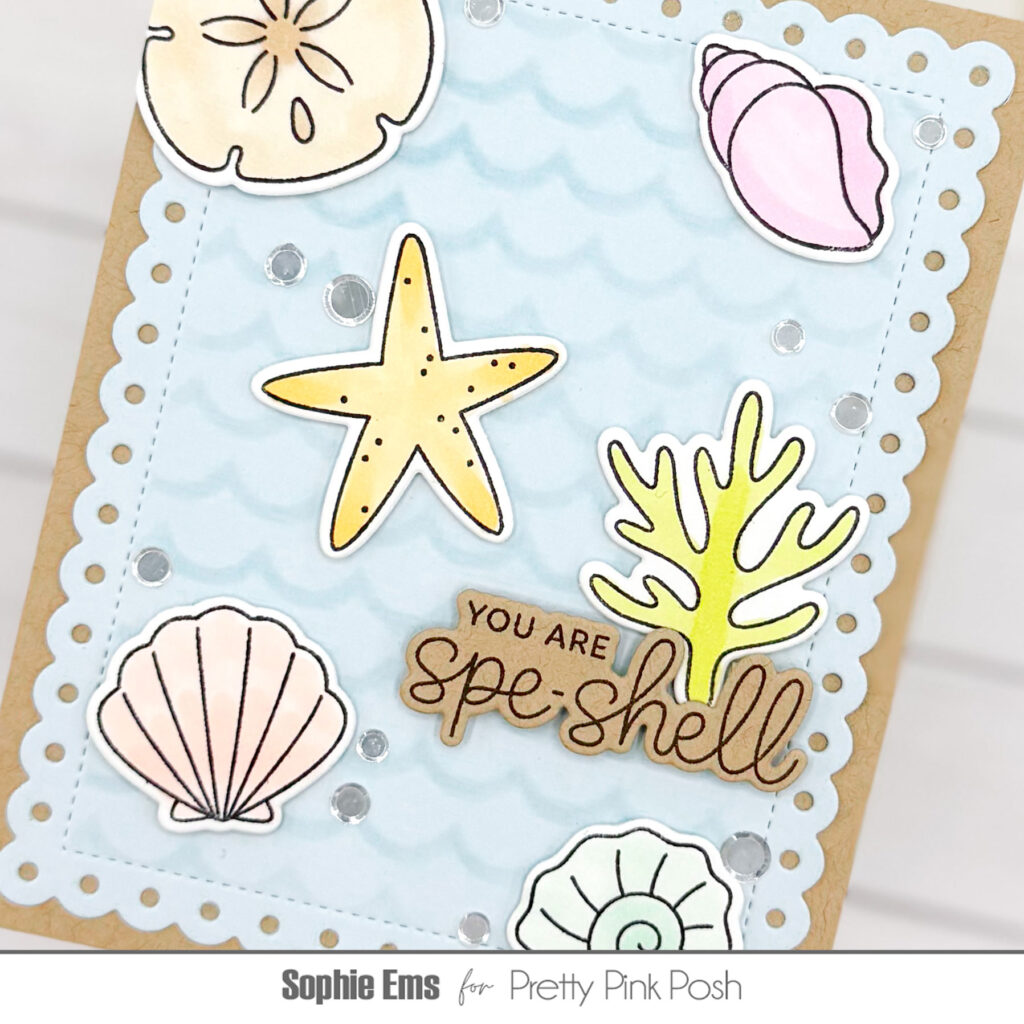
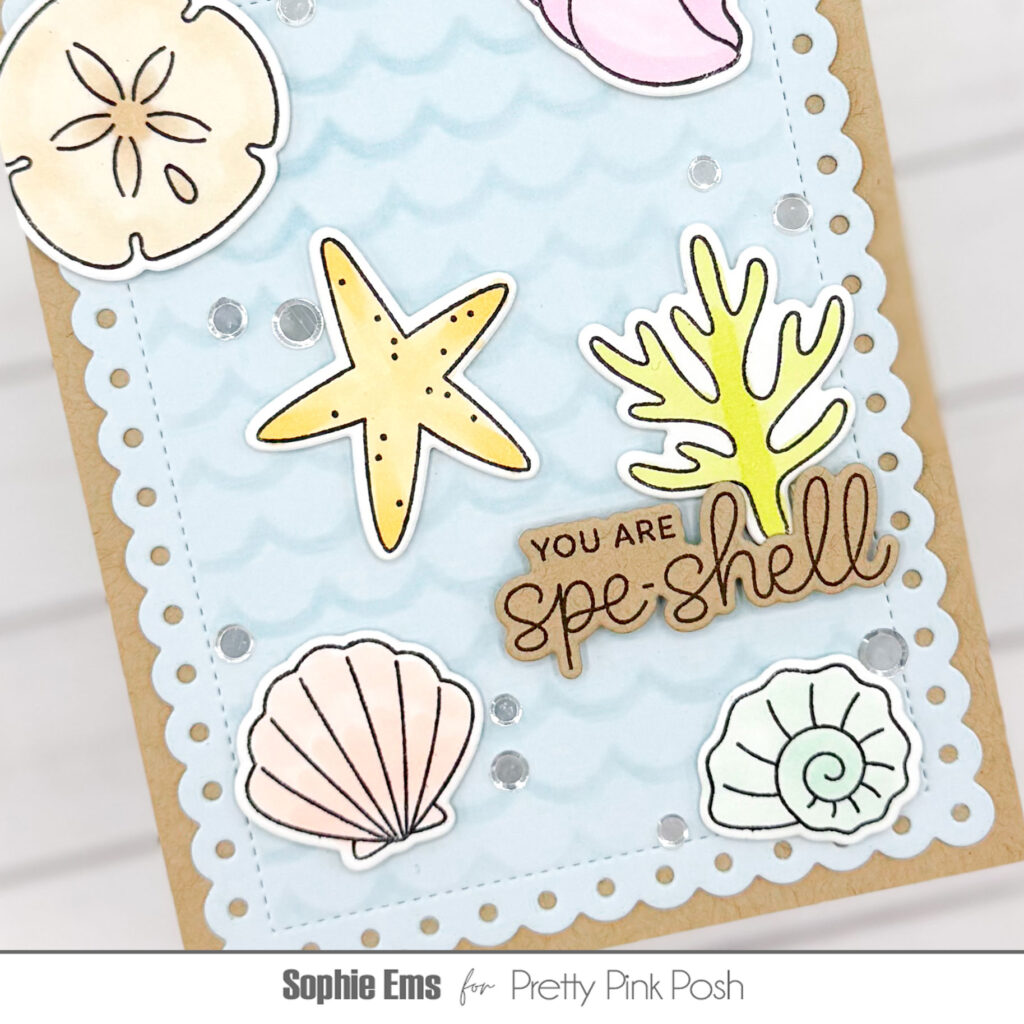
Hi friends! Sophie here and I am thrilled to be wrapping up our Stencil Week celebration with a fun, summer inspired card featuring the Waves Stencil. Let’s dive in!
We are finally getting some spring weather in my neck of the woods which is making me itch for summer weather so I pulled out some fun summer supplies from last year to bring some sunshine to my craft room.
I started out with some light blue cardstock that I cut using the Eyelet Rectangles Dies – a much loved staple in my craft room. I masked off the edges and used the Waves Stencilto add a light wash of blue ink in the background – I love using tone on tone stenciling because it adds texture and interest without becoming overwhelming.
For the images on this card I used the Seashells Stamps and Dies for the fun shell images. I did very simple coloring with my Copic markers – most of the images I actually only used one marker but did a few extra layers on top to add some light shading to areas. Here are the markers I used!
I finished off this card with a sentiment from the same Seashell set and used a kraft colored card base. I really love how Paulina always gives us coordinating dies for the sentiments – I love to pop them up on my cards with some dimension to really draw the eye in!
To finish things off I couldn’t resist adding some of my favorite Sparkling Clear Confetti. The perfect accents to any card! I hope you enjoyed and I hope you’re getting some spring weather wherever you are.
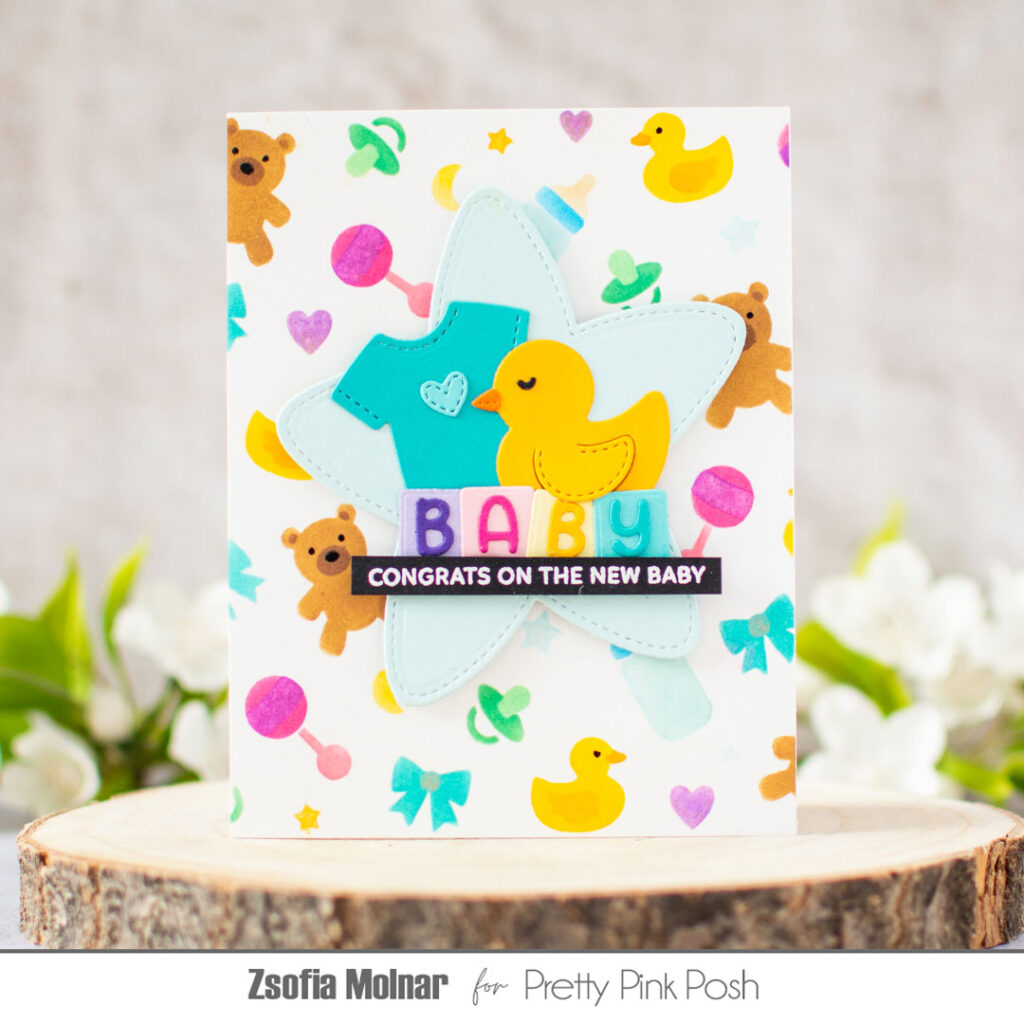
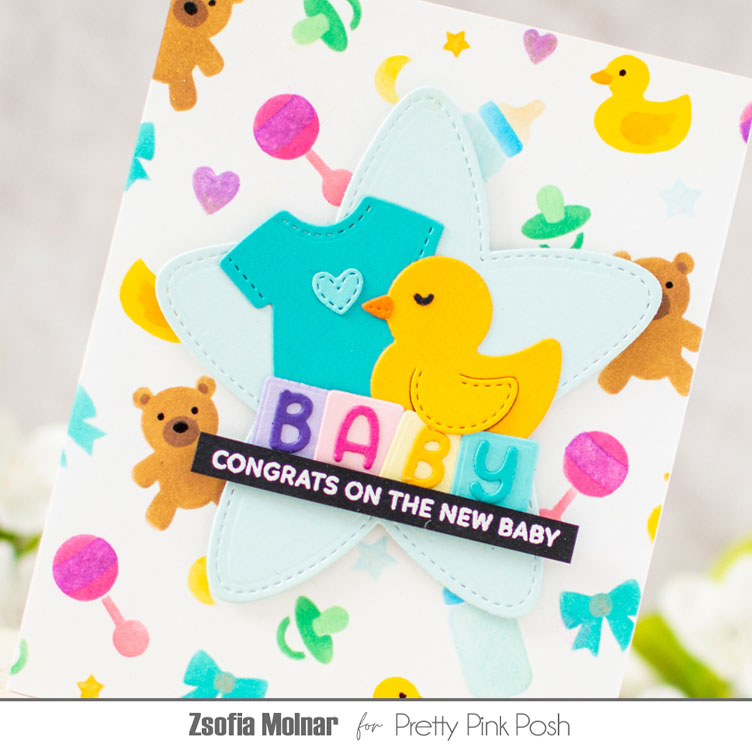
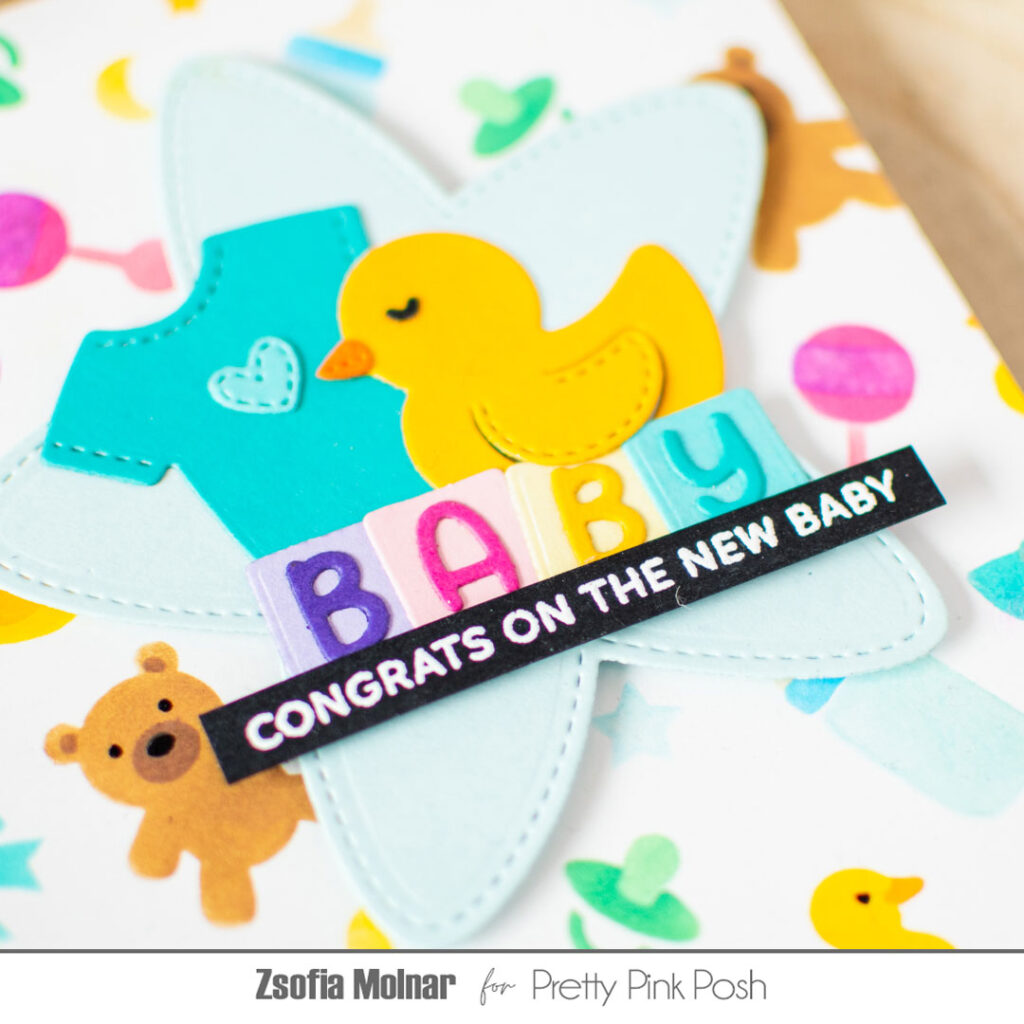
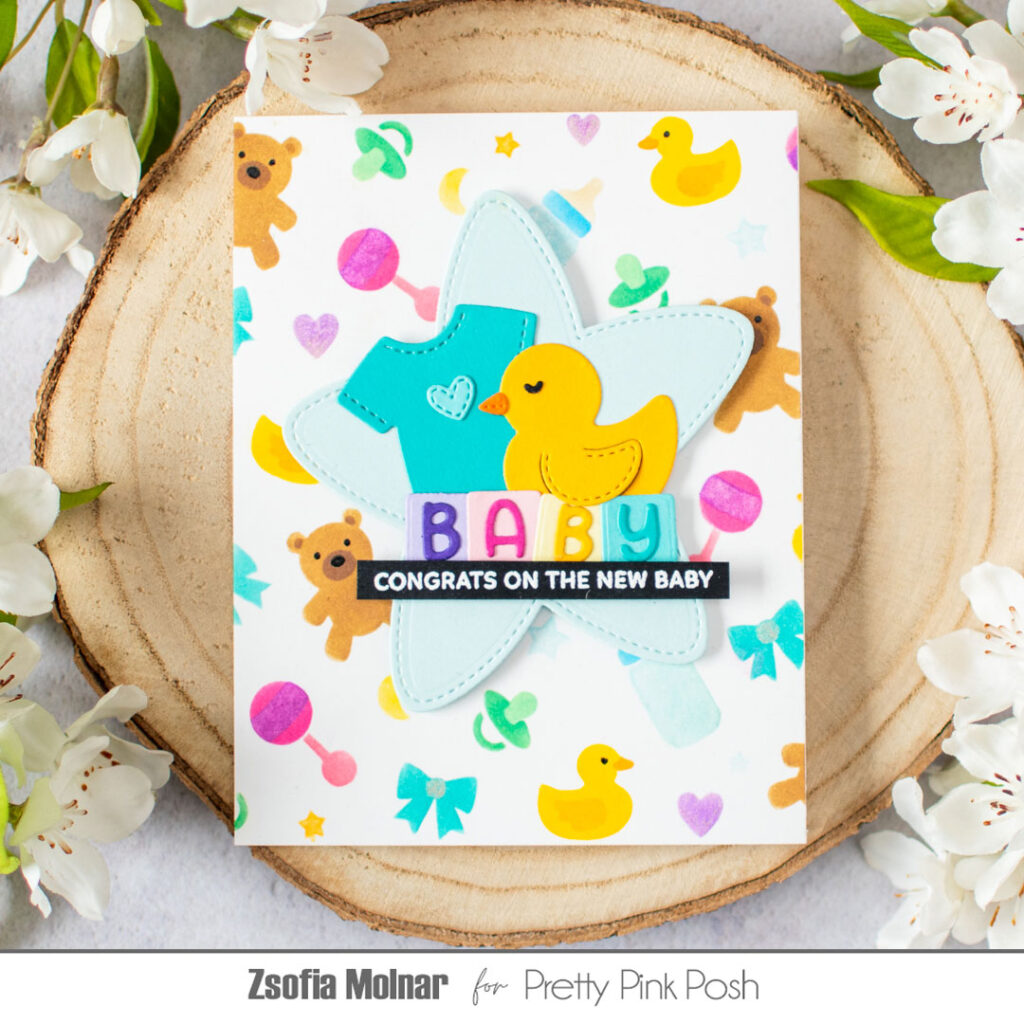
Hello Everyone! Welcome to the fifth day of the Stencil Theme Week! It is Zsofi here today with a cute baby card mixing some older stencils, stamps and dies. Let me guide you through the process of how I built this unisex and very colourful projects.
I started with creating my own patterned paper: the Layered Baby Wreath set has 3 stencils included which allows you to apply many different colours without masking, and helps you build depth and add details in an easy way. I used Distress Oxide inks today, but it can work with many other types of ink. I used a small blending brush for each colour family, it worked perfectly fine even if the brush head was not particularly small.
When all 3 layers were done, I used a clear shimmer pen to add some sparkle (be careful as it will move the ink being water soluble), and added some further details with a black glaze pen.
Then I worked on the focal panel: I used the Stitched Stars die set (retired) to cut the biggest star out of light blue cardstock. All the little baby accessories I die cut from colourful scraps using the Baby Mug Additions die set. It is a perfect way to use up all the little cardstock pieces you wanted to throw away. I love the stitching details, it adds a home-made feel to the whole design! After adhering it all on the star, I popped the focal panel in the middle of the stencilled background using 3D foam squares for extra dimension.
The sentiment I white heat embossed on a thin strip of black cardstock using theSentiment strips: Occassions stamp set. I used foam squares to adhere it under the baby accessories to make it even more dimensional.
As a finishing touch I wanted to add some glossy accents to the background to make a few parts shiny, but I totally forgot. Even though I wanted to make a unisex card, I can easily imagine this in monochrome colours (pink, blue) too.
I hope you like this idea and got inspired to use your older stencils and dies. I cannot wait to see your beautiful creations, make sure to share them in our Facebook group!
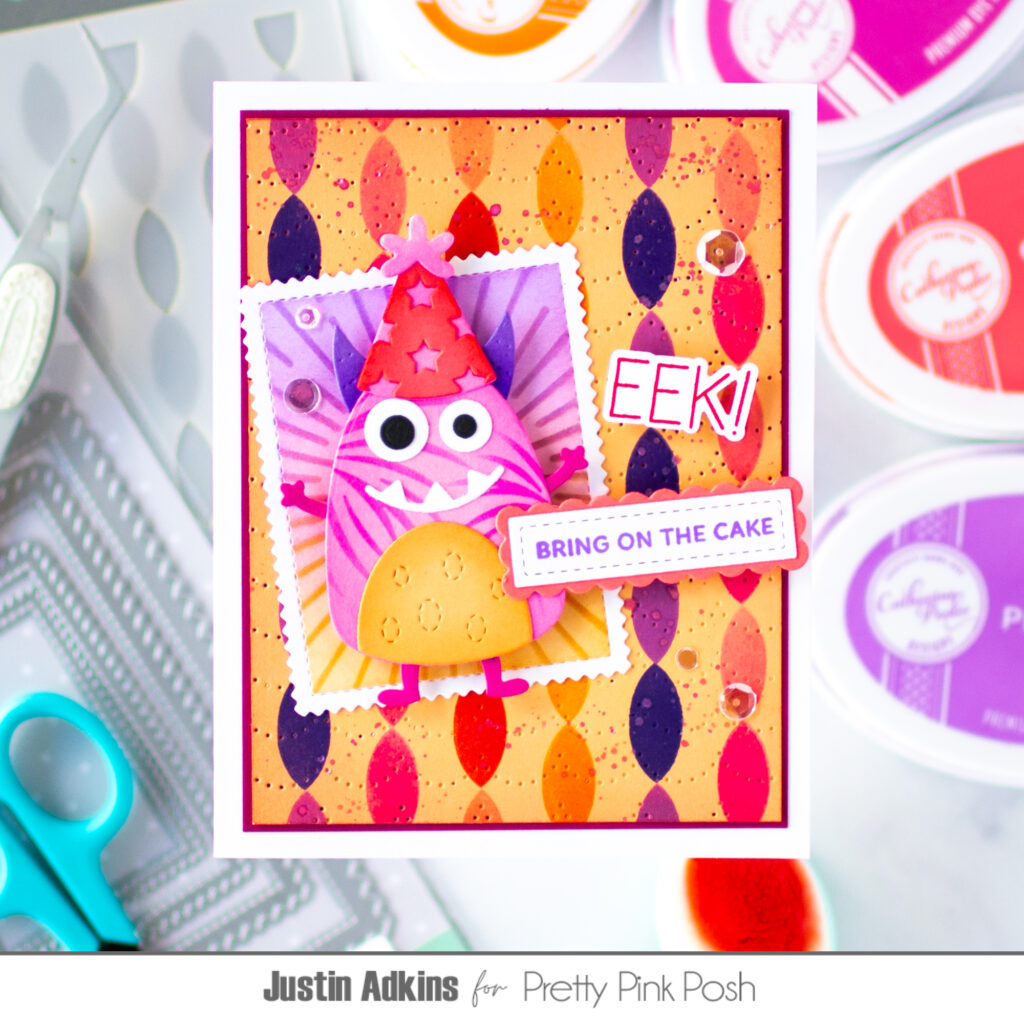
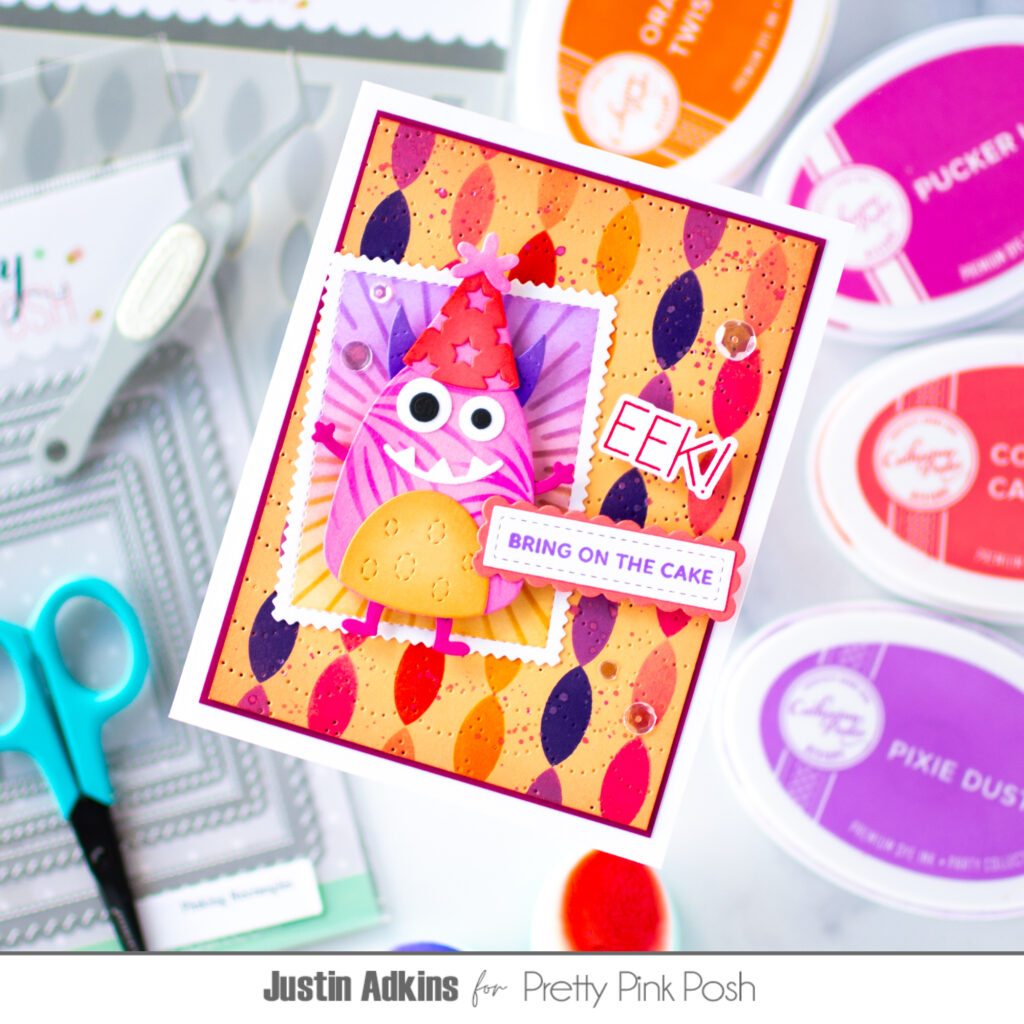
Hello, friends! Justin Adkins, and I’m so excited to be celebrating Stencil Theme Week with Pretty Pink Posh! If you love adding layers, color, and texture to your cards, this week is definitely for you. Today, I’m sharing a playful, party-ready card featuring an adorable (and slightly mischievous!) monster ready to celebrate!
For this card, I used the following Pretty Pink Posh products:
This card is all about combining stencils + bright color + fun character elements for a bold party vibe!
To start, I created the background using the Streamers Stencil. By blending multiple ink colors through the stencil, I was able to build a vibrant, celebratory pattern that instantly sets the tone for the card.
Next, I brought in the Fireworks Stencil in a totally unexpected way—adding texture to my monster! By lightly blending through the stencil, it creates a fun faux furry effect that gives the character extra personality and dimension.
Behind the monster, I used the Line Bursts Stencil to create a radiating backdrop. This subtle detail helps draw your eye right to the focal point and adds even more energy to the design.
To finish things off, I layered everything with the Pinking Rectangles Dies and added a sentiment strip for that perfect party-ready message. The mix of textures, layers, and bright colors really brings this little monster celebration to life!
Stencil Theme Week is the perfect time to experiment, layer, and play—and don’t forget, all stencil products are 20% off on the Pretty Pink Posh website this week!
Thank you so much for stopping by today! I hope this card inspires you to get inky and have some fun with your stencils.
Be sure to follow me on Instagram and YouTube at @justanotebyjustin for even more crafting inspiration!
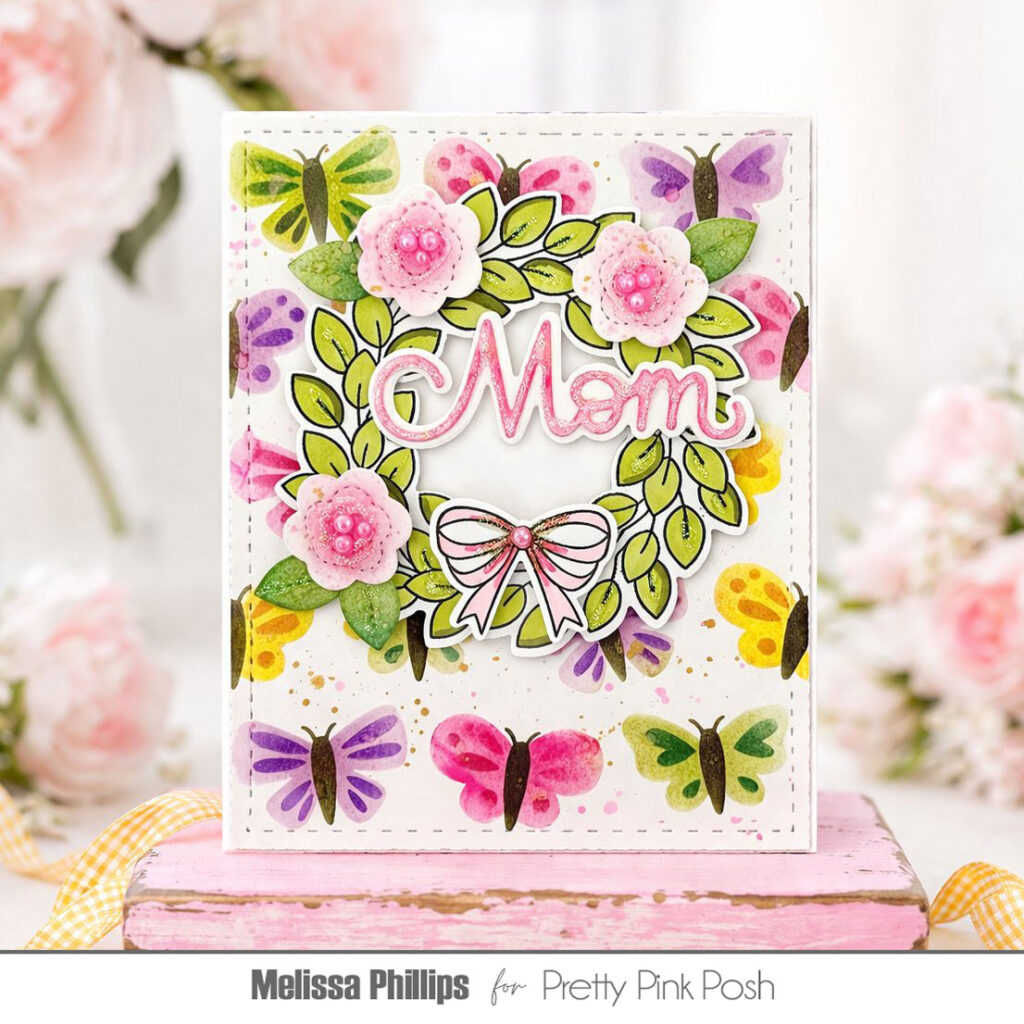
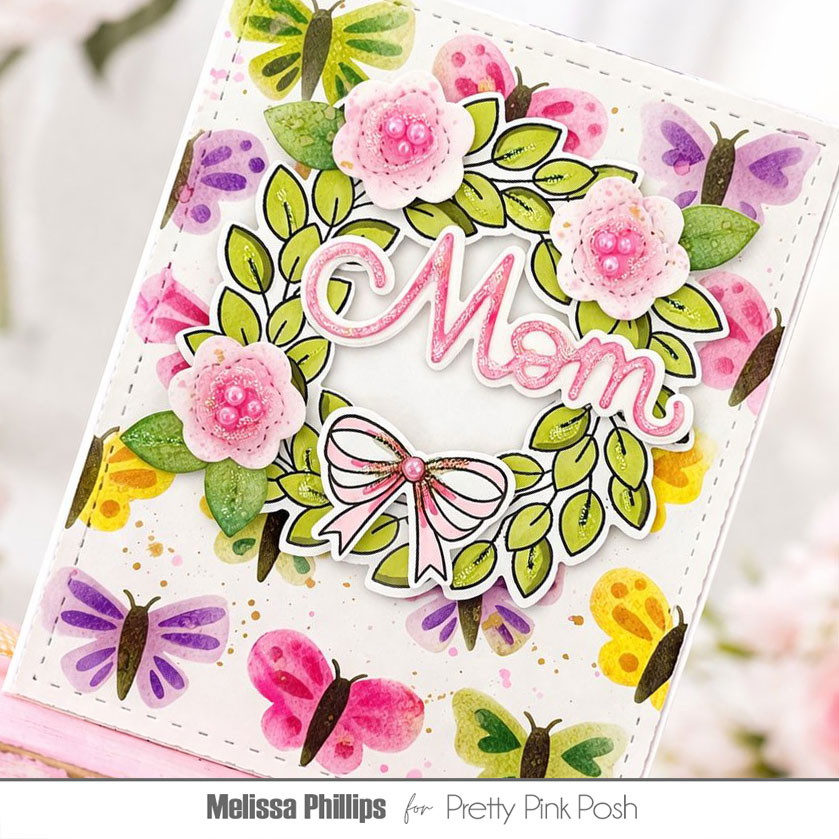
Welcome, Everyone! It’s Melissa here and I’m joining in on the fun with Pretty Pink Posh and Stencil Theme Week! Stencils have become my most favorite way to begin my cards and Pretty Pink Posh has the sweetest designs to choose from. Let’s jump right in and get started!
I chose to use the adorable Layered Butterflies stencils to set the tone of my card today. This stencil set is a 3-step stencil, starting with the base layer and ending with the centers of each butterfly.
I had Mother’s Day in mind when I began my card so I used Springtime colors to breathe life and energy into this special card. After completing my stenciled background, I used the Leafy Spring Wreath stamp setand dies to create my focal point. I used my Copic Markers in different shades of green to color in each leaf.
I added flowers from the Valentine Holder Additions to bring in a few dimensional florals, and finished my card with a tiny bow and the Mom/Mother Shadow dies to add a sentiment. Switch up the sentiment on this card, and present it to a friend, coworker, someone who needs a hug, and so many other occasions!
It’s been such a treat to create for you today. Happy Stenciling!
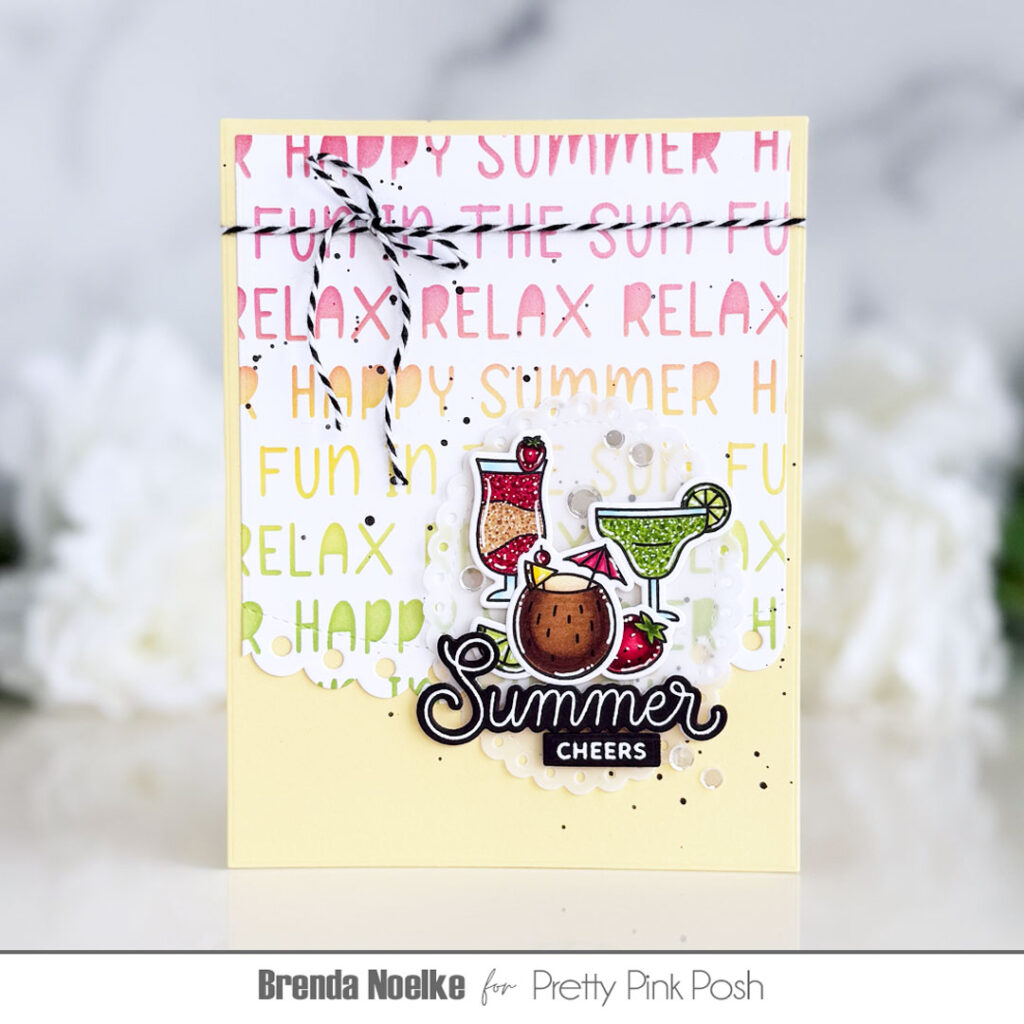
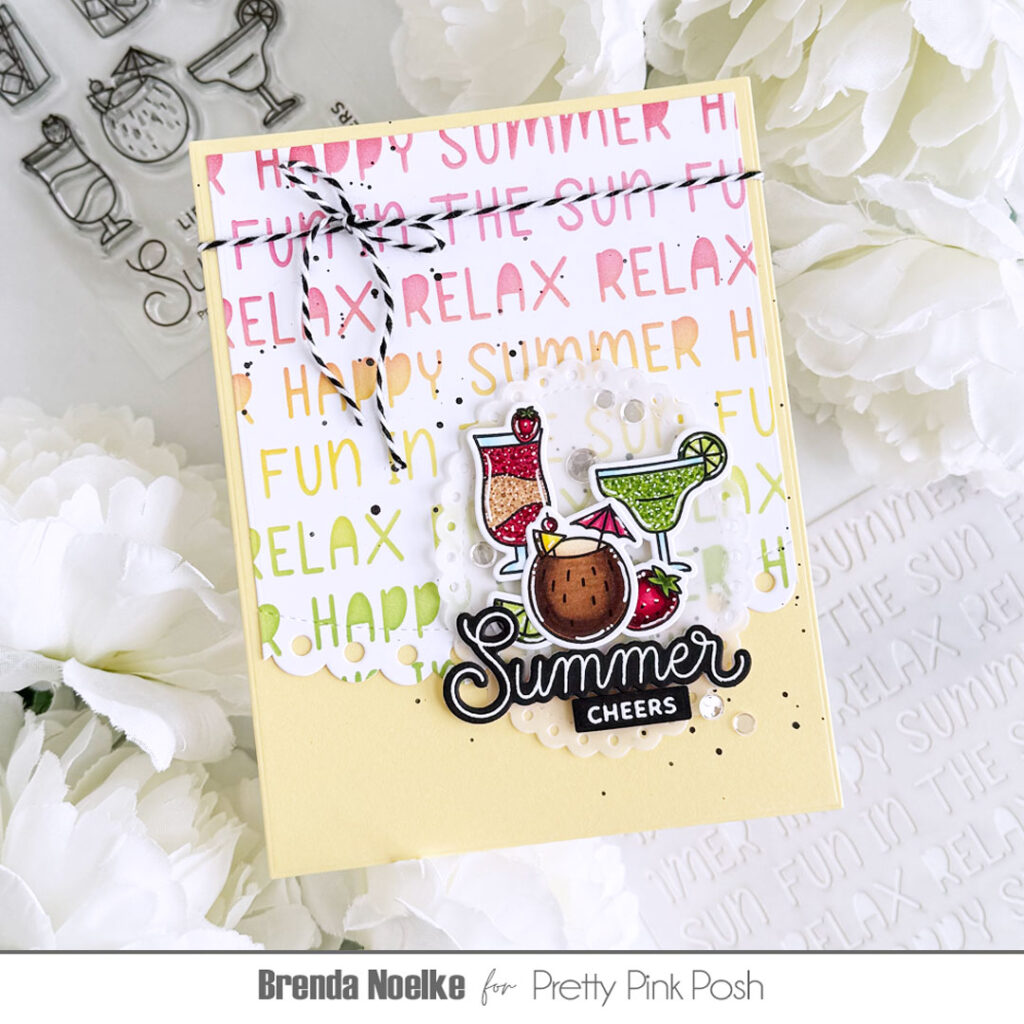
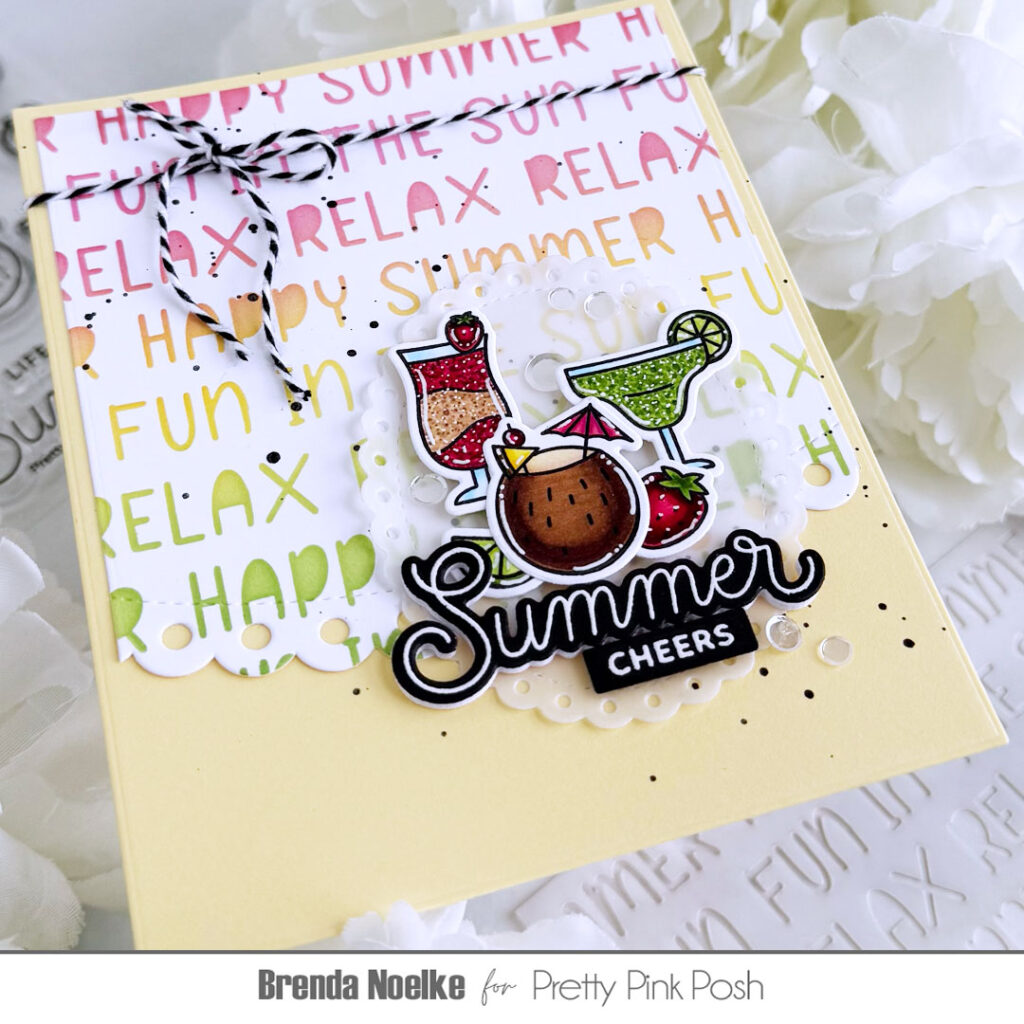
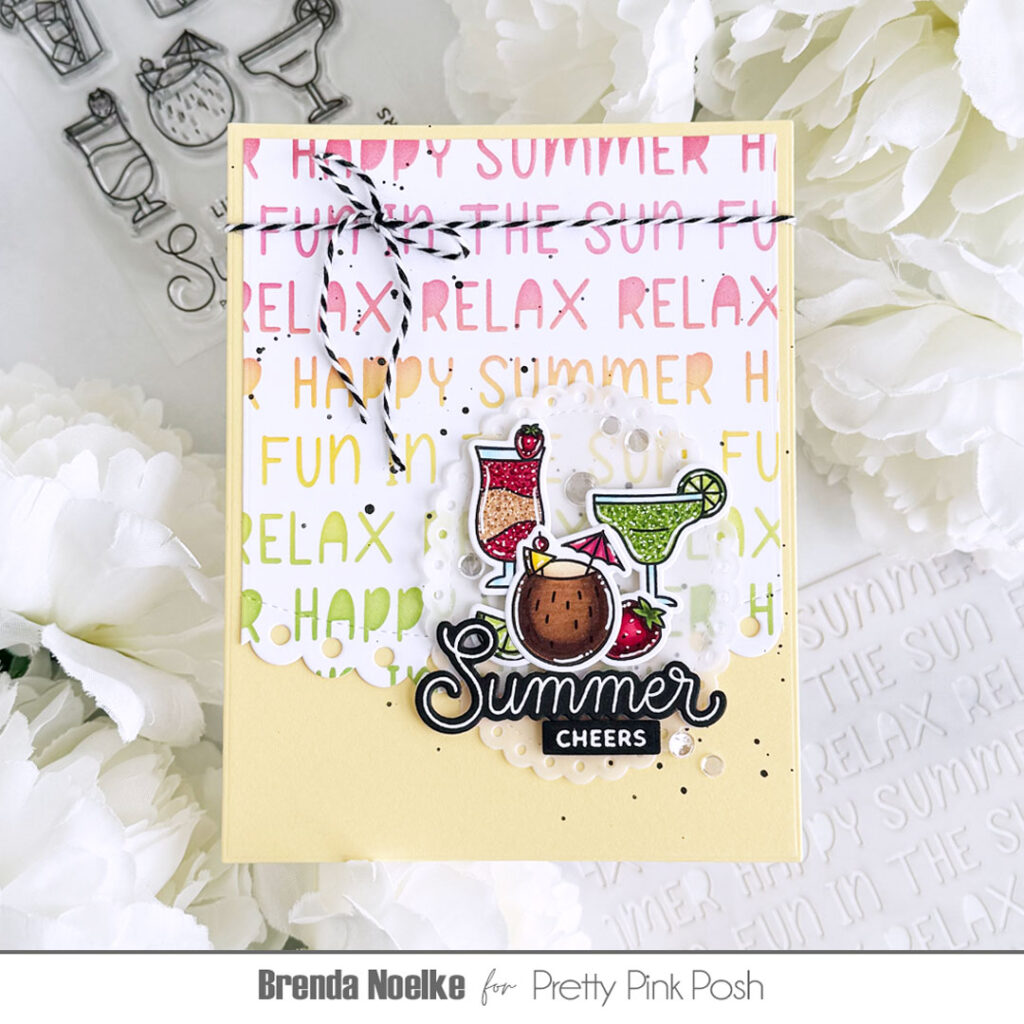
Hello, friends!! I hope you’re all doing well!! Brenda here with a fun summer card for Stencil Theme Week!! Tune in all week for tons of inspiration featuring some of the design team’s favorite Pretty Pink Posh stencils (along with other fabulous goodies) !! Plus, save 20% on all the products in the Stencil Section during theme week!
My card today has me longing for those warm summer days spent at the lake or lounging by the pool with a cool (preferably frozen) cocktail or mocktail in hand!! It can’t get here fast enough!!
I began by stamping the images from the Summer Drinks Stamp Set onto white cardstock with Copic-friendly black ink. I colored them with Copic markers, added highlights with a white gel pen, then used the Coordinating Dies to cut them out.
For the background, I stenciled the Summer Words Stencil onto an A2 panel of white cardstock using Lumberjack Plaid, Kitsch Flamingo, Mustard Seed, Twisted Citron and Mowed Lawn Distress Inks. I trimmed the panel slightly and die-cut the bottom edge with a die from the Eyelet Borders Die Set, then adhered it to an A2 panel of light yellow cardstock. I added a bit of black ink to my glass mat, diluted it with water, then splattered it onto the panel with a paint brush.
The sentiment is also from the Summer Drinks Stamp Set. It was stamped onto black cardstock with clear embossing ink and embossed with white detail embossing powder. “Summer” was cut out with the Coordinating Die and “cheers” from a die in the Sentiment Strips Die Set. I also die-cut three more layers of the “summer” die-cut from heavyweight white cardstock and adhered them behind the black one, for dimension. The second largest die in the Eyelet Ovals Die Set was cut from vellum and the drink and sentiment die-cuts were adhered to it with a combination of liquid glue and foam squares. The vellum oval was then adhered to the background panel, adding liquid glue only behind the die-cuts.
To finish, I wrapped black and white baker’s twine around the top of the panel and tied it into a bow. A sprinkling of Sparkling Clear Confetti adds a bit of shine and finishes off the card.
Now, who’s ready for summer and a nice, refreshing drink?!? Cheers!!
Thanks for popping in for Summer Stencil Theme Week! Be sure to check out the inspiration the rest of the week and don’t forget about the sale in the Stencil Section!