
January Release Now Available
The January 2026 Release is now available in the Pretty Pink Posh Shop and select retailers that carry our products. If you missed our post yesterday, we revealed all of the products in picture form, but if you would like to see them in a video, Mindy has that below.
Watch the video above I Watch the video in HD on YouTube
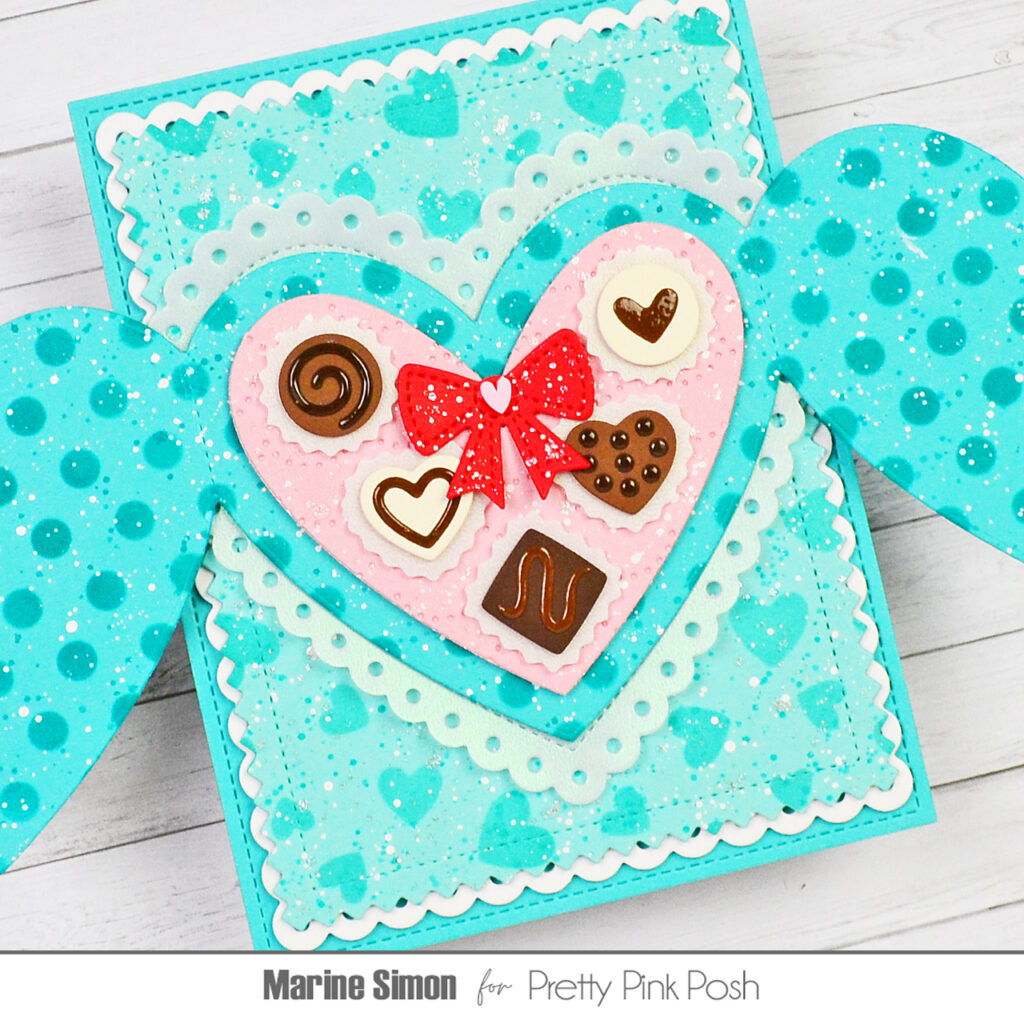
Hello crafty friends, Marine here, I’m happy to be back with this Valentine card I had so much fun creating! The brand new Heart Card Base die set is absolutely amazing, and works beautifully with both new and old items, such as the Box Of Chocolates from the January 2026 release and the roses from the Valentine Mug Additions and Valentine Holder Additions die sets, both from previous releases.
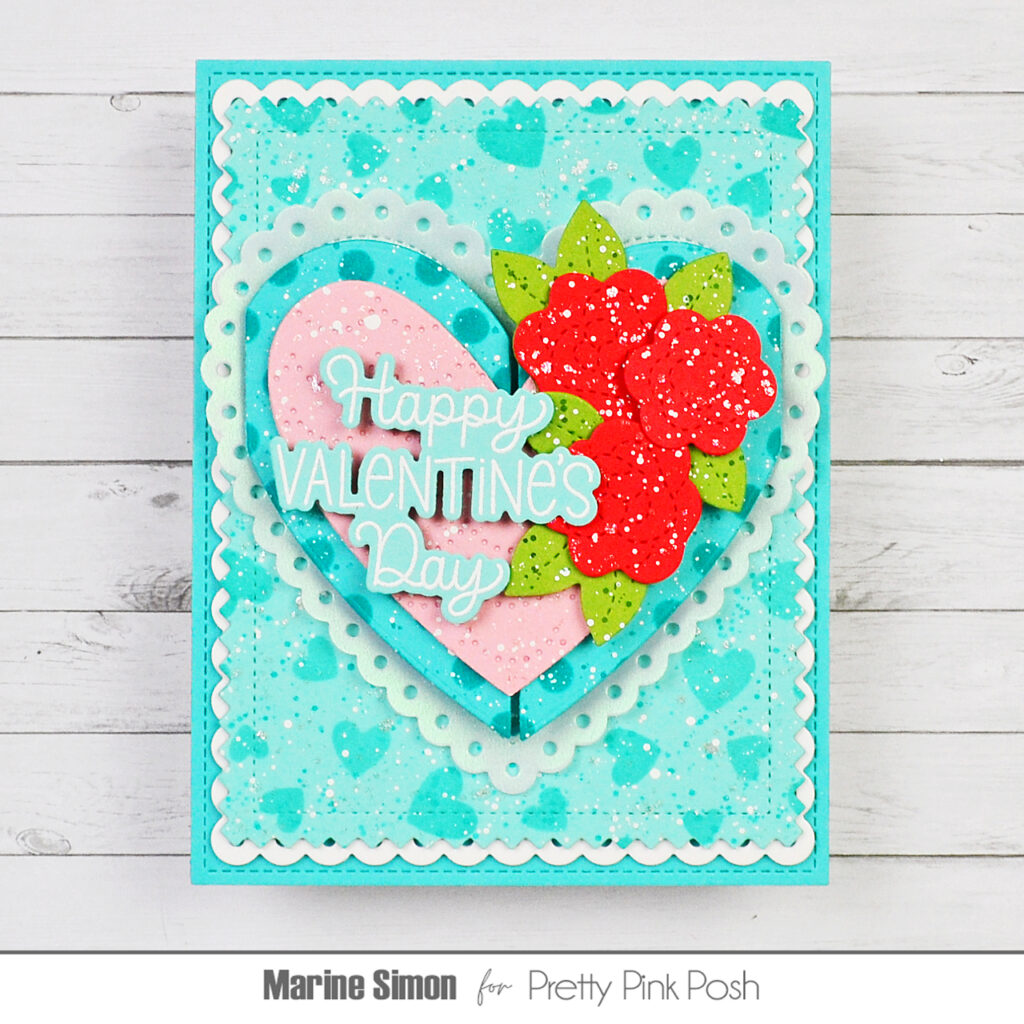
I started off by creating the card base. I cut a large Pinking Rectangle panel out of aqua cardstock and used the Scattered Hearts Frame stencil along with salvaged patina distress ink to add lots of tone on tone hearts to my panel. I mixed a few droplets of copic opaque white ink with water and used a slim brush to add white splatters all over my piece of paper, I did the same with peacock feathers distress ink to emphasize the tone on tone look, and then the same again with liquid stardust for sparkles. When it was dry, I attached my Pinking Rectangle panel to a white Eyelet Rectangle panel using 1mm foam squares, next to a 5,5 x 4,25 inches turquoise panel using 1mm foam squares again, and then the whole thing to a white card base using liquid glue.
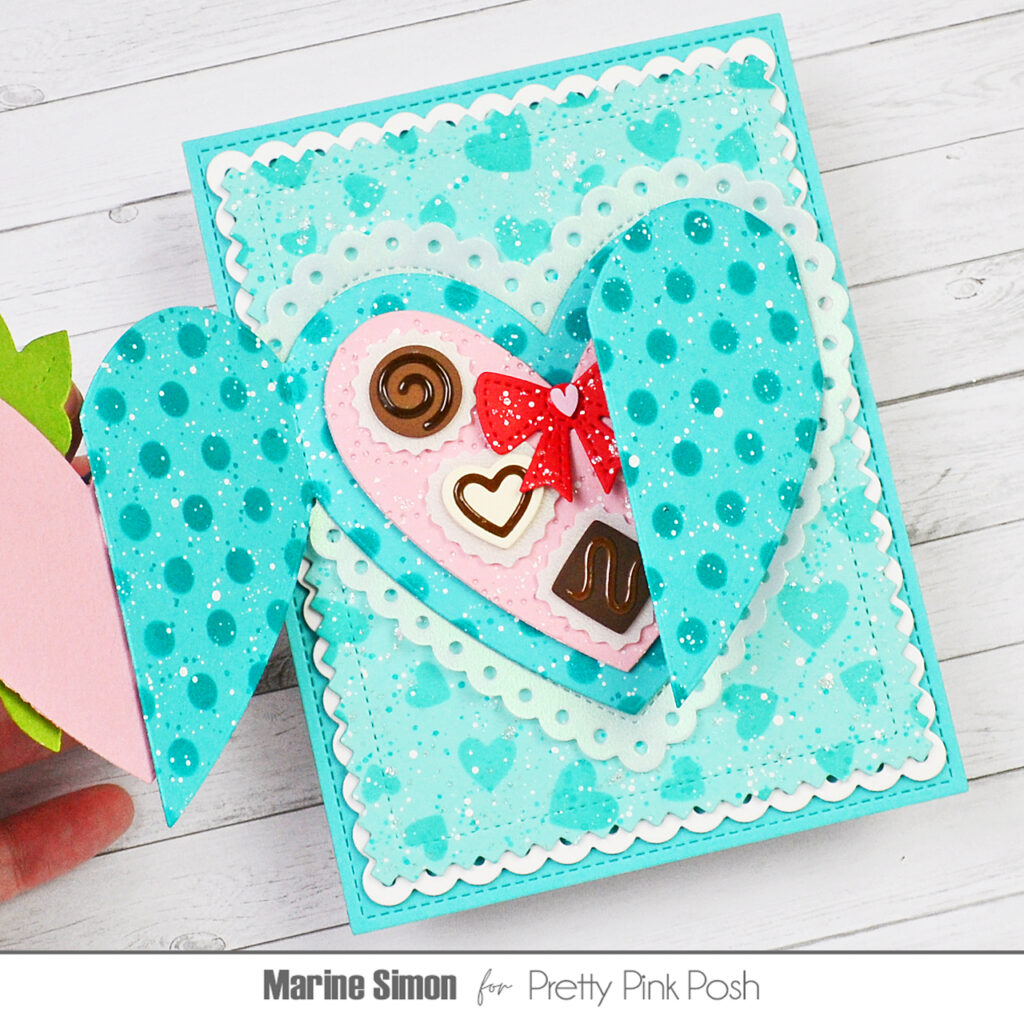
I wanted to use the Heart Card Base die set to create a Box Of Chocolates, so I cut a panel out of turquoise cardstock and worked on the inside first using the Medium Polka Dots stencil along with peacock feathers distress ink to add a fun pattern to the inside of my box, and then added white splatters and peacock feathers splatters as well. I cut a pink heart using another Heart Card Base die, added more interest to it using the Scallops Pierced Plate die, and then added white splatters and sparkling splatters. I attached my pink heart on the middle part of the Heart Card Base panel using 1mm foam squares, and then cut my Box of Chocolates pieces to create five chocolates. I cut the wrapping papers out of pearlescent vellum, the chocolates and icing out of vanilla cardstock and two different brown cardstock. I stuck the details on each chocolate using liquid glue, attached each chocolate to a wrapping paper using 1mm foam squares, and then stuck each chocolate to the pink heart using 1mm foam squares again. I applied glossy accents to the icing details, cut a red bow using a Valentine Holder Additions die, added splatters to it, attached it to the pink heart using liquid glue, and then glued a pink heart confetti from the Valentine Heart mix right in its center.
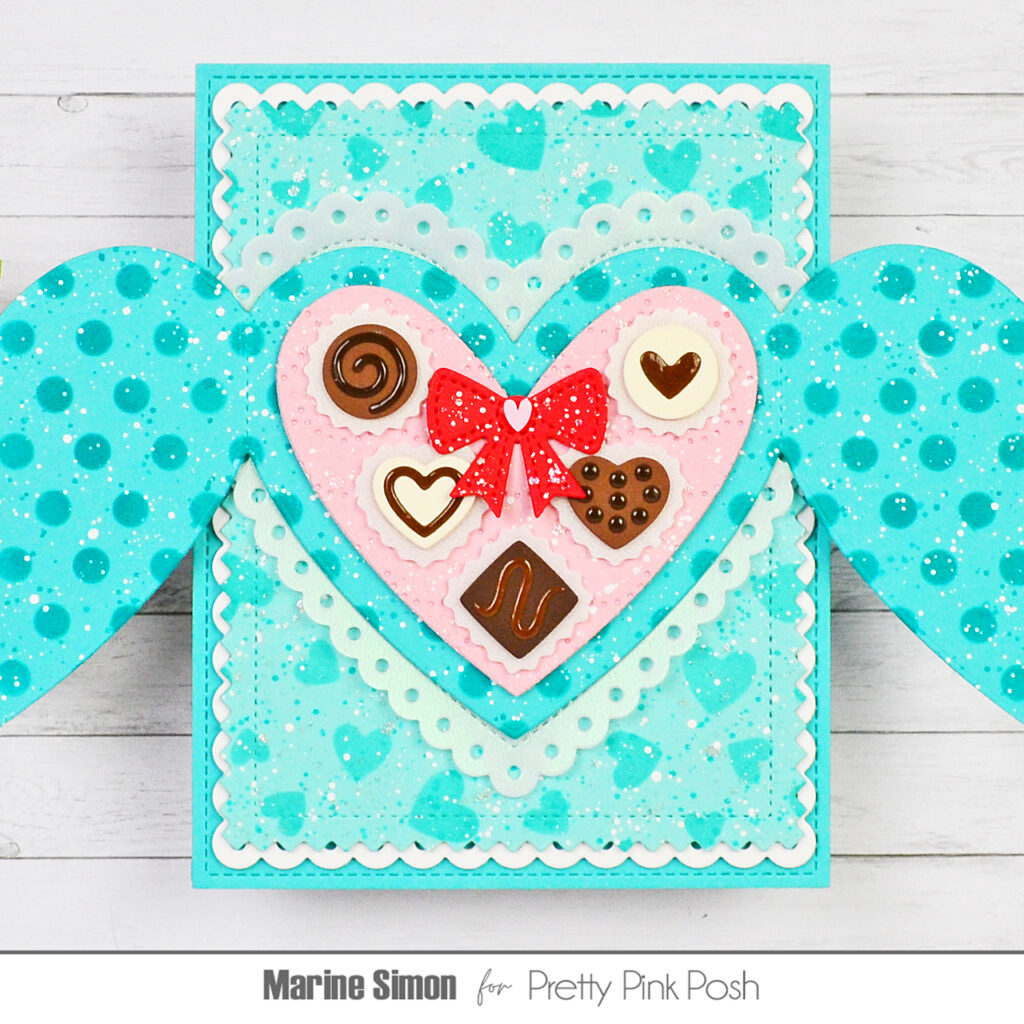
Next I folded my Heart Card Base panel on the score lines and worked on the outside of my box. I cut another Heart Card Base panel out of the same turquoise cardstock as the inside of the box, but trimmed it and kept the end pieces only. I created the same polka dots pattern and added the same textures, and when both of my half heart panels were dry, I attached them to the front of the box using liquid glue. This way, both the inside and outside of the box are the same. I cut another pink heart, added the same details and textures as the ones I added to the inside heart, and then I attached it to the front of my box using 1mm foam squares, but only on the left side of the box to be able to open it.
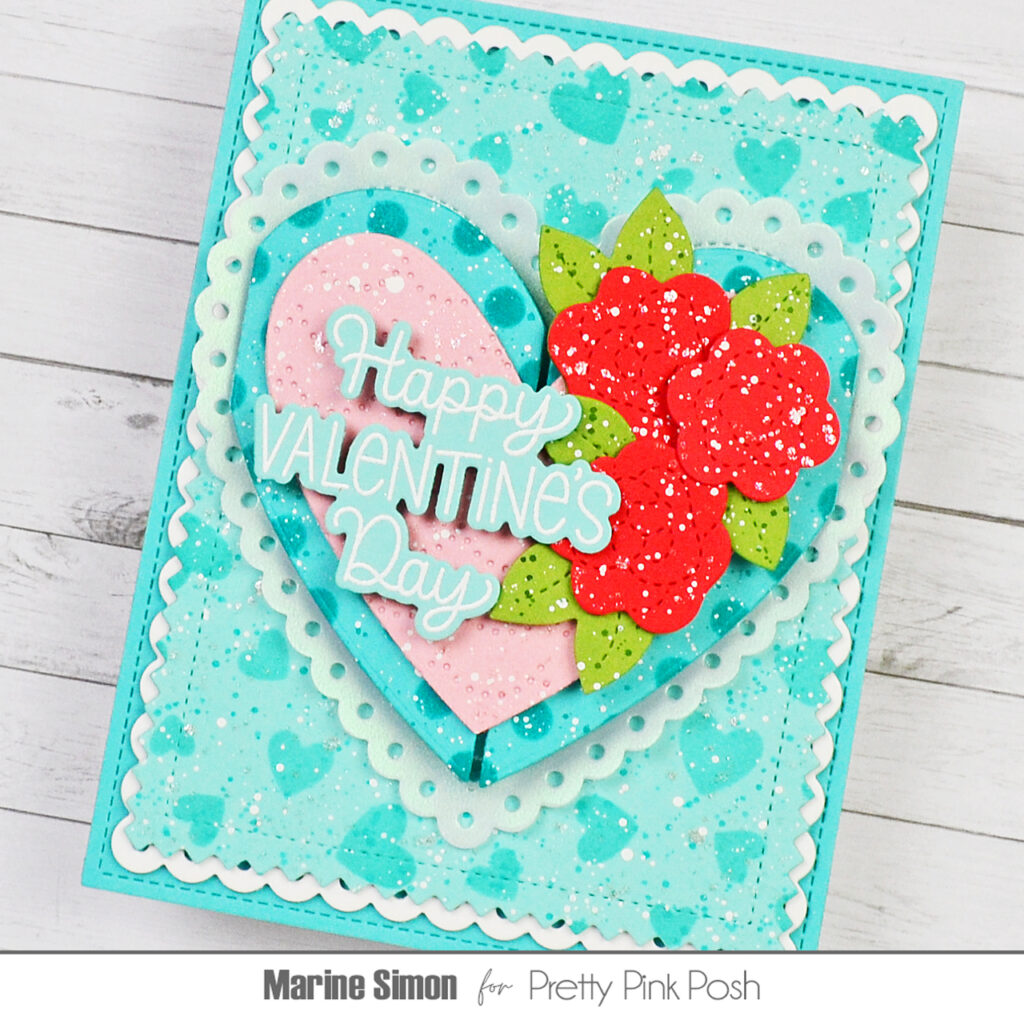
To decorate the front of my Box Of Chocolates, I cut roses and leaves using dies from the Valentine Mug Additions and Valentine Holder Additions die sets, added splatters to those pieces, assembled them and then attached them to the right side of the pink heart using 1mm foam squares. I white heat embossed “Happy Valentine’s Day” from Valentine Greetings on aqua cardstock, cut it using the matching die and attached it on the left side of the heart using 2mm foam squares. Next I cut a large Eyelet Heart panel out of pearlescent vellum, attached my Heart Card Base to it using 1mm foam squares, and finally stuck the whole piece to the card using foam squares again.
And that’s it! Oh how I love this Heart Card Base die set, it’s so awesome, super easy to use and I can’t wait to feature it on more projects!
I hope that my Box Of Chocolates card has inspired you, thanks so much for stopping by, and see you soon!