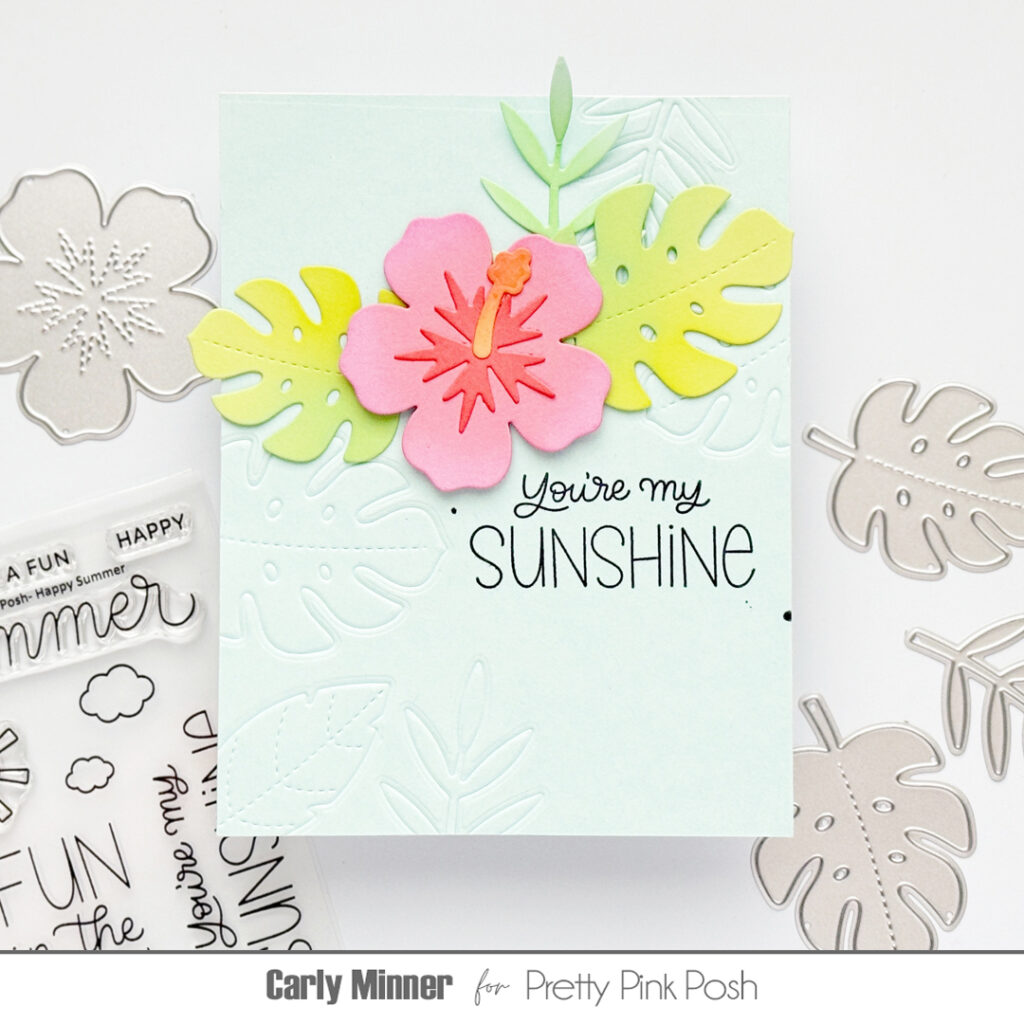
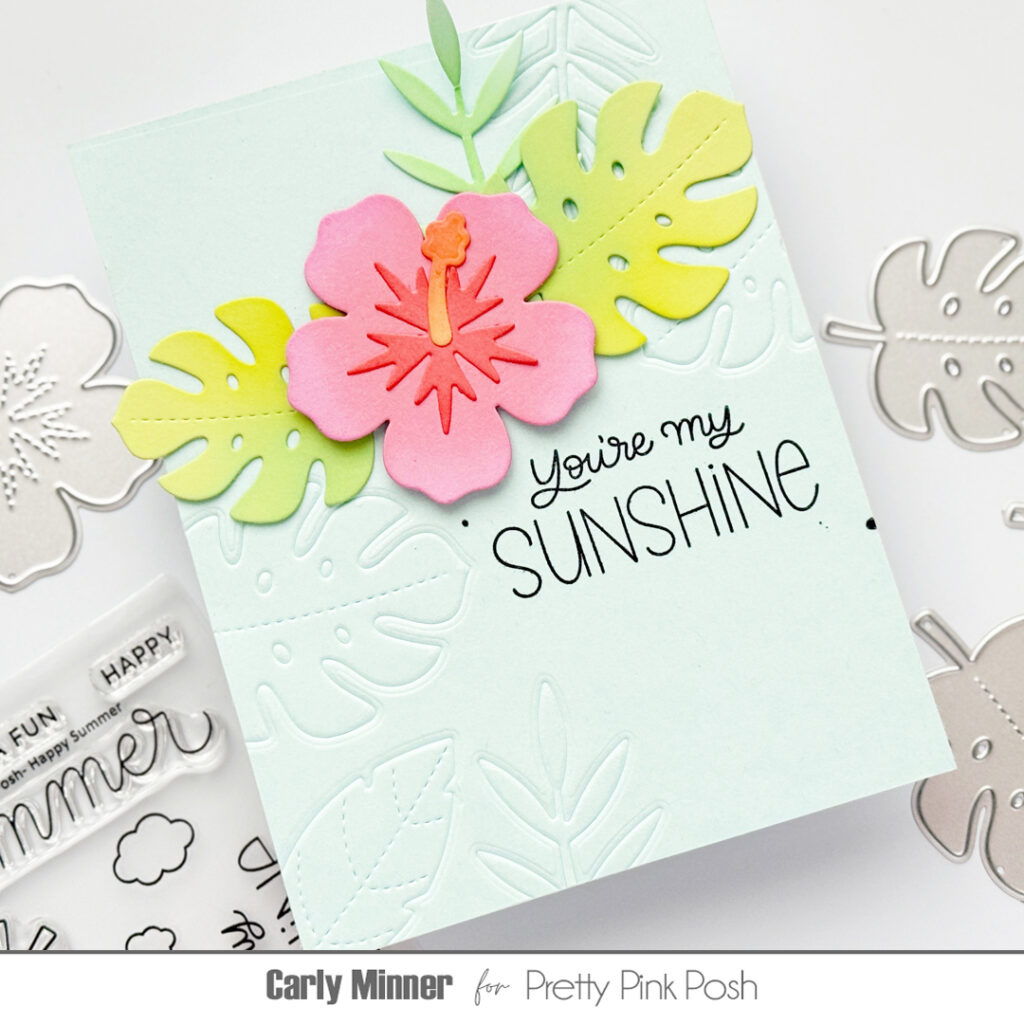
Hi friends, it’s Carly here. Do you ever use your cutting dies for embossing? It’s such a fun & easy way to stretch your supplies and create beautiful texture on your handmade cards!
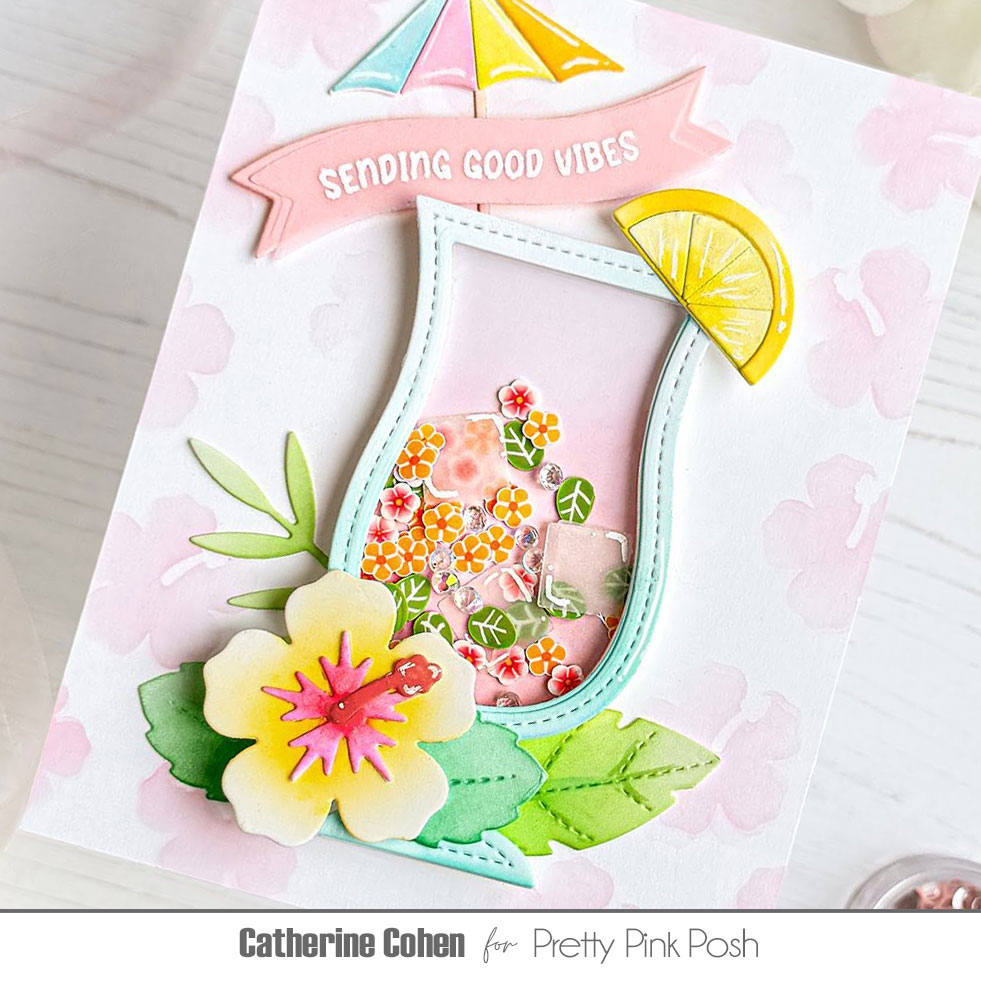
To begin, I created a soft hibiscus background using the first layer of the Layered Hibiscus Stencils and Kitsch Flamingo Distress Oxide Ink, blending from the outer edges toward the center for a subtle, dreamy look.
Next, I die cut the umbrella and lemon slice from Summer Drink Shaker, the leaves from Tropical Leaves and the flower from Hibiscus Flowersusing white cardstock. I ink blended the pieces with the following Distress Oxides:
For the shaker, I die cut the drink base, frame, foam layer, and an acetate window. The drink frame was ink blended with Salvaged Patina, while the drink base was blended with Kitsch Flamingo and Spun Sugar. I adhered the acetate behind the drink, added the foam layer, and filled the center with Summer Blossoms Shaker Mix, vellum ice cubes from the set, and a few Clear Crystals before sealing everything together.
Once all the elements were complete, I arranged and adhered them to the card panel. To finish the design, I added a pink banner from Summer Banner Greetings featuring a white heat embossed “Sending Good Vibes”sentiment.
Thank you so much for joining me today! I hope you enjoyed this card and found a little summer inspiration for your next crafty project. Have a wonderful day and happy crafting!
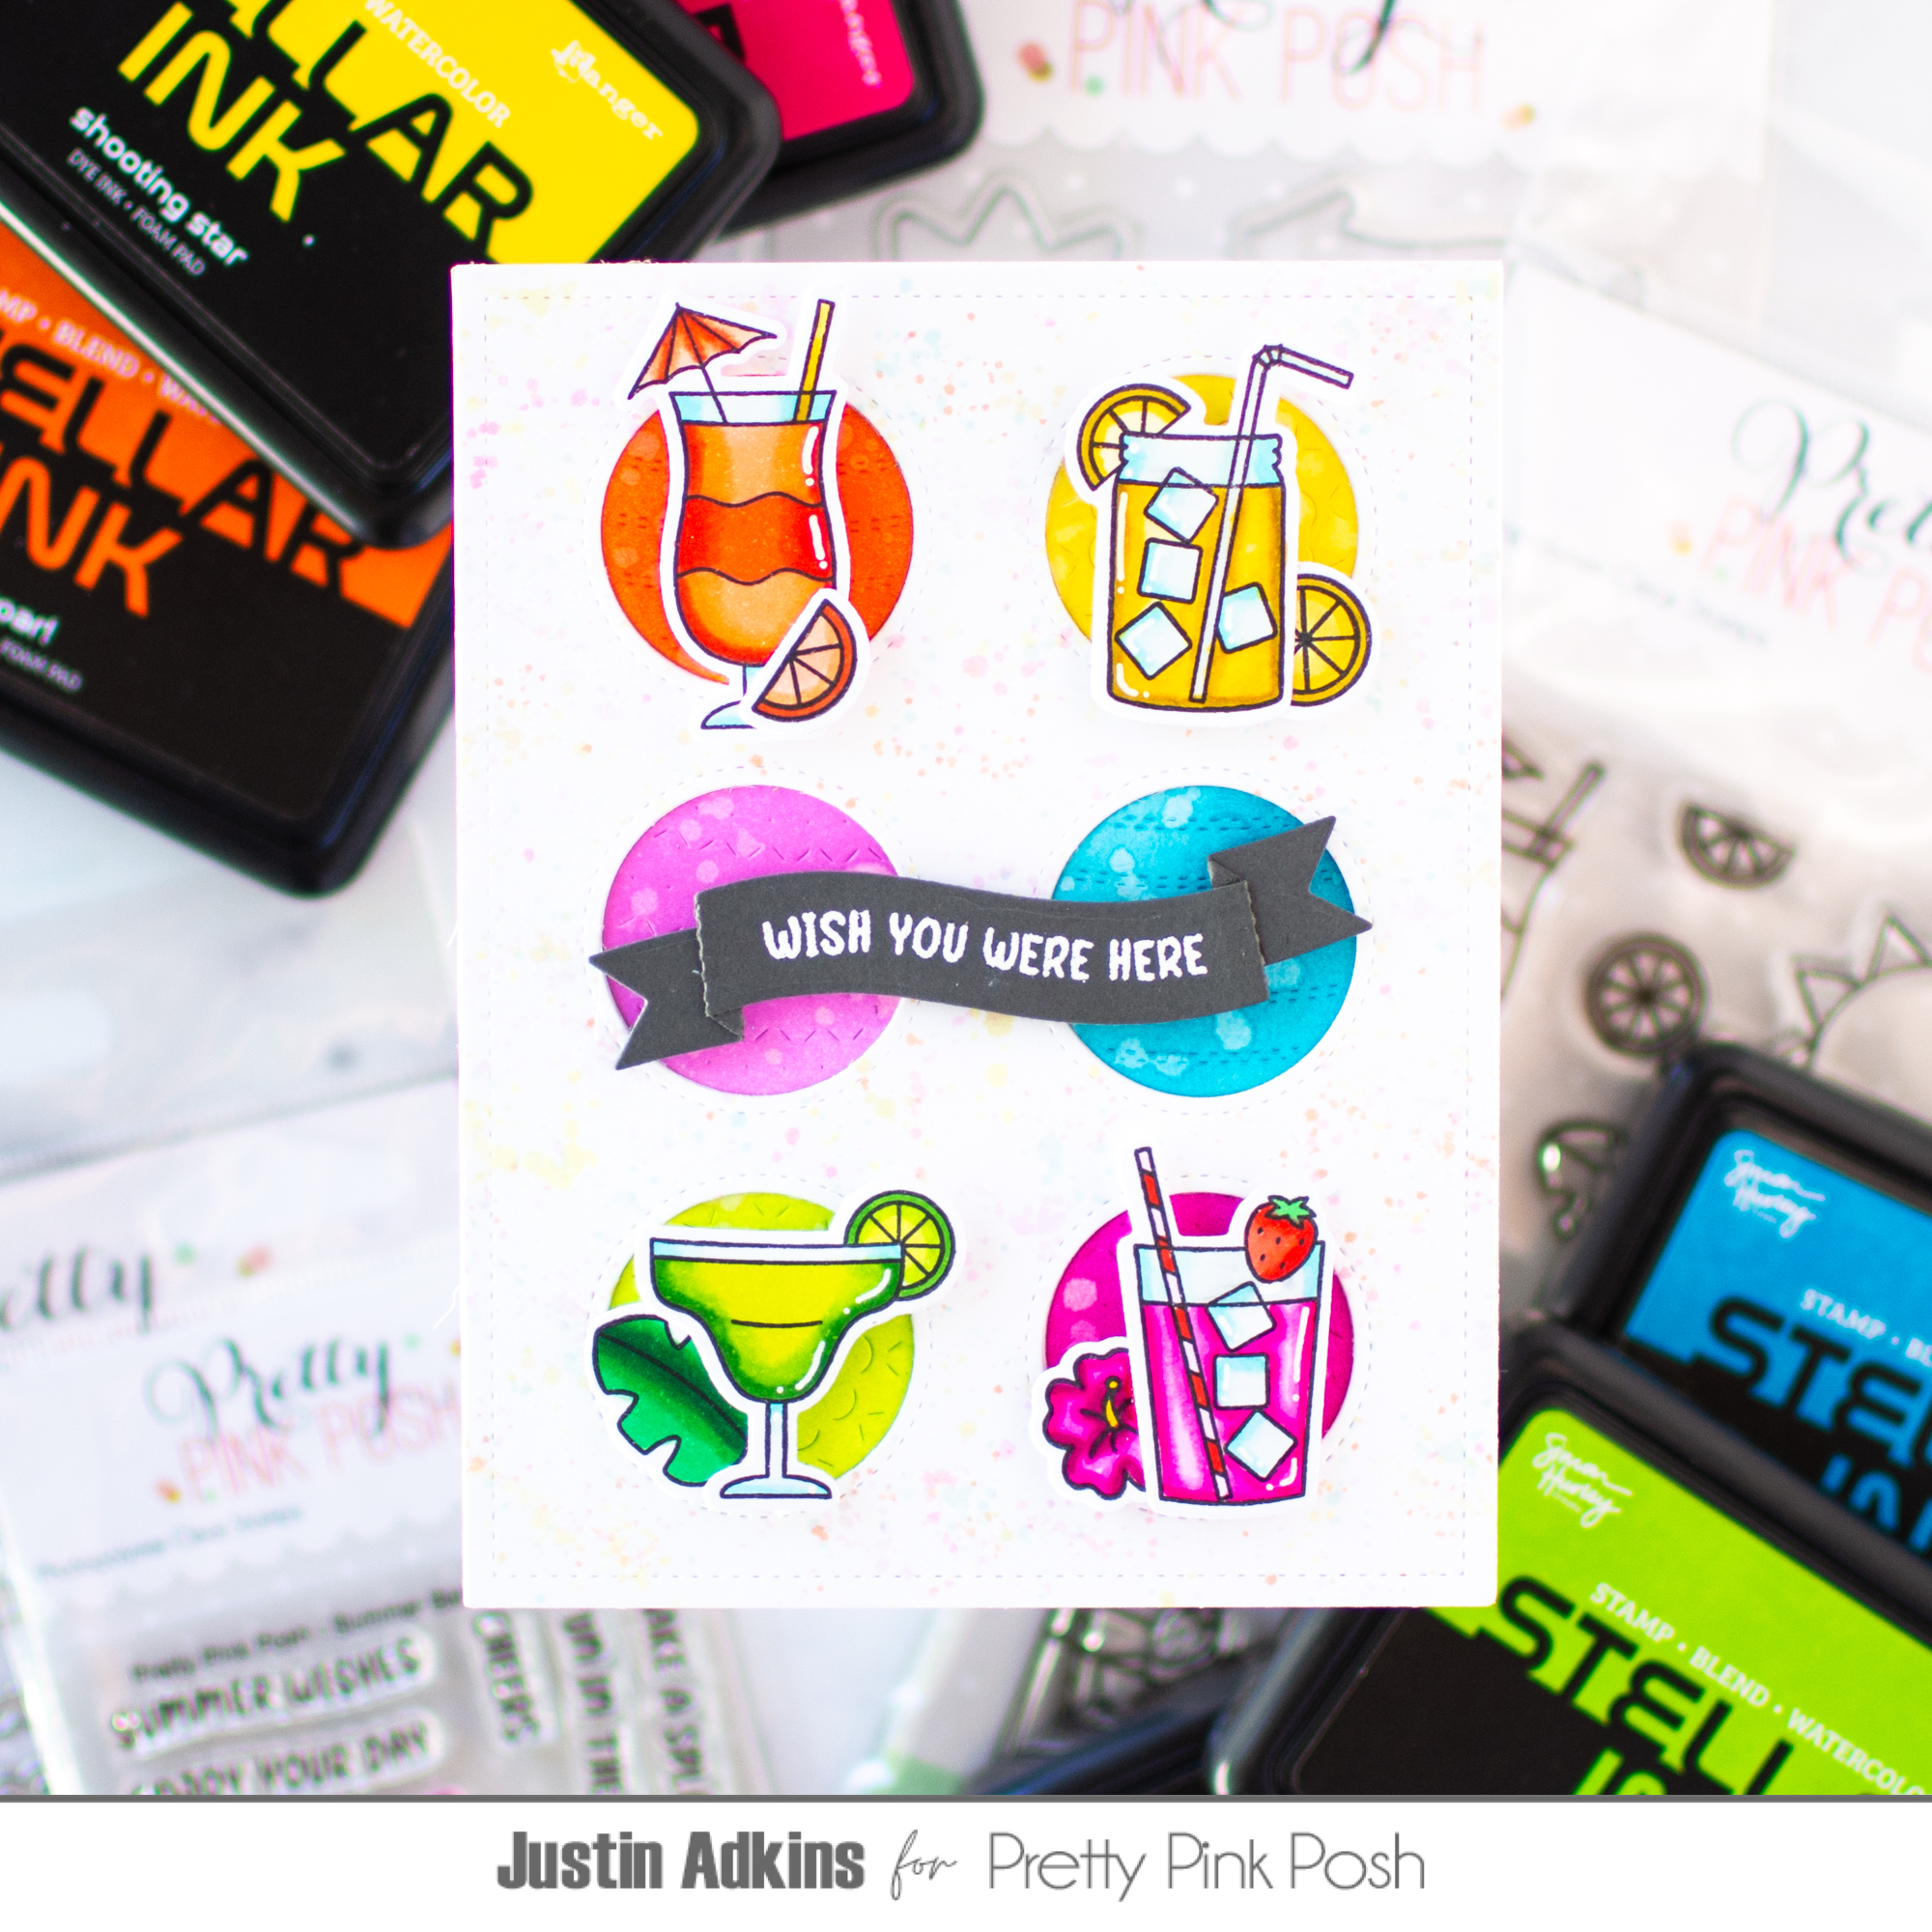
Hello, friends! Justin here and I’m excited to be back on the Pretty Pink Posh blog sharing another bright and colorful project featuring products from the Pretty Pink Posh Summer Collection.
For this design, I created a playful grid layout by pairing the Ornament Cover Plate Die with four colorful drink images from the Summer Sips Stamp Set. Each drink was colored with OLO Markers, while the circular backgrounds were ink blended using Stellar Inks. I gave each circle its own monochromatic color palette to help every image stand out while keeping the overall design cohesive.
To add extra depth, I used a simple stacked die-cut technique by layering multiple Ornament Cover Plate die cuts. This creates beautiful dimension without relying on bulky foam adhesive and gives the card a polished, professional finish.
Thanks so much for stopping by today! I hope this project inspires you to mix bright colors, fun summer images, and dimensional die-cutting in your next cardmaking session. For even more inspiration, be sure to follow me on Instagram andYouTube@justanotebyjustin.
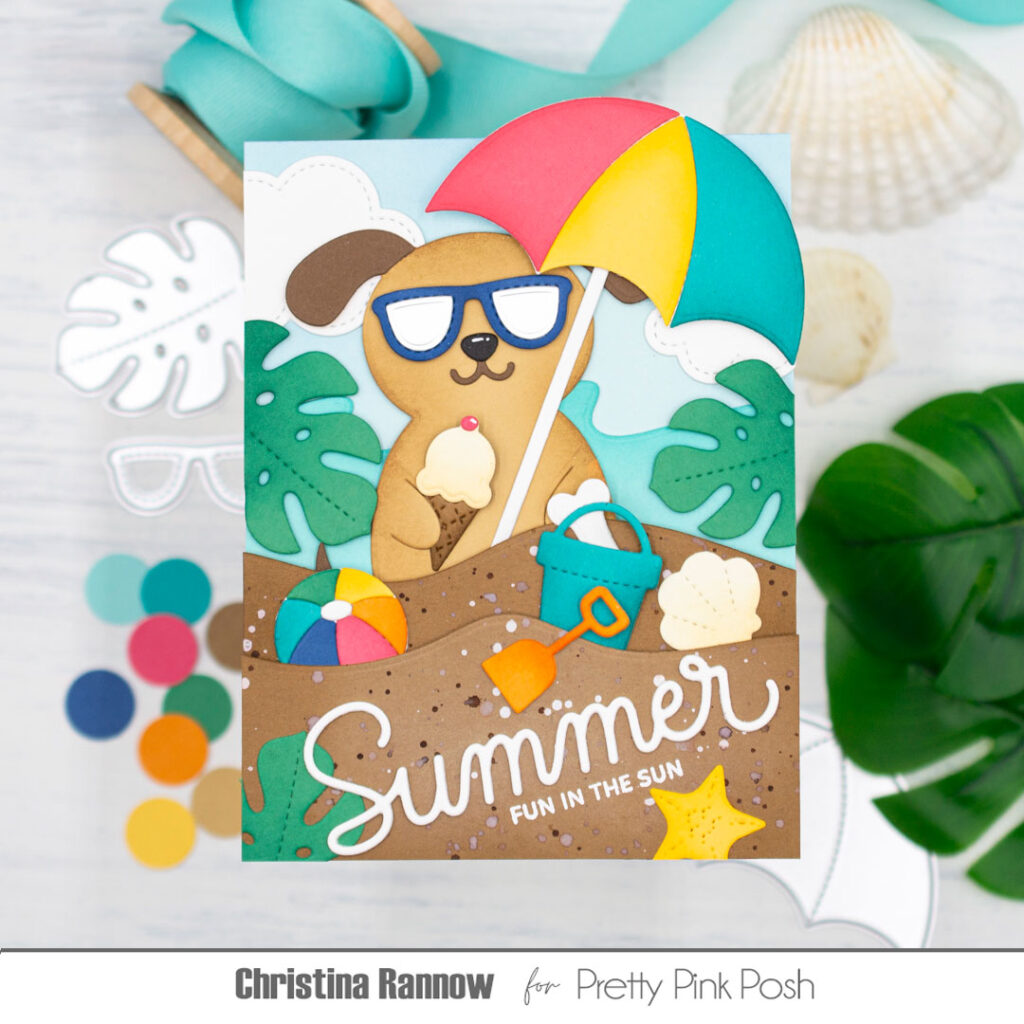
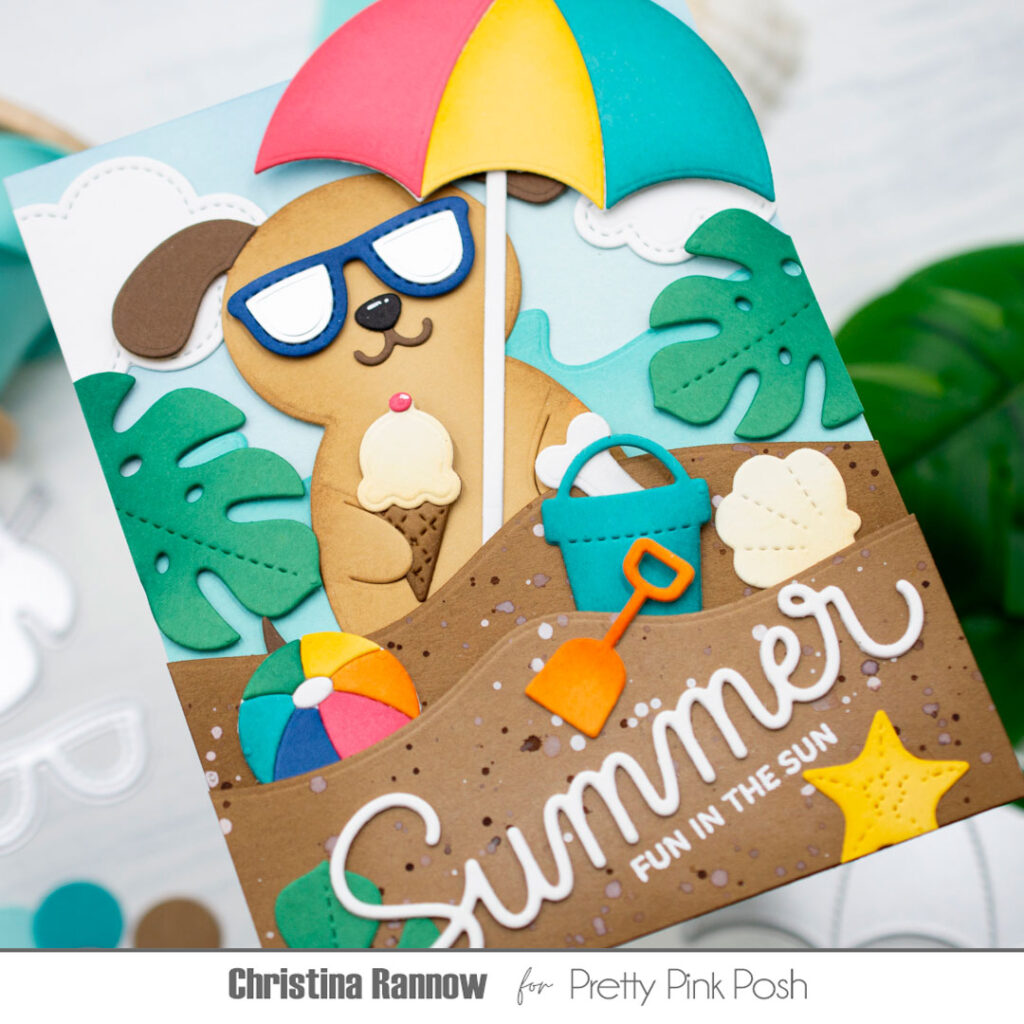
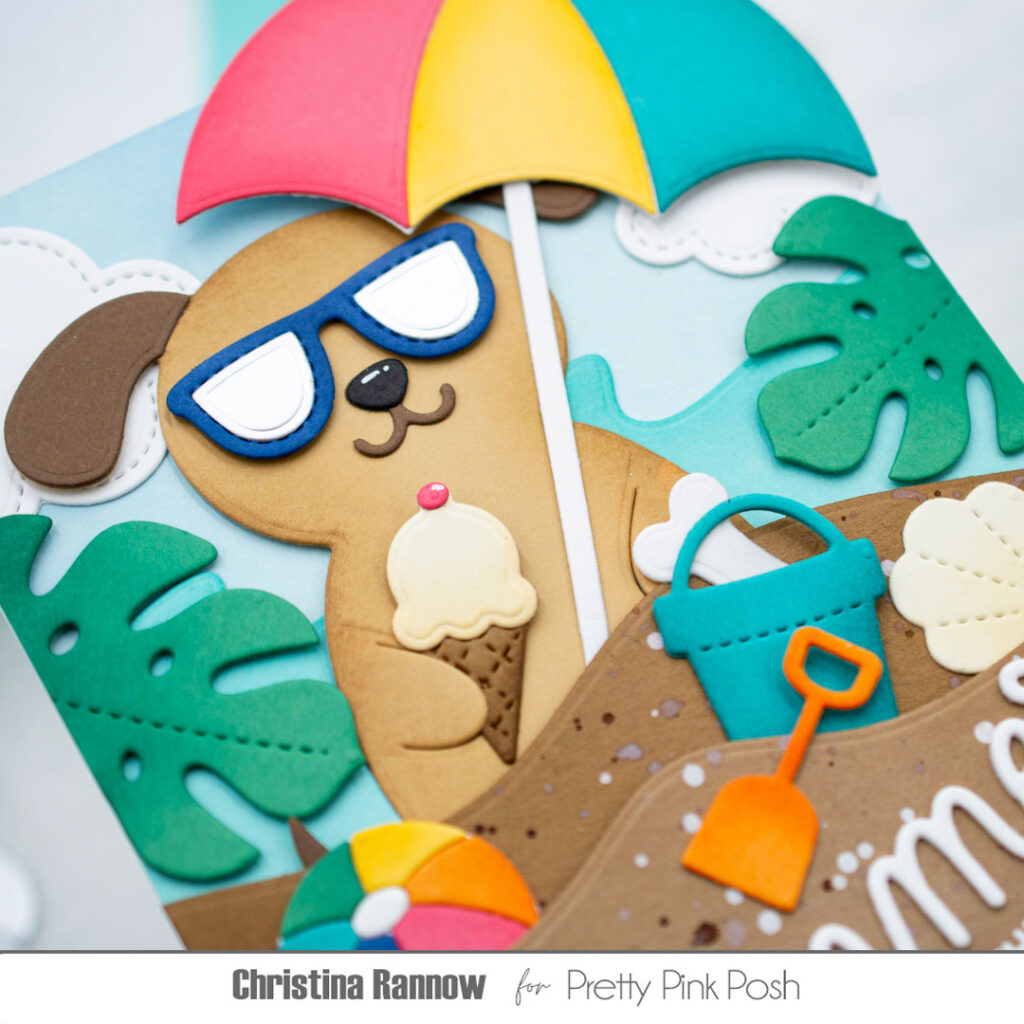
Hi friends! Christina here, and today I’m sharing a card with a playful beach scene featuring the adorable Dog Holder. He is the perfect addition to this summer-themed design because what dog doesn’t love the beach? Well, there might be a few furbabies who don’t like the beach, but I know my pup does, and he likes ice cream even more! That was my inspiration for this fun-in-the-sun beach scene.
My first step was to die-cut and assemble all the elements I needed to create the scene. I started with colored cardstocks and added subtle shading to the pieces before assembling them. I chose classic beach items for my scene and added the bone that’s included in the Dog Holder set to his bucket. I couldn’t resist giving this pup sunglasses, and matte silver cardstock gives them a cool mirrored look. The umbrella is from the Springtime Holder Additions set and works great as a beach umbrella, especially if you use bright summer colors like I did here.
With all the components die-cut and assembled, it was time to create the background. I started with a light blue cardstock panel for the sky, added a couple of Stitched Clouds, and then layered on the ocean waves using one of the Shoreline Borders. Before attaching the Dog Holder to the scene, I added the two layers of sandy beach that I die-cut using the Snowy Hills diesand then spattered with ink and white splatter medium. I used foam squares to secure the sandy layers and then tucked the pup inside the top layer.
Now it was time to add all the fun beachy items to the scene. I tucked some things into the sandy layers, gave the pup an ice cream cone, and popped up the umbrella with more foam squares. I brought in some greenery with the Tropical Leaves and added a bright white sentiment to complete my card design. The final step was to attach the scene to a top-fold card base.
Thank you so much for reading about the fun beach-themed card I created featuring the adorable Dog Holder. Happy summer crafting!
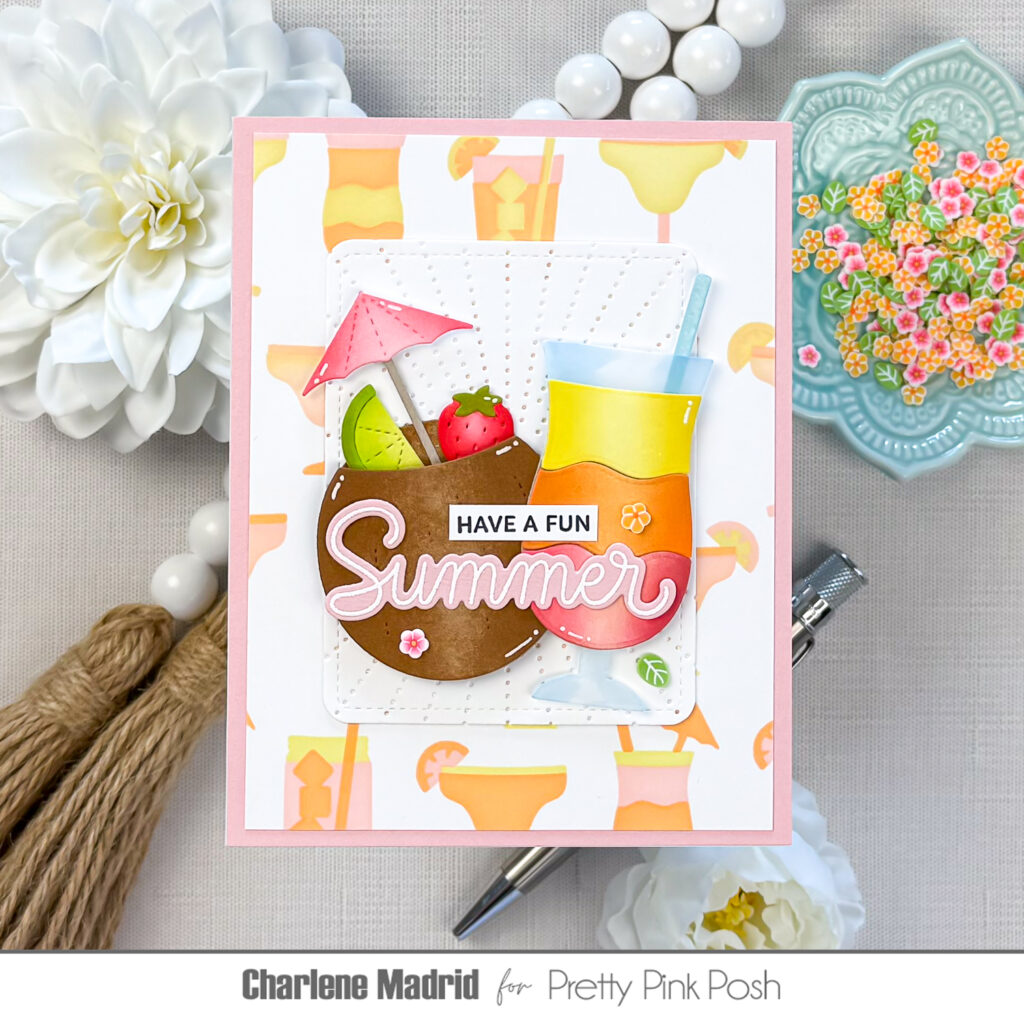
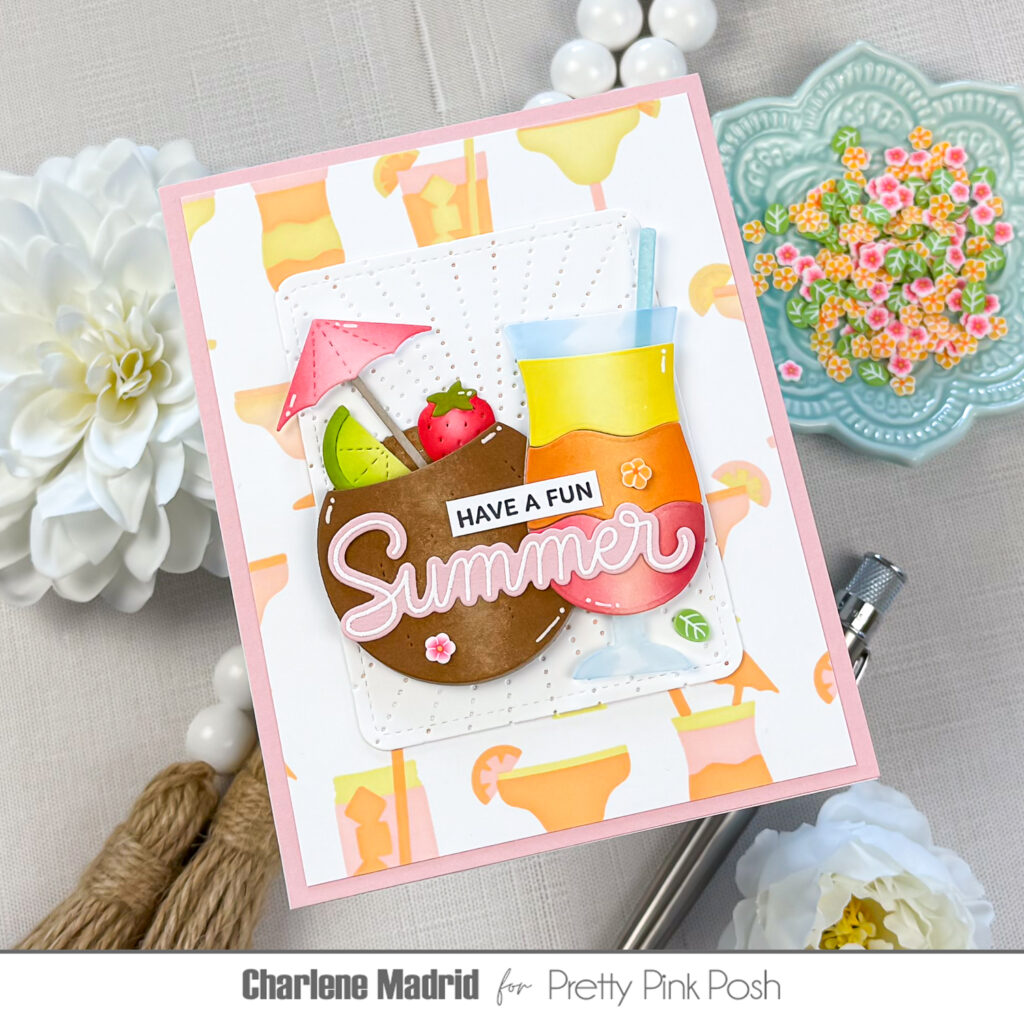
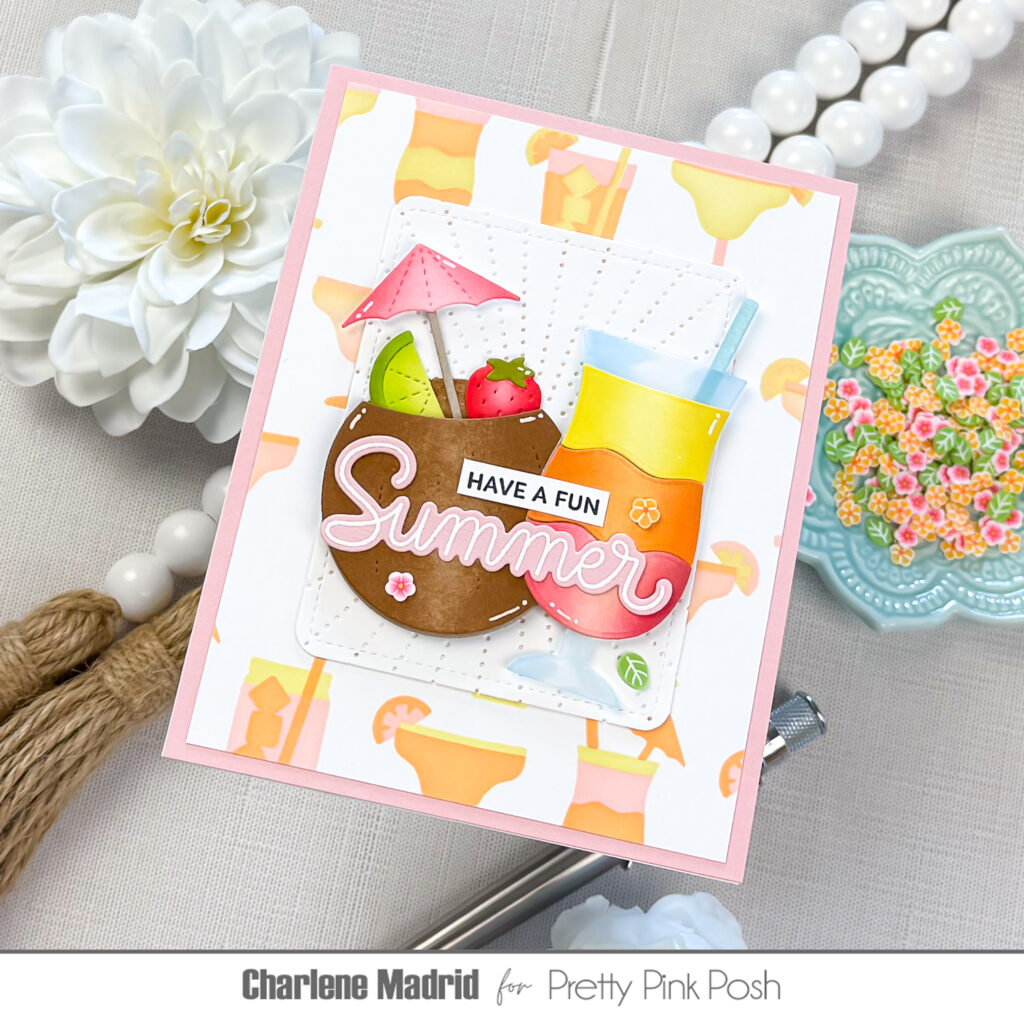
Hi friends, Charlene here! Have you ever wondered how to make a die-cut drink glass actually look like glass? Today I’m sharing a simple vellum trick that adds translucency, definition, and a surprisingly realistic finish.
I began by die cutting the coconut from kraft cardstock and adding light brown ink around the edges. Keeping the center lighter creates a natural highlight and helps the coconut appear rounded instead of flat.
I used the same idea for the colorful drink layers. Each piece received a light layer of ink followed by a darker shade blended inward from the sides. Leaving a lighter area through the center creates a consistent highlight across the pink, orange, and yellow layers.
The vellum glass is the star of this card. I die cut the glass from vellum, then used a very light blue alcohol marker to flick color inward from the outer edges. I left most of the center translucent so the piece would retain that clear, glass-like appearance. After attaching the colorful drink layers behind the vellum, the glass immediately looked more dimensional and realistic.
To keep the design cohesive, I repeated the same colors throughout the smaller die-cut details. The pink umbrella coordinates with the bottom drink layer, while the strawberry, lime, and aqua straw add playful pops of color. I tucked the fruit and umbrella inside the coconut and used foam squares beneath the top layer to give the drink extra fullness.
I also positioned the umbrella and straw at similar angles. Repeating those diagonal lines helps balance the two drinks and gives the finished scene a relaxed, easygoing feeling.
For the background, I blended pink, orange, and yellow ink through the Layered Summer Drinks Stencils. I changed the order of the colors on each stencil layer, creating plenty of variety while keeping the palette consistent with the focal images.
Because the background has so much color and movement, I added a white rectangle to give the drinks a quiet place to rest. I ran the panel through my die cutting machine with the Sunburst Pierced Plate Diefor subtle texture that would not compete with the colorful die cuts.
The sentiment combines a small stamped strip with the larger die-cut word from the Happy Summer stamps. I stamped “HAVE A FUN” in black, then heat embossed “Summer” in white on pink cardstock to connect the sentiment with the other pink details.
To finish the card, I added a few pieces of Summer Blooms clay confettiand drew white gel pen highlights onto the die cuts. Those small details add shine and make the finished drinks feel even more polished.
I love how one simple vellum detail completely changes the appearance of the drink glass. I hope this inspires you to try vellum the next time you create a die-cut beverage!
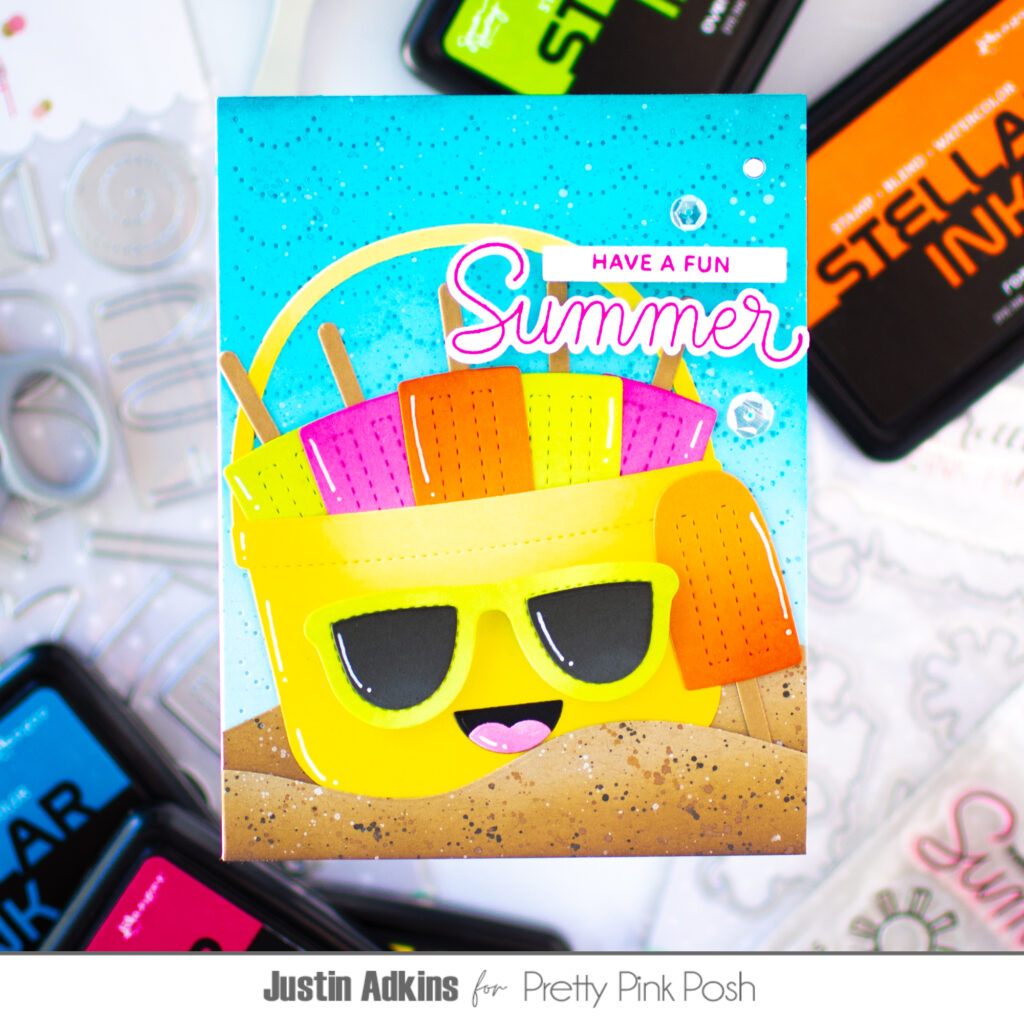
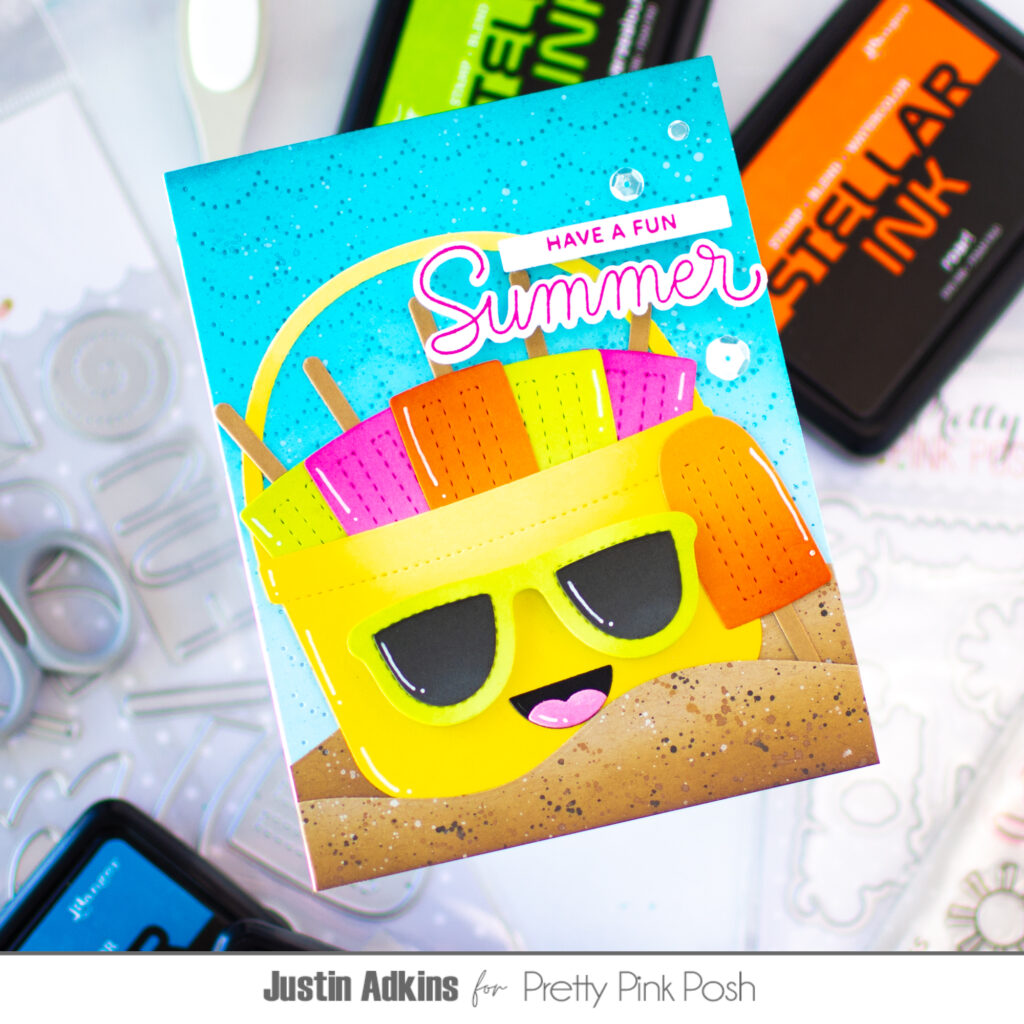
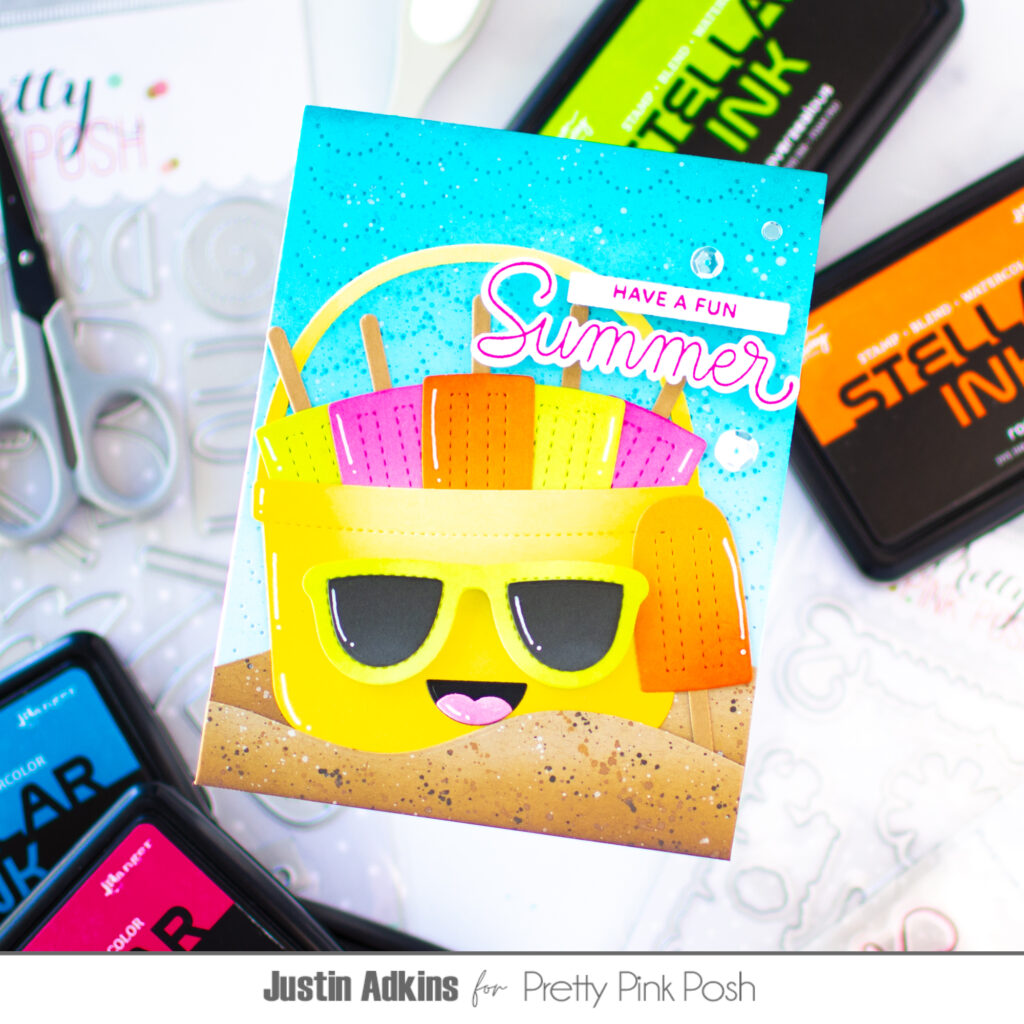
Hello, friends! Justin here, and I’m excited to be back on the Pretty Pink Posh blog sharing a project for Summer Theme Week!
If you’re ready for sunshine, popsicles, and beach days, today’s card is sure to brighten your day. I created this cheerful scene using several products from the Pretty Pink Posh Summer Collection.
To create the beach scene, I die cut my hills using the Snowy Hills Border Dies from Kraft cardstock. I then blended Vintage Photo Distress Oxide Ink around the edges before splattering the sand with Vintage Photo, Black Soot Distress Oxide Ink, and White Linen Dylusions Ink Spray. This simple combination creates realistic sandy texture with lots of depth.
For the background, I ink blended a bright summer sky before adding subtle texture with the Scallops Pierced Plate Die. The bucket itself was die cut from white cardstock and ink blended using Stellar Inks in Prom Queen, Roar!, Shooting Star, Overzealous, and Siren Song to create the vibrant popsicles and sunny bucket. A little extra shading helps bring the die cuts to life and gives the entire card a fun, dimensional look.
I hope this colorful summer card inspires you to create with the fabulous Pretty Pink Posh Summer Collection! Don’t forget that Summer Theme Week is the perfect opportunity to grab your favorite summer products while they’re 15% off.
Thanks so much for stopping by! For even more cardmaking inspiration, tutorials, and colorful projects, be sure to follow me onInstagramandYouTube @justanotebyjustin.
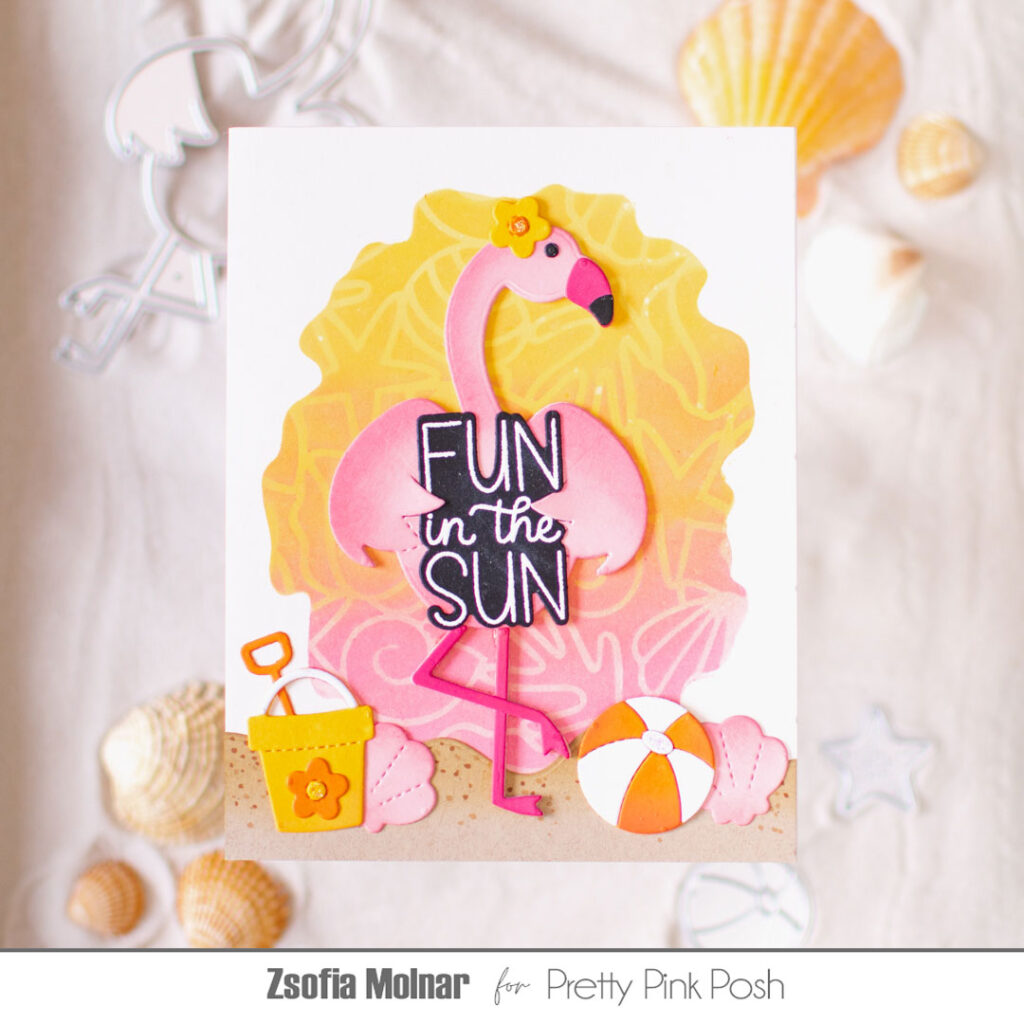
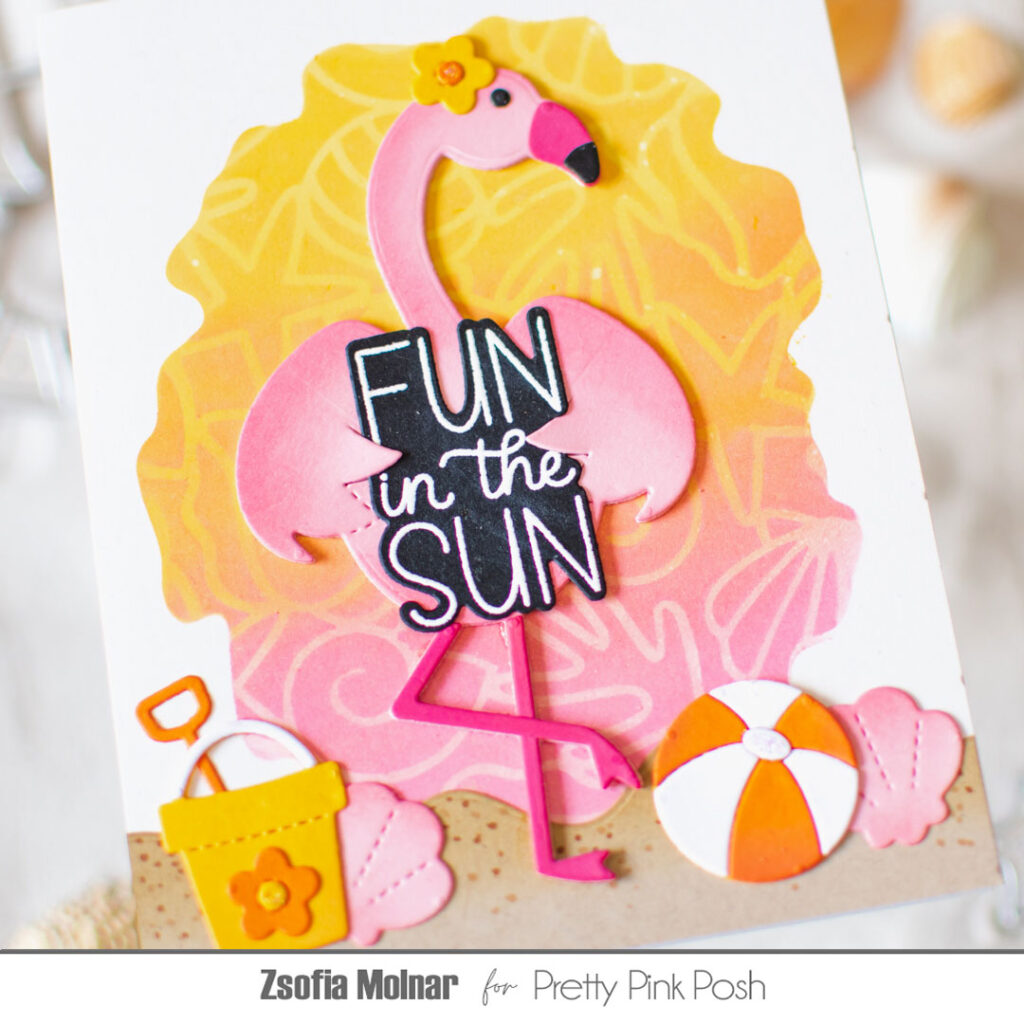
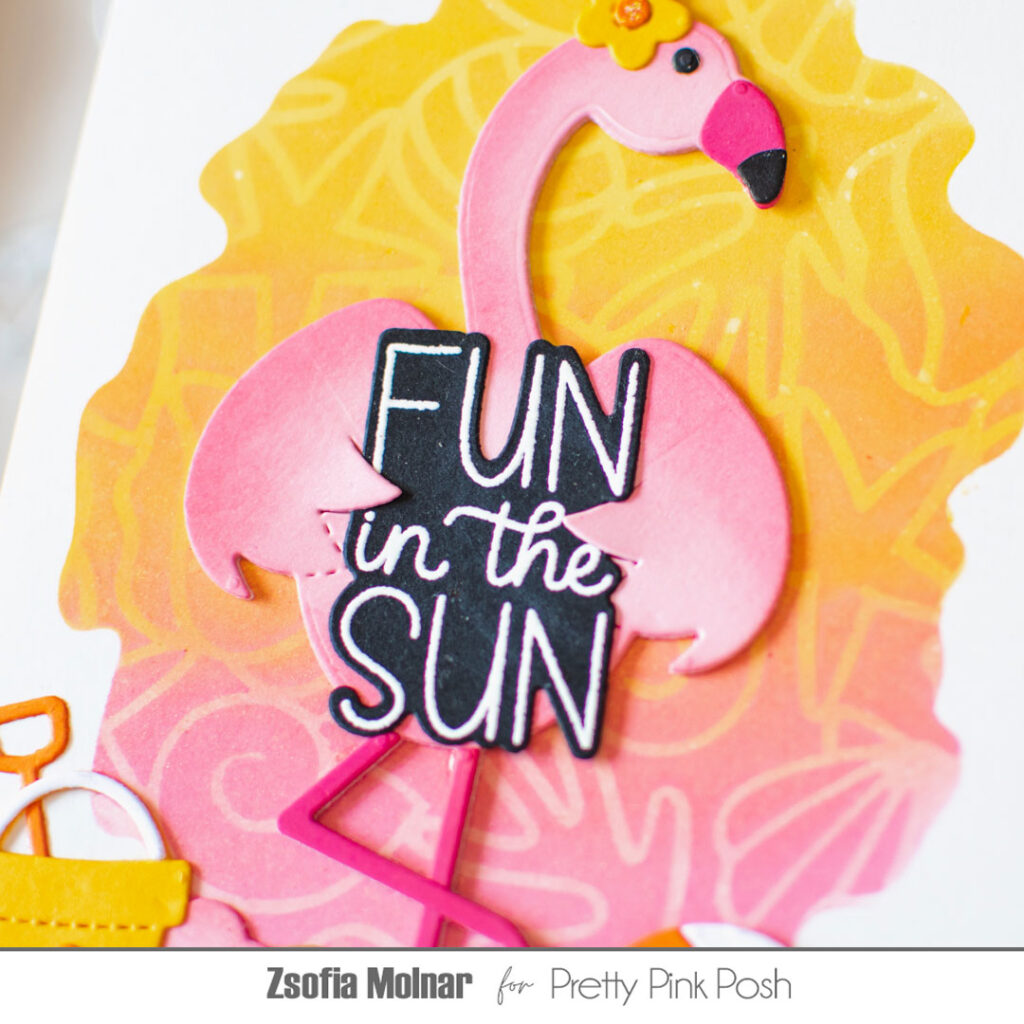
Hello Everyone! Welcome to Day 6 of the Summer Theme Week! It is Zsofi here today with a fun summer card, mixing the latest releasewith older ones. I love to create scenes with a stencilled background and die cut elements. Let me show you how I made this cheerful flamingo one.
First, I created the background on a piece of Bristol Smooth cardstock with the Watercolour Oval stencil and 3 shades of Distress Oxide inks: Spun Sugar, Wild Honey and Squeezed Lemonade. Then without removing the stencil, I added the Seashell Background stencil on top of it and blended it with one shade darker inks: Kitsch Flamingo, Carved Pumpkin and Mustard Seed. Before removing the stencil, I spritzed it with a gold sparkle spray for a subtle shine. I love when the pattern reveals afer removing the stencils, it always has the WOW-effect on me!
Next, I die cut the Flamingo Holder die from pink cardstock and used also the Summer Holder Additions die set for the accessories: I chose yellow, orange, pink and white scraps to match the background colours. I also did some ink blending on the die cuts to add a little shading.
To set the scene, I die cut a piece of Desert Storm cardstock with the Shoreline Borders die, and added some dots with 2 shades of brown Copic markers to imitate the sand.
I thought it would be fun to incorporate the sentiment within the scene, so I stamped the “Fun in the sun” sentiment from the Happy Summer stamp set with clear embossing ink on black cardstock and white heat embossed it. I love that even the sentiments have coordinating dies, it looks so cool and it perfetcly fits in the wings of the flamingo!
After assembling the card, I used some Stickles on the flower centres and on the ball, just for some extra fun.
I hope you like this idea and got inspired. I cannot wait to see what you create with the new release, make sure to share them in our Facebook group! And don’t forget: the whole Summer section in the Pretty Pink Posh store is discounted this week!
Thanks for stopping by and I hope to see you soon, Zsofi
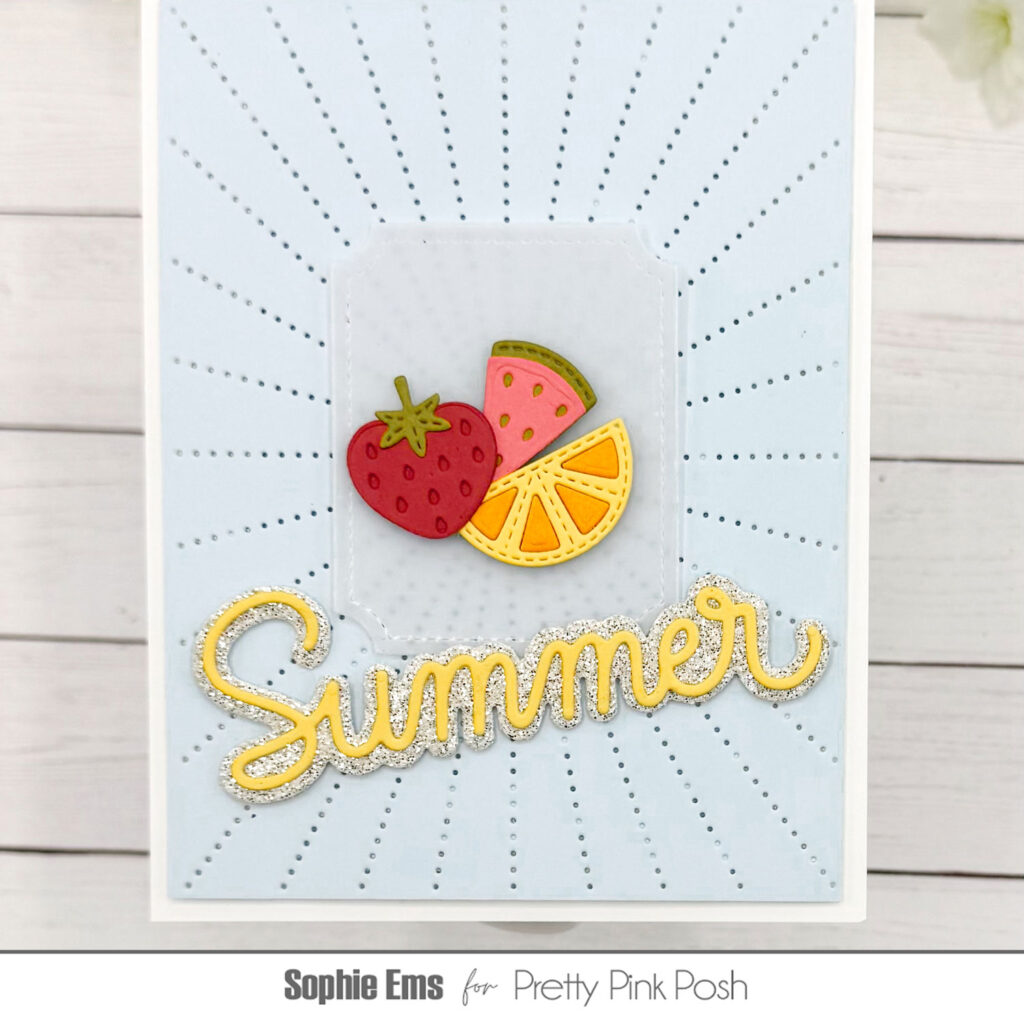
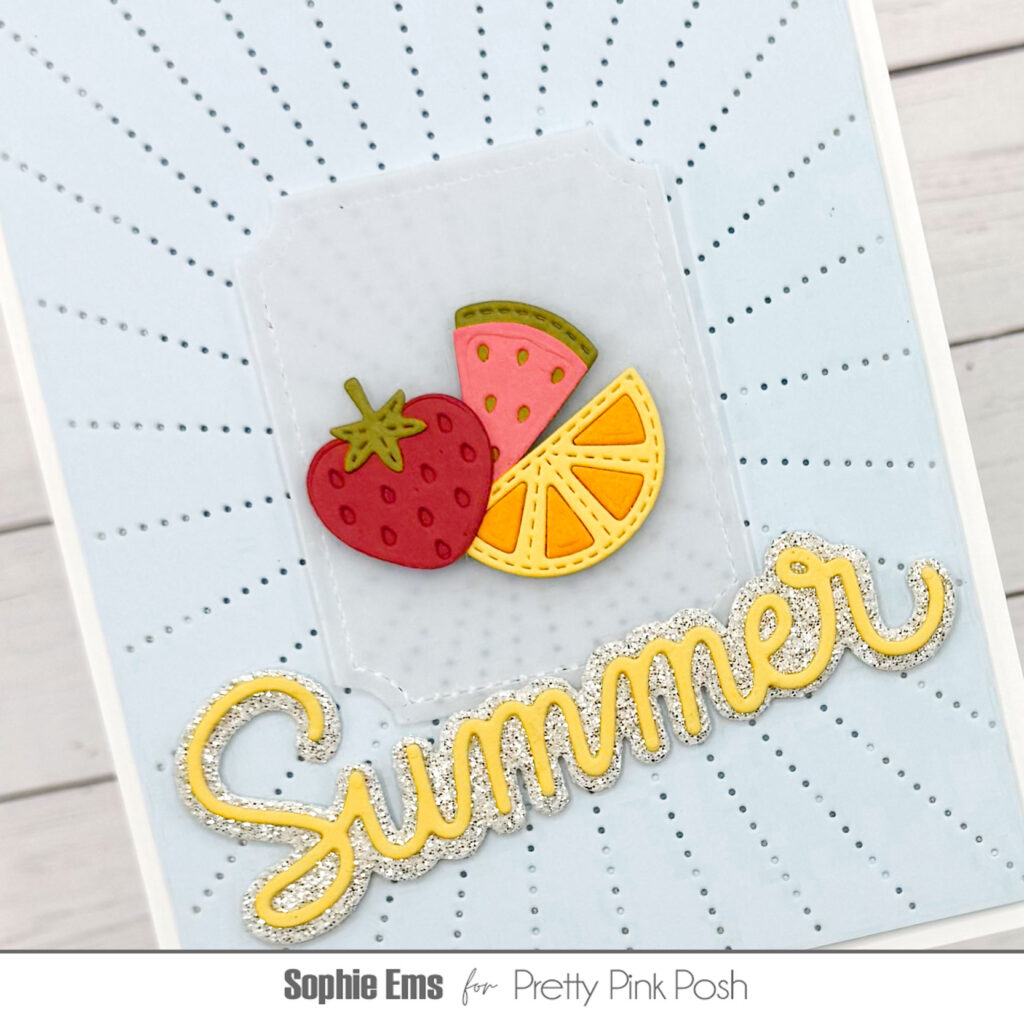
Hi friends! Sophie here today happy to share a card celebrating Summer Theme week here on the Pretty Pink Posh Blog. I hope you’ve been having a wonderful summer so far! It always goes by so fast…
For my project I am featuring the Fruit Mug Additions dies paired with some of the newest summer realese products. I wanted to encourage you to hopefully look at older die sets that you have and give them new live by integrating with some newer products. I also wanted to show that there is so much life to even the small dies in a larger set! I only used a few of the little fruit dies here, and they are the star of the show; you don’t always have to use the whole die set or use it as it is originally intended!
The new Summer Shadow die set is quickly becoming a favorite of mine along with the new Sunburst Pierced Plate – such a staple die to have in your stash! To help draw the eye in to the little fruit die cuts I layered them on a vellum Notched Rectangle die.
I hope this inspires you to look at the small dies in your stash and your older sets! Can’t wait to be back soon to share more!
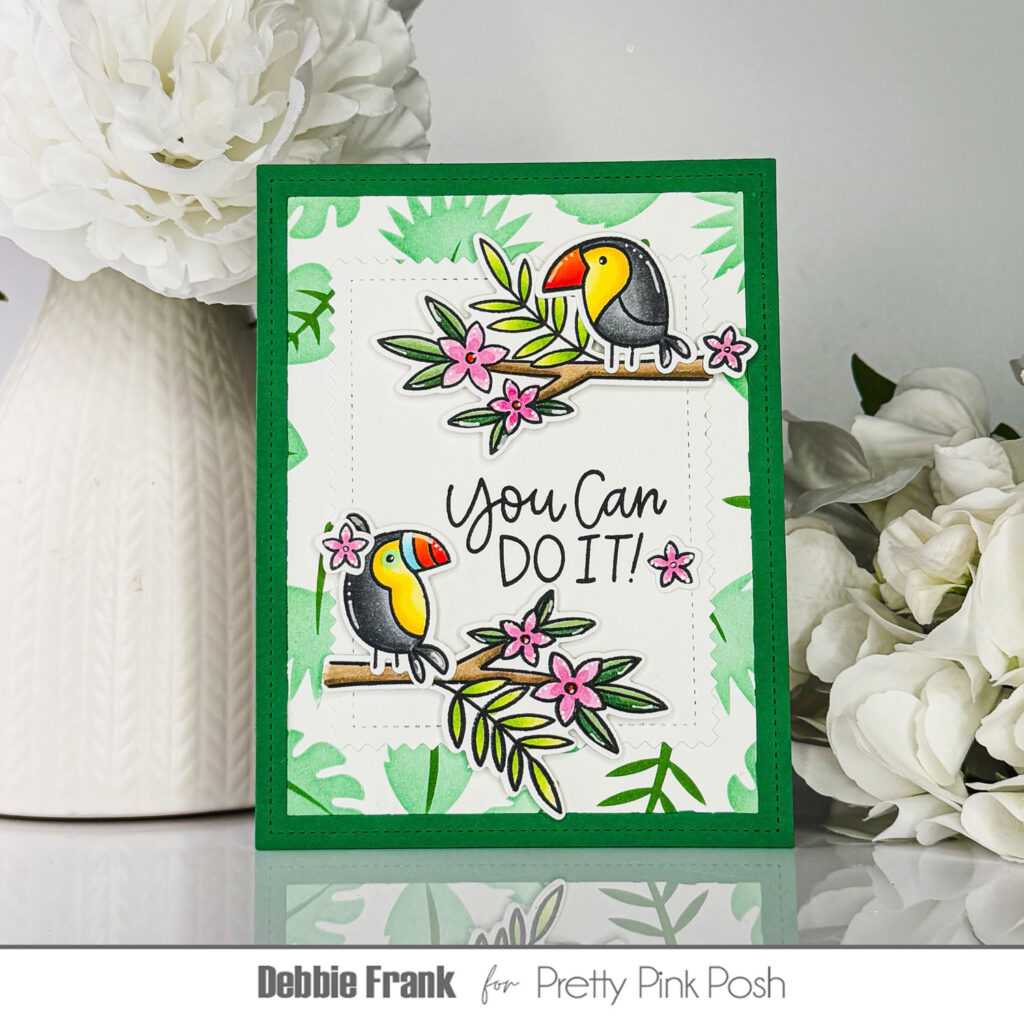
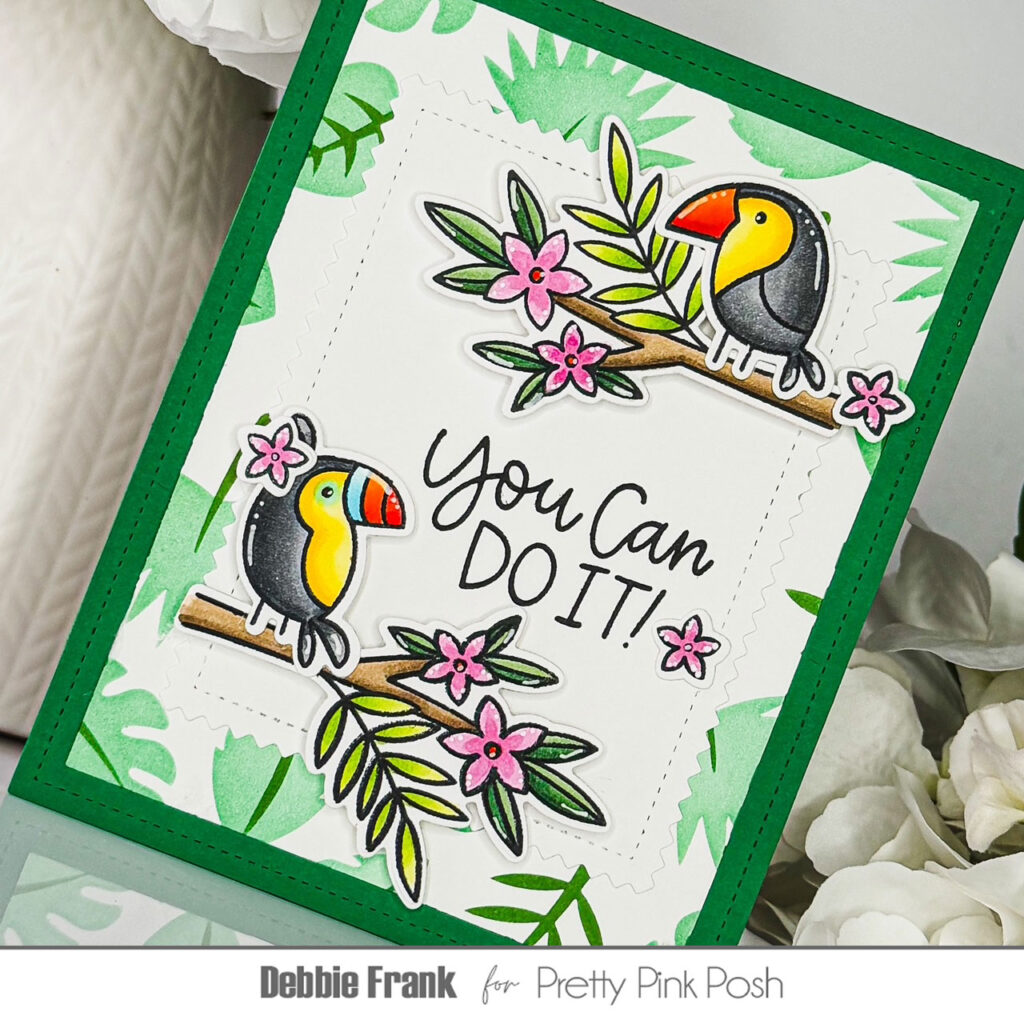
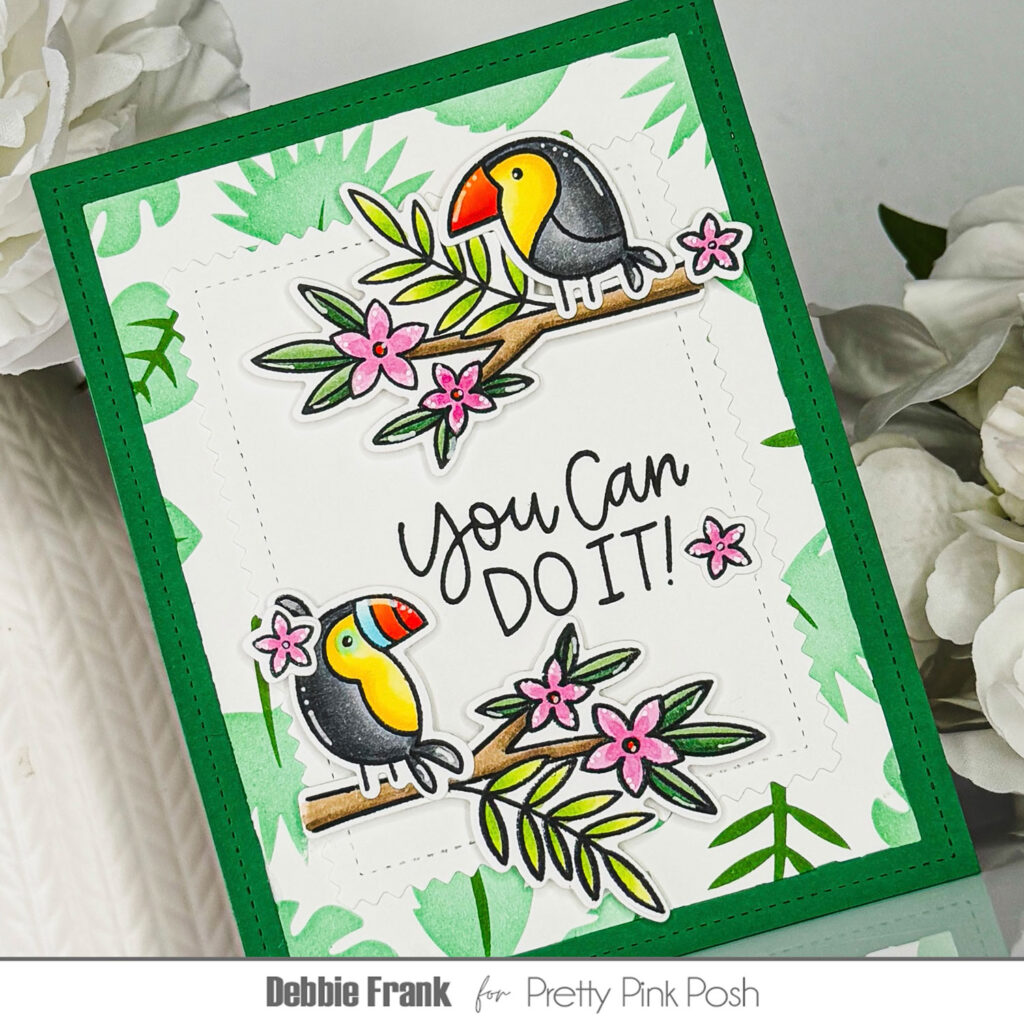
I started off by stamping out all the images plus an extra branch and flowers from the set onto Copic friendly premium card stock using Memento Tuxedo Black ink in my Misti. Once I finished coloring up the images with my Copics, I die-cut them out with their Coordinating Dies.
For my background panel I used the new Layered Tropical Leaves Stencil, applying two shades of green dye inks with the layers on a standard A2 panel of Neenah Classic Solar.
To make the toucans show up on the stencil panel, I die-cut out another white panel using the second to largestPinking Rectangle Dies. I laid out my design on the pinking rectangle panel but before I attached the toucans and greenery, I stamped on the sentiment “You Can Do It!” from the stamp set.
Using the Spider Web Cover Plate, I die-cut it out with matching card stock snipping off the web to use the frame for the Toucans!
I then assembled my card by gluing on the white panel onto the stenciled. With foam squares on the back of the images I popped them on the Pinking Rectangle panel. Finishing off my card by adding white highlights using a Decogel Milkyway pen and adding a Portrait top fold card base
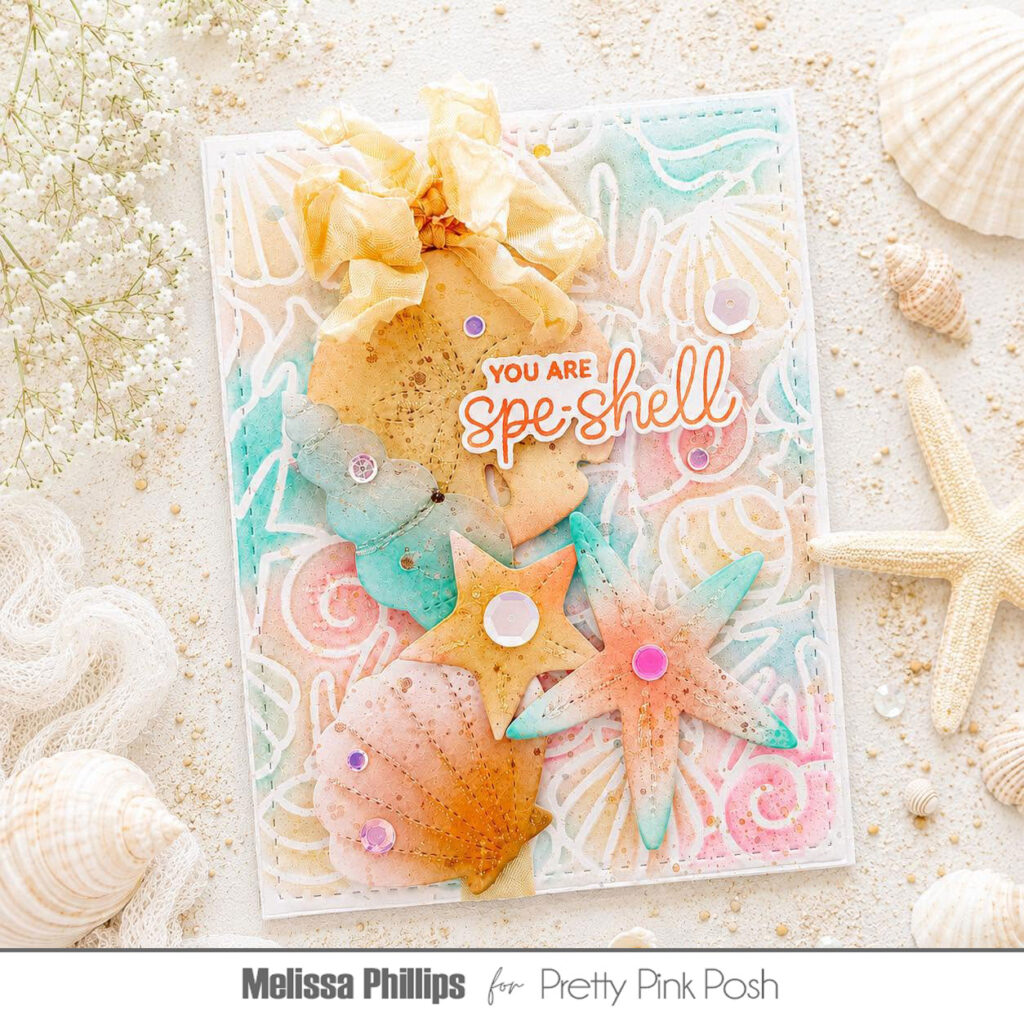
Hi Everyone! It’s Melissa here with you today, and I have the most endearing card and sentiment to share with you, using some sweet, Summertime products from Pretty Pink Posh.
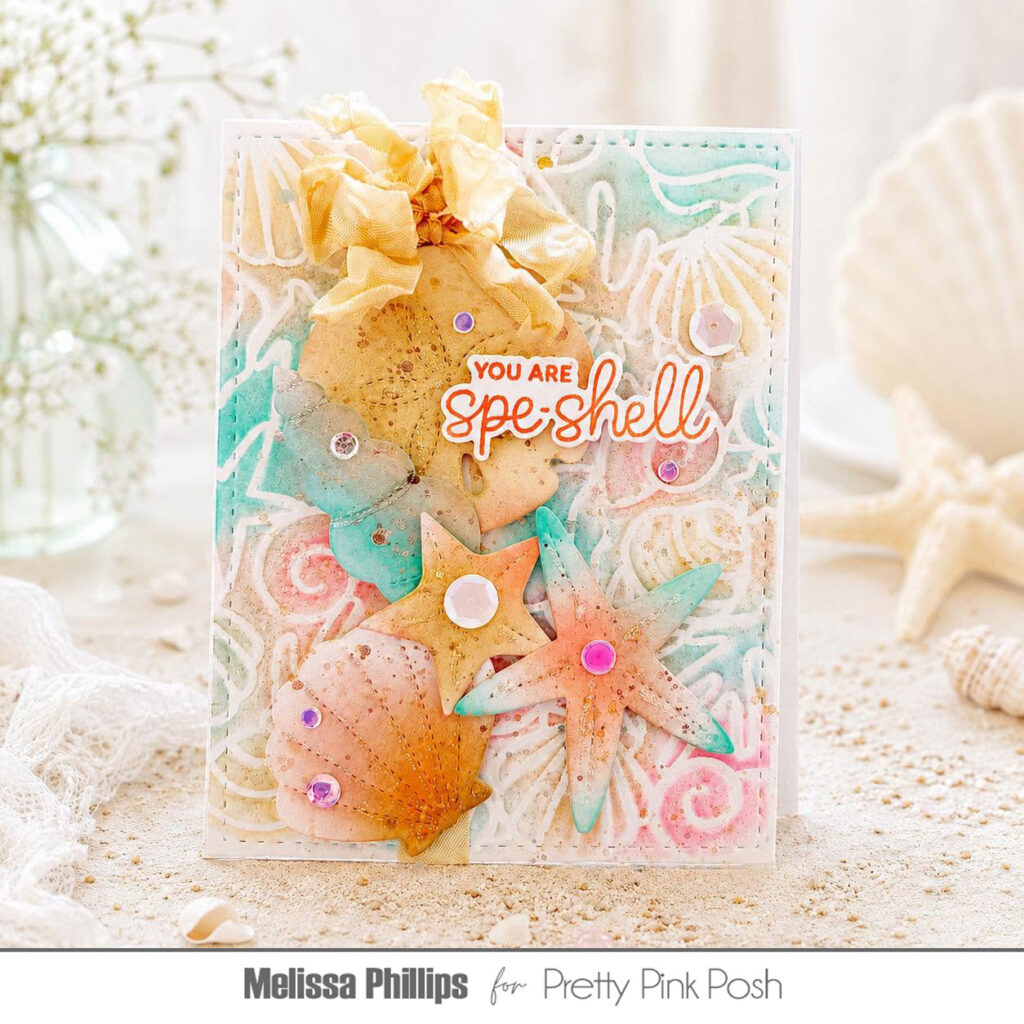
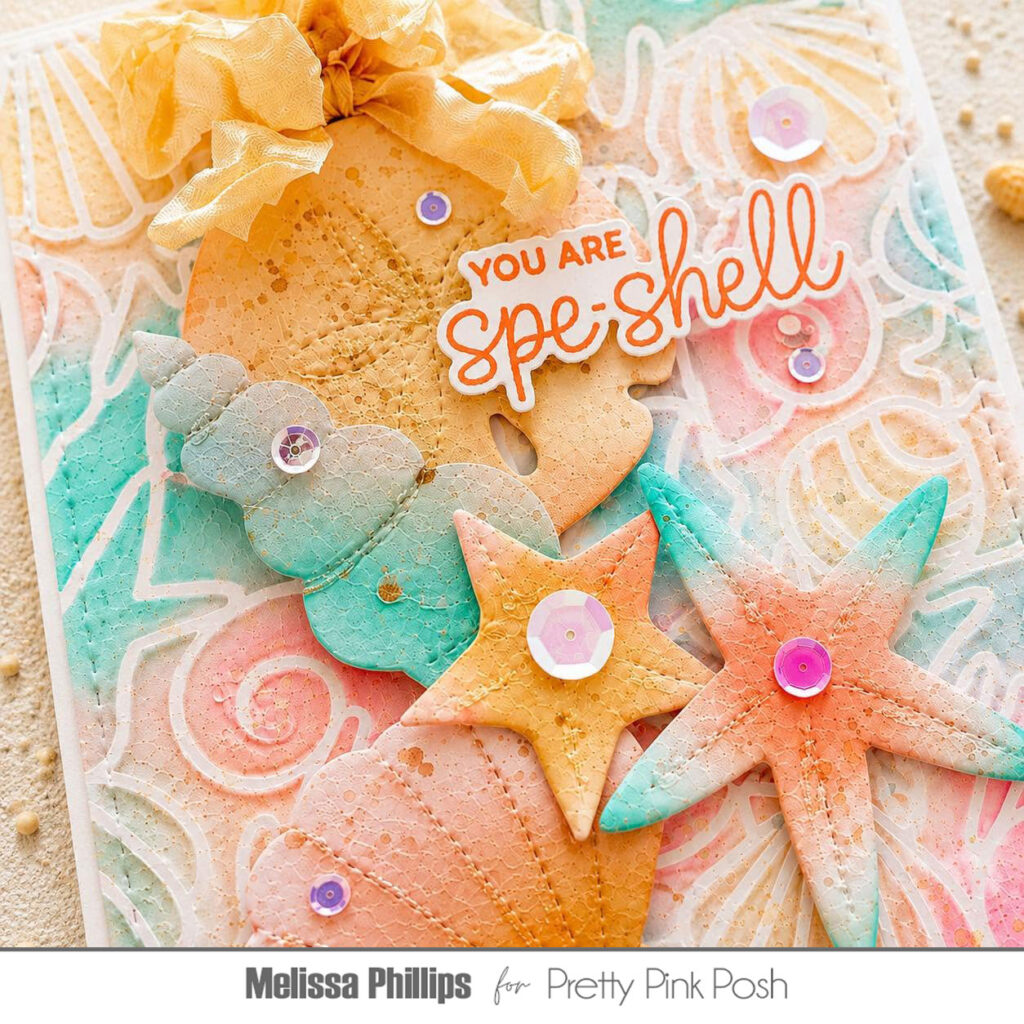
It all began with the most adorable sentiment from theSeashells stamp set and coordinating dies. I couldn’t resist using You Are SpeSHELL on my card and then wrapping it up with other shell-themed products.
I began with the beautiful Seashell Background Stencil. After adhering my stencil to my block of white cardstock, I used pale aqua, coral, and tan to create my watercolor background. I added a few splatters of Peacock Feathers and Fossilized Amber Distress Spritz to create a soft, speckled look.
Next, I added a scrunched seam binding bow in cream and nestled in my seashells cut from the Stitched Seashells dies. I added color to them in the same shades as my background using blending brushes as my tool. I used Distress Spritz once again to each seashell to mimic how they’d be found in nature.
Lastly came the sentiment I love so much. I wanted it to stand out, so I used the coordinating dies and foam adhesive to pop it up and off my card to shine for the recipient!
I love seashell season and weather, don’t you? Thanks for visiting. Happy Summer crafting!