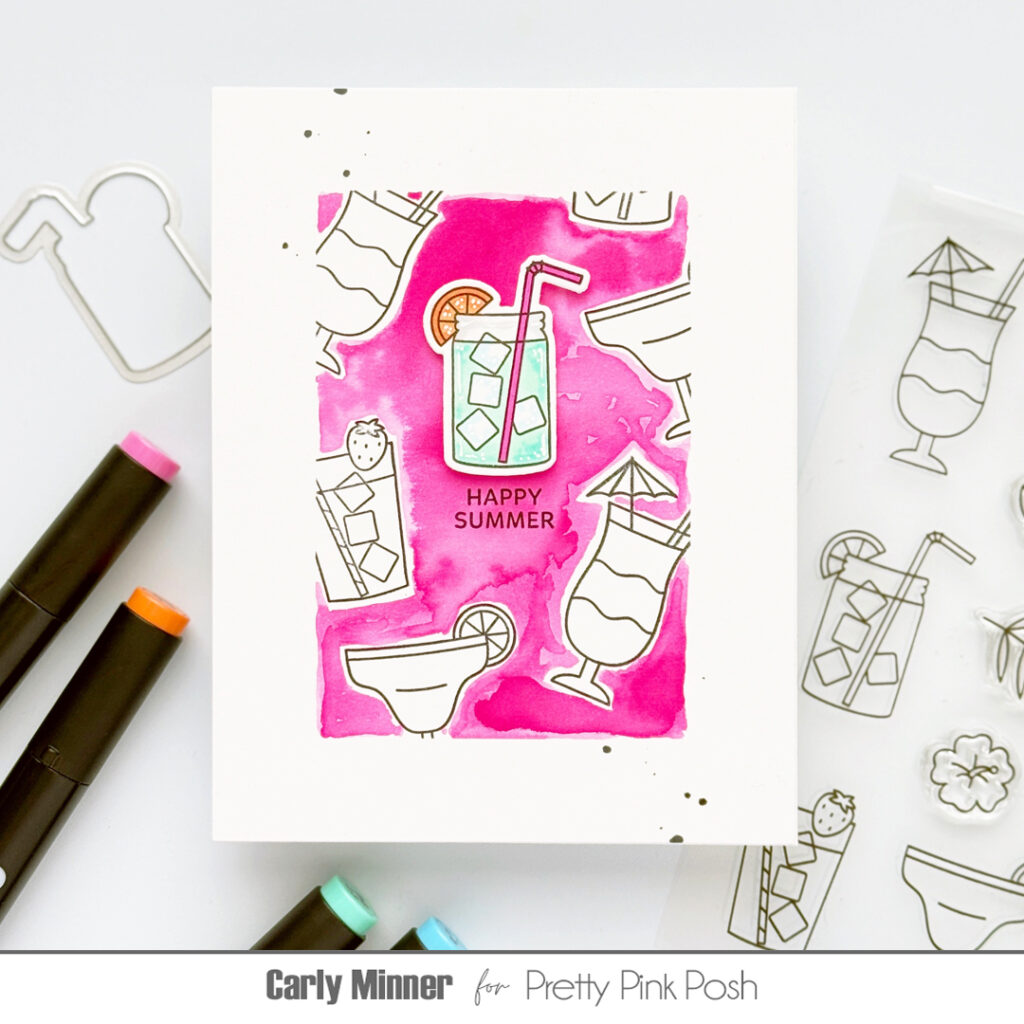
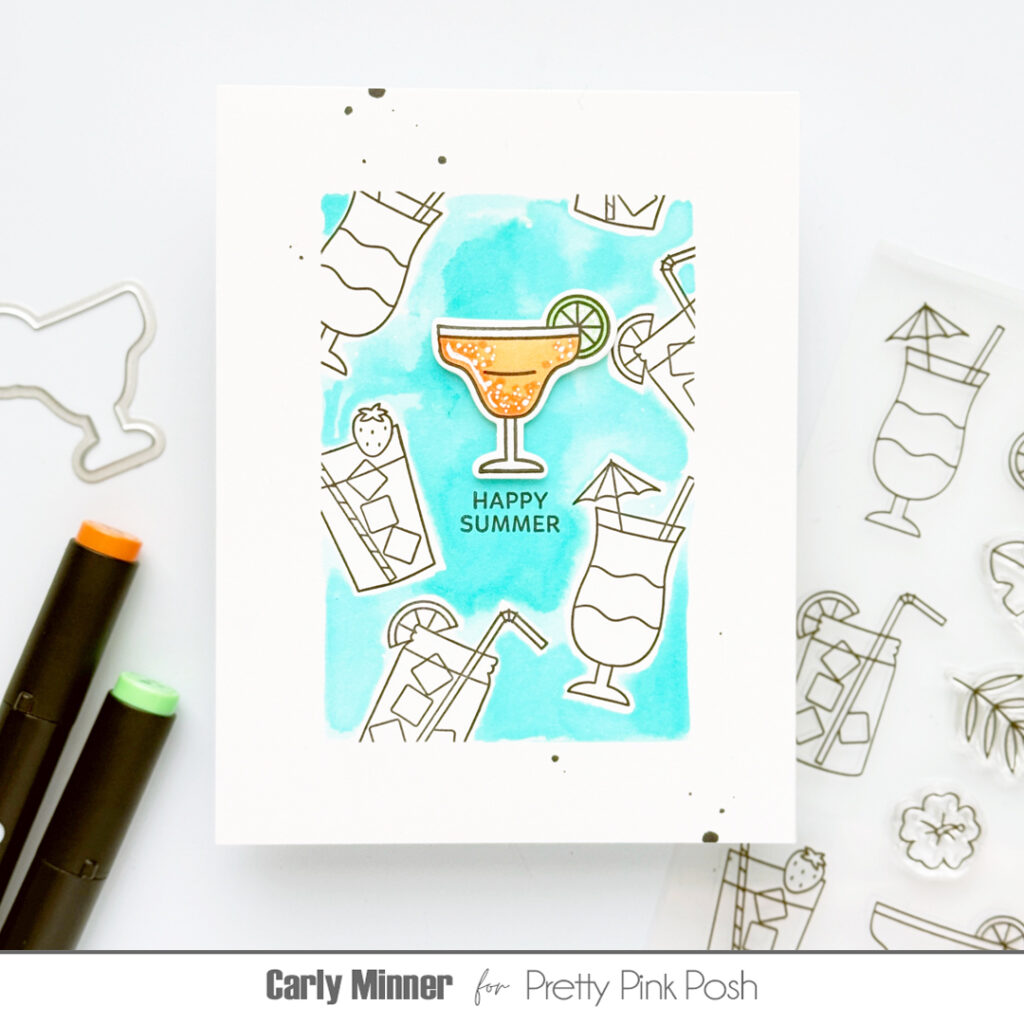
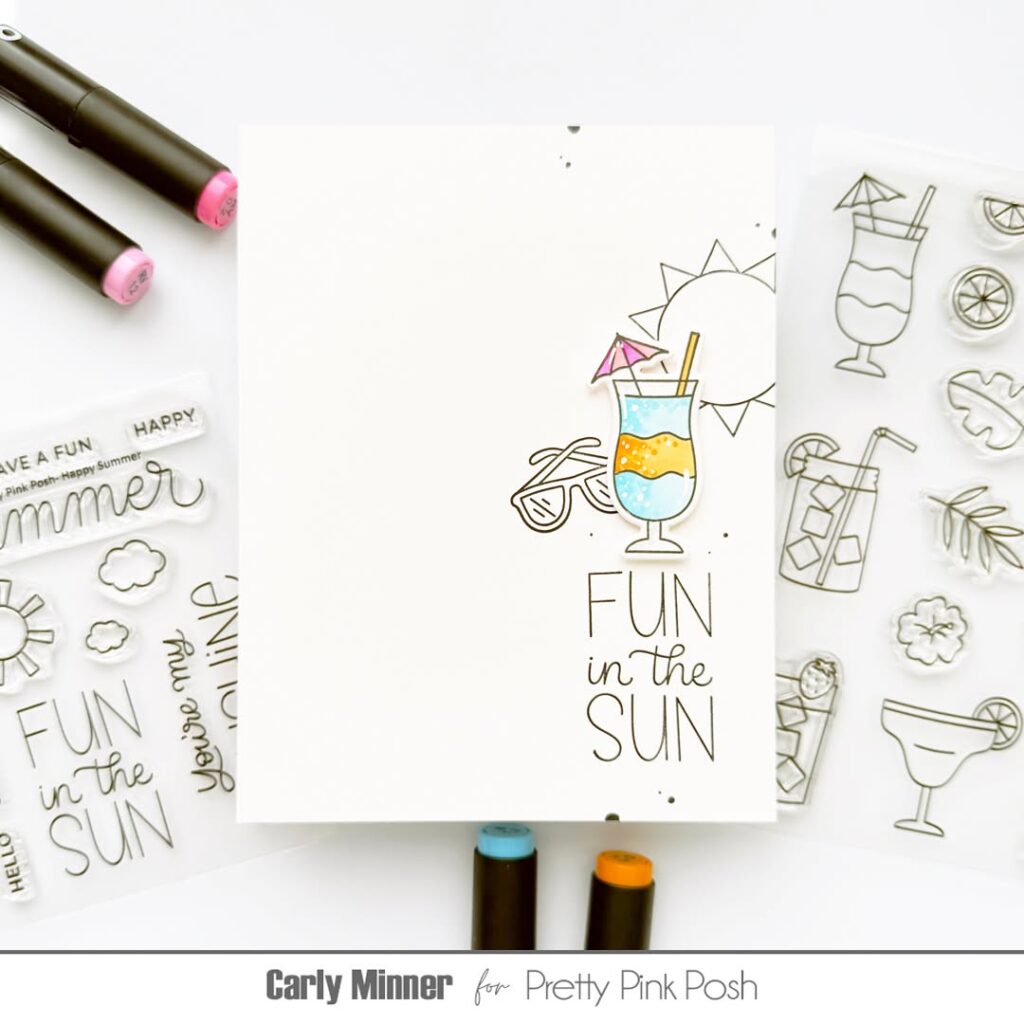
Hi friends, it’s Carly here. Are you looking for an easy, no-fail card design? Let me show you this easy one I love that includes SUPER easy watercoloring!
something to watercolor with…could be watercolor paint or water reactive ink pad/reinker
The process is so quick & fun! Mask a rectangle on cardstock. Stamp images as desired in waterproof ink. And then with tape still in place, watercolor around the stamped images to create a really fun background!
When the paint is dry you can add any focal element & sentiment!
OLO Marker Colors
RV1.3 Pink Lotus
OR1.3 Papaya
O2.2 Cantaloupe
G1.2 Mint
G0.0 Small Emerald
BG2.3 Aqua Green
BG2.1 Sea Glass
B1.3 Blue Hydrangea
B1.1 Light Blue
Thanks for stopping by! I hope you enjoyed today’s tutorial.
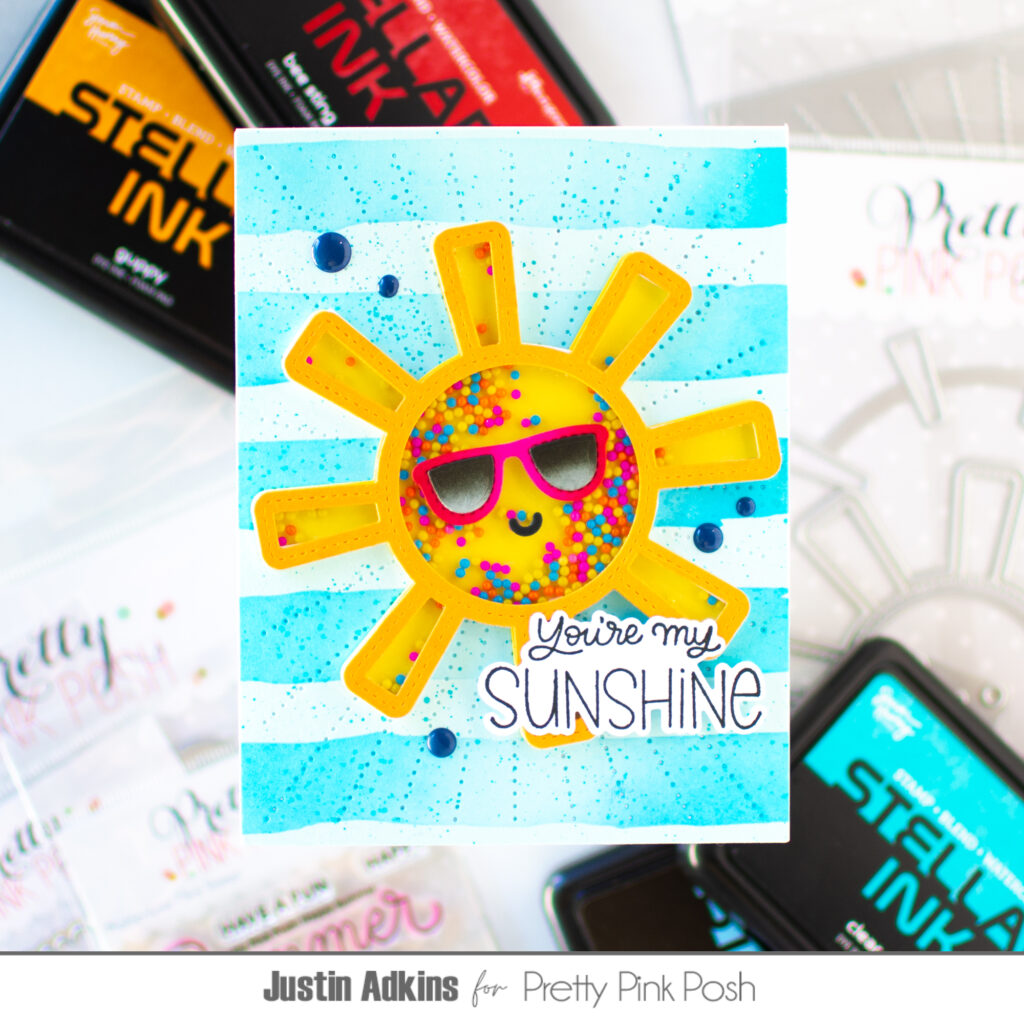
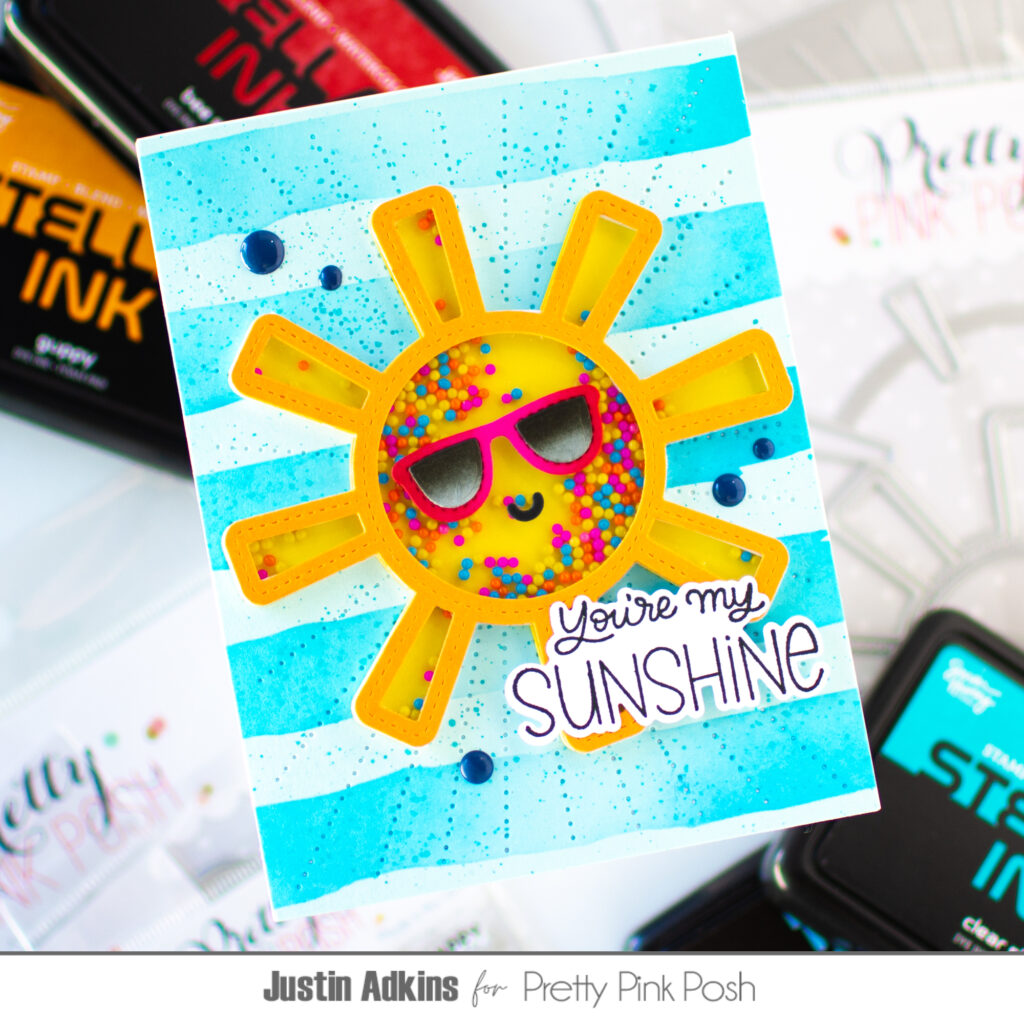
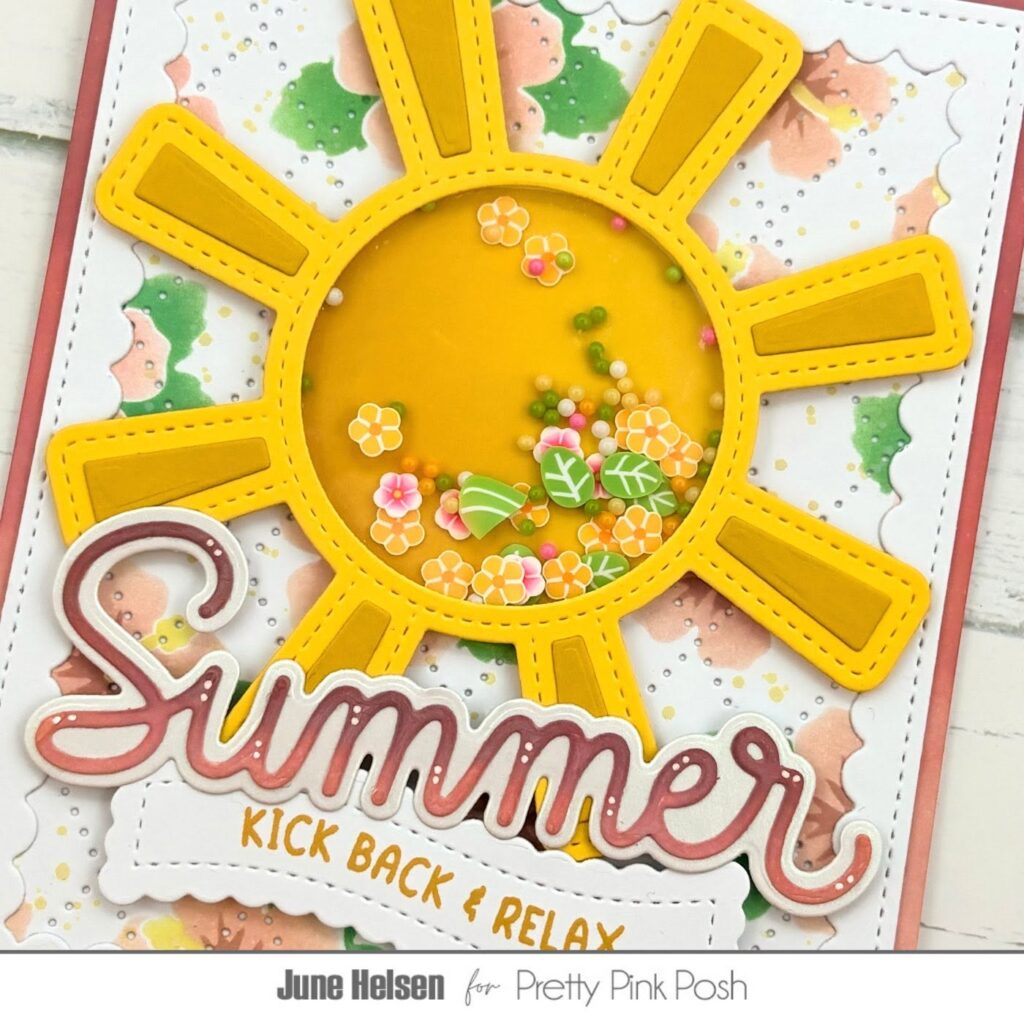
I had so much fun creating this playful shaker card with a smiling sun that’s ready for summer adventures! If you’d like to see exactly how this card came together, be sure to check out my full video tutorial on the Pretty Pink Posh YouTube Channel.
To create the background, I used the Watercolor Strips Stencil with bright blue ink blending to give the card a fun beachy feel. I then added texture with the Sunburst Pierced Plate before creating the adorable shaker sun using the new Sun Shaker Dies.
The sunglasses from the Summer Holder Additions Dies add extra personality, while the colorful Beach Party Shaker Beads bring plenty of movement and sparkle. I finished the card with the “You’re My Sunshine” sentiment from the Happy Summer Stamp Set, creating a card that’s perfect for sending sunny wishes all season long.
Don’t forget to follow me on Instagram and YouTube at @justanotebyjustin for even more crafting inspiration!
Thanks so much for stopping by today! See you again soon!
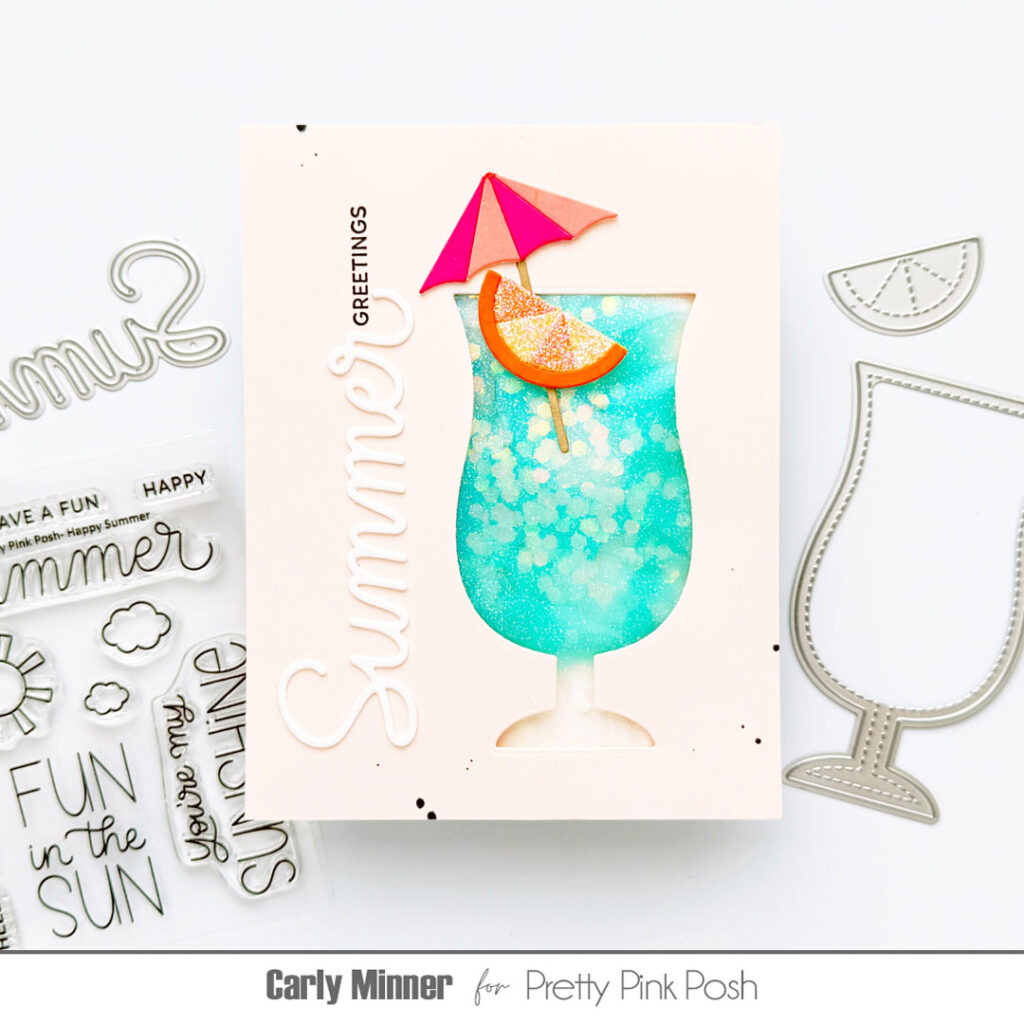
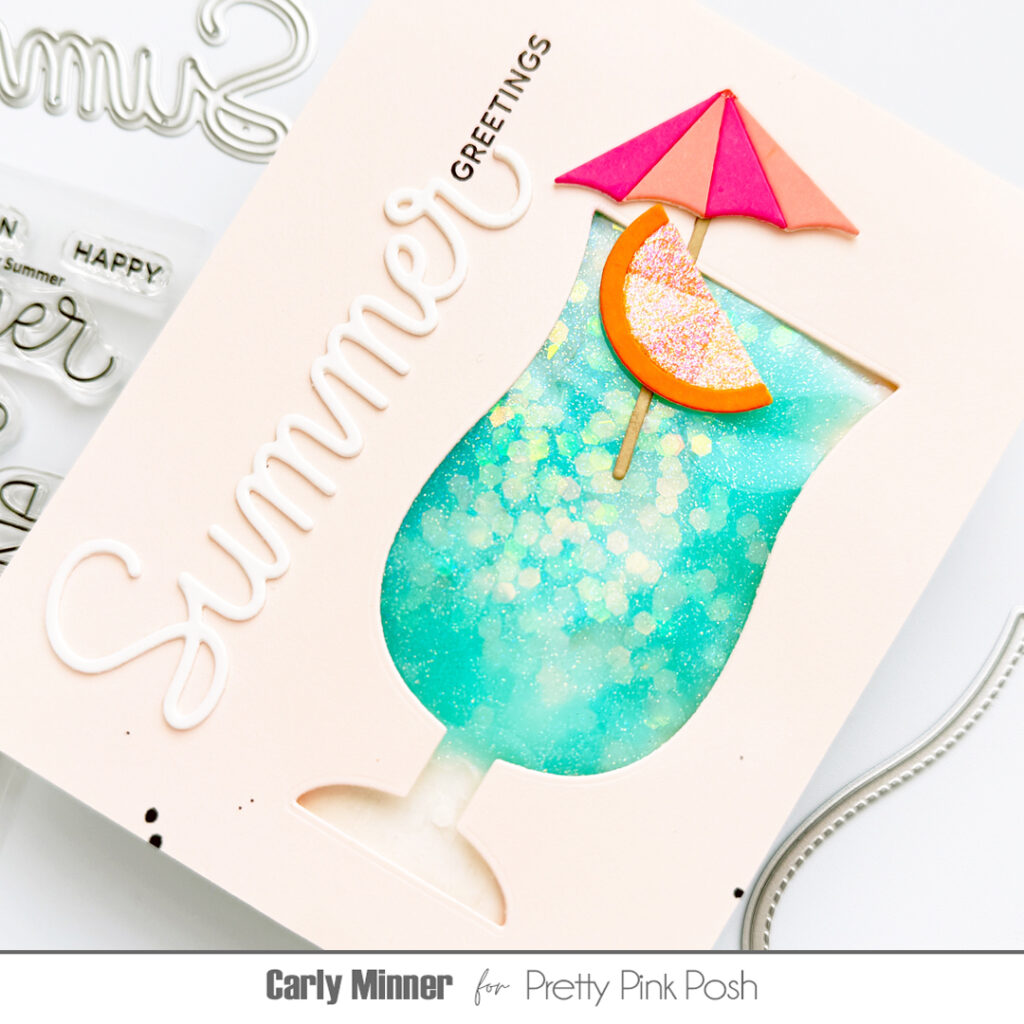
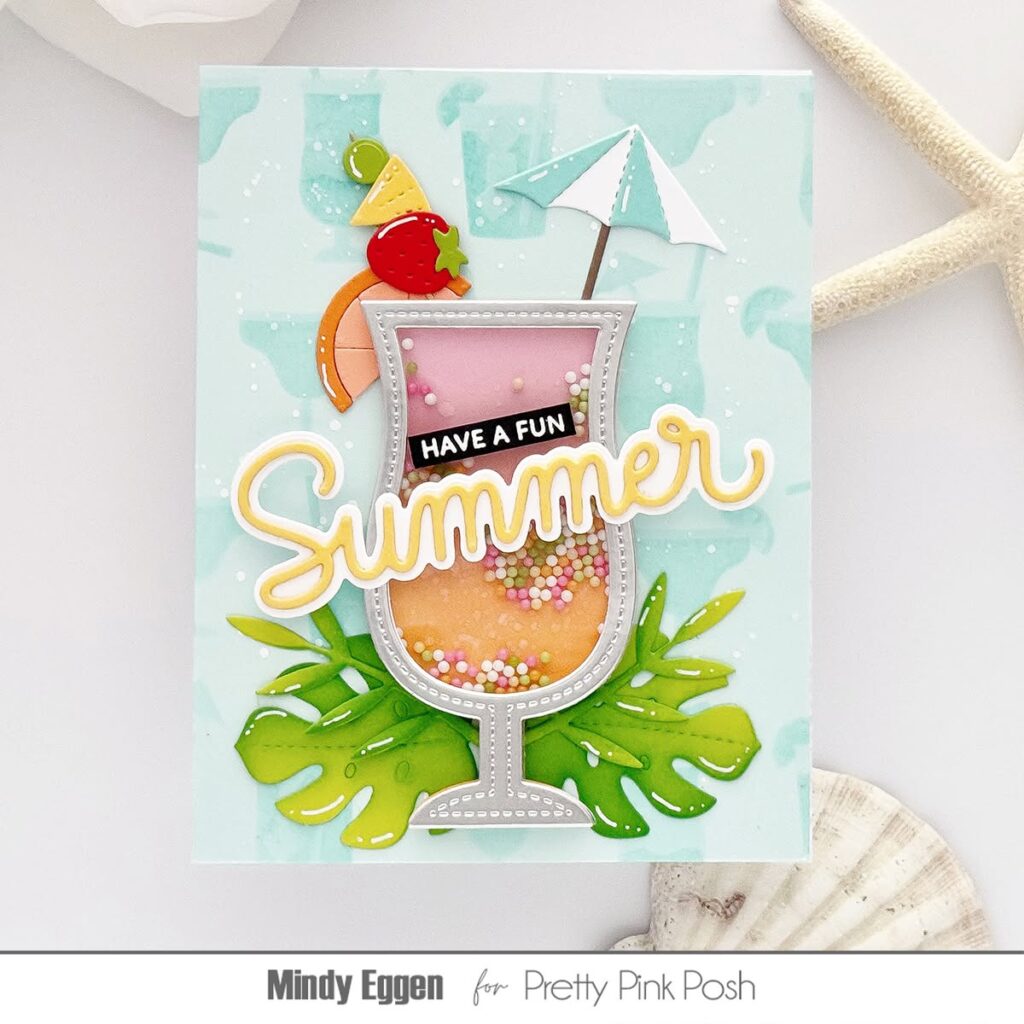
I used the Summer Drink Shaker to create a window and then I made a squishy pocket to fit behind it. It looks like a yummy tropical drink and it’s fun to squish!
I used glitter paste colored with reinker but there are many other mediums you could try, I’ve even heard that hair gel is fabulous! And I used a laminator pouch but scrap plastic or even a sandwich bag would work too.
Thanks for stopping by! I hope you enjoyed today’s tutorial.
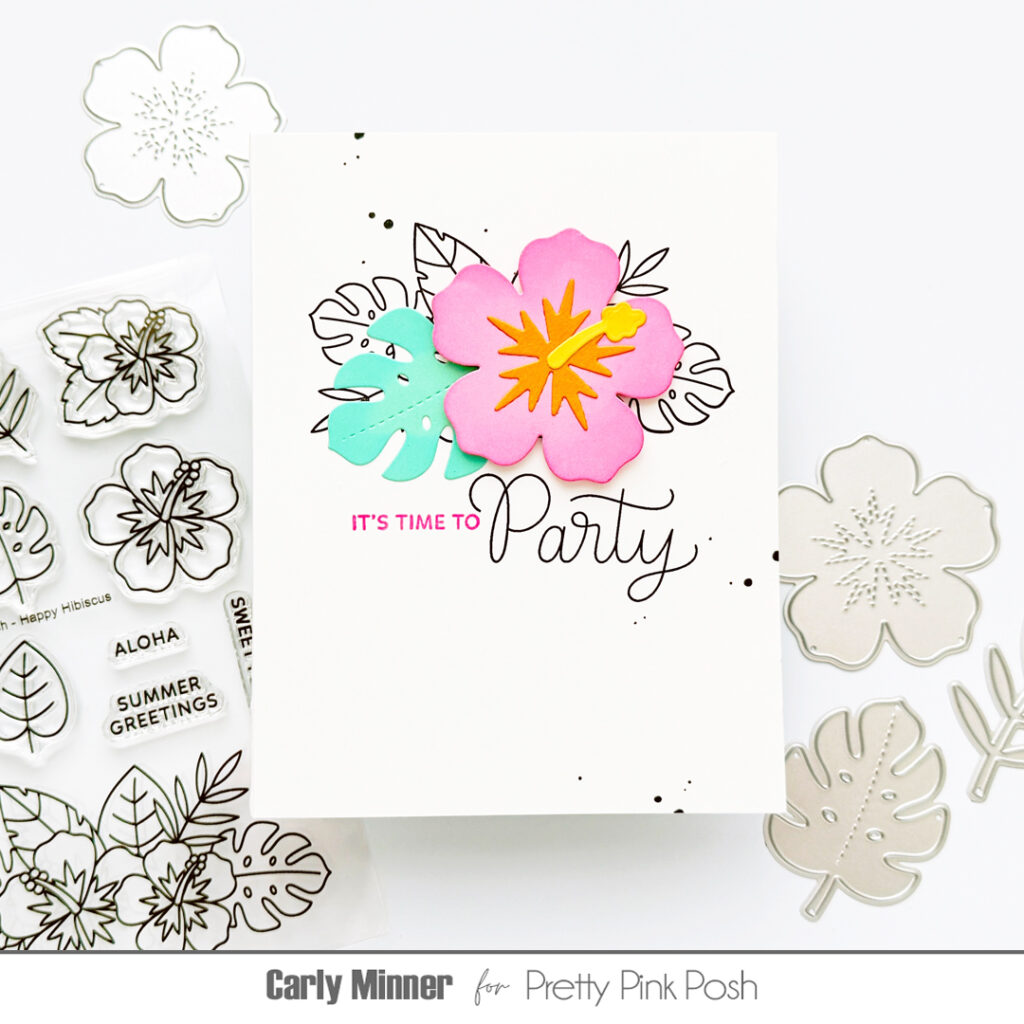
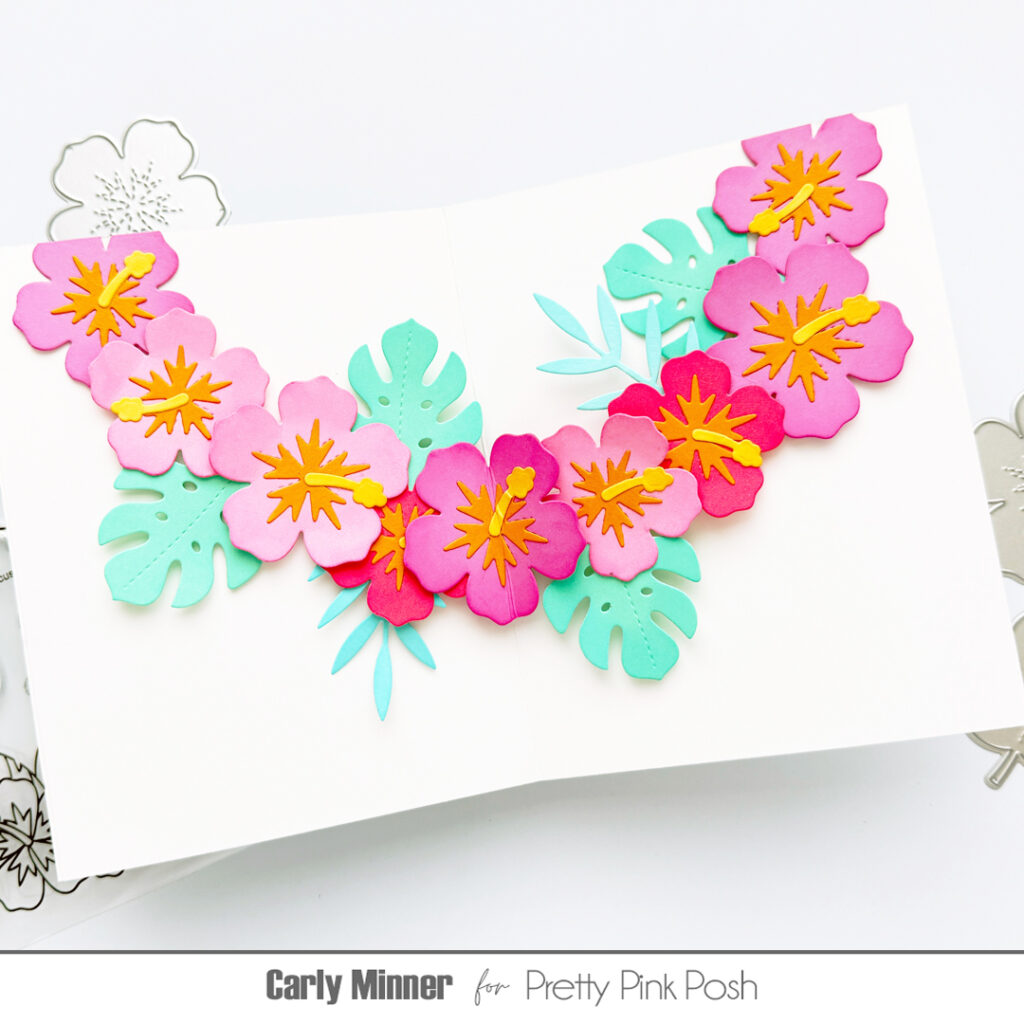
Hi friends, it’s Carly here. Are you looking for an extra special card to make for a birthday, graduation or another celebration? How about a tropical lei card? It opens to reveal a beautiful flower lei inside!
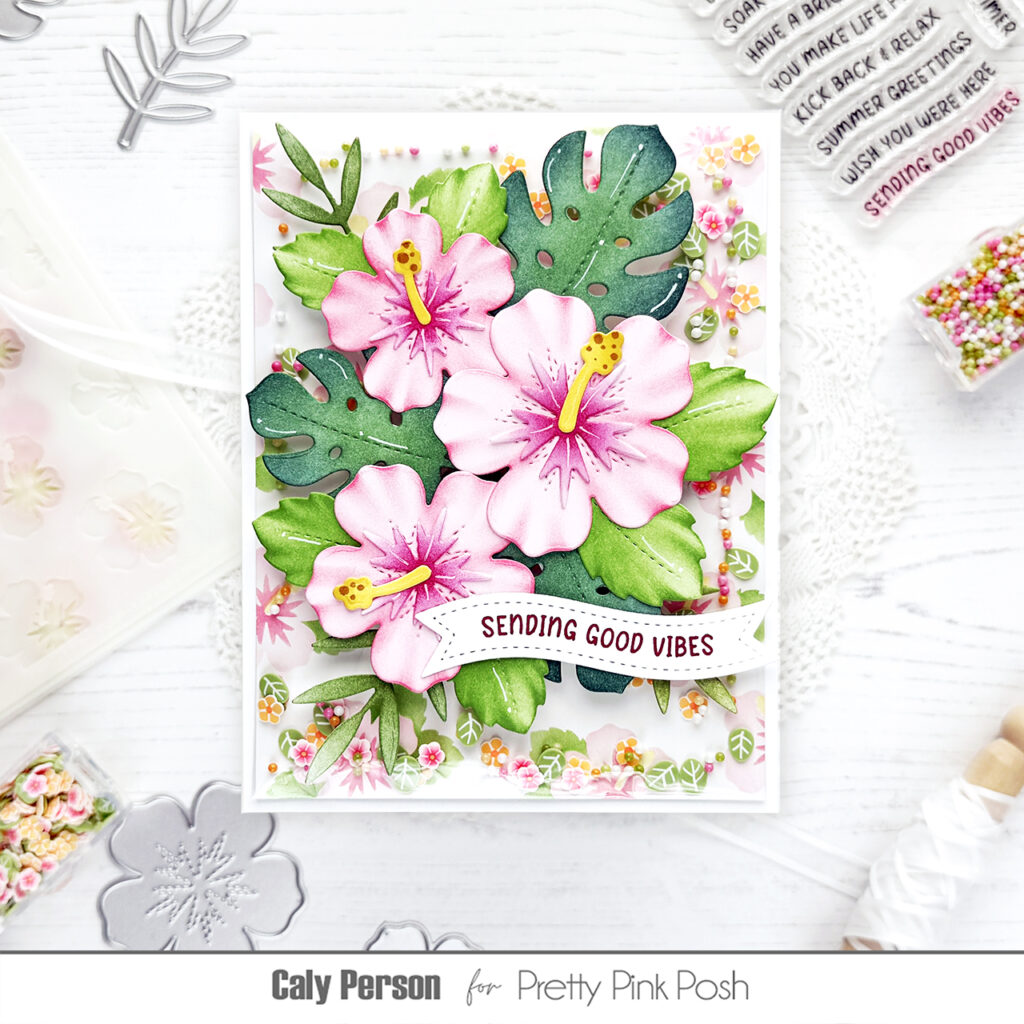
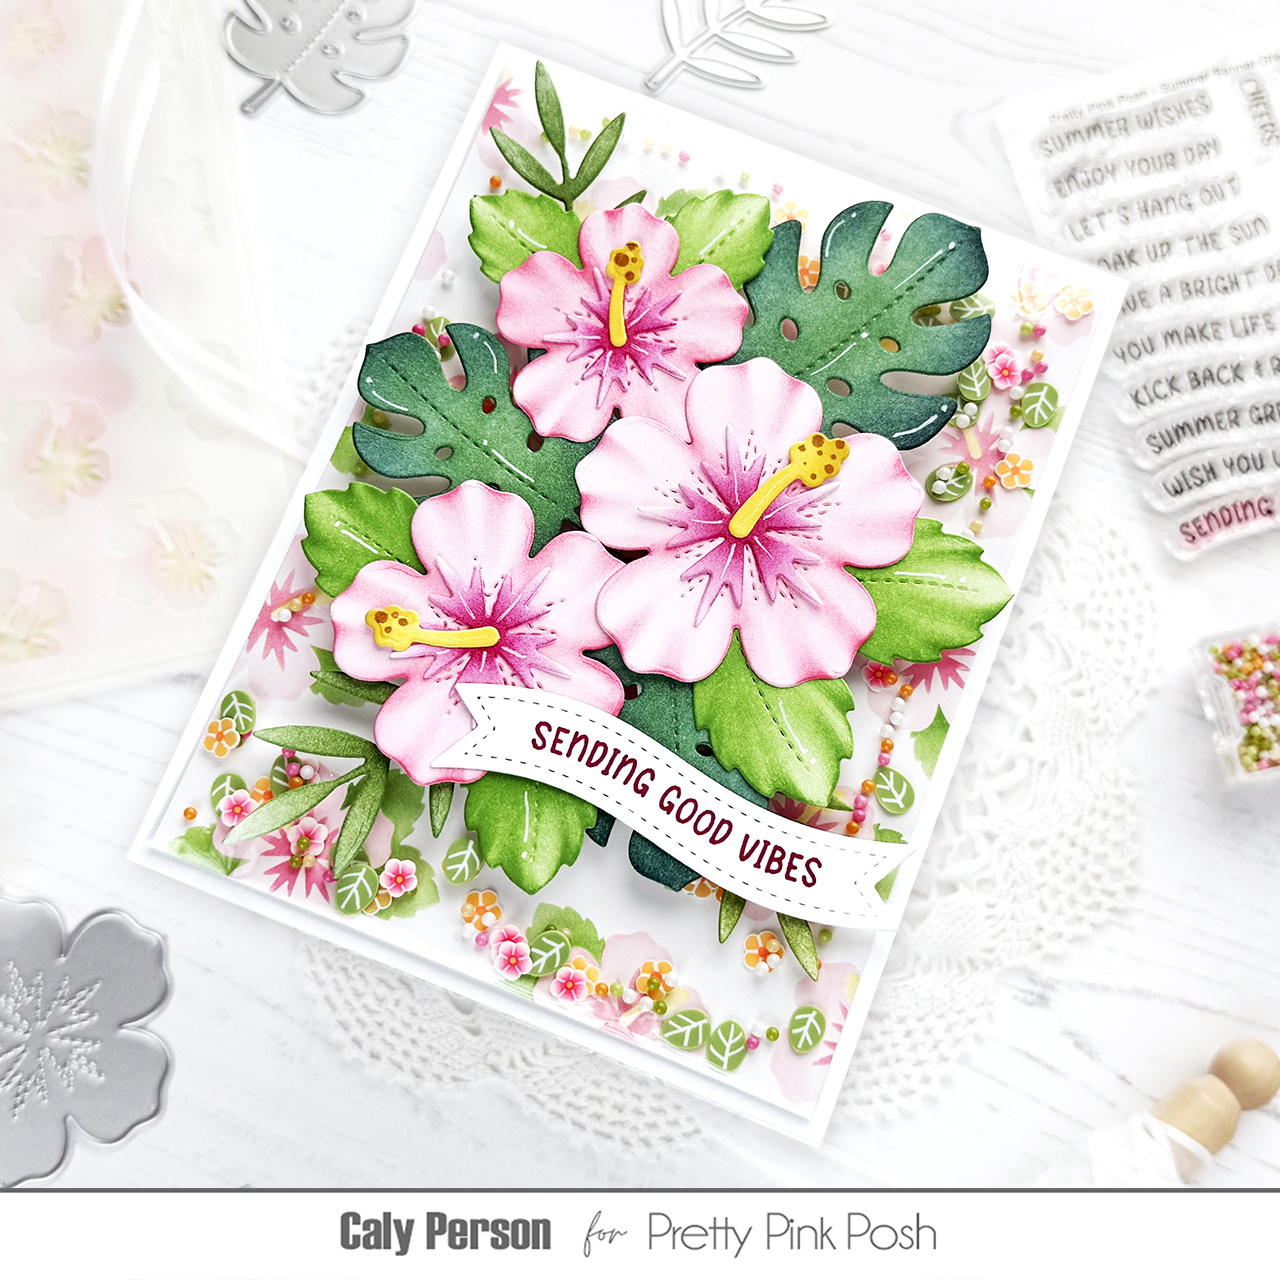
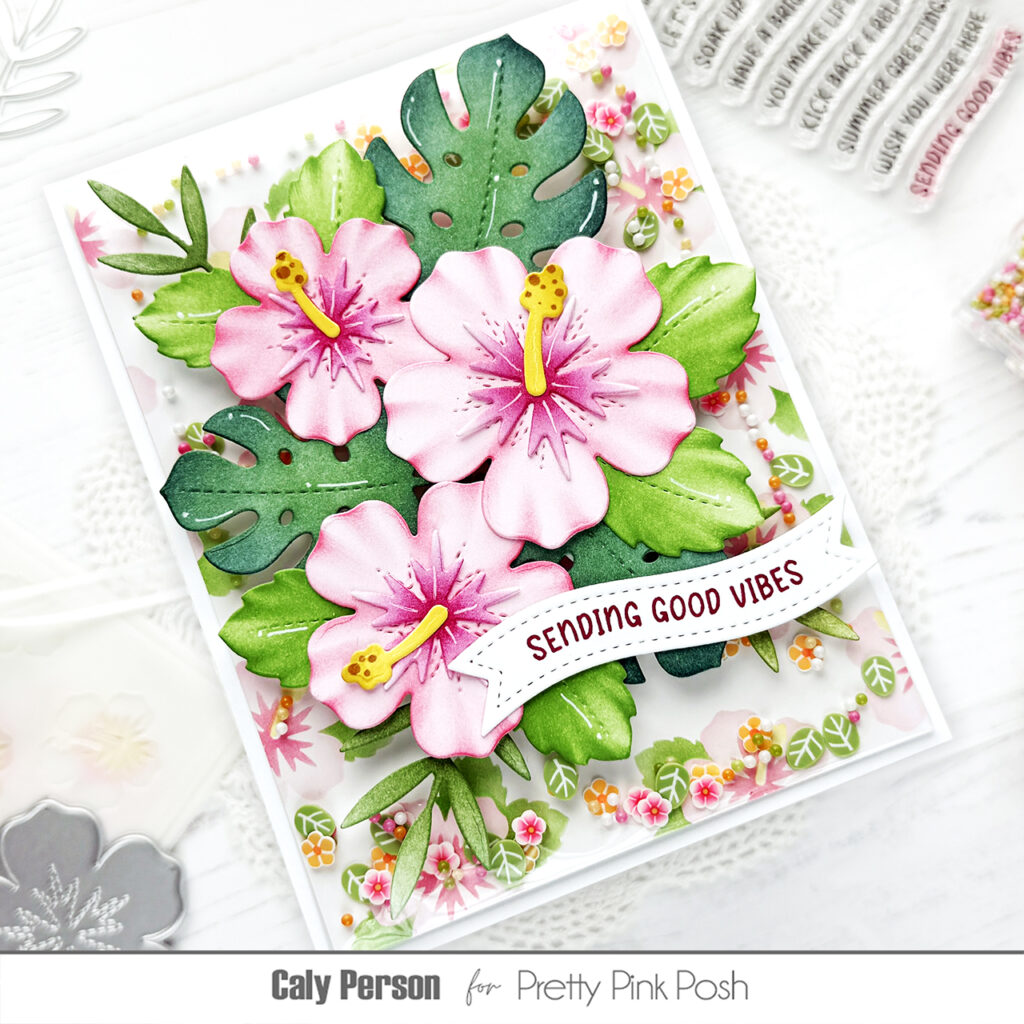
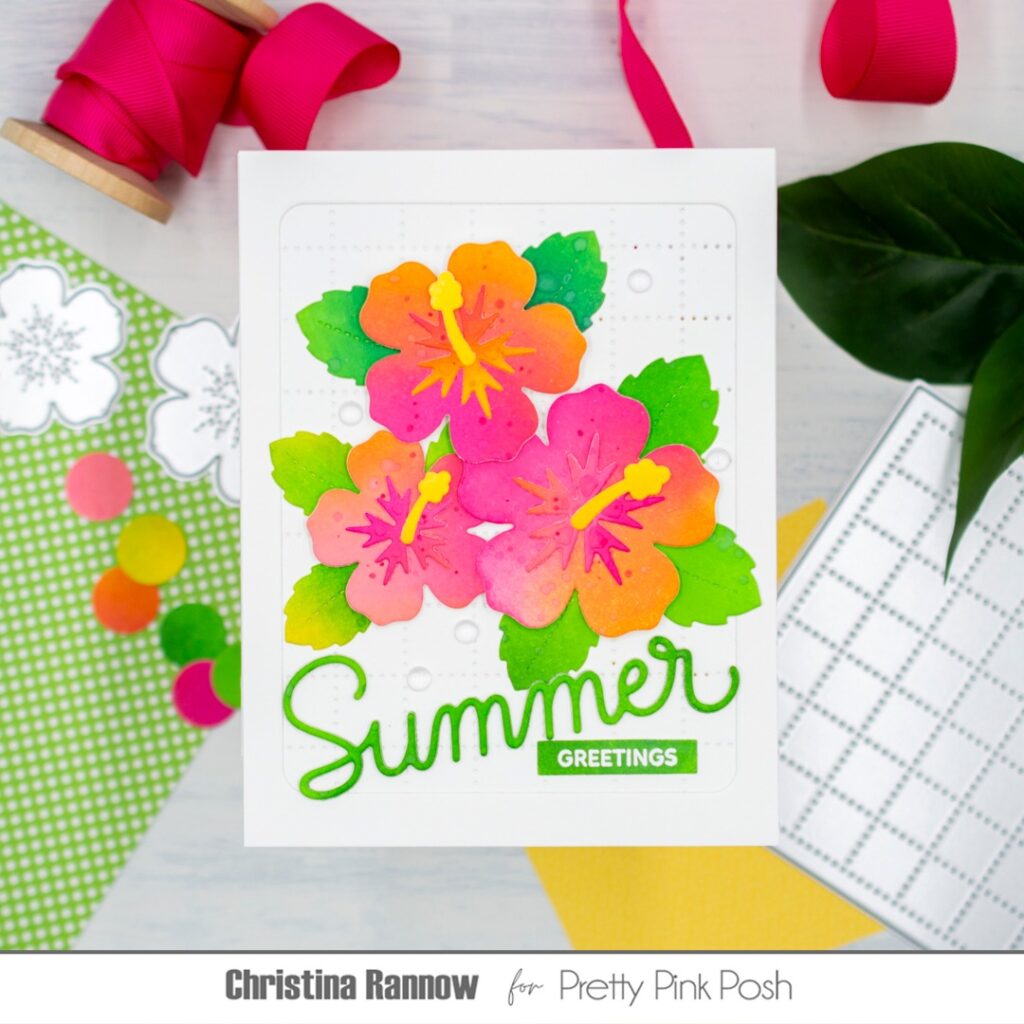
Hello, friends! It’s Caly with you and today’s card celebrates the June 2026 release with Hibiscus! Join us for the video hop, sharing lots of inspiration from this fun release and leave a comment along the way for your chance to win a gift card to shop this release!
To make my infinity shaker, I started with the background. I ink-blended a soft hibiscus background using the Layered Hibiscus Stencils. I knew this layer would be good for the background and chose soft colors intentionally.
When done, I turned this into an infinity shaker using some cellophane from stamp/die packaging. It’s an easy, lightweight option! Be sure to watch my video to see how it’s done if you are interested! I filled the shaker with a mixture of the Summer Blooms Clay Mix and Rainbow Sherbet Glass Shaker Beads.
I die-cut flowers and leaves using the Hibiscus Flowers Dies and the Tropical Leaves Dies and ink-blended them to add color. Using a detailed brush, I added texture to the hibiscus flowers and leaves.
Hi friends! The June 2026 Release is now available in the Pretty Pink Posh Shop and select retailers that carry our products. If you missed our post yesterday, we revealed all of the products in picture form, but if you would like to see them in a video, Mindy has that for you today!
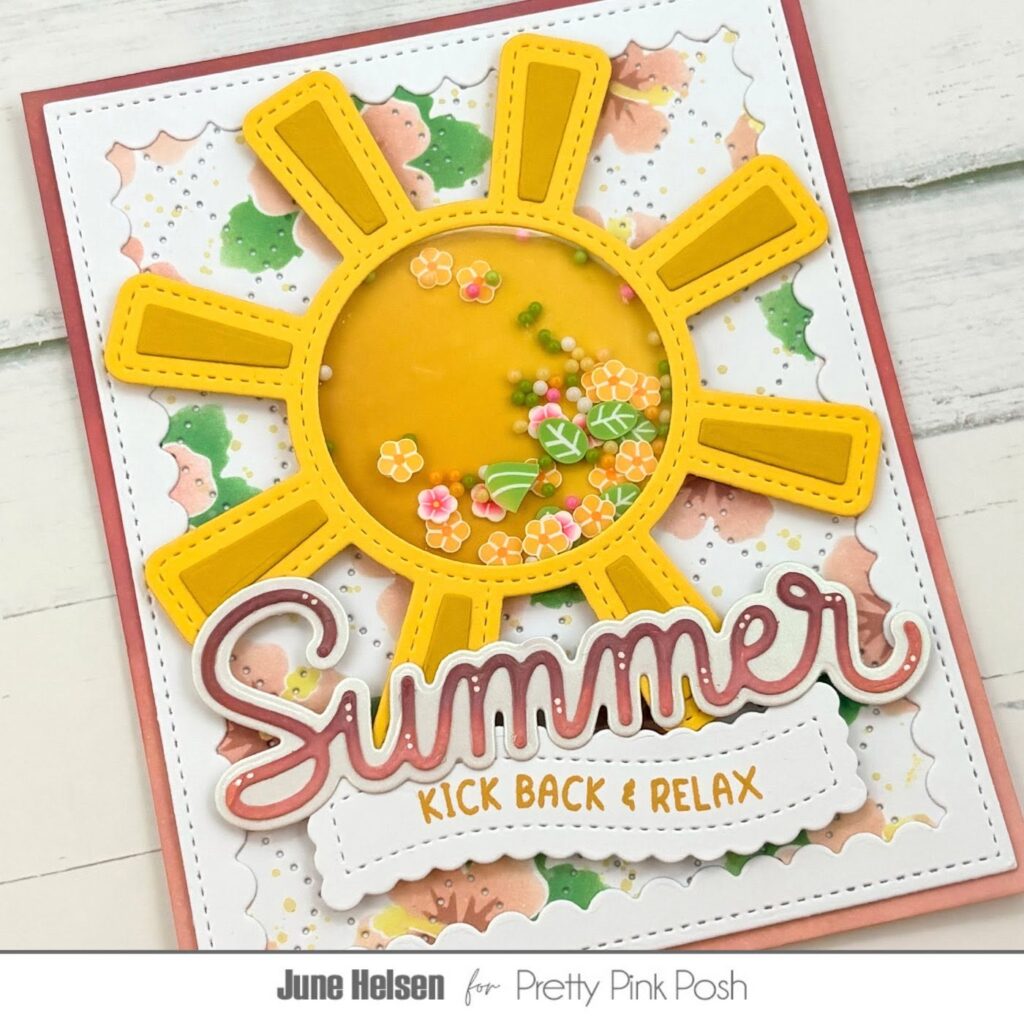
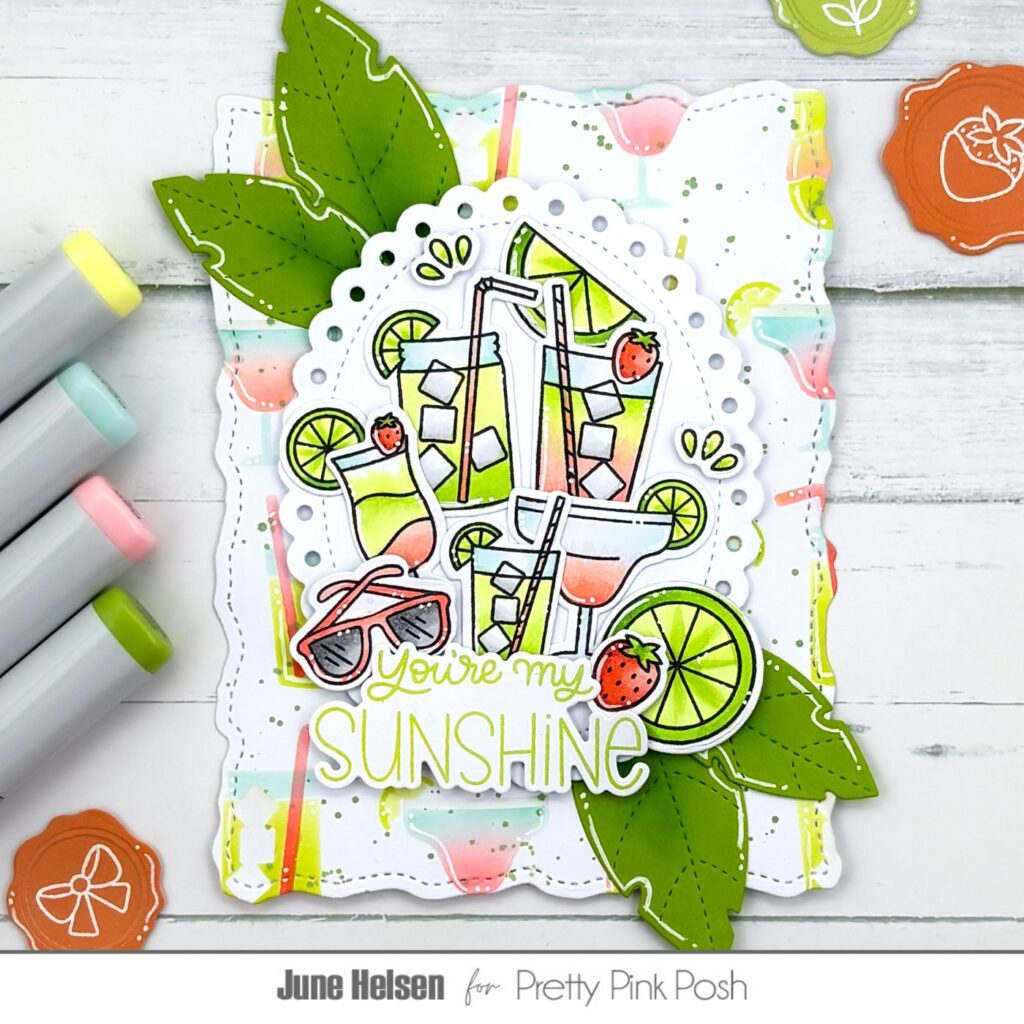
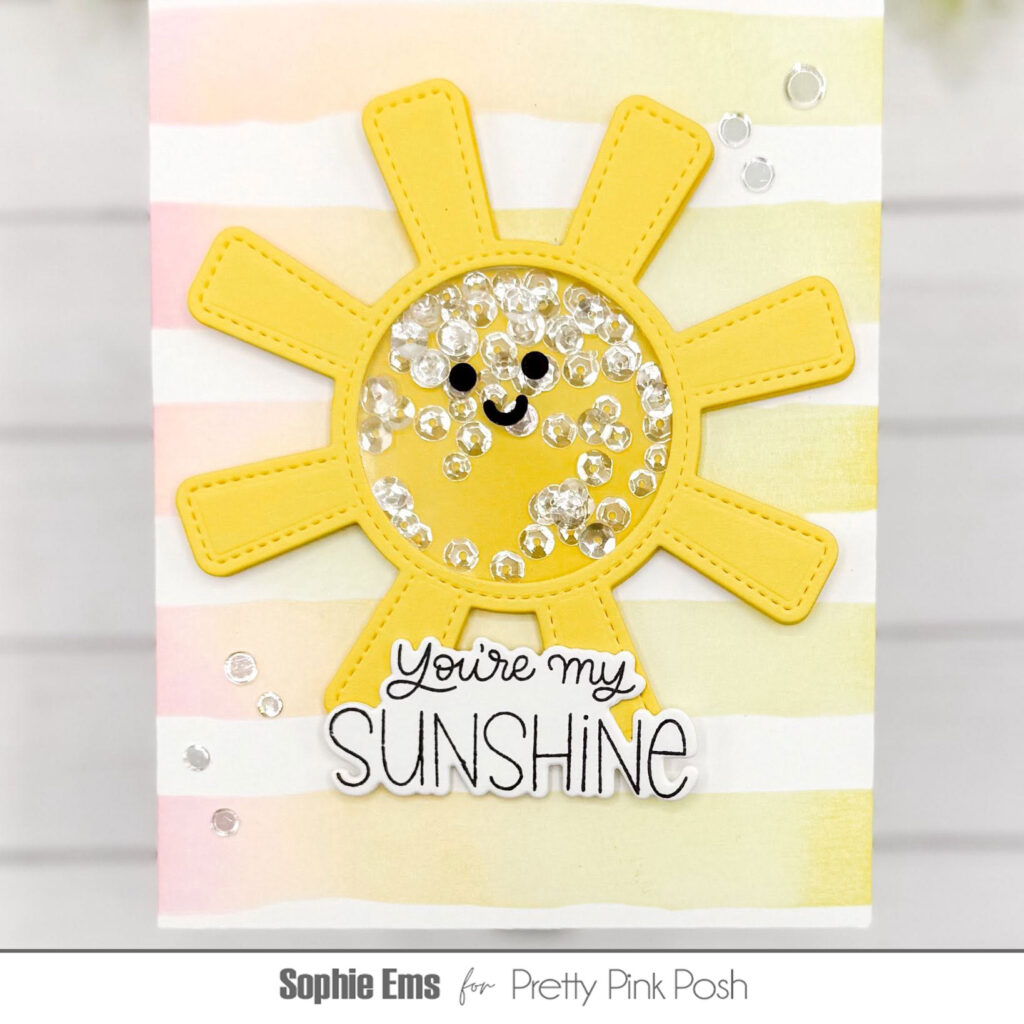
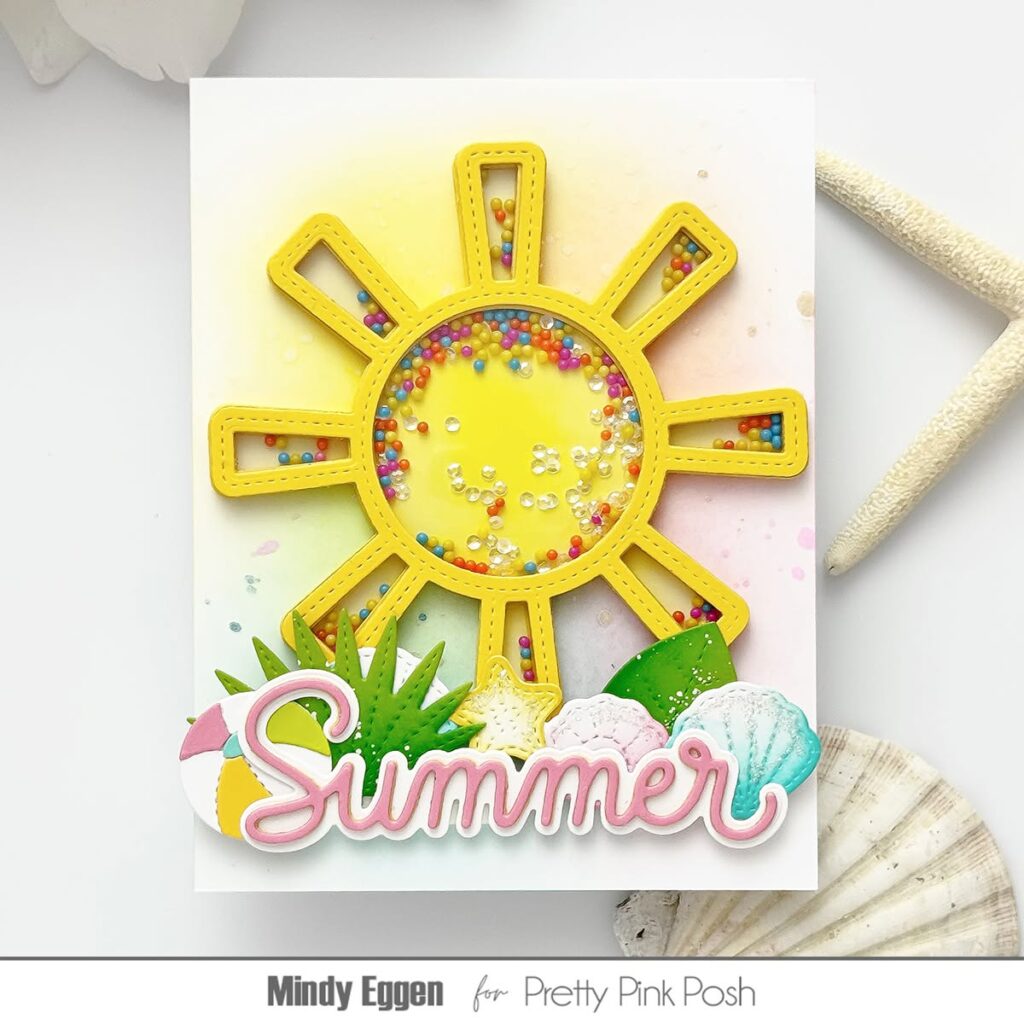
Hello crafty friends, June here! Today I’m sharing my favourite card I made using supplies from the new June release. The Sun Shaker was a die that instantly stood out to me, so I had to create a card where it was the main focus! Let’s get started!
I cut the Sun Shaker from yellow cardstock and did some light ink blending on just the back piece of the shaker. I only used the middle shaker inlay piece, but also cut the ones that are supposed to make the rays part of the shaker from a darker shade of yellow cardstock so I could add a bit of detail to the sun. I filled the sun with the Summer Blooms Mix and the Rainbow Sherbet Shaker Beads, because it’s gonna be a great match for the floral background I have planned.
I stencilled a background with the new Layered Hibiscus stencils and Distress Oxides. I used Victorian Velvet, Aged Mahogany, Scattered Straw and Rustic Wilderness. I also used the Victorian Velvet to splatter around my flowers to fill the white space. Once dry, I ran my background through my die cutting machine using the Argyle Pierced Plate. I love the combination of this with the floral print, it looks exactly like a vintage quilted plaid I used to own. To keep up with that theme, I cut a Scallop Frame cause I thought it would add to the vintage look. I matted the background onto a panel that I blended a gradient on using the same Victorian Velvet and Aged Mahogany.
For the sentiment, I cut the new Large Summer Shadow from white cardstock and carefully did the same blend on it. I backed it using the shadow piece cut from iridescent cardstock. It’s not visible in my photos, but it matches perfectly with the pink and green color scheme when the light hits it just right. I also added a banner from Banner Greetings 2 and stamped one of the new Summer Banner Greetings on it using a dark yellow ink to match the sun.
This new release is SO getting me into a summer mood! How about you? The weather was so warm a while ago and it completely turned around, so I can use all the summer vibes I can get! I hope to see you again soon, bye!
Hello and welcome to the last day of sneak peeks for the June 15th release. This collection features refreshing summer cocktails, vibrant hibiscus blooms, fun shaker dies, fabulous flamingos, and much more. This release includes four stamp sets, three coordinating dies, eleven standalone dies, five stencils, and four embellishments.
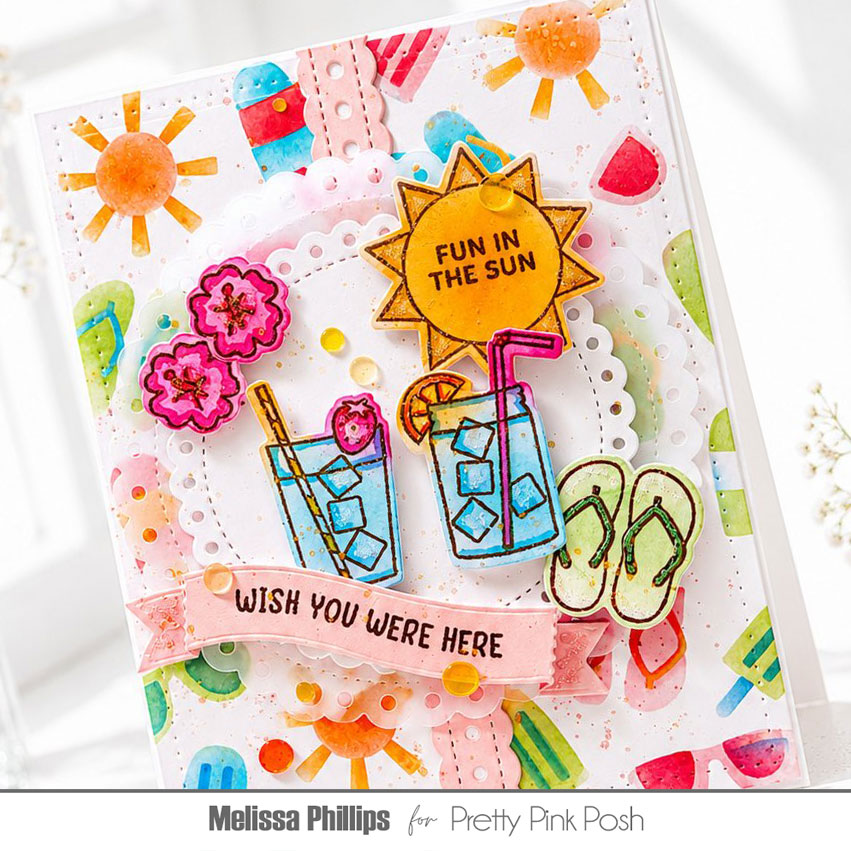
Hey, Sunshine! Melissa here with you today and I’m lucky enough to be sharing a couple of cards created with the new Pretty Pink Posh June Release stamps and stencils. Let’s jump right in and make a splash!
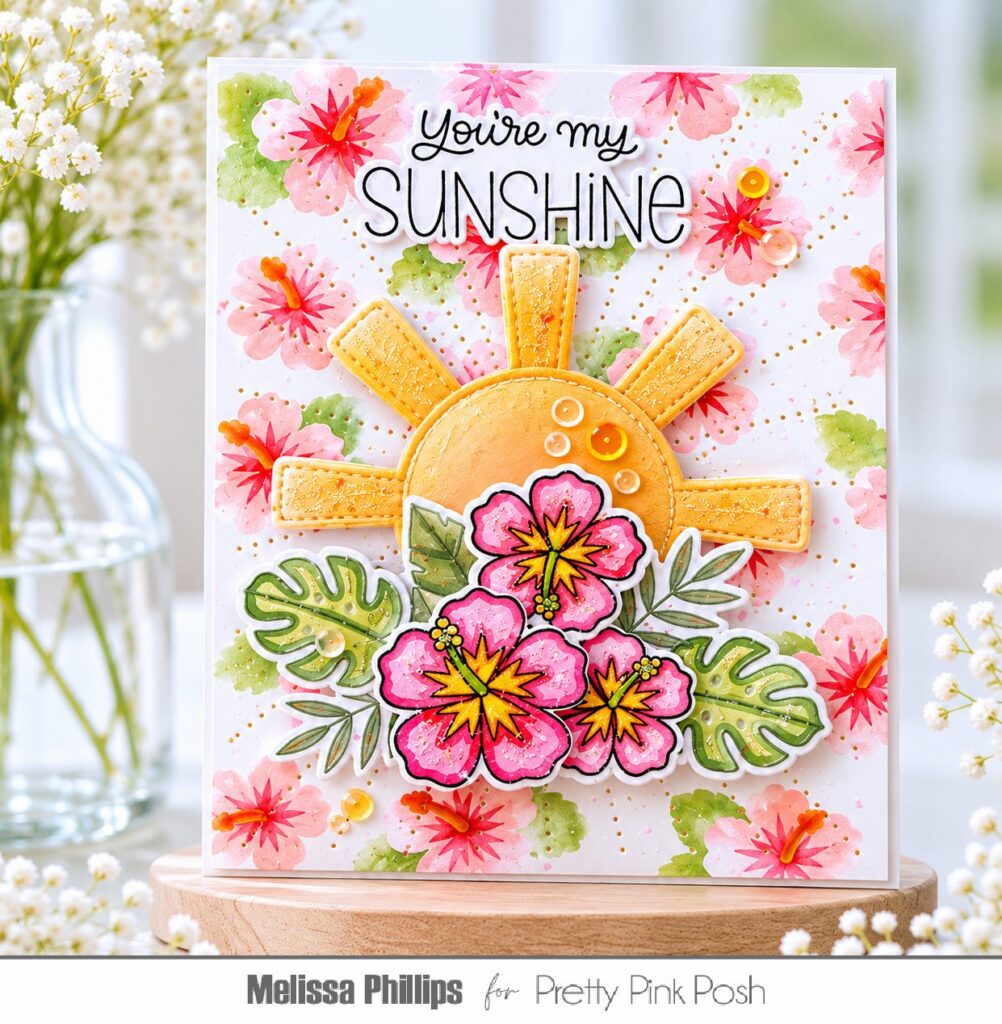
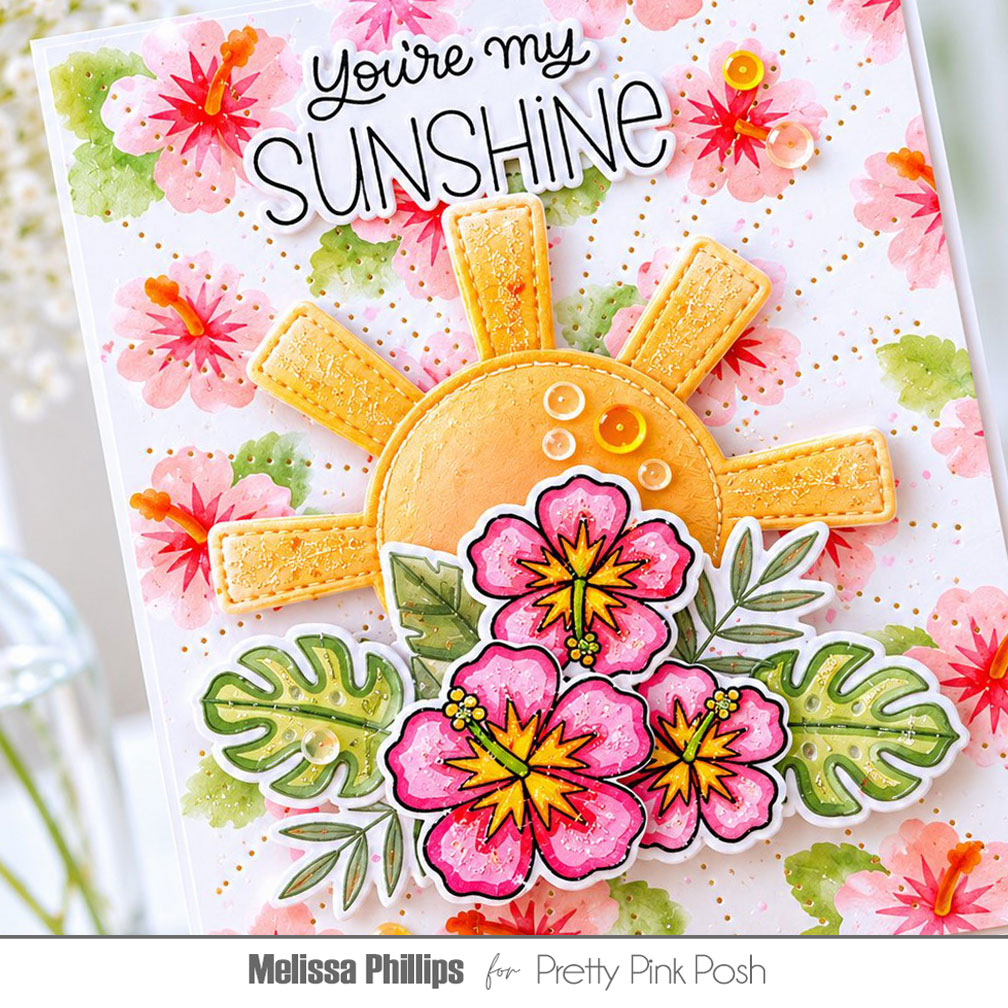
My first card uses the new Layered Hibiscus stencils to create my background, using bright and playful colors to set the tone of the card. These sweet tropical flowers make me smile and will be sure to brighten your day! After creating my background, I used the new Sunburst Pierced Plate to bring in the texture and accentuate the theme of my card.
I then cut white cardstock using the Sun Shaker die and added yellows and a bit of rusty orange to create an ink-blended sunshine. I added this to the center of my card using foam adhesive to allow it to pop off the background.
Next, I die cut and stamped my flowers using images from the Happy Hibiscus stamp set with coordinating dies. I colored them using my Copic Markers and added then beneath my sunshine, once again using foam adhesive. To finish, I die cut and stamped my cheerful sentiment using the Happy Summer stamp set and coordinating dies. What a happy card to create!
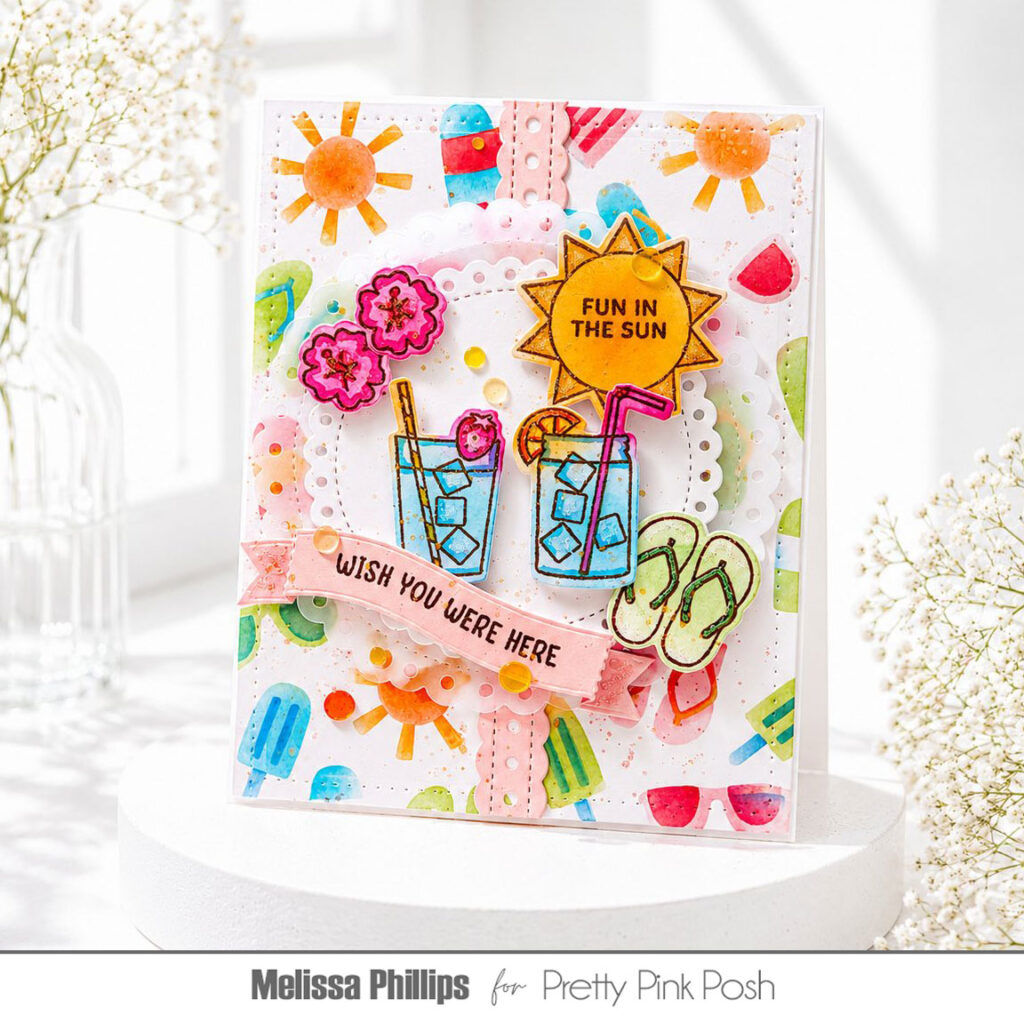
I had such fun creating my second card for you. I began by using the new and oh, so adorable, Layered Summer Fun stencils. Sunglasses, flip flops, sunshine and more, create the cutest background for your summertime cards.
I then used vellum, white cardstock, and theEyelet Circles dies to create a layered base for my focal points. I used the Summer Sips stamp set and coordinating dies to bring in some fresh, summer drinks, sunshine, and hibiscus. I used a fun technique on my stamped images by adding color through ink blending. I added just a touch of shading using my Copic Markers.
After I adhered my stamped images, I used the new Summer Banner Greetings stamp set and the Banner Greetings 2 diesto create my sentiment. Adhering it on a diagonal was a fun and unexpected twist that balances out my card.
Ready to see some wonderful samples from the team using these products? It’s so fun to see how we can use the same products in such a variety of ways!
It’s been such a treat to create for you today. Happy crafting with these new supplies…you’ll love every minute. Join us tomorrow as we reveal all the new products!
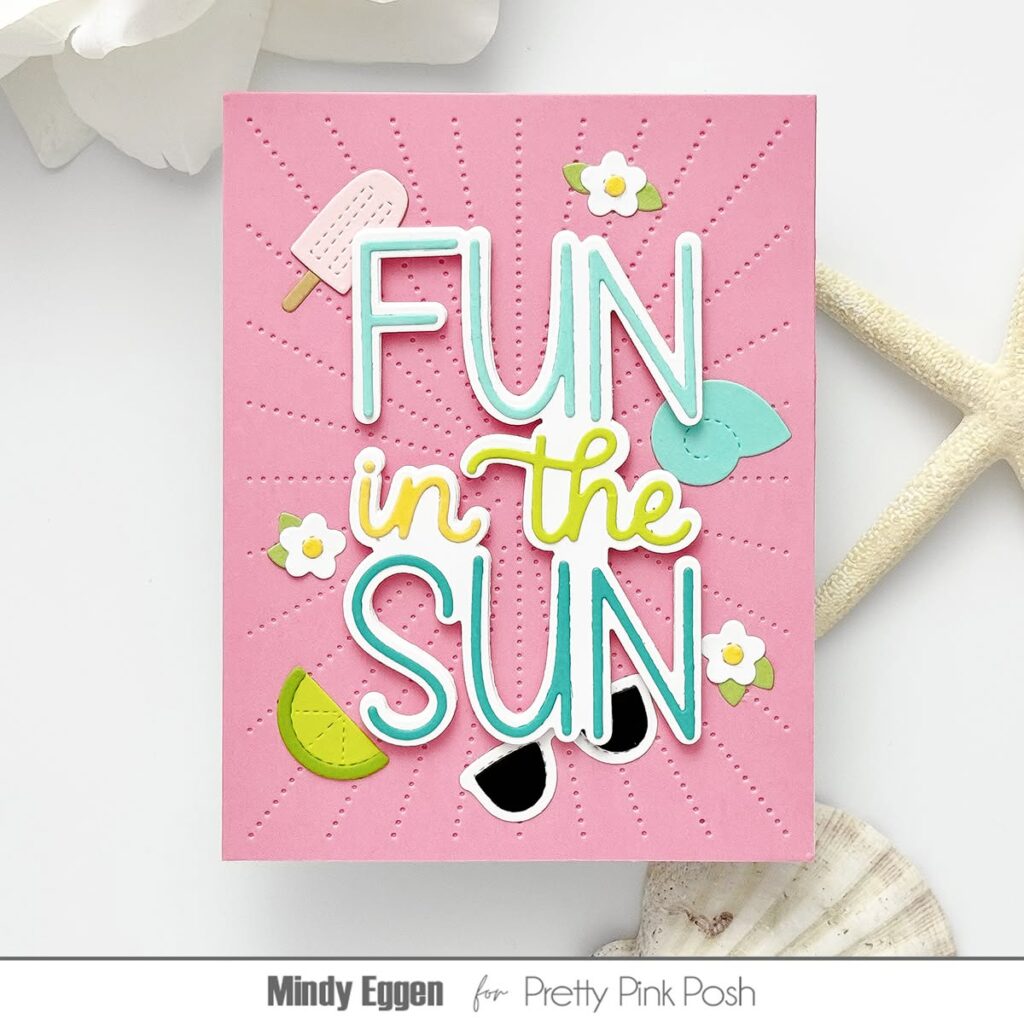
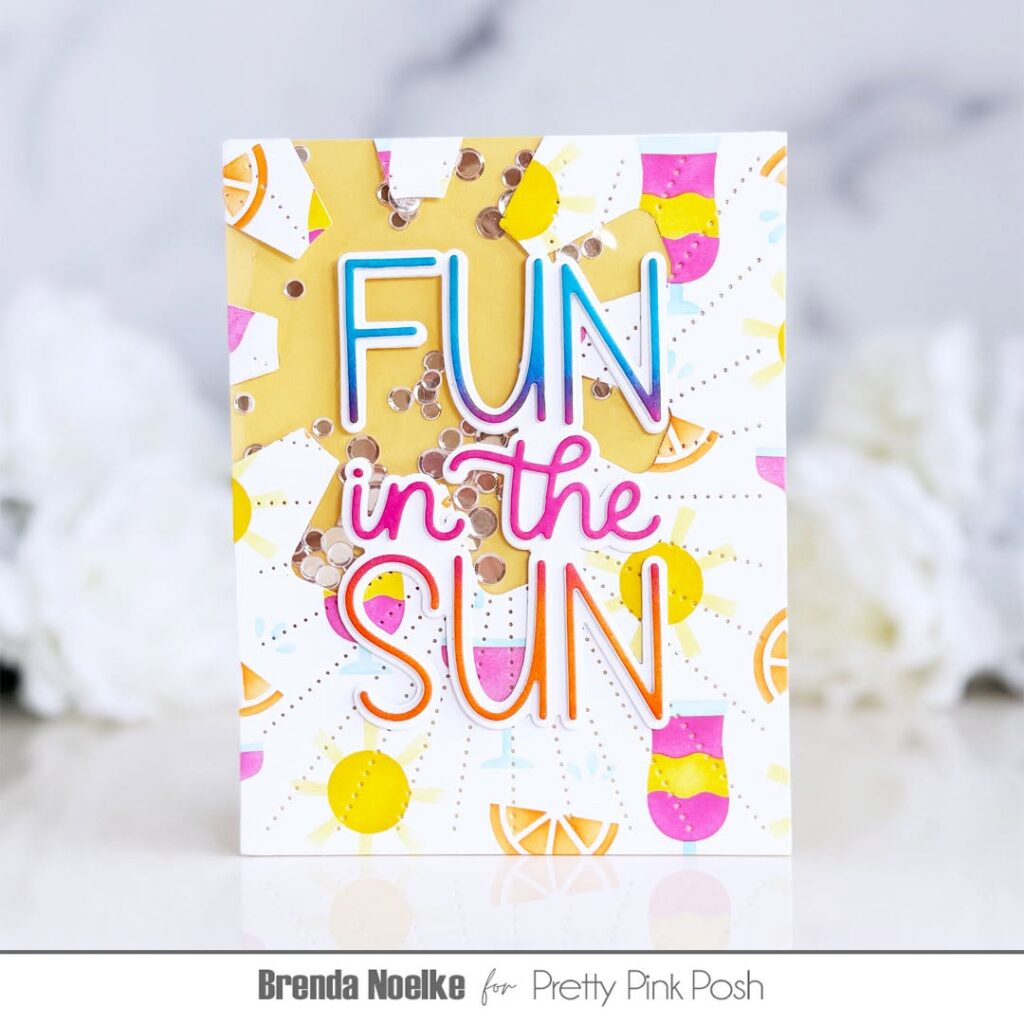
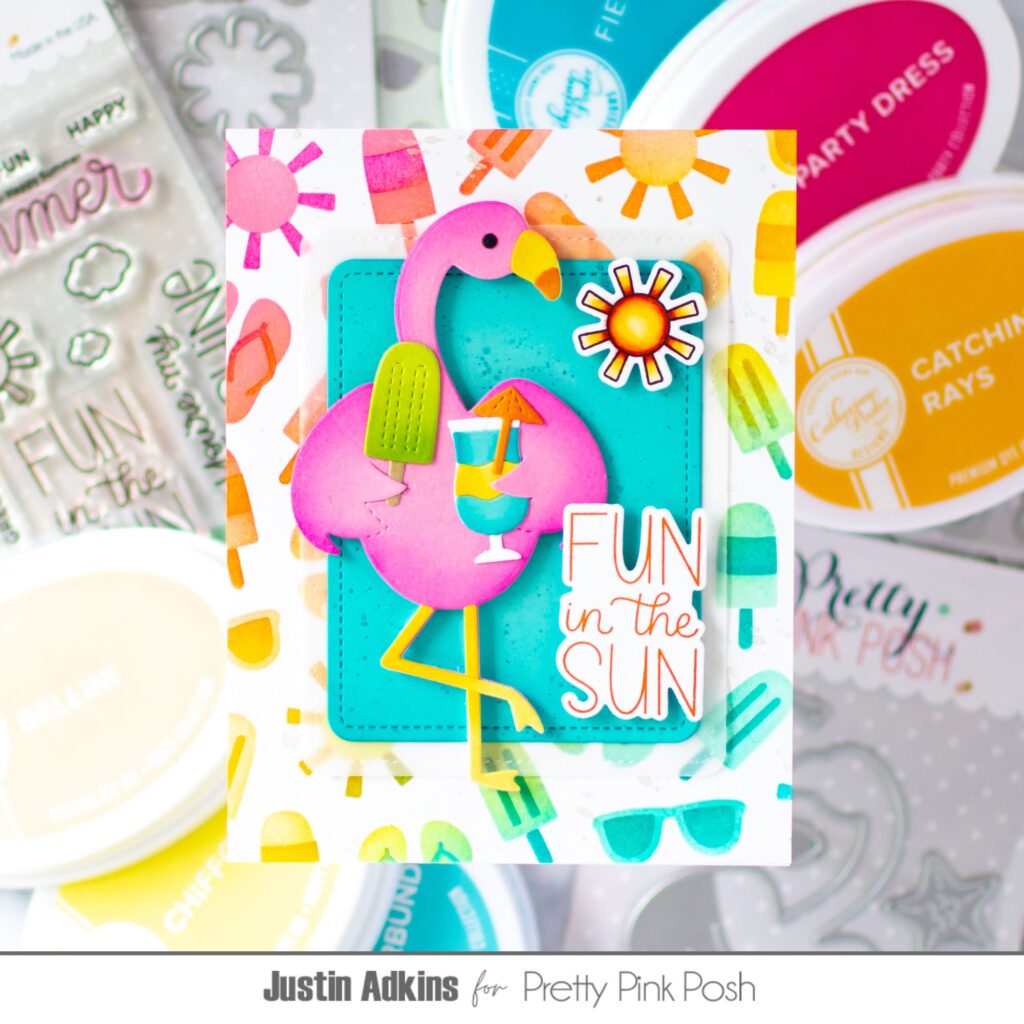
It’s Day 3 of sneak peeks for the June 15th release and today we’ll be taking a look at four of the new standalone die sets: Fun in the Sun Shadow, Sun Shaker, Summer Bucket Additions, and Sunburst Pierced Plate.
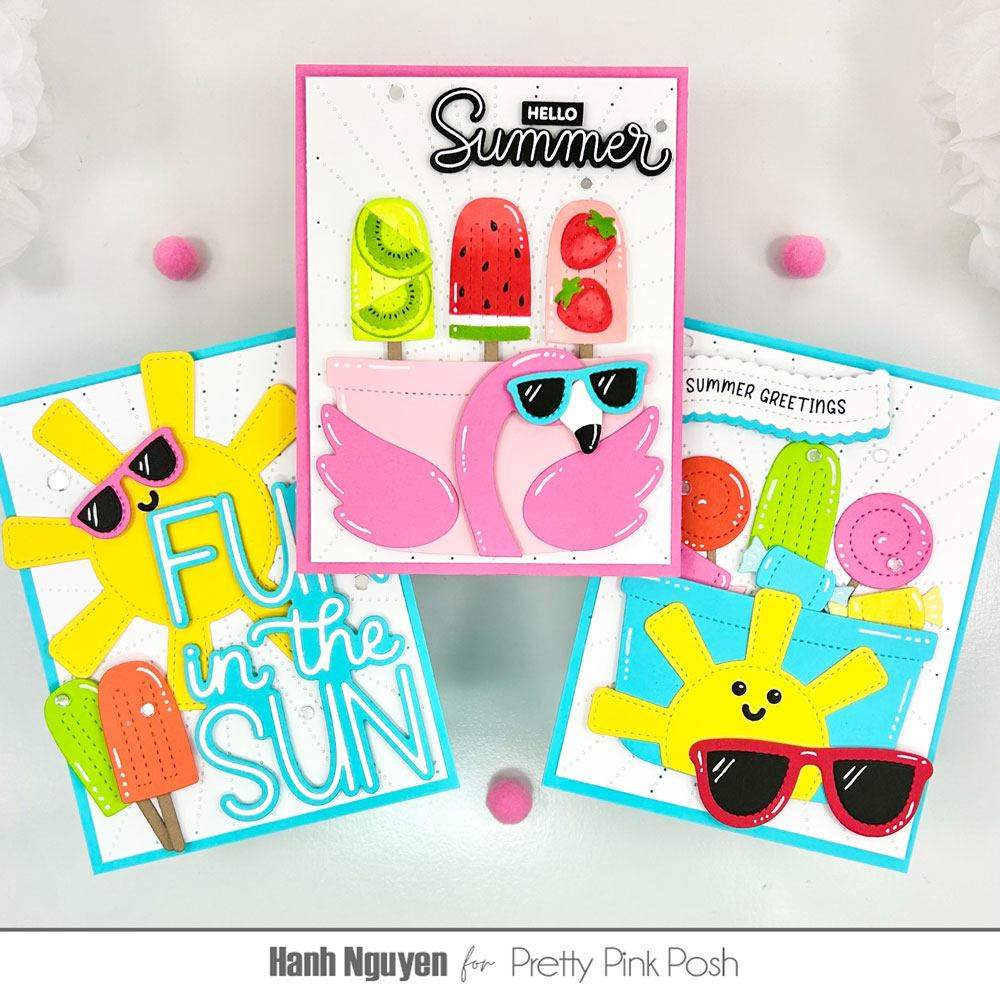
Hello Crafty Friends! It is Hanh here with you today and I am thrilled to show you a little sneak peek of the upcoming June Release. This awesome release is packed with everything happy and fun about summer. I had so much fun with this release and have three cards to share with you today showcasing the soon-to-be-released Fun in the Sun Shadow Dies, Sun Shaker Dies, Summer Bucket Additions Dies and the Sunburst Pierced Plate. So let’s get started.
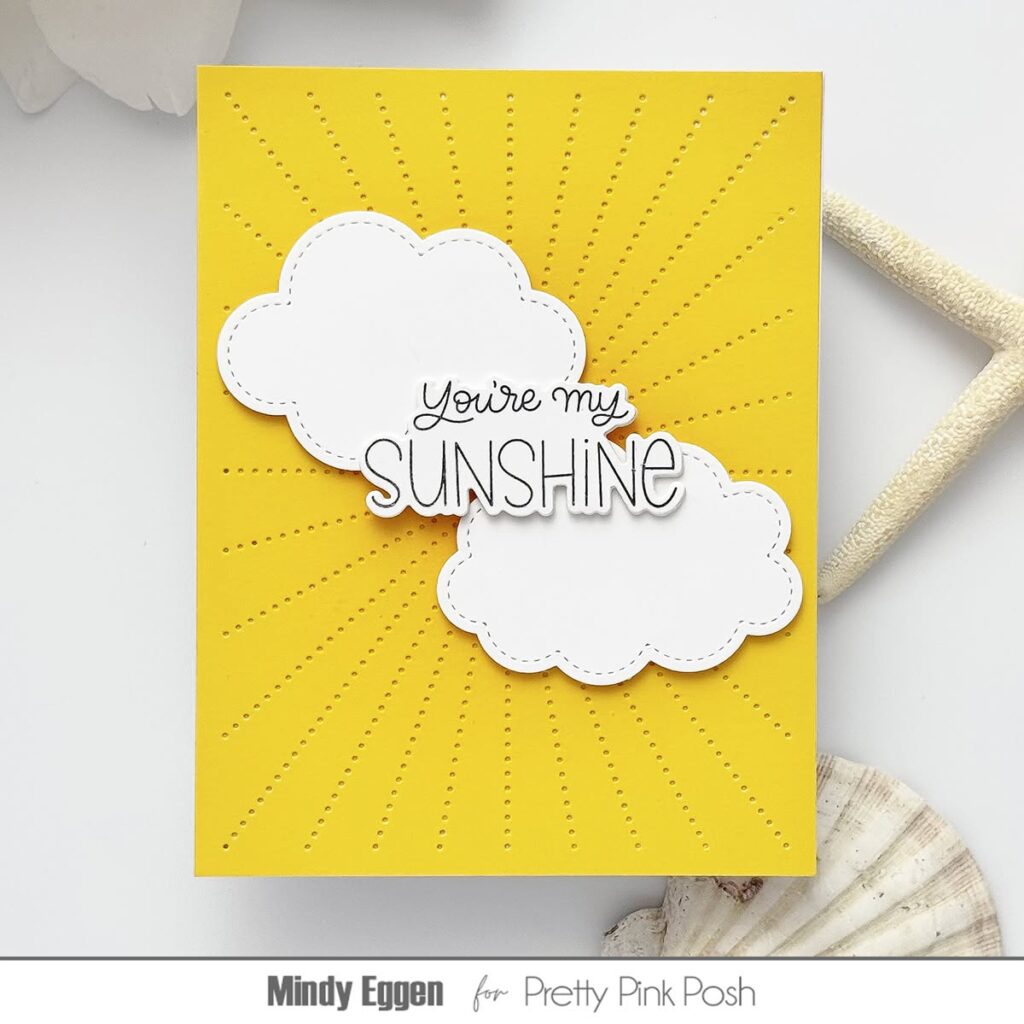
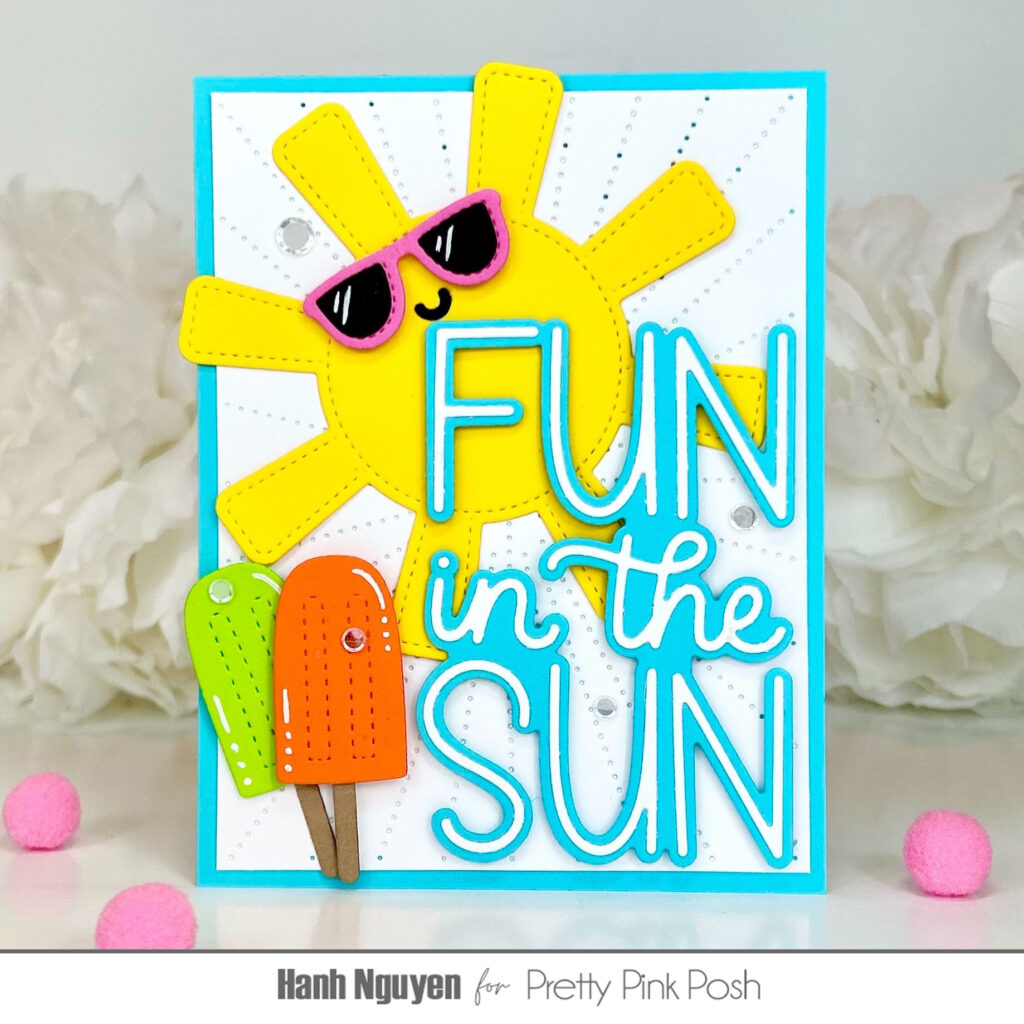
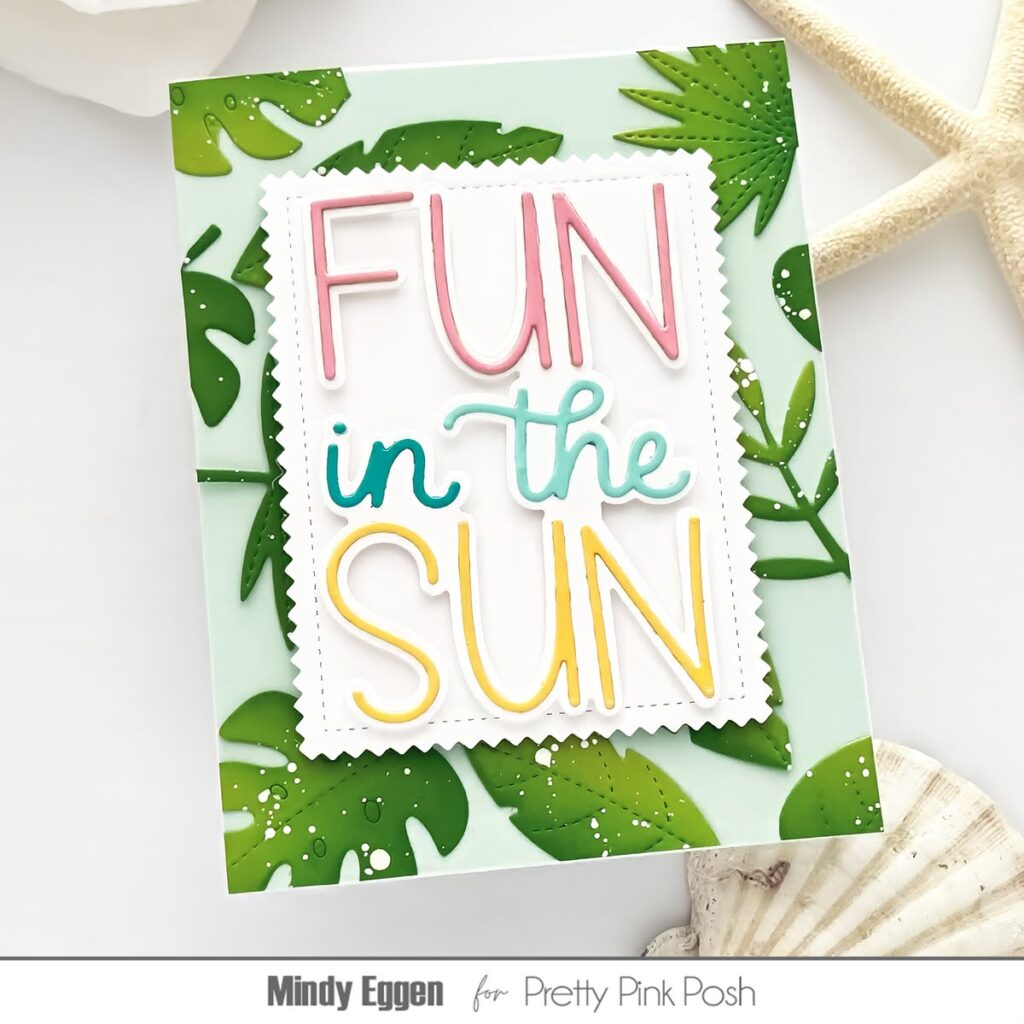
Fun in the Sun! My first card features the Sun Shaker Dies, Fun in the Sun Shadow Dies and the Sunburst Pierced Plate with the help of the Summer Bucket Additions Dies and Summer Holder Additions Dies.
I started with Sunburst Pierced Plate to create a subtle texture on my white cardstock background. I trimmed the edge off and matted the panel with a piece of teal cardstock.
Next, I diecut with the Sun Shaker Dies for the adorable sun, the Summer Holder Additions Dies for the little sunglasses, the Summer Bucket Additions Dies for the popsicles and colored cardstock. I assembled the pieces and highlighted with a white gel pen. The sun and popsicles were adhered to the panel. Some were popped up with foam tape for a bit of interest.
I used the Fun in the Sun Shadow Dies to diecut the sentiment out of teal and white carsdstock. I love this fun combo of the two fonts. This beautiful die can easily hold its own and be the center of attention on an A2 card. I adhered to sentiment and shadow to each other with liquid glue and then to the card front with foam tape. I finished the card with a fewSparkling Clear Confetti Mix.
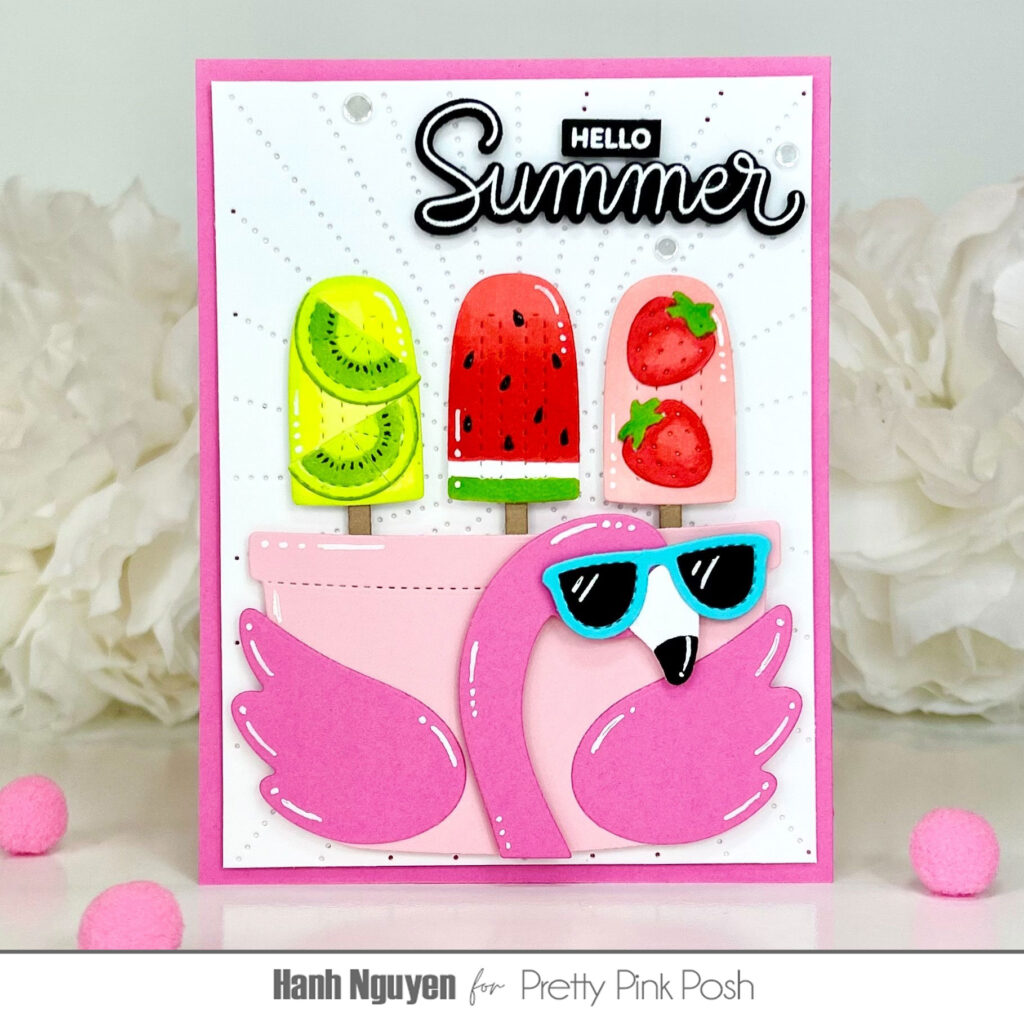
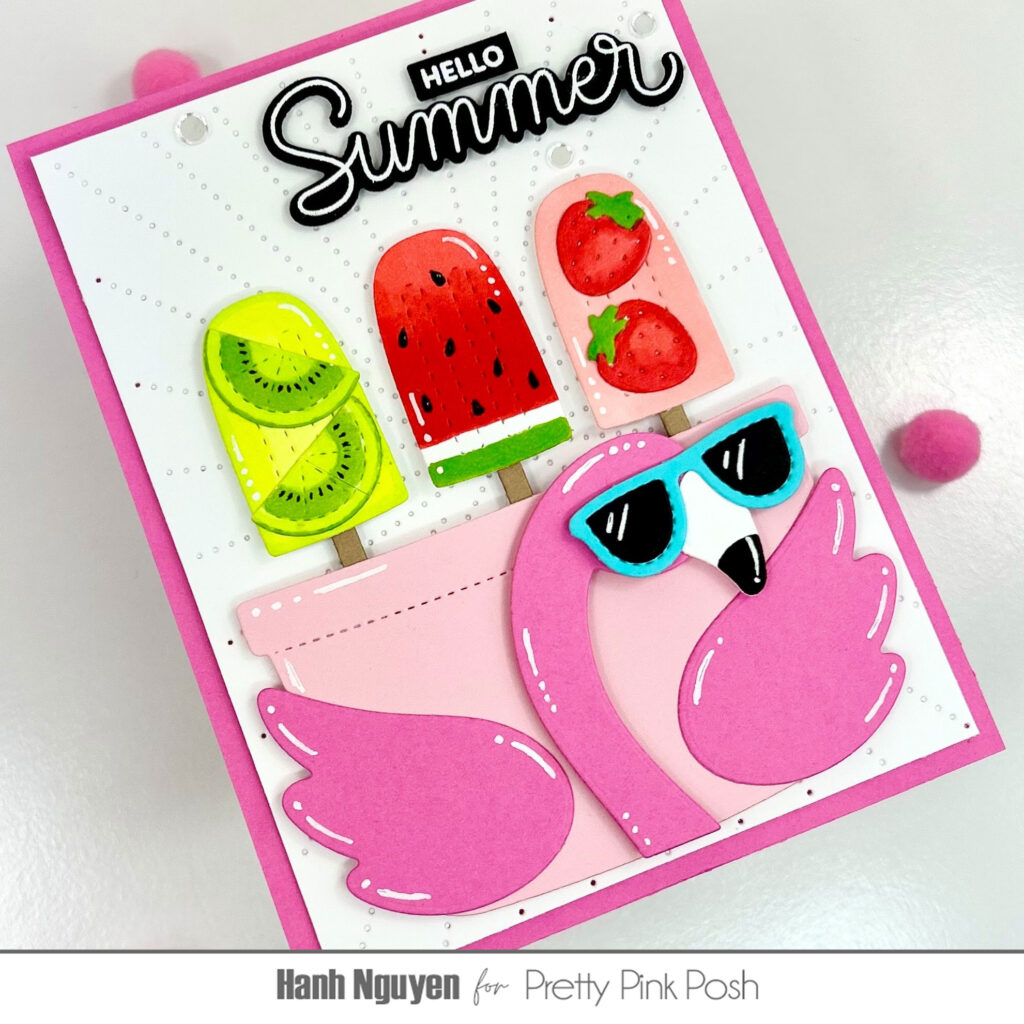
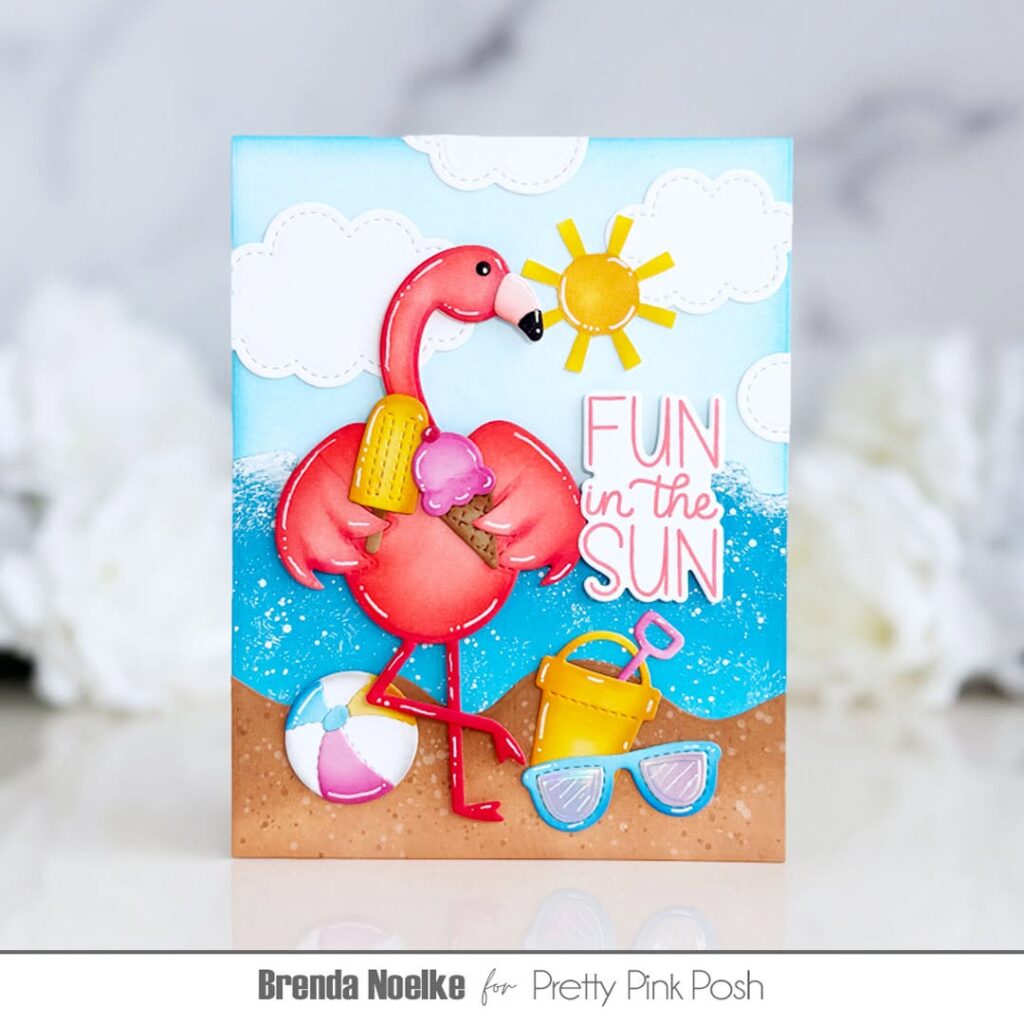
Hello Summer! My second card features the Summer Bucket Additions Dies and the Sunburst Pierced Plate with the help of the Summer Cocktails Dies, Summer Holder Additions Dies, the Happy Summer Stamp & Dies and the previously released Candy Bucket Dies. Isn’t that flamingo just the cutest? And don’t these yummy fruit popsicles just scream summer?!
Once again, I created a subtle background with the Sunburst Pierced Plate. I am a huge fan of clean and simple card designs and white space. I love how this plate adds just a little subtle interest while preserving that pure white space for me. This time I matted the panel with a piece of pink cardstock.
I used the Summer Bucket Additions Dies, Summer Holder Additions Dies and the previously released Candy Bucket Dies to diecut the flamingo, popsicle sticks, sunglasses and bucket out of colored cardstock. The Summer Bucket Additions Dies and Summer Cocktails Dies were used to diecut the popsicles and fruits out of Neenah Solar White cardstock. I did some simple coloring of the popsicles and fruits with Copic markers and added seeds with a black Pigma Micron pen. I assembled the diecuts and highlighted with a white gel pen. The popsicles and bucket were adhered to the card front with a combination of liquid glue and foam tape,
For the sentiment, I stamped the “Hello” and “Summer” sentiments from the Happy Summer stamp set with Versamark Watermark ink onto a piece of black cardstock and white heat embossed before using the coordinating Happy Summer coordinating dies and Sentiment Strips Dies to diecut them out. I adhered the sentiment to the card front with foam tape and finished the card with some Sparkling Clear Confetti Mix.
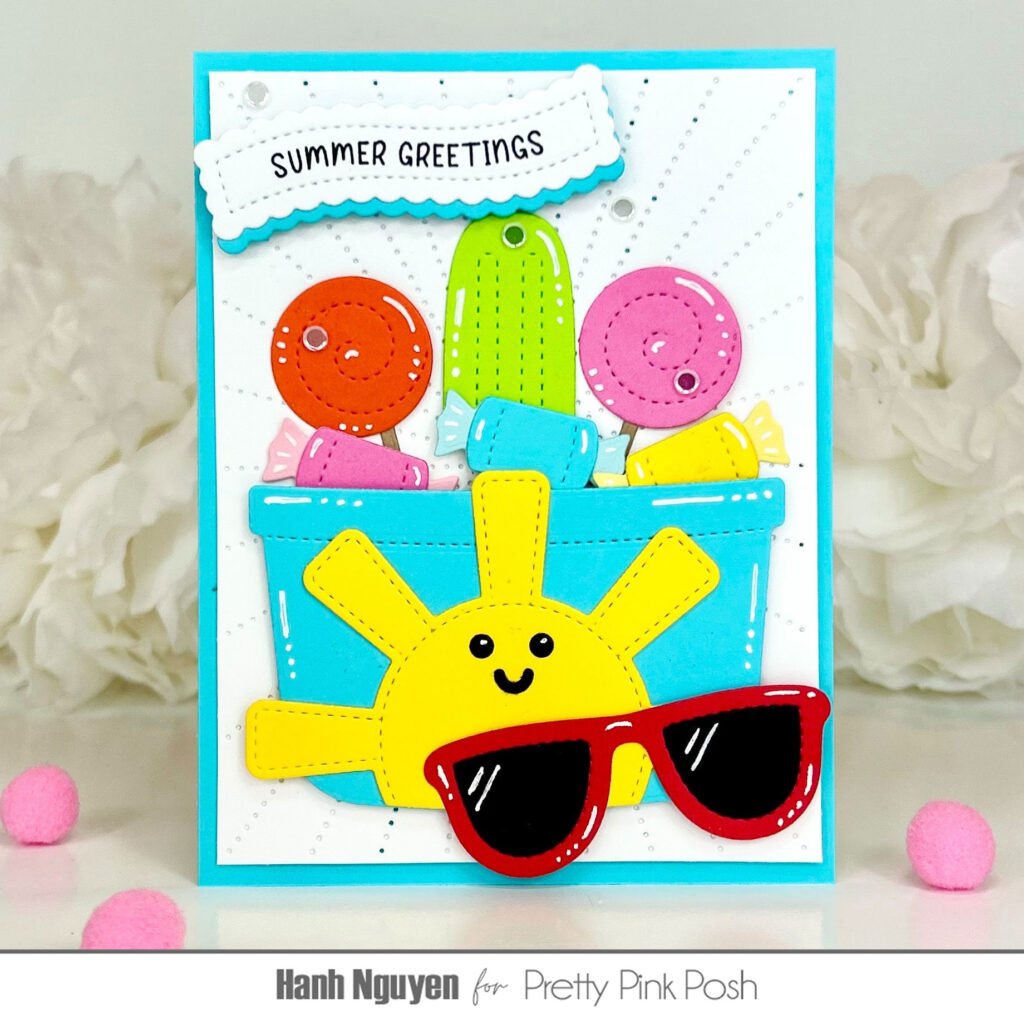
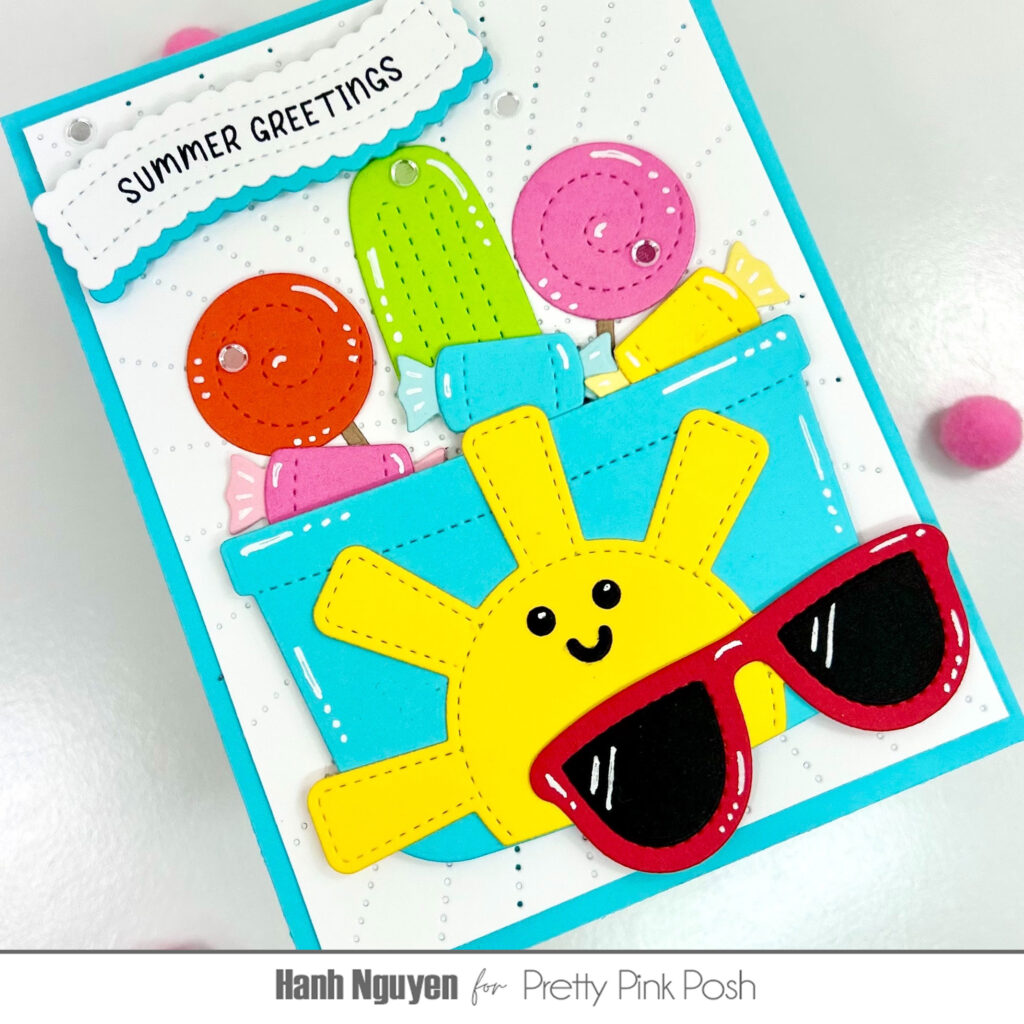
Summer Greetings! My third card features more of the many fun elements of the Summer Bucket Additions Dies along with the Sunburst Pierced Plate, the Summer Banner Greetings and the previously released Candy Bucket Dies andBanner Greetings 2 Dies. There are so many different ways to use and decorate with the Summer Bucket Additions Dies. The possibilities are endless!
Once again, I created a subtle background with the Sunburst Pierced Plate. I trimmed down the panel and matted with a piece of teal cardstock.
I used the Summer Bucket Additions Dies and the Candy Buckets Diesto diecut all of the elements out of colored cardstock. I assembled the elements and highlighted with a white gel pen. I adhered them to the card front with liquid glue and foam tape.
For the sentiment, I stamped the “Summer Greetings” sentiment from the Summer Banner Greetings stamp set onto a piece of white cardstock. I used the Banner Greetings 2 Dies to diecut it out. I used the same die to diecut another banner out of teal cardstock. The banners were adhered to each other with glue and then to the card front with foam tape. I finished the card with some Sparkling Clear Confetti Mix.
Ready to see what the team has created with these products?
There are just endless ways to play with these super fun products from the June Release. Come back tomorrow for another day of sneak peeks!
Welcome to Day 2 of sneak peeks for our June 15th release! This collection features refreshing summer cocktails, vibrant hibiscus blooms, fun shaker dies, fabulous flamingos, and much more.
Today we’ll be taking a look at three of the new standalone die sets: Hibiscus Flowers, Tropical Leaves and Large Summer Shadow.
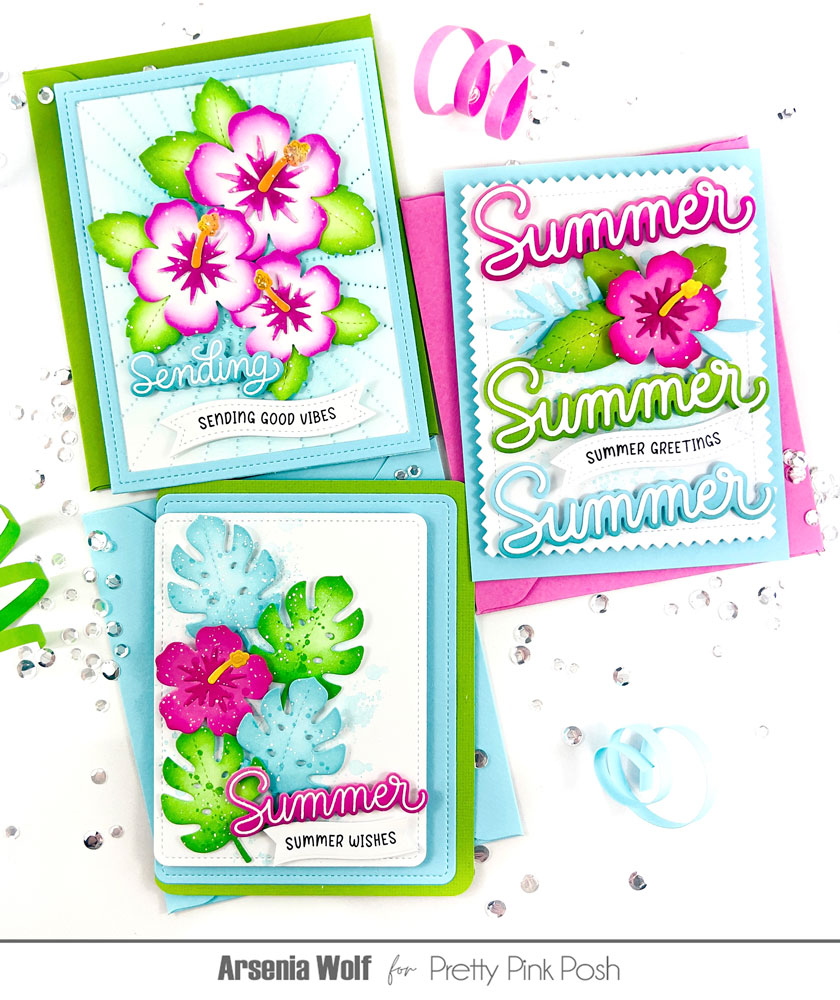
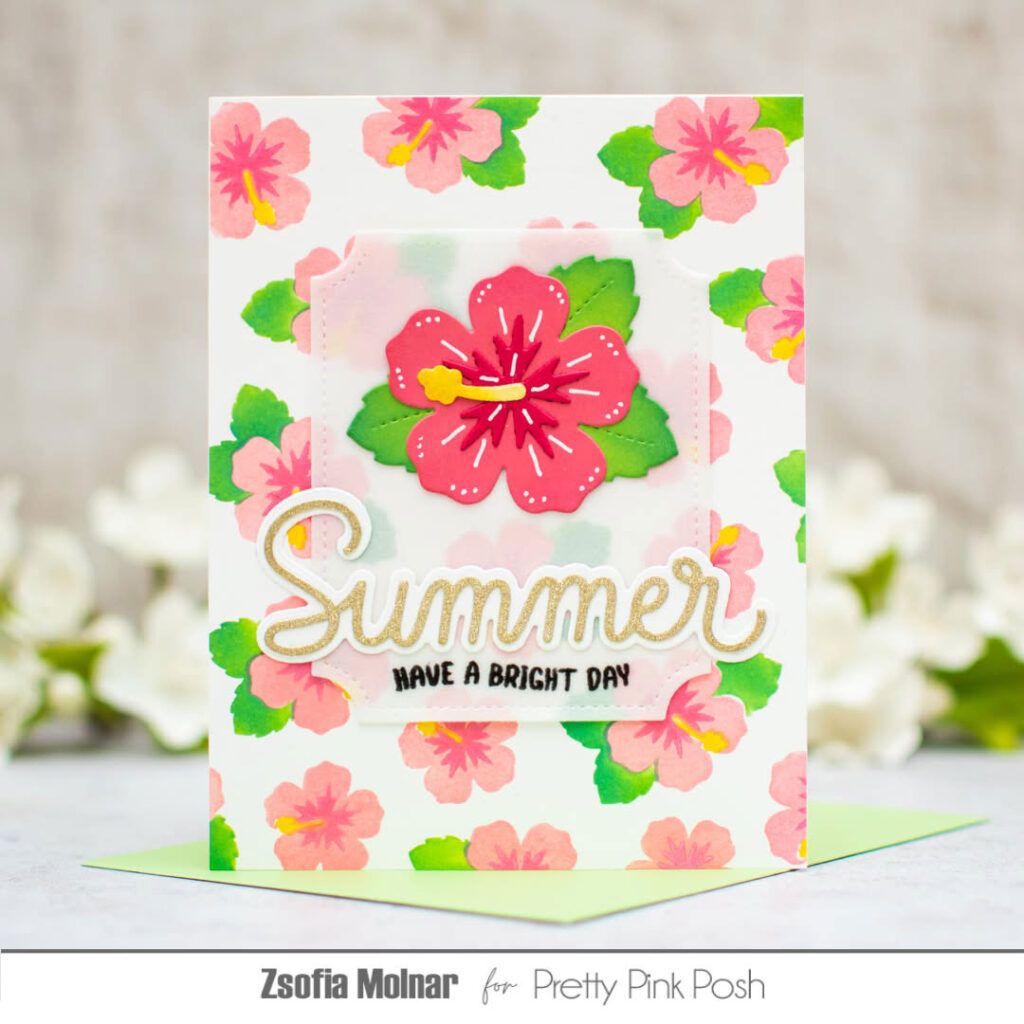
Hello crafty friends! Arsenia here, and I’m bringing all the tropical summertime vibes your way today. This release is absolutely bursting with sunshine, tropical beauty, and all the summer fun! Today I’m sharing three colorful cards featuring the new Large Summer Shadow Die, Tropical Leaves Dies, and Hibiscus Flowers Dies.
Did you know hibiscus flowers bloom in a rainbow of gorgeous colors? That makes them perfect for crafty playtime—simply grab your favorite cardstock colors and let your creativity bloom!
Card One
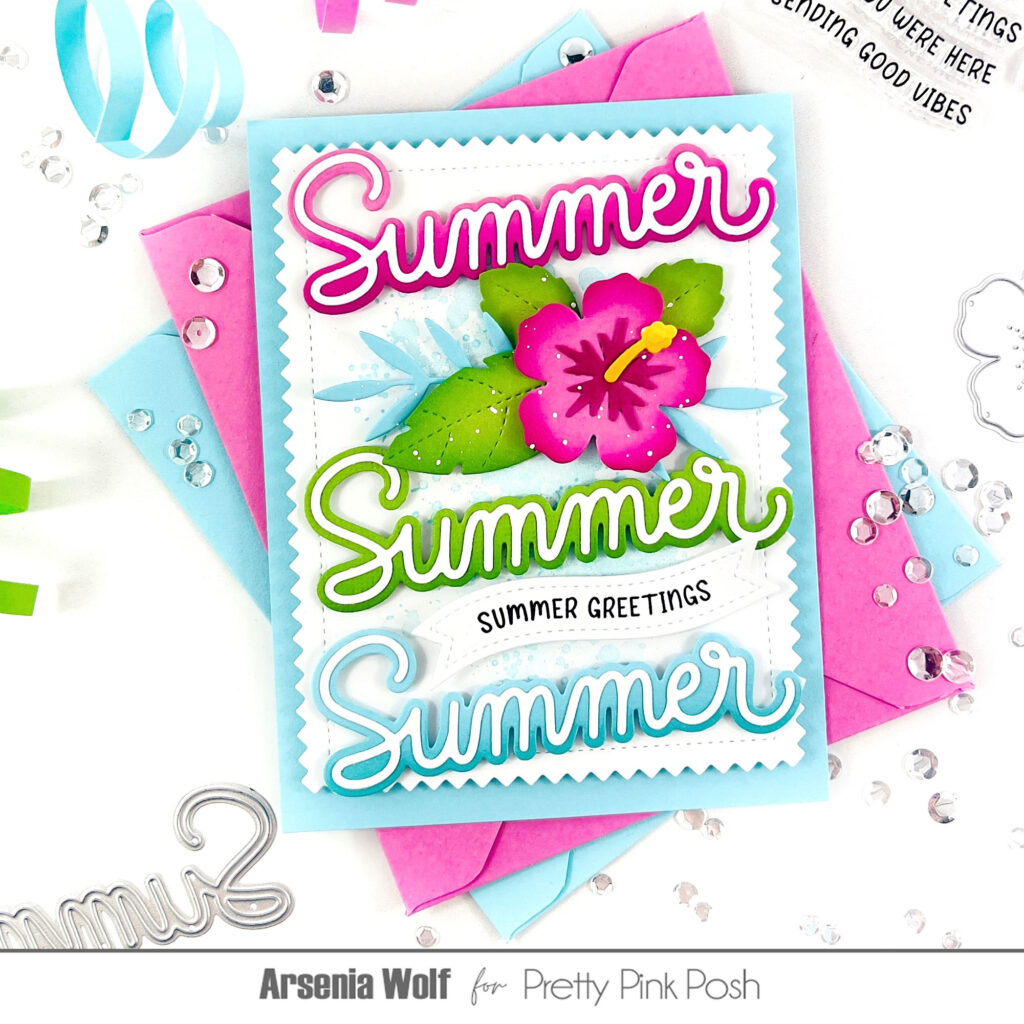
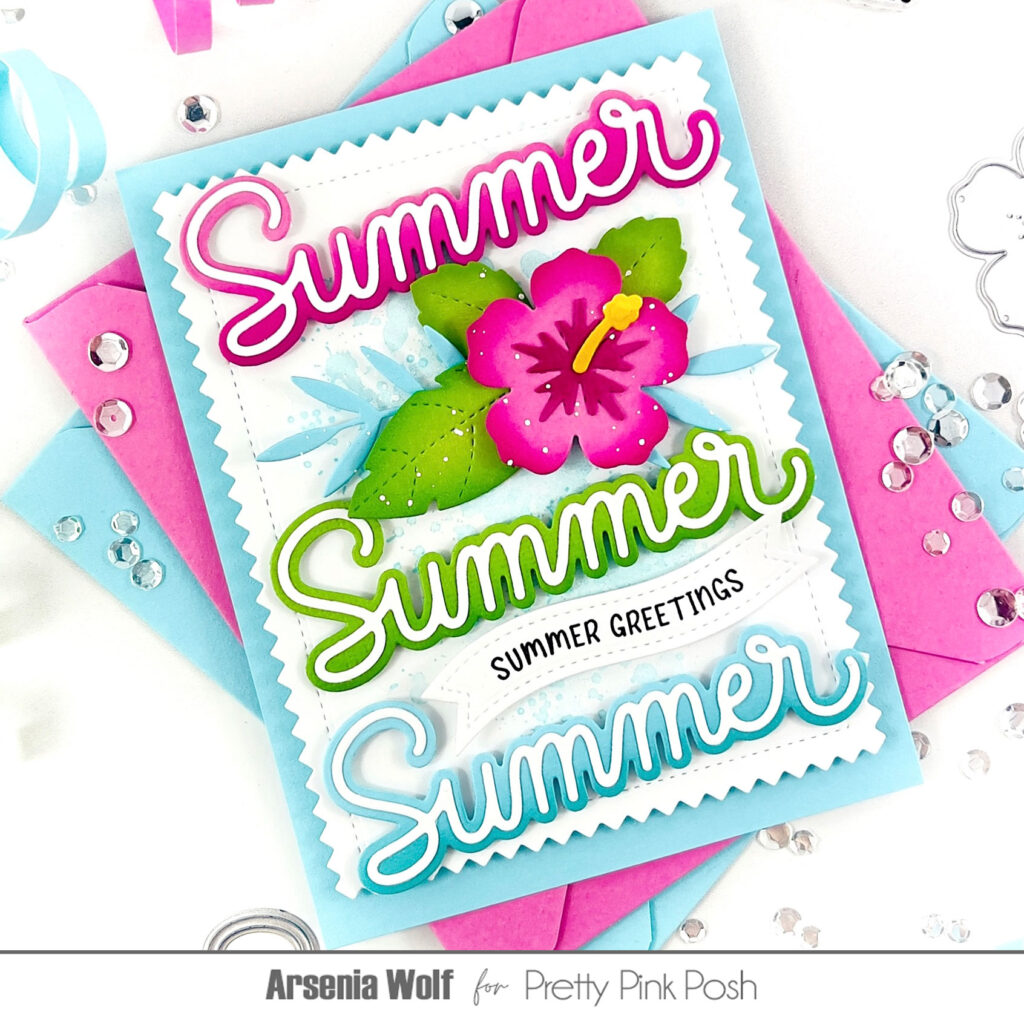
For my first card, I combined the new Large Summer Shadow Die with the gorgeous Hibiscus Flowers Dies and Tropical Leaves Dies. I die cut all of the images from colorful cardstock and added a bit of ink blending for extra depth and dimension.
For the background, I used the Pinking Rectangles Dies and created a breezy blue panel with some fun ink smooshing. After adhering the panel to a coordinating blue card base, I arranged all of my tropical elements until I was happy with the design.
To finish things off, I added a sentiment from the new Summer Banner Greetings and die cut it using the Banner Greetings 1 dies. Voilà—card complete! I absolutely love a good repeat sentiment design; they’re always a favorite of mine!
Card Two
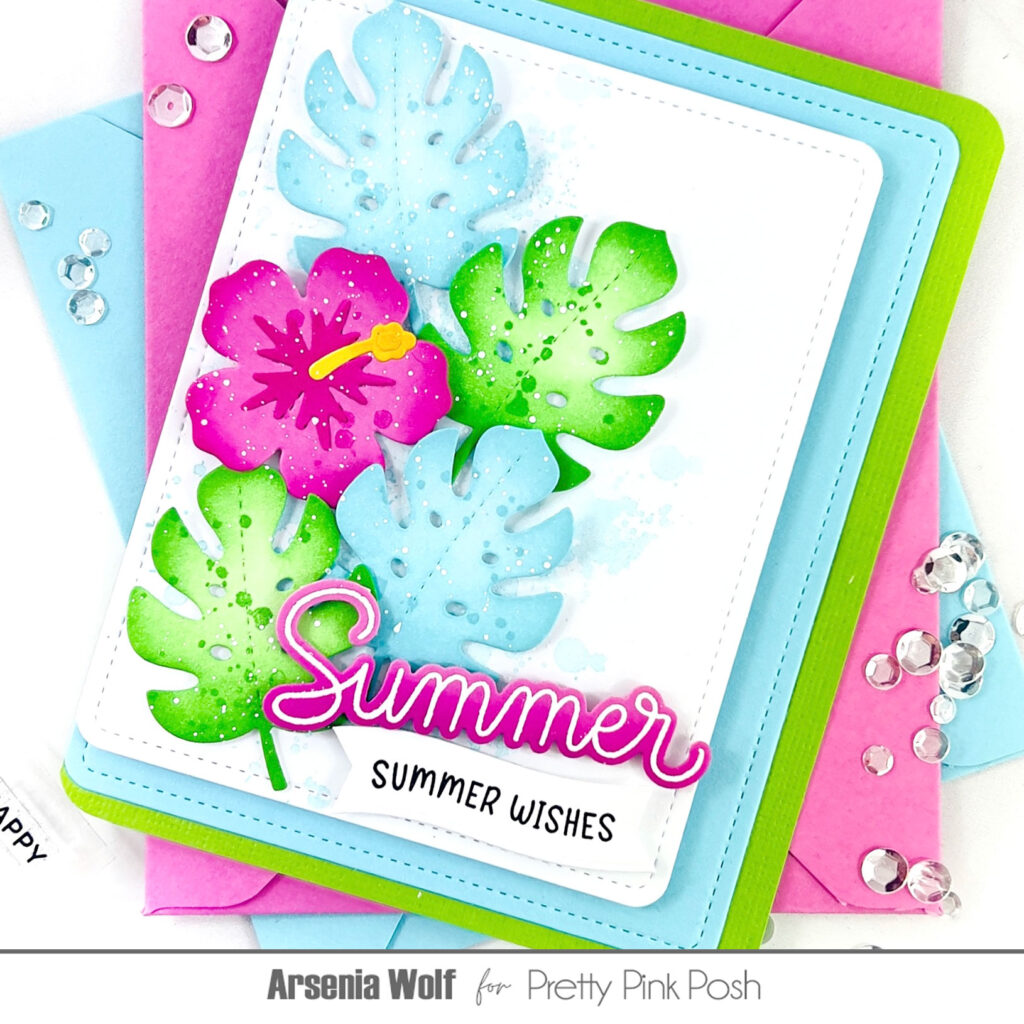
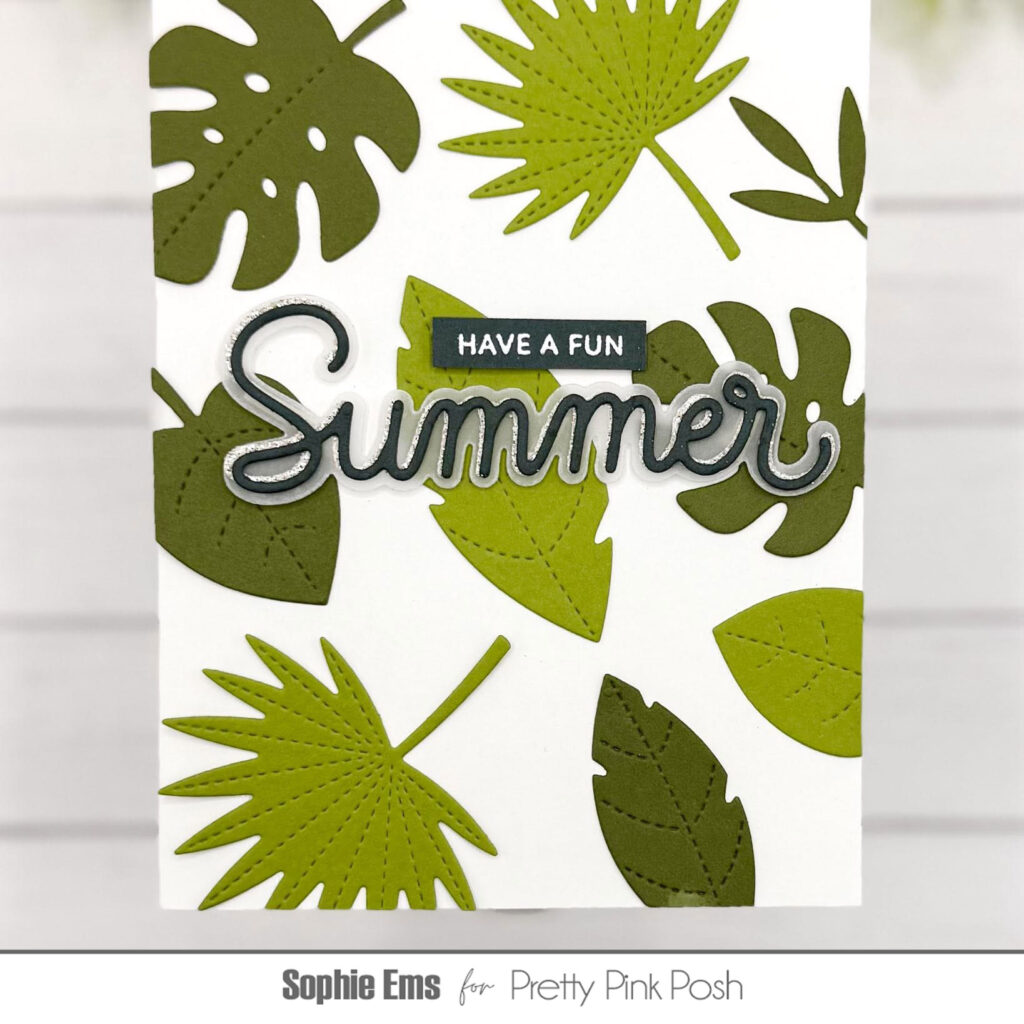
For my second card, I couldn’t resist reaching for my all-time favorite tropical leaf—the fabulous monstera from the new Tropical Leaves Dies!
I die cut the leaves from white cardstock and brought them to life with ink blending and a little splatter. For a pop of color, I added a gorgeous hibiscus flower from the Hibiscus Flowers Dies, cut from bright cardstock.
The beautiful “Summer” sentiment comes from the new Happy Summer stamp set and coordinating dies. For the sub-sentiment, I used Summer Banner Greetings and a die from Banner Greetings 3, trimming it down to perfectly fit my greeting.
For the card base, panel, and layering piece, I used the Rounded Stitched Rectangles Dies. A little ink smooshing and splattering added even more tropical texture before I adhered all the elements. The result is a bright and cheerful tropical card that feels like a mini vacation!
Card Three
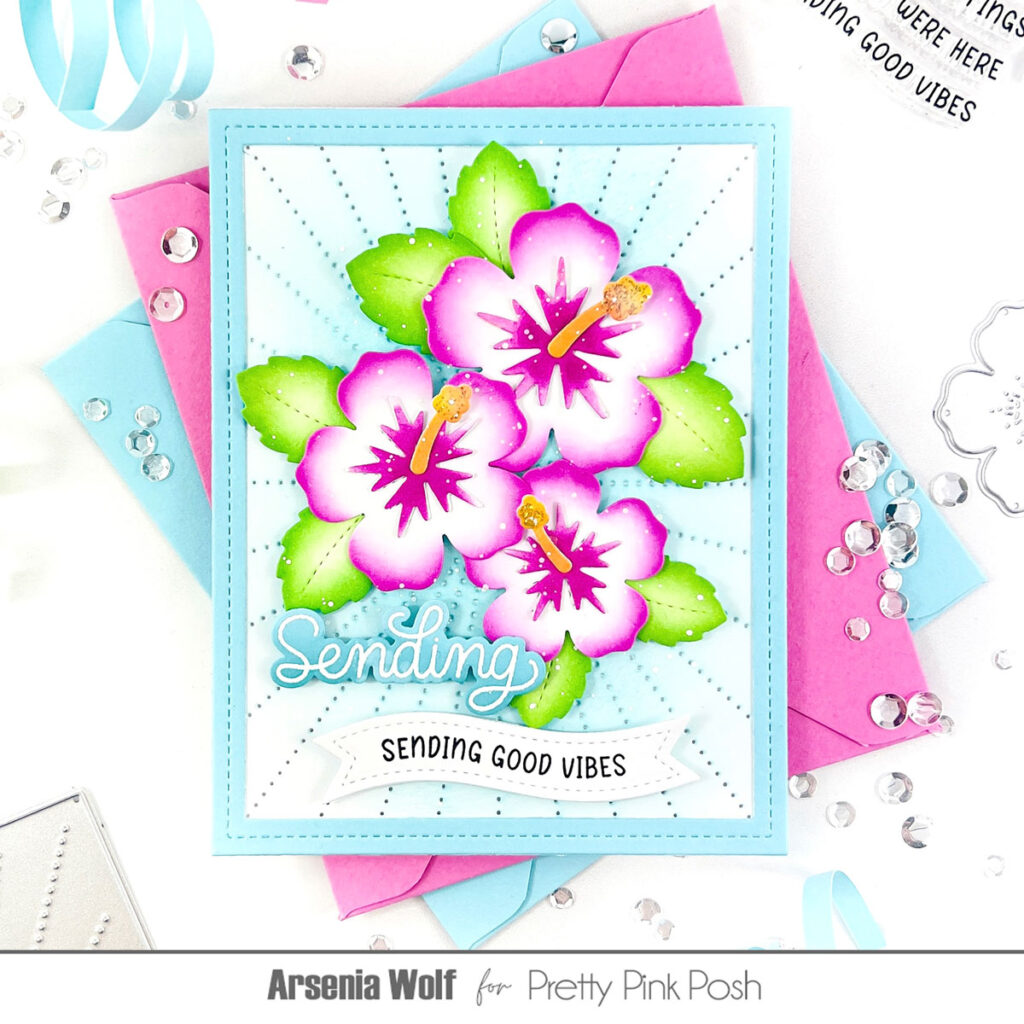
For my final card, I started with the stunning new Sunburst Pierced Plate and added a soft wash of breezy tropical blue ink blending across the background.
Next, I die cut several blooms from the Hibiscus Flowers Dies, added ink blending, and set them aside while I worked on the rest of the design.
To add a little extra detail, I created a frame using the Fancy Cake Dies—a must-have staple for any crafty stash! Once the frame was adhered, I arranged the flowers and leaves until everything felt perfectly balanced.
For the sentiment, I used the “Sending” greeting from the Potted Roses stamp set along with the coordinating dies. I paired it with another sentiment from Summer Banner Greetings, cut using the Banner Greetings 1 dies.
And voilà! Another card finished and filled with tropical charm. The bright blooms, sunny colors, and layered details make this card feel like a little splash of paradise.
This release is overflowing with tropical treasures and summertime goodness, and I can’t wait for you to see everything! Make sure to scroll to see all the amazing makes from the design team!
Thank you so much for stopping by today! I hope these projects inspire you to add a little tropical sunshine to your crafty time. Have a wonderful day!
Welcome to the sneak peeks for our June 15th release! This collection features refreshing summer cocktails, vibrant hibiscus blooms, fun shaker dies, fabulous flamingos, and much more. This release includes four stamp sets, three coordinating dies, eleven standalone dies, five stencils, and four embellishments.
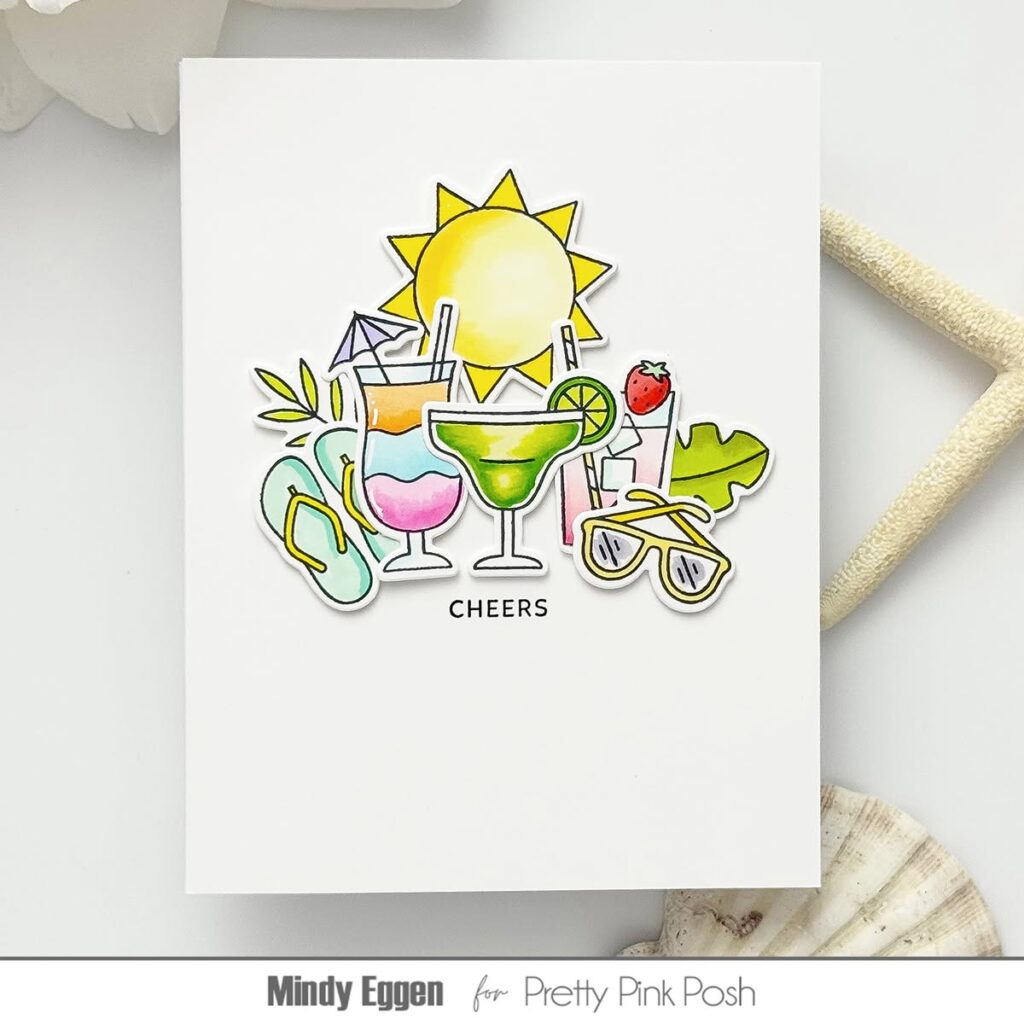
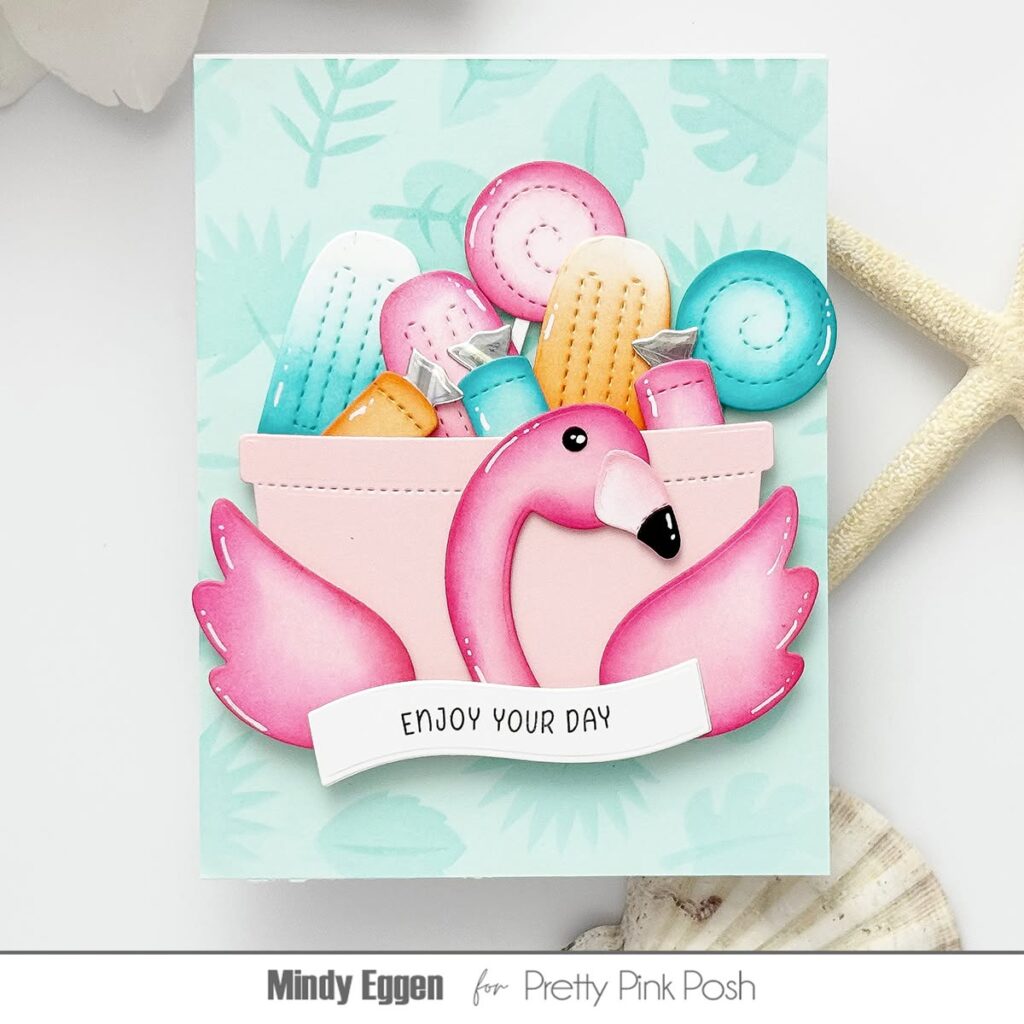
Today we’ll be taking a look at four of the new standalone die sets: Flamingo Holder, Summer Holder Additions, Summer Cocktails, and Summer Drink Shaker.
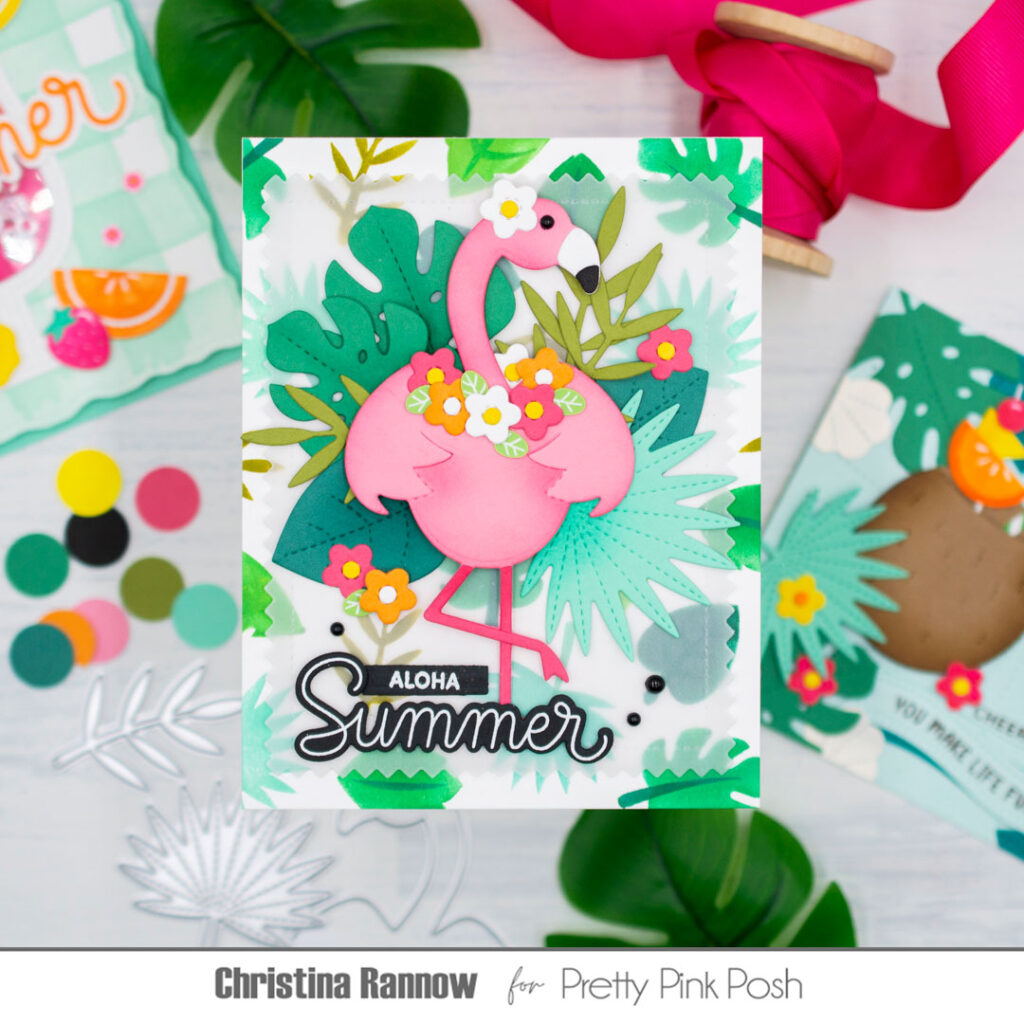
Hi friends, it’s Christina here! Are you ready for a tropical getaway? It’s Day 1 of sneak peeks to the release on June 15th that’s full of balmy, sun-kissed stamps, dies, and stencils perfect for summertime crafting. Today we are introducing some of the new dies, including the Flamingo Holder and the Summer Holder Additions, plus the Summer Cocktails and Summer Drink Shaker. So stick around; the team has some dazzling inspiration projects to share with you!
To showcase the new dies, I created three island-inspired cards, all with a similar tropical color palette. To get the brightly colored tropical vibe, I chose seafoam, avocado, and emerald greens and complemented them with yellow, orange, and pink. I brought all these colors together in my first card and made the fabulous Flamingo Holder my focal point. Before assembling the flamingo, I added shading to the die-cut pieces with ink and a small blending brush, and then after assembling, I added an Onyx Pearl for the eye. While the Summer Holder Additionsset has all the fun summery things perfect for any of the critters in the “Holder” collection, I chose to use the small flower that’s included and created a floral lei for my flamingo, accenting it with leaves from a new mix called Summer Blooms.
To create an island paradise for my flamingo, I reached for the new Layered Tropical Leaves Stencil and the Tropical Leaves die set. I layered a Pinking Rectangle die-cut from acetate on top of the stenciled background panel to soften it a bit and then tucked a variety of tropical leaves behind the flamingo before attaching everything with either liquid glue or foam squares. I finished this card design with a heat-embossed sentiment created by combining two new stamp sets, Happy Summer and Happy Hibiscus, and a few more Onyx Pearls for embellishment.
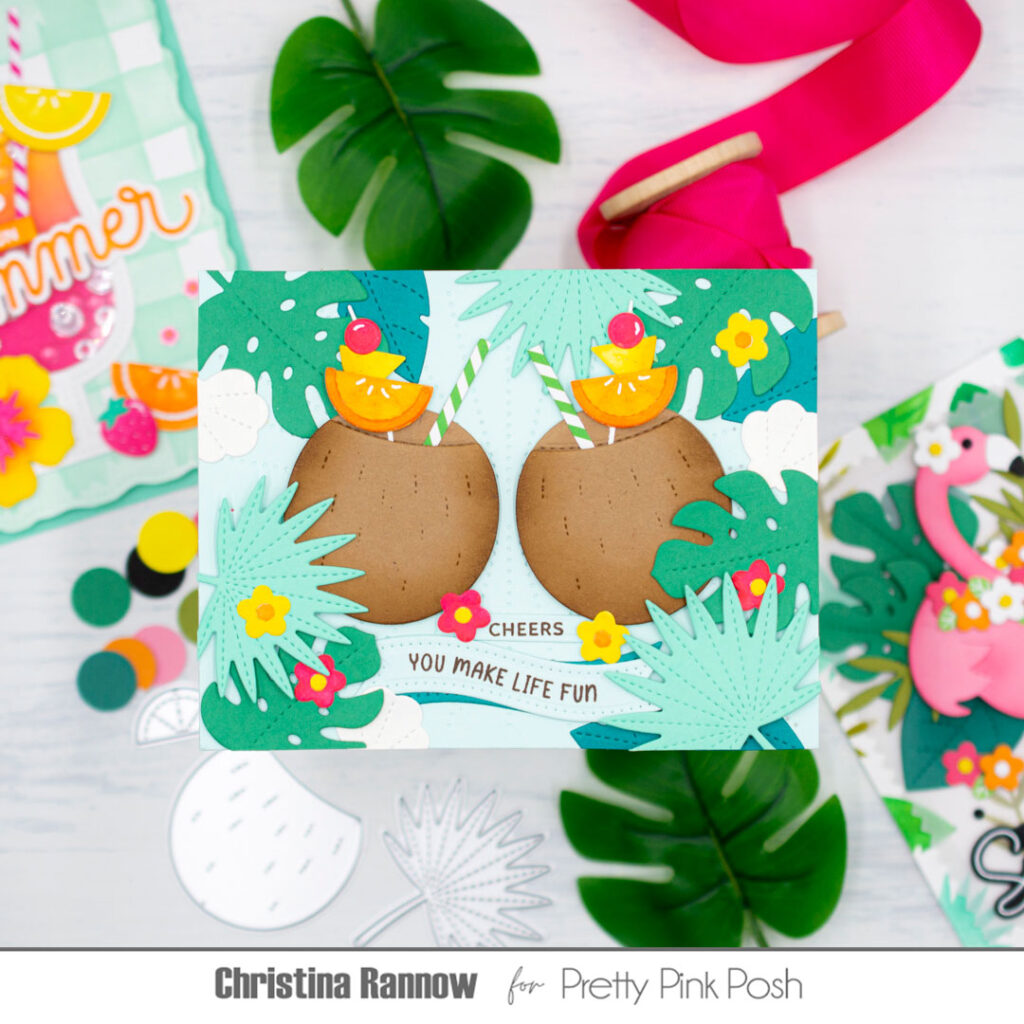
My next card shares a glimpse of what you might find if you peek through those tropical leaves in my first card—Summer Cocktails sipped from coconuts! The Summer Cocktails die set gives you a variety of options for creating fun fruity drinks, but I chose to double up on the coconut drinks and nestled them in a frame of Tropical Leaves for a lush tropical feel.
I used the new Sunburst Pierced Plate die-cut from Seaside cardstock as the background and tucked a few seashells and small flowers from the Summer Holder Additions set into the leaves that frame the scene. I added straws and colorful fruit picks to the coconut cocktails before finishing things up with a sentiment that, like my first card, I created by combining two new stamp sets. I used a sentiment from the Summer Banner Greetings with a pierced banner from the Banner Greetings 3 die set and the word “Cheers” from Summer Sips, a fun summer drink stamp set.
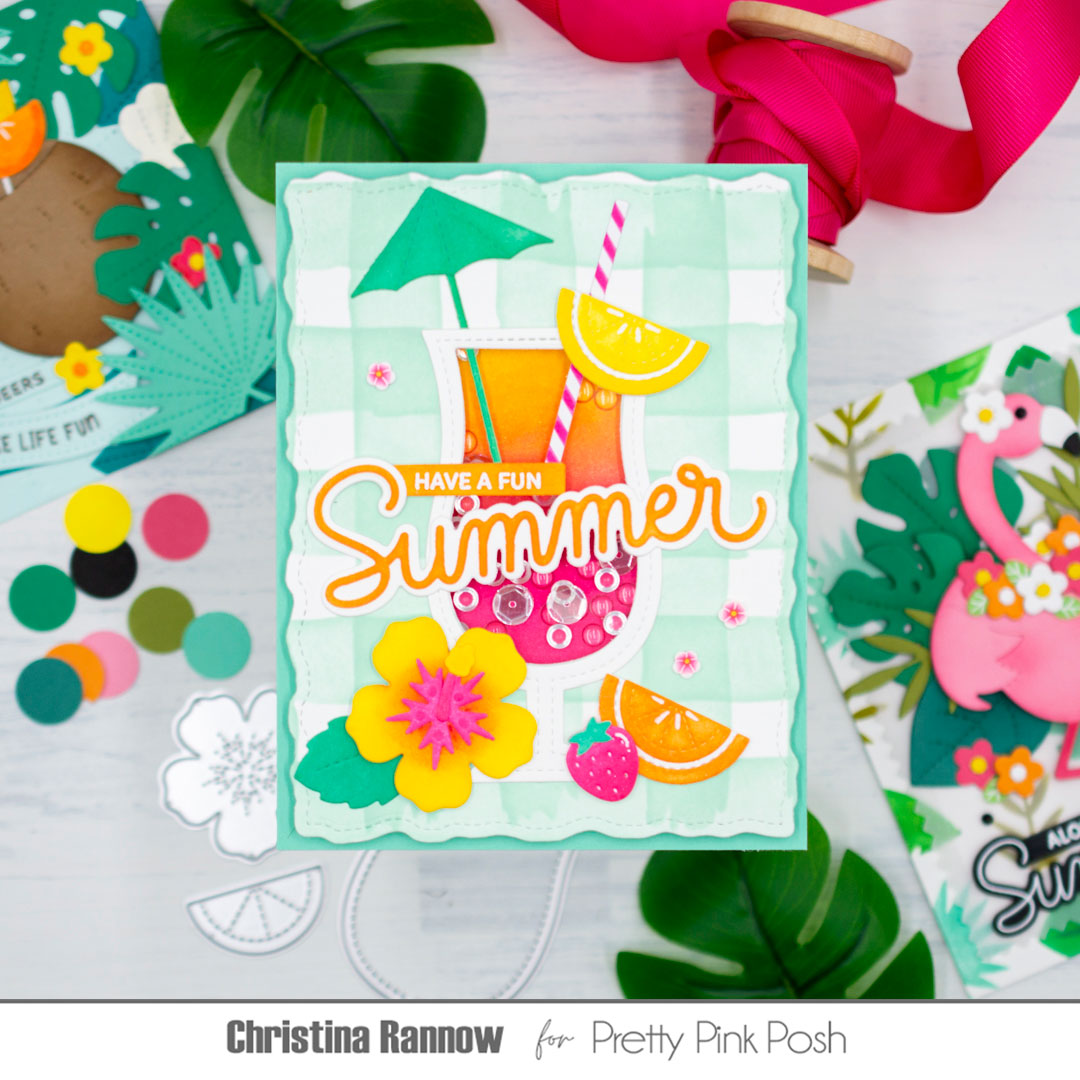
The last card I’m sharing with you today is a shaker card featuring the new Summer Drink Shaker. I stuck with the same tropical-inspired color palette I used for my first two cards, using a yellow, orange, and pink ink blend for the summer drink shaker and a seafoam checkerboard background I created by stenciling the new Watercolor Stripes horizontally and then vertically onto a white cardstock panel.
To create the shaker element, I used foam tape to pop up the stenciled checkerboard panel onto a seafoam cardstock base, created a well around the acetate shaker window, and filled it with 4mmClear Droplets and 8mm Sparkling Clear Sequins. I used white cardstock to frame the drink shaker and then added some fun fruity drink accessories, including a straw, a drink umbrella, and of course, fresh fruit. I wanted my citrus slices to have a white pith, so I combined the smaller citrus slice from the Summer Cocktails set with the larger one included with the Summer Drink Shaker. I added a beautiful ink-blended Hibiscus Flower for more of a tropical island vibe along with a few clay hibiscus flower embellishments from the new Summer Bloomsclay mix. I finished up this card design by combining the new Large Summer Shadow die with a sentiment strip from the Happy Summer stamp set.
Keep scrolling for more balmy, sun-kissed inspo from the team!
Thank you so much for checking out the sneak peek inspiration I created for the upcoming June 15th release. Come back tomorrow for more sneak peeks!