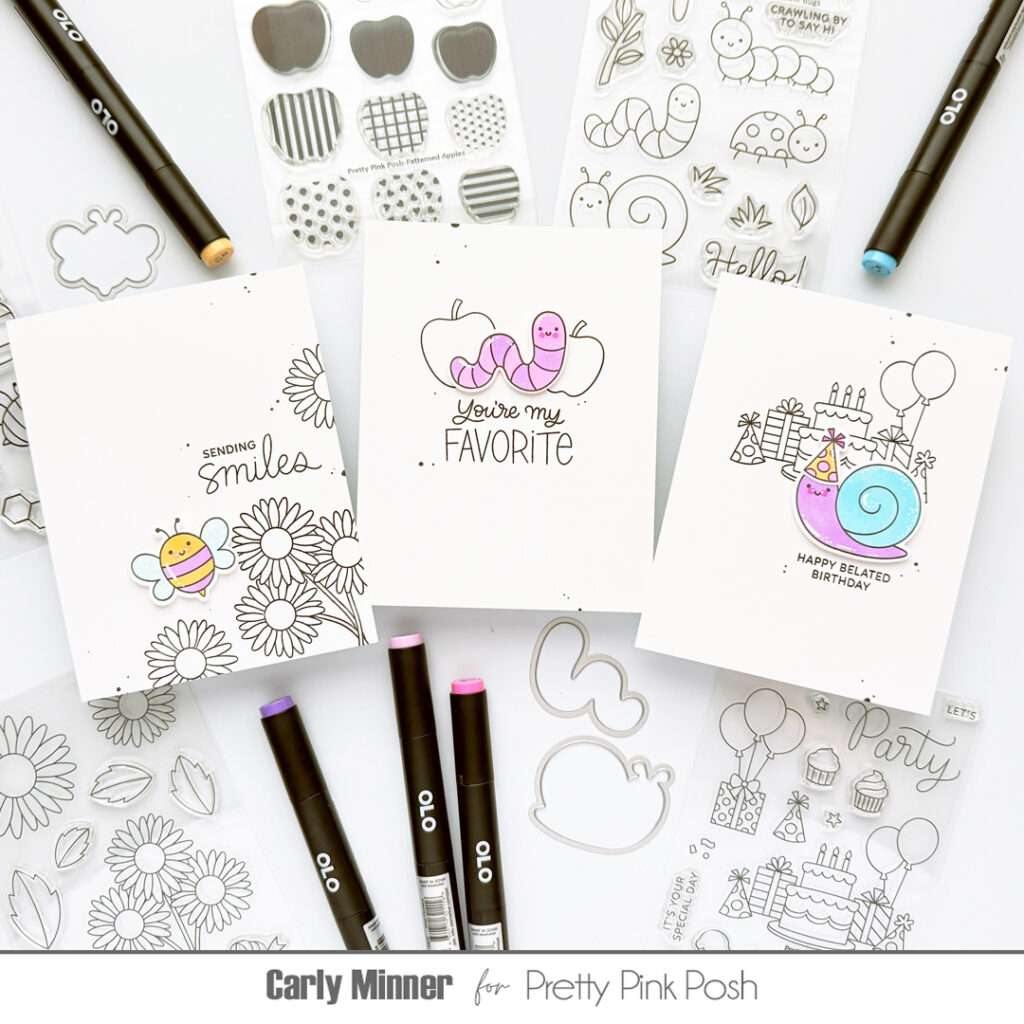
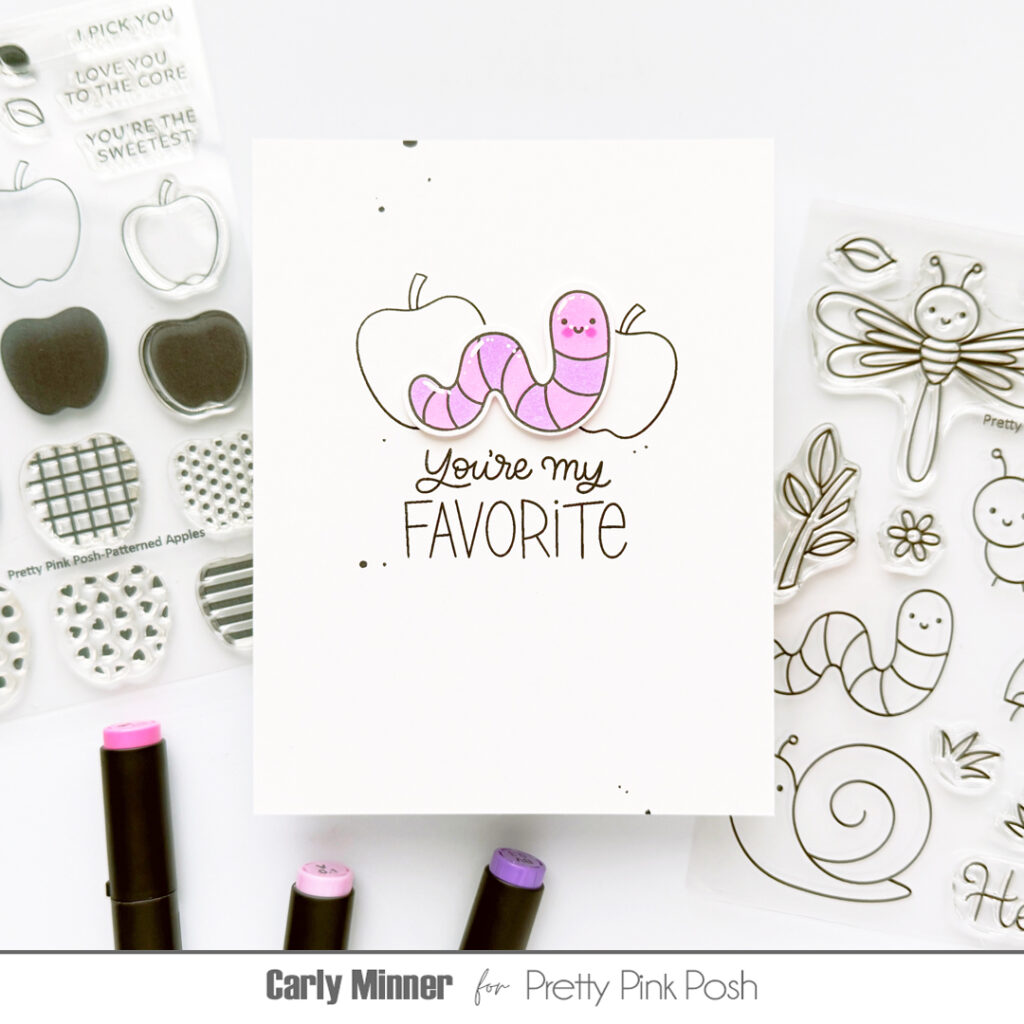
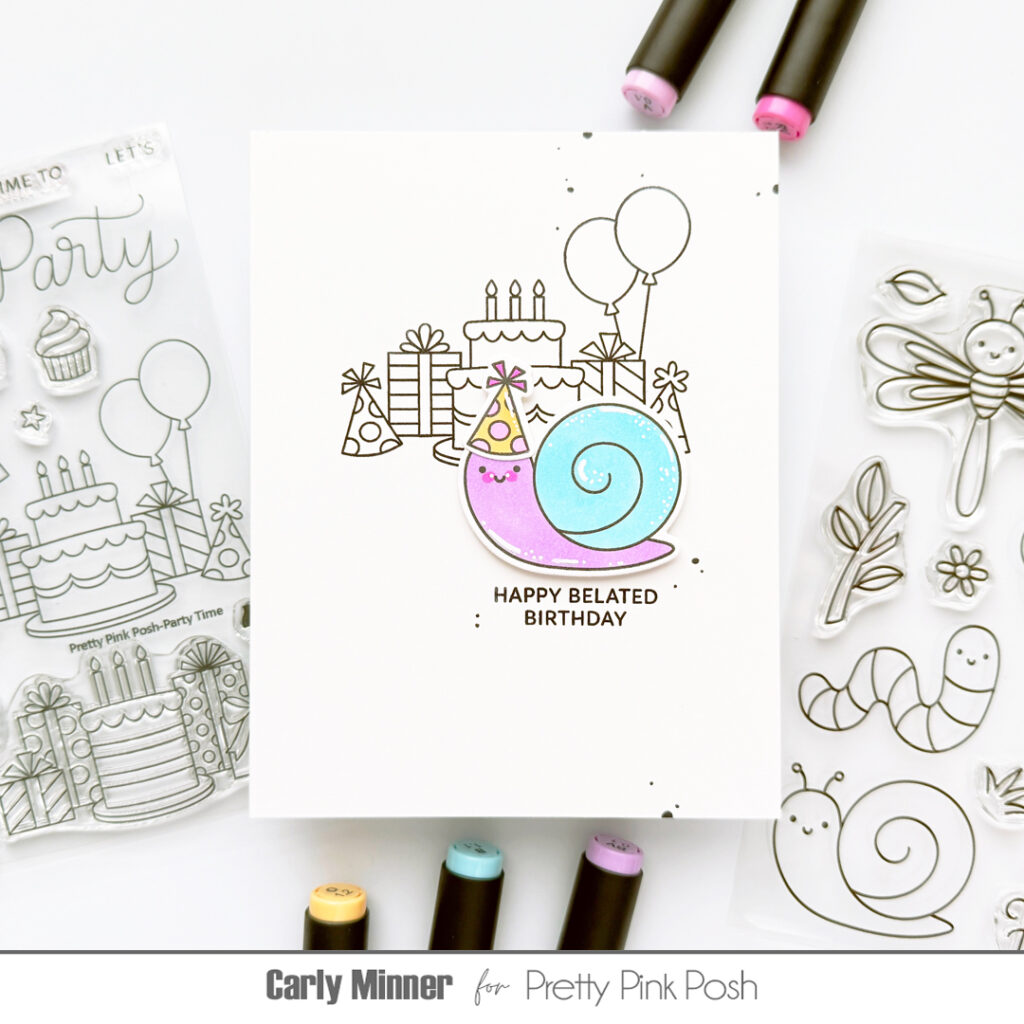
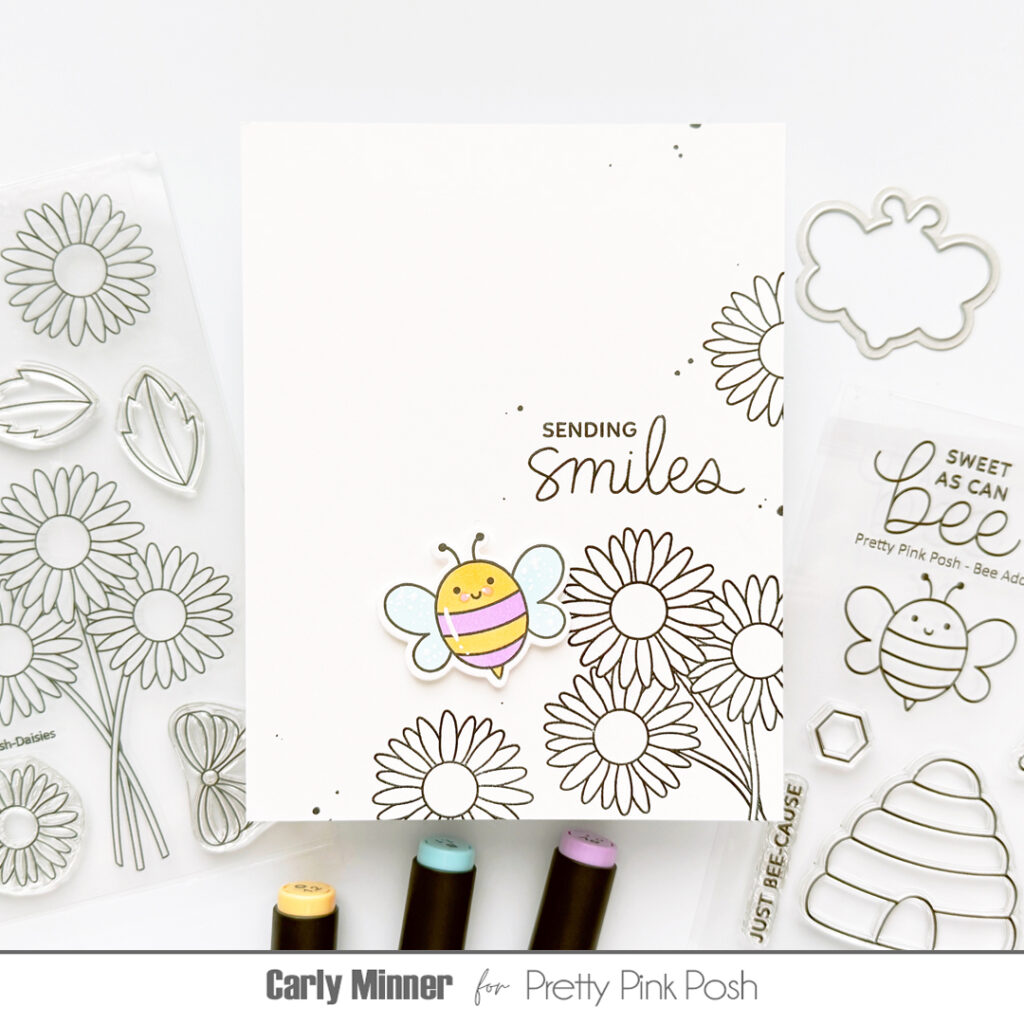
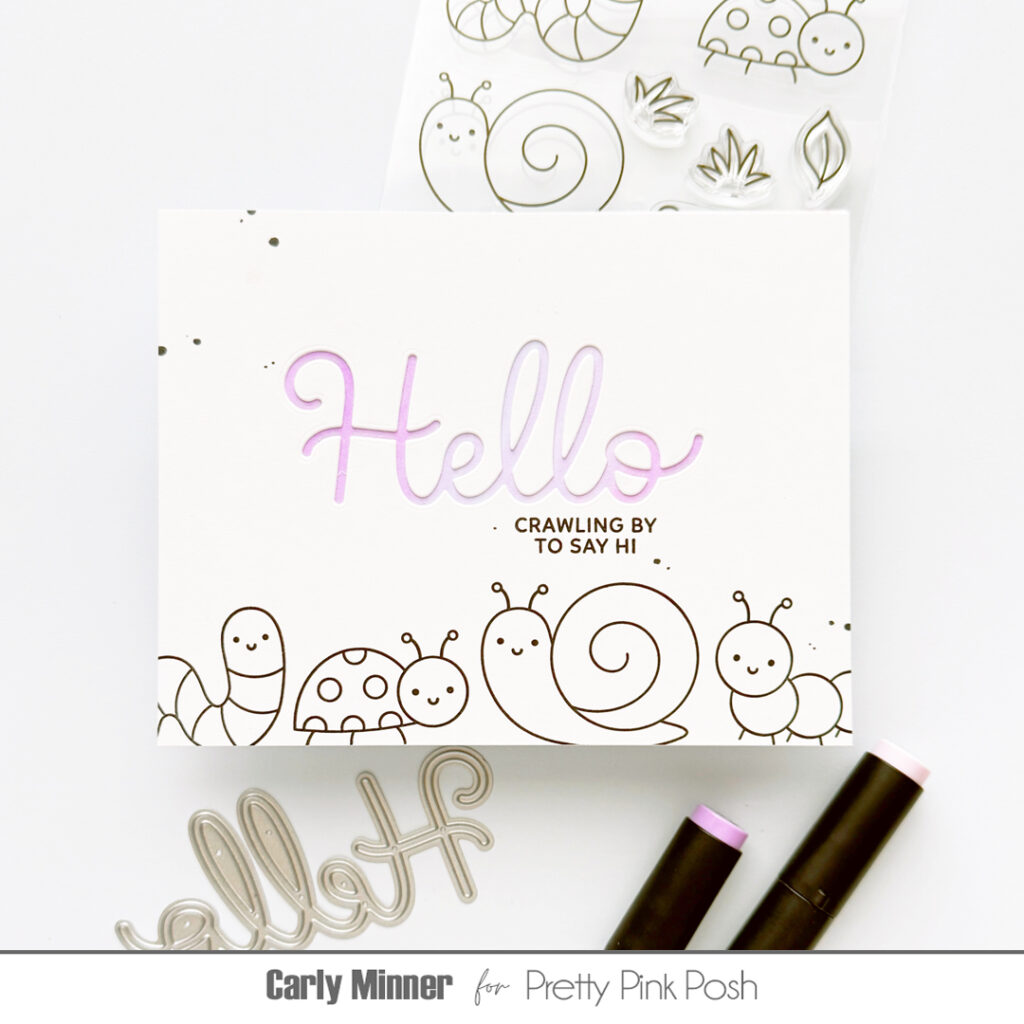
Hi friends, Carly here today. Pretty Pink Posh stamps are some of my absolute favorites to color but…coloring takes me a long time! And sometimes I don’t have as much time to spend cardmaking as I would like so that’s where easy black & white backgrounds come in!
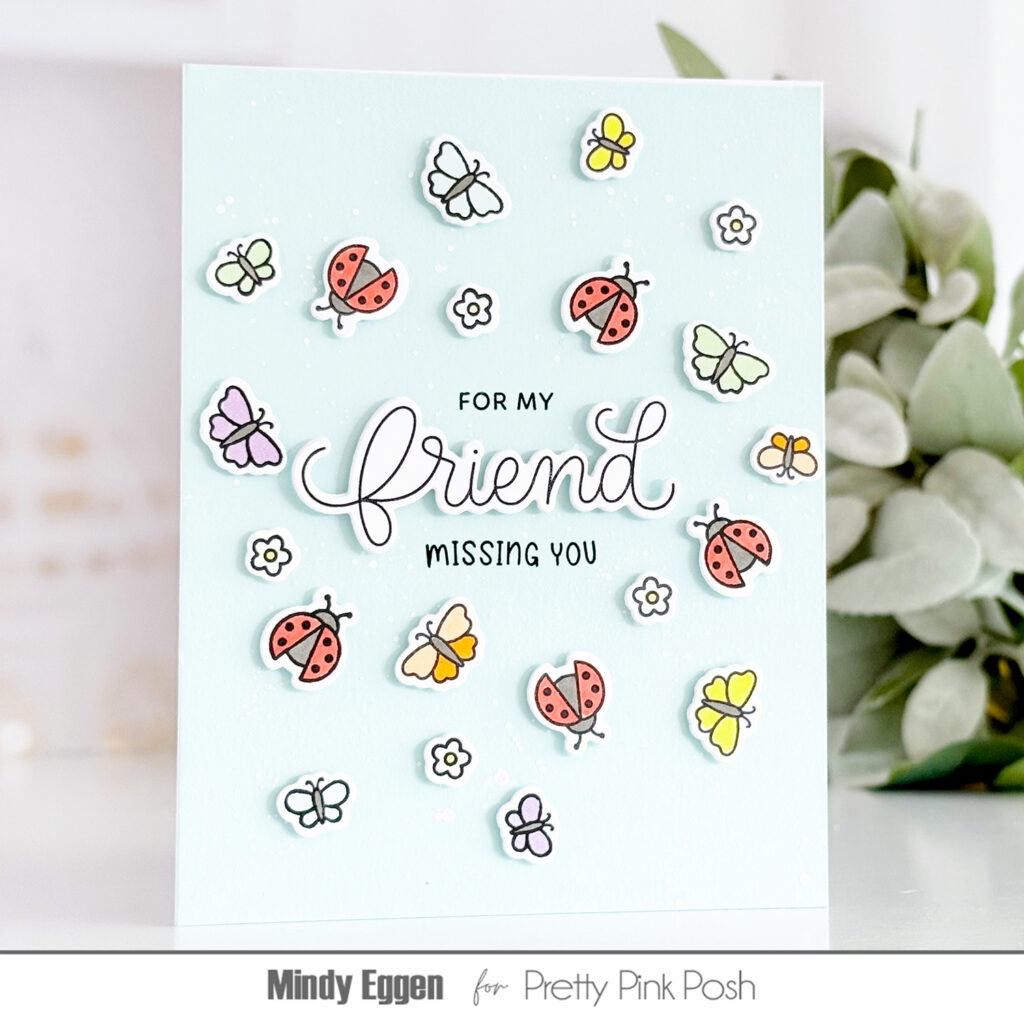
choose the stamps I want to be the “main character” like the bees from the Bee Additions set and bugs from Cute Bugs.
stamp & die cut the “main characters”.
choose the “scenery” stamps.
use the “main character” to help place the “scenery” and a sentiment (I like to use the center of my card front or the bottom corner,) and then stamp it.
then color the “main character” and adhere to the card.
This process is quick, easy and even great for “compartmentalized makes” as Tim Holtz says because you can do one step today when you have a few minutes and come back for another step on another day.
OLO Marker Colors O1.2 RV1.3 V0.1 BV0.3 B1.1 B1.3
Thanks for stopping by! I hope you enjoyed today’s tutorial.
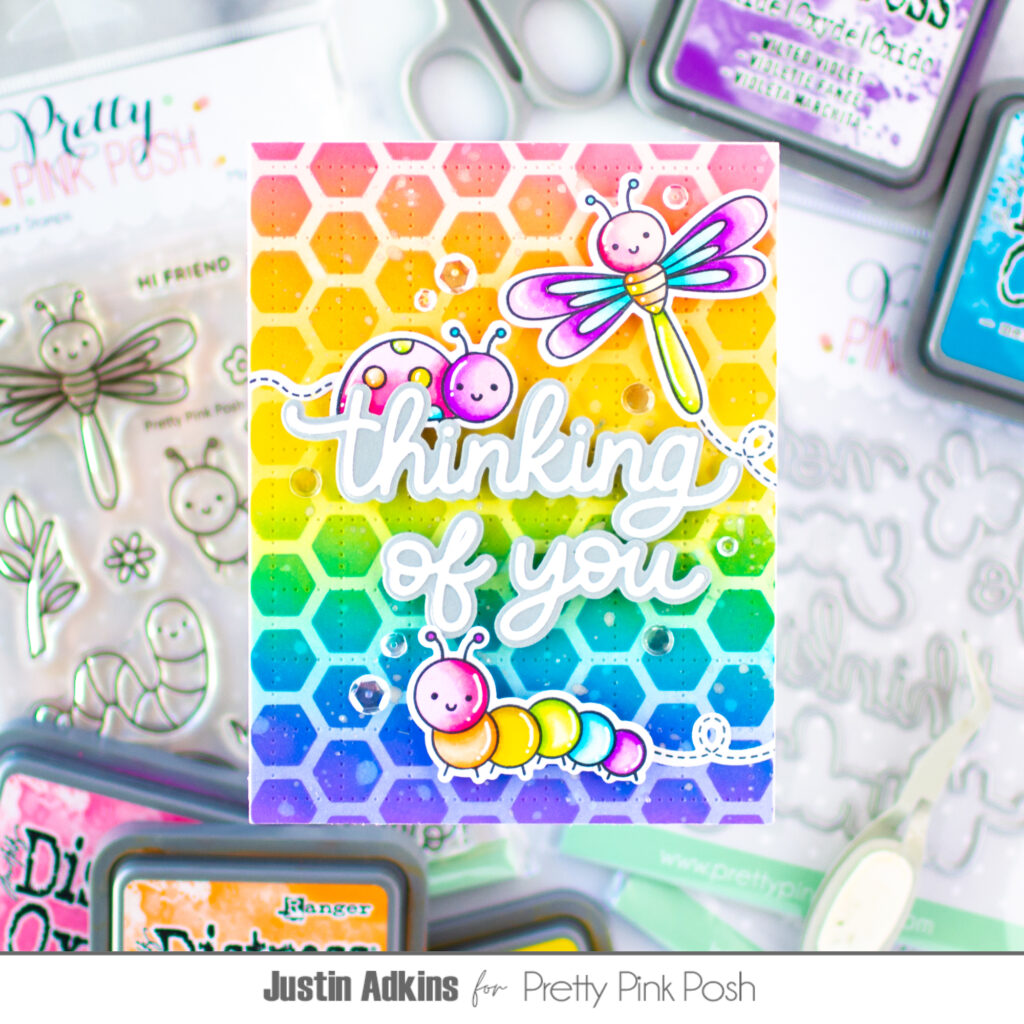
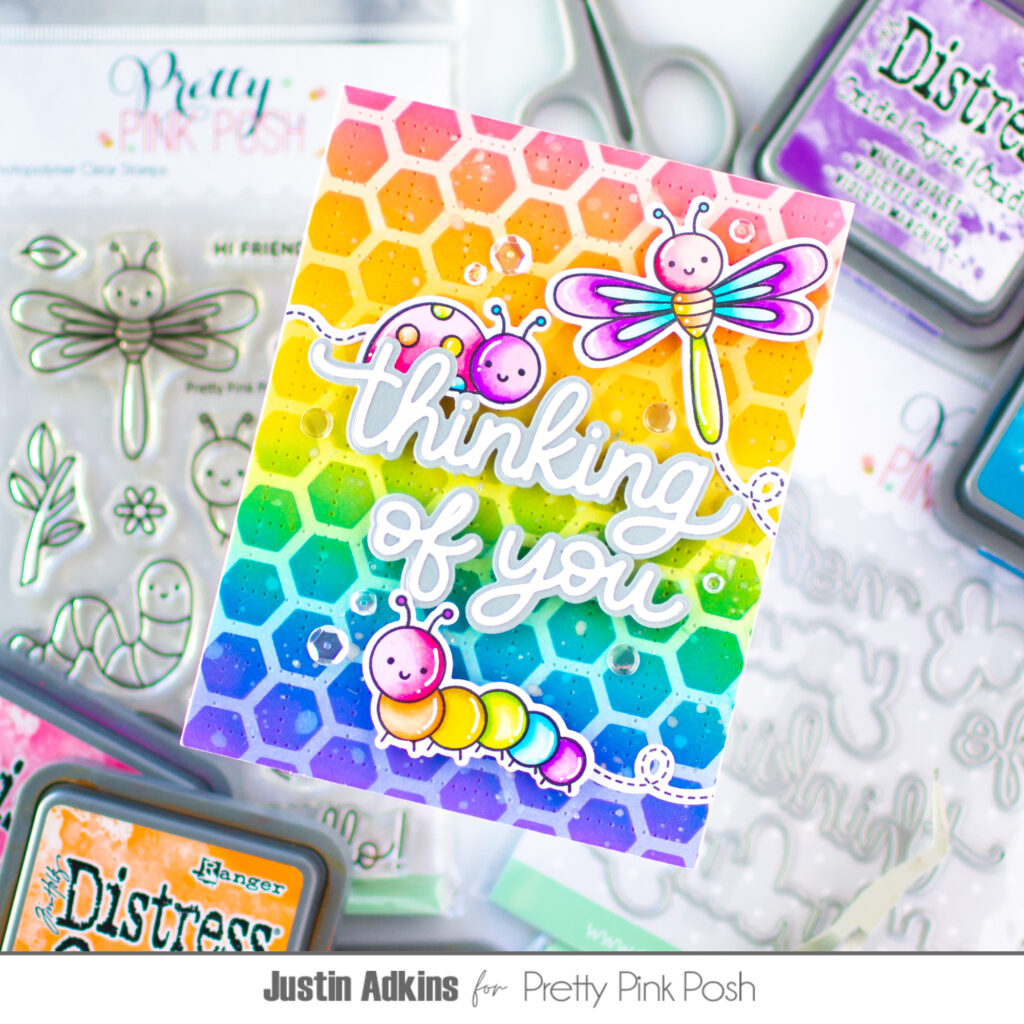
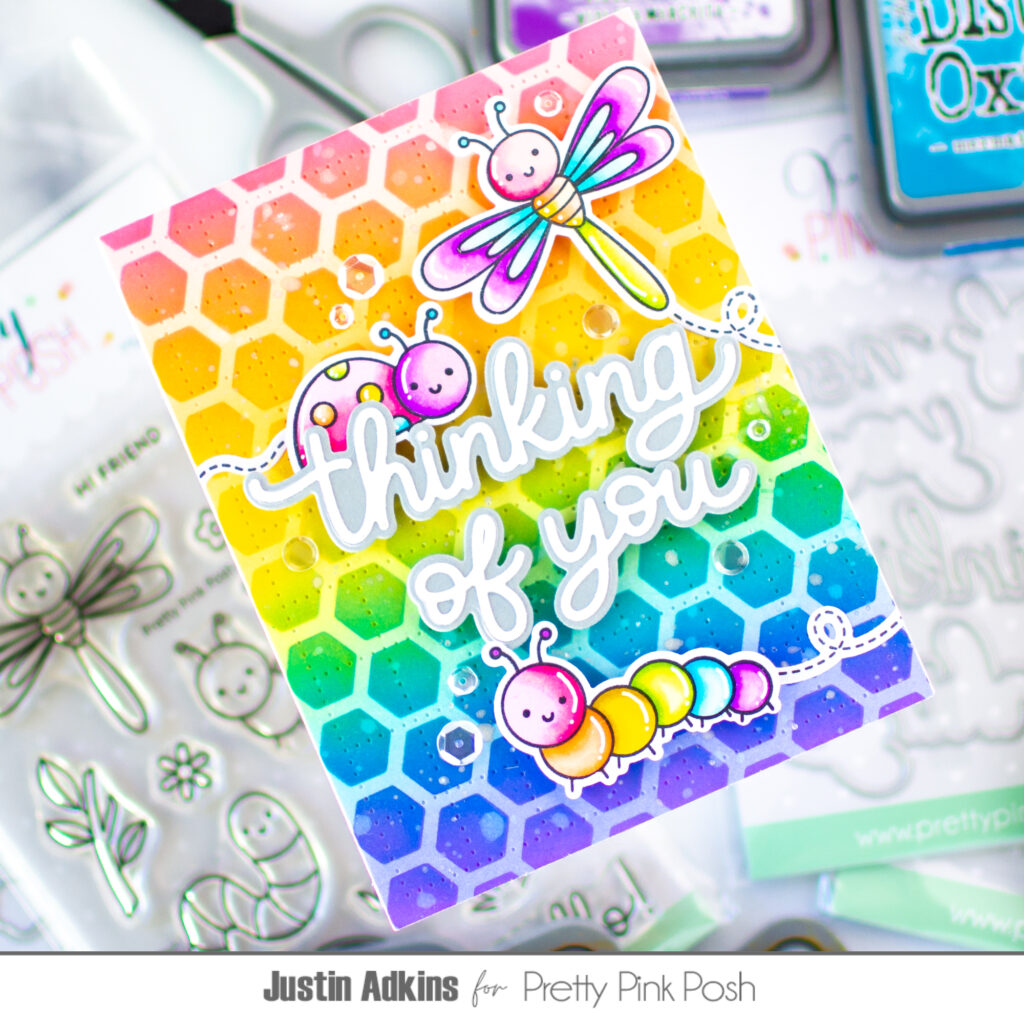
Hello, friends! Justin here and today I’m excited to share a bright and colorful bug-themed card featuring several adorable Pretty Pink Posh products. I also created a full video tutorial showing exactly how this card came together from start to finish.
To create this colorful background, I started by using theHoneycomb Stencilalong with a full rainbow blend of Distress Oxide Inks. Blending the colors from warm tones into cool tones helped create a bright gradient that really makes the card stand out.
After completing the ink blending, I layered the panel over the Checkered Pierced Plate Die cut background to add extra texture and subtle detail throughout the card front. I also added pearl paint splatter and water bleach marks across the panel for additional movement and interest.
The adorable bugs from the Cute Bugs Stamp Setwere colored with Olo Markers using bright coordinating colors to match the rainbow background. Once die cut, I arranged the bugs around the largeThinking of You Shadow Diesentiment to help frame the focal point of the card.
To finish the design, I added a few Crater Lake Sequins for sparkle and dimension while keeping the overall design bright, playful, and easy to mail.
Don’t forget to follow me on Instagram and YouTube at @justanotebyjustin for even more crafting inspiration!
Thank you so much for stopping by the blog today! Happy crafting!
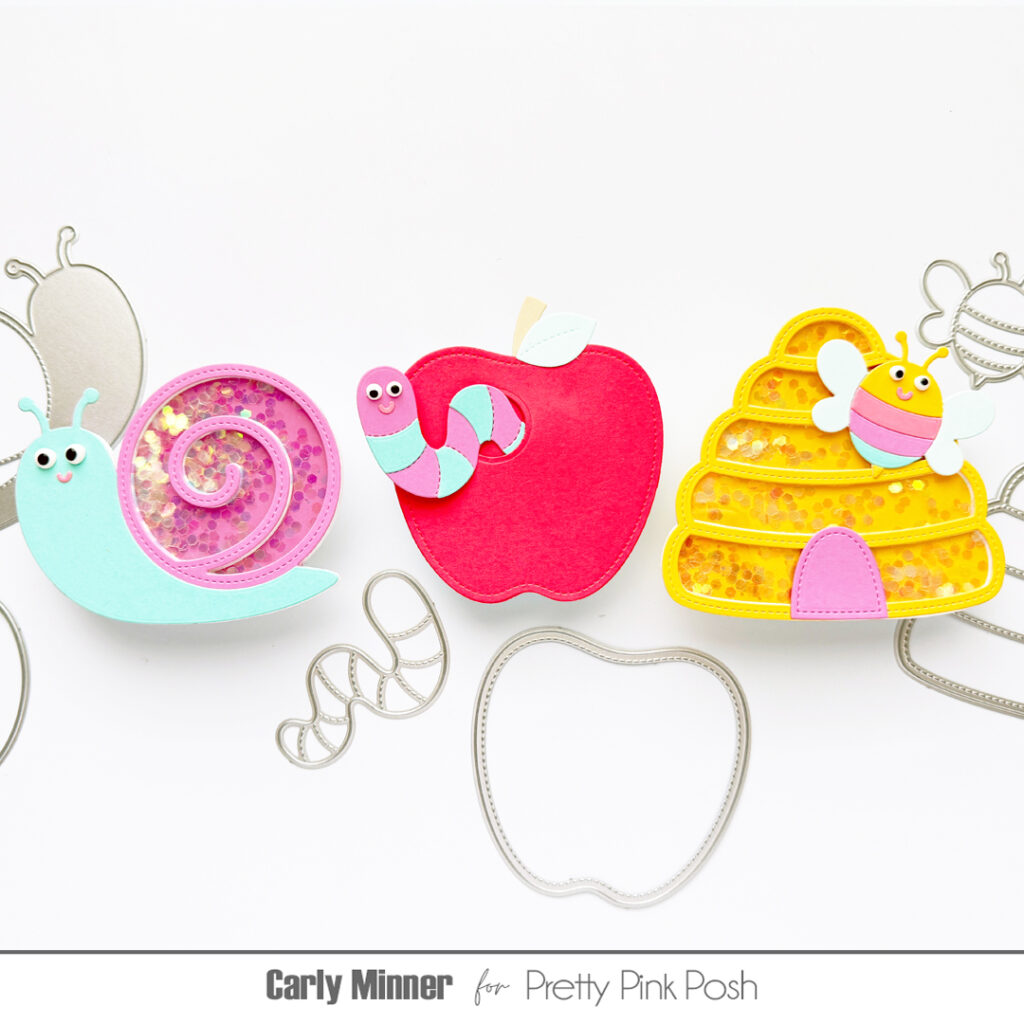
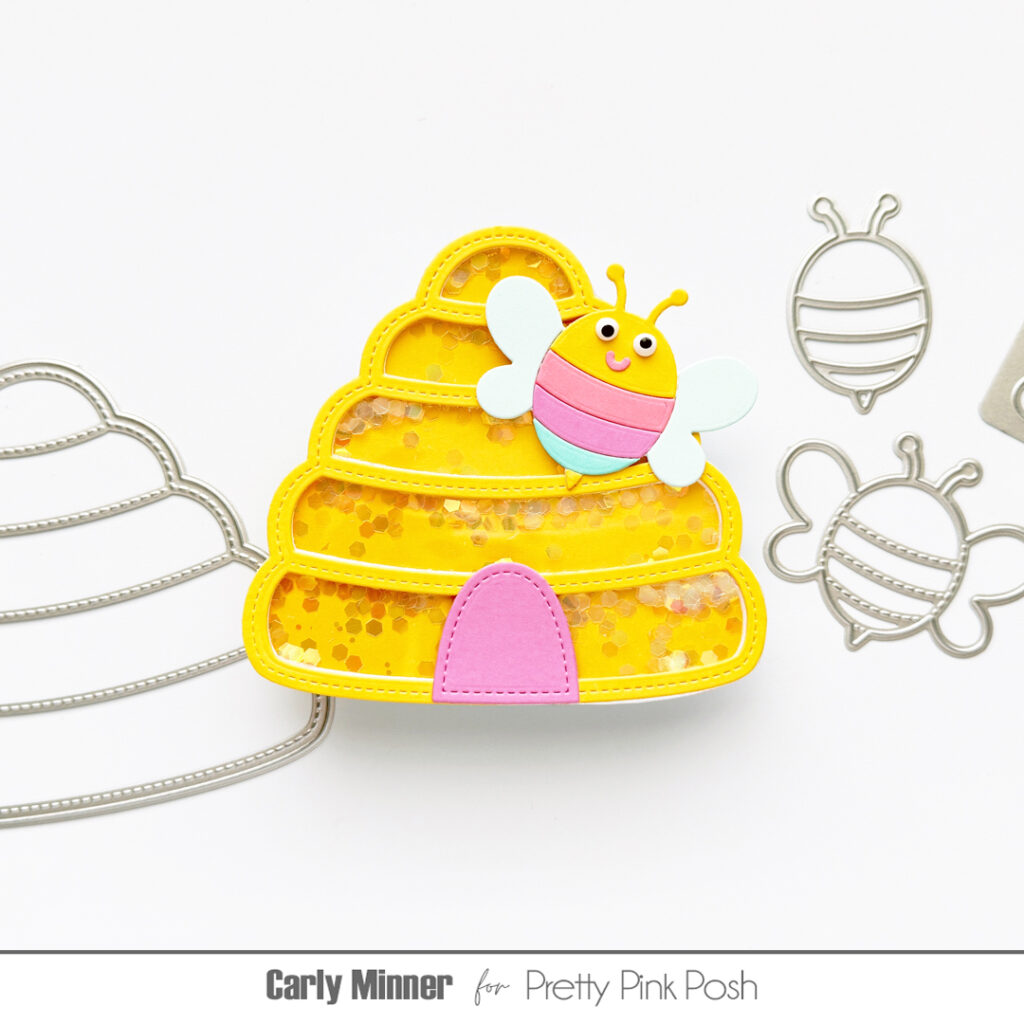
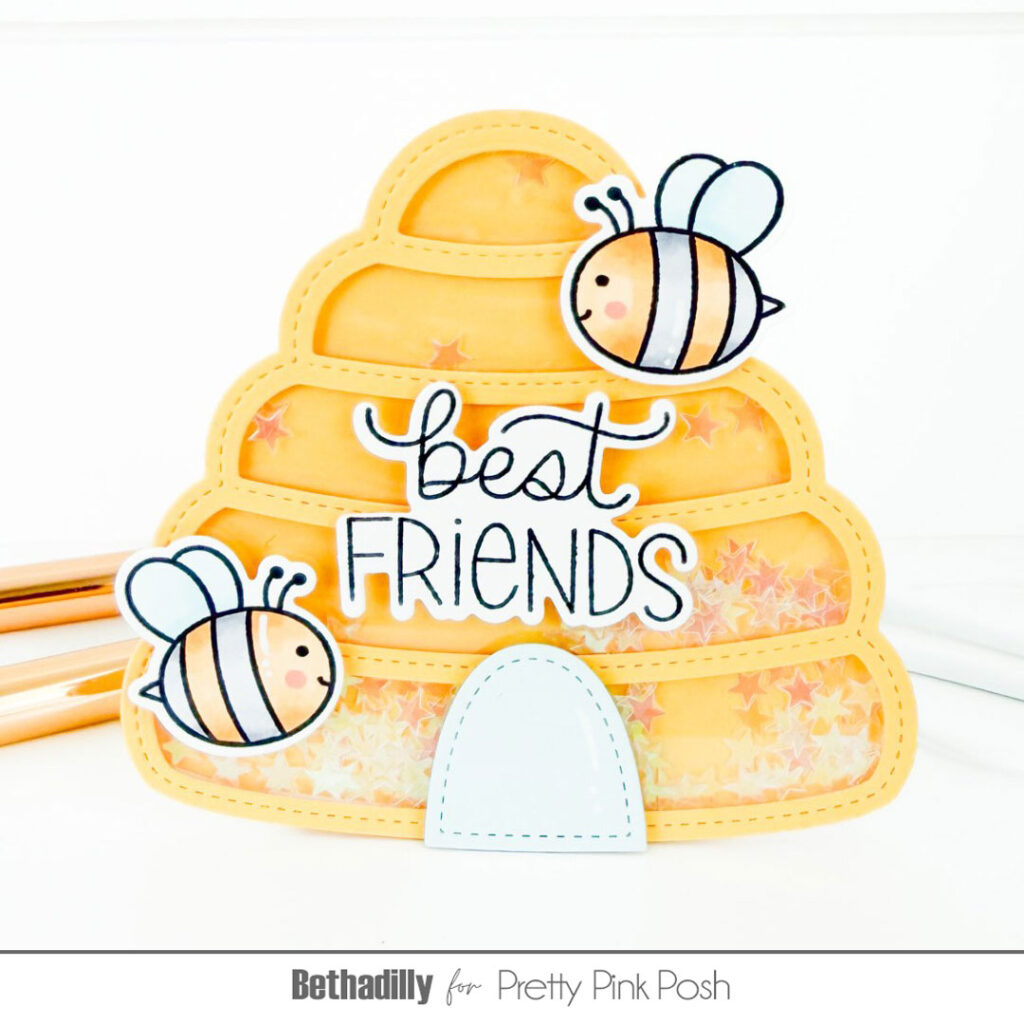
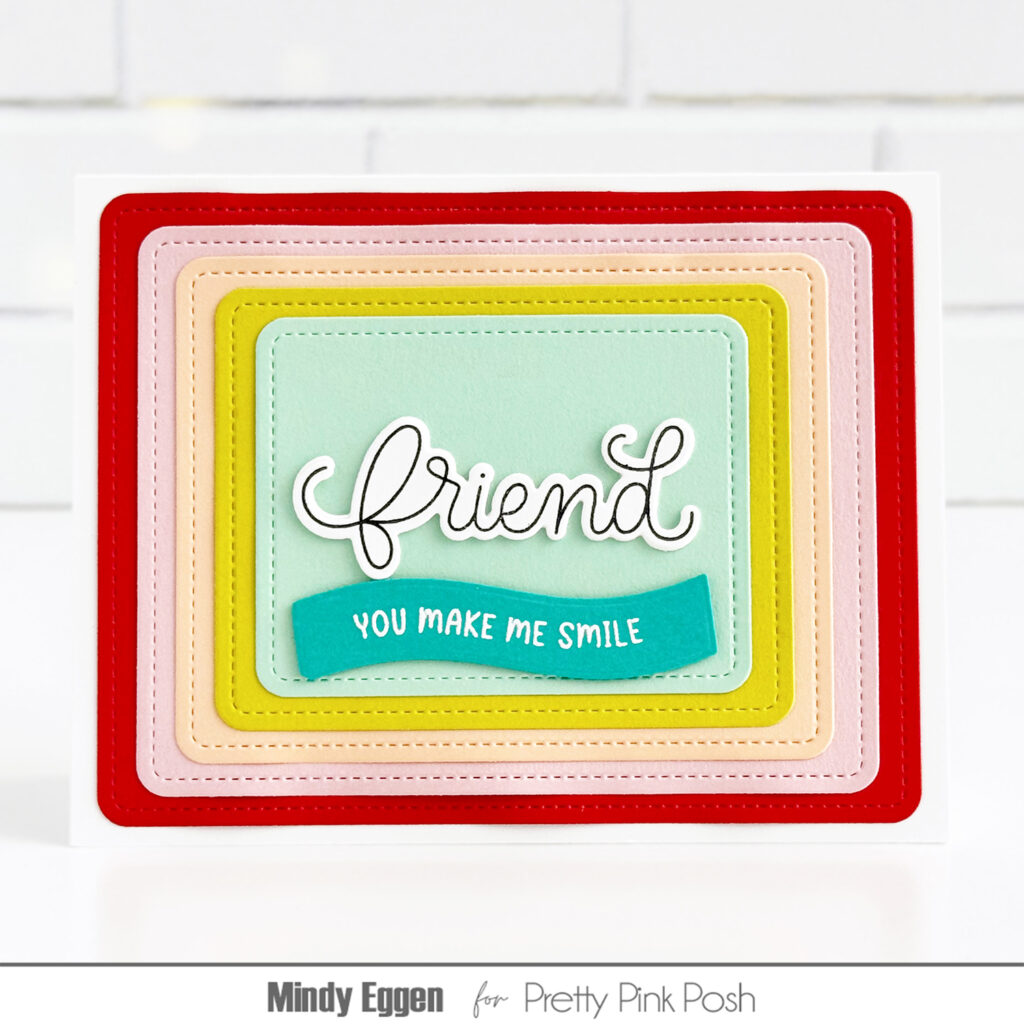
Hi friends, Carly here today. Do you like shaped cards? I think there is something about them that feels extra special and extra fun! And shaped cards are super easy to make with so many of the Pretty Pink Posh shaker dies!
To create the base of the card I die cut the shape from a folded card, making sure to place the folded edge of the card inside the cutting edge of the die. I add at least one more complete shape on top to complete the look (and for stability) and then have fun decorating!
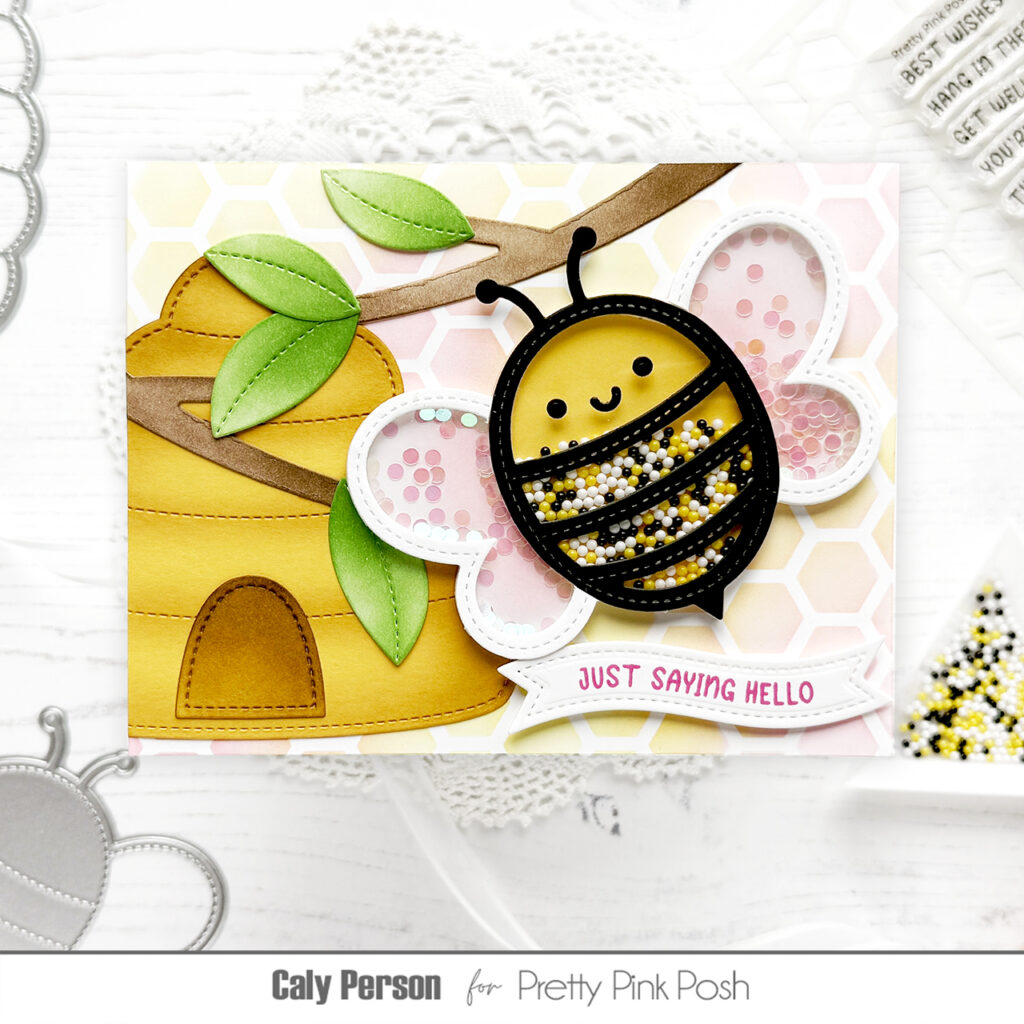
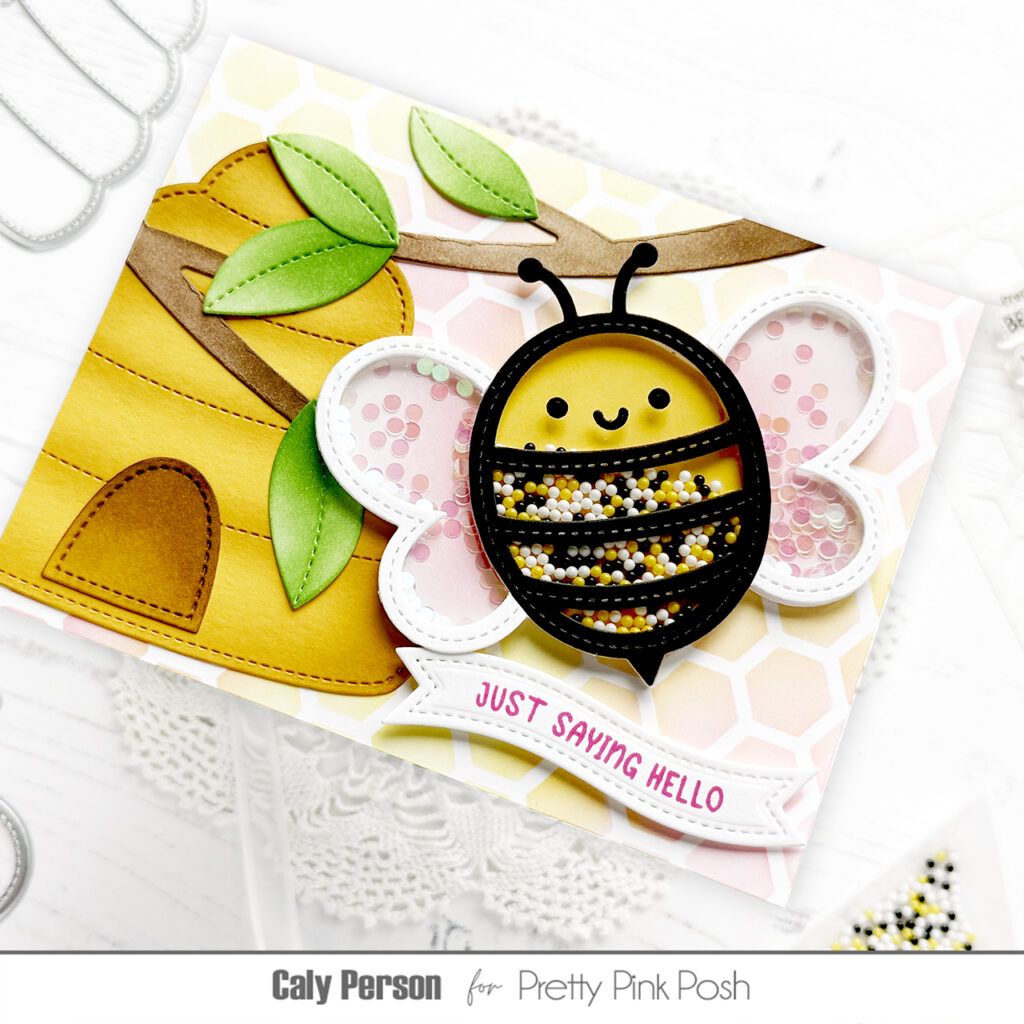
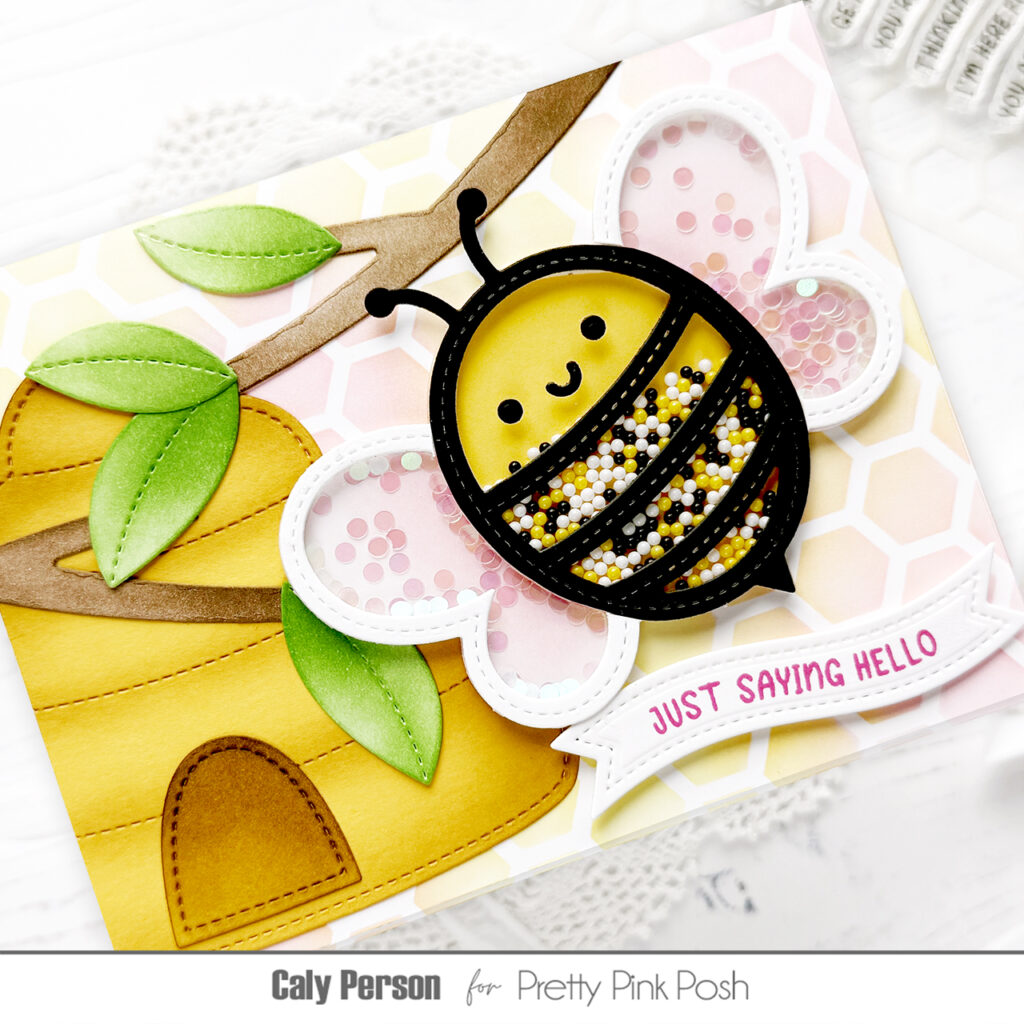
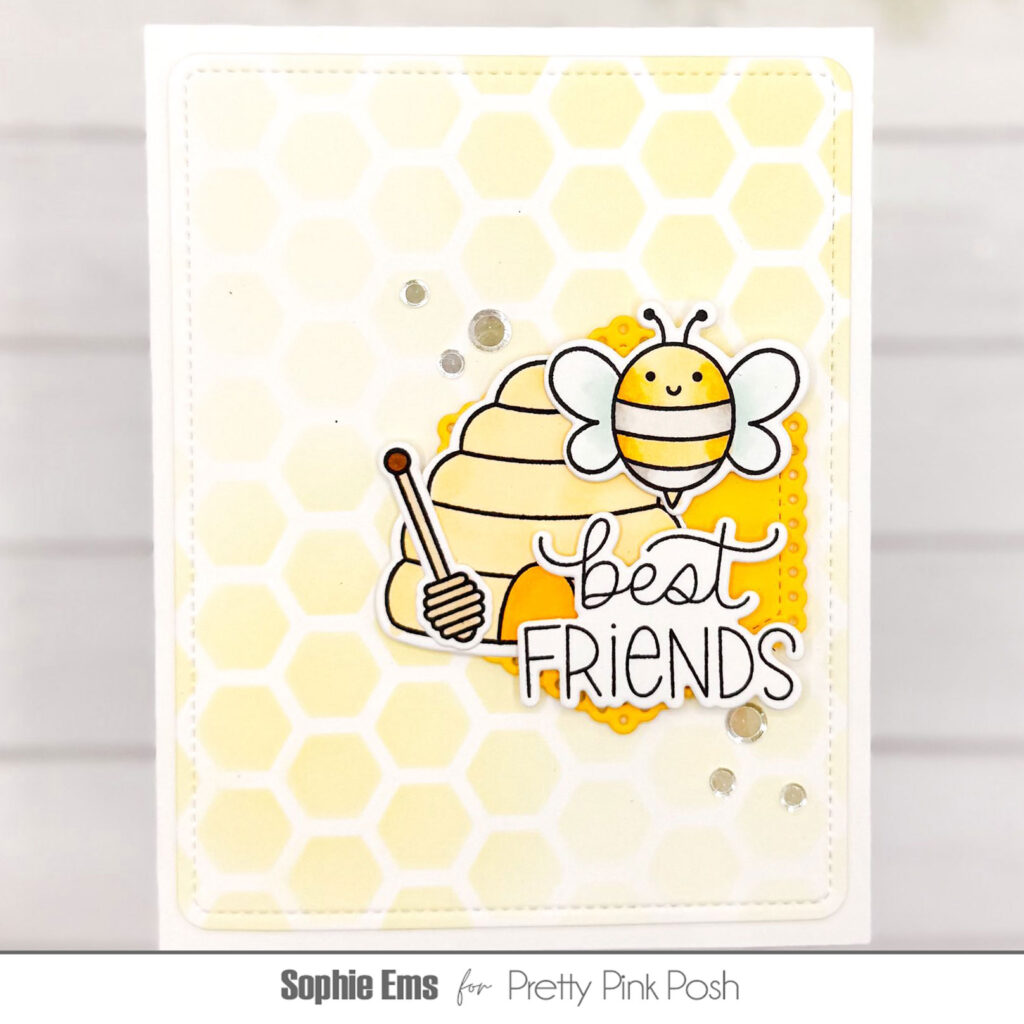
Hello, friends! It’s Caly with you today, celebrating the release of the Pretty Pink Posh May 2026 release! For today’s video hop, I’ve made a card featuring the Bee Shaker.
I added the beehive to give it a full scene, but the Beehive Shaker Diescan be used as a standalone centerpiece on any card! The Everyday Branches helps create pops of color against the yellow of the beehive and bee.
To give my bee more color, I pieced it together using black, yellow, and white cardstock. I made to sure to add more color with the addition of pink on the bee’s wings and in the honeycomb background.
I hope you enjoyed this project! Be sure to hop along and leave a comment along each video stop for your chance to win a $20 gift certificate to shop Pretty Pink Posh!
The May 2026 Release is now available in the Pretty Pink Posh Shop and select retailers that carry our products. If you missed our post yesterday, we revealed all of the products in picture form, but if you would like to see them in a video, Mindy has that for you today!
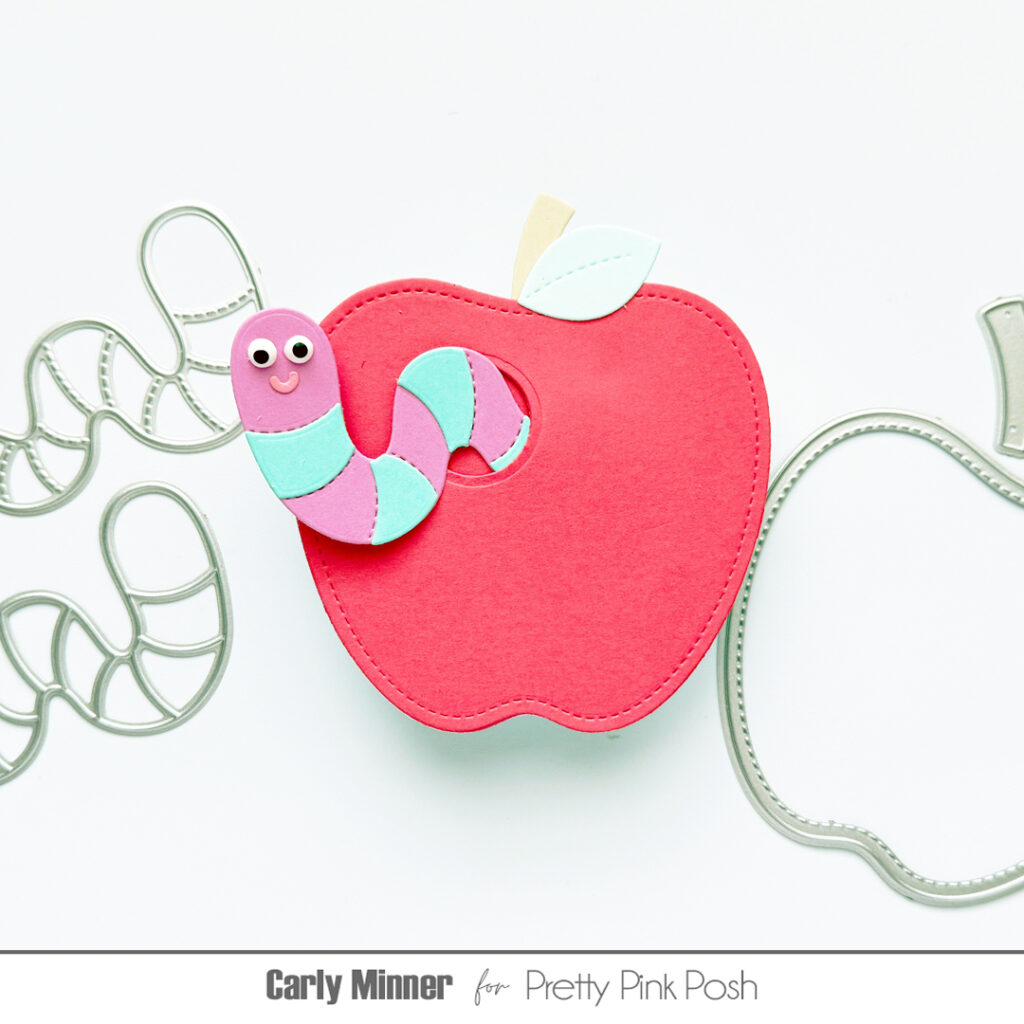
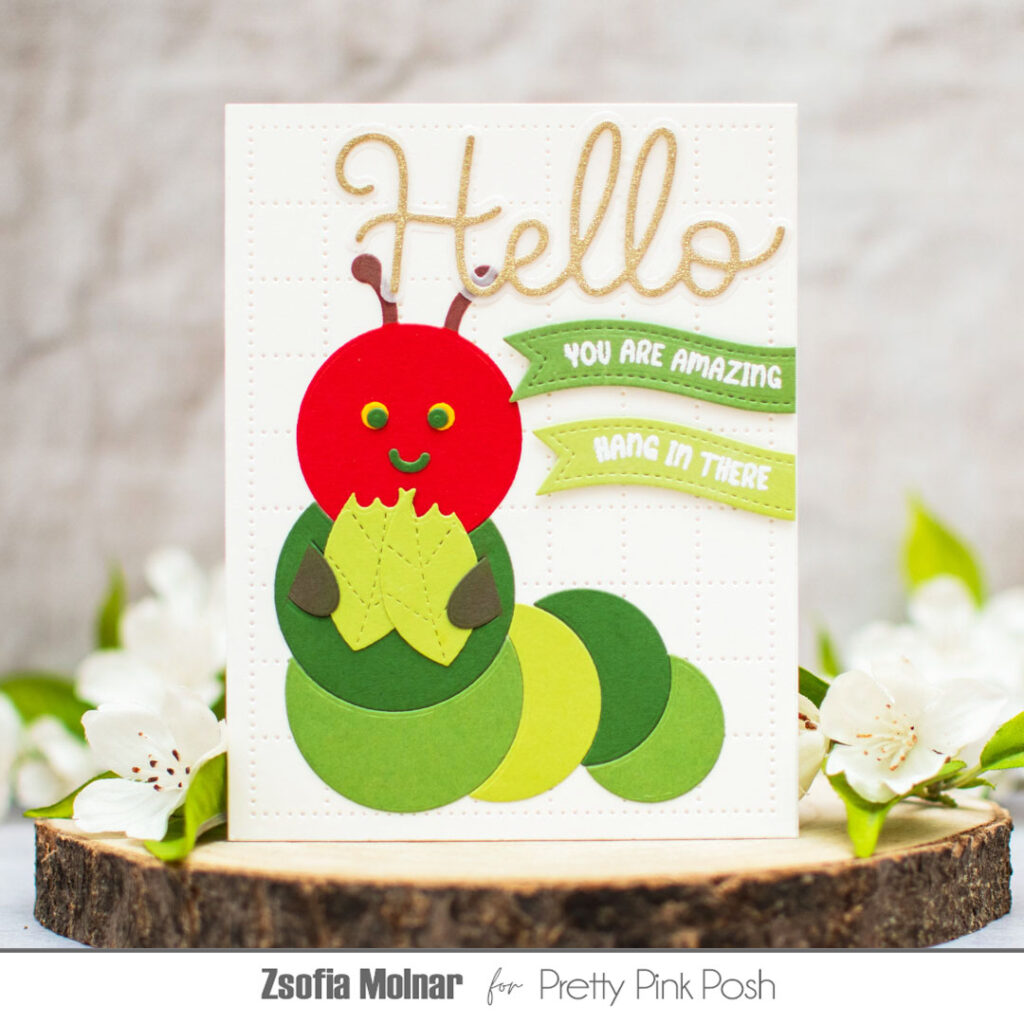
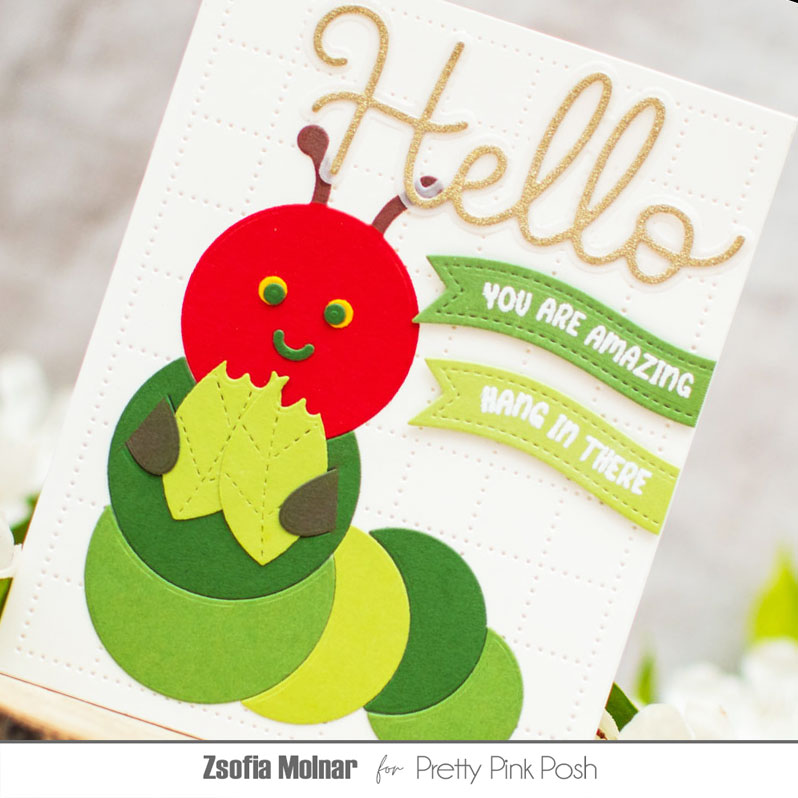
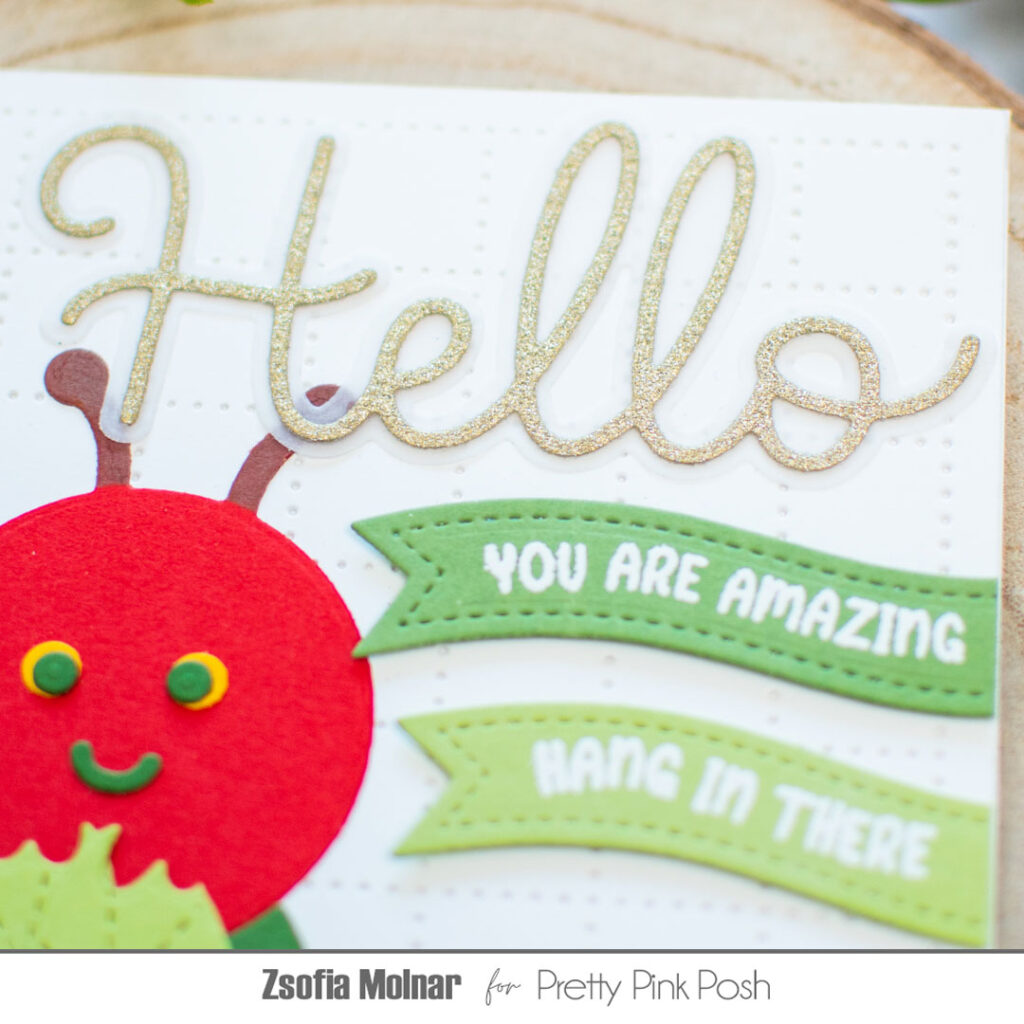
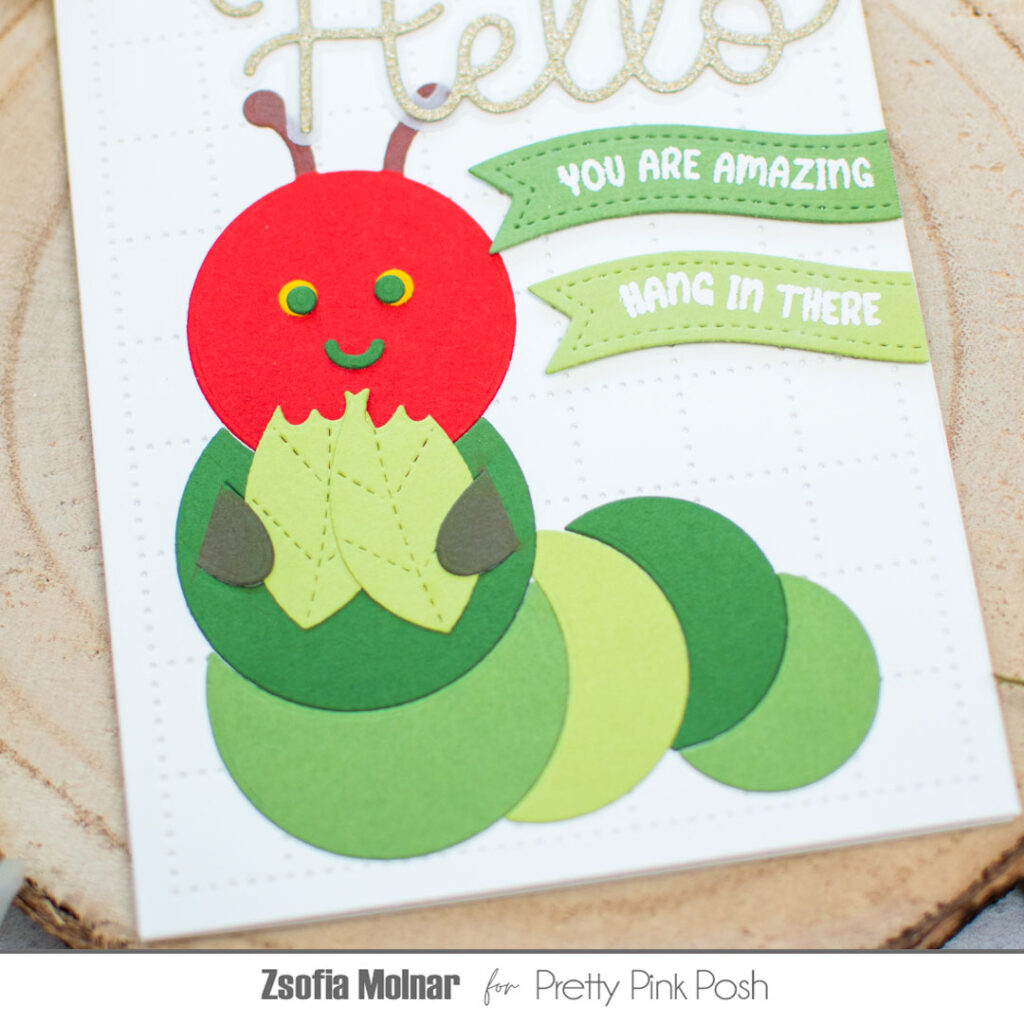
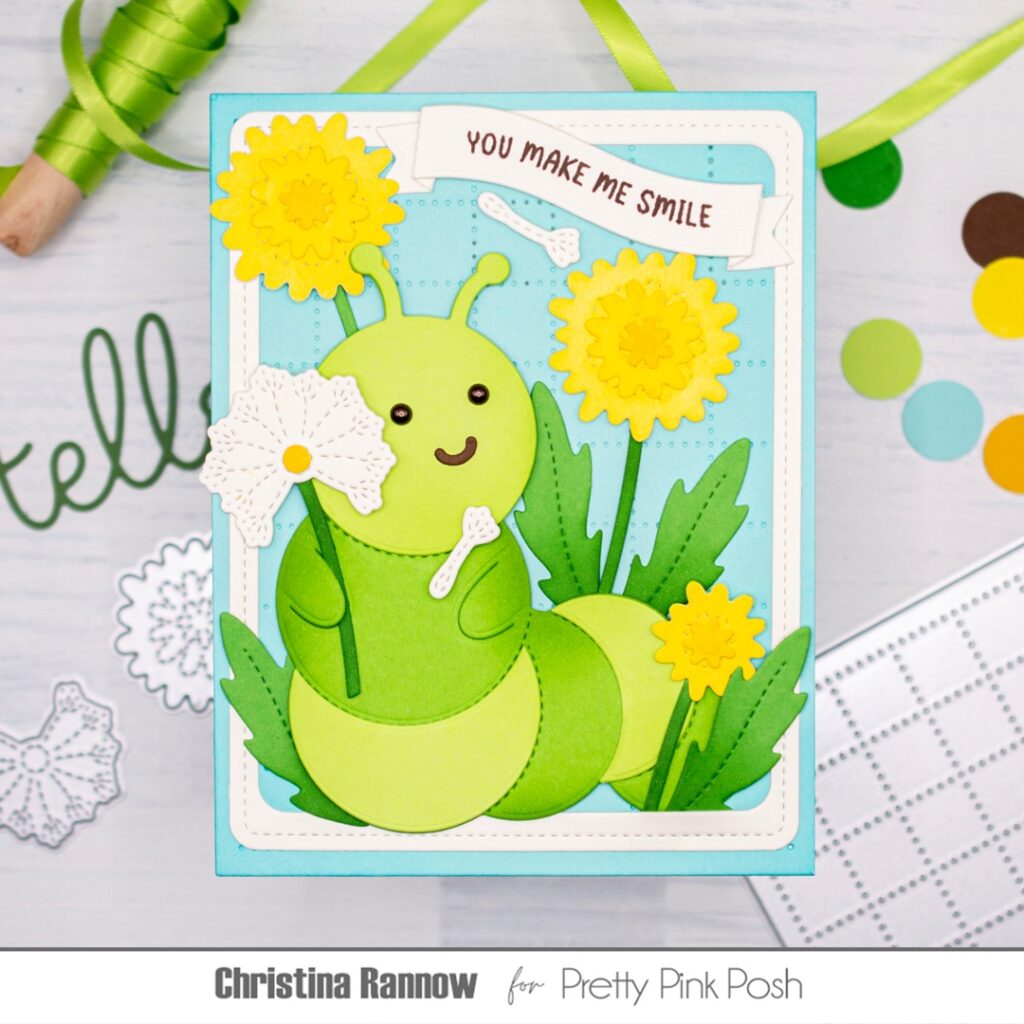
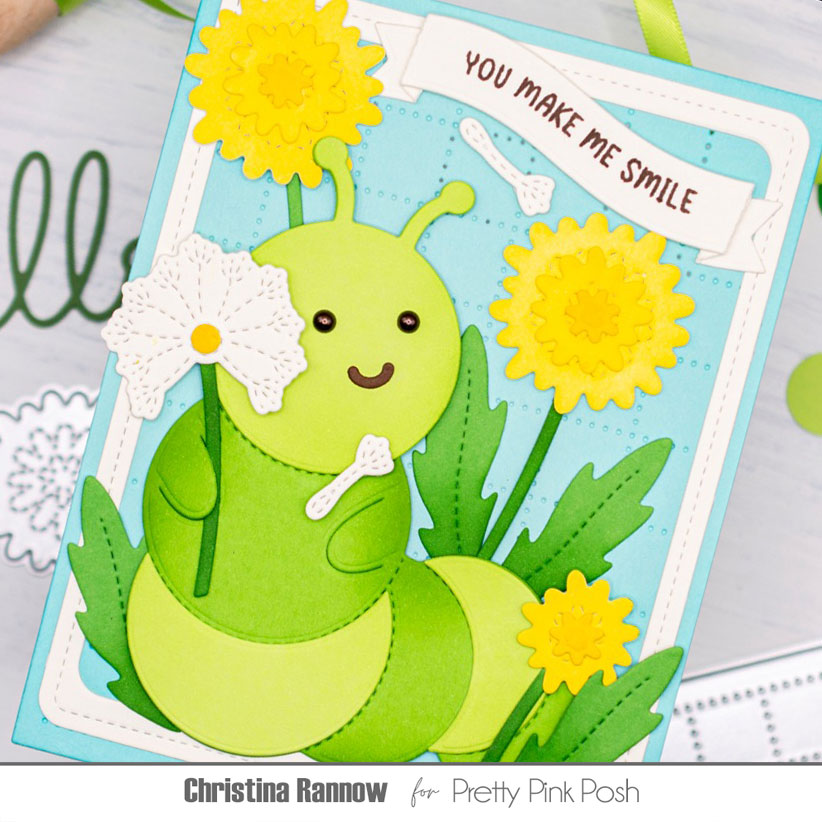
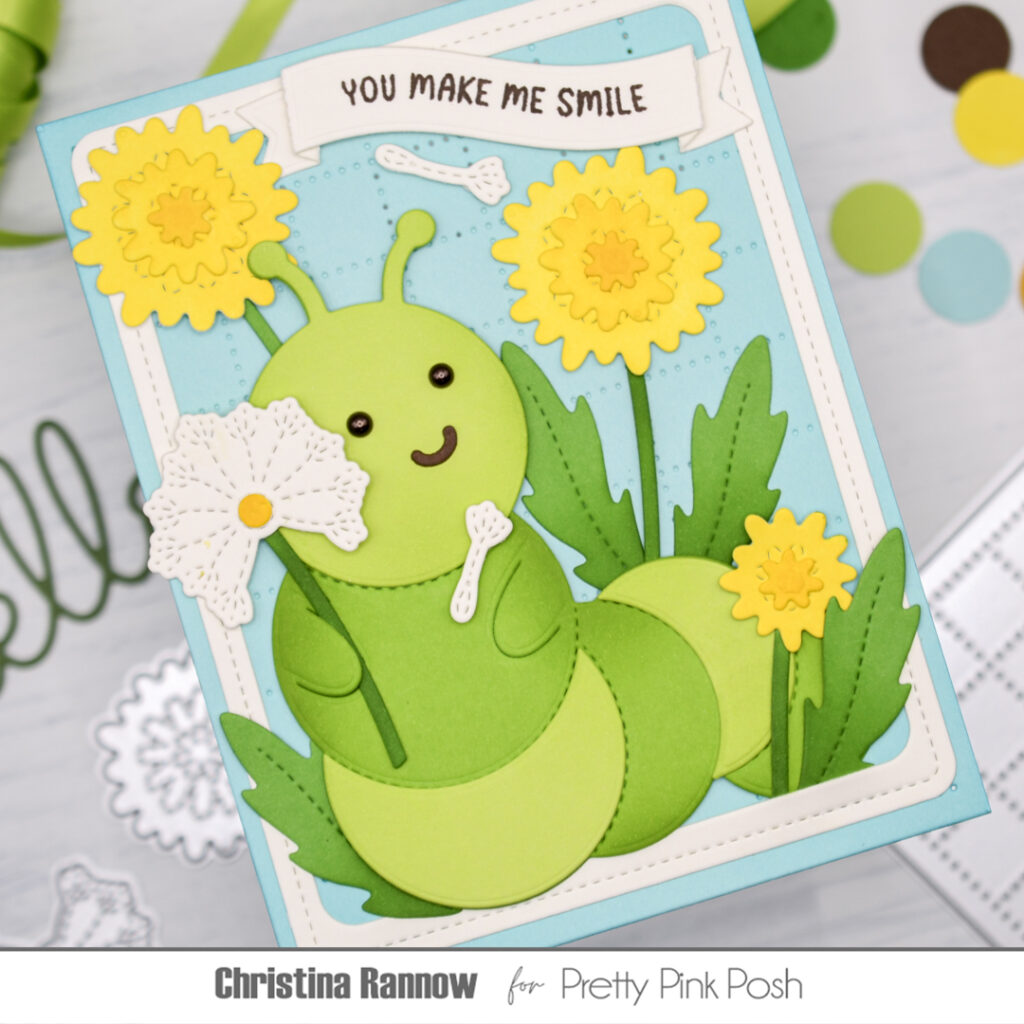
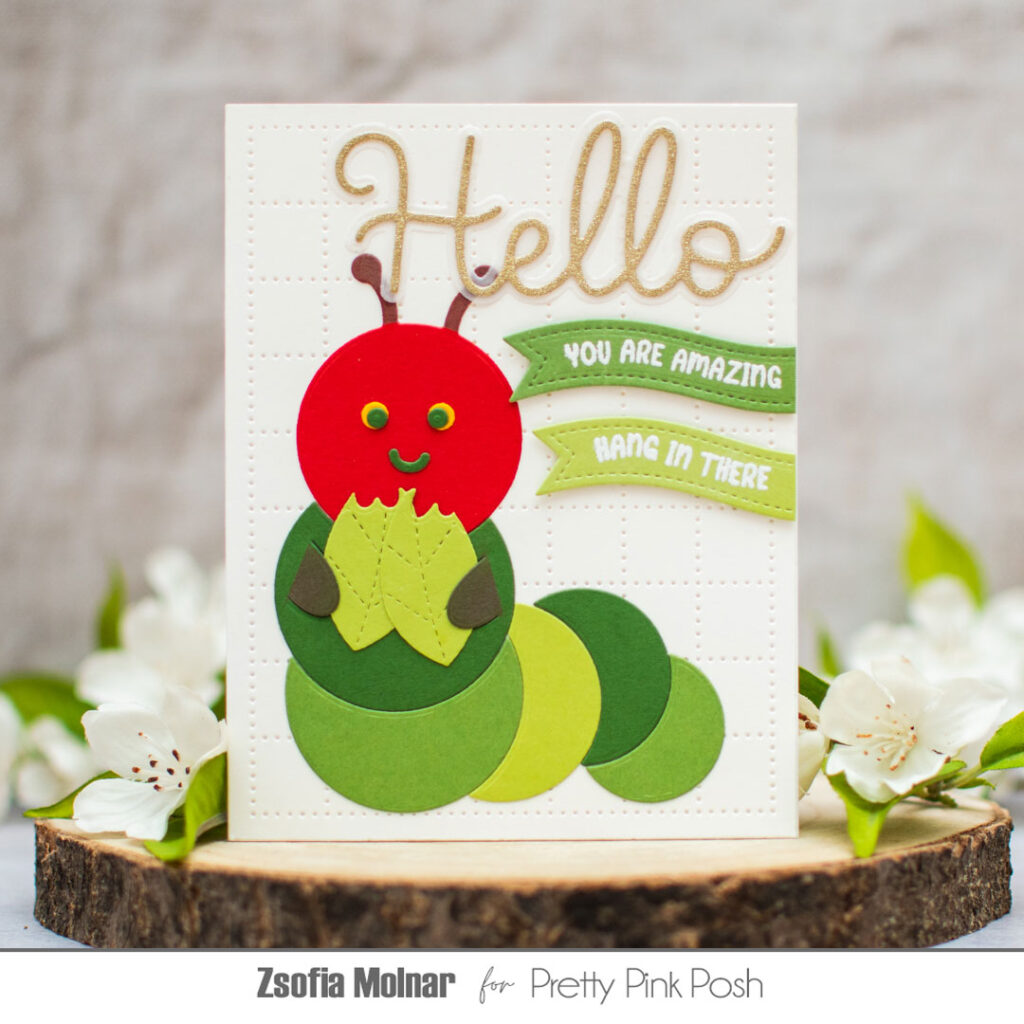
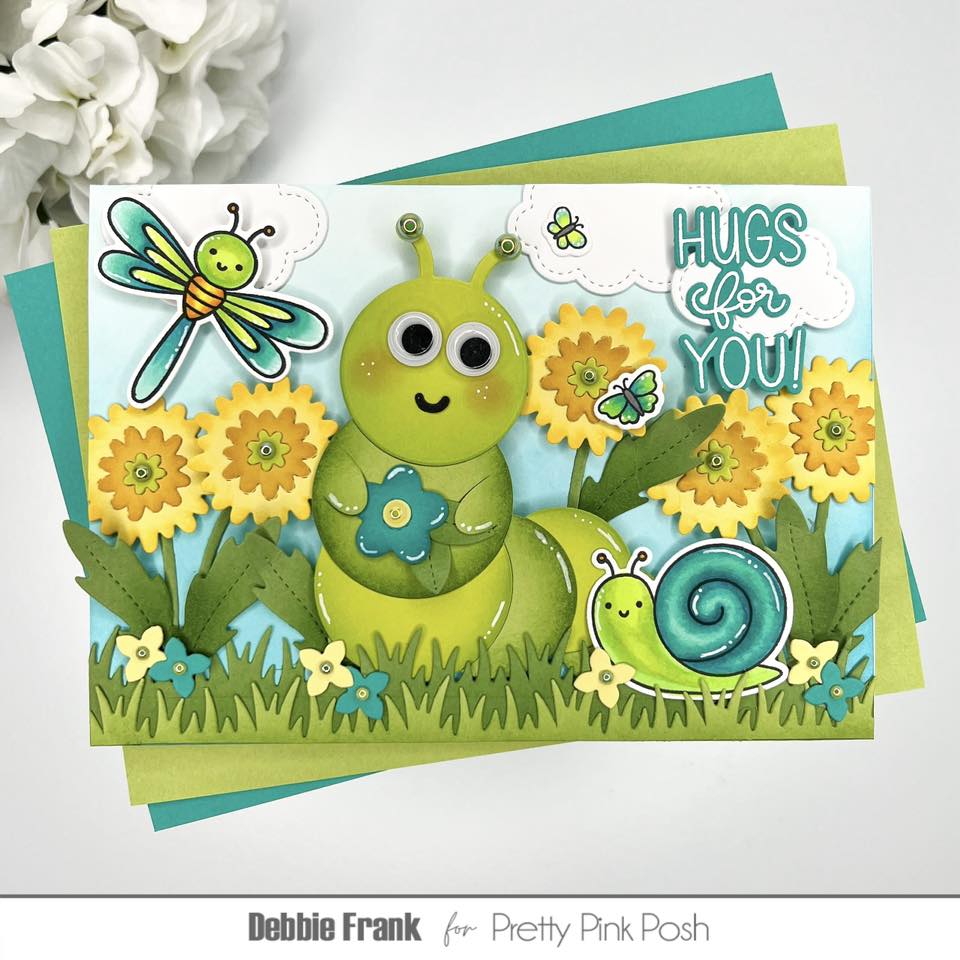
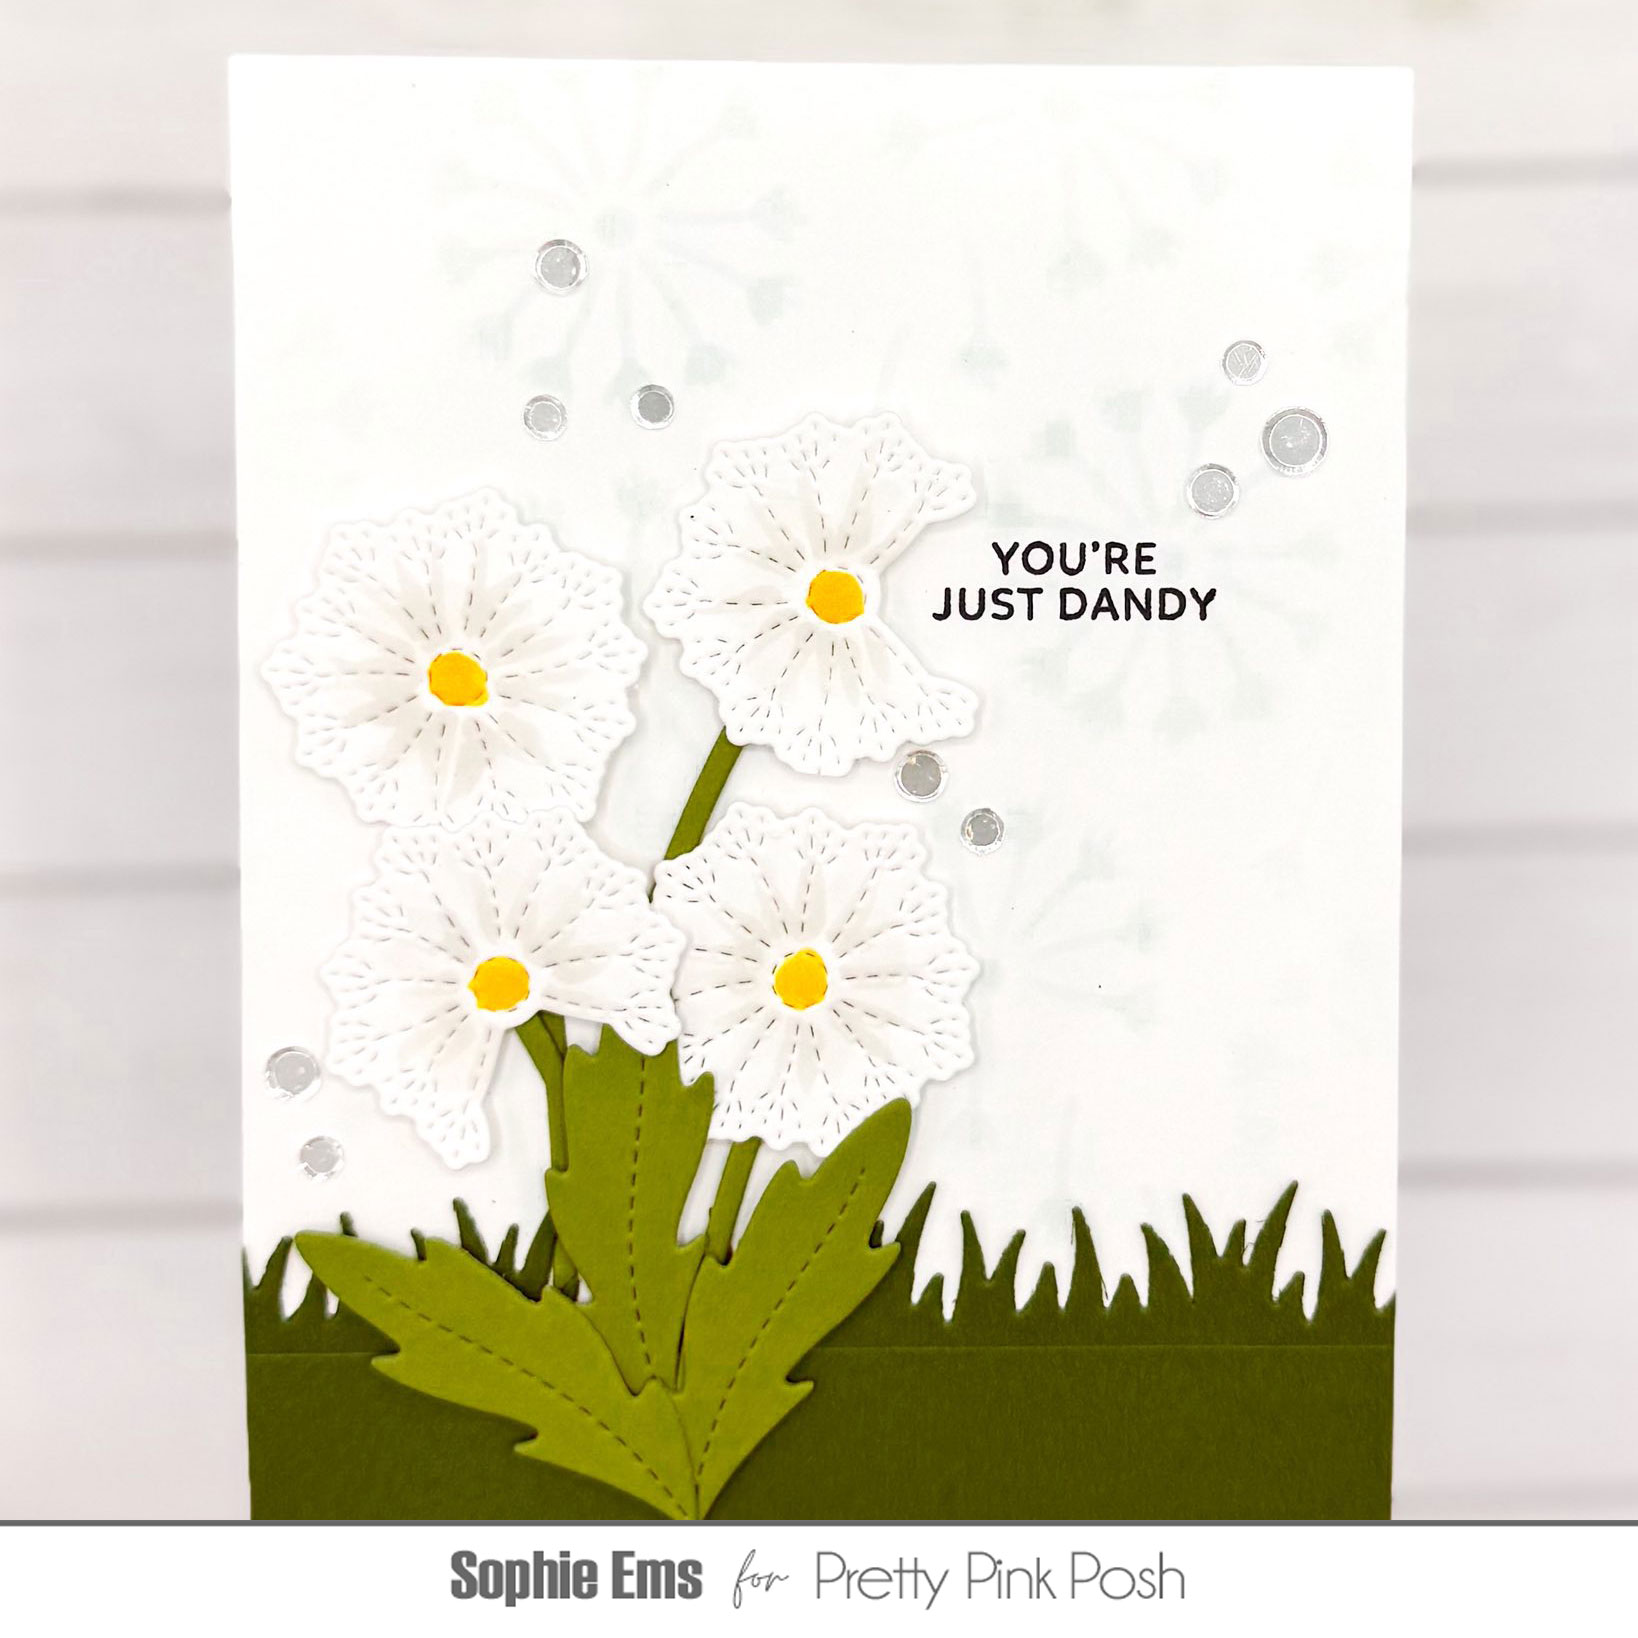
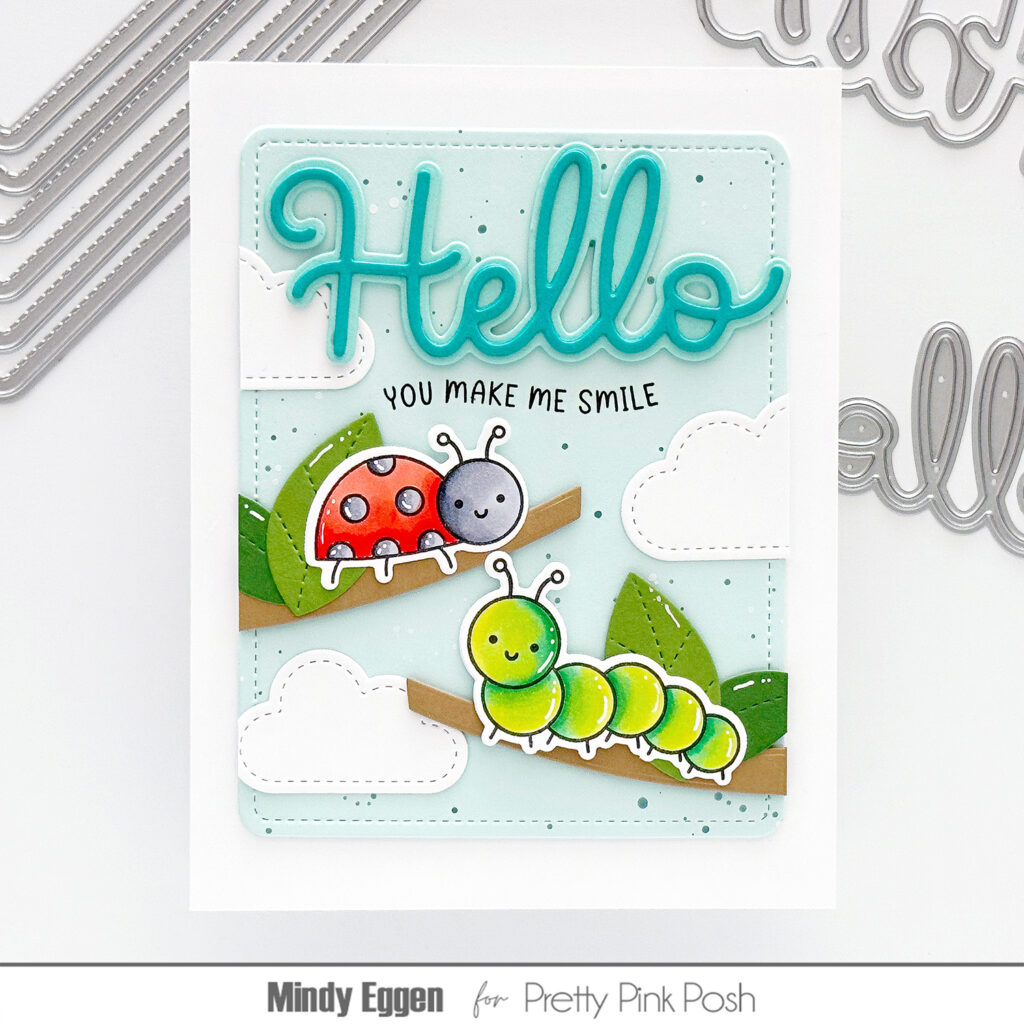
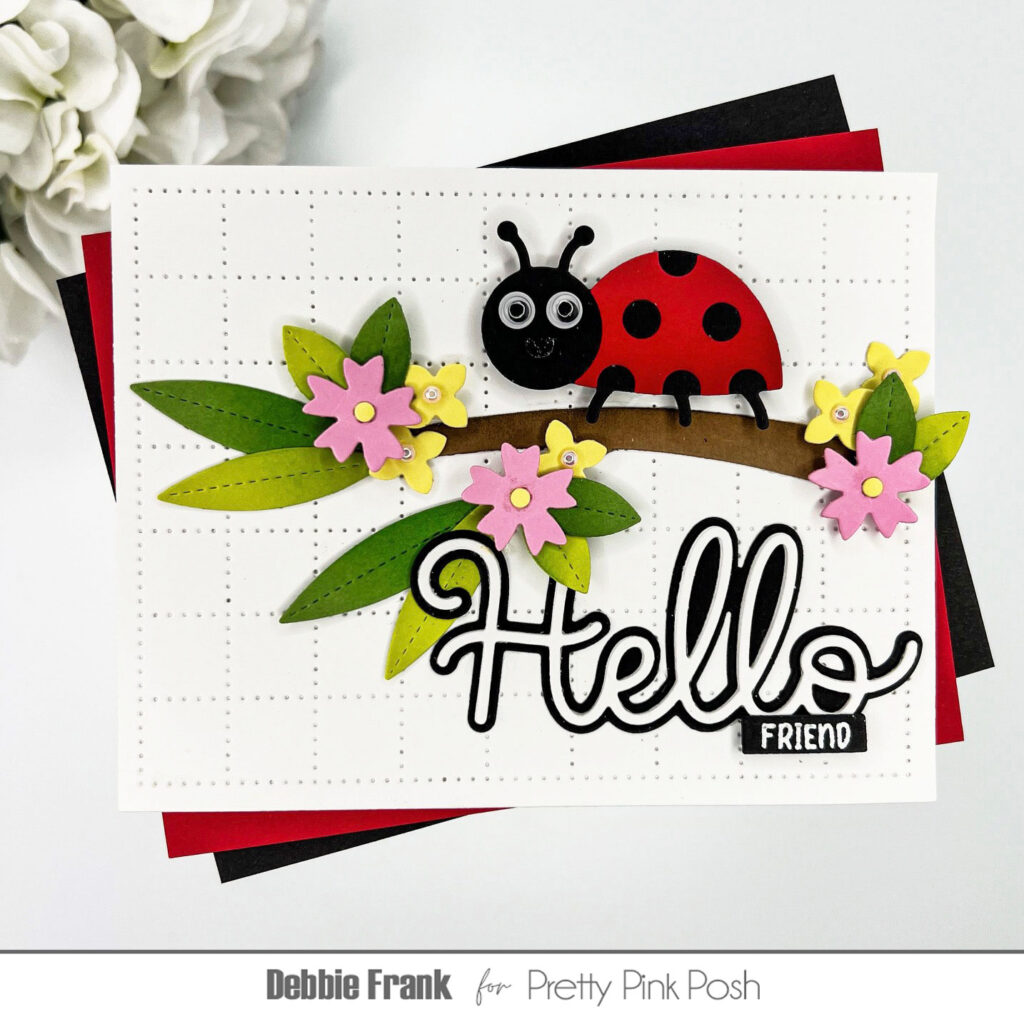
Hello Everyone! It is Zsofi here today with a cute caterpillar card using the May release. It is absolutely unique and full of cheerful little garden critters, perfect for the season. This card was heavily inspired by the famous children’s book, The Very Hungry Caterpillar. Let me show you how I made it.
First I cut the Caterpillar Holder die 3 times from different shades of green cardstock. I kept the negatives to use as a template later. I also cut the head from a red scrap piece, masked off the head under the little aentenna with a piece of post-it and blended it with Gathered Twigs Distress Oxide ink. On the red it really looks purplish, just like in the book. I did the same with the little arms. Then I die cut the eyes and mouth from the darkest green cardstock and found a slightly bigger pair of circles in the Stitched Dandelions die set, which I cut from yellow cardstock to layer it under the green eyes.
I wanted the background to have some texture while still resembling the children’s book, so the new Checkered Pierced Plate was the perfect choice. I cut it from white heavy weight cardstock, and using one of the negative pieces of the caterpillar holder die cuts as a template, I assembled the little critter and adhered all the pieces directly on the background.
I wanted some leaves for this cutie to munch on, so I die cut two leaves from the Everyday Branches die set and used the edge of a dandelion die to create the “bite”. It looks so cool, having this very hungry caterpillar holding those half-eaten leaves!
I wanted to keep the sentiment simple yet encouraging, just like the main message of the book. So I die cut the Large Hello Shadow die from gold sparkle cardstock and the shadow from vellum.
I also die cut 2 green flags with the Banner Greetings 3 die set and white heat embossed some encouraging words from the Everyday Banner greetings stamp set to complete the message. I popped them up under the big Hello using 3D foam squares for extra dimension.
Thanks for stopping by, I hopoe you were inspired by this card!
Welcome to Day 4 of sneak peeks for the May 14th release. Today we’ll be taking a look at the new stamps and stencils. In this release, there are five new stamp sets (four with coordinating dies) and five new stencils.
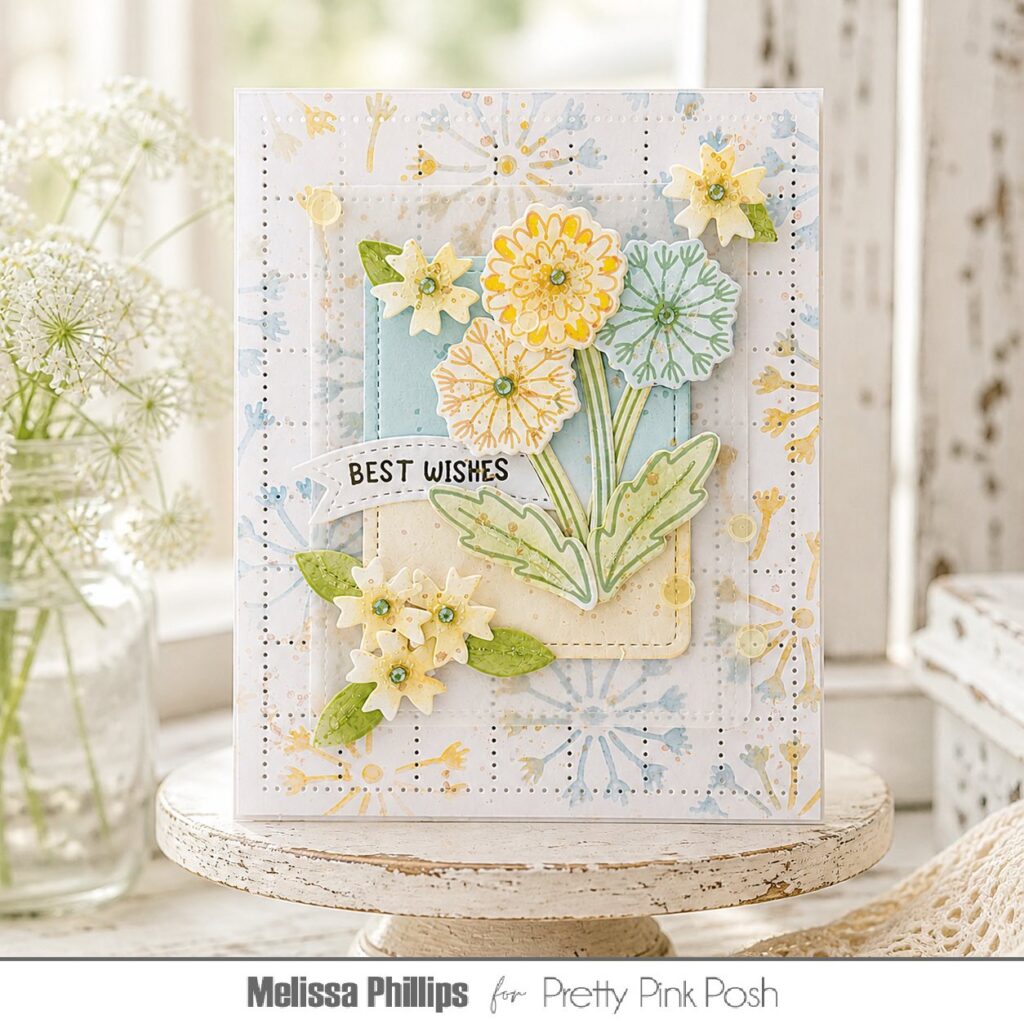
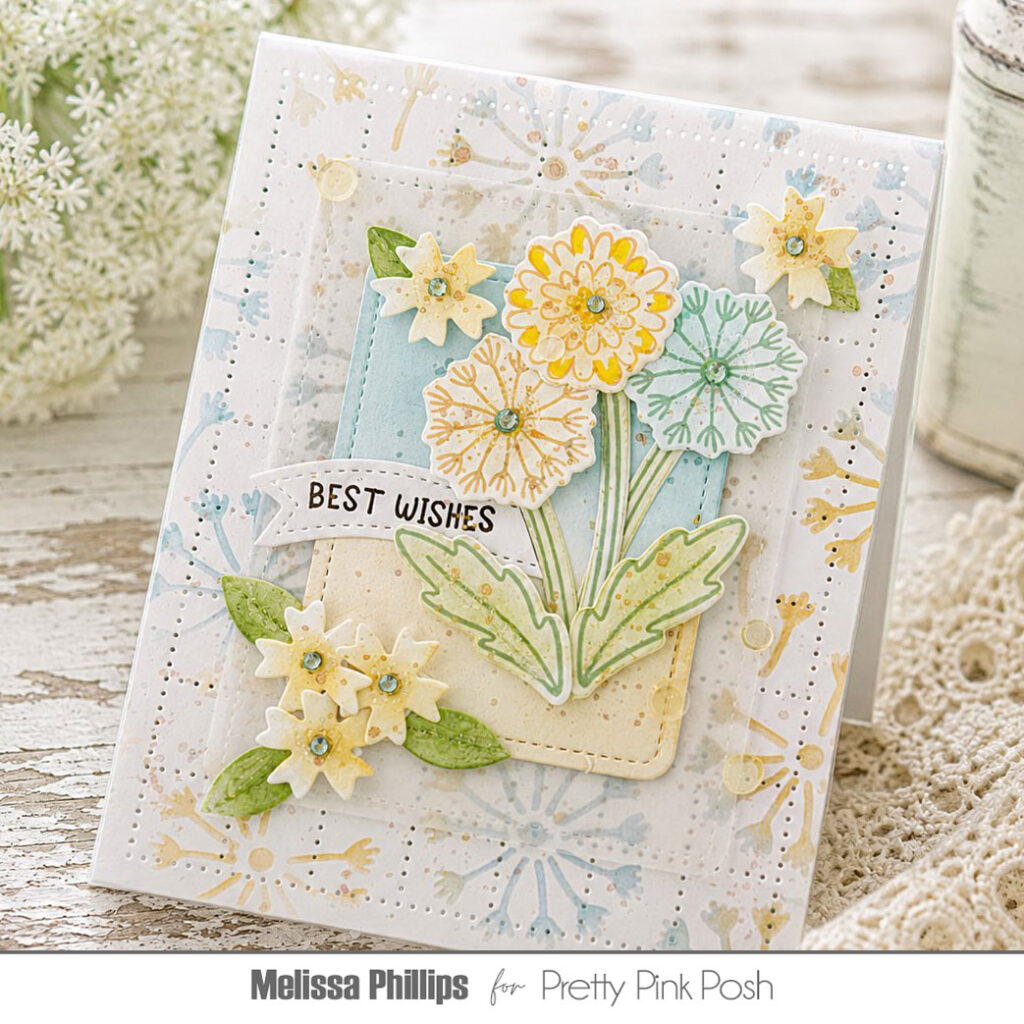
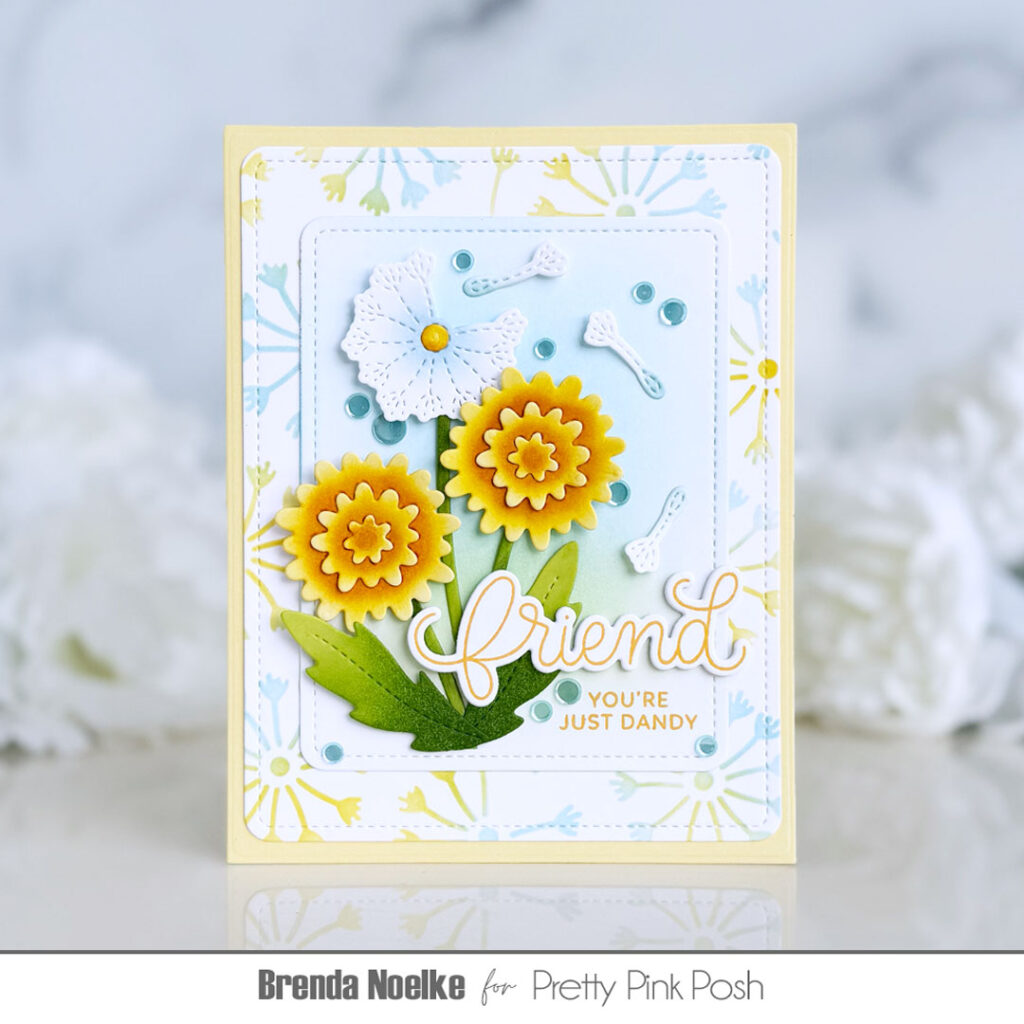
Hi everyone! Melissa Phillips here with you today and I am so happy to be celebrating the new May Release from Pretty Pink Posh.
I’m sharing a couple of cards created with the new stencils and stamps you’ll find in the May Release. You’re in for such a treat!
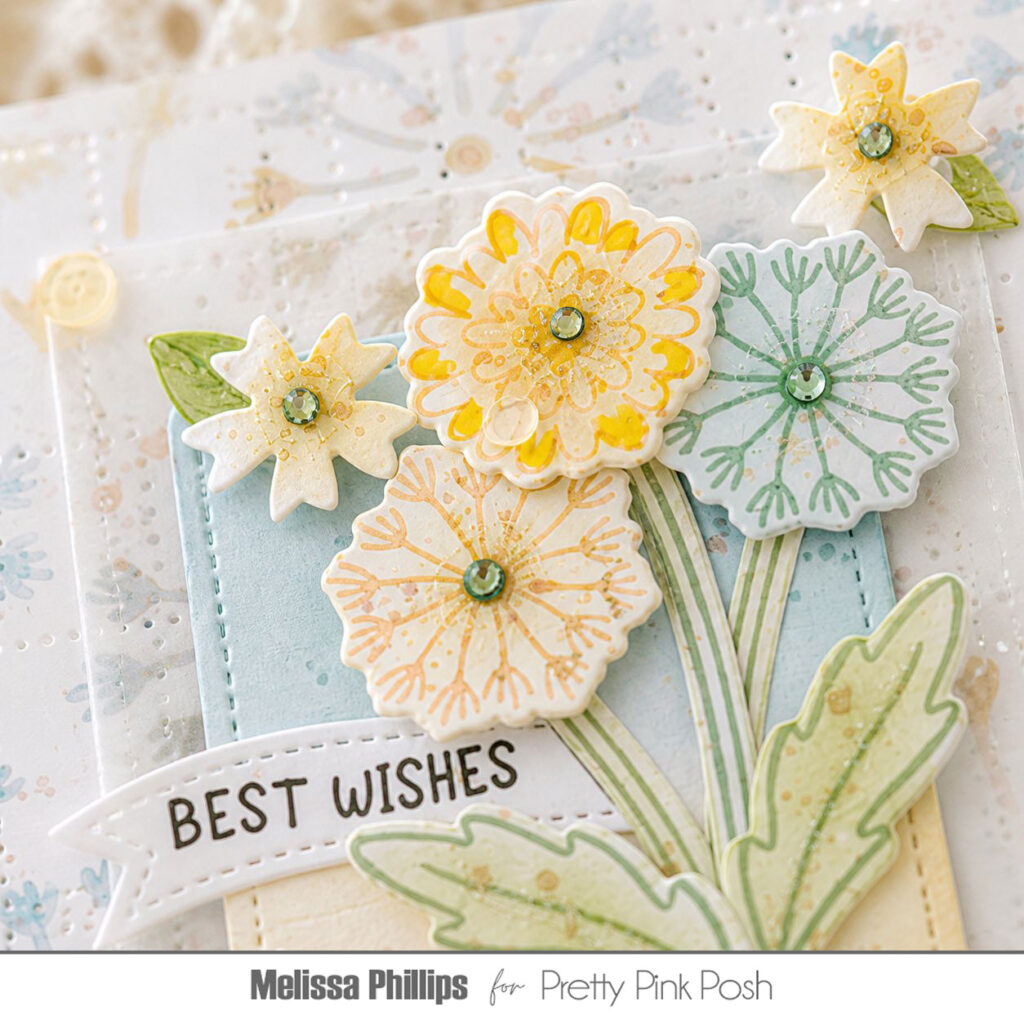
My first card uses the darling, new Dandelions stamps and coordinating dies. I began with the new Checkered Pierced Plate die to create my soft, textural background. I stenciled dandelions across my card base using the new Dandelion Background stencil. It’s so irresistible! From there I’ve used the new Rounded Stitched Rectangles die to create a scene for my dandelions. The base rectangle was cut from vellum and the top was cut from white cardstock and ink blended in coordinating colors.
Each dandelion was cut from white cardstock and then stamped in shades of yellow and pale green. I then ink blended coordinating colors over each, stem, leaf, and dandelion. I arranged them using dimensional adhesive to make them pop up off the card.
My sentiment comes from the new Everyday Banner Greetings stamp set and Banner Greetings 1 dies. Accent flowers were cut and ink blended using the Stitched Spring Flowers dies. Who would’ve thought weeds could be so cute?
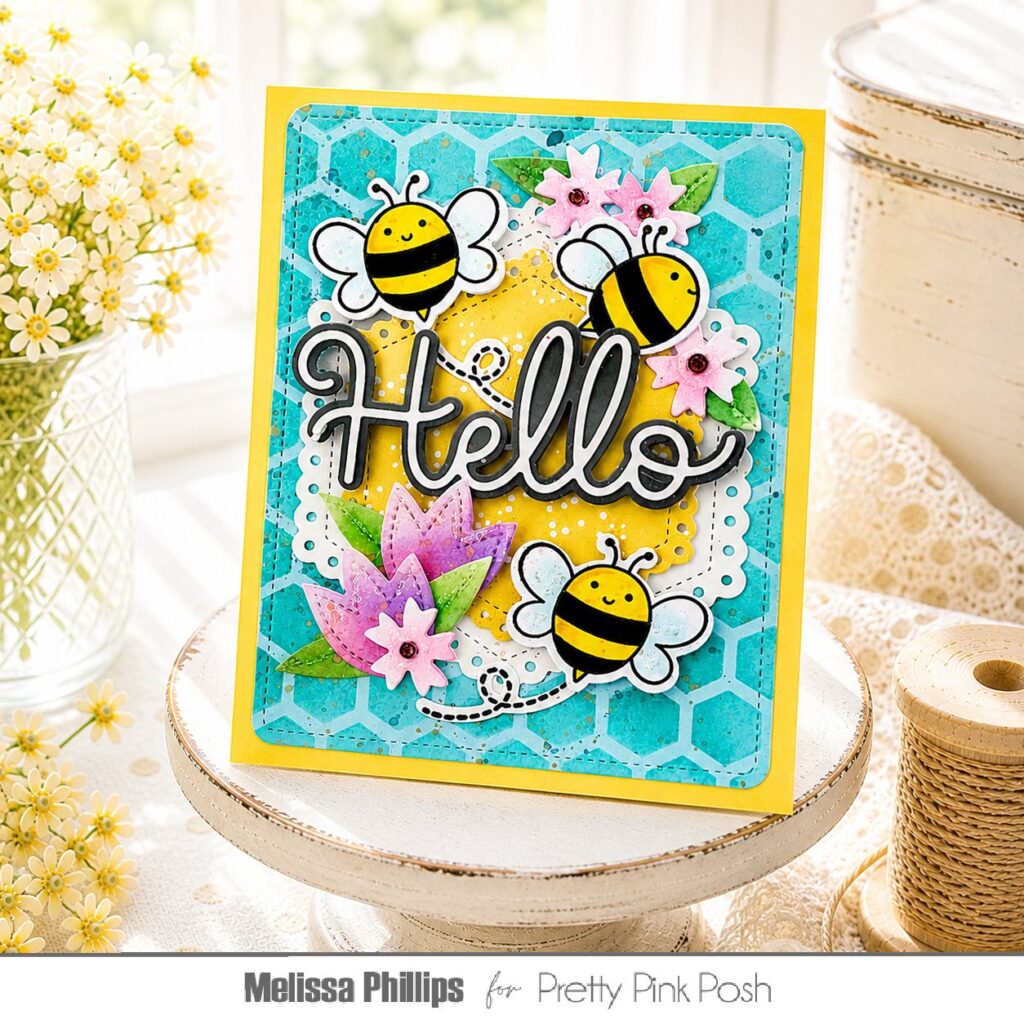
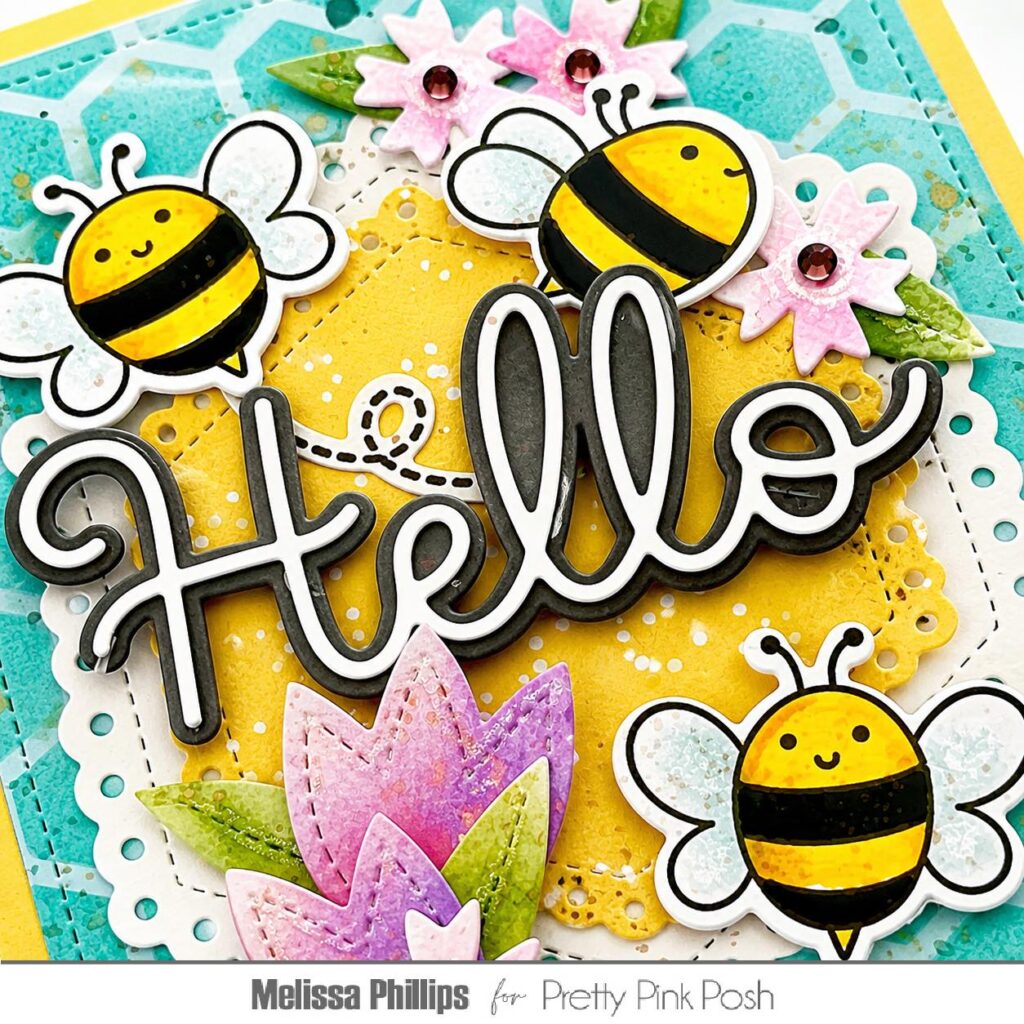
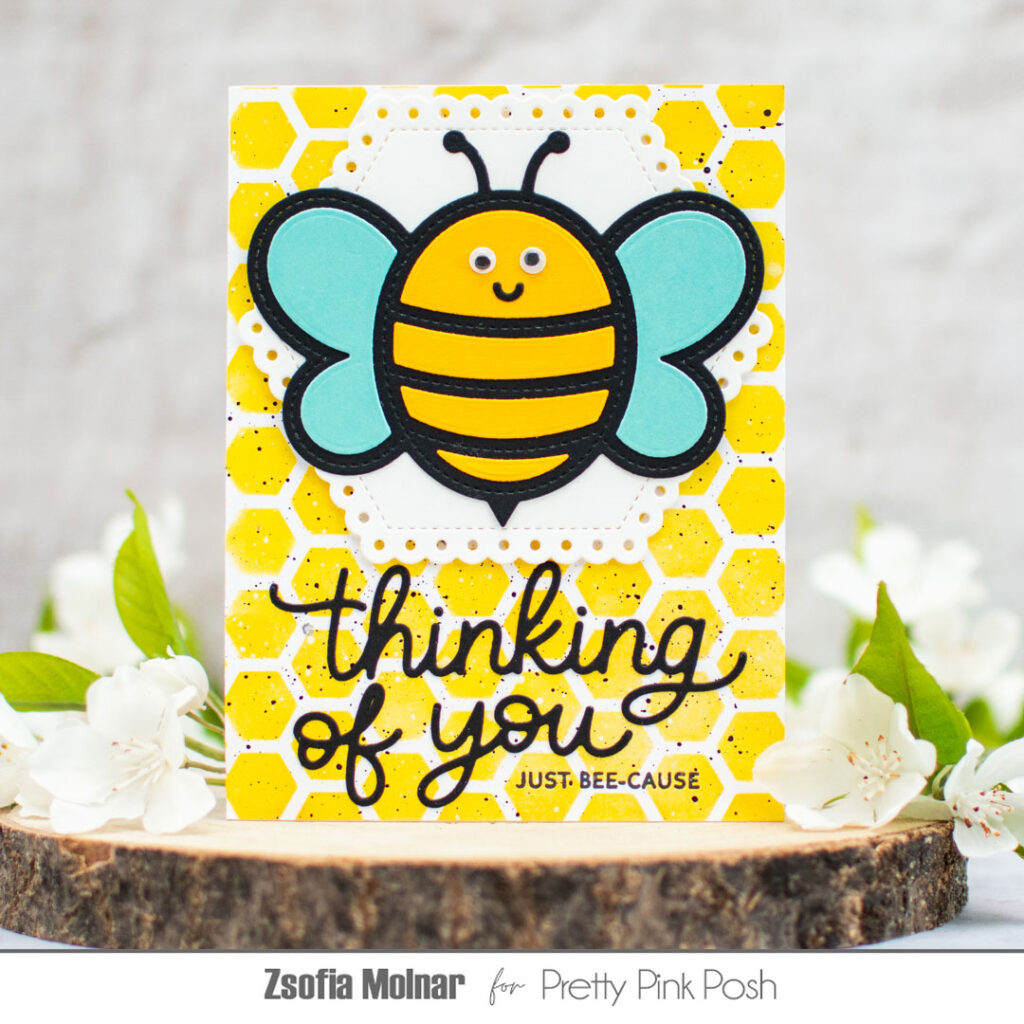
My second card warms my heart! I’ve used the new Honeycomb stencil to create my background. I stenciled bright aqua ink over an aqua cardstock background and then added a bit of splattering using coordinating Distress Spritz.
I used the Eyelet Hexagons dies to create my focal point. These come in a variety of sizes and layer together so perfectly. I added stamped and die cut bumblebees using the new Bee Additions stamps and coordinating dies. They are the cutest, happiest bumblebees!
My sentiment comes from the new Large Hello Shadow die. I love this beautiful, bold sentiment, don’t you?
The sweet tulips and tiny flowers were cut using the Stitched Spring Flowers dies. They make the sweetest accents and Iove adding them to my cards to finish things off.
Ready to see some wonderful samples from the team using these products? It’s so fun to see how we can use the same products in such a variety of ways!
It’s been so fun creating with you today. Stop by tomorrow to see the photo reveal of all the new products!
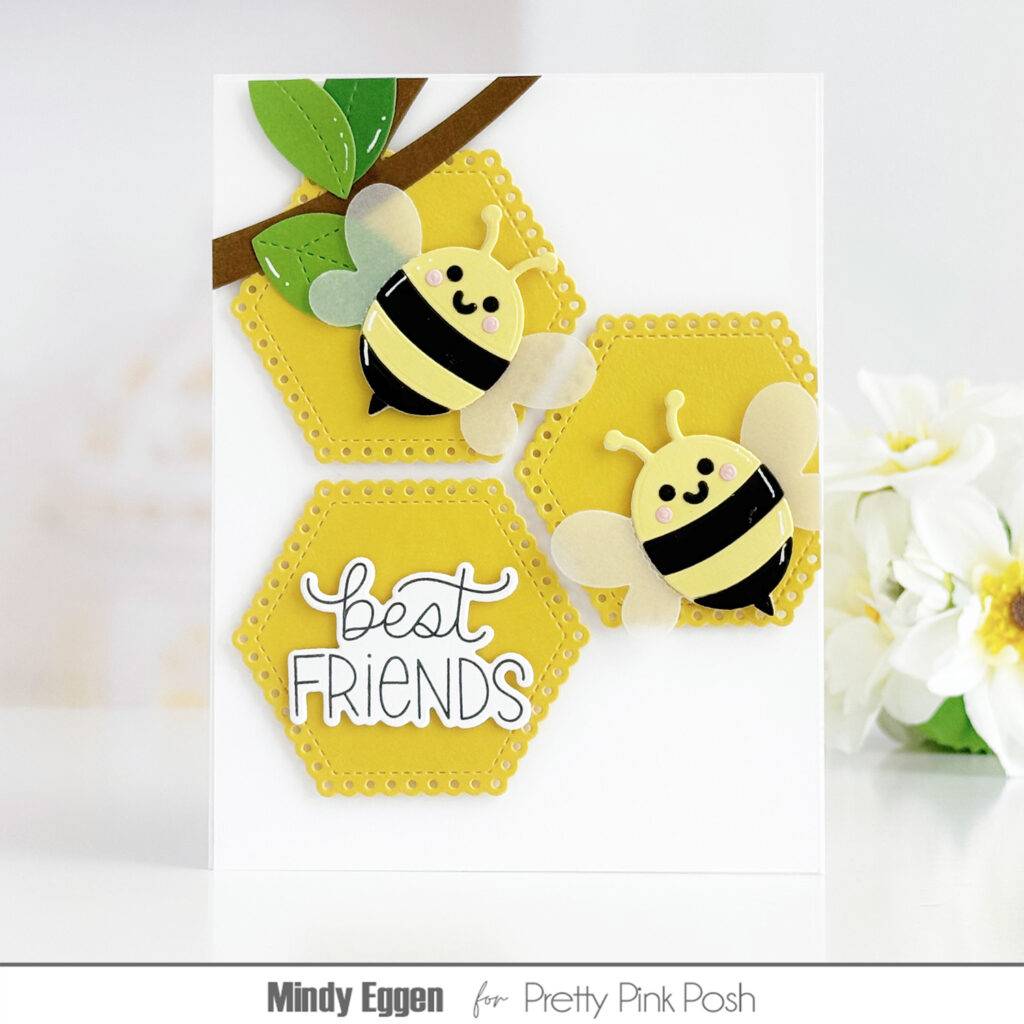
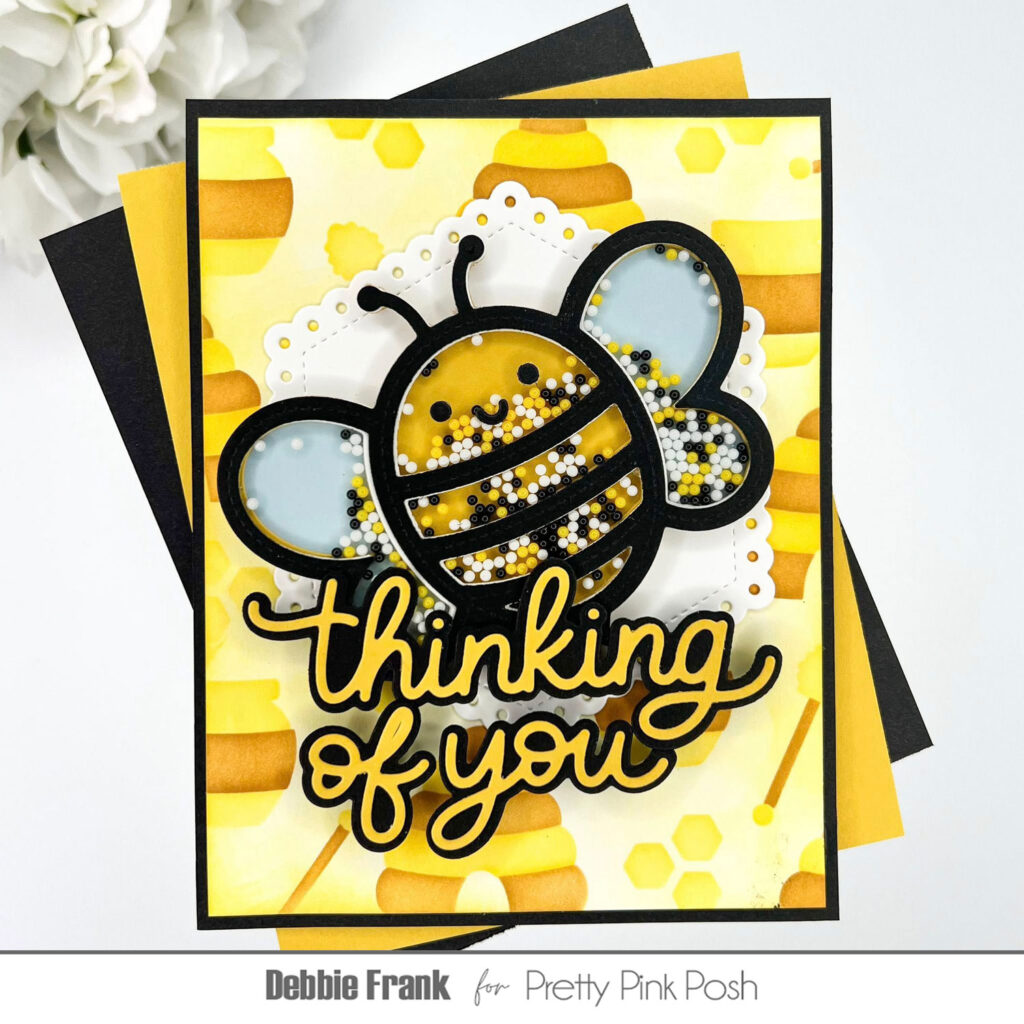
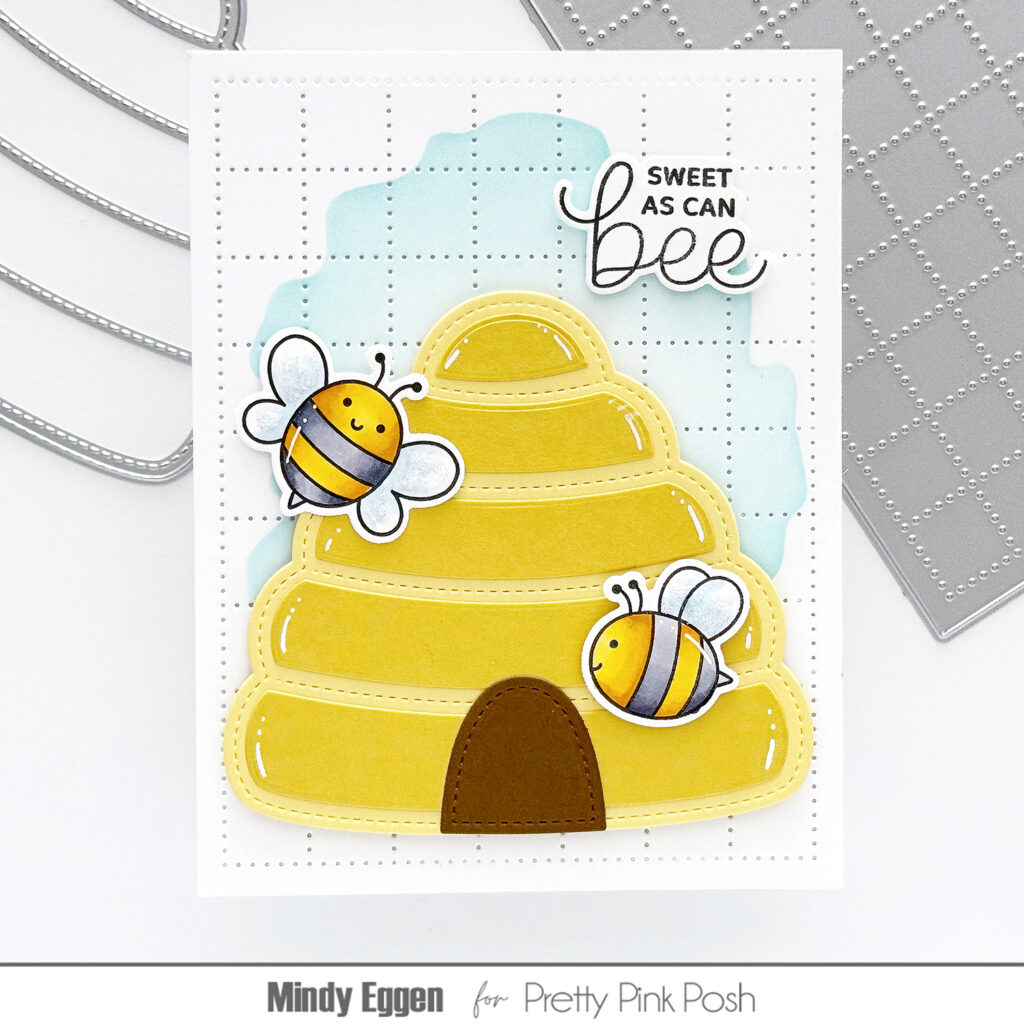
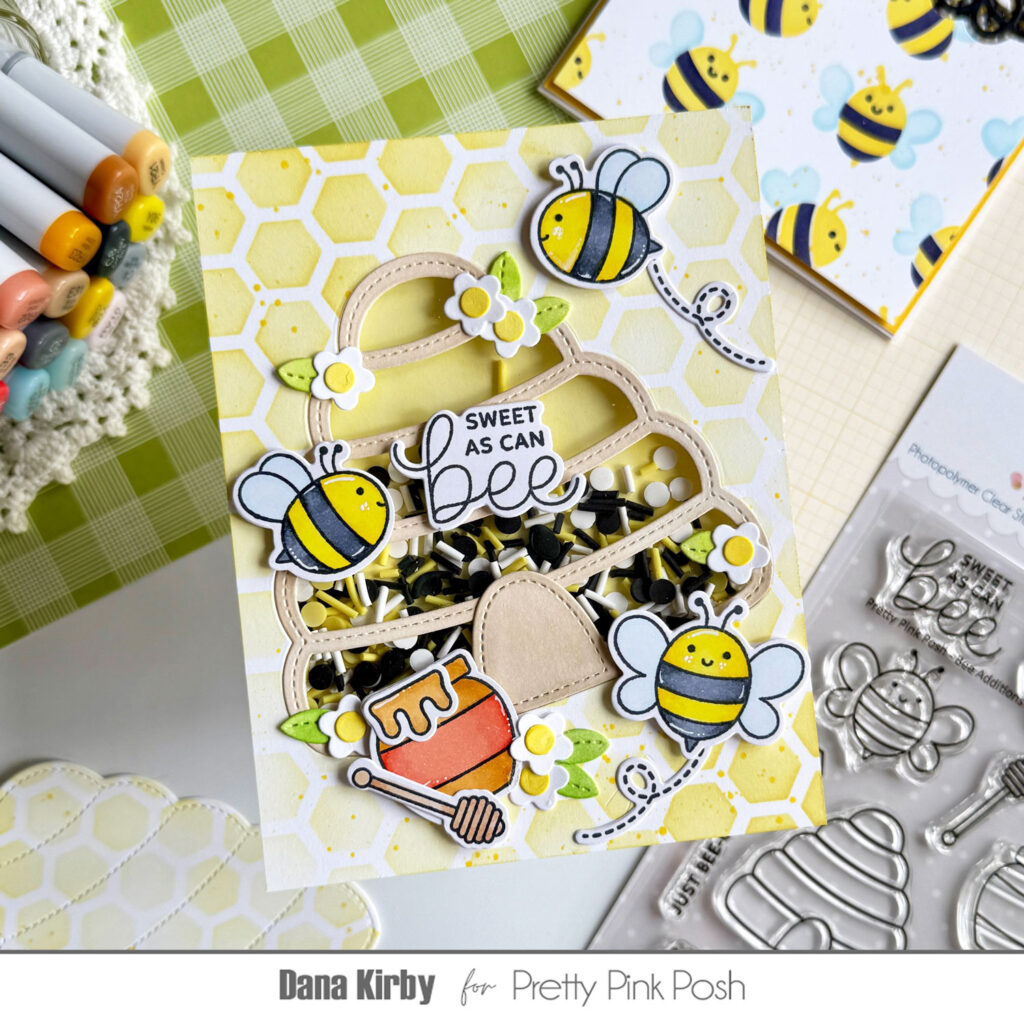
Welcome to Day 3 of sneak peeks for the May 14th release. We are showcasing the Bee Shaker, Beehive Shaker, Thinking of You Shadow Word Die, and the Eyelet Hexagons die sets today.
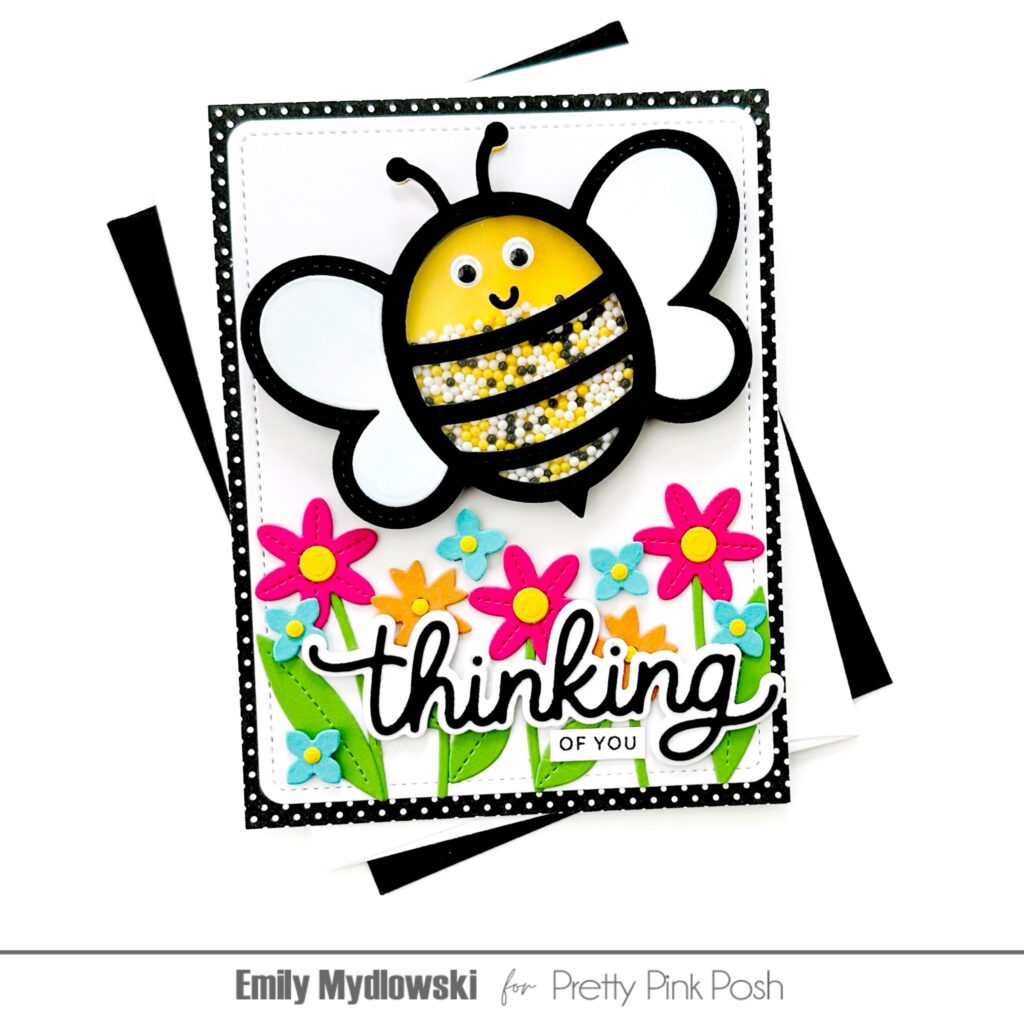
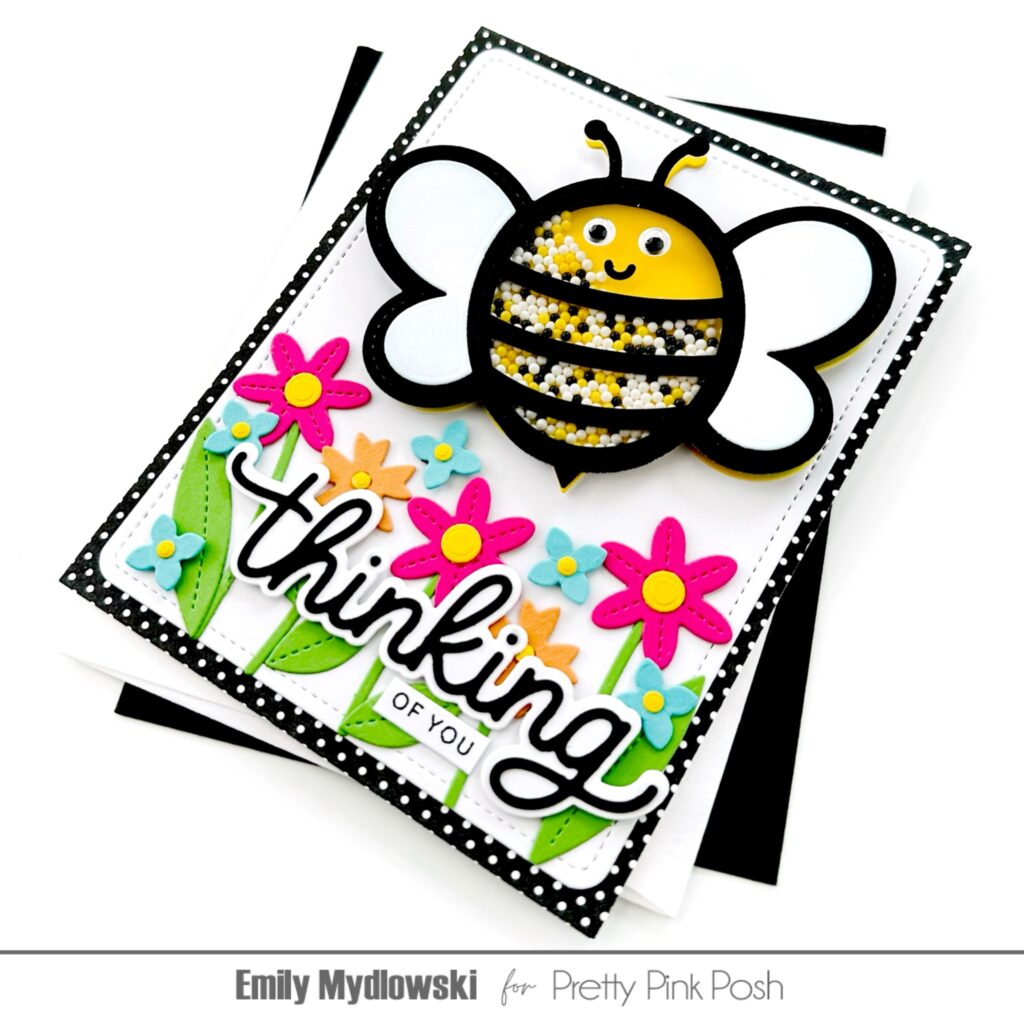
Hi Friends! Emily here with you today sharing two sweet as can bee cards using the soon-to-be-released products. The Bee Shaker is absolutely adorable, especially buzzing around a bright and cheerful flower garden.
I assembled the Bee Shaker using black cardstock for the outline, white with yellow ink-blended cardstock for the body, and white cardstock wings with light blue ink-blended tips.
For the shaker bits, I used the Bee Happy shaker beads. And of course, for extra cuteness, I added googly eyes and a sweet smile. I created the colorful garden using the Stitched Spring Flower Dies, which I adhered to a Rounded Stitched Rectangle background panel. For the black & white sentiment, I die-cut the Thinking of You Shadow Word die with a stamped and snipped “of you” from the Thinking Of You sentiment from theSimple Sentiments stamp set.
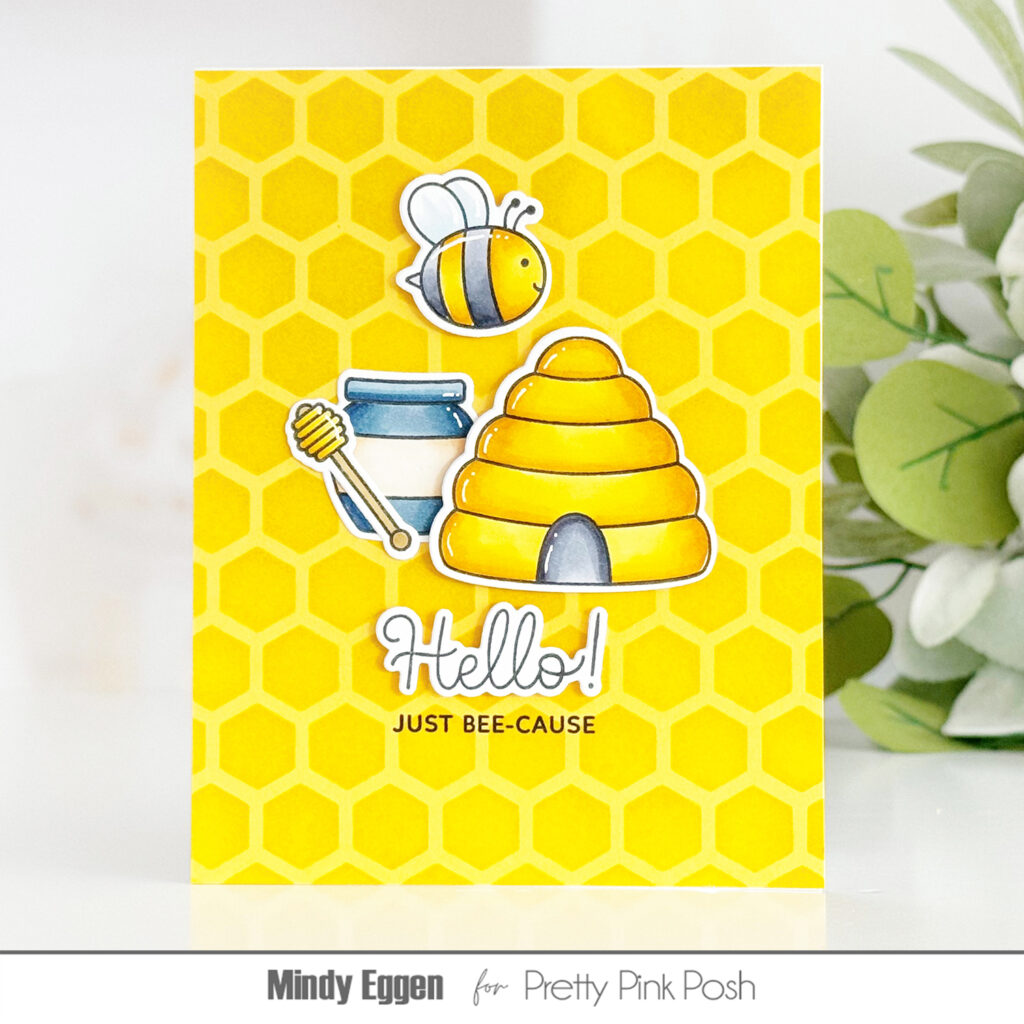
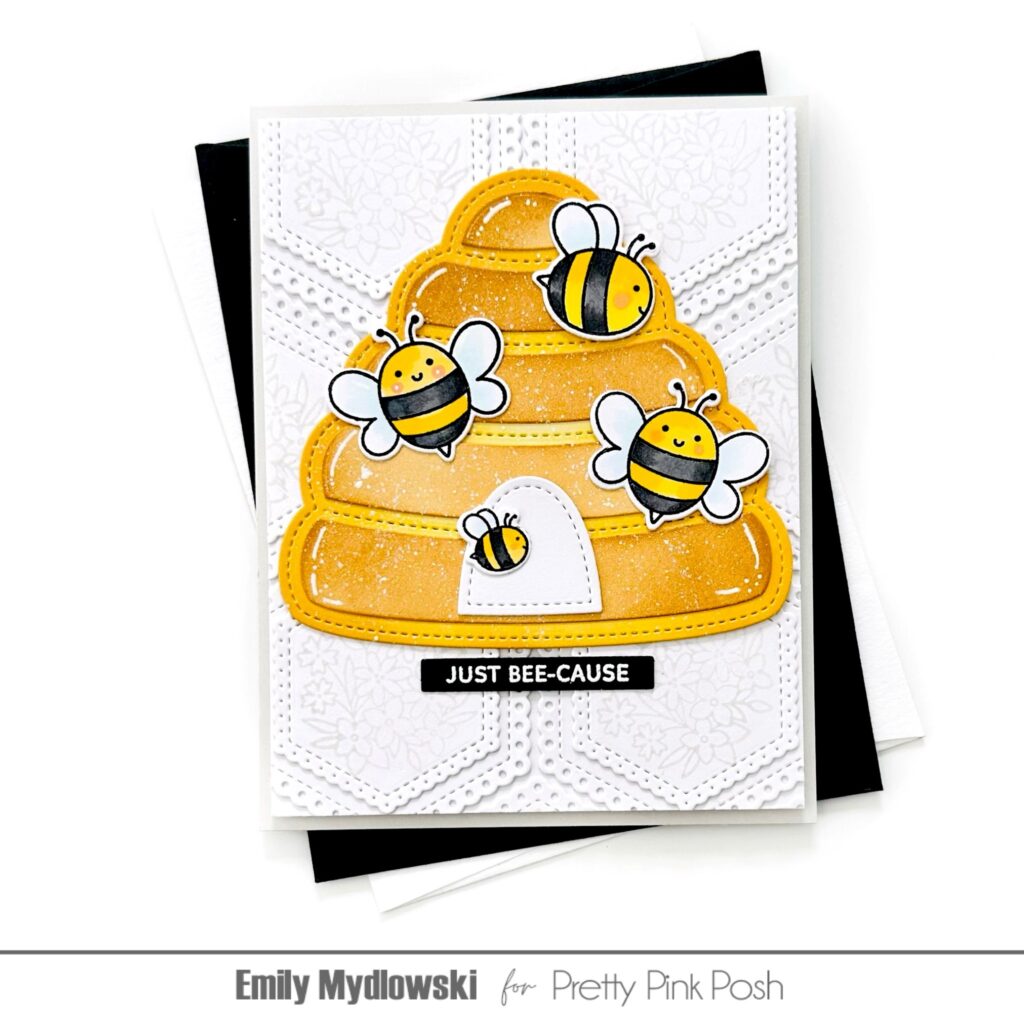
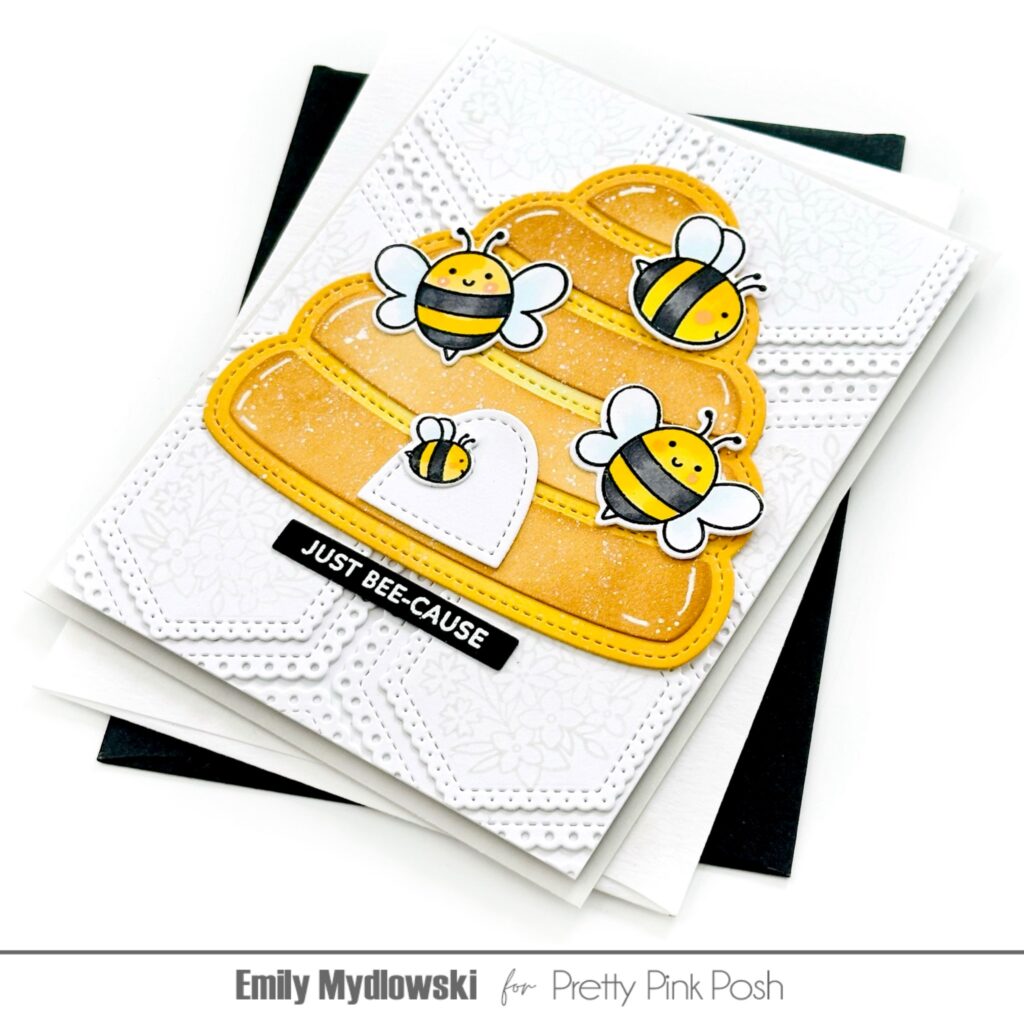
Receiving a Just Bee-cause card will always brighten a friend’s day! My cheerful card features the Beehive Shaker with a lace-like honeycomb background using the Eyelet Hexagons. I die-cut the bee hive from white cardstock twice – once for the hive background that I ink-blended with a bright yellow and a second time for the hive inlay pieces that I ink-blended in honey yellow. I adhered the inlay pieces to the hive base and, for extra dimension, added white ink splatters. Then I stamped and colored with OLO markers the adorable bee images from the Bee Additions and Bee Friends stamp sets.
The background was created by layering and stacking Eyelet Hexagon pieces to a white card panel. For extra dimension and charm, I stamped the center of each hexagon with a floral image with light gray ink from the Spring Blooms stamp set.
Be sure to check out the incredible inspiration from the rest of the design team below, and don’t forget to visit the Pretty Pink Posh YouTube channel for in-depth sneak peeks.
Thanks for buzzing by and have bee-utiful day! Be sure to swing by tomorrow for even more inspiration with this fun, new collection.
It’s Day 2 of sneak peeks for our May 14th release. Today we’ll be taking a look at the Snail Shaker, Caterpillar Holder, Stitched Dandelions, and Rounded Stitched Rectangles die sets.
In this release, there are five stamp sets, four coordinating dies, 12 standalone dies, five stencils, and four embellishments.
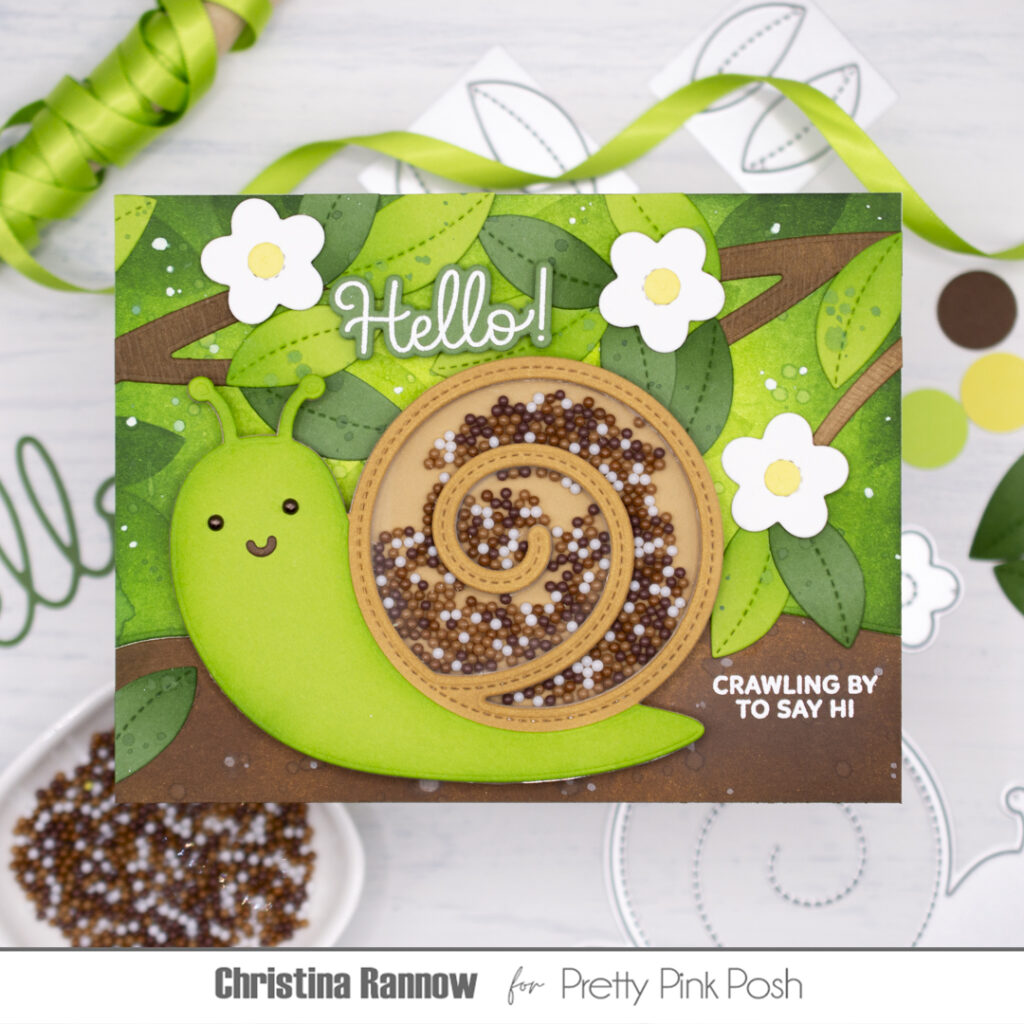
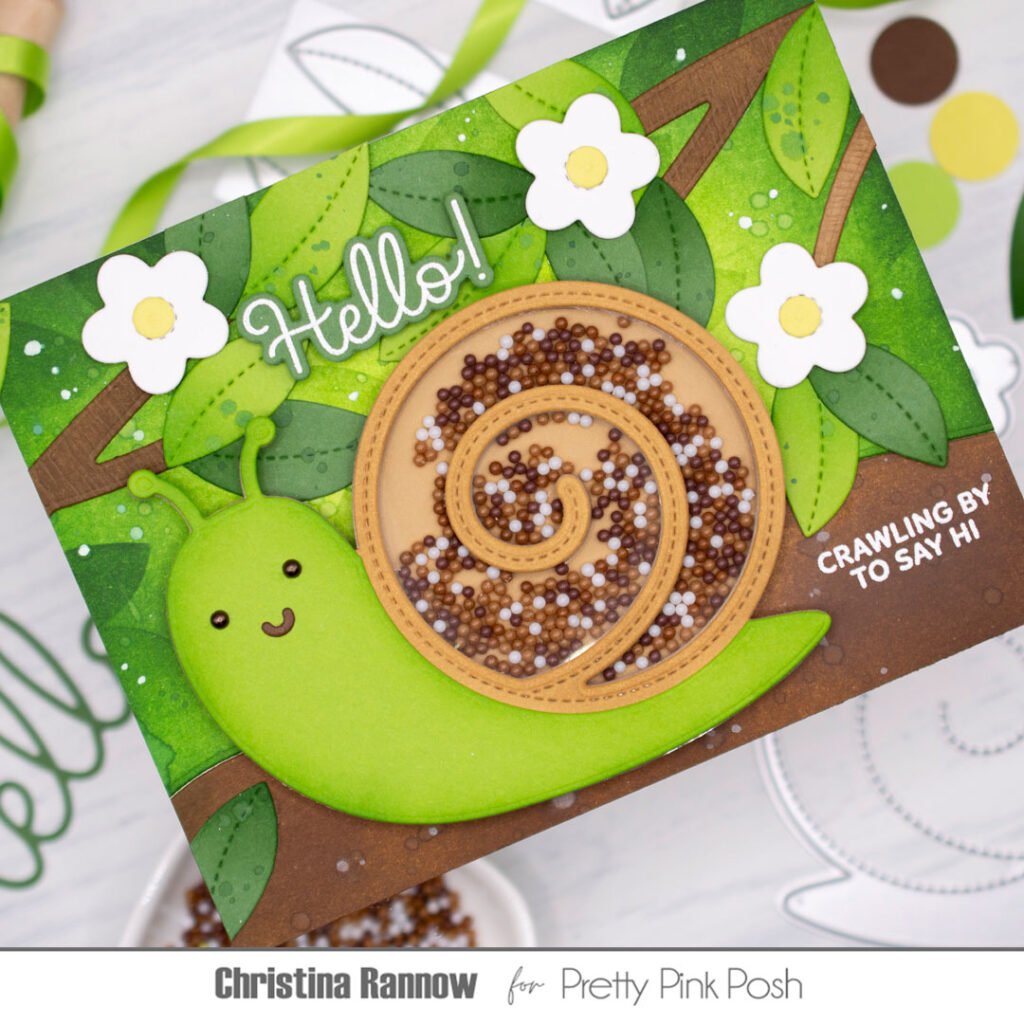
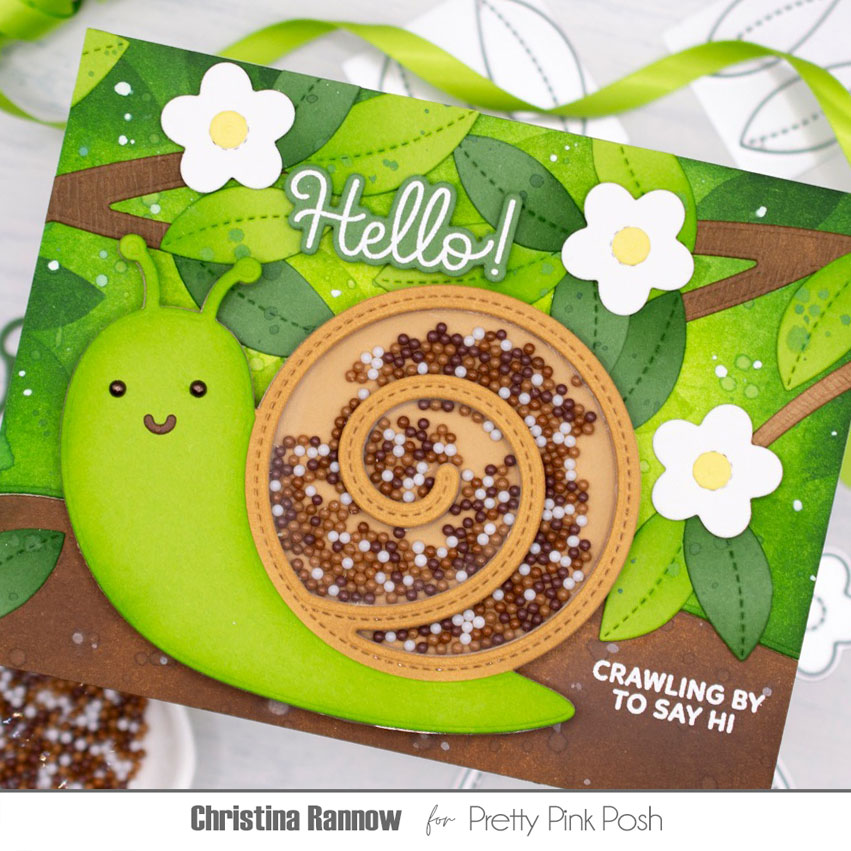
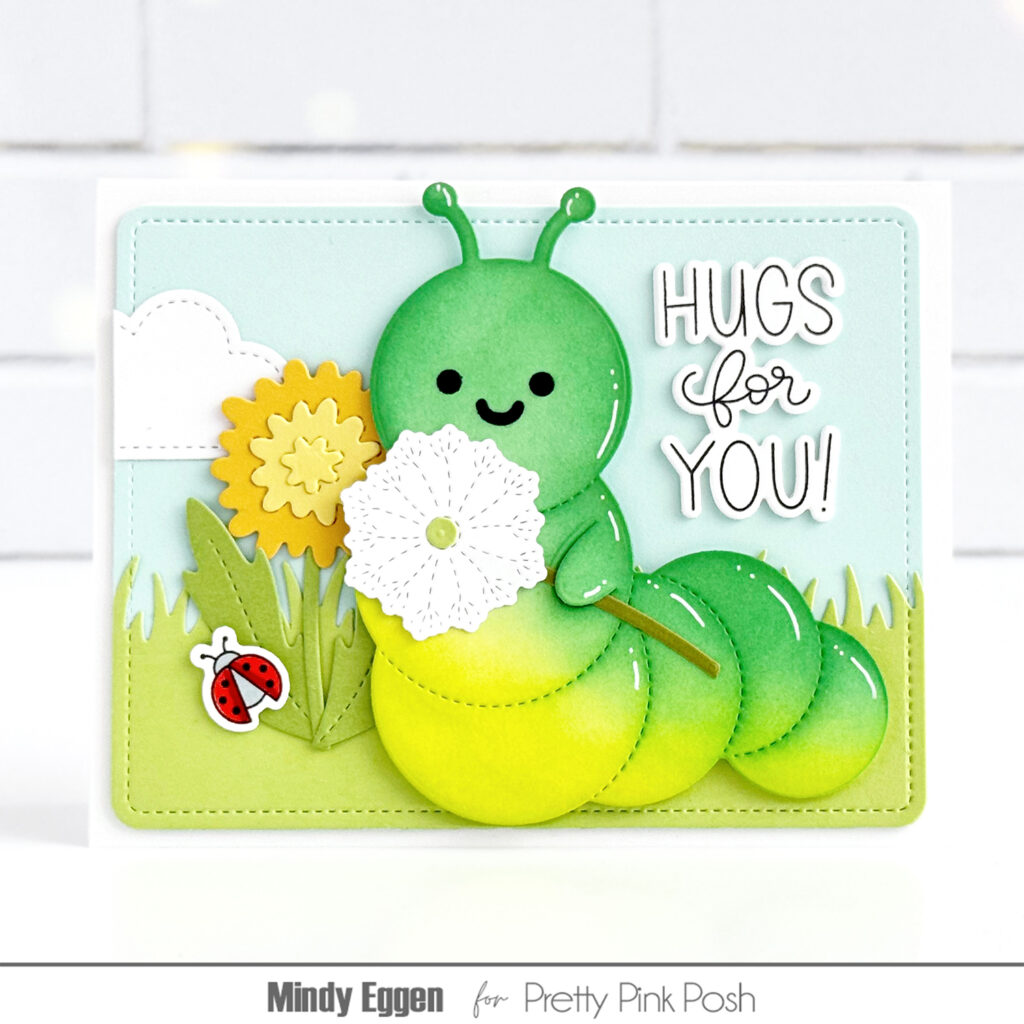
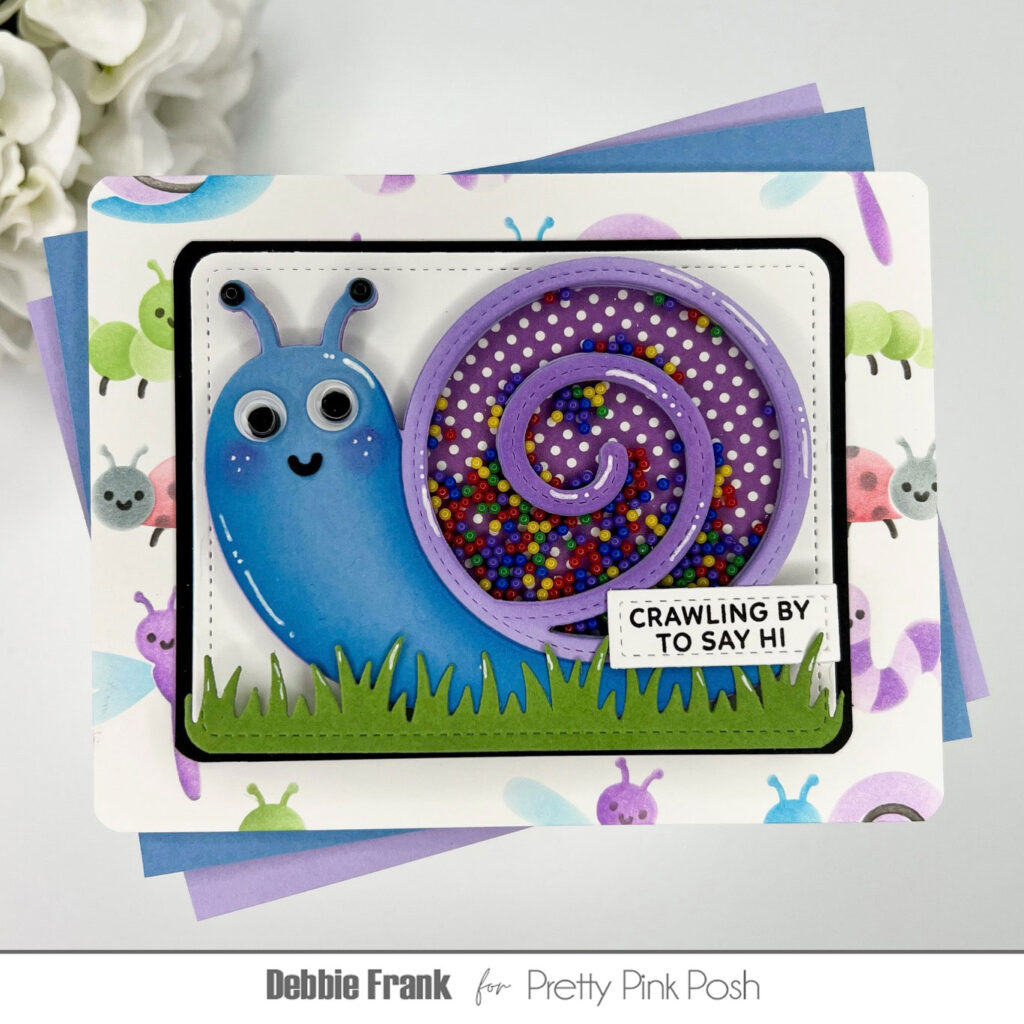
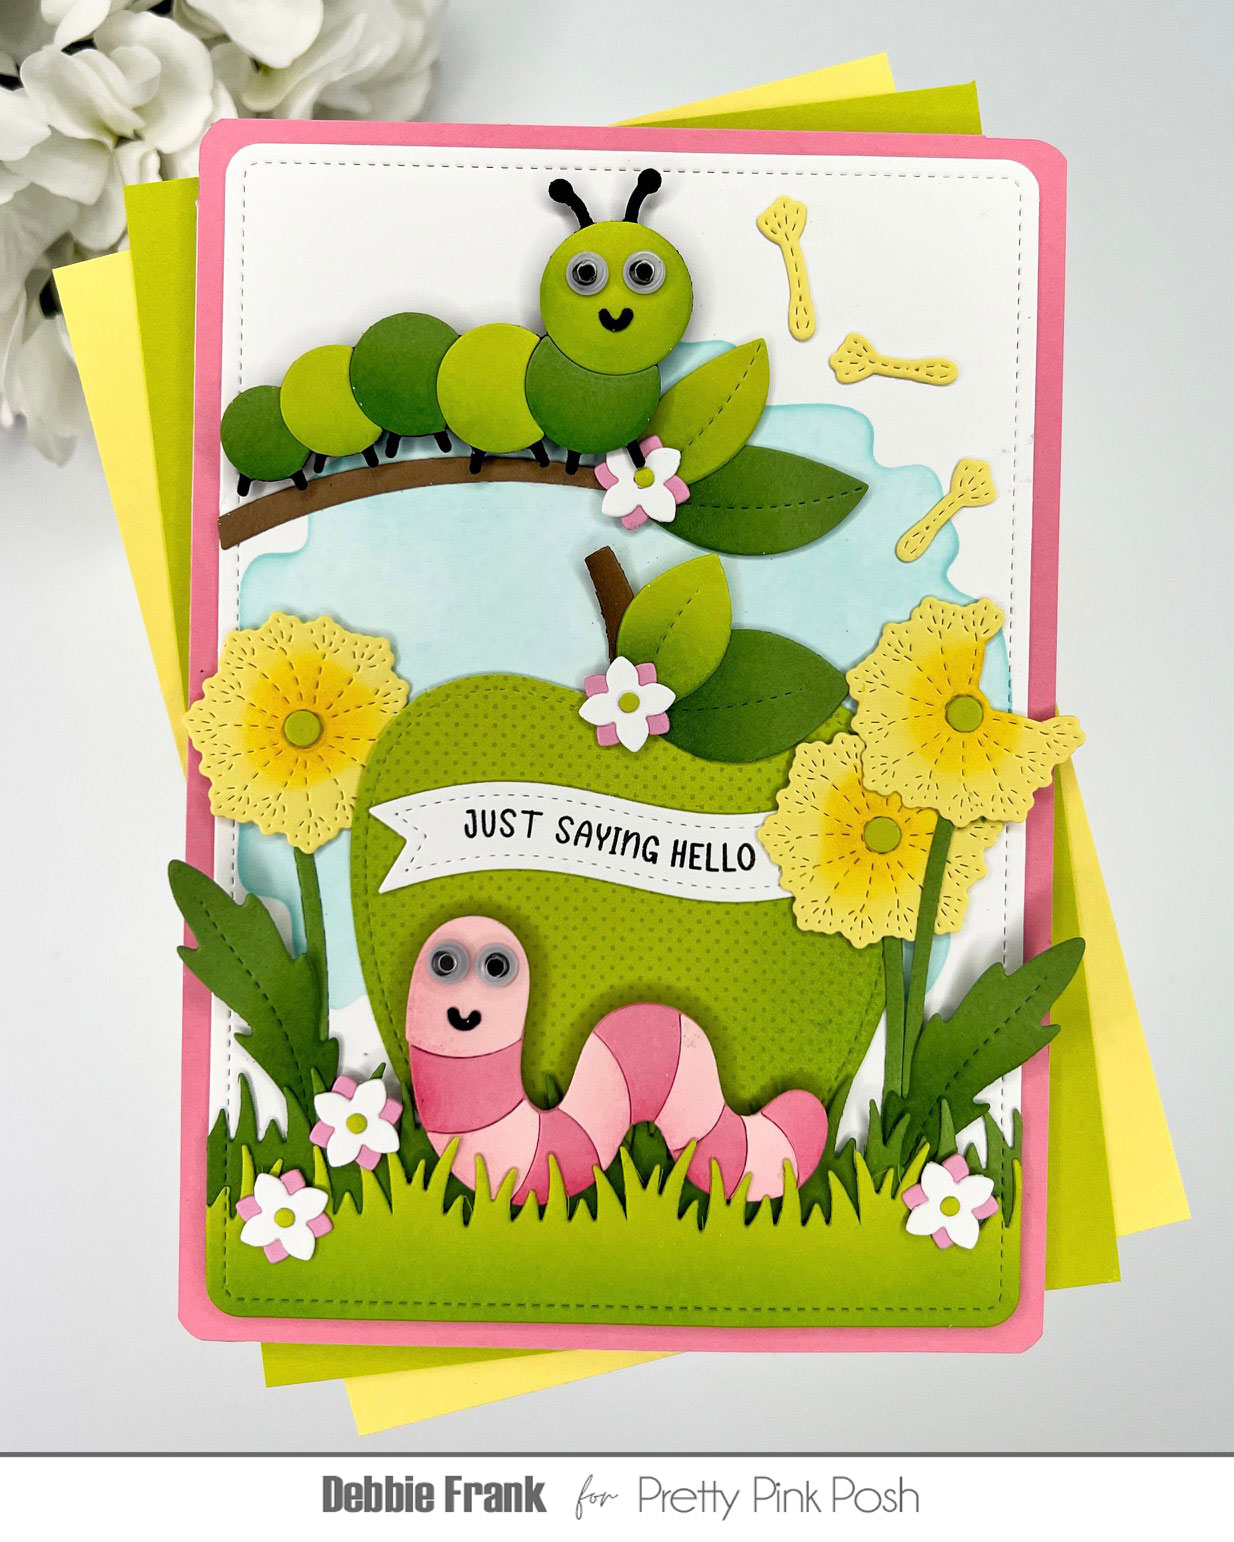
Hi friends, it’s Christina! This release is full of irresistible bugs, the sweetest bees, and some new must-have basics that you are going to love. To give you a glimpse of what’s in store, I have two cards to share with you today. My first card features the latest critter holder, the Caterpillar Holder. I paired this adorable guy with the new Stitched Dandelions and the Rounded Stitched Rectangles for a darling summertime scene. My second card features one of the new shaker dies, the Snail Shaker. I nestled this cutie into lush garden greenery that I created using the new Everyday Branches. Let’s take a look at how these irresistible bug scenes came together!
My first step for the Caterpillar Holder card was to die-cut all the components for the caterpillar and the dandelions from colored cardstock. Even the white cardstock is actually an ivory color. Then, before assembling the die-cuts, I added subtle shading to the pieces with coordinating ink colors. Instead of opting for the usual black facial features for this guy, I chose Espresso Pearlsfor the eyes and a chocolate brown cardstock for his smile.
Next, I created the background for my scene. First, I die-cut the new Checkered Pierced Plate from a happy sky blue cardstock and then layered on an ivory Rounded Stitched Rectangle Frame. To create the frame, I die-cut the largest and the second-largest dies together and saved the smaller rounded rectangle for another project. My next step was to arrange my die-cuts on the background panel and secure them in place using liquid glue and thin foam squares. My final steps were to add a wavy banner stamped with a sweet sentiment from the new Everyday Banner Greetings stamp set and attach the card front to a top-fold card base.
Now for the Snail Shaker card! This card has a few more steps, but the results are worth it, I think! My first step was to create the lush background scene. I used one of the Snowy Hills dies to die-cut a white A2 cardstock panel, separating what will be the dirt and what will be the greenery. To color the dirt layer, I used Distress Inks and then spattered the layer with more ink and an Oxide spray for texture and interest.
For the greenery, I also used Distress Inks and before spattering the panel with more ink and a white spatter medium, I stenciled on some leaves in a random pattern using a stencil I created. To create the leaf stencil, I used the negative space left after die-cutting the leaves from the Everyday Branches. You can die-cut them from acetate for a sturdier stencil, but I just used heavyweight cardstock. This is such an easy technique but has a big impact! To finish up the background, I attached the dirt and greenery panels to a card base.
My next step was to construct the shaker. I die-cut the shaker frame piece seven times from fawn cardstock and layered them together, securing a piece of acetate between the top two layers for the window. I filled the shaker well with Chocolate Shaker Beadsand then sealed the shaker with the backer piece. I finished the snail shaker by adding a rainforest green body piece, lightly inked around the edges, and Espresso Pearleyes with a chocolate brown smile.
Before attaching the snail to my background, I finished the background scene with branches die-cut from woodgrain cardstock and leaves die-cut from two shades of green and spattered with ink. Then to break up all the green, I added a few white flowers. The last step was to add a greeting and a small sentiment, both from a new stamp set called Cute Bugs and both heat-embossed with white embossing powder.
Keep scrolling to see more amazing inspiration from the design team!
Thank you so much for reading, and be sure to stop back tomorrow for Day 3 of sneak peeks. You won’t want to miss it!
Welcome as we kick off the first day of sneak peeks for the May 14th release. In this release, there are five stamp sets, four coordinating dies, 12 standalone dies, five stencils, and four embellishments.
Today we’ll be taking a look at four of the new standalone die sets: Stitched Bugs, Everyday Branches, Checkered Pierced Plate, and Large Hello Shadow.
Hello crafty friends! Arsenia here, popping in with a little sprinkle of excitement and a whole lot of cuteness.
Oh my goodness, this release is bursting with spring and summer charm… and critters! Tiny, adorable, can’t-stop-smiling critters. Everything is just so stinking cute, I can hardly stand it! Today I’m sharing a few projects featuring the Stitched Bugs Dies (already a fast favorite!), the oh-so-versatile Everyday Branches (hello, scene building dreams!), and the bold and beautiful Large Hello Shadow Die.
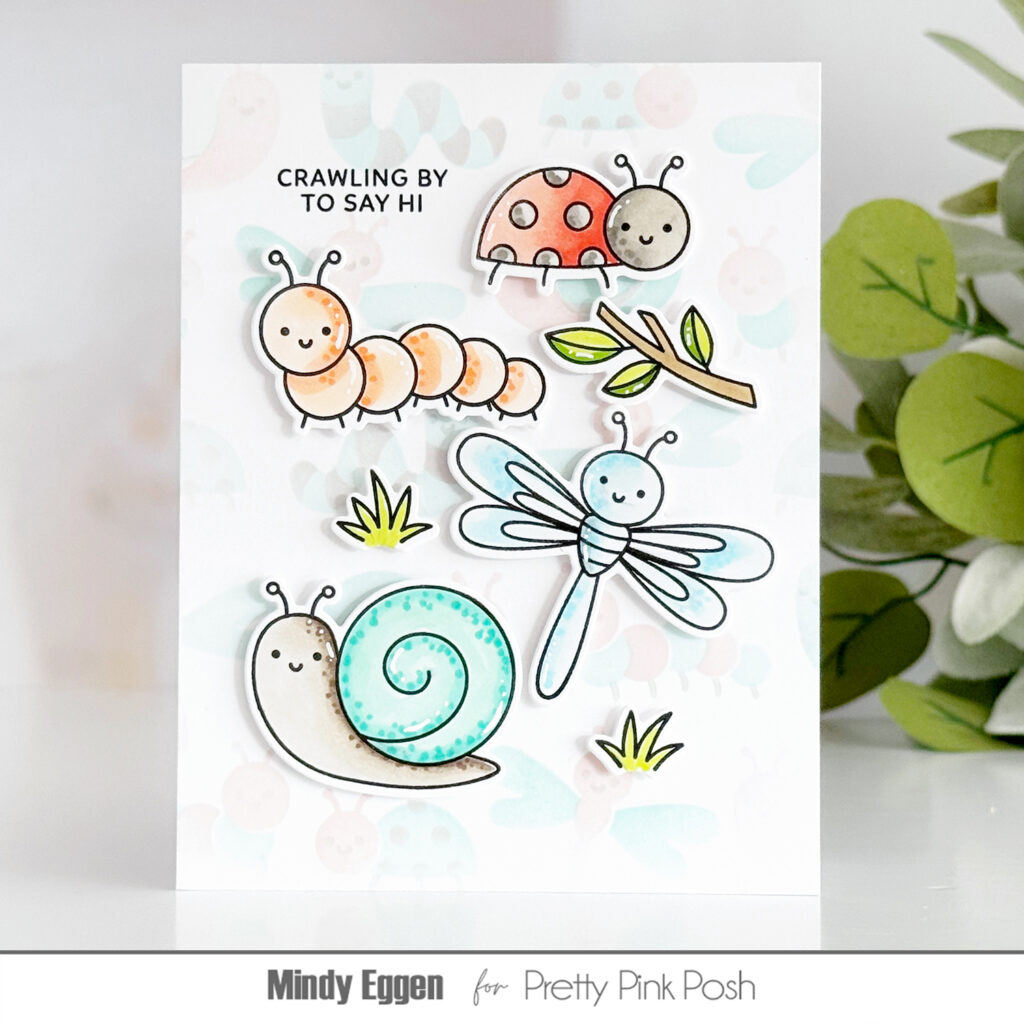
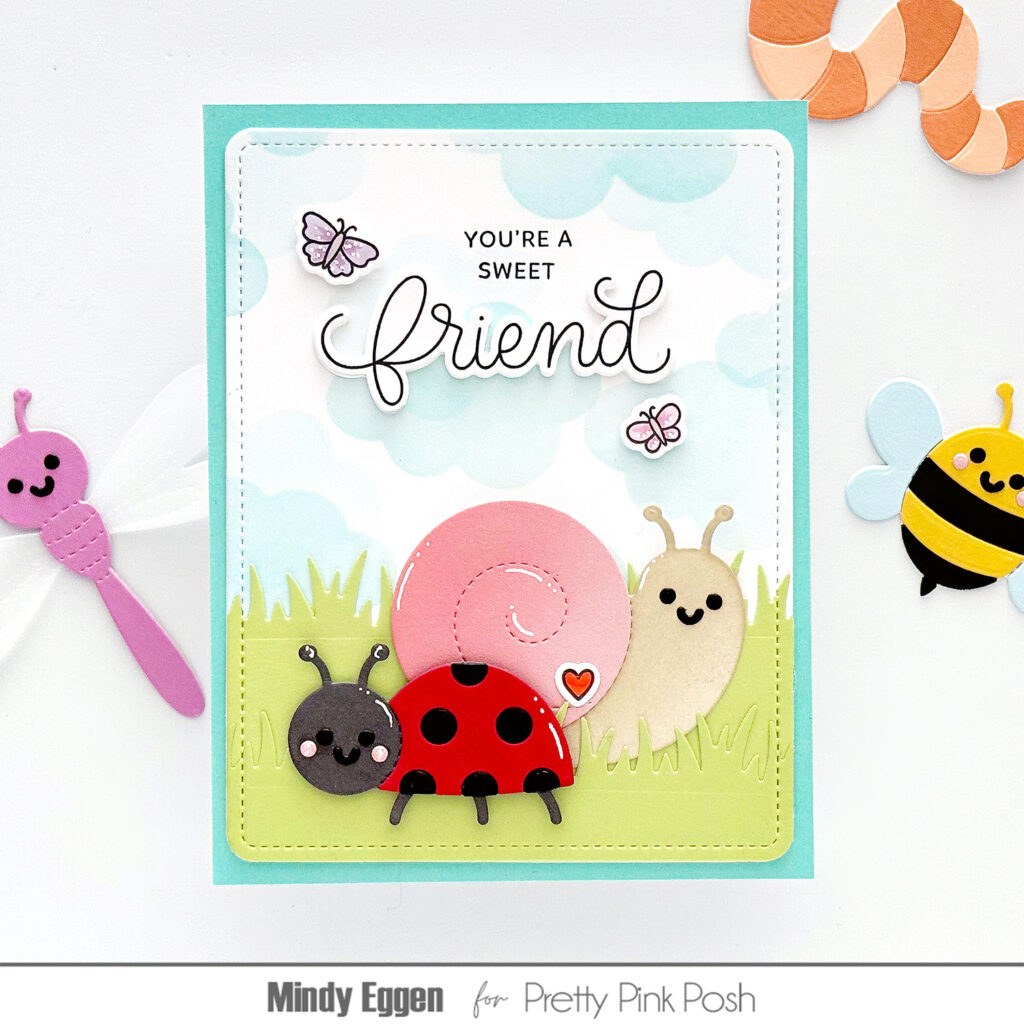
Friends, this release truly has the cutest bugs ever. And those tiny faces? I mean… come on. The Stitched Bugs set also includes an adorable ladybug and bee, so the creative possibilities are endless!
I have three cards and a tag to share today, all dressed up in one of my absolute favorite spring/summer color palettes. I kept lots of white space because, honestly, these bugs deserve the spotlight—they are just too cute to compete with!
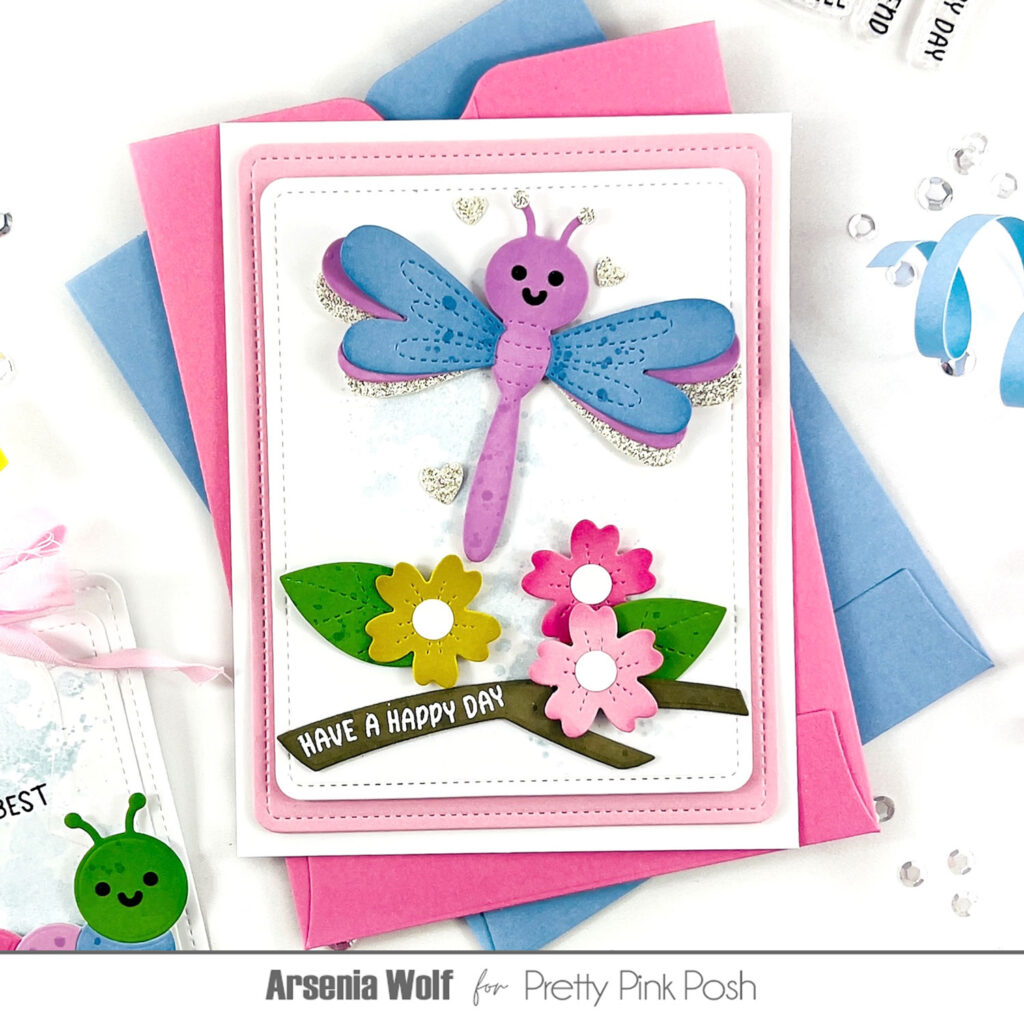
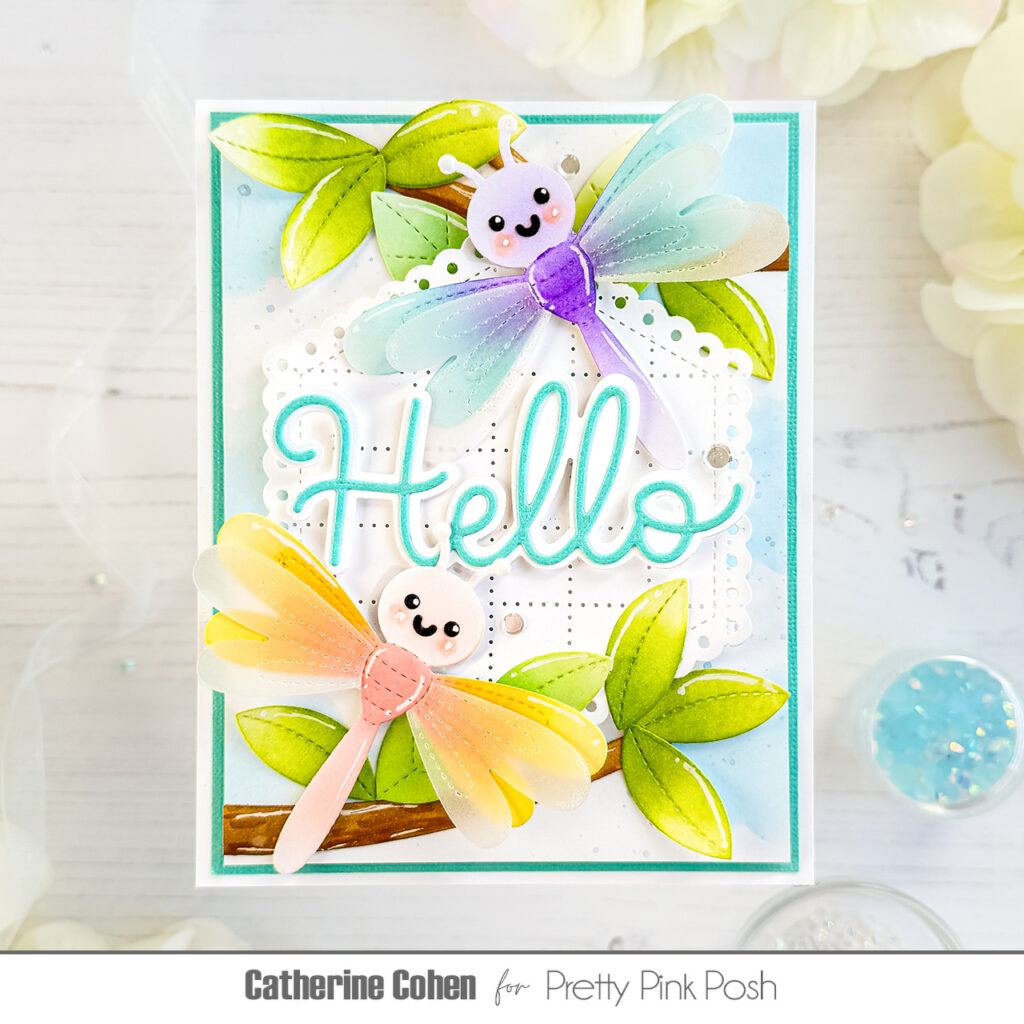
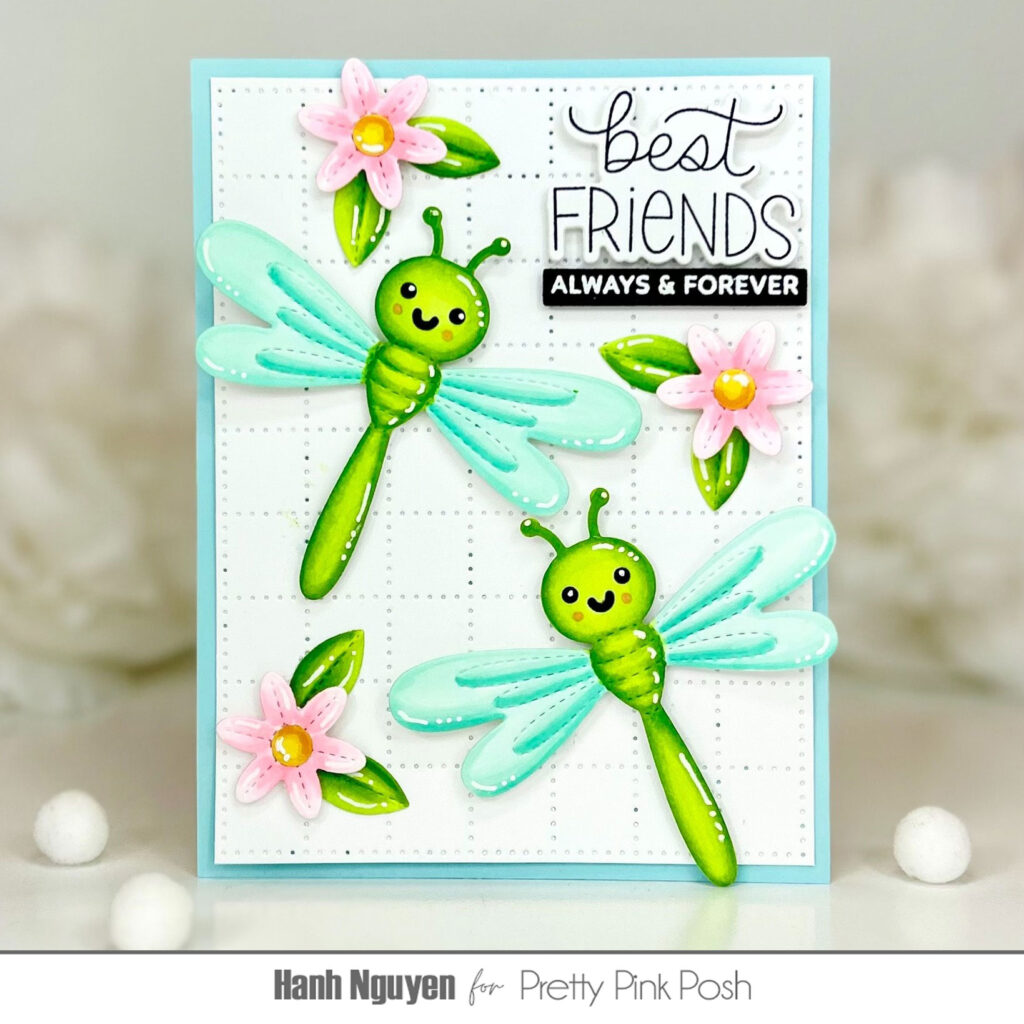
Card One: Dragonfly Delight For my first card, I fluttered over to the sweetest little dragonfly from the Stitched Bugs Dies. I layered up those wings for extra dimension (because more layers = more magic, right?). The base is one of the new Rounded Stitched Rectangles, and I created a soft little scene using the Everyday Branches along with florals from the Floral Wreath Builder Dies.
To finish it off, I added the most darling sentiment from the Everyday Banner Greetings stamp set—and voilà! A card that’s sure to bring instant smiles. And can we talk about that tiny face?! I’m obsessed.
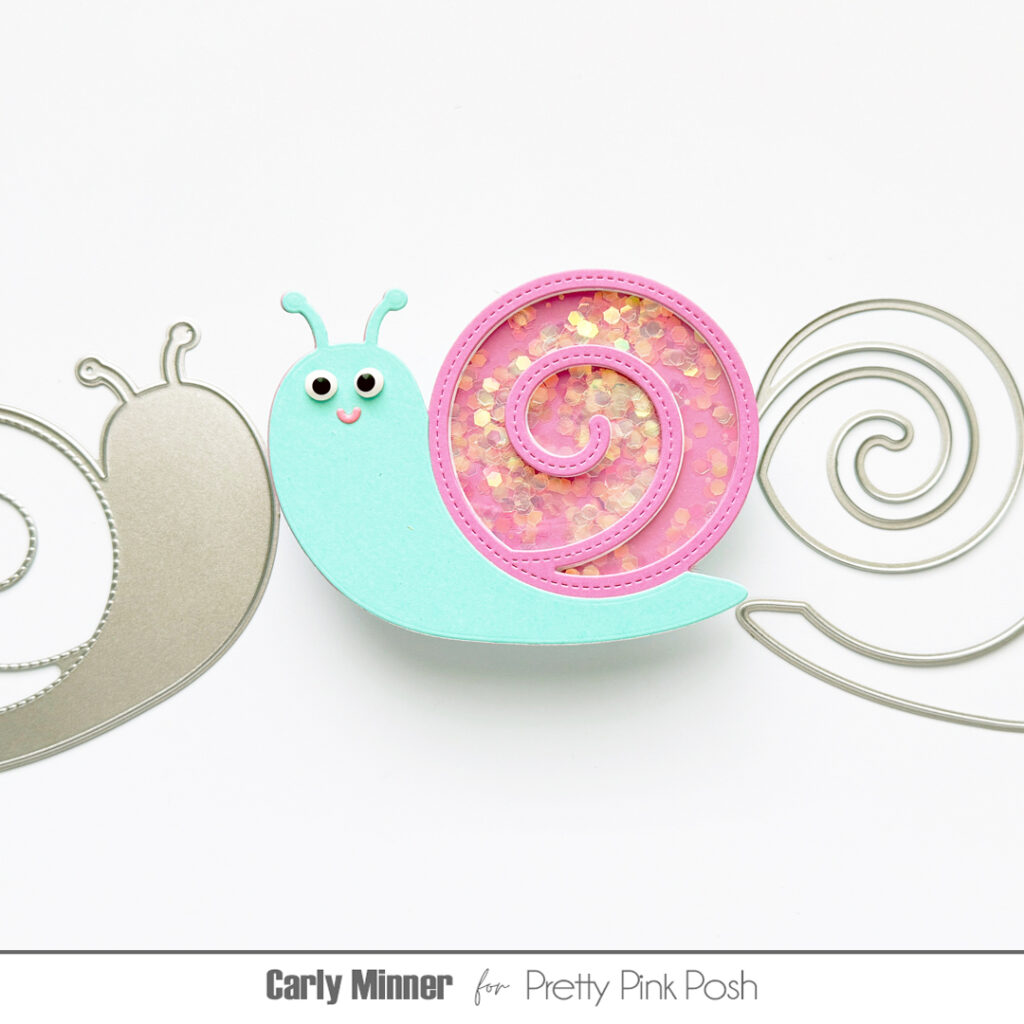
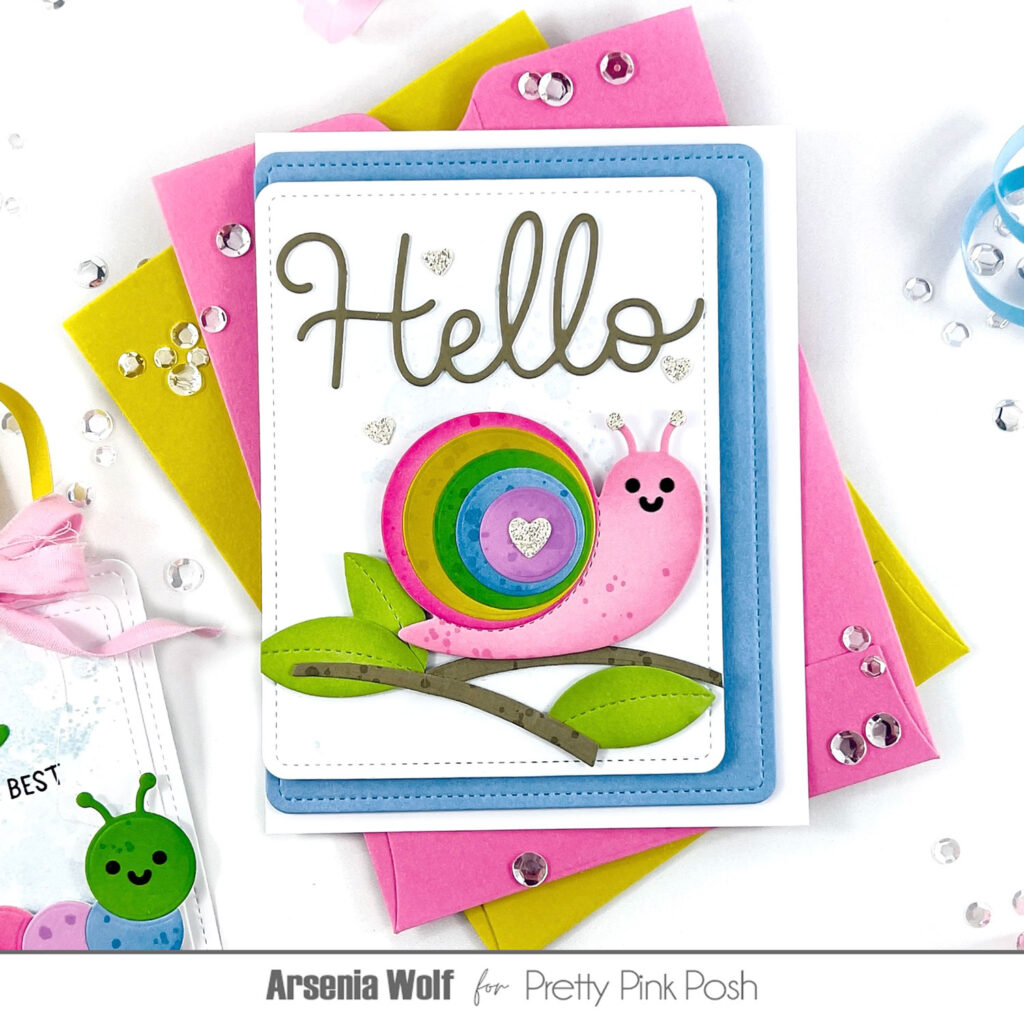
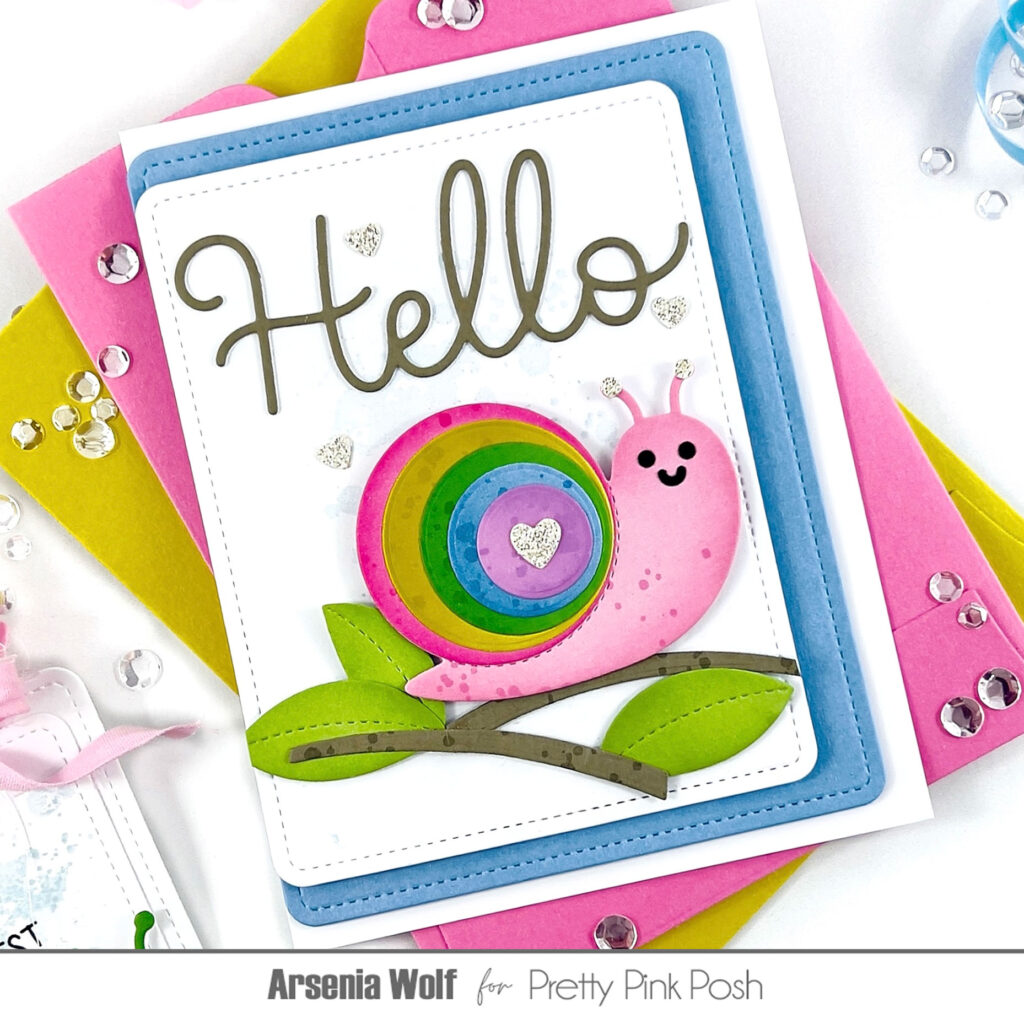
Card Two: Rainbow Snail Cutie Next up… a snail, but make it rainbow! I dove into my craft stash and pulled out my circle punches, layering and offsetting each color to create the happiest little snail shell.
I added in branches and leaves from the Everyday Branches Dies, kept the sentiment clean and simple with the Large Hello Shadow Die, and built it all on another Rounded Stitched Rectangle panel. A few glittery hearts later… voilà!
This one is all about sweet simplicity, and I love how that colorful snail totally steals the show.
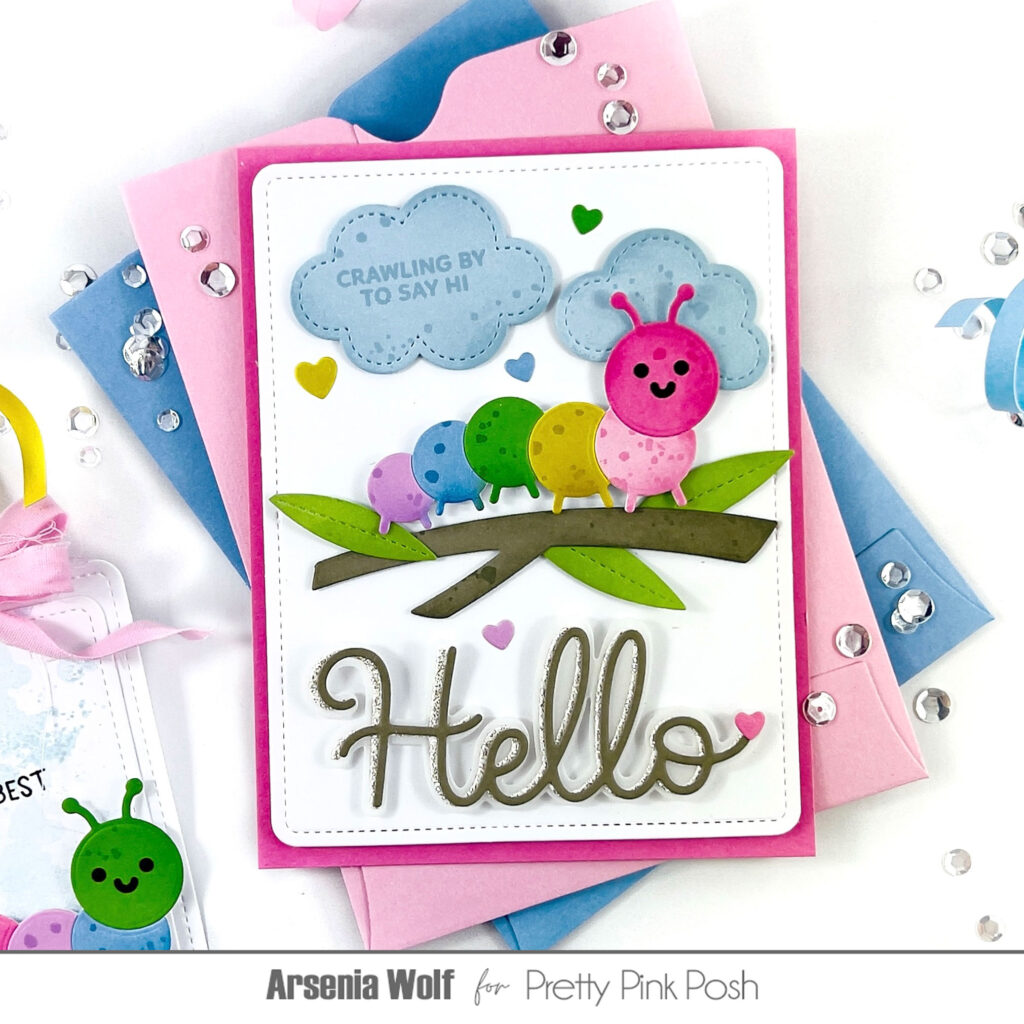
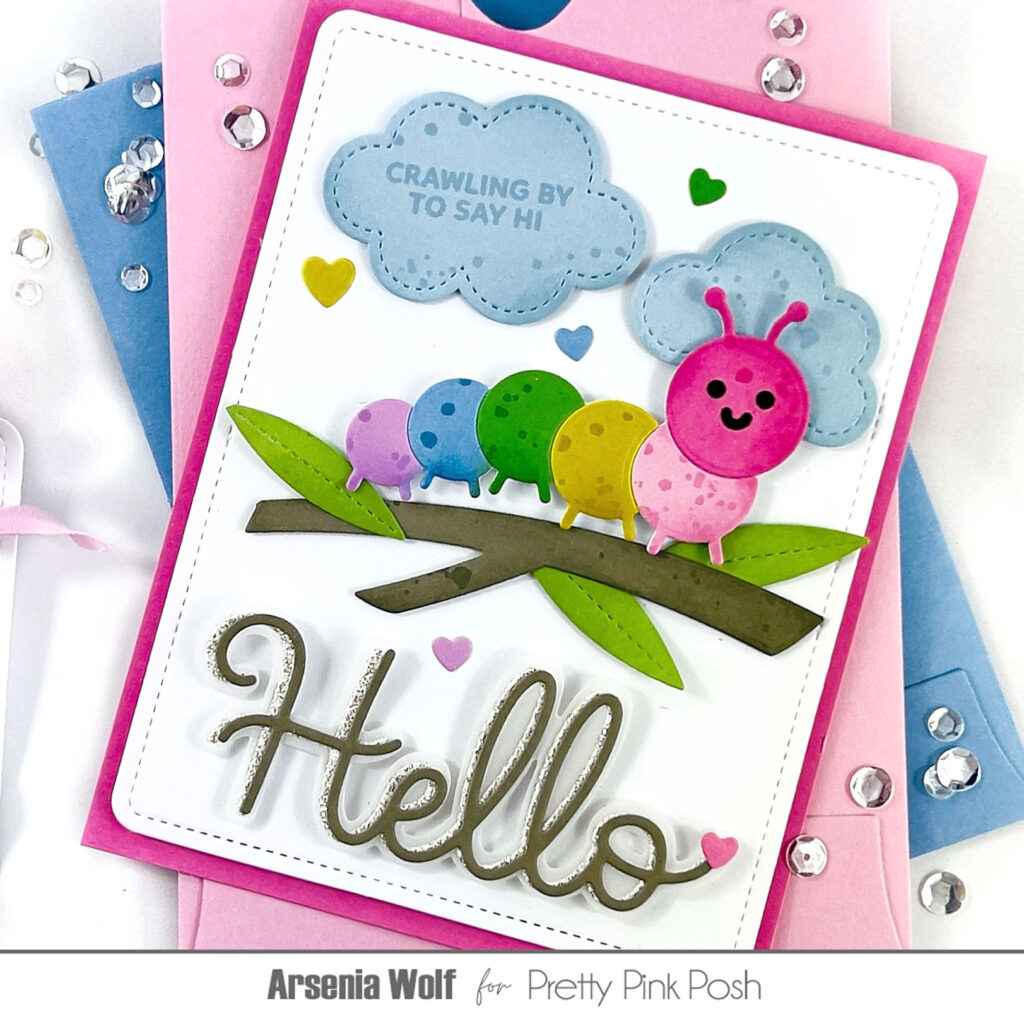
Card Three + Tag: Caterpillar Cuteness For my final card, I couldn’t resist the adorable caterpillar—seriously, how cute is this little guy?! And yes… I went rainbow again. Apparently that’s just the mood!
I perched him on a branch from the Everyday Branches, added some fluffy clouds from the Stitched Cloud Dies, and finished with the Large Hello Shadow Die. Everything sits on a Rounded Stitched Rectangle panel, and I tucked in a secondary sentiment from the Cute Bugs stamp set right onto a cloud.
Of course, I had to add a sprinkle of rainbow hearts (because… always), and I even made a matching tag to go with it. Double the cuteness, double the fun!
Be sure to check out the incredible inspiration from the rest of the design team below, and don’t forget to visit the Pretty Pink Posh YouTube channel for in-depth sneak peeks.
Join us again tomorrow for another day of sneak peeks!
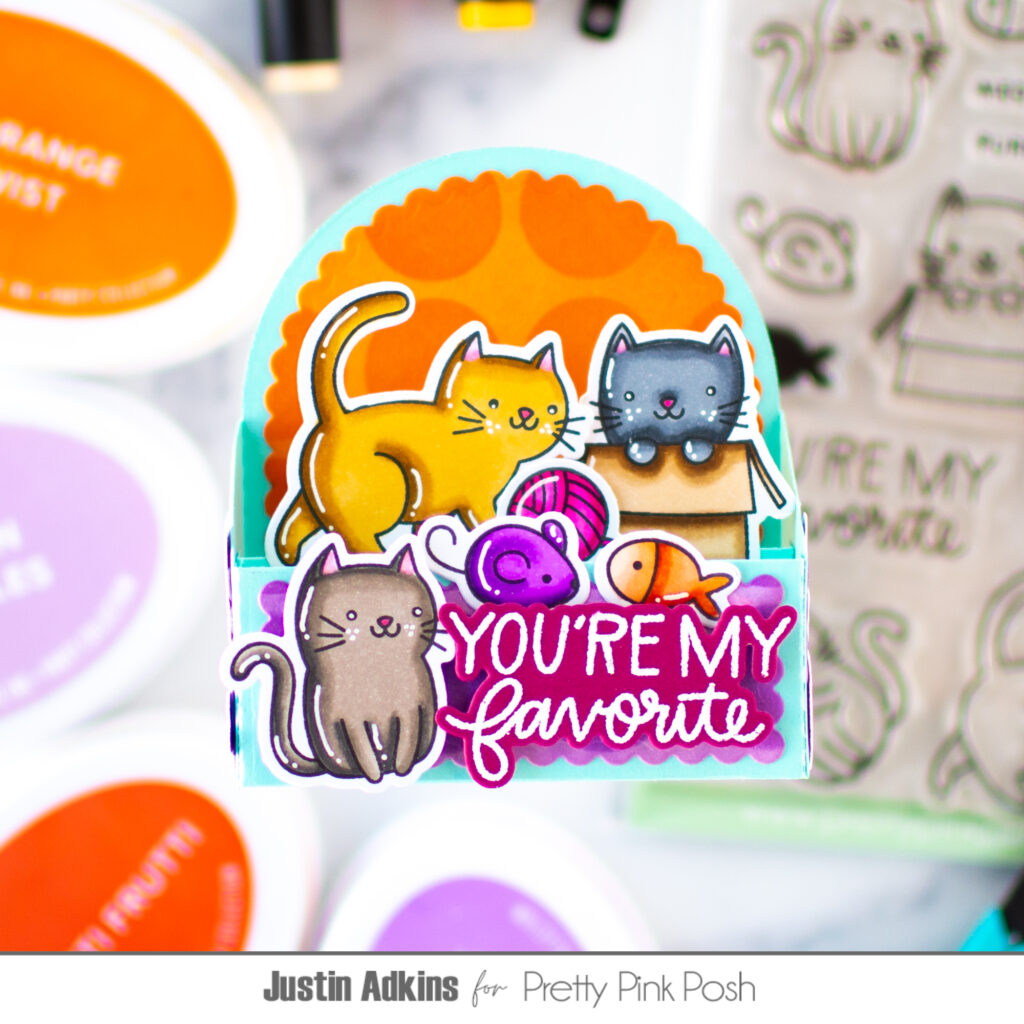
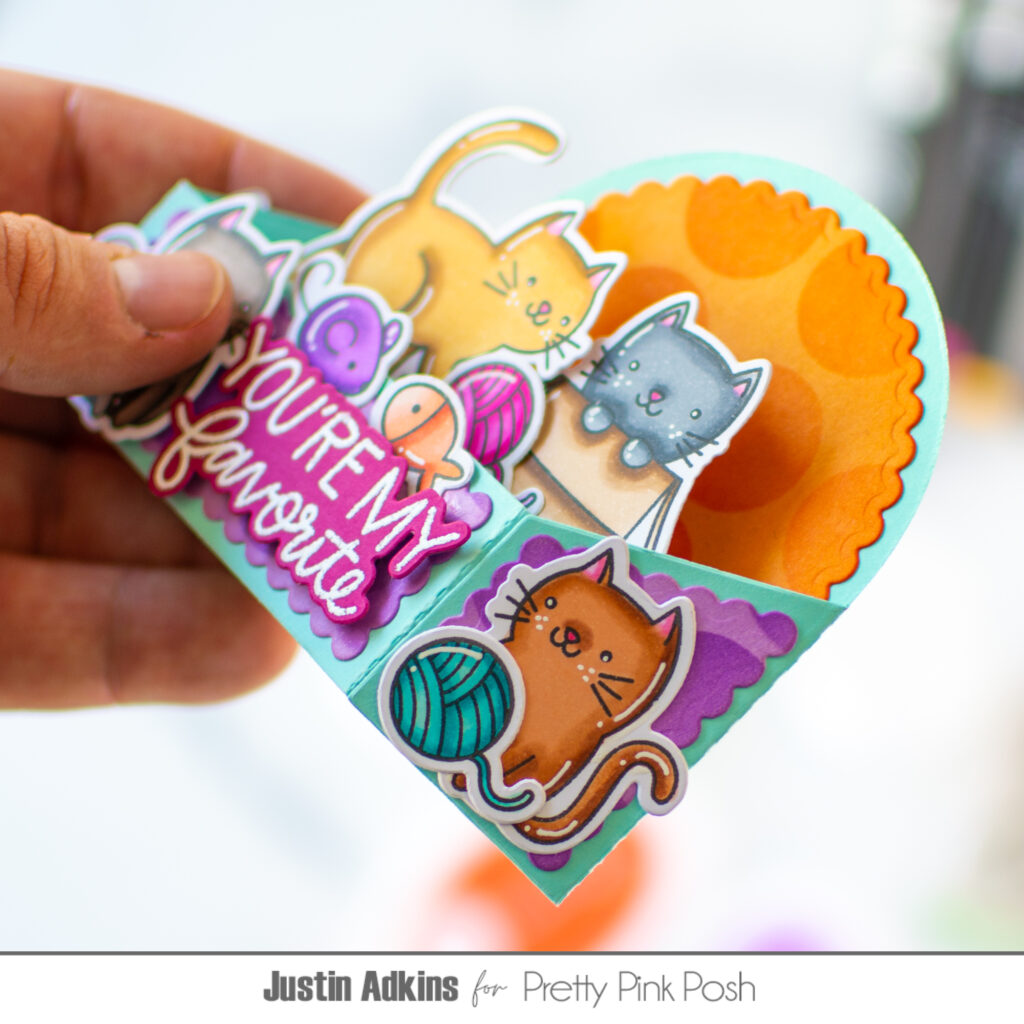
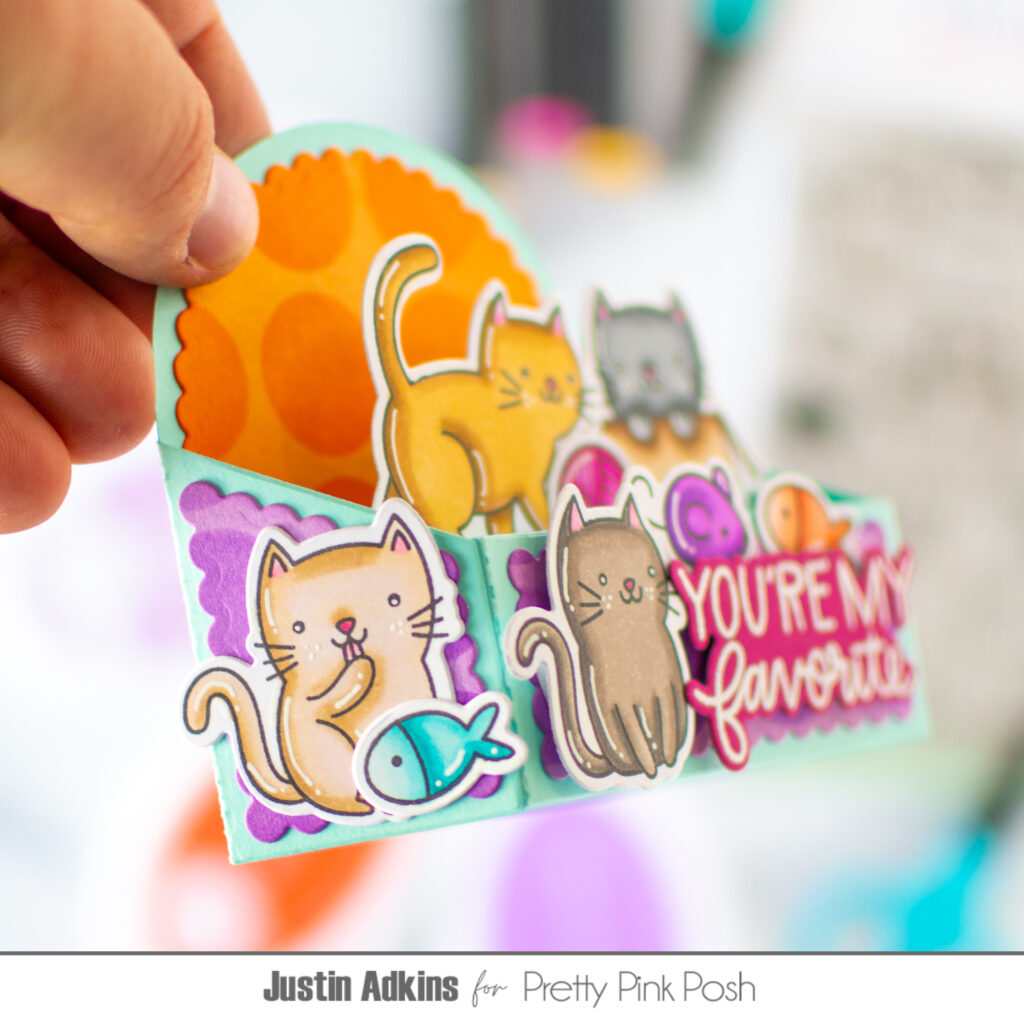
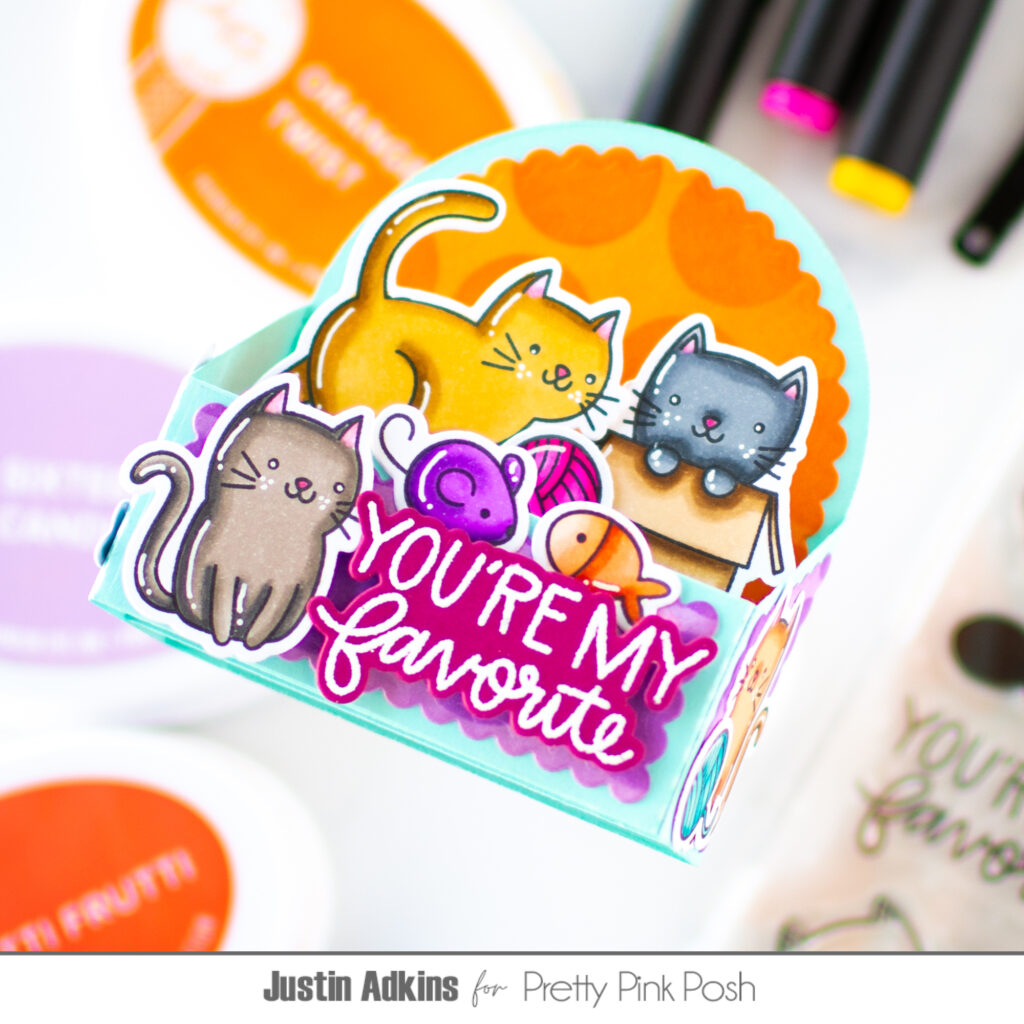
Hello, crafty friends! It’s Justin Adkins, and today I’m sharing a fun and dimensional project that’s sure to make you paws and smile—a scalloped box card featuring the adorable Cuddly Cats! This card is full of playful layers, bright color, and just the right amount of kitten charm.
This project is all about dimension and color! The Scallop Box Card Die Set creates that standout structure, giving the design a playful, interactive feel. I used the Circle Grid Stencil with bright inks to build a bold, layered background that really makes those sweet kitties pop.
The images from the Cuddly Cats stamp set were colored with OLO Markers for a soft, blended look, and then arranged inside the box to create a cozy little scene—complete with toys and lots of personality. Adding foam strips helps give everything that extra lift, making the card feel full of life(and a little cattitude!).
This card is a purr-fect mix of fun techniques and dimensional design, and it’s such a joy to create! Don’t forget to check out the full video tutorial for all the tips and tricks to recreate this project.
Be sure to follow me on Instagram and YouTube at @justanotebyjustin for even more crafting inspiration!