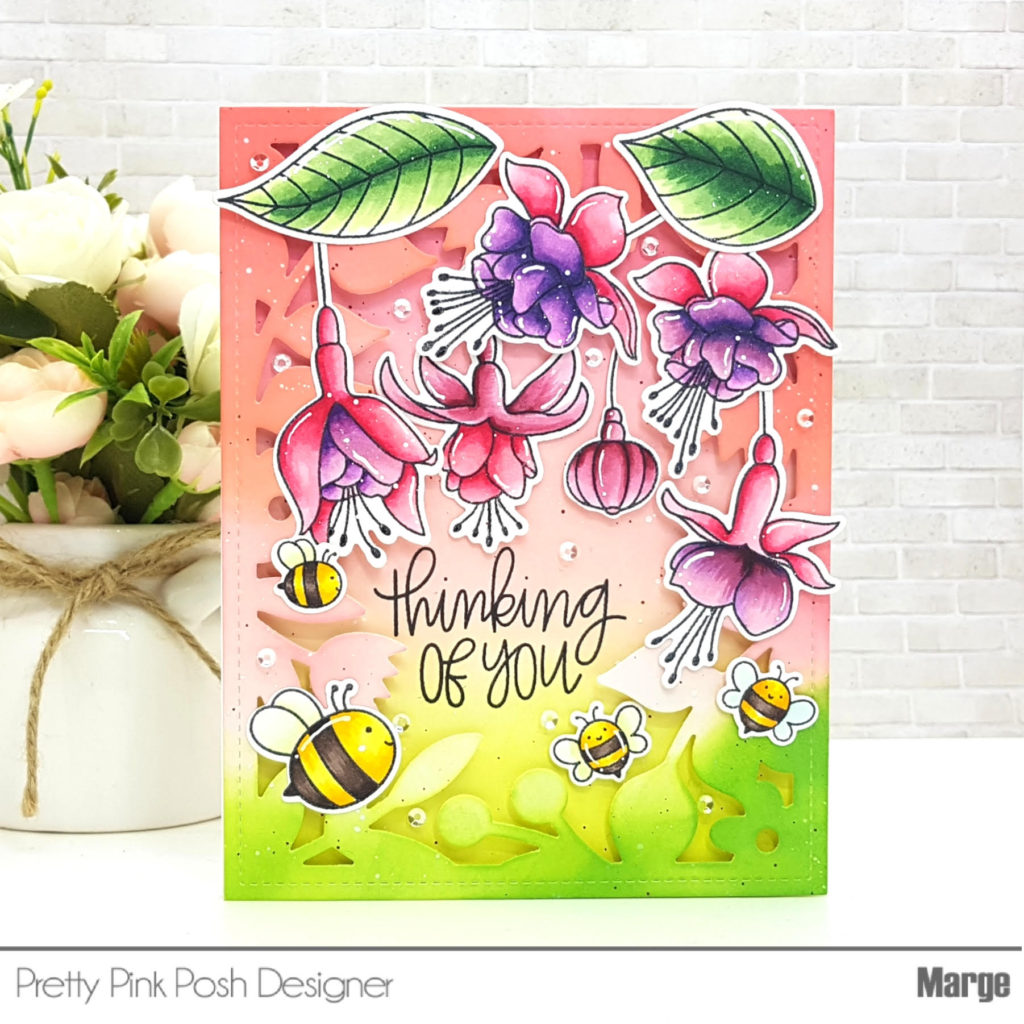
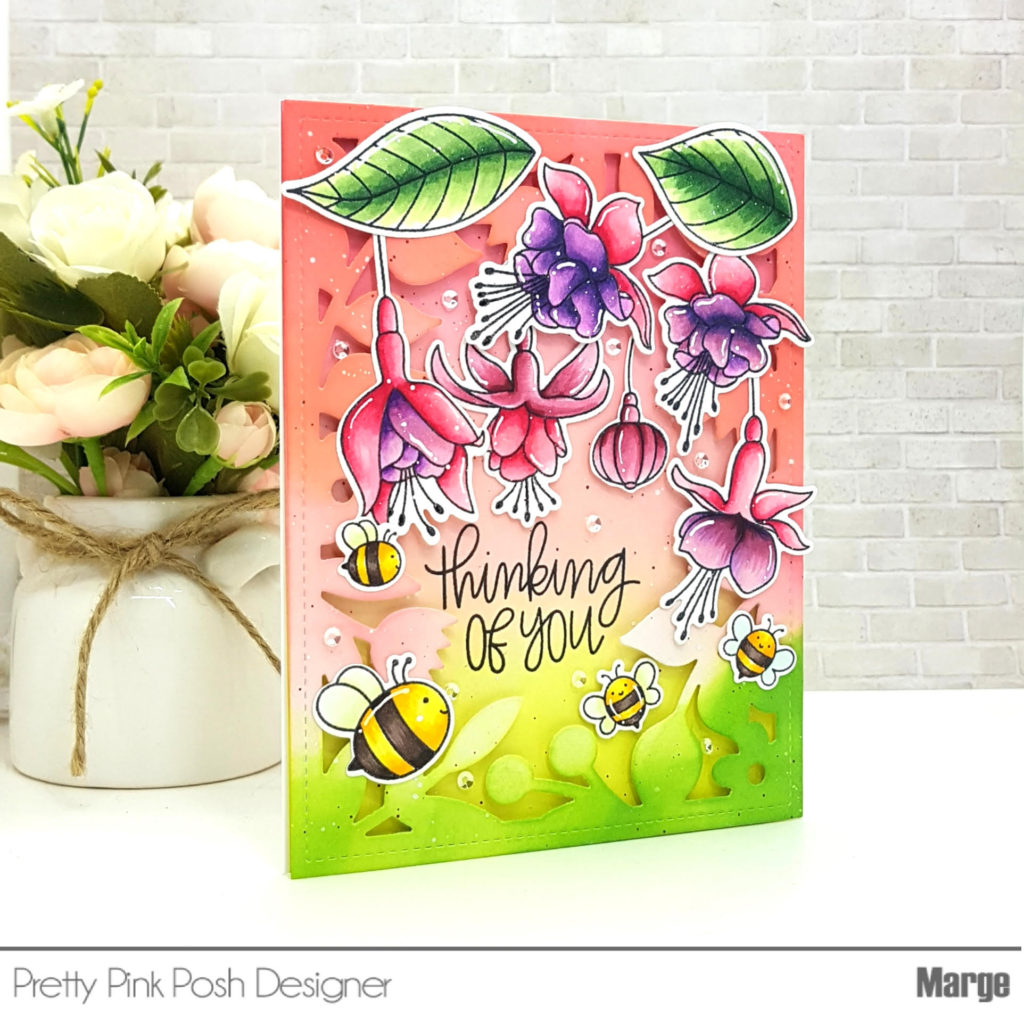
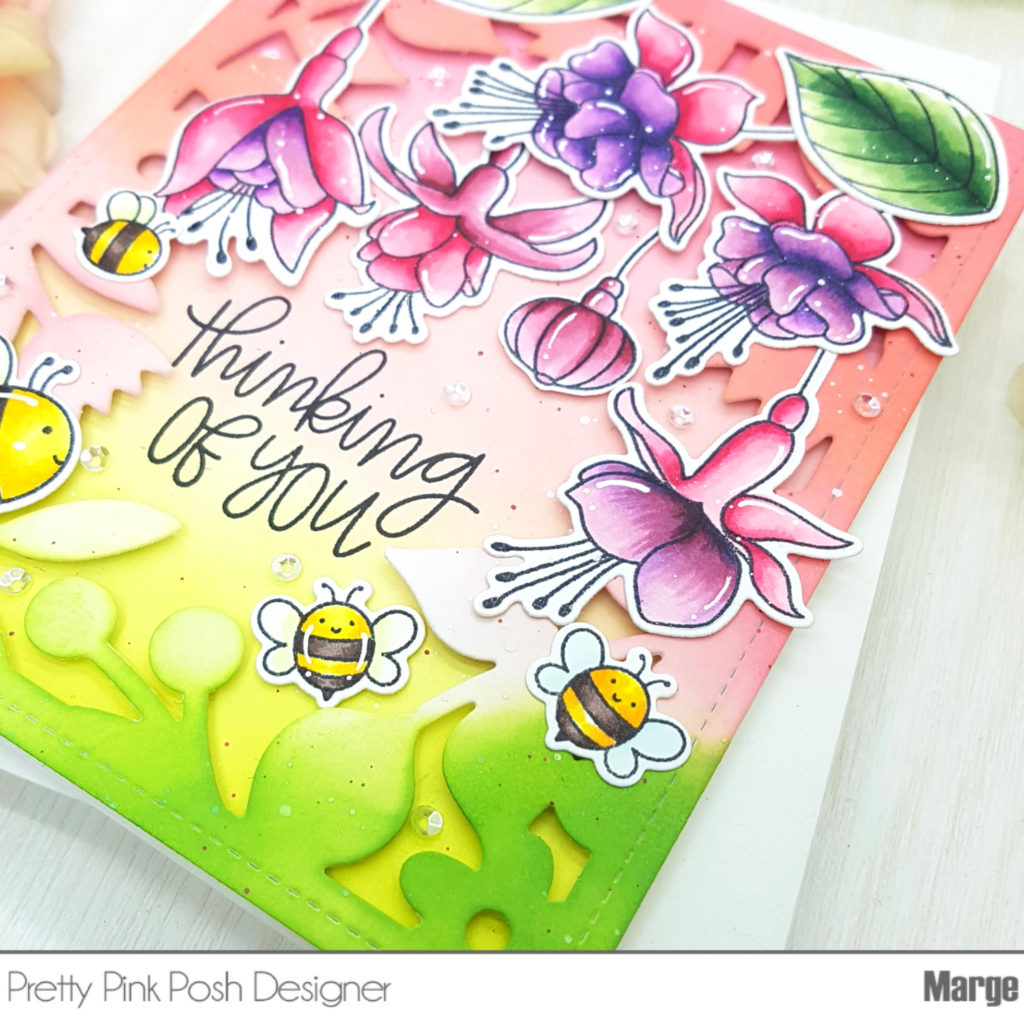
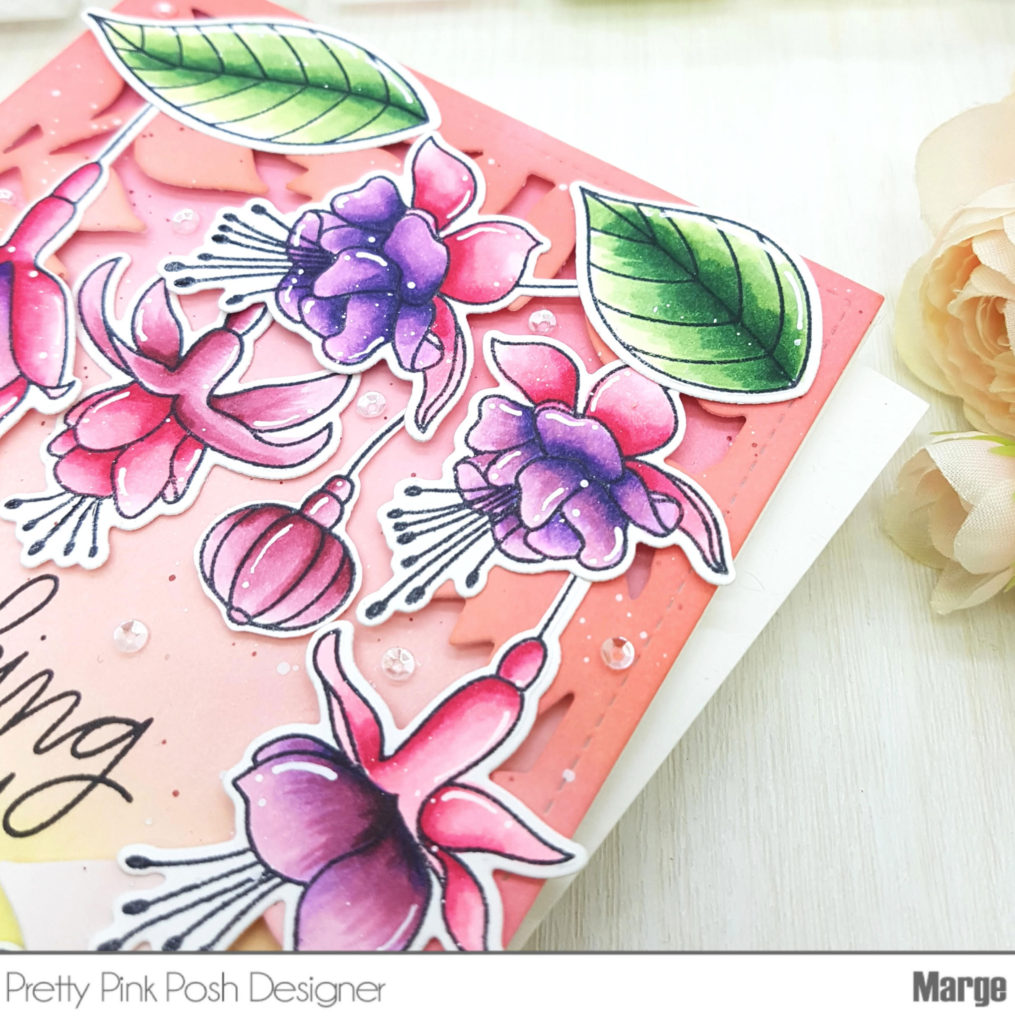
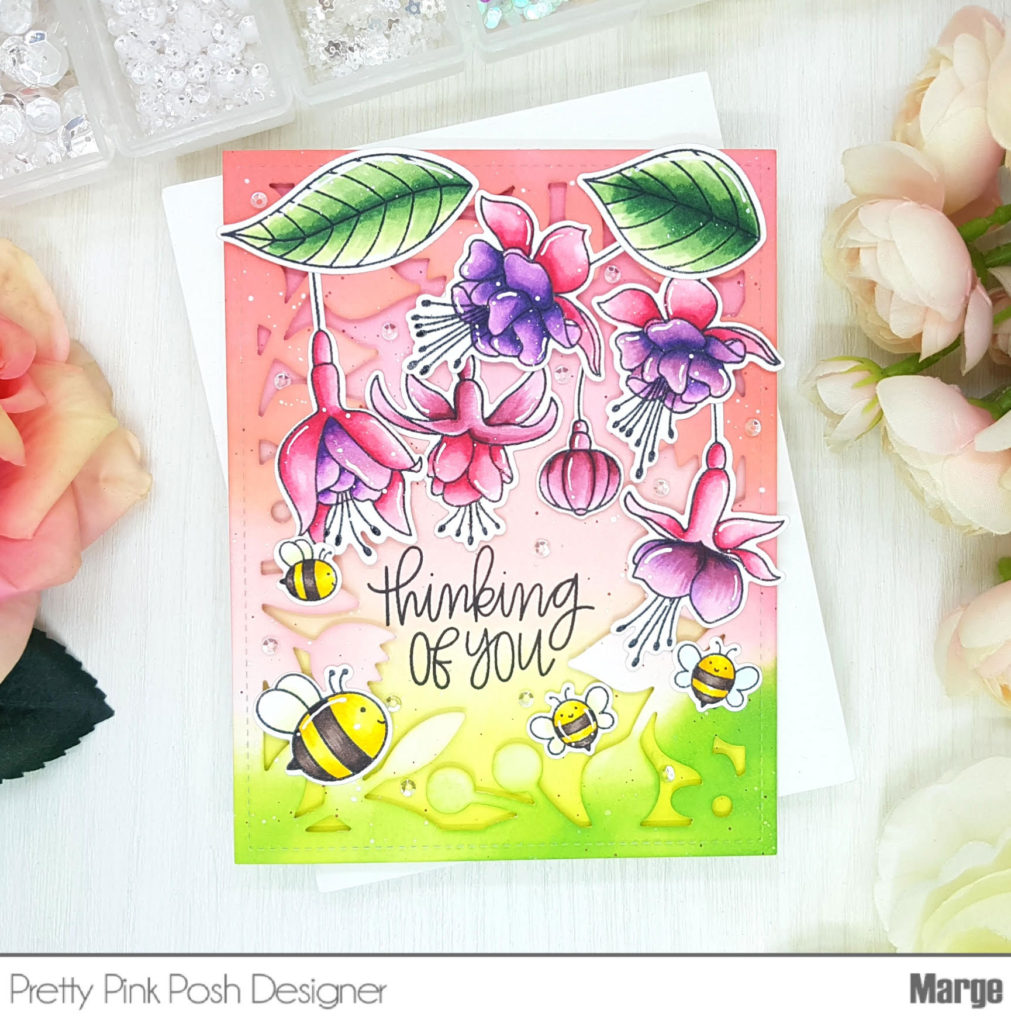
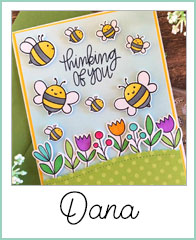
Hi, everyone! Marge here with you for the day 3 of Floral Theme Week featuring the Flourishing Fuchsias stamp set. Today, I’m going to share my Copic coloring of the fuchsias on Distress Oxide ink blended background.
I layered the frame to the bottom panel followed by fuchsias and bees around the frame, then I stamped Thinking of You from Bee Friends stamp set through the frame using my Mini MISTI. I splattered with white and dark pink ink over the panel and let them dry.
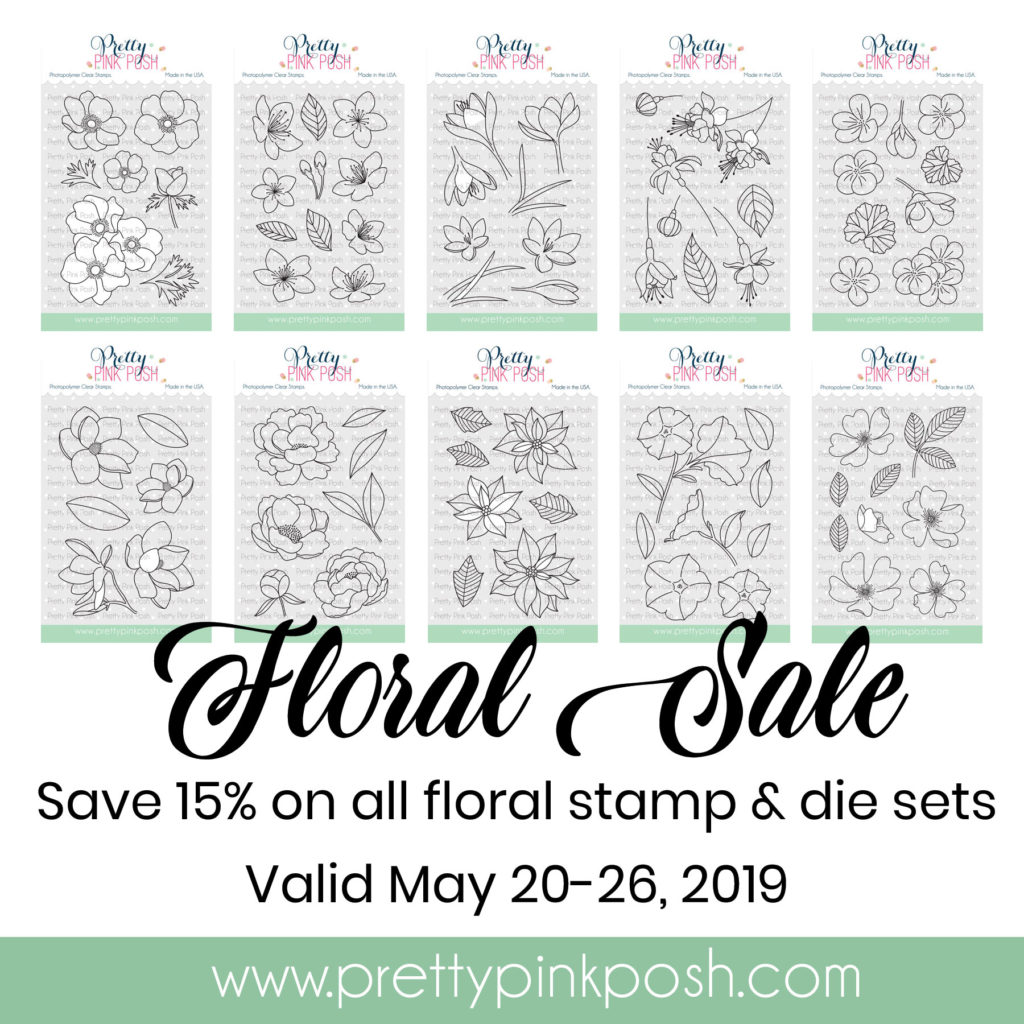
Hi everyone, Ardyth here and it’s my turn to highlight one of Pretty Pink Posh’s floral stamp sets for Floral Theme week. Be sure to check back because we will have new inspiration each day this week. All products in the floral section are 15% off May 20-26.
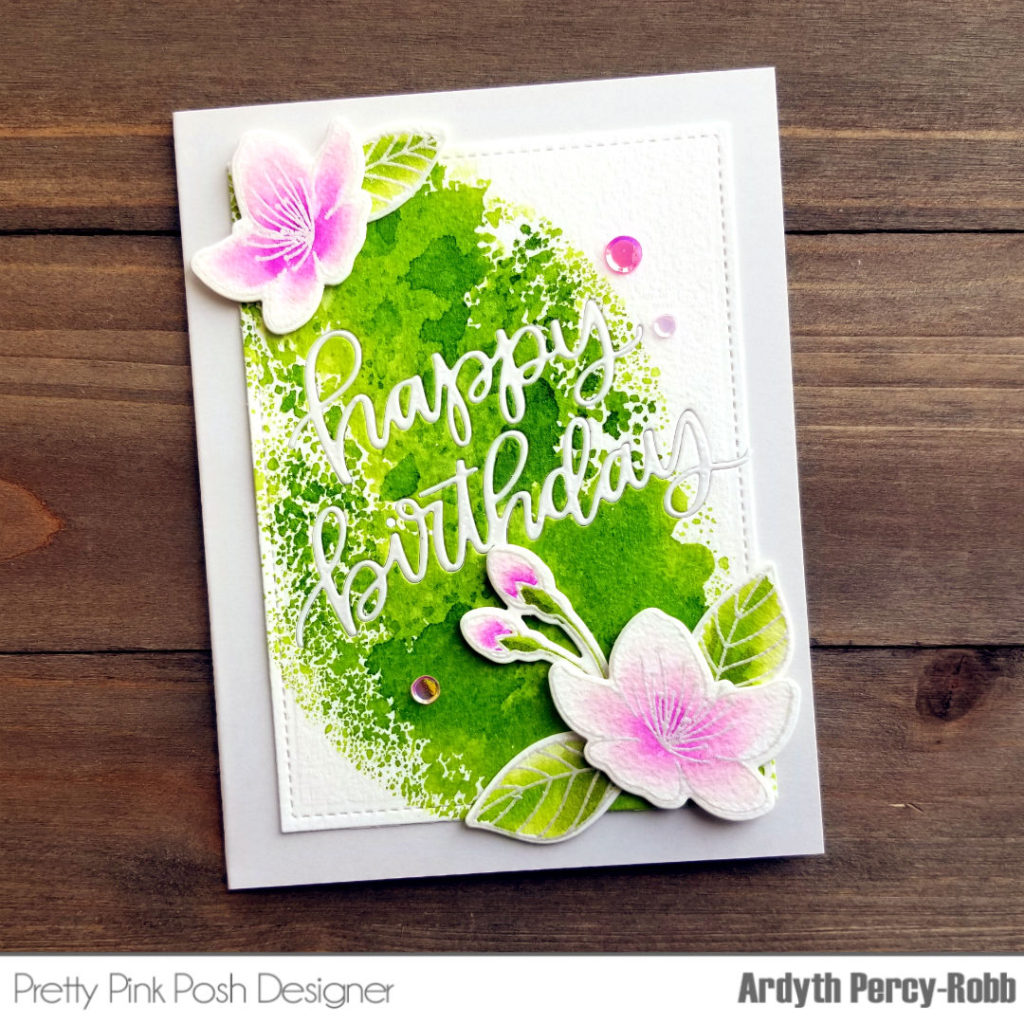
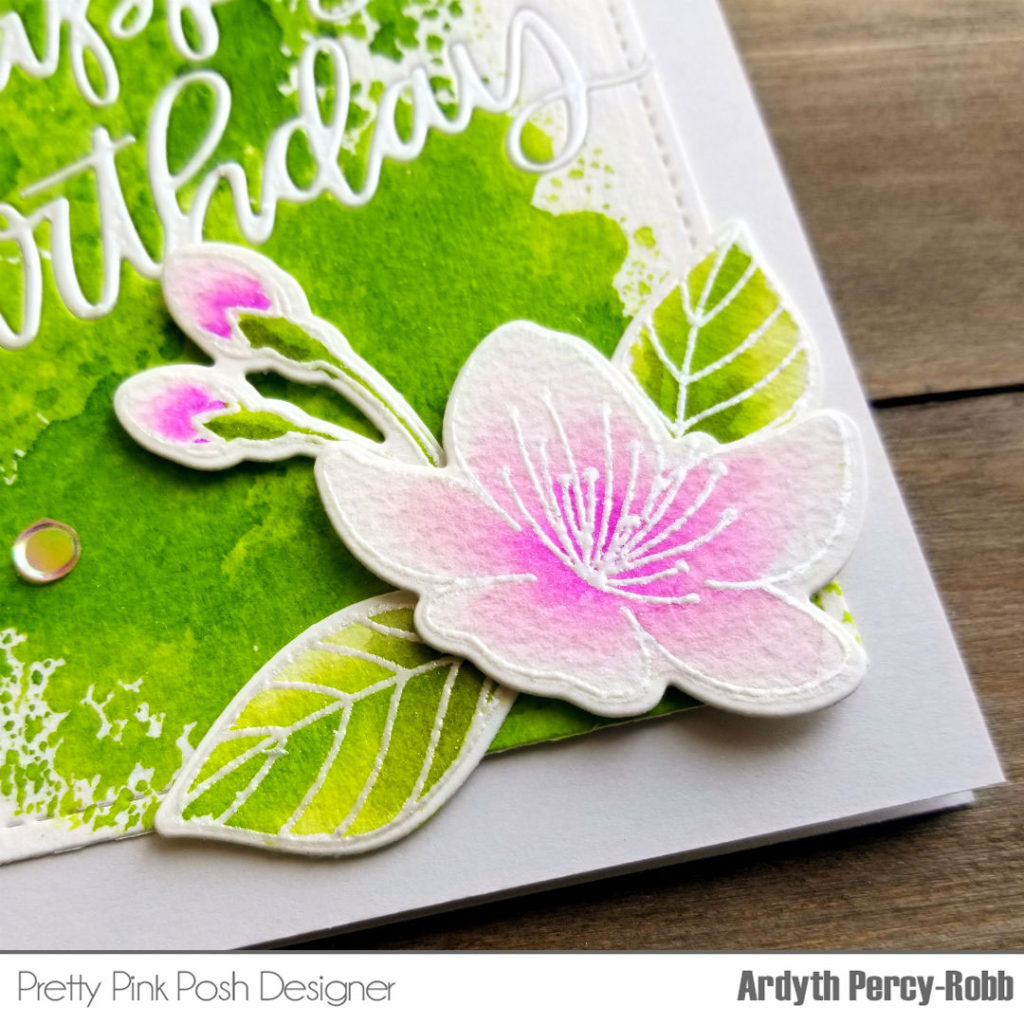
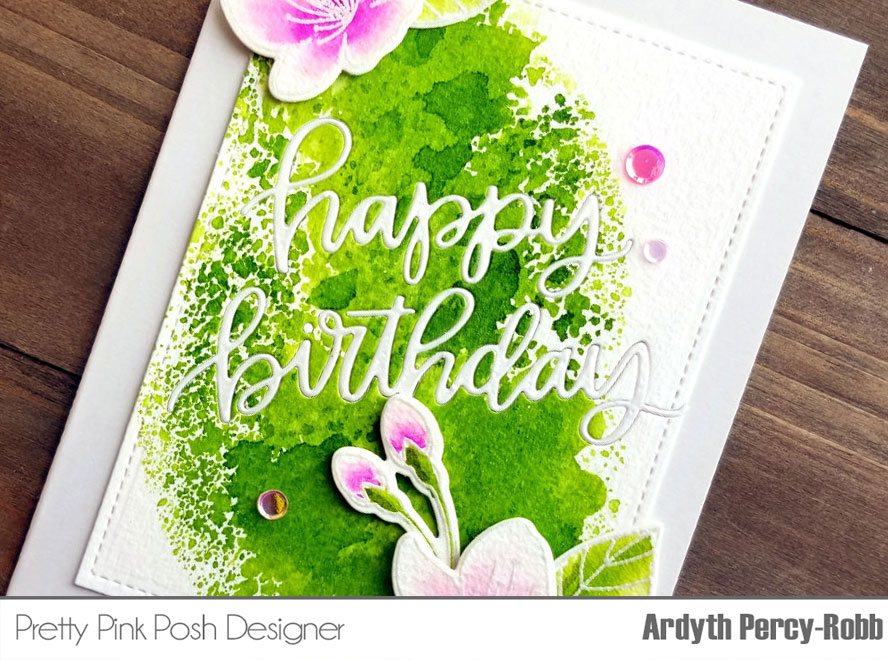
Cherry blossoms are the perfect sign that spring has arrived (finally!) and I wanted to recreate their soft pretty colours.
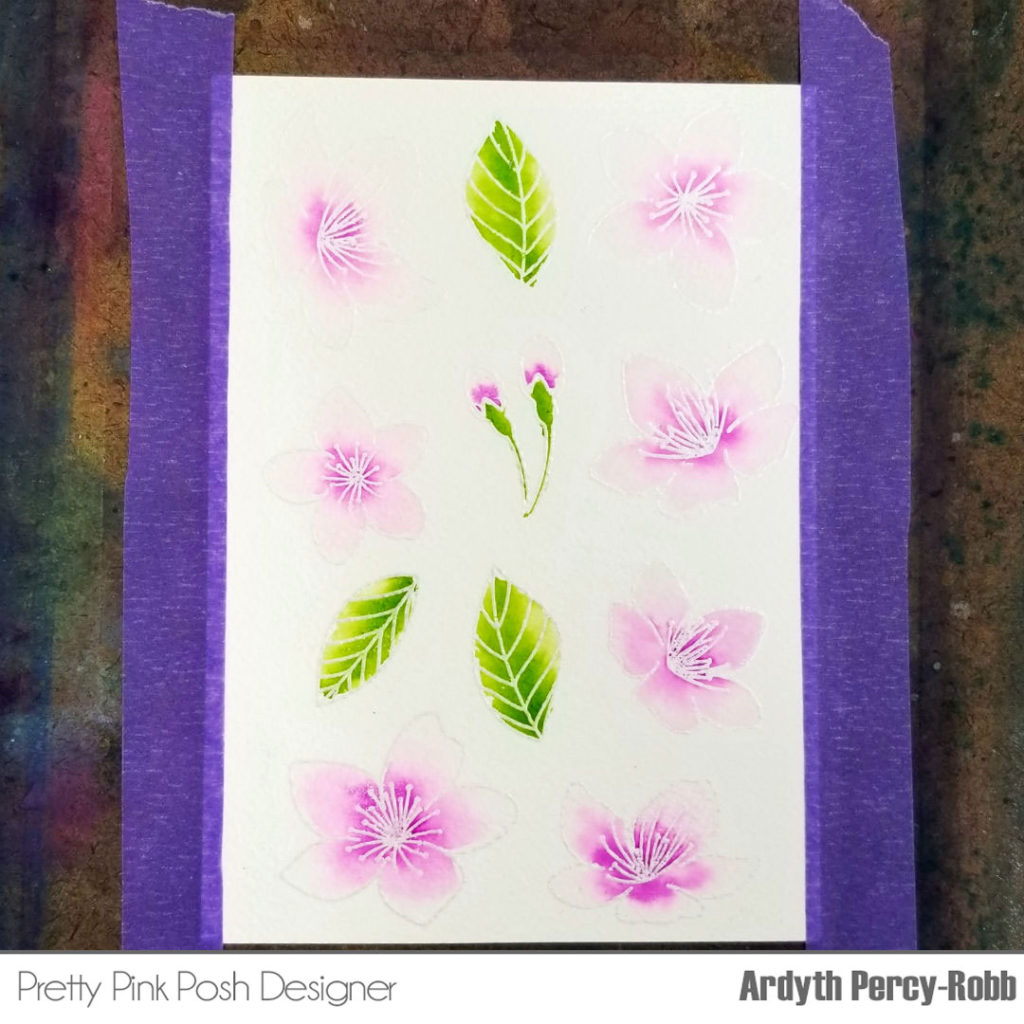
I started by stamping all the Cherry Blossom stamps in the set onto some watercolour cardstock, with embossing ink, before embossing them with Silver Pearl embossing powder. This powder is white, but it also has a beautiful shimmer.
I taped the panel to a board and watercoloured them with some of my ink pads. I used a water brush to fill each flower with water before bringing a small amount of colour to the centre, allowing the water to carry the colour out to the edges, fading out as it travelled. The embossed outlines kept the colour from going too far.
I followed a similar process for the leaves, using a fresh, spring green that I knew would contrast well with the flowers. To add a bit more interest and sophistication, I went back in with a second colour – a more muted lavender for the blossoms and a deeper green for the leaves.
I used the coordinating diesto cut all the flowers and leaves out and then it was time to create my background.
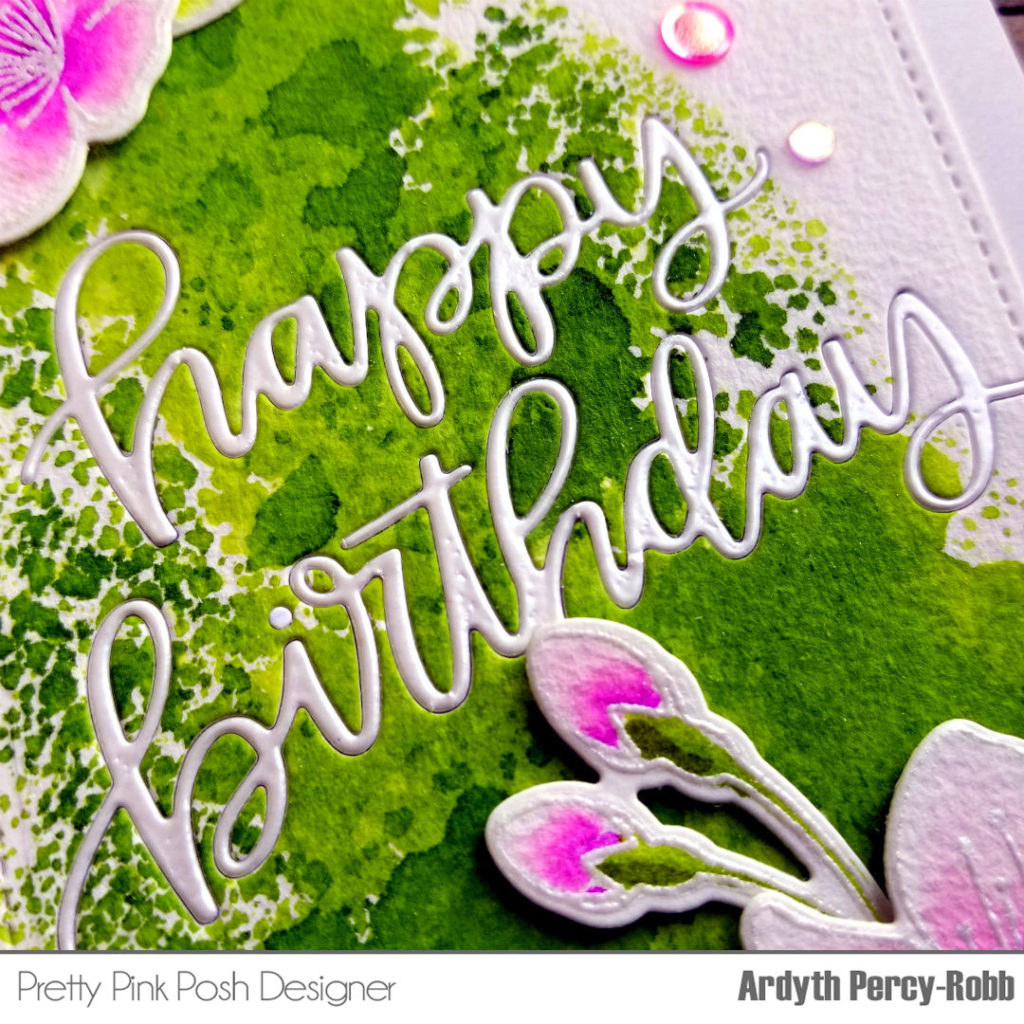
As a cardmaker, I tend to use bold bright colours. Whenever I try to make something soft and pretty, I find myself reaching for something ‘else’ to punch it up a bit. This time I did some ink smooshing on my background, in the same fresh green colour that I had used on the leaves. This increased contrast helped the blossoms pop! I trimmed this panel with the stitched rectangle from Stitched Notes.
For my sentiment, I used the Happy Birthday Script die. I cut it once from white cardstock and then again from the centre of the green ink-smooshed panel. Before inlaying the white sentiment into the panel, I coated it with embossing ink and embossed it with the same Silver Pearl embossing powder that I used for my images, so that everything would tie together. I added the flowers and leaves to the panel, allowing parts to extend over the edge for added interest. I used foam tape to pop up some of the elements, and others were glued directly to the panel.
To finish the card, I glued the panel to an oyster card base. I have some leftover flowers for another card; I will store them in the pocket with the stamp set until I need them.
Thanks for joining us today. Stop by tomorrow for a card using our Flourishing Fuchsias!
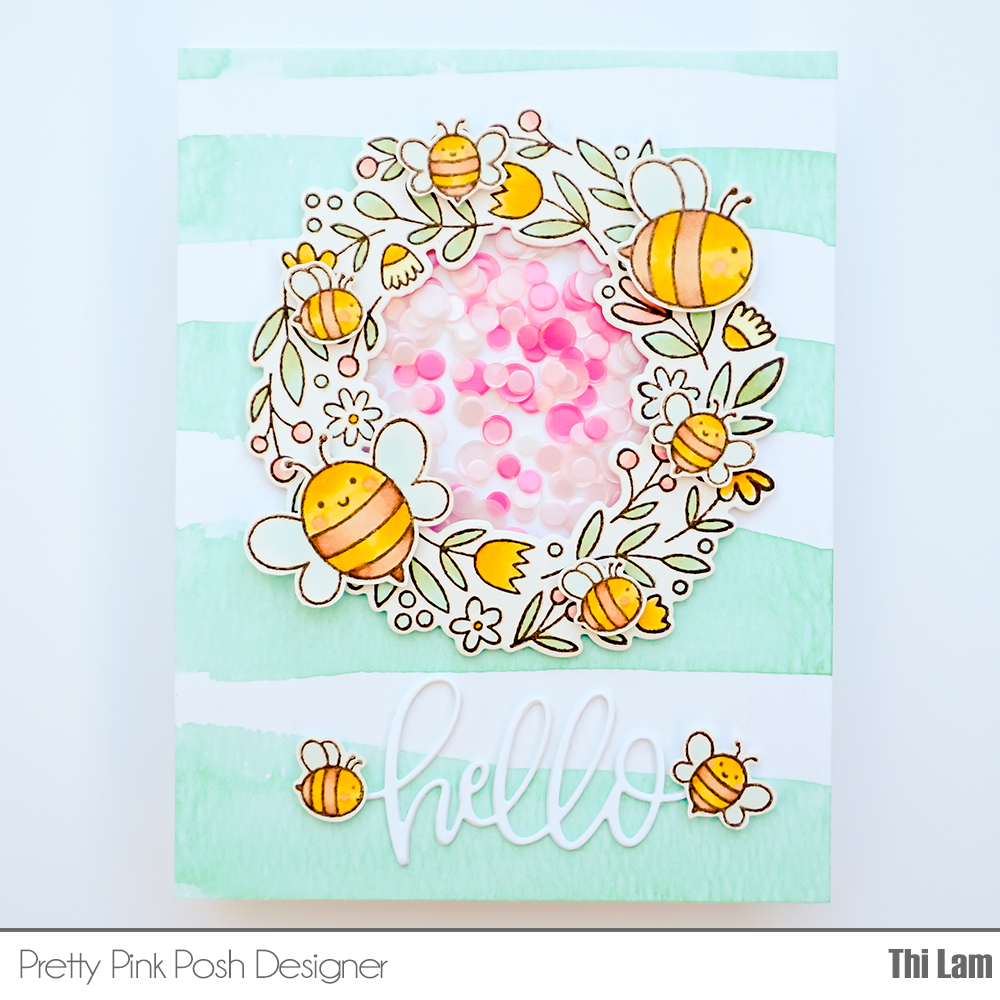
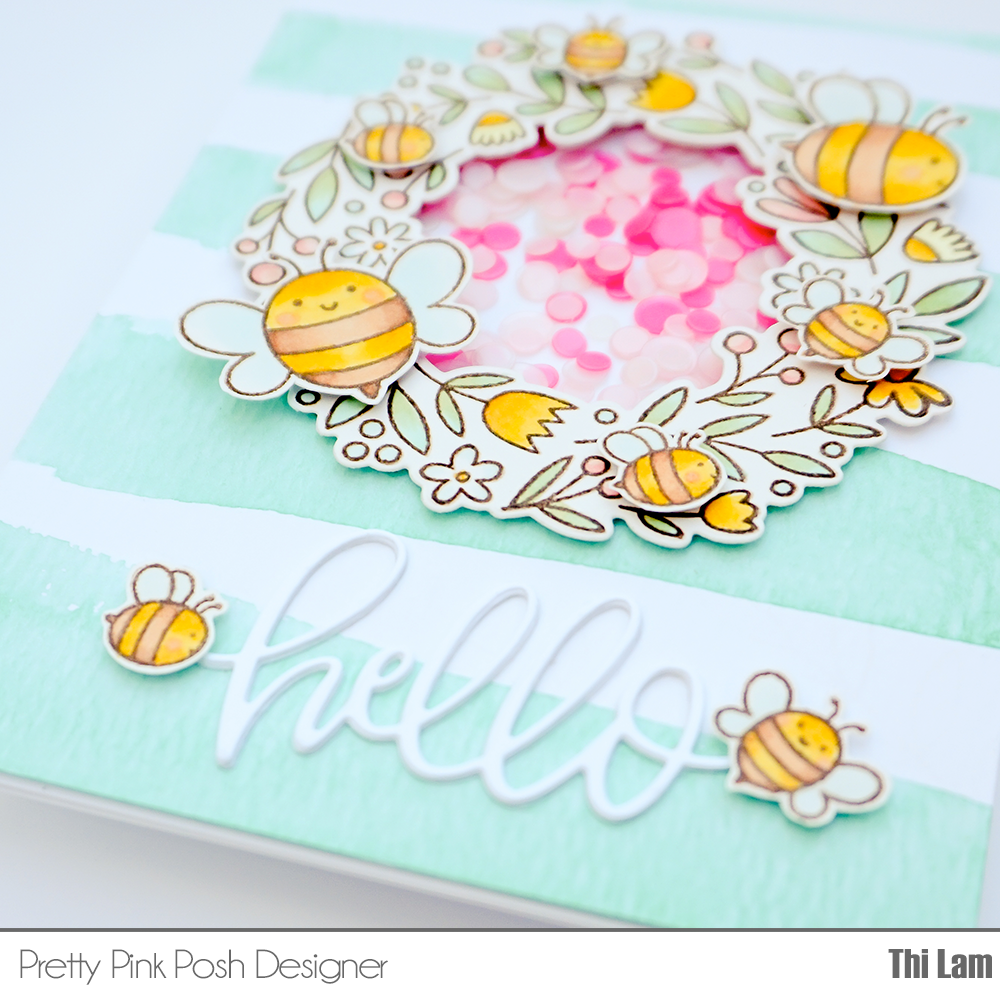
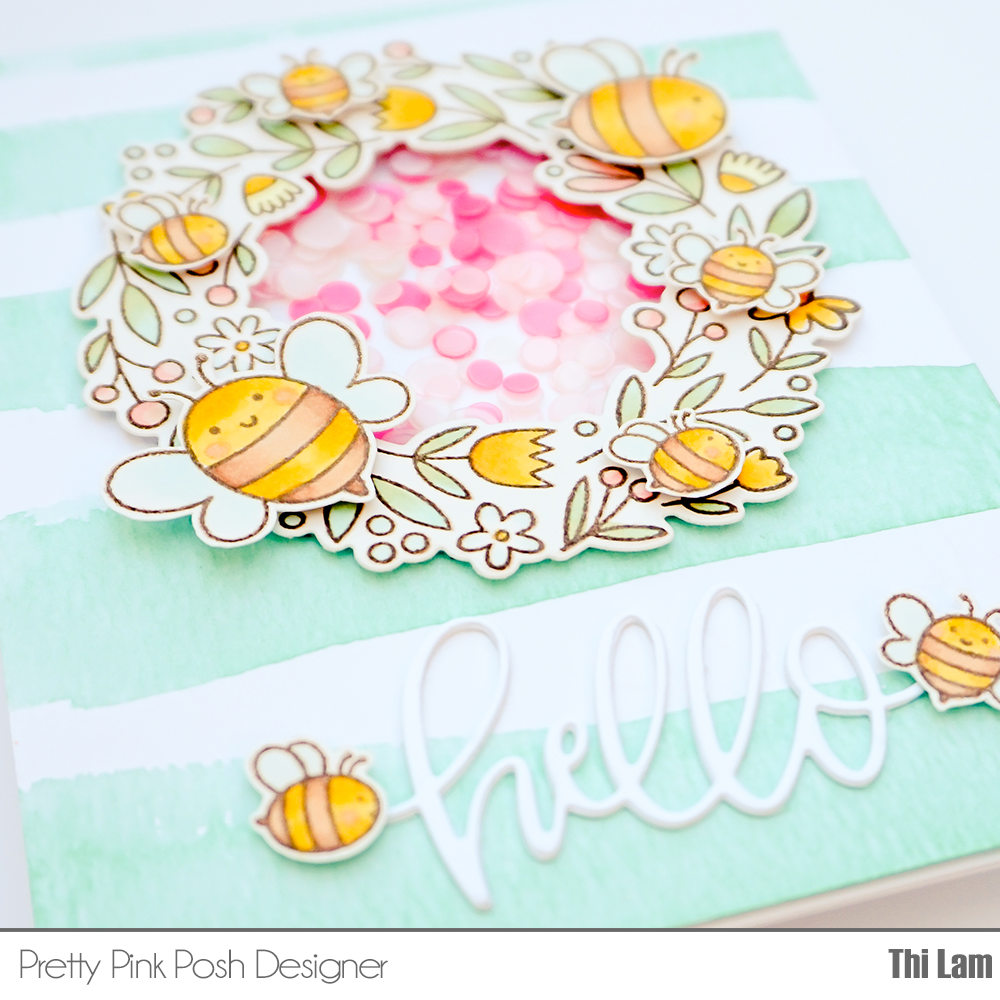
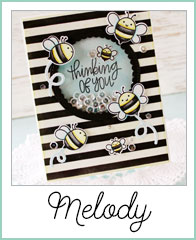
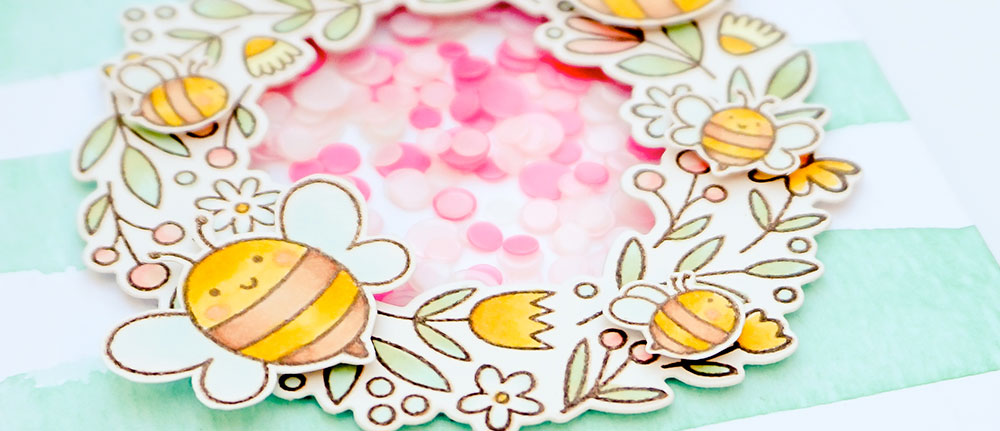
Hello, crafty friends! Thi here for a fun blog hop and today I am sharing a BEE-autiful shaker card for World Bee Day and using the adorable Bee Friends stamp set! Pretty Pink Posh is participating today to support bees and raise awareness for the importance of bees. It’s a great cause and we have the perfect stamp set to celebrate these amazing insects!
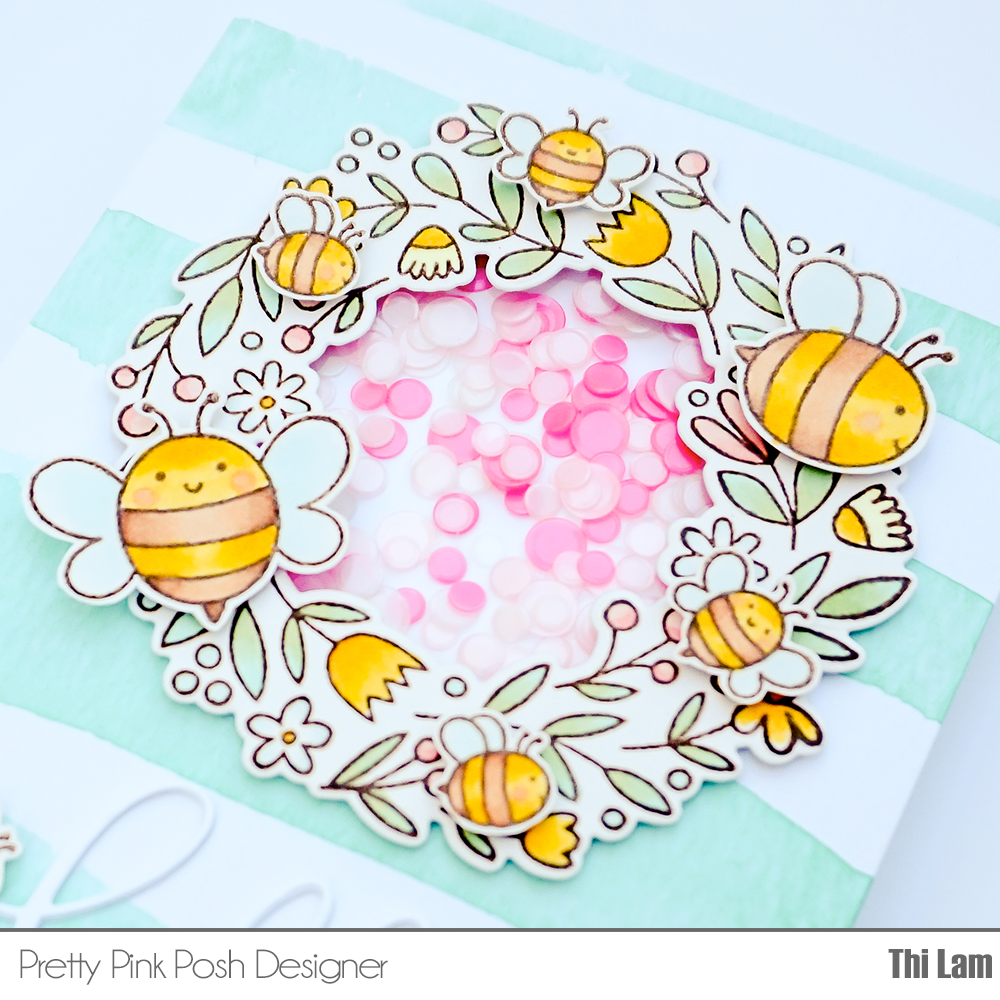
Let’s start the card making! I first stamped the images from Bee Friends and Spring Wreath with brown ink and colored with Copic markers. I cut these little guys out and set aside to work on my background and shaker elements.
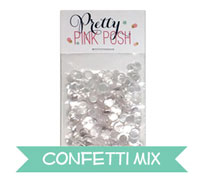
For the front panel, I freehand watercolored some light teal stripes onto watercolor paper and let this dry. After it dried, I die cut a circle and taped acetate to the back of this panel. Next, I used foam tape and built a well for my sequins to go in. For this card, I used Valentine Confetti Mix and filled the entire well. I then backed it with some white card stock. I adhered this panel onto an A2 top-folding card piece and moved on to decorate the front of my card.
I put some foam tape behind the wreath and adhered it over the shaker window. For more dimension, I also put my little bees on with foam tape so it would stand out. Basically, I was trying to make a bee wreath.
For my sentiment, I die cut just “hello” from the Hello Friend Script die three times on white card stock. I glued them together and glued to my card front. I finished this off with two of my little bee images and my card is finished.
Some of the Pretty Pink Posh team have also created inspiration with our Bee Friends set. You don’t want to miss them!
Here’s a list of the sponsors for this fun blog hop. There are lots of great prizes you can win if you leave comments!
Ready to hop along and see lots of great bee inspiration and possibly win some prizes?
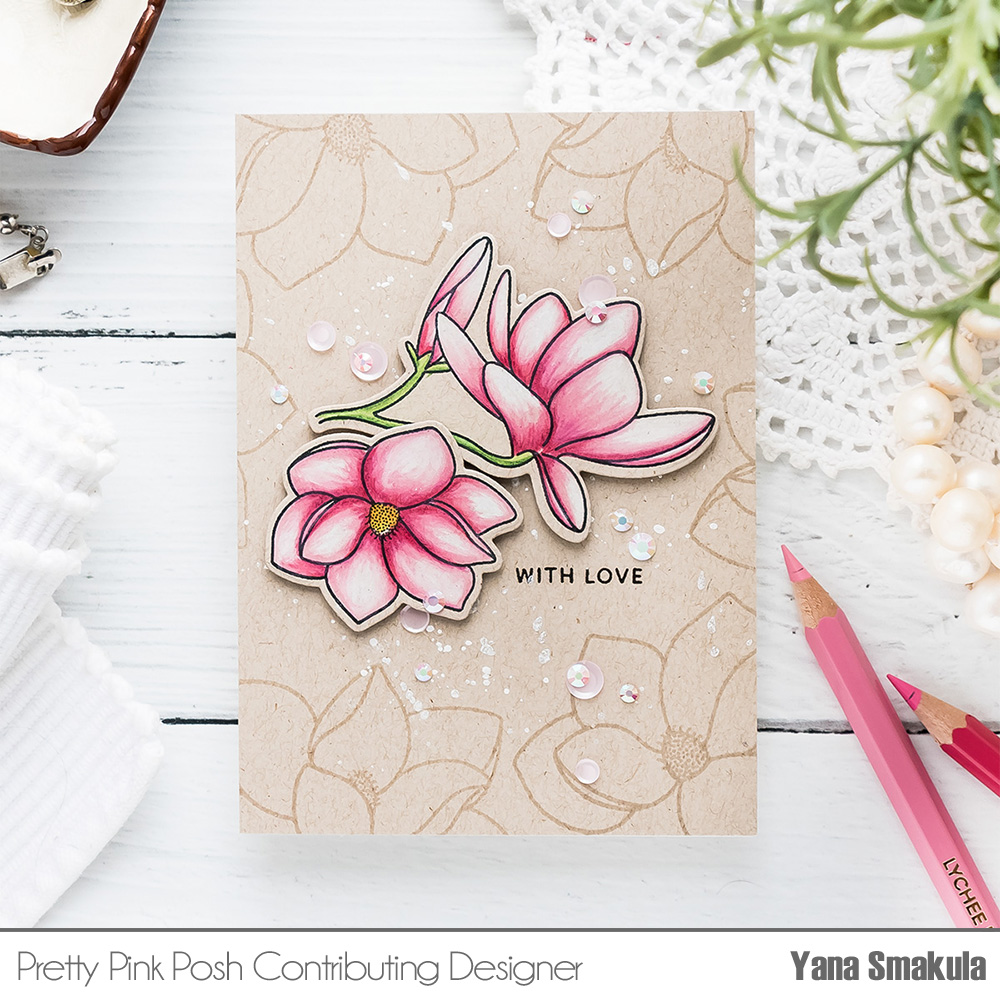
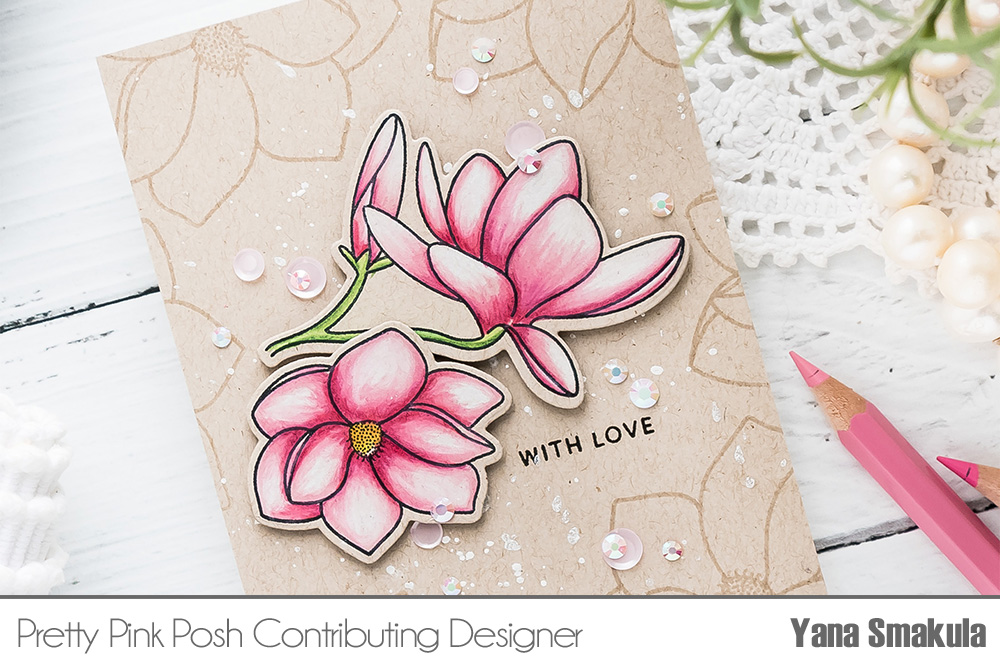
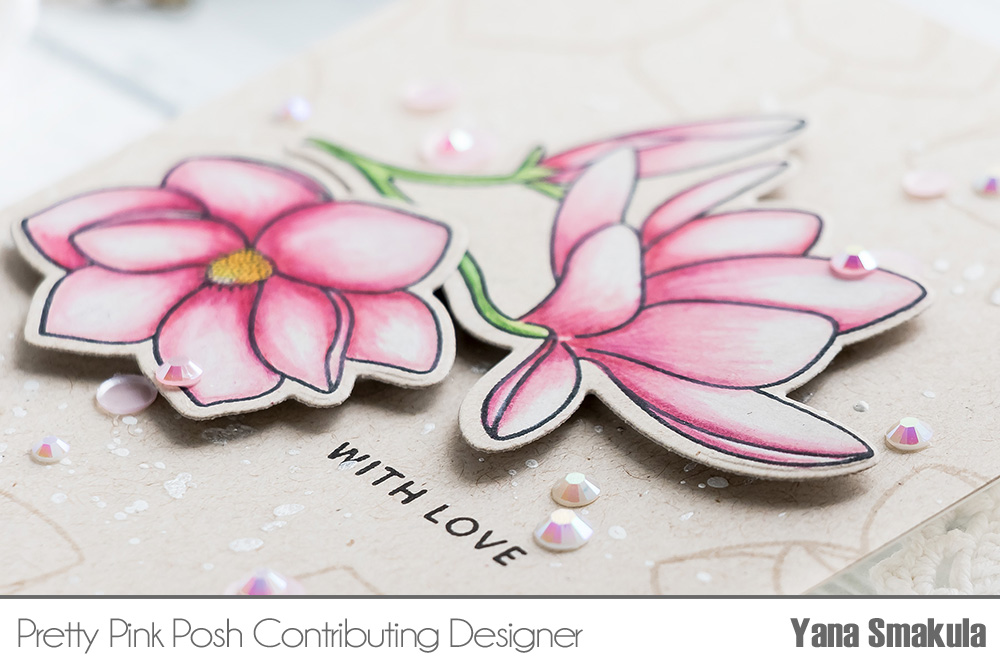
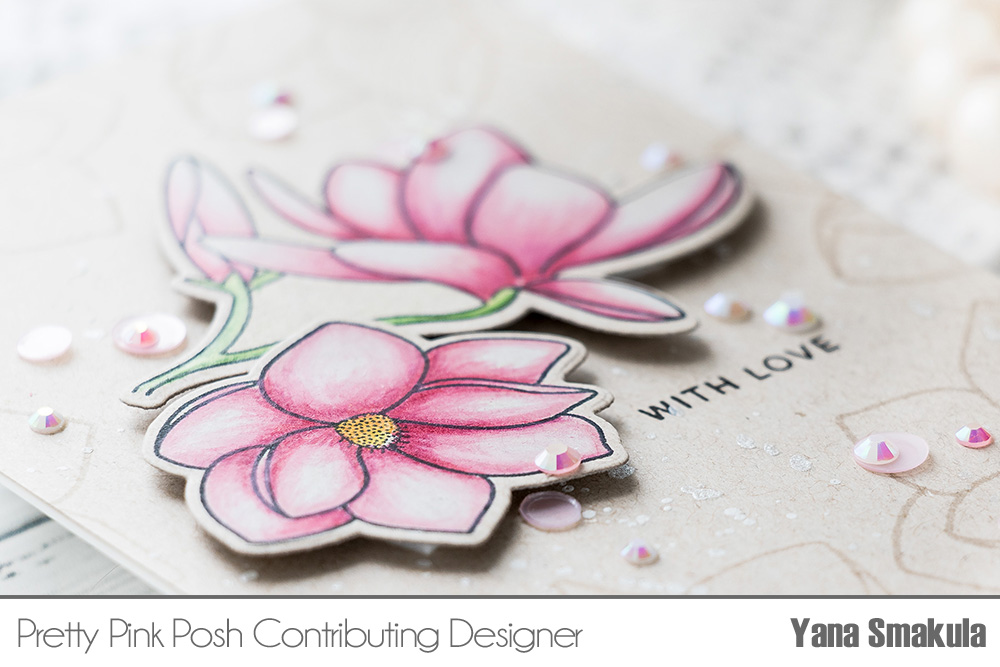
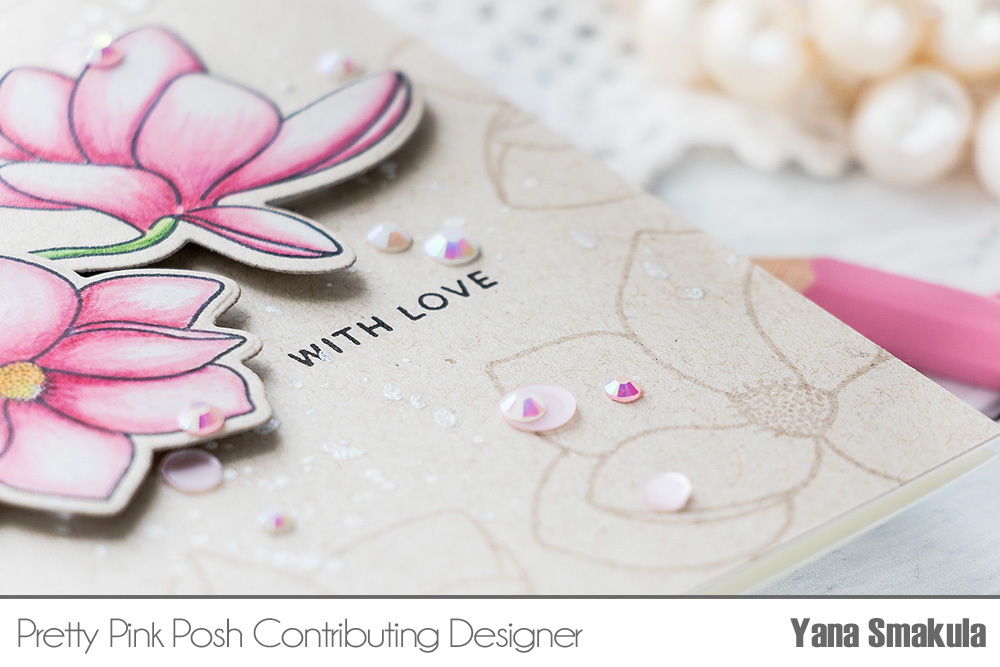
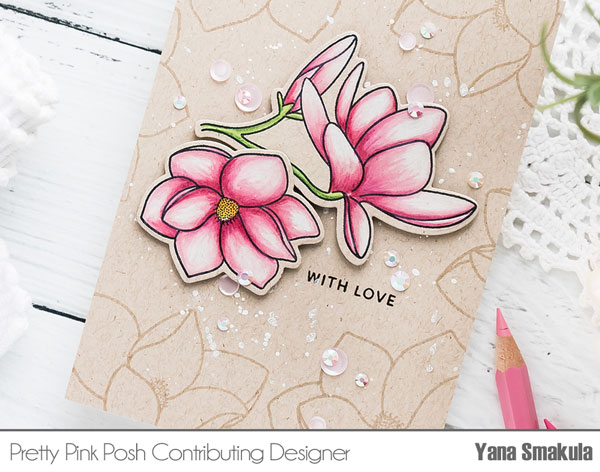
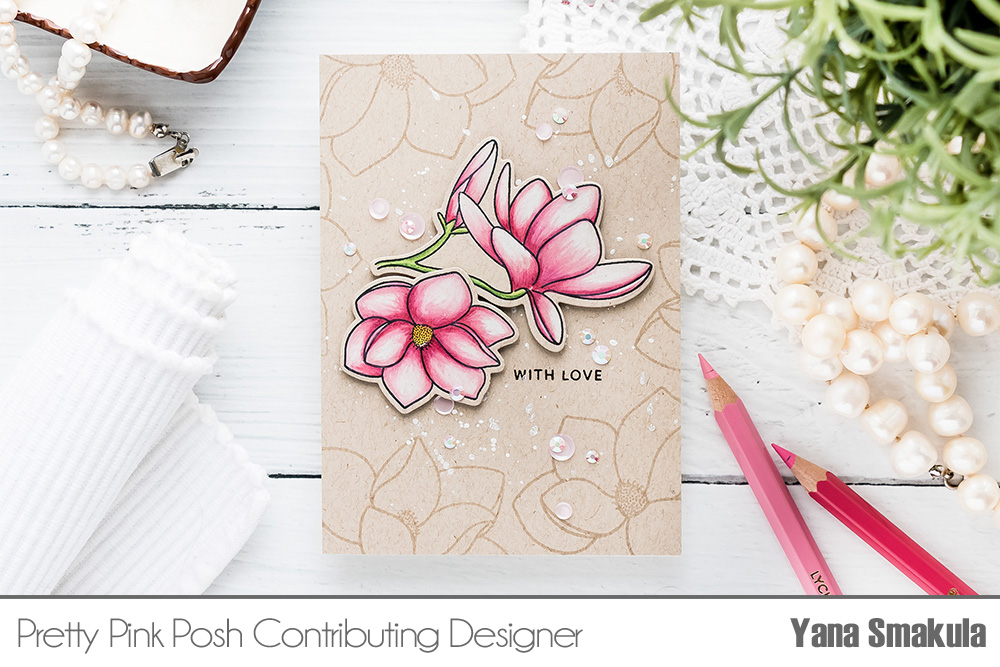
Hello, Pretty Pink Posh’ fans! This is Yana Smakula. I love to use colored pencils to color my stamped images with, they add a lot of interest and intricate details to all sorts of images, but especially flowers. Today I’m sharing a simple coloring tutorial featuring Magnolia Flowers stamp set and Chameleon Color Tones pencils.
I selected 2 flower images from the Magnolia Flowers stamp set and my plan was to stamp them in black ink onto kraft paper, color with pencils and re-stamp flower outlines with black ink again for a nice crisp black line. To be able to do this I used a MISTI stamping tool. You can skip this step and stamp your images using a clear block and perhaps re-outline the image boundaries with a black pen, or even skip re-applying the black outline altogether, but I think taking that extra step is what makes the finished card look extra nice.
If you do use a stamping tool remember to keep the stamps in the tool and not remove them.
I wanted to use Chameleon Color Tones pencils for my coloring. This is a new to me product, something I came across when visiting the CreativeWorld show in Germany this winter. I was intrigued by these pencils because they are double sided. One pencil has 2 colors built into it, for example, a light pink and dark pink. I have a 25 pencil set, and because the pencils are double sided this gives me 50 colors, plenty to chose from to create beautifully colored images. Pencils come in a nice display case and I’ve found them to be very easy to use.
I picked a few pencils for my card: 2101 Pear and 2102 Basic colors for the green pencil; 101 Soft White (there’s also cream, but I am only used white), 801 Lychee and 802 Strawberry, and finally 901 Warm Pink along with 902 Plum.
I prefer to color with colored pencils on non white paper as when I’m coloring on white I can always use my translucent coloring mediums, such as Copic markers, for example, these pencils are opaque or semi-opaque and that means I can color with their help over not just white surfaces, but dark surfaces too and still have beautiful vibrant results. The paper I colored my image on is Neenah Desert Storm 80lb Cardstock.
Even though each pencil has 2 shades, it doesn’t mean you have to use only those shades for your coloring. I used a white pencil, and light shades from 2 different pencils to color the petals. I went back to the darker shades of my pencils to add deeper shadows and a beautiful dimension to the flower petals.
I love using colored pencils for images like these as I can sharpen my pencils to a very fine point and have the smallest, finest stroke details on my petals. This is something I can’t really achieve with Copic markers, the tip of the markers is just never that fine.
Once my coloring was done I placed the image back inside my MISTI tool, made sure nothing shifted, inked up the stamps and re-stamped the black outlines to make them crisper. There are coordinating dies available so I used mine to cut these gorgeous flowers out.
Next, I positioned the flowers on the background panel and having figured out the placement I stamped a simple “with love” sentiment in black ink. This message comes from the Floral Hearts stamp set. To spice my background up a bit, I added some splatter. For this, I used a shimmer spray from my stash and just pattered some of it into the background. Next, I used foam adhesive and adhered the flowers in place.
At this point, the background still looked a bit blank, so I decided to trim it down to a smaller size to make this card into a 4Bar instead of A2 and also to stamp some additional flowers using tone on tone stamping technique.
I pulled out my watermark embossing ink and some additional magnolias from this stamp set and stamped several flowers around the edges of the panel framing my focal point. Using the watermark ink gave me beautiful soft impressions on the paper that blended well with the rest of the background.
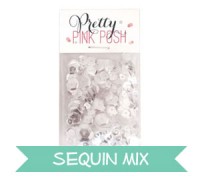
Finally, I used some sequins and jewels to embellish this card. I went with pretty Easter confetti mix using just some pale pink sequins and Valentine Jewel mix using white and light pink jewels. As always, I adhered these in place using my trusty Crystal Katana tool.
We will be having new inspiration every day using a different floral set to coordinate with our floral sale. Hope you’ll join us again tomorrow!
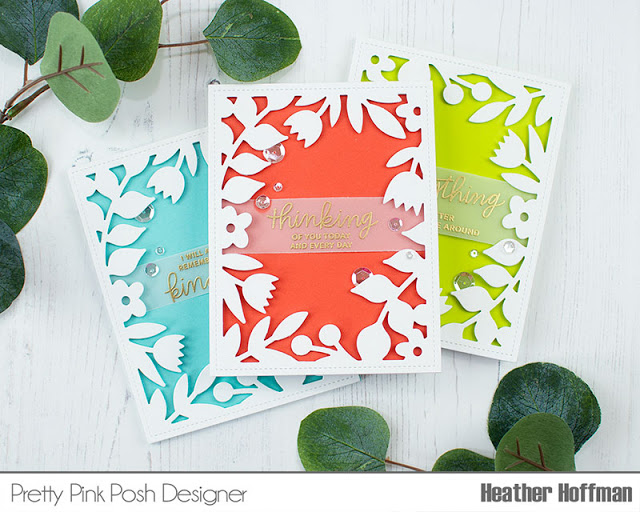
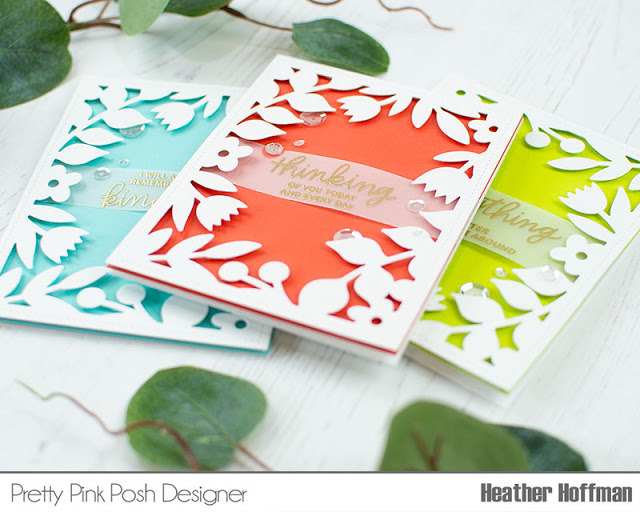
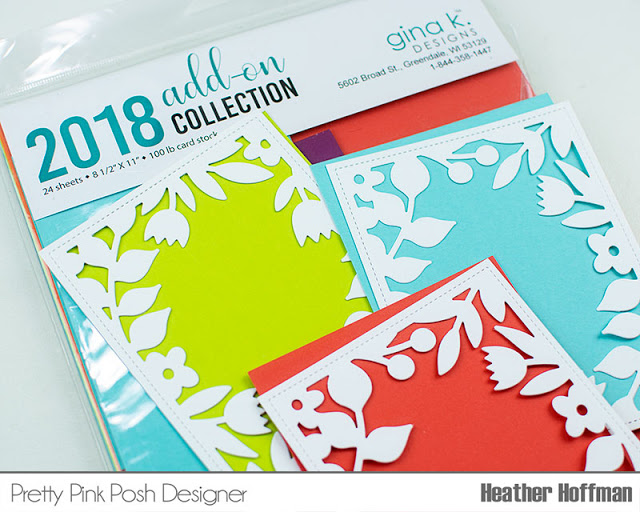
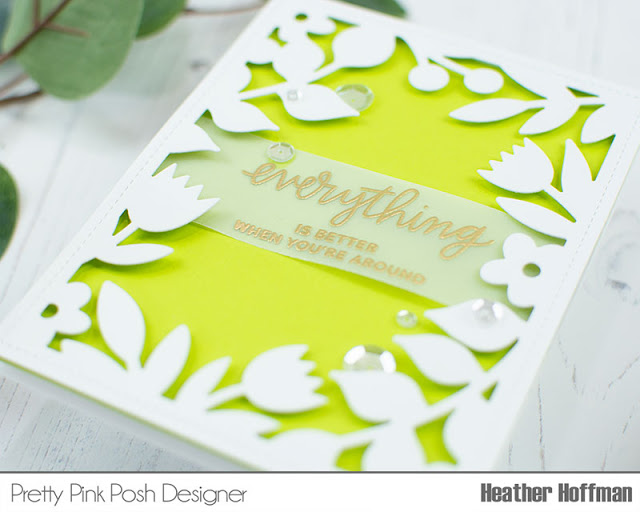
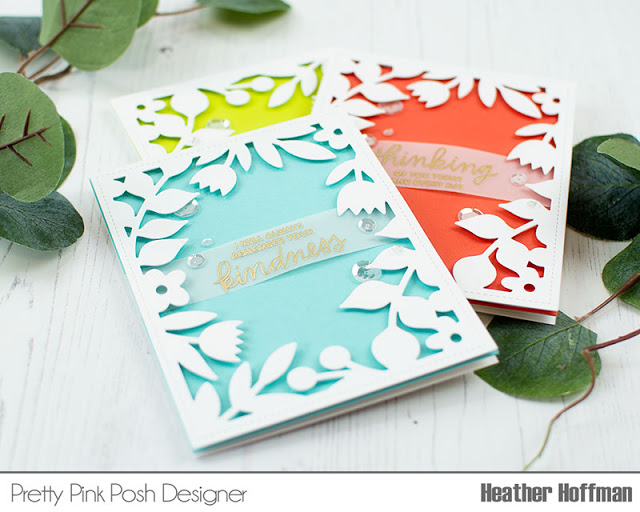
Good morning! Heather here and I’m sharing a fun set of cards created with the gorgeous Spring Frame Die – I love how they pop against bold colored cardstock, and make a perfect simple canvas for some lovely sentiments. This would be an easy way to create a set for gift giving, or to have on hand for lots of different occasions!
There is almost a graphic feel to these cards – and the vellum adds just the right touch of softness. Keep reading to see how these came together, step by step!
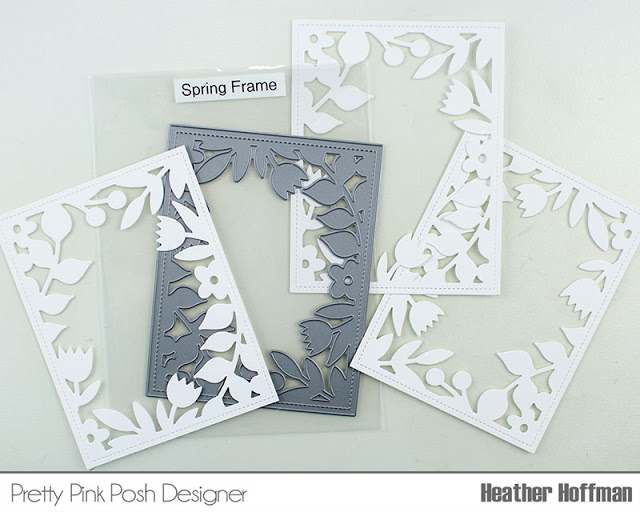
First up, you are going to need to die cut several of the Spring Frame from white cardstock. This die cuts like butter! And while there is lots of detail to make it gorgeous, there aren’t a ton of super tiny pieces to punch out, which I love!
Next, I chose some fun solid cardstock colors – there are all by Gina K Designs. The colors even look gorgeous together! I trimmed these down to fit behind the windows – so 4 1/4″ by 5 1/2″.
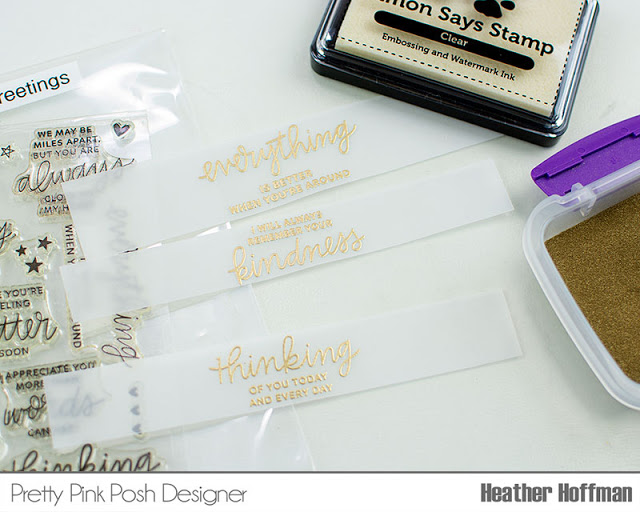
Next up – it was time to choose some sentiments! I heat embossed some sentiments from Thoughtful Greetings Stamp Set – a previous release – in gold on vellum, then trimmed them down into long strips, wider than the width of my card.
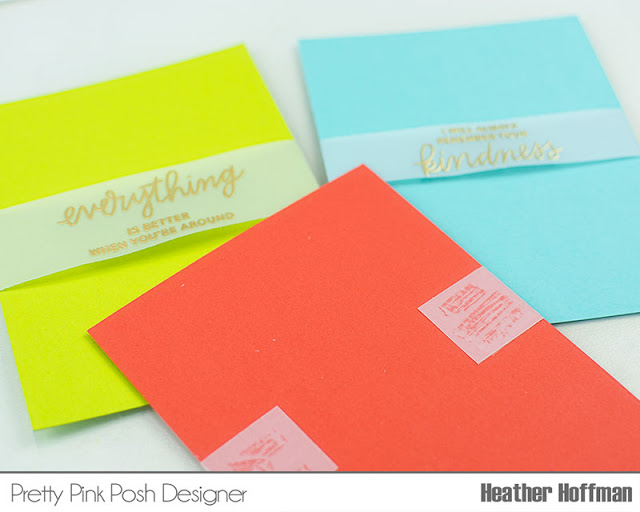
Next, I lined them up on my colored cardstock panels, folded the edges around to the back, and adhered them from behind. This way there is no need to hide the adhesive!
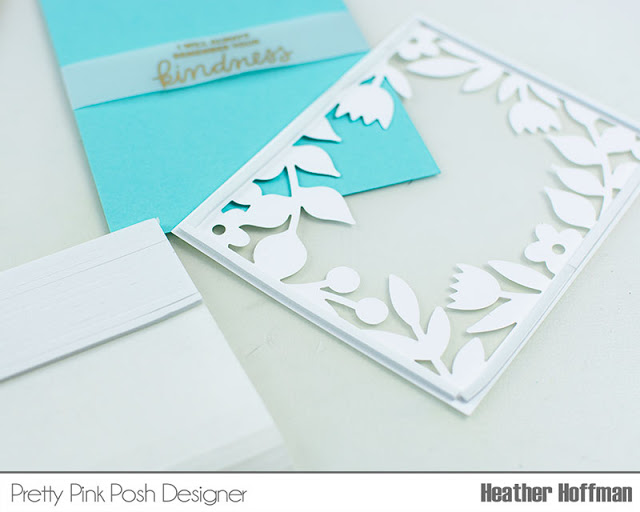
I used the handy Double Sided Foam Sticky Strips to adhere all of the Spring Frames over my cardstock panels – they are the perfect size to fit around the edges of this die, and it pops them up the perfect bit to add a bit of dimension.
The final finishing touch was a few Sparkling Clear Sequins adhered around for a bit of sparkle and shine!
And there you have it – a complete set, and super easy to put together!
Which color combo is your favorite? Or do you have a favorite sentiment?
Thanks so much for stopping by today – have an absolutely wonderful day!
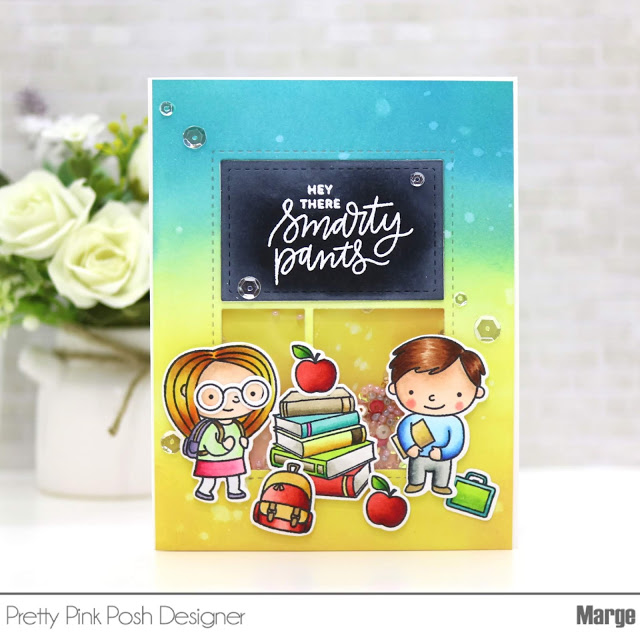
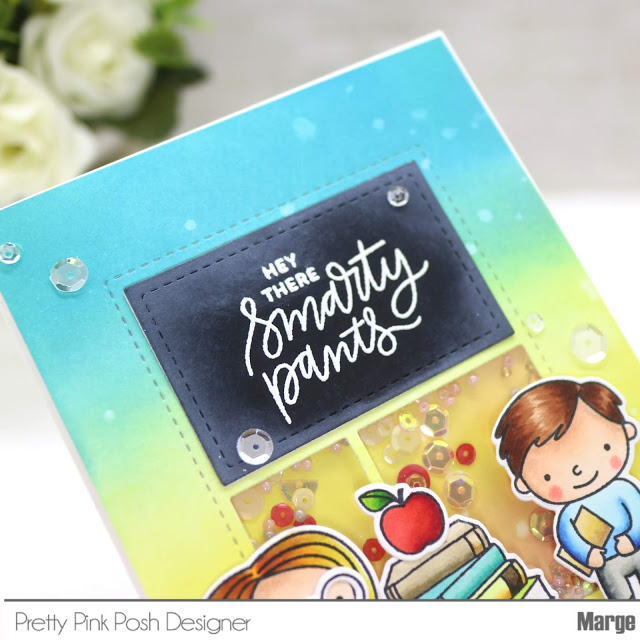
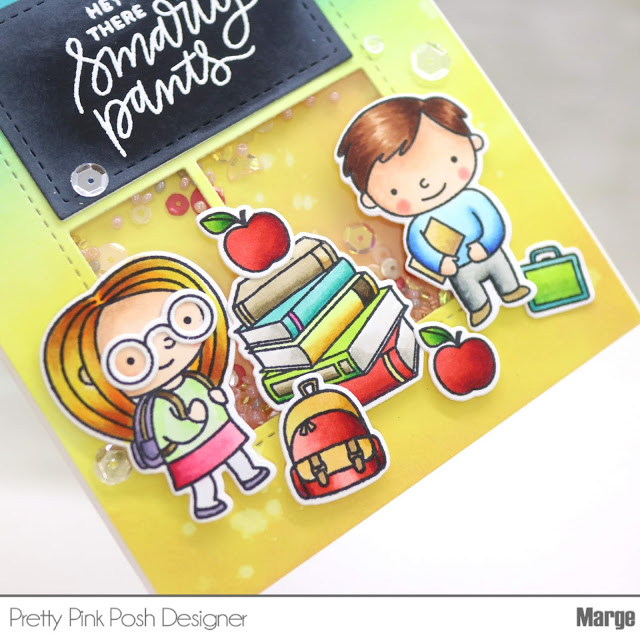
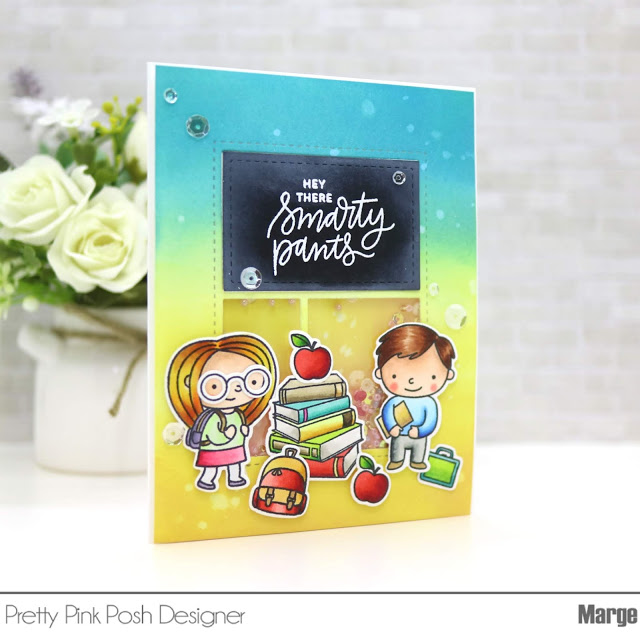
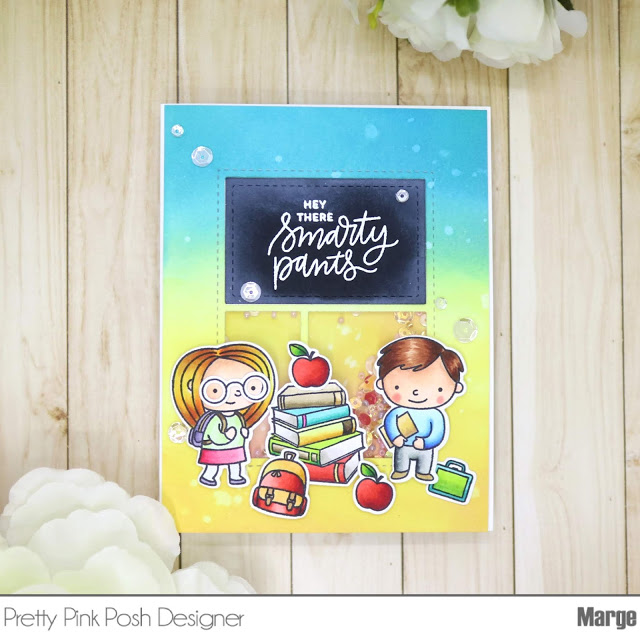
I trimmed a piece of Bristol Paper into A2 size (4.24×5.5 inch), then I ink blended it using Distress Oxide Inks – Wild Honey, Fossilized Amber, Squeezed Lemonade, Mermaid Lagoon and Peacock Feathers from bottom to top.To give some interesting layout to the card, I die cut the inked panel using Storybook 1 Dies. Among the three windows created by Storybook 1 Dies, two were to for shaker window and one for chalkboard. I die cut Storybook 1 Dies out of black card stock again, heat embossed sentiment in white and then I added a little bit of white pigment ink around the edges by just using my fingertip. To give some dimension to the chalkboard, I layered 4 pieces including the top one.
Colored images were then adhered using glue and foam tapes. I put the panel onto a card base made of 110 Neenah White then I added Sparkling Clear Sequins Mix as a final embellishment.
For my second card, I diecut 110 Neenah White paper and red cardstock using Scallop Borders 2 Dies and adhered them. Sentiment was heat embossed on red cardstock in white and I die cut it using Mini Tags Dies Set.
I used mini hearts paper from Pebbles Forever My Always 6×6 paper pad as a background panel. To add some lovely mood I added Ivory Twine Ribbon.
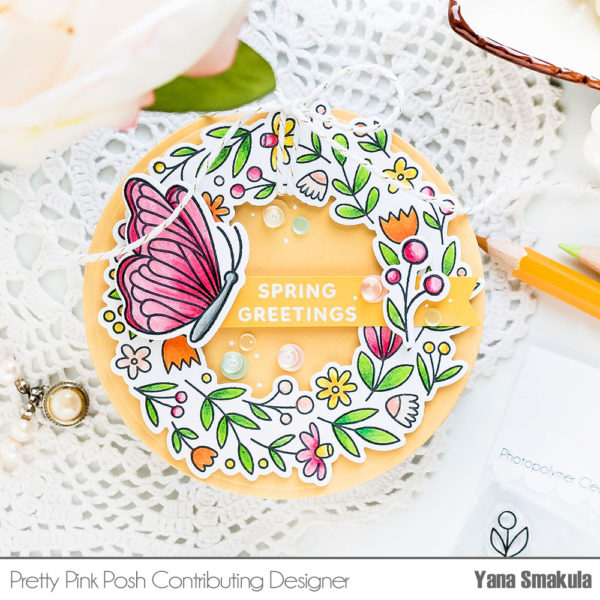
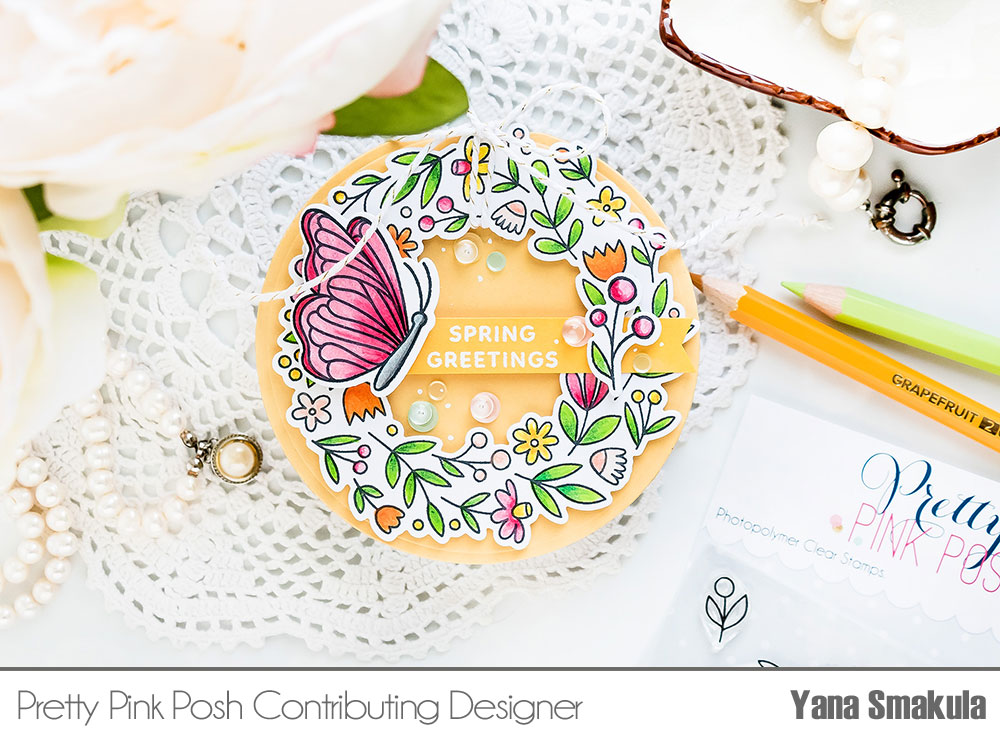
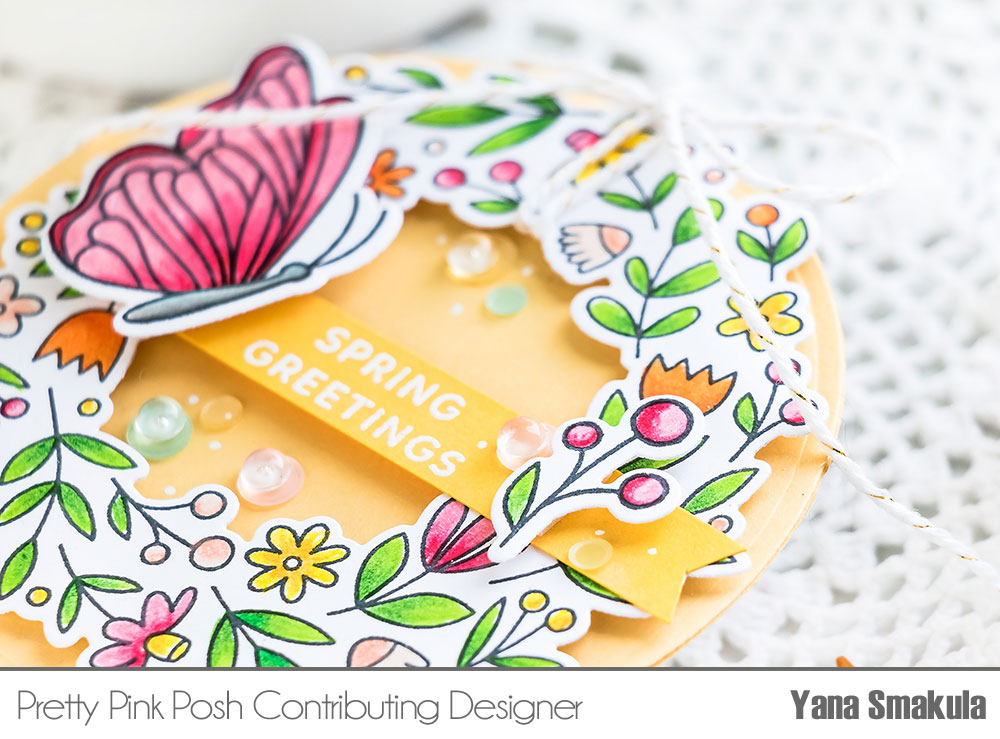
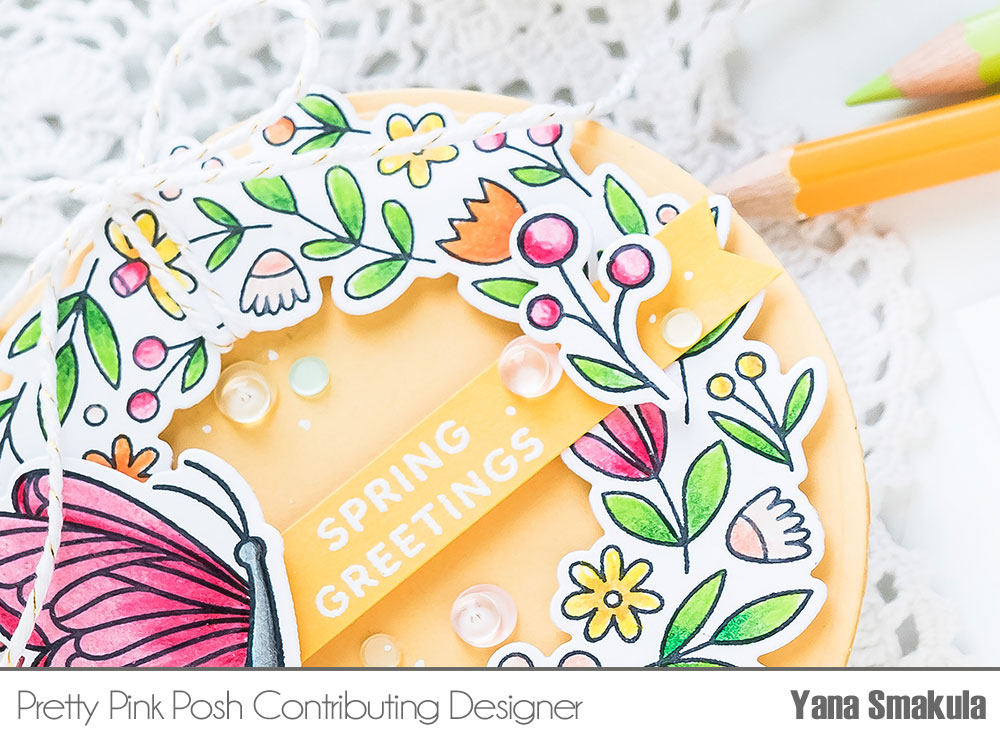
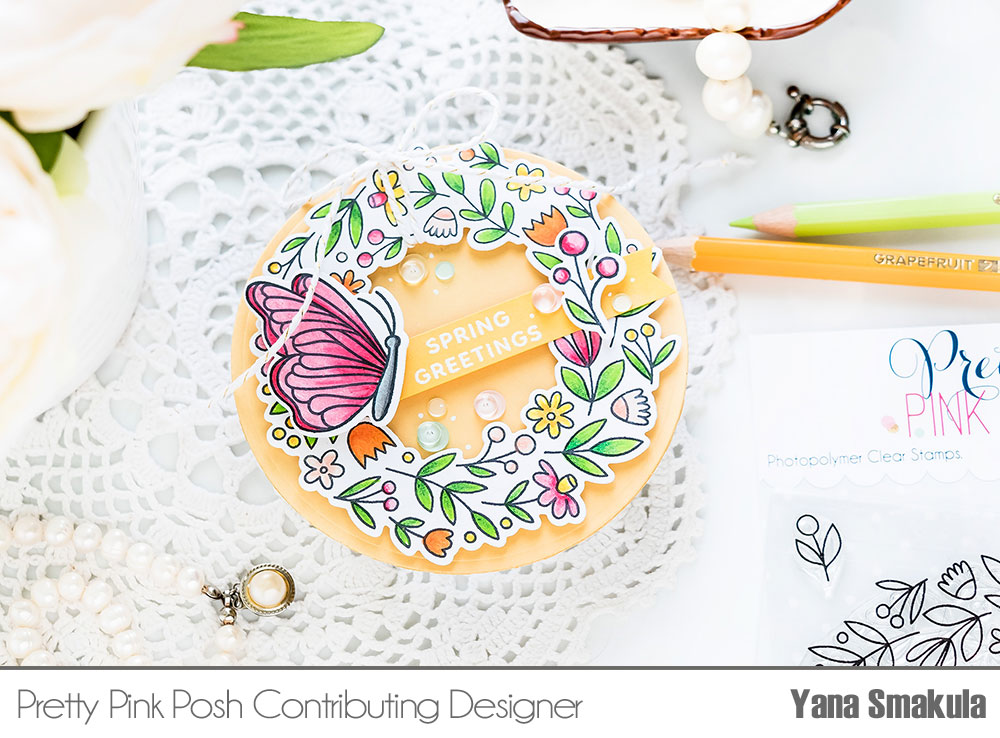
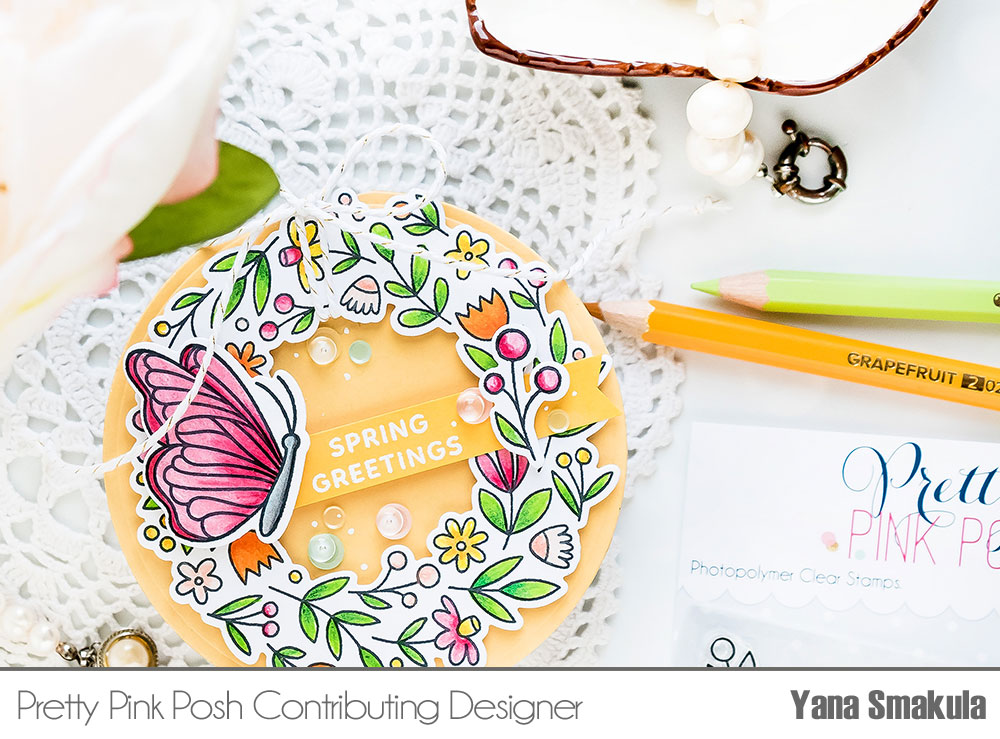
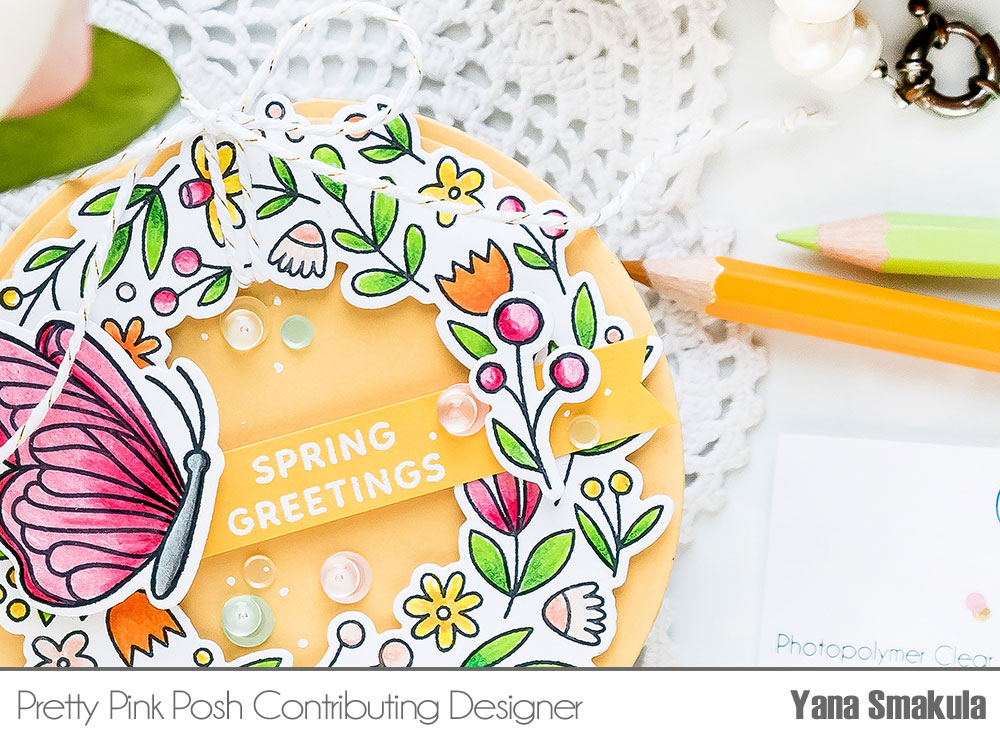
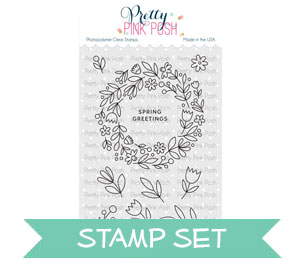
Hello, Pretty Pink Posh fans! This is Yana Smakula. I rarely make shaped cards now and frankly, this is something I really miss from my early card making days. When I saw the Spring Wreath stamp set by Pretty Pink Posh I knew it was perfect to use for a cute little circle card. It’s like it was made just for that!
If you are not into shaped cards and prefer regular A2 card size and format you can easily incorporate my today’s idea into a traditional format card.
Watch my video tutorial below to learn how I made this card.
I started working on my project by stamping the Spring Wreath in black ink on regular white paper. I wasn’t sure which coloring medium I wanted to use for this card, but having just received a set of Dual Ended Chameleon pencils in the mail I wanted to give them a go. For this card, I picked just a handful of colors to test these pencils out.
If you are not into colored pencils, you can, of course, color this wreath using any coloring medium you like, the images here are small and don’t require a lot of work, so it’s a great image to color quickly or on the go.
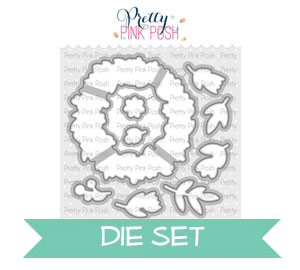
There are coordinating dies available for both of these stamp sets, I used mine to cut the wreath, individual flower and also the butterfly out.
Next, I stamped a sentiment for this card that reads Spring Greetings, it comes from the Spring Wreath stamp set. I stamped it on dark yellow cardstock and heat embossed in white embossing powder, once it was ready I trimmed t into a skinny strip.
From this point, if you prefer a standard format card you can create a regular A2 card base and follow the tutorial. I however wanted to make a circle card so I die-cut a circle card base using a regular circle die. I first created an A2 card base out of light yellow cardstock and next used the die to cut it into a circle. I made sure the die blade went outside the fold of the card so that I didn’t just die cut 2 circles, but rather a circle card base.
Next, I used lots of foam adhesive squares to foam mount the colored wreath on to the card. Before I adhered it in place I added some white twine to be able to tie it into a bow later. It just adds a nice finishing touch to the card.
I made a V-shaped cut on the right-hand side end of the sentiment strip and having figured out the placement I adhered it in place using glue, I only added glue where the strip overlapped the wreath. I used different shades of yellow of cardstock for the card base and sentiment strip so that they won’t blend together.
I also shaped the butterfly a bit and adhered it onto the card using foam adhesive to pop it up above the background. I also foam mounted the individual flower I had colored.
Finally, I used a mix of sequins from the Easter mix and also small clear droplets to embellish this card. I adhered them in place using liquid glue.
I think these cards turned out really beautiful. I hope you like them! Have fun stamping!
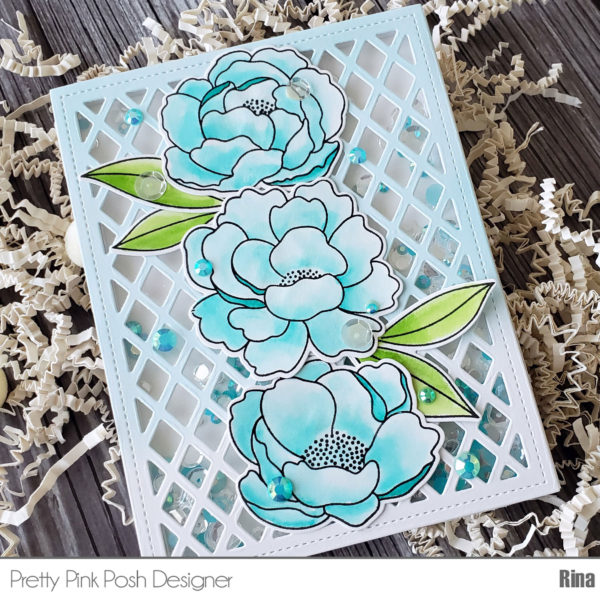
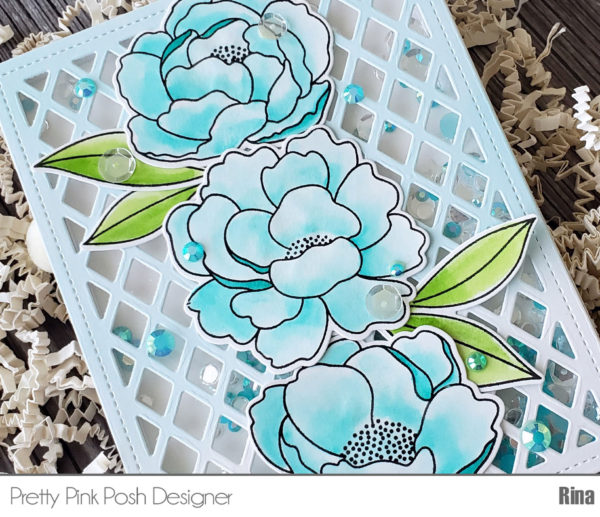
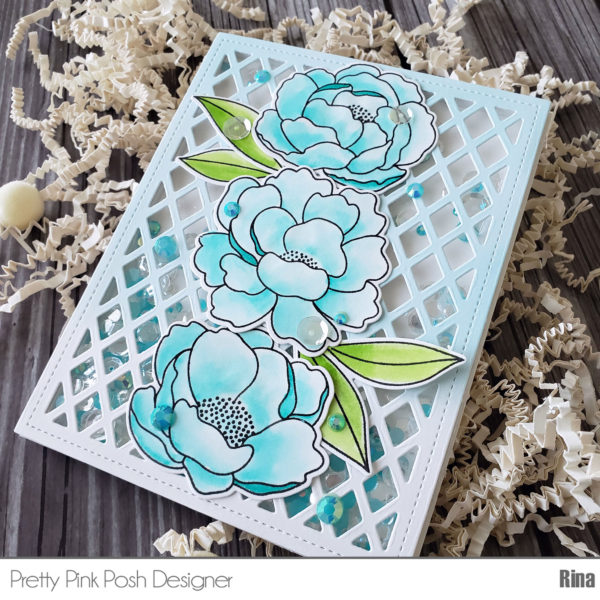
Hi everyone, Rina here with a fun floral shaker card. I have made this card a Mother’s Day theme, but you can make it for any occasion you want using a sentiment stamped on the inside of the card.
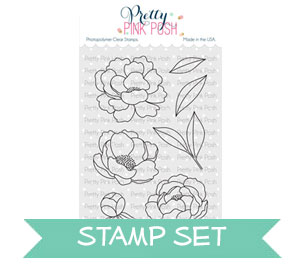
I used Bristol Smooth Surface cardstock stamped with Versafine Onyx Black ink to watercolor the images. I used the Peonies stamp set along with the Mother’s Day stamp set (for the inside of the card). I used two Zig Real Clean Color Brush Markers in Turquoise Green and Light Green. I adore these colors together.
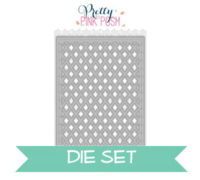
I created the card front using the new A2 sized Lattice Background Die and lightly ink blended it with Tumbled Glass Distress Oxide ink.
I created my shaker card by adhering the acetate to the back of the Lattice Background die cut. And then applying double sided foam tape around the edges. I created a custom shaker mix to match with the images:
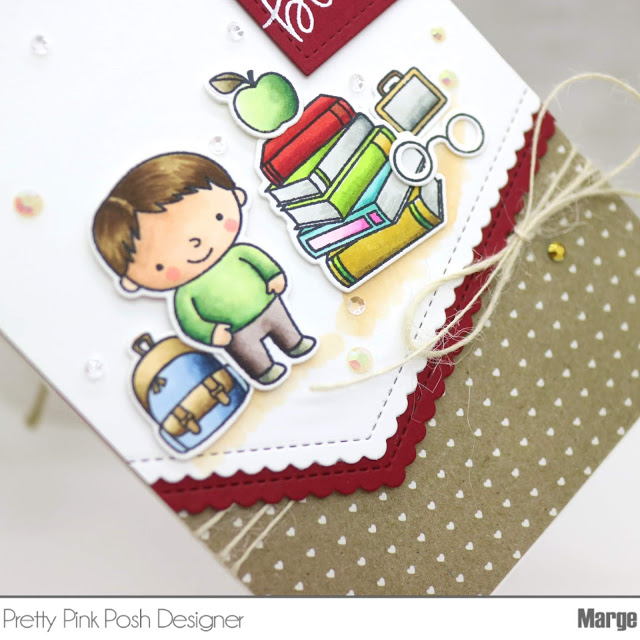
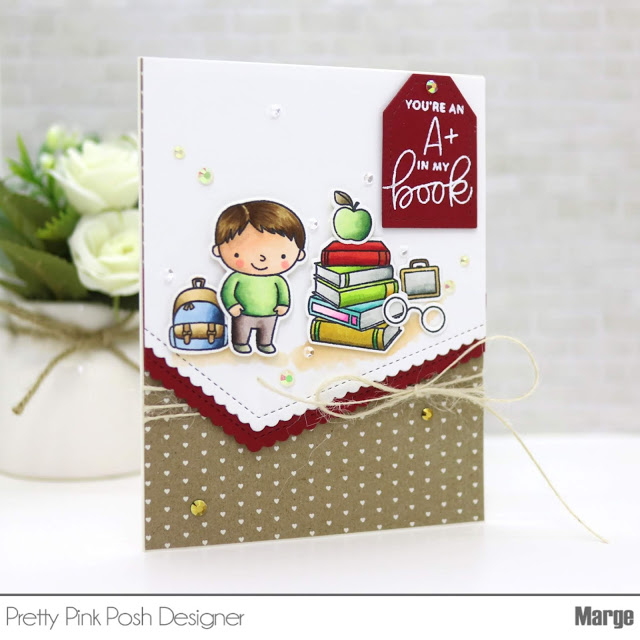
Hi, friends! It’s Marge here for you today. Mother’s day is soon and I’m going to share a card inspiration for Mother’s Day using the new products from Pretty Pink Posh.
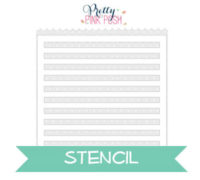
I thought the new stencil would be a great background for the peonies, so I chose Wide Stripes Stencil from the new release, and I decided to go with earth-tone colors for stenciling to make a natural mood on my card.
I placed Wide Stripes Stencil onto A2 sized ivory card stock and then sponged warm-brown colored dye ink through the stencil, I didn’t fill all the space, instead, I left some part of the area to give the stenciled pattern some tapering effect and more depth to the shades. I then splattered with white, black and gold inks onto my panel and colored flowers.
Hello there everybody, Wanda here guesting on the Pretty Pink Posh blog! I’m sharing a card today using products from the April release.
Begin by stenciling the Wide Stripes Stencil using a small sponge dauber and Squeezed Lemonade Distress Ink. Tape the stencil down over your paper using Purple Tape or some other temporary tape. Tamp the ink down with the dauber placing more color towards the outer edges and less color towards middle of the cardstock . Use a water sprayer to lightly mist the inked paper and let it dry. Splatter Copic Opaque White using a small paint brush.
Stamp and die cut the bouquet and small flower from the Mother’s Day stamp set and bee from Bee Friends. Color the images with bright shades of Copic Markers. Add white accents with a gel pen.
To assemble the card, use a kraft A2 sized card base. Wrap a strip of vellum around the striped panel and affix it on the back side. Attach this layer to the card base using foam tape. Adhere the two tag shapes together with adhesive and then attach them to the card using foam tape.
Stamp the bee trail and the two tiny hearts onto the tag. Mount the bee, bouquet and flower to the tag. Using clear glue, glue the word die at an angle across the bottom of the card.
These products work together so beautifully and you can really customize the card to fit the recipient.
That’s it for today….Hope you have a beautiful, happy day!