Pretty Pink Posh Shop

Sneak Peek: Summer Surfboards

Hi friends, Angelica here excited to show off the new Summer Surfboards stamp set. This stamp set screams summer fun! I have a couple cards to share today using this stamp set, as well as a few other PPP products. 

Pretty Pink Posh: Sneak Peek- Summer Surfboards

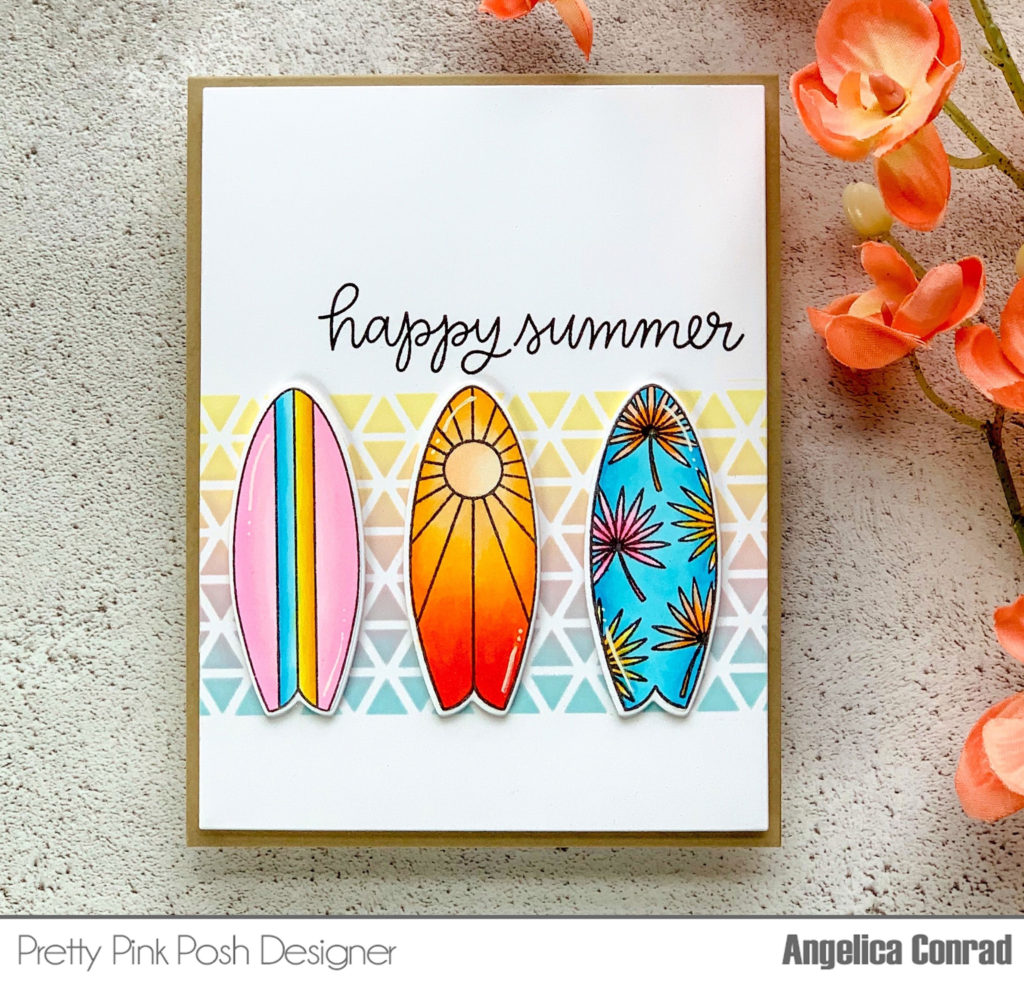
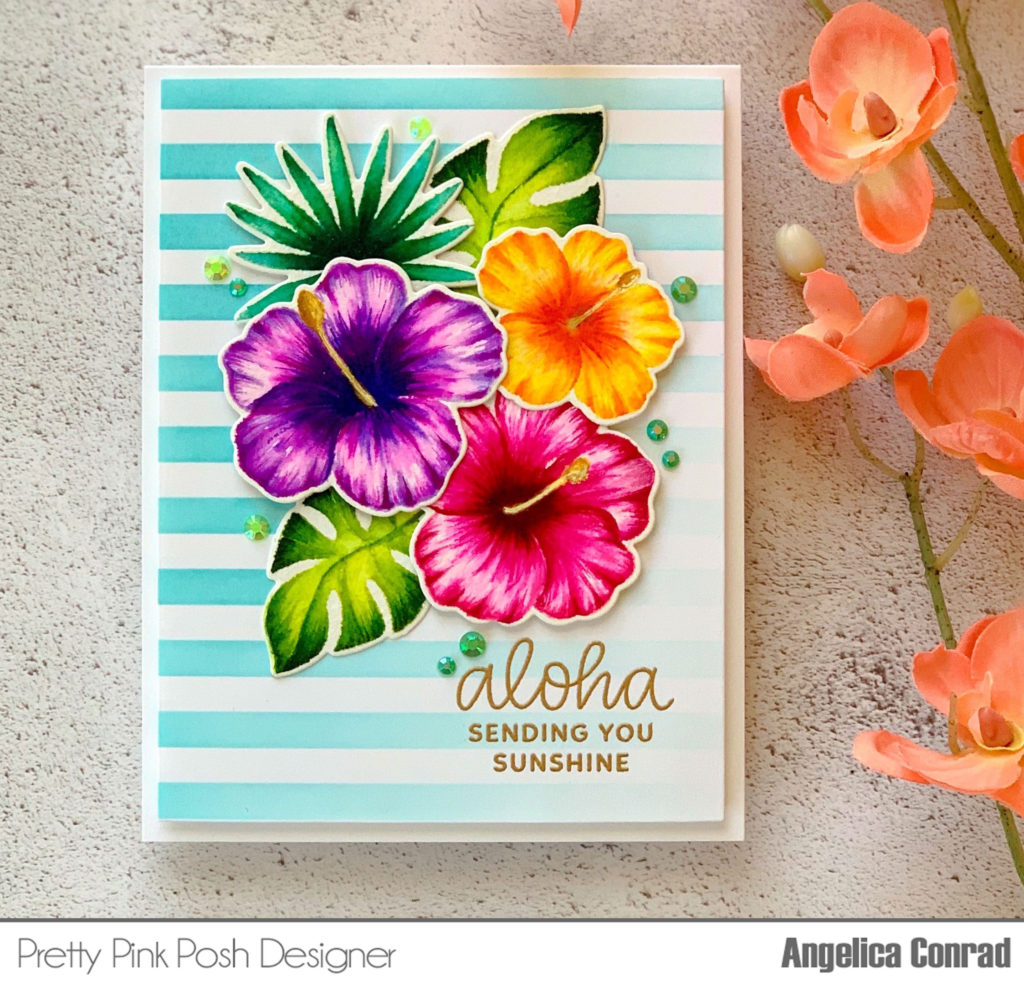
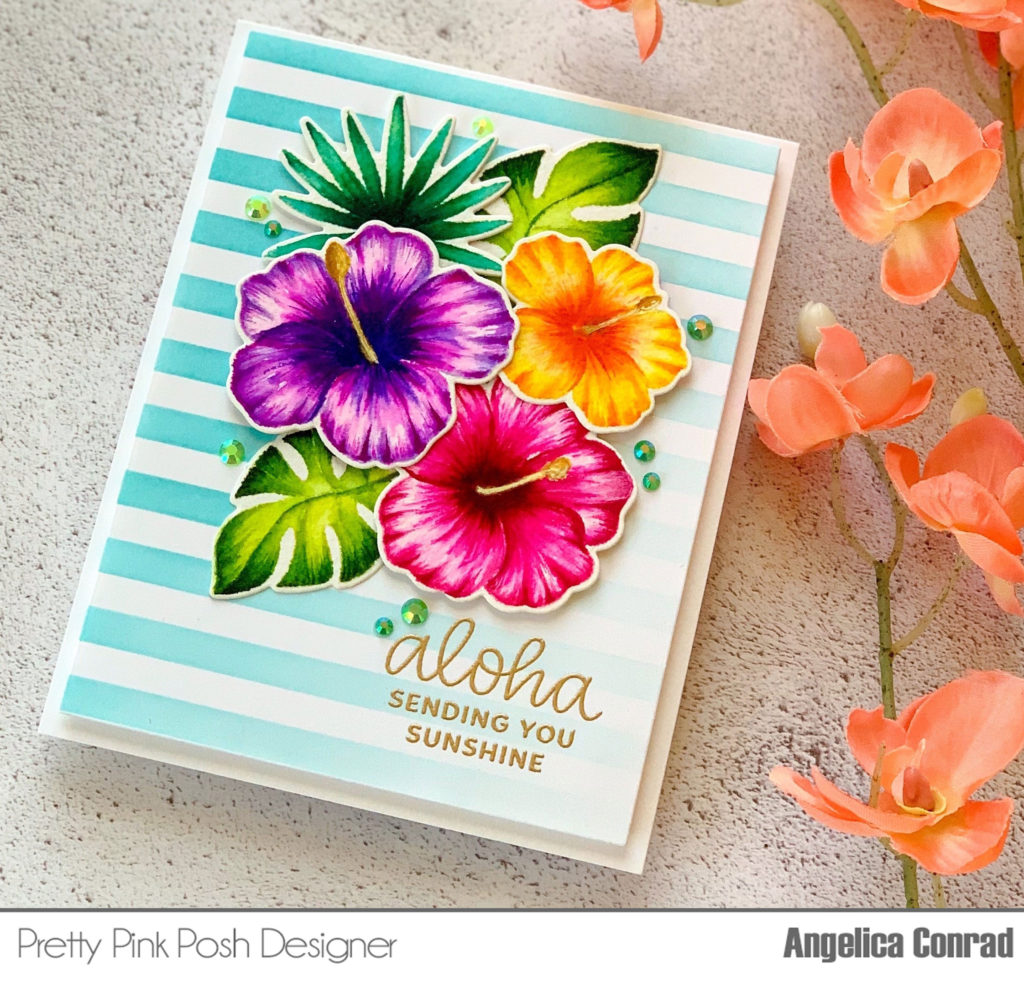
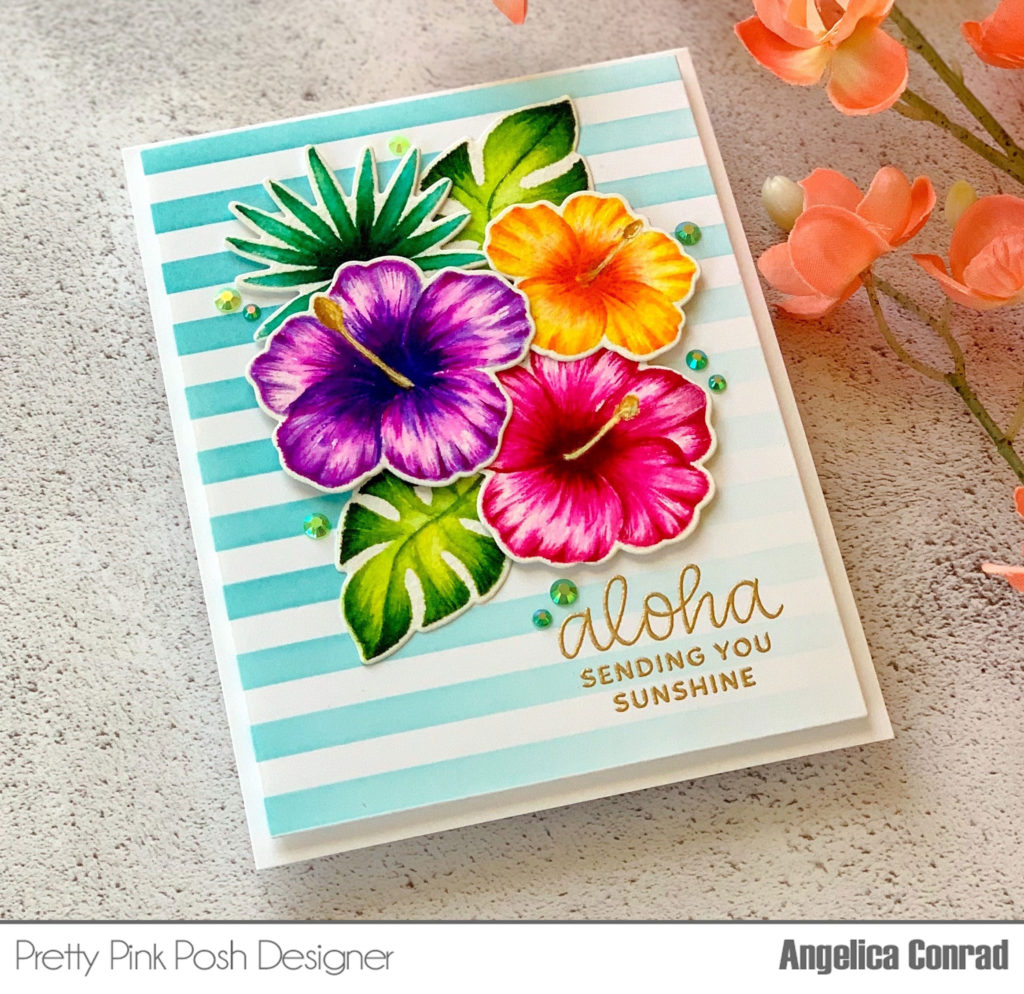
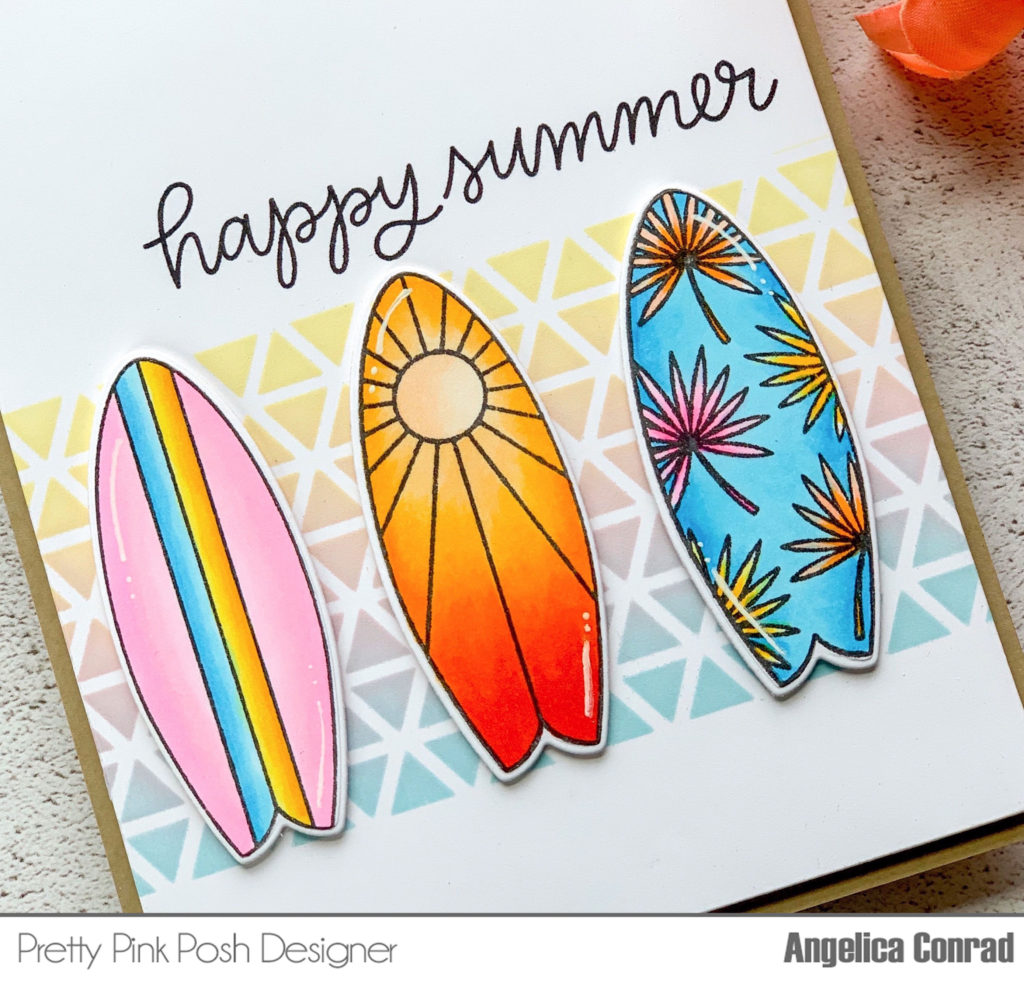
I picked three boards to stamp onto white card stock. I used Copic markers to color them,  added white gel pen highlights, then cut them out with the coordinating dies. I used the new Triangle Stencil to make the background. I sprayed the back of the stencil with iCraft Pixie Spray for a good temporary hold, and attached it to a card front panel. I masked the top and the bottom of the stencil, then ink-blended MFT Summer Splash (Blue), Tickled Pink, and Lemon Chiffon inks in a rainbow order. I stamped the sentiment from the Summer Surfboards stamp set above the triangles, I added the card panel to a card base with foam adhesive. My last step was adding the surfboards with thin foam squares. 

Pretty Pink Posh: Sneak Peek- Summer Surfboards

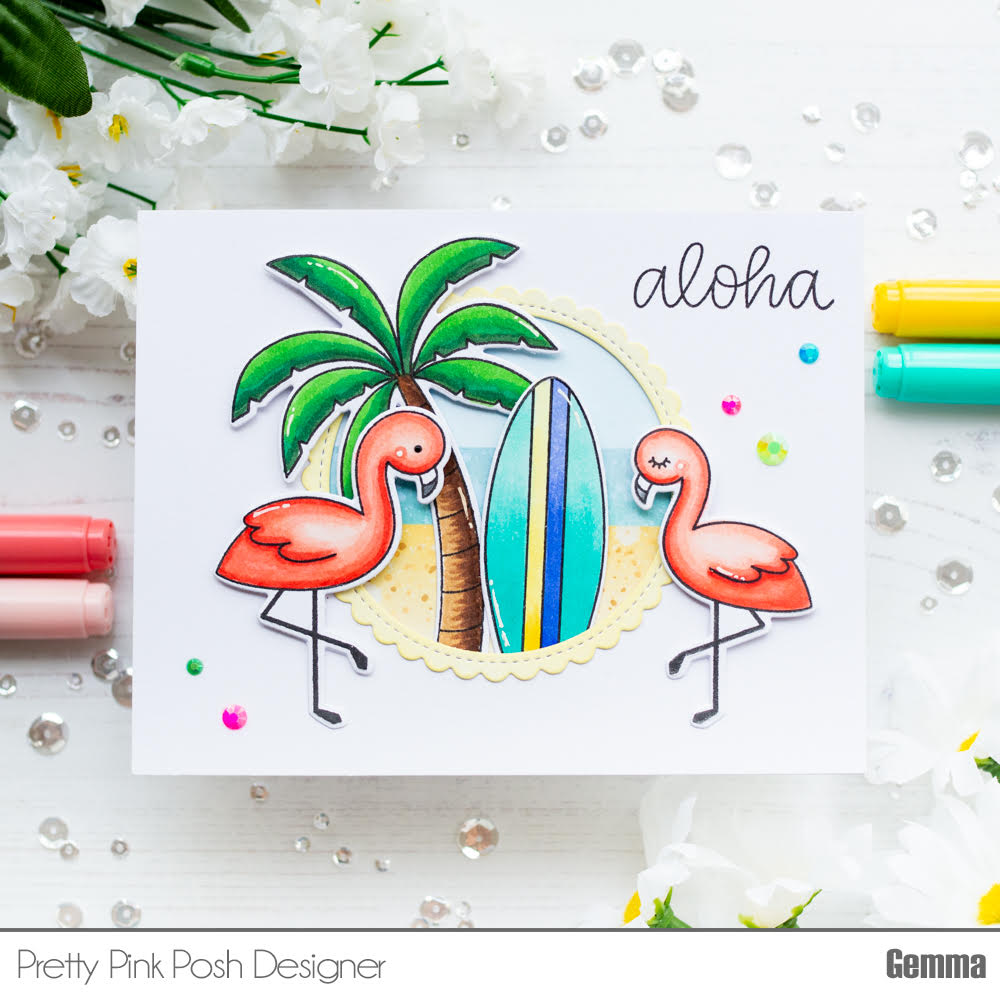
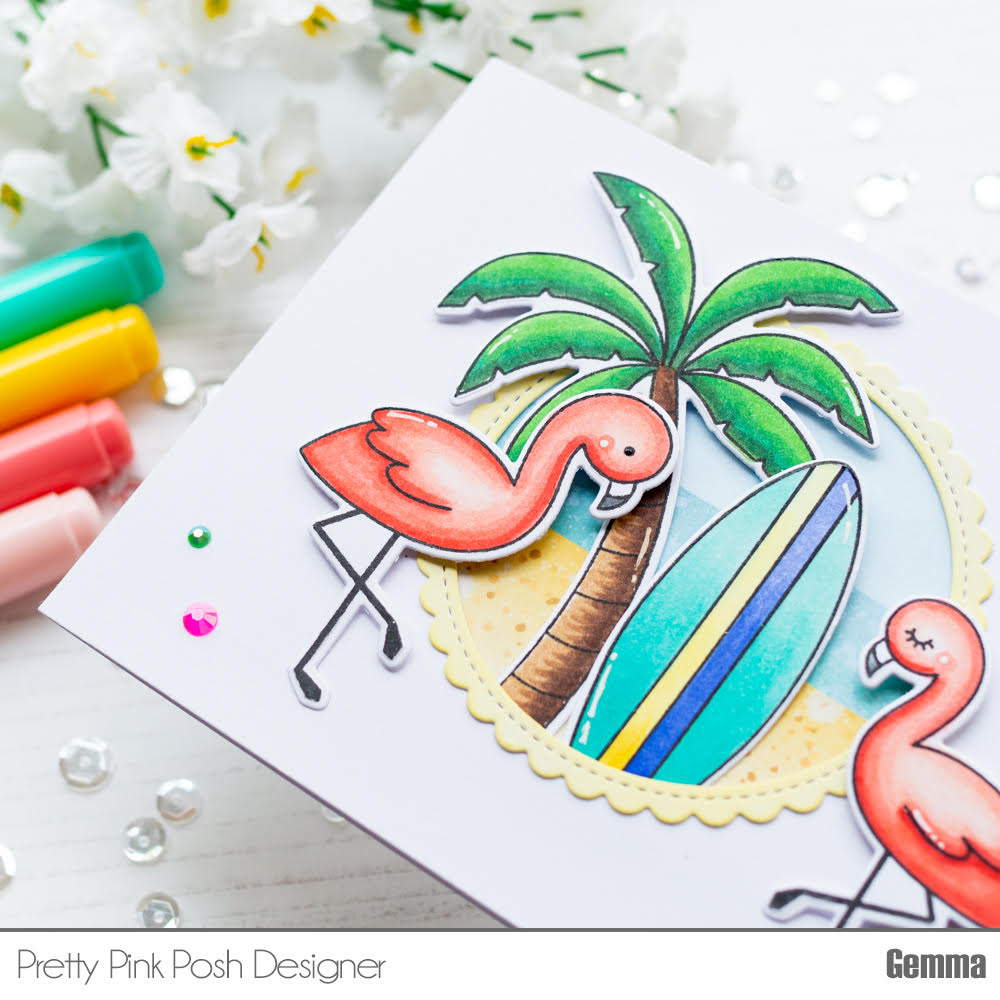
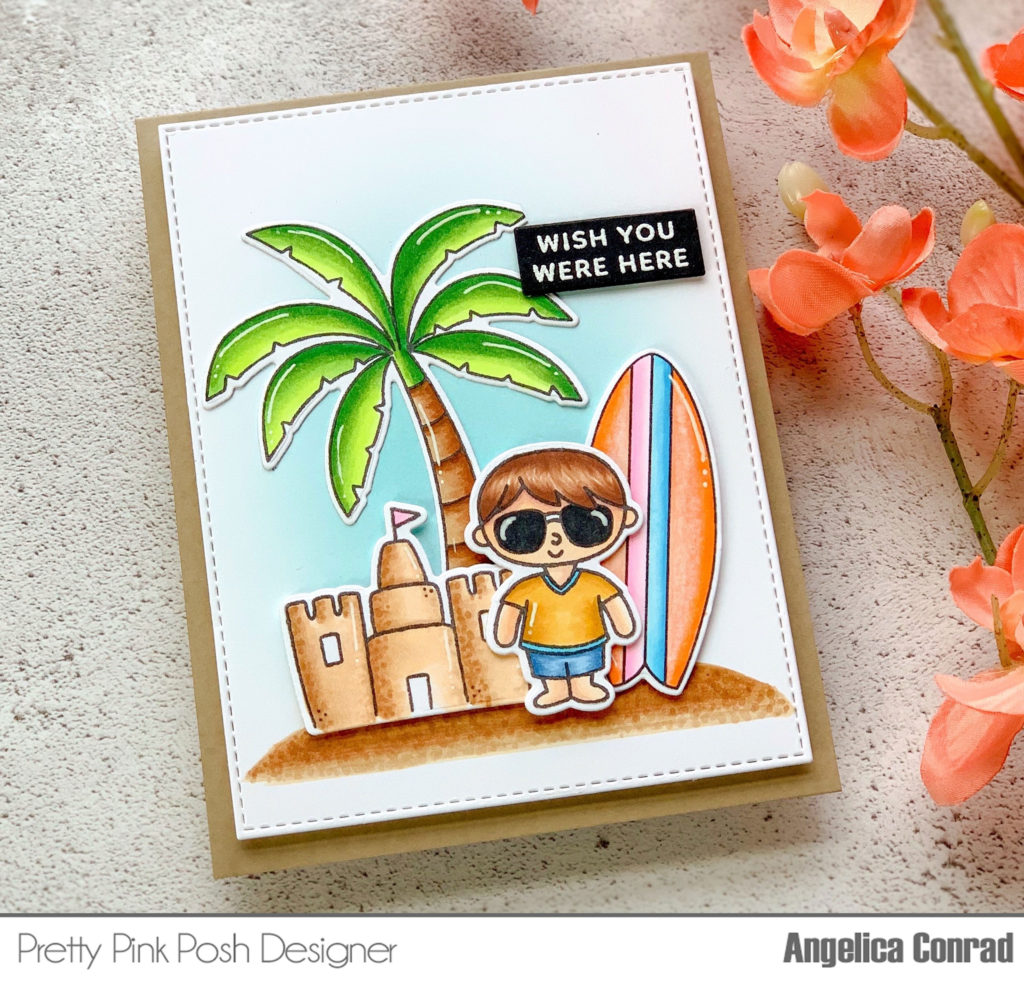
For my next card, I mixed a few stamp sets together to make a beach scene. 

Pretty Pink Posh: Sneak Peek- Summer Surfboards

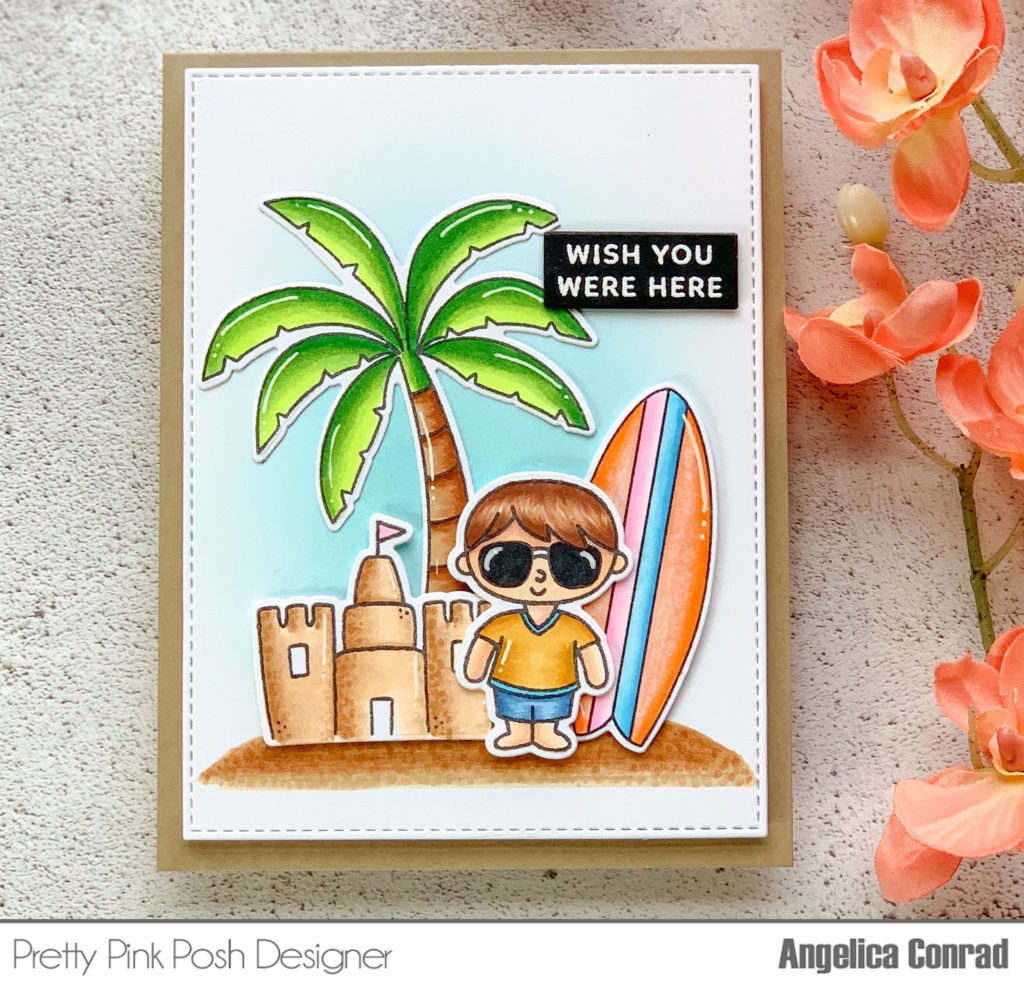
I picked the palm tree and sentiment from the new Tropical Birds stamp set, and the sandcastle and boy from the Summer Friends stamp set. I also picked one surf board to use. I stamped the characters out, and used Copic markers to color them, and a white gel pen to add highlights. To give the surfboard a distressed/beachy look, I used my Colorless Blender marker towards the middle of the board to lighten the colors. I used the coordinating dies for Summer Friends, Summer Surfboards, and Tropical Birds to die-cut the images. For the card front, I trimmed a panel of white card stock with a stitched rectangle die, then used Copic markers to hand draw a quick sand bar. I ink-blended a blue sky with Summer Splash ink, then glued the palm tree to the panel. I used different sizes of foam squares to add the rest of the images and a white heat-embossed sentiment, then attached it to a card base.

Pretty Pink Posh: Sneak Peek- Summer Surfboards

I hope these cards have given you ideas about the new release that is available on June 10th. Thanks for stopping by!

Sneak Peek: Tropical Toucans

Hello Pretty Pink Posh friends! Suzy here and today I get to show you one of the brand new stamp and die sets called Tropical Toucans. This is one of the smaller sets which means it costs less and you get a lot of bang for the buck! I have two cards to share with you where I’ll also be using the new Tropical Frame die, some of the stand alone word dies, and the new jewel mixes.

Pretty Pink Posh: Sneak Peek- Tropical Toucans

I call this technique random stamping and I love to do it with all the PPP stamps since they have small images. I stamp them all with my Misti stamping tool using a light color of ink for no-line coloring. I then color them all in with colored pencils. If you like making puzzles, you will love doing this with your stamps!

Pretty Pink Posh: Sneak Peek- Tropical Toucans

I stamped the sentiment in the set with white embossing powder on a rectangle from the Storybook 6 die. I die-cut the new Sunshine Script Die die-cut from turquoise glitter paper and attached it under the sentiment just because it looked so pretty!

Pretty Pink Posh: Sneak Peek- Tropical Toucans

When coloring the toucans, I used black for their bodies, but then used all different bright colors for the rest of them – not technically how they look, but more fun to look at! I added some of the new Luau Jewel Mix around the sentiment.

Pretty Pink Posh: Sneak Peek- Tropical Toucans

This card uses the new Tropical Frame die which I die-cut from pink glitter paper and attached to a white card base. I die-cut the Happy Summer Script word dies from turquoise glitter paper and attached them to a second set from white cardstock so they had more dimension.

Pretty Pink Posh: Sneak Peek- Tropical Toucans

I stamped all of the images from the Tropical Toucans stamp set with black ink and colored them in with colored pencils. Again, I used lots of bright colors along with black so the colors really pop. I cut two of the flower branches apart and used those pieces tucked under the frame. I also used a bunch of the small flowers around the frame.

Pretty Pink Posh: Sneak Peek- Tropical Toucans

Last I used the new Citrus Mix and Luau Mix jewels around the frame and inside the middle of the flowers. The bright color of these jewels go so perfectly with all my brightly colored stamped images!

Pretty Pink Posh: Sneak Peek- Tropical Toucans

Thanks for visiting today and make sure to come back for all of the sneaks this week. This is my favorite release from PPP ever and it all works so perfectly together. It will make you want to book a tropical summer vacation!

Xoxo, Suzy

Sneak Peek: Tropical Birds

Hello, Gemma here with a sneak peek to share with you all. Today I have two cards featuring the new Tropical Birds set, which is perfect for summer.

Pretty Pink Posh: Sneak Peek- Tropical Birds

For my first card, I created a window beach scene with the flamingos.
On my card base, I added distress oxide inks to create areas for sand, ocean and sky. Next, I die cut a scallop circle from the centre of a piece of white card. I adhered the panel over my card base, so the beach scene shows through the window.

Pretty Pink Posh: Sneak Peek- Tropical Birds

To give the scallop circle some dimension, I layered two circles together, adding some squeezed lemonade distress oxide ink to the top layer. I stamped and coloured some images from the Tropical Birds stamp set, along with a fun surfboard from the new Summer Surfboards stamp set. I coloured everything with copic markers, then die cut them with the coordinating dies. 

Pretty Pink Posh: Sneak Peek- Tropical Birds

I arranged the images and adhered to my card, using foam tape behind the leaves of the palm tree and the flamingos. I tucked the bottom of the palm tree and surfboard under the window, adhering with liquid glue I finished my card by stamping a sentiment from the Tropical Birds stamp set, then adhering a few jewels from the new Luau Mix around the card.

Pretty Pink Posh: Sneak Peek- Tropical Birds

For my second card, I used two more birds from the Tropical Birds stamp set. I coloured them with copics and die cut with the coordinating dies.

Pretty Pink Posh: Sneak Peek- Tropical Birds

I created a stencilled background with the new Tropical Leaves stencil and distress oxide inks in Twisted Citron, Mowed Lawn and Lucky Clover. I inked some more of the two darker colours around the edge, to create a vignette effect. I also spritzed the panel with water to get droplet details.

Pretty Pink Posh: Sneak Peek- Tropical Birds

Next, I die cut the new Aloha Shaker die from yellow glitter card. I layered some vellum behind the die before adhering to my card. This helps the word to show up against the background.

Pretty Pink Posh: Sneak Peek- Tropical Birds

I added the two Tropical Birds around the die cut, then added some jewels from the new Citrus Mix around to finish.

Pretty Pink Posh: Sneak Peek- Tropical Birds

We hope you’ve been enjoying the sneak peeks so far. See you tomorrow for a look at another new stamp set!

Sneak Peek: Hibiscus Flowers

Hi friends, Angelica here kicking off our sneak peeks with a card showcasing the fabulous new Hibiscus Flowers stamp set that releases on June 10th. 

Pretty Pink Posh: Sneak Peek- Hibiscus Flowers

I started this card by stamping the hibiscus images onto Fabriano Extra White watercolor paper with distress inks. For the purple and pink flowers, I used Spun Sugar, and the rest I used Antique Linen. I colored the images with a rainbow of Zig Clean Color Real Brush Markers, a #4 round watercolor brush, and clean water. I kept a paper towel next to me to clean my brush off frequently. I started by adding darkest colors first, moving the pigments around with my lightly damp paintbrush. I then went back with the markers alone to add fine details. Once the paper was completely dry, I used the coordinating dies to cut them out.

Pretty Pink Posh: Sneak Peek- Hibiscus Flowers

For the card front, I ink-blended turquoise stripes using the Wide Stripes Stencil. I stamped two sentiments from the new  Tropical Birds stamp set with embossing ink, then heat-embossed with gold embossing powder. I attached the panel to an A2 size card base with craft foam, then added the floral arrangement with foam squares. My final touch was adding Citrus Mix Jewels around the flowers with Ranger Multi-Media Matte.

Pretty Pink Posh: Sneak Peek- Hibiscus Flowers

I hope I have helped inspire you with ideas for these gorgeous stamp sets. Join us tomorrow for another look at the new June 10th release!

Sneak Peek: June 2019 Stencils

Hi, everyone! Marge here with you to share my cards featuring the new stencils along with other new stamps/dies from the June 10th Release. We have four new stencils and I’m going to use three of them which are Tropical Leaves, Tropical Background, and Triangles to show you how you can use stenciled patterns as a background for your cards. 

Pretty Pink Posh: Sneak Peek- June 2019 Stencils

First, I ink-blended a piece of A2 sized Bristol paper partially using regular distress inks. I put the Tropical Leaves Stencil on the paper, then I sponged similar colored archival dye inks over the stencil, and then I splattered with water. I created two panels with different color themes as shown in the picture to use them as backgrounds for tropical scenes. 

Pretty Pink Posh: Sneak Peek- June 2019 Stencils

With the yellow one, I made a scene with toucans using the new Tropical Toucans Stamp and Tropical Toucans Coordinating Dies. I used Glue Dots and Square Foam Adhesives to adhere the images, and the sentiment was chosen from Tropical Birds Stamp set. I also cut one edge of the panel using Scallop Borders Dies to give some visual interest. Embellishments I used are 6mm Sunshine Glow4mm Sunshine Glow, and 3mm Sparkling Clear Sequins.

Pretty Pink Posh: Sneak Peek- June 2019 Stencils

For the green one, I used Tropical Birds Set and Tropical Toucans Set to compose a scene. Then, I adhered Sparkling Clear Sequins Mix and 3mm Sparkling Clear Sequins for a touch of sparkle.

Pretty Pink Posh: Sneak Peek- June 2019 Stencils

Here’s my third card featuring Tropical Background Stencil. I simply put the stencil onto a piece of  Bristol paper, then I colored it in with distress inks using regular- and mini-blending tools.

Pretty Pink Posh: Sneak Peek- June 2019 Stencils

By doing this, you can make a quick and easy pattern background full of tropical moods. I added Happy Summer Script Die cuts made of gold mirror card stock on the center with a sheet of vellum paper under the scripts. For embellishing I used 6mm Metallic Gold Sequins and 4mm Metallic Gold Sequins.

Pretty Pink Posh: Sneak Peek- June 2019 Stencils

Lastly, one more card with a stenciled background where I used the brand new Triangles Stencil. Again, I did partial stenciling which covers half part of the panel in diagonal direction by using blue dye inks. 

Pretty Pink Posh: Sneak Peek- June 2019 Stencils

I did no-line water-coloring on Hibiscus Flowers Stamp Set which is also a part of the new release, then I cut the images using Hibiscus Flowers coordinating dies. A sentiment from Encouraging Greetings Set was stamped, and I finished off my card by adding Sparkling Clear Sequins Mix and 3mm Sparkling Clear Sequins.

Pretty Pink Posh: Sneak Peek- June 2019 Stencils

Thanks for reading this post. Stop by tomorrow for a look at more of the new release!

Spring Bee Wreath

Good Morning! Dana here sharing a card using the adorable Spring Wreath and Bee Friends stamp sets.

I started my card by stamping the wreath from the Spring Wreath stamp set, along with the smaller bees from the Bee Friends stamp set. I then colored my images with Copic markers and used the coordinating dies, Spring Wreath and Bee Friends, to die cut the images.

Next, I started working on my card panel. I began by ink blending Distress Oxide Ink in Tumbled Glass to create my background. I then used the Scallop Frames Die Set to die cut my background and a white frame. I attached this to a sunny yellow cardstock mat before attaching it to my A2 card base.

To finish my card, I stamped my sentiment from the Everyday Greetings Stamp Set in the center of my card. Lastly, I attached my wreath and the fun little bees with foam adhesive to my card front. 

If you missed the post last week featuring lots more bee inspiration, you can find it HERE. This stamp set is really fun and can be used in a lot of ways.

Enjoy your day!

Floral Theme & Sale Week- Day 7

Pretty Pink Posh: Floral Theme & Sale Week- Day 7

Hello crafty friends, Yoonsun here with you sharing couple of watercolored floral cards using so beautiful Peonies Stamp & Die Set. Today is the last day of Floral Theme Week and I bet you guys are really enjoying Pretty Pink Posh’s flowers each day this week! All products in the floral section are 15% off May 20-26.

Pretty Pink Posh: Floral Theme & Sale Week- Day 7

I started by stamping peonies & leaves on watercolor paper using light colored dye ink. I then watercolored all stamped images, die cut them with the Peonies Coordinating Dies.

Pretty Pink Posh: Floral Theme & Sale Week- Day 7

I die cut the Spring Frame from white card stock, then mounted it on white card base using double-sided tape – it’s tone-on-tone background base.

Pretty Pink Posh: Floral Theme & Sale Week- Day 7

For the sentiment, I die cut the Love You Script from white card stock. I then added all watercolored peonies & sentiment die cut on the bottom right side of the card front using foam tape. I embellished with some Valentine Jewels Mix.

Pretty Pink Posh: Floral Theme & Sale Week- Day 7

Here is another card with the Peonies Stamp Set. It is a so simple watercolor card. I stamped peonies & leaves (from the Peonies Set), sentiment (from the Encouraging Greetings Set) on watercolor paper panel using black pigment ink first. I used Post-It Notes for masking.

Pretty Pink Posh: Floral Theme & Sale Week- Day 7

I then freely watercolored on stamped images! :D

Pretty Pink Posh: Floral Theme & Sale Week- Day 7

Thank you so much for stopping by. I hope you enjoyed the floral theme week!

Hugs, Yoonsun

Floral Theme & Sale Week- Day 6

Pretty Pink Posh: Floral Theme & Sale Week- Day 6

Welcome to Day 6 of Pretty Pink Posh Floral Theme Week! Alix here using my bright and pretty spring colors to inspire you today! We are having a 15% discount on all items in our Floral section during this week! 

Pretty Pink Posh: Floral Theme & Sale Week- Day 6

To start with my card, I stamped my flower and leaf images from Crocus Flower stamps set  using versafine onyx black ink onto a piece of Bristol smooth paper and die cut them using the Crocus Flowers coordinating dies. I pulled out Zig Clean color real brush markers to color them in layers. I set them aside for later use.

Pretty Pink Posh: Floral Theme & Sale Week- Day 6

To build my background, I cut my lattice panel by using  Lattice Background Die out of a piece of white card stock paper, then I hand cut the center to create a diamond shaped opening. I layered it over a piece of A2 sized card base as a template so I could mark the area with pencil. I removed the lattice die cut and masked the background with washi tape. I ink blended it the unmasked area with TIm Holtz Distress oxide ink in Squeezed Lemonade and Mustard Seed, and stamped the sentiment I chose form Thoughtful Greeting stamp set. I lined up and glued the lattice panel to the card base.

Pretty Pink Posh: Floral Theme & Sale Week- Day 6

I arranged my stamped images around the diamond window using Multi Medium Matte. Then I embellished my card with Sugar Plum Mix Jewels

Do you feel the Spring inspiration now? The sale ends tomorrow. Don’t hesitate to grab a few floral sets and start to plant your flowers on your cards!

Floral Theme & Sale Week- Day 5

Hi Friends! Welcome to another day of Floral Theme Week! It is Melody here today and I have a card to share that I created with the Geraniums Stamp Set and the Geraniums Coordinating Dies.

Have you purchased any of our florals? This week they are 15% off!

The Geraniums along with the Hugs Shaker makes this card perfect for a number of different occasions.

My first step was to create the checked backgrounds. I cut a piece of white card stock to fit the card front and attached the Wide Stripes Stencil to the paper horizontally across the card front. I used a pale green ink and a ink blending tool to stencil the stripes.

Next I used the stencil again changing the direction so that the stripes run vertically. In two steps I have a cute gingham pattern!

To add the sentiment I cut the Hugs Shaker Die twice, once directly into the card front to cut out the circle from the card front, and again from purple cardstock. Then I inlayed the purple die cut into the front of the card. Behind the circle I added vellum and then yellow cardstock.

I arranged the flowers and leaves around the sentiment. The images are colored with Copic Markers and the accented with a white gel pen. I finished off the card with a scattering of Pearl White Jewels.

Thanks so much for stopping by today! Be sure to stop by tomorrow for more floral inspiration.

Floral Theme & Sale Week- Day 4

Pretty Pink Posh: Floral Theme & Sale Week- Day 4

Hi friends, Eloise here and today I have a card to share with you all. I used the Anemones stamp set along with some alcohol inks to make a simple missing you card.

All items in the Floral section are 15% off this week!

Watch the video above  I  Watch the video in HD on YouTube

Pretty Pink Posh: Floral Theme & Sale Week- Day 4

I started off with stamping out the anemones onto some watercolour paper with black ink and clear heat embossed over it. I then used my Mijello Mission Gold Watercolour palette and coloured them in with shades of purple as well as colouring the leaves green. Once they were coloured, I cut them out using the Anemones coordinating dies and set them off to the side.

Pretty Pink Posh: Floral Theme & Sale Week- Day 4

Next, I decided to do my striped alcohol ink background. I pulled several shades of blue alcohol inks out and used them to create a striped background. I used a paint brush along with water to help create the stripes today. I went from lightest to darkest down a piece of Yupo paper to create the background. I then dried it with a heat tool.

Pretty Pink Posh: Floral Theme & Sale Week- Day 4

Lastly, I adhered all my flowers to the centre of the inked panel and then used the Camping Friends stamp set for the ‘Missing You’ sentiment. I white heat embossed it on a strip of black cardstock and adhered it onto my card as well.

Pretty Pink Posh: Floral Theme & Sale Week- Day 4

Thanks so much for stopping by today, I hope you guys enjoyed and I’ll see you next time.

Eloise