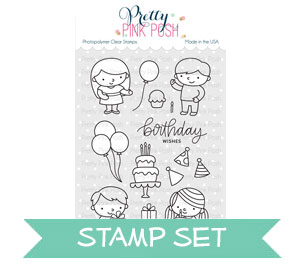
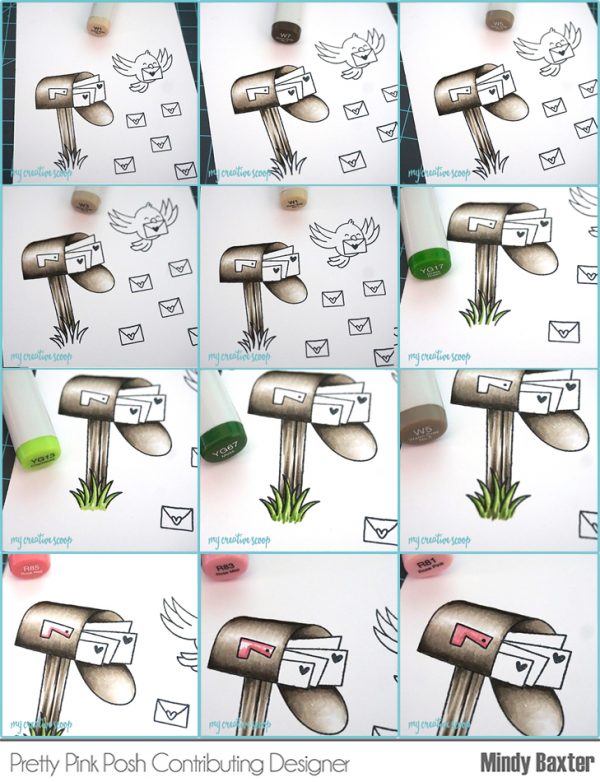
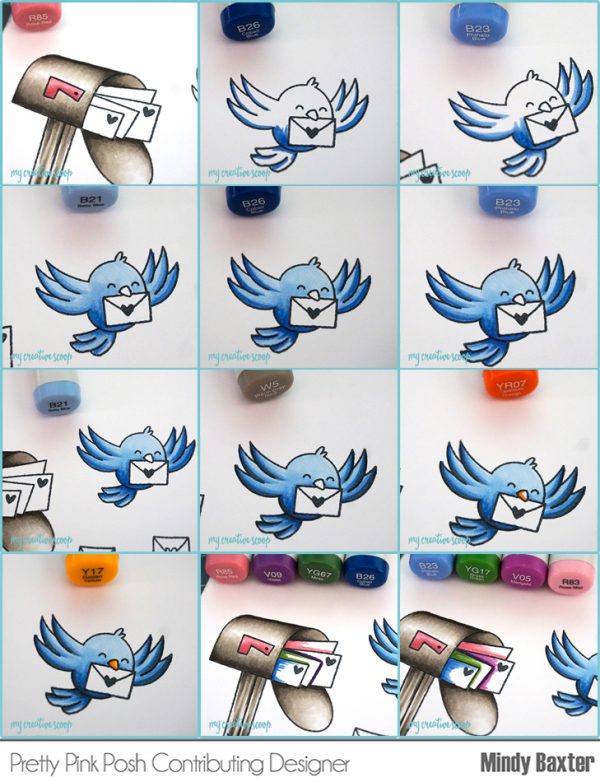
Hi! It’s Mindy from My Creative Scoop! I’m here to share a little sneak peek of the new release. This stamp set is called, ‘Happy Mail’. I love how all the stamps from this release and previous releases will coordinate perfectly with this stamp set. You can make the cutest little cards with this mailbox. I’m also using the Scallop Borders Dies and Rainy Days Die Set.
I have a step by step tutorial of how I colored this entire scene. How fun right!
I hope you enjoyed the tutorial and today’s inspiration – I know you can’t wait to get your hands on these stamps.
Have a wonderful day. Make sure you visit tomorrow for some more inspiration!
Hello everyone! Amy here sharing a sneak peek of the new upcoming May 5th release. For my two projects today, I’m highlighting the adorable Playful Puppies stamp set and Playful Puppies coordinating dies.
To begin, I colored the stamped images with Copic markers and cut them out with the coordinating dies.
I created the patterned panel by stamping the two solid bone stamps with white pigment ink on A2 sized kraft card stock. After, I die-cut the panel with the frame die from Stitched Notes for the beautiful stitched detailing on the card. I stamped the sentiment with dark brown dye ink.
To finish, I foam mounted the images as shown and adhered the front panel to a top folding card base.
For the second card, I created a fun scene using the puppies. I colored the stamped images with Copic markers again and cut them out with the coordinating dies.
I trimmed Smooth Bristol paper to 5″x 3.75″. I create the clouds using an acetate stencil I made using the cloud shaped die from Stitched Borders 2 and Tumbled Glass Distress Ink. Once again, I stamped the sentiment with dark brown dye ink.
I die-cut natural card stock with a Picket Fence die and adhered the fence to the cloud panel. Then, I die-cut Smooth Bristol card stock with a die from Stitched Borders 4 to create the lawn the puppies are sitting on. I inked it with Mowed Lawn Distress Ink. To finish, I foam mounted it to the top of the fence and adhered the puppies as shown.
I hope you enjoyed my projects; thank you for stopping by. Join us tomorrow for another sneak peek!
Good morning Pretty Pink Posh friends! Heather here this morning with a peek at some of the newest goodies from Pretty Pink Posh! You may remember the butterflies from the Butterfly Friends set that was the free-with-purchase set for the January release. It will now be available for purchase on it’s own! I paired it up here with the new Simple Sayings: Life– a sweet little sentiment kit for this rainbow butterfly cards! I also managed to sneak on a few of the new colors of jewels that will be releasing!
I played with some 3D effects for the butterflies using the coordinating dies. For this first card, I used some of the simple outline butterfly images I was going to color them, but ended up liking them clean and crisp and white so well that I left them that way. I did cover them with a sparkly coat of Nuvo clear glitter drops to help them pop a little.
I used some pretty rainbow pattern paper for the base of my card. I stamped the sentiment and butterflies on the white layer, then die cut the butterflies with the coordinating dies. I adhered the white panel to the rainbow layer, then adhered the butterflies just on the body portion, leaving the wings loose and curling them up once my adhesive dried. I finished off with a few of the Sparkling Clear Jewels.
For these next two cards I used the same technique, just changed up the colors on each one!
I stamped one of the large butterflies from the set, then die cut it with the coordinating dies. I then used the coordinating dies to cut the same butterfly again (without stamping) out of a rainbow of colored cardstock. I colored the stamped butterfly to coordinate with my layers of cardstock. I glued them all together in the centers, allowed to dry, then curled up all the wings for a SUPER fun dimensional effect! I also covered the wings of the top butterfly with sparkly clear Nuvo Drops as well.
I used Stitched Borders 1 to cut some pretty edges on a strip of pattern paper for the bottom of the cards, and stamped another of the sentiments from Simple Sayings: Life, then for these two cards added a few of the new Pearl White Jewels to finish these off.
So much fun- these rainbows make me so happy! And the sentiments and butterflies are both so darling together!
Hope you enjoyed today’s sneak peek! Thanks so much for stopping by today!
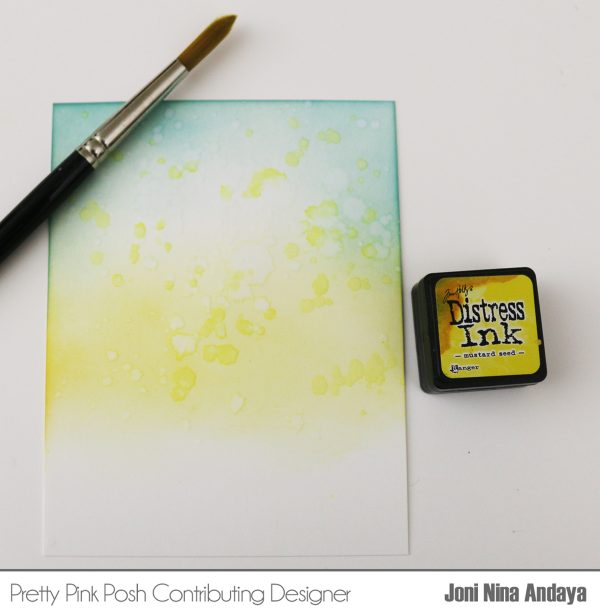
Hello everyone, Joni here sharing a sneak peek of the new Pretty Pink Posh floral stamp set called Flourishing Fuchsias that releases on May 5th. It’s such a pretty set and the perfect addition to the floral sets.
To begin I stamped the images on a white cardstock and colored the images with Copic Markers then I used the Flourishing Fuchsiascoordinating dies.
Next, I distressed another white cardstock using Distress Oxides then splattered with water. Once dried I then stamped the sentiment from Encouraging Greetings stamp set stamp set.
Next, I adhered the die-cuts with foam tape and added some jewels inAquamarine.
For this second card I also used the same Flourishing Fuchsiasstamp set and coordinating dies. I just changed the background color and used a different image.
For the background I distressed it with Distress Oxides and splattered it with water for interest.
I also adhered the die-cuts with foam tape for dimensions and added some Buttercream Jewels to finish off the card.
I hope you guys enjoyed these new products coming your way on May 5th. Join us tomorrow for another sneak peek of the new release!
Hi everyone, Eloise here on the blog and YouTube channel today with an encouragement card using the Cherry Blossoms and Encouraging Greetings stamp sets. I’ll be doing a sort of colour blocking technique I guess, basically I’m blending on stripes of colours, and white heat embossing my images over top of the coordinating colours needed. I don’t have a good technique name, but that’s the gist what I did.
To begin my card today, I started off with a piece of watercolour cardstock, added some tape to the back of it to hold it down onto a craft sheet and then used post it tape to mask off diagonal lines. First tip is to use post it tape, or another low tack tape. I literally went through 8 pieces of cardstock from using the wrong tape and in the end decided to just use post it tape, because that’s what worked the best. So I masked off stripes all over my background and ink blended different colour Distress Oxide inks inside each strip. Since I was using Cherry Blossoms, I basically wanted them to be pink. Generally, I would want them to be lighter, because Cherry Blossoms are a lighter pink, but I didn’t have any lighter Oxide Inks, so this is fine. I used Worn Lipstick, Picked Raspberry and Abandoned Coral for the pinks and then Twisted Citron and Lucky Clover for the green areas. Once all my stripes were ink blended, I flicked on some water to create a water splotch effect, dried it off with my heat tool and then I could stamp my images.
Once my background was dried, I used my powder tool to coat my background, so that any powder didn’t stick to places I didn’t want it too. Then, I strategically stamped out my images over the coordinating colour stripes. I made sure to stamp out my flowers on the edge of the pink sections so that there was room for the leaves to be right next to each flower. Once they were all stamped, I used white heat embossing powder, poured it over top and then heat set all my images.
For my sentiment, I decided to use the Encouraging Greetings stamp set and so I stamped the ‘You Got This’ sentiment on a strip of black cardstock and white heat embossed the sentiment. I then added foam tape to the back and adhered it on the right hand side of my card. I then added fun foam onto my panel, set it off to the side and worked on my card base.
I cut down a piece of teal cardstock at a diagonal to match my background and adhered it onto a white card base. I wanted there to be an additional colour as well as white on the card base to match my white embossing, so that’s my little way of incorporating two colours into my card base. It’s a fun design element as well. I then adhered my panel on top and used some new jewels in Watermelon, Pink Blush, Spring Green and Shamrock onto my card base as well.
So that finished up my card for today, I hope you enjoyed and got inspired and I hope you enjoyed my video as well. Thanks so much for stopping by and I’ll catch you all next time!
We are excited to be part of this super fun blog hop event. We have partnered with 17 other stamp and papercraft companies to do a special blog hop and will be giving away 18 prizes to 18 lucky winners!
WHEN: Starts TODAY, April 23 and ends Friday, May 4th at midnight EST
HOW: Follow this blog and each participating sponsor in the hop. Comment at each blog stop
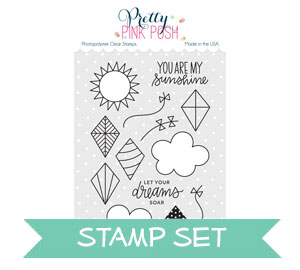
Hi everyone, Eloise here and today I have a card to share with you all using theFly A Kite Stamp Set along with showing you how to create your own pop-up box card.
To begin my card I first started off with my images. I coloured these a while ago and just used them now for a card. I used Copic Markers to colour them in and then used the coordinating dies to cut them out. Once my images are ready I can begin to work on my box card.
Making these box cards are actually surprisingly easy. I first pulled a piece of blue cardstock and cut down two pieces to 5 ¼” wide and 4 ¼” tall. Out of the same blue cardstock I also cut three pieces down to 3 ½” wide and 1” tall. Once they were all cut down I could score them. For each 5 ¼” x 4 ¼” pieces I scored them at 2” and 5” on the long side, then I turned my piece 90 degrees in my scoring tool, to the short side and then scored at 2 ¼”. I repeated this step for both pieces. Then for each of the three pieces I cut, I scored each end at ¼”. So, score at ¼”, rotate 180 degrees, score at ¼” again. Once all my pieces were cut, I took them to my paper trimmer and cut down the 2” score line to the horizontal score line, and the same at the 5” score line. Then I rotated my piece 90 degrees again and cut up from the bottom to the 5” score line, cutting on the horizontal score line, just to remove the over hang. I did this to both pieces.
Now it was time to assemble the box card. I folded along all the score lines and then added a strip of adhesive on one of the flaps and adhered it to the other side of the box card. I then added strips of adhesive on each of the three long pieces and adhered one side into my card. I them removed the backers from the other side and closed the box card on top of them, this adhered both sides of the middle pieces to the inside of my box card. Then on the last flap, I added more tape and adhered that inside too. Now my box card was all ready to go.
First up I die cut down a white cardstock piece using the Stitched Borders 1 Dies and I used the little scalloped edge as a border and adhered that to the background of my box card, to make it look like white clouds. I then added strips of acetate onto the back of three of my previously stamped, coloured and die cut kites and then adhered the strings on the bottom of each too and adhered them into the middle of my card. I also adhered some clouds and a sun to the background of my card flat.
Now my images were adhered, I laid my card down flat and adhered another cloud and also stamped the sentiment ‘Let Your Dreams Soar’ in black ink onto the front of my card. At this stage my card was missing a little something so I used the same Stitched Borders 1 Dies and cut down two more small strips of white cardstock with the scalloped border and adhered those onto both side flaps of my card to finish it up completely.
I loved making this card today and I hope you enjoyed the DIY tutorial on how to make a box card without a die. Thanks so much for stopping by and I’ll catch you next time!
Good morning! Heather here this morning to share another Something Old, Something New card with you – the idea is to mix together both older and newer Pretty Pink Posh products – and to show you how AMAZINGLY well all of Pretty Pink Posh’s products work together!
Today’s card is a bright and happy watercolor spring scene featuring the Fly A Kite set, which is 25% off the next 3 days!
Lots of fun layers and colors – not to mention a good sprinkle of some of the fabulous jewels!
So to start off, I did some loose and messy watercoloring to create a background – nothing terribly fancy – just blue for the sky, and green for some grass or greenery at the bottom.
While that dried, I die cut a fence from white cardstock using the Picket Fence Die.
Then, simply pick up again with the Press and Seal, place on the watercolor background, press in place, then peal off the Press and Seal. At this point I also needed to adhere the kite to the clouds, but that was easy peasy!
Finally, it felt like my scene just needed a little something more – so I stamped, colored, and die cut a bunch of the flowers using Bunny Friends stamps and Bunny Friends coordinating dies again. I didn’t end up using all the flowers on this project, but I wanted to make sure I had plenty – and those others are saved and will probably be used on something else down the road!
For extra dimension, I adhered the tops of the flowers and greenery with Double Sided Foam Squares, then used liquid adhesive to adhere the bottom of the stems to the background. This makes it feel as if the flowers are popping right out at you!
I planned on stamping a sentiment, but left everything to dry, then forgot to add a sentiment before I finished photographing the card. I’m not sure if I will add a sentiment on here or not now – it’s kind of cute as it is, and it makes it super versatile since it could be given for any occasion. What do you think – would you add the sentiment, or leave it as is?
Thanks so much for stopping by today! Have a wonderful day!
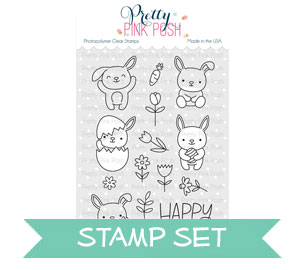
Hi everyone! It’s Melody here today and I have a sweet birthday card to share with you. I just love the cute bunnies in the Bunny Friends Stamp Set. I used the set in combination with the Birthday Friends Stamp Set to put together this birthday scene.
To create the background I cut a piece of watercolor paper for the card front. Using a blending tool I blended Distress Oxide Inks in Peacock Feathers, Twisted Citron, Squeezed Lemonade, and Worn Lipstick. Next I spritzed the paper with water and splashed on white paint. Once the paper had dried I die cut the half circle directly in the card front with the larger die in the Window Frames Dies.
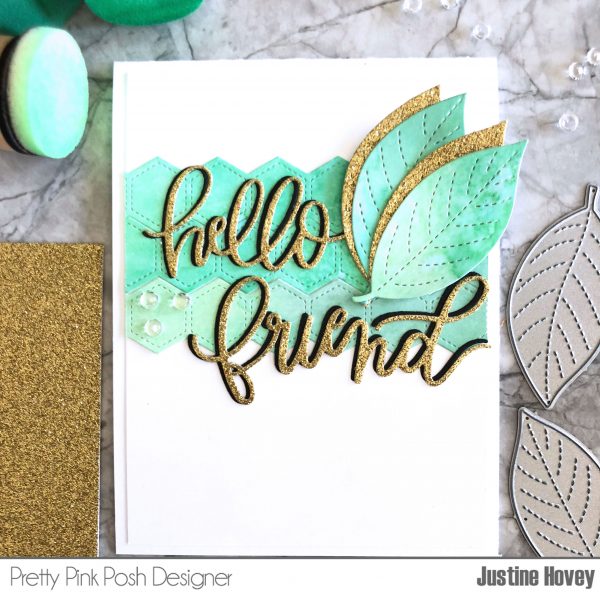
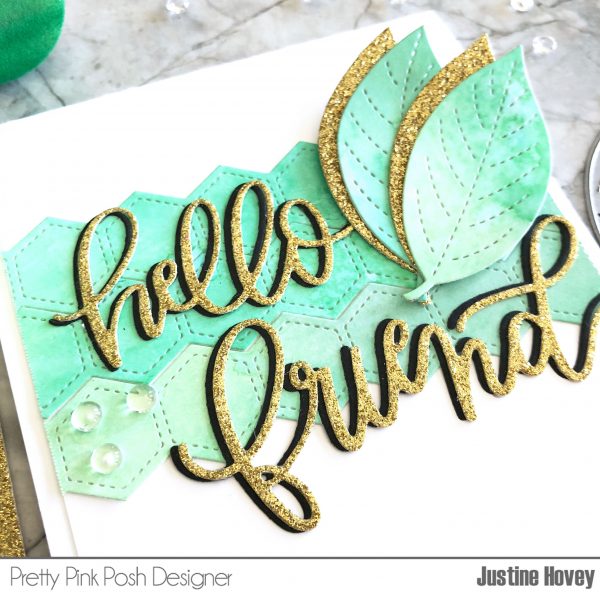
I always look forward to adding colour to my projects and I challenged myself to use a colour I rarely use. It was so worth it! It’s Justine here again for an April video tutorial. I’m looking at using dies on your cards and I have a challenge for everyone – try to step out of your comfort zone! I did it twice – using green and no stamping!
I used the Stacked Edges 2 die to create an interesting green background. I additionally added the Stitched Foliage leaves cut twice in both gold glitter paper and the green background I created with Distress Oxide inks. The sentiment, Hello Friend Script, has been cut with the same glitter gold paper and black cardstock. I topped off the card with a few clear droplets.
Thanks for having me again here on the blog. I look forward to bringing you more inspiration next month! If you enjoyed my video, be sure to check out my personal channel for weekly videos.
Hello everyone, Joni here sharing the oldie but goodie products along with some new release products as well. For this project I used the Woodland Critters,Rainy Days, and Encouraging Greetings stamp set and dies.
First, I stamped the picked images on a white cardstock and colored them with Copic Markers.
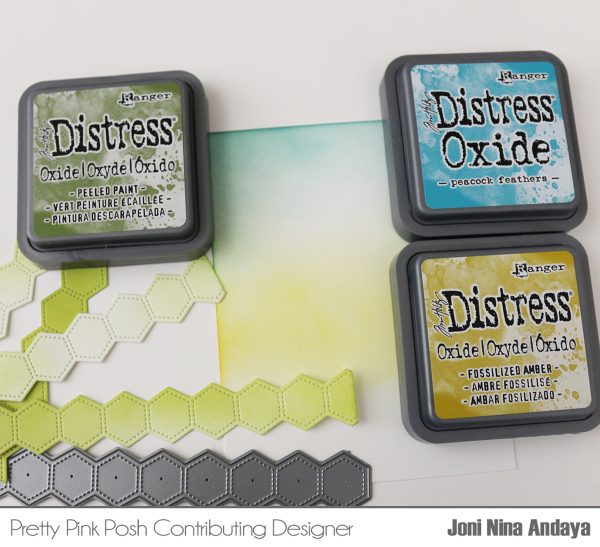
Next, I created my background using Distress Oxide. I also die-cut some green octagon border using the Stacked Edges 2 Die (which is on sale right now).
I then, splattered the background with water and diluted Mustard Seed to give interest.


 For my sentiment, I decided to use the