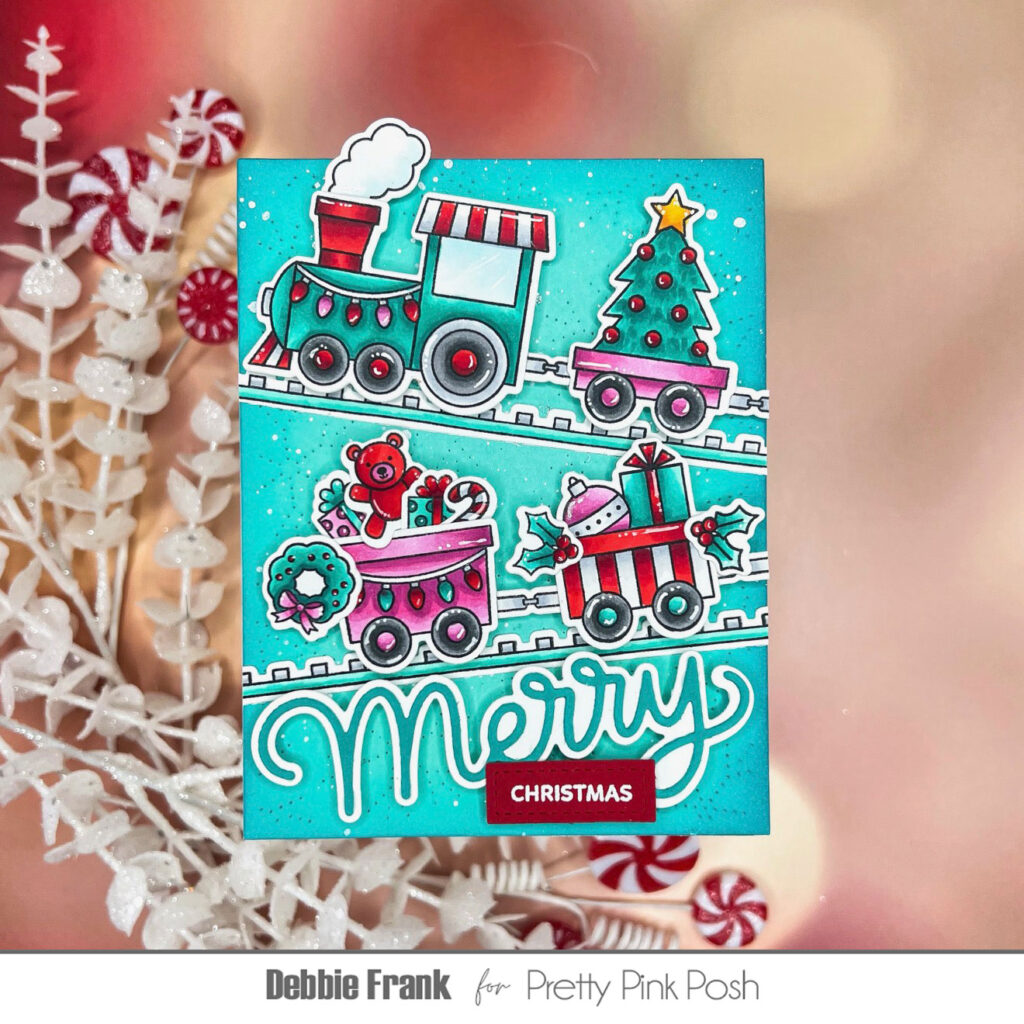
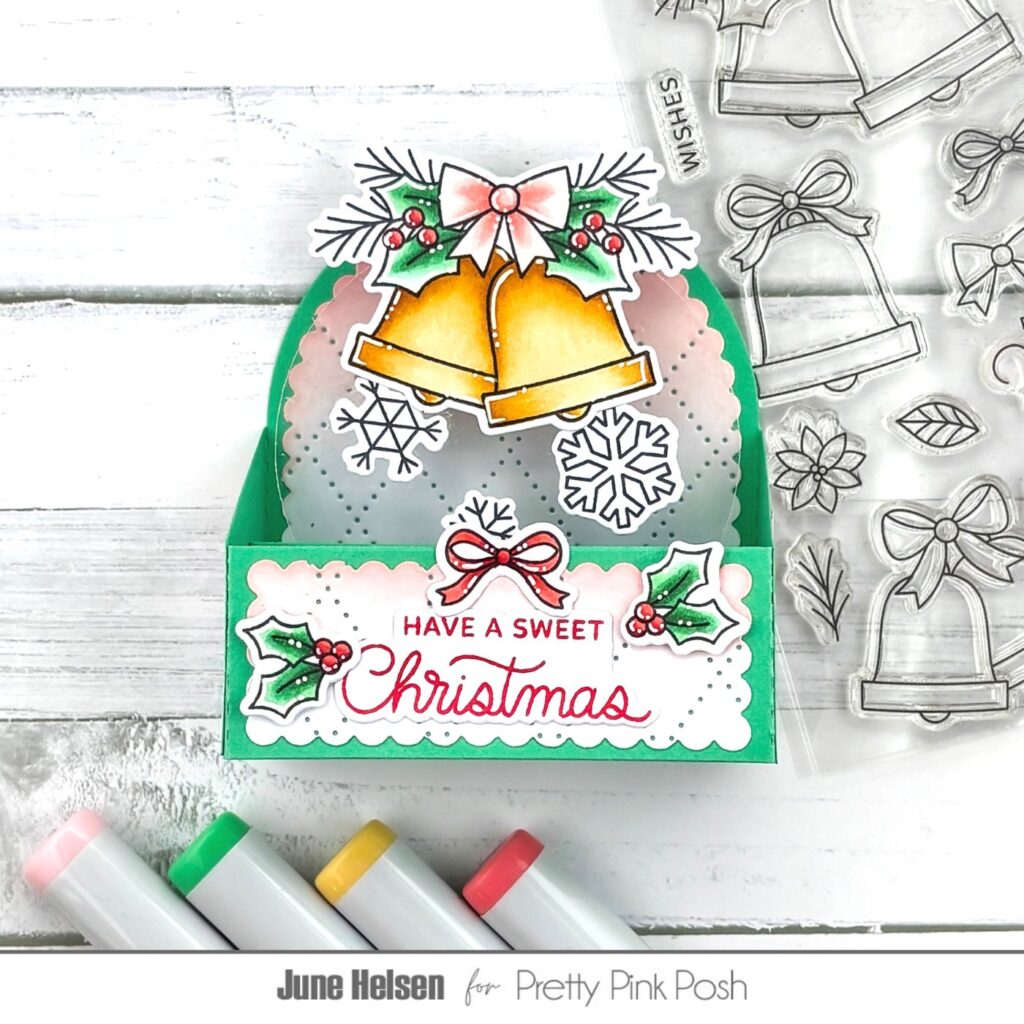
It’s Day 2 of sneak peeks for our February 5th release. Today we’ll be taking a look at the Easter Bunny Mugs, Decorative Easter Egg, and Large Easter Shadow die sets.
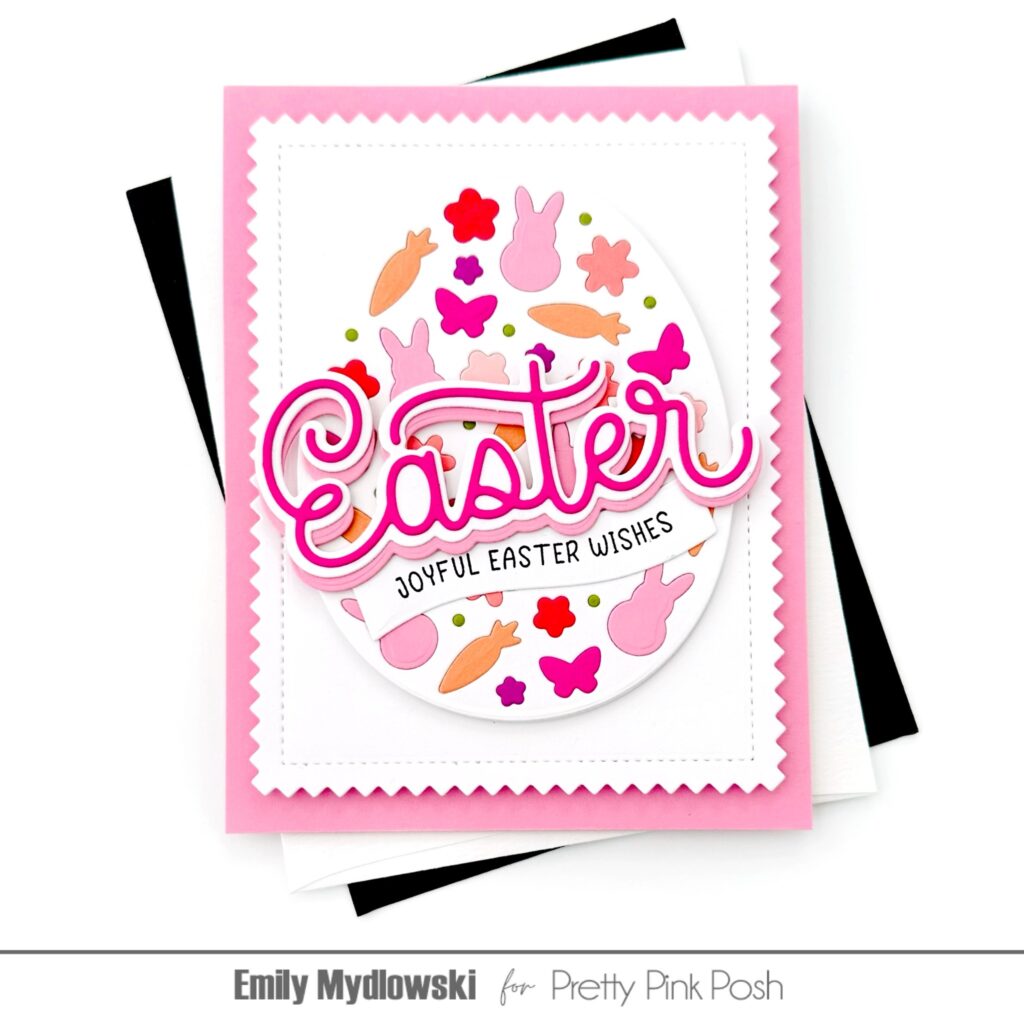
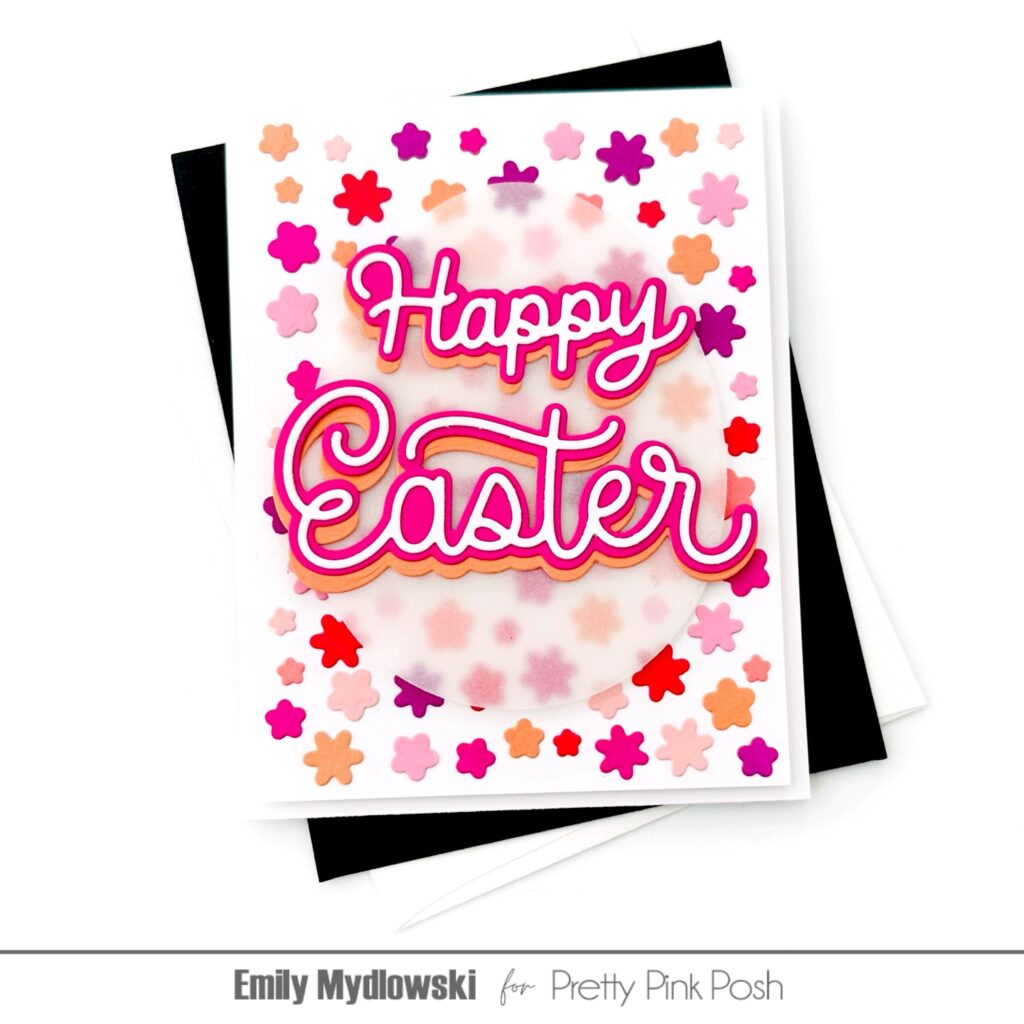
Hi Crafty Friends! Emily Mydlowski here with you today sharing Easter-themed sneak peeks using the Easter Bunny Mugs, Decorative Easter Egg Die Set and the Large Easter Shadow Die.
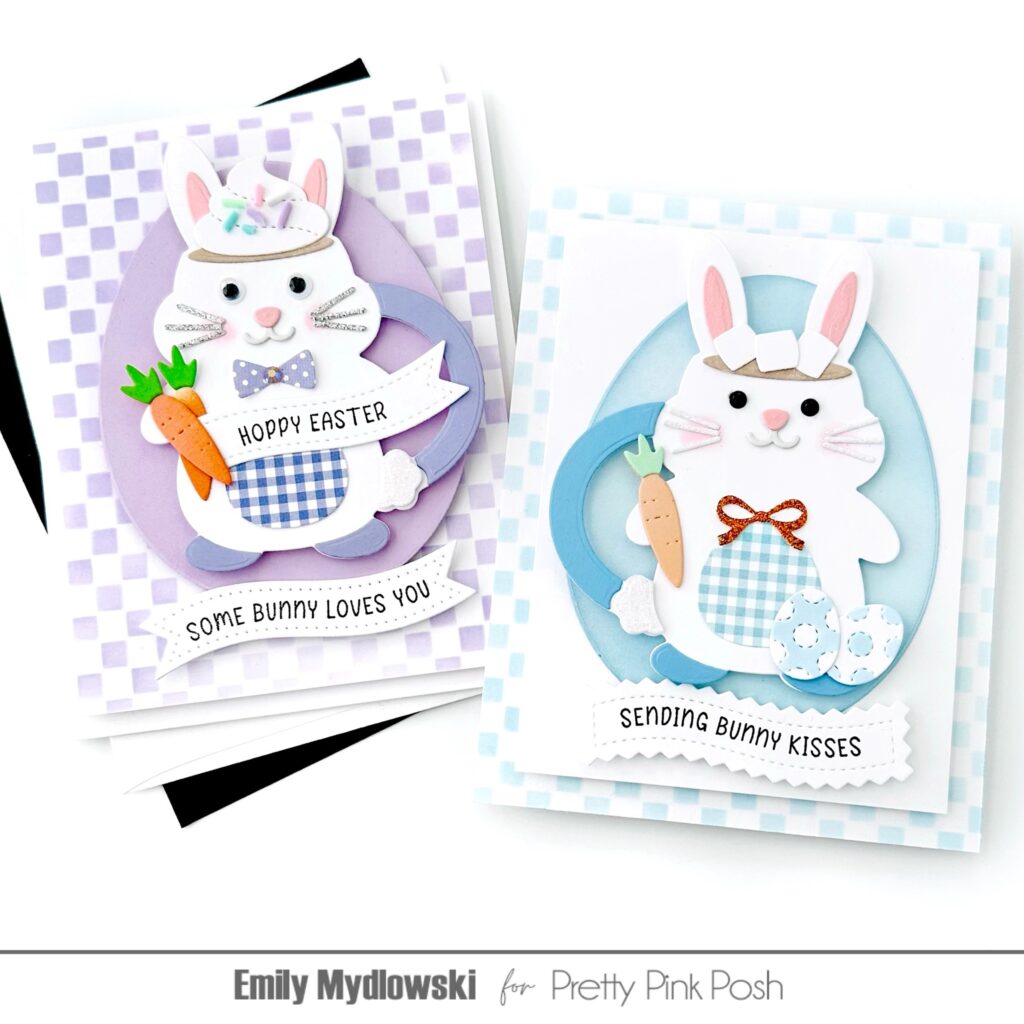
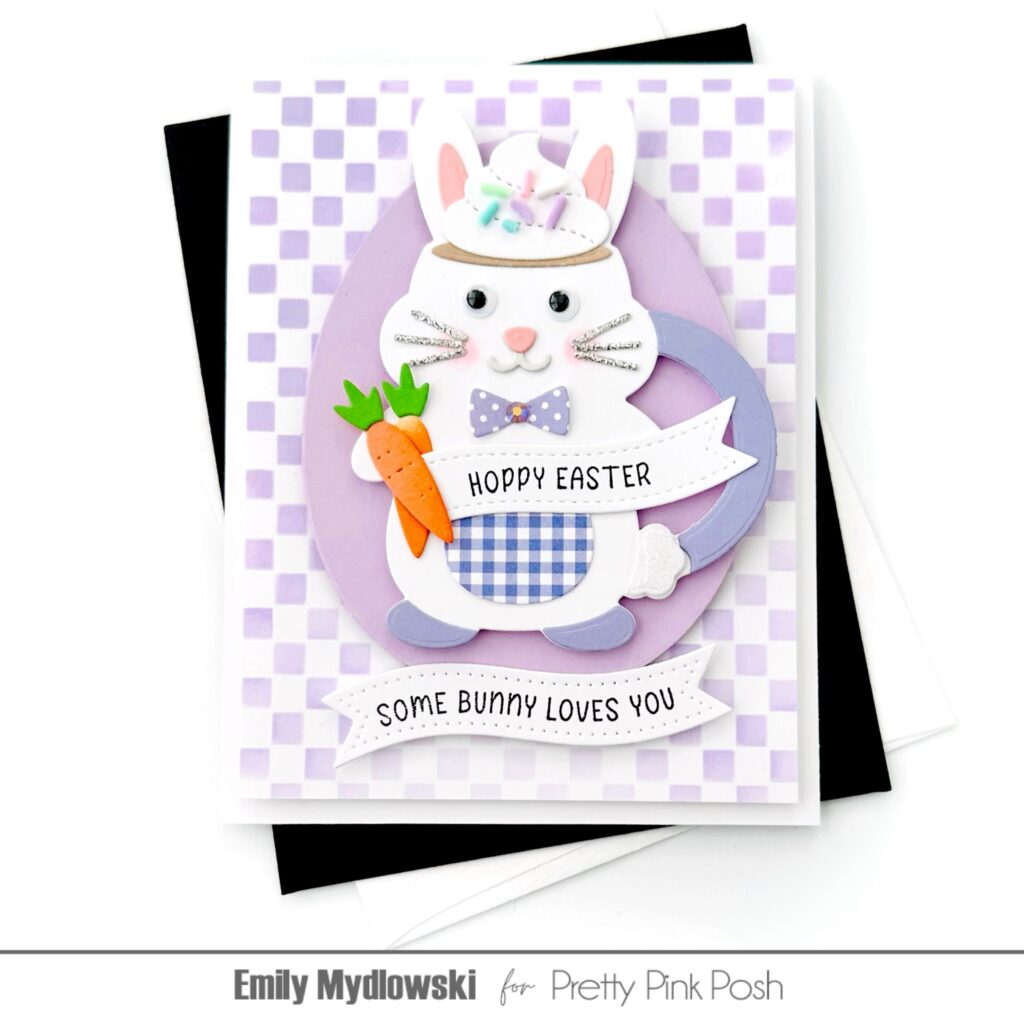
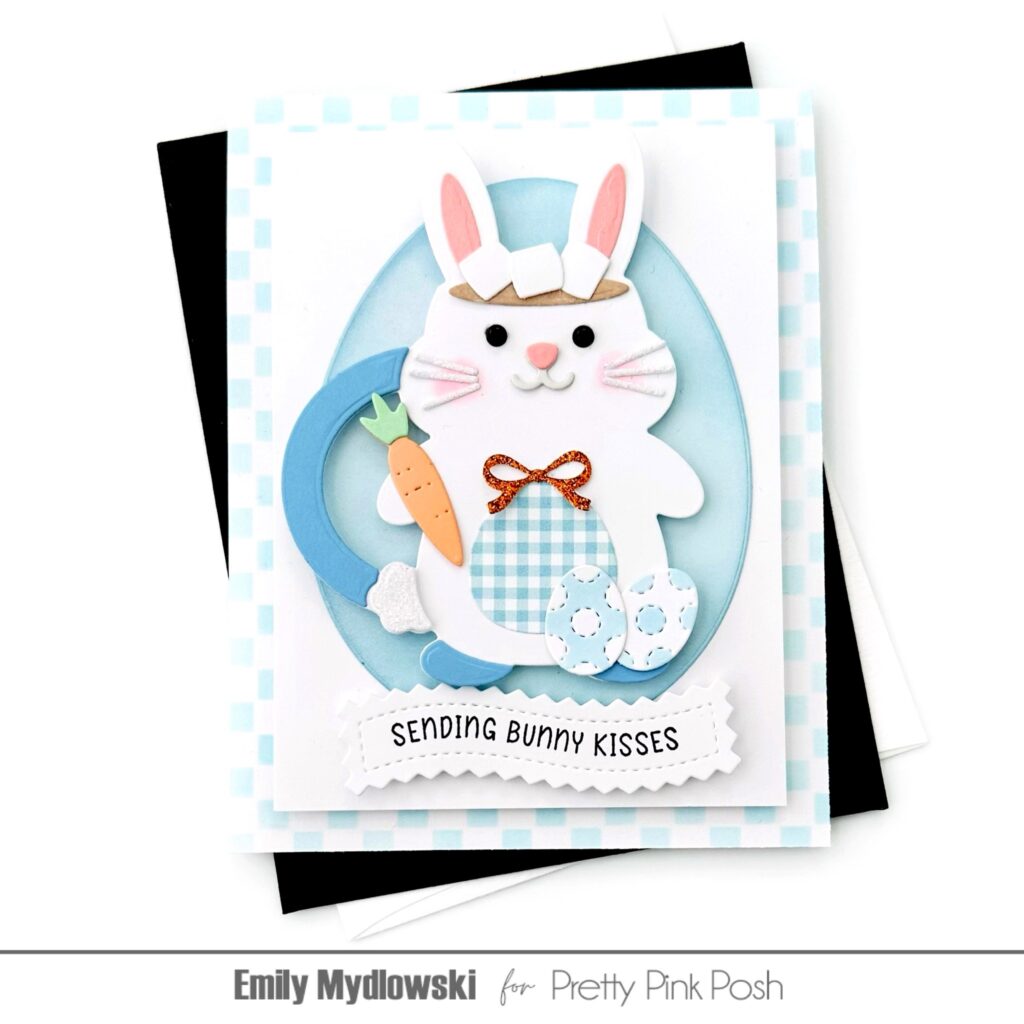
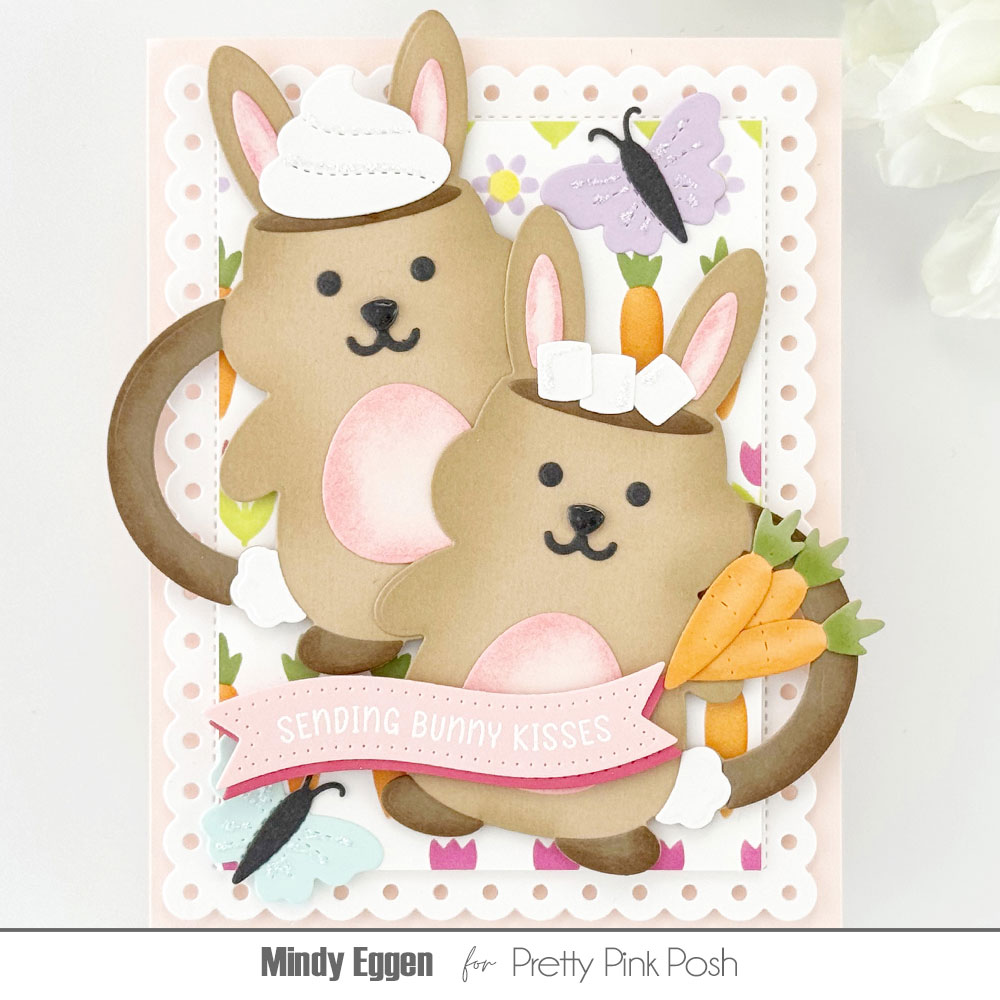
Oh my goodness, the Easter Bunny Mugs are THE cutest that I had to create more than one bunny and card — one in pastel blues with yummy marshmallows & the other in springtime purples with a dollop of whipped cream & Spring Carrots Clay Confetti.
I layered each of the Easter Bunny Mugs to a Large Egg Frame from the Decorative Easter Egg Die Set. The blue and purple checkered backgrounds were created using the Mini Checker stencil. For the sentiments I used the Banner Greetings 3 Dies & Easter Banner Greetings stamp set.
Little elements on the bunnies include glitter whiskers & cottontails, googly and onyx pearl eyes, blue polka dot eggs colored with alcohol markers, ink blended and die cut carrots, gingham pattern paper bellies, sparkly bow-ties and puffy pink cheeks using a cotton swap and Spun Sugar Distress Oxide Ink.
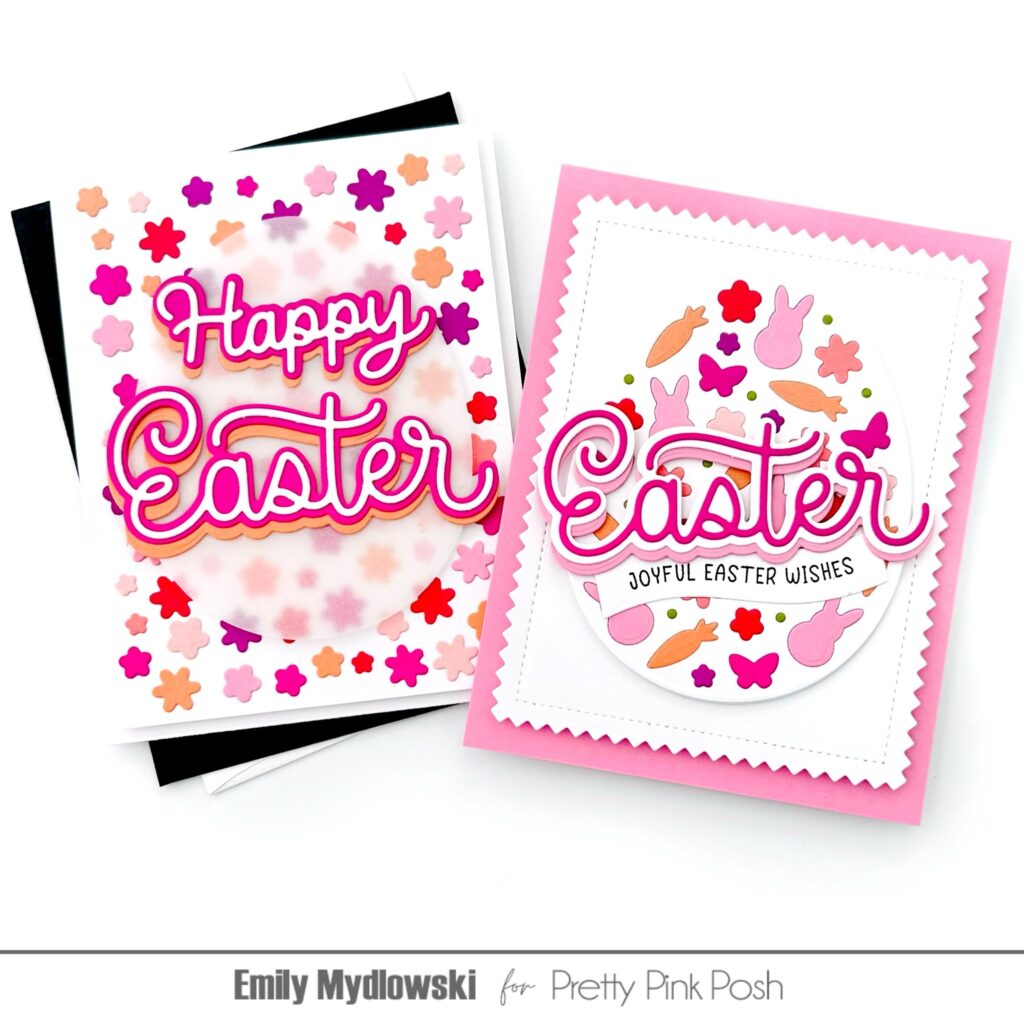
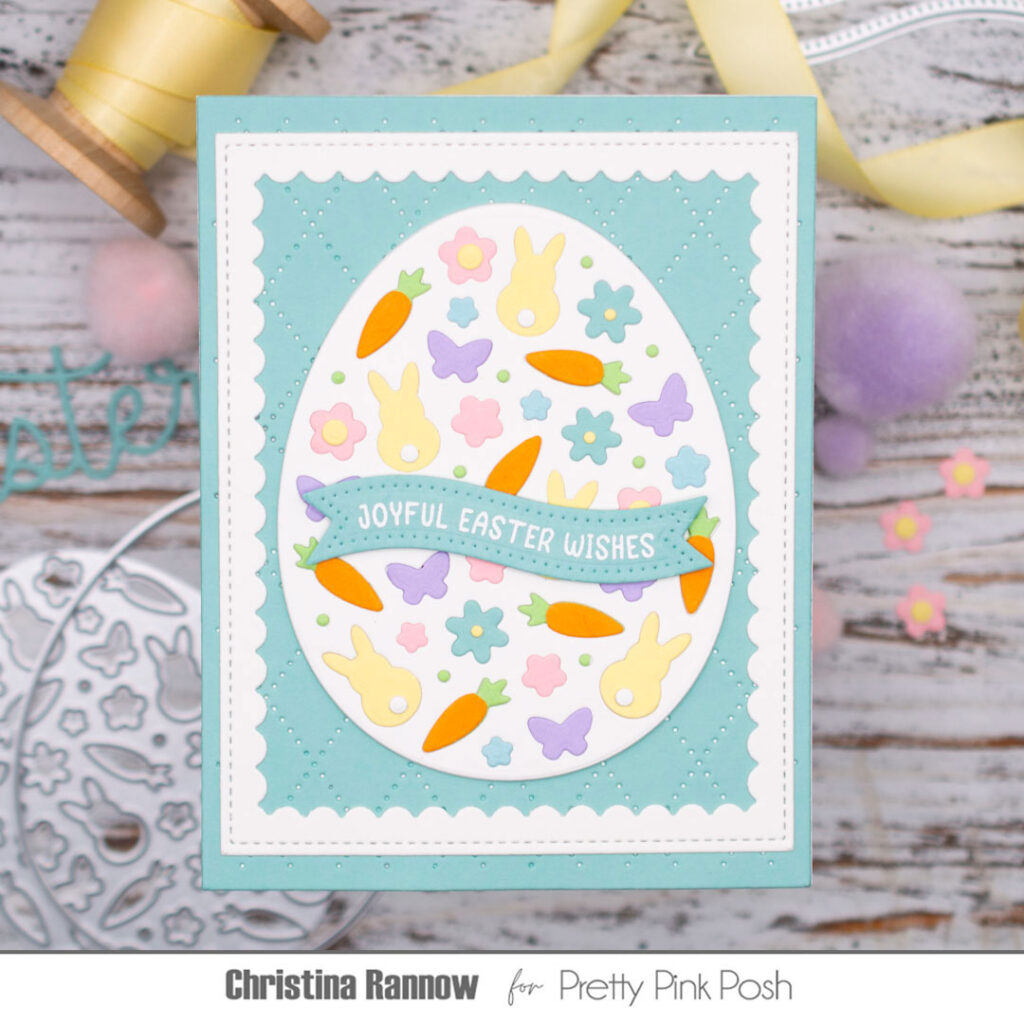
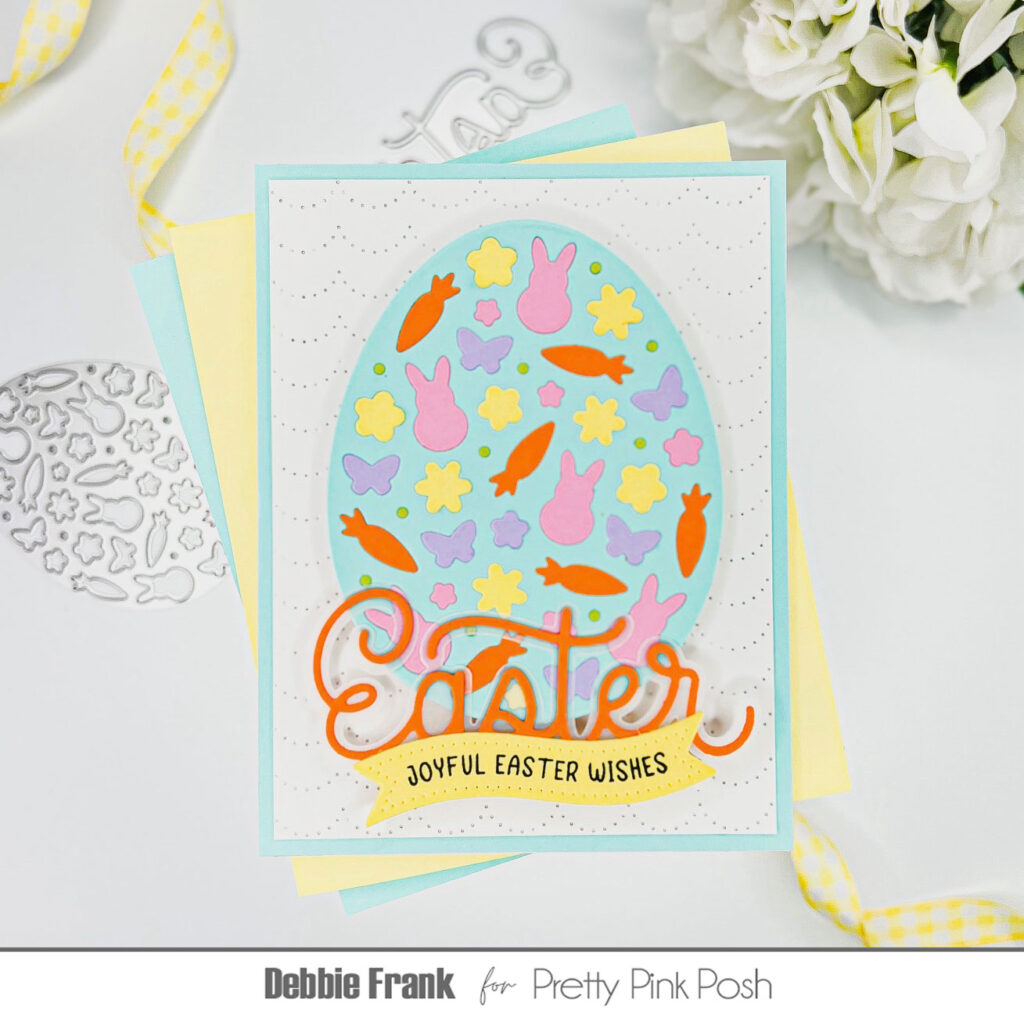
For my next project, I created two cards using the Decorative Easter Egg & Large Easter Shadow die sets in a bright spring color palette.
For my first card, I created a bright and cheerful inlay egg using an assortment of pink, red, orange, purple and springtime green cardstock. I used the Large Easter Shadow die to create a double-shadow sentiment. To finish the card, I adhered the Decorative Easter Egg to a white Pinking Rectangle Frame and a pink card base.
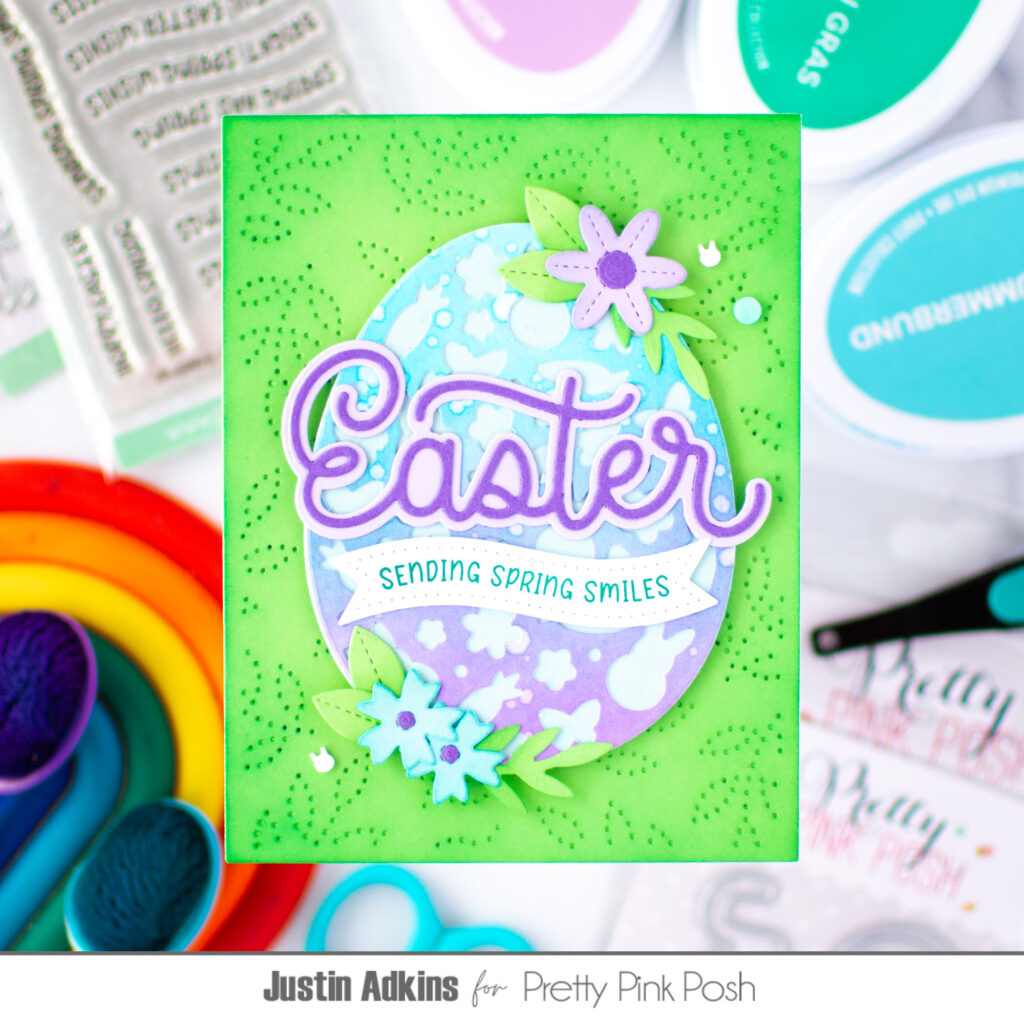
I adhered all the remaining decorative flower die cuts to a white card panel to create the background for my second card. For the Happy Easter Sentiment, I combined the Large Easter Shadow with the “Happy” from the Happy Halloween Shadow Dies and placed them on a Vellum Large Easter Egg.
Keep scrolling to see more amazing inspiration from the design team!
Have a Hoppy Easter Cardmaking season. Thanks for stopping by and Big Paper Hugs.
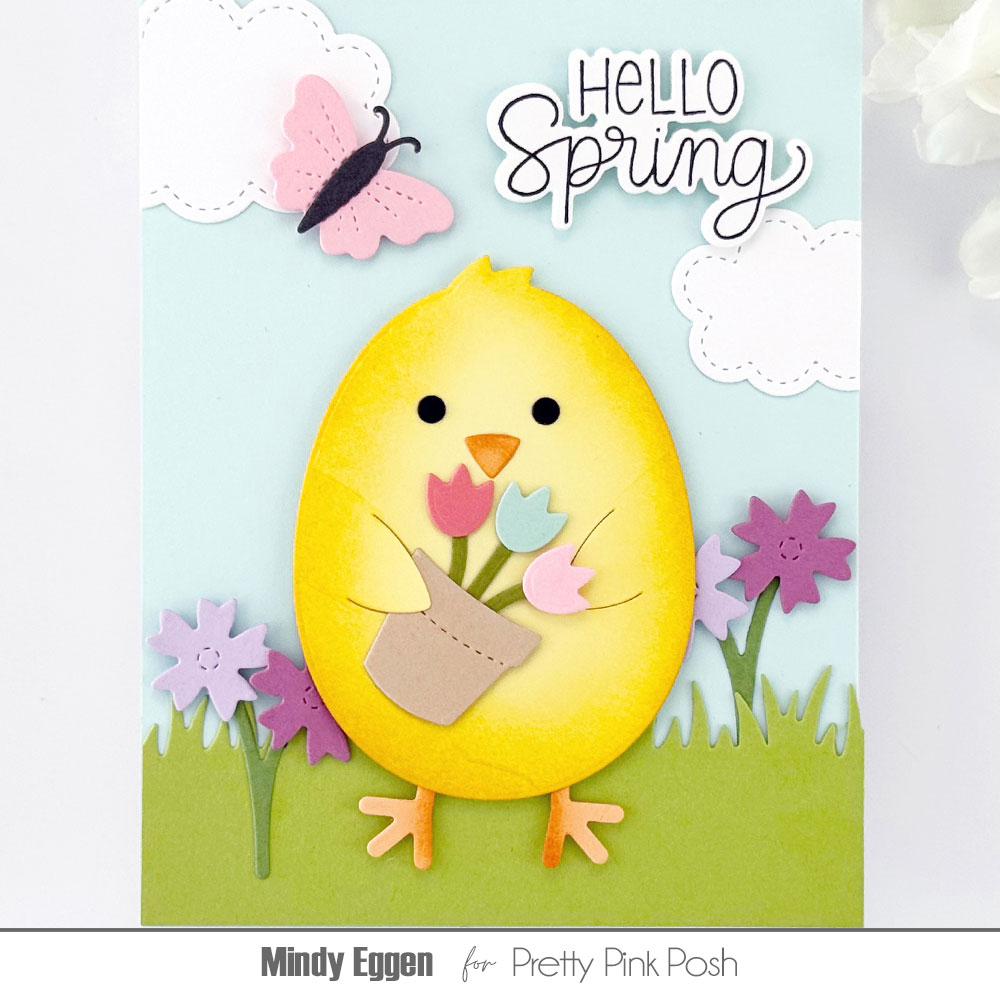
Welcome as we kick off the first day of sneak peeks for the February 5th release. Today we’ll be taking a look at four of the new die sets: Chick Holder, Chick Shaker, Springtime Holder Additions, and Stitched Clouds.
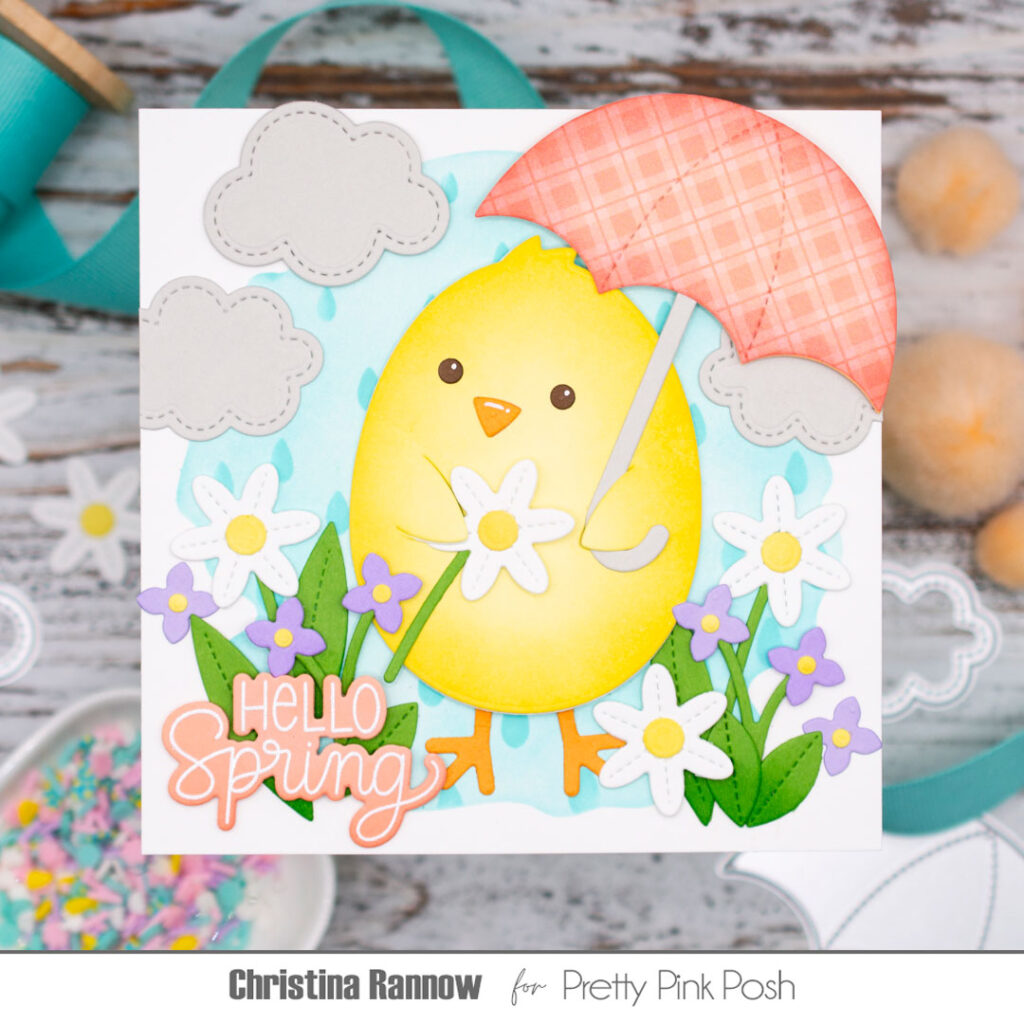
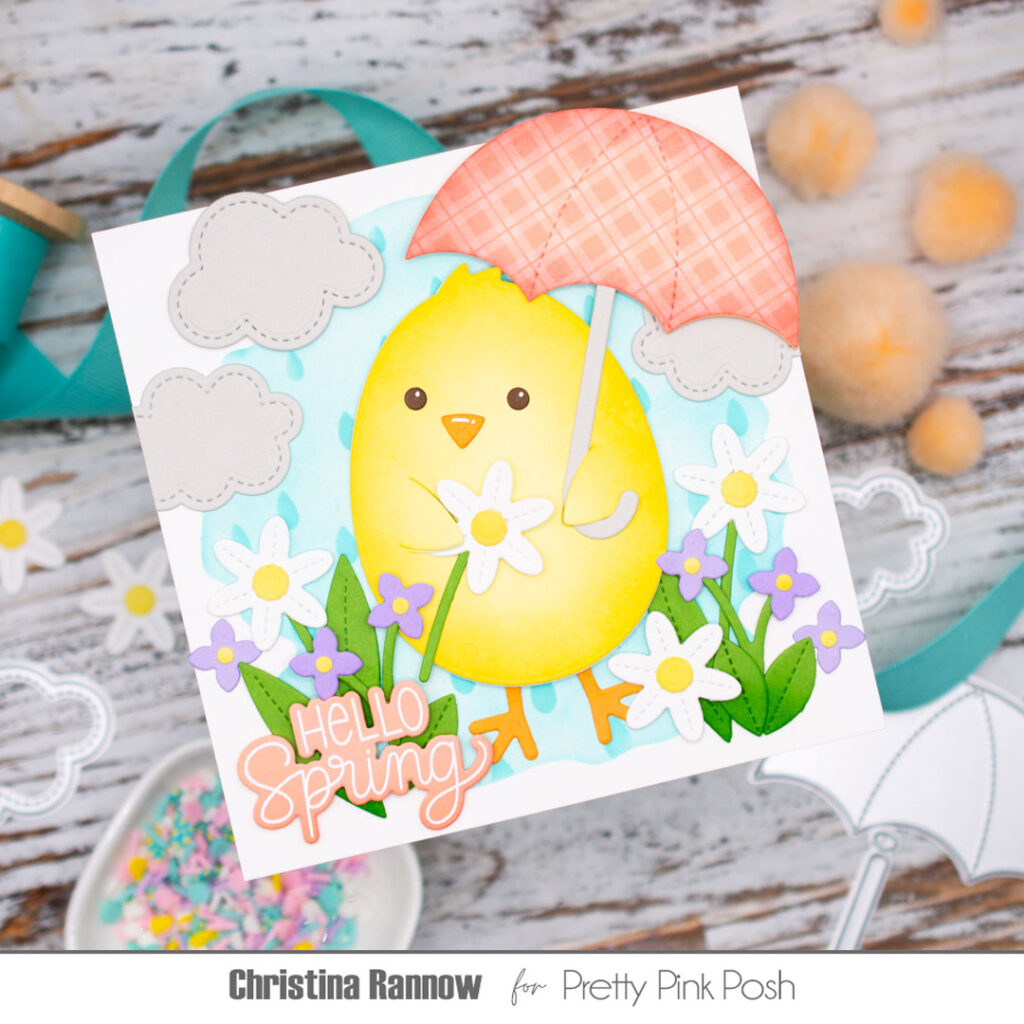
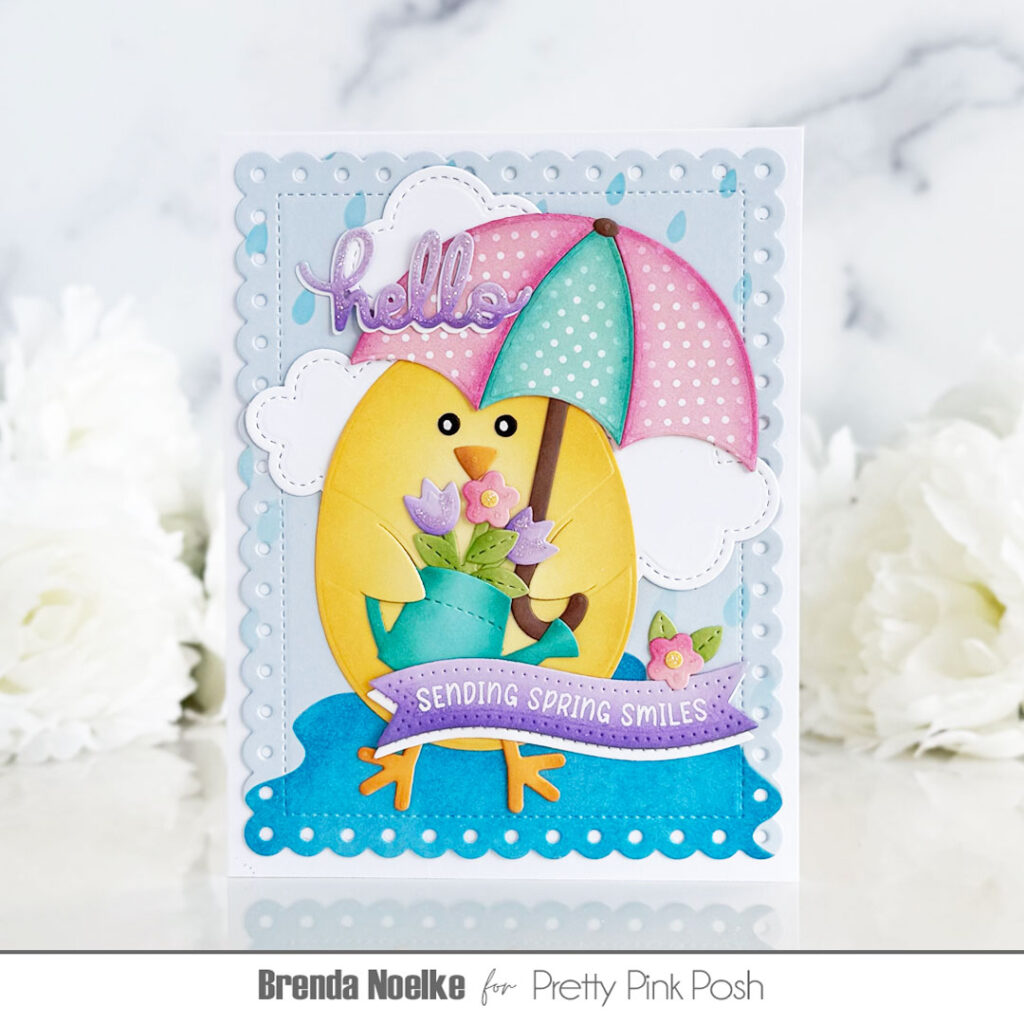
Hi friends! Christina here, and I’m so excited to be kicking off sneak peeks for the super sweet spring release! Today we are showcasing some of the adorable new dies that will be available February 5th, including the Chick Shaker and the Chick Holder. These cuties coordinate perfectly with the other goodies we’re highlighting today, the Springtime Holder Additions and the Stitched Clouds. I’ve combined elements from all these new sets in the happy springtime inspiration that I’m sharing with you! Let’s get started!
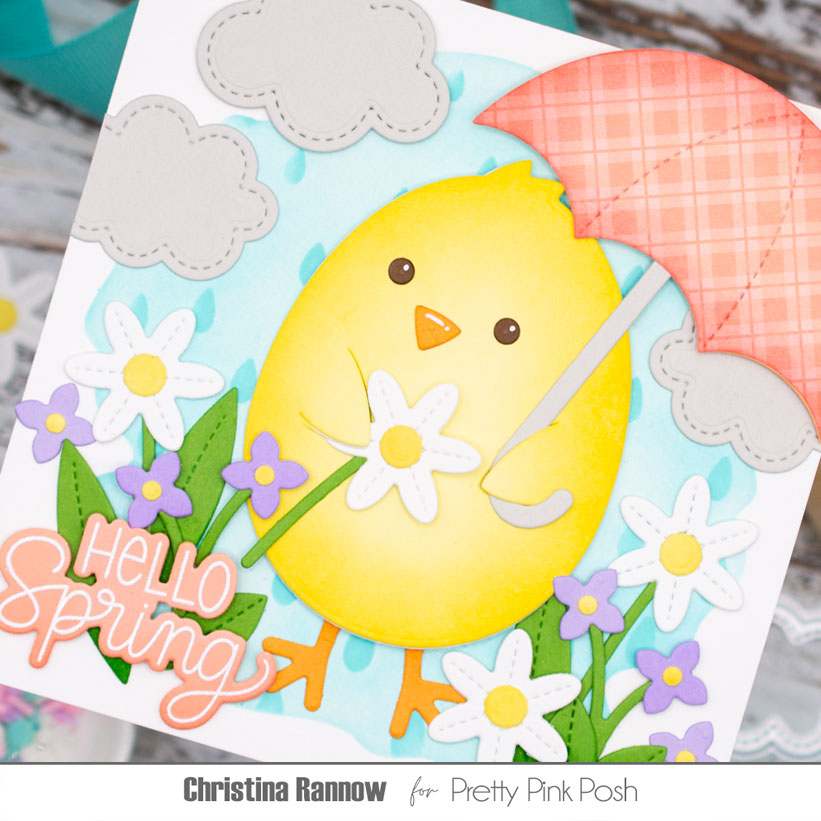
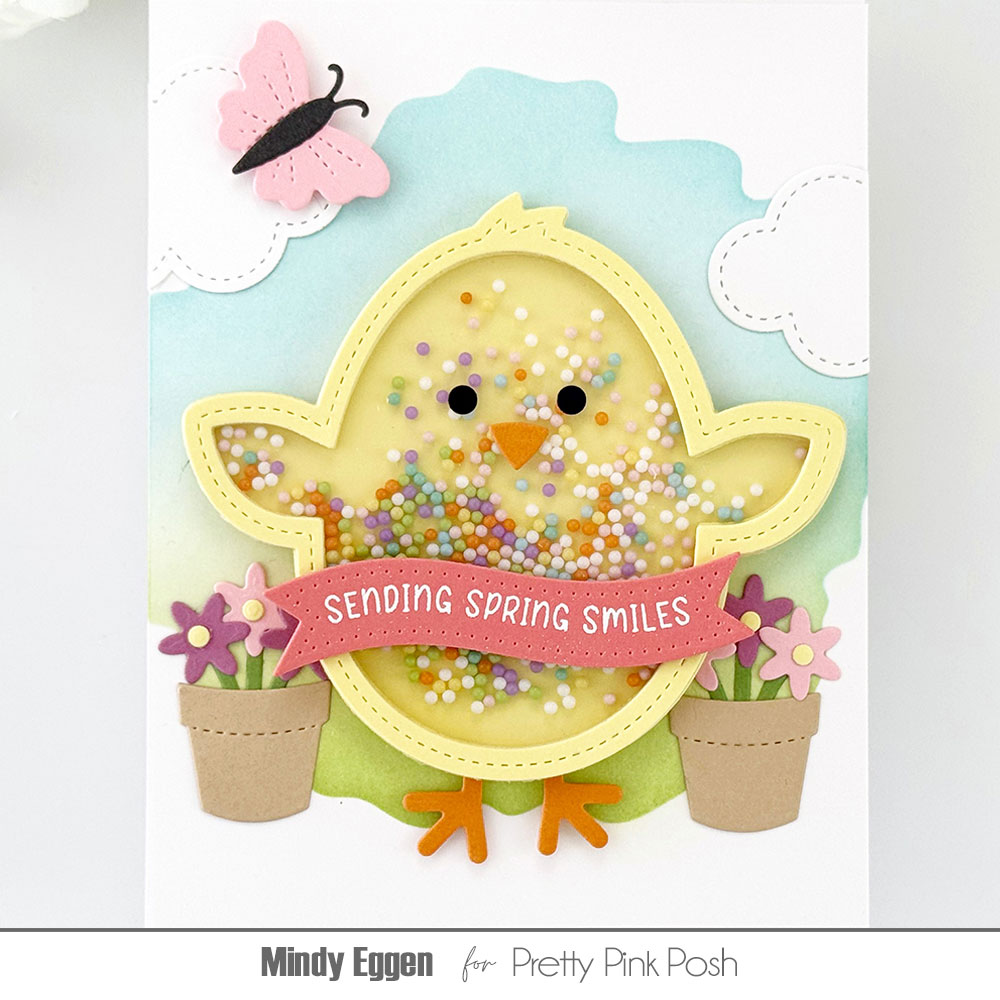
My first card features the newest addition to the “Holder” collection, the Chick Holder! This plump little chick is just the cutest, and I paired him with the umbrella from the Springtime Holder Additions and surrounded him with the lovely new Stitched Spring Flowers to create a rainy springtime scene.
My first step was to create the rainy background panel. I started with a piece of 5×5 white cardstock and two new stencils that are part of the spring release, the Watercolor Circle and Raindrops. I stenciled the Watercolor Circle first with Salvaged Patina Distress Ink, and then, leaving the stencil in place, I stenciled the raindrops over the watercolor circle using more Salvaged Patina ink. I set the panel aside while I got to work on some die-cutting.
For most of the die-cutting I started with colored cardstock but chose plain white cardstock for the daisies and a sweet plaid patterned paper for the umbrella. I added subtle shading to the chick, the leaves, and the umbrella by lightly blending a darker coordinating ink around the edges. After assembling the diecuts, I arranged them on my background panel and attached them with either glue or thin foam squares.
Just a couple more things to wrap up this rainy springtime card! First, I added a greeting from one of the new stamp sets, Spring Blooms. I heat embossed it with white embossing powder on peach cardstock and then die-cut it with the coordinating die. And lastly, I popped this 5×5 card front onto a card base that I made from a piece of white cardstock measuring 5 x 10 inches.
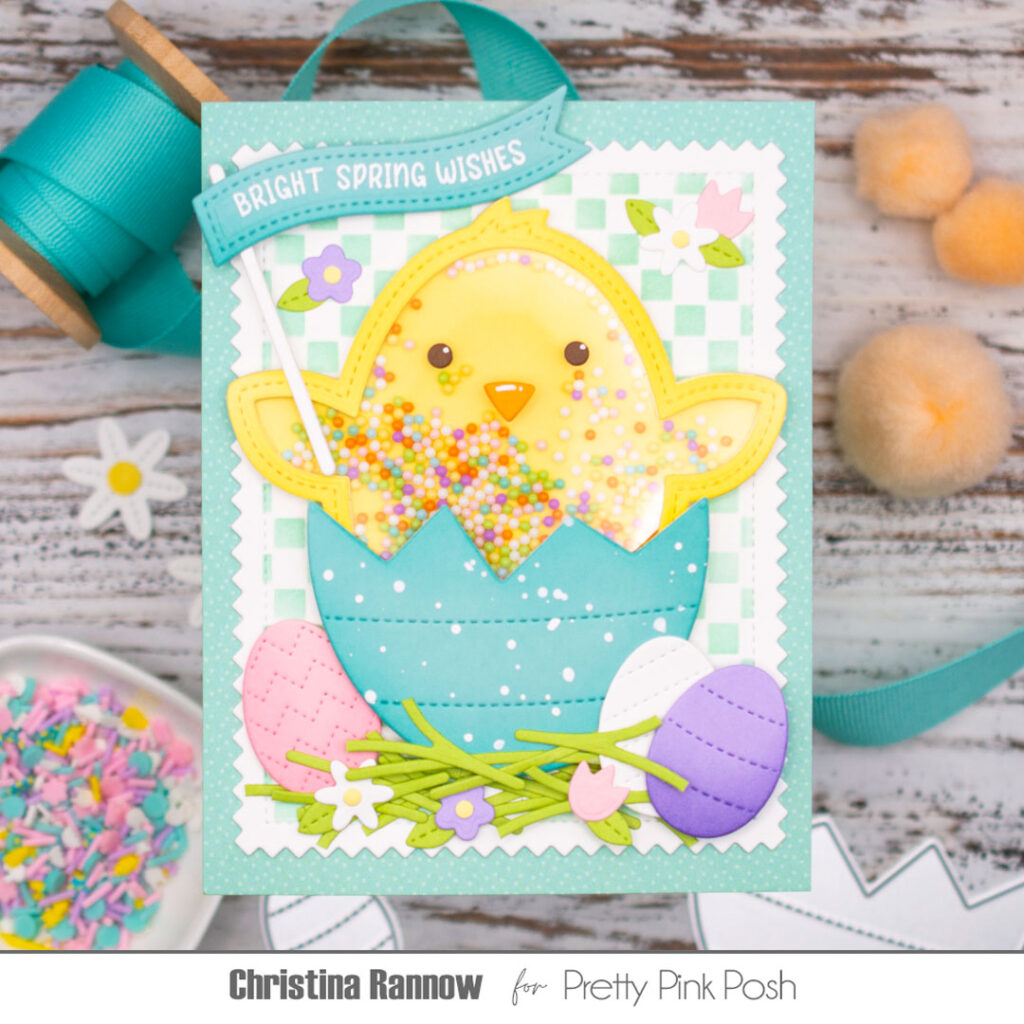
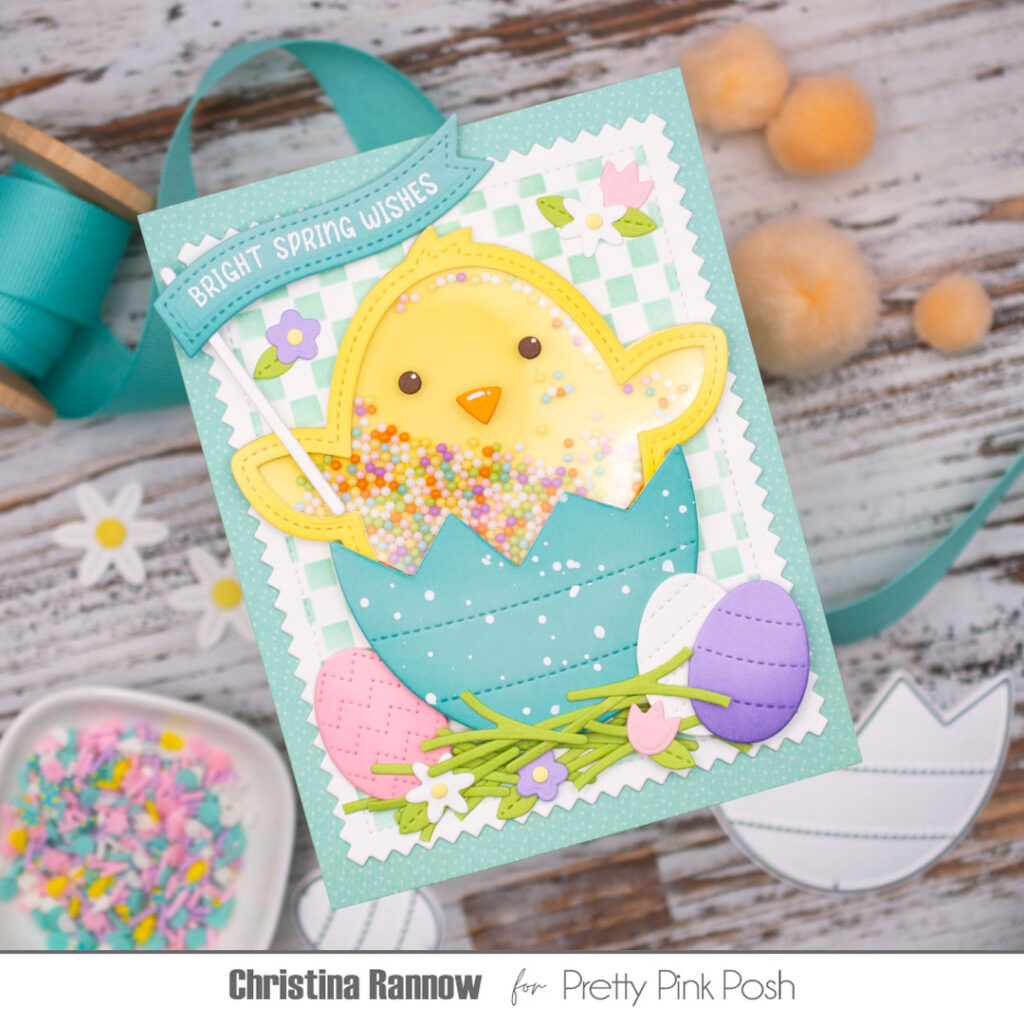
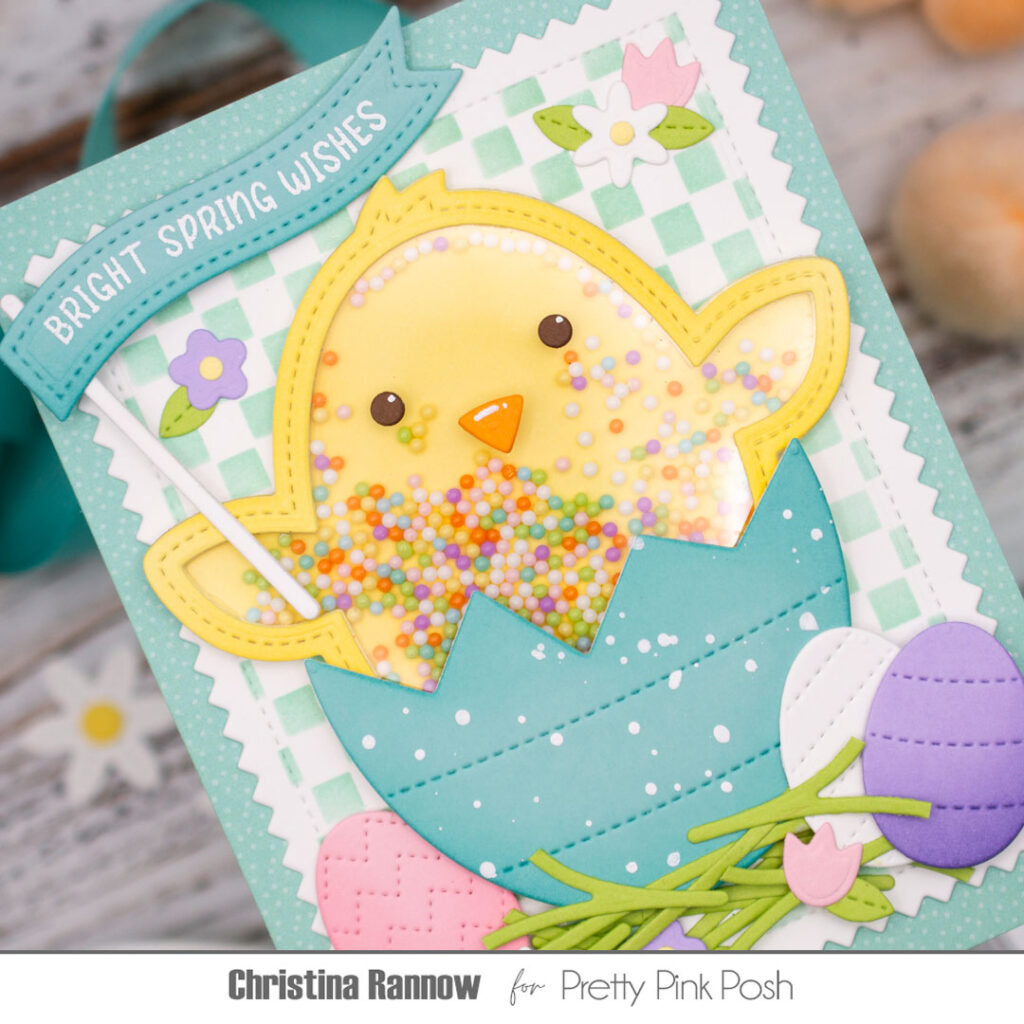
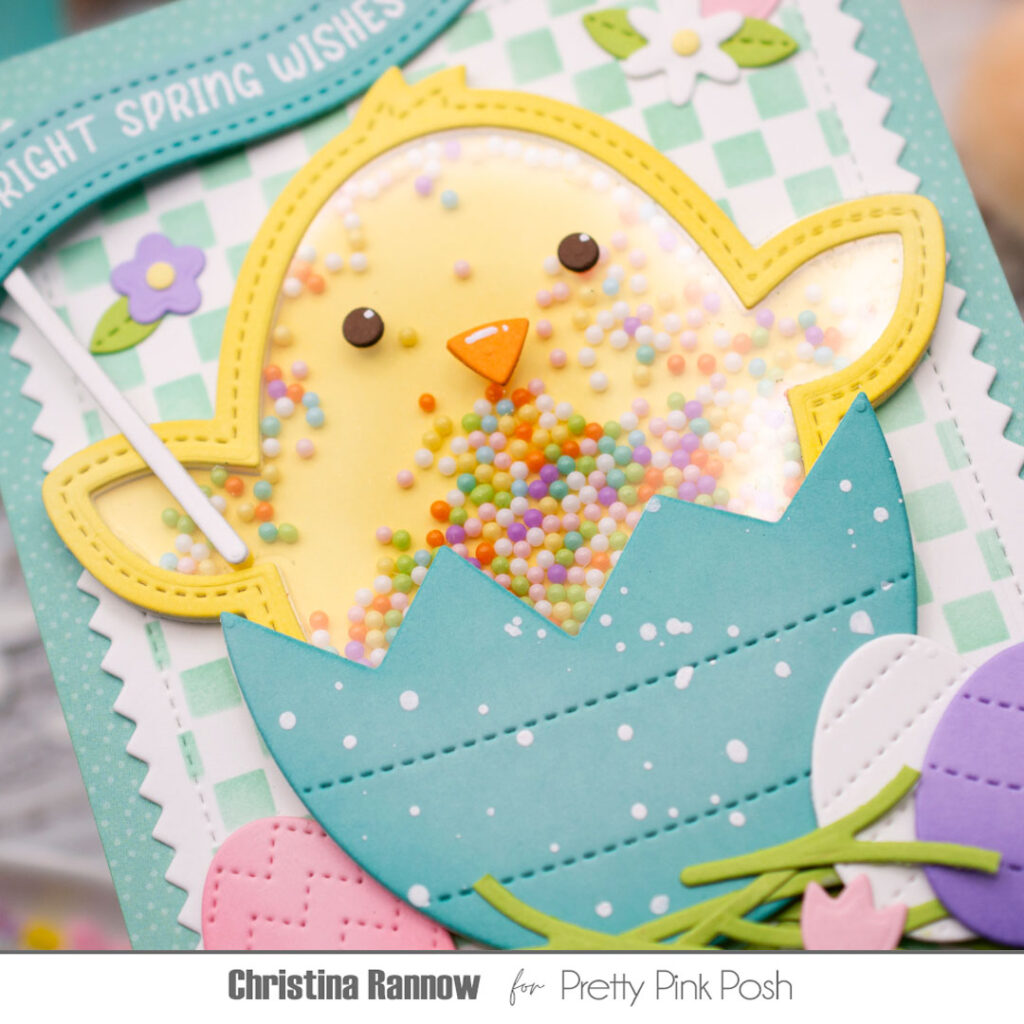
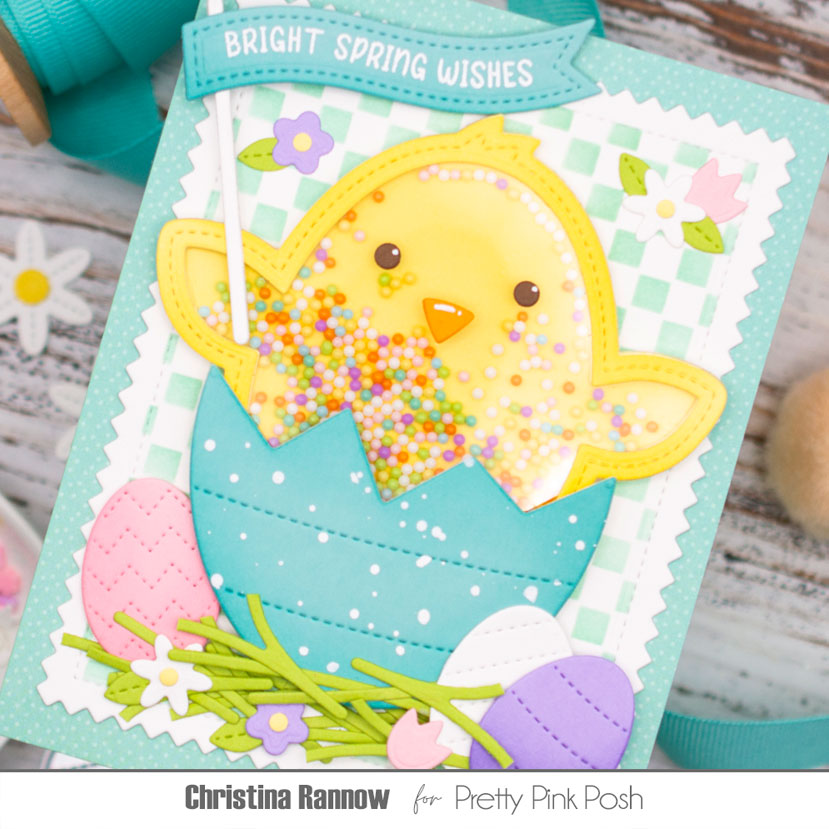
My second card is a playful shaker card featuring the Chick Shaker. This cutie is just as irresistible as the Chick Holder, especially when she’s popping out of an egg! I combined this sweet chick with new Bunny Hop Shaker Beads and the new Mini Checker Stencil that I think is a must-have for your crafty stash.
For this card, I started by creating the shaker element first. I used the Chick Shaker dies to die-cut the chick frame six times from yellow cardstock and stacked them together to be the walls of the shaker. Before securing the frames with glue, I sandwiched a piece of acetate between the top two layers to be the window of the shaker. Then I filled the shaker with the beads and finished up by attaching the backer piece to the stacked frames. Easy! The last steps were to add the chick’s face and the cracked eggshell she’s popping out of. I die-cut the eggshell from tidepool cardstock, added white spatter, and then attached it right over the chick shaker.
Next I created my background panel by first die-cutting the largest Pinking Rectangles from white cardstock and masking the edges before stenciling on the Mini Checker pattern with teal ink. Then I layered this onto a subtle tone-on-tone teal patterned paper panel. With the background completed, I attached the Chick Shaker to the panel with glue and moved on to the other elements of my card design.
I wanted my chick to be sitting in grass, so I reimagined some flower stems from the new Stitched Spring Flowers and layered them along the bottom. I found smaller egg dies in the Chick Holder set and the Easter Holder Additions set and die-cut them from pretty pastel cardstock. I tucked them around the chick and her egg and added small flowers that are accessories in the Springtime Holder Additions. For the sentiment, I heat embossed an Easter Banner Greeting with white embossing powder on one of the new banners from the Banner Greetings 3die set. Then I added the banner to a white “stick” and gave it to the chick to hold. So cute! Finally, I popped the card front onto an A2 card base.
Keep scrolling to find even more springtime inspiration from the design team!
Thanks so much for checking out these sneak peeks featuring new products from the upcoming spring and Easter release on February 5th.
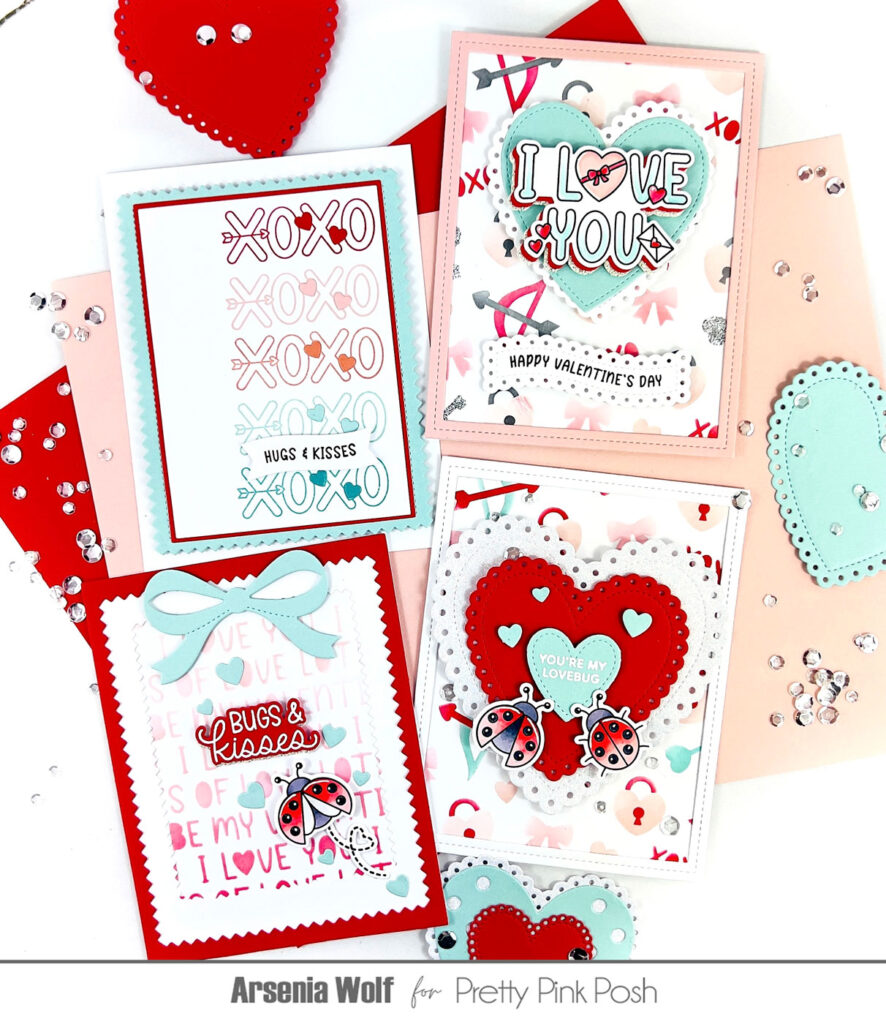
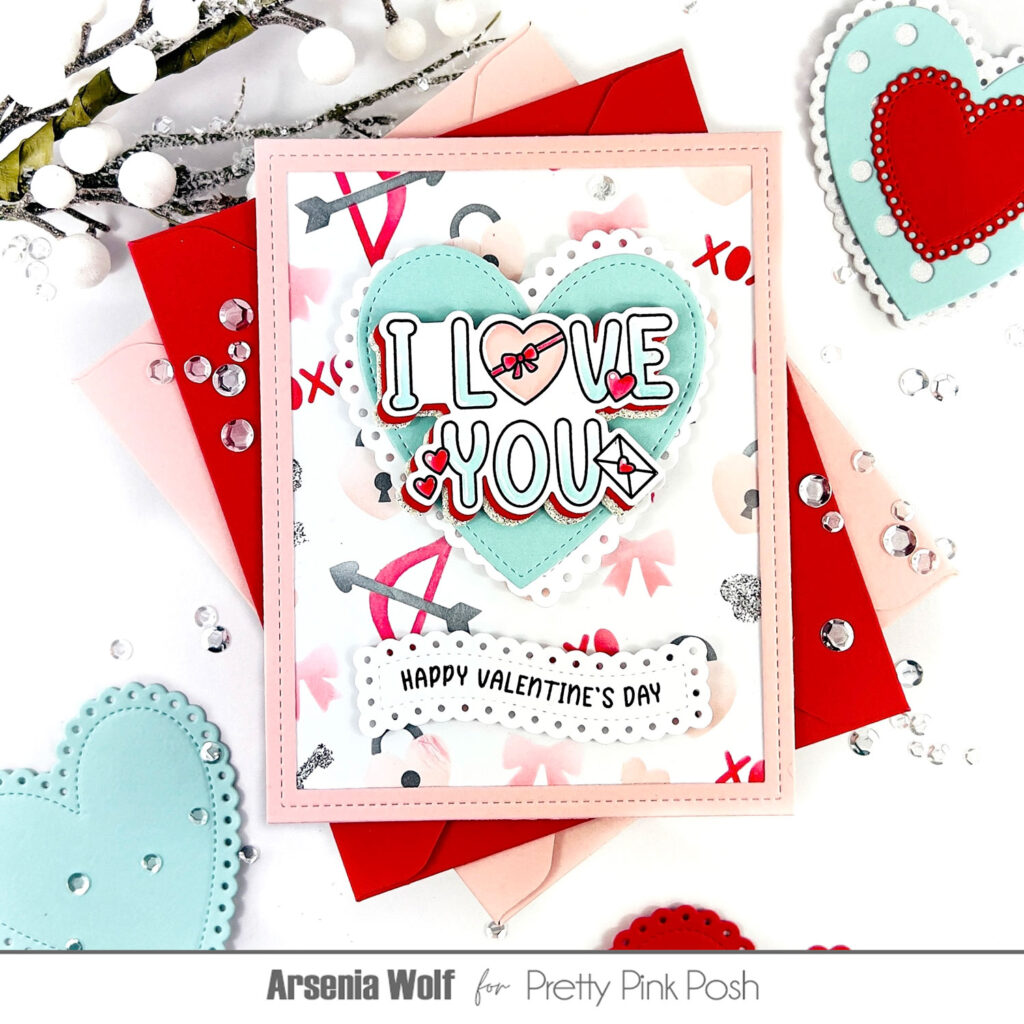
Hello crafty friends! Arsenia here, popping in with some happy little sneak peeks for the January Release—and oh my goodness, friends, it’s a good one! Today we’re shining the spotlight on the new stamp sets with coordinating dies and stencils. Spoiler alert: I used almost every single set, because these goodies are perfect for spreading love notes all year long—with a dash of lucky vibes too!
I’ve got three cards to share, plus a bonus card at the end, so grab a cozy drink and let’s dive in!
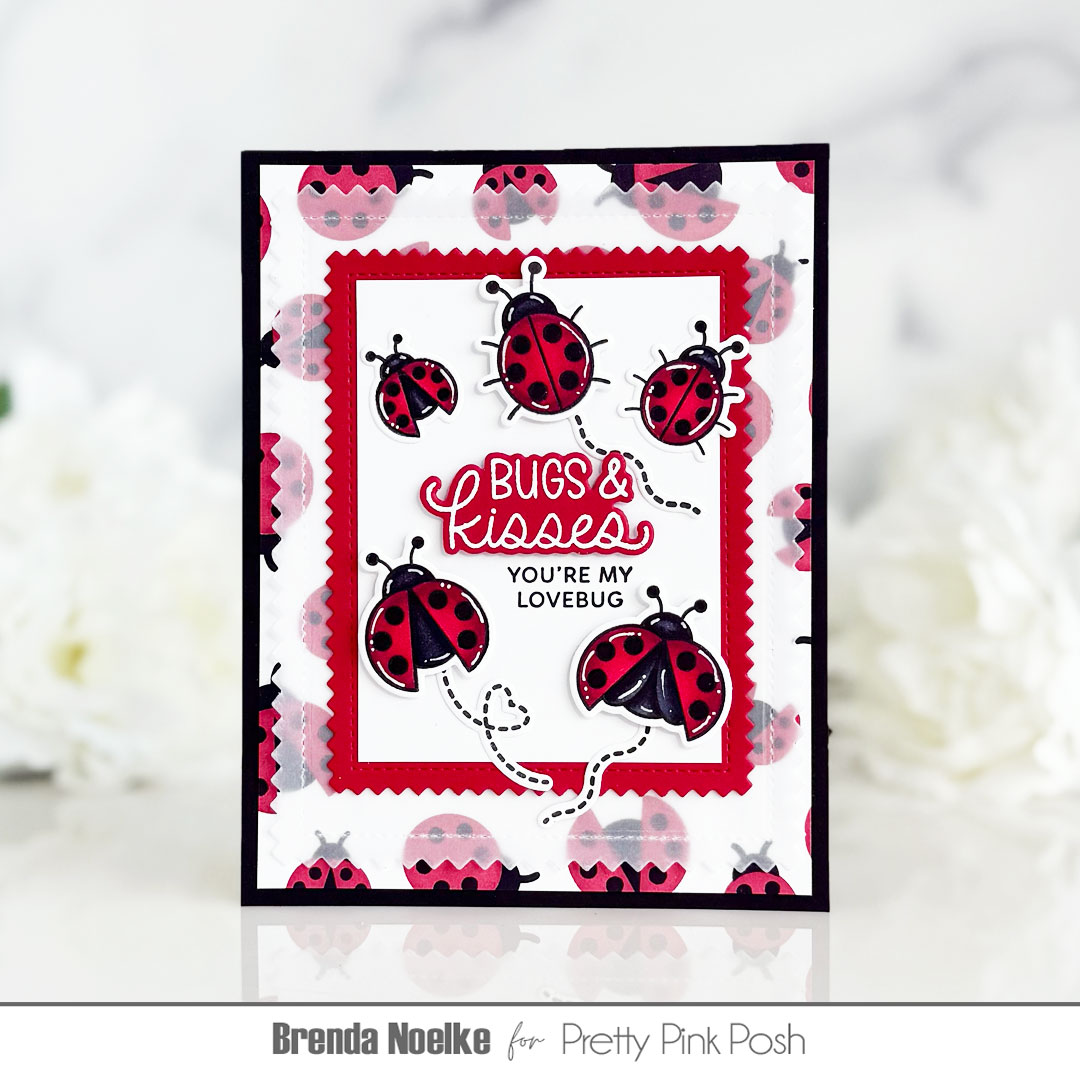
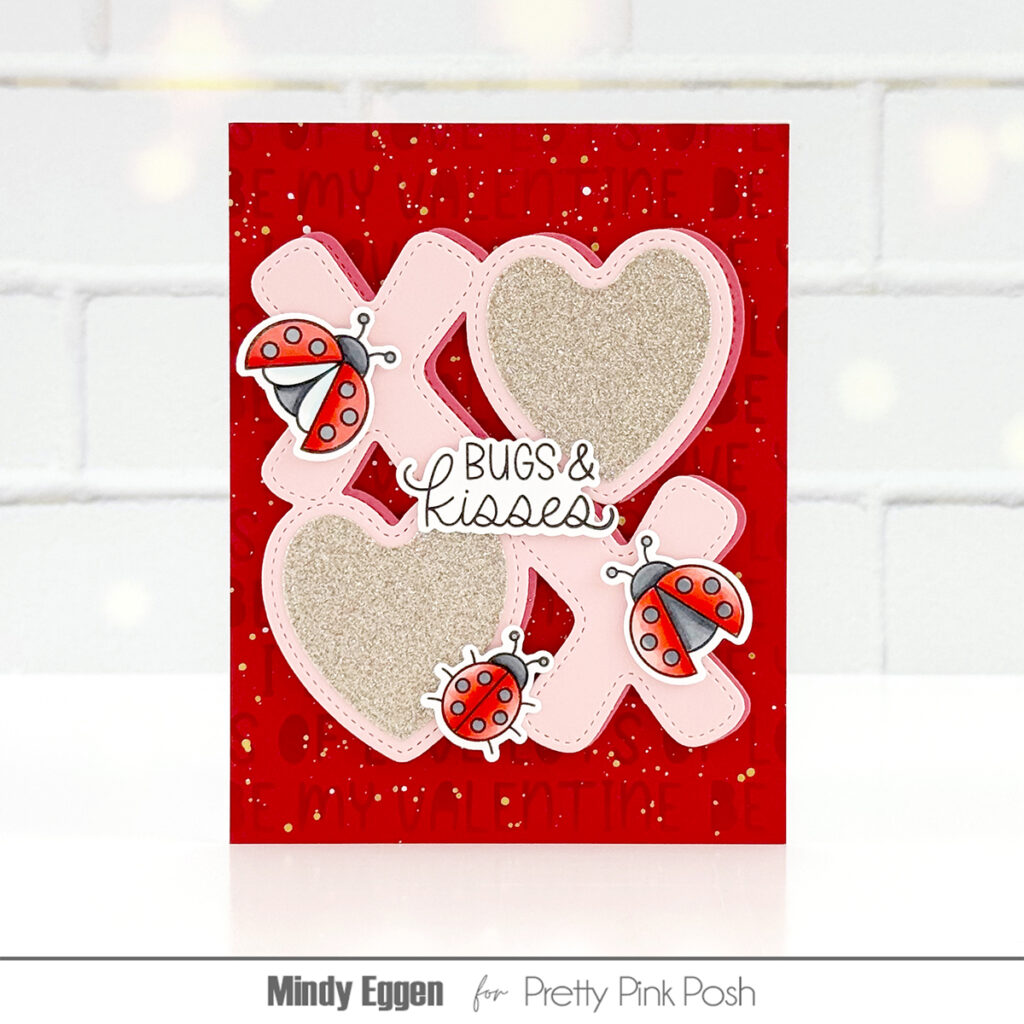
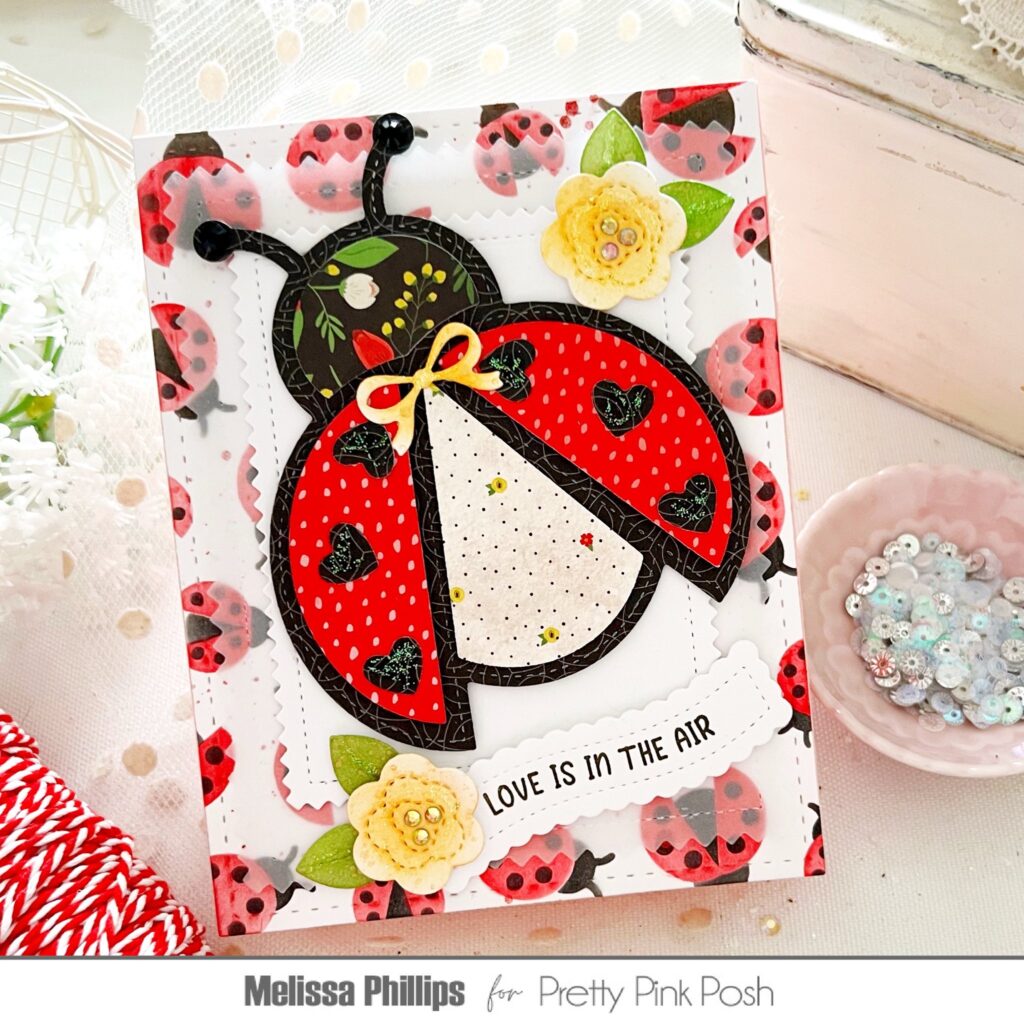
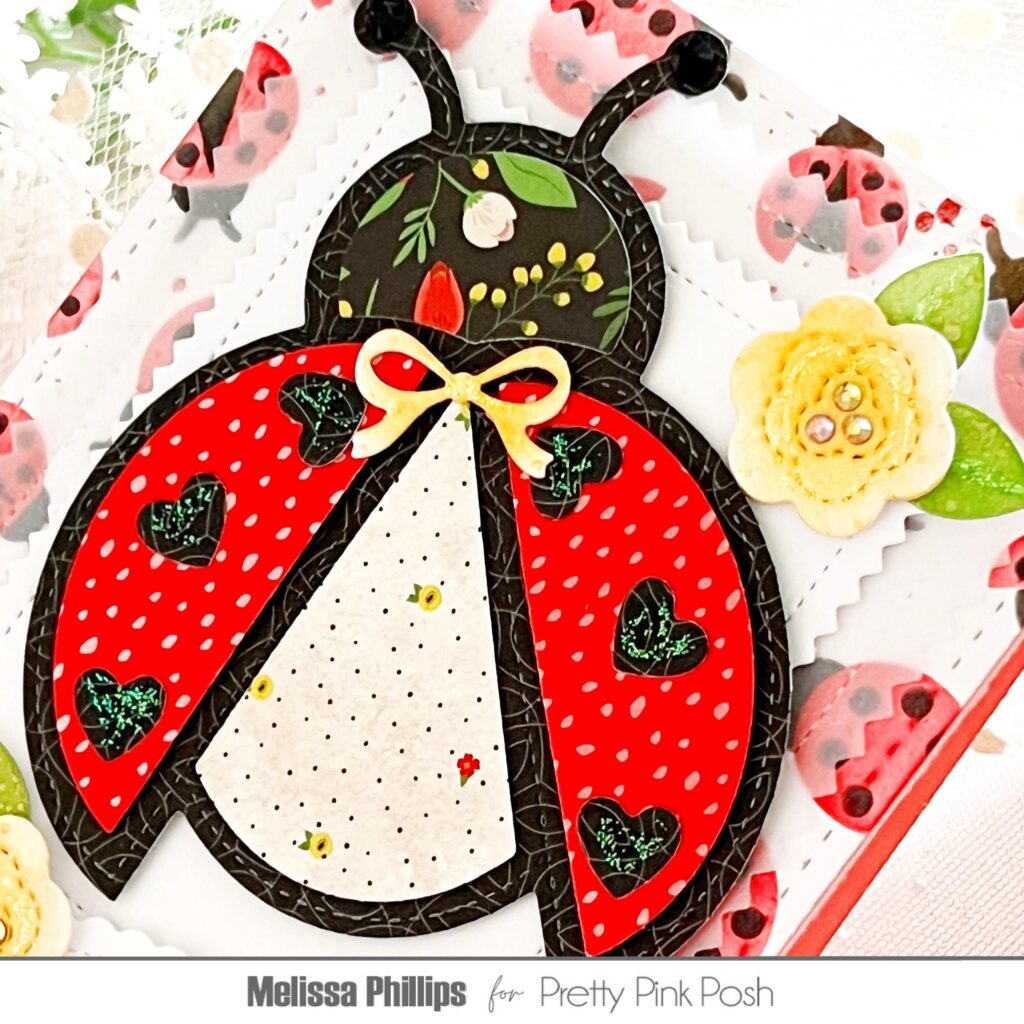
Card One: Ladybug Love
For my first card, I started by ink blending a dreamy background in reds and pinks using the brand-new Love Words Stencil—hello ombré goodness! Next up, I stamped, colored, and die cut the cutest ladybugs ever from the Lovely Ladybugs Stamp Set with coordinating dies. This may be a small set, but wow does it pack a punch!
I created frames using the new Pinking Rectangles Dies, adhered them to my card panel, and then nestled my sweet little ladybugs inside along with a sentiment. To finish it off, I added a bow from the Present Shaker Die and a few hearts from the Build a Heart Die Set. Ta-da! Card one is complete. I just love the whimsy of those love words floating in the background—so fun and happy!
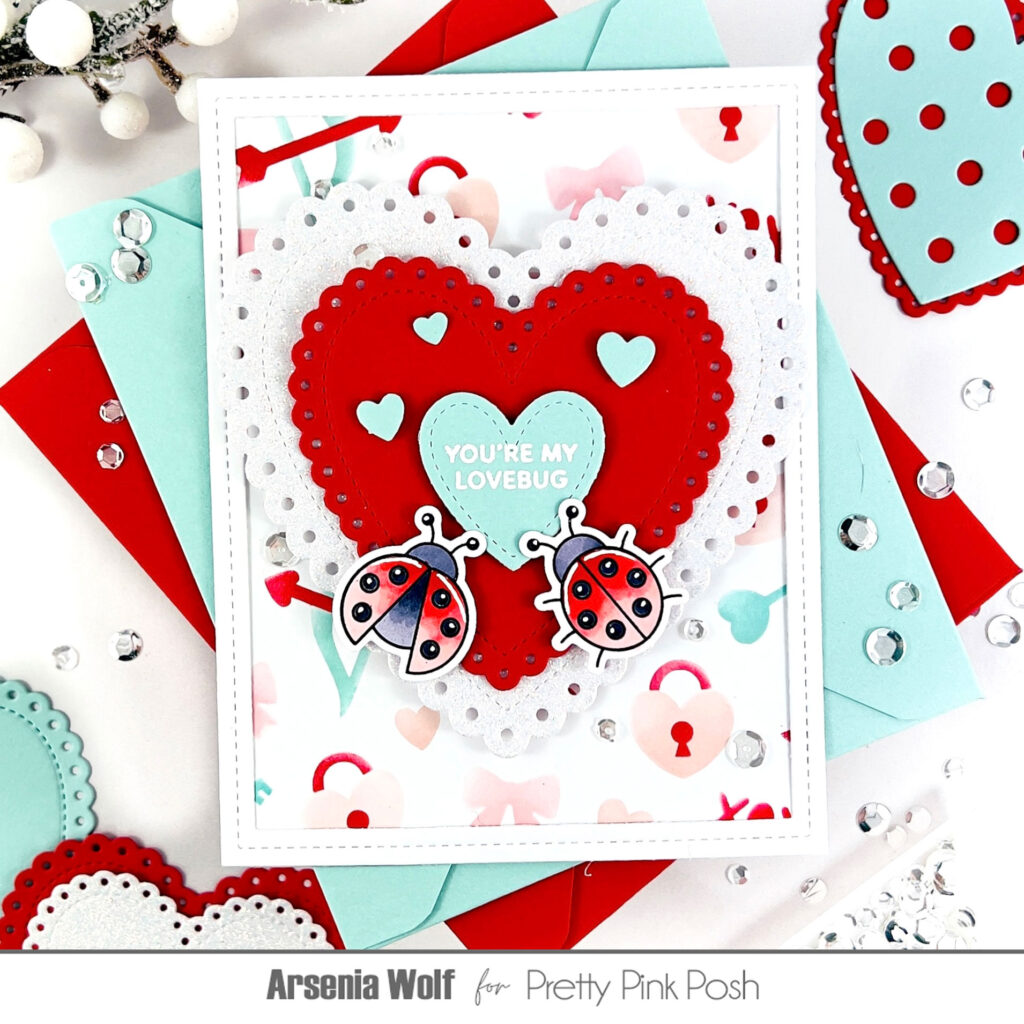
Card Two: Cupid Cuties
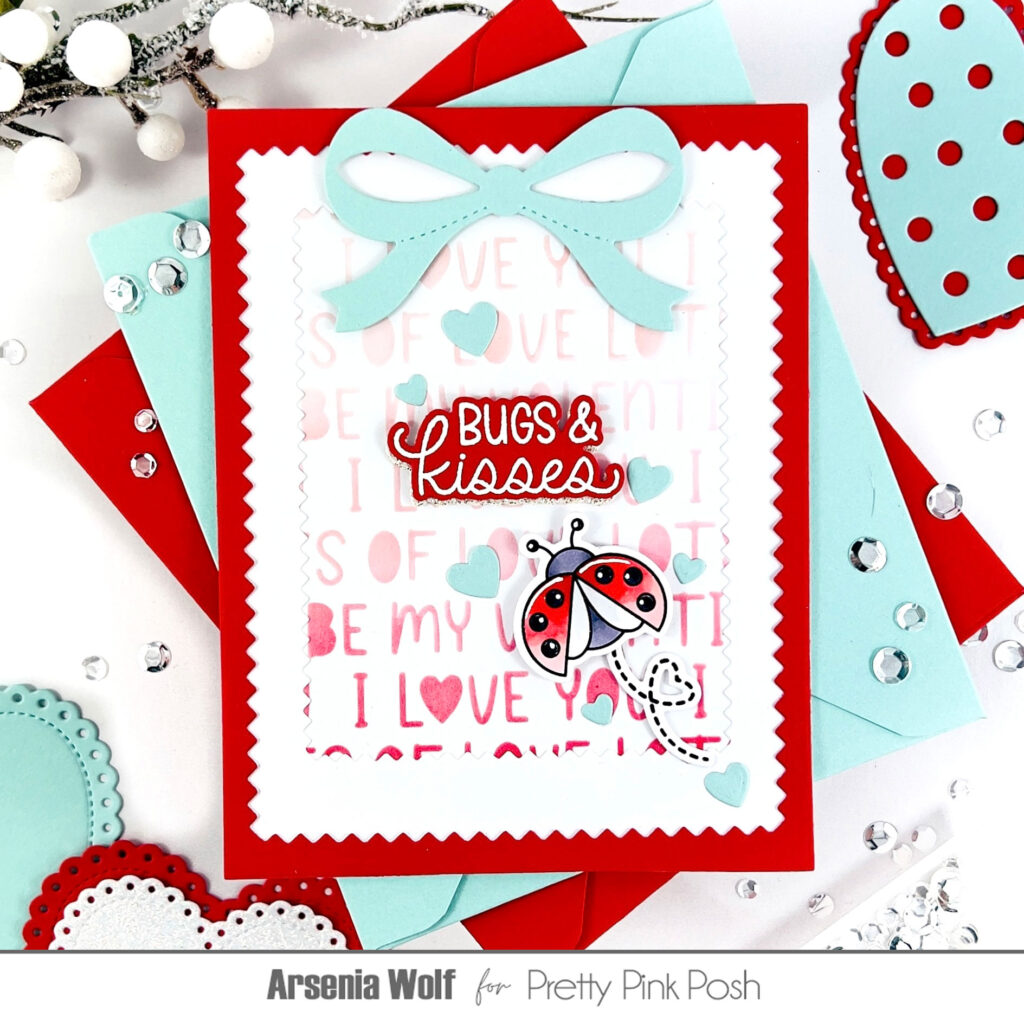
For card number two, I inked up a background with the new Layered Cupid Items Stencil—friends, this one is an instant favorite! I brought back more adorable images from the Lovely Ladybugs set and gave them a cozy resting spot using an oldie-but-goodie: the Eyelet Hearts Dies.
For my third card (yes, still loving it!), I used the Layered Cupid Items Stencil again—told you it was a favorite! I stamped, colored, and die cut an image from the new Valentine Word Scenes set and stacked it up with red and glitter cardstock for some extra sparkle.
Since the background was nice and busy, I gave my image a place to shine using the Stitched Hearts Die Set and Eyelet Heart Dies. I added a sub-sentiment from the new Valentine Banner Greetings Stamp Set with the Banner Greetings 2 Die Set, then finished everything off with a frame from the Fancy Cake Die Set. Card three is complete, and I’m obsessed with the dimension—these word scene sets are definitely a favorite!
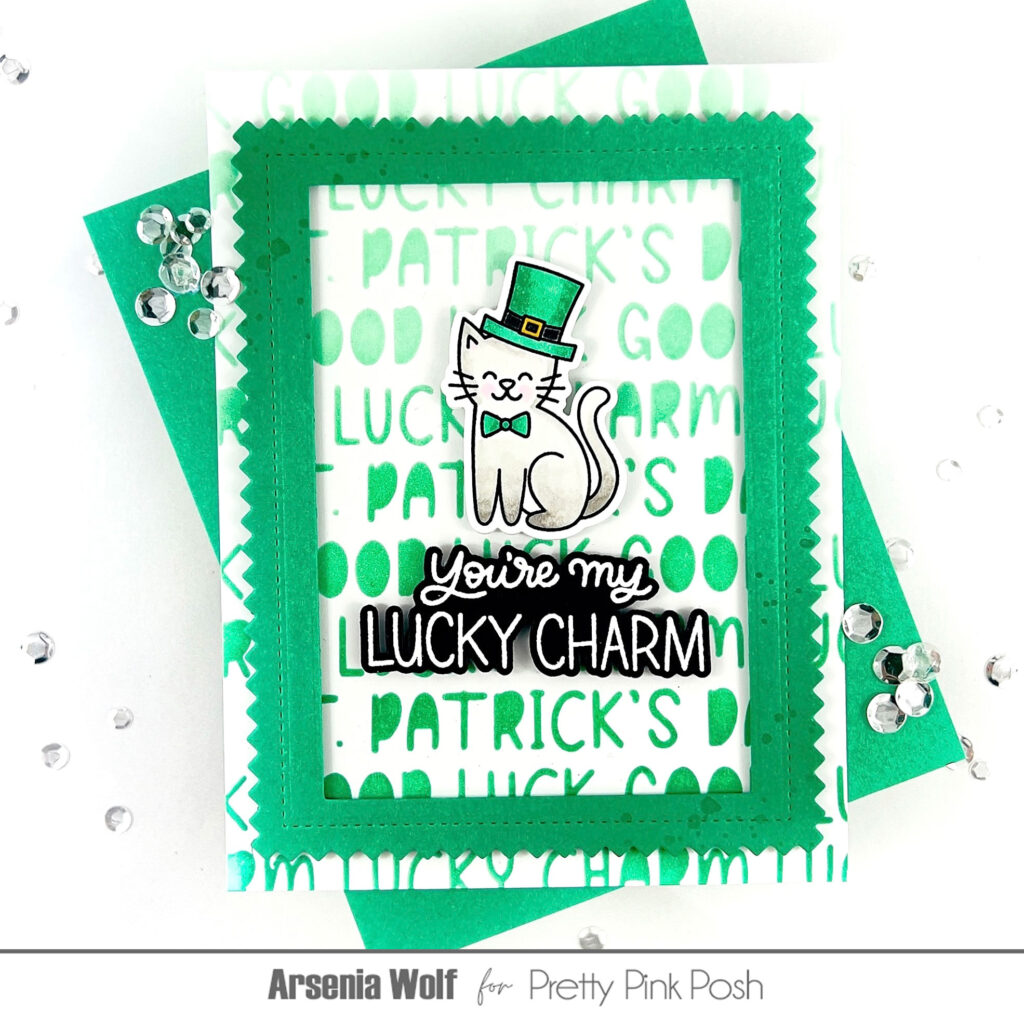
Bonus Card: Lucky Little Kitty
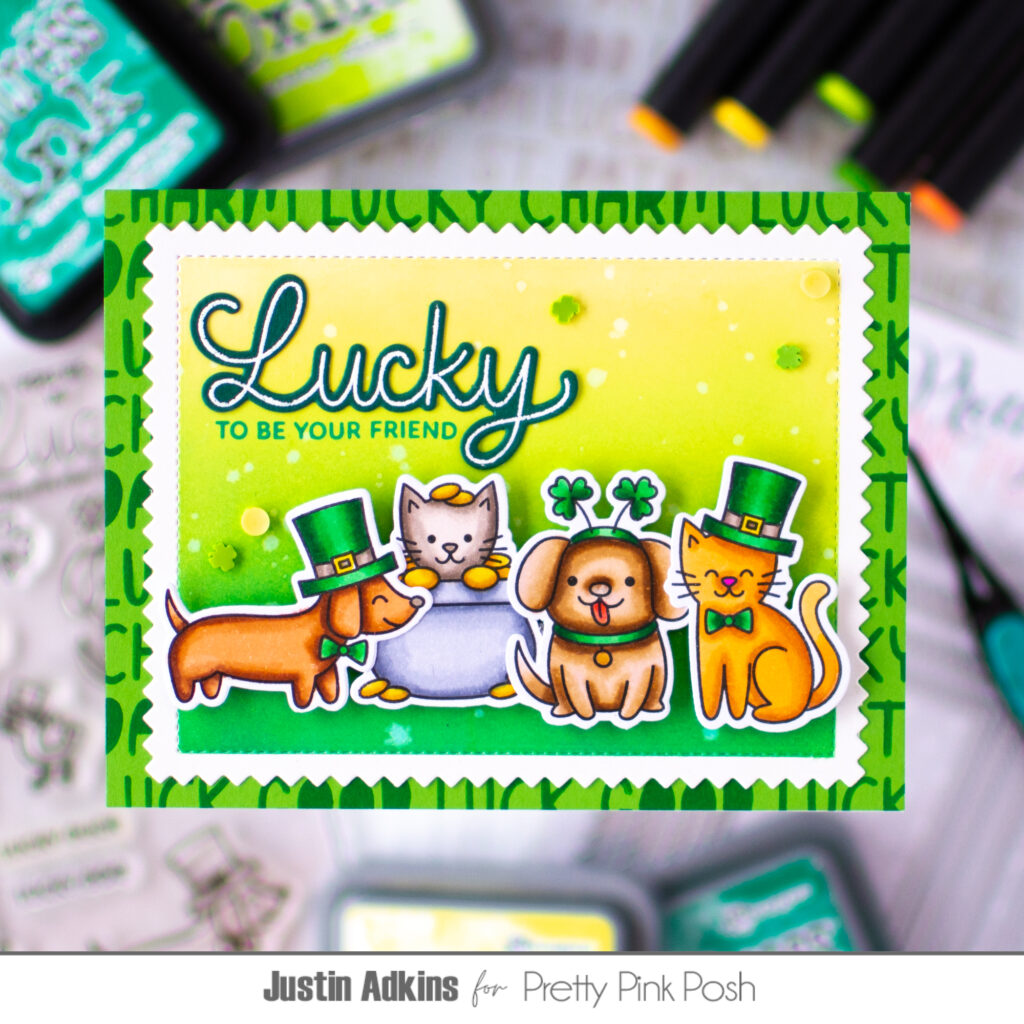
And now for the bonus card! I couldn’t resist the new Lucky Animals Stamp Set with coordinating dies—this kitty is guaranteed to send all the lucky vibes. That shamrock hat? Too cute!
I inked up the background using the new Lucky Words Stencil, created a frame with the Pinking Rectangles Dies, and added my sentiment using the new Lucky to Know You Stamp Set with coordinating dies. A perfect little card to share some luck and smiles!
Be sure to scroll along and check out all the amazing creations from the rest of the design team—you’re in for a treat!
Thank you so much for joining us for the sneak peeks! We’ll be back tomorrow with the full picture reveal, so you can start to put together your wish lists!
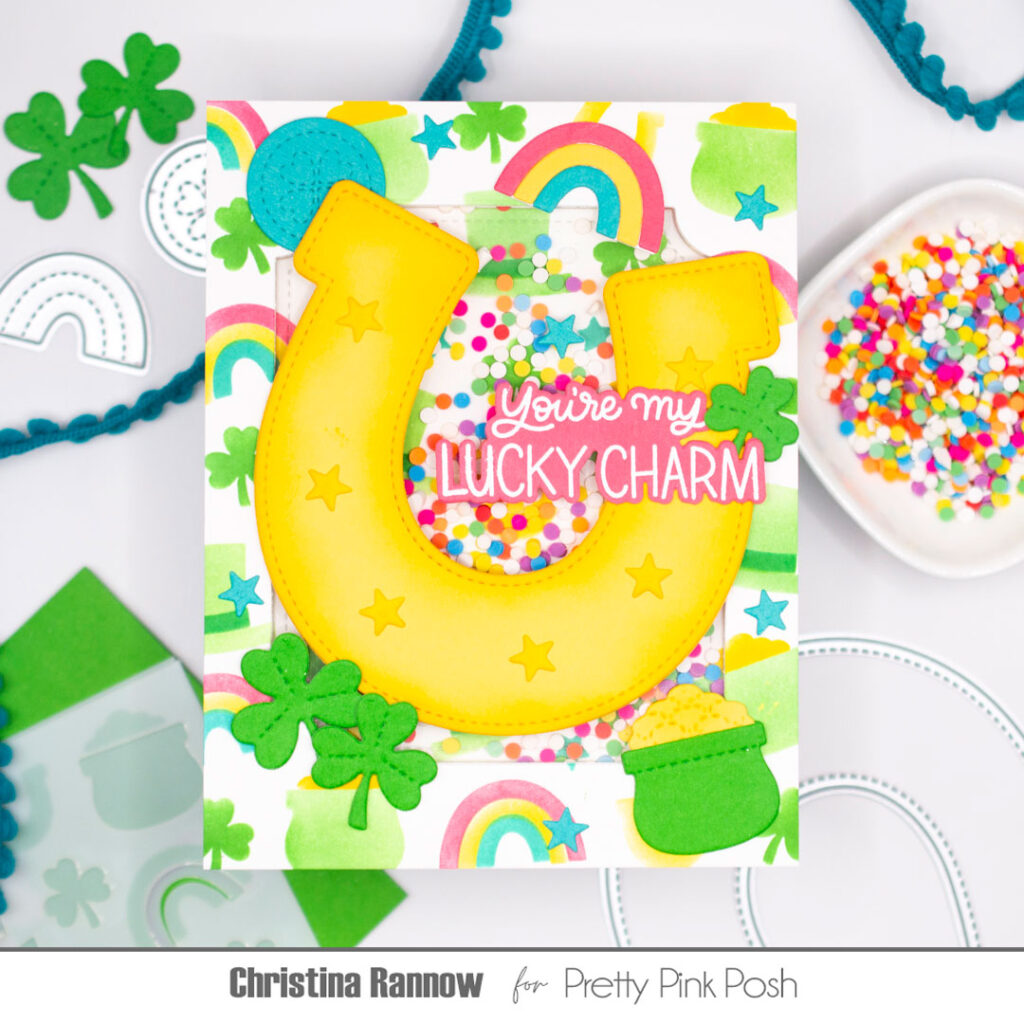
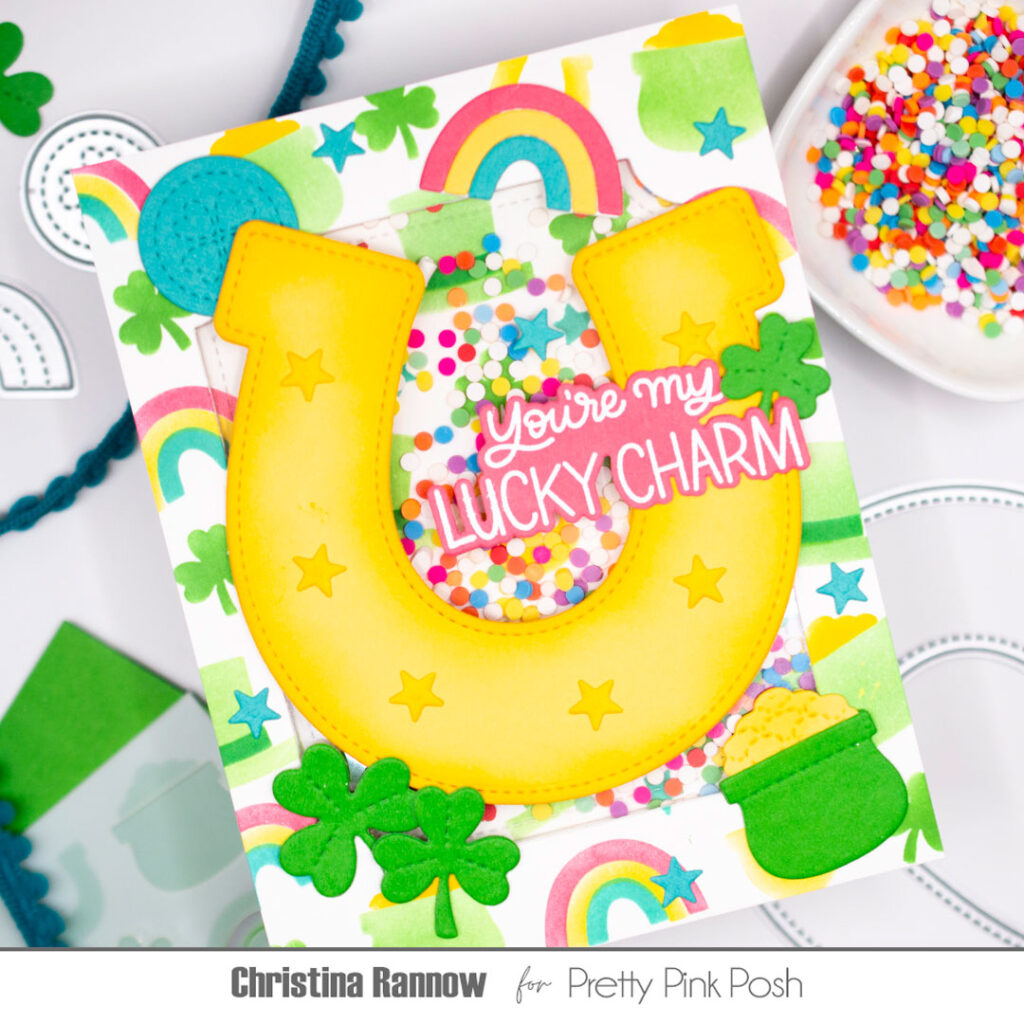
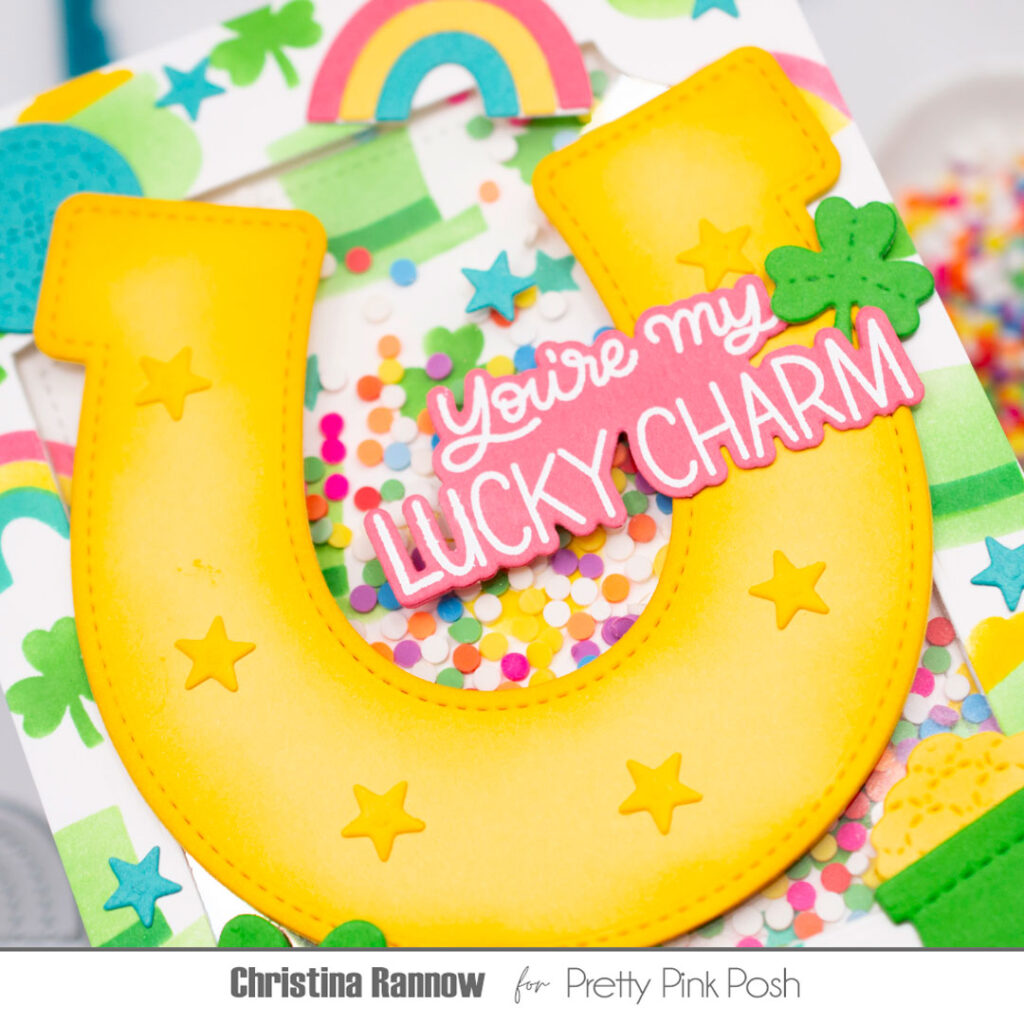
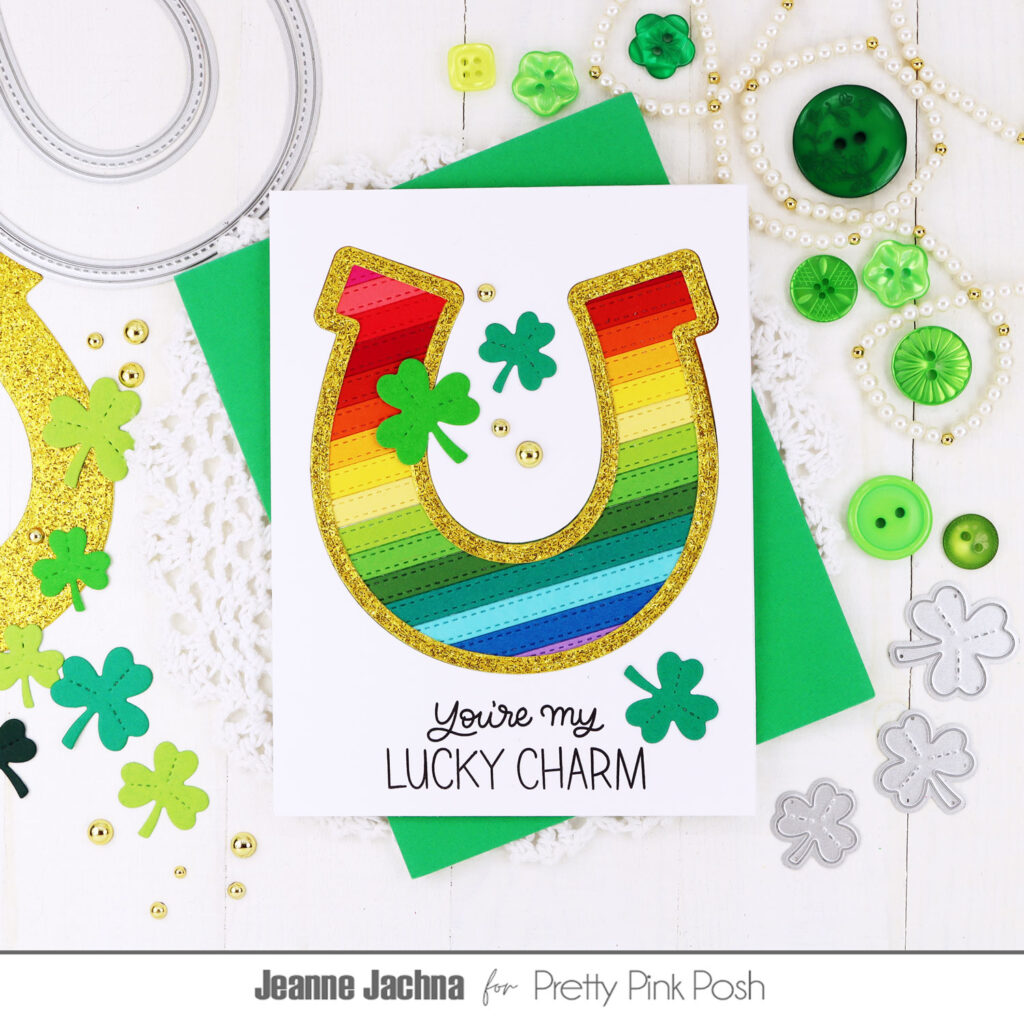
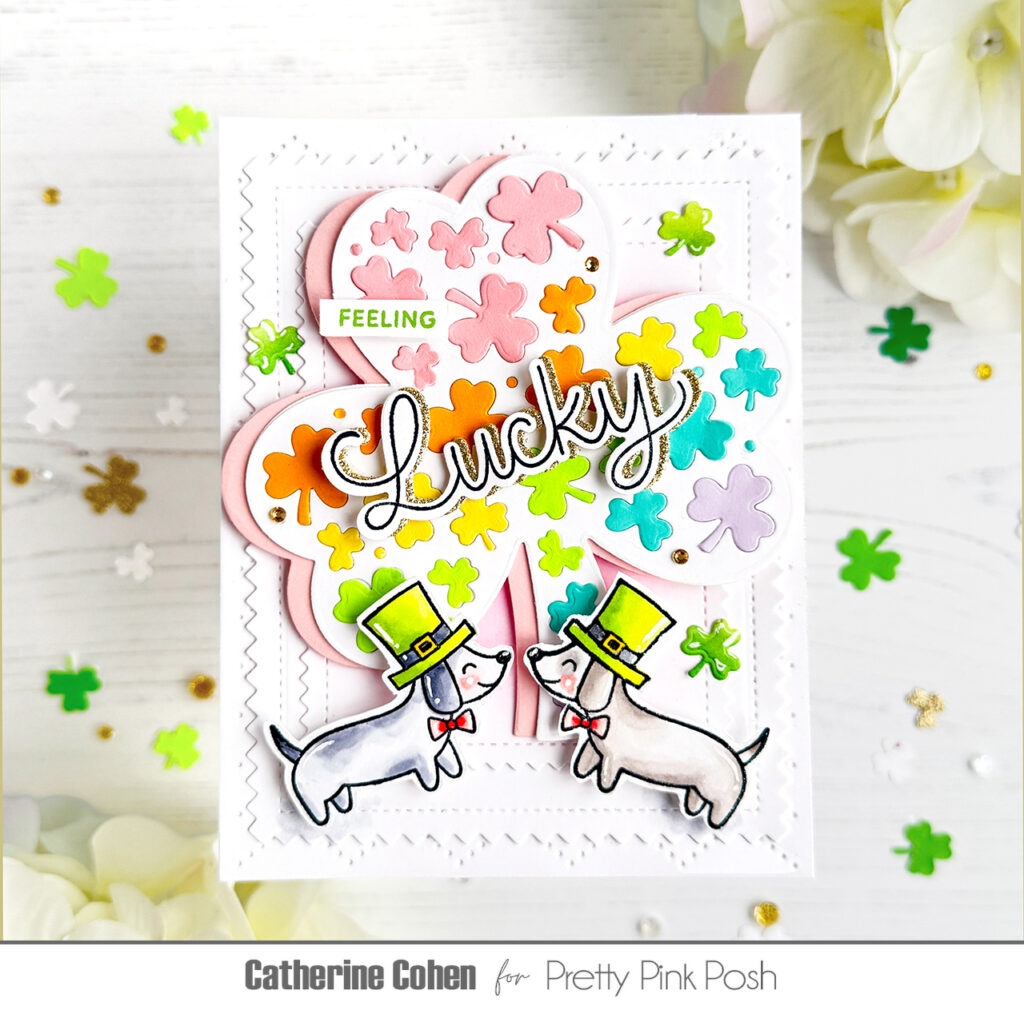
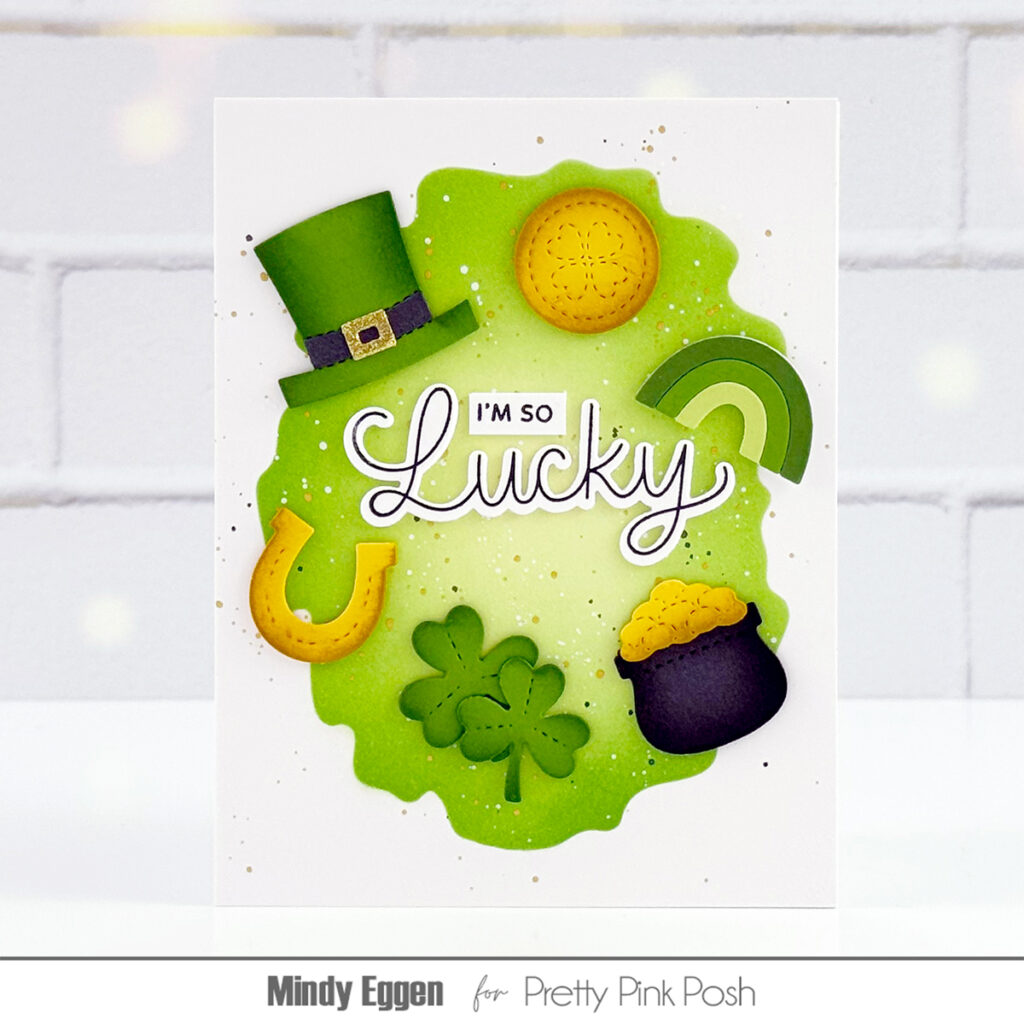
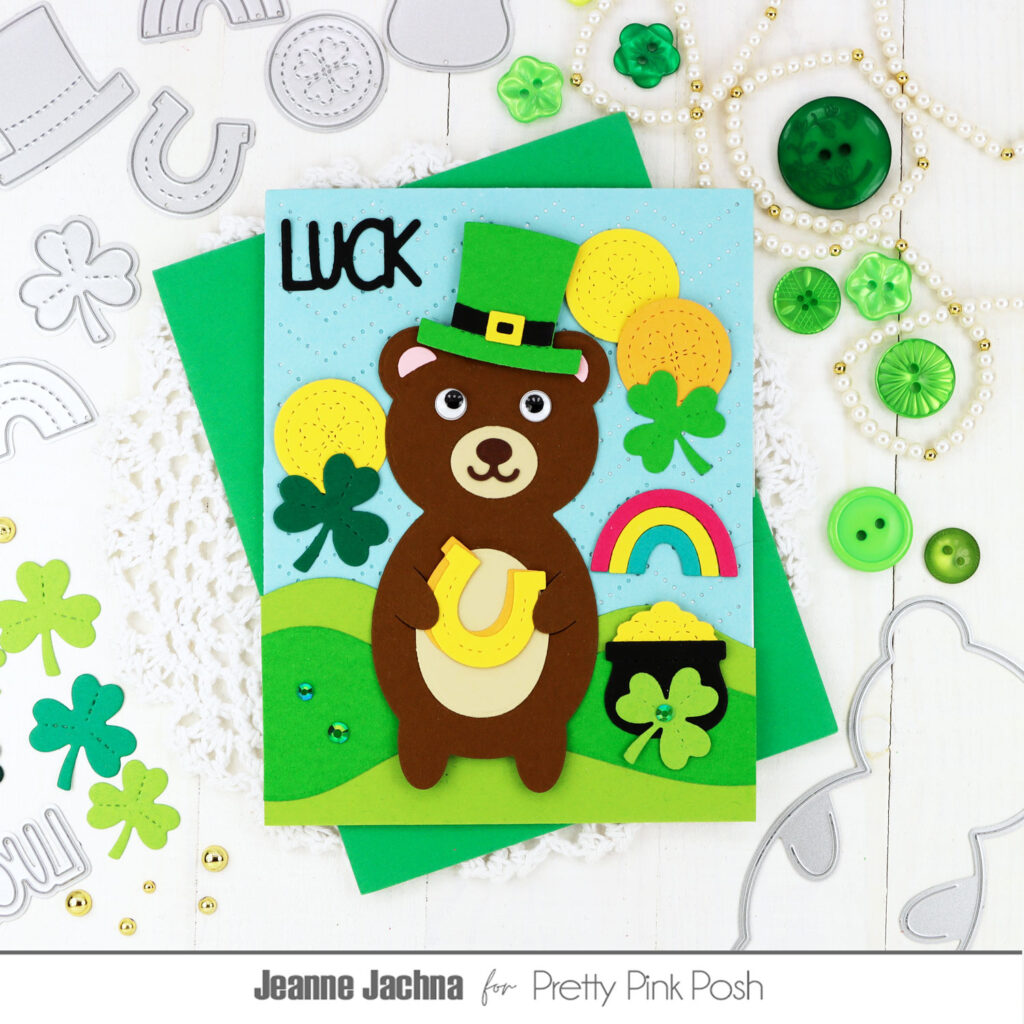
Welcome to the Day 3 sneak peeks of our January 5th release. Today we’ll be taking a look at the Decorative Shamrock, Horseshoe Shaker, Lucky Holder Additions and Shamrock Border die sets.
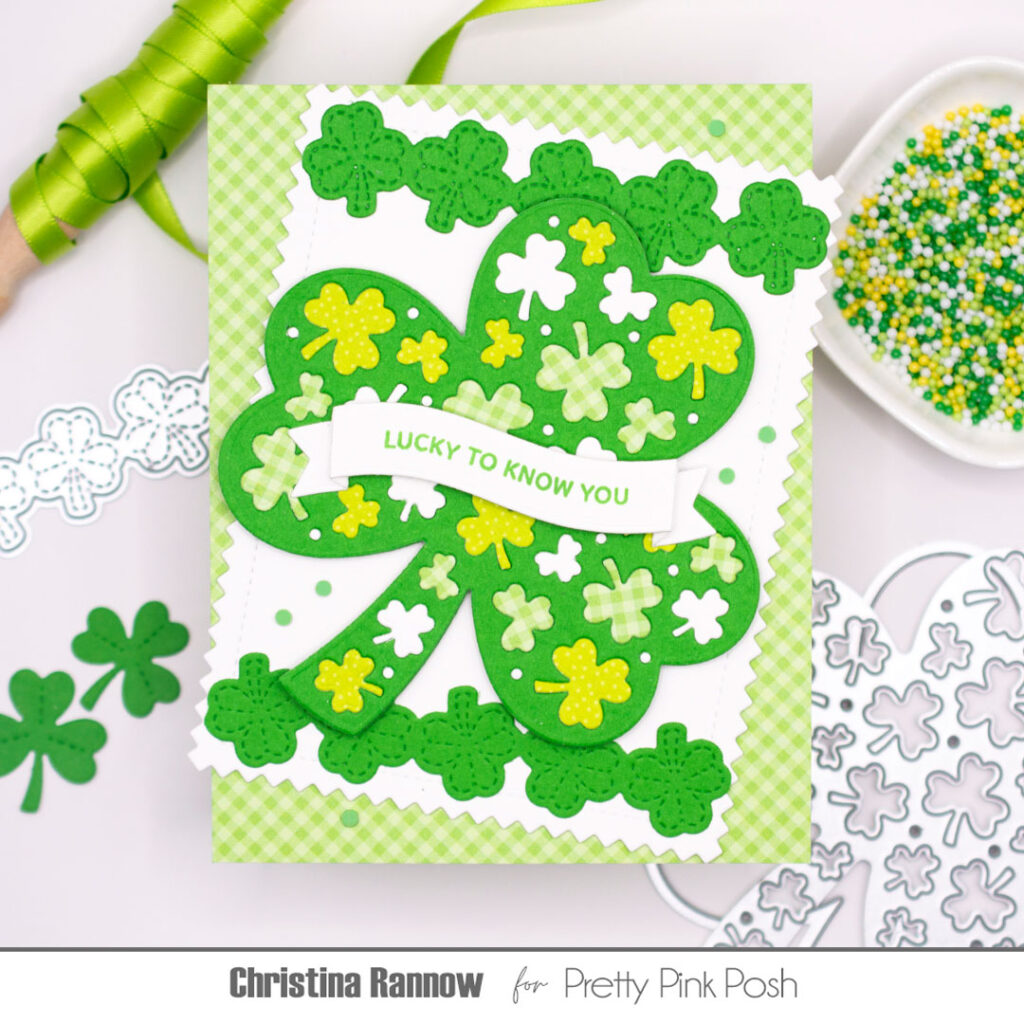
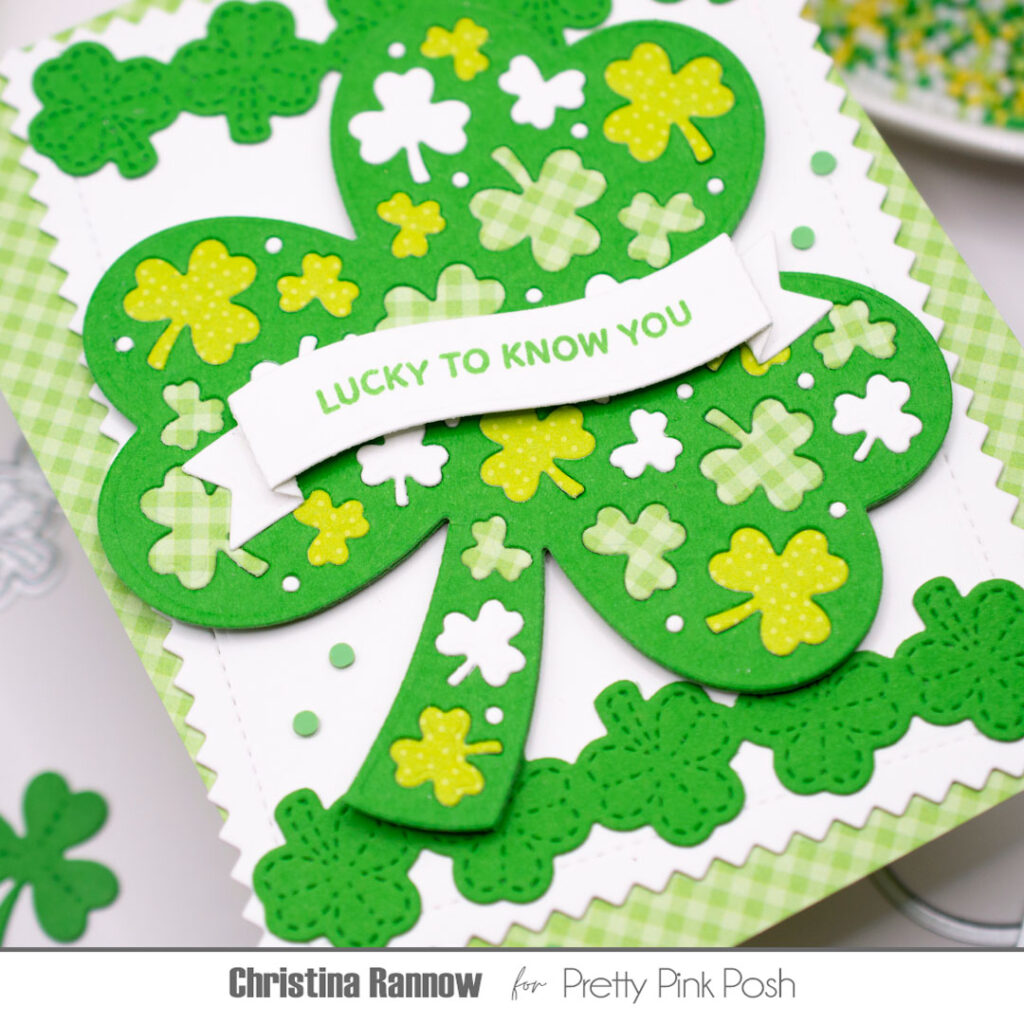
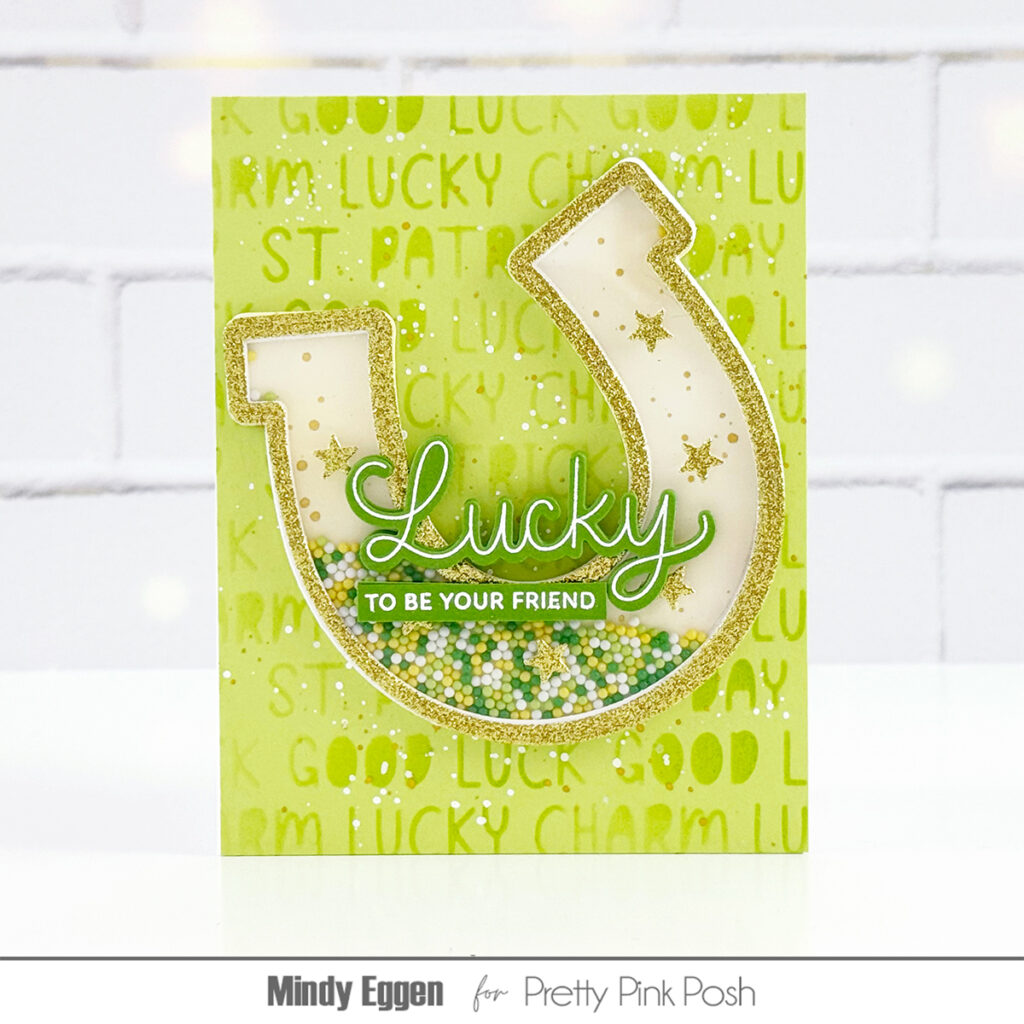
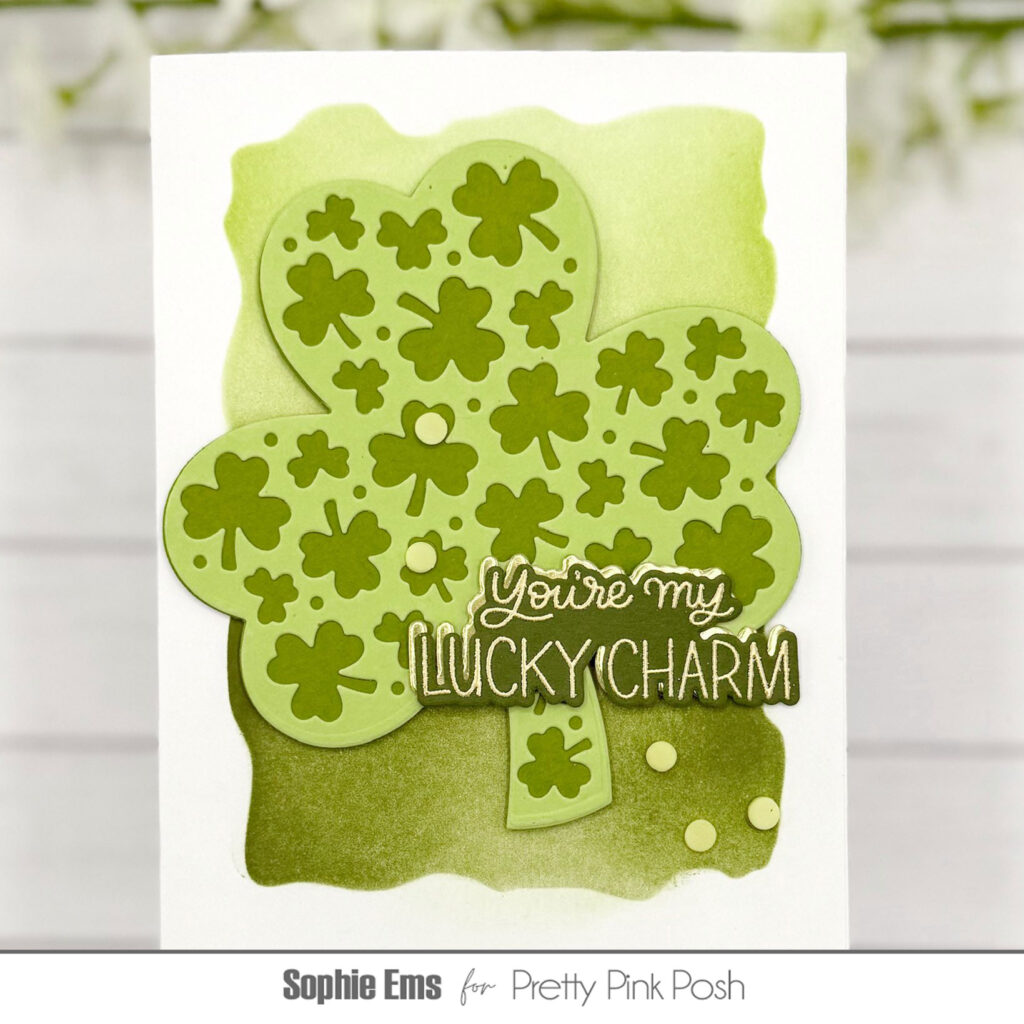
Hi friends! Christina here, and I’m excited to share with you a couple of St. Patrick’s Day-themed sneak peeks! My first card features the new Decorative Shamrock die, which has so many creative possibilities, including inlaying each little shamrock with fun patterned papers like I did here. My second card is a bright multicolored shaker featuring the new Horseshoe Shaker and Layered Lucky Items Stencil. We have tons of lucky inspiration to share with you today, so let’s get started!
For the Decorative Shamrock card, my first step was to create the focal point by die-cutting the shamrock multiple times so I could inlay each little shamrock. I chose a cilantro green cardstock for the main body and inlaid the shamrocks with white cardstock and two green patterned papers. I love the monochromatic color palette I chose for the shamrock, but wouldn’t it be so pretty in rainbow colors? That might be my next project!
Next, for my background panel, I die-cut one of the new Pinking Rectangles from white cardstock and layered it, slightly askew, onto a green patterned paper panel. I added a fun Shamrock Border die-cut from more cilantro green cardstock to the top and bottom of the pinking rectangle and then attached the decorative shamrock in the center with thin foam squares.
Now it was time for the finishing touches. First I stamped a sentiment with green ink on one of the new dimensional banners from the Banner Greetings 2 die set. I combined two sentiment strips to create my sentiment, one from the new Lucky To Know Stamp set and one from the new Lucky Animals stamp set. Then I attached this across the decorative shamrock and finished by adding just a few small green clay confetti pieces from the Bright RainbowClay Confetti Mix.
For the Horseshoe Shaker card, I started by creating the shaker element. First I stenciled the Layered Lucky Items on a white cardstock panel with a rainbow of ink colors. Then I die-cut a Notched Rectangle from the center of the panel to create the window and frame for the shaker. And I attached the stenciled notched rectangle to the center of a white cardstock panel to be the background of the shaker window.
Next I attached a piece of acetate behind the window opening with double-sided tape and added foam tape to the back of the stenciled frame around the window, creating a well for the Bright Rainbow Confetti. Then I placed the background panel onto the foam tape, and the shaker element was done!
With the shaker element done, I moved on to die-cutting the remaining elements from colored cardstock. I used the big Horseshoe Shaker diecut as my focal point and ink blended the edges for a little dimension. I surrounded it with fun die-cut charms from the new Lucky Holder Addition Die set and finished things up with a heat-embossed sentiment from the new Lucky To Know You Stamp Set.
Below you’ll find even more lucky inspiration from the design team!
Be sure to swing by tomorrow for even more inspiration with this fun, new collection.
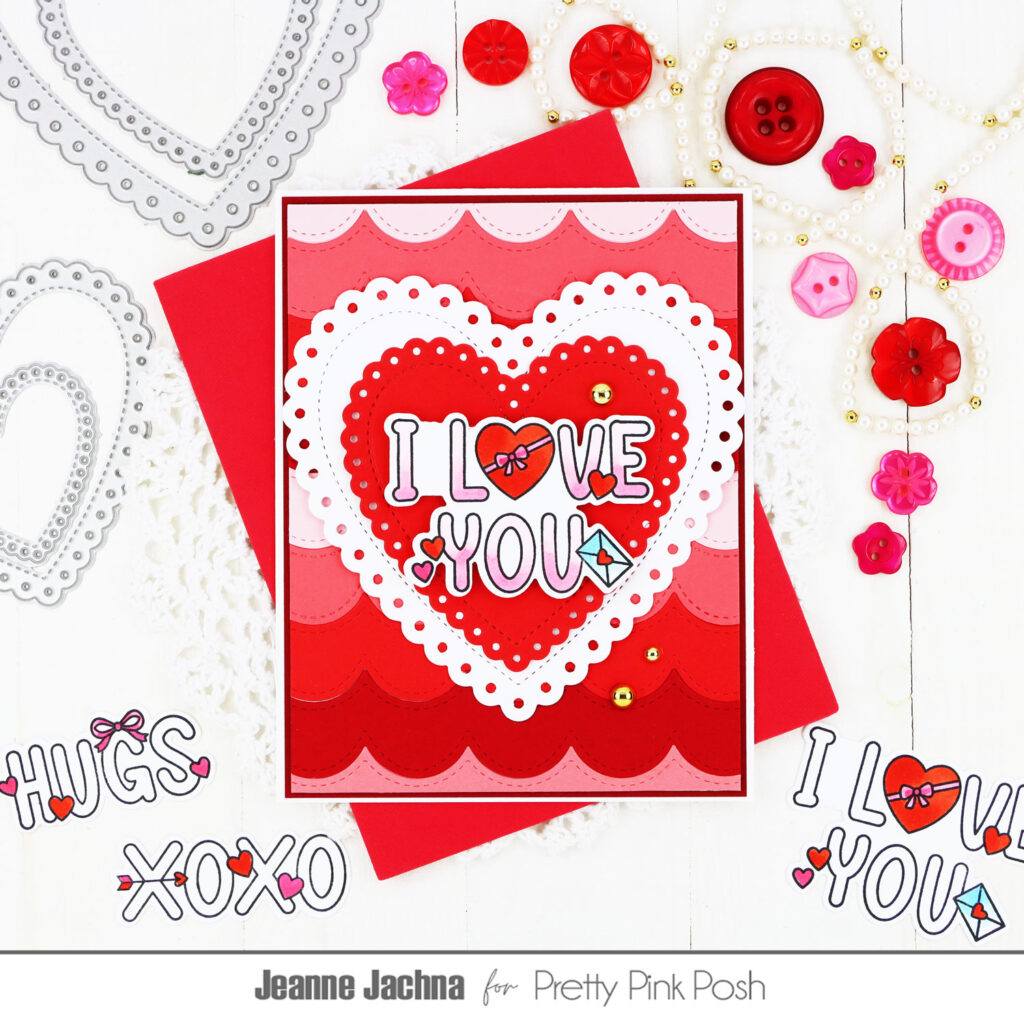
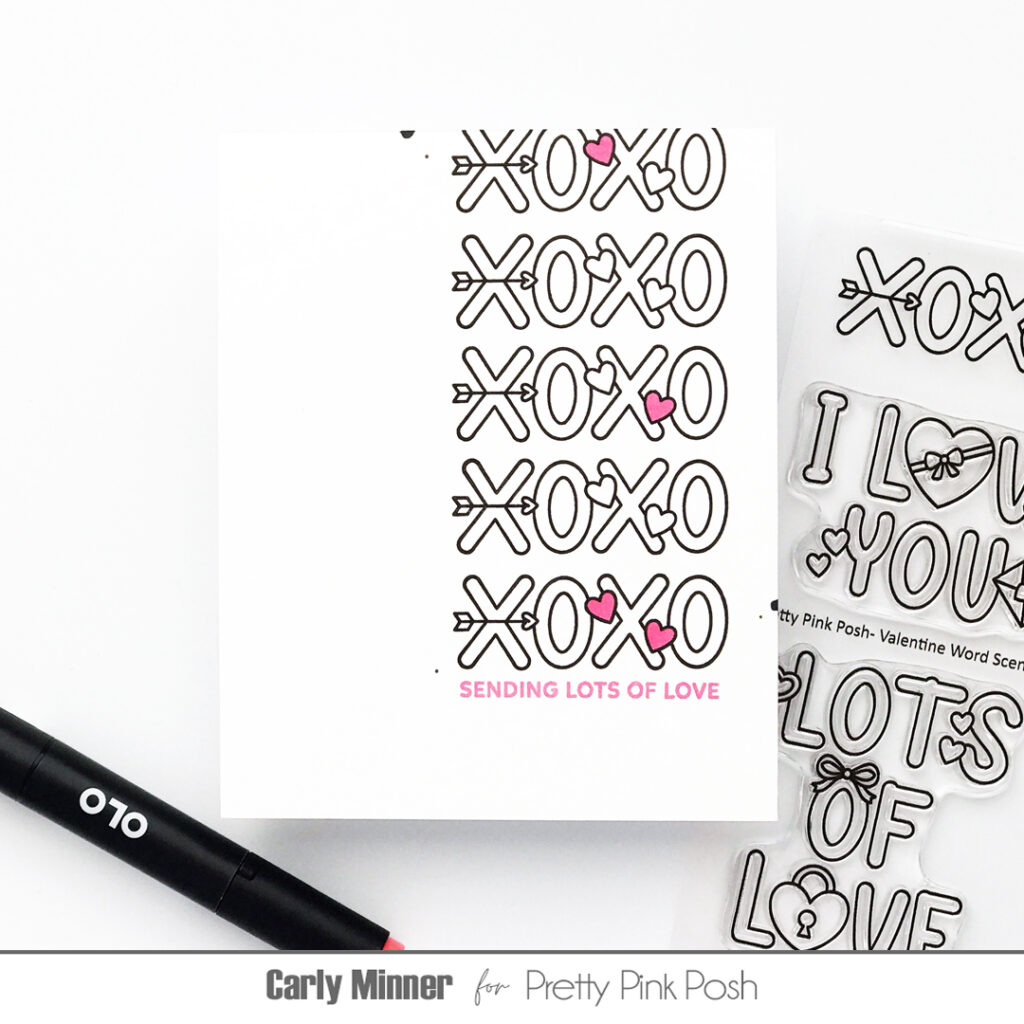
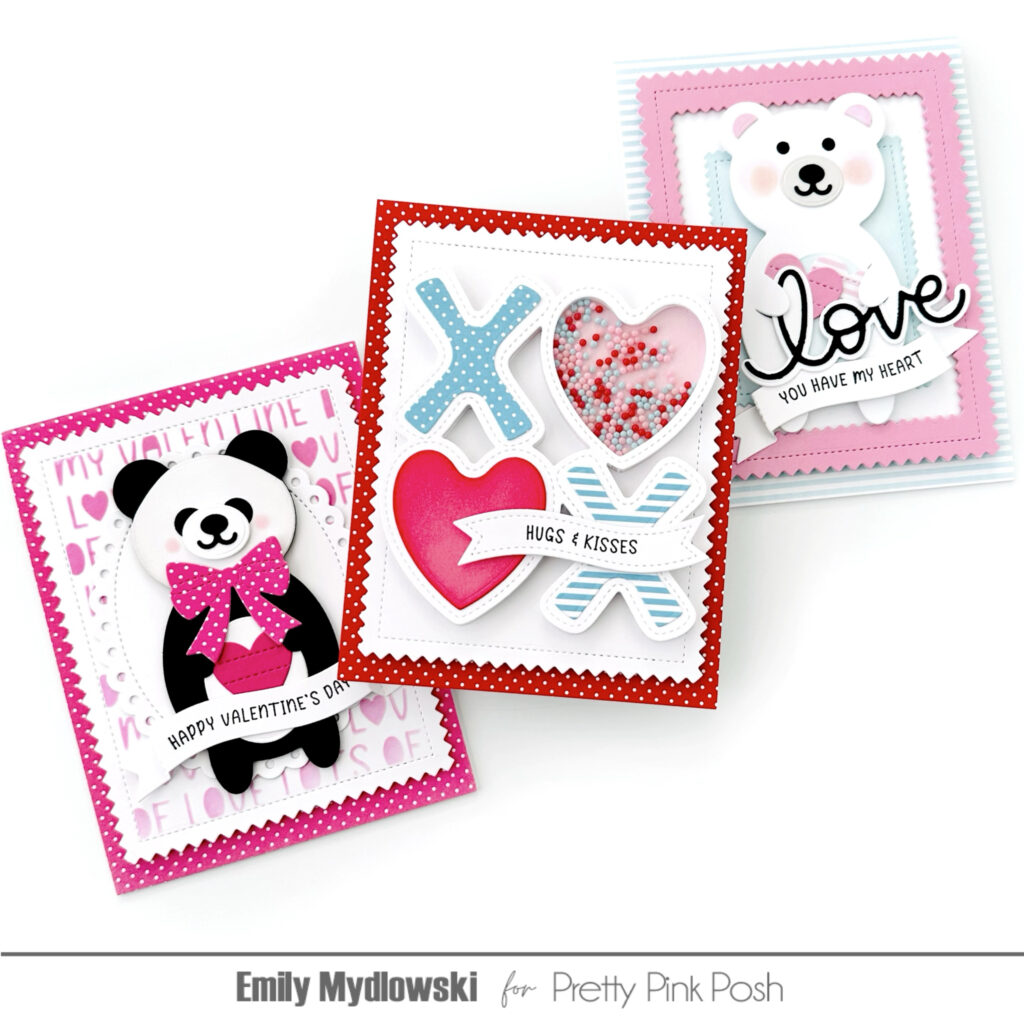
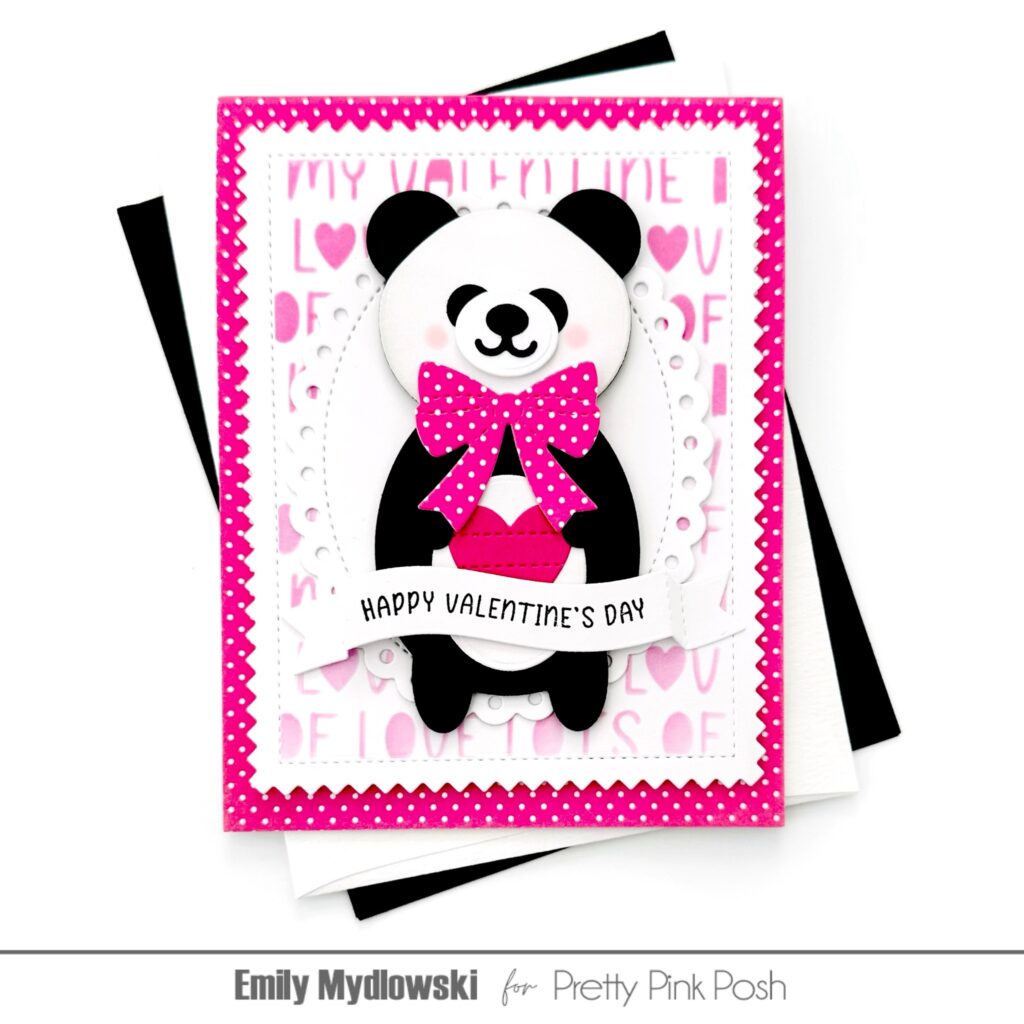
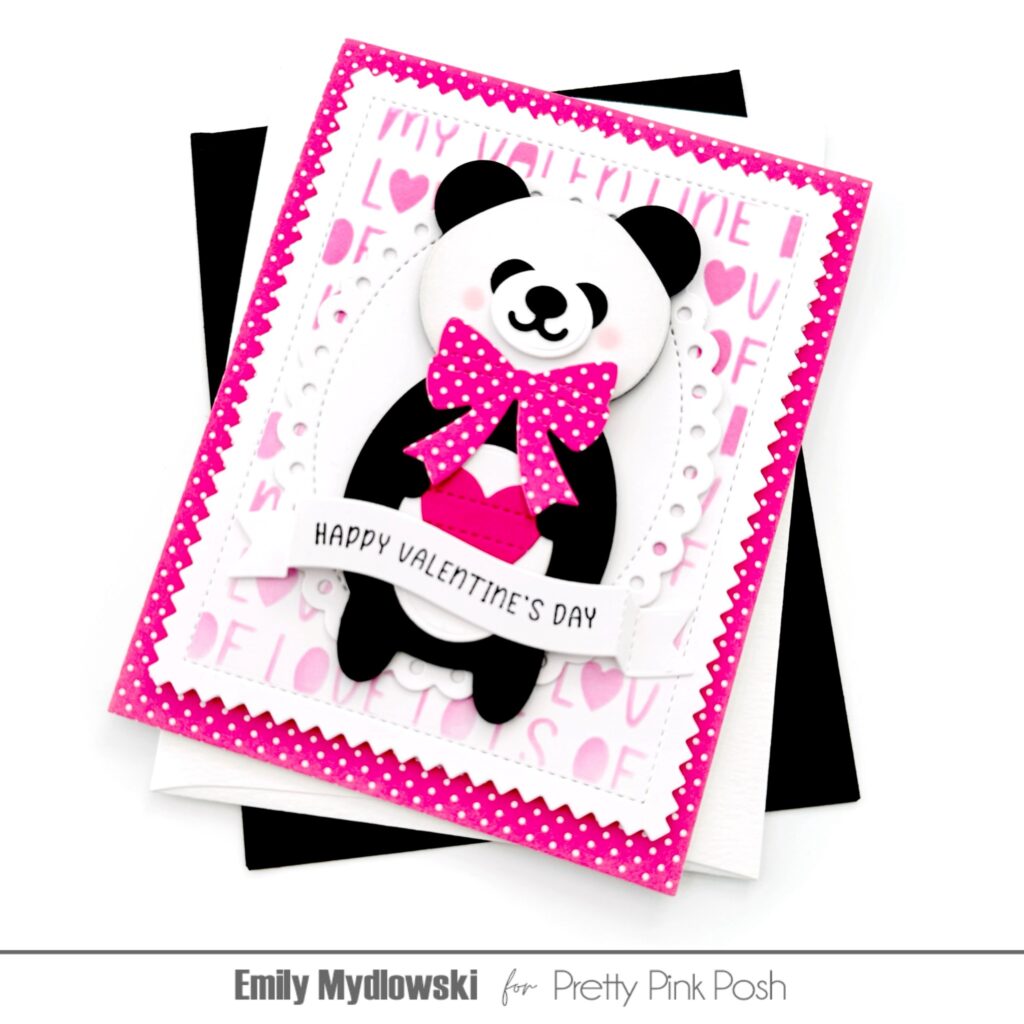
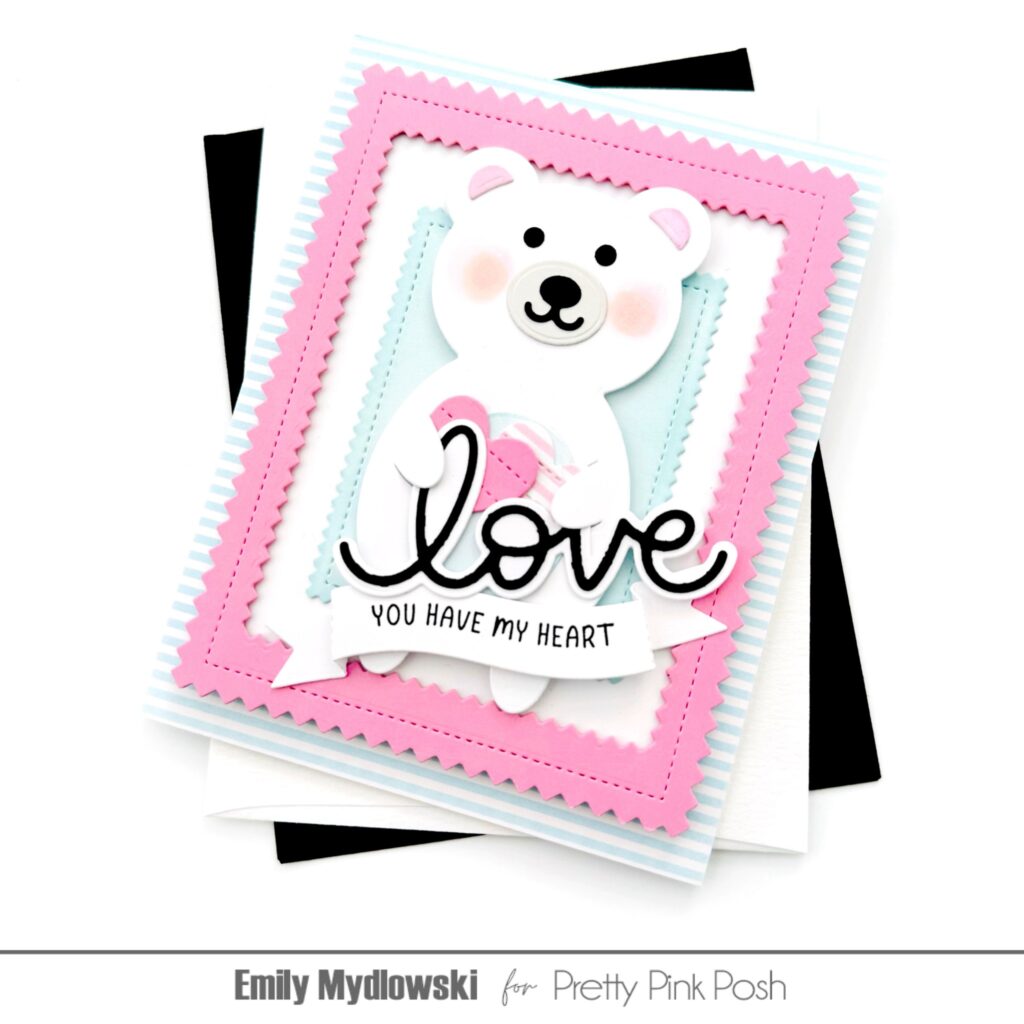
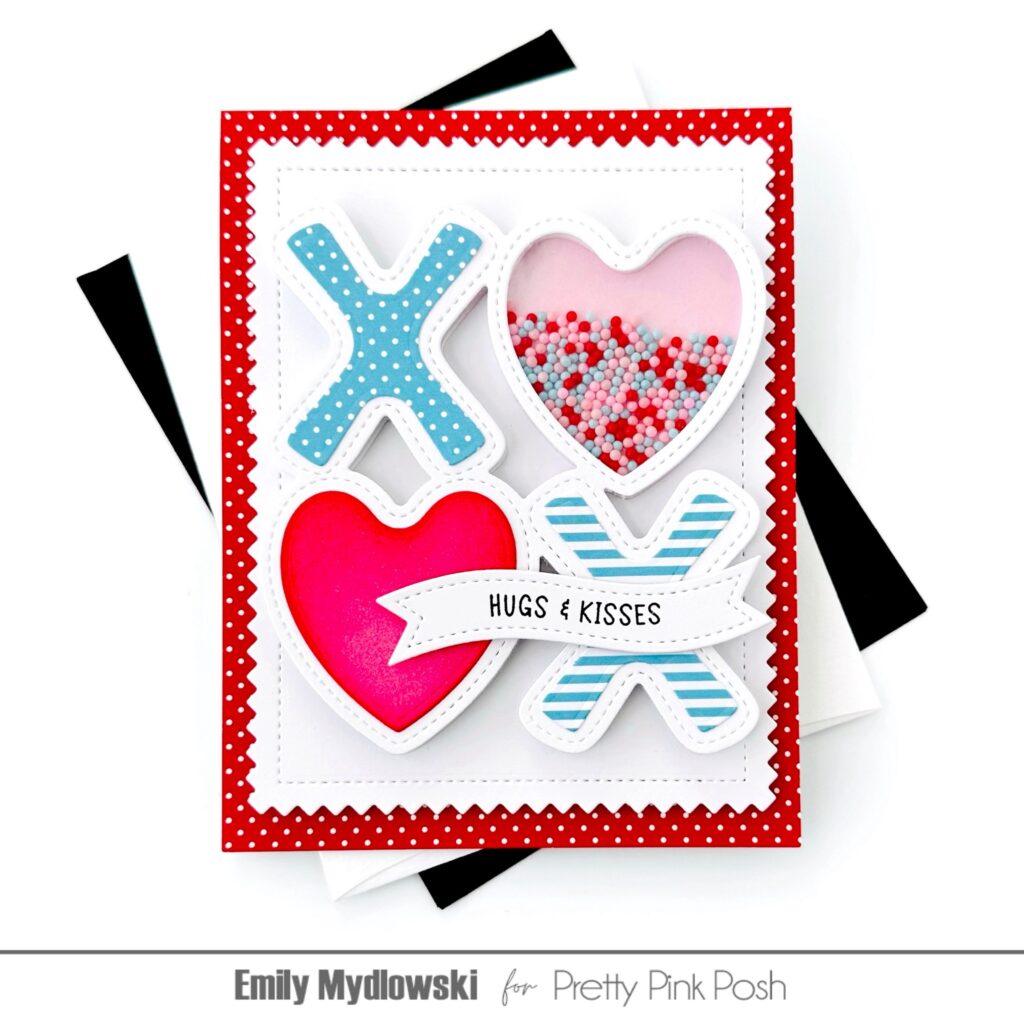
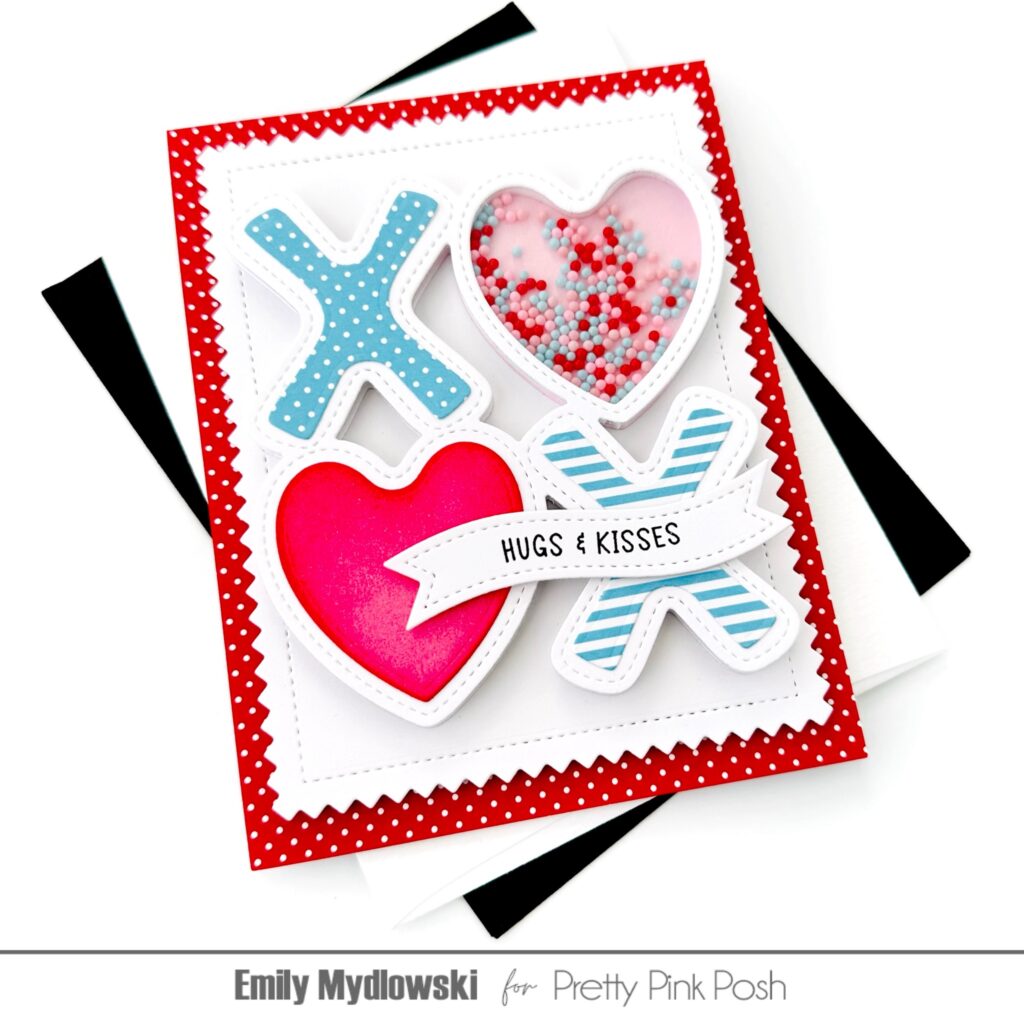
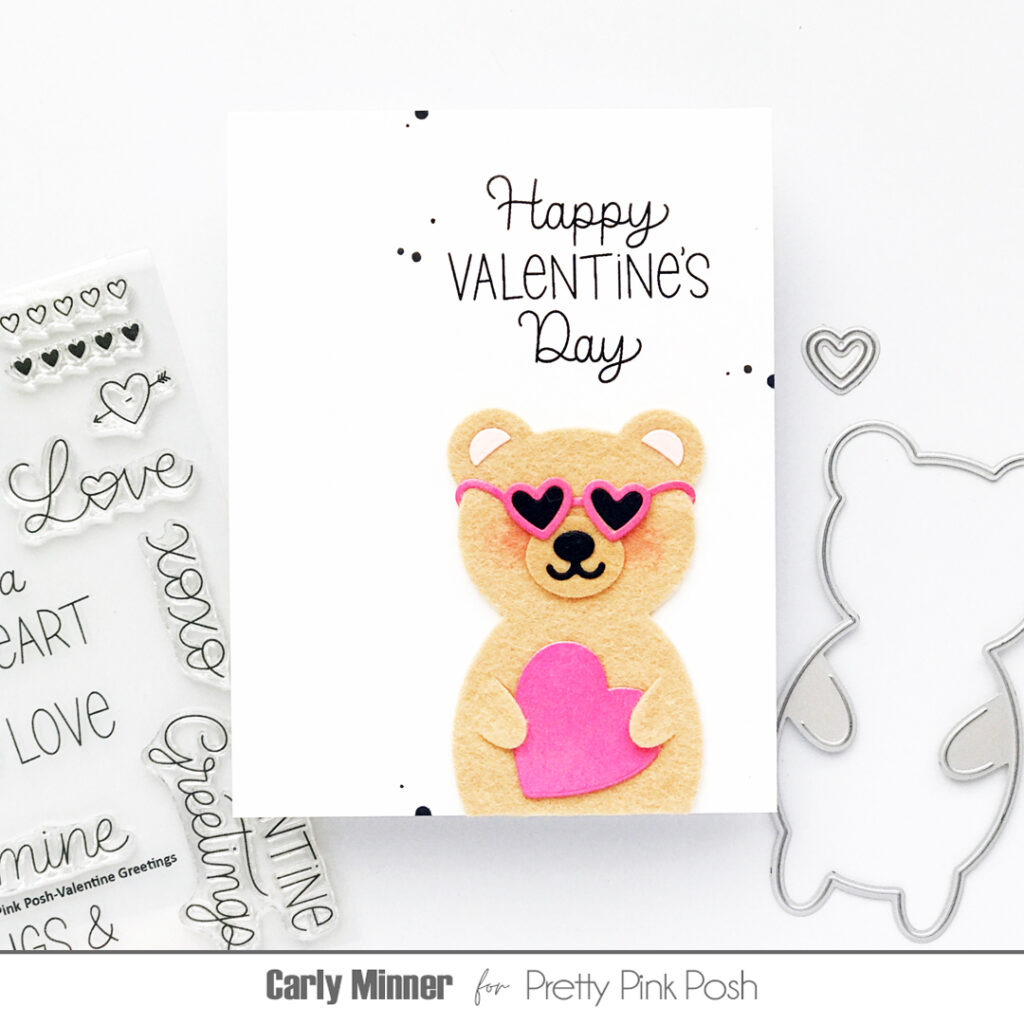
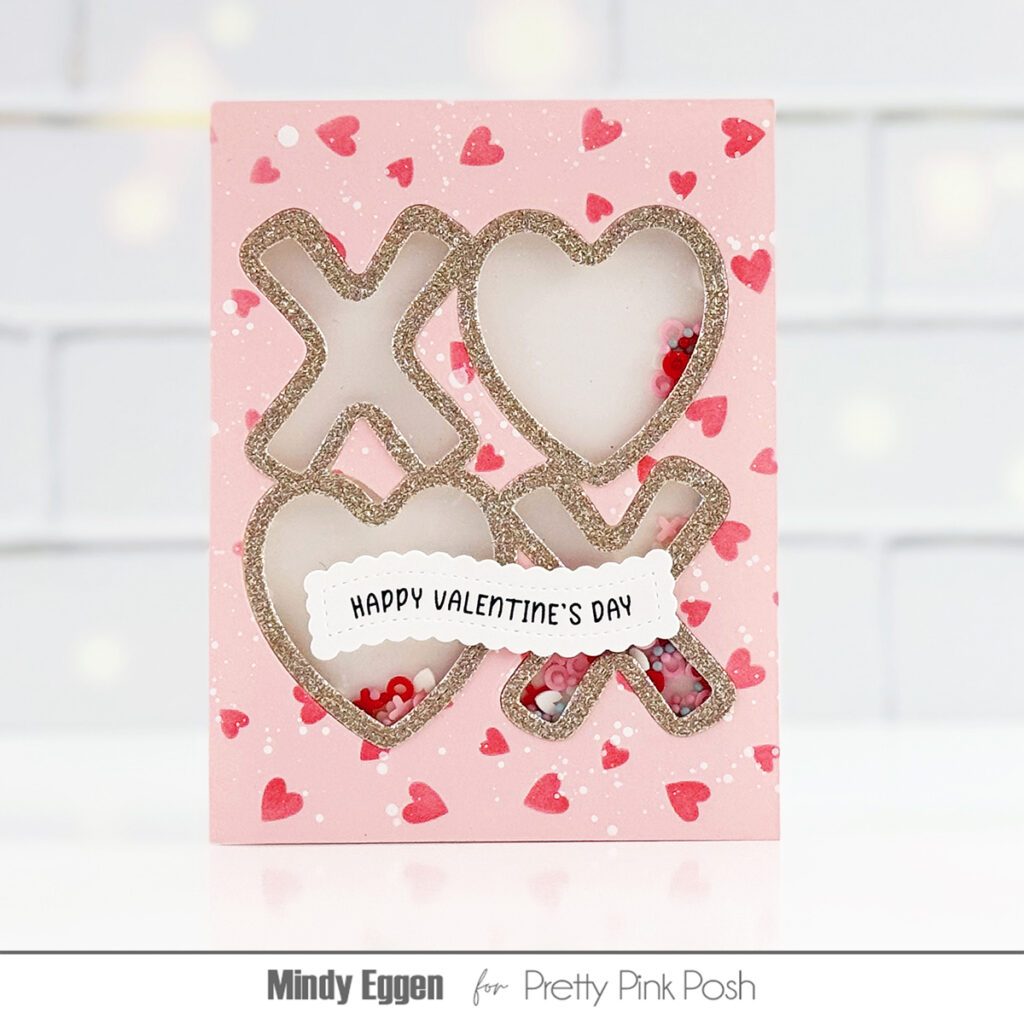
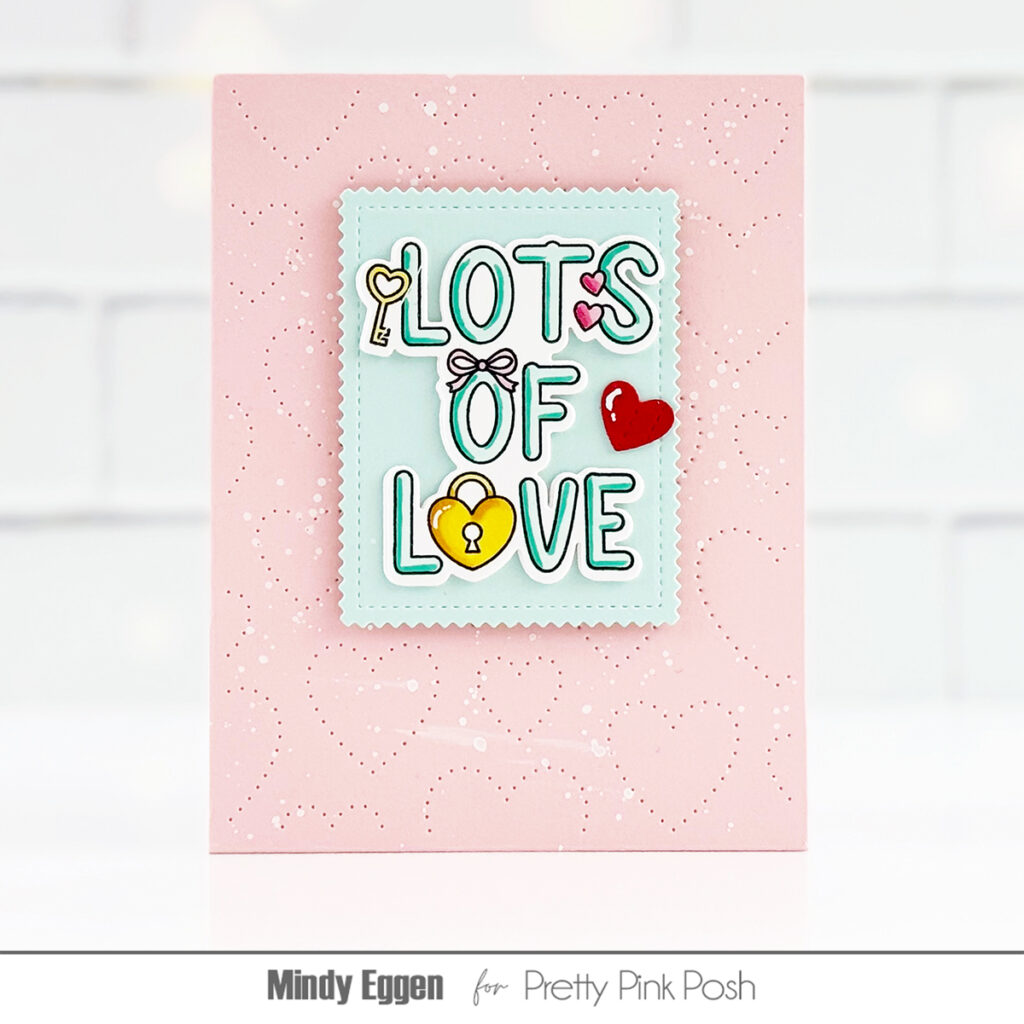
Hi Crafty Friends! Emily Mydlowski here, sharing sneak peeks of adorable and fun Valentine’s Day cards using the Bear Holder Die, Pinking Rectangles Die, and the XOXO Word Shaker.
I’m absolutely smitten with the Bear Holder Die. You can really stretch this die to create a variety of bears. For my projects, I made both a Polar Bear and a Panda Bear, using a color change and some fussy cutting.
To make the Panda, I cut the bear out of Black and White cardstock. The black cardstock forms the base of the bear, while the white fur face is fussy cut from the white bear die cut. To add dimension, I inked blended light gray ink around the edges of the face. The black eyes are actually the inside ear pieces that I placed behind the panda’s mouth and nose. For extra Valentine’s Day charm, I added a pink and white polka dot bow tie and pink cheeks (I used a cotton swab with pink ink to add the cheeks). Then, I added a white tummy and tucked in a bright pink heart into their paws.
To assemble the card, I attached the panda to a white Eyelet Oval die cut, which I adhered to a Pinking Rectangle Panel with pink Love Words stenciling. To finish the card, I added a Valentine Banner Greetings and Banner die cut and adhered the decorated panel to a pink and white polka dot scrap paper card base.
For the Polar Bear card, I cut the bear holder from white cardstock and blended the edges with a light blue ink. I added pink ink-blended ears, a gray and black nose, black eyes and mouth, and a blue ink-blended belly. To create the rosy cheeks, I used R20 and R000 Copic markers.
The polar bear is holding two hearts and a Love die-cut from the upcoming Love You Shadow set. I used Pinking Rectangles to create all the framed layers and finished the card with a Valentine Banner Greetings.
For my XOXO shaker card, I matched the colors to the Love is Kind shaker beads in pink, blue, and red. I particularly love the pops of blue for Valentine cards. For the Xs, I used blue and white patterned paper and blended the hearts in red and pink ink. I adhered the shaker to a white cardstock Pinking Rectangle and Valentine Banner Greetings for the “Hugs & Kisses” sentiment.
Keep scrolling to see more amazing inspiration from the design team!
Thank you so much for checking out day 2 of sneak peeks for the upcoming release available on January 5th. Be sure to stop back tomorrow for another day of sneak peek inspiration!
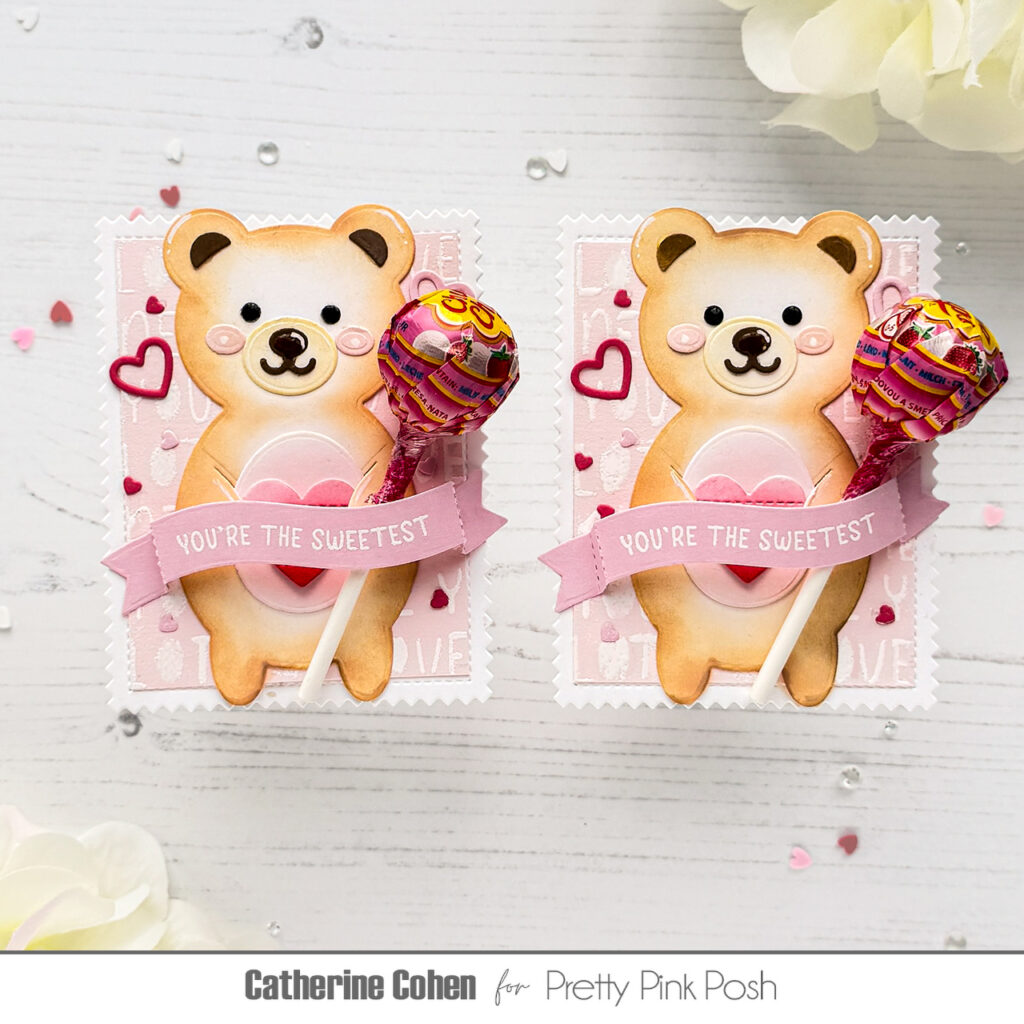
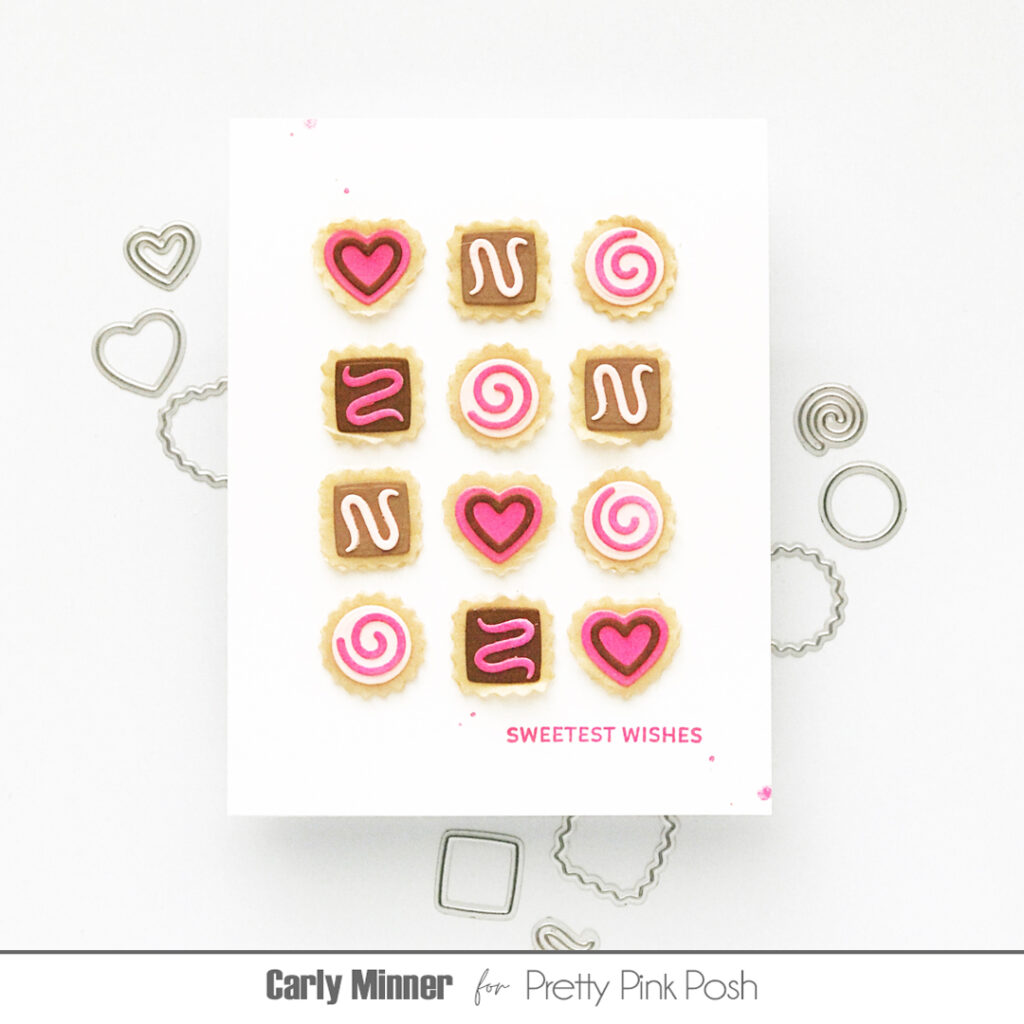
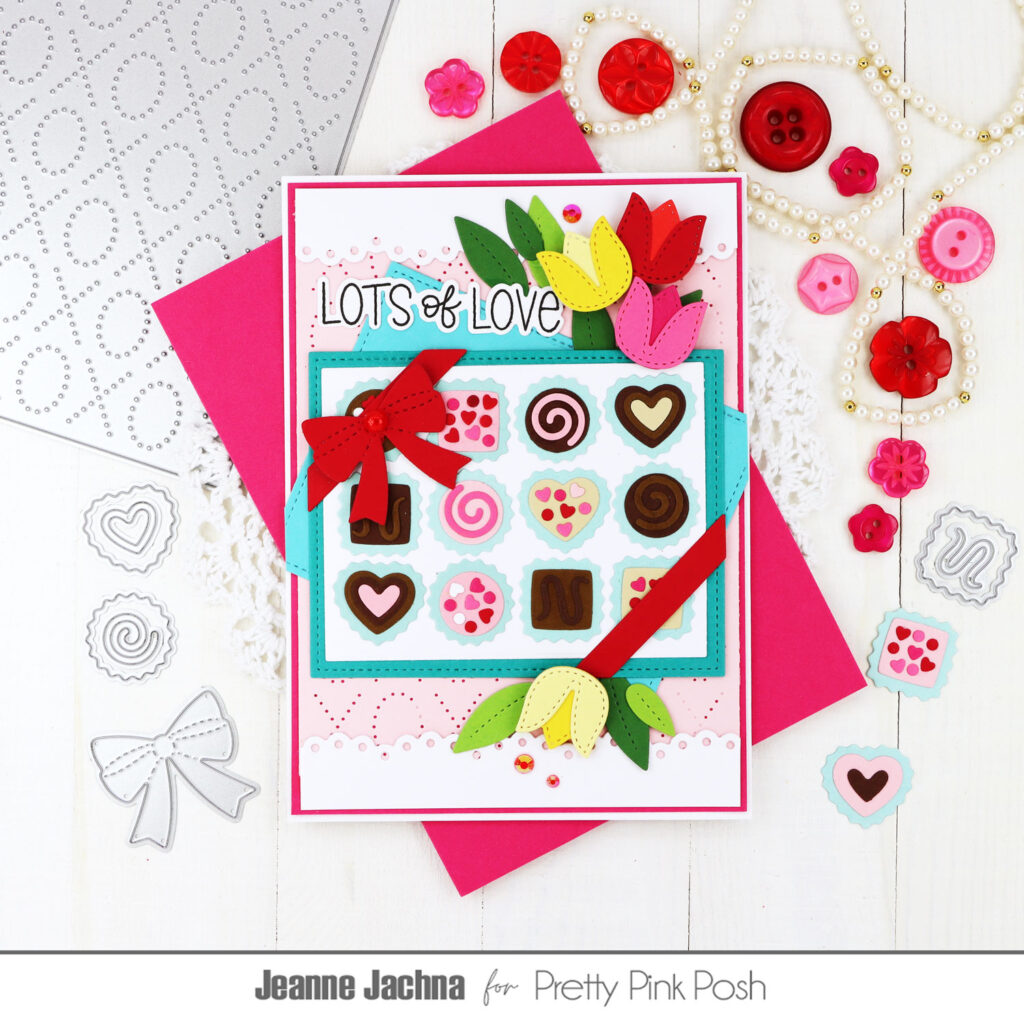
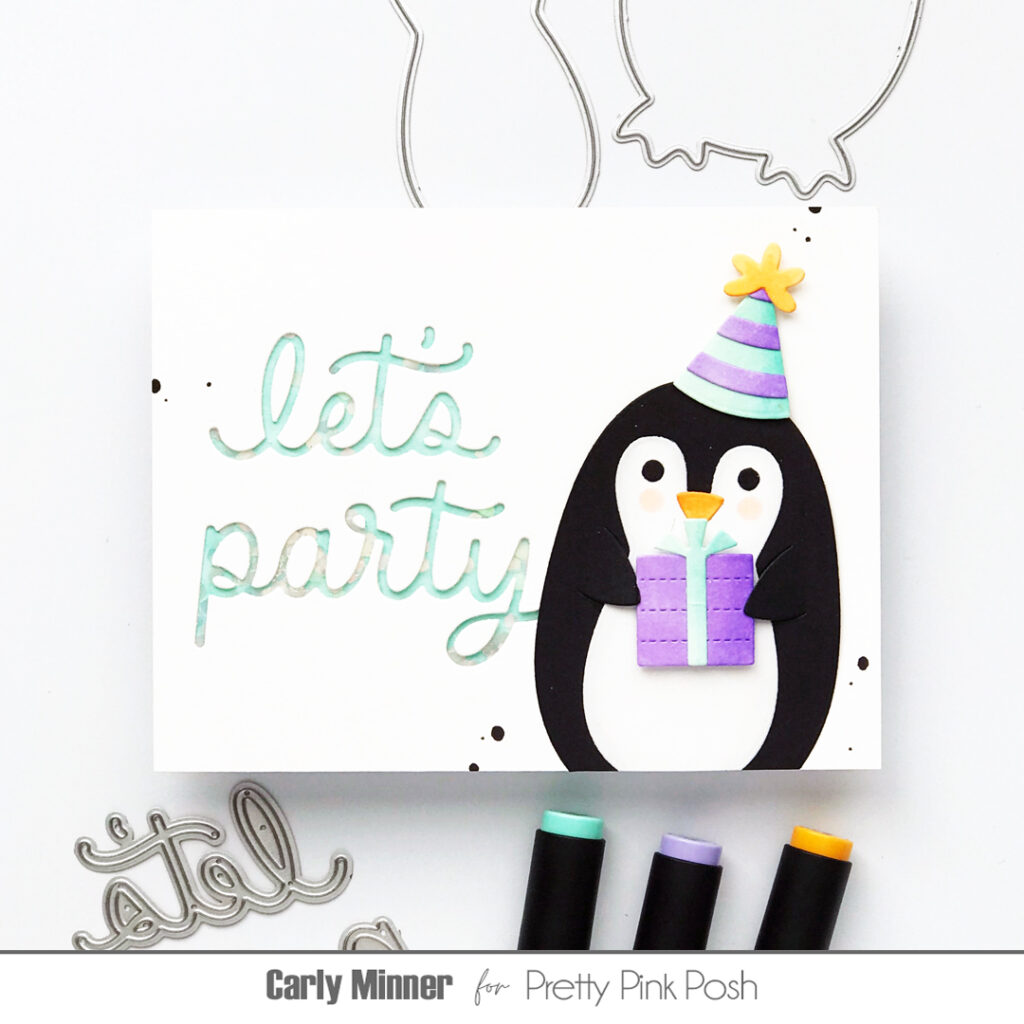
Welcome as we kick off the first day of the January 5th release. Today we’ll be taking a look at three of the new die sets: Box of Chocolates, Heart Card Base and the Ladybug Shaker.
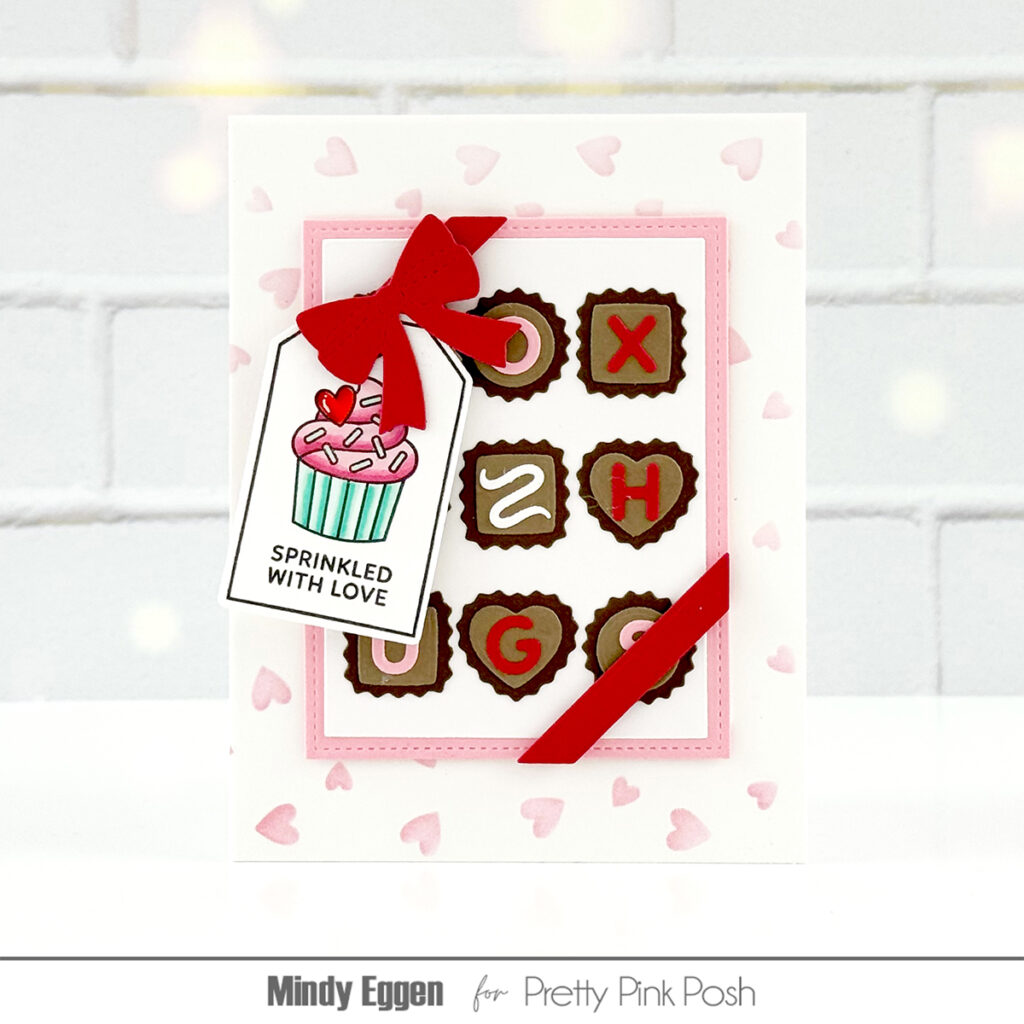
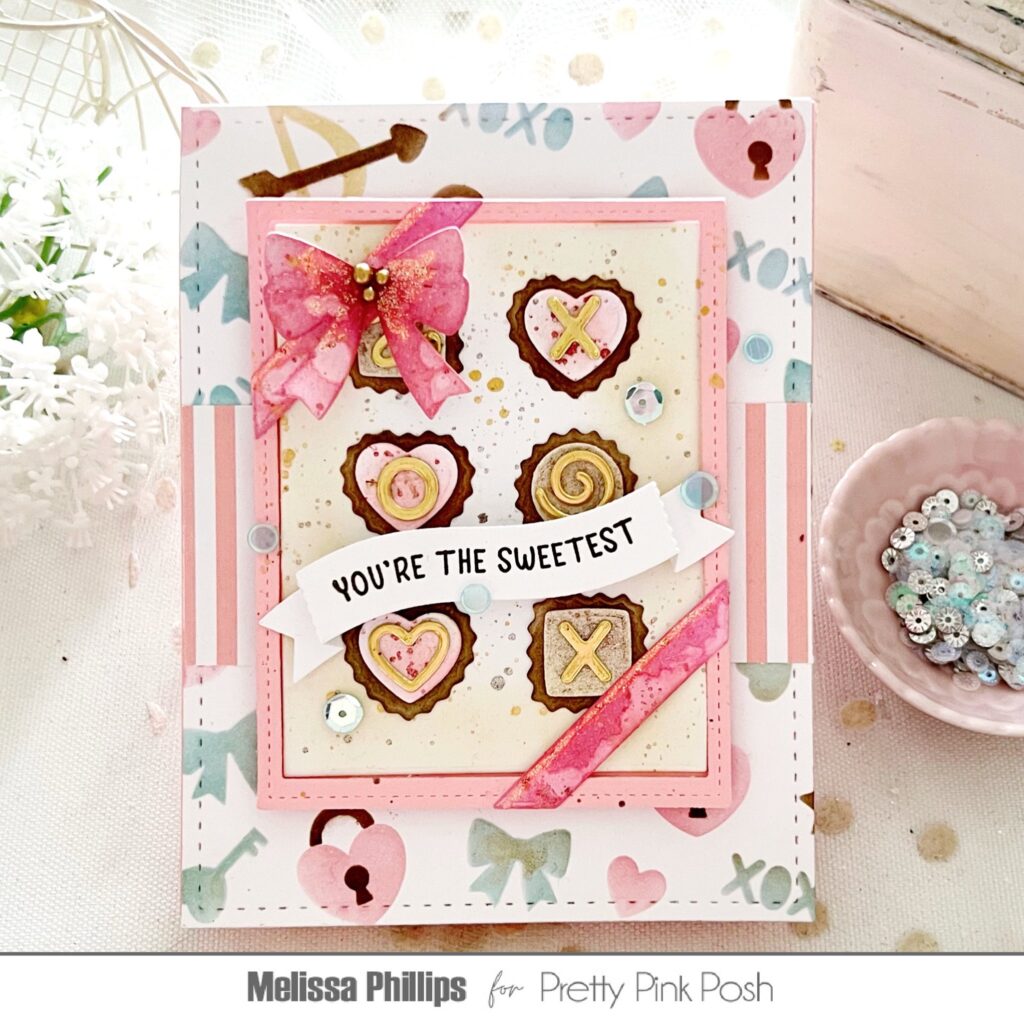
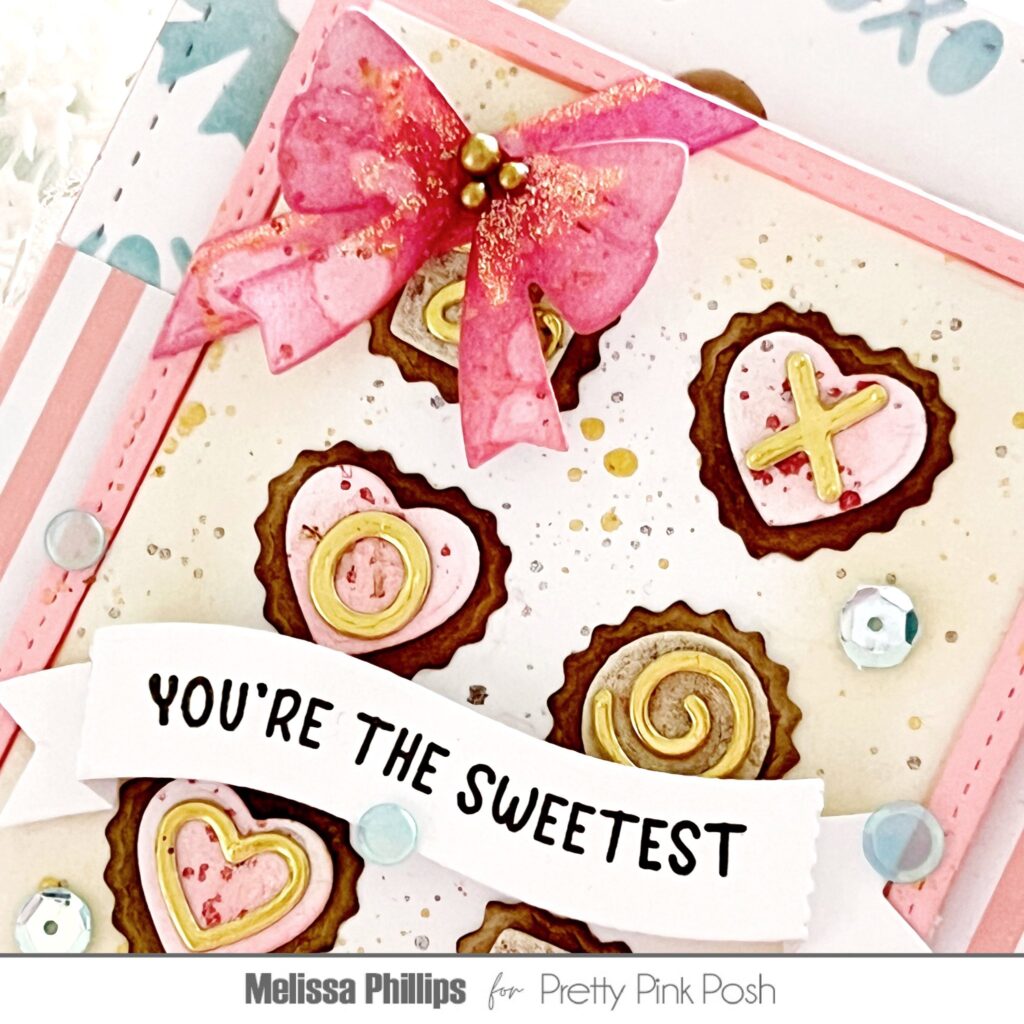
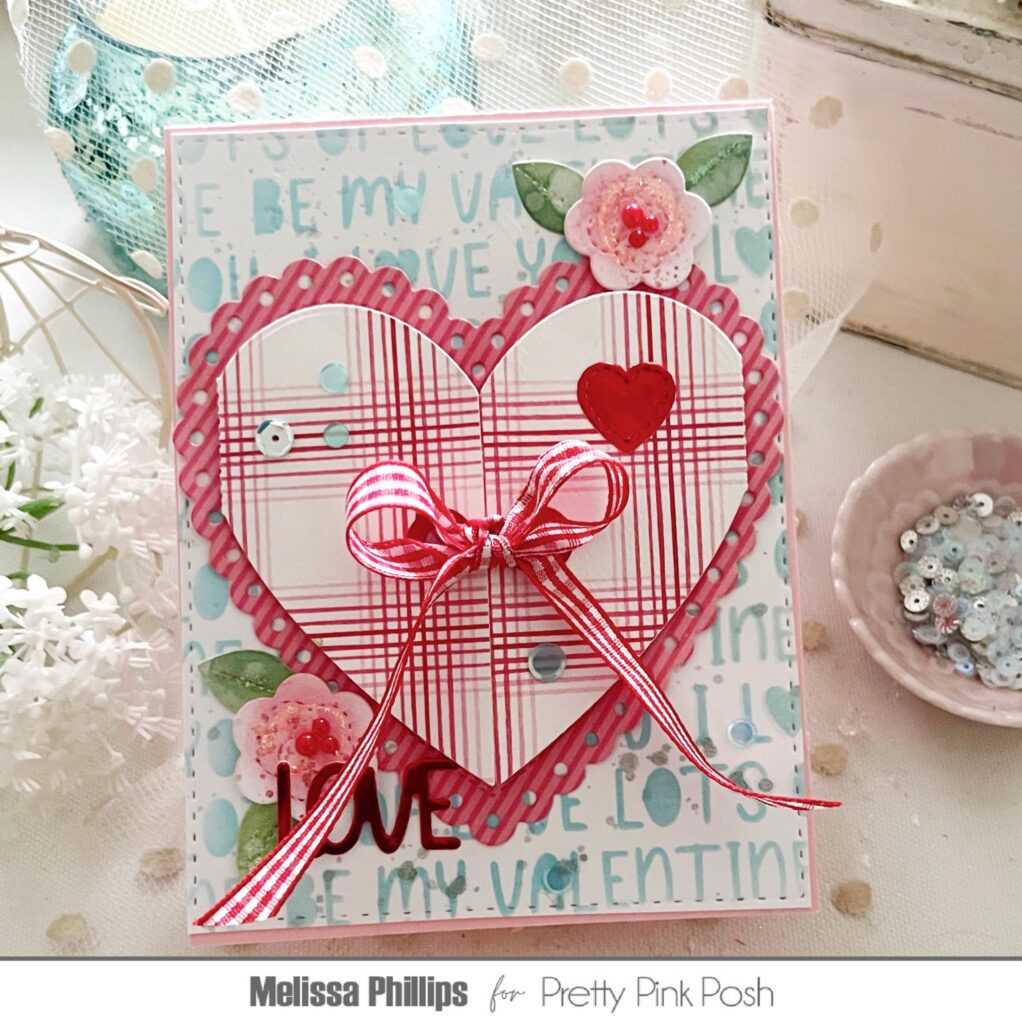
Melissa here and today I’m sharing a few cards made with the adorable, new Box of Chocolates, Heart Card Base, and Ladybug Shaker dies. They are phenomenal!
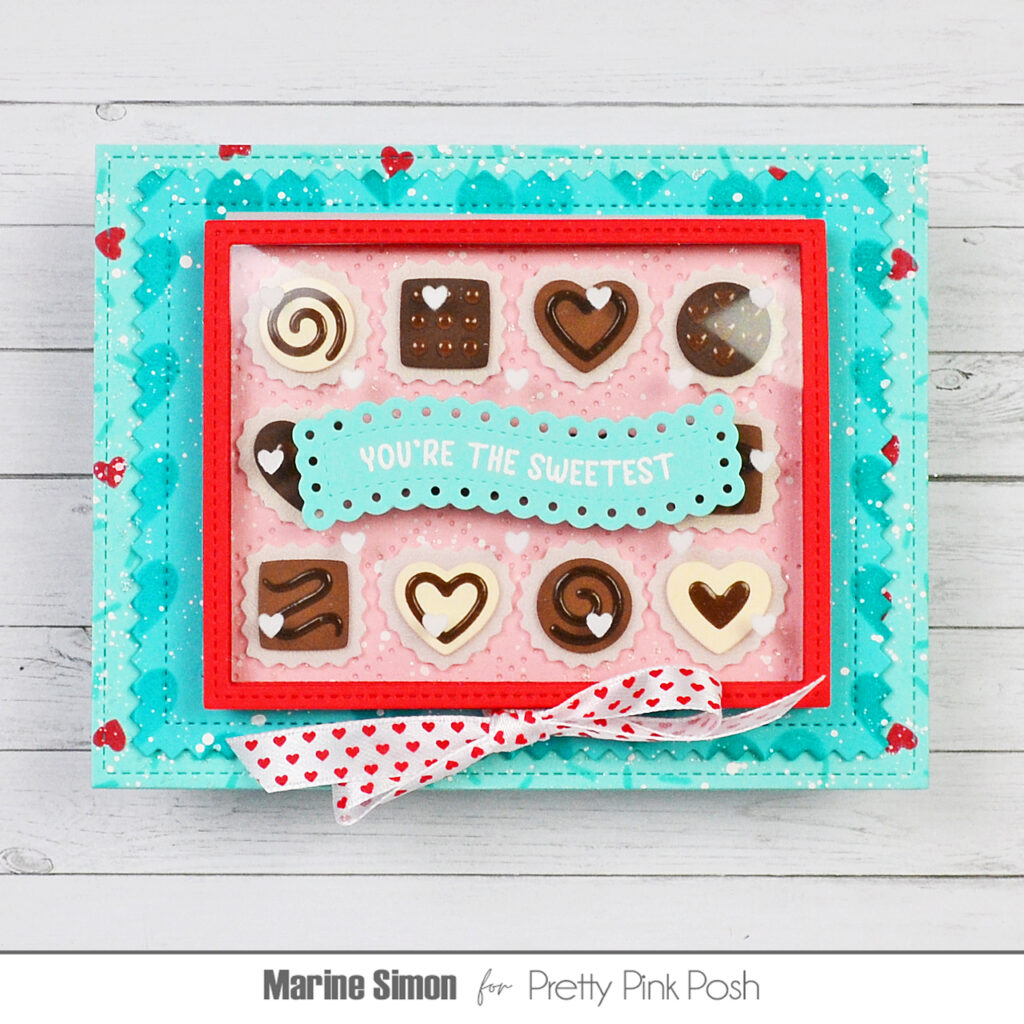
My first card uses the sweet Box of Chocolates die…I am smitten with this collection! It contains everything you’ll need to create your own custom box of chocolates, including the tiny paper cups, hearts, circles, and square-shaped chocolates. You’ll even find sprinkles and drizzle for the tops!
After assembling my box of sweets, I wrapped it up using the bow die included in this set…every tiny detail was perfectly thought out and executed. My sentiment comes from the new Valentine Banner Greetings and is stamped on a Banner Greetings 2 die. My background was created using the darling Layered Cupid Items Stencils…love them!
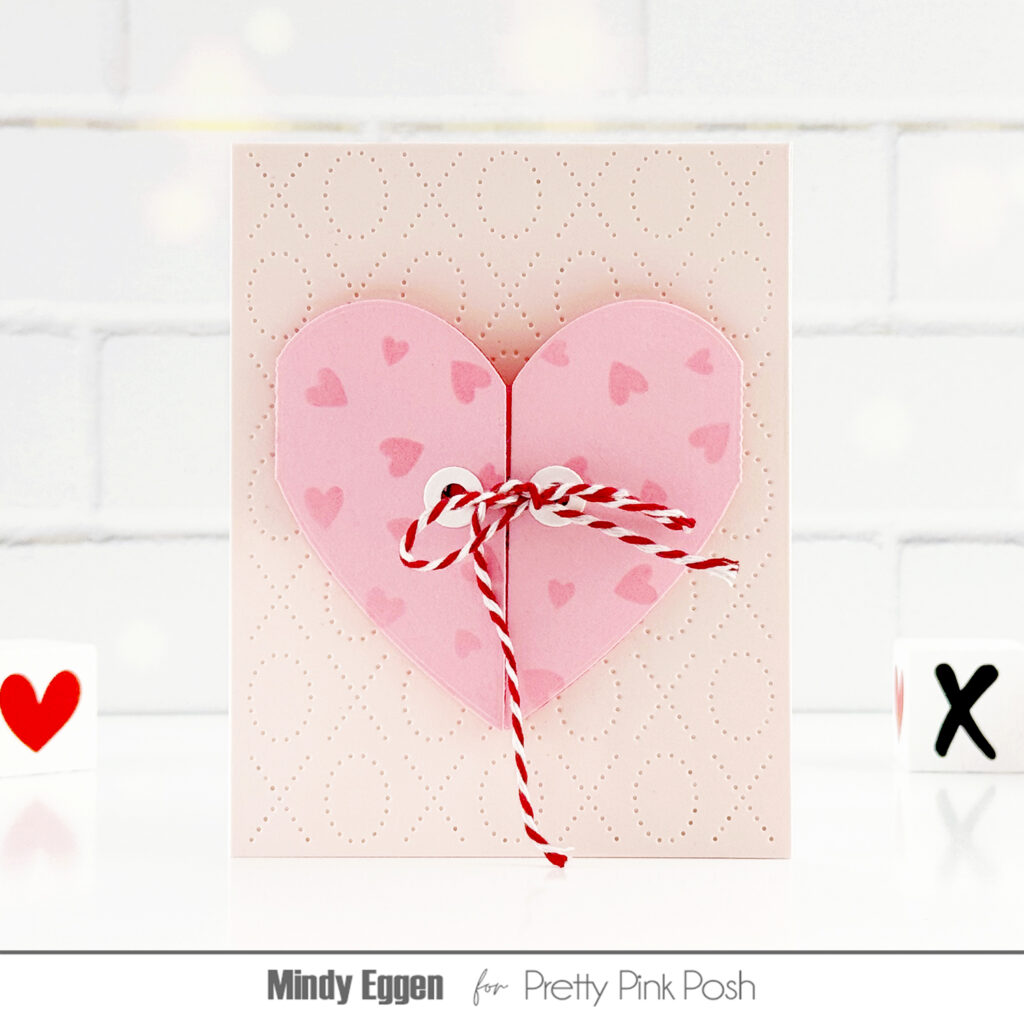
My next card uses the new Heart Card Base, which creates the cutest interactive tag or focal point for your handmade Valentines this year. I die cut my heart from patterned paper and then adhered it to a die cut Eyelet Heart. Next, I dressed up the inside using the new Love You Shadow die and Valentine Banner Greetings stamp set. I tied my heart closed with gingham ribbon and added the new Love Words stencil to create my background.
Lastly, I’ve used the irresistible Ladybug Shaker die to create my card. I began with the Layered Ladybug Stencils, creating my background. I then added two different sizes of Pinking Rectangles, the largest cut from vellum followed by a smaller cut from white cardstock.
I added my paper-pieced ladybug and followed up with a sentiment from the Valentine Banner Greetings stamp set, stamped on a die cut Banner Greetings 2. I used flowers from the Valentine Holder Additions dieto bring in some softness.
Here’s some more inspration using these products from the team!
Thanks for stopping by for the first day of sneak peeks. We’ll see you again tomorrow!
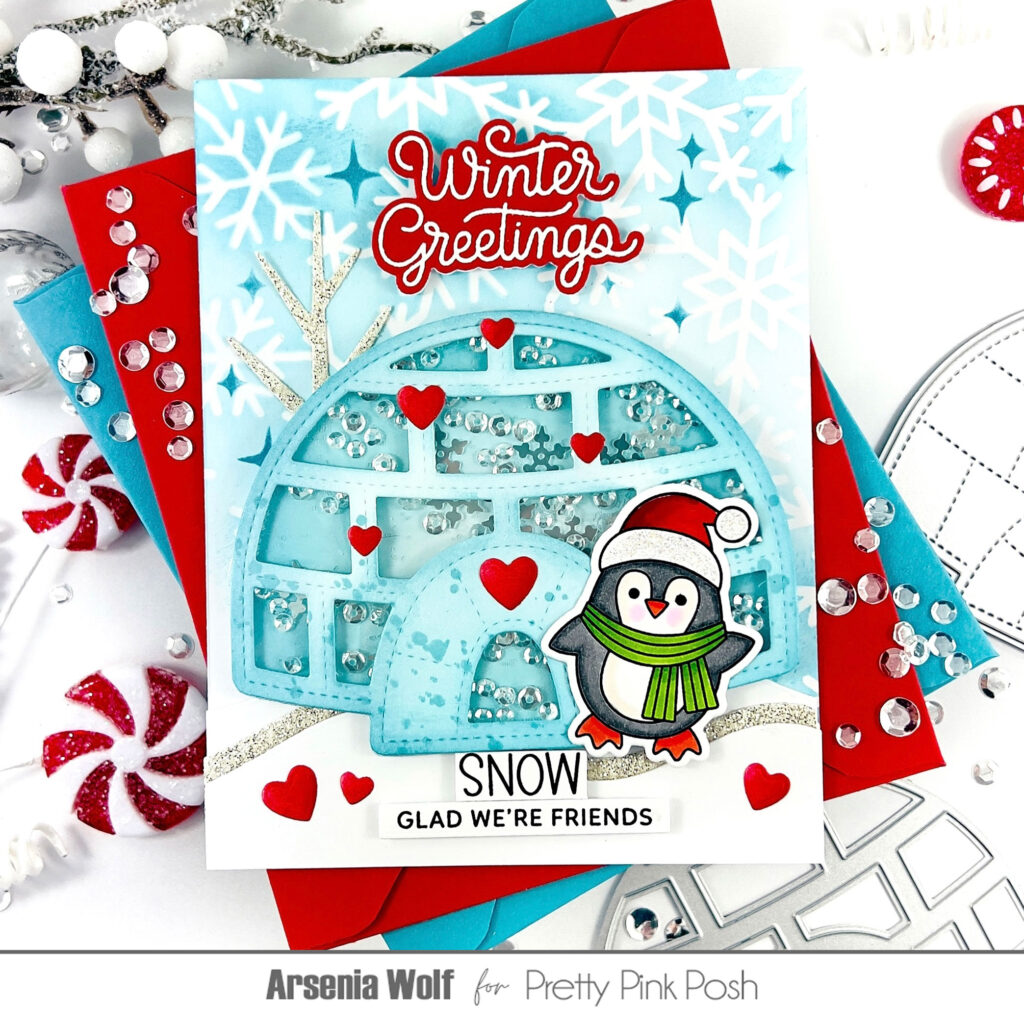
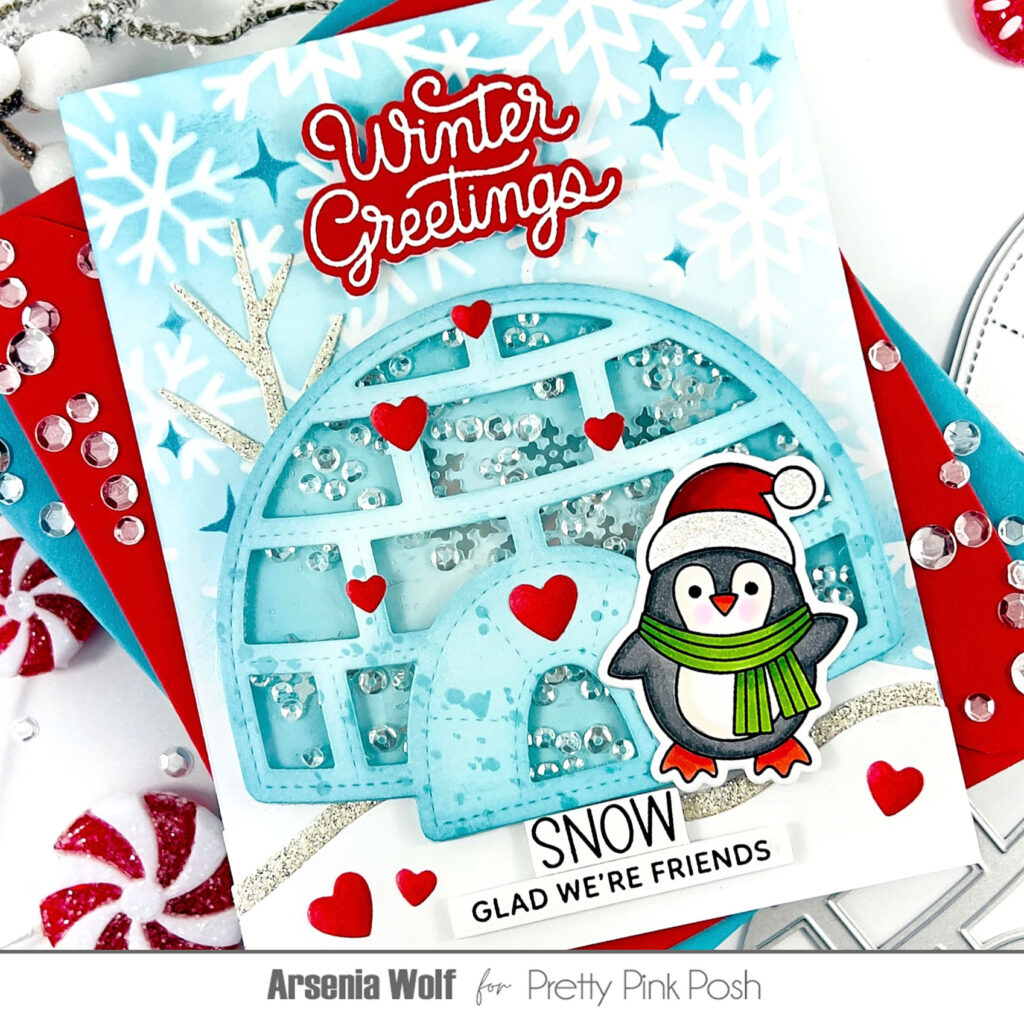
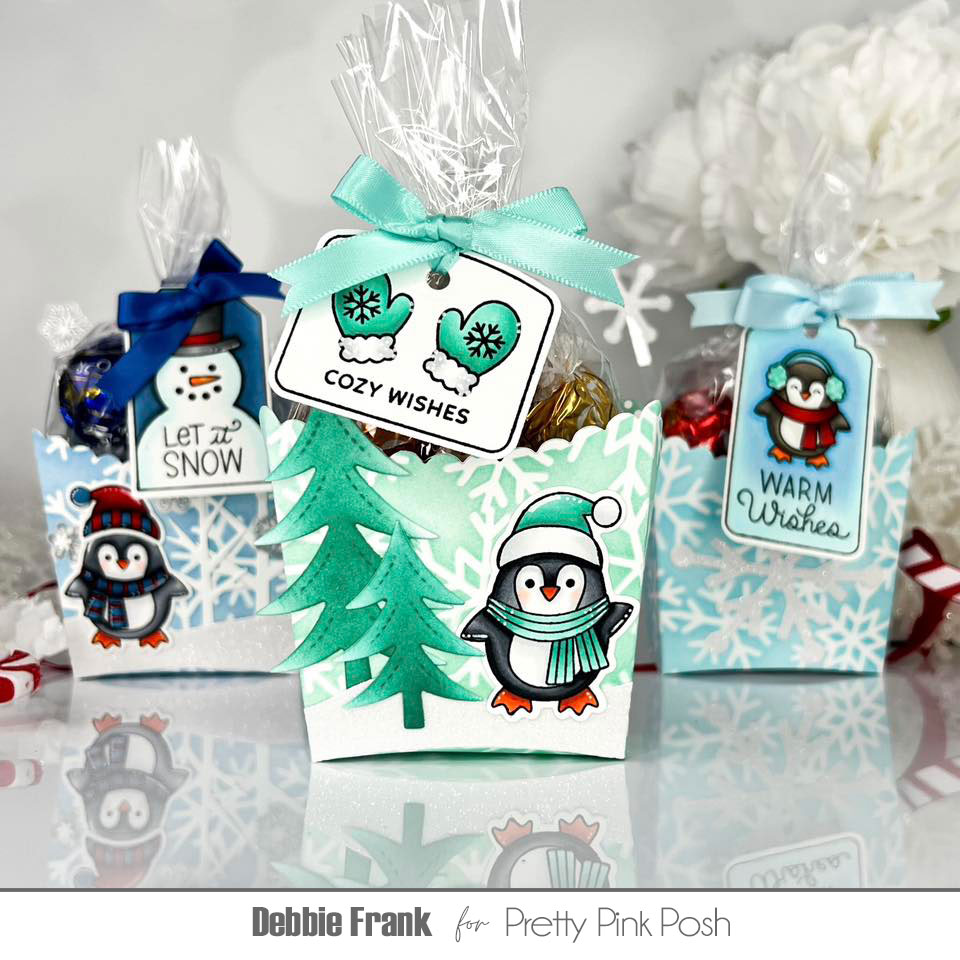
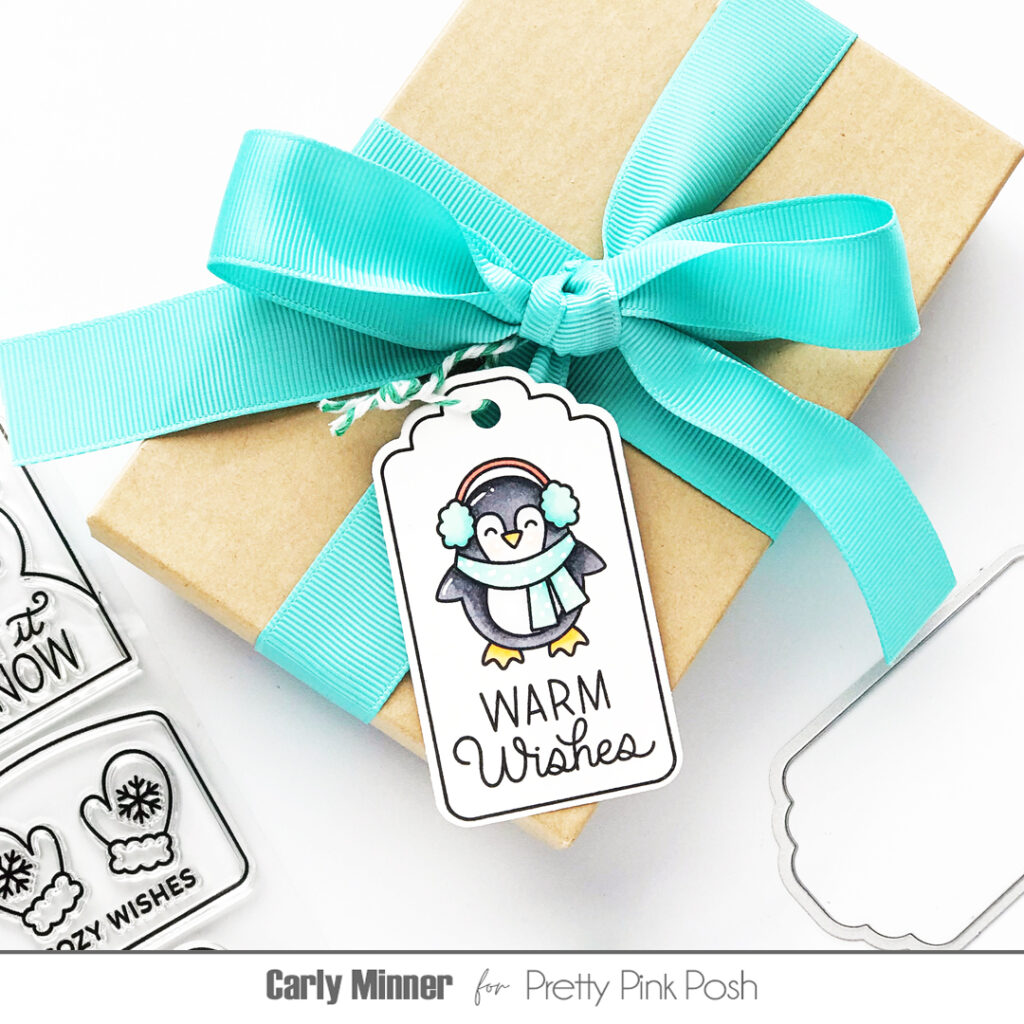
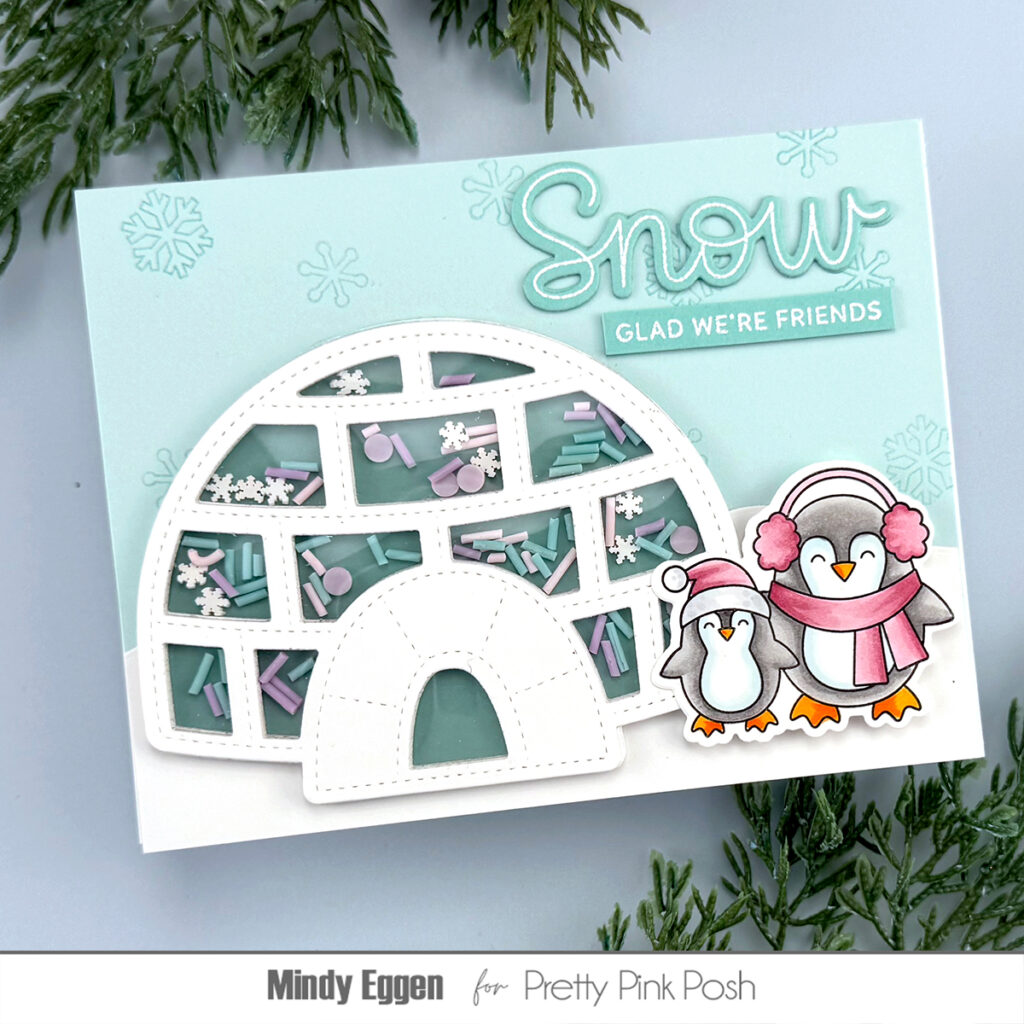
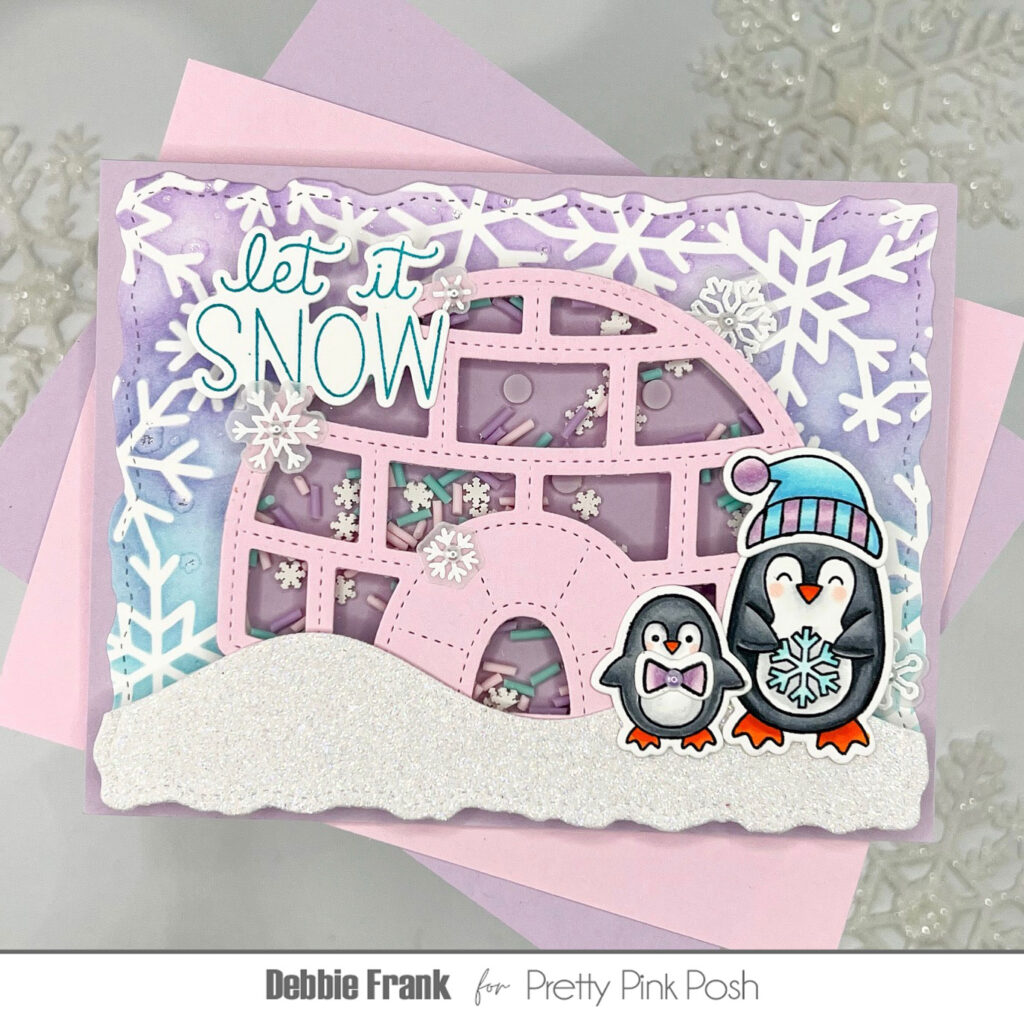
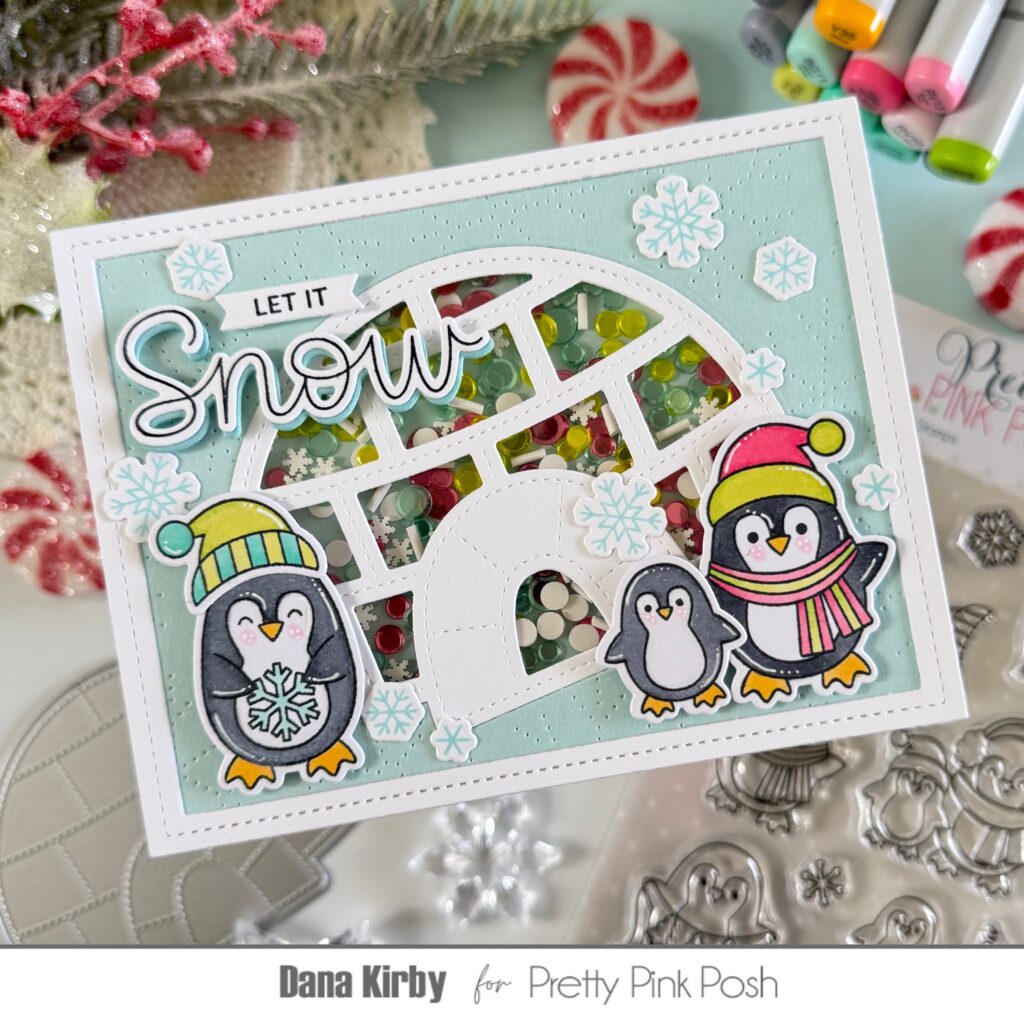
Welcome to the last day of sneak peeks of our November 6th release. Today we’ll be taking a look at the new stamps sets, along with the Igoo Shaker and Notched Rectangles die sets.
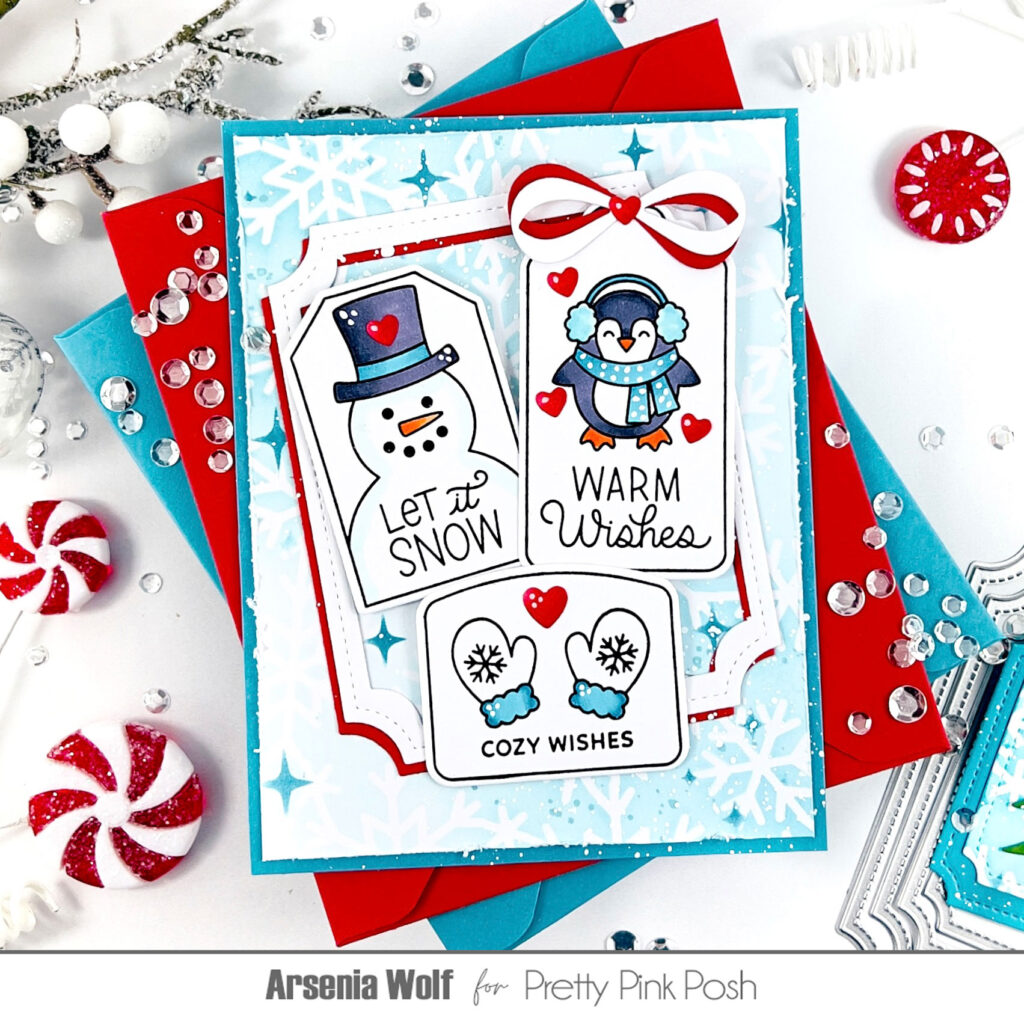
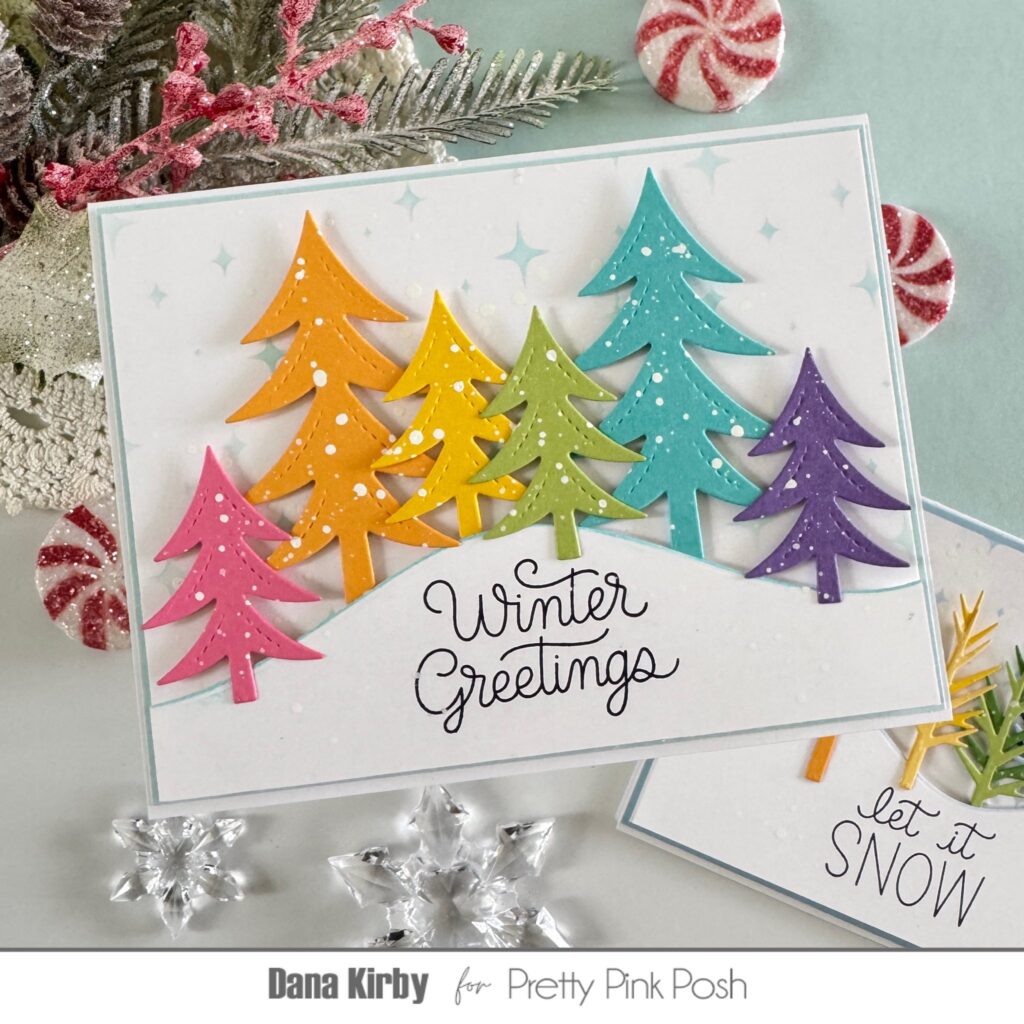
Hello, my crafty friends! Arsenia here, welcoming you to Day 3 of our cozy November Release Sneak Peeks! Today’s post is bursting with frosty charm, glittery snowbanks, and penguin-sized cuteness.
This release is absolutely snow-laden with possibilities — penguins galore, twinkling trees, icy hills, and a dash of holiday magic. I whipped up two cards, a set of tags, and even a little tag holder box (because what’s winter without a few surprises?). My color palette? Classic holiday red, frosty blues, and just a wink of green — simple, cozy, and perfectly festive. Let’s slide right in!
Card One: Shake, Sparkle, and Let It Snow!
For my first frosty creation, I reached for the new Igloo Shaker Die, Penguin Friends stamp set (with coordinating dies), Let It Snow stamps, and Winter Tags — a perfect combo for a snow-filled celebration!
I started by ink-blending panels with the new Snowflake Background Stencil, using three shades of icy blue for a chilly ombré effect. Then I added a dark, twinkling layer using the new Twinkle Stencil — instant winter magic! These panels became the frosty base for all my projects today (yes, I made four — I couldn’t stop!).
Next up, the Igloo Shaker — cut from soft blue cardstock and gently ink-blended for frosty depth. I filled it with a storm of clear sequins and snowflake confetti, then layered three snowy hills using the new Snowy Hills Borders — two white and one glittery, because sparkle is always a good idea.
A charming winter tree (from the new Winter Trees Die Set) stood tall in the background, and of course, the star of the show — a cheerful little penguin from the Penguin Friends stamp set, all decked out with a touch of glitter on his hat!
For the sentiment, I white-embossed Winter Greetings onto red cardstock from the new Let it Snow Stamp set with coordinating dies. My sub sentiment is paired with the word snow from the Winter Tags set. A sprinkle of red hearts (thank you, Build A Heart Dies) finished it off perfectly. And just like that — a snowy, sparkly shaker card was born!
Card Two: Tags, Twinkles, and a Touch of Fun
For my next card, I used one of my stenciled panels (a blend of Snowflake Background and Twinkle Stencil). I trimmed it to size and mounted it on a blue card base.
Then came the stars of the show — three adorable images from the Winter Tags stamp set, colored up with my trusty OLO markers. To add a little dimension, I framed the scene using the new Notched Rectangles Dies — one crisp white frame and one in festive red, layered just slightly off-center.
A dainty bow (from the beloved Beautiful Bows Die Set) and a sprinkle of hearts from Build a Heart dies brought everything together. And because it wouldn’t be a proper winter card without it — I added white splatters for that freshly fallen snow look. Ta-da! You’d think tags belong on gifts, but oh no — they make stunning cards too!
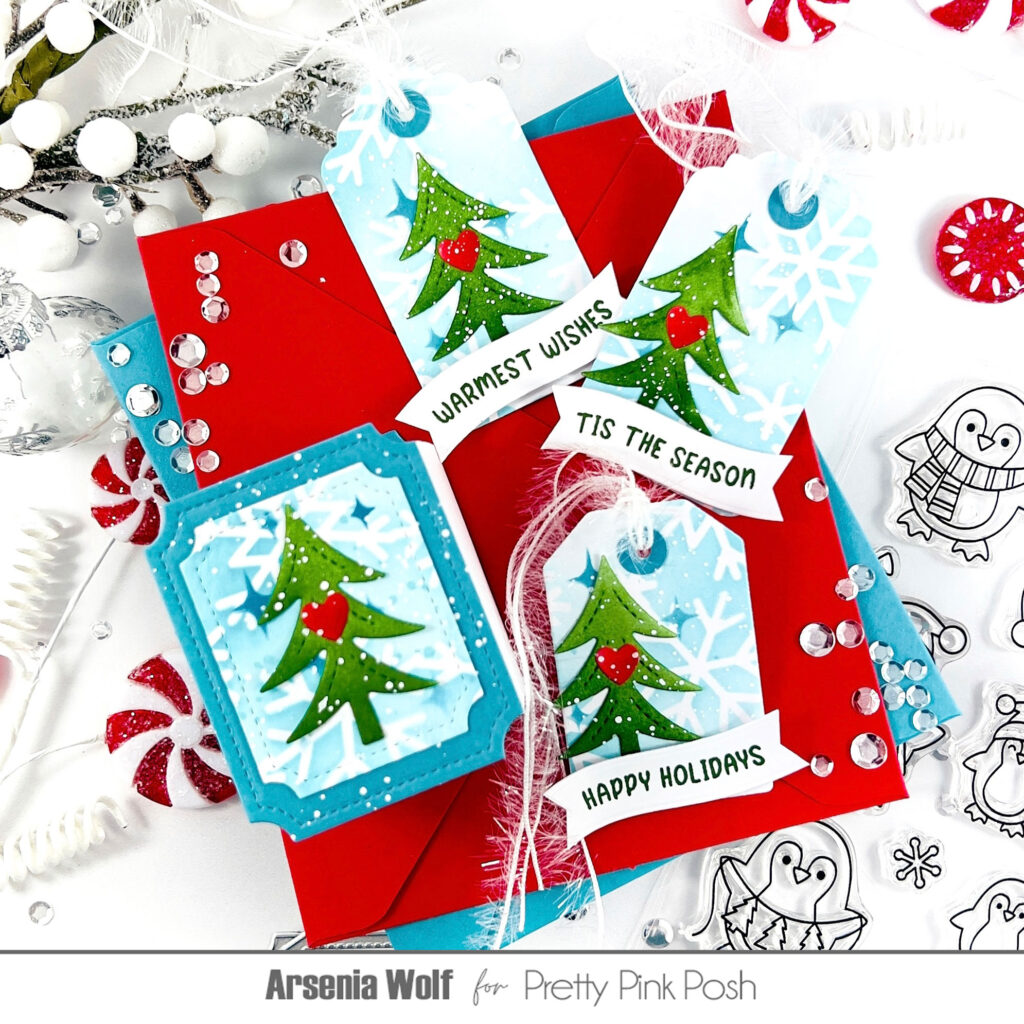
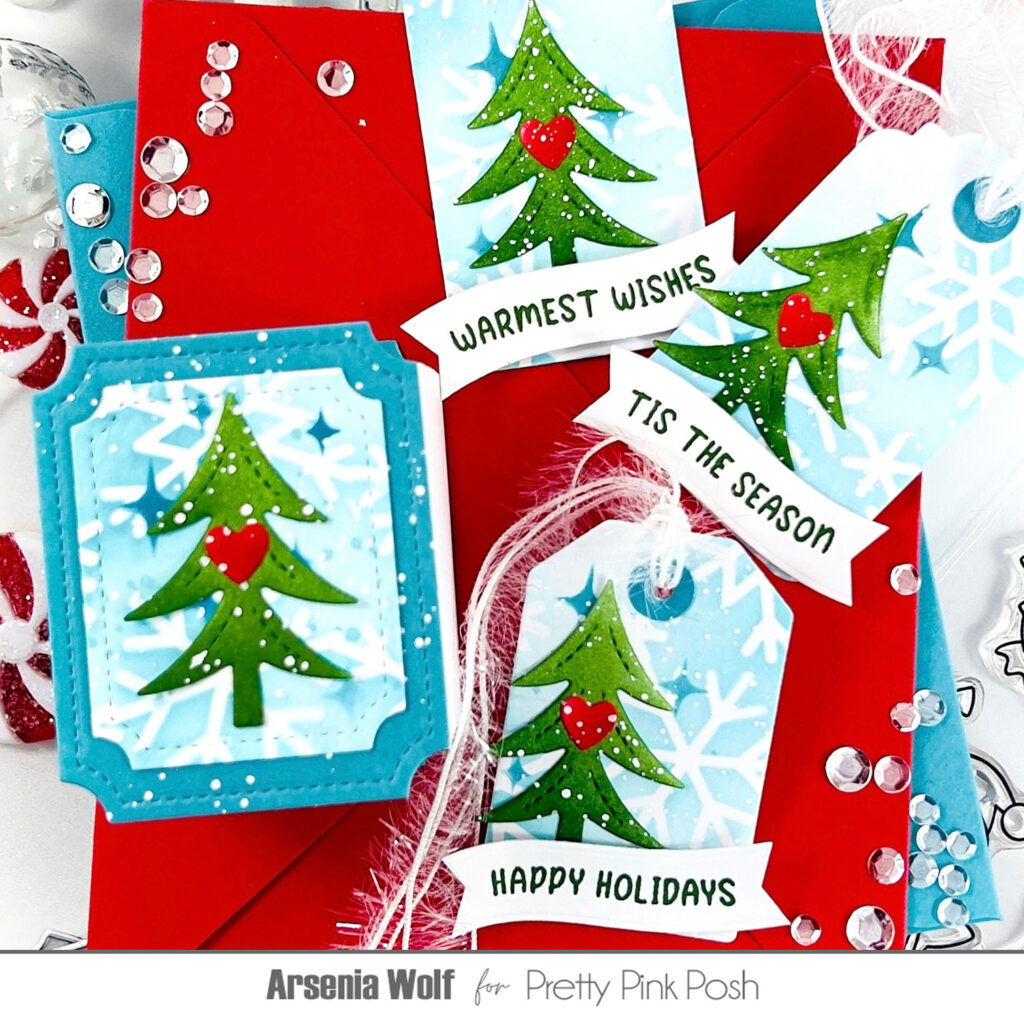
Tags & Holder Box: Frosty Favors and Tiny Treasures
Now for the grand finale — the tags and tag holder box! Using my earlier stenciled panels, I cut out three tags with the new Winter Tags Dies. Each tag got its own little snowy tree (from the Winter Trees Die set), a heartfelt sentiment from Christmas Banner Greetings, and a red heart using the Build A Heart Dies. Add a flurry of white splatters and voilà — winter perfection!
For a finishing touch, I created a mini box using the Notched Rectangles Dies to hold my tags. The notched edges act like adorable little “snowshoe feet,” making the box extra charming. Imagine these at your holiday table — tiny tag holders filled with chocolates or notes of gratitude. The possibilities are truly endless!
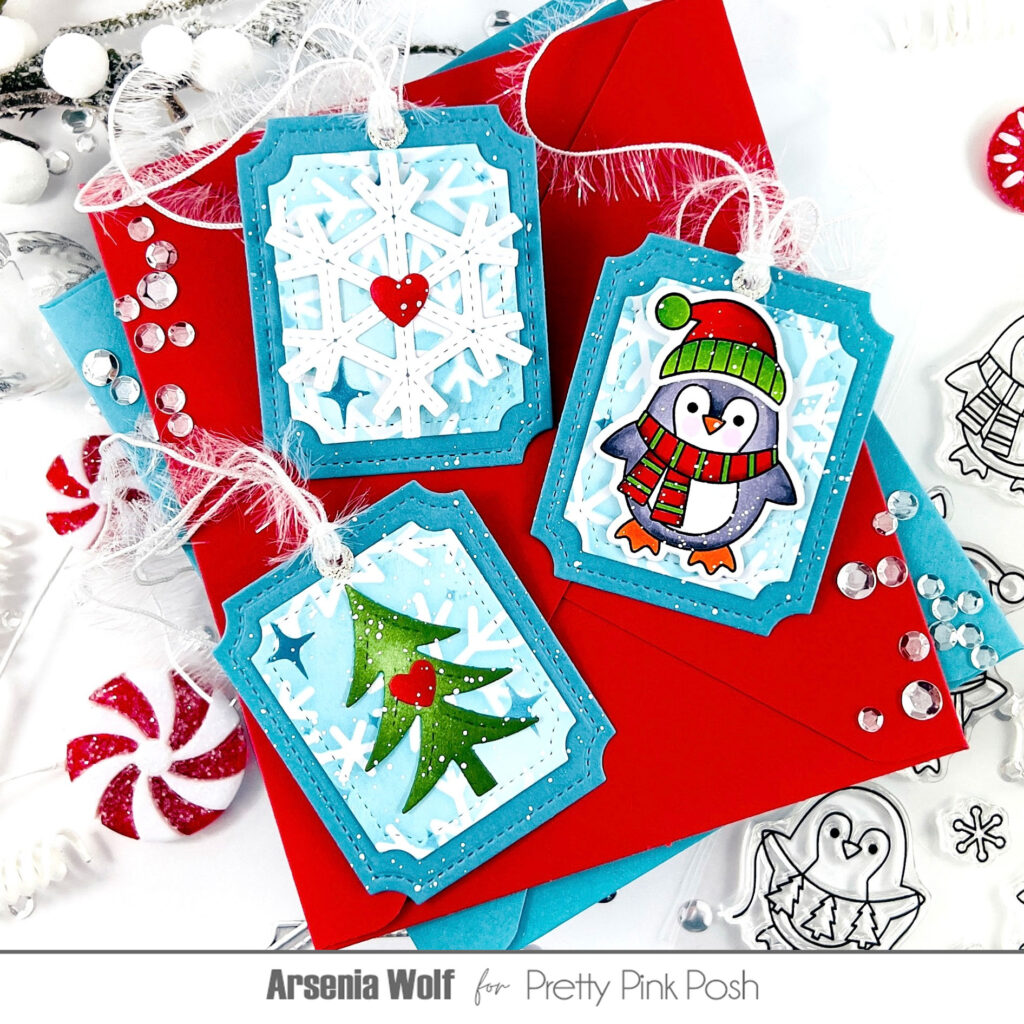
For my final trio of tags using the Notched Rectangles Dies as tags, I switched things up — one with a snowy tree from Winter Trees Die set, one featuring our darling penguin friend from Penguin Friends Stamp set, and one with a shimmering snowflake from the Stitched Snowflake Dies.
Be sure to check out the incredible inspiration from the rest of the design team below — and remember, there’s snow limit to what you can create!
Thank you so much for joining us for the sneak peeks! I hope your imagination is snowballing with ideas. We’ll be back tomorrow with the full picture reveal, so you can start to put together your wish lists!
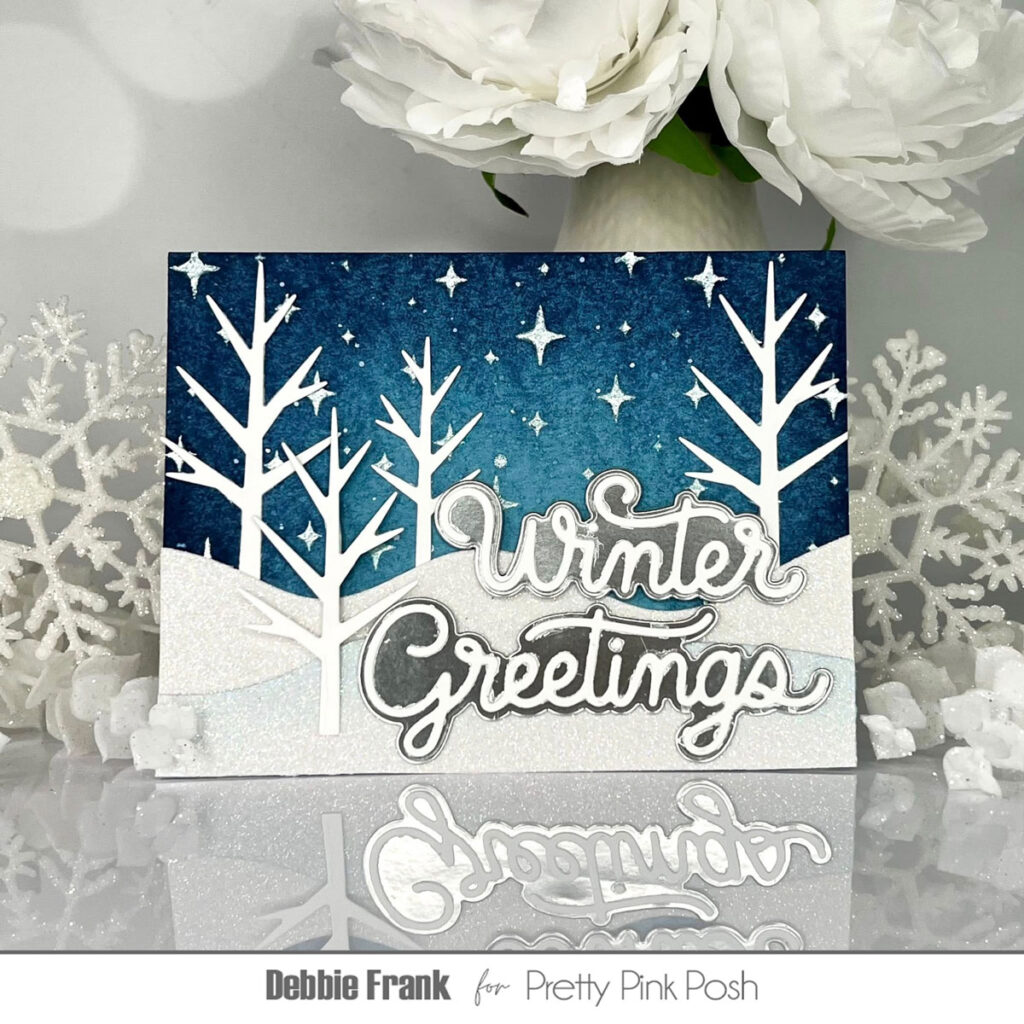
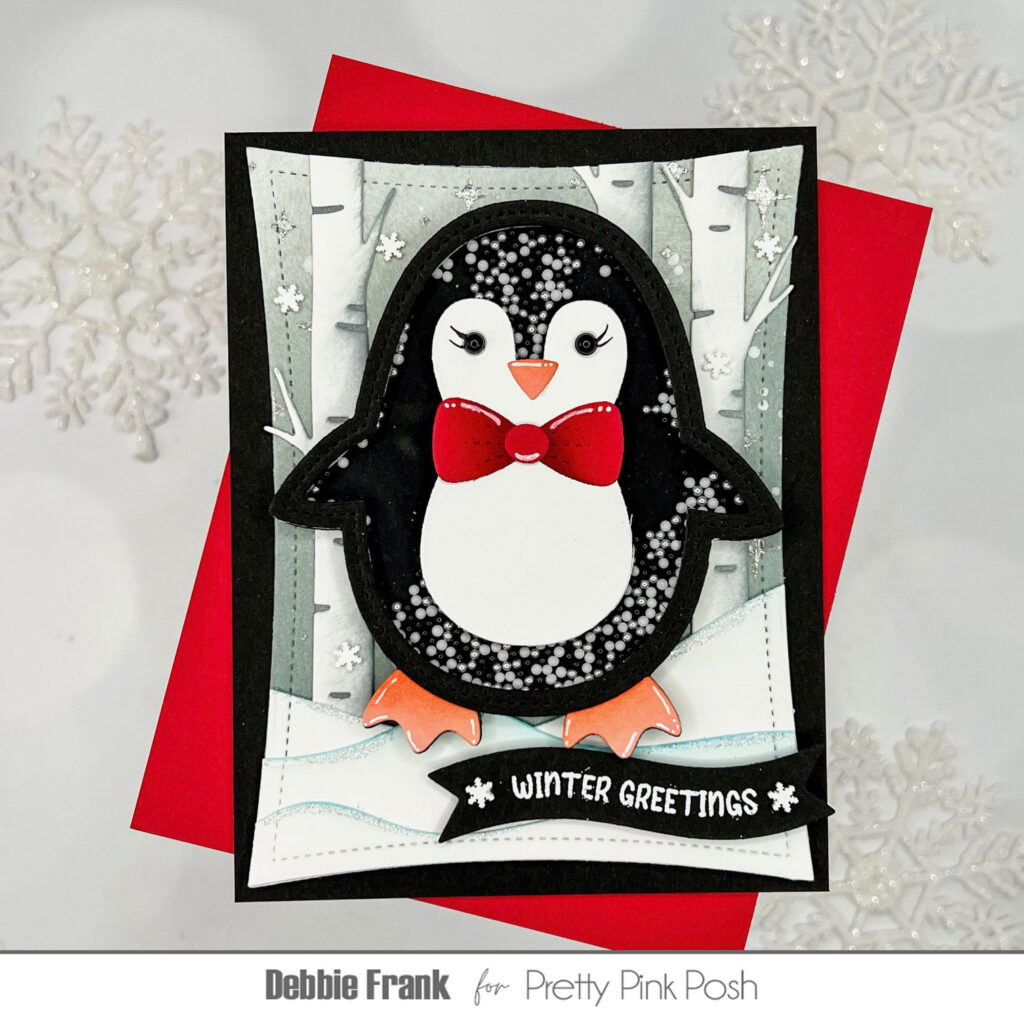
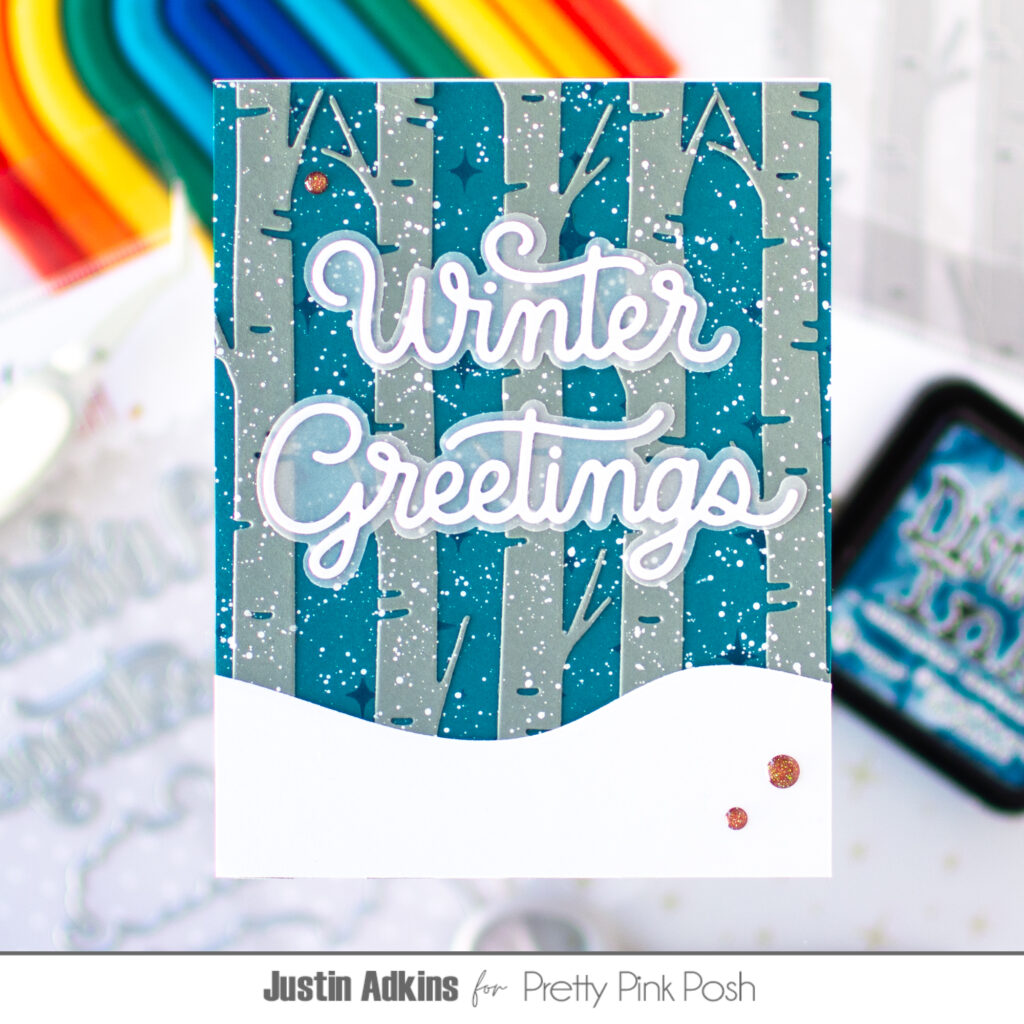
It’s Day 2 of sneak peeks for our November 6th release. Today we’ll be taking a look at the Penguin Holder, Snowy Hills Borders, Winter Greetings Shadow and Winter Trees die sets.
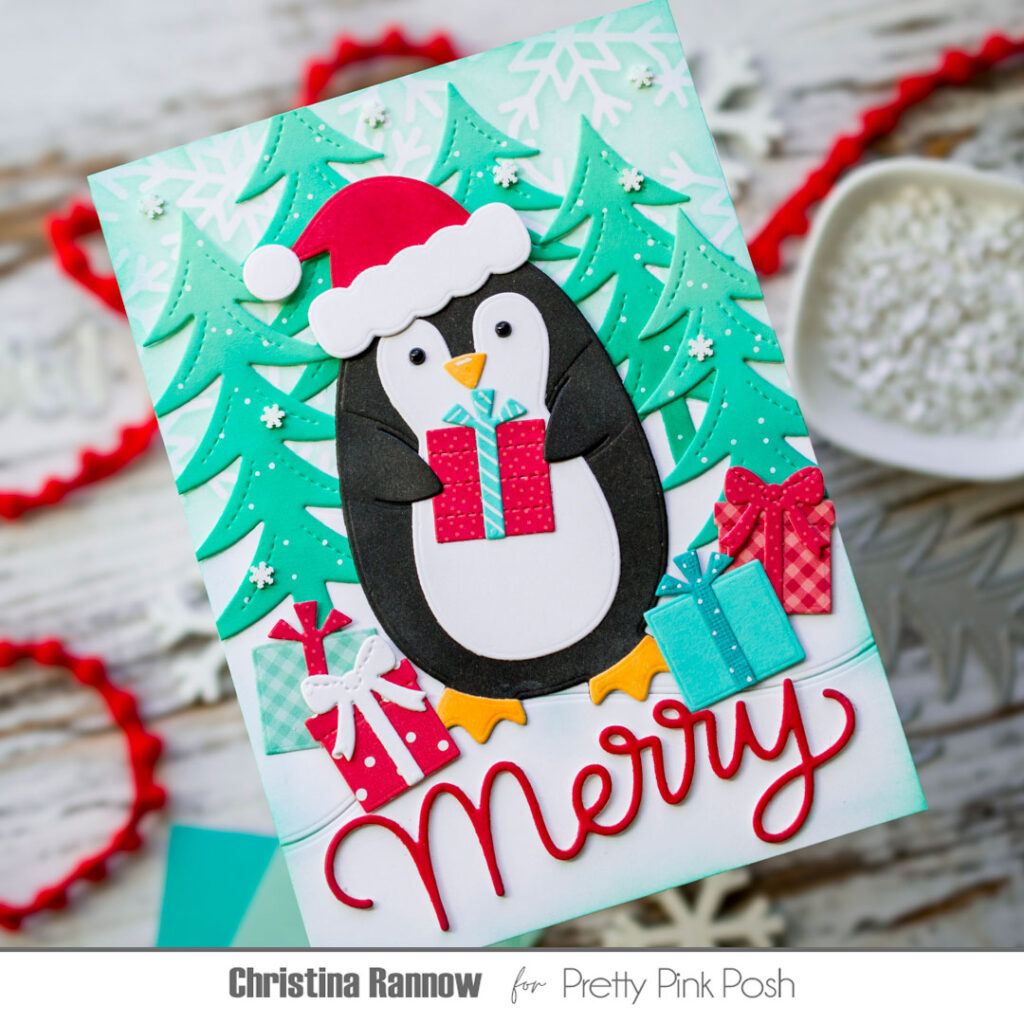
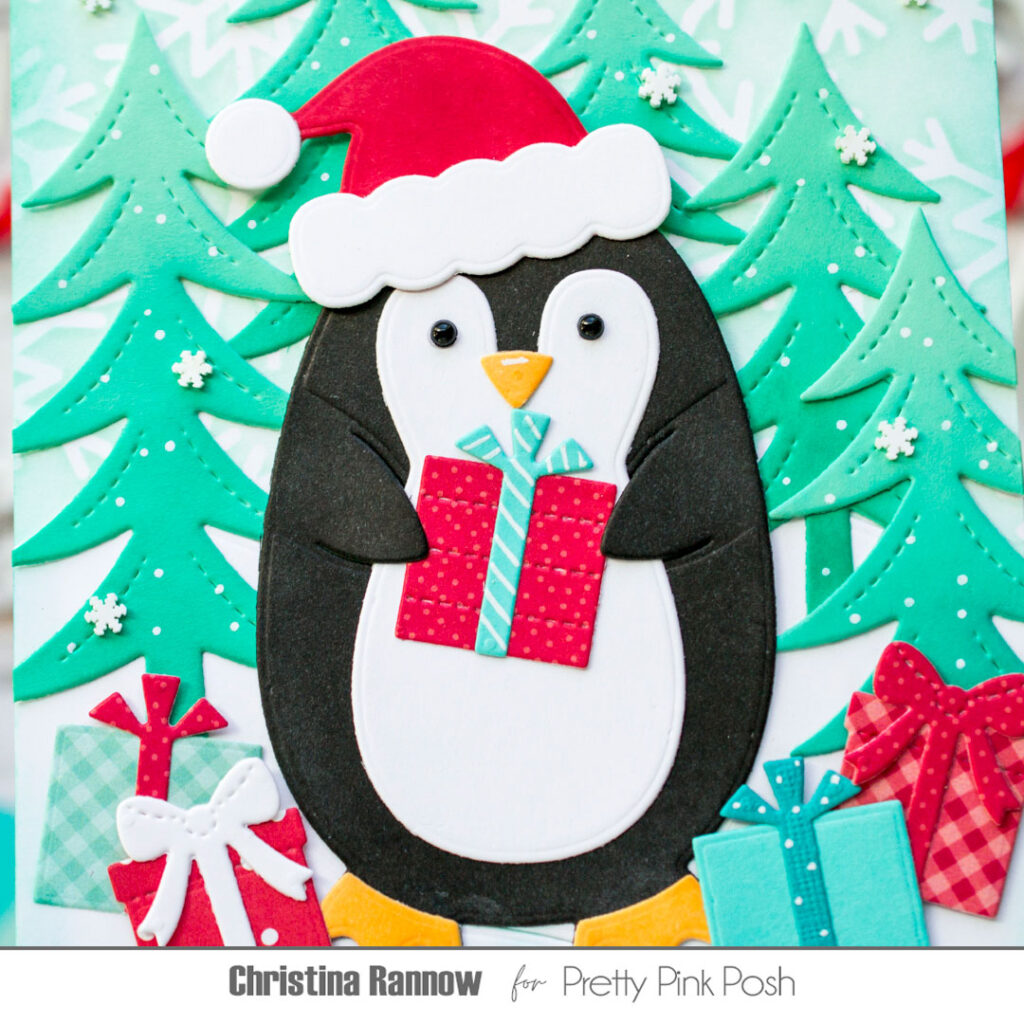
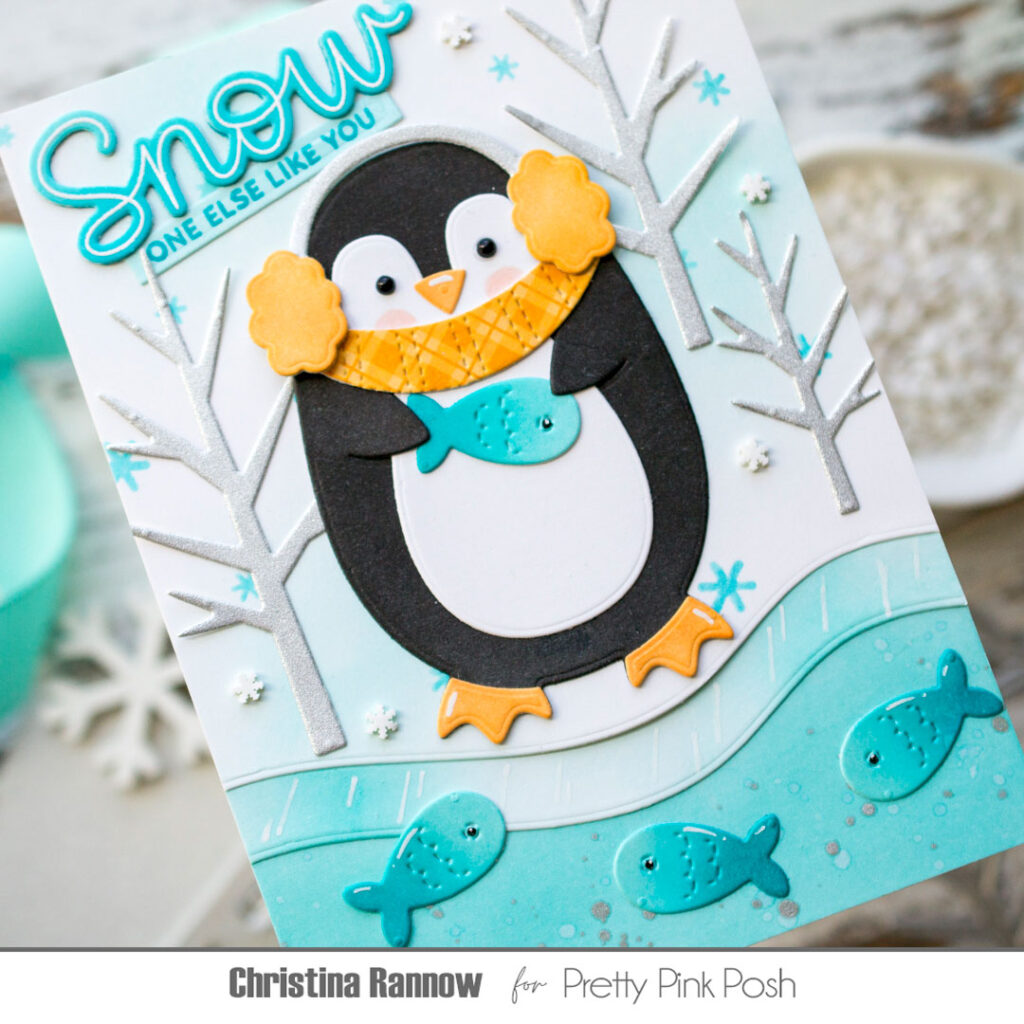
Hello, friends! Christina here to share some snowy sneak peeks of the upcoming winter release. For inspiration, I created a couple of bigger A6 cards featuring the adorable new Penguin Holder. This frosty friend is the latest addition to the popular critter holder collection and can hold any of the winter- or Christmas-themed accessories for creating festive wintertime cards! Let’s get started!
Both of my cards are 4.5 x 6.25 inches, or A6 size, so I would have a little more space to build my snowy scenes. My first card is a festive Christmas card that I started by stenciling the new Snowflake Background Stencil on white cardstock with a minty green ink. Then, to create a snowy winter forest, I layered on some snow drifts using the Snowy Hills Borders and a line of Winter Trees. I lightly inked along the edges of the snowy hills first with more of the mint green ink to give them a cool, frosty look. And for the Winter Trees,Iinked them with mint green and teal inks before adding them to my scene.
With the background complete, I die-cut and inked the pieces for the Penguin Holder before assembling him and adding him to my scene. I added Onyx Pearls for his eyes and then accessorized this frosty friend with a Santa hat and a gift, both included in the die set. Finally, I surrounded him with piles of gifts, some of them from the Christmas Holder Additions set, that I die-cut from both patterned paper and regular cardstocks.
The last steps were to add the text from the Large Merry Shadow die set and a flurry of white clay snowflakes from the new Winter WonderlandMix.
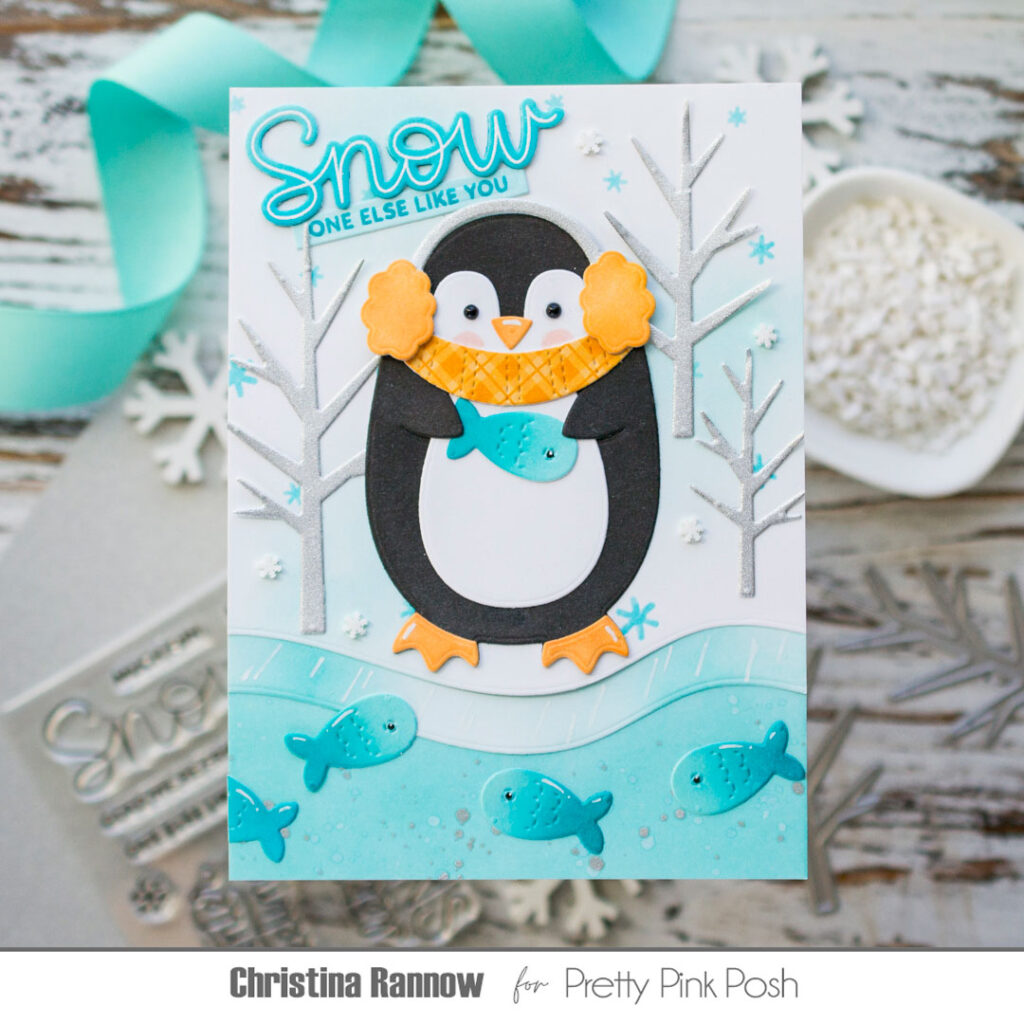
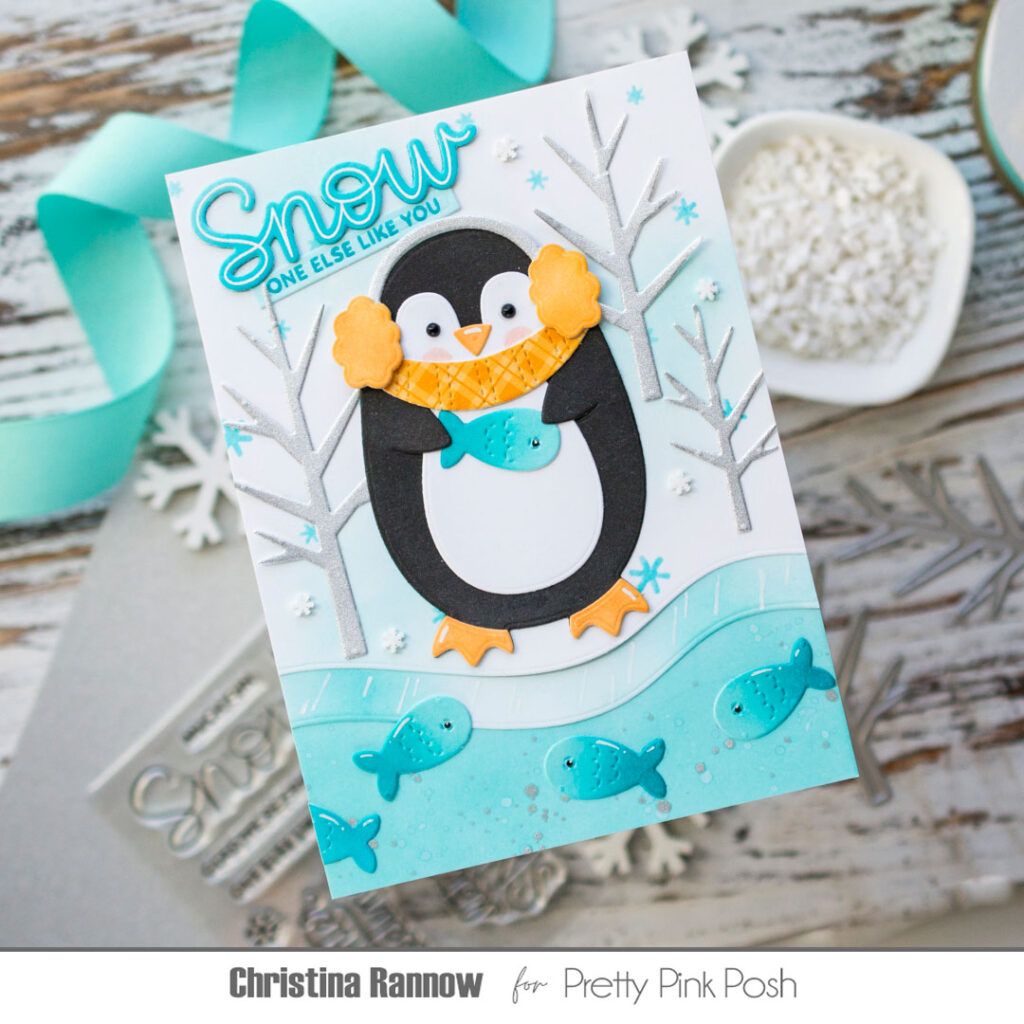
My second card is a winter-themed card with an icy landscape that is the perfect backdrop for the Penguin Holder. I started by die-cutting three sections for the background using the Snowy Hills Borders. The top snowy section is white cardstock that I stenciled using the Cascading Snowflakes Stenciland an icy blue ink.I also added some softly blended blue areas for a frosty look. The next section is a thin icy border that I created by simply blending in more of the blue ink, making it darker in some areas and lighter in others along the border, and then adding white lines with a white paint pen. So easy! The last section is cool icy water for the fish. I blended the same blue across the entire piece before spattering it with plain water and a little Frozen Fog Mica Stain. To finish up the icy landscape, I die-cut a few Winter Trees from some glittery silver cardstock and attached them to the top snowy section of the background.
With the background complete, I moved on to die-cutting and inking the pieces for the Penguin Holder. I assembled the pieces and then accessorized this chilly chap with the cutest earmuffs, which are from the Christmas Holder Additions set, and a scarf to bundle up in that I pulled from the new Penguin Mugs Die Set. I again added Onyx Pearlsfor his eyes and gave him some rosy cheeks before adding him to my scene.
To finish things up, I die-cut multiple fish from the Cat Holder dieset and ink blended them with two icy blue colors before adding eyes with a black glaze pen and highlights with a white gel pen. I gave one to the penguin to hold and added the rest to the icy waters. Then I added a sentiment from the new Let it Snowstamp set that has coordinating dies and, lastly, added a flurry of white clay snowflakes from the Winter WonderlandMix.
Keep scrolling to see more amazing inspiration from the design team!
We hope you enjoyed today’s sneak peek. We will see you again tomorrow for another day of sneak peeks and inpiration!
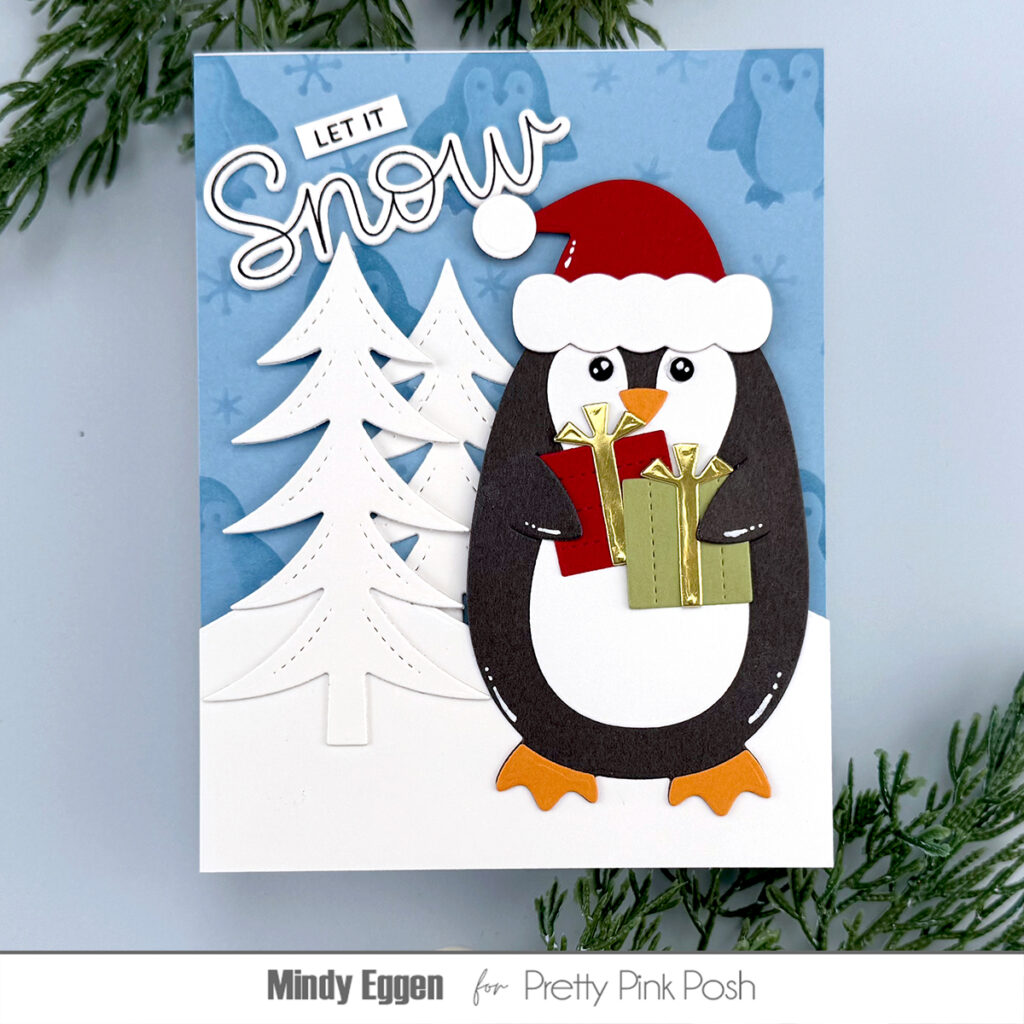
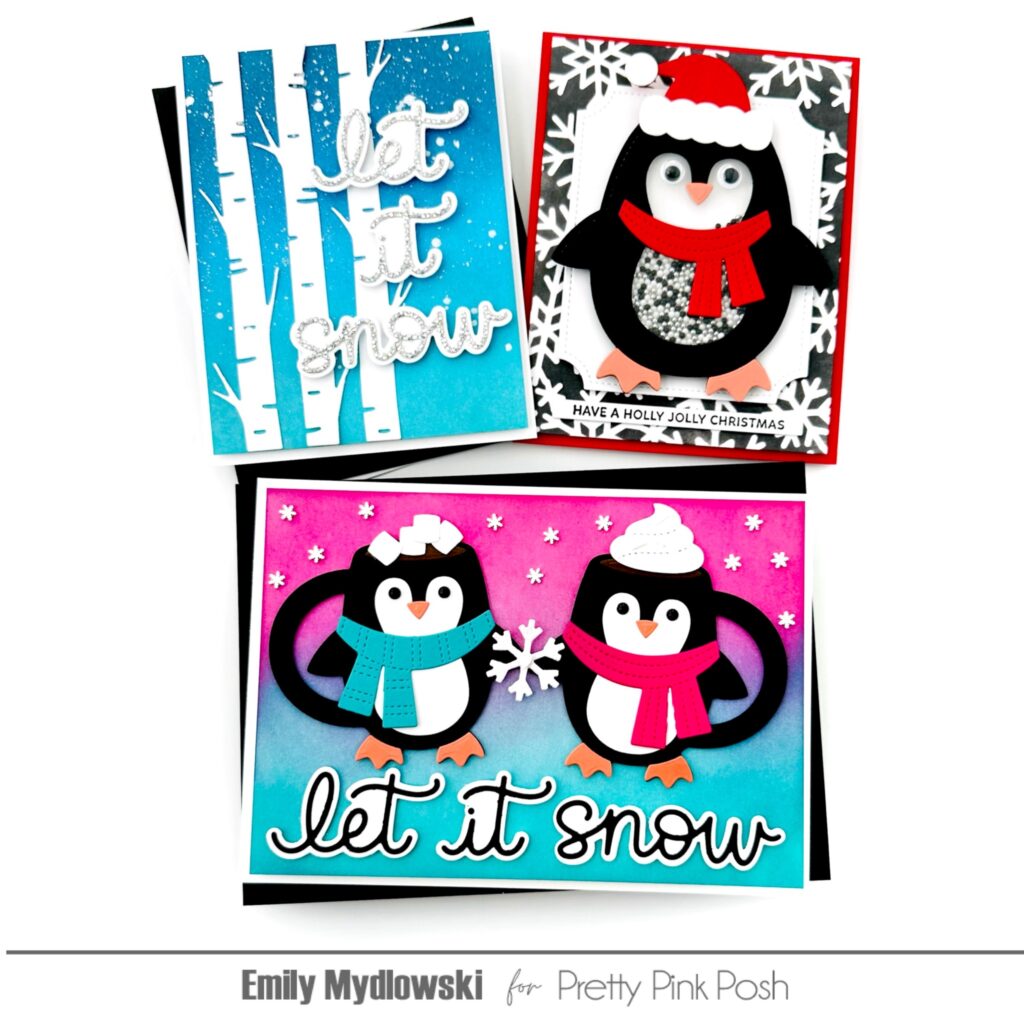
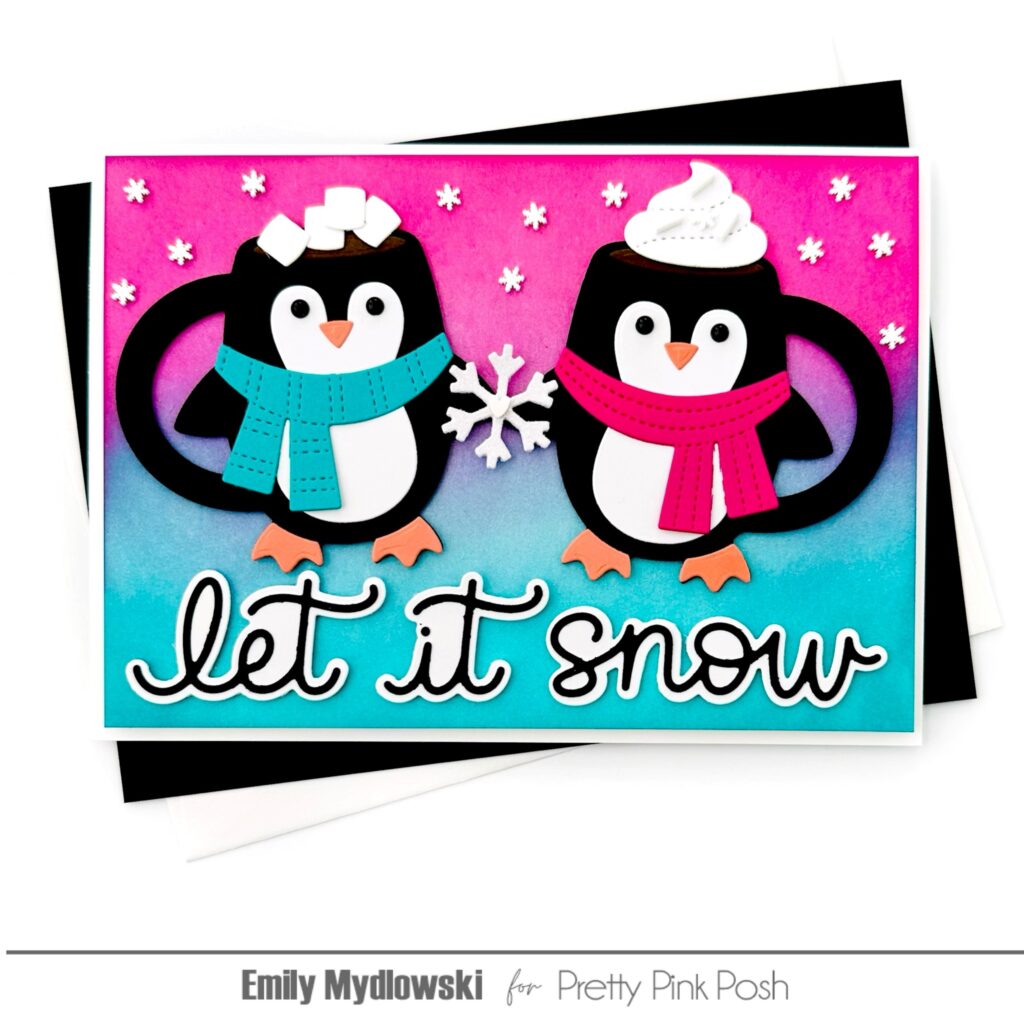
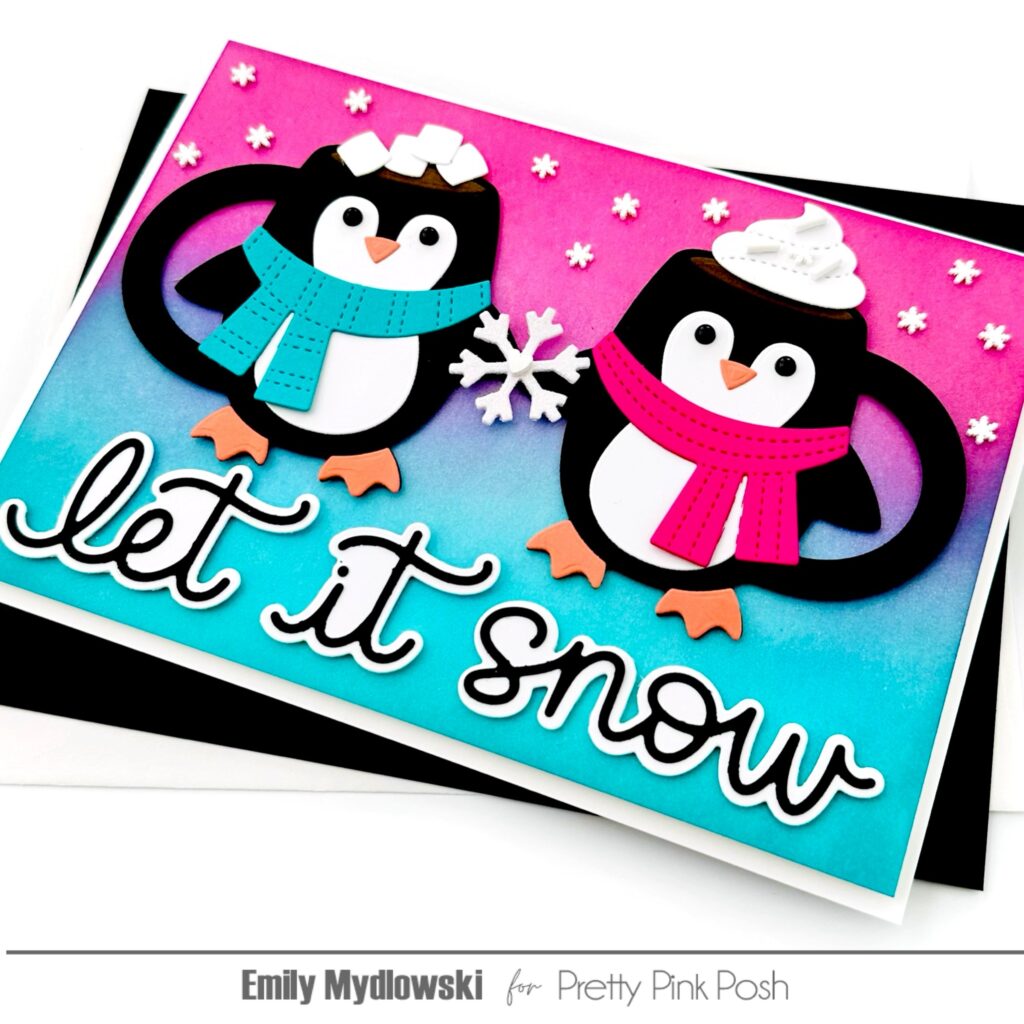
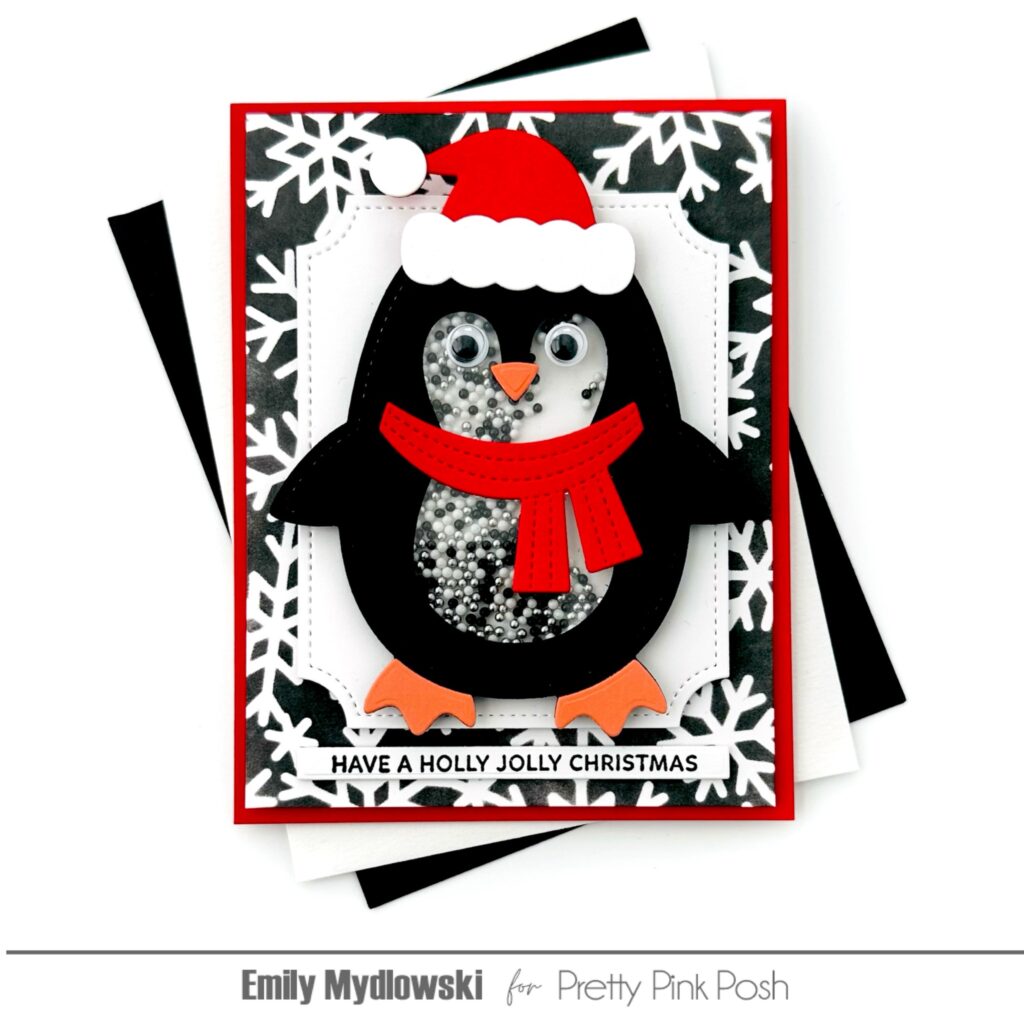
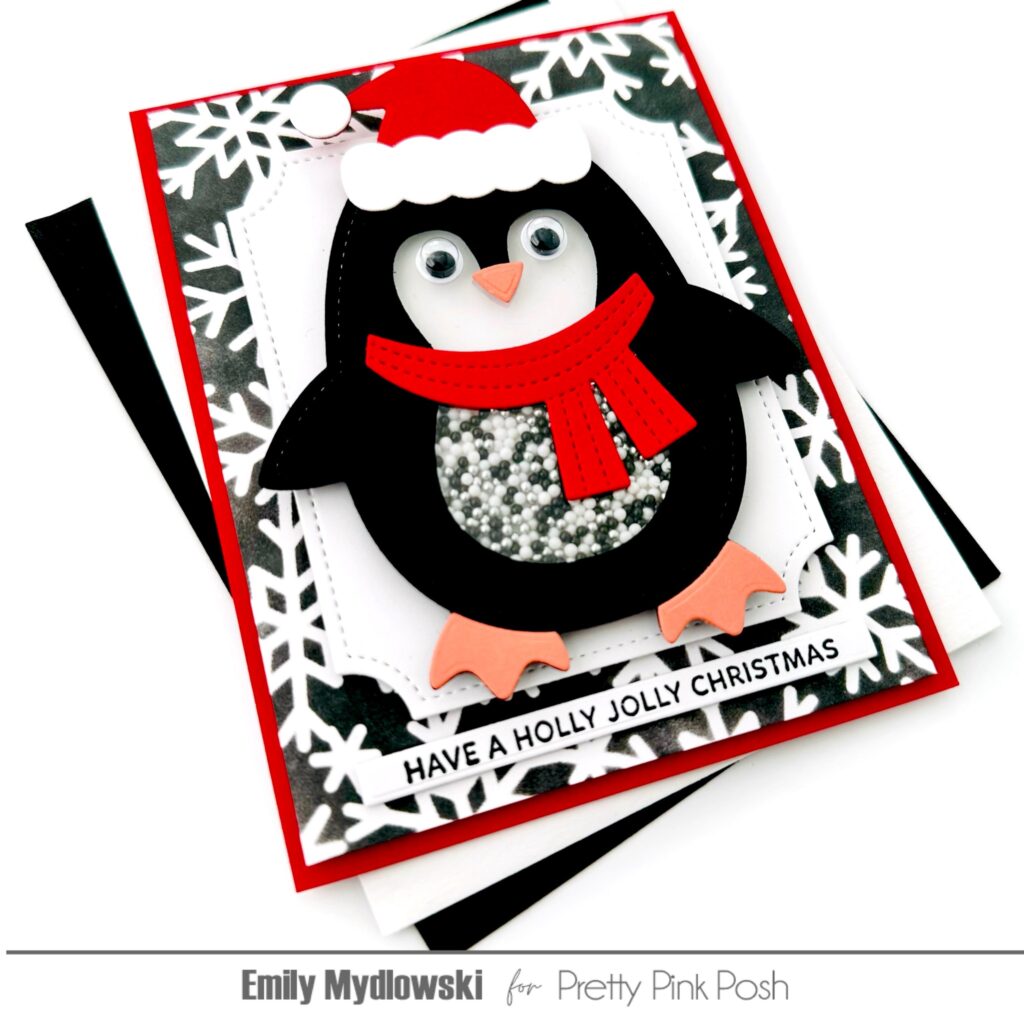
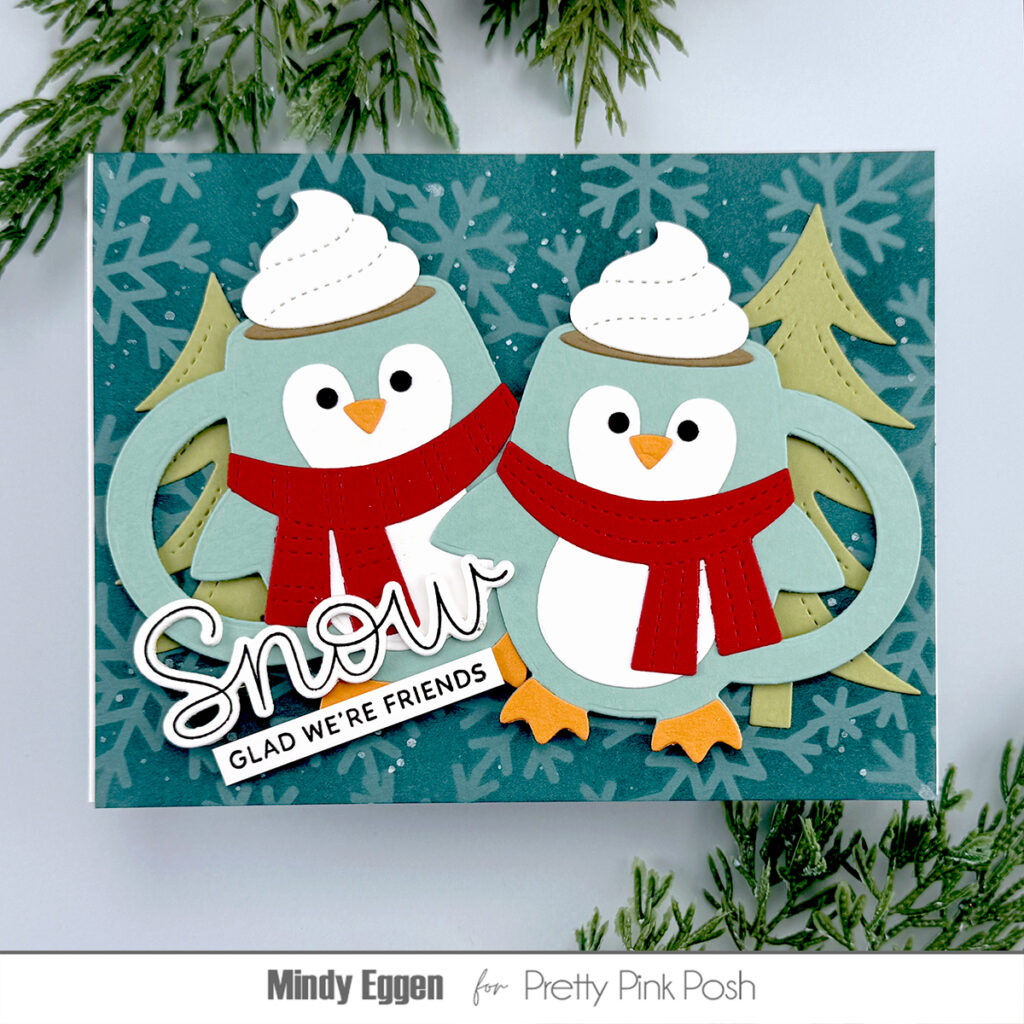
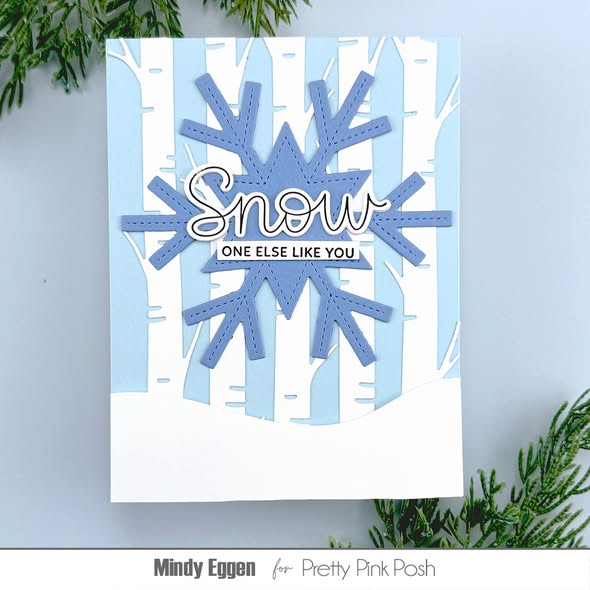
Welcome as we kick off the first day of our November 6th release. Today we’ll be taking a look at the Penguin Mugs, Penguin Shaker, Birch Trees and Let It Snow Shadow die sets.
Hi crafty friends! Emily Mydlowski here with you today to sharing winter wonderland sneak peeks using a variety of new dies from the upcoming winter release.
Let it Snow Penguin Mugs
When I first saw the Penguin Mugs, I knew I wanted to have a cute couple/set of penguin mugs so I went with an A7-sized card design. To my happy surprise the Black & White cardstock Let It Snow Shadow sentiment fit perfectly across the A7 panel!
To create the penguins, I used the Penguin Mugs Die Set to cut all the pieces from colored cardstock. Black for the mugs, white for the penguin body, marshmallows & whipped cream, orange for the beak and feet and Teal & Pink for the scarves. I used Onyx Pearls for the eyes.
For the northern lights background, I matched the scarf colors and ink-blended the top and bottom of an A7 white cardstock panel in pink and teal dye inks creating with pretty blended purple center. After adding the sentiment and penguins to the northern lights background, I added a glitter cardstock snowflake with a clay heart between the penguins and Winter Wonderland Clay Confetti snowflakes.
Penguin Shaker
Oh my cuteness, the Penguin Shaker is absolutely adorable—especially when you add a few holiday accessories like Santa’s Hat (Penguin Holder Sneak) & Scarf from Penguin Mugs plus googly eyes. For the shaker bits, I used the Black Tie Shaker Beads.
I used the Snowflake Background stencil to create the background with black ink on white cardstock. Then I layered the Penguin to a Notched Rectangle. To finish the card, I added the Christmas Sentiment Strip and adhered the decorated panel to a bright red cardbase.
Winterscape Let it Snow & Winter Trees
This was a quick and easy card with a few simple elements but looks so elegant and pretty. I love the way white Birch Trees glow against a dark snowy sky turning the cold into something magical.
To create the magical winter card design, I added white Winter Tree die cuts to a dark blue & teal ink-blended panel with white ink splatters for the snow. Then I added a sparkly silver glitter cardstock & white Let It Snow Shadow die cut sentiment.
Here’s some more inspration using these products from the team!
Thanks for stopping by for the first day of sneak peeks. We’ll see you again tomorrow!
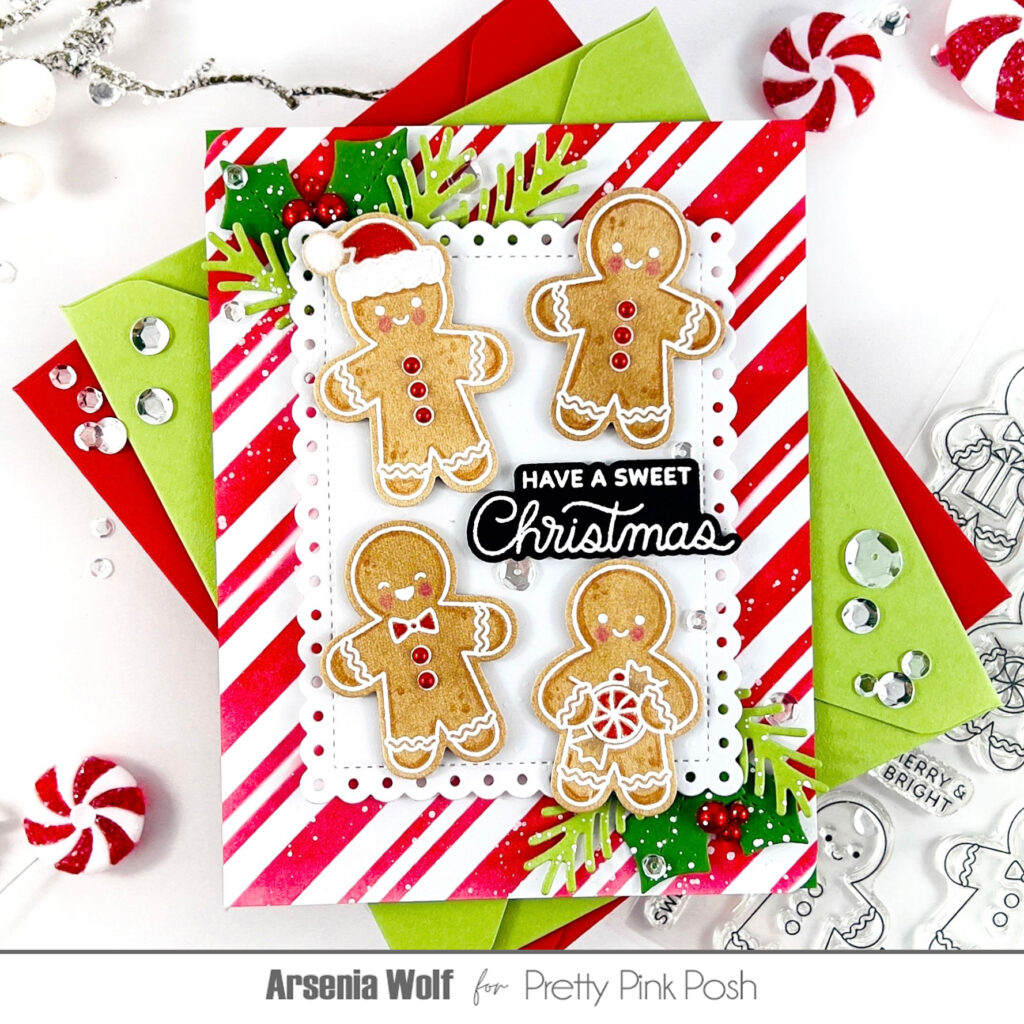
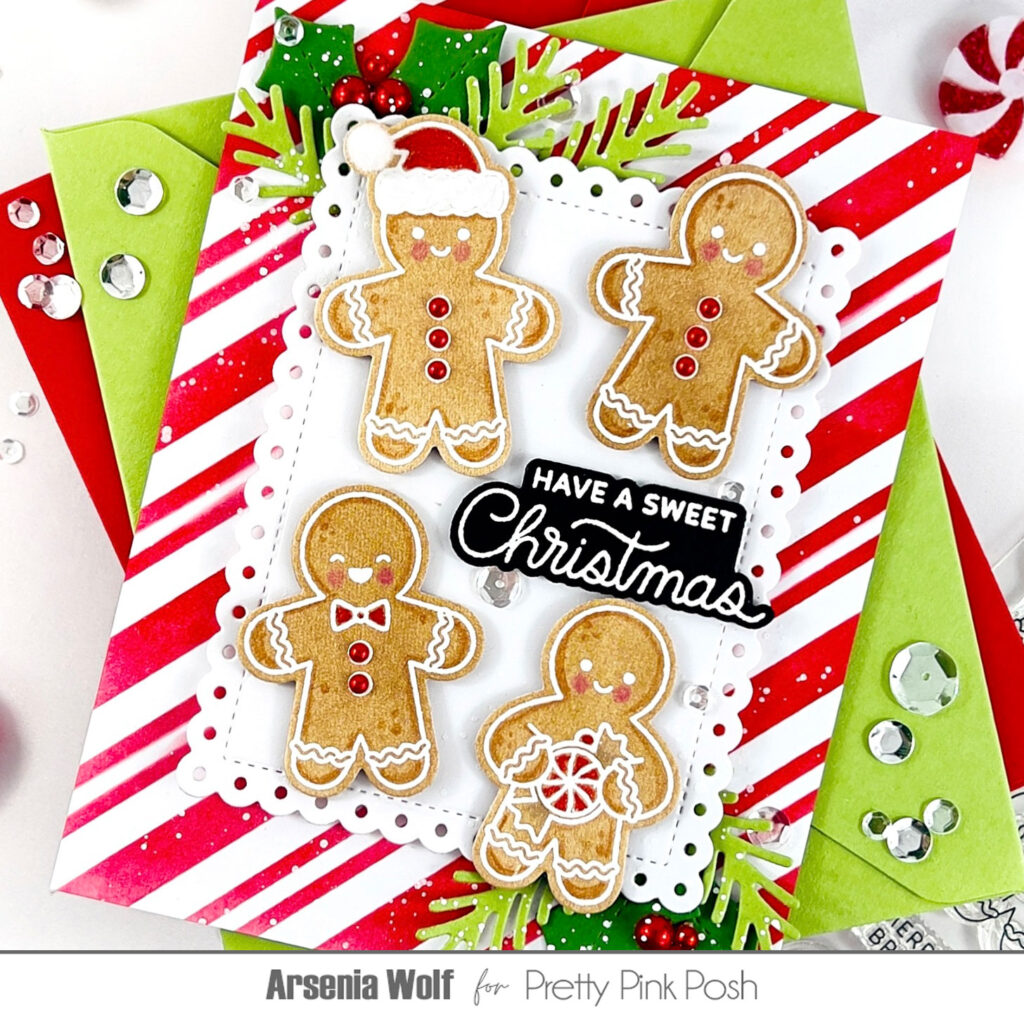
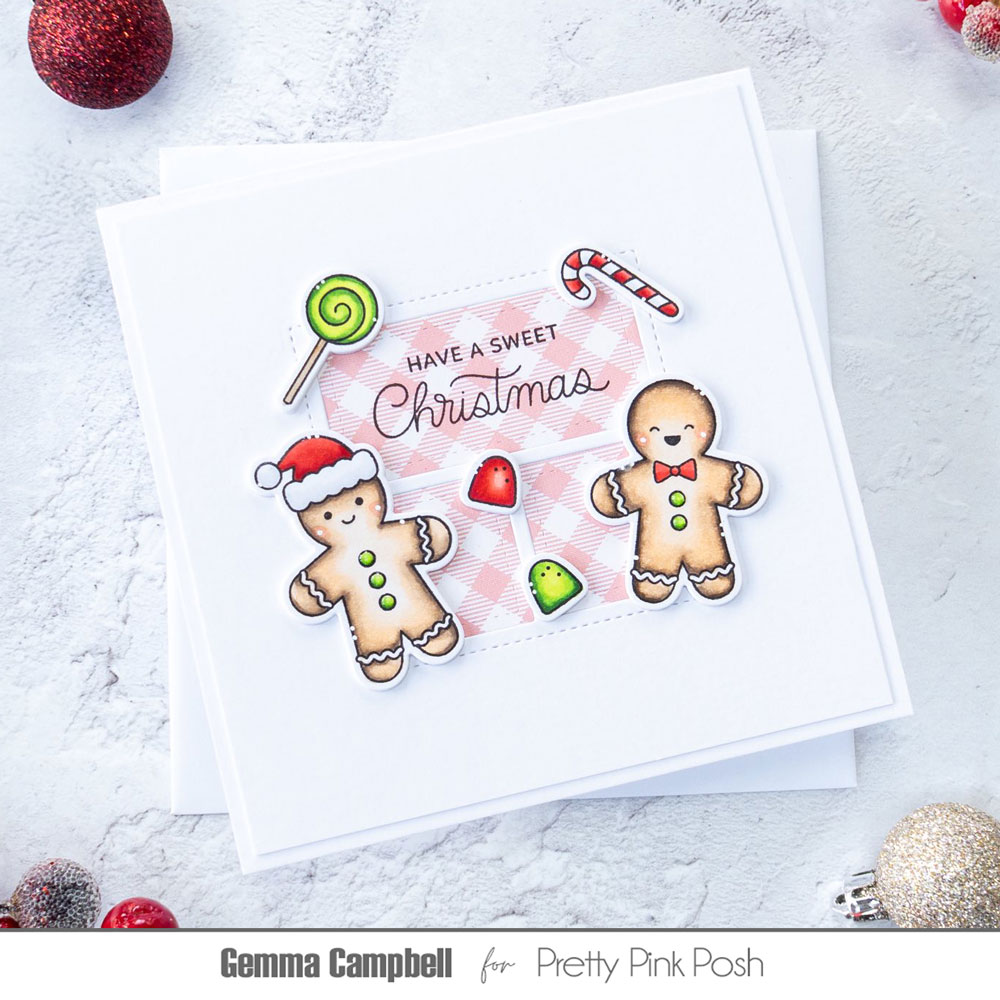
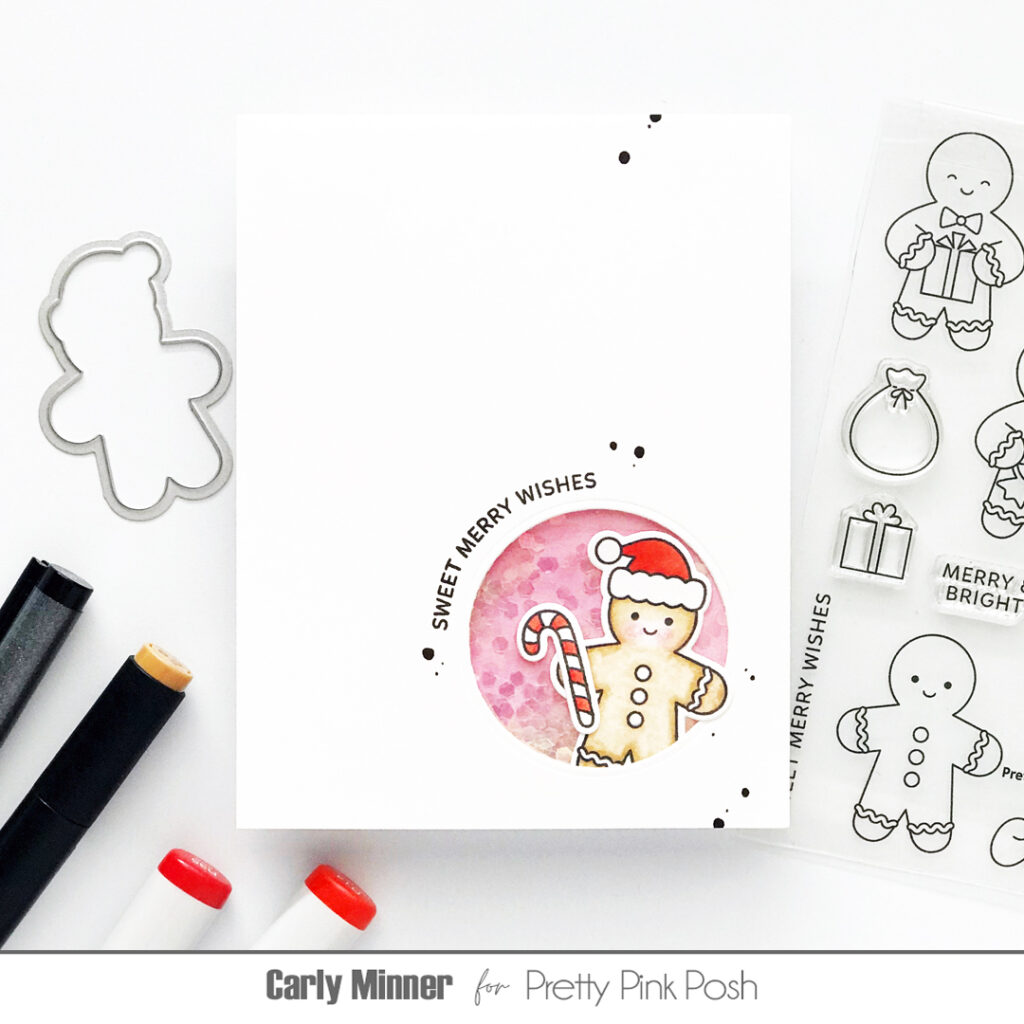
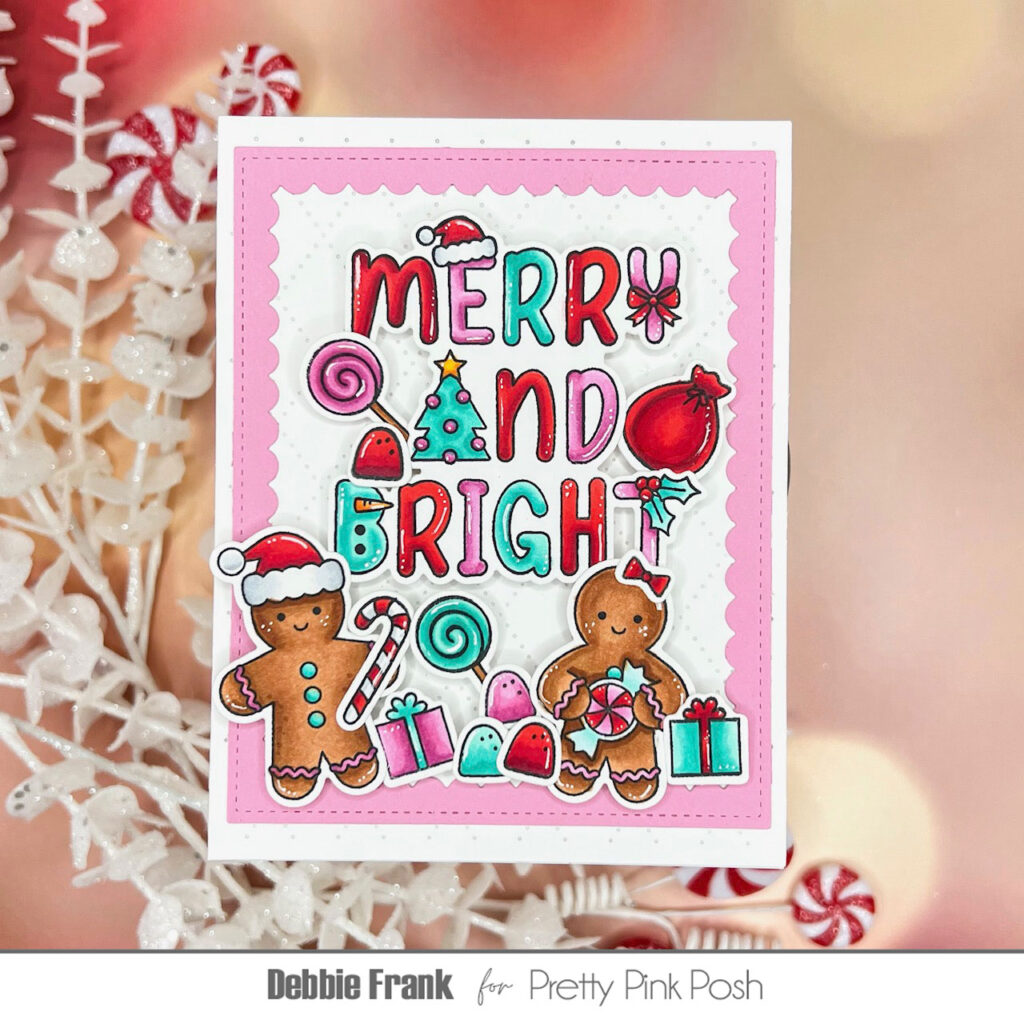
Welcome to the last day of sneak peeks of our September 18th release. Today we’ll be taking a look at the new stamps sets, along with the Gingerbread Mugs die set.
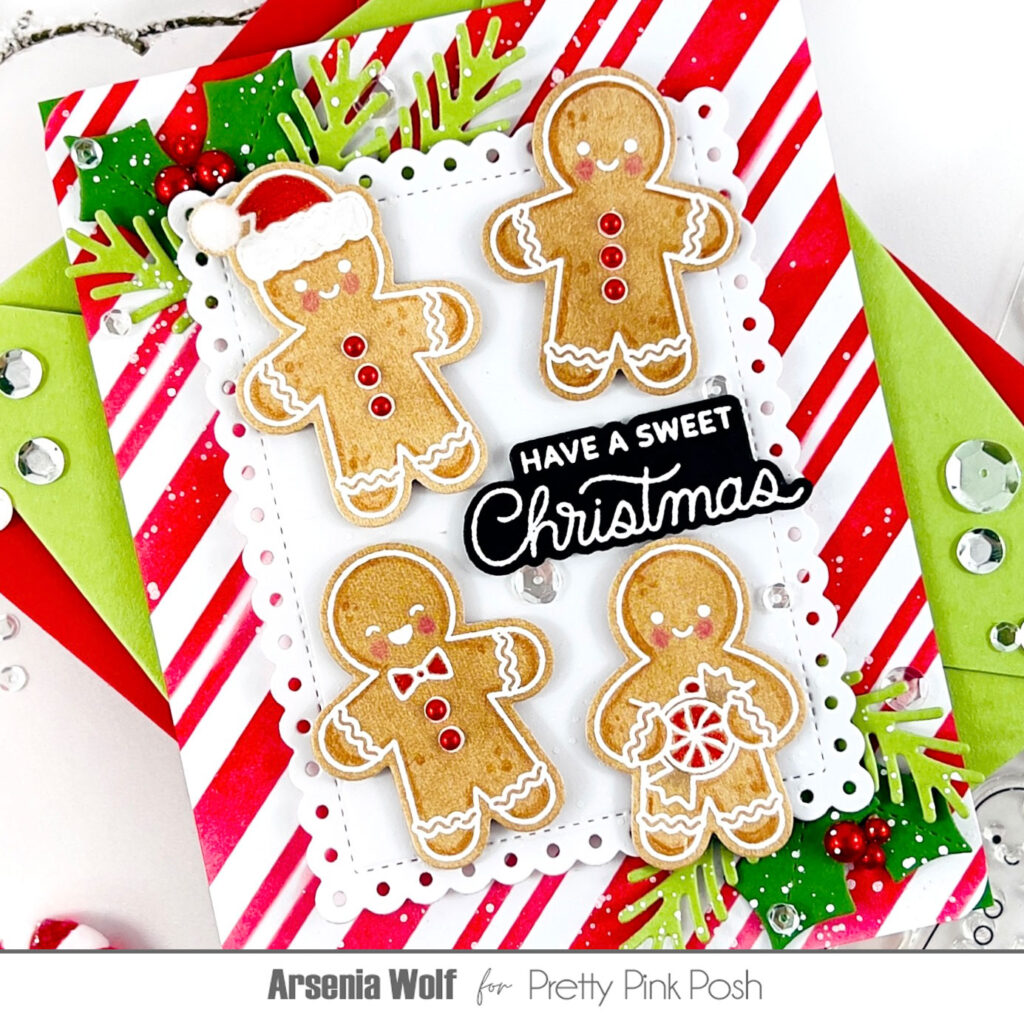
Hello crafty friends! Arsenia here with Day 4 of our September Holiday Sneak Peeks!
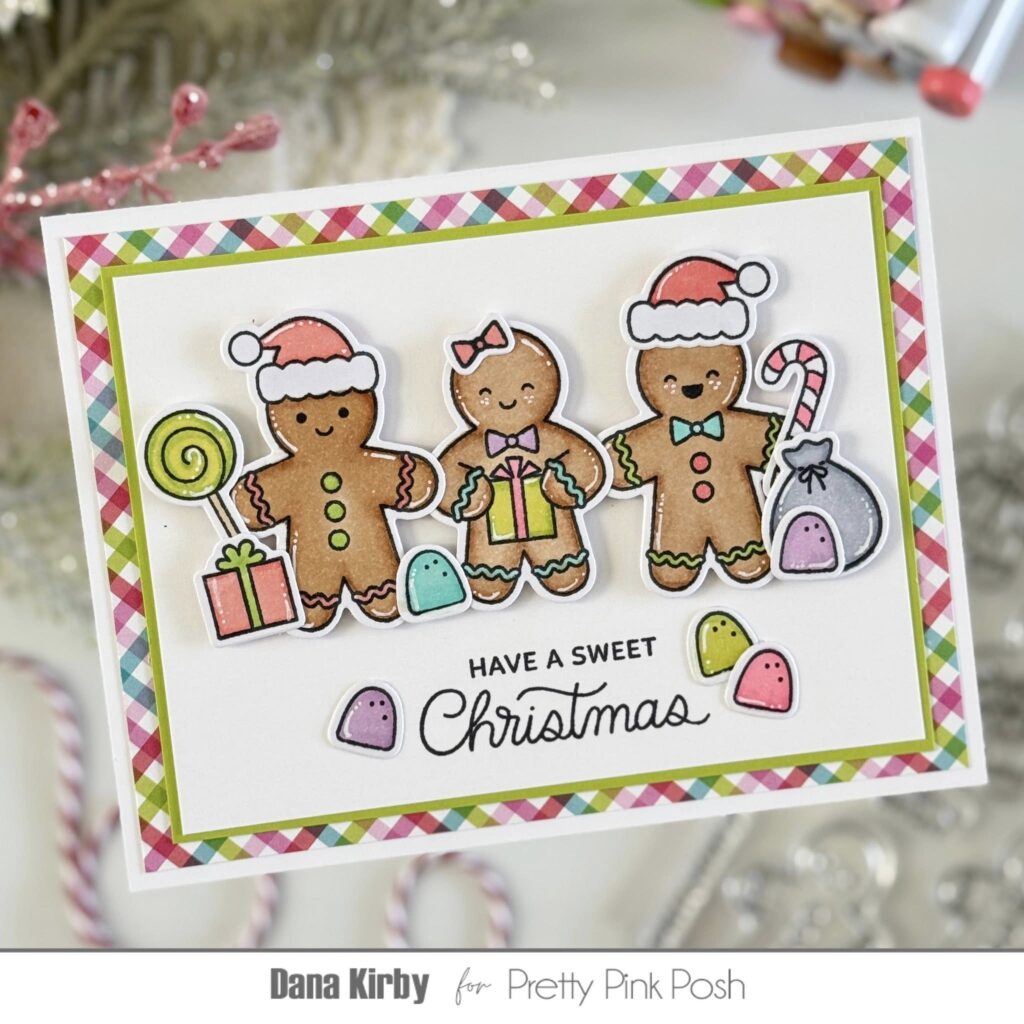
Today is extra sweet because we’re diving into the most adorable stamp sets (with coordinating dies, of course!) and the must-have Gingerbread Mugs Die Set! Trust me, these goodies are packed with festive charm and whimsy—perfect for holiday crafting magic.
For my card today, I reached for the brand-new Gingerbread Friends stamp set and oh my gumdrops—they are the cutest little cookie crew you’ve ever seen! I’m saving the Gingerbread Mugs Die Set sneak peek for my fellow design team elves, so make sure to keep scrolling and see all the amazing creations from the team!
I kept the background clean and cheerful by stenciling the new Candy Cane Stripes stencil in a vibrant cherry red—classic holiday vibes, right? Then came the stars of the show: the adorable gingerbread peeps!
To get that classic white icing detail, I heat-embossed white powder onto some patterned paper from my stash—voilà, instant sweetness. After die-cutting my gingerbread cuties, I brought them to life with a bit of coloring magic using Castle Art colored pencils (Cinnamon, Rose Pink, Scarlet Red, Davy’s Grey, and Titanium White).
And because no gingerbread is complete without a little flair, I added:
A white pompom to the gingerbread friend wearing a Santa hat
A cozy neutral base using the Eyelet Rectangle Dies, with festive corners from the new Christmas Bell Shaker Die Set
For the finishing touch, I heat-embossed a sweet sentiment from the new Gingerbread Friends stamp set in white on black cardstock. A touch of white splatter, and ta-da—my card is complete and full of holiday cheer!
Keep scrolling to find even more sneak peek inspiration from the team!
I’m absolutely smitten with how it turned out—cute, cozy, and perfect for the season. I hope it brings a little extra holiday spirit your way!