The November 2025 Release is now available in the Pretty Pink Posh Shop and select retailers that carry our products. If you missed our post yesterday, we revealed all of the products in picture form, but if you would like to see them in a video, Mindy has that for you today!
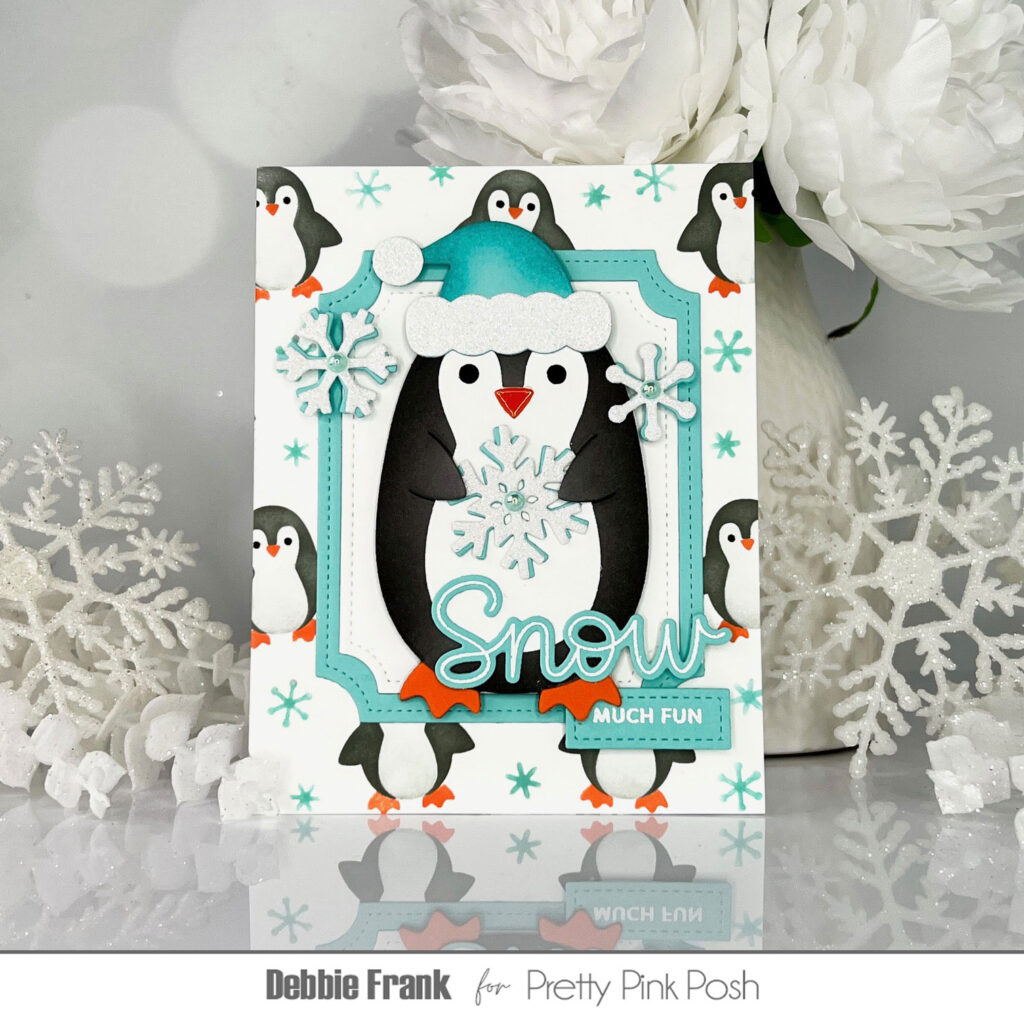
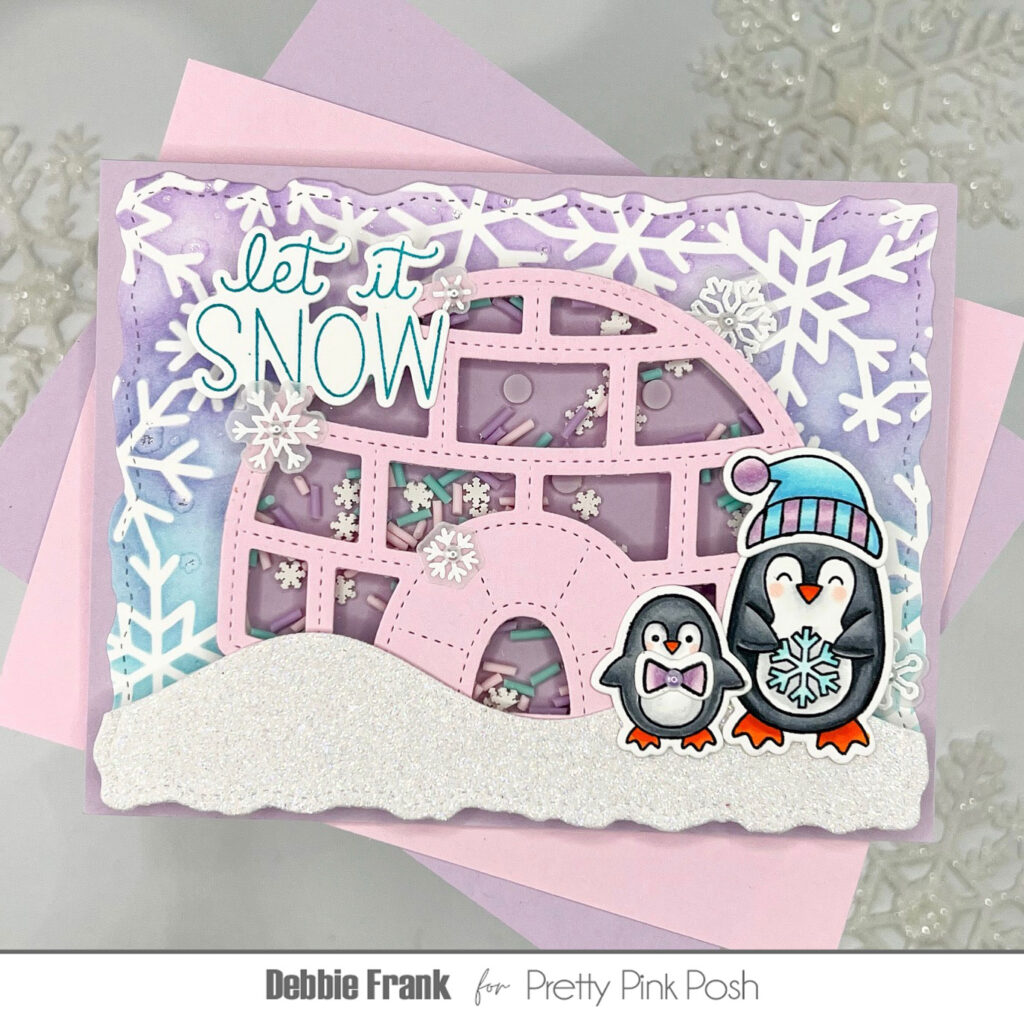
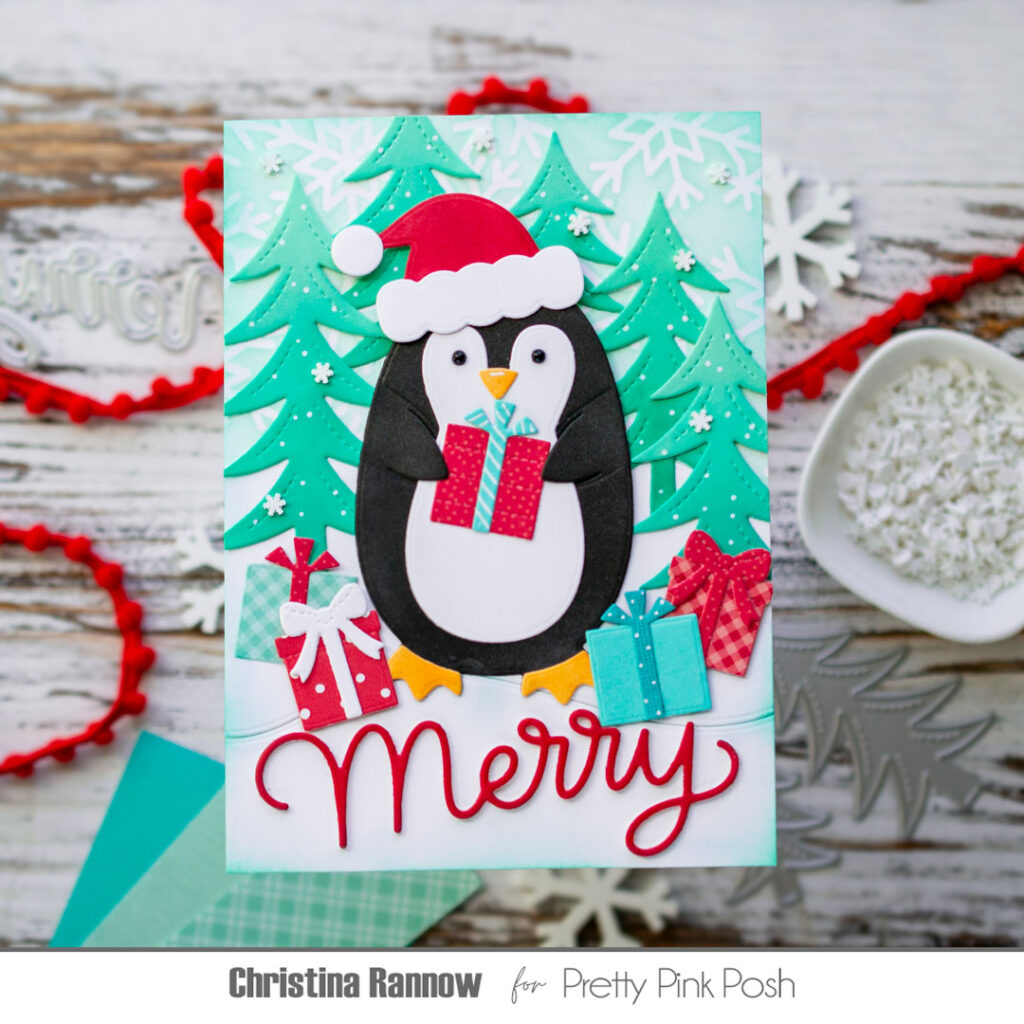
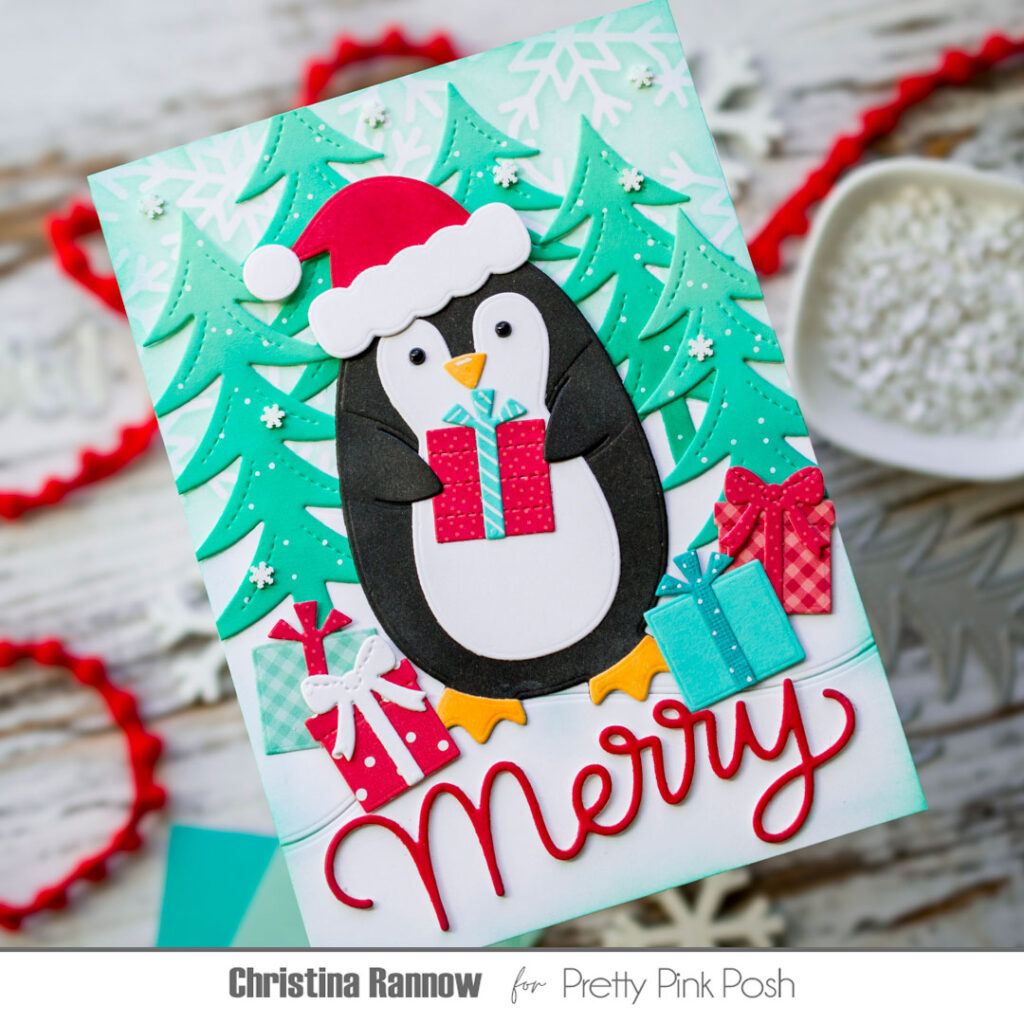
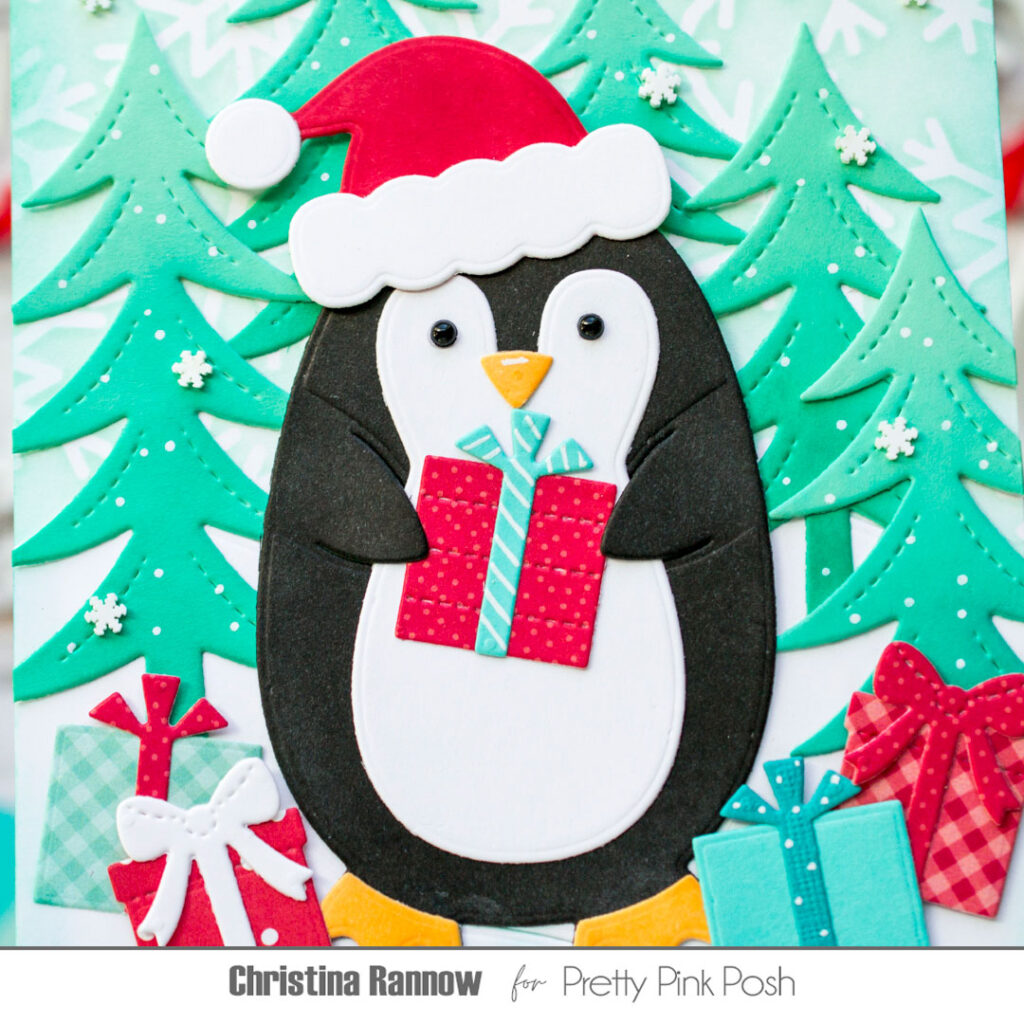
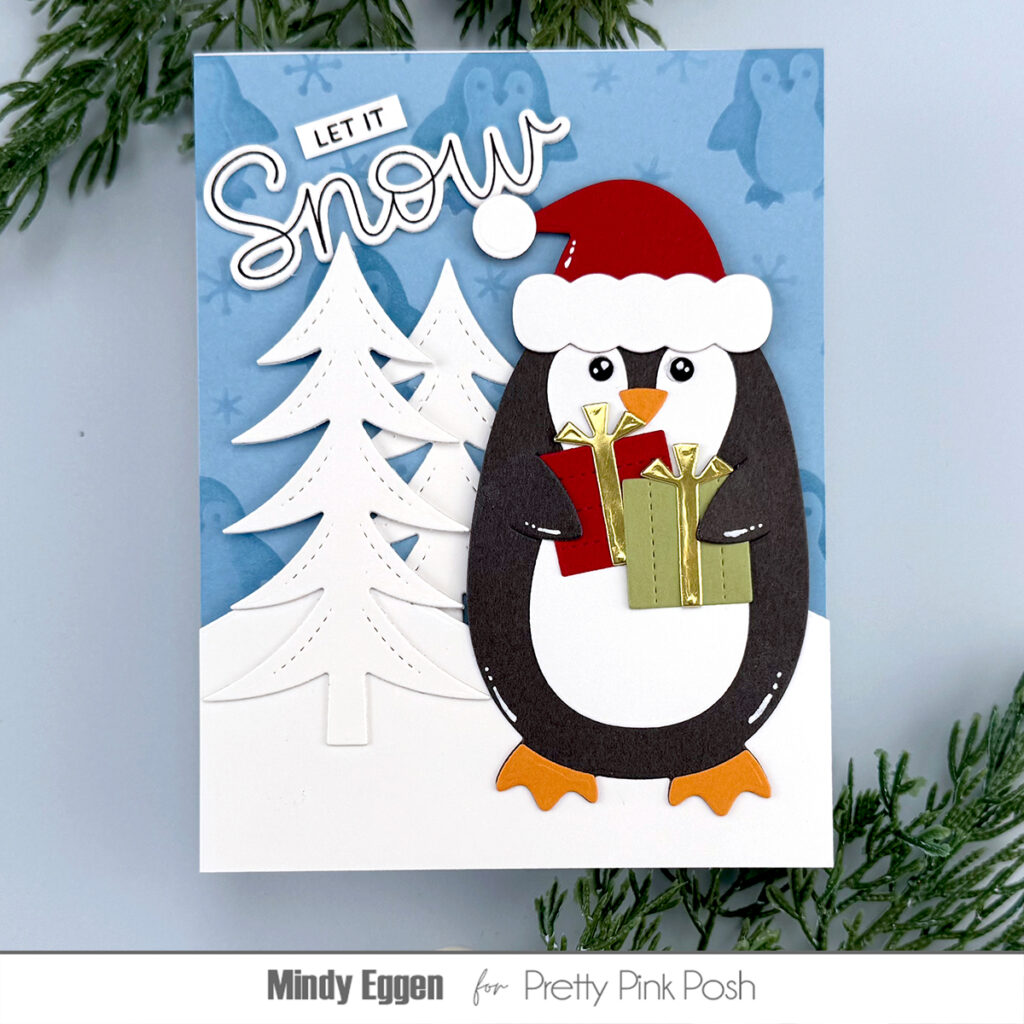
To start off with my card today, I took a standard A2 panel and the Layered Penguins Stencil onto a grip mat and ink blended on dye inks.
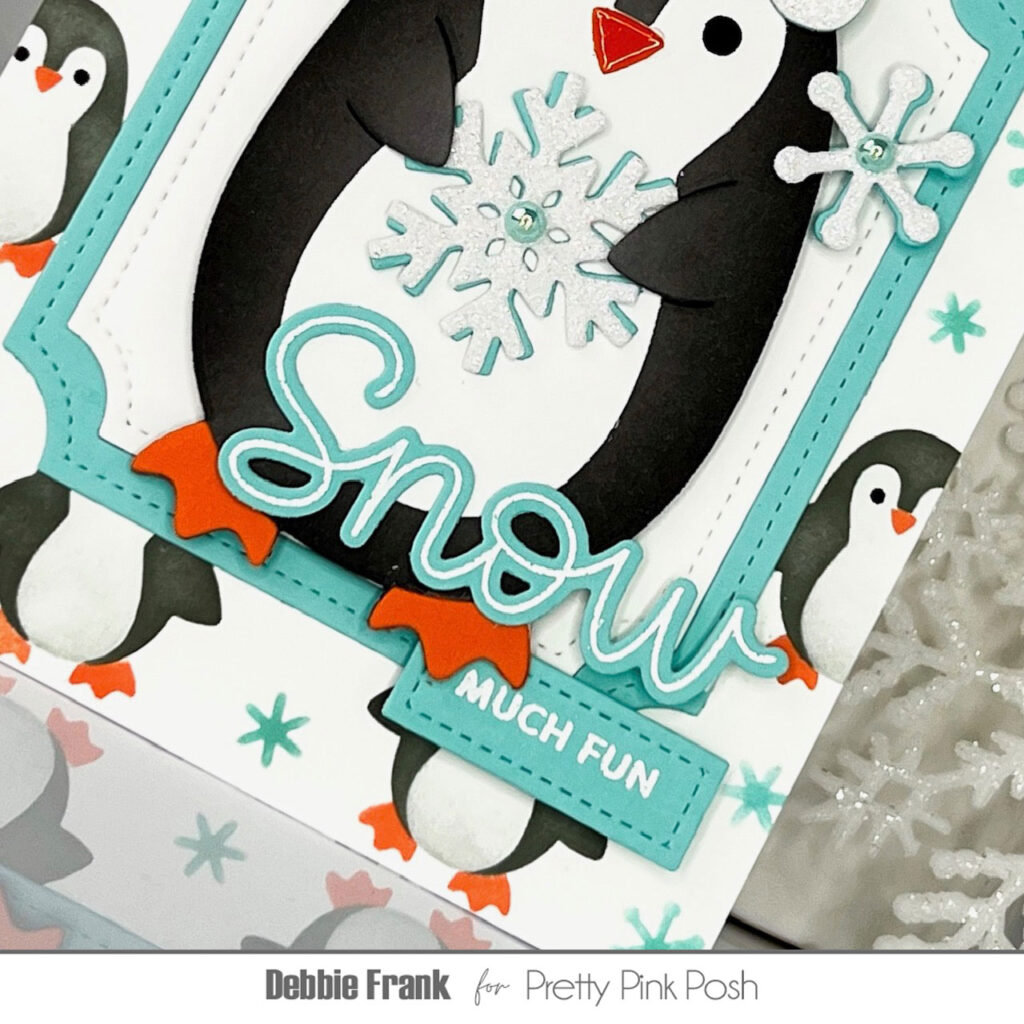
Next, with the Notched Rectangles Dies I die cut out with the two largest dies. The largest die from a matching teal card stock to the background panel. And the other with a white card stock to adhered them together to give a nice frame for the penguin. And attached to the Penguin panel background with liquid glue.
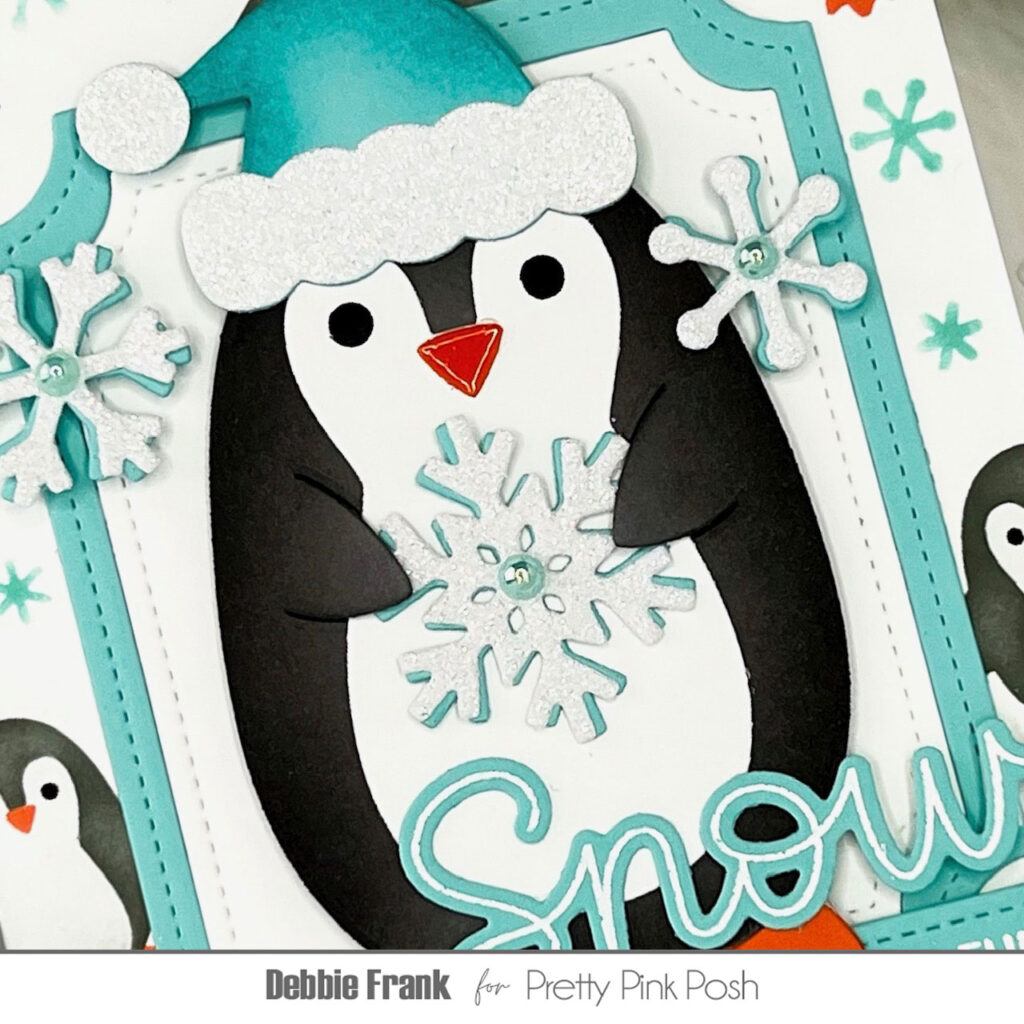
After I die cut out the Penguin Holder, he needed the Santa hat from the set. I did an ink blend with dye ink on the edge for dimension, and a glitter brim on the hat. I decide to have the Penguin holding a snowflake. So I die cut out a both of the snowflakes from the Christmas Holder Additions Dies. I layered up the snowflakes with glitter card stock and teal by off setting them a bit and attached with liquid glue. But I still needed one more smaller snowflake, using the one in the Christmas Bucket Additions Dies.
For my sentiment, I went with the Let it Snow stamp set. I stamped and white heat embossed the “Snow” and the “Much Fun”. I then die cut the “Snow” with the coordinating dies. For the “Much Fun” I used the Sentiment Strips Dies to cut it out.
The final touch was to added Sea Foam Pearls to the center of the snowflakes. Then attached the panel to the card base and added Glossy Accent to the beak of the penguin!
Welcome to the last day of sneak peeks of our November 6th release. Today we’ll be taking a look at the new stamps sets, along with the Igoo Shaker and Notched Rectangles die sets.
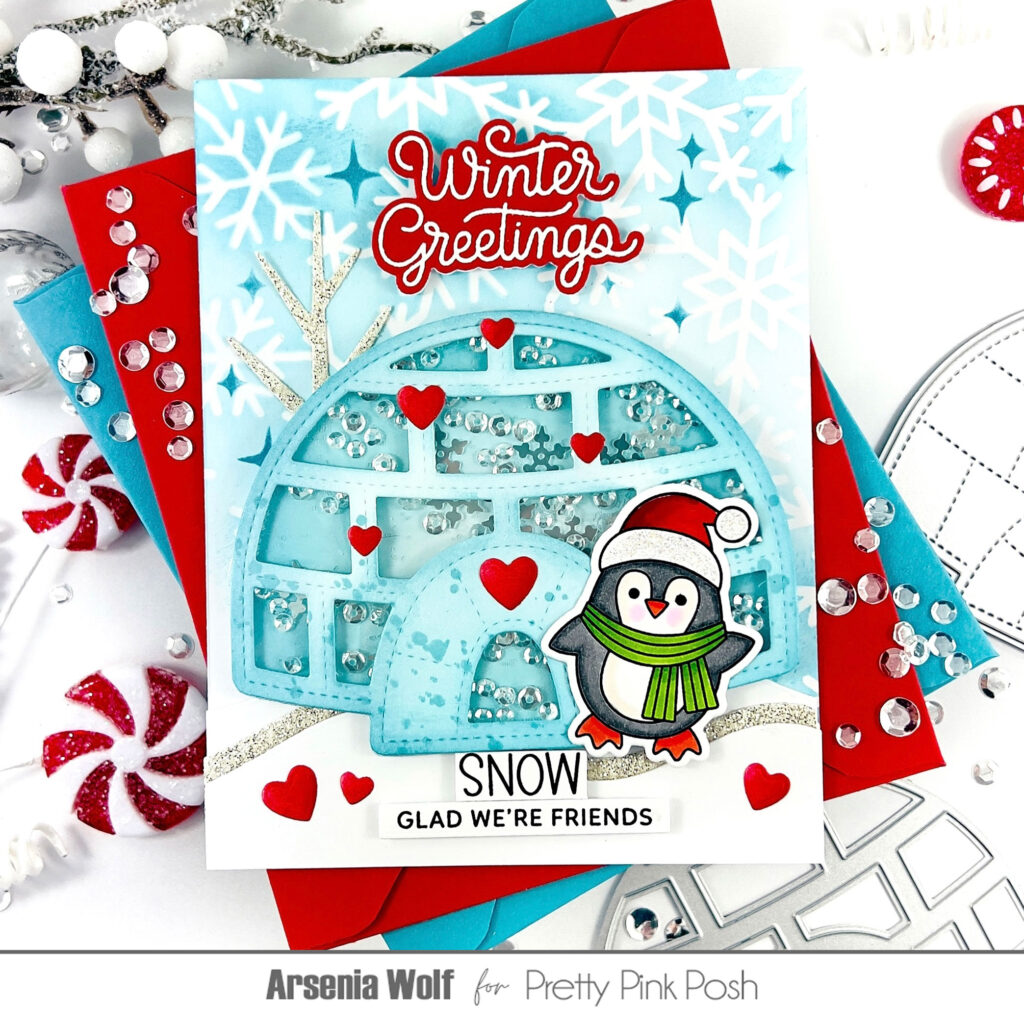
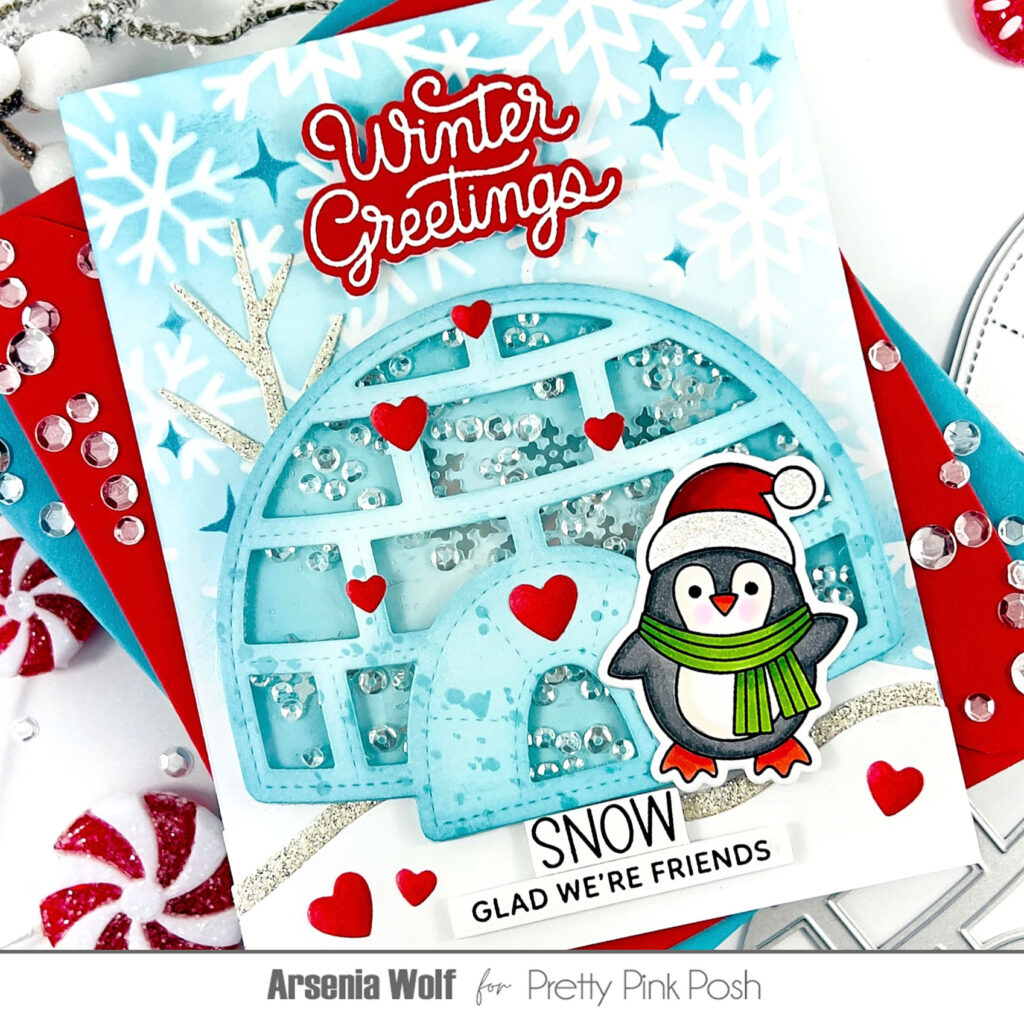
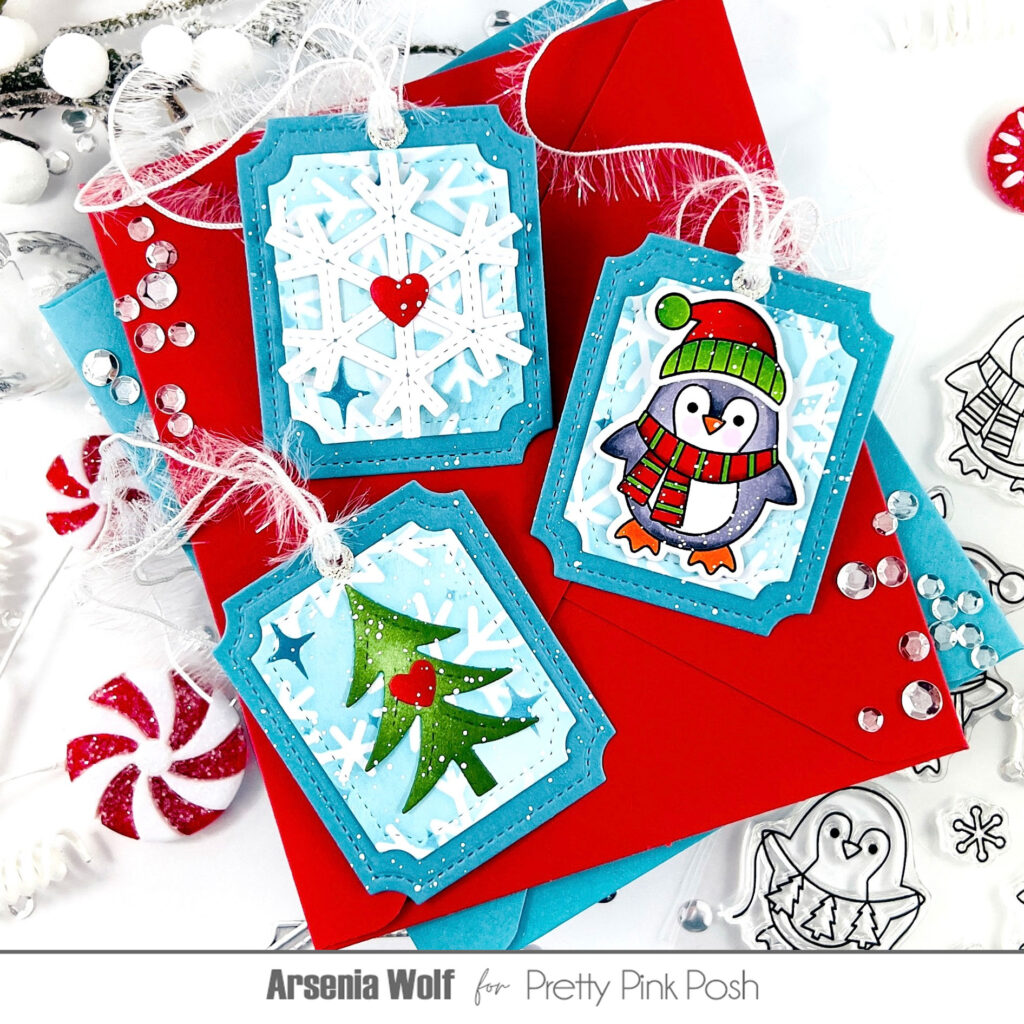
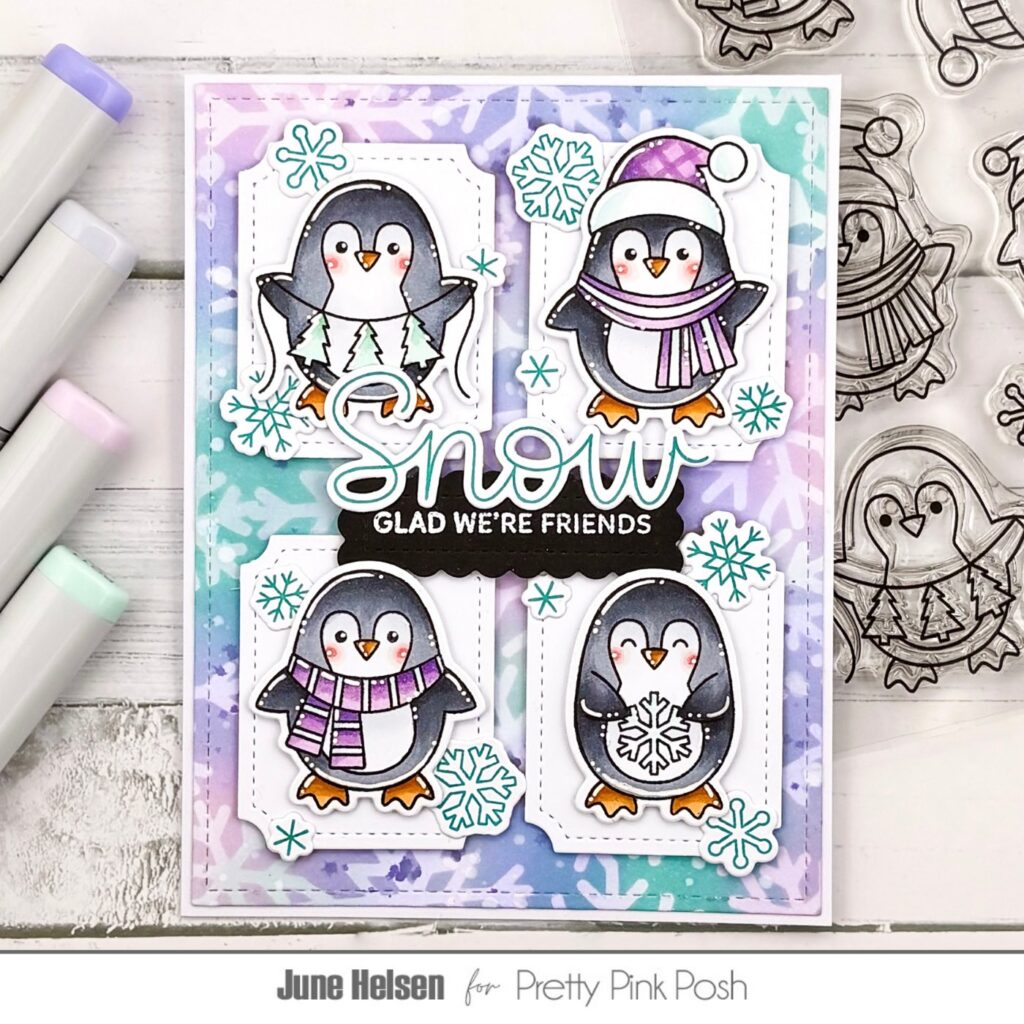
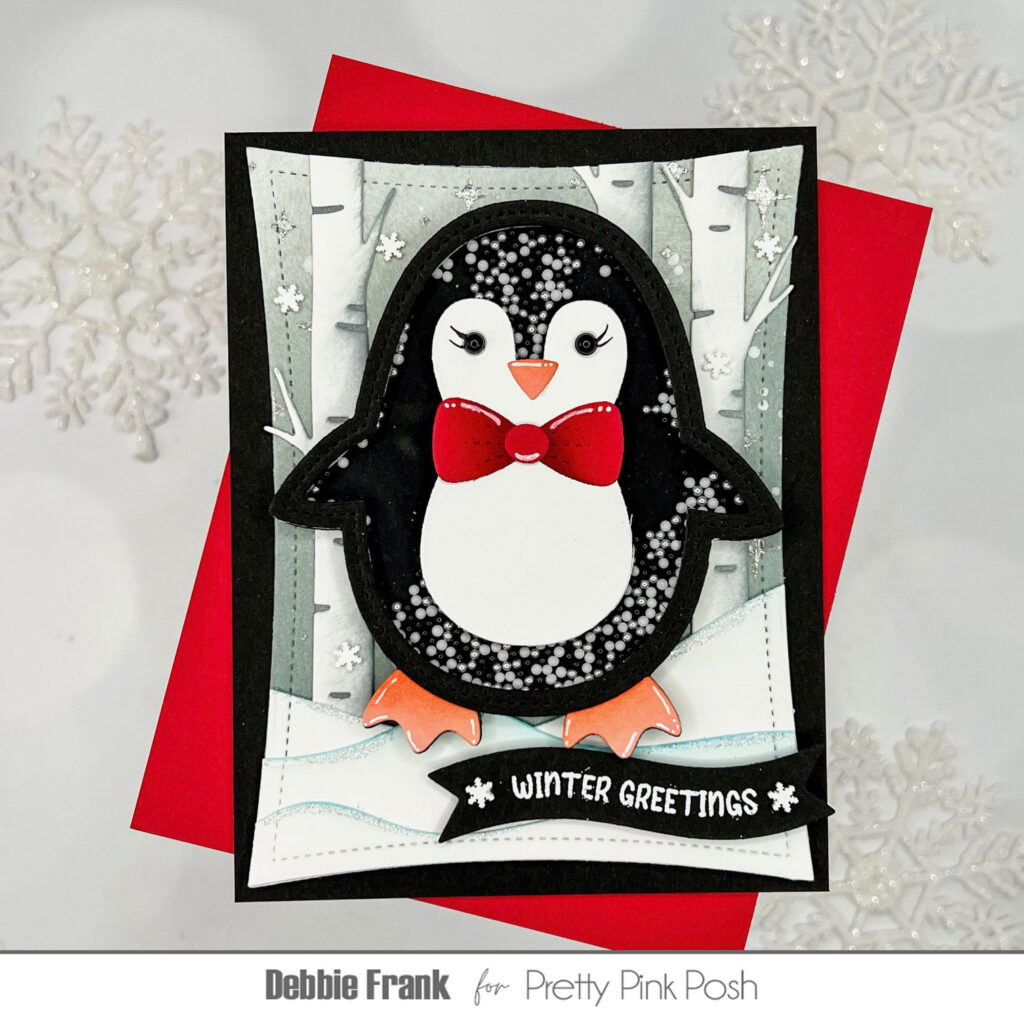
Hello, my crafty friends! Arsenia here, welcoming you to Day 3 of our cozy November Release Sneak Peeks! Today’s post is bursting with frosty charm, glittery snowbanks, and penguin-sized cuteness.
This release is absolutely snow-laden with possibilities — penguins galore, twinkling trees, icy hills, and a dash of holiday magic. I whipped up two cards, a set of tags, and even a little tag holder box (because what’s winter without a few surprises?). My color palette? Classic holiday red, frosty blues, and just a wink of green — simple, cozy, and perfectly festive. Let’s slide right in!
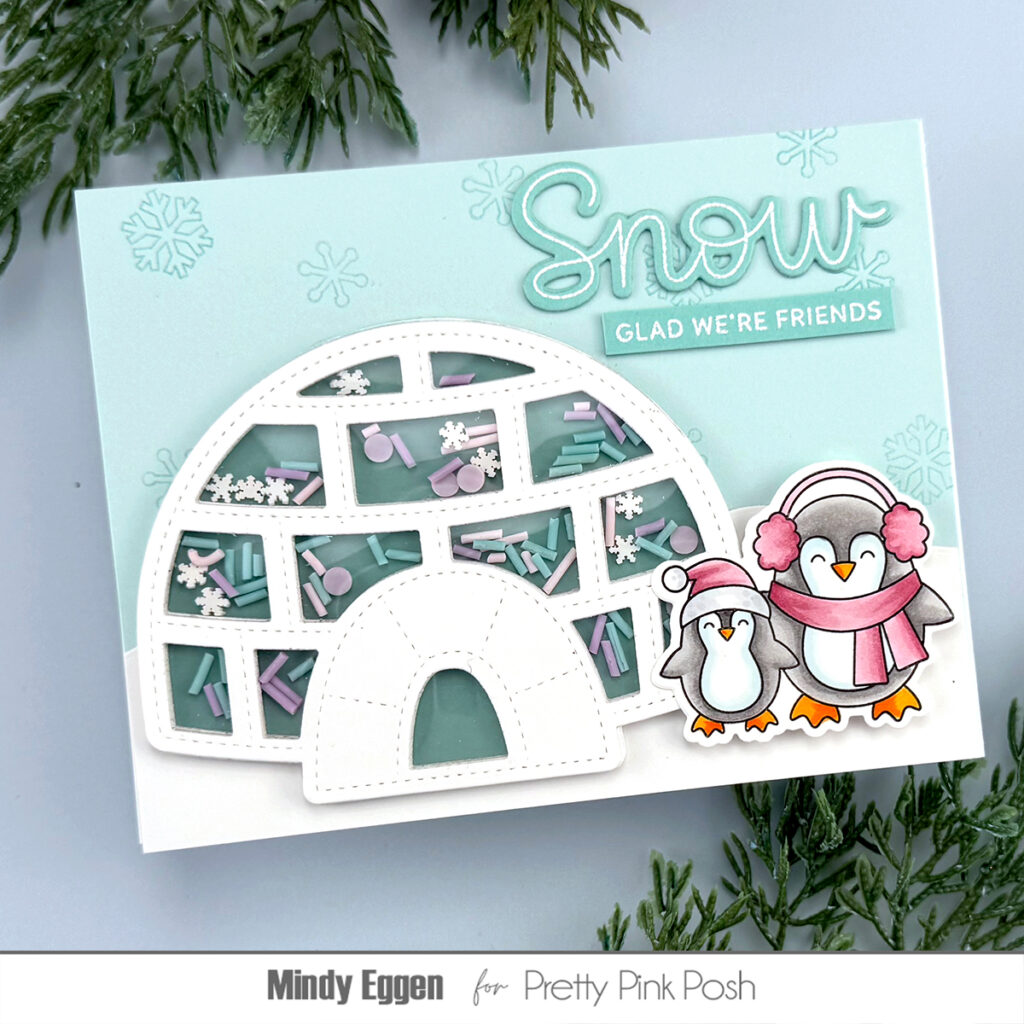
Card One: Shake, Sparkle, and Let It Snow!
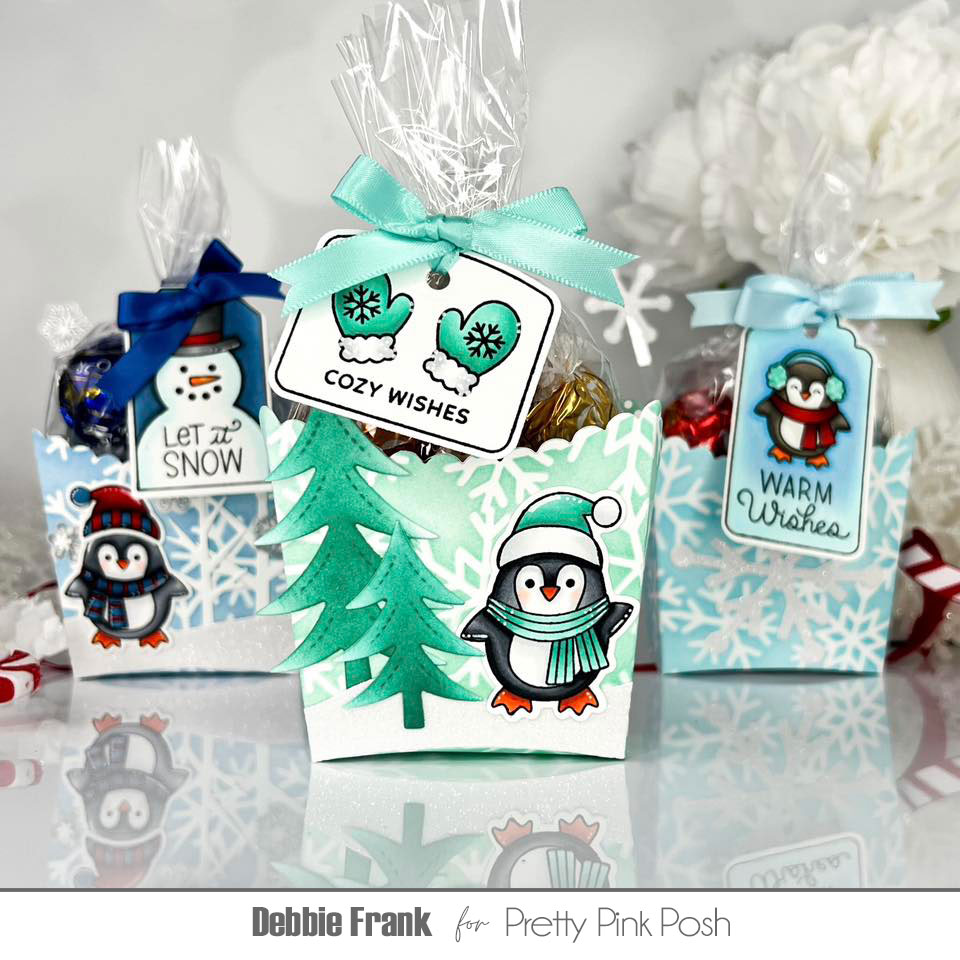
For my first frosty creation, I reached for the new Igloo Shaker Die, Penguin Friends stamp set (with coordinating dies), Let It Snow stamps, and Winter Tags — a perfect combo for a snow-filled celebration!
I started by ink-blending panels with the new Snowflake Background Stencil, using three shades of icy blue for a chilly ombré effect. Then I added a dark, twinkling layer using the new Twinkle Stencil — instant winter magic! These panels became the frosty base for all my projects today (yes, I made four — I couldn’t stop!).
Next up, the Igloo Shaker — cut from soft blue cardstock and gently ink-blended for frosty depth. I filled it with a storm of clear sequins and snowflake confetti, then layered three snowy hills using the new Snowy Hills Borders — two white and one glittery, because sparkle is always a good idea.
A charming winter tree (from the new Winter Trees Die Set) stood tall in the background, and of course, the star of the show — a cheerful little penguin from the Penguin Friends stamp set, all decked out with a touch of glitter on his hat!
For the sentiment, I white-embossed Winter Greetings onto red cardstock from the new Let it Snow Stamp set with coordinating dies. My sub sentiment is paired with the word snow from the Winter Tags set. A sprinkle of red hearts (thank you, Build A Heart Dies) finished it off perfectly. And just like that — a snowy, sparkly shaker card was born!
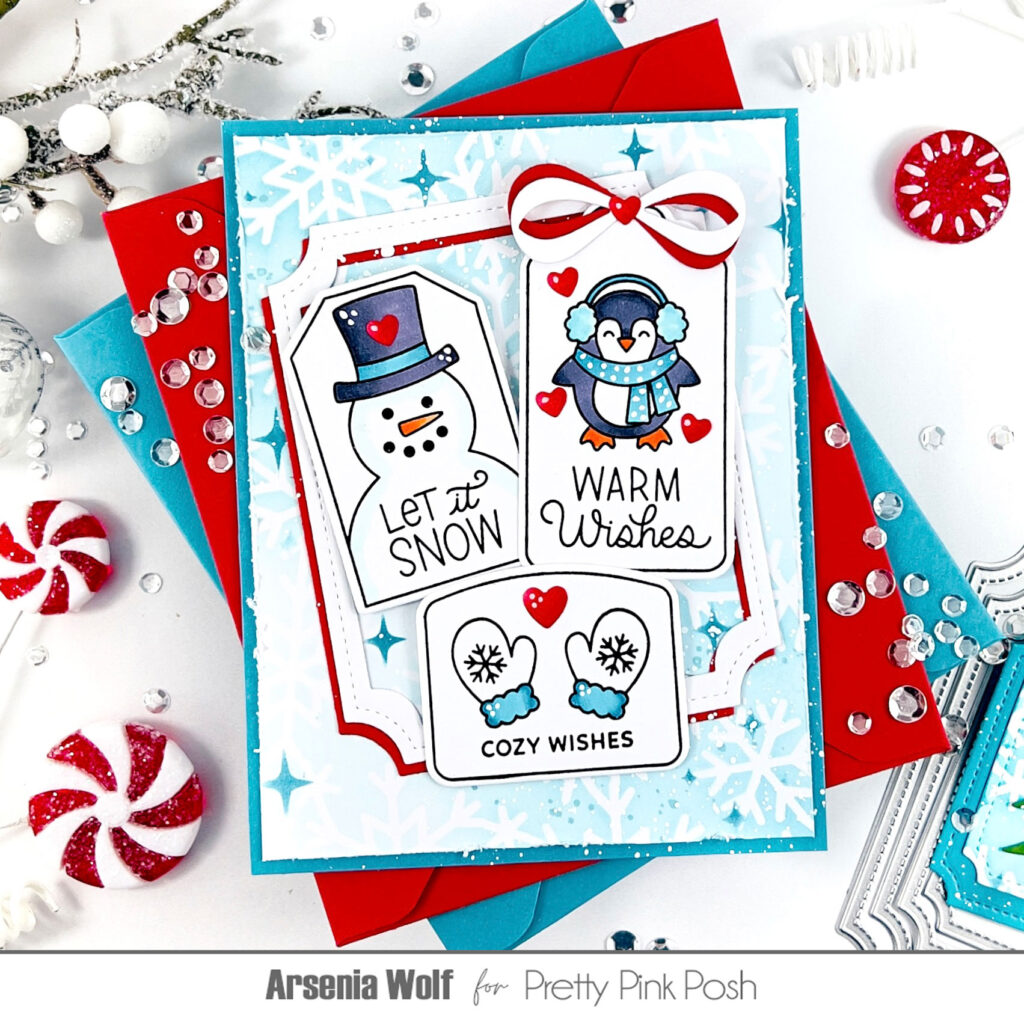
Card Two: Tags, Twinkles, and a Touch of Fun
For my next card, I used one of my stenciled panels (a blend of Snowflake Background and Twinkle Stencil). I trimmed it to size and mounted it on a blue card base.
Then came the stars of the show — three adorable images from the Winter Tags stamp set, colored up with my trusty OLO markers. To add a little dimension, I framed the scene using the new Notched Rectangles Dies — one crisp white frame and one in festive red, layered just slightly off-center.
A dainty bow (from the beloved Beautiful Bows Die Set) and a sprinkle of hearts from Build a Heart dies brought everything together. And because it wouldn’t be a proper winter card without it — I added white splatters for that freshly fallen snow look. Ta-da! You’d think tags belong on gifts, but oh no — they make stunning cards too!
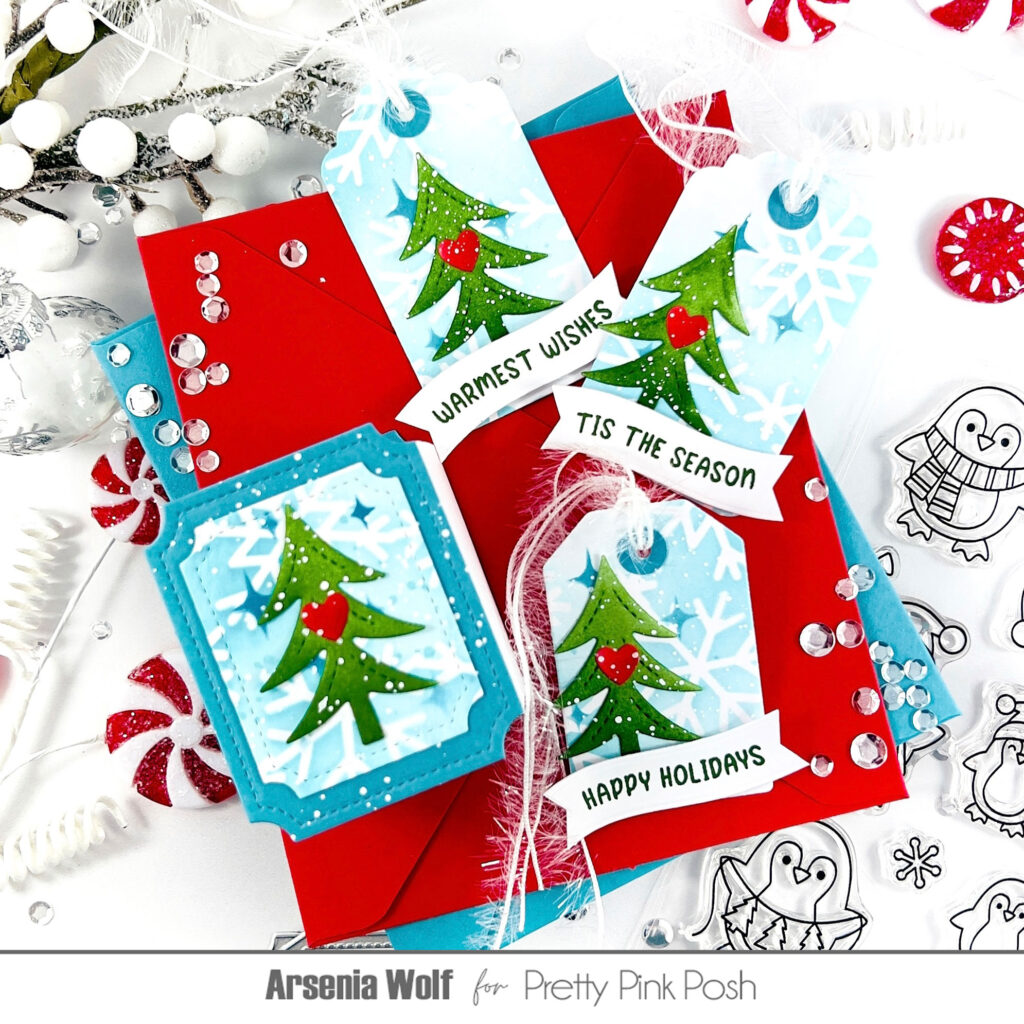
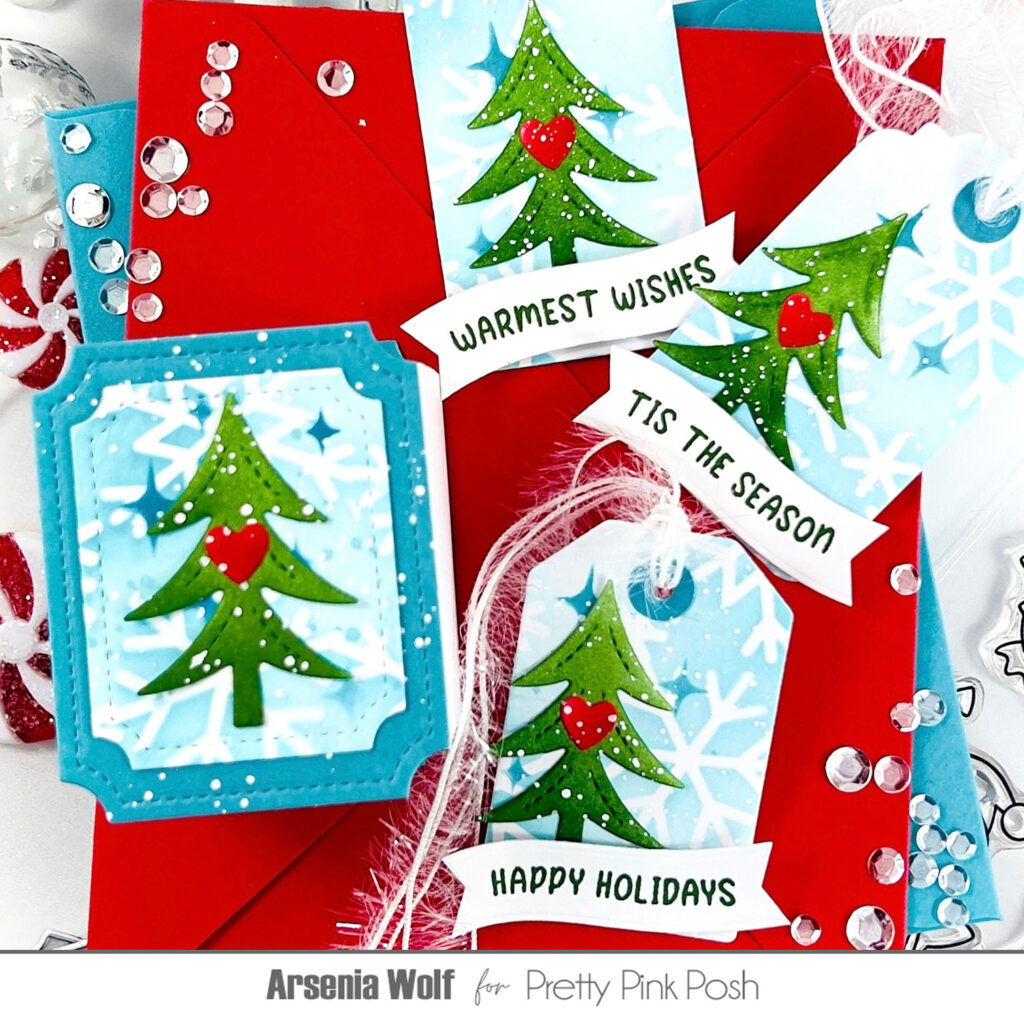
Tags & Holder Box: Frosty Favors and Tiny Treasures
Now for the grand finale — the tags and tag holder box! Using my earlier stenciled panels, I cut out three tags with the new Winter Tags Dies. Each tag got its own little snowy tree (from the Winter Trees Die set), a heartfelt sentiment from Christmas Banner Greetings, and a red heart using the Build A Heart Dies. Add a flurry of white splatters and voilà — winter perfection!
For a finishing touch, I created a mini box using the Notched Rectangles Dies to hold my tags. The notched edges act like adorable little “snowshoe feet,” making the box extra charming. Imagine these at your holiday table — tiny tag holders filled with chocolates or notes of gratitude. The possibilities are truly endless!
For my final trio of tags using the Notched Rectangles Dies as tags, I switched things up — one with a snowy tree from Winter Trees Die set, one featuring our darling penguin friend from Penguin Friends Stamp set, and one with a shimmering snowflake from the Stitched Snowflake Dies.
Be sure to check out the incredible inspiration from the rest of the design team below — and remember, there’s snow limit to what you can create!
Thank you so much for joining us for the sneak peeks! I hope your imagination is snowballing with ideas. We’ll be back tomorrow with the full picture reveal, so you can start to put together your wish lists!
It’s Day 2 of sneak peeks for our November 6th release. Today we’ll be taking a look at the Penguin Holder, Snowy Hills Borders, Winter Greetings Shadow and Winter Trees die sets.
Hello, friends! Christina here to share some snowy sneak peeks of the upcoming winter release. For inspiration, I created a couple of bigger A6 cards featuring the adorable new Penguin Holder. This frosty friend is the latest addition to the popular critter holder collection and can hold any of the winter- or Christmas-themed accessories for creating festive wintertime cards! Let’s get started!
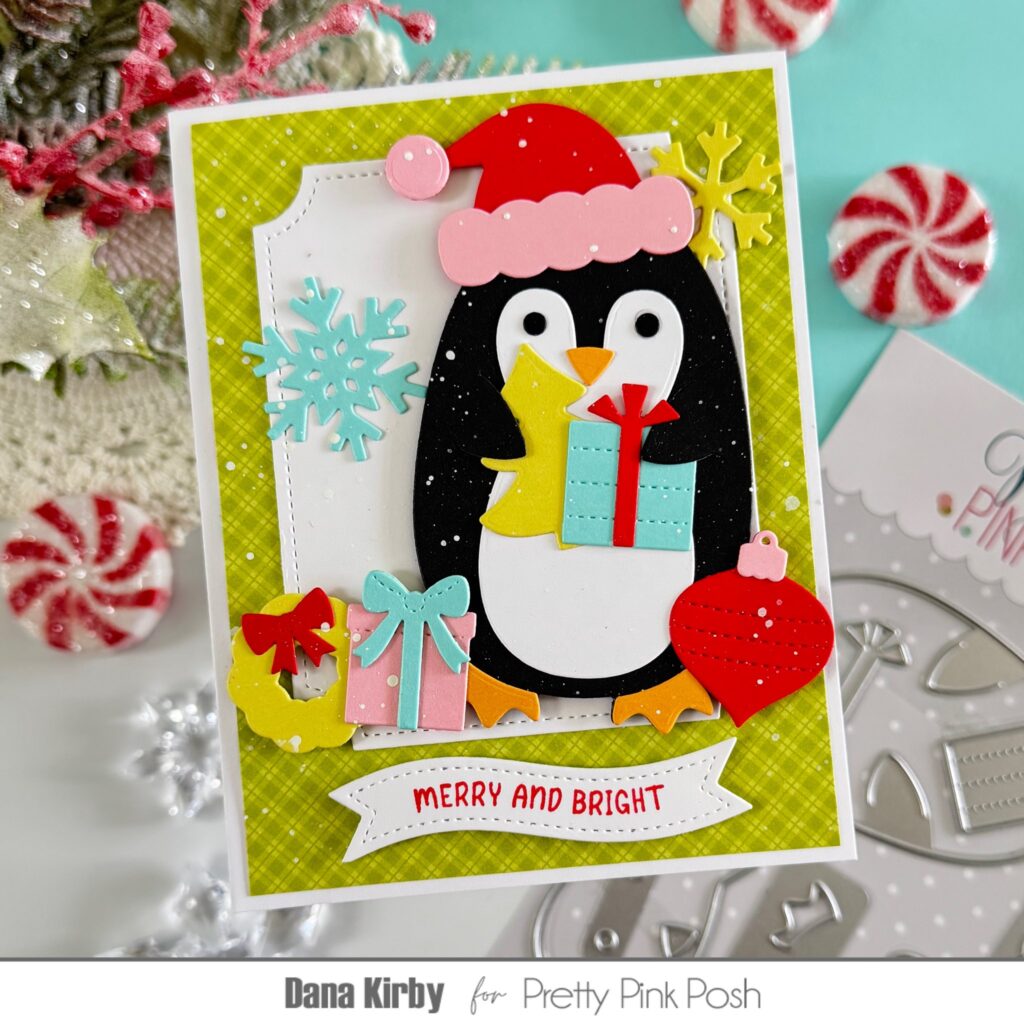
Both of my cards are 4.5 x 6.25 inches, or A6 size, so I would have a little more space to build my snowy scenes. My first card is a festive Christmas card that I started by stenciling the new Snowflake Background Stencil on white cardstock with a minty green ink. Then, to create a snowy winter forest, I layered on some snow drifts using the Snowy Hills Borders and a line of Winter Trees. I lightly inked along the edges of the snowy hills first with more of the mint green ink to give them a cool, frosty look. And for the Winter Trees,Iinked them with mint green and teal inks before adding them to my scene.
With the background complete, I die-cut and inked the pieces for the Penguin Holder before assembling him and adding him to my scene. I added Onyx Pearls for his eyes and then accessorized this frosty friend with a Santa hat and a gift, both included in the die set. Finally, I surrounded him with piles of gifts, some of them from the Christmas Holder Additions set, that I die-cut from both patterned paper and regular cardstocks.
The last steps were to add the text from the Large Merry Shadow die set and a flurry of white clay snowflakes from the new Winter WonderlandMix.
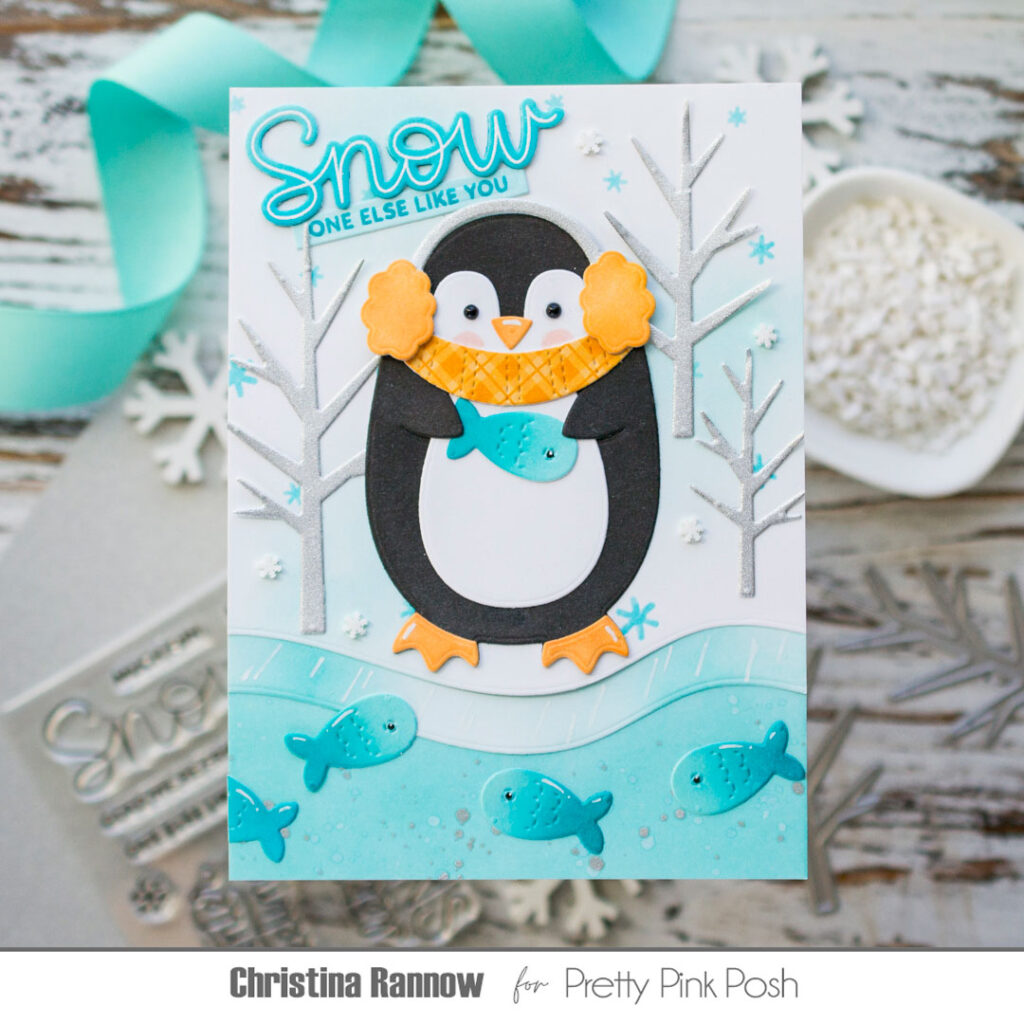
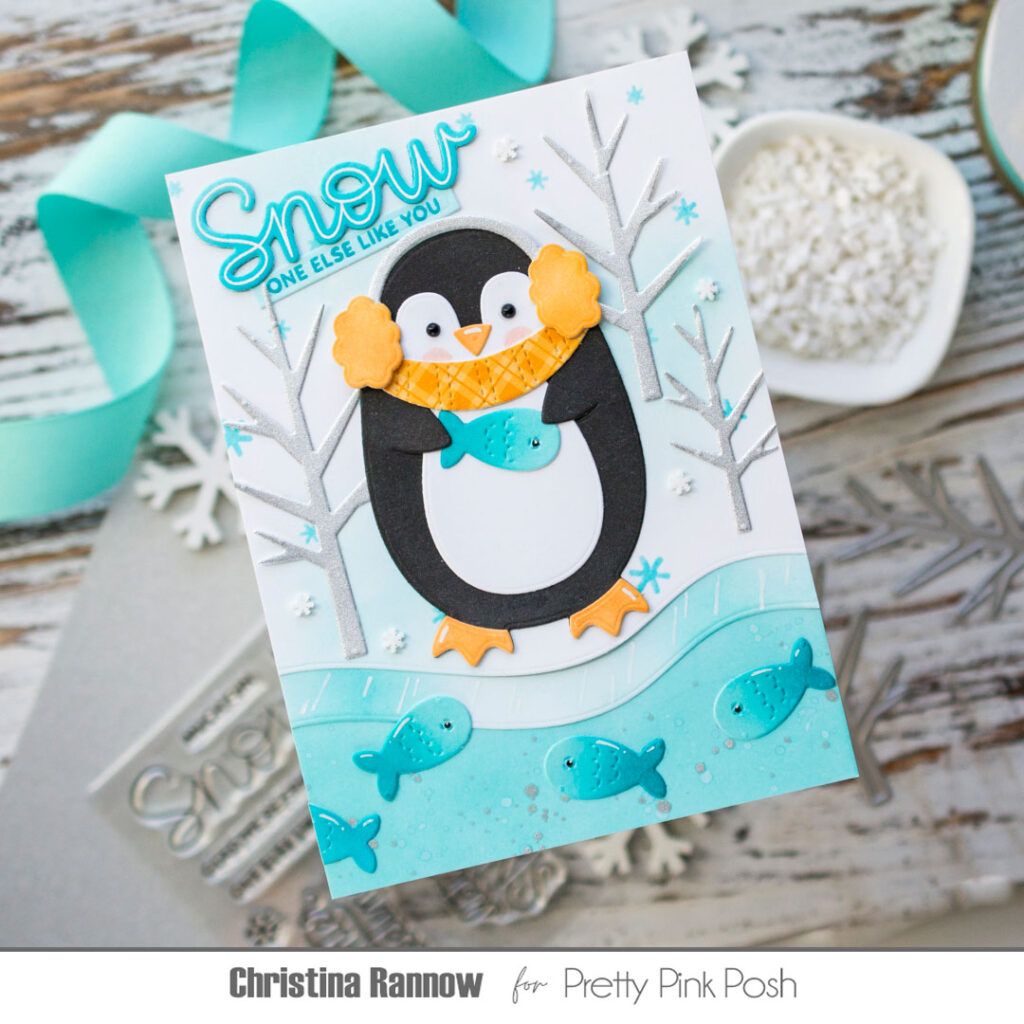
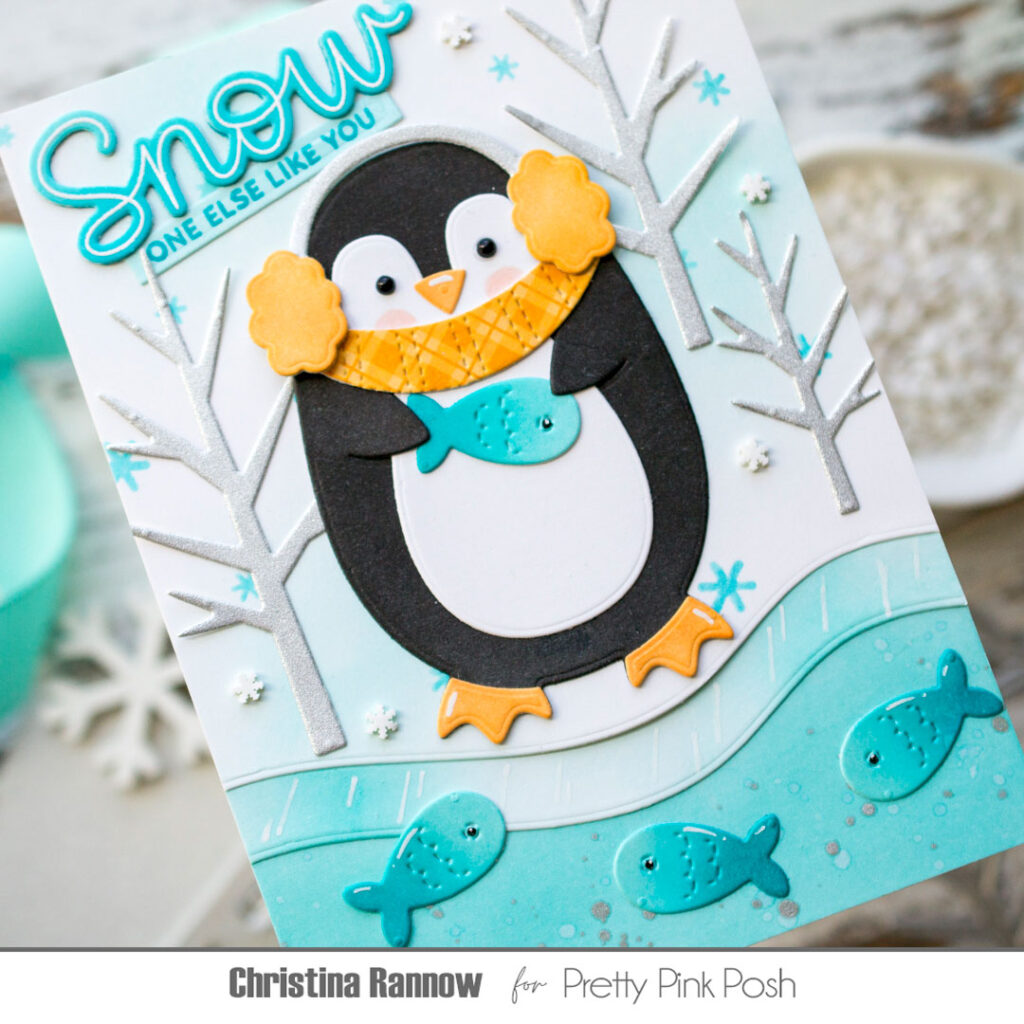
My second card is a winter-themed card with an icy landscape that is the perfect backdrop for the Penguin Holder. I started by die-cutting three sections for the background using the Snowy Hills Borders. The top snowy section is white cardstock that I stenciled using the Cascading Snowflakes Stenciland an icy blue ink.I also added some softly blended blue areas for a frosty look. The next section is a thin icy border that I created by simply blending in more of the blue ink, making it darker in some areas and lighter in others along the border, and then adding white lines with a white paint pen. So easy! The last section is cool icy water for the fish. I blended the same blue across the entire piece before spattering it with plain water and a little Frozen Fog Mica Stain. To finish up the icy landscape, I die-cut a few Winter Trees from some glittery silver cardstock and attached them to the top snowy section of the background.
With the background complete, I moved on to die-cutting and inking the pieces for the Penguin Holder. I assembled the pieces and then accessorized this chilly chap with the cutest earmuffs, which are from the Christmas Holder Additions set, and a scarf to bundle up in that I pulled from the new Penguin Mugs Die Set. I again added Onyx Pearlsfor his eyes and gave him some rosy cheeks before adding him to my scene.
To finish things up, I die-cut multiple fish from the Cat Holder dieset and ink blended them with two icy blue colors before adding eyes with a black glaze pen and highlights with a white gel pen. I gave one to the penguin to hold and added the rest to the icy waters. Then I added a sentiment from the new Let it Snowstamp set that has coordinating dies and, lastly, added a flurry of white clay snowflakes from the Winter WonderlandMix.
Keep scrolling to see more amazing inspiration from the design team!
We hope you enjoyed today’s sneak peek. We will see you again tomorrow for another day of sneak peeks and inpiration!
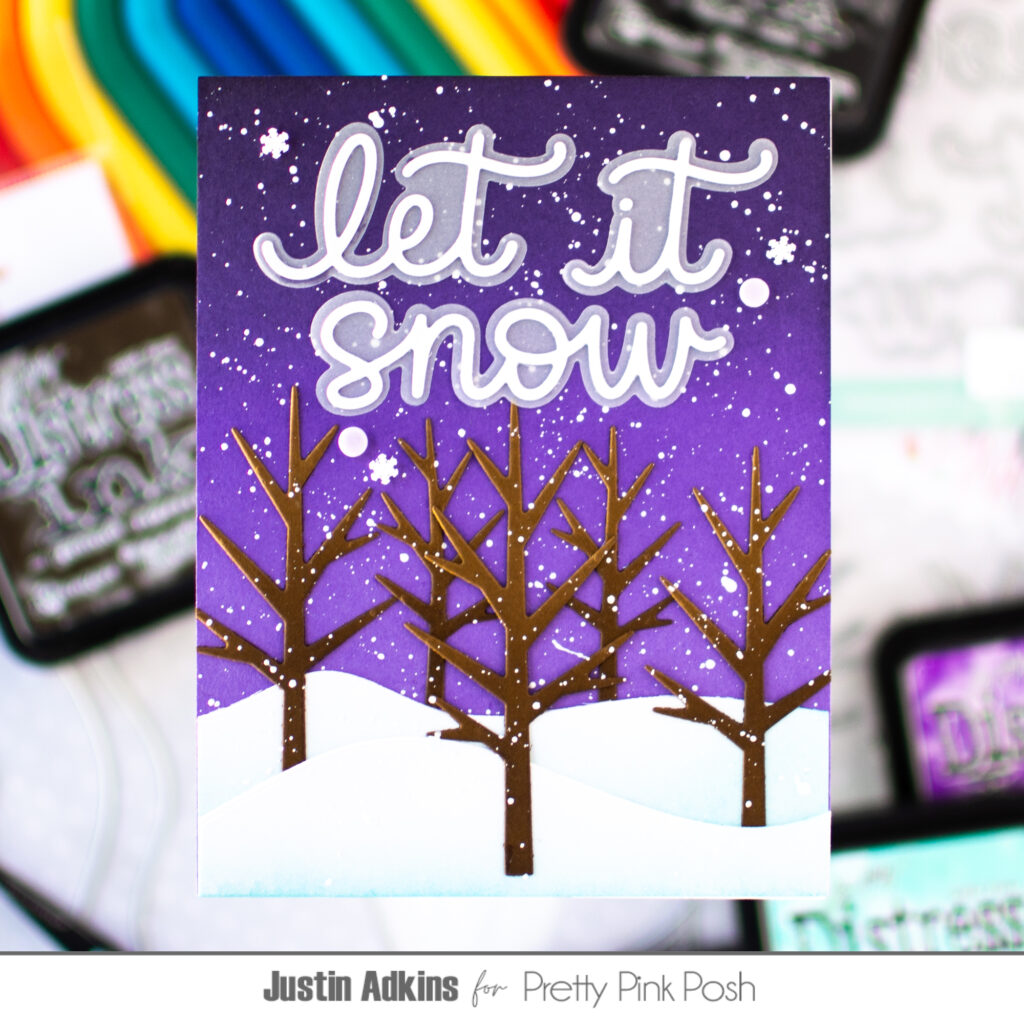
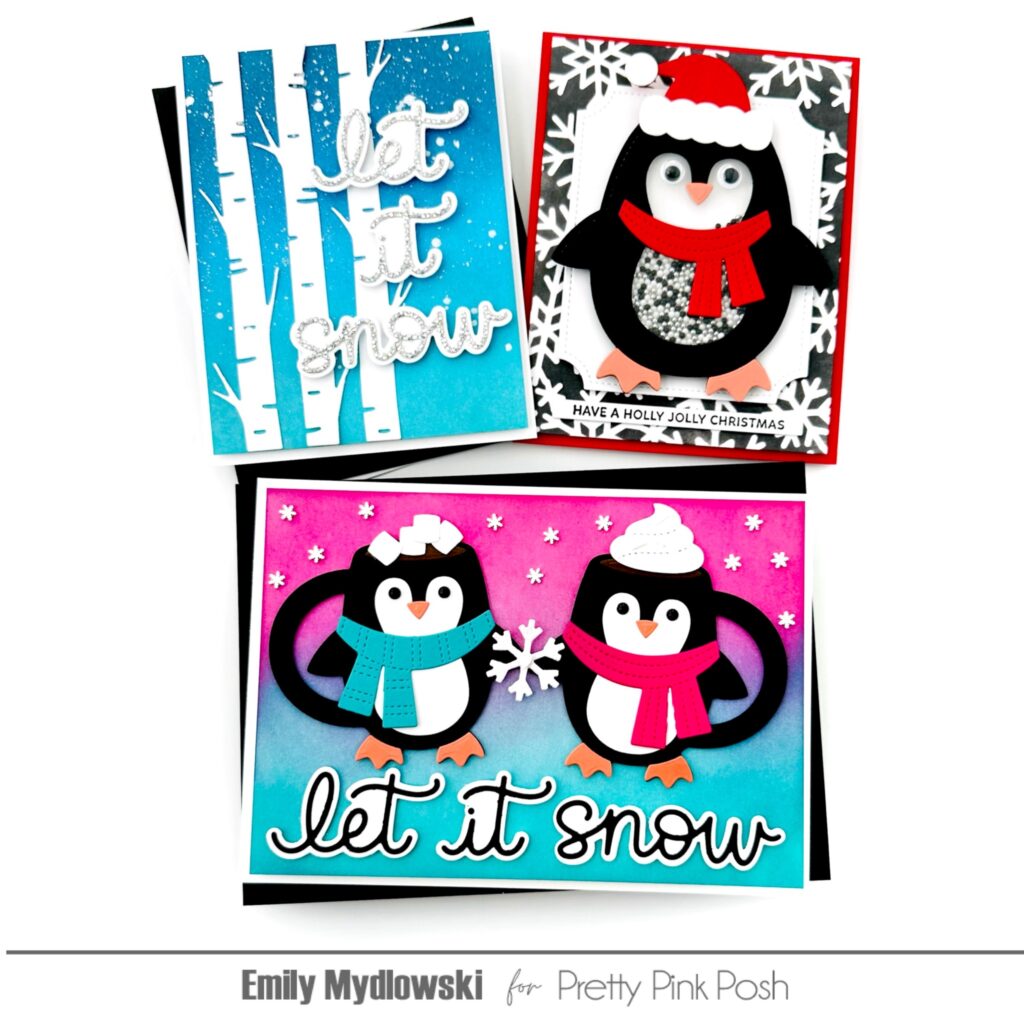
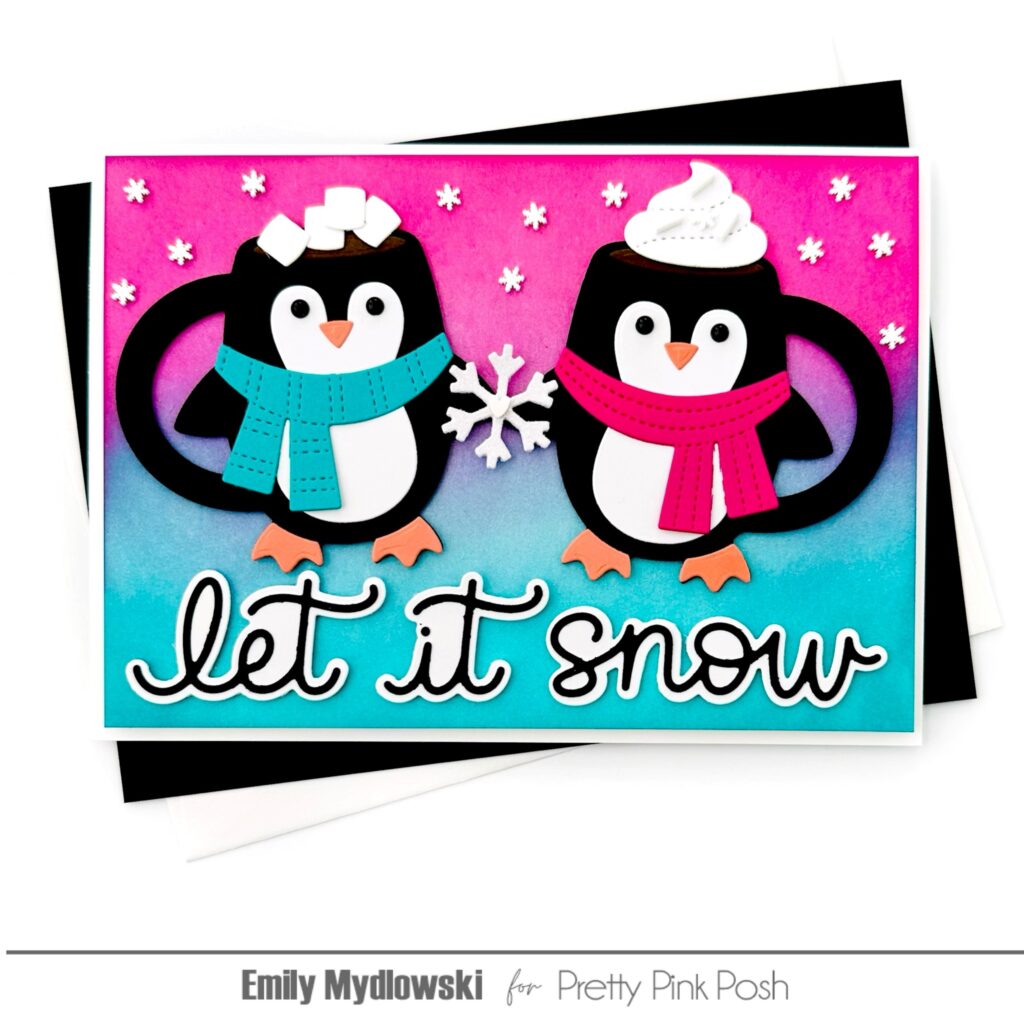
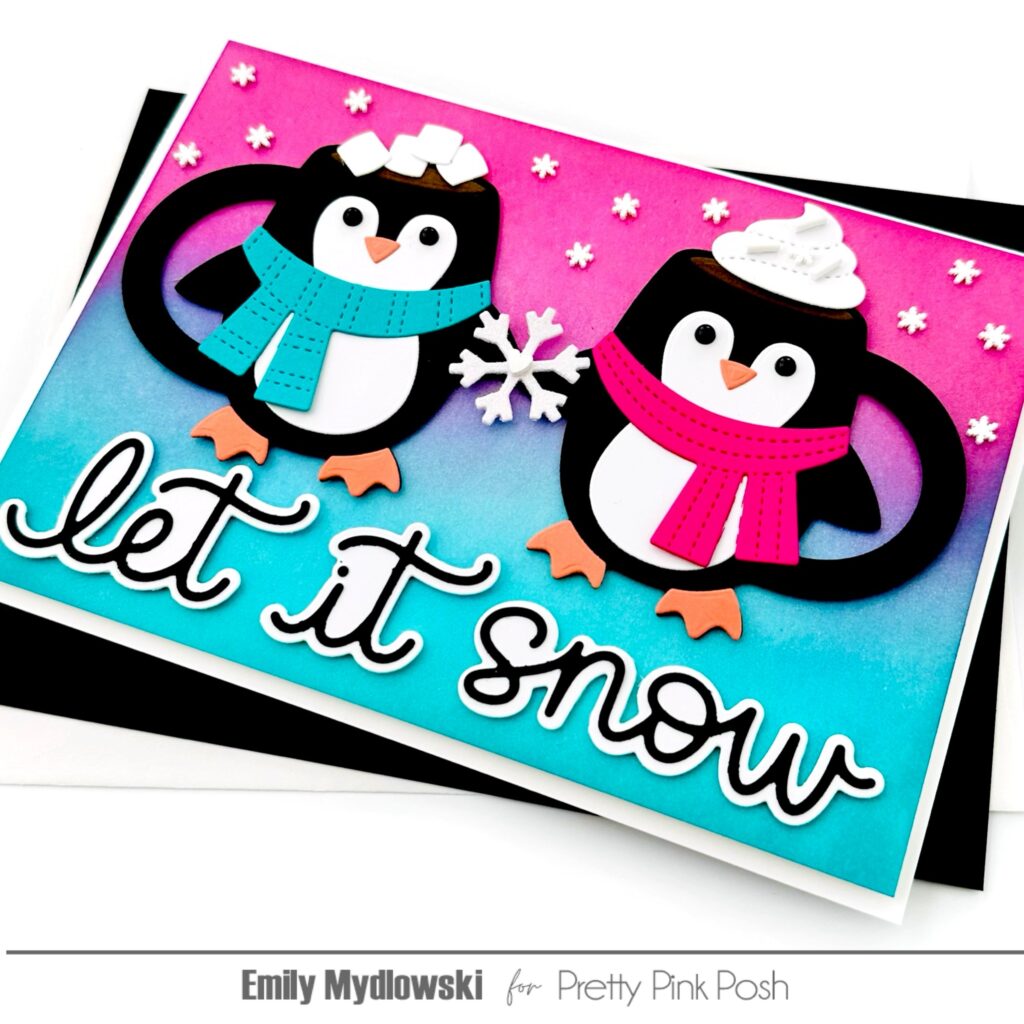
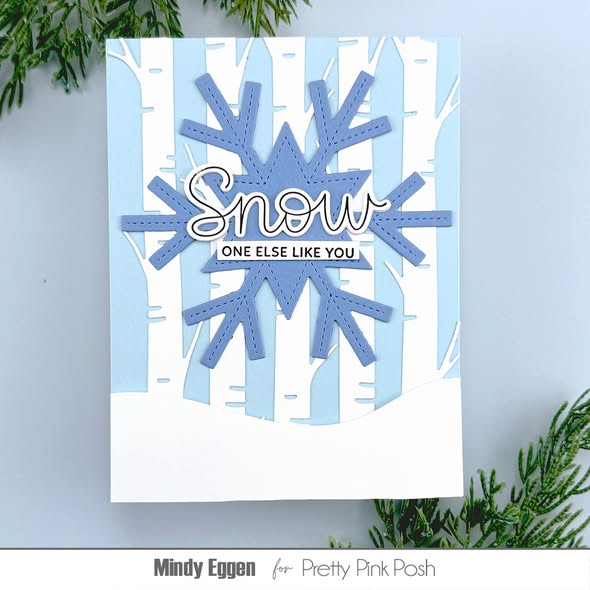
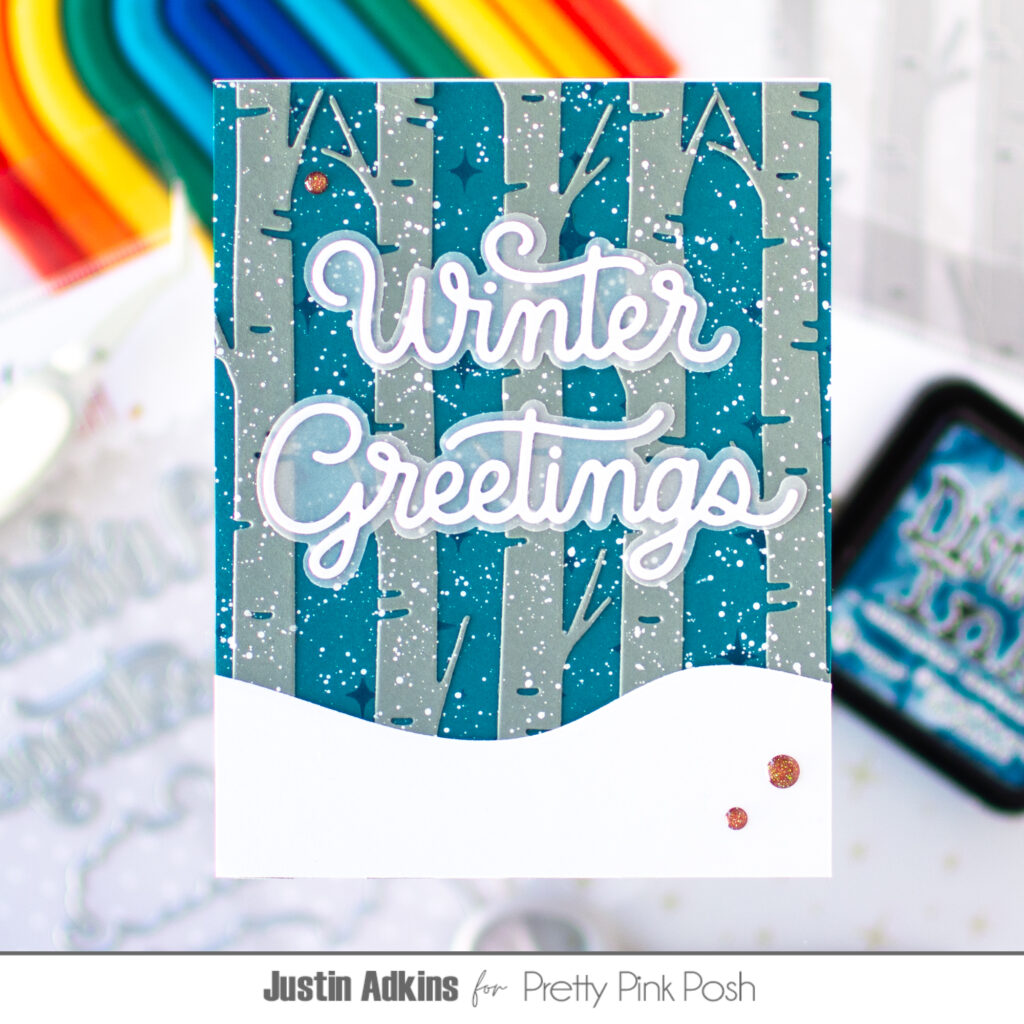
Welcome as we kick off the first day of our November 6th release. Today we’ll be taking a look at the Penguin Mugs, Penguin Shaker, Birch Trees and Let It Snow Shadow die sets.
Hi crafty friends! Emily Mydlowski here with you today to sharing winter wonderland sneak peeks using a variety of new dies from the upcoming winter release.
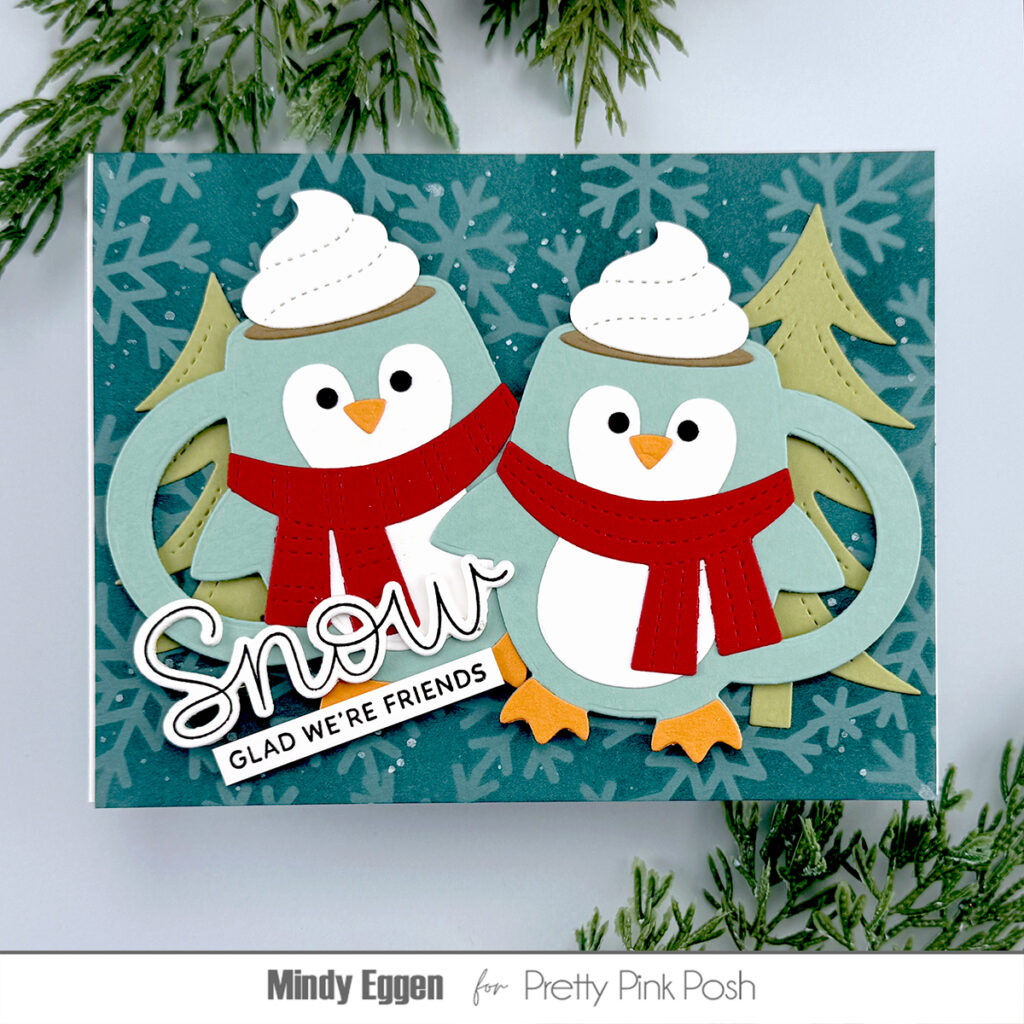
Let it Snow Penguin Mugs
When I first saw the Penguin Mugs, I knew I wanted to have a cute couple/set of penguin mugs so I went with an A7-sized card design. To my happy surprise the Black & White cardstock Let It Snow Shadow sentiment fit perfectly across the A7 panel!
To create the penguins, I used the Penguin Mugs Die Set to cut all the pieces from colored cardstock. Black for the mugs, white for the penguin body, marshmallows & whipped cream, orange for the beak and feet and Teal & Pink for the scarves. I used Onyx Pearls for the eyes.
For the northern lights background, I matched the scarf colors and ink-blended the top and bottom of an A7 white cardstock panel in pink and teal dye inks creating with pretty blended purple center. After adding the sentiment and penguins to the northern lights background, I added a glitter cardstock snowflake with a clay heart between the penguins and Winter Wonderland Clay Confetti snowflakes.
Penguin Shaker
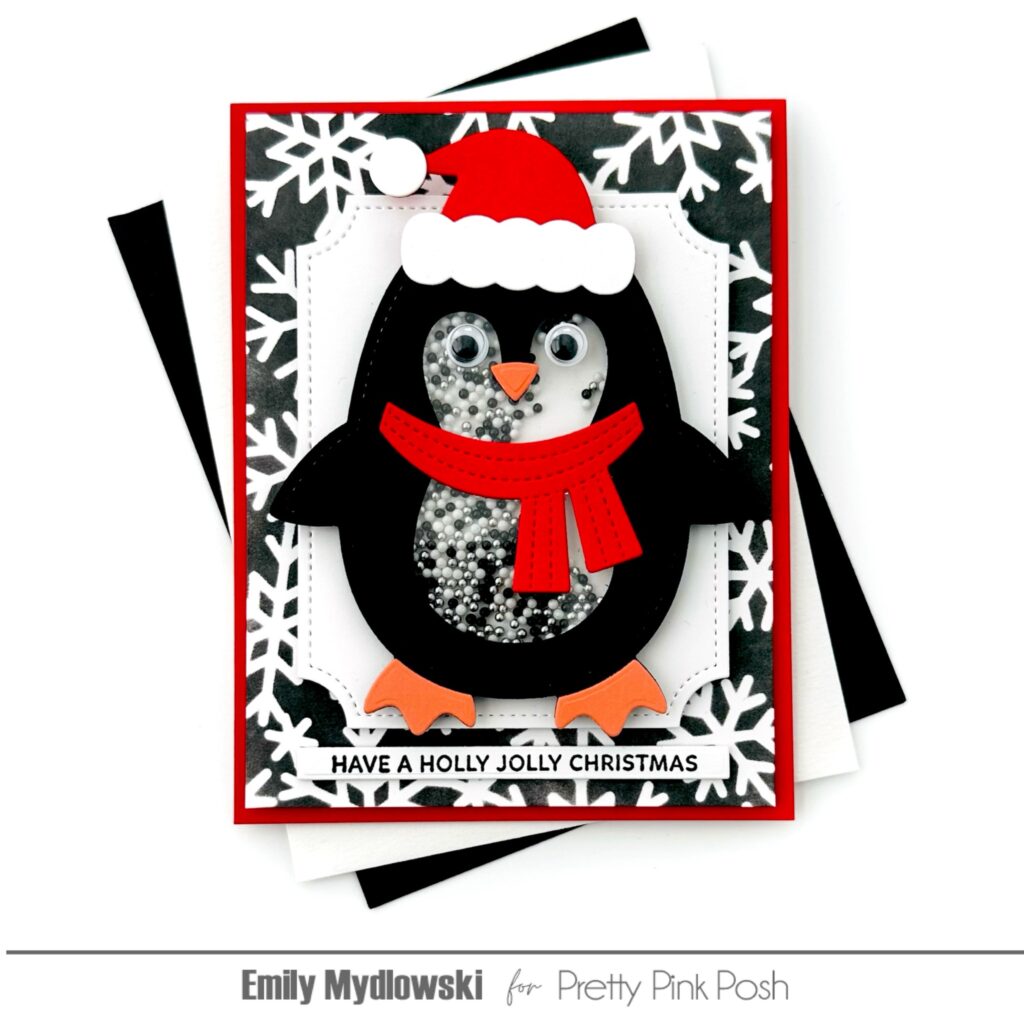
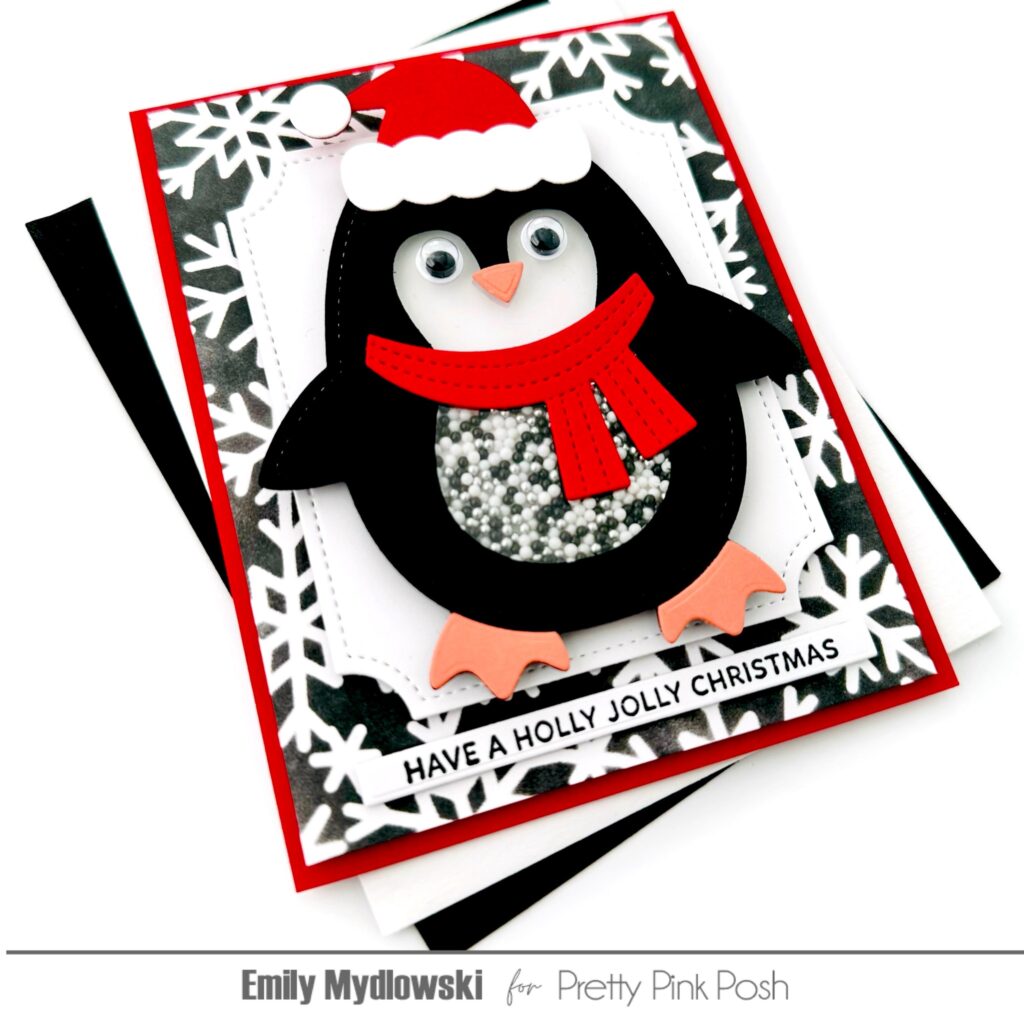
Oh my cuteness, the Penguin Shaker is absolutely adorable—especially when you add a few holiday accessories like Santa’s Hat (Penguin Holder Sneak) & Scarf from Penguin Mugs plus googly eyes. For the shaker bits, I used the Black Tie Shaker Beads.
I used the Snowflake Background stencil to create the background with black ink on white cardstock. Then I layered the Penguin to a Notched Rectangle. To finish the card, I added the Christmas Sentiment Strip and adhered the decorated panel to a bright red cardbase.
Winterscape Let it Snow & Winter Trees
This was a quick and easy card with a few simple elements but looks so elegant and pretty. I love the way white Birch Trees glow against a dark snowy sky turning the cold into something magical.
To create the magical winter card design, I added white Winter Tree die cuts to a dark blue & teal ink-blended panel with white ink splatters for the snow. Then I added a sparkly silver glitter cardstock & white Let It Snow Shadow die cut sentiment.
Here’s some more inspration using these products from the team!
Thanks for stopping by for the first day of sneak peeks. We’ll see you again tomorrow!
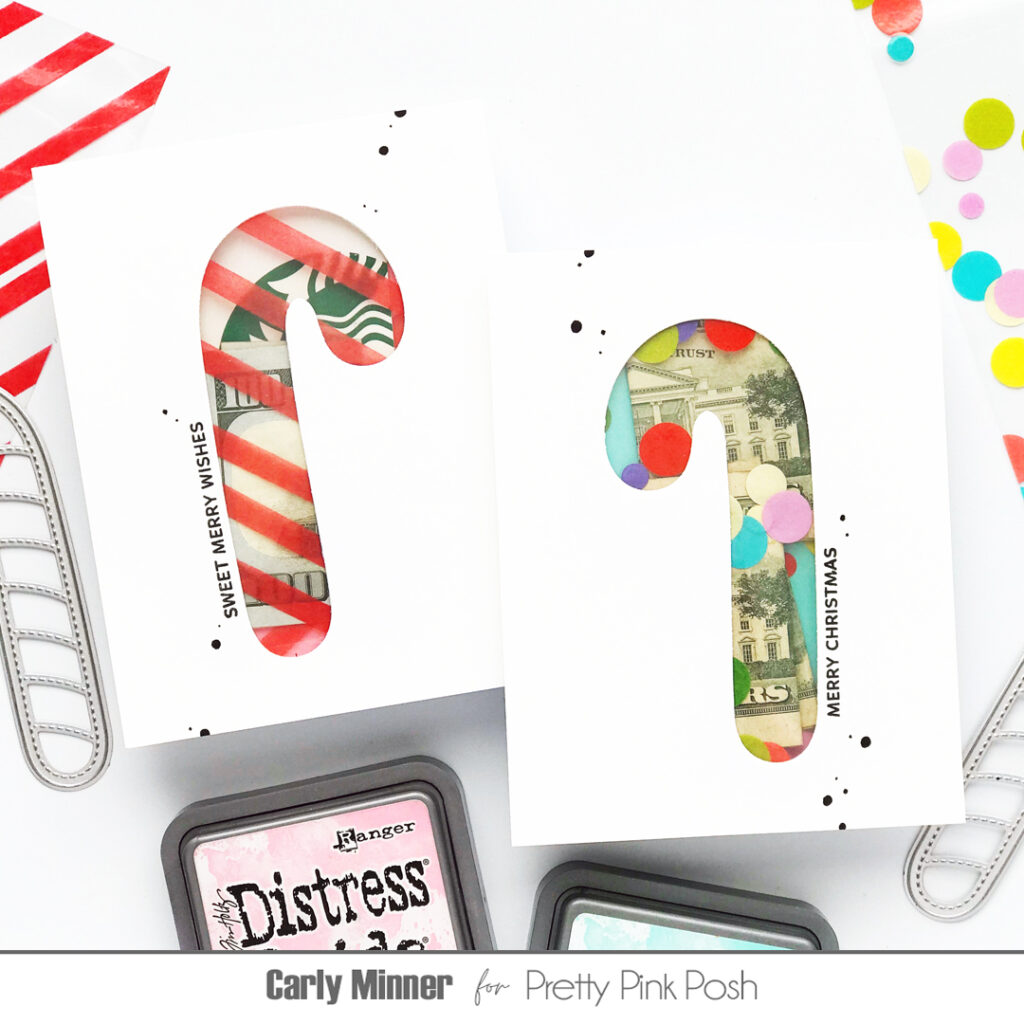
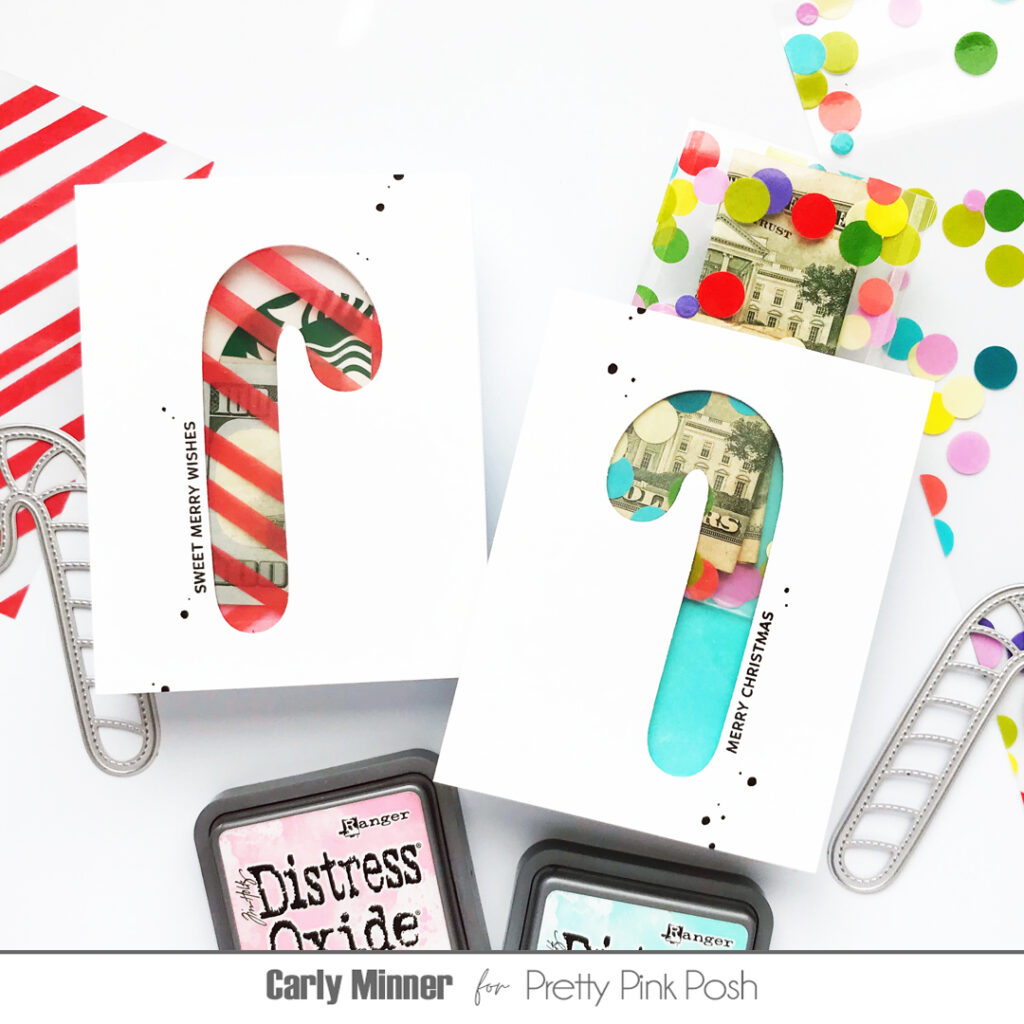
I love all of the Pretty Posh Shaker dies for making shakers but they are also awesome just for the negative die cut space! They make some of the best windows!
I used the base layers from the Candy Cane Shakers to create windows and then created an acetate pocket to fit behind it that can hold gift cards and money. I love the result! It feels like such a fun way to customize a gift that could feel impersonal. Just think of the possibilities for holiday shapes like this or this or this!
I hope these projects and video inspired you this holiday season.
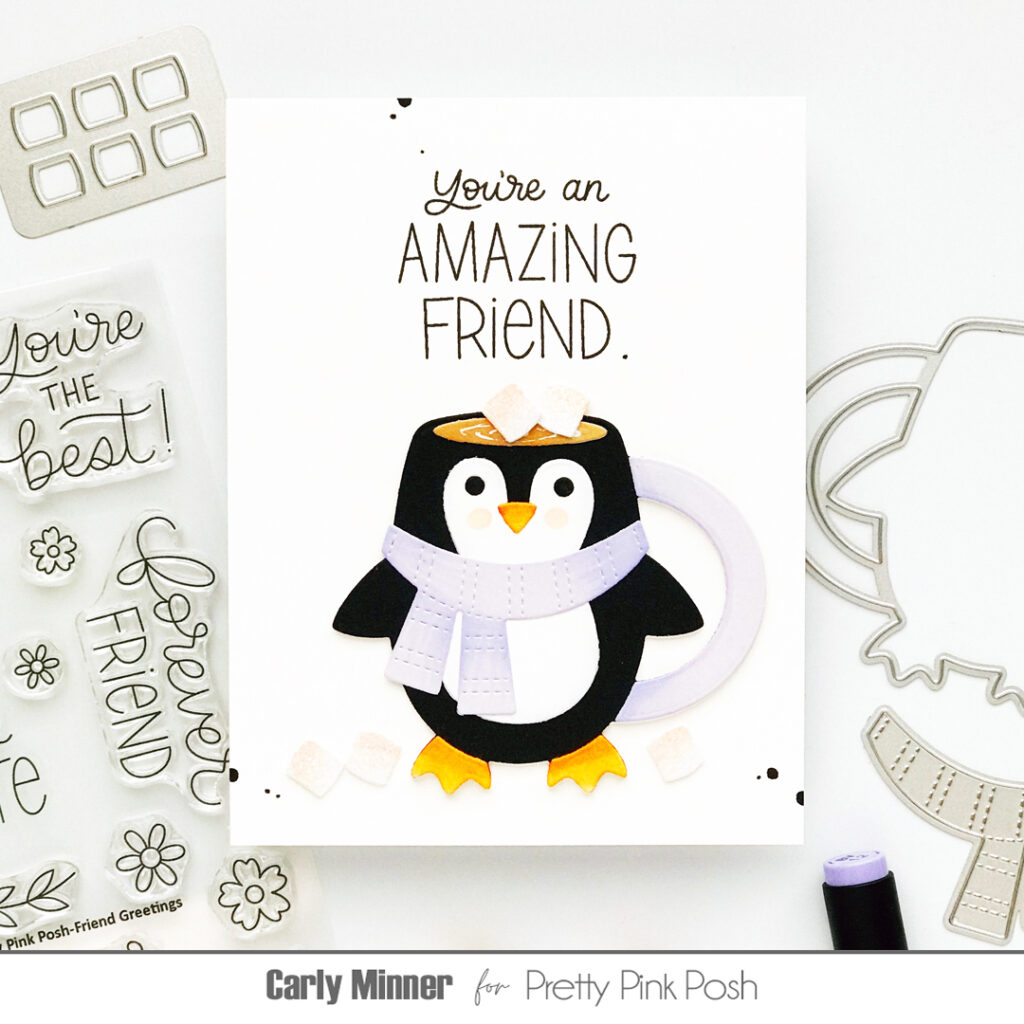
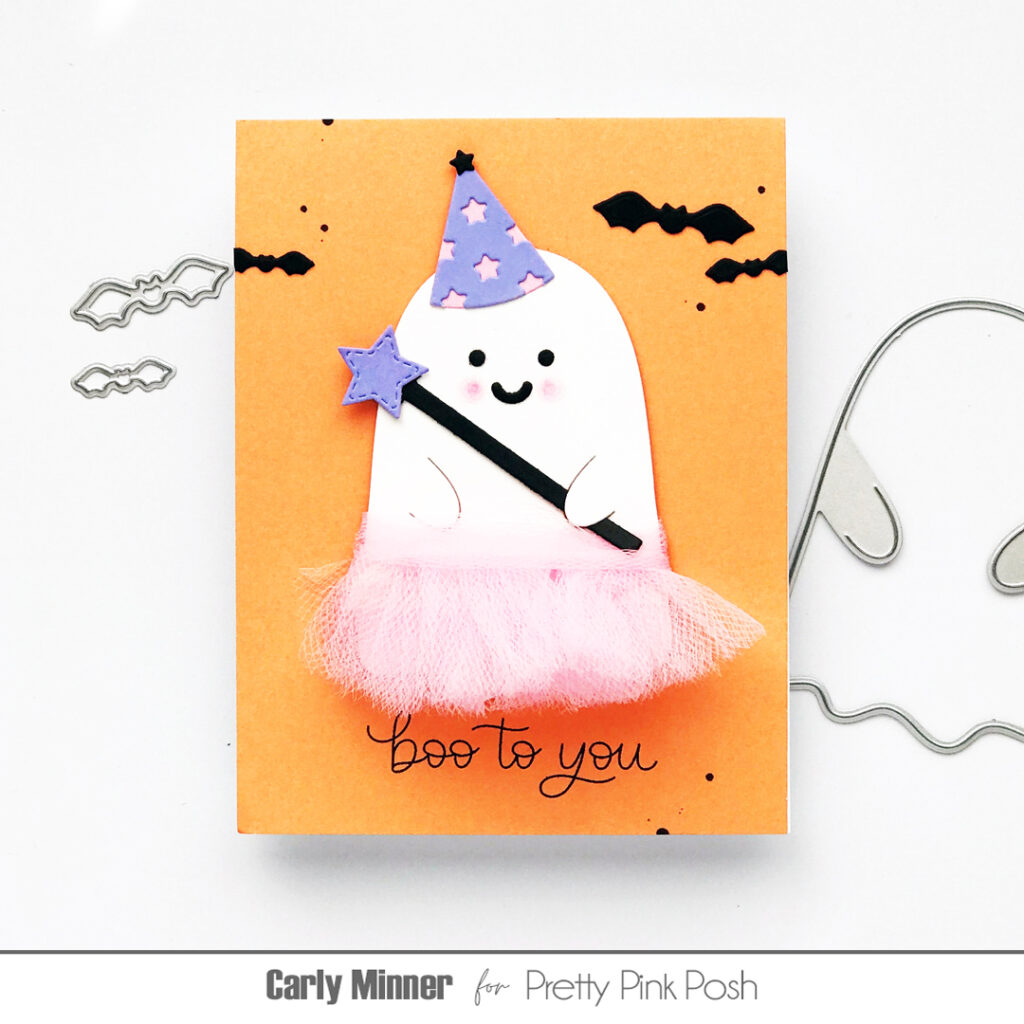
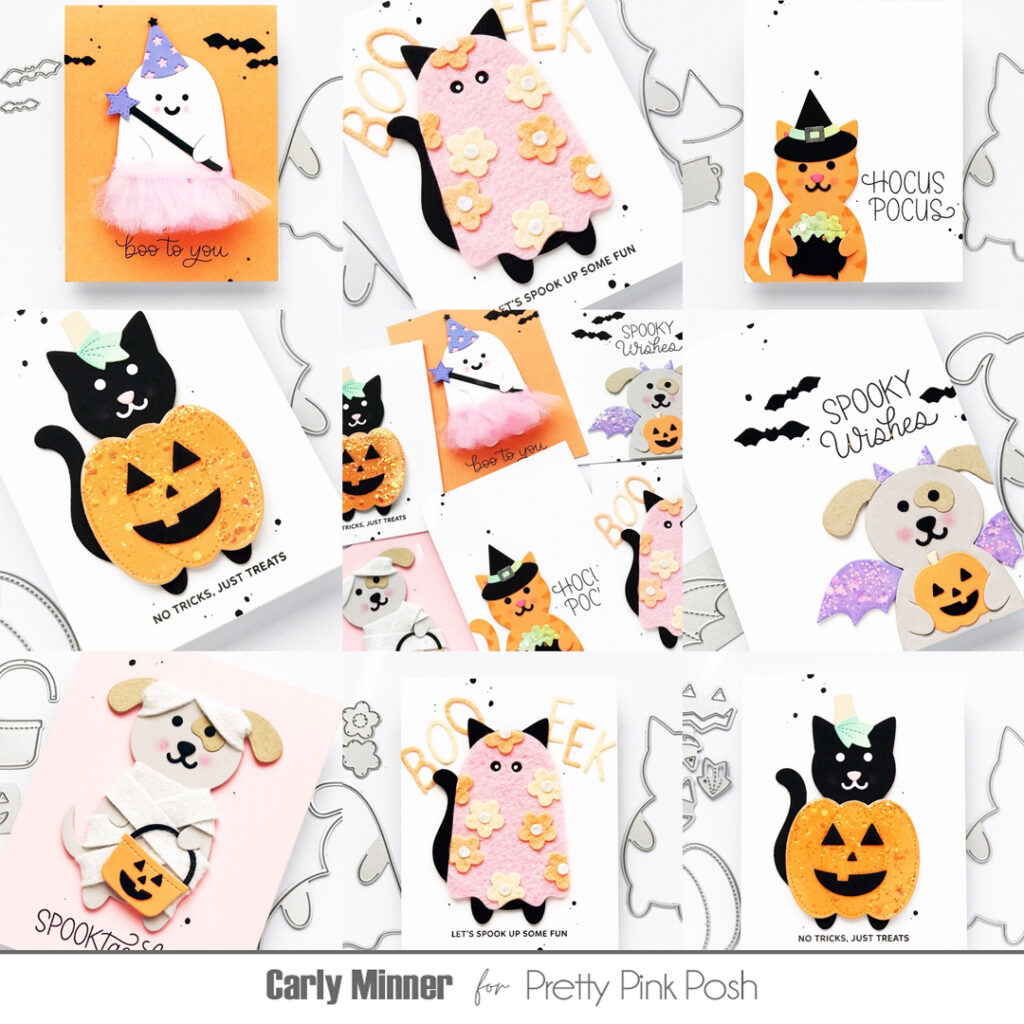
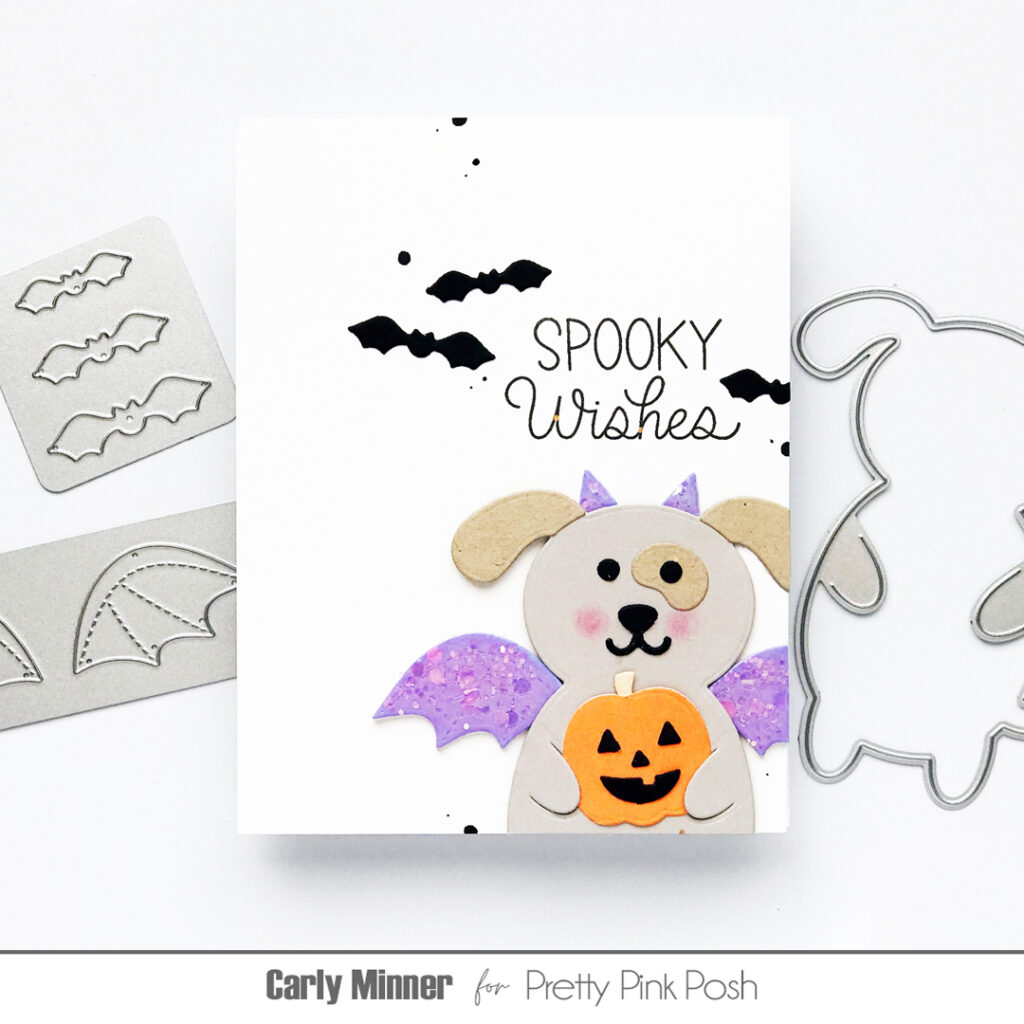
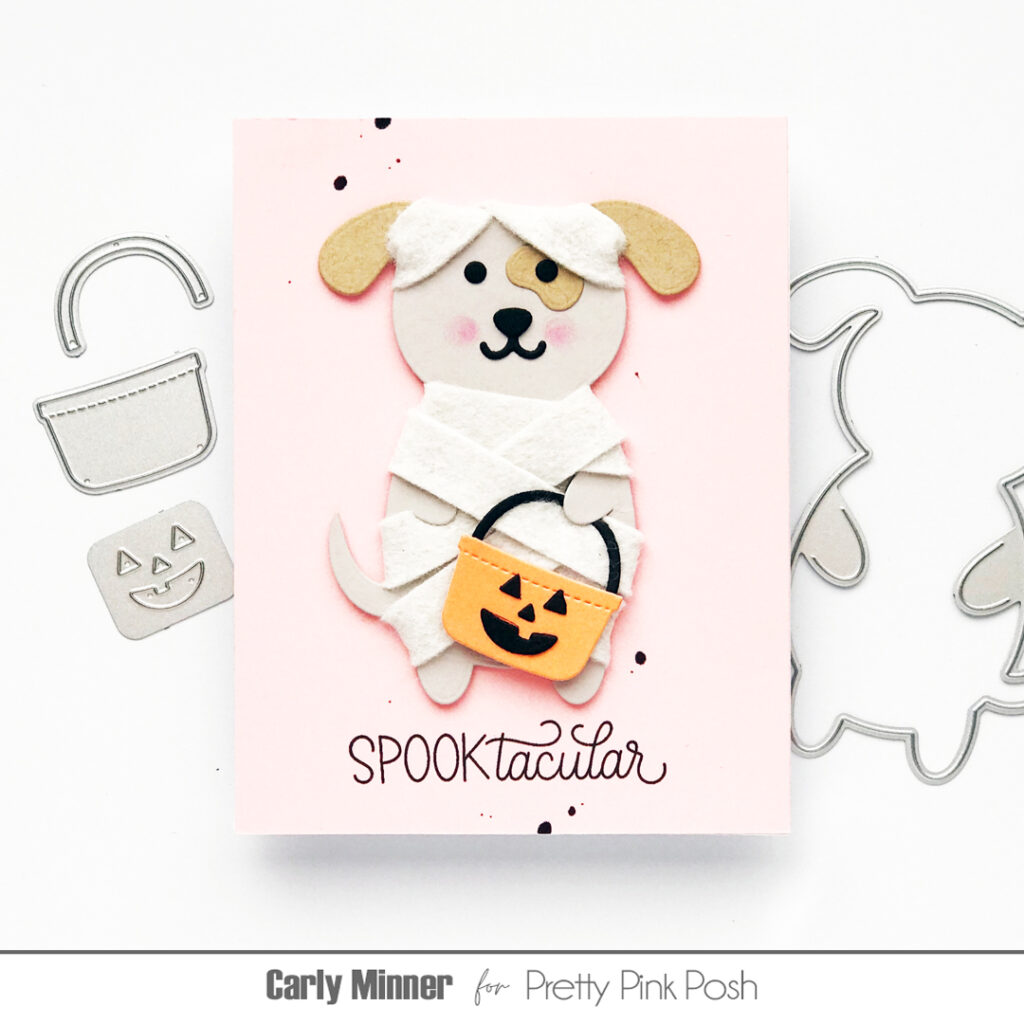
Hi Crafty Friends! Carly here and you might already know how much I adore all the Pretty Pink Posh holder dies (and if you don’t know, the answer is SO MUCH). Last Halloween I turned the Ghost Holder into a ballerina and it was one of my favorite cards of the year!
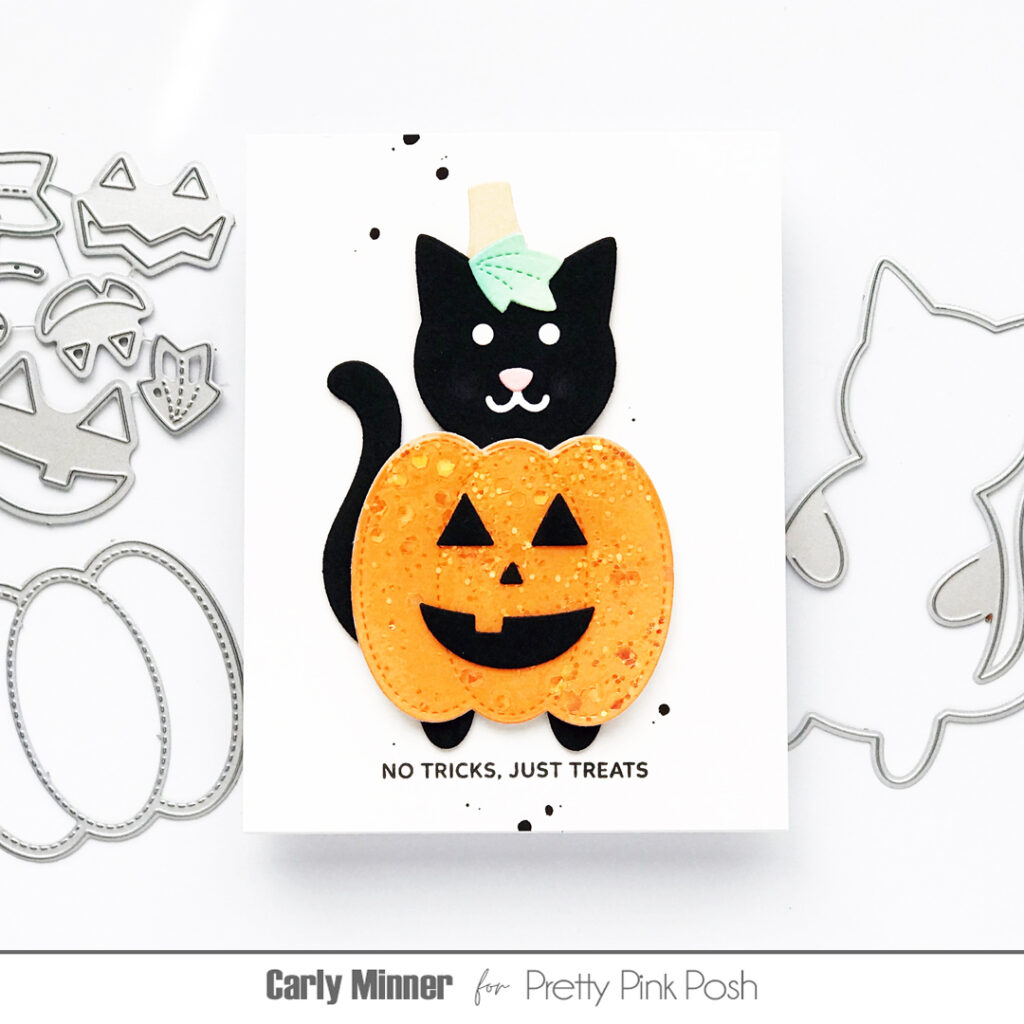
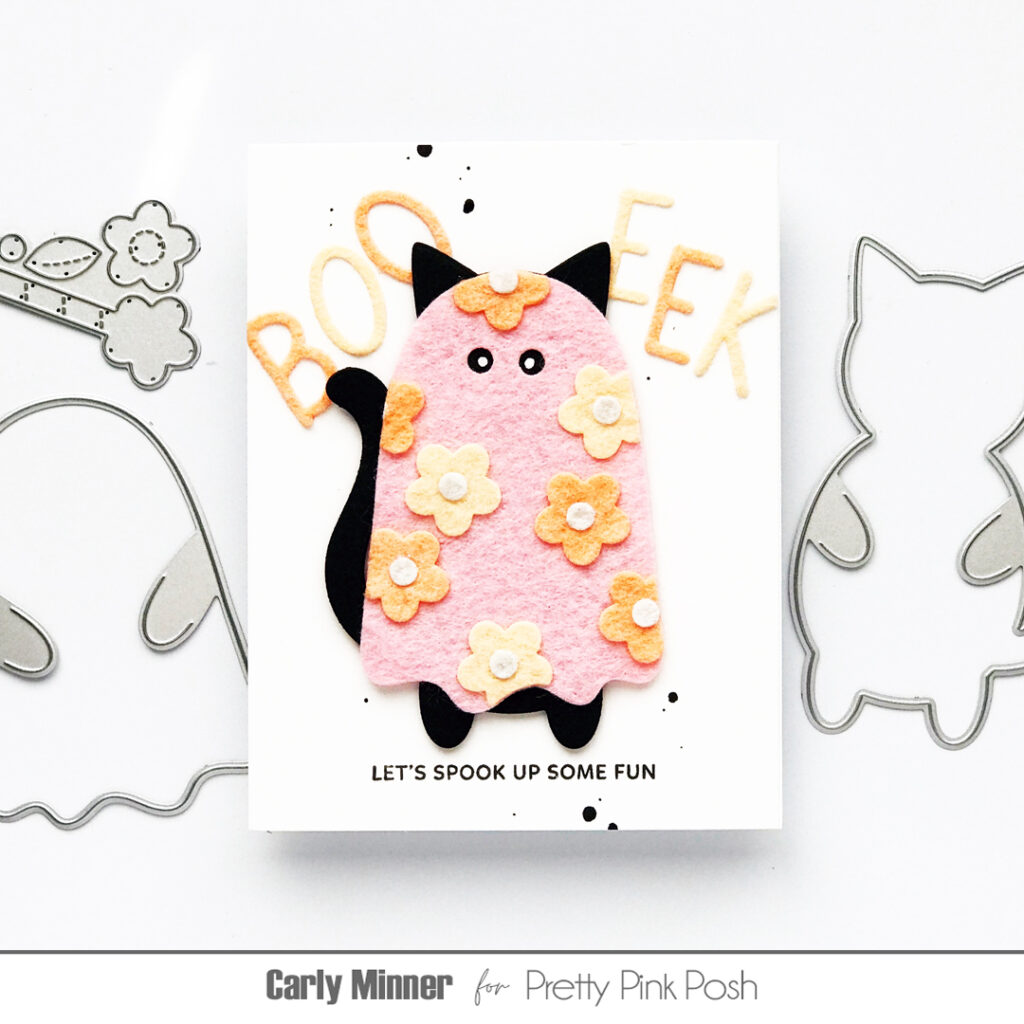
And my favorite of the bunch is the combo of the Ghost Holder and the Cat Holder. It looks like the kitty borrowed a floral bed sheet to make a costume!
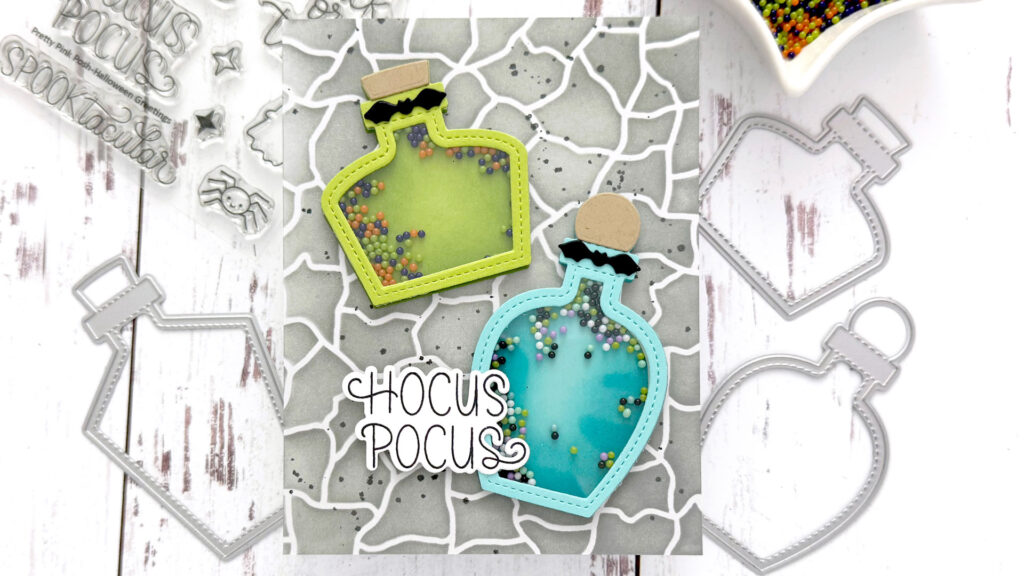
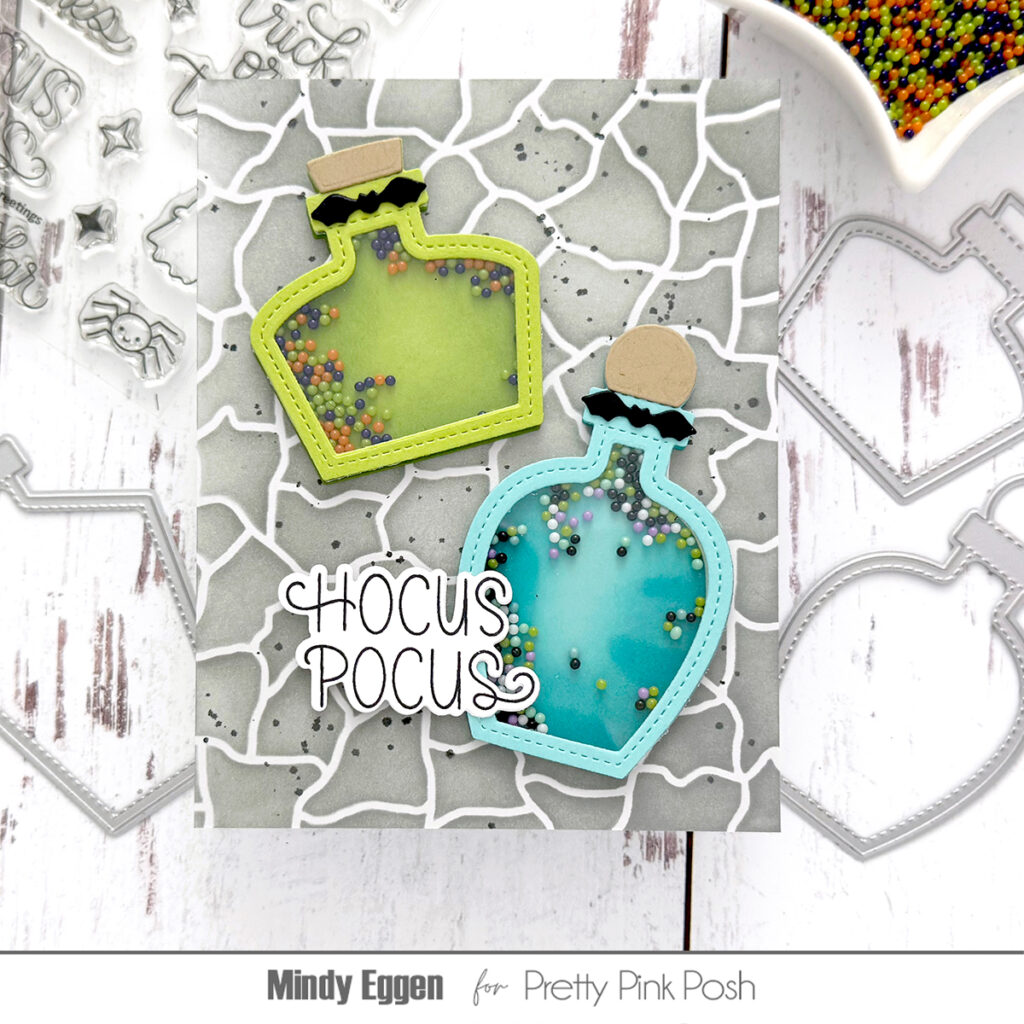
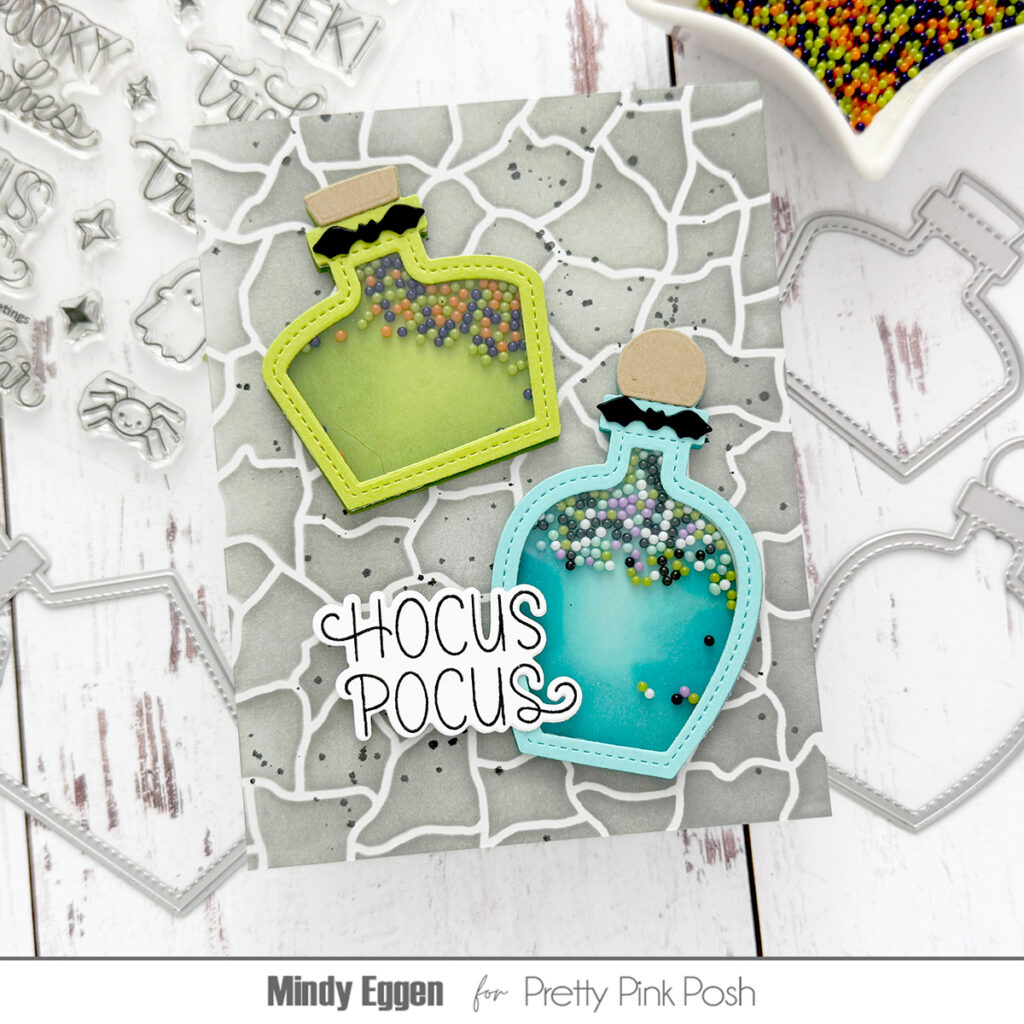
Welcome, friends! It’s Mindy Eggen, and today I’m sharing a tutorial for making potion bottle shaker cards that are full of Halloween fun and a touch of spooky charm.
I started by creating a moody, textured background using the Crackle Stencil on Fog cardstock, layering in Hippo ink for depth. To give it a little extra eerie flair, I flicked Black Soot Distress Spray Stain across the panel with a paintbrush, creating splatters.
For the potion bottles, I die cut shapes from Sea Glass and Jelly Bean Green cardstock using the Potion Bottle Shakers die set. Then lightly ink blended the base pieces to add dimension and visual interest.
The real magic comes from the shaker elements: the blue potion bottle is filled with the Spellbound shaker mix, while the green potion bottle holds the spooky Halloween Night shaker beads—both adding movement and color to the card.
To bring everything together, I added a sentiment from the Halloween Greetings stamp set. The result? A fun, interactive card that’s perfect for Halloween or anytime you want to add a little potion-inspired enchantment to your creations.
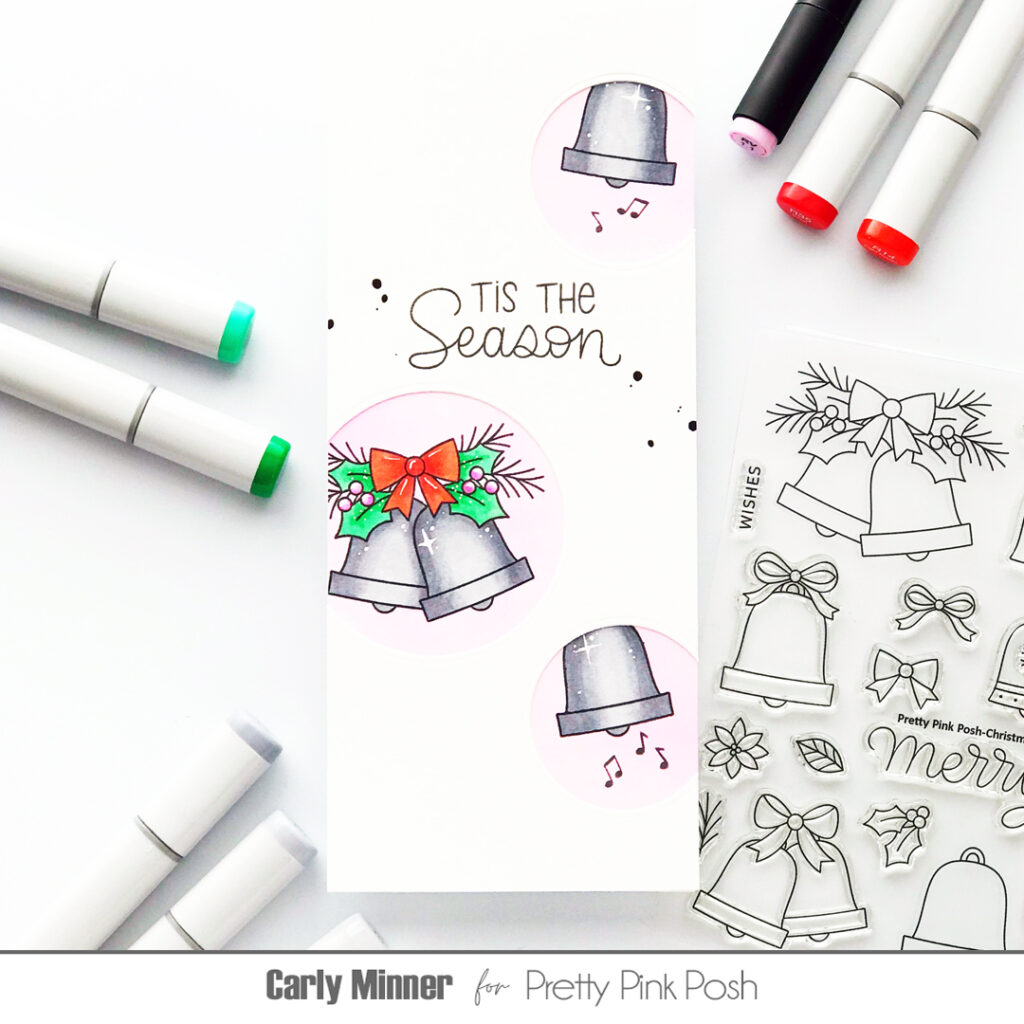
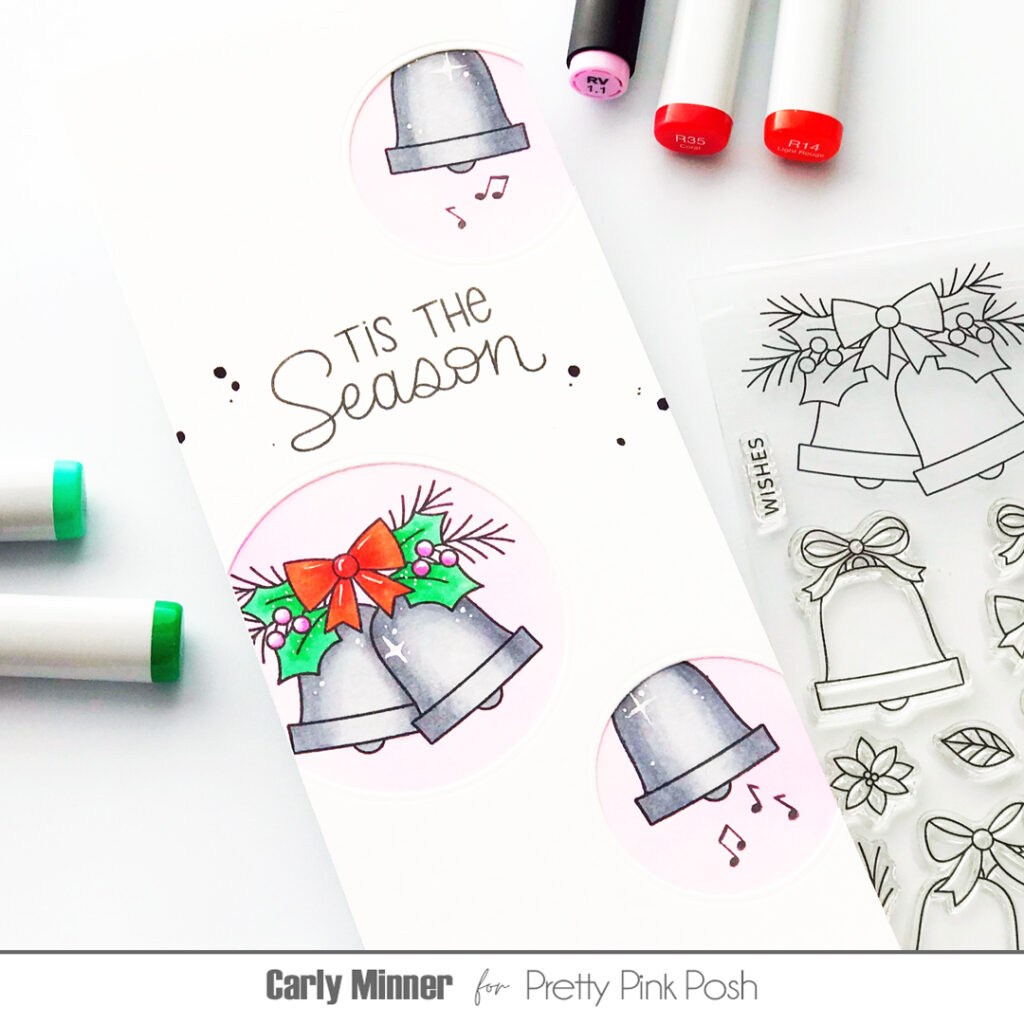
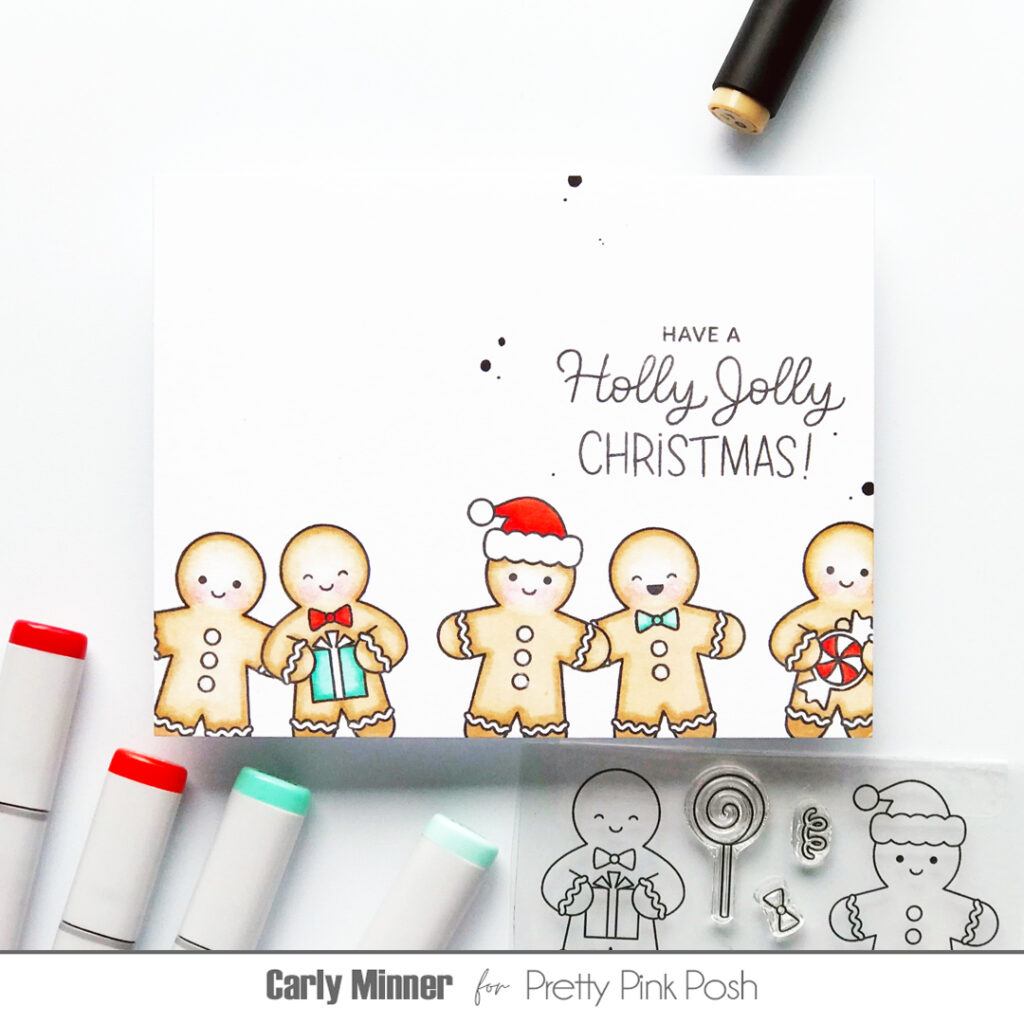
Hi Crafty Friends! Carly here and I’m excited (and a little nervous) to share my first coloring tutorial with you! When I saw the PPP Christmas Bells, I immediately heard Silver Bells in my head and I wanted to try coloring them a little more realistically than I would usually attempt.
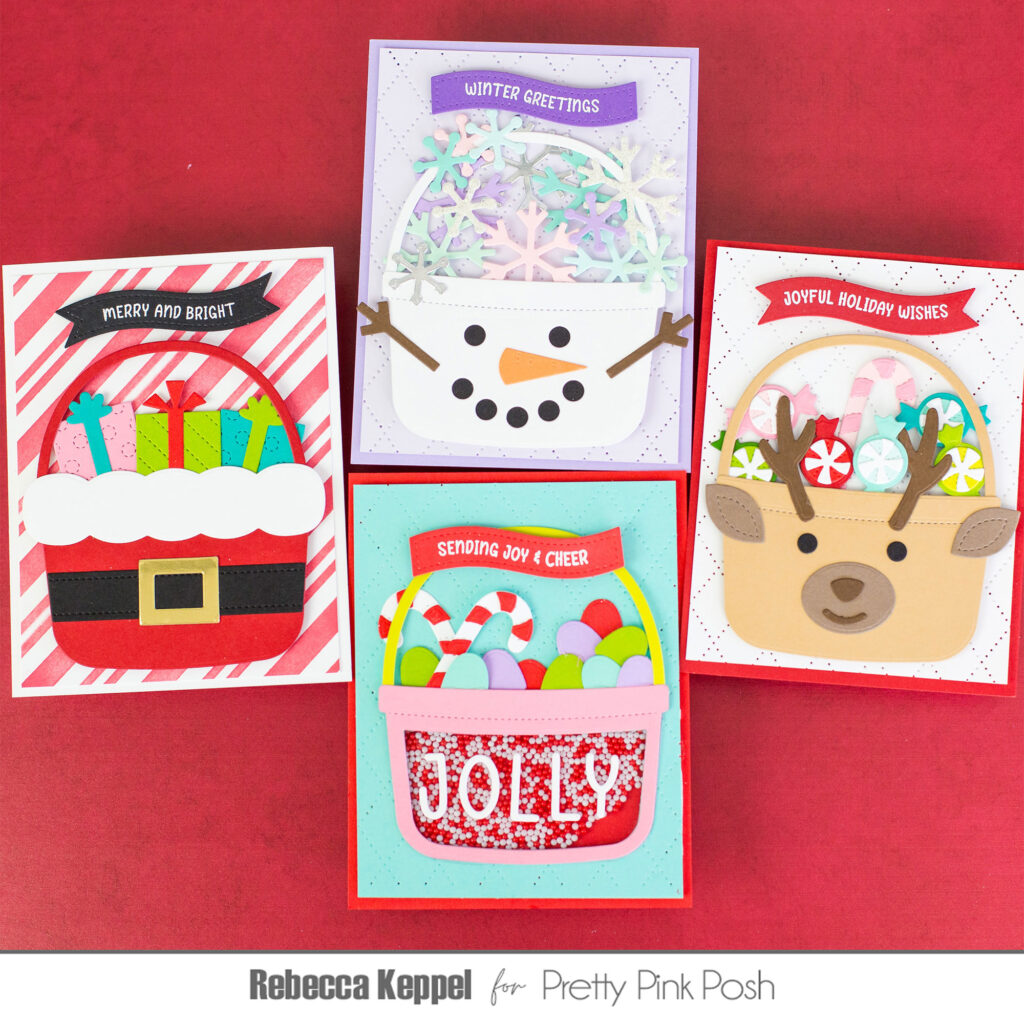
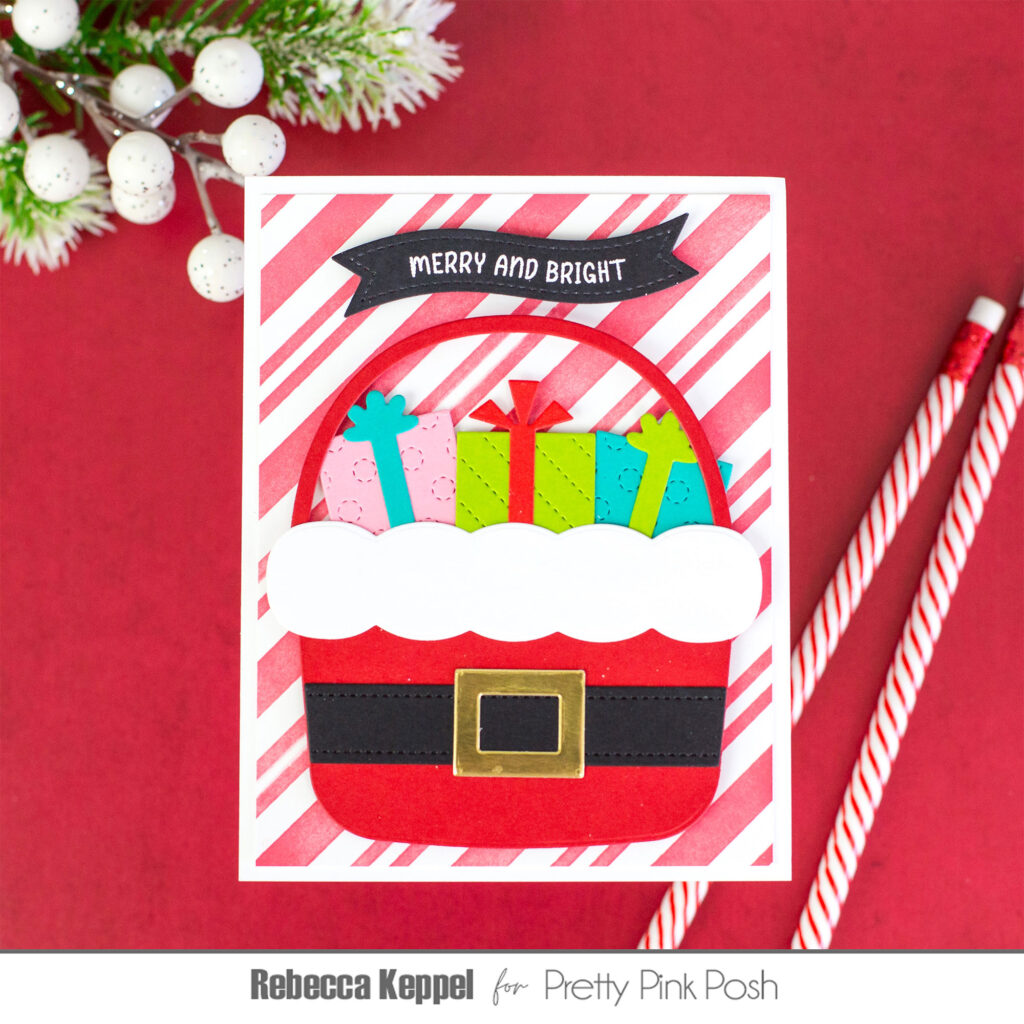
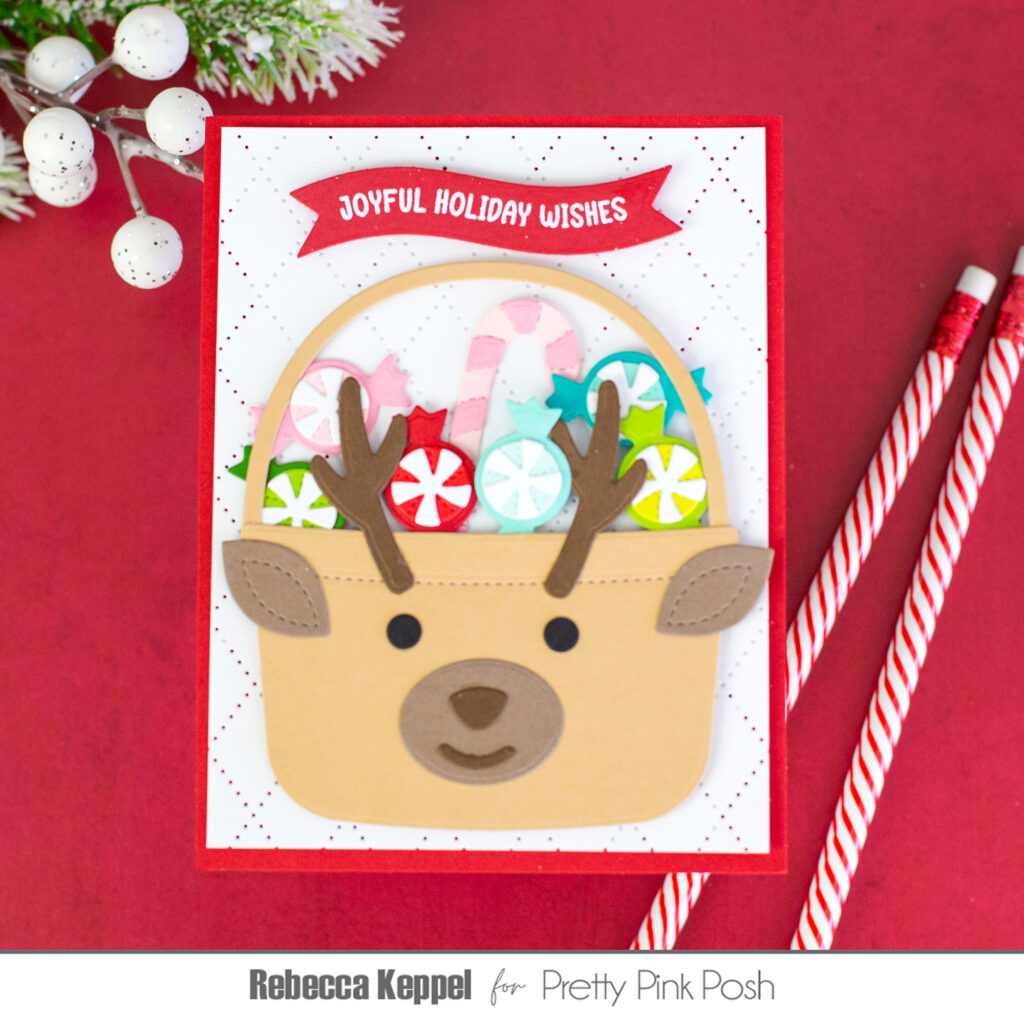
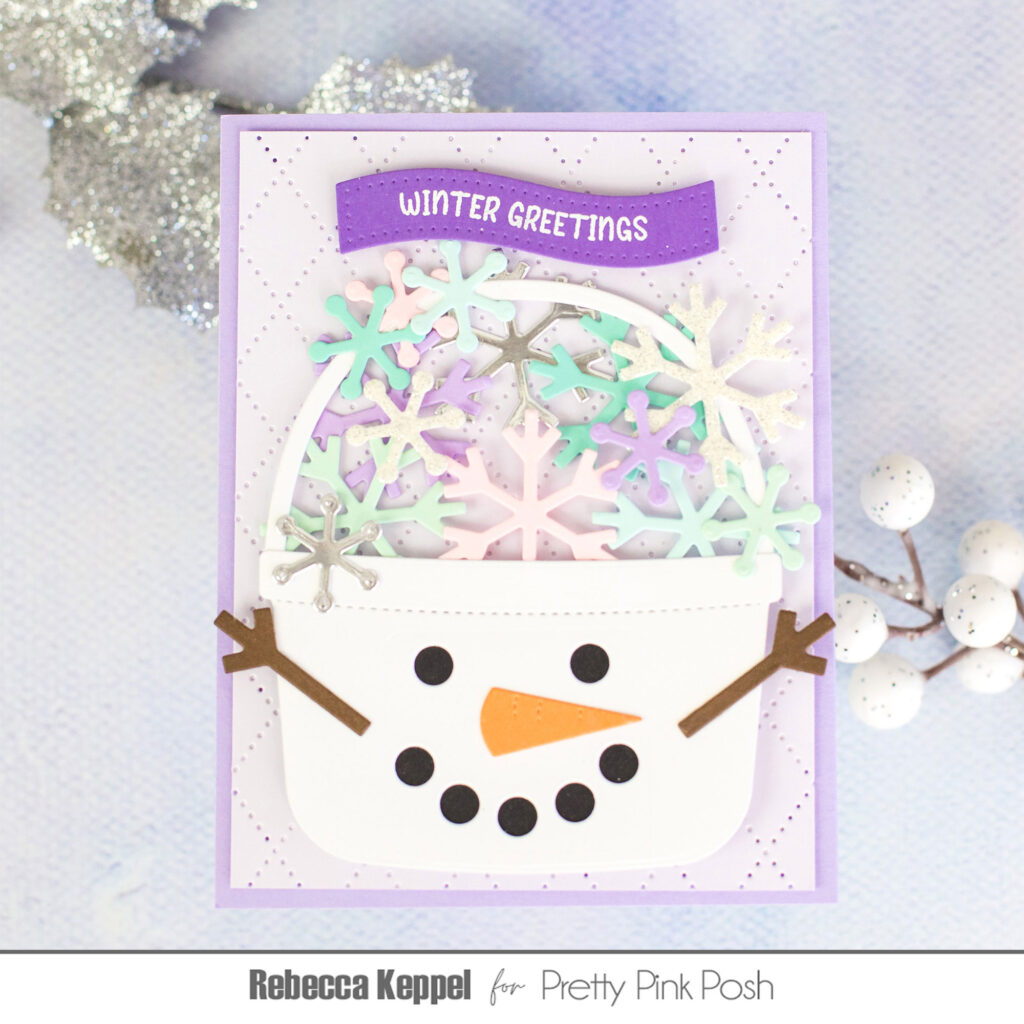
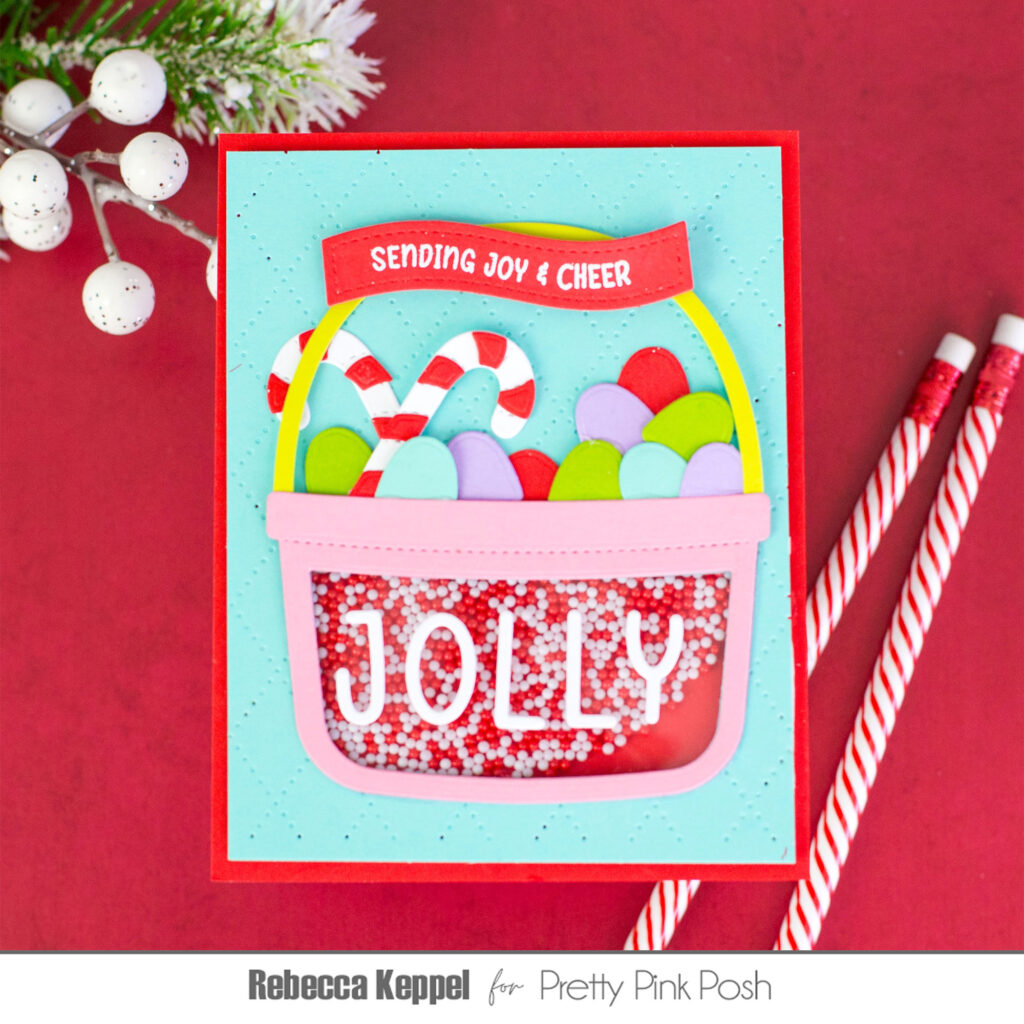
As an “additions” die set it is meant to pair with the original Candy Bucket Dies. From the original die set you can cut out the buckets and handles. Then the Christmas Bucket Additions Dies has elements to add to the buckets to make them look like Santa, a reindeer or a snowman. The original Candy Bucket Dies also has a inner bucket shape that can be used to cut a window out of the bucket, making it into an adorable shaker.
For my Santa bucket I filled the bucket with presents. The Christmas Bucket Additions Dies comes with two presents dies and 2 ribbon/bow dies.
For the reindeer bucket, I filled it with peppermint candies. The Christmas Bucket Additions Dies comes with a layering die that creates a striped round candy and a wrapper.
With the snowman bucket I used the two snowflake dies to fill the bucket. And for the shaker I filled it with candy canes and gum drops from the die set and then added Candy Cane Shaker Beads to the shaker element.
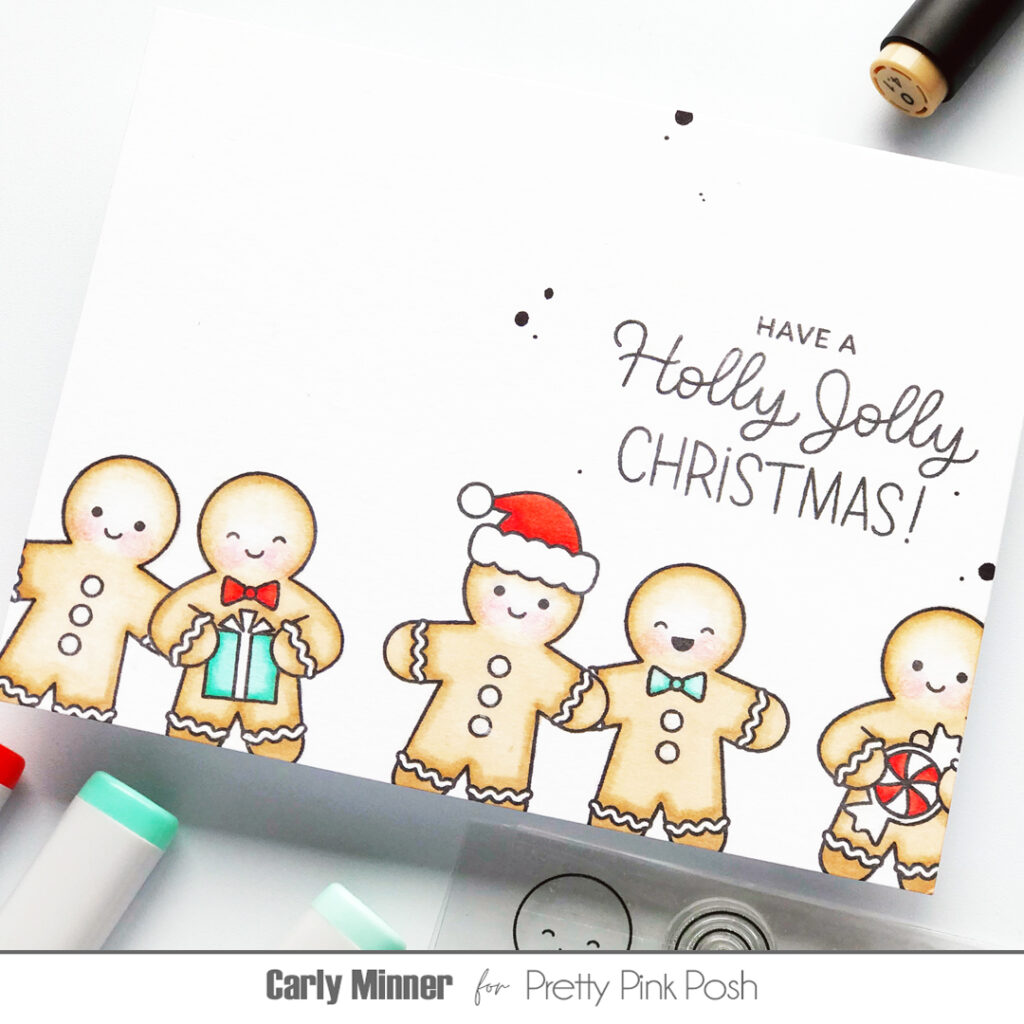
Hi friends, it’s Carly! I’m excited to share a project using the brand new holiday release.
This project is part of our September Video Hop! Check the description in the video for links to the next stop so you can keep hopping along for tons of holiday inspiration.
Do you have a favorite stamping technique? Simple masking is one of my favorites and it is so easy! It’s one of the first stamping techniques I learned and I still love it for creating clean & simple one layer cards!
If you haven’t tried masking yet, basically it is a technique that allows you to layer images by stamping one and then covering it with a temporary mask before you stamp the next image.
For this sweet Gingerbread Friendscard I did a little simple masking so that the gingeys could be standing together.
Here are my top masking tips…
make a plan before stamping…which images should look like they are “in front” because they will need to be stamped first. A sketch can help in the planning or even stamping it all first without masking.
start with post-its…there are lots of options for low-tack, stamp-able masking paper but try it with a Post-It first. Then if you love the technique of masking you can invest in more supplies.
stamp masks in permanent ink…using a waterproof/permanent ink for stamping the masks will keep ink from transferring from the masks to your project while you are using them.
to make the mask…just stamp on the Post-It, fussy cut the image out aiming for the middle of the stamped line and then it’s a little temporary masking sticker! And make masks last longer by putting a piece of clear packing tape on top before cutting out.
have a black pen handy…a black pen can help “fix” any of the stamped lines that might have been missed because of a mask. I’m not great with fussy cutting so often my masks aren’t perfect but I can fix it with a pen. I like to use Copic Multiliners when I know I’m going to color with alcohol markers
have a white gel pen handy…it makes a great “eraser” for any little bits you didn’t mean to stamp or any coloring that went outside of the lines.