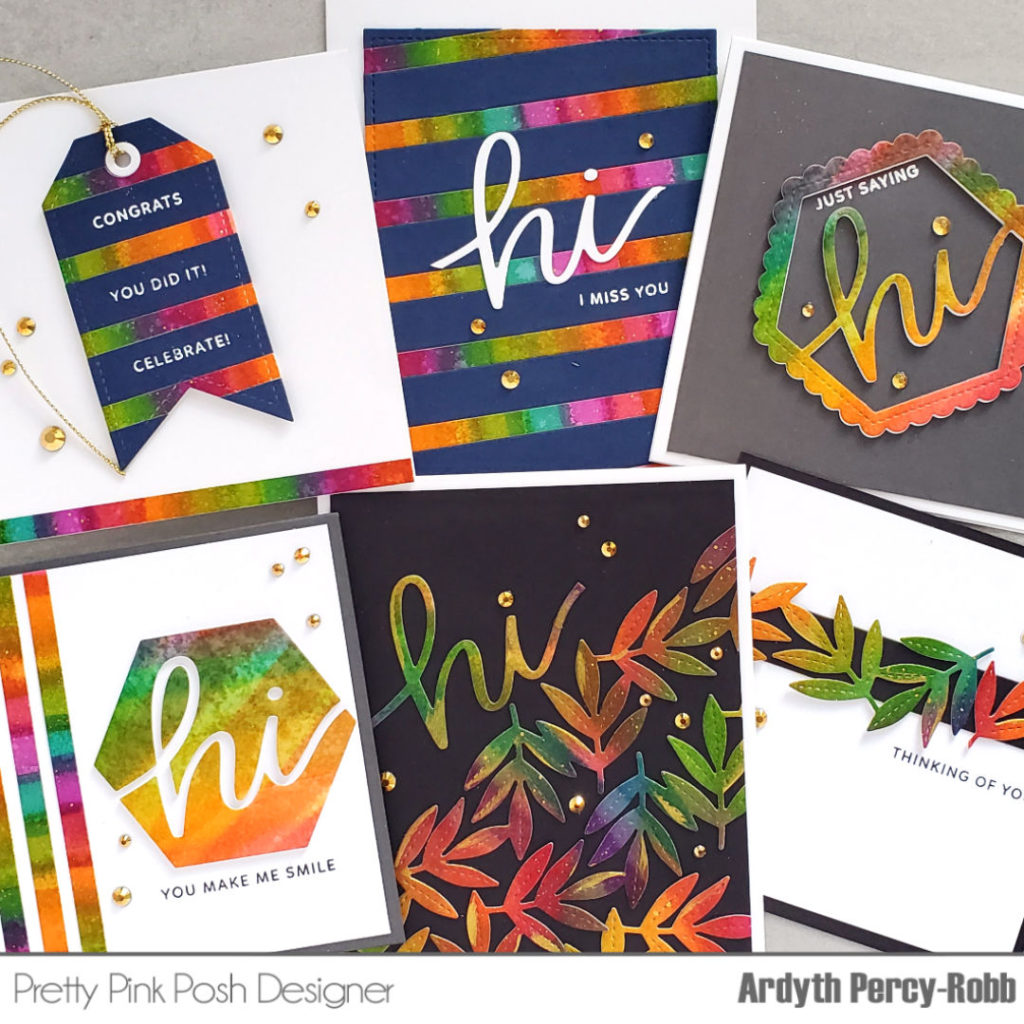
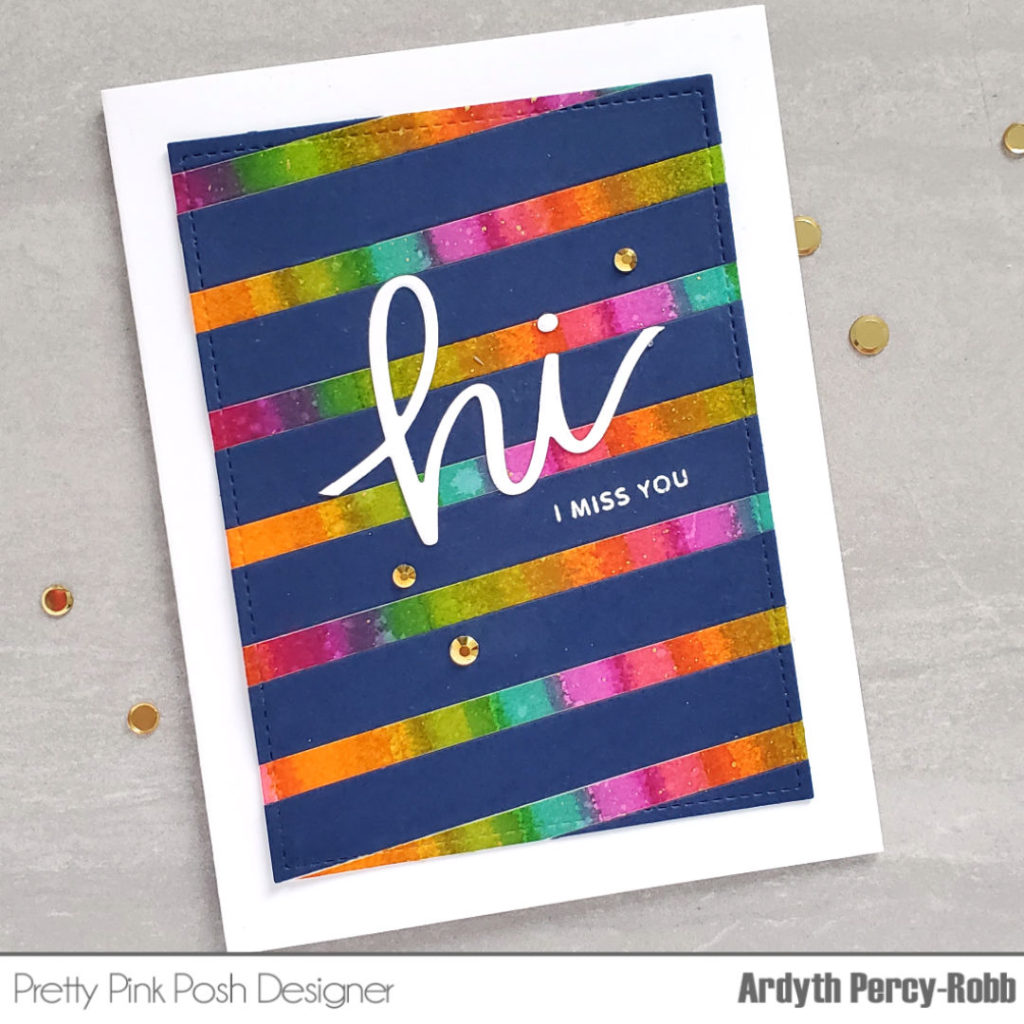
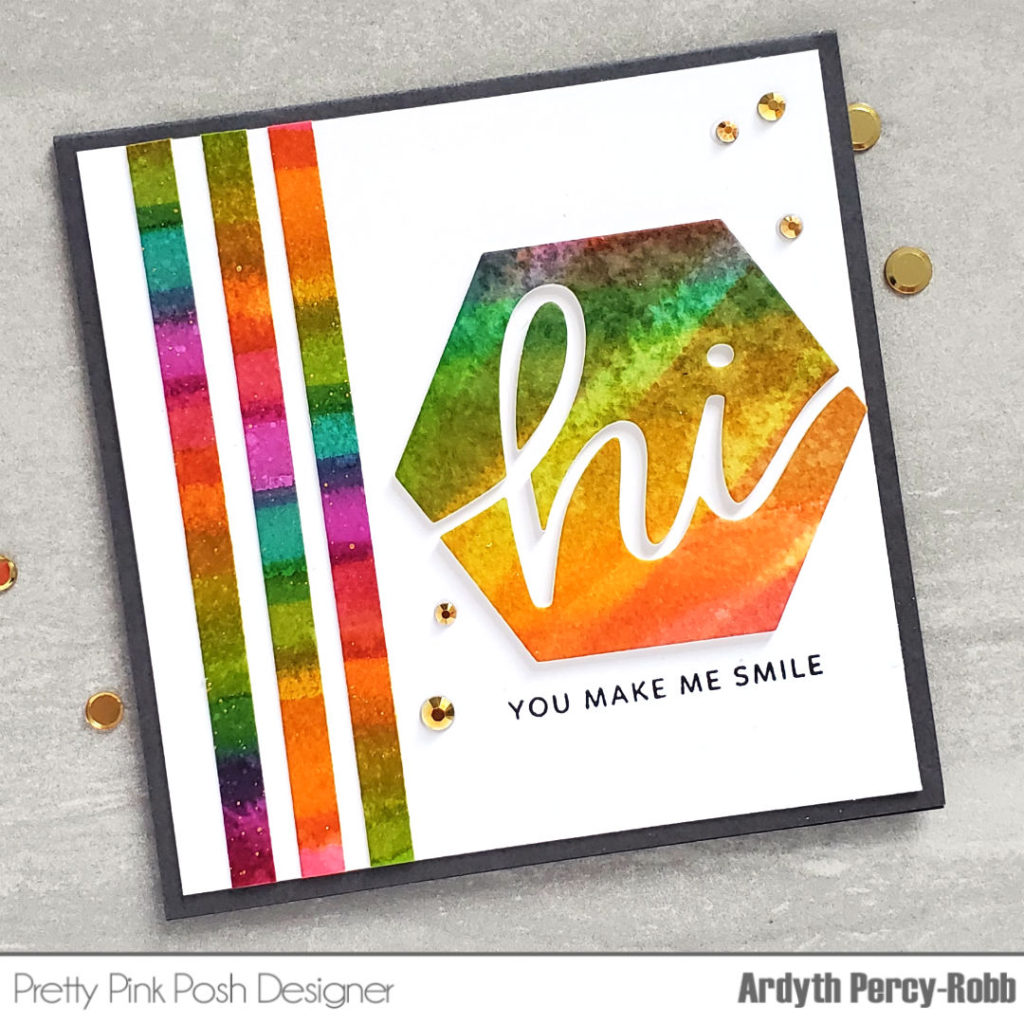
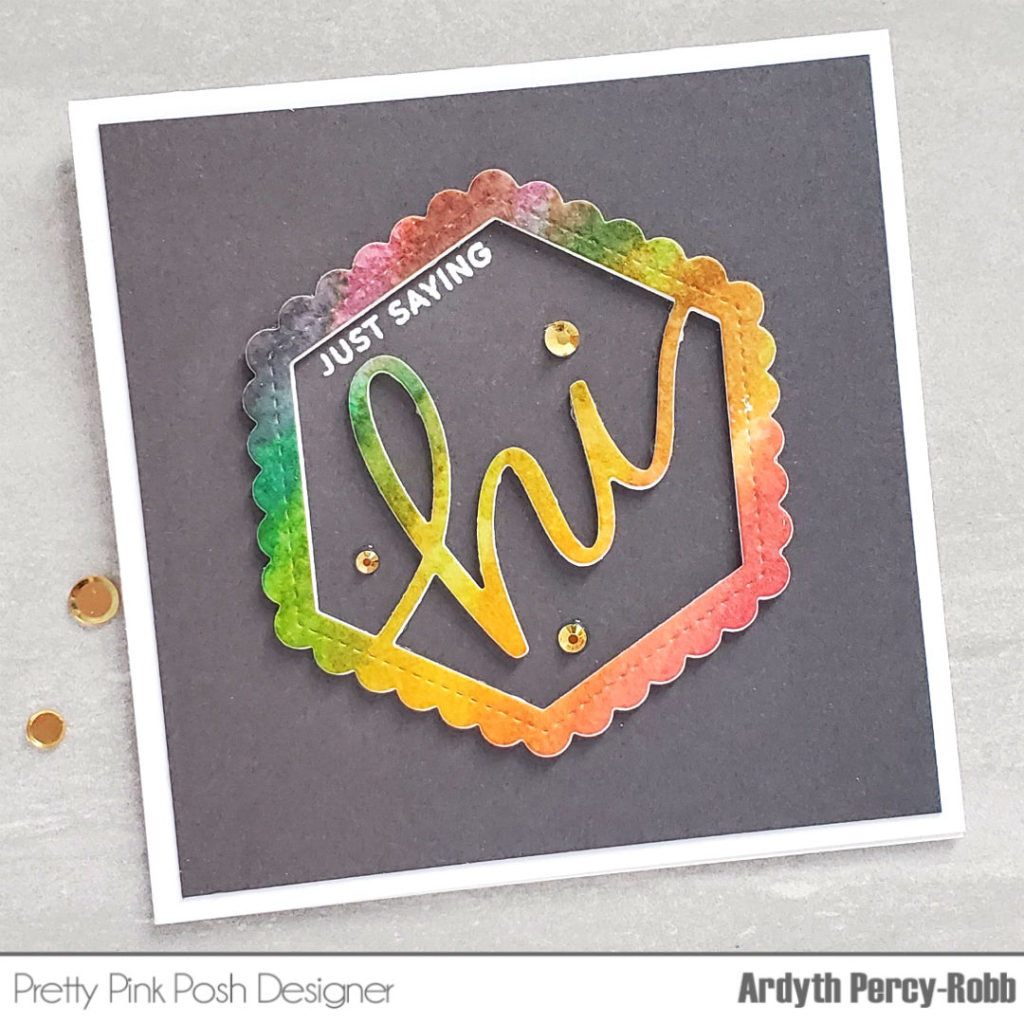
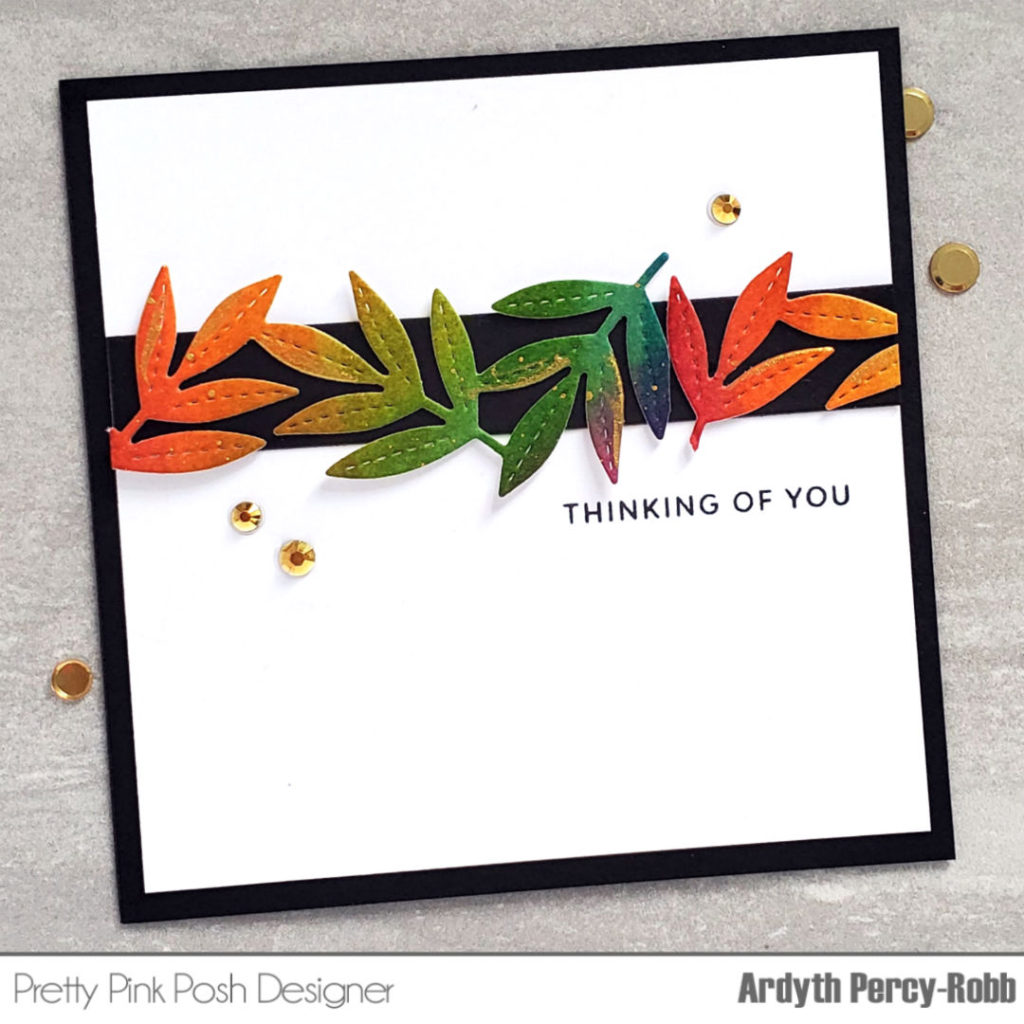
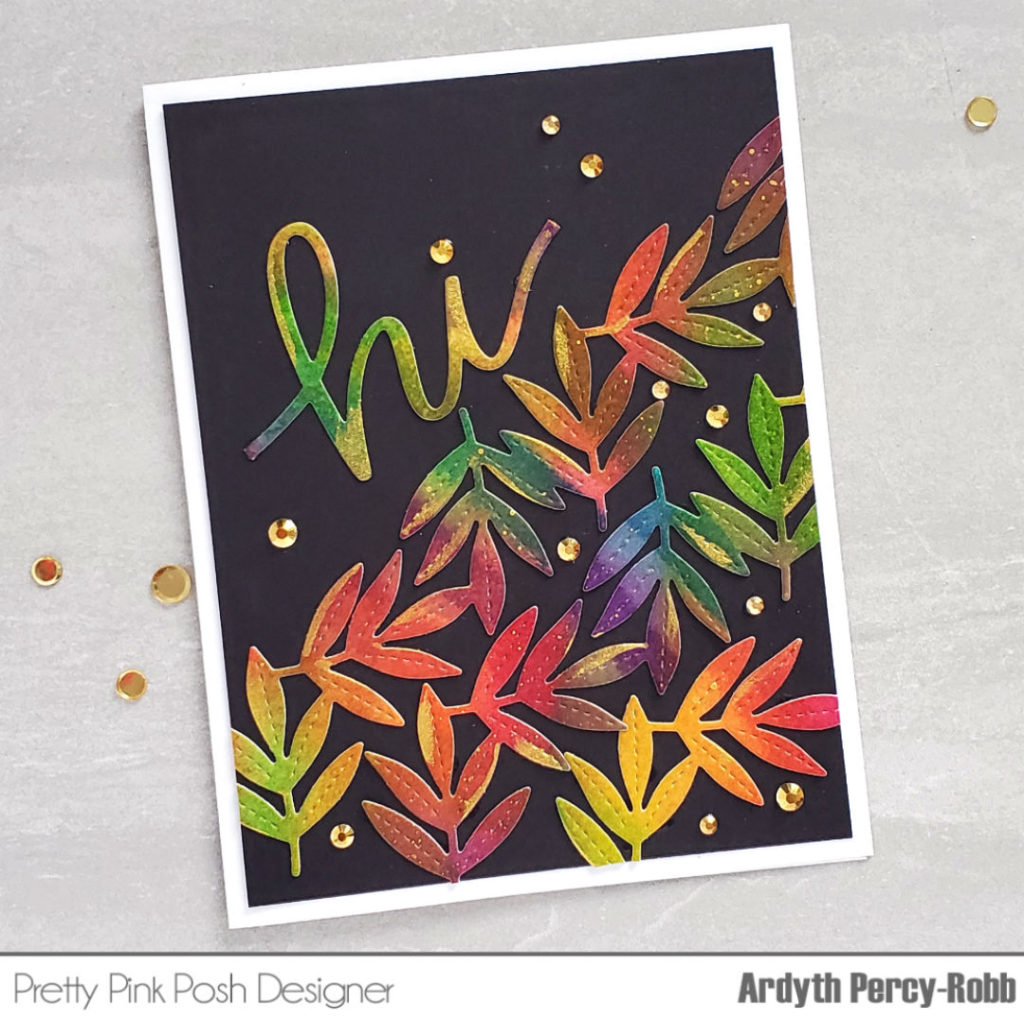
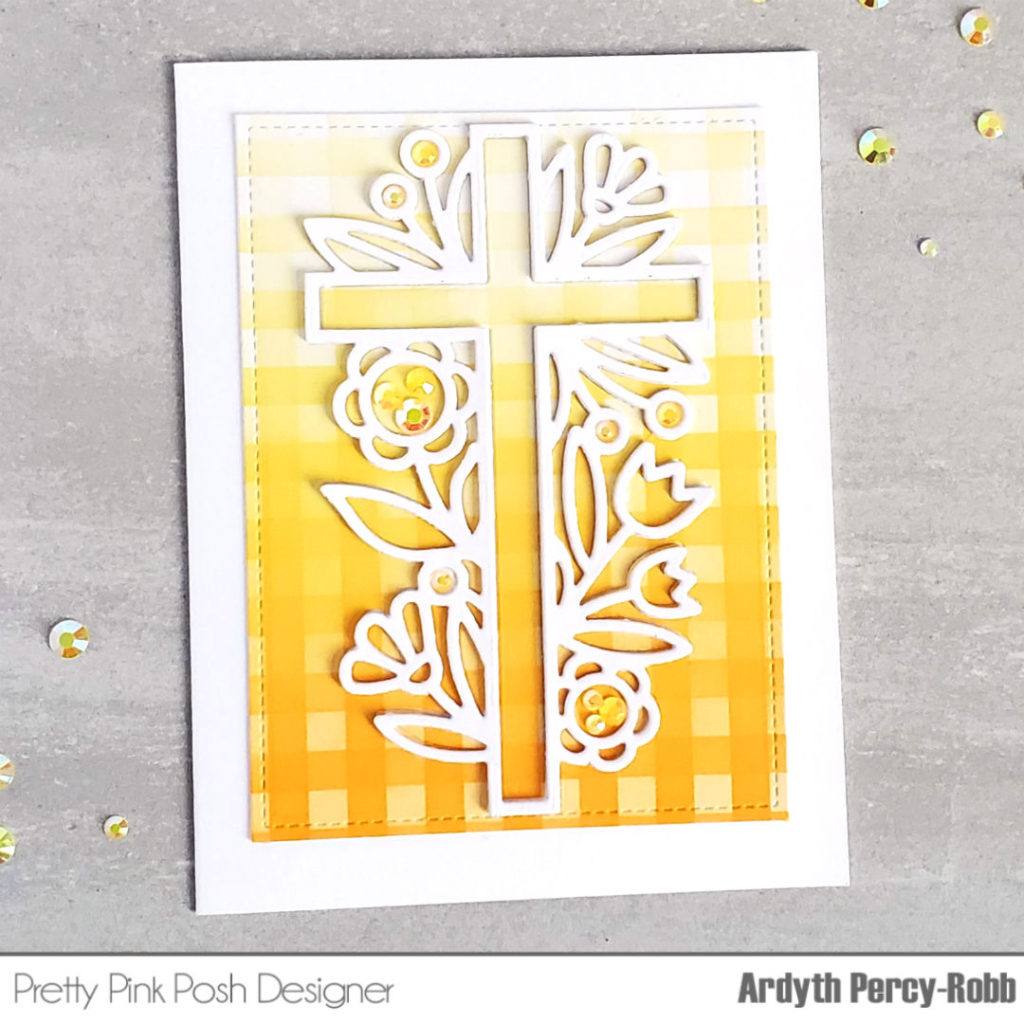
Hello! It’s Ardyth here with a post about rescuing your card fails! I had grand plans for some beautiful watercolor backgrounds that did not actually happen. Despite repeated attempts, I ended up with 3 unattractive panels that I really didn’t want to use. It’s so frustrating when that happens, isn’t it?
I slept on it and the next day, I decided to die cut the panels. Doing this often results in something much more usable and luckily, that’s what happened here!
I ended up with 6 beautiful cards from my 3 ugly panels. Here’s a video to show you that perseverance can really pay off!
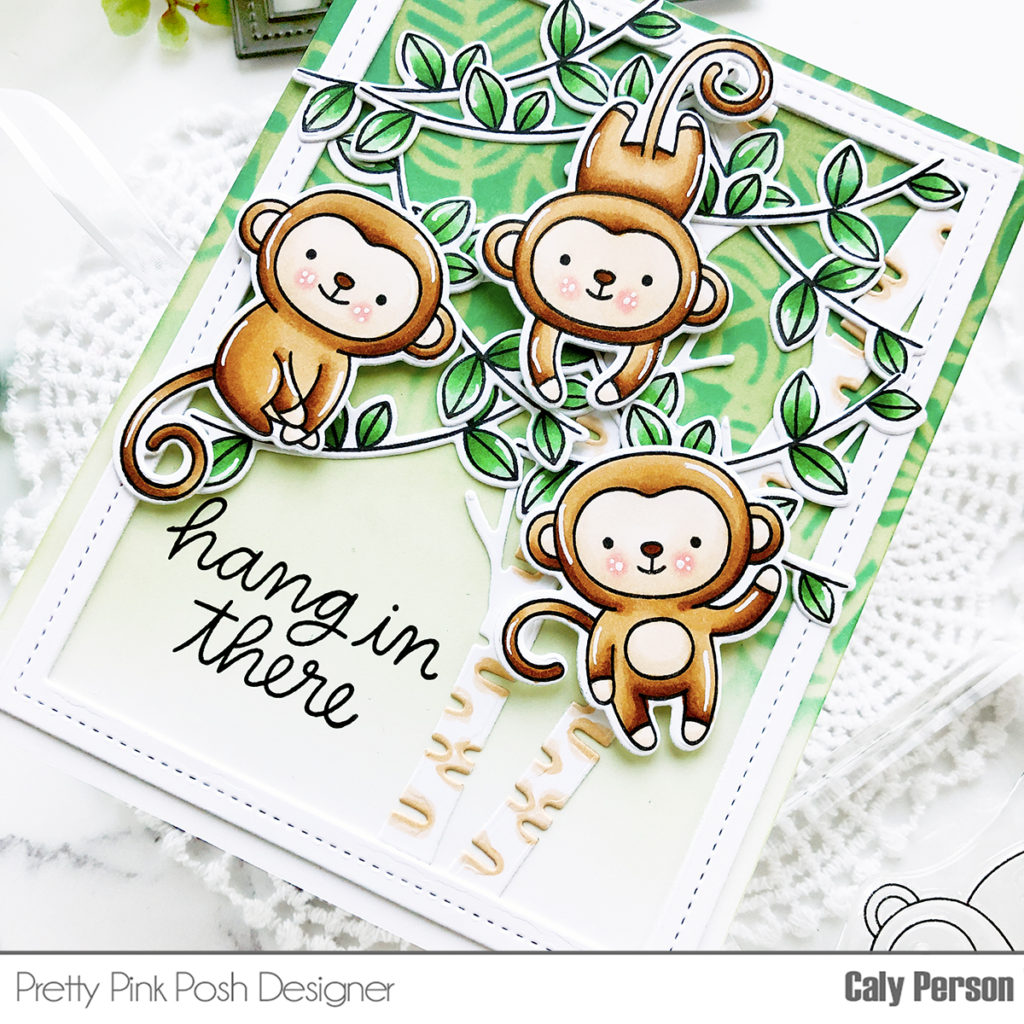
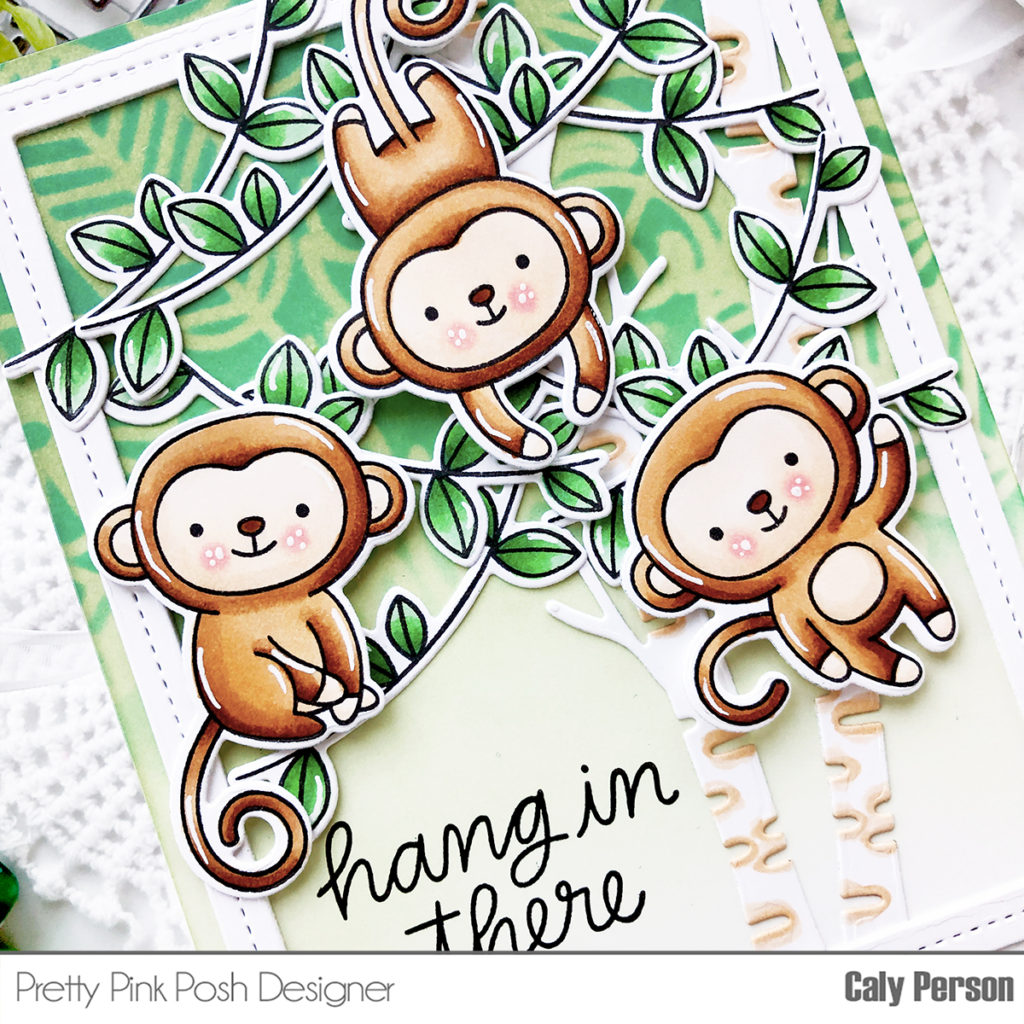
To start, I stamped and colored my images with Copic markers. I stamped lots of vines from the Jungle Friends set. The images were quick to color and you can see my blending and shading process in the video.
Copic colors used:
Greens: G12, G14, G17
Monkeys: [E50, E53], [E30, E34, E37]
Blush: R201, R20
After die-cutting my images, I set them aside to work on my scene. I die-cut the Nature Essentialsdie twice to get to birch trunks. Since I had two frames from the two cuts, I adhered them together to create a more sturdy and thicker frame. The two birch trunks are then colored with the E50 and E53 only at the side cuts.
My background is first ink-blended with Bundled Sage Distress Oxide Ink. I blended the color from top down with more saturated color at the top and faded to white towards the bottom. Then I used the Jungle Background Stencil to ink-blend Lucky Clover Distress Oxide Ink only towards the top of my panel. This will create a heavy tree canopy for the monkeys to swing from.
I adhered my frame and birch trunks to the ink-blended panel, then I stamped my sentiment. Then I began adhering the colored vines to my card to create the tree canopy for my monkeys. Finally, the monkeys are adhered to my card using foam adhesive to give the card some dimension.
I hope you enjoyed today’s card using the new release products from Pretty Pink Posh! Thanks so much for stopping by!
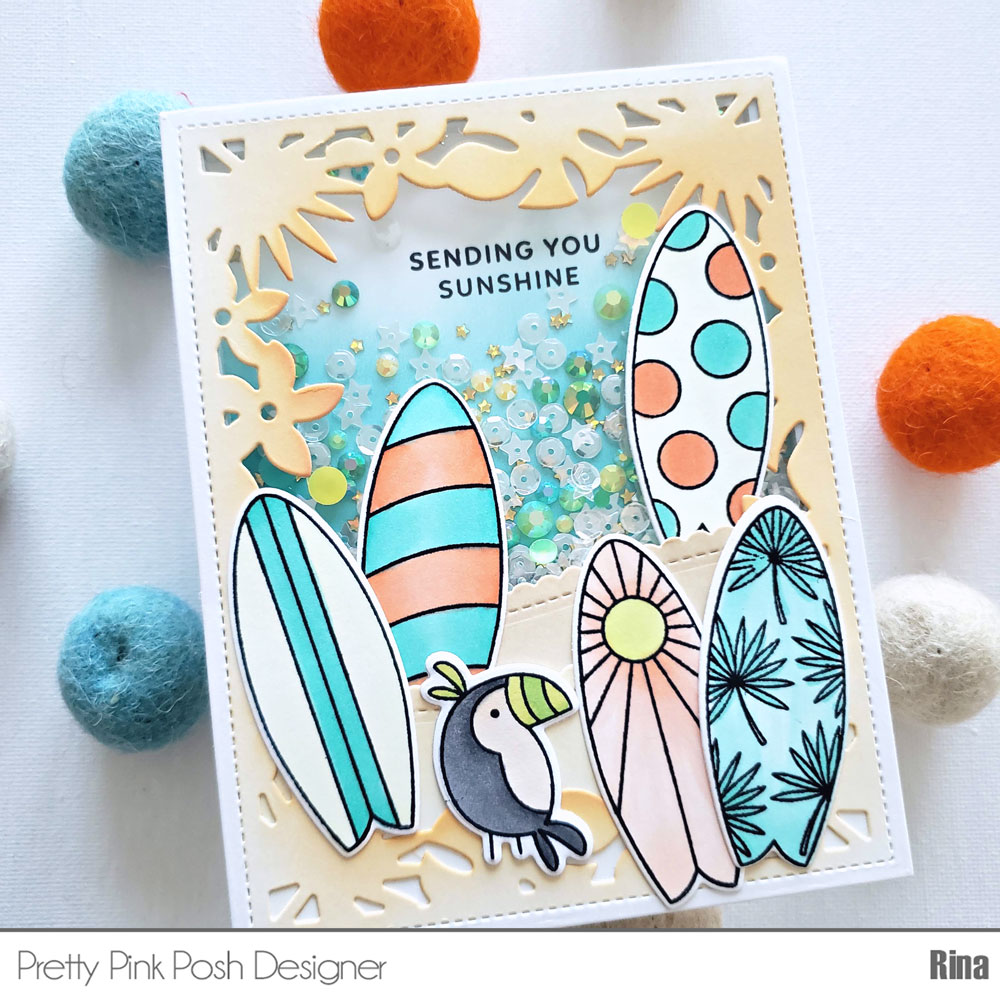
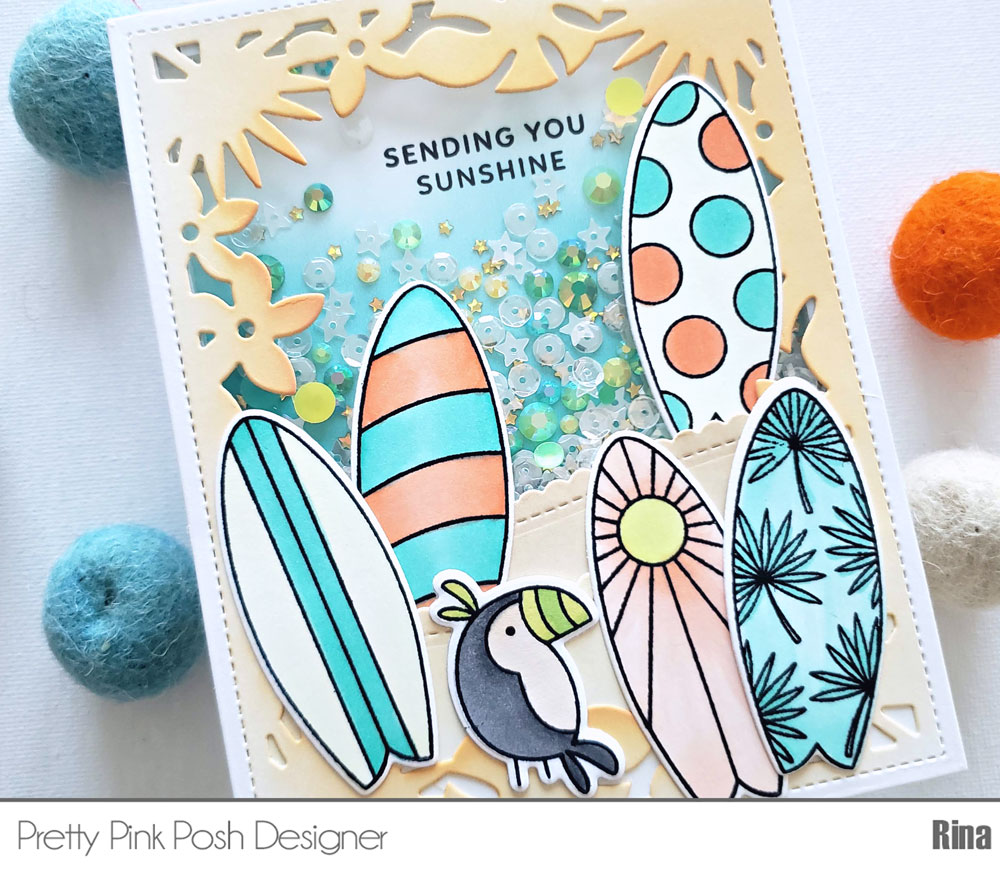
Hi everyone! It’s Rina here and I have a fun shaker card for you today using the Tropical Frame Die. A2 sized dies are a staple in my craft room, it makes card making so easy! I love making these quick card fronts using these dies.
Watch the video for a step by step tutorial on how to make this card.
The Summer Surfboard stamp set has my heart. The images are so fun to color with their graphic designs and patterns. I also added an extra toucan image from the Tropical Toucans set to finish off this card.
For my shaker mix, I used theCitrus Jewels along with the mini gold stars and sparkling clear stars. I love the shine and sounds a shaker card makes. It is always so fun to give someone a shaker card because it always brings a smile!
I hope you try making this fun beachy card! Thanks for stopping by!
This video is part of a video hop and Pretty Pink Posh is one of the sponsors, so be sure to visit the video on YouTube so you can hop and comment for a chance to win!
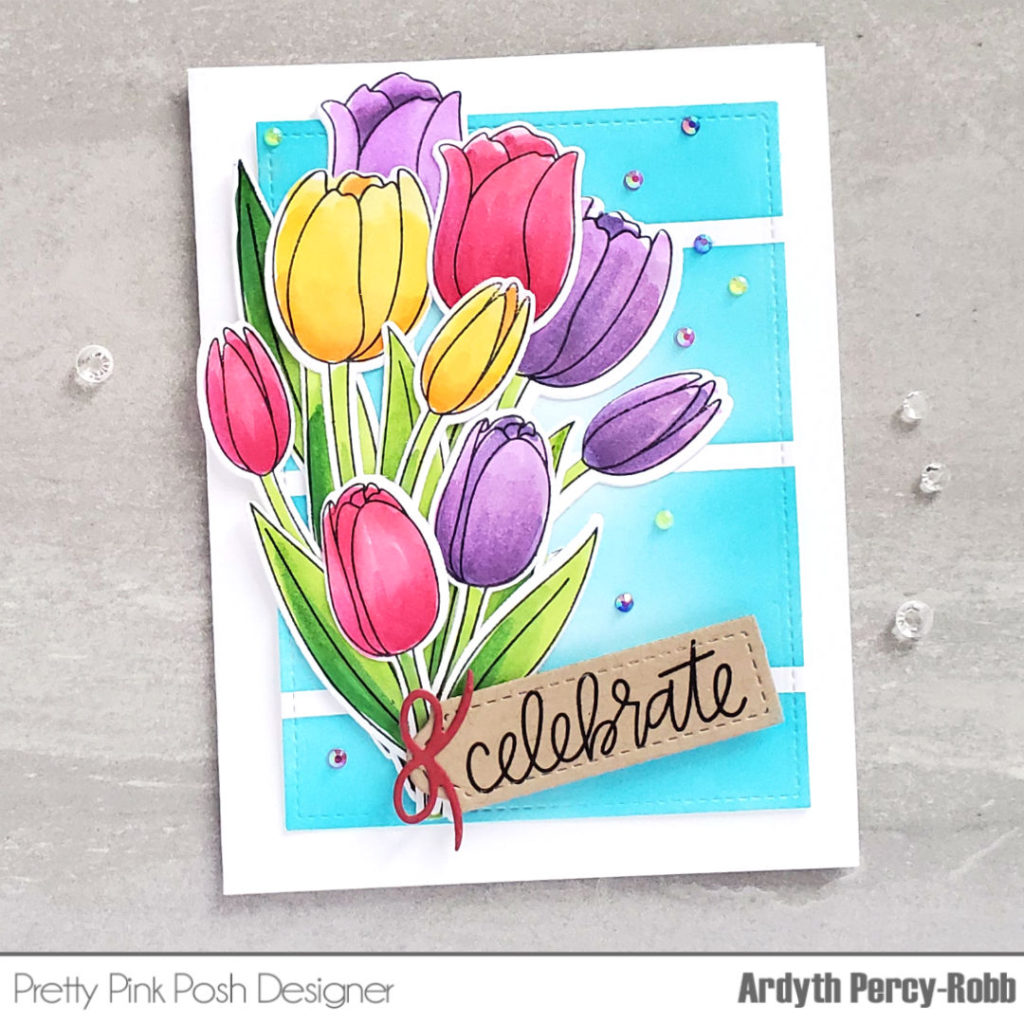
I started by stamping, colouring and die cutting a whole bunch of tulips. I didn’t know how many I would need, so I did a lot, and kept the extras for a future project.
Once I had my arrangement exactly the way I liked it, I used a piece of Press’n’Seal to pick it up and then put glue on the back and put it onto my card front. (if you don’t have Press’n’Seal, masking paper works too!).
I finished the arrangement with a kraft tag and some tiny jewels in coordinating colours!
I hope you enjoyed today’s video and post. Again, be sure to visit the video so you can hop along in the video hop for a chance at some great prizes!
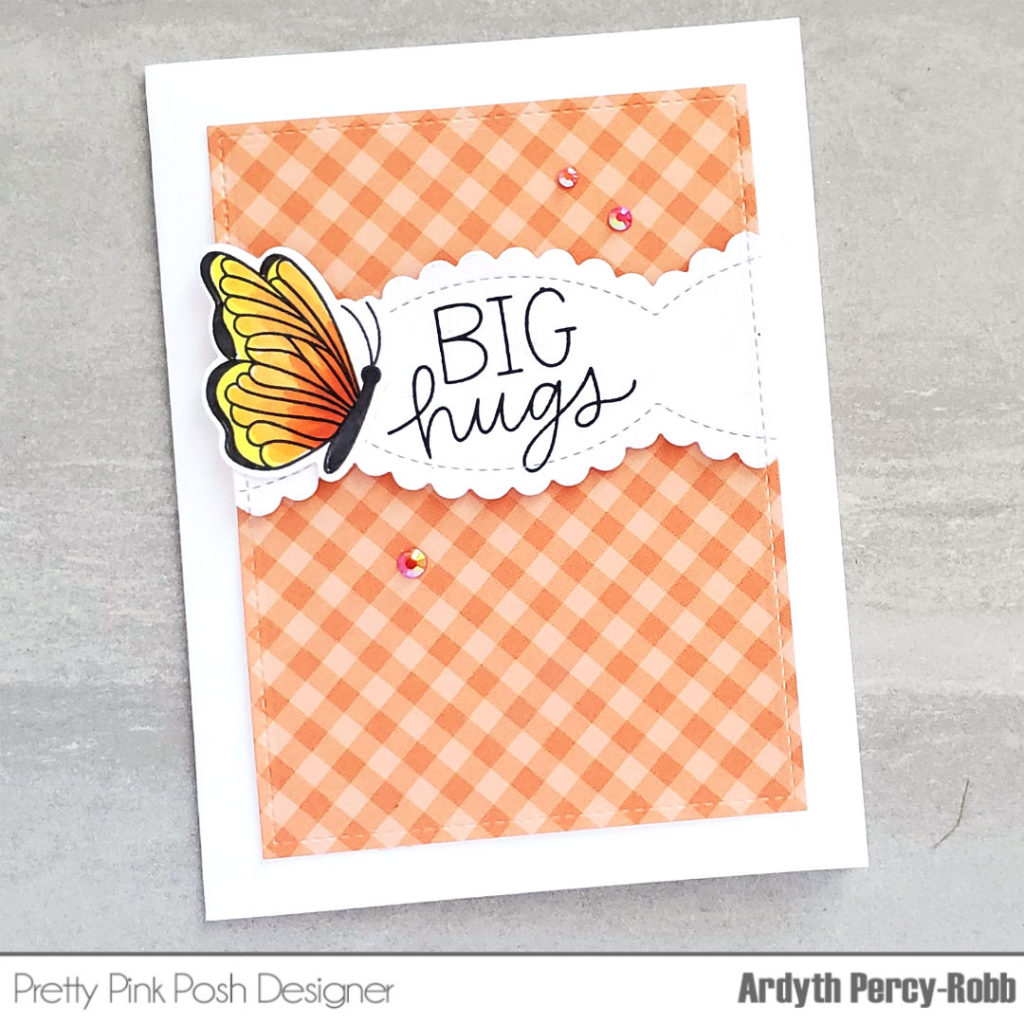
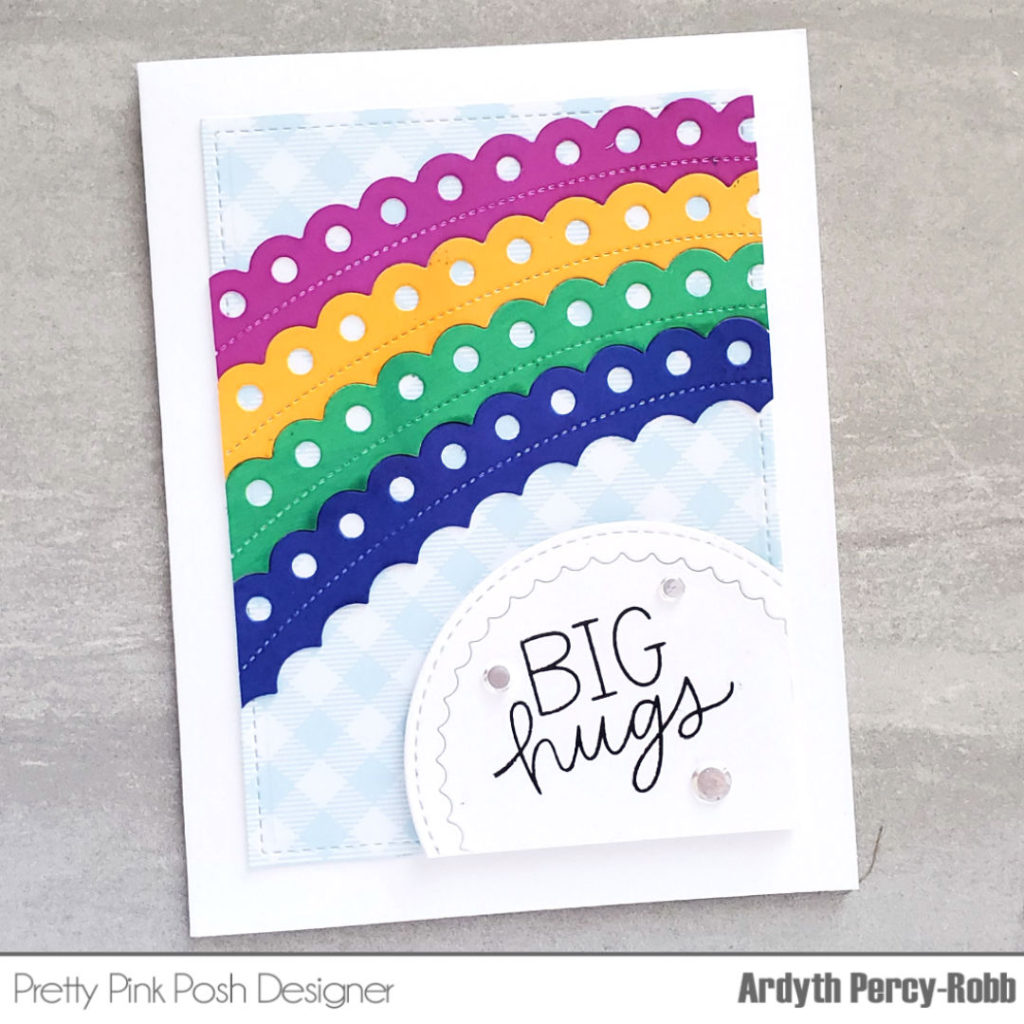
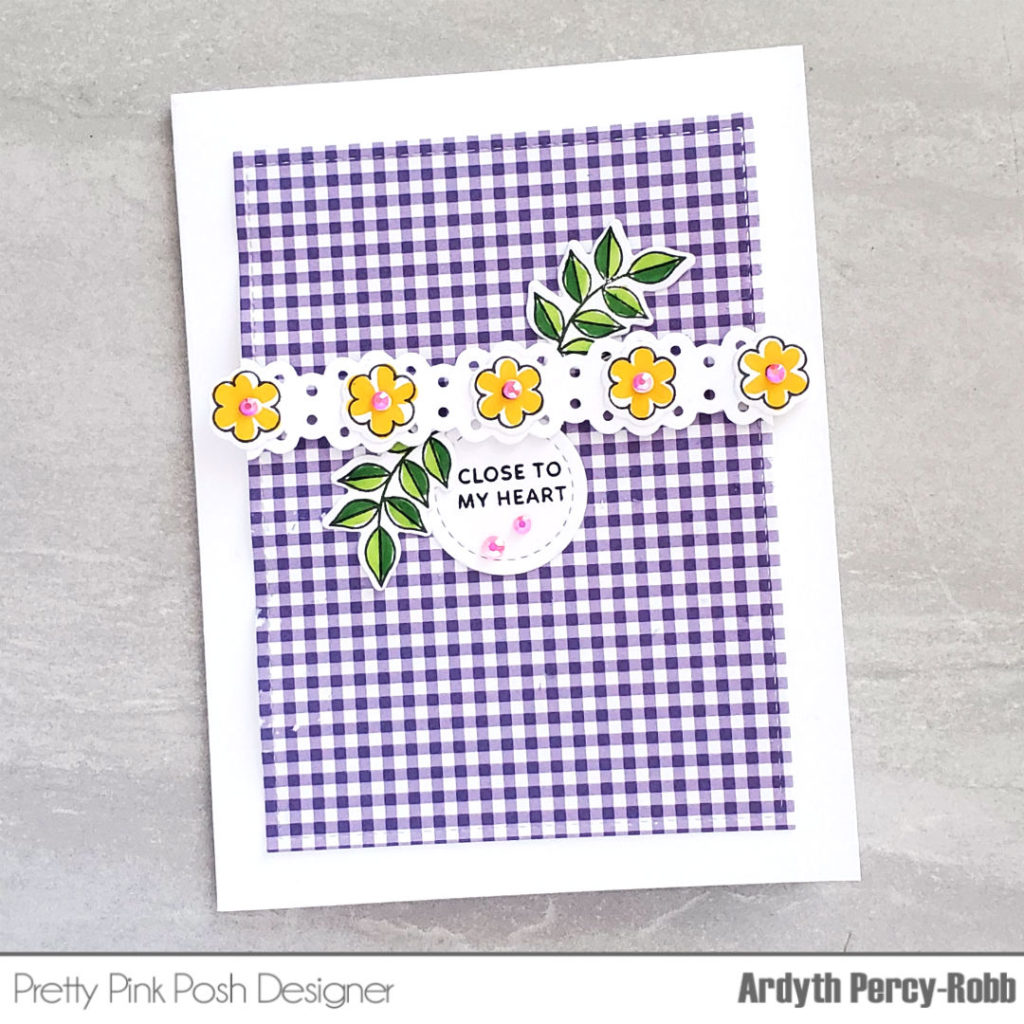
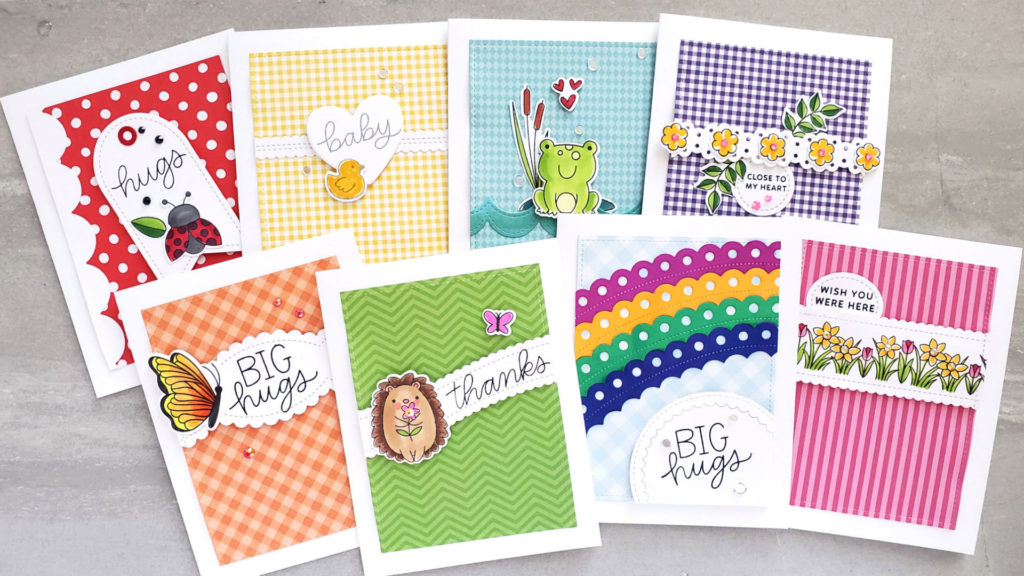
You can create sentiment strips by using a border die on each side of a strip, customizing the width to fit your sentiment or stamped images!
By making the strips narrow, you can create paper ‘ribbons’ or ‘lace’ to embellish your card fronts.
You can also customize the width of your Stacked Edges dies, which are not exactly border dies, but have some similar features.
You can even use the off cuts to get a different look!
You can cut them so that they an even width, by using a grid or ruler, or you could deliberately make them wider on one end for a completely different look!
I hope you’re inspired to get your border dies out and give this technique a try!
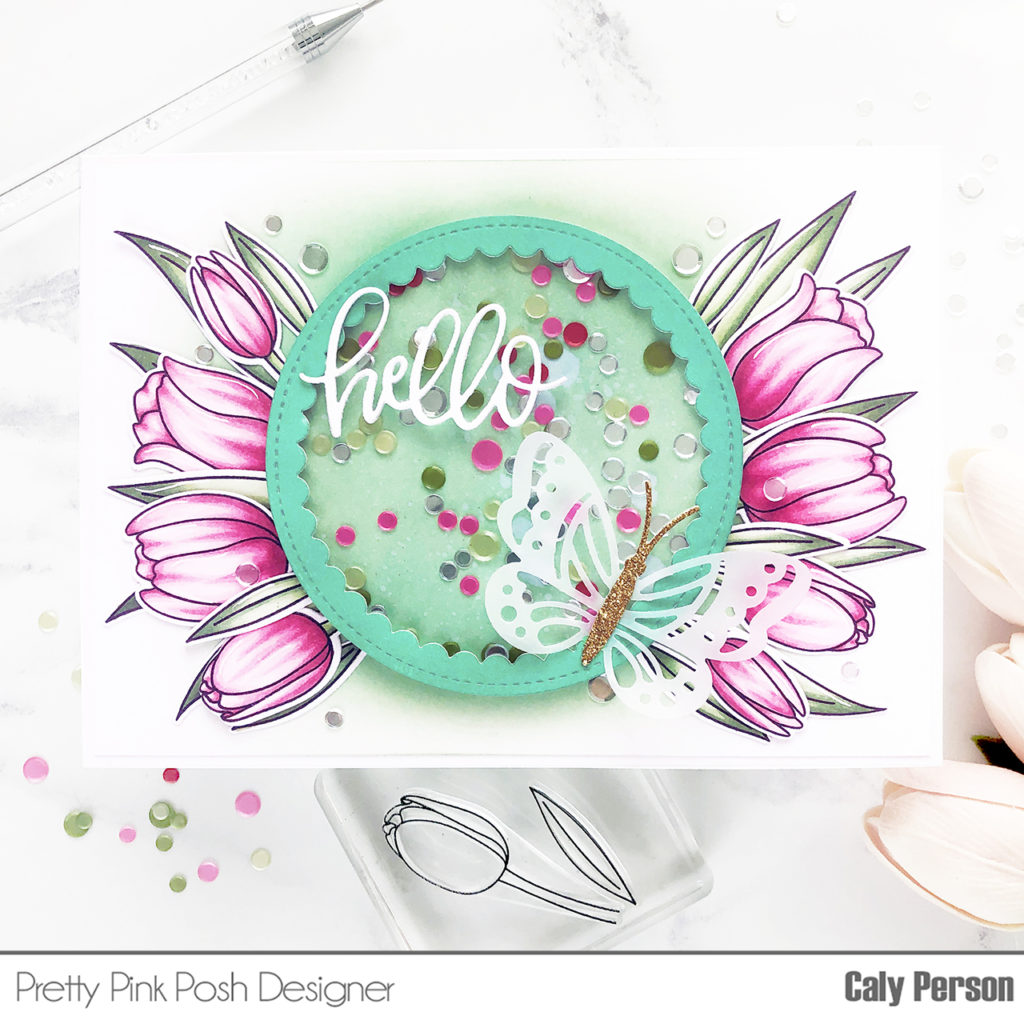
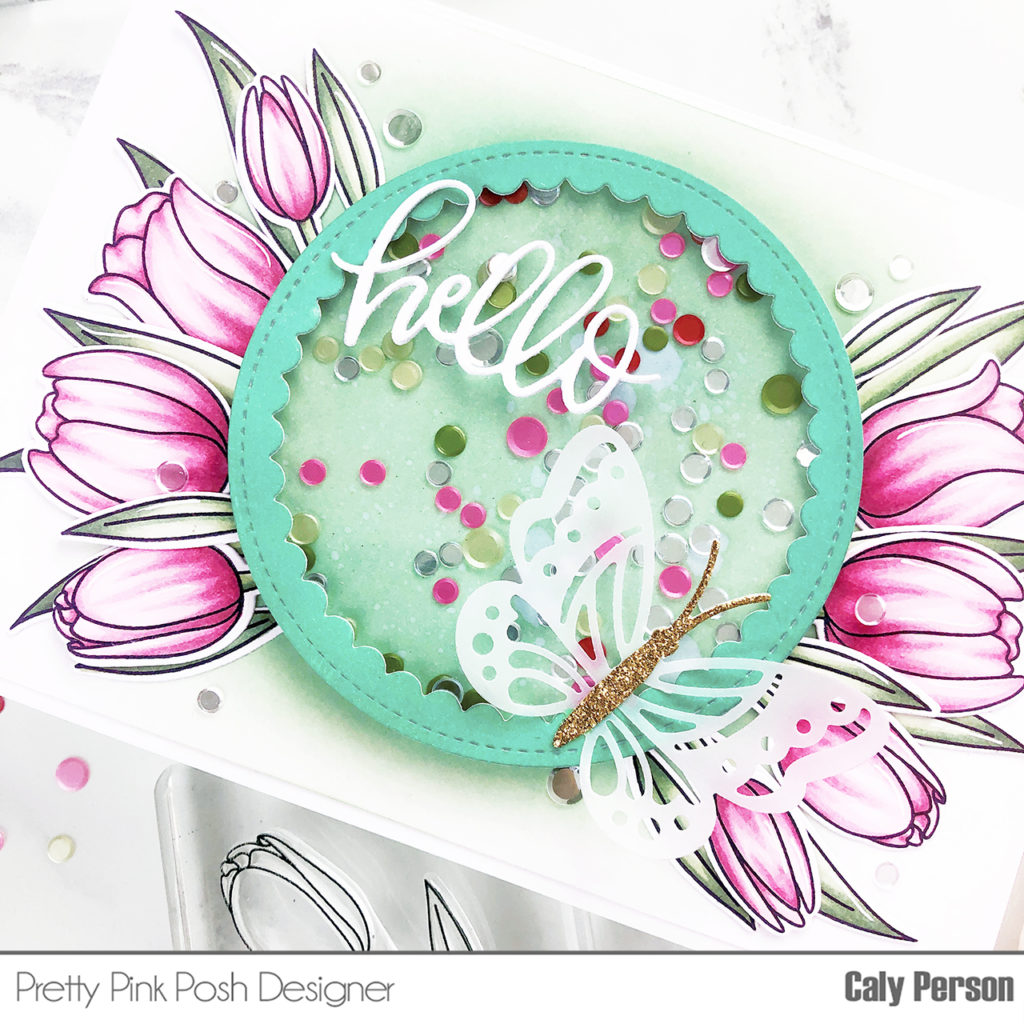
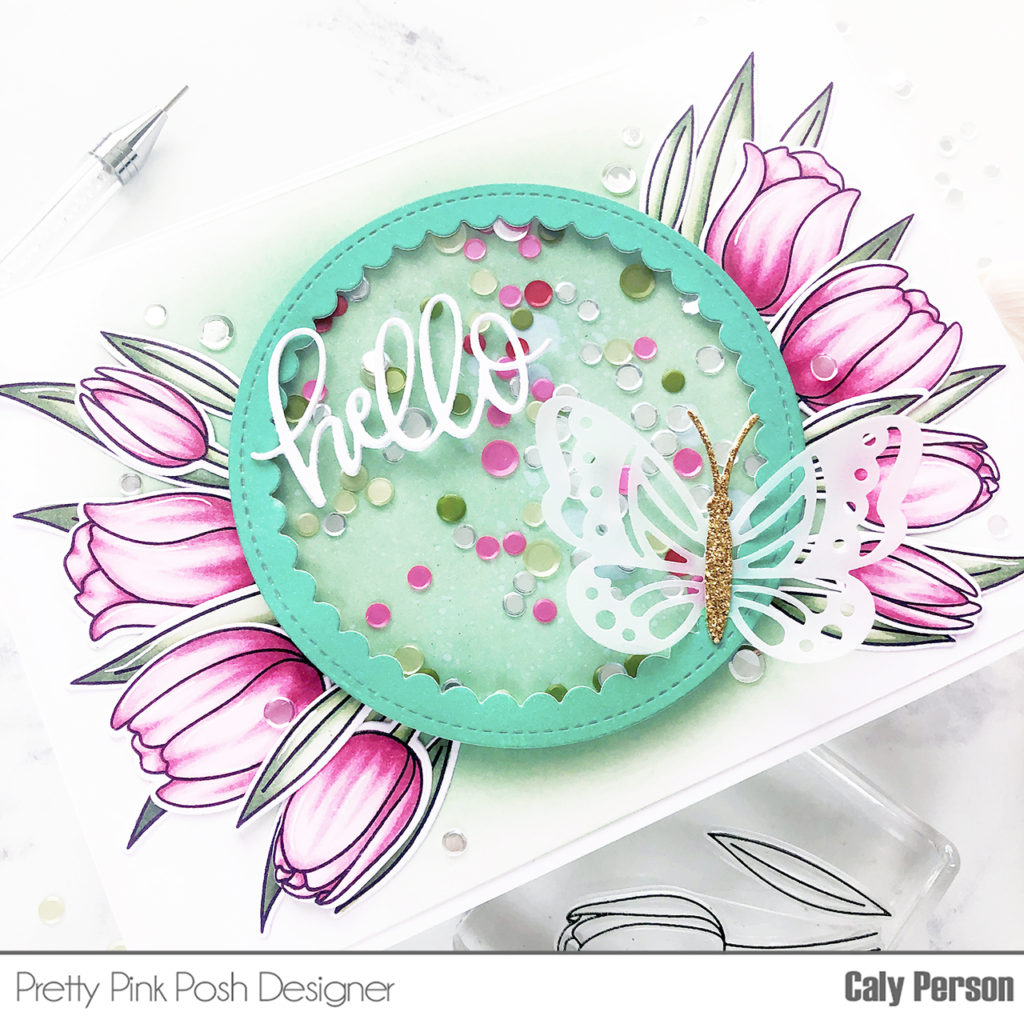
Hi, Friends! This is Caly with you sharing a shaker card made using the Tulipsstampset. My arrangement today requires a larger card, so I’ve created a card that is 5”x7”. Please check out the video on the Pretty Pink Posh YouTube channel to see the process!
I stamped and colored the tops of each tulip stem and stamped each of the leaves 4 times to get enough to frame my shaker for the center of my card.
Copics Used: RV10, RV32, RV34, R56, G40, G43, G46
After die-cutting my images, I set them aside to work on my card panel. I ink-blended my 5”x7” panel using Lucky Clover and Bundled Sage Distress Oxide Inks. I also ink-blended a separate panel with Lucky Clover for the Scallop Circleand then another panel using Bundled Sage for the shaker background.
After attaching a window to the back of the Scallop Circle, I sprayed the background panel with some water droplets for texture. Then I added confetti from the Berry Bright and Sparkling ClearConfetti mixes before sealing my shaker.
To finish today’s card, I arranged my tulips around the shaker and adhered it in place. I added some white gel highlights to the images and embellished with more Sparkling Clear Confetti.
I hope you enjoyed this project! Thanks so much for stopping by today!
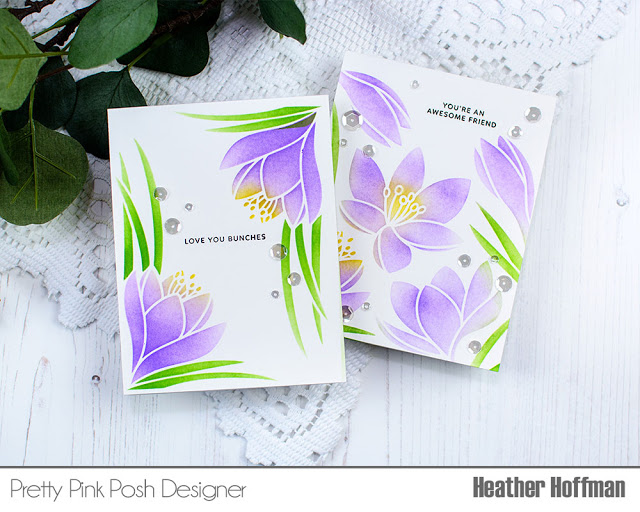
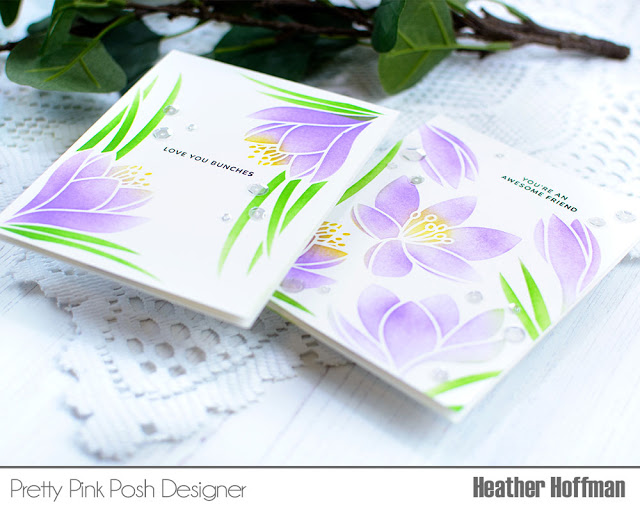
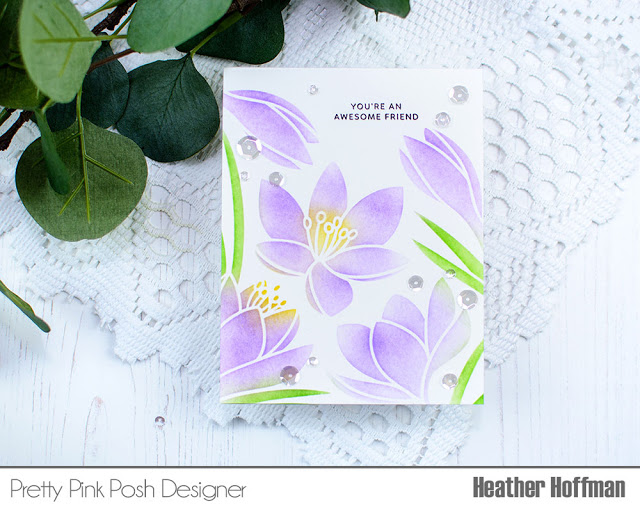
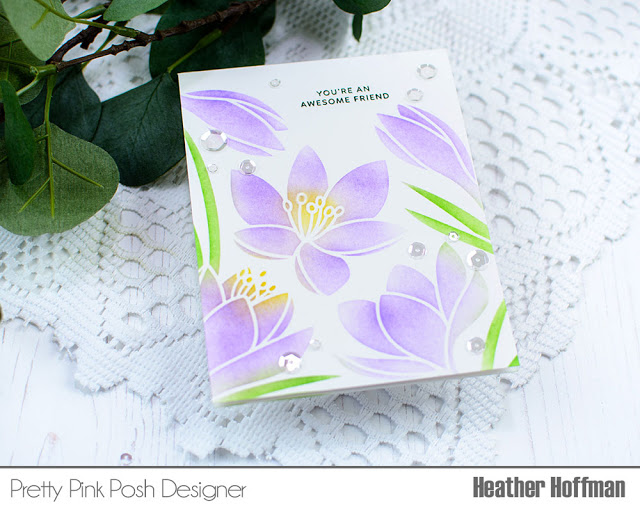
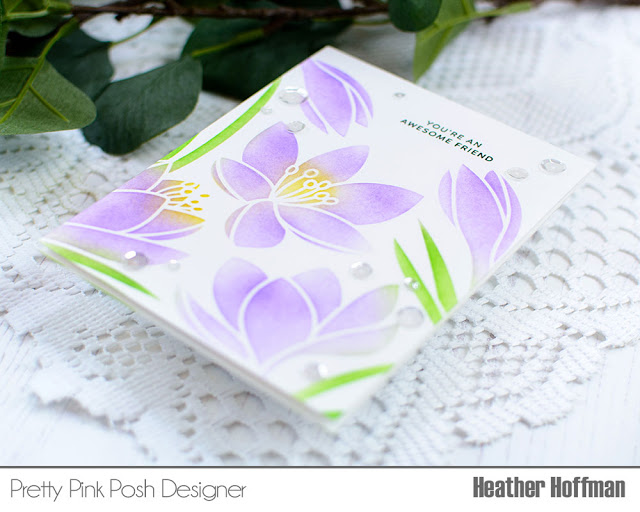
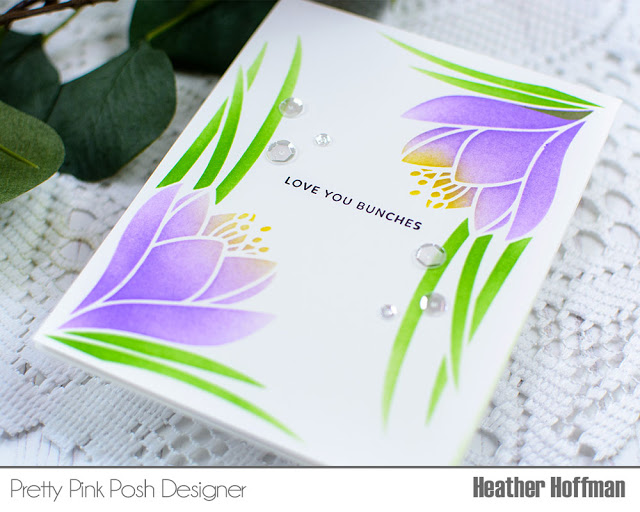
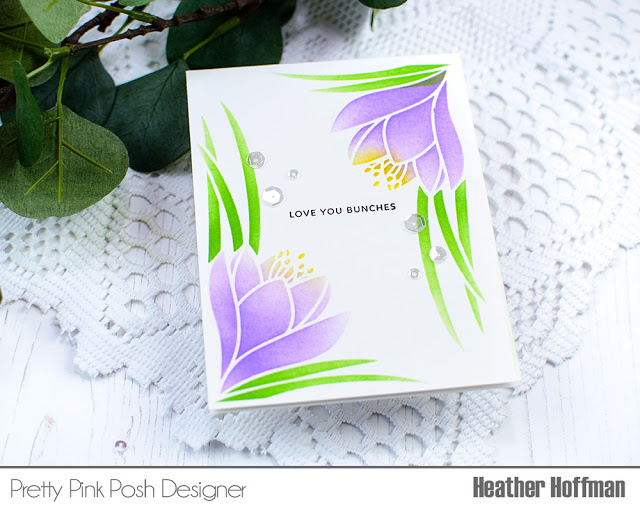
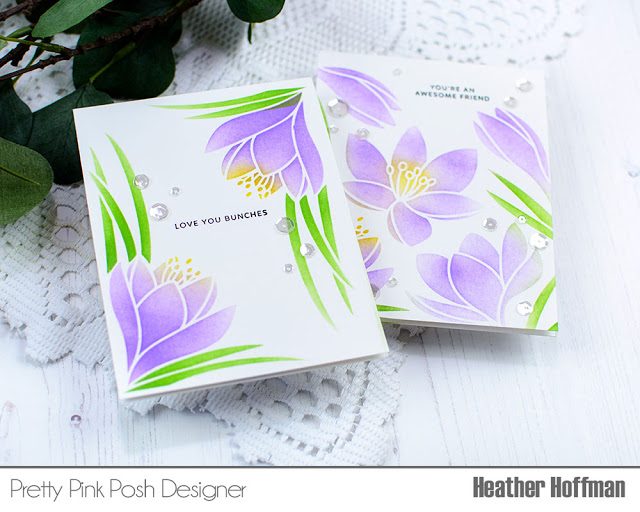
Good morning! Heather here today to share a couple cards using the beautiful new Crocus Stencilfrom Pretty Pink Posh! There is a video tutorial below as well, so keep reading to watch that and learn more!
Here is a video showing how I created these two cards.
I’m sharing two different ways to use this stencil – using the full panel to fill a card, or focusing on just a portion of it with some simple masking to just use a specific image.
For this first version of the card, I used the entire stencil to fill my card front with these lovely floral images.
I used a combination of Mustard Seed, Wilted Violet, and Mowed Lawn distress inks with my ink blending brushes and no masking required – super simple and easy!
For the second version, I used the lovely corner image to create a frame on my card front.
I did some very simple masking with post it tape – which is nice and inexpensive, and readily available! A bit of Post it Tape finishes off some of the other areas.
I used the same distress ink colors and blending brushes to add the color through the stencil.
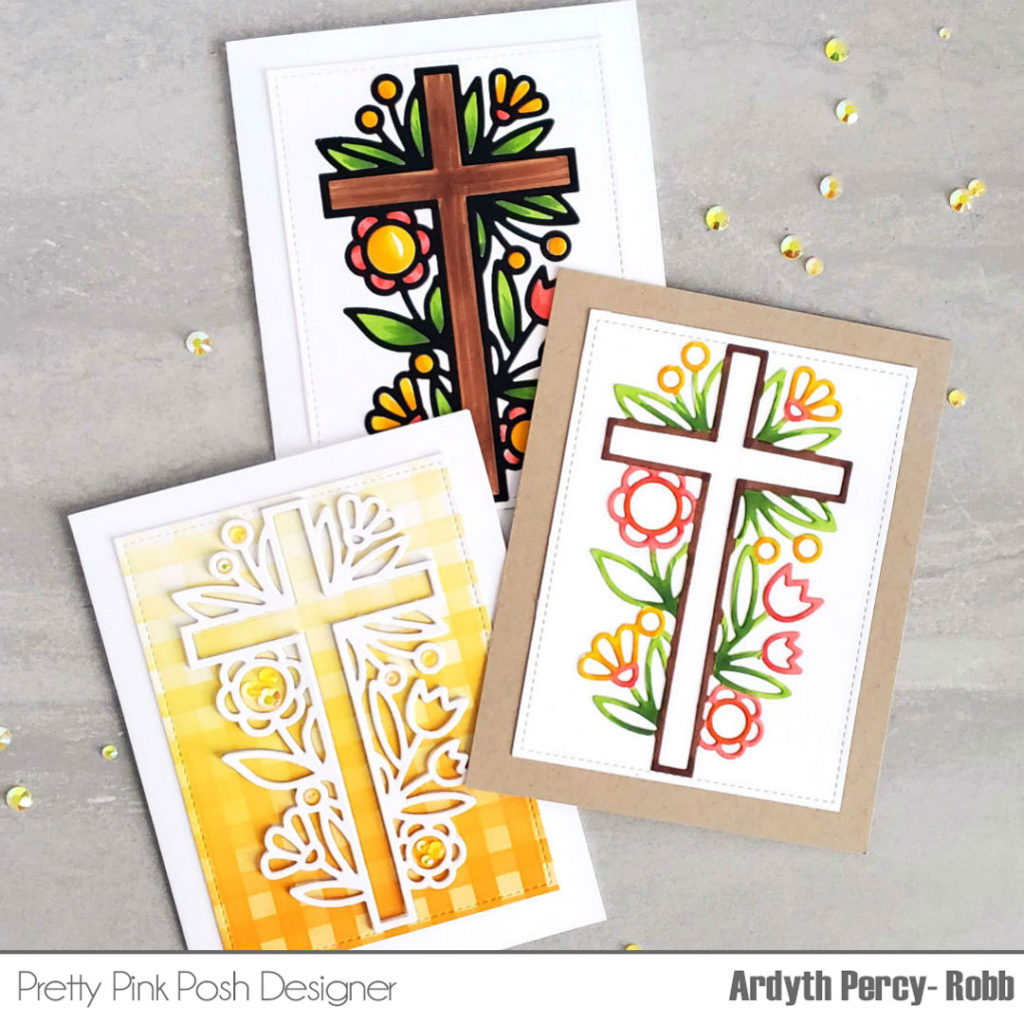
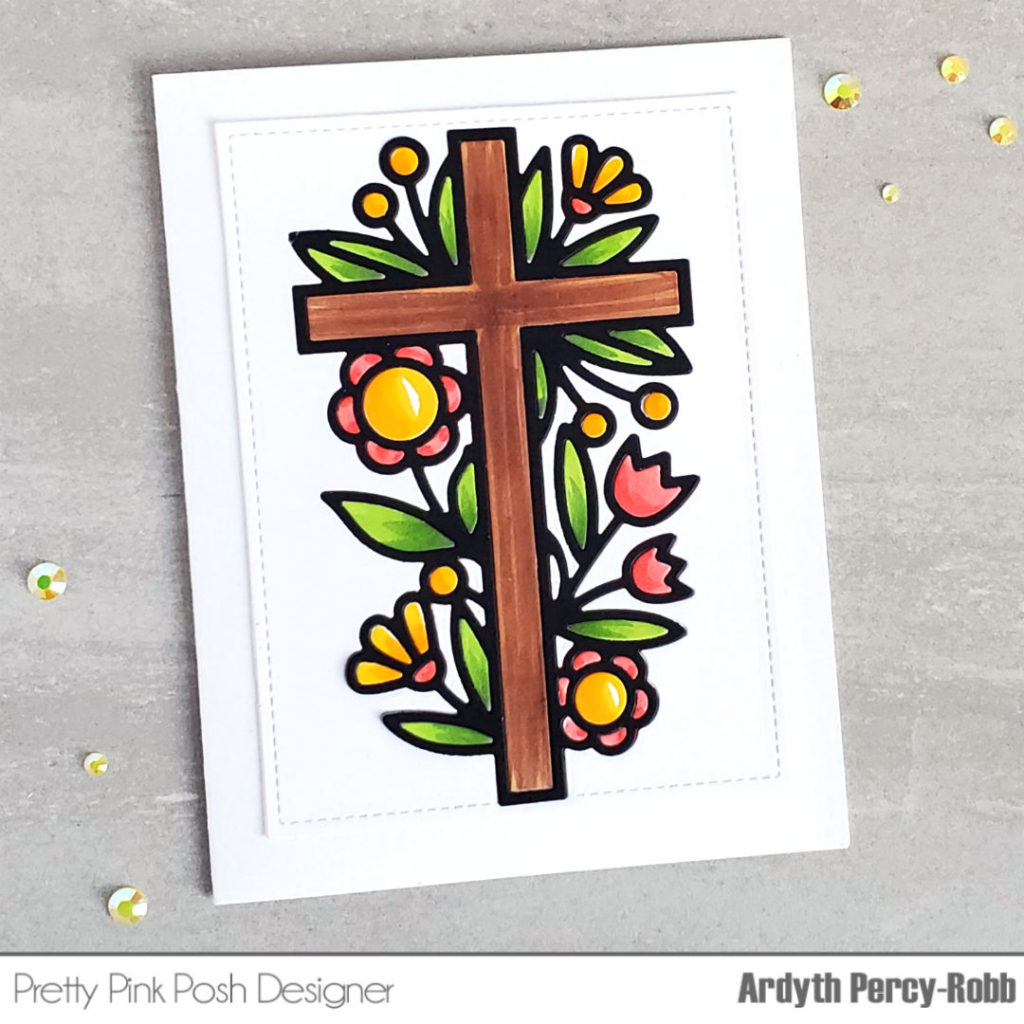
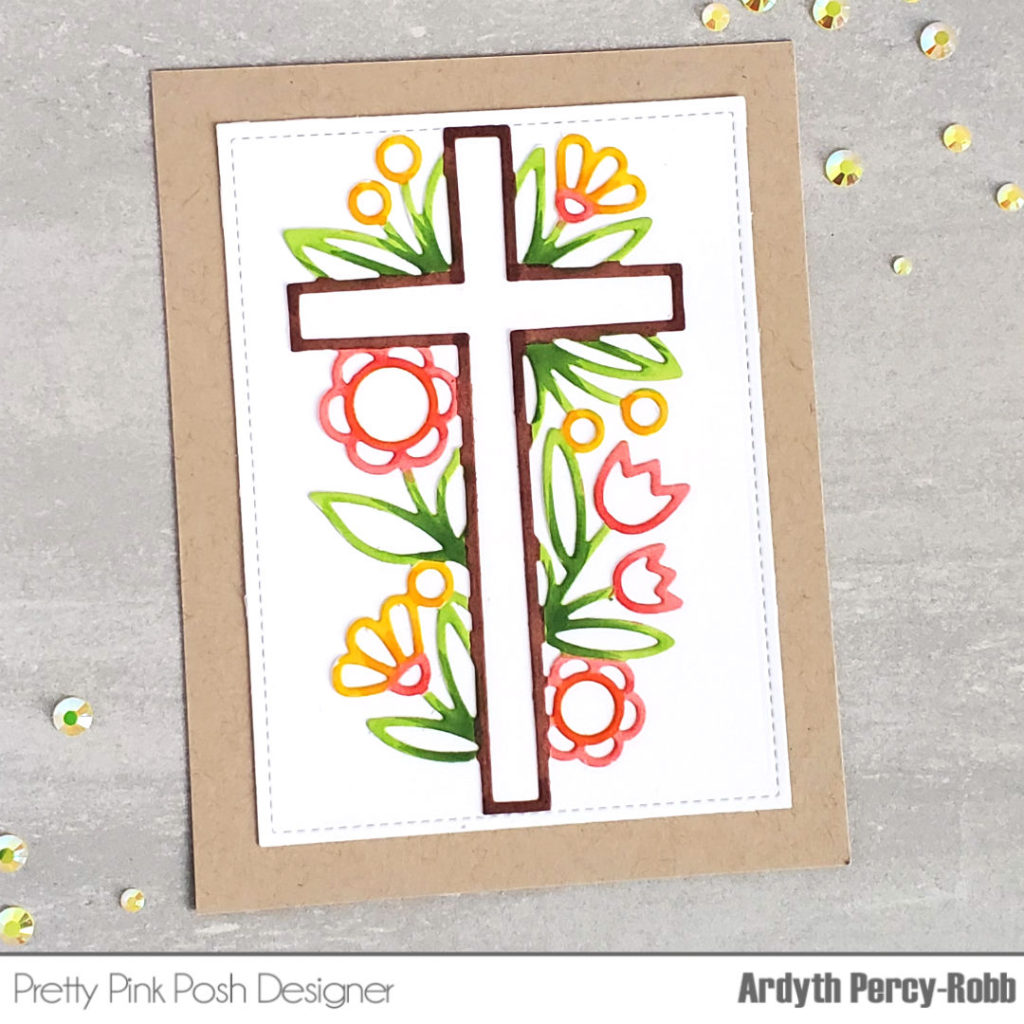
Hi everyone! Ardyth here with 3 ideas for using the new Decorative Cross die. This lovely, intricate die cut is perfect for cards for Easter, baptisms, First Communion, confirmation, sending prayers and sympathy cards – and there are so many ways it can be used!
Take a look at this video that shows how to make all three of these cards.
The March 2020 Release is now available in the Pretty Pink Posh Shop and select retailers that carry our products. If you missed our post yesterday, we revealed all of the products in picture form, but if you would like to see them in a video, Ardyth has that for you today!
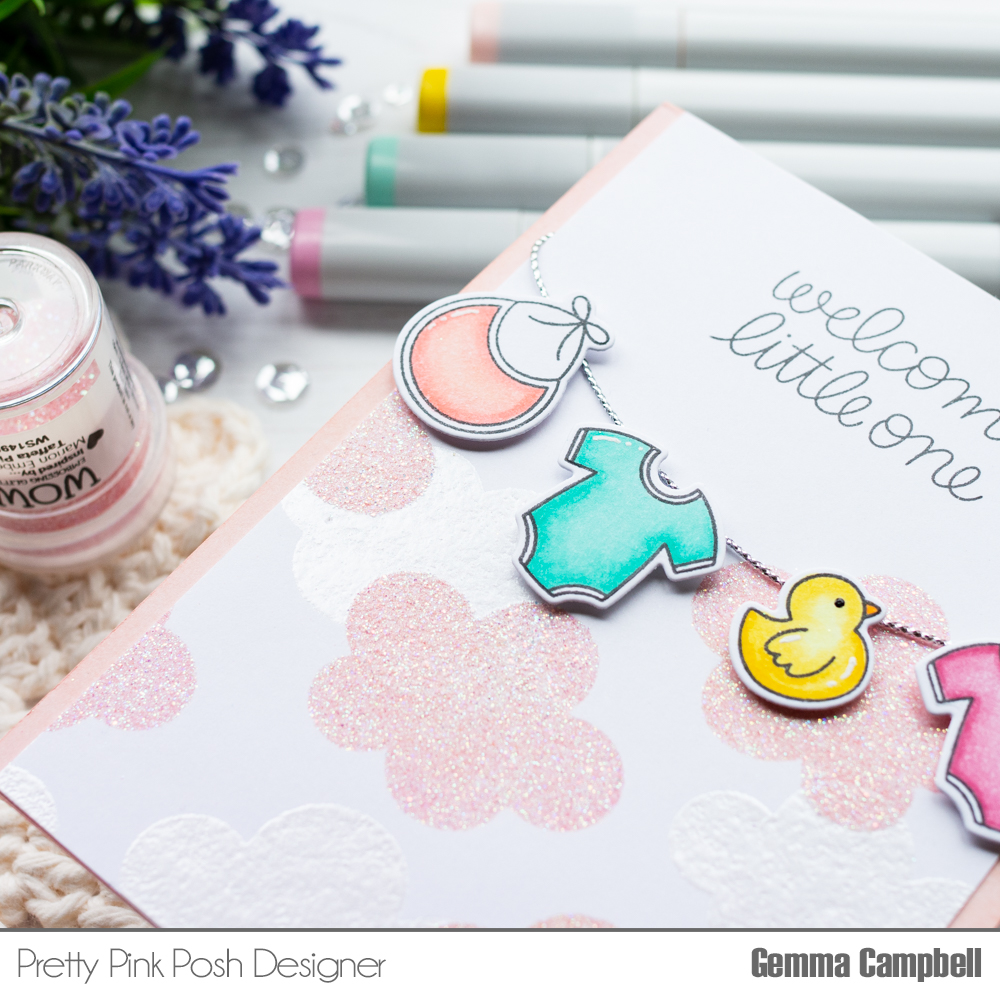
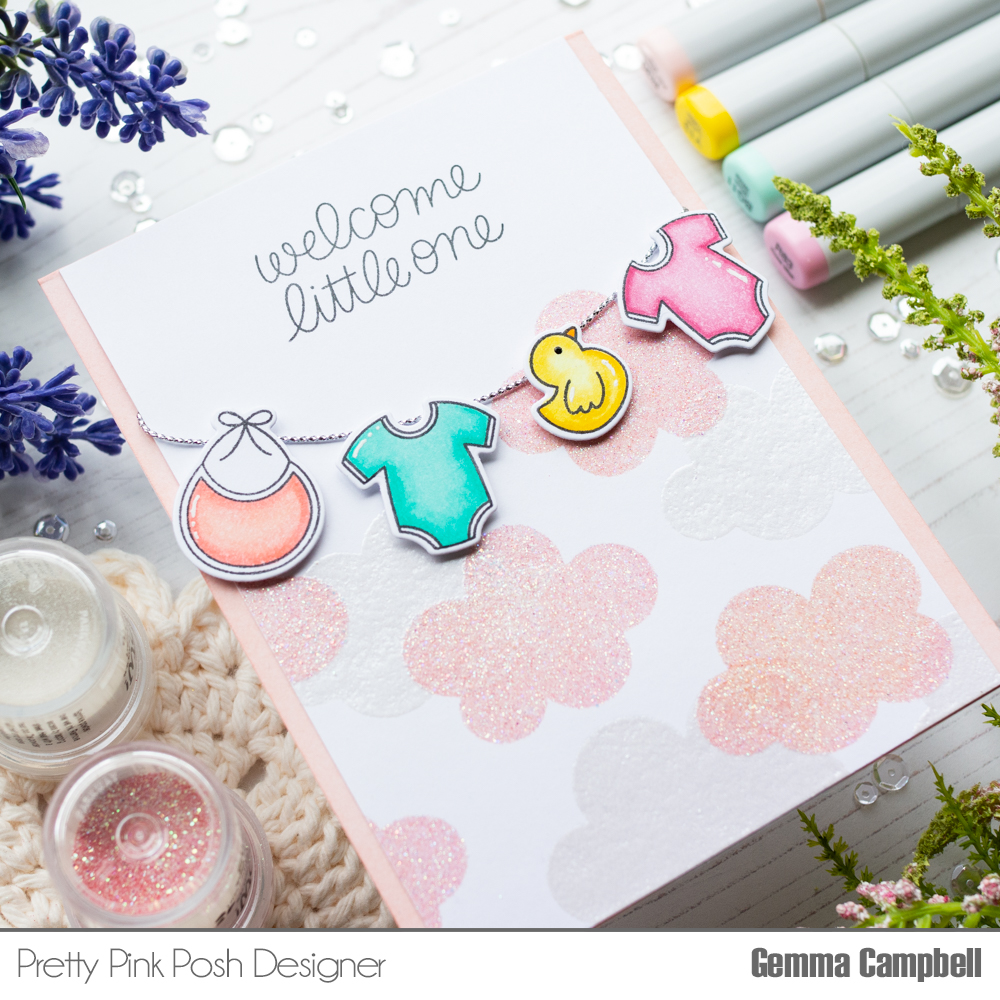
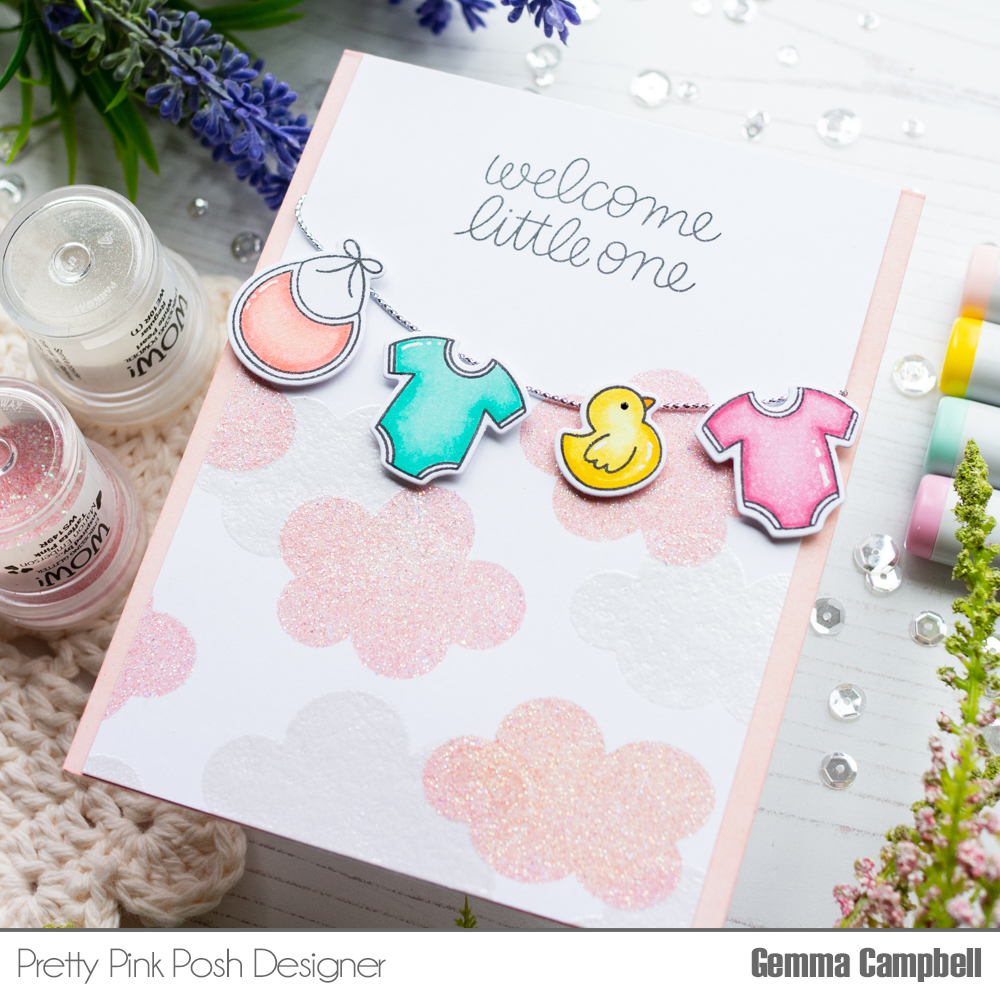
I began with the stencils and a panel of white card. I used clear embossing ink to ink through the first stencil, then heat embossing it with WOW White Pearl embossing powder. This gives a lovely subtle tone on tone look. I kept the embossing to the lower portion of my A2 panel only.
Next, I layered the other stencil in the set and inked again with clear embossing ink. This time I used WOW Taffeta Pink embossing glitter. This powder has a translucent base so some of the White Pearl clouds can be seen beneath, where they overlap.
At the top of the panel, I stamped a sentiment from the Little One stamp set, then I trimmed the panel down to 4 inches wide.
I attached some silver thread to the back of the embossed panel, then attached the images with foam tape to hold the thread in place to look like a washing line. I secured the other end of the thread behind the panel.
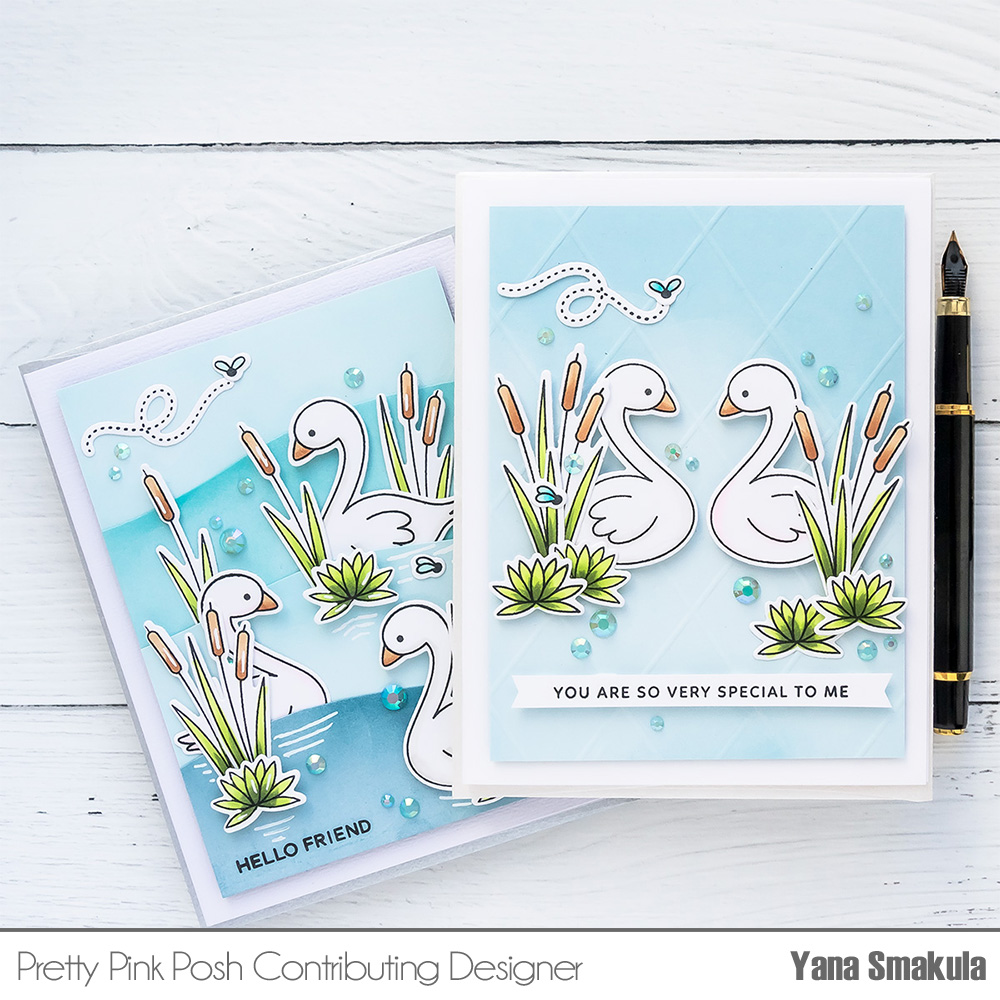
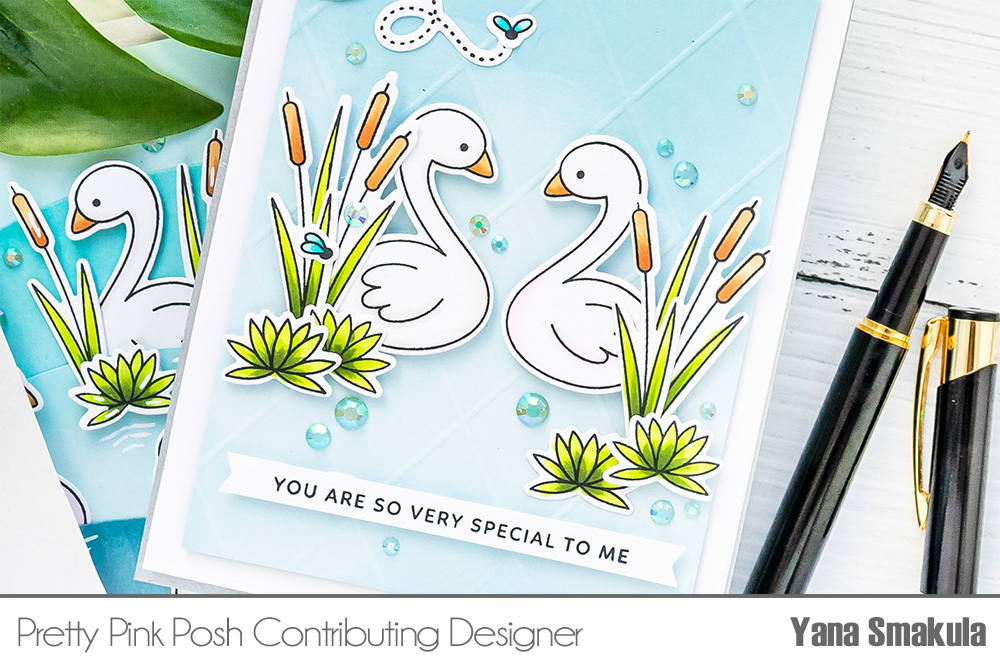
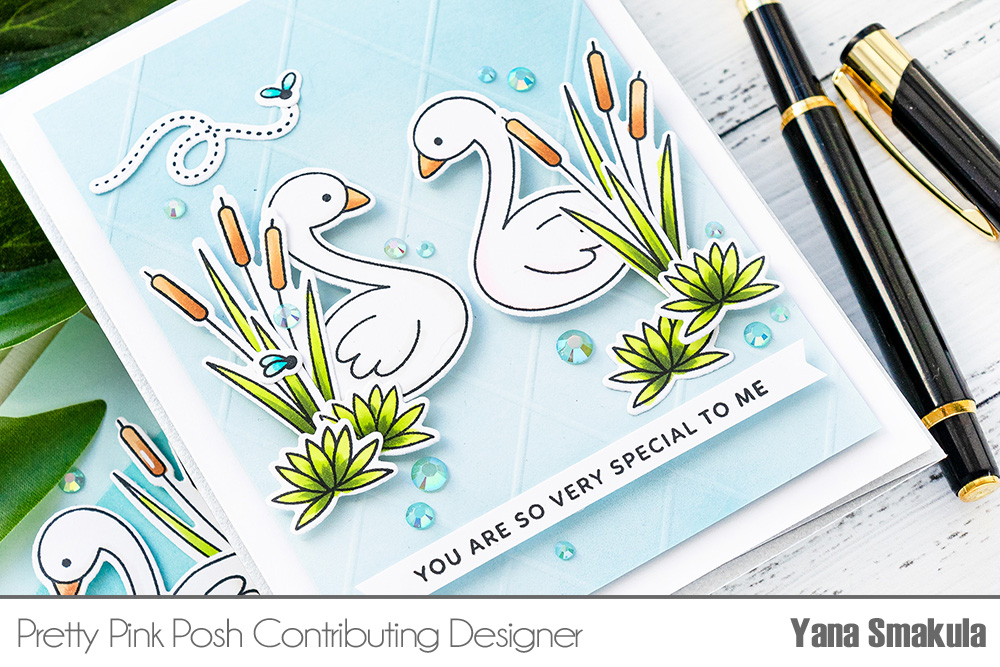
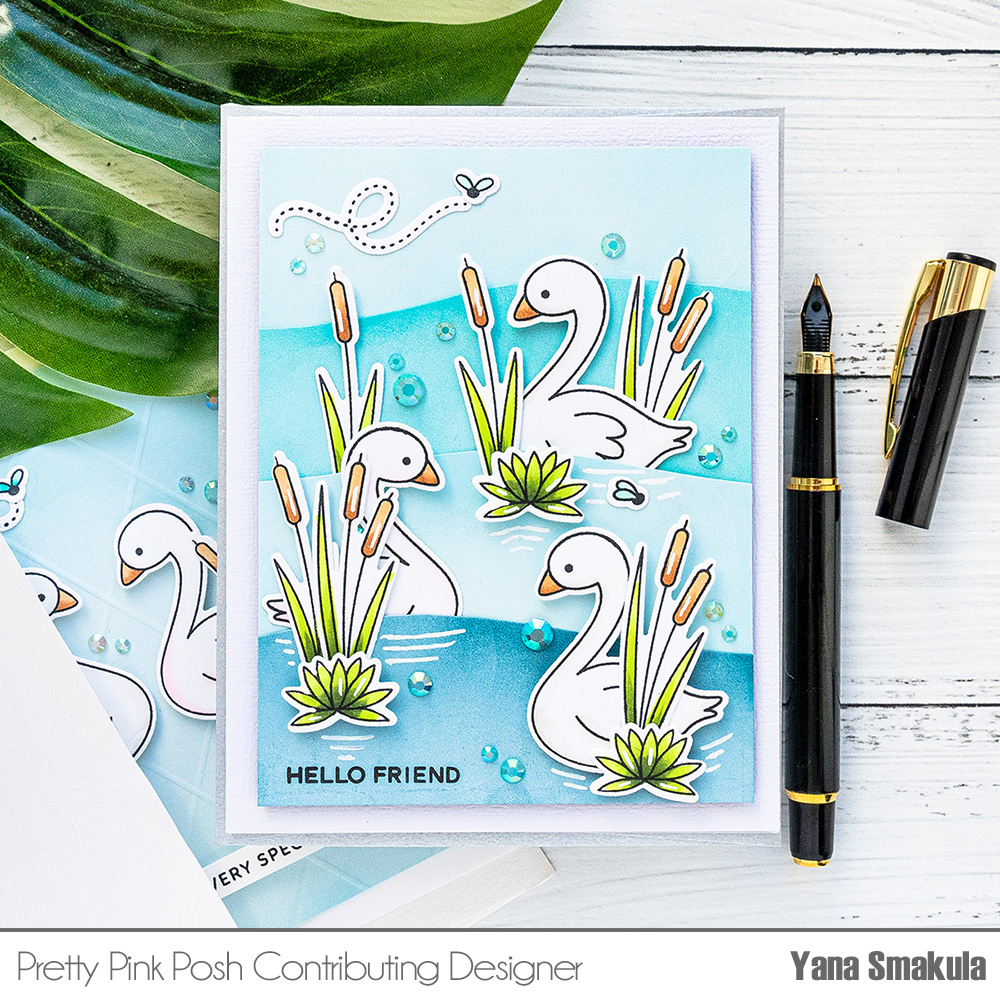
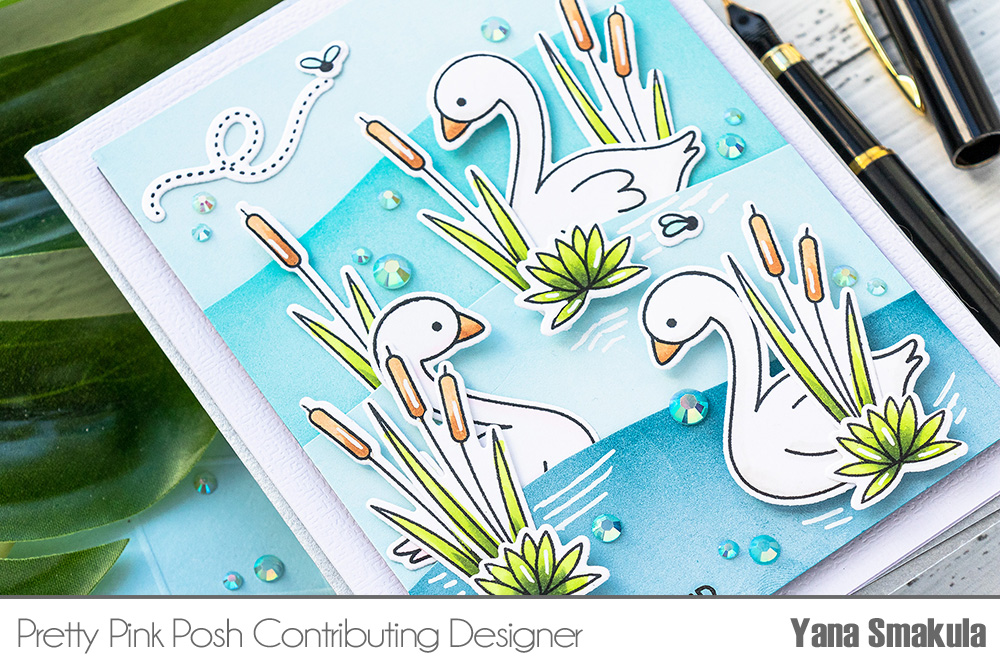
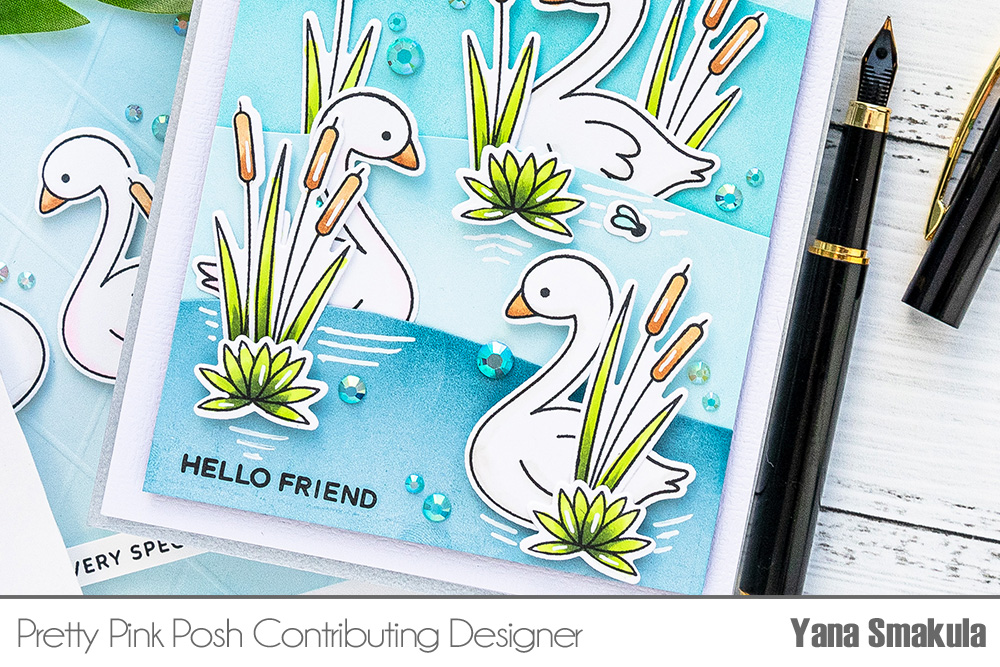
Hello, Pretty Pink Posh’ fans! This is Yana Smakula. In this video, I’ll show you how to use the Pond Friends stamp set to make sweet greeting cards for our friends.
I started to work on my cards by stamping images from the Pond Friends stamp set in alcohol marker friendly ink and cutting the images out using coordinating dies. Next, I colored them using my Copic markers to bring these cute swans to life.
I used the following colors:
W1 and RV00 as well as a colorless blender to color the swans gray and pink
E31, E33
YG01, YG03, G94
BG45, BG11.
I have two card ideas to share today. For my card #1, I wanted to use scraps of colored cardstock to create layers of water, if you will, on my card. I like to have fun and unique backgrounds on my cards using I can always achieve that with the help of colored cardstock. I cut several colors of cardstock to 1 3/4” tall x 4 ¼” strips and used my scissors to freehand a wave on each of those pieces.
You can use a die, Pretty Pink Posh has several die sets that would work perfectly for cutting little waves or hills like these, I didn’t have any on hand, so I freehand the cuts using scissors.
Lately, I love to add ink blending to my backgrounds, not colored ink blending, but white. White pigment ink is a fantastic tool to help you soften the background and create various effects on paper. I’ve been using it a lot recently to make clouds for my cards and today I decided I might as well use it to make water. I grabbed my ink blending tool and blended white ink onto my hand-cut panels to make that background. I also did the same thing to make a background for the 2nd card I’m sharing today.
The white ink isn’t as visible on the lighter colors of cardstock, but it still adds a nice touch and softens the color of the cardstock beautifully. With the panels ink blended I used glue and adhered them to another scrap cardstock panel. Next, I brought in my paper trimmer and cut the panel to 3 3/4” by 5” giving me a beautiful 1/4” white mat when adhered to an A2 white card base.
With the background panel created I arranged the images to create a scene on my card and adhered everything in place using a mix of foam adhesive for dimension and glue. I also used my white Sakura pen and added a lot of white pen details to these images to make them pop. Seeing how the scene is set on water, I added details to the background as well – little water rings here and there to make it look somewhat more realistic.
I also added a bunch of Sea Glass Jewels – I scattered them around the images filling the background in. I got so carried away building the scene, that I completely forgot about the sentiment for this card! Luckily, I had room for a skinny strip sentiment at the bottom and I stamped one that reads Hello Friend. This sentiment comes from an older stamp set, Birdie Friends.
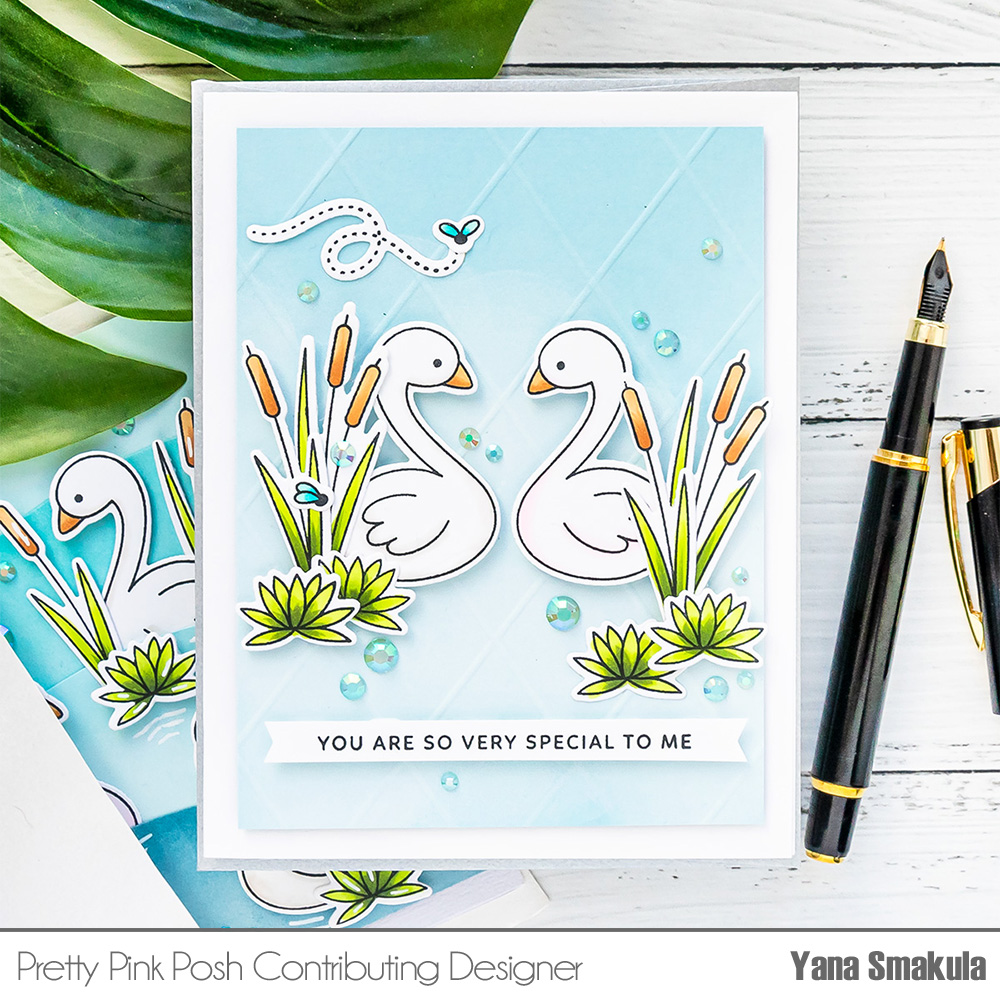
Let’s take a look at the 2nd card. I made the background for this card in the same manner as for the previous card – I ink blended white pigment ink over a light blue cardstock panel. Here, I also added some scoring to the background to make it more interesting, I shared this technique in my Valentine’s Day video last year, please do check it out if you’d like to learn how to create this scored background.
I trimmed the panel to 3 3/4 x 5” and foam mounted to the A2 white card base. For this card I placed two swans, a pink and a gray one, looking at each other in the center of my panel and added the rest of the elements around them creating a scene.
This time I did plan for a sentiment, I stamped one from the Pond Friends stamp set and it reads You Are So Very Special To Me. I stamped it in black ink on a skinny white cardstock strip and foam mounted it to the card to give it a bit of a lift. I used the same Sea Glass Jewels to embellish this project and again, I scattered them around the scene to add interest to my background.
TIP: if you have trouble holding the little embellishments, a Crystal KatanaPick- Up Toolhelps when you are placing small embellishments!