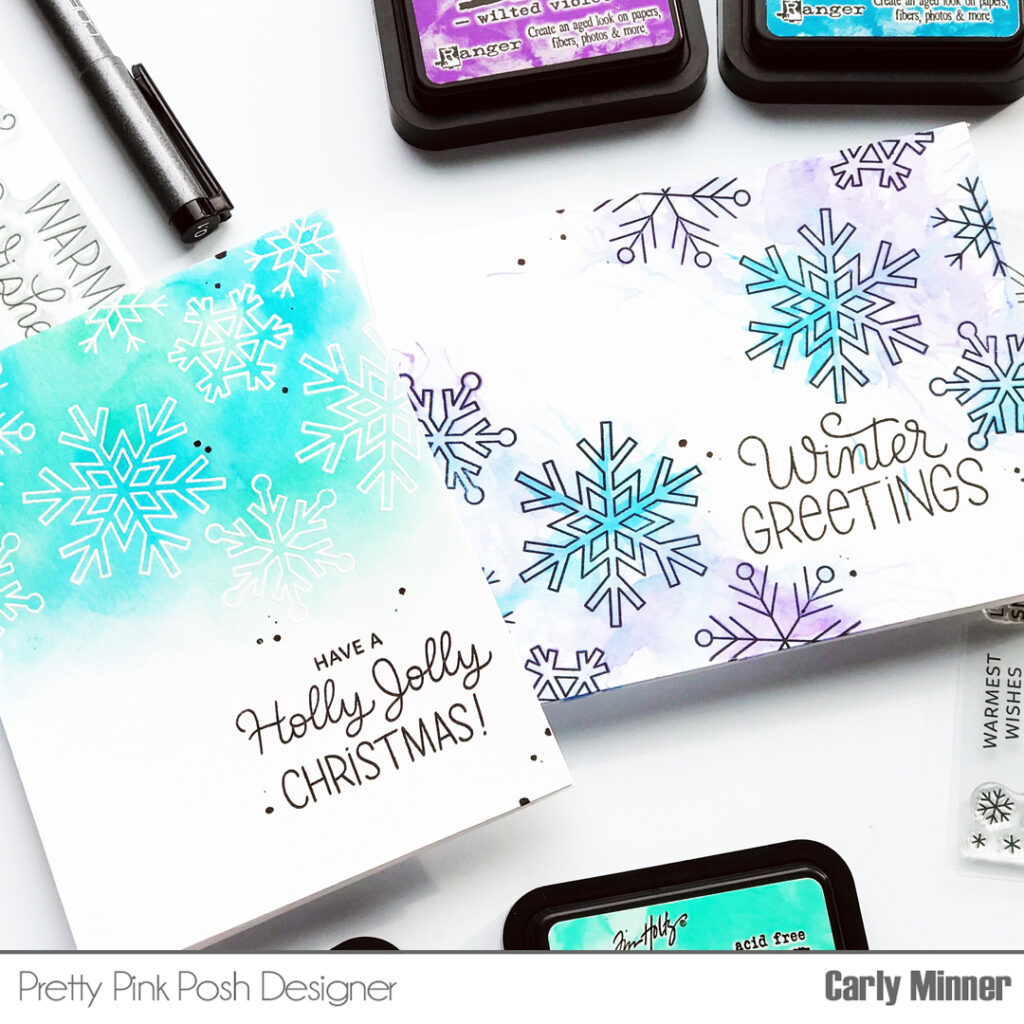
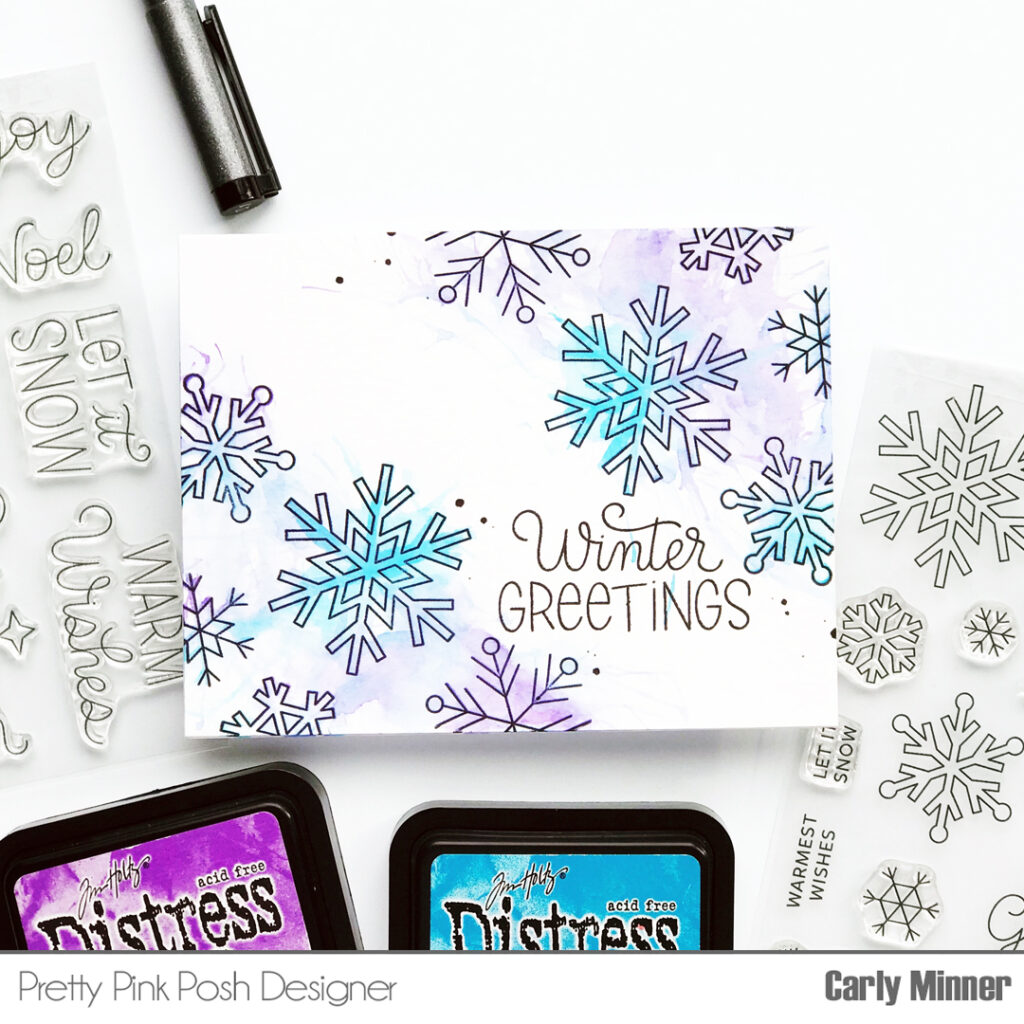
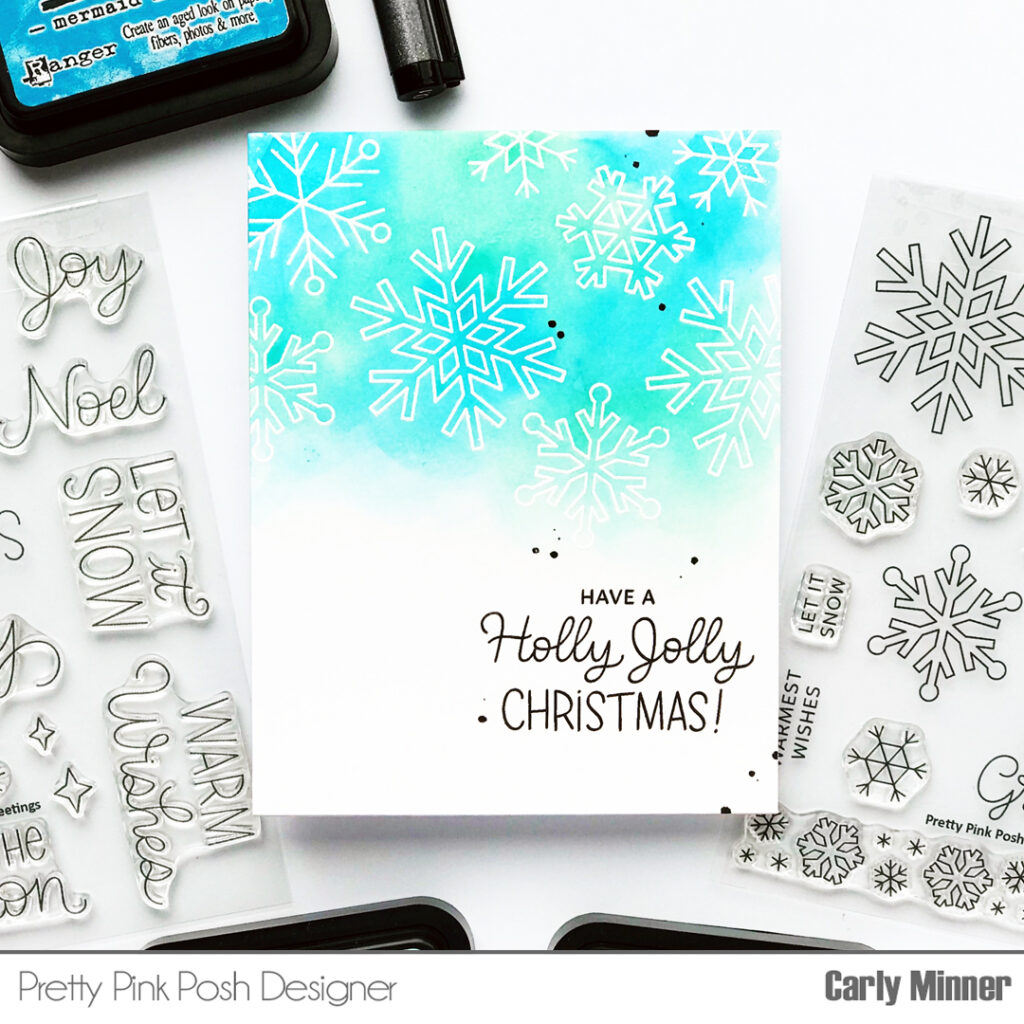
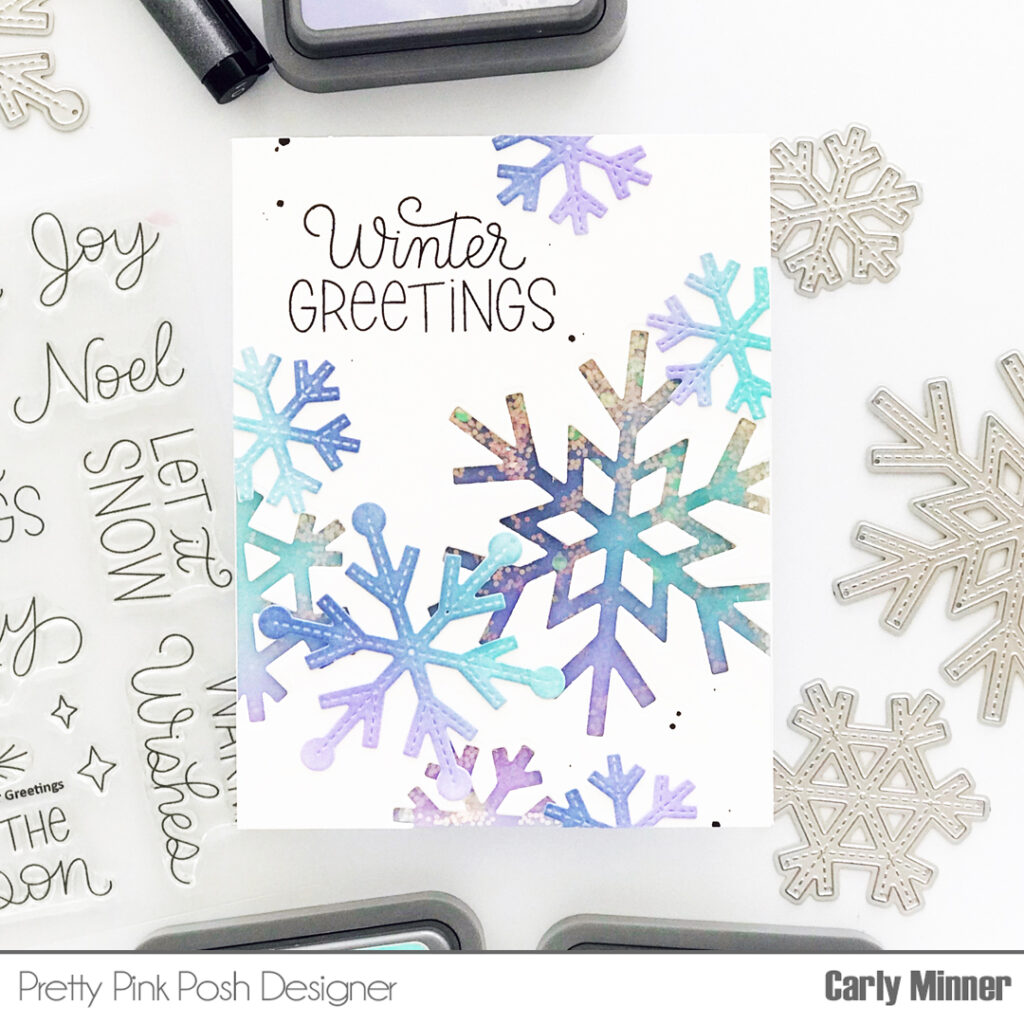
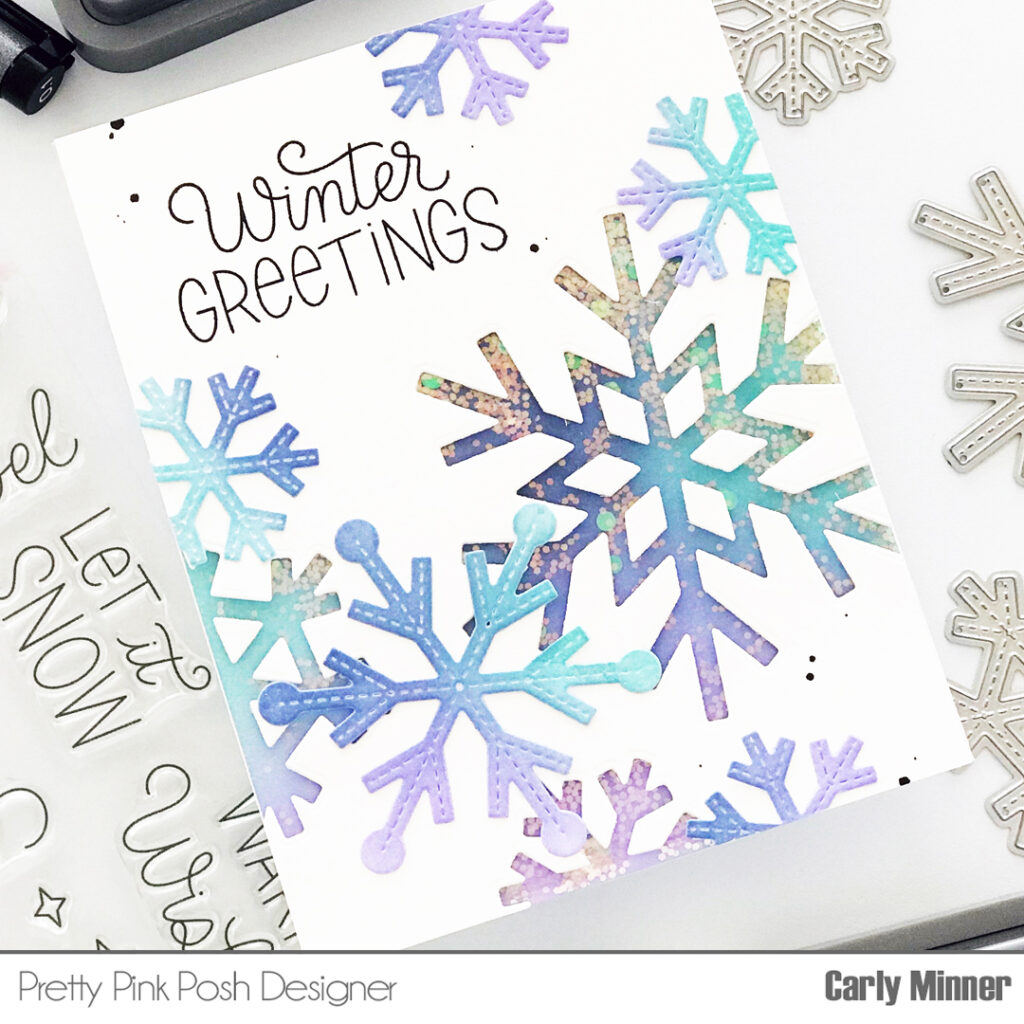
If you need a card from late fall until early spring, snowflakes are always the answer! Christmas…snowflakes. Birthday…snowflakes. Thank you…snowflakes. I could go on but I’ll stop, LOL!
The Snowflakes stamp sethas quickly become one of my favorites! It pairs so well with these easy watercolor techniques that I’m excited to share with you in my latest video!
Thanks so much for stopping by! I hope you were inspired by these cards!
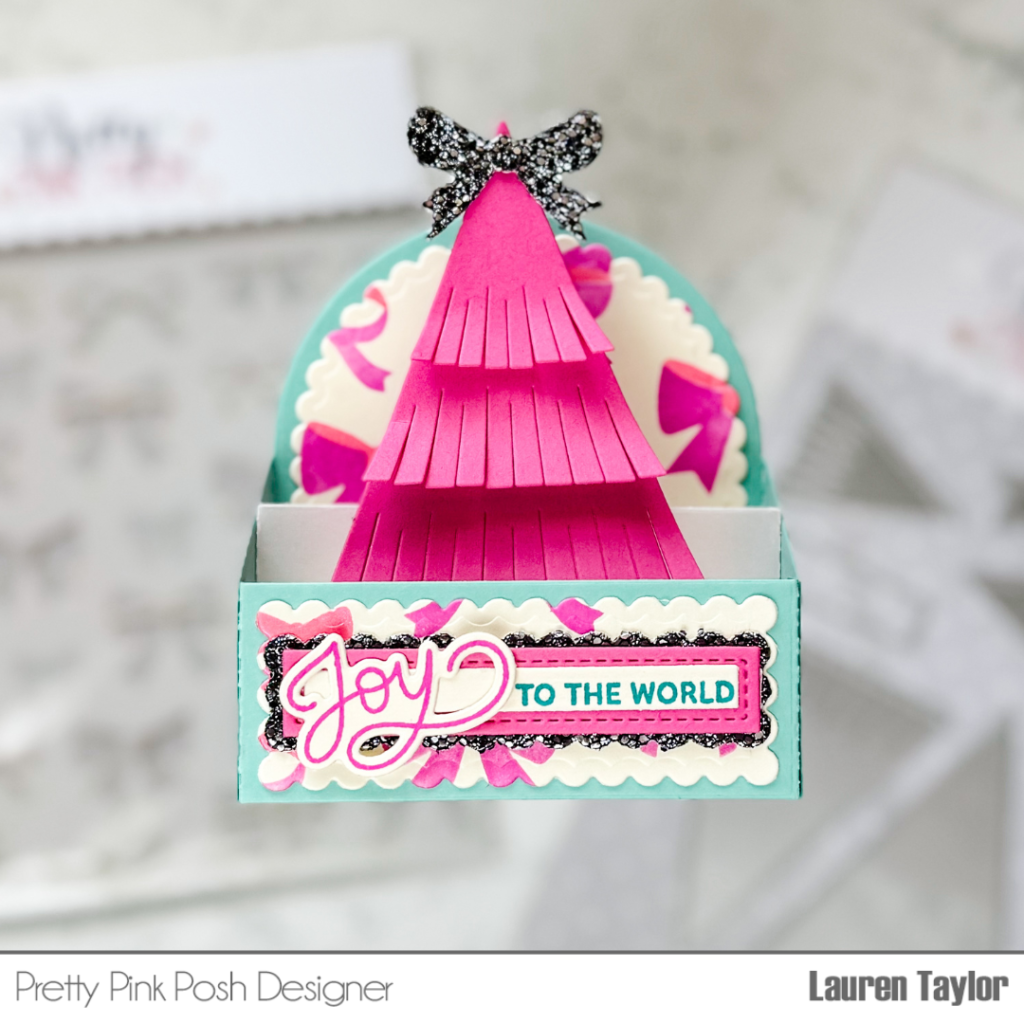
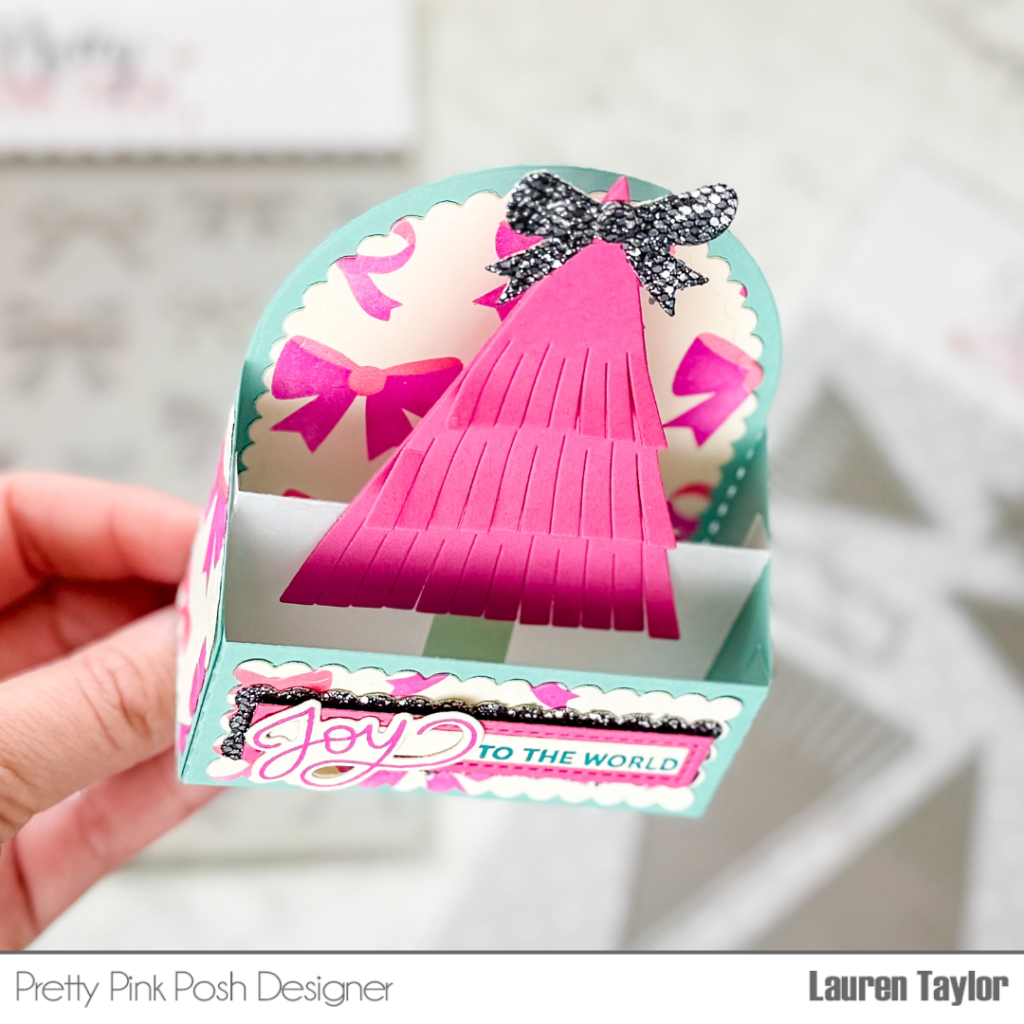
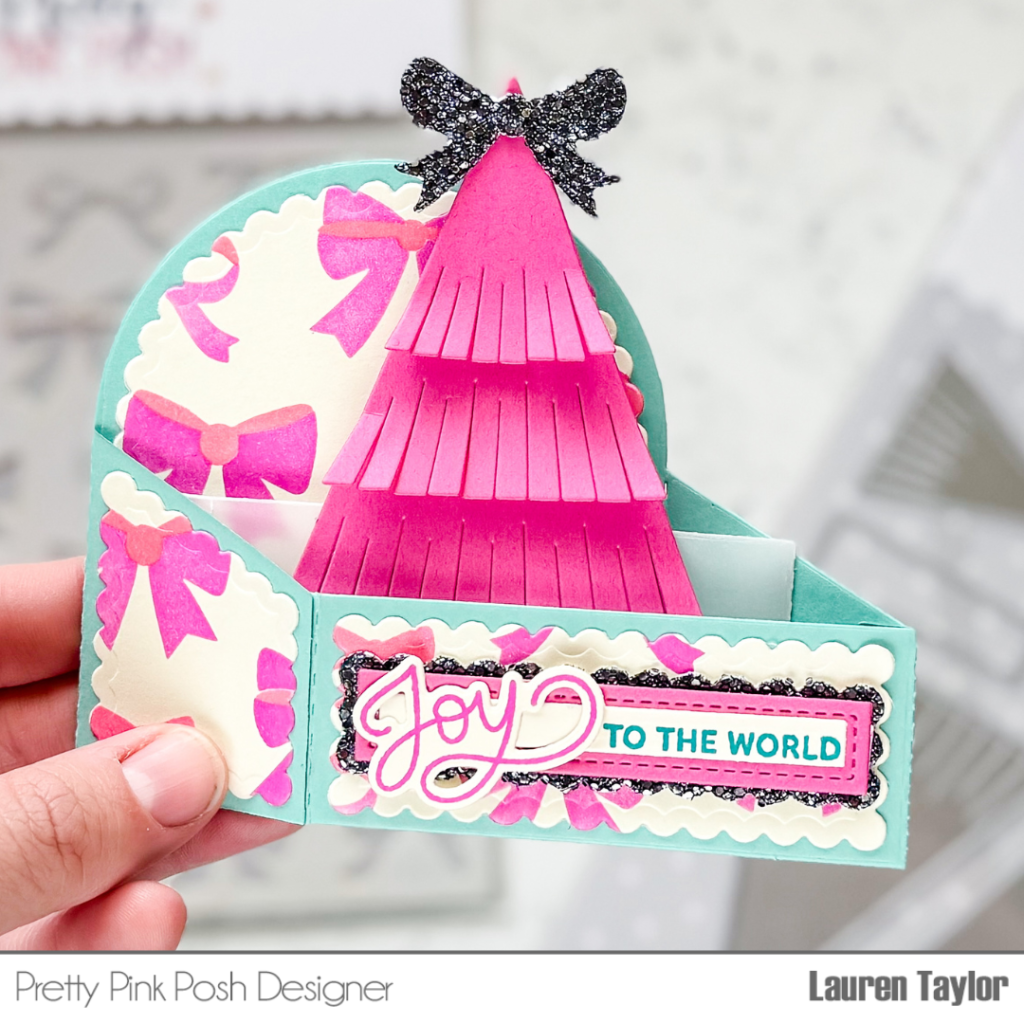
Hi, friends! It’s Lauren and I am back with a new video today. I have a non-traditional holiday color box card to share with you! It’s a bit on hot pink side, but I think it’s super fun and you can easily switch out the colors I used in the video today with your favorite holiday colors.
I started with doing all of my die cutting! I cut the Scallop Box Card Diesbase out of a light teal cardstock, scalloped pieces from a cream cardstock and one of the connector pieces of vellum. Next I cut the Fringe Tree Dies from hot pink cardstock for the tree layers (except the largest one) and the trunk of the tree out from cream cardstock. The bow is cut from the Holiday Mug Addition Dies out of glitter cardstock. Finally, I cut the Sentiment Strip Dies from the glitter, hot pink and cream cardstocks.
My sentiment is from the Holiday Scripts Stamp Setand I stamped “to the world” on the smallest sentiment strip in teal ink and “Joy” in pink ink on cream cardstock separately so I could use the Coordinating Die to cut it out.
To add more pink to the card, I used the same pink ink as well as an Interference Ink with the Layered Bows Stencilson the scalloped die cut pieces. Now that I have all of my pieces, I assembled the Scallop Box Card with the vellum piece in the center. I added my tree to the vellum and layered my sentiment strips and sentiment to the front of the box card.
What do you think of a hot pink tree? Would you want it in your living room – or is it better on a box card? I hope you had some fun with this box card today!
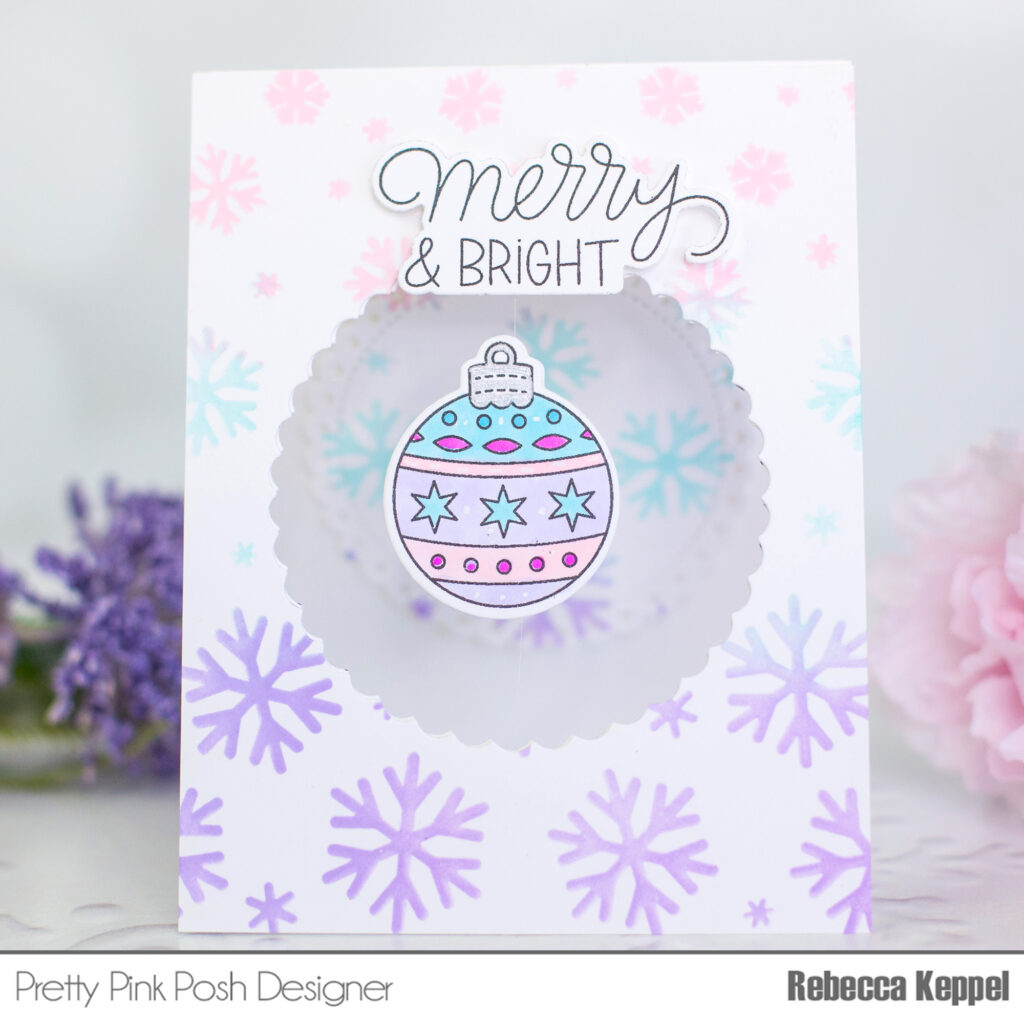
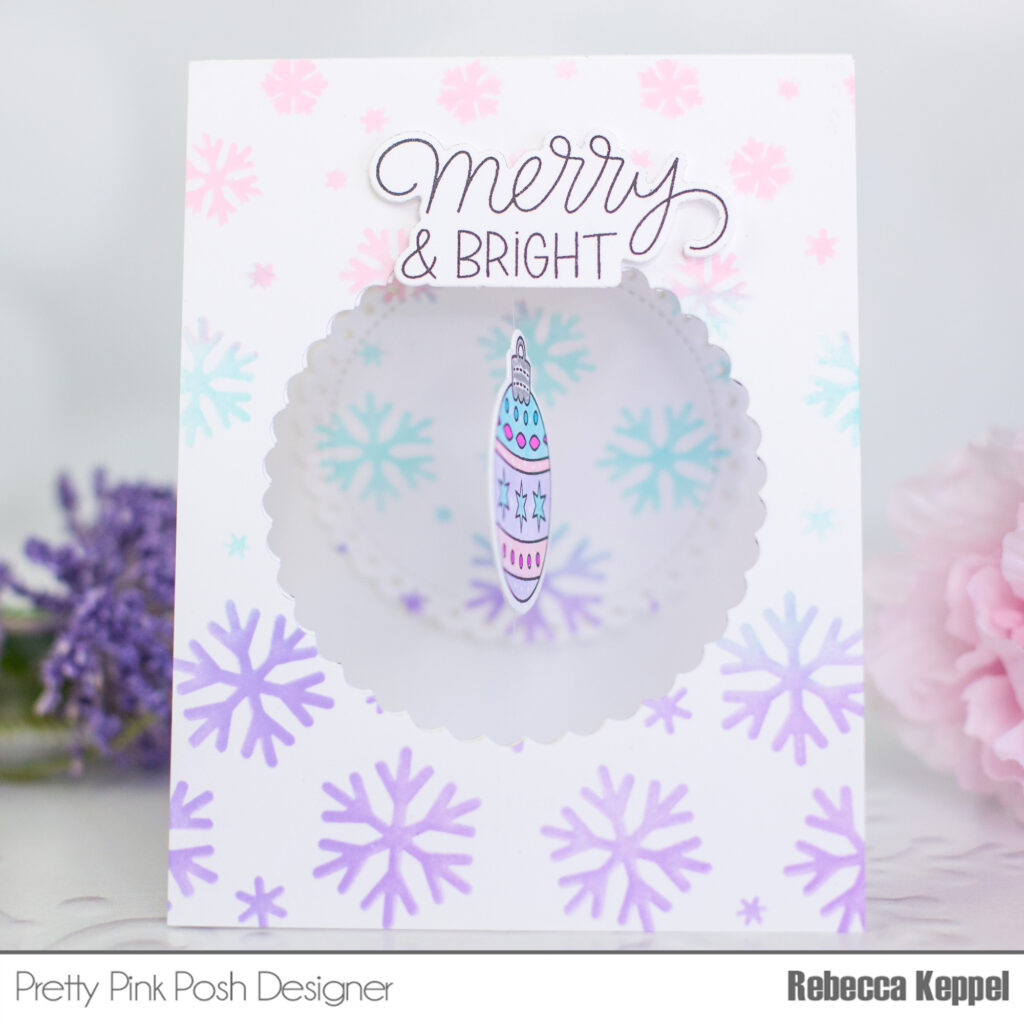
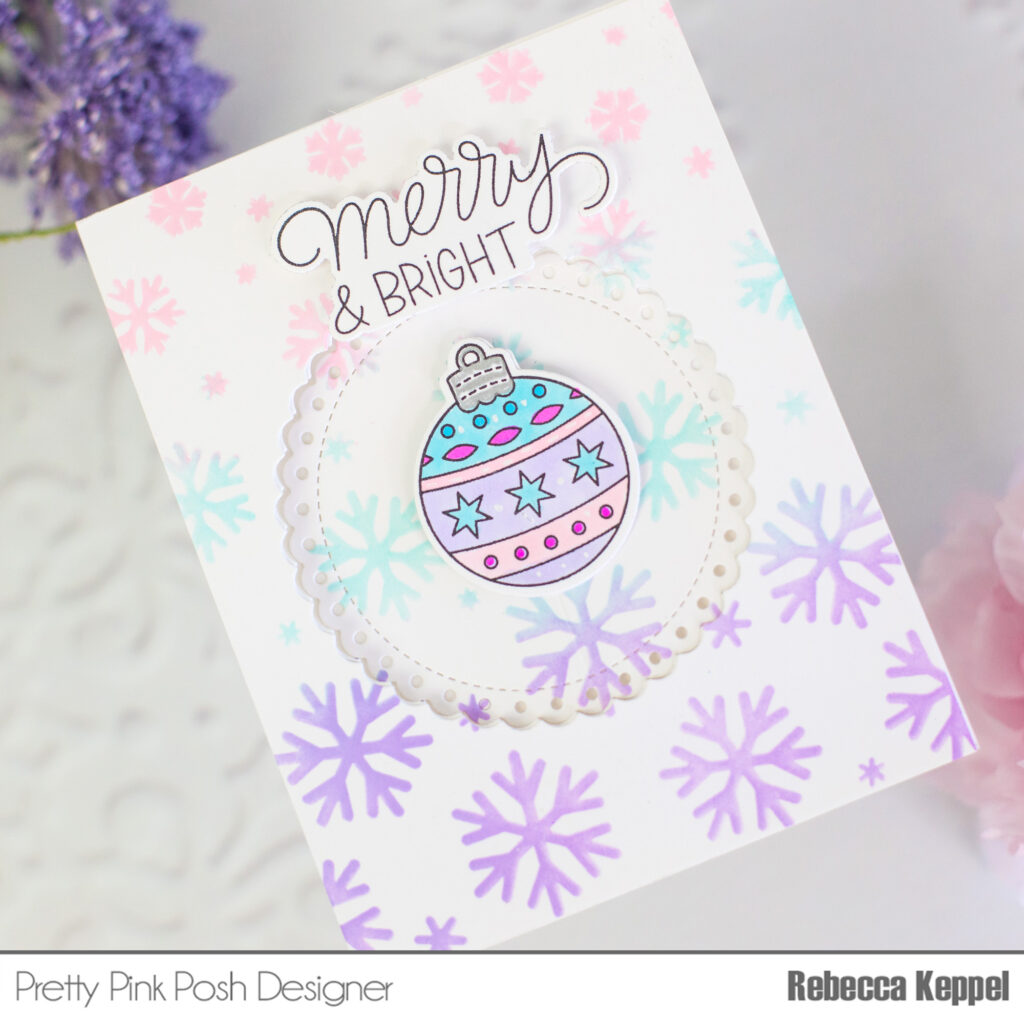
Hi crafty friends, Rebecca here. It turns out that spinner cards are REALLY easy to make even though they have such a fun interactive element! All you need to do is stamp a Christmas Ornament from the Holiday Ornaments Stamp Set twice and color both in exactly the same way. Then use the Holiday Ornaments Coordinating Dies to cut both ornaments out.
Now create a background panel with the Cascading Snowflakes Stencils. I love non traditional pinks, blues and purples for the holidays, but you can use any color combination you love! I tried to match the colors to those on my ornaments.
Next die cut a circle slightly larger than the ornament. I used the Eyelet Circles Dies to cut out my window, but you could use an oval shape if you chose a different ornament shape. Cut the same circle out of the front of a card base in the same spot as it is on the panel. Use pencil marks to create a guide of where to cut.
Grab some clear string (or any color you like!) and make sure the string is longer than the card panel from top to bottom. Flip over one of the ornaments and tape the center of the string on the back of the ornament. Then add liquid adhesive and place the other ornament on top. Next tape the top of the string to the card base and the bottom of the string to the bottom of the card base and fortify with more adhesive.
Now all you have to do is adhere the stenciled panel on top and add a sentiment from the Winter Greetings Stamps and Dies. Then wind up your ornament by turning it in one direction over and over and close the card. When you open the card, the ornament will spin!
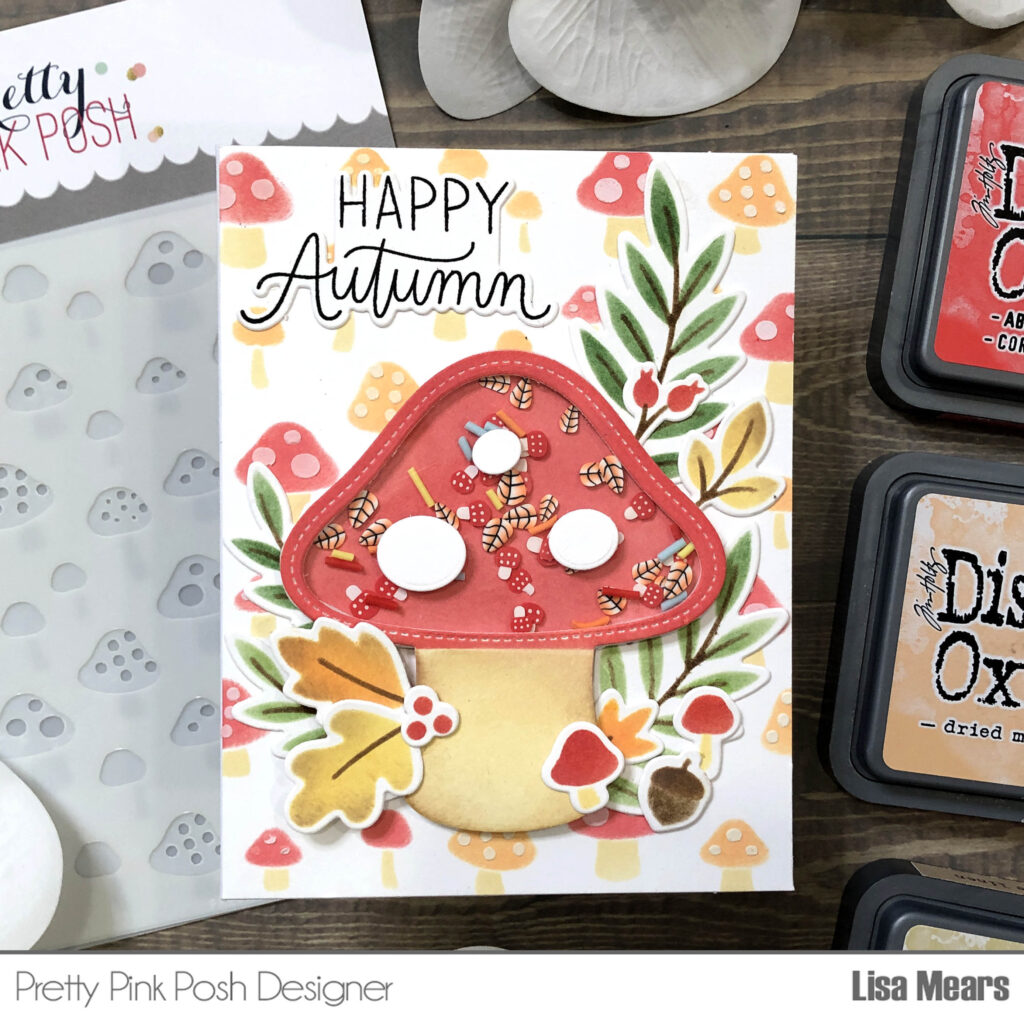
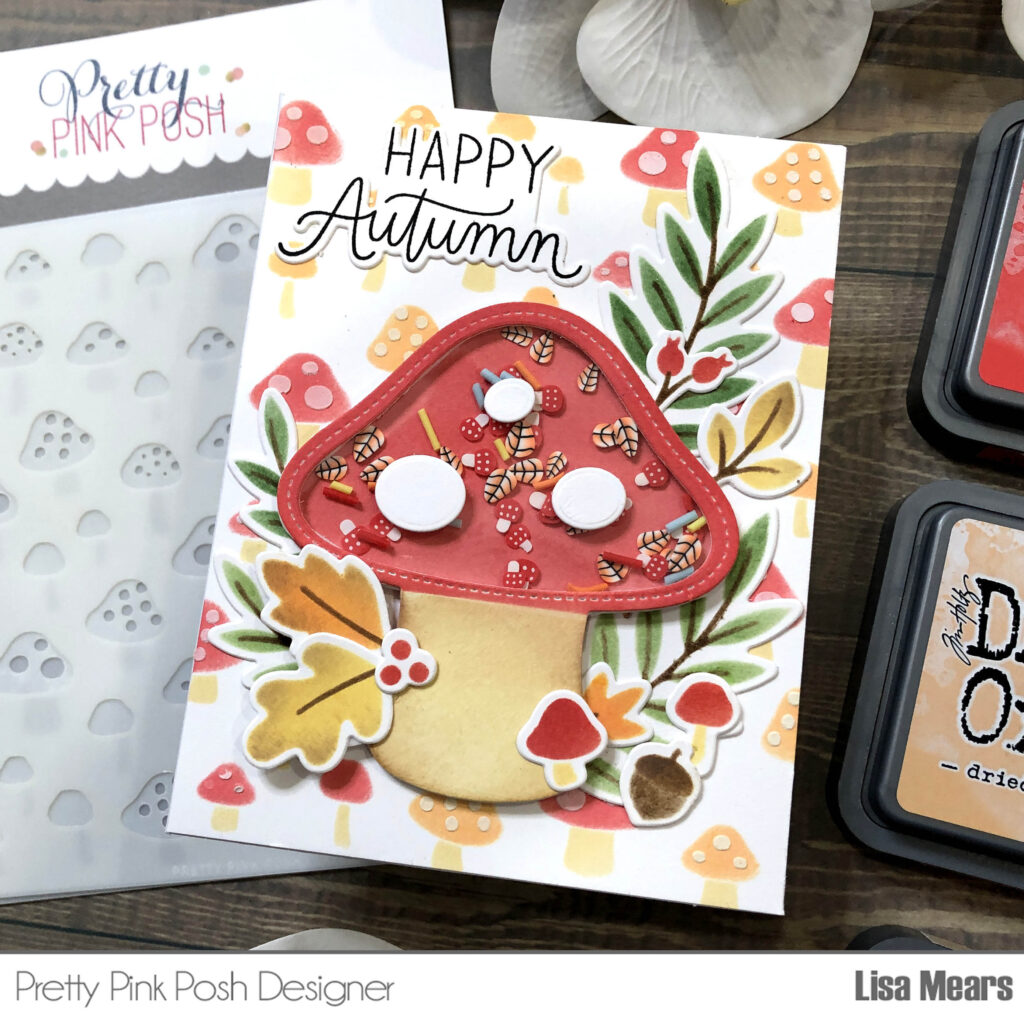
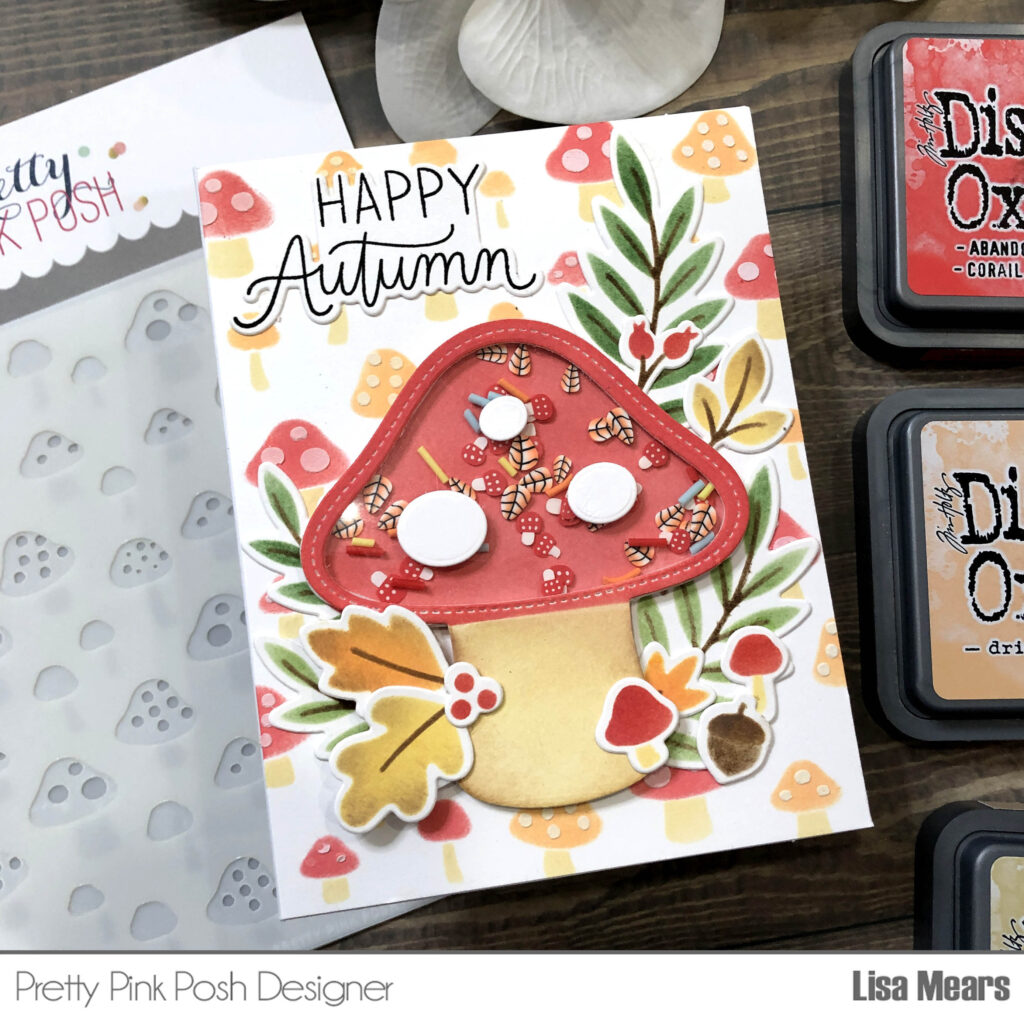
Hello crafty friends! It’s Lisa Mears on the blog today and I’m super excited to share a cozy and whimsical fall-themed card that I made using the fall release!
My card features a Mushroom Shaker element that adds a fun touch to the design. I also incorporated a mushroom-stenciled background and some beautiful fall foliage to really capture that autumn vibe.
I started off by creating my card background. I used the Layered Mushrooms Stencils with the following Distress Oxide inks: Abandoned Coral, Dried Marigold, and Antique Linen.
For the white dots on the mushroom caps, I used Scrapbook.com Cloud Whip along with a palette knife to spread the Cloud Whip into the holes on the stencil. The Cloud Whip is a bright white paste which not only gives dimension to the card, but also allows for a nice white color over the colored ink. Using Cloud Whip is so much easier than trying to add white ink over top of the red and orange mushroom caps.
The mushroom shaker is the centerpiece of my card. I die cut the mushroom die with white cardstock and inked the cardstock with Abandoned Coral and Antique Linen Distress Oxide inks. I added theFall Mushroom Clay Confetti Mix to the inside of the shaker. Be sure to watch my video to see how I made the mushroom shaker.
For the foliage, I used the Solid Fall Foliage stencils along with the following Distress Oxide inks: Rustic Wilderness, Fired Brick, Spiced Marmalade, Scattered Straw, Walnut Stain, and Ground Espresso. After inking the foliage on the stencil, I used the Solid Fall Foliage coordinating dies to cut the foliage out. I added the foliage around the mushroom and I used the Happy Autumn sentiment from the Solid Fall Foliage stamp set.
Hello crafty friends! It’s Lisa Mears on the blog today and I’m excited to share my latest cards with you! I made two grid cards that feature the beautiful Fall Icons stamp and dies from Pretty Pink Posh!
Grid cards are all about structured elegance. By arranging your elements in a grid pattern, you create a clean, organized look that draws the eye to each individual piece. This layout is perfect for showcasing a variety of stamps, dies, or embellishments, and it makes for a cohesive, balanced design.
The grid design has a lot of versatility. You can use stamps, dies, or a mix of both to feature multiple elements without overwhelming the card. It’s a great way to highlight different designs or colors in a unified way.
When designing a grid, first decide on the type of layout you want. I went with a 3 x 3 layout for a balanced look. This simply means that my card has 3 rows and 3 columns.
Next, select your stamps or dies. For my cards, I used the Fall Icons stamp and coordinating dies. This stamp set has 12 different fall-themed icons such as a pumpkin, scarecrow, fall leaf, acorn, and more.
I colored my stamps with Zig Clean Color Real Brush markers. The markers I used were: Mustard, Mid Brown, Pale Orange, Marigold, Beige, True Blue, Mimosa, Evergreen, Carmine Red, and the Blender. After coloring, I die cut the stamped images with the coordinating dies.
I also used the coordinating dies and die cut the scalloped circle dies from white cardstock and I die cut the circle dies from colored cardstock. I adhered the circles to the scallop circles. Next, I added the fall icons to the top.
I adhered the circles to a piece of colored cardstock that measures 4″ x 5 1/4″. I started with the center circle and then adhered the remaining circles in the middle row. Then I adhered the top and bottom rows until all of the circles were glued to the cardstock.
Next, I stamped two sentiments from the Sentiment Strips: Fall stamp set. I die cut the sentiments with the coordinating dies and added them between the rows. I adhered the panel to an A2 size card base.
Using this grid technique is a great way to create a card that’s both organized and visually appealing. It’s perfect for showcasing a variety of elements while maintaining a clean, structured look. I hope you enjoyed this step-by-step tutorial and that you’re inspired to try this technique with your own stamps and dies.
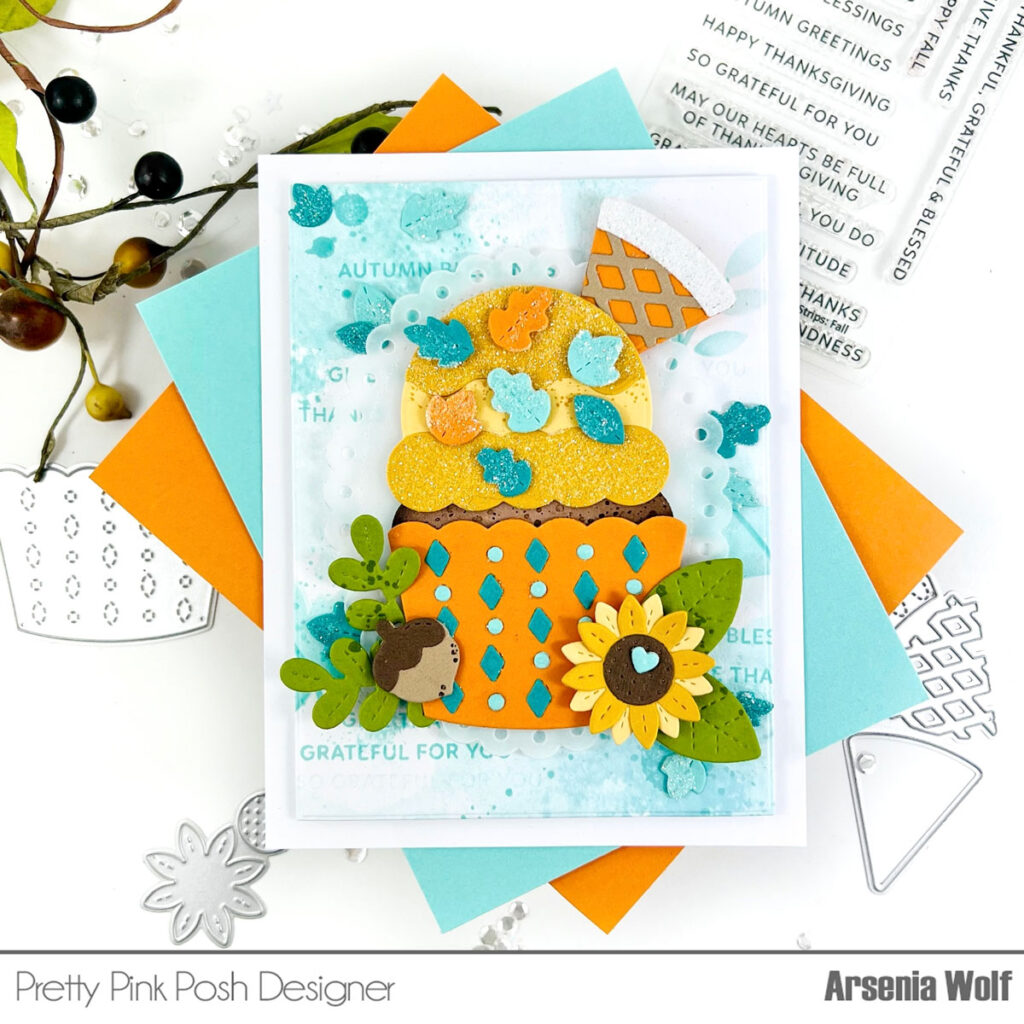
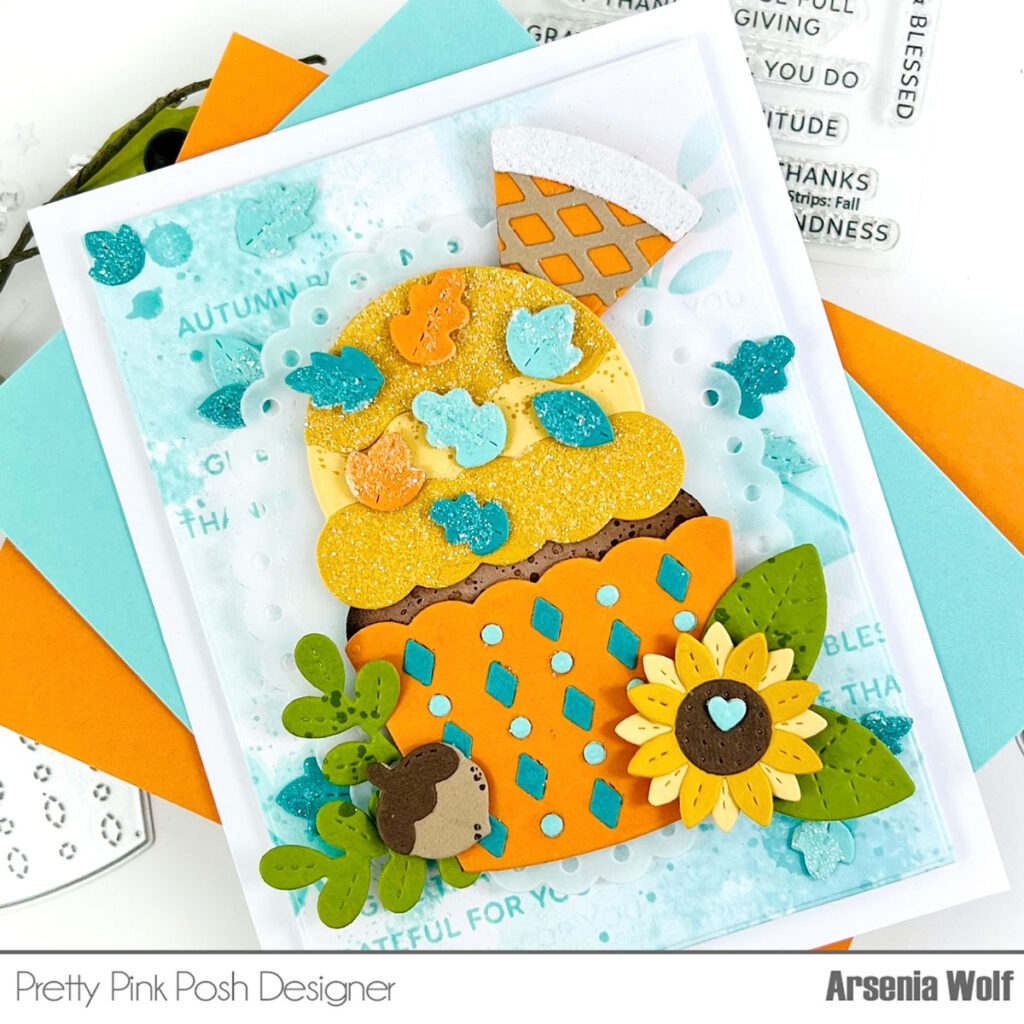
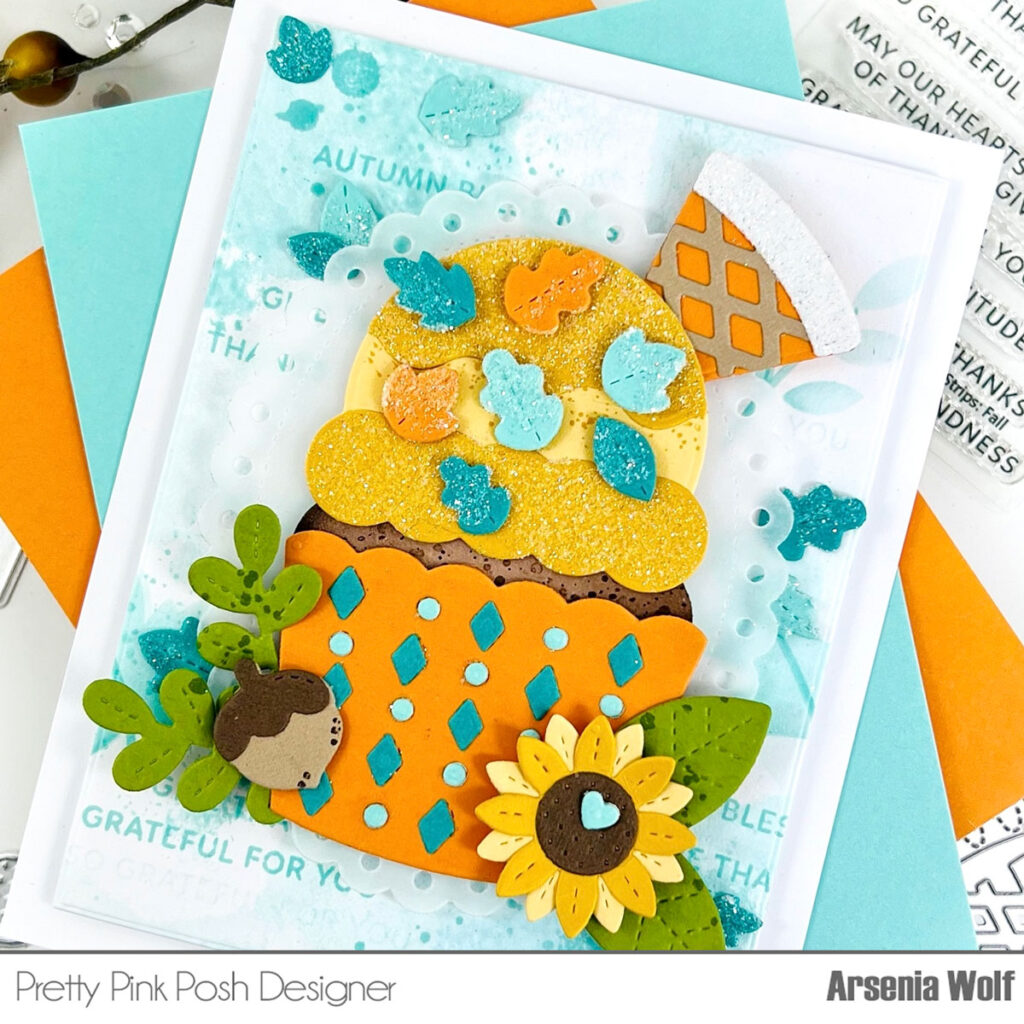
Hello friends, Arsenia here to share a lovely fall big cupcake with you. Fall is most definitely in the air and I’m here for it. The leaves are changing and falling, oh so beautiful. Let’s do some fall crafting,
I adore all the big cupcake die sets and the Big Fall Cupcake Dies does not disappoint! It’s jammed packed with some incredible dies, the possibilities are endless. We have a turkey, pie, leaves, sunflowers, acorns, mushrooms and more! First, I did some ink smooshing with aqua/teals dye inks onto heavy weight white card-stock. After my card panel was dry I did some partial stenciling with the same die inks using the new beautiful Solid Leaf Foliage stencil set. Next, I wanted to incorporate my sentiment onto the background. I used the Sentiment Strips: Fall stamps and did random stamping applying first and second generation stamping. This is best done with an acrylic block. Background is done and I love it, it’s dreamy! I did cut it down to 3 3/4 – 5 inches.
Next, I cut out serval pieces from the Big Fall Cupcakes dies and the Fall Tree dies. I used teal, aqua, yellows, oranges, mustard yellows, brown, and yellow green card-stock from my crafty realm. I took several adornments for the cupcake and added a combination of glitter and rock candy to them. I find using Rangers Multi Medium Matte works the best to adhere the glitter combination. I wanted them to have a sugary sparkle appearance. I used the negative pieces from the pie die to decorate the cupcake liner. I think the teal diamonds pop off the orange cupcake liner!
To finish the card I die cut the large oval from the Eyelet Ovals Dies. I adhered everything and ta-da card is done. It’s so lovely, I wish I could capture all the sparkle with a photo but trust me it’s sparkly!
Thank you so much friends for stopping by, I hope you have a great day! Happy crafting!
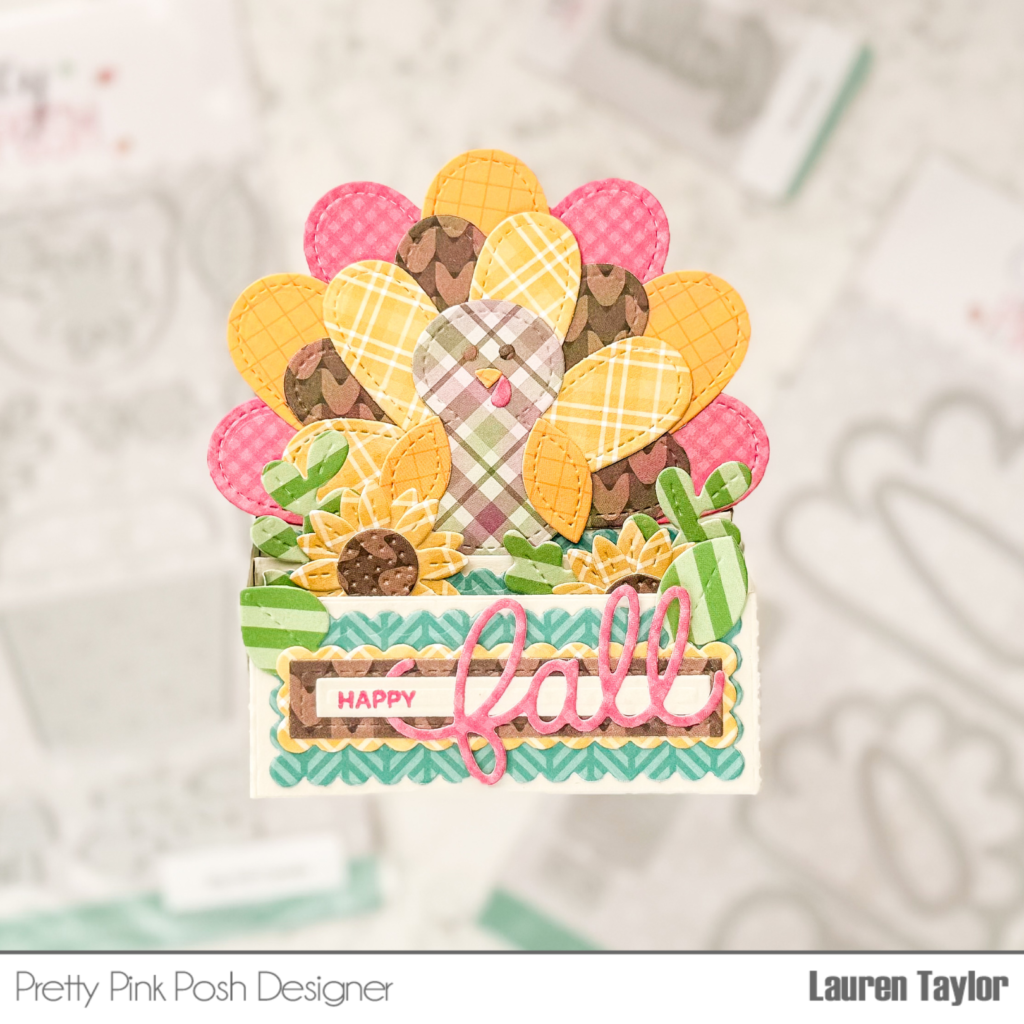
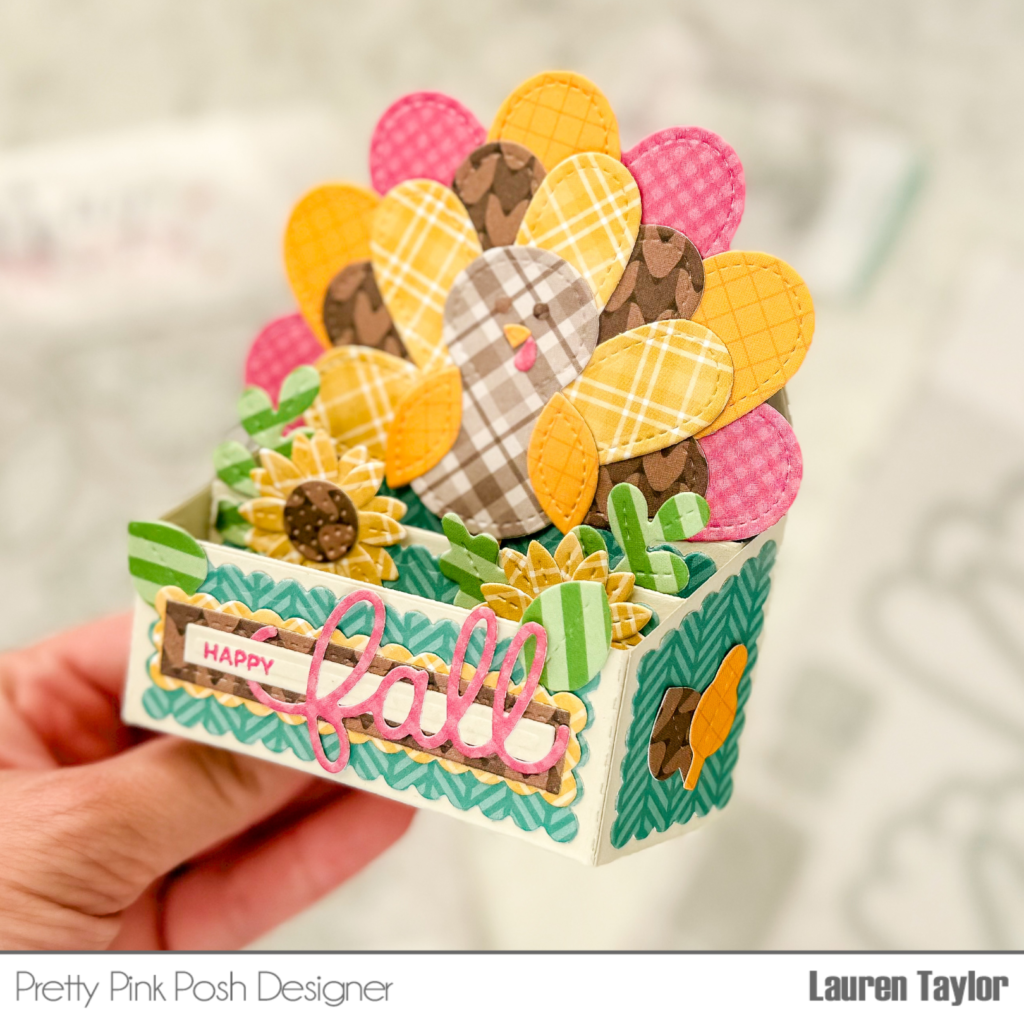
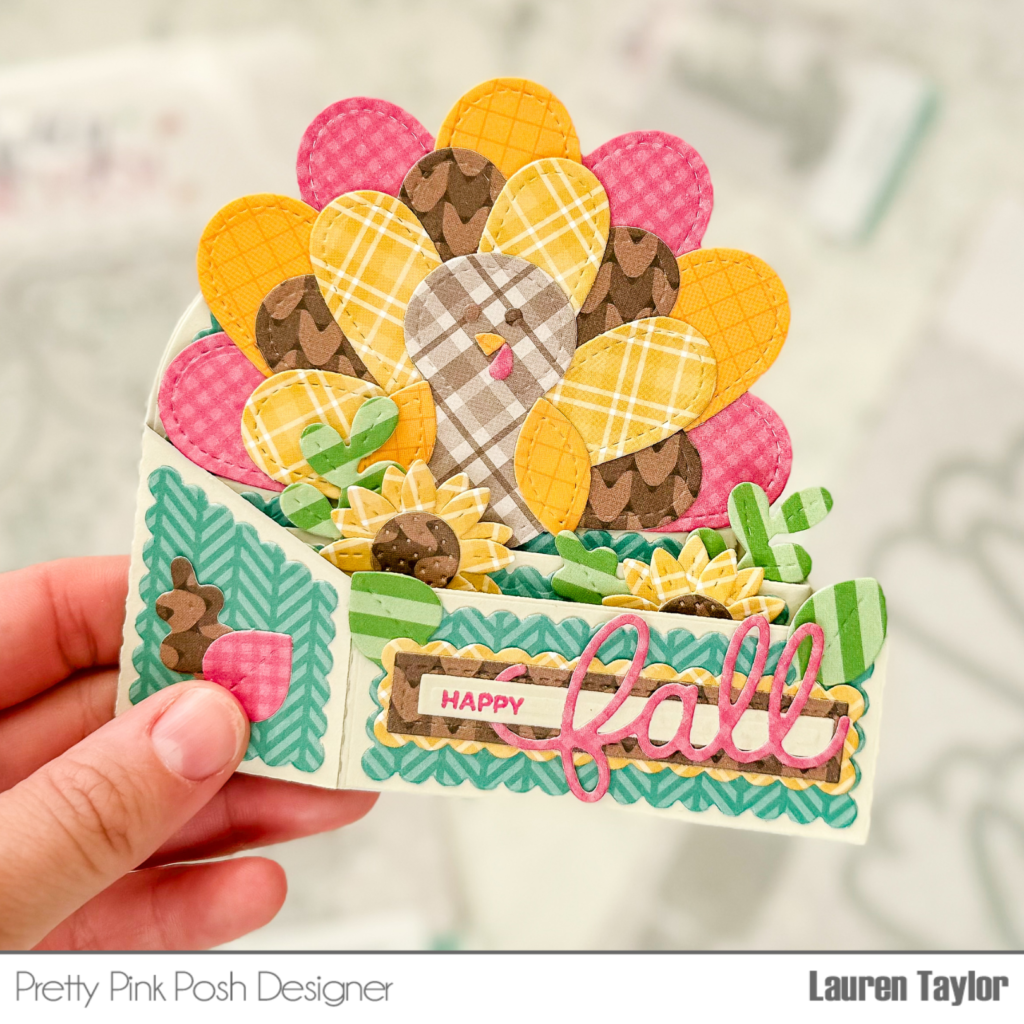
I started with die cutting all of the pieces I needed with patterned paper in Fall themed colors. I cut the Stitched Turkey Dies, leaves and flowers from the Big Fall Cupcake Dies, layered strips from the Sentiment Strips Dies, and my base from the Scallop Box Card Dies. My thinnest sentiment strip and base of the box card were die cut from a beige cardstock.
For the sentiment, I cut the Fall Script Die out of a dark pink cardstock and stamped “happy” in a matching ink from the Holiday Sentiments stamp setto create the “Happy Fall” sentiment for the box card.
I assembled the turkey together and adhered it to the back of the two middle shelves in the middle of the box card. On the front of the two middle shelves, I adhered the sunflowers and green leaves. The sides of the box card, I added different colored leaves and a couple more on the front of the box card with the sentiment strips.
I hope this gives you some inspiration to use your patterned paper to create a fun turkey for the upcoming season.
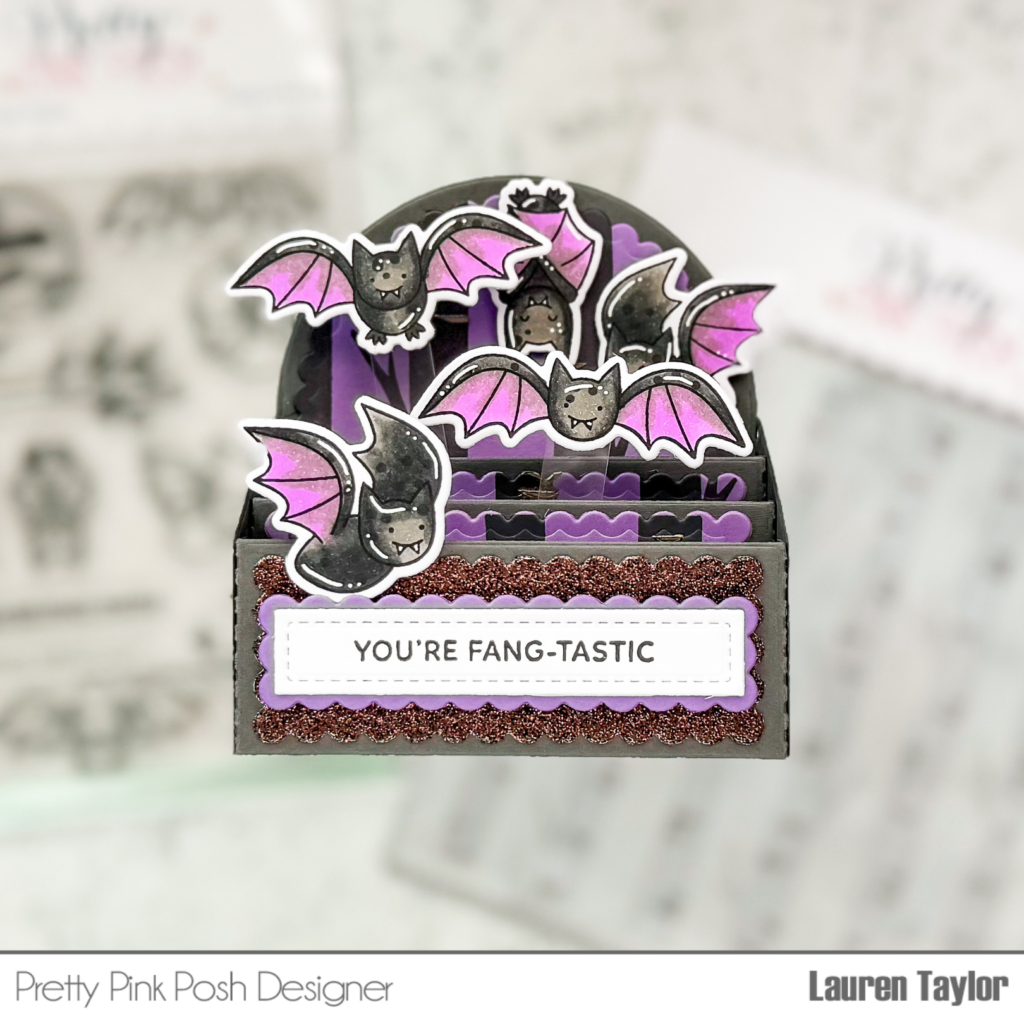
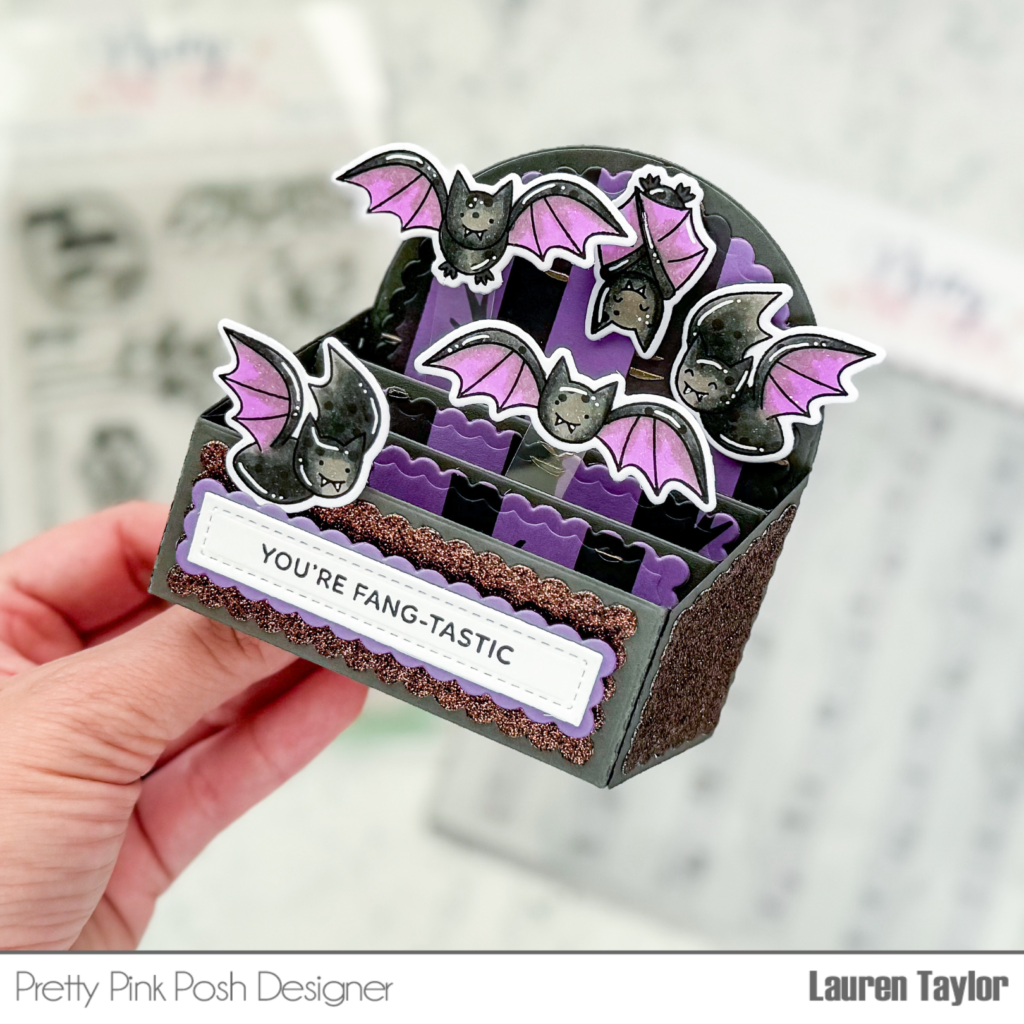
Hi Crafty Friends! Carly here and you might know that I love shakers. I really, REALLY love them, LOL! And I love snowflakes too so I can’t wait for you to see my latest shaker card with the gorgeous Stitched Snowflakes!
Some fun things about this shaker…it is very flat & easy to mail and it uses some “crafty trash” aka the plastic die packaging. Also you could easily change the sentiment to make a Christmas, birthday, hello card, etc.
Thanks so much for stopping by! I hope you’ve been inspired by all the fun holiday projects!
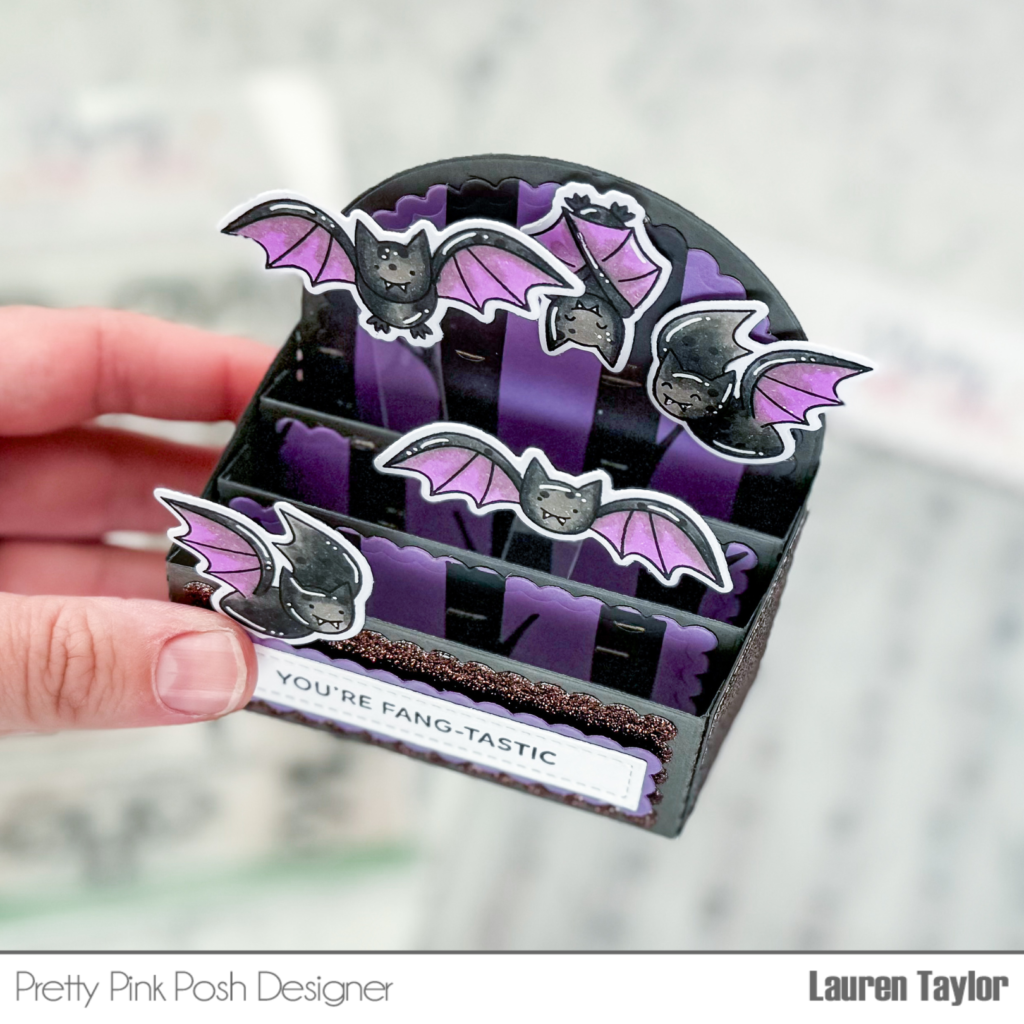
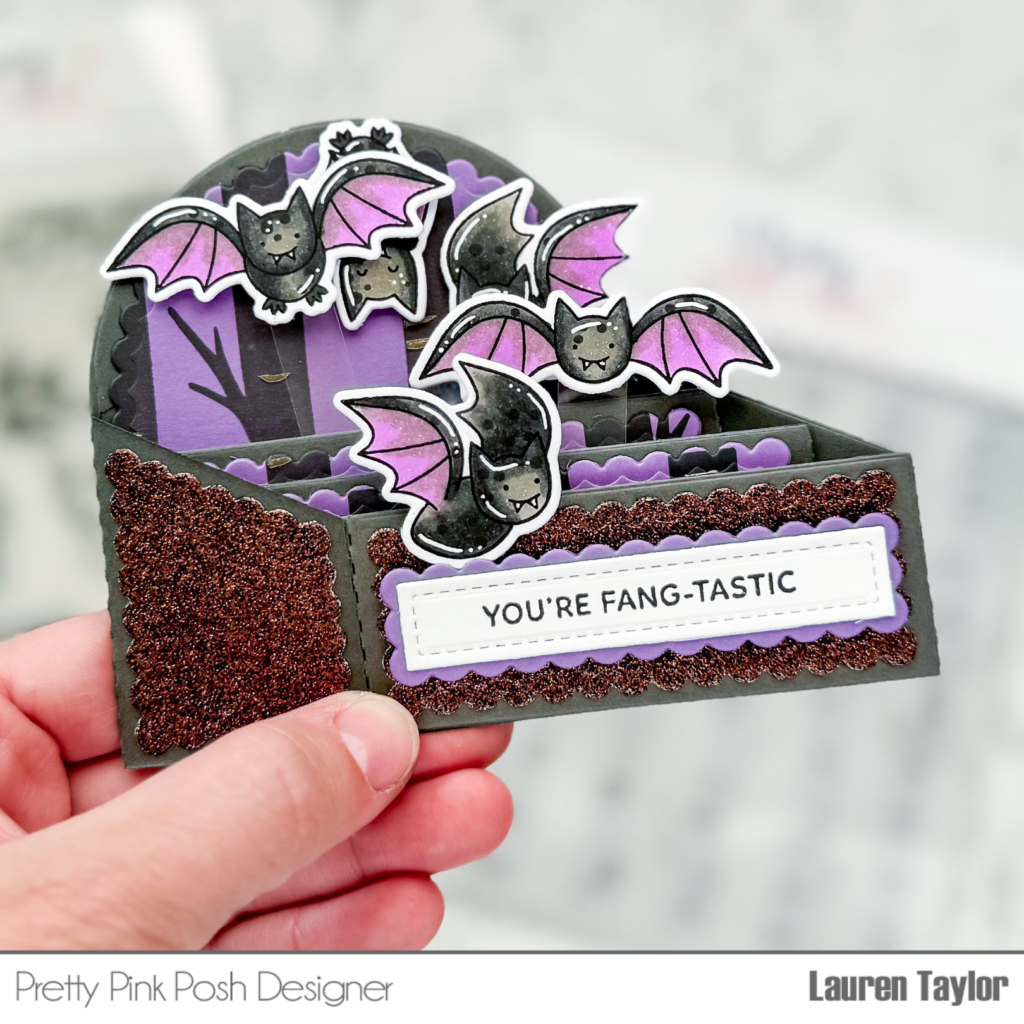
To start my card, I am going to do my stenciling first as I’m going to be using stencil paste and want to make sure the details dry while I work on other parts of the card. I cut the Scallop Box Card Dies(the back arch and two rectangles) out of purple cardstock and used the Layered Birch Trees Stencils. For the (A) stencil I used Black Soot Distress Oxide and for the (B) stencil I used Grrr! Simon Hurley Lunar Paste.
While that was drying, I cut the Scallop Box Card Diesside scallop pieces and one more rectangle out of brown glitter cardstock and the base of the box card out of dark grey cardstock. I assembled the box together and you can follow along in the video if you’d like to see each step of the process.
Once the box card was assembled and I added on all of the scalloped pieces – including the stenciled pieces once they were dry – it’s time to decorate! I stamped all of the bats from the Batty About You stamp set and colored them in with alcohol markers. I used the coordinating diesto cut them all out after I added some white highlights with a gel pen.
For the sentiment, I die cut a scalloped rectangle out of purple cardstock and a rectangle from white cardstock from the Sentiment Strips Dies. I stamped my sentiment with a black ink from the Batty About You stamp set. I added the sentiment strips and a bat to the front of the box card and a few bats to the back arch with foam adhesive.
There are two bats I added with acetate strips to the center pieces of the box card so it looks like they’re flying! I just love how fun this card turned out and honestly I think you could use for any bat lover in your life, not just for Halloween.
I hope you enjoyed the Halloween box card and I’m excited to get more in the fall mood for next month!
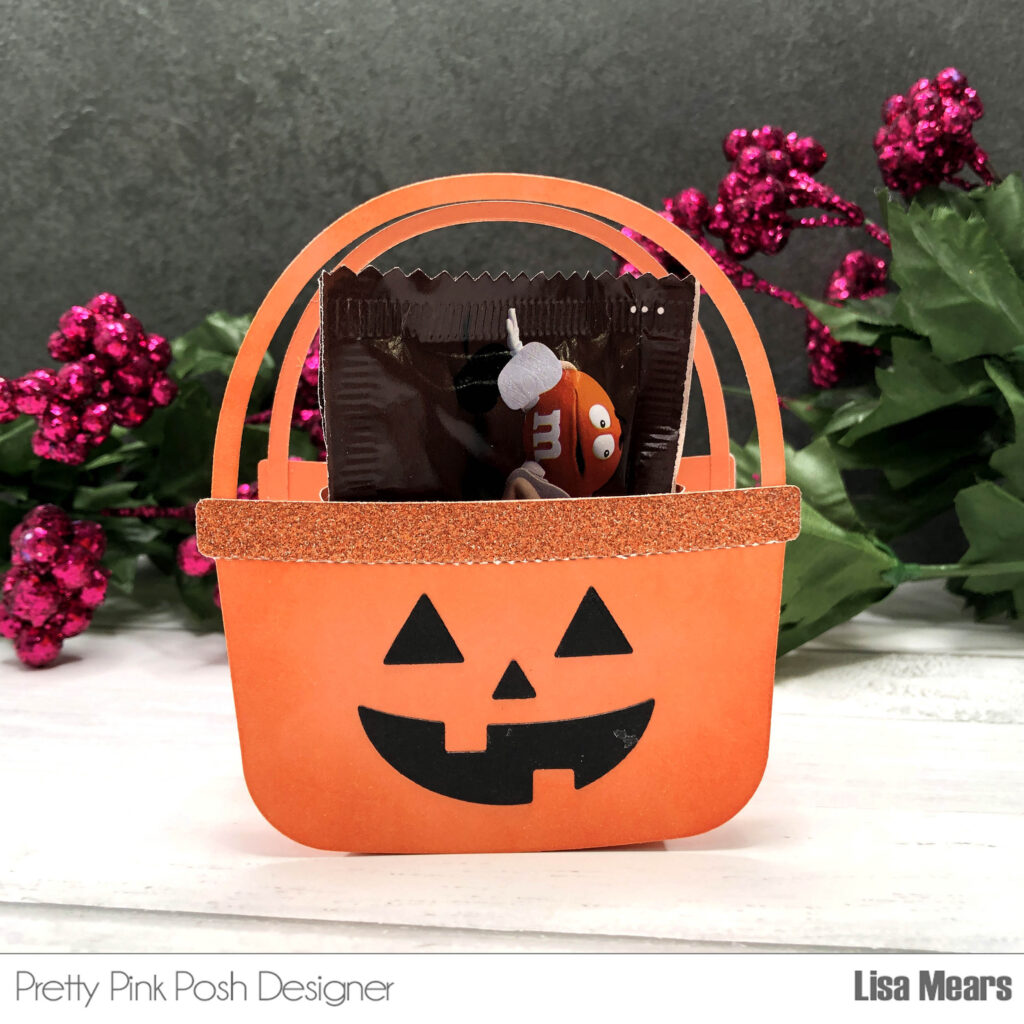
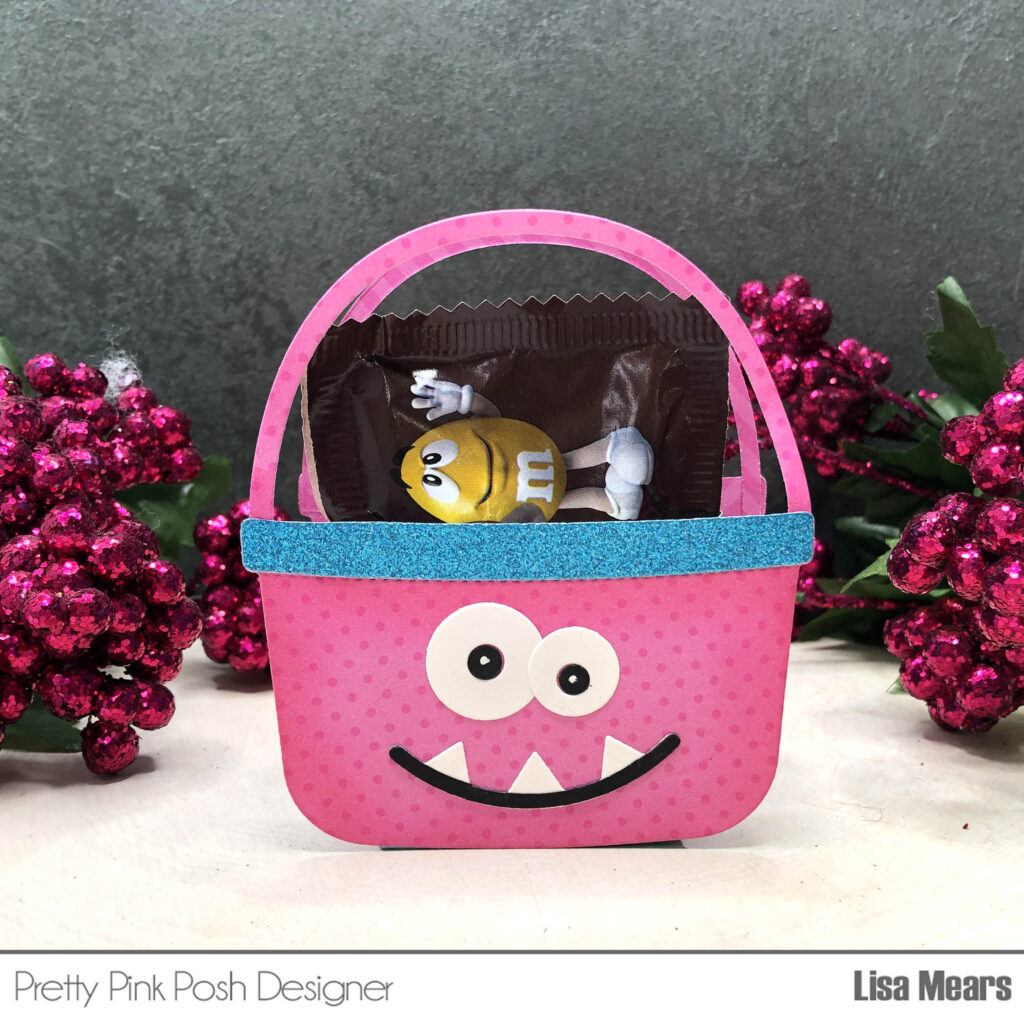
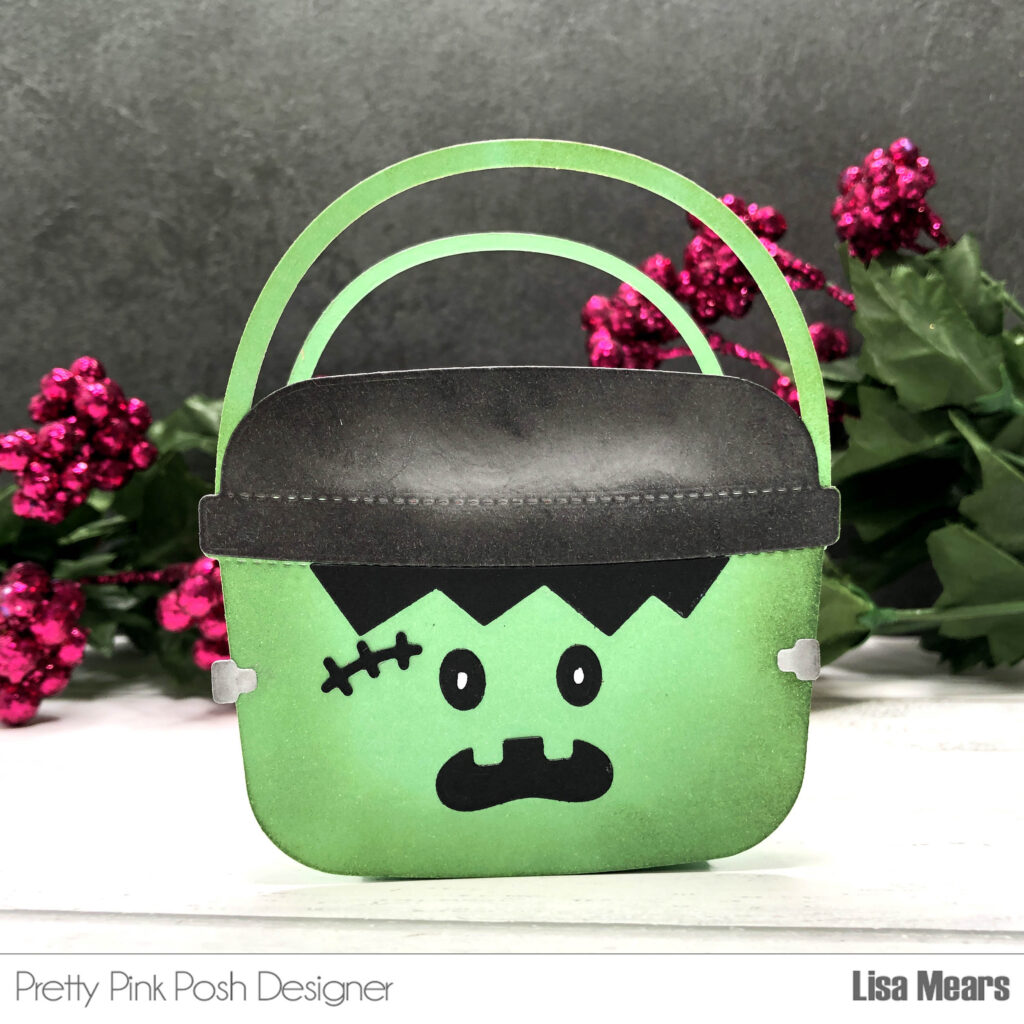
Hello crafty friends. It’s Lisa Mears on the blog today. If you enjoy handing out treats for Halloween, here’s a creative twist to make it even more special.
In my video, I’ll walk you through the steps to create these candy buckets for your spooky celebrations!
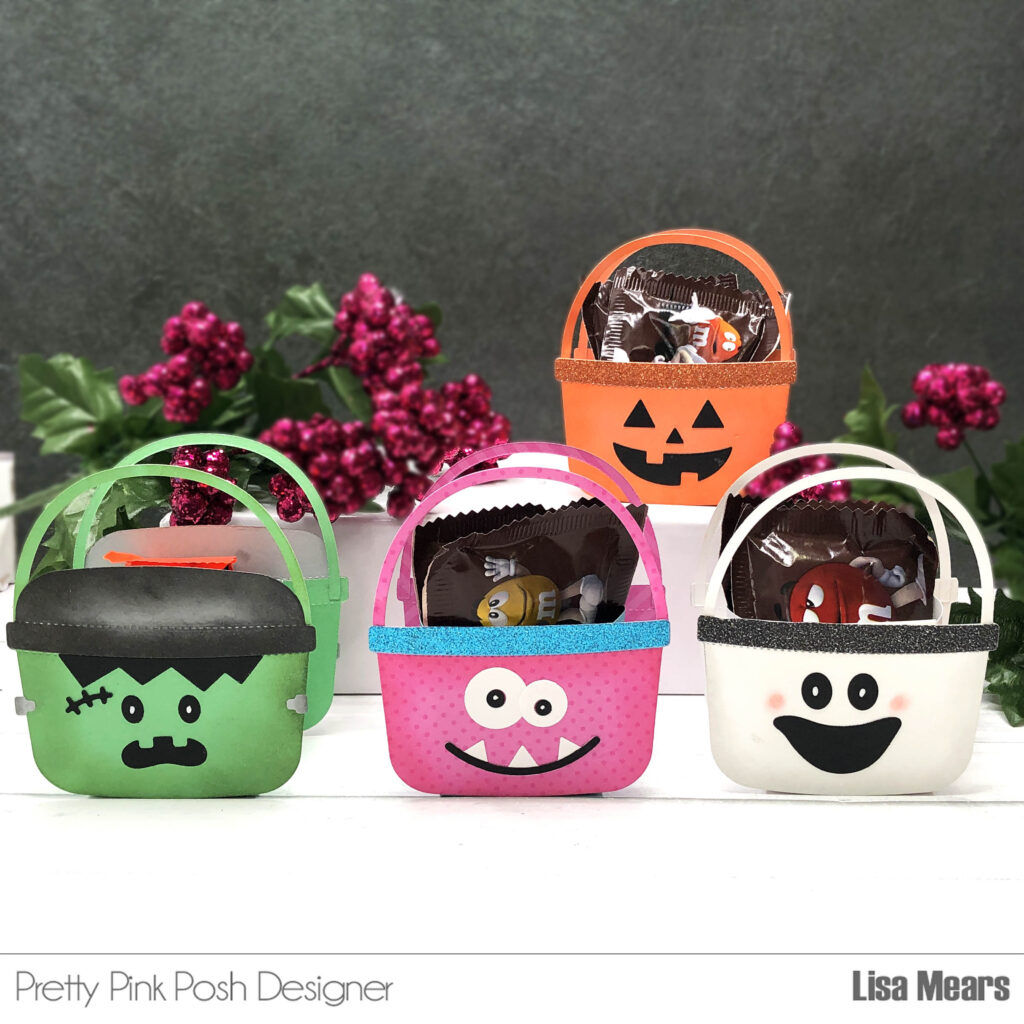
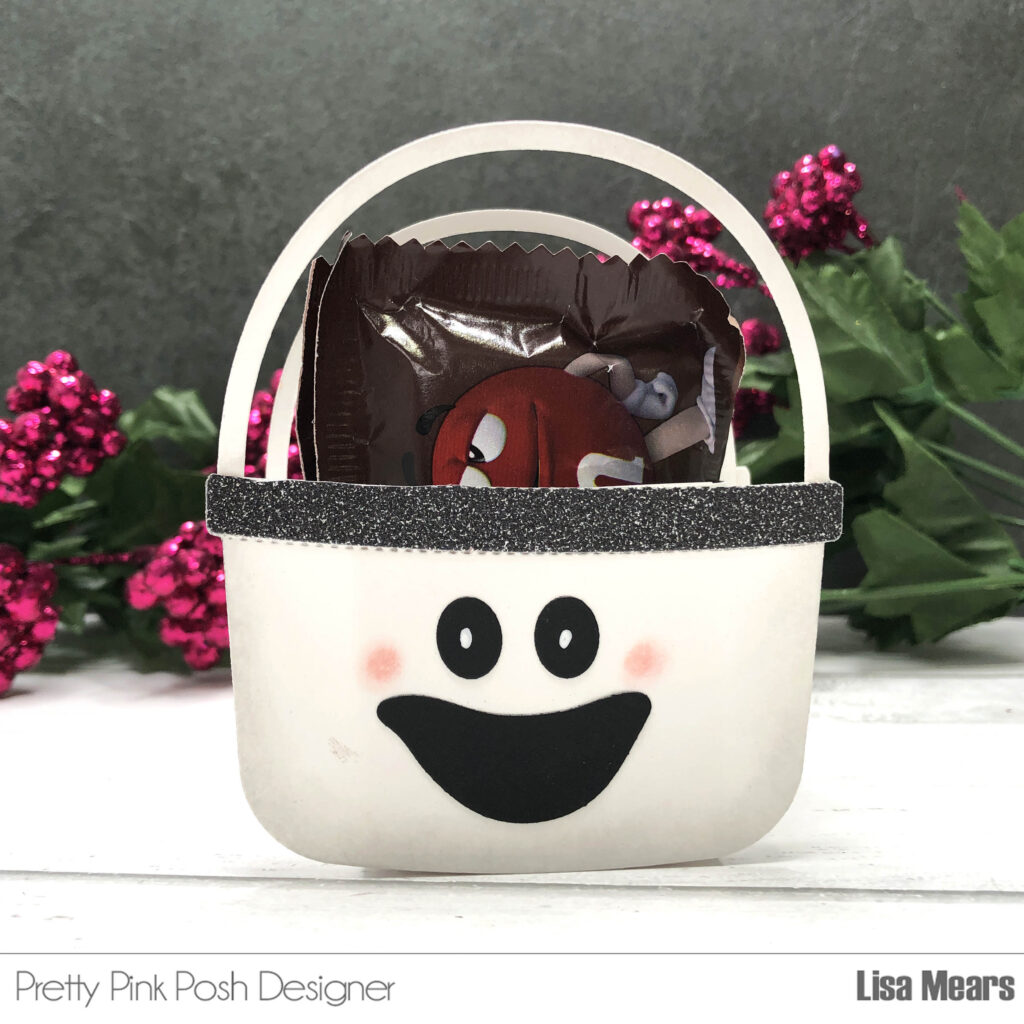
I made some adorable candy buckets using the Candy Bucket dies. These easy-to-make buckets are perfect for holding goodies and adding a festive flair to your Halloween.
I love how there are four face options for the candy buckets — Frankenstein, a pumpkin, a ghost, and a monster — and I made one of each!
You can use the front of the candy buckets on cards, but I made them into little candy buckets that you can put candy inside.
I made a box to put in the middle of two of the candy buckets and attached the box with double sided adhesive tape to the front and back pieces.
These would be super cute to give to kids, friends, family, and co-workers on Halloween. You can fill them with candy, or other small snacks, or toys.
Thank you so much for stopping by today. Have a spooktacular day! Lisa Mears