The February 2026 Release is now available in the Pretty Pink Posh Shop and select retailers that carry our products. If you missed our post yesterday, we revealed all of the products in picture form, but if you would like to see them in a video, Mindy has that for you today!
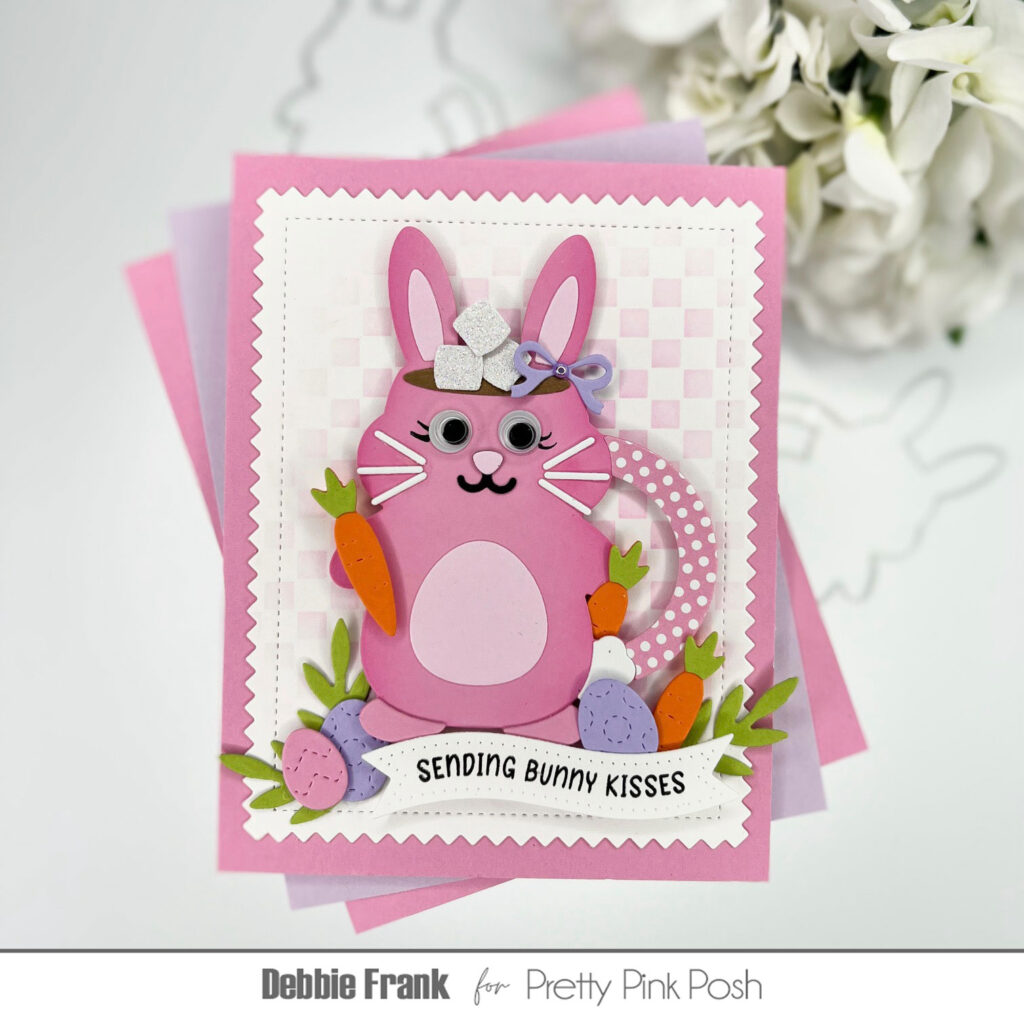
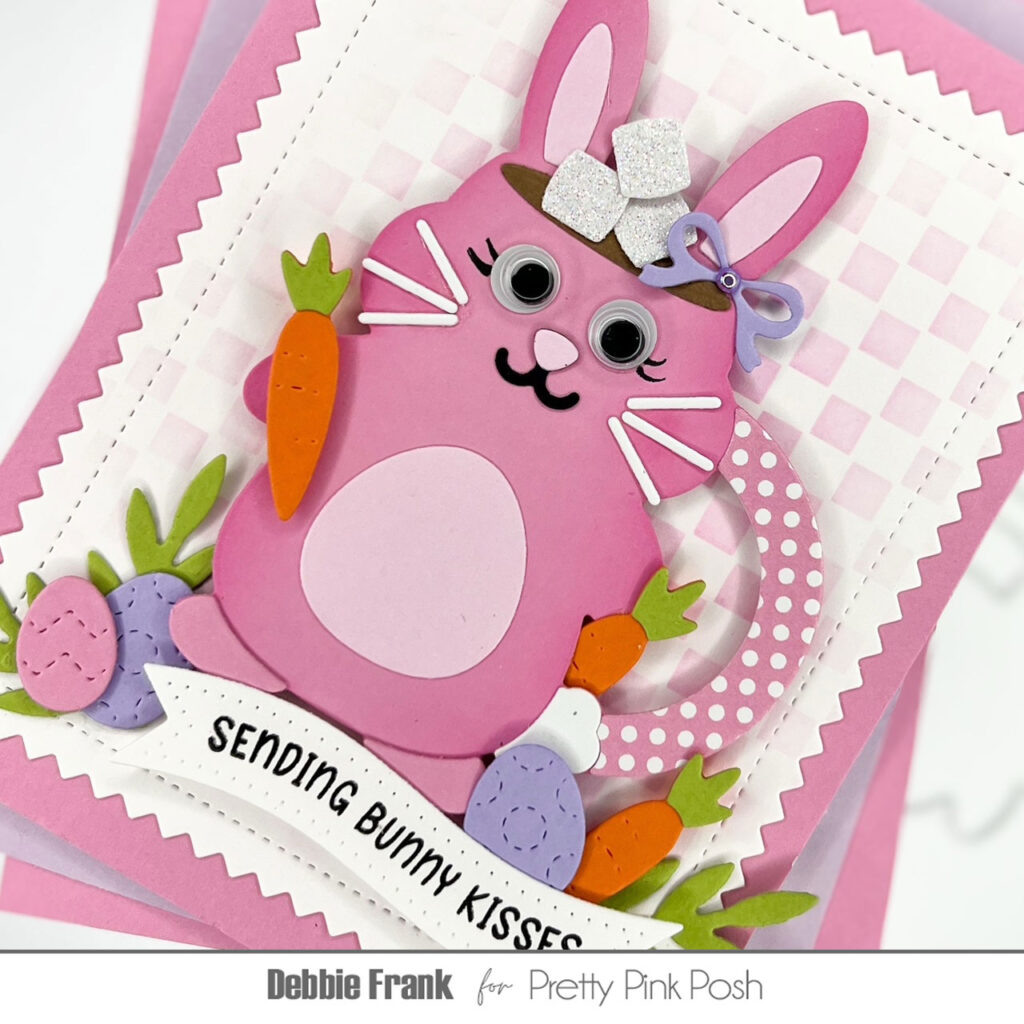
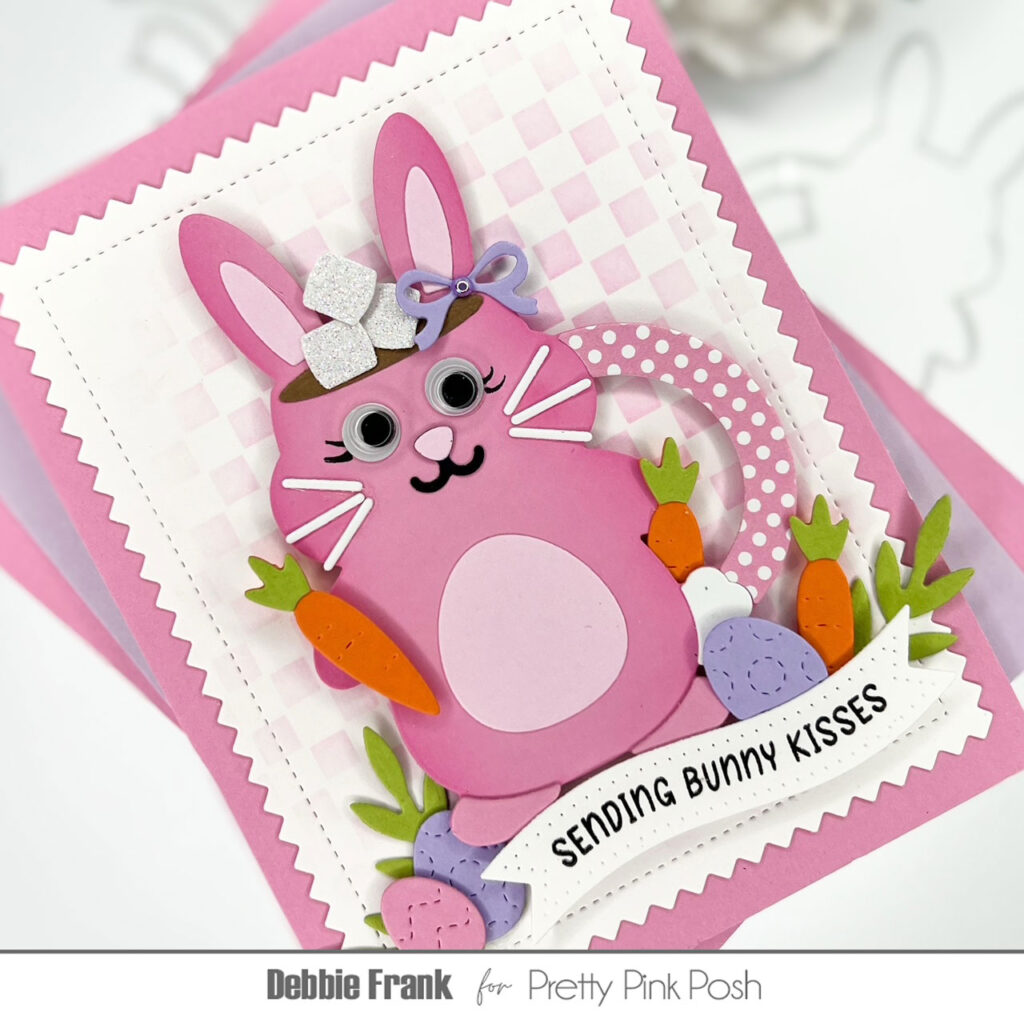
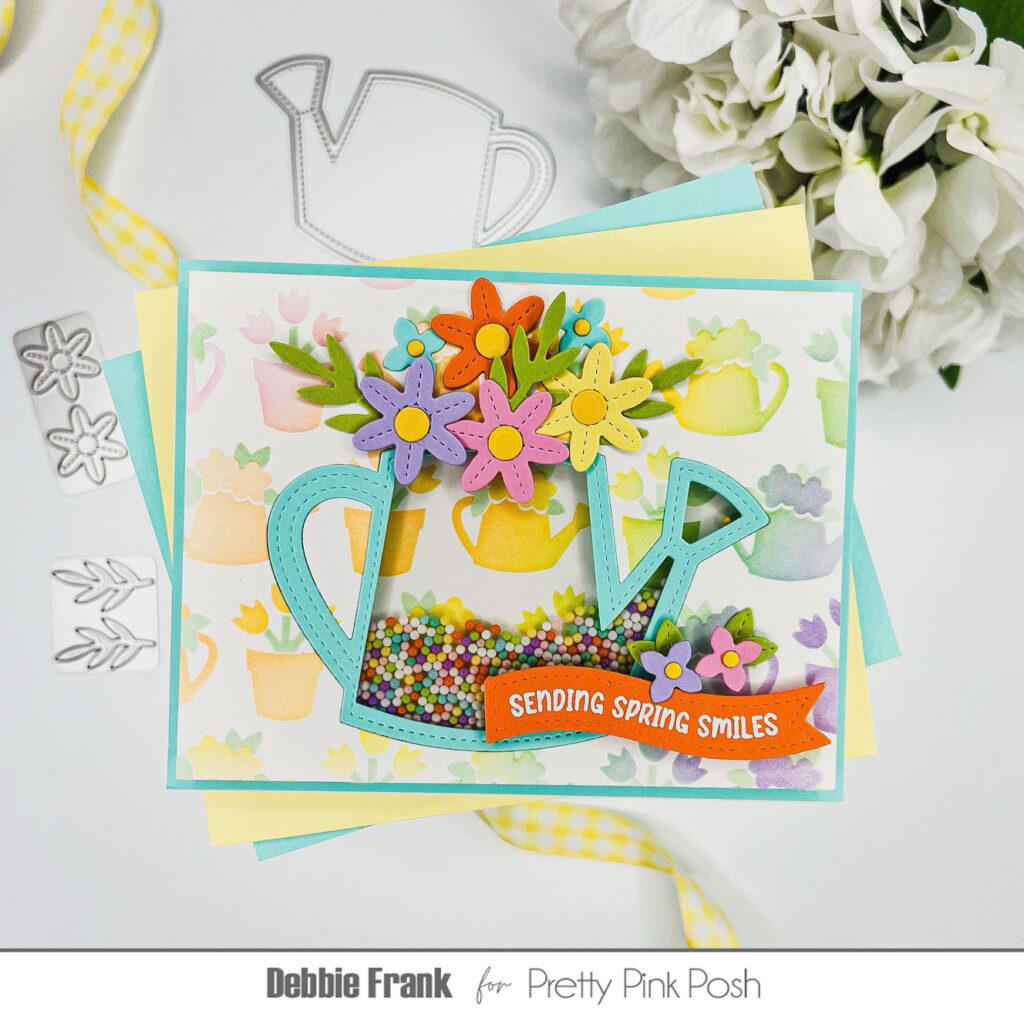
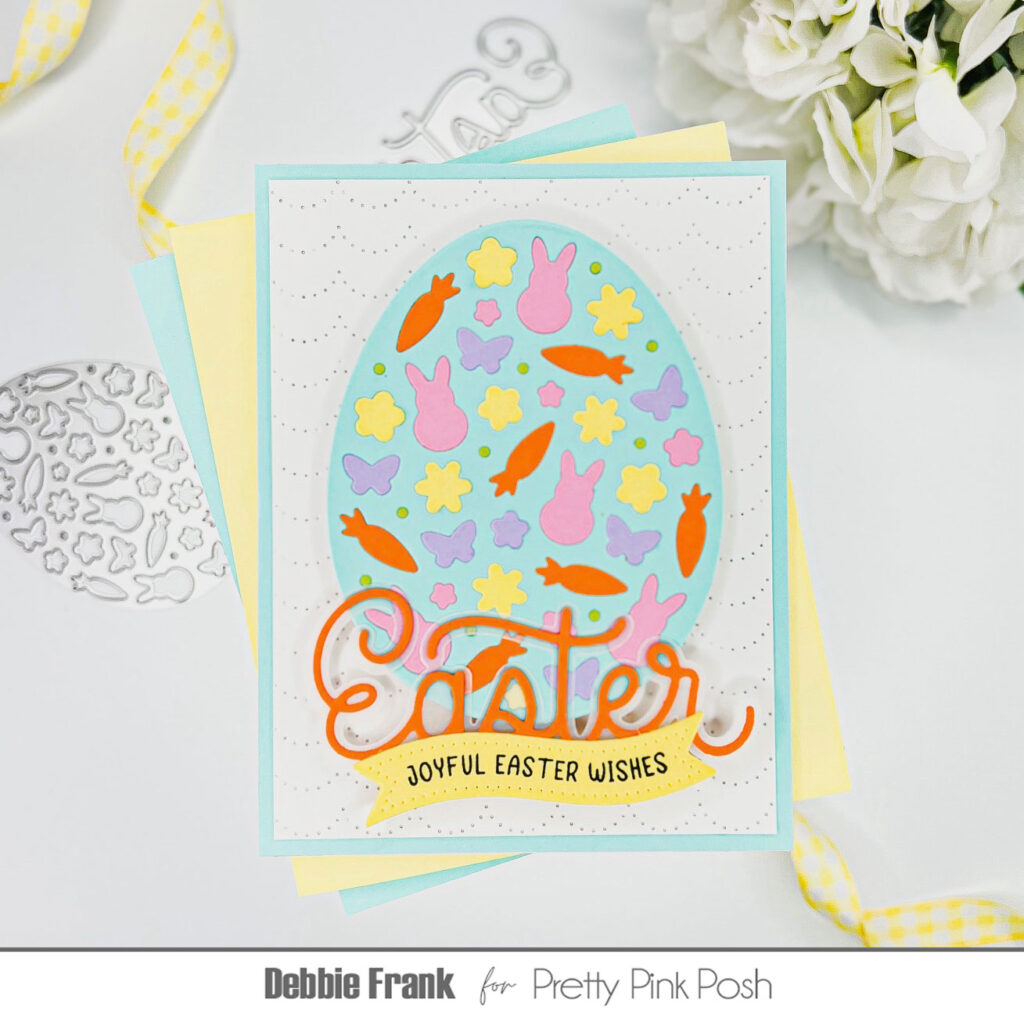
Hi Crafty Peeps! Debbie here with the most adorable Easter Bunny Mugs from the new Easter/Spring release at Pretty Pink Posh! This release is packed with so much cuteness with the Dies, Stencils and Stamps! I’m loving the Chicks and Bunnies, then with all the flower dies I’m in heaven!
I decided to start off making one of the Easter Bunny Mugs, but doing her in pink to make her more playful! Using two shades of pink card stock and then inking on the edges for some dimension. I gave her a sweet face with the googly eyes, lashes, and rosy cheeks, then of course the Polka Dot handle.
Next with the new Mini Checker Stencil, I lightly ink blended a pink ink onto a standard A2 panel. Keeping it heavier in the center and fading off to the sides. Then with the Pinking Rectangle Dies I die-cut the panel out. Popping up the Bunny Mug and adhering it to the panel.
Next, I die-cut out some of the carrots, bow, eggs and Glitter marshmallows from the Easter Bunny Mug dies. With the Springtime Holder Additions Dies, I die-cut out some of the greenery and the smaller eggs. I started to tuck and pop up the die cuts all around her and placing a carrot in her paw. For a final touch I add one smallLilac Pearlto the center of the bow.
Thanks for stopping by and have a wonderful crafty day!
Thank you to everyone who joined us for Valentine Theme Week and left comments to be entered into the giveaways. It was really fun to read your answers and see some participating that haven’t left comments on the blog before! Winners, email us within 7 days to claim your prize!
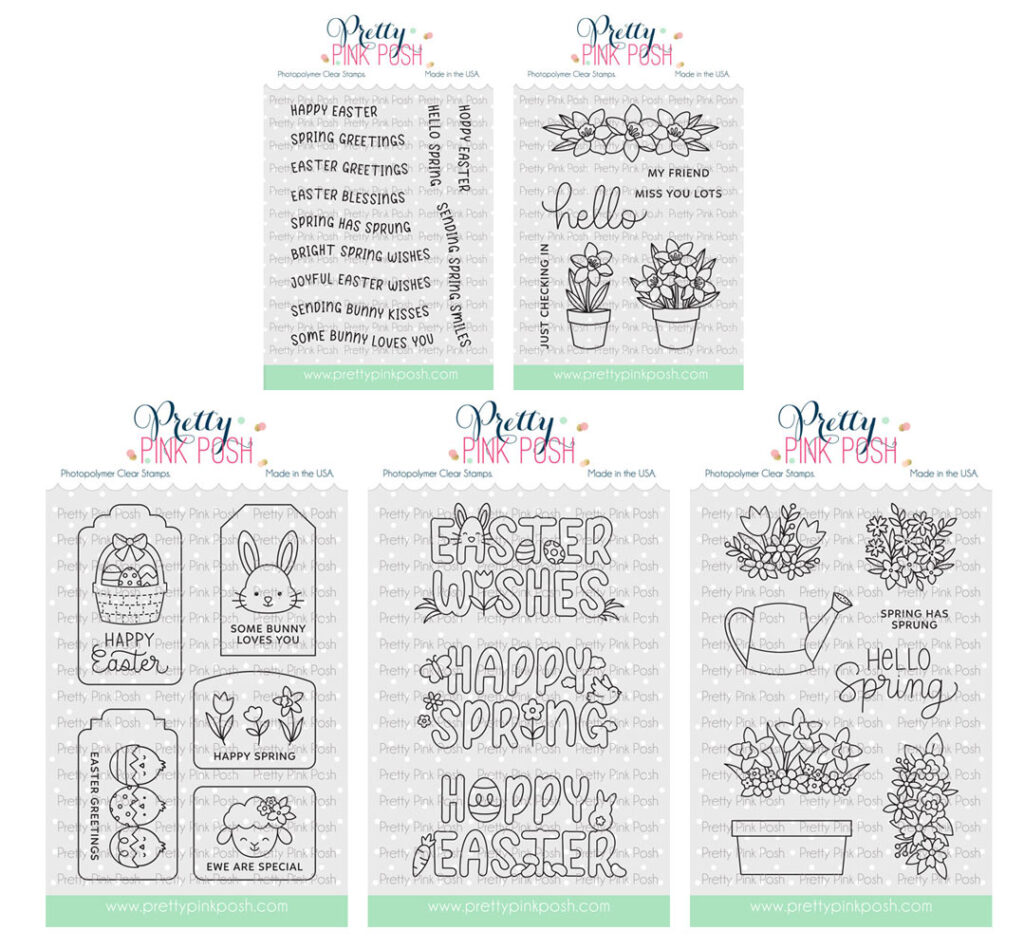
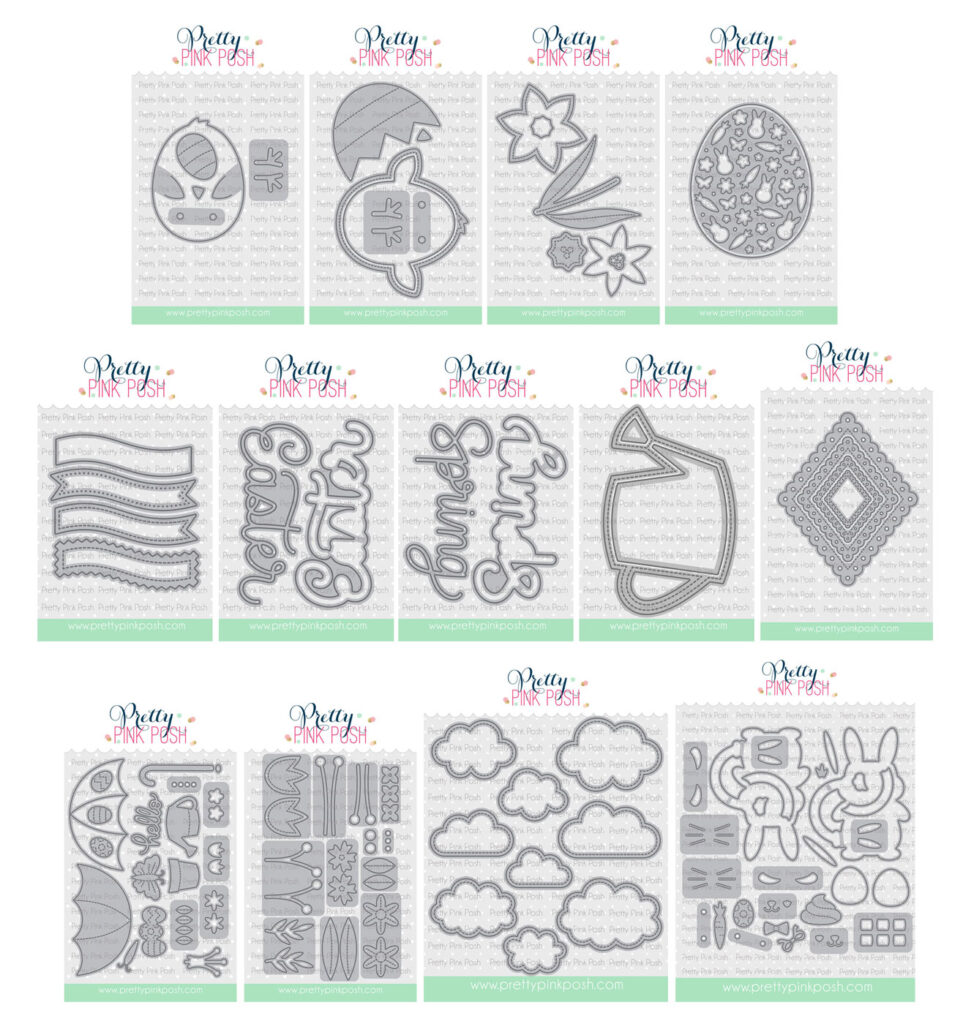
Hello friends! It’s time to reveal all of the spring and Easter products that are part of the February 5th release. This collection of products ranges from daffodils, chicks, sentiments and more!
Here’s a look at the five new stamp sets that will be available for purchase: Easter Banner Greetings, Potted Daffodils, Easter Tags, Easter Word Scenes, and Spring Blooms.
Here are the thirteen individual die sets that will be available: Chick Holder, Chick Shaker, Daffodil Shaker, Decorative Easter Egg, Banner Greetings 3, Large Easter Shadow, Large Spring Shadow, Watering Can Shaker, Eyelet Diamonds, Springtime Holder Additions, Stitched Spring Flowers, Stitched Clouds, and Easter Bunny Mugs.
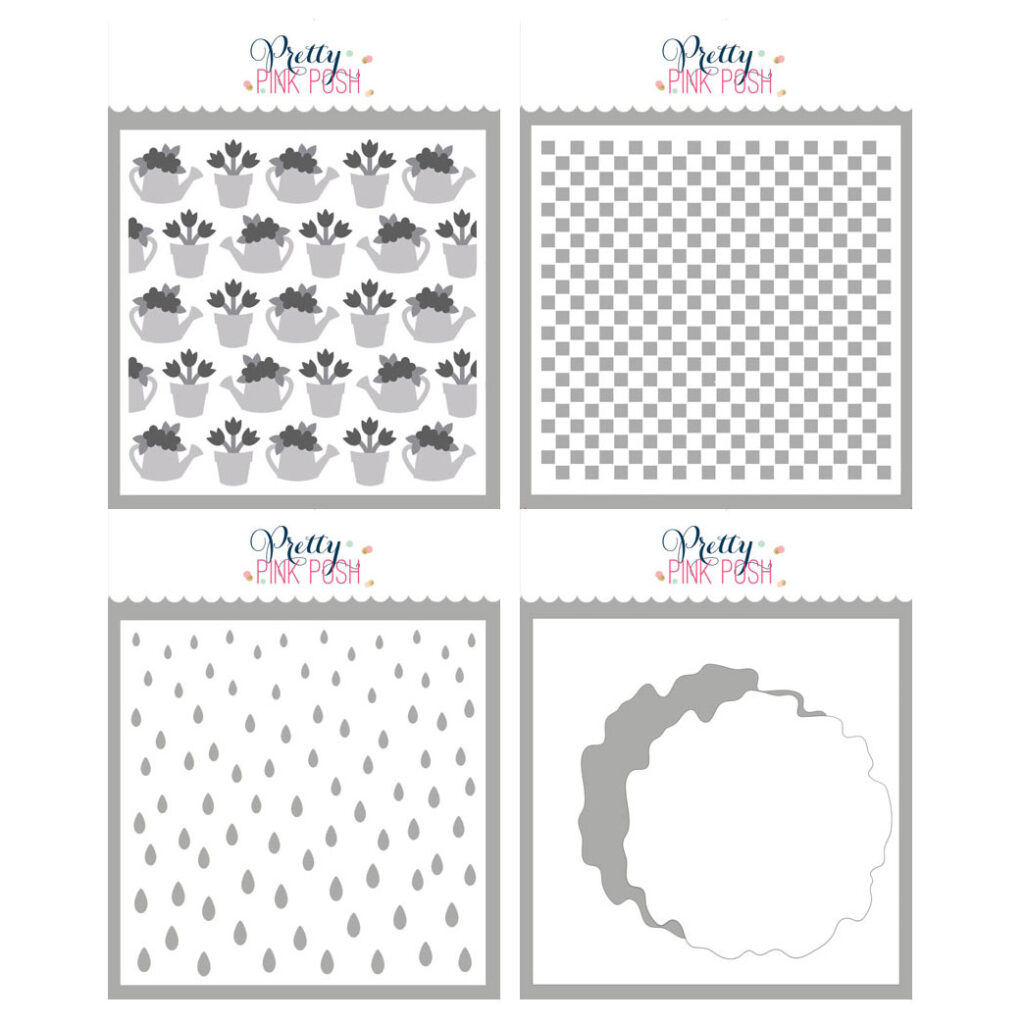
Here are the four new stencils for this month: Layered Watering Can Floral, Mini Checker, Raindrops and Watercolor Circle w/ Mask.
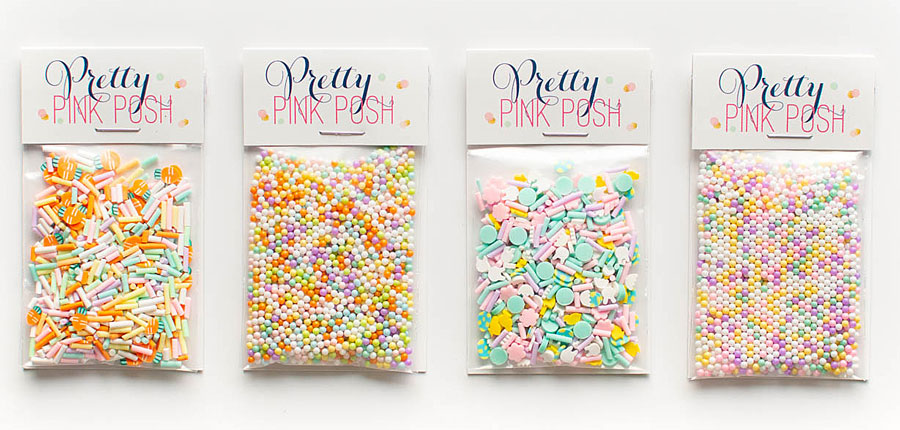
There are four new embellishments this month: Spring Carrots clay confetti, Bunny Hop shaker beads, Springtime Bunny clay confetti, and Pastel Dreams shaker beads.
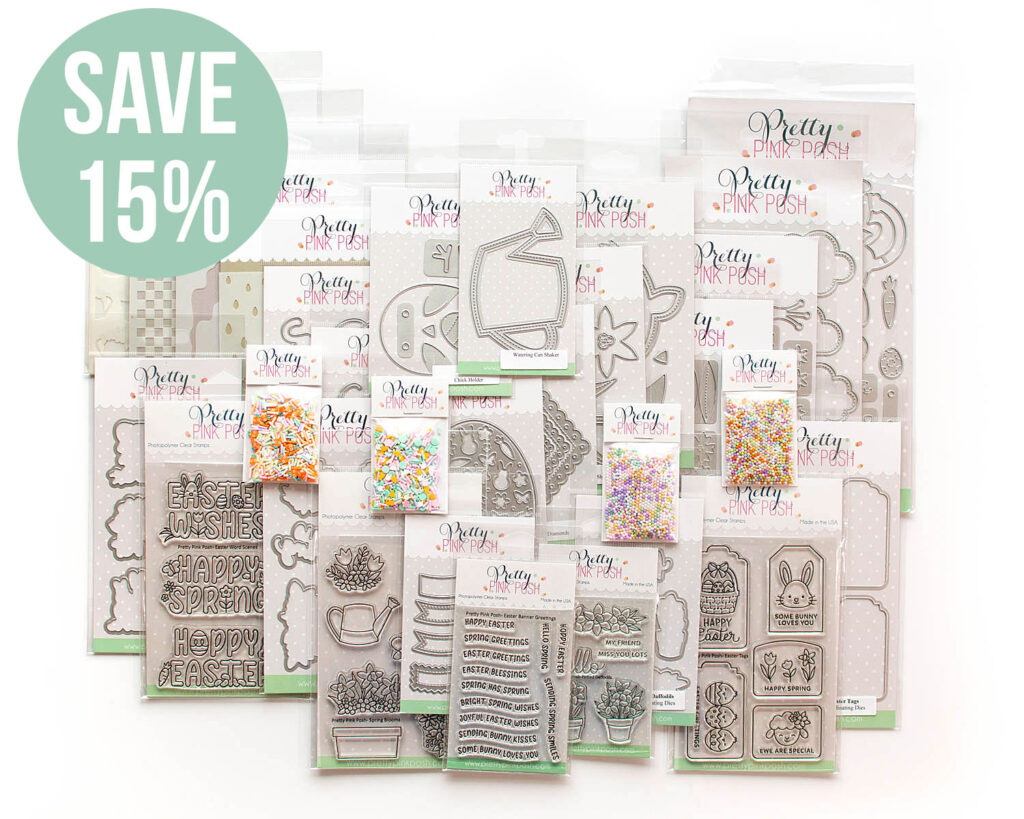
We have a limited amount of bundles available where you can buy this release in one easy click. Plus, you’ll save 15% off when you buy it all together.
We will see you tomorrow as we show you the new products in a video, the products go live individually, and we’ll also have a video hop!
Welcome to the last day of sneak peeks of the February 5th release. Today we’ll be taking a look at the new stamps sets, along with the Eyelet Diamondsdie set.
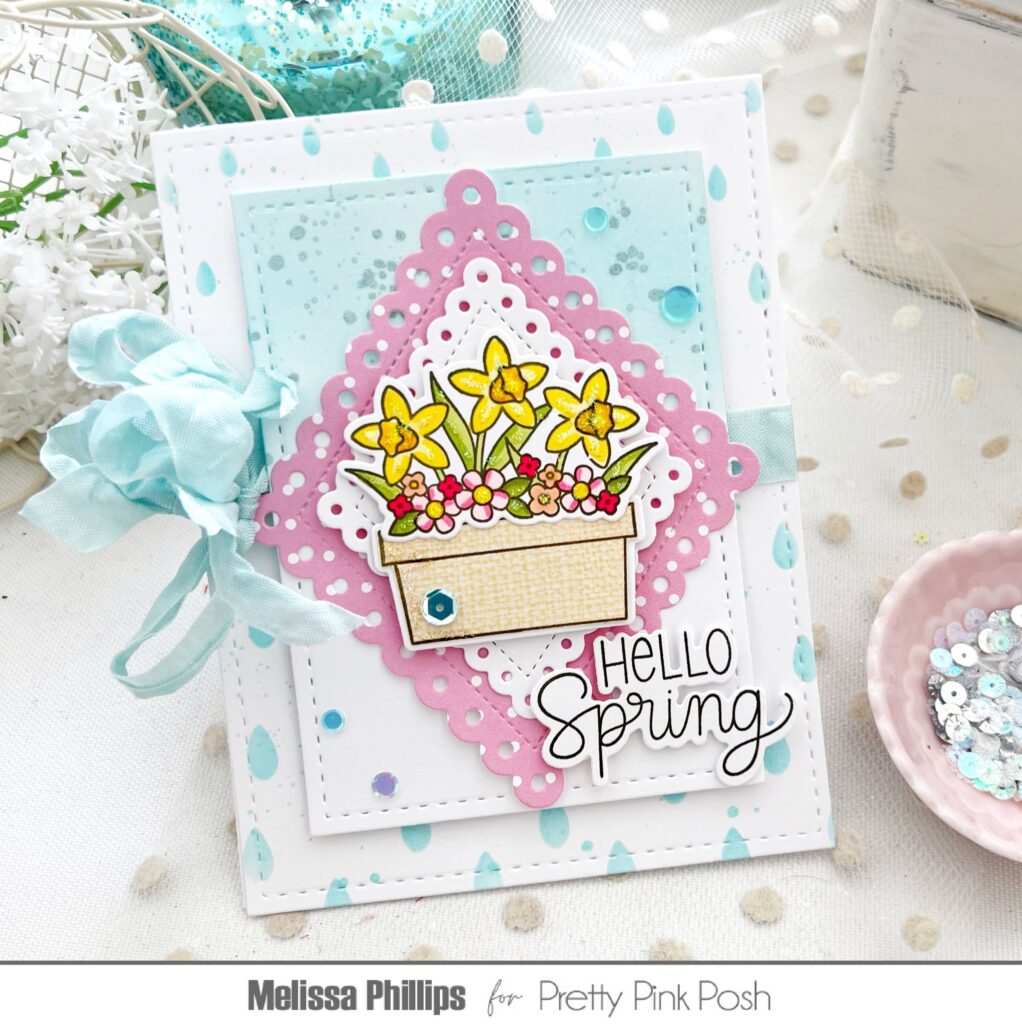
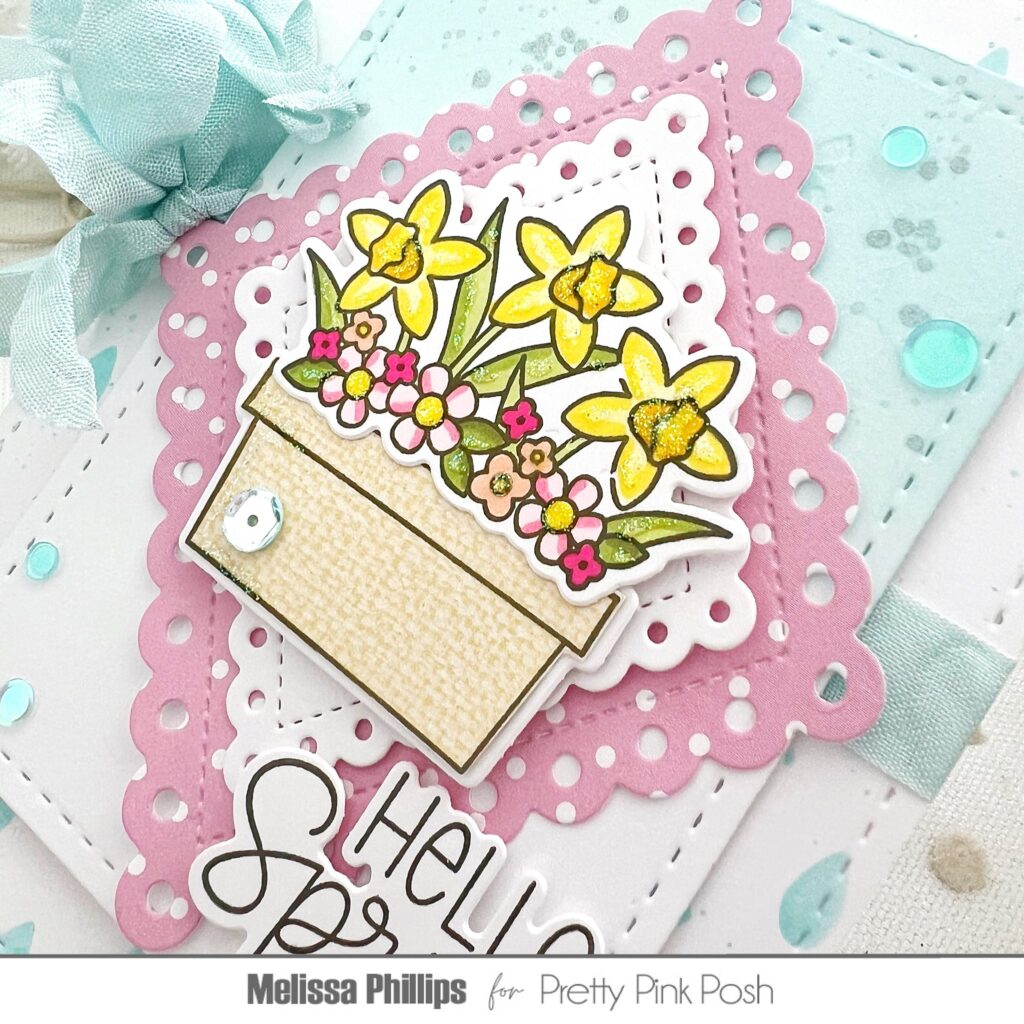
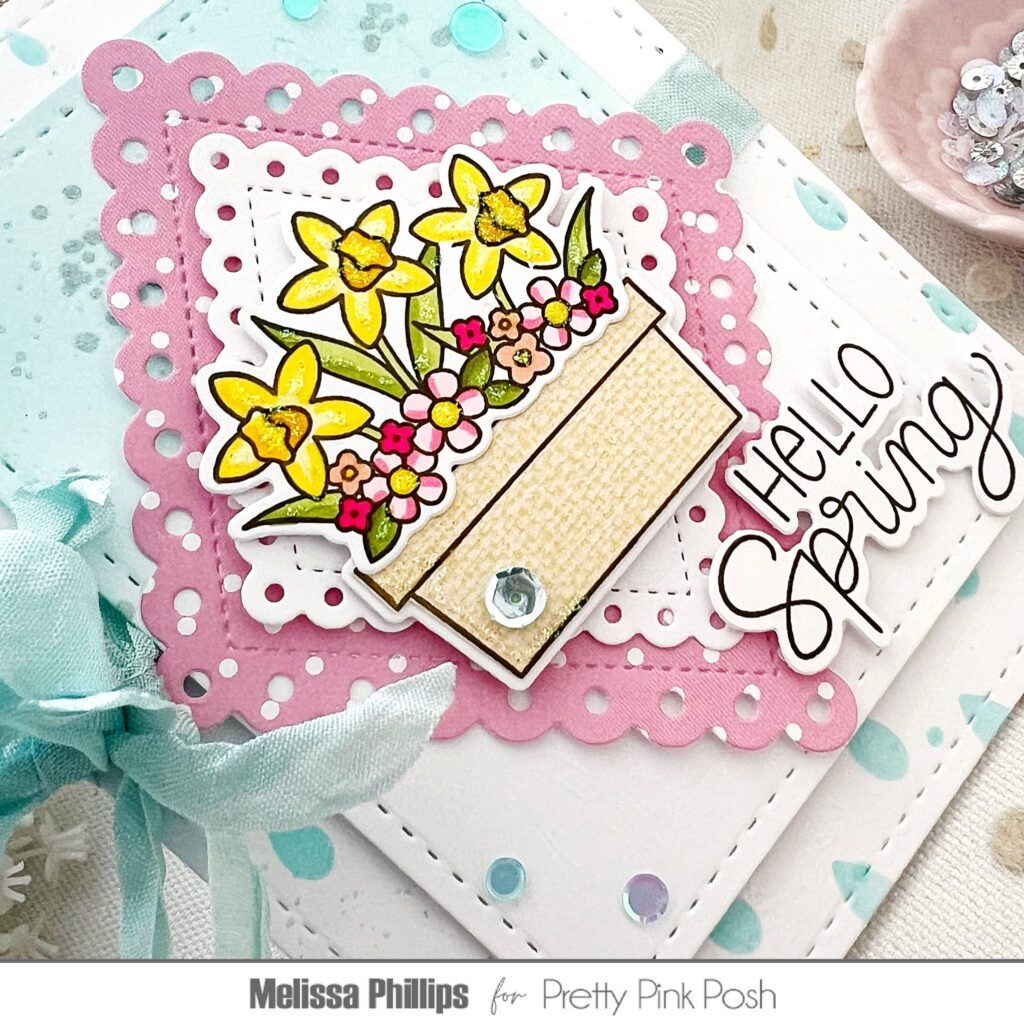
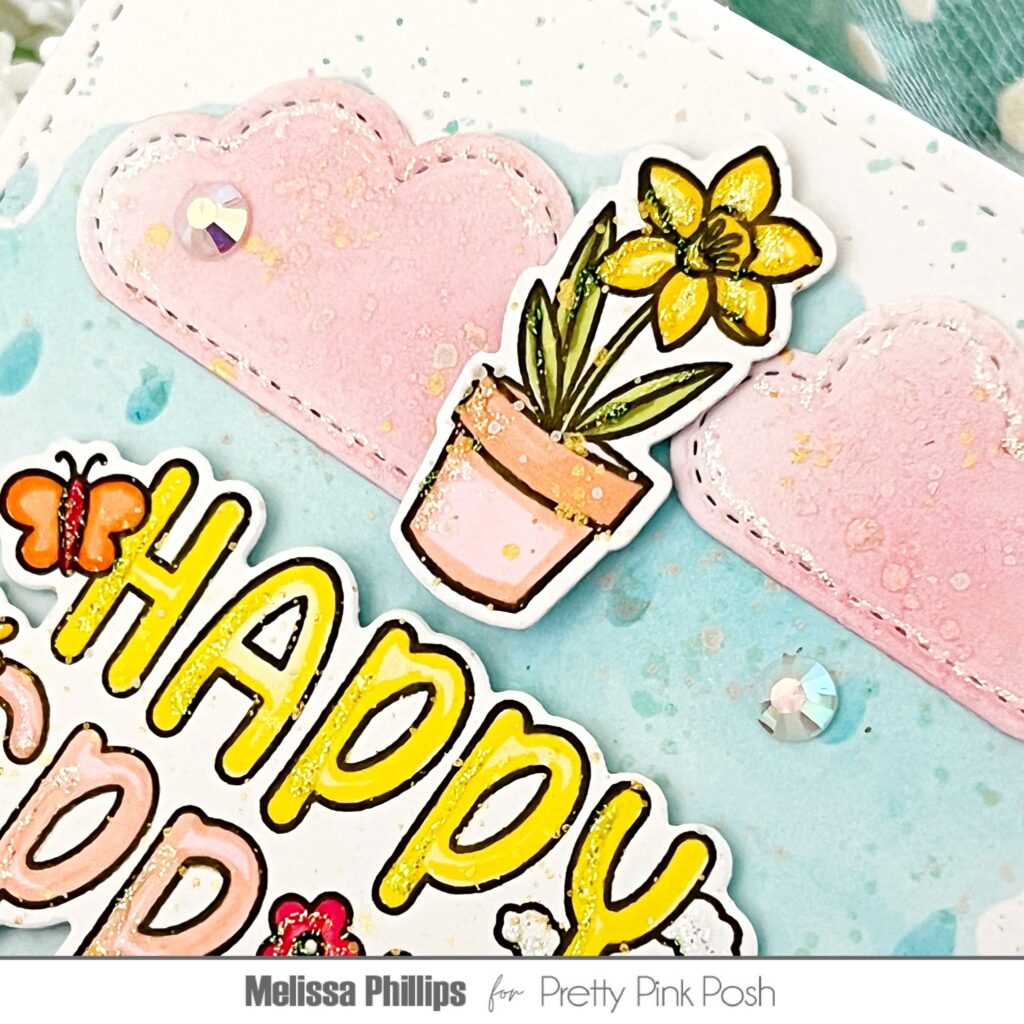
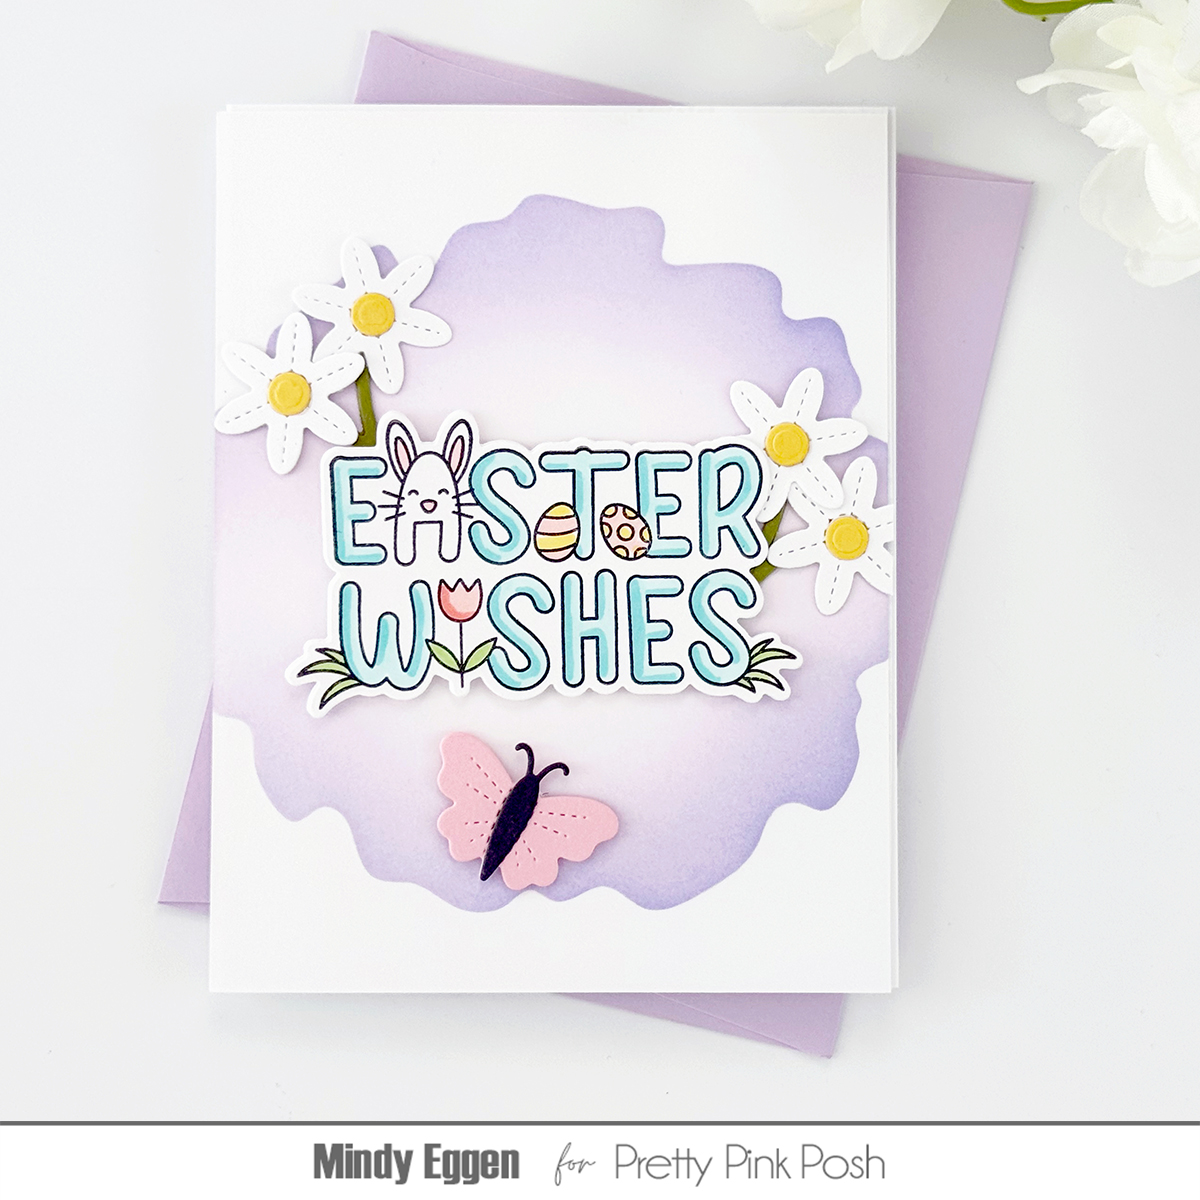
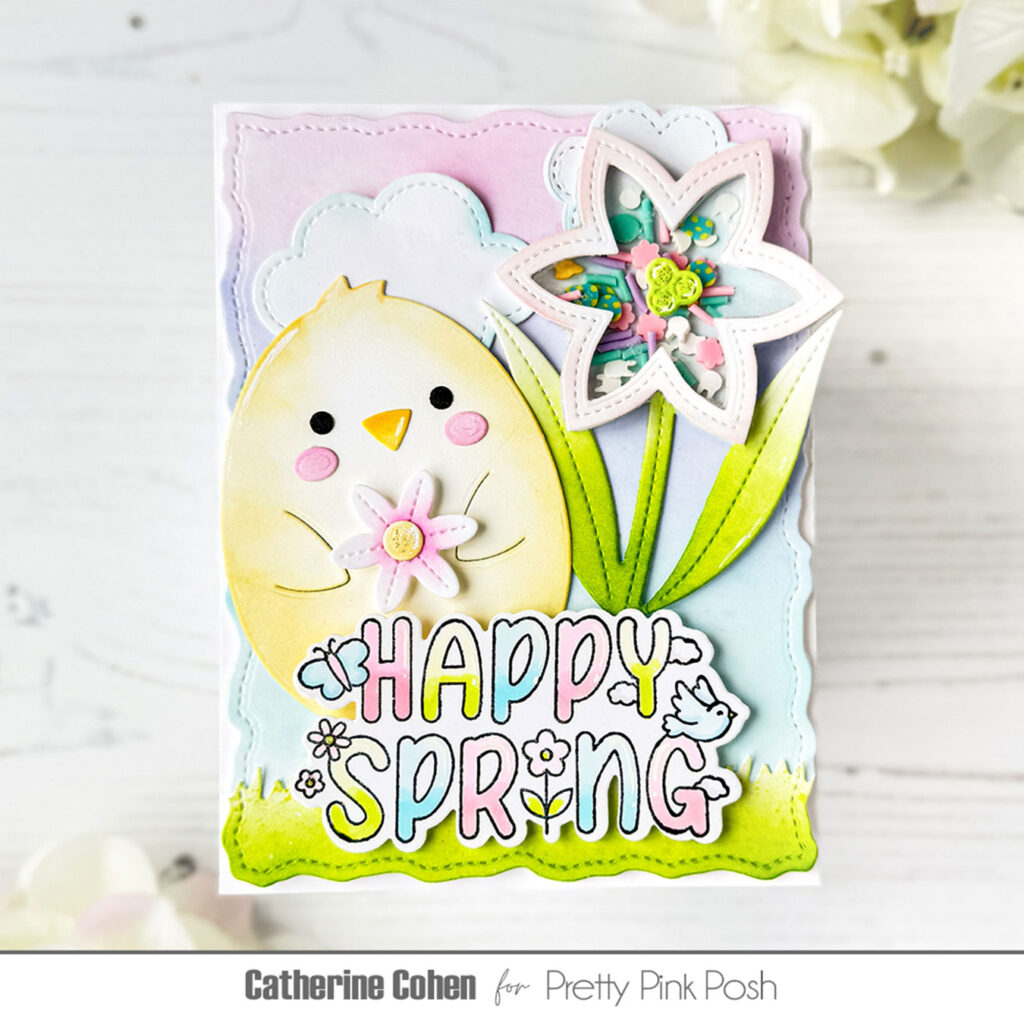
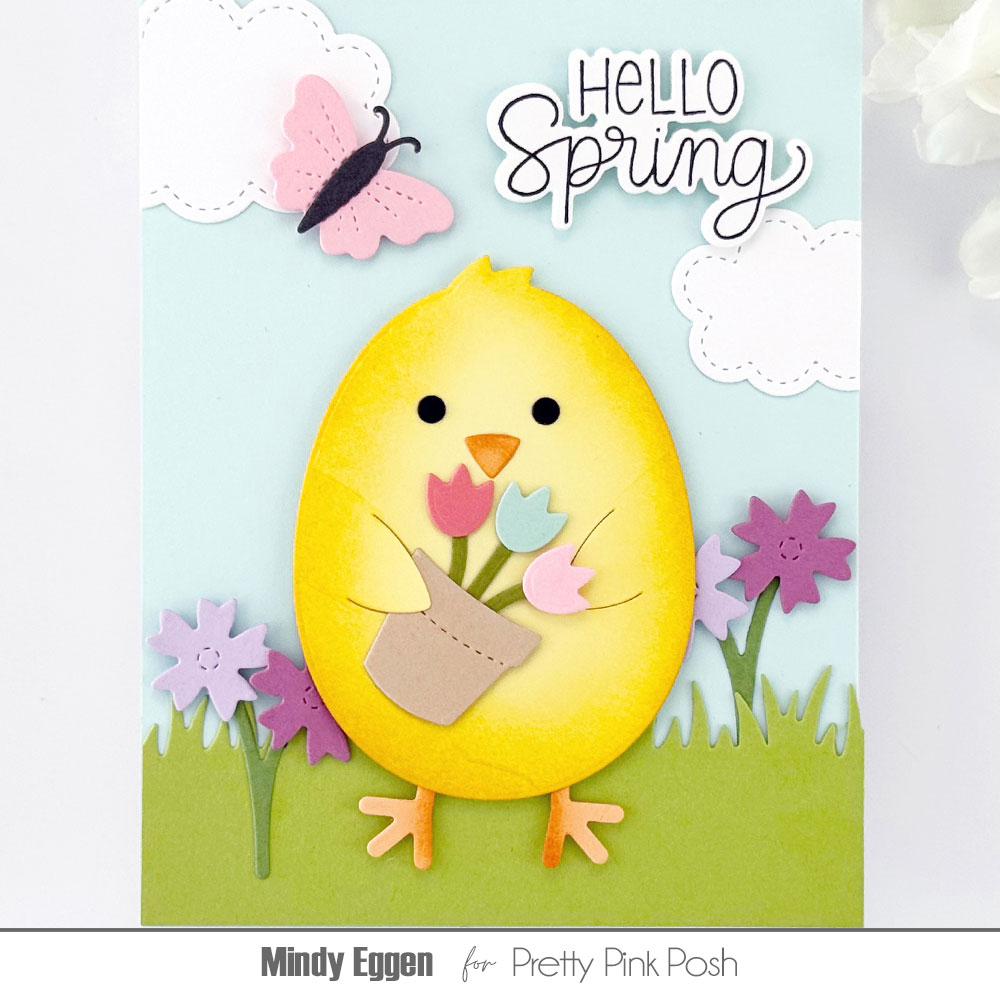
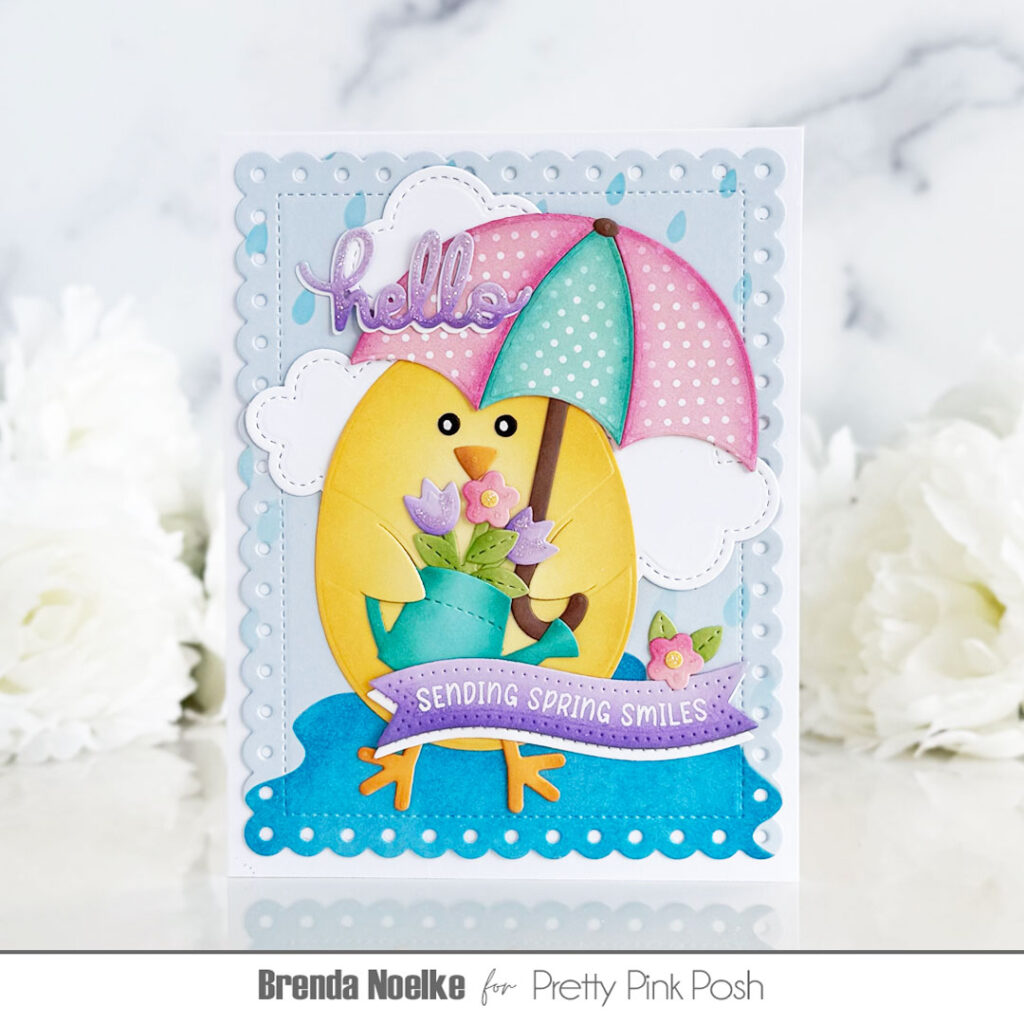
Hi, friends! It’s Melissa and I’m here with you today sharing three cards that will get you ready for Spring. This release is all about Easter, eggs, daffodils, bunnies, and more! Let’s get started!
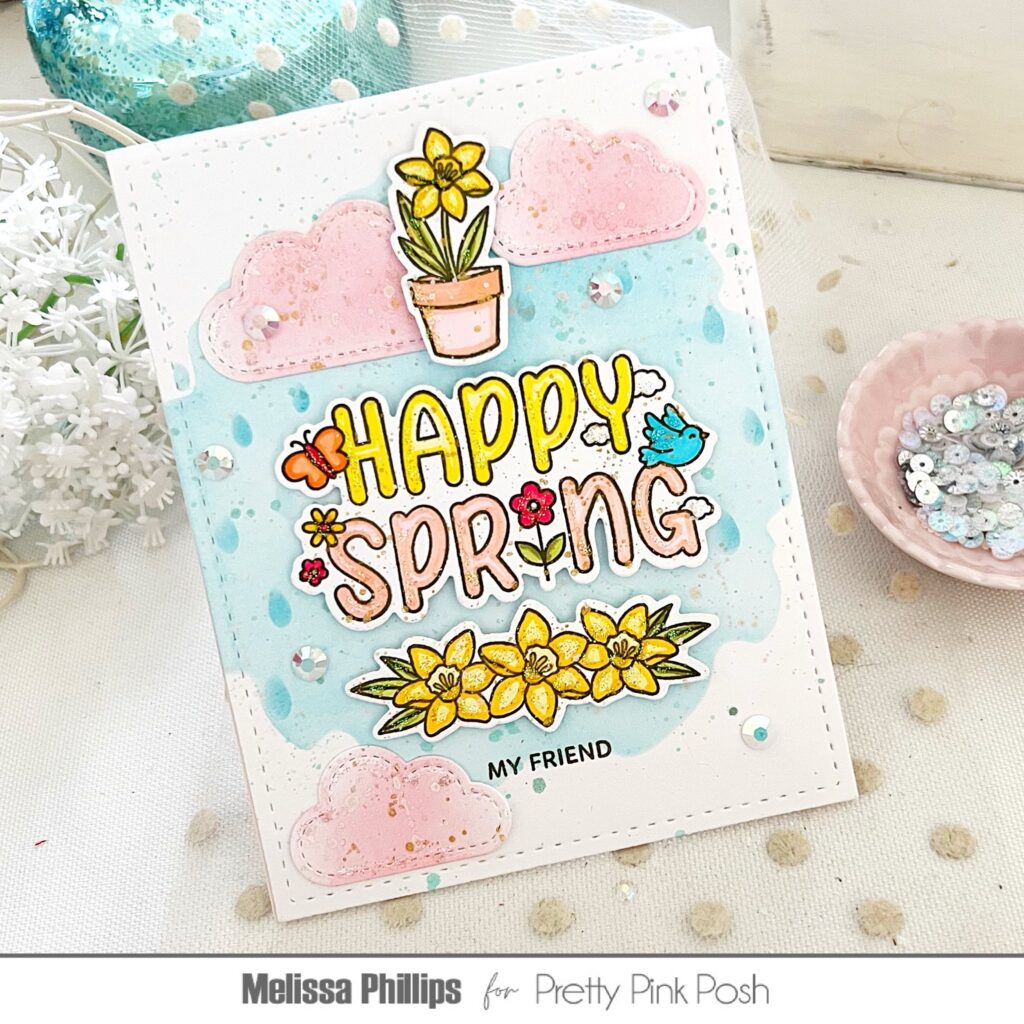
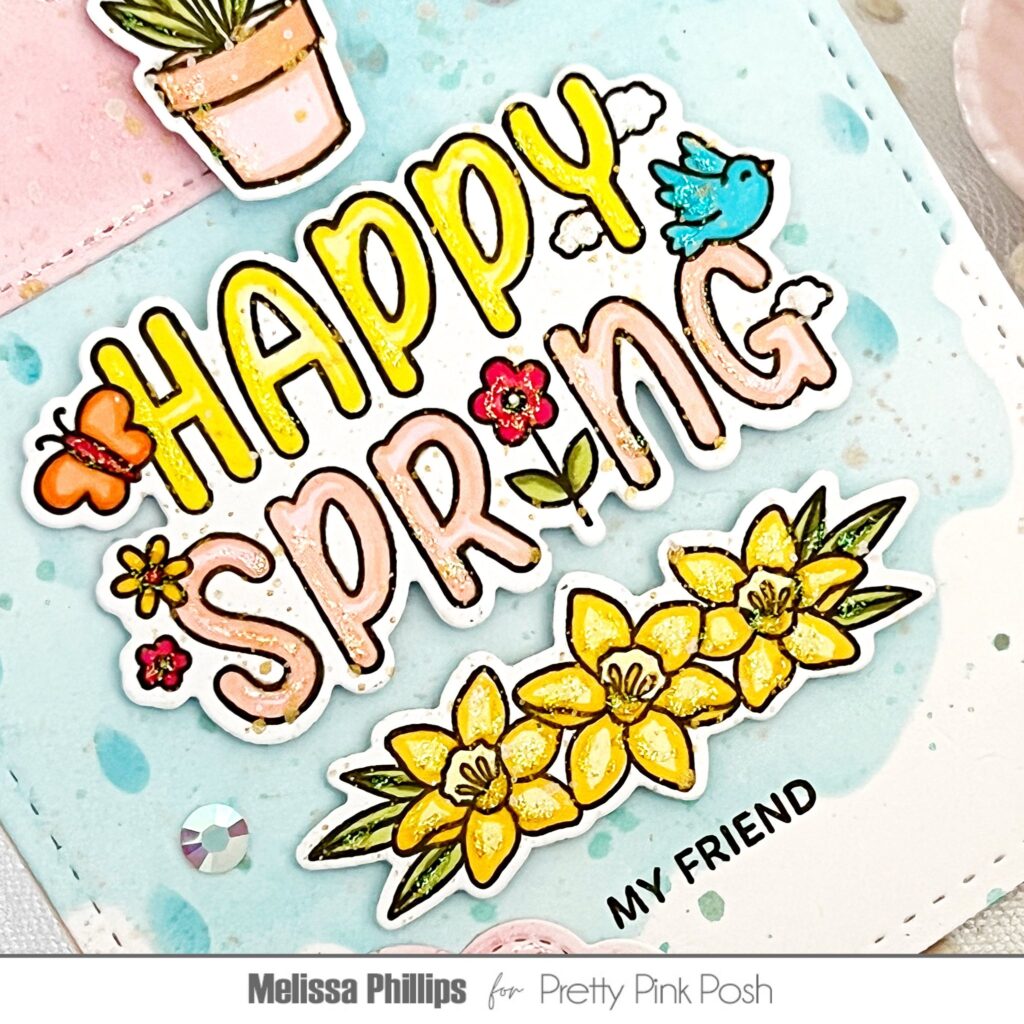
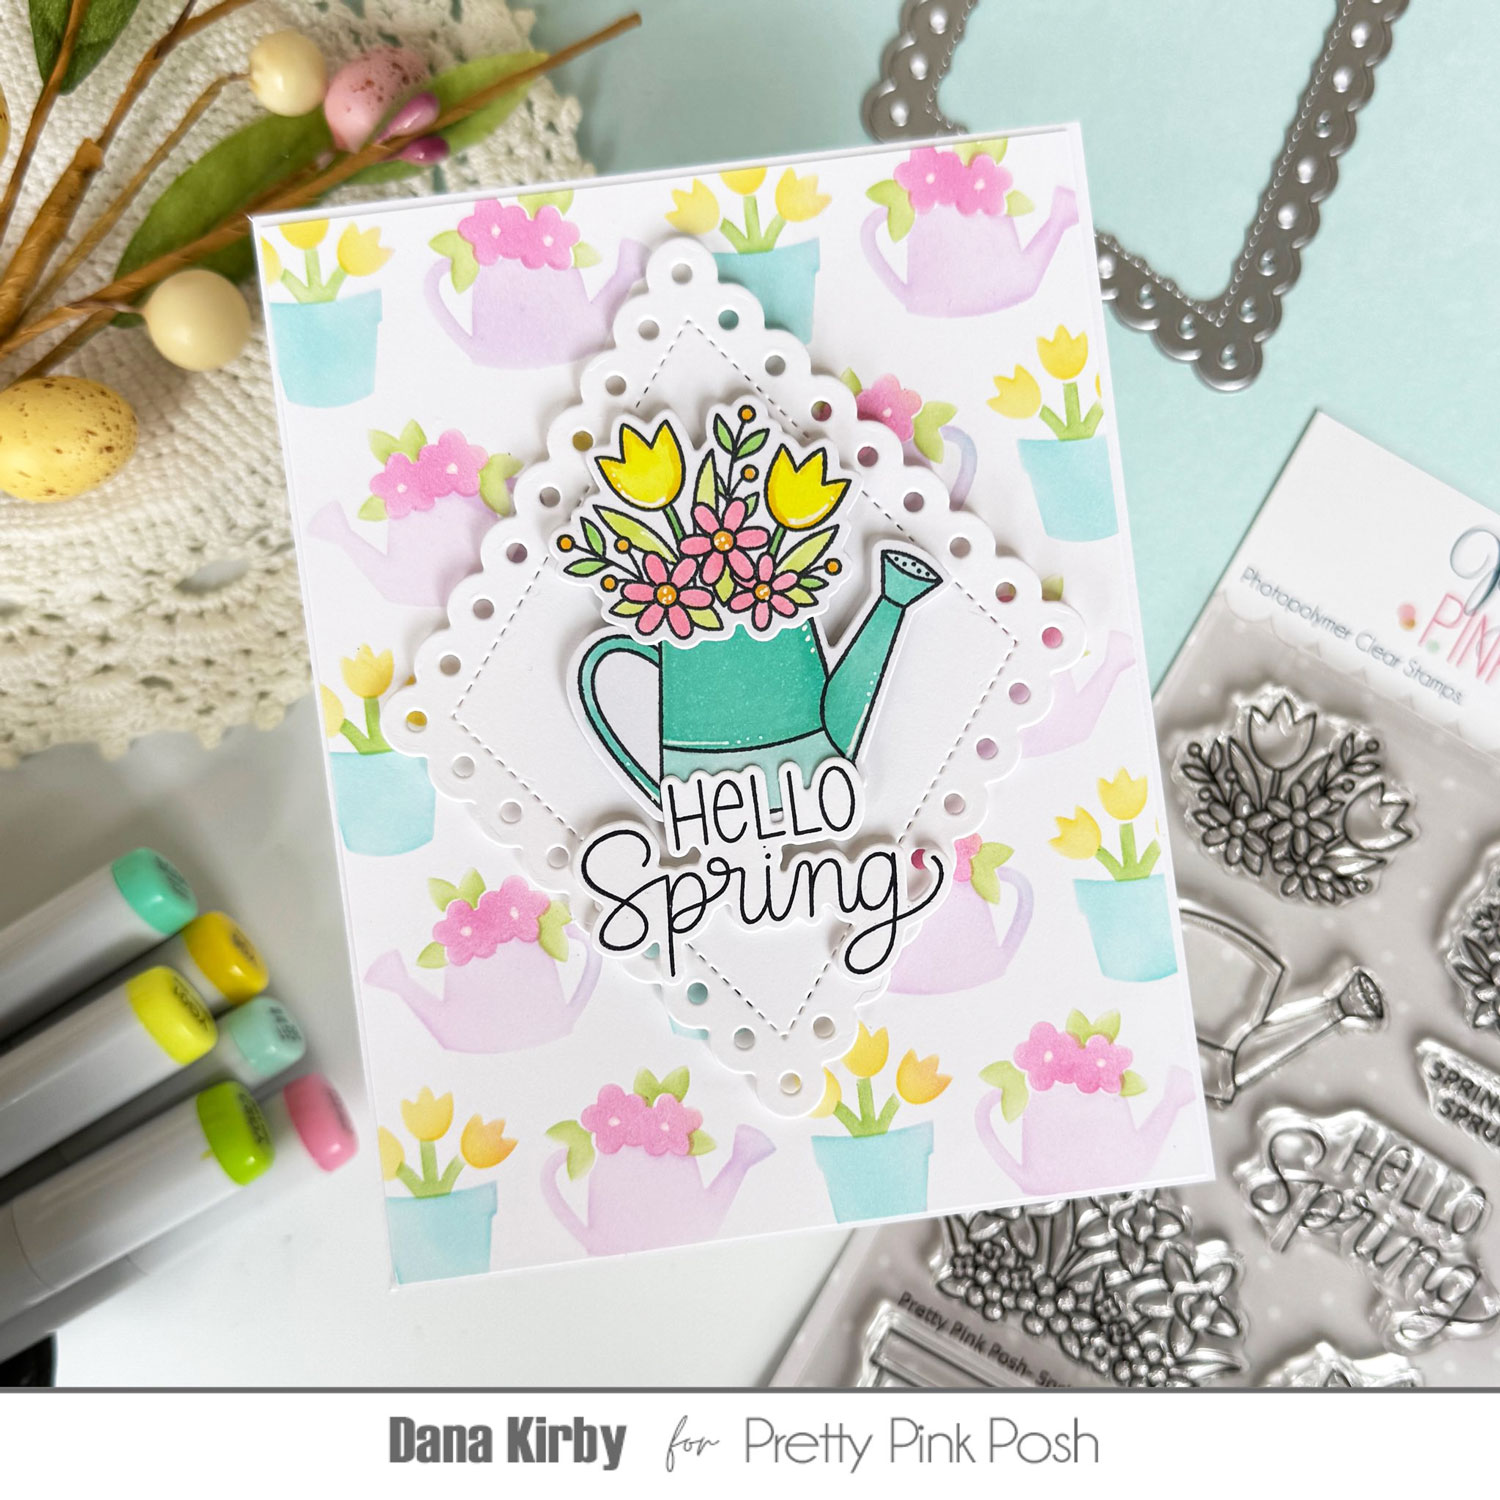
My Hello Spring card uses the darling, newSpring Blooms stamp set and coordinating dies for my focal point. I layered two of the new Eyelet Diamonds die cuts and mounted the pretty flowers on top. I used patterned paper to piece together the pot and Copic markers to color in my flowers.
For the background I have used the fun, new Raindrops stencil in a soft aqua. They are delightful and definitely give off Springtime vibes.
My sentiment also comes from the Spring Blooms stamp set and has a fun coordinating die that allows you to layer your sentiment over elements on your card front and really make it pop!
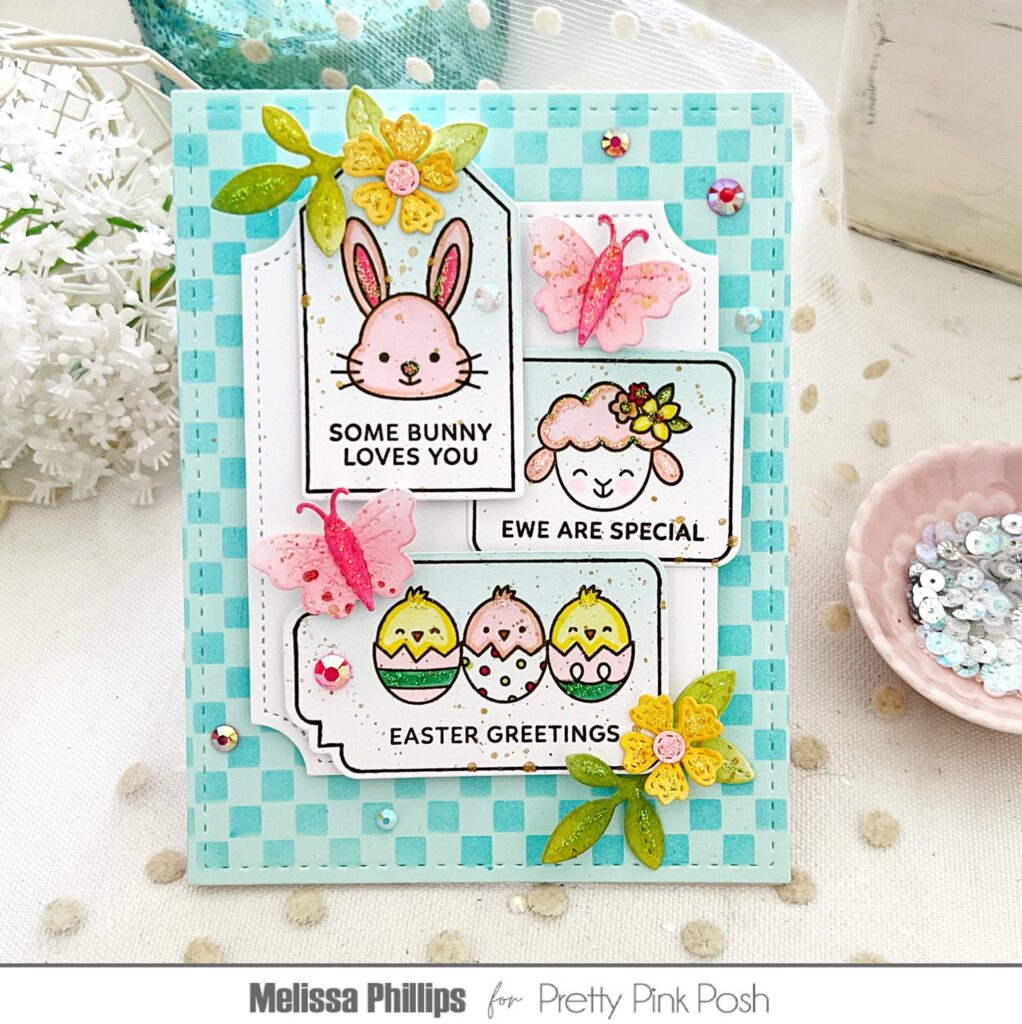
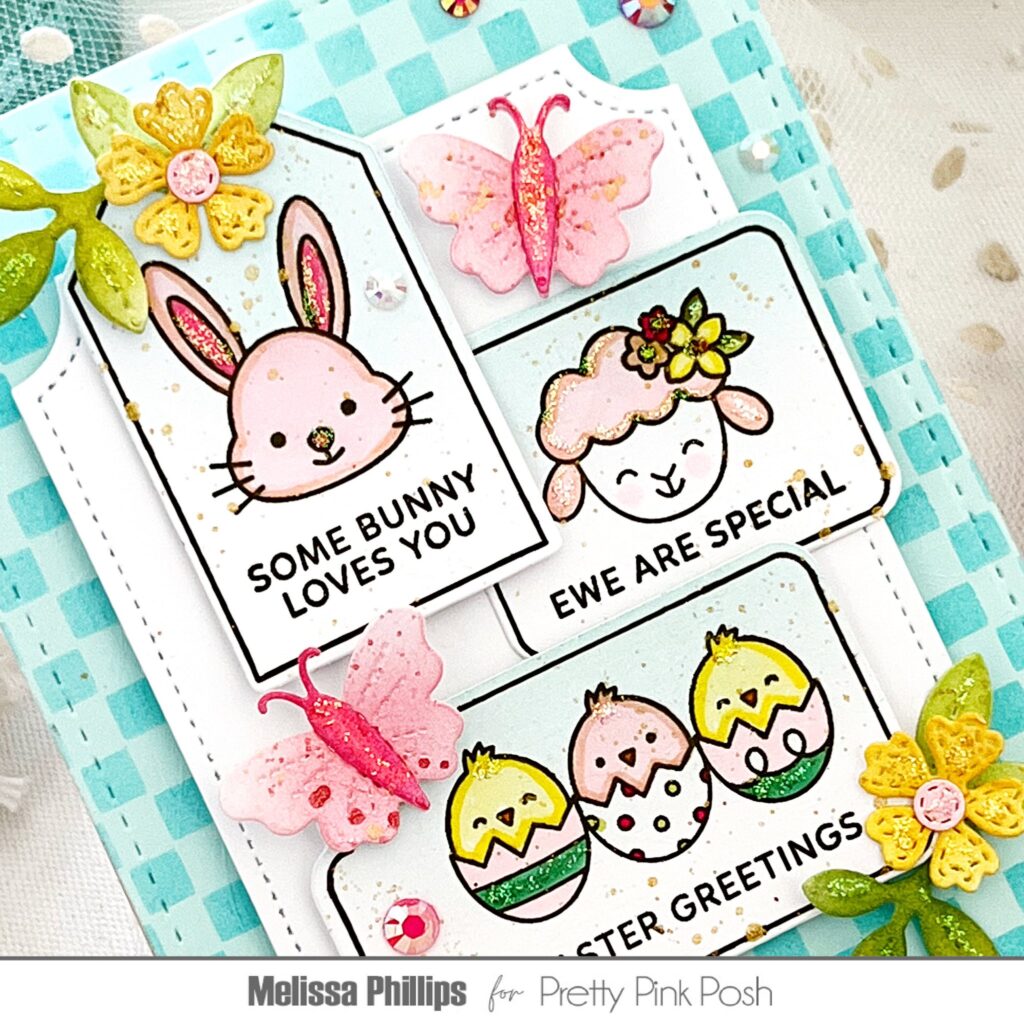
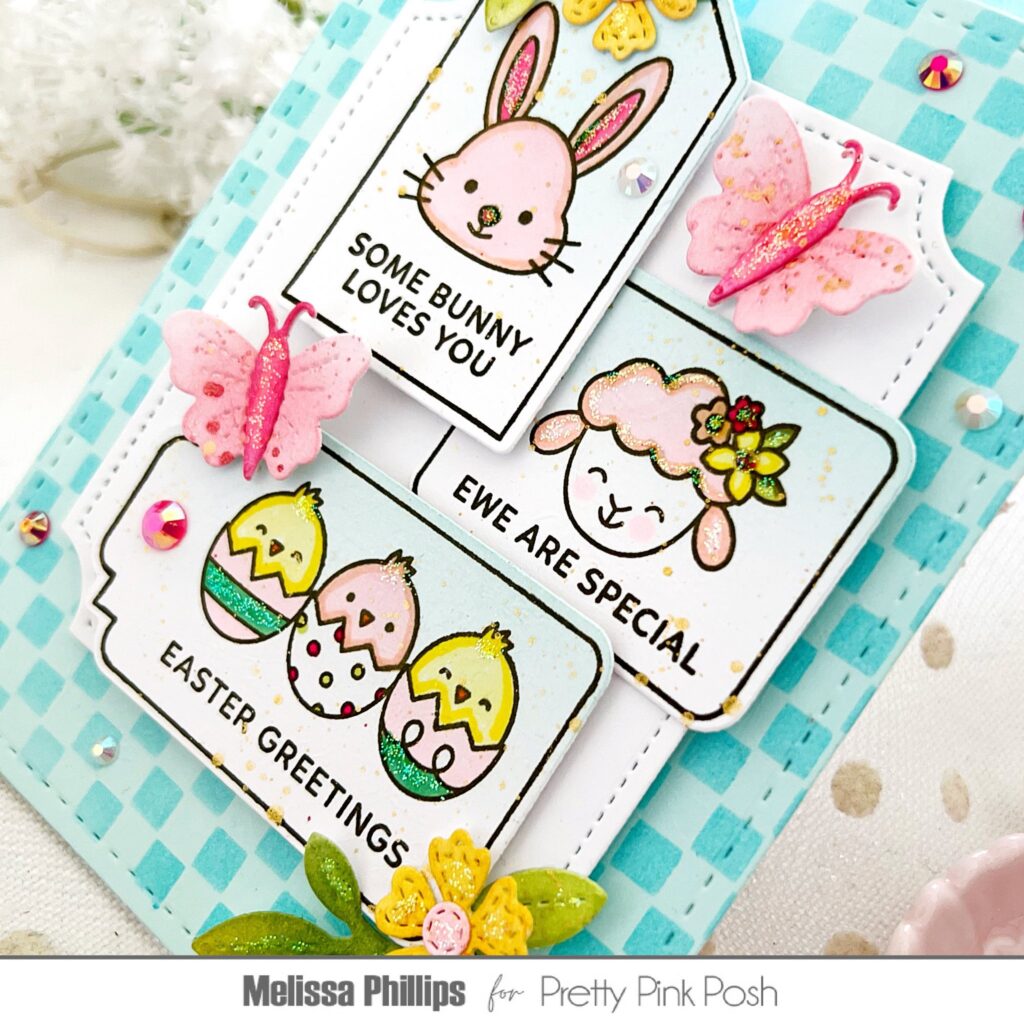
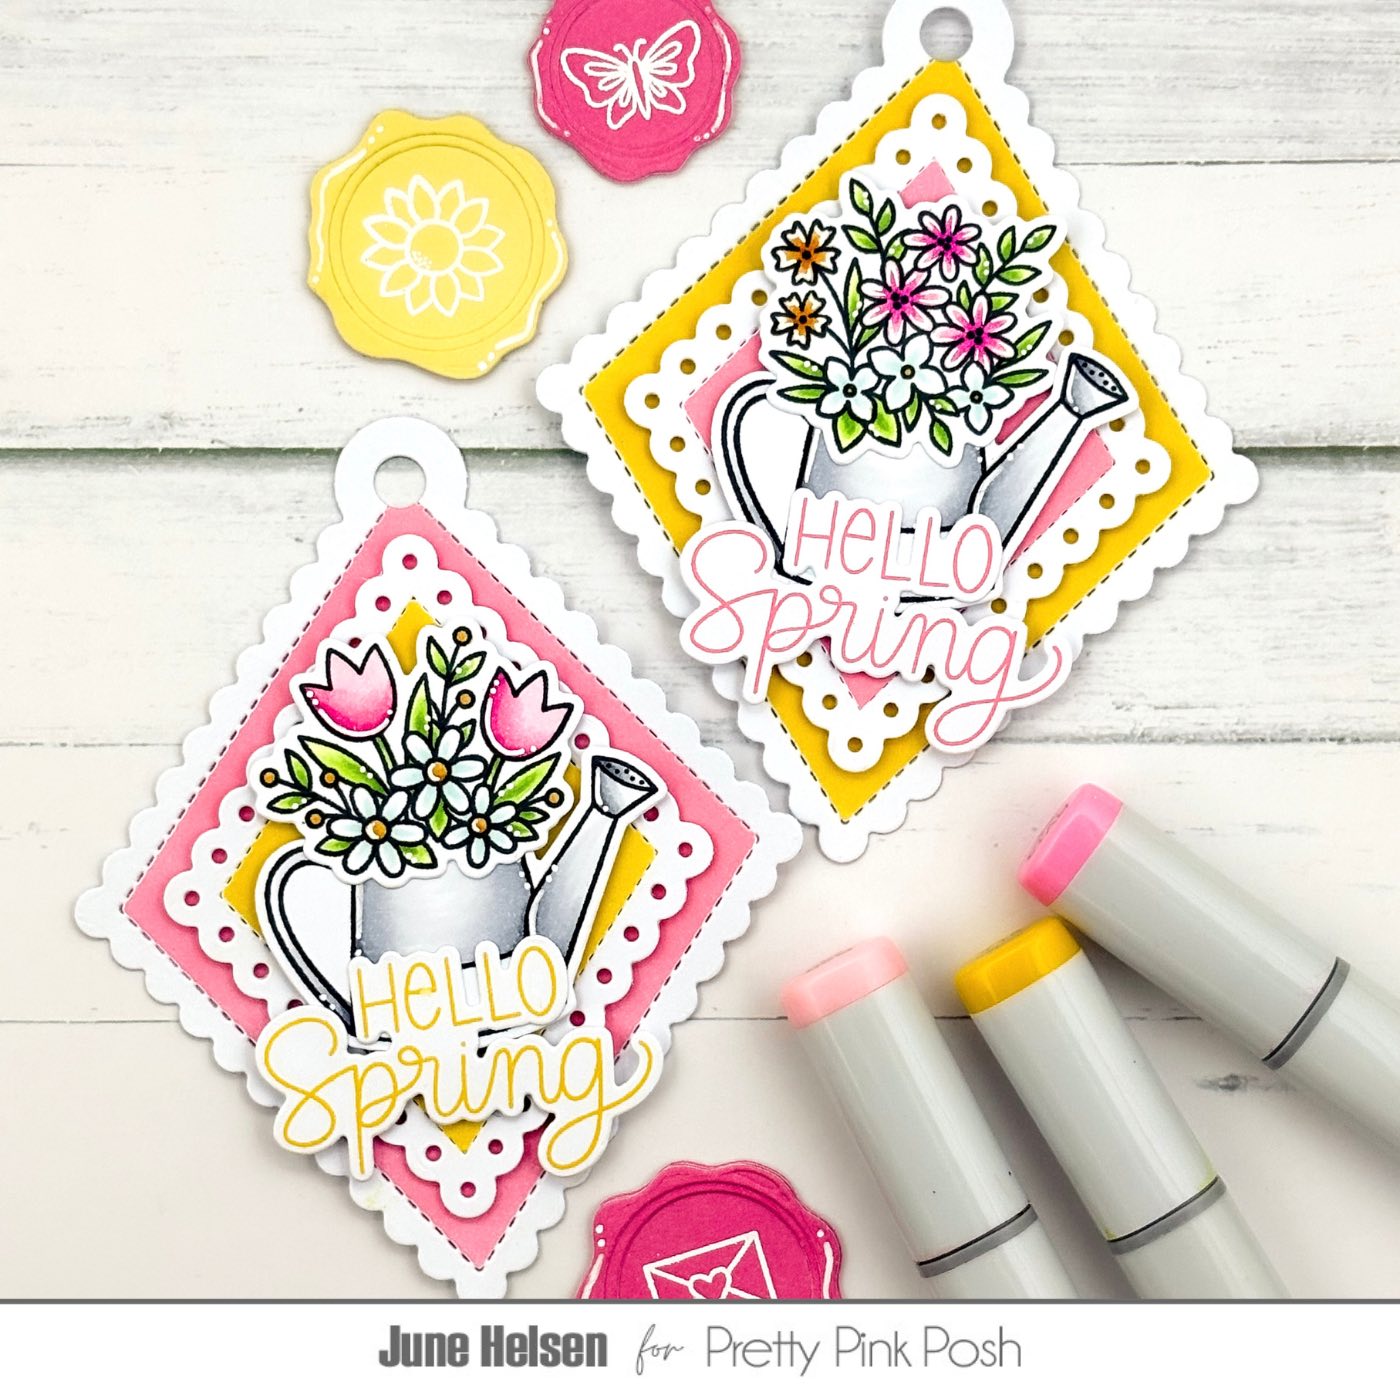
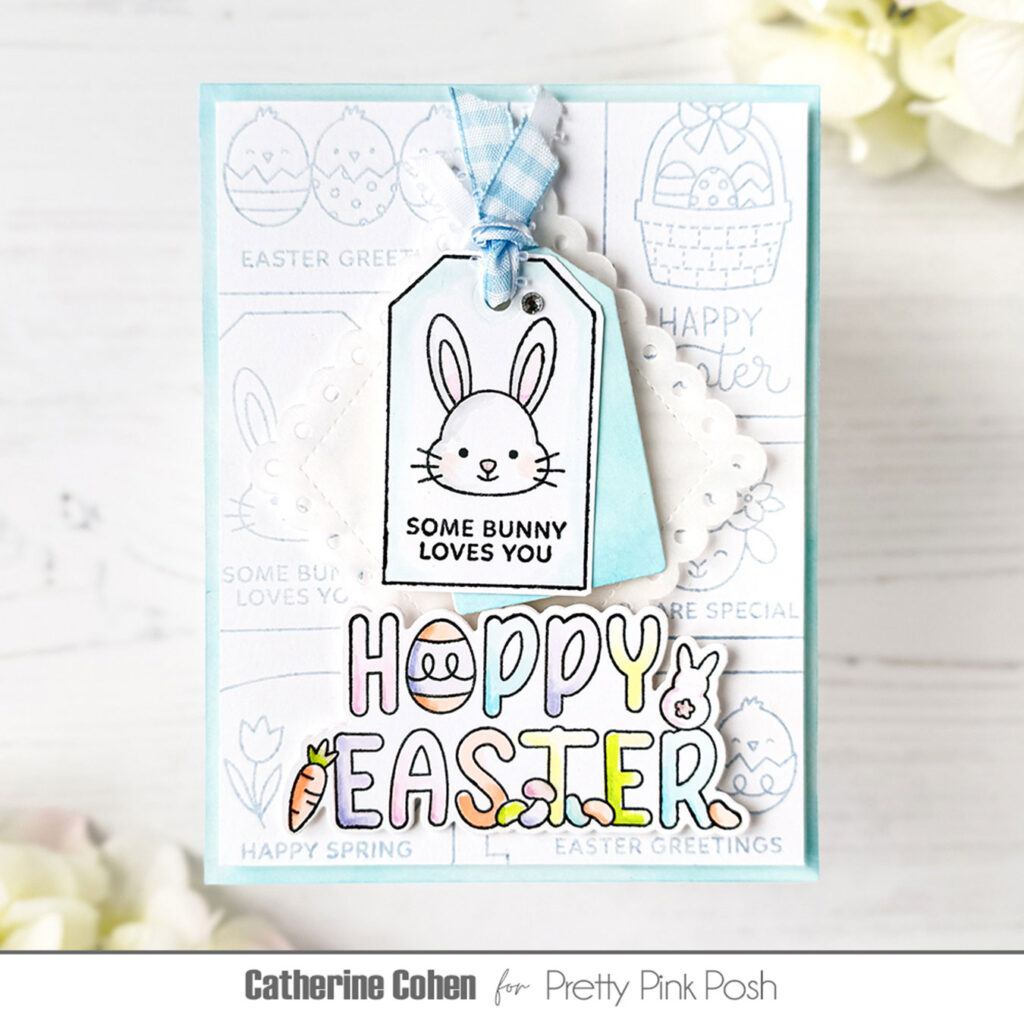
My second card was so much fun to create. I used the new Easter Tags stamp set and coordinating dies to piece together a fun card. I’ve used three of the Easter Tags and used my Copic markers to color them in.
Next, I layered them over a die cut Notched Rectanglesblock of white cardstock. I added butterflies from the new Springtime Holder Additions dies and flowers from the Spring Foliage die collection. These dies helped fill in my card front and add dimension and personality.
The new Mini Checker Stencil was used over aqua cardstock to create my fun background filled with interest and pattern!
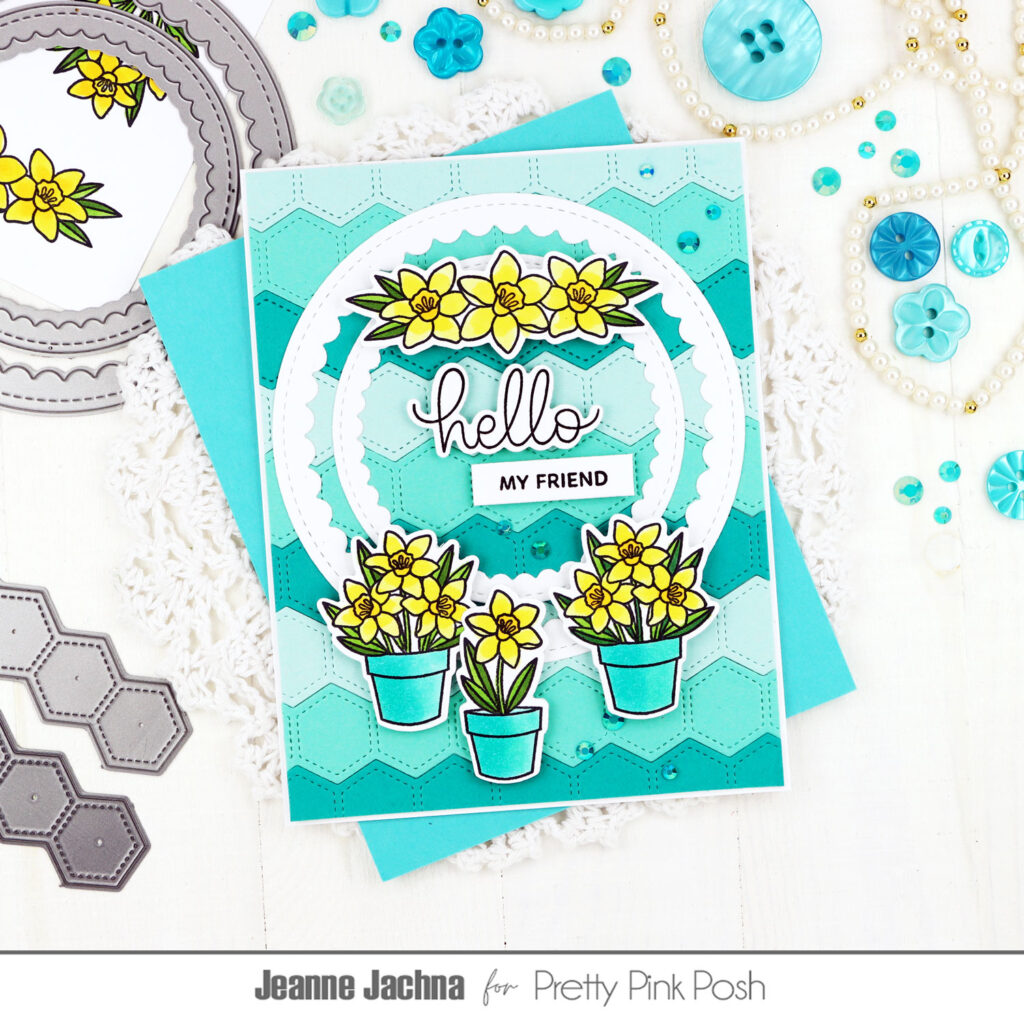
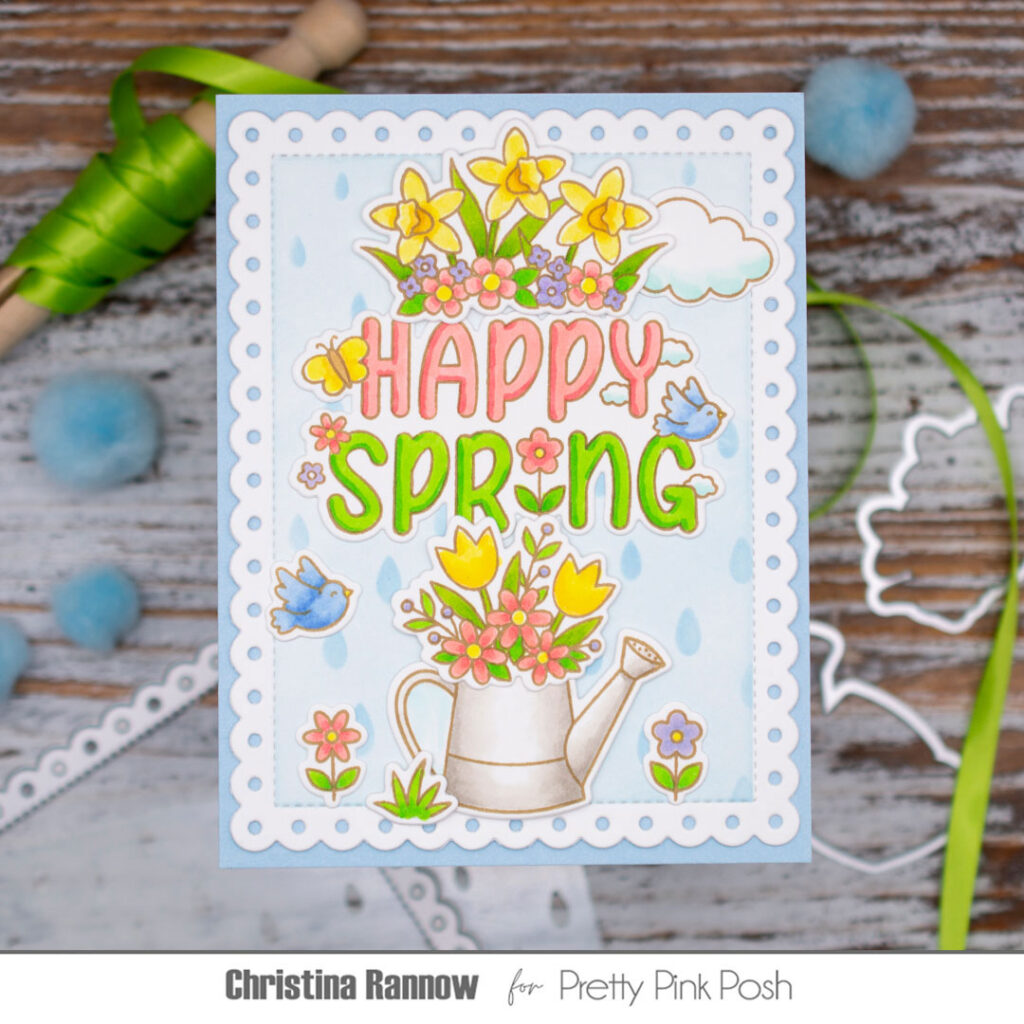
For my last card, I began with the new Watercolor Circle stencil and added raindrops once again using the Raindrops stencil. These little drops of stenciled water add so much to the background and look like they’re coming from the new Stitched Cloud dies. I adore these!
I used the new Easter Word Scenes stamps and coordinating dies in the center of my card and colored these darling images in used Copic Markers.
To finish my card, I brought in more daffodils using the new Potted Daffodils stamps and coordinating dies, and even a secondary sentiment at the bottom. This is the sweetest stamp set! All that was missing was some Stickles glitter and gems.
Ready to see some wonderful samples from the team using these products? It’s so fun to see how we can use the same products in such a variety of ways!
It’s been such a treat to create for you today. Thanks for joining us for the sneak peeks! We’ll be back tomorrow with the full picture reveal, so you can start to put together your wish lists!
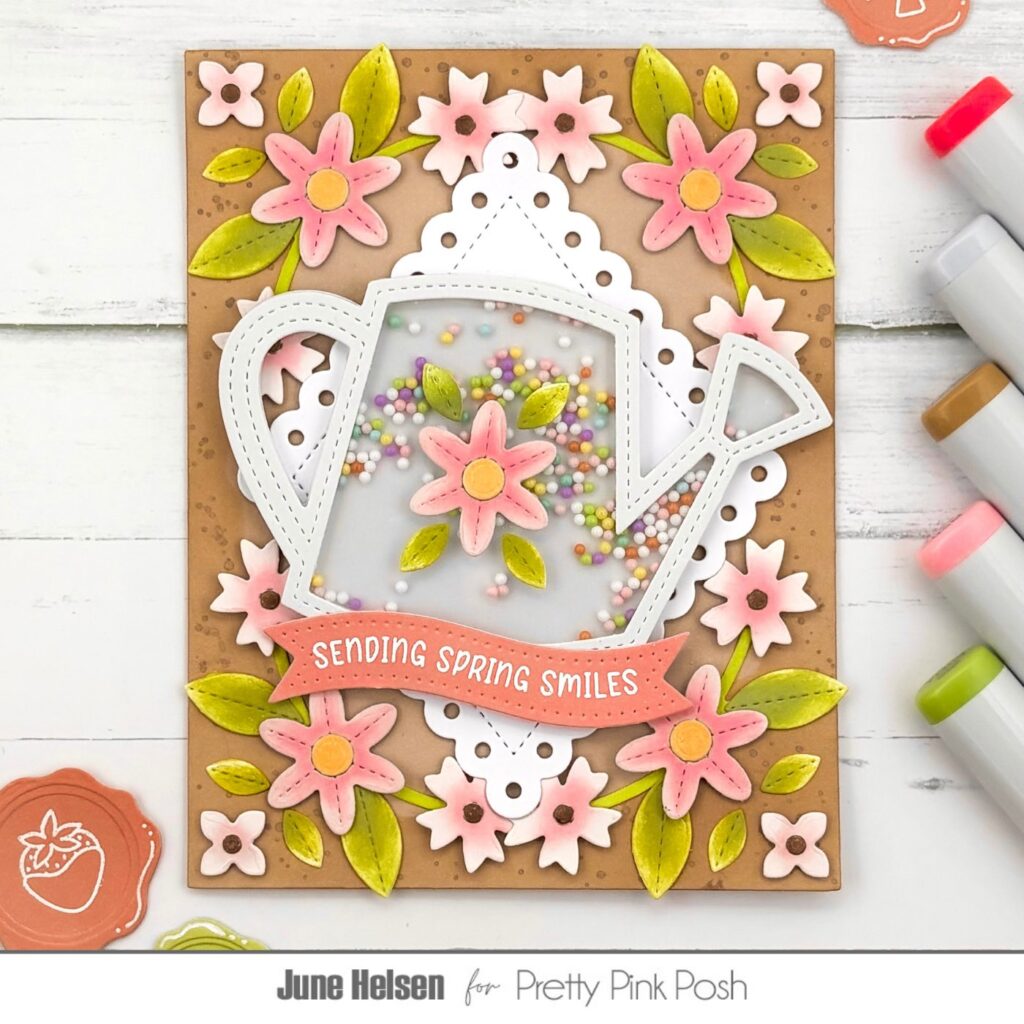
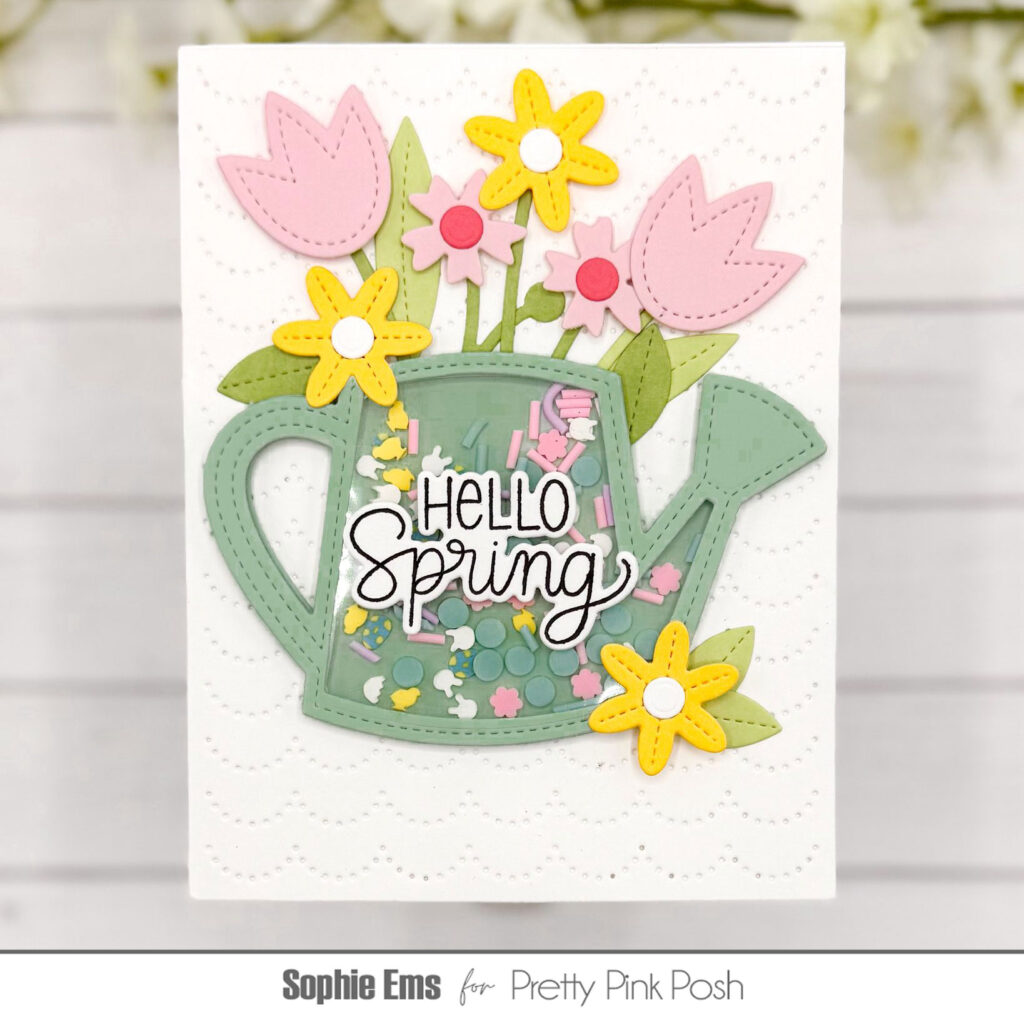
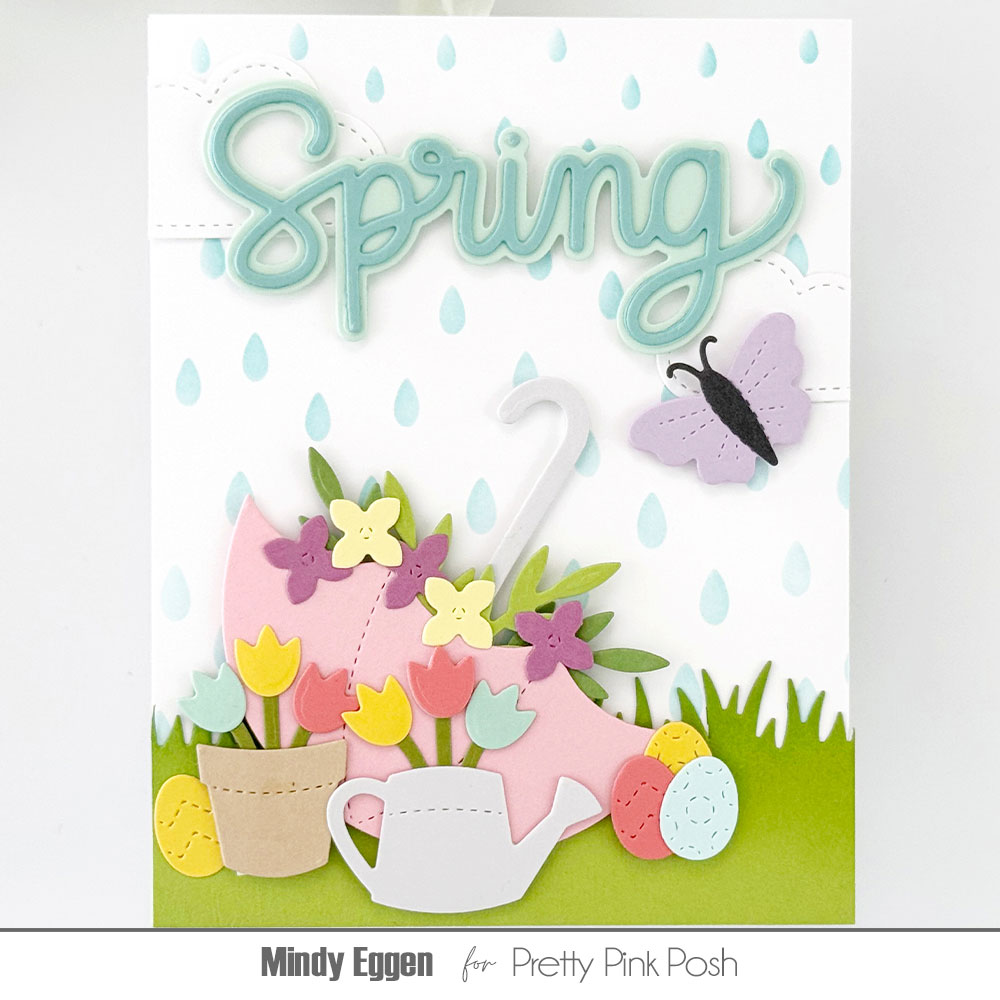
Welcome to Day 3 of sneak peeks for the February 5th release. Today we’ll be taking a look at the Daffodil Shaker, Large Spring Shadow, Stitched Spring Flowers and Watering Can Shaker die sets.
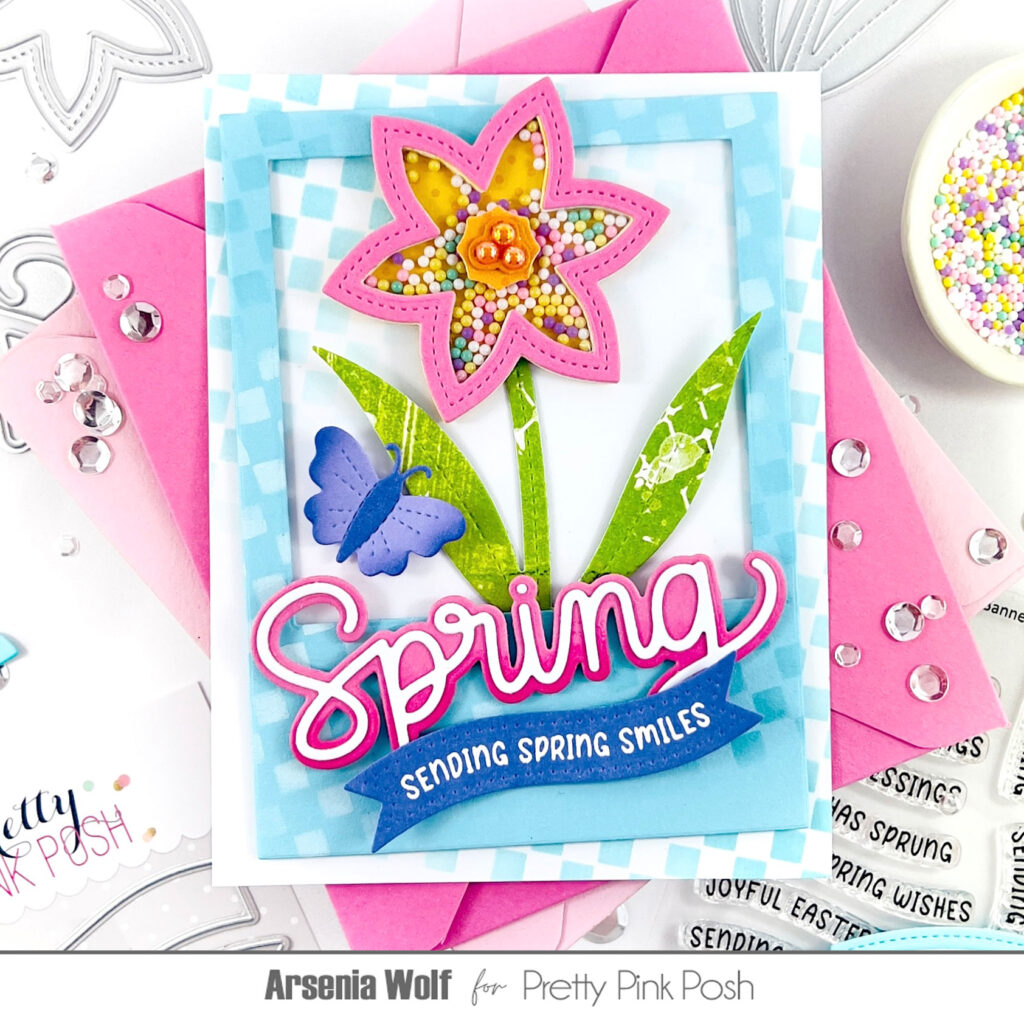
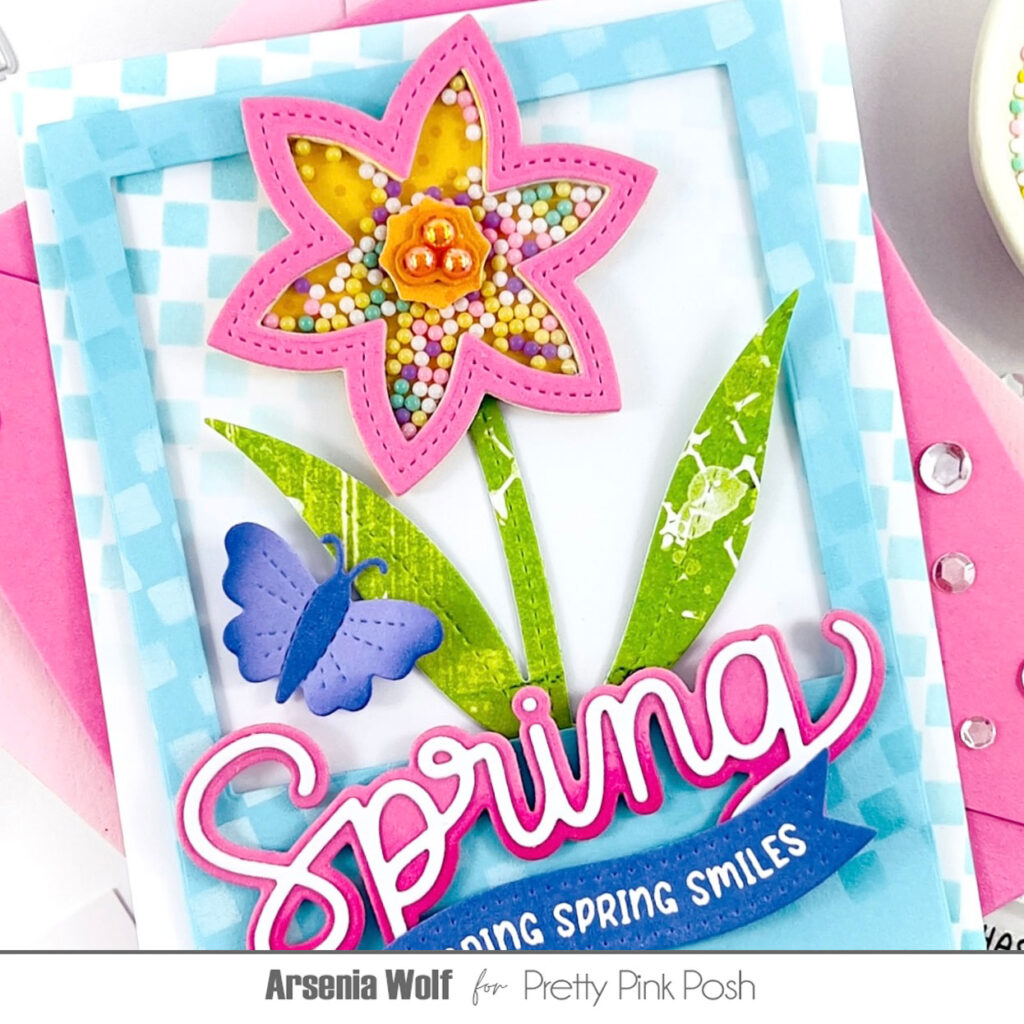
Hello crafty friends! Arsenia here, popping in with a sneak peek of the February release—and oh my goodness, it’s a good one!
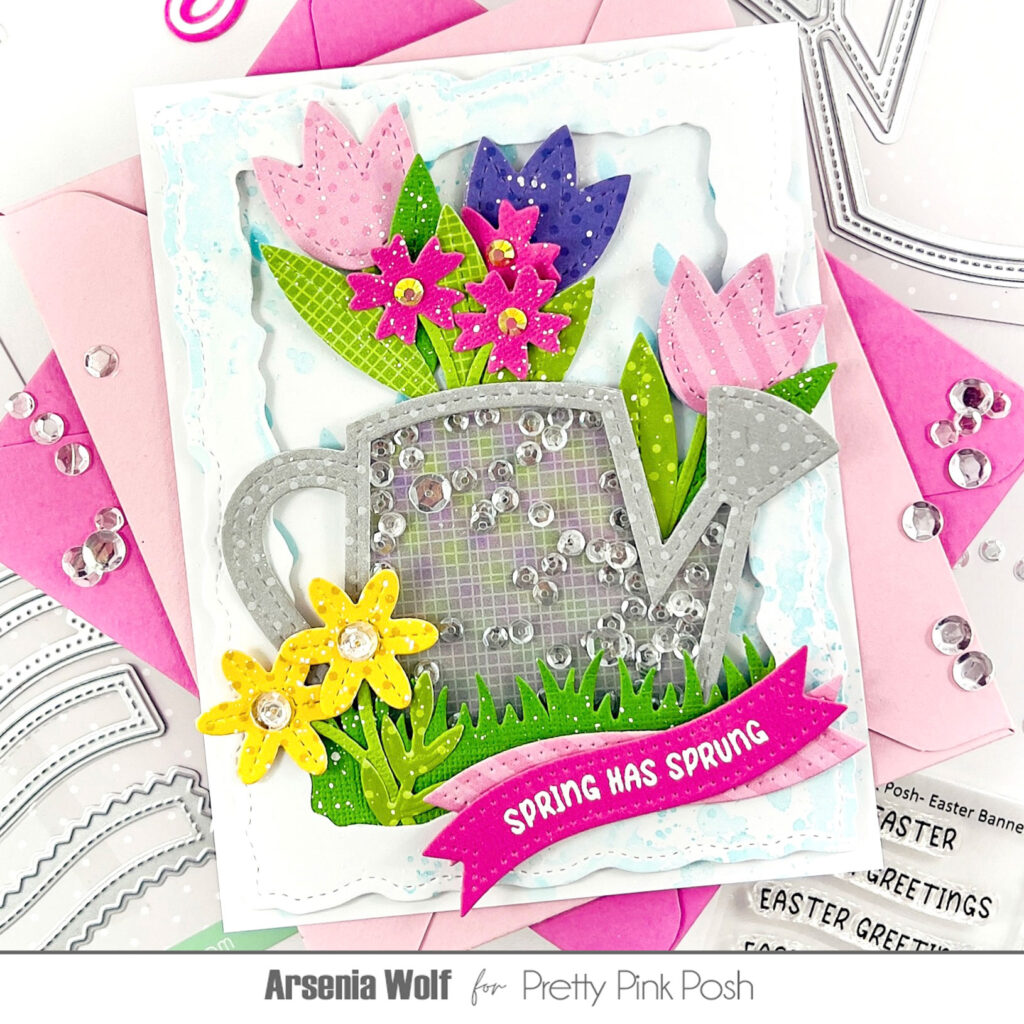
Today it’s shaker time, and I’m sharing two cheerful cards featuring the new Watering Can Shaker, Daffodil Shaker, Large Spring Die, and Stitched Spring Flowers. This release is absolutely chock-full of springtime goodness and is perfect for getting those crafty spring vibes flowing. So grab your supplies and let’s get started!
Card One: Daffodil Shaker
For my first card, I kicked things off by creating the background with some partial stenciling using the new Mini Checker Stencil. I knew I wanted my daffodil to really shine, so I grabbed a smaller panel of colored cardstock and cut a window using a die from the Present Shaker Die set. To keep things playful, I added a bit more partial stenciling to the frame—because why not?
Now for the fun part… shaker time! I used the new Daffodil Shaker Dies to create a pink daffodil (because pink daffodils = instant happiness) and filled it with the new dreamy Pastel Dreams Shaker Beads. For the center, I sprinkled in some Sunset Pearls for that perfect little pop of sunshine.
To add a touch of artsy flair, I cut the leaves from a piece of distress green cardstock from my stash. Once everything was ready, I adhered the frame and daffodil to the card base—and of course, I tilted the frame just a bit for some whimsical wonkiness.
For the sentiment, I used the new Large Spring Shadow Die, paired with a sub-sentiment from the new Easter Banner Greetings Stamp Set and Banner Greetings 3 Dies. The card still felt like it needed one more little detail, so I added a butterfly from the new Springtime Holder Additions Dies… and voilà!
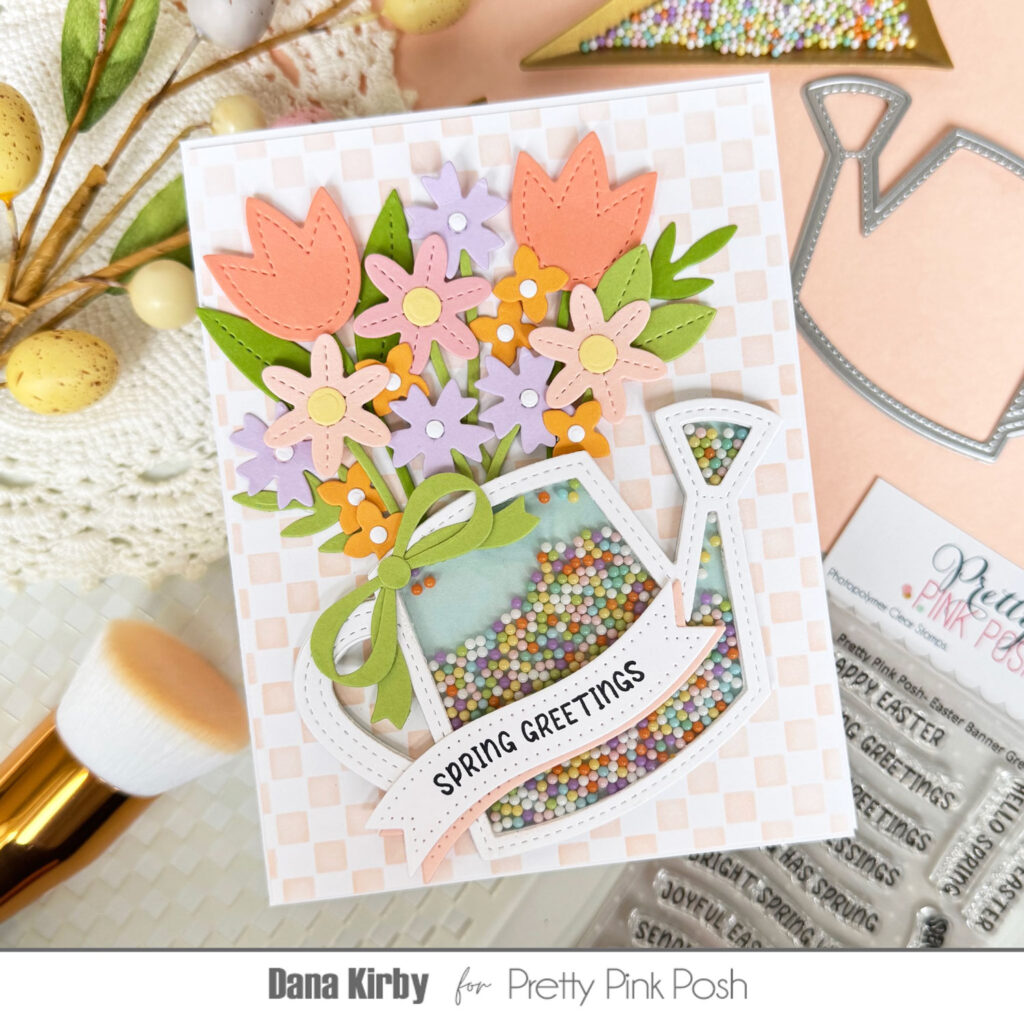
Card Two: Watering Can Shaker
Onto card number two! I started by creating a shaker with the new Watering Can Shaker Die, filling it with oodles of Sparkling Clear Sequins(because more sparkle is always the right answer).
Next, I made the sweetest little flowers using the new Stitched Spring Flowers dies. I went bold with my color choices and had a blast mixing in patterned papers from my stash. For the background, I did some ink smooshing and brought in the new Raindrops Stencil—instant spring rain vibes!
I love adding frames, so I used the Stitched Torn Rectangle Dies to create one and gave it a little ink smooshing to tie everything together. To ground the scene, I placed my watering can on a cozy bed of grass using the Grass Border Die.
Now came the truly whimsical part—adhering all the elements to the card base and watching the scene come to life. Once everything was in place, I added a sentiment from the new Easter Banner Greetings stamp set using the Banner Greetings 3 Die Set.
I absolutely adore how this card turned out. The Watering Can Shaker Die has endless possibilities and is definitely one of those dies you’ll reach for all year long.
Be sure to check out the incredible inspiration from the rest of the design team below, and don’t forget to visit the Pretty Pink Posh YouTube channel for in-depth sneak peeks.
Be sure to swing by tomorrow for even more inspiration with this fun, new collection.
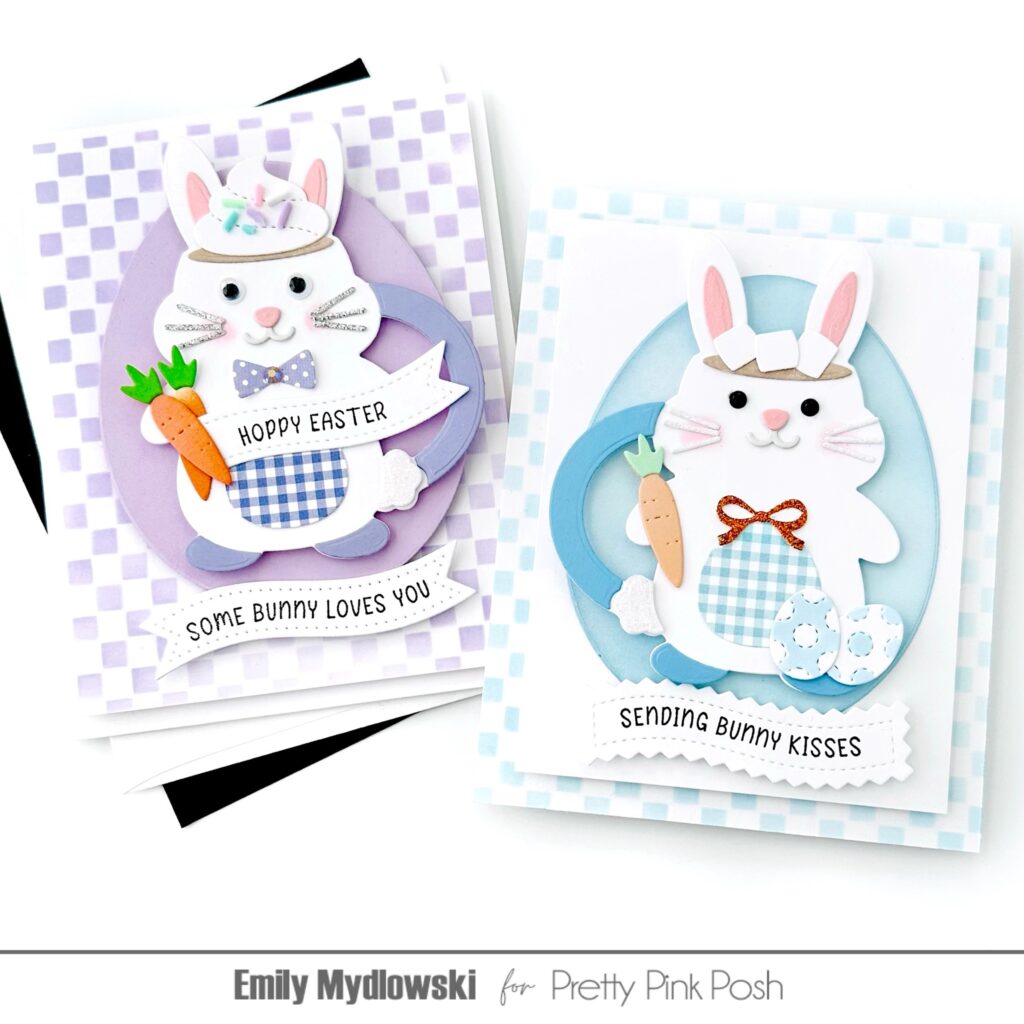
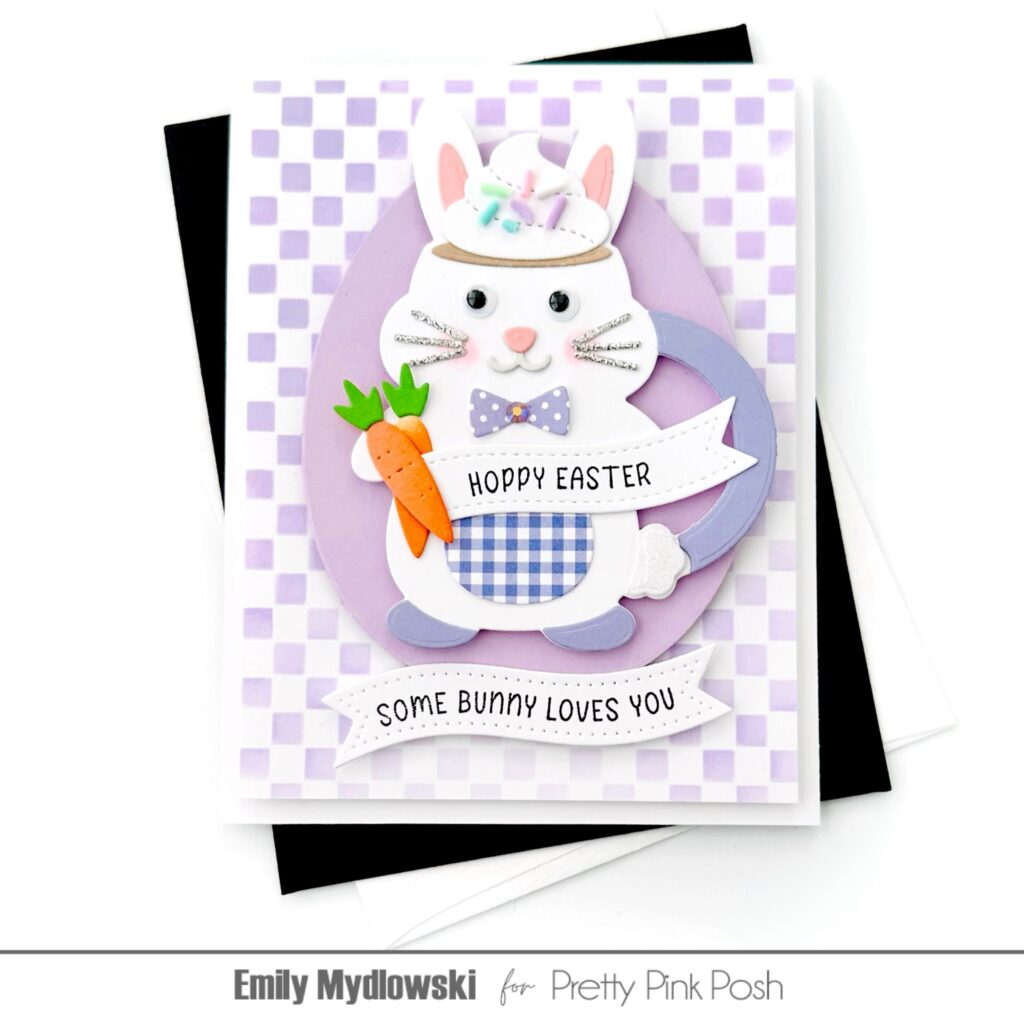
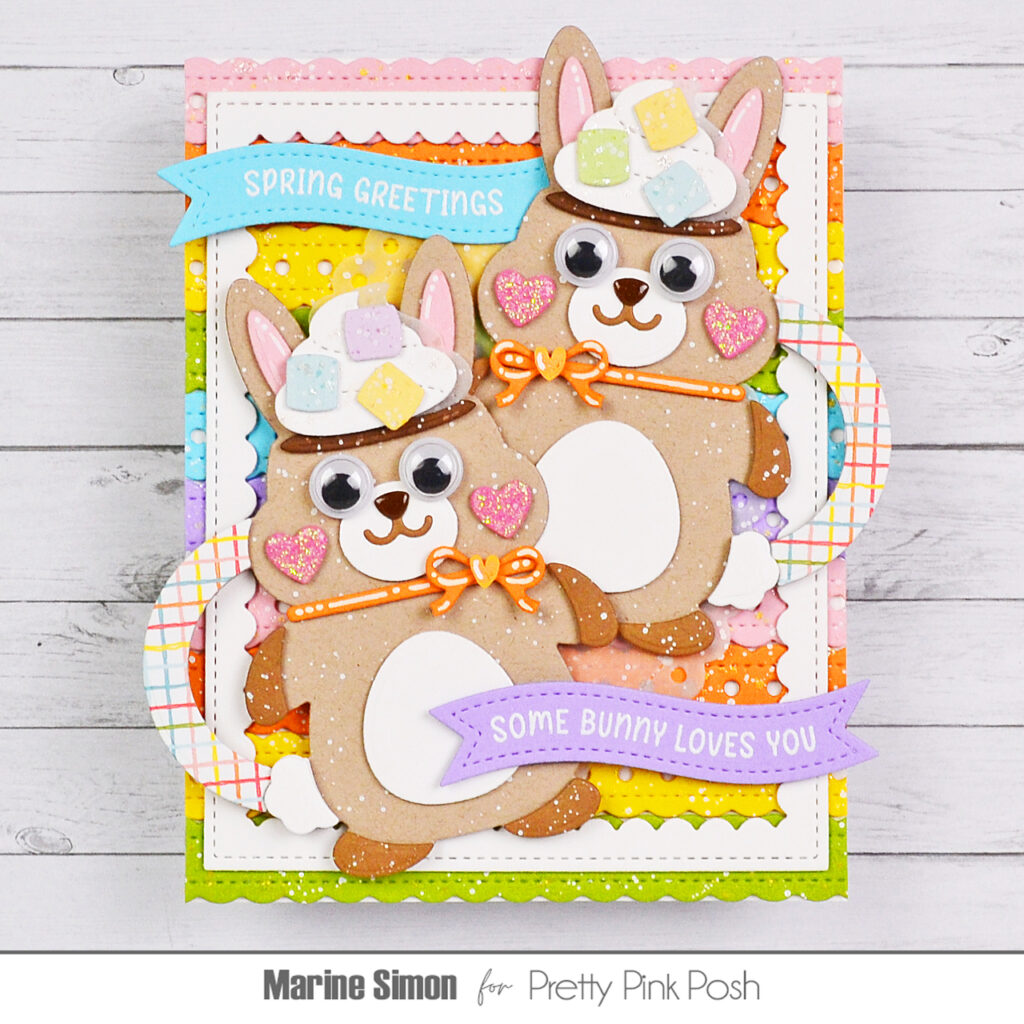
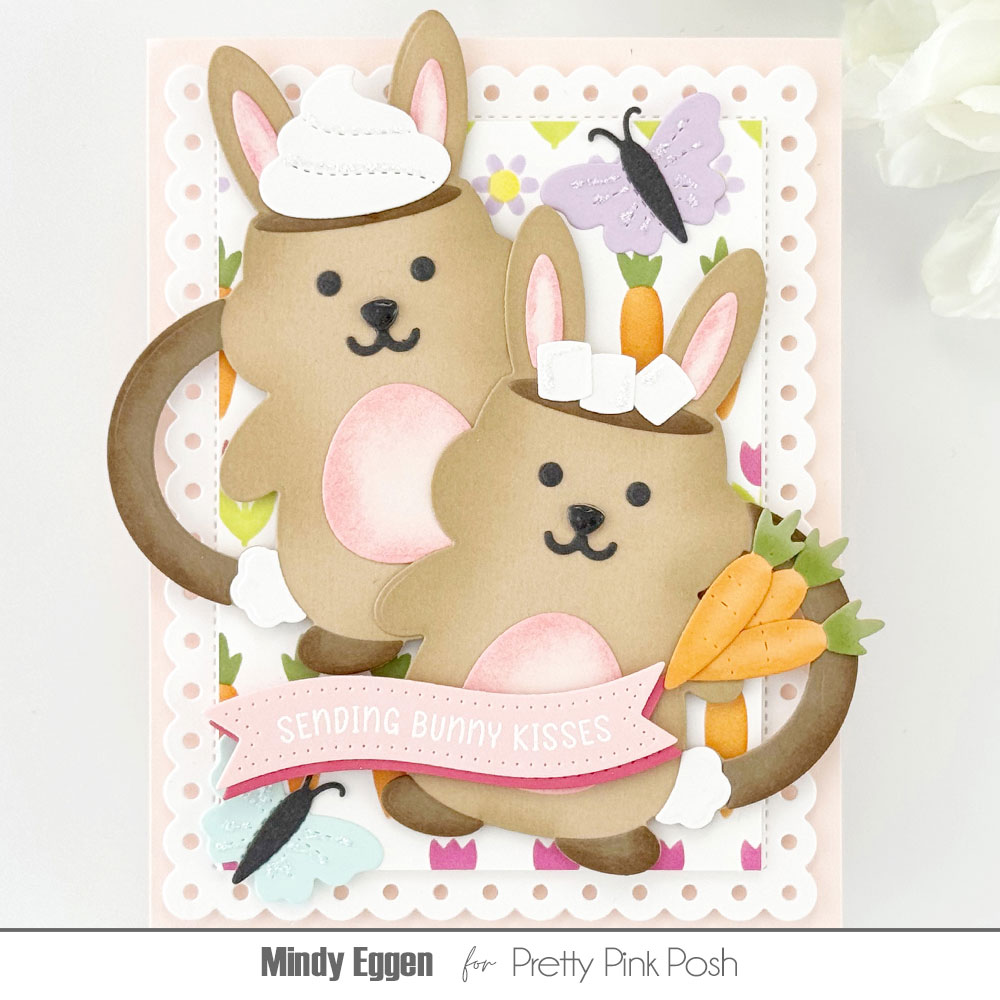
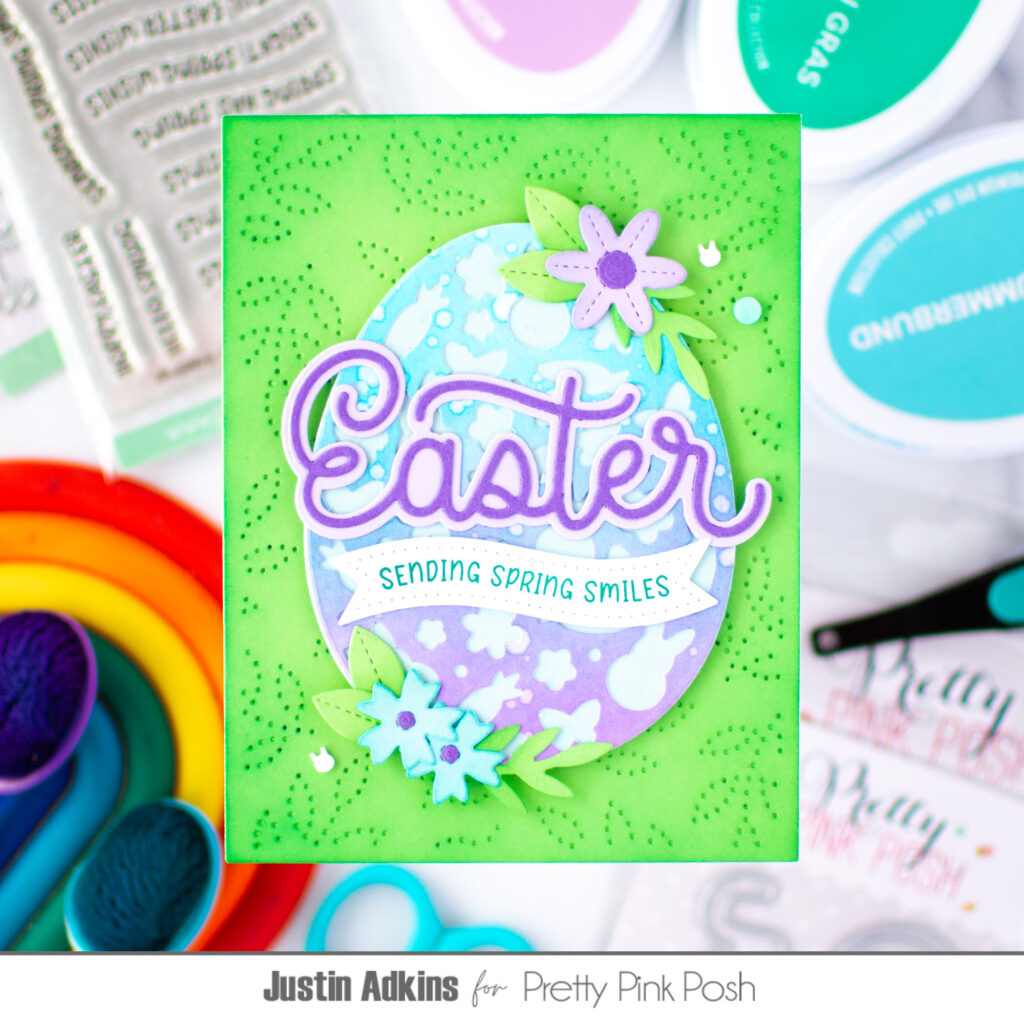
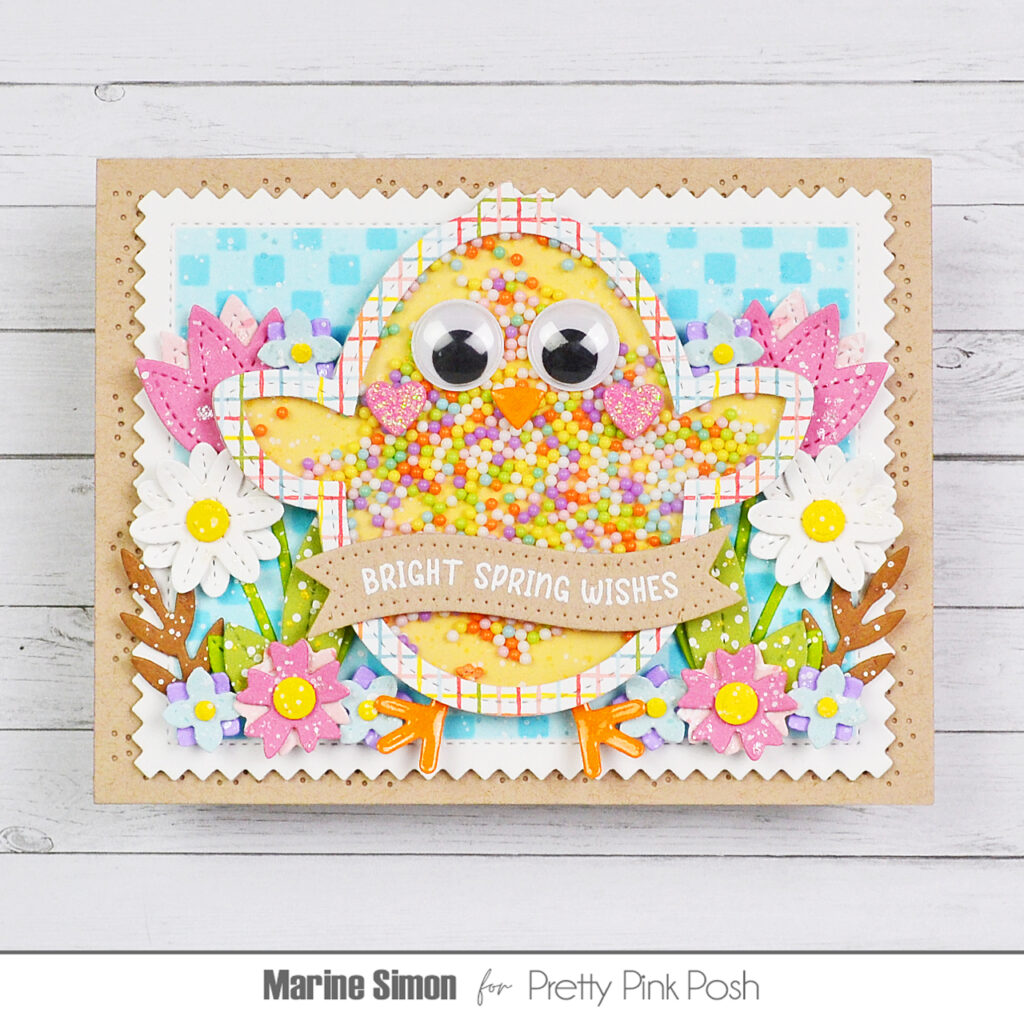
It’s Day 2 of sneak peeks for our February 5th release. Today we’ll be taking a look at the Easter Bunny Mugs, Decorative Easter Egg, and Large Easter Shadow die sets.
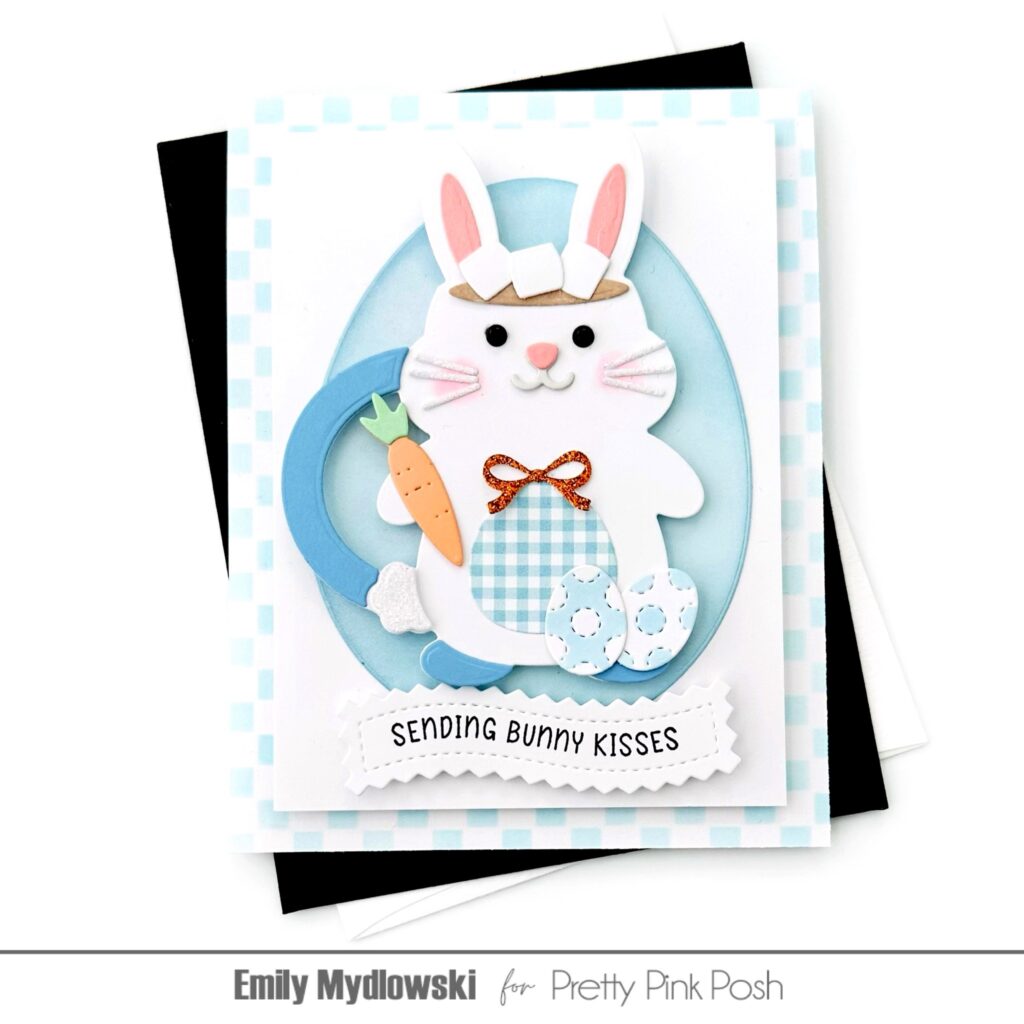
Hi Crafty Friends! Emily Mydlowski here with you today sharing Easter-themed sneak peeks using the Easter Bunny Mugs, Decorative Easter Egg Die Set and the Large Easter Shadow Die.
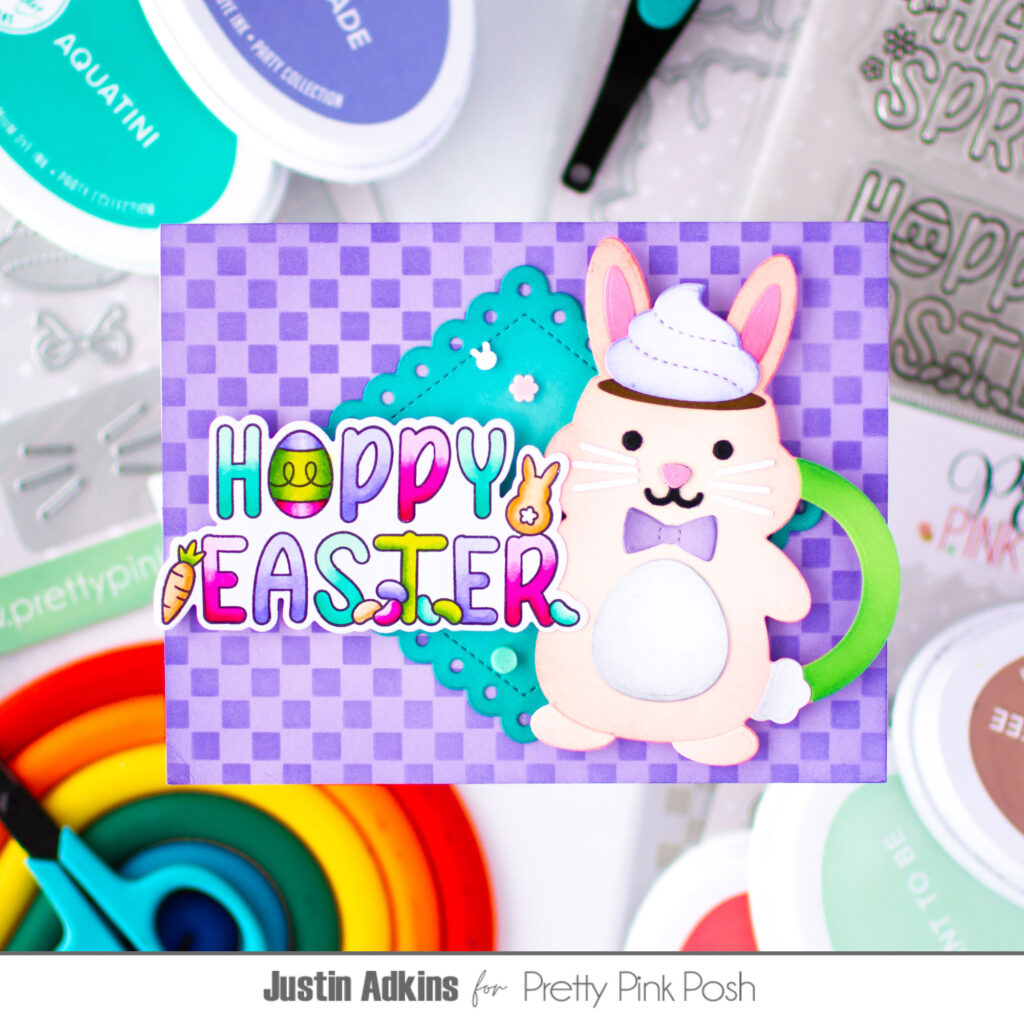
Oh my goodness, the Easter Bunny Mugs are THE cutest that I had to create more than one bunny and card — one in pastel blues with yummy marshmallows & the other in springtime purples with a dollop of whipped cream & Spring Carrots Clay Confetti.
I layered each of the Easter Bunny Mugs to a Large Egg Frame from the Decorative Easter Egg Die Set. The blue and purple checkered backgrounds were created using the Mini Checker stencil. For the sentiments I used the Banner Greetings 3 Dies & Easter Banner Greetings stamp set.
Little elements on the bunnies include glitter whiskers & cottontails, googly and onyx pearl eyes, blue polka dot eggs colored with alcohol markers, ink blended and die cut carrots, gingham pattern paper bellies, sparkly bow-ties and puffy pink cheeks using a cotton swap and Spun Sugar Distress Oxide Ink.
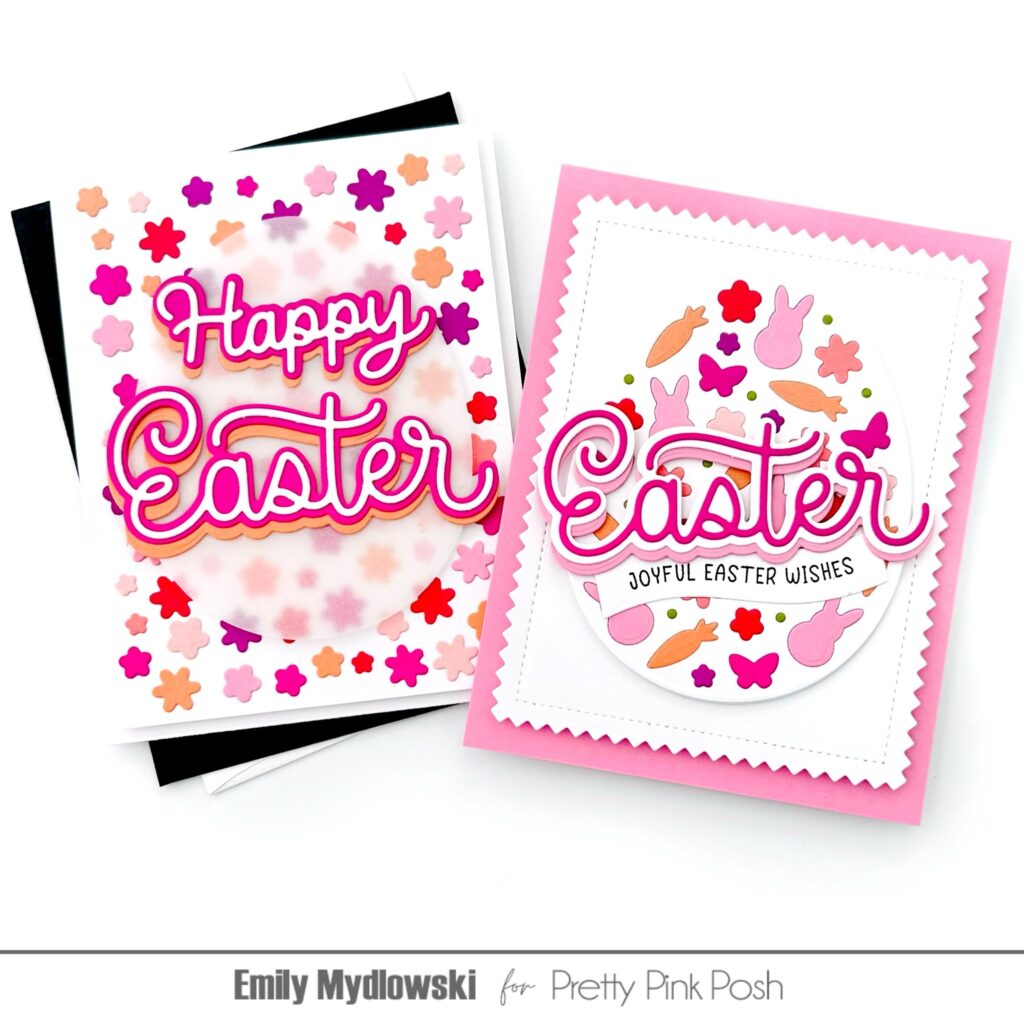
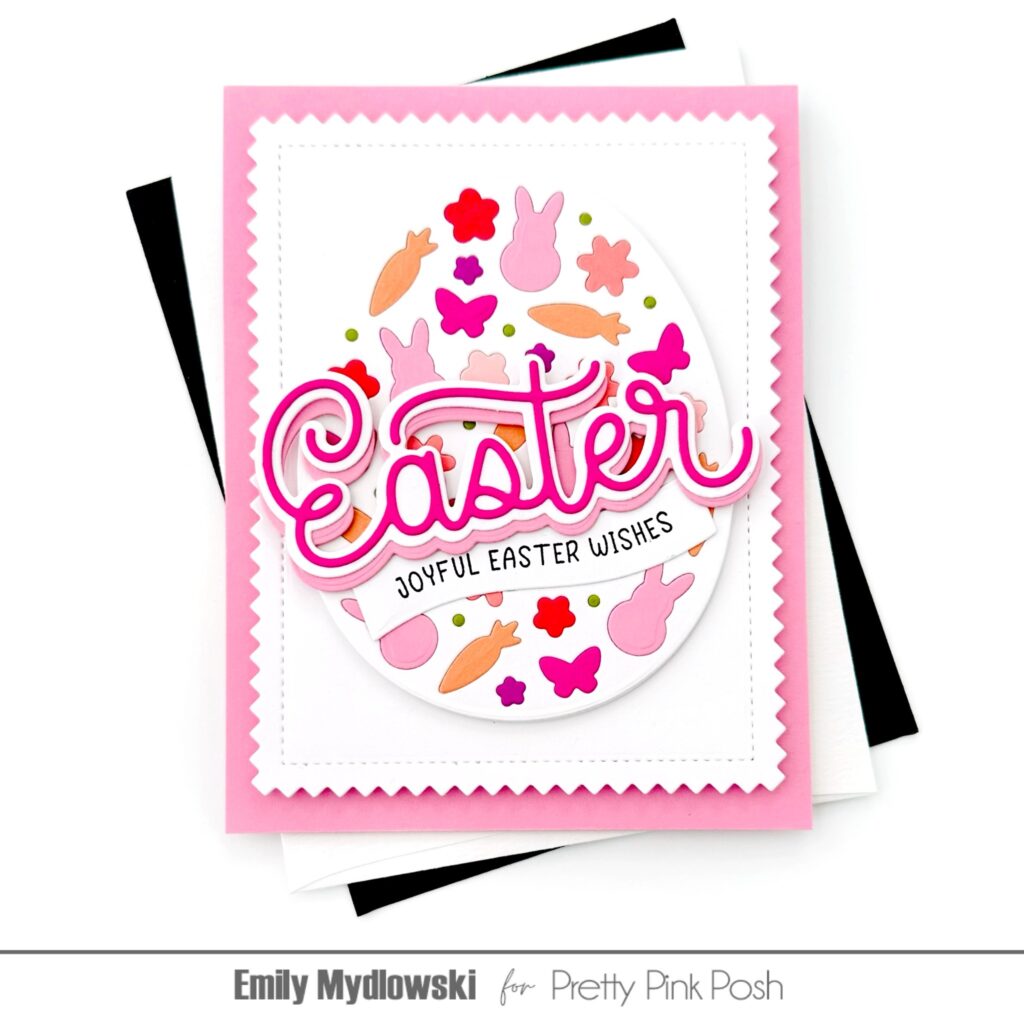
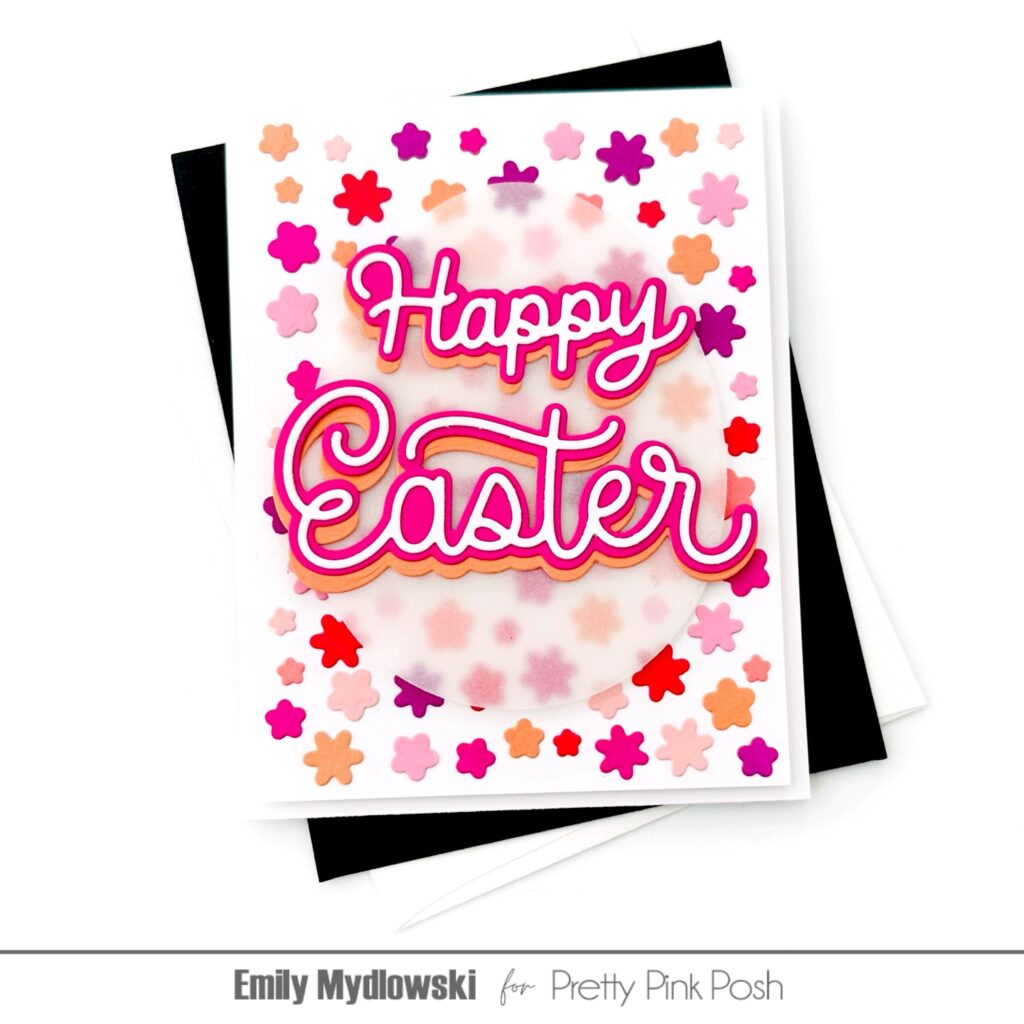
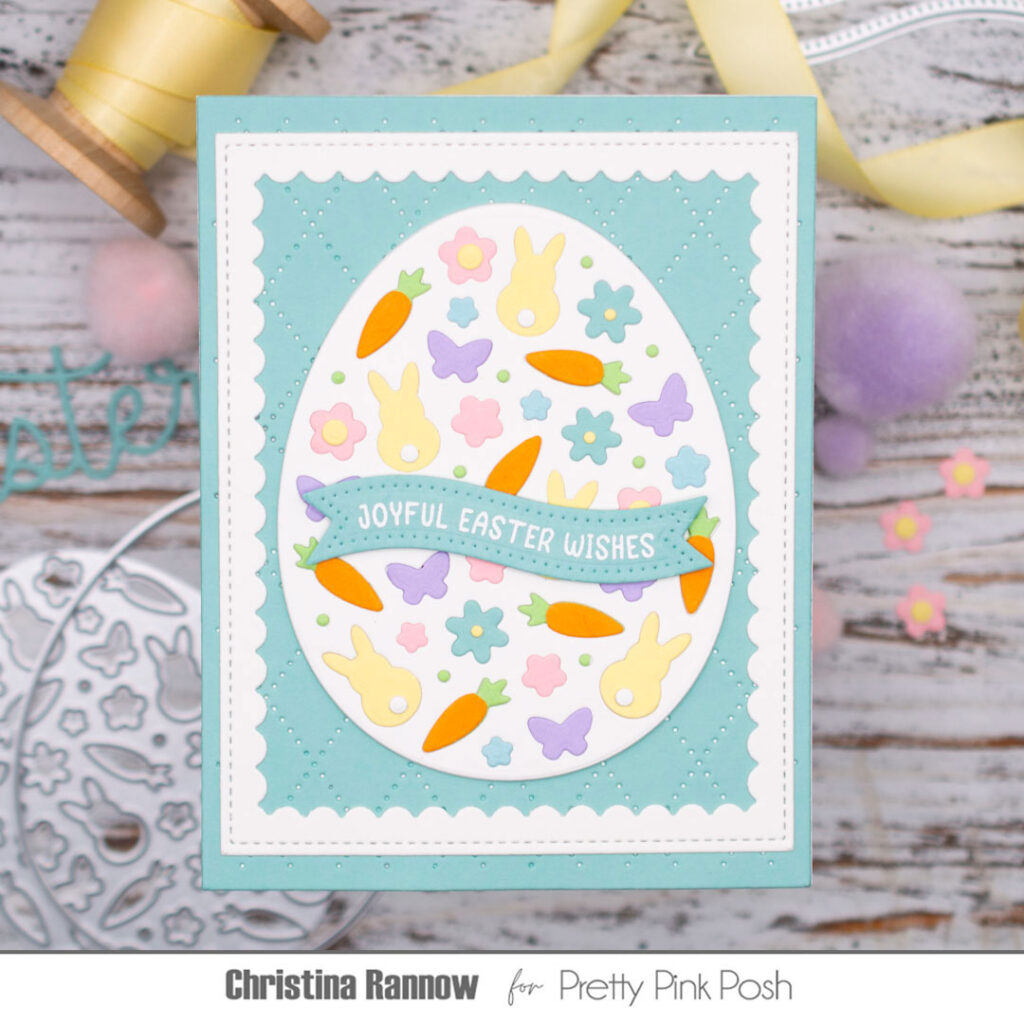
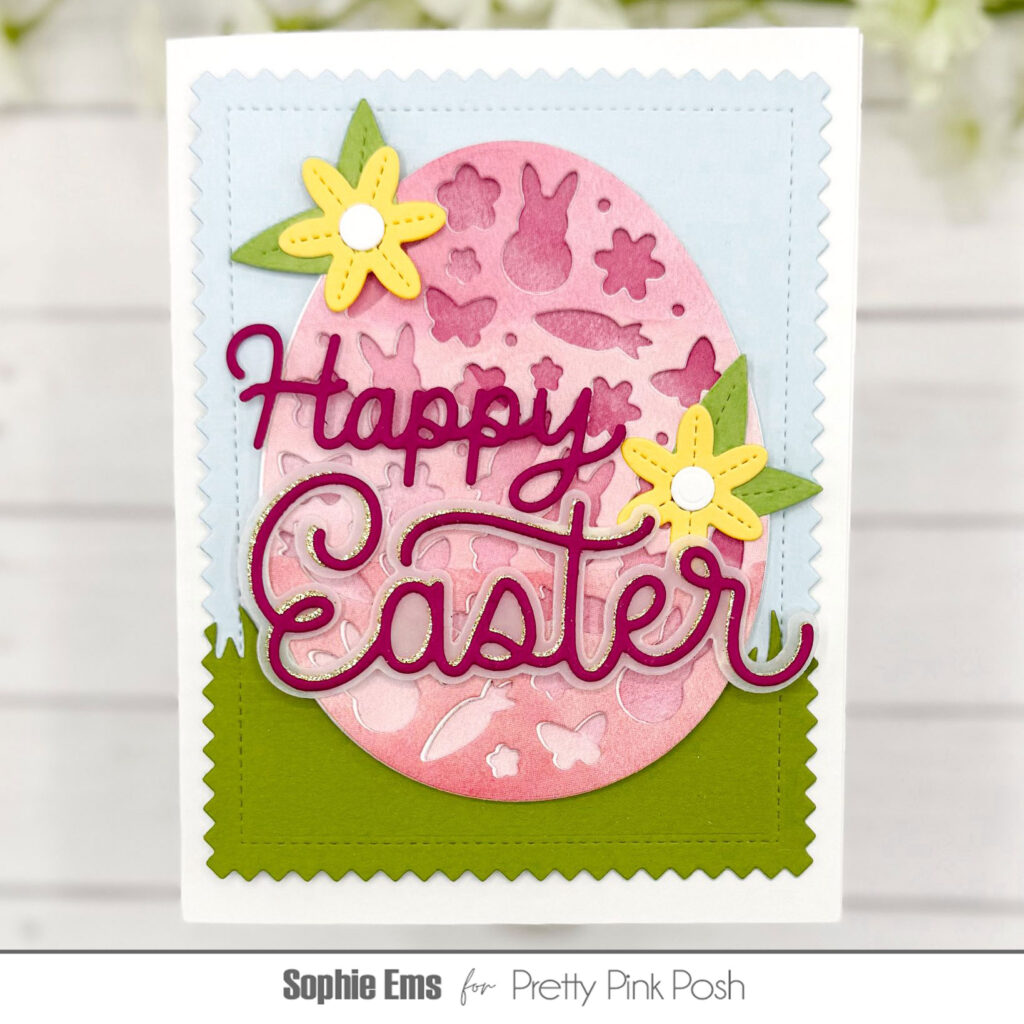
For my next project, I created two cards using the Decorative Easter Egg & Large Easter Shadow die sets in a bright spring color palette.
For my first card, I created a bright and cheerful inlay egg using an assortment of pink, red, orange, purple and springtime green cardstock. I used the Large Easter Shadow die to create a double-shadow sentiment. To finish the card, I adhered the Decorative Easter Egg to a white Pinking Rectangle Frame and a pink card base.
I adhered all the remaining decorative flower die cuts to a white card panel to create the background for my second card. For the Happy Easter Sentiment, I combined the Large Easter Shadow with the “Happy” from the Happy Halloween Shadow Dies and placed them on a Vellum Large Easter Egg.
Keep scrolling to see more amazing inspiration from the design team!
Have a Hoppy Easter Cardmaking season. Thanks for stopping by and Big Paper Hugs.
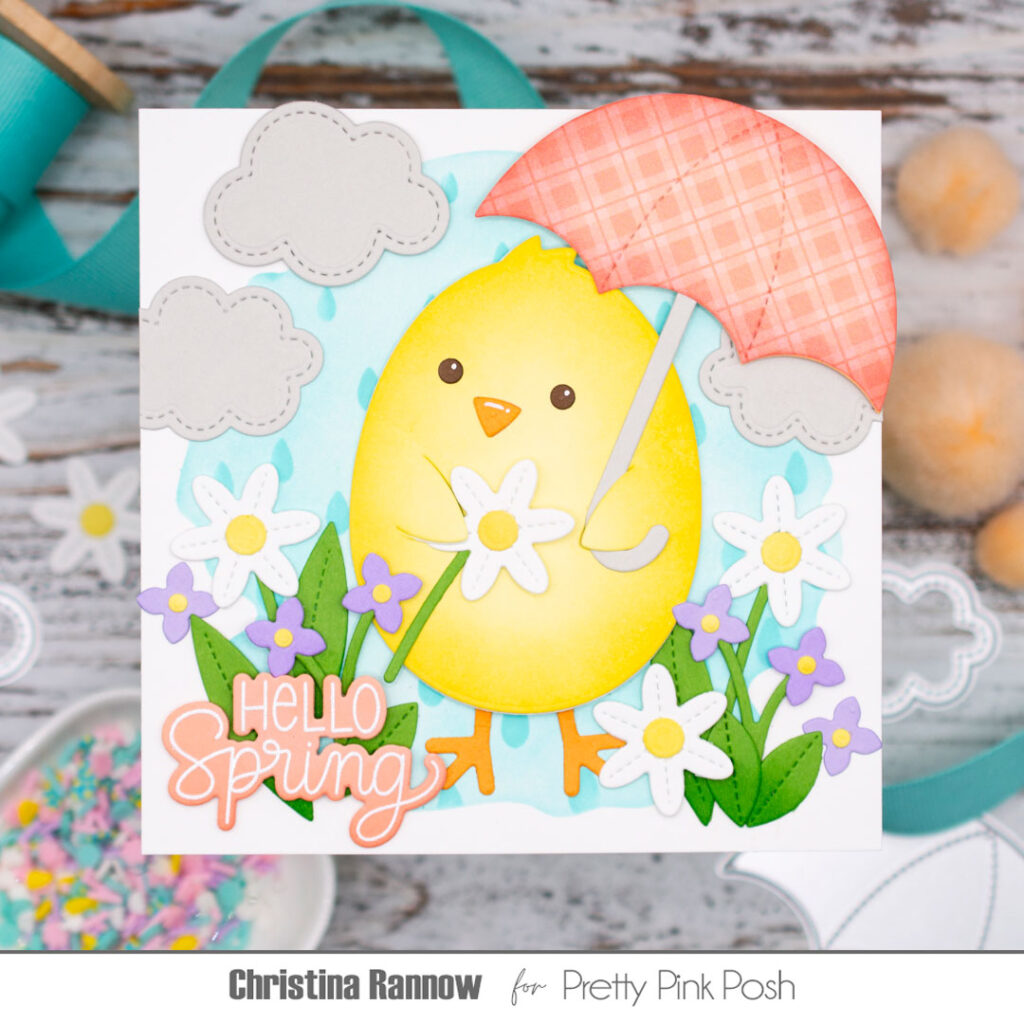
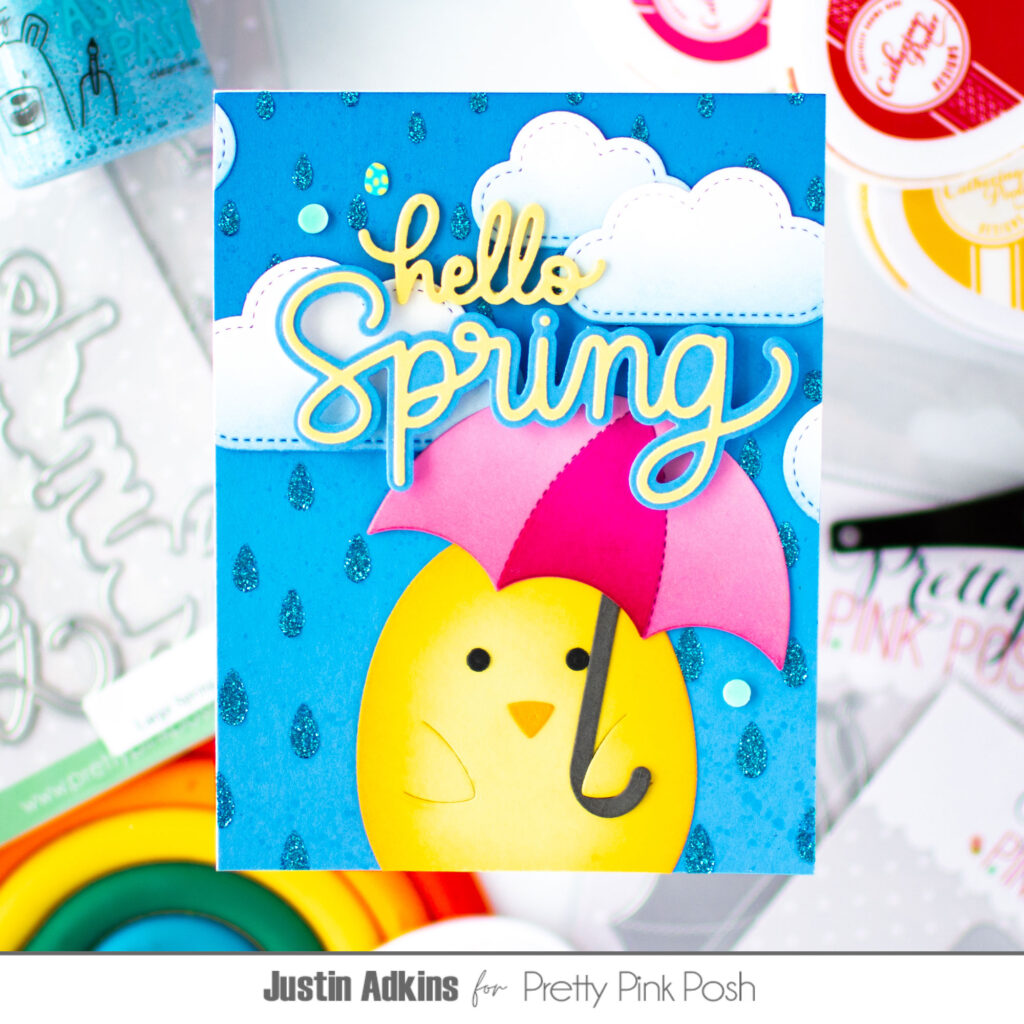
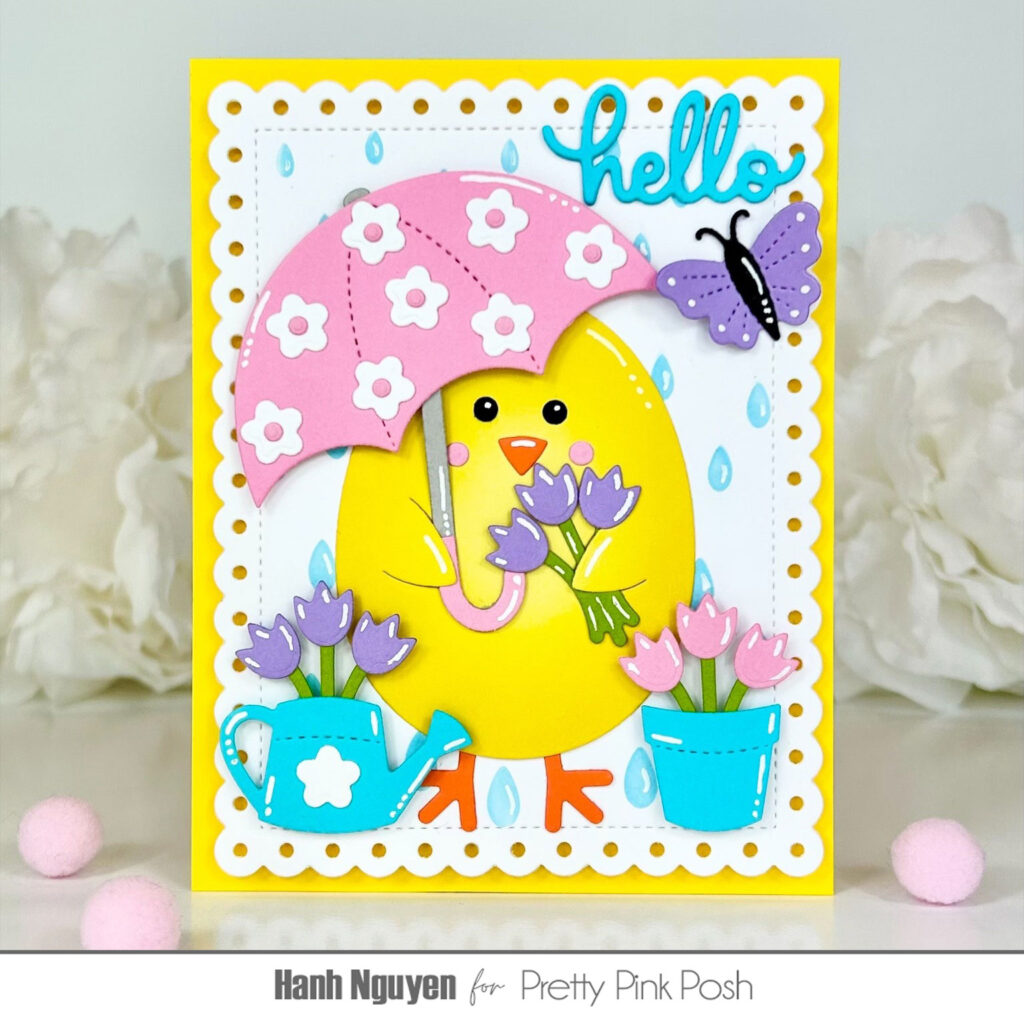
Welcome as we kick off the first day of sneak peeks for the February 5th release. Today we’ll be taking a look at four of the new die sets: Chick Holder, Chick Shaker, Springtime Holder Additions, and Stitched Clouds.
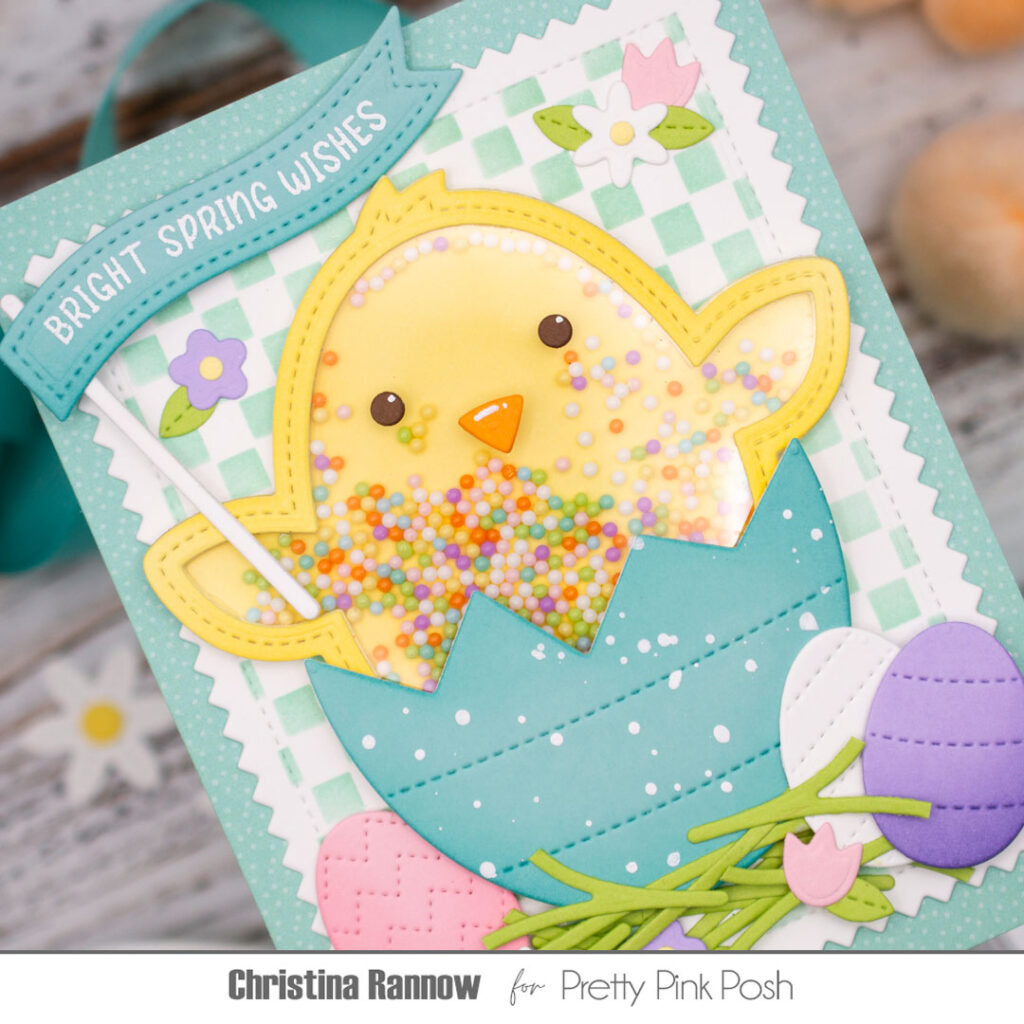
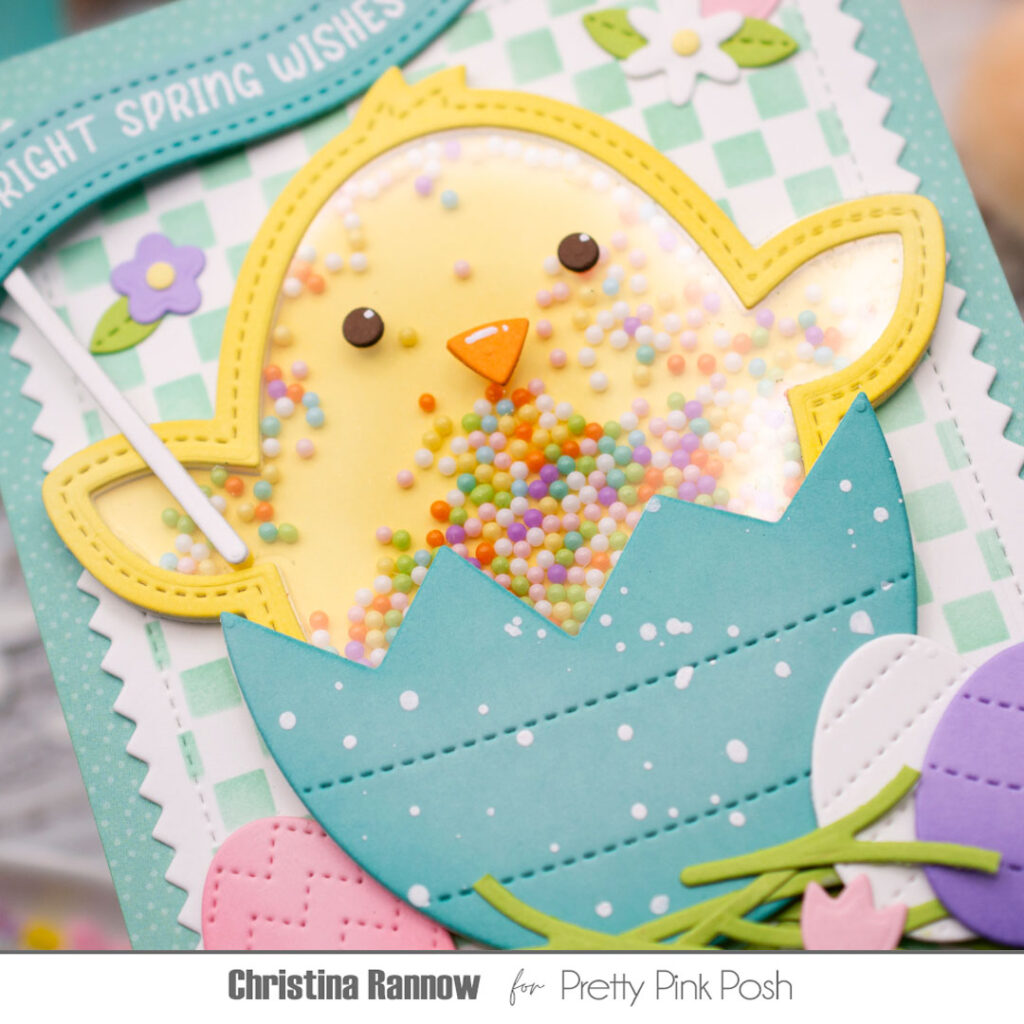
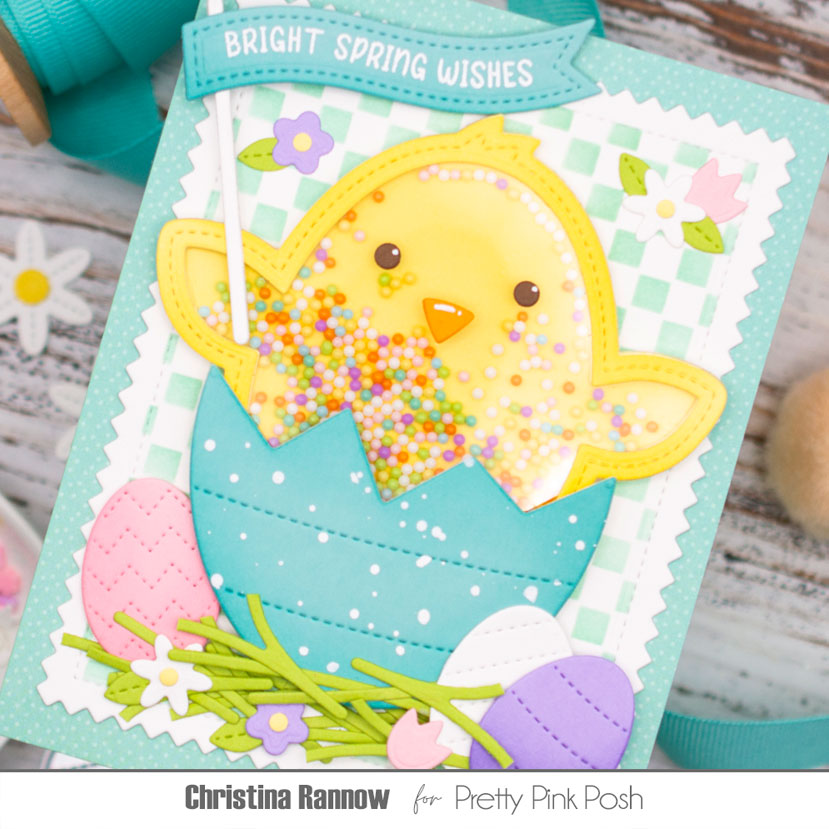
Hi friends! Christina here, and I’m so excited to be kicking off sneak peeks for the super sweet spring release! Today we are showcasing some of the adorable new dies that will be available February 5th, including the Chick Shaker and the Chick Holder. These cuties coordinate perfectly with the other goodies we’re highlighting today, the Springtime Holder Additions and the Stitched Clouds. I’ve combined elements from all these new sets in the happy springtime inspiration that I’m sharing with you! Let’s get started!
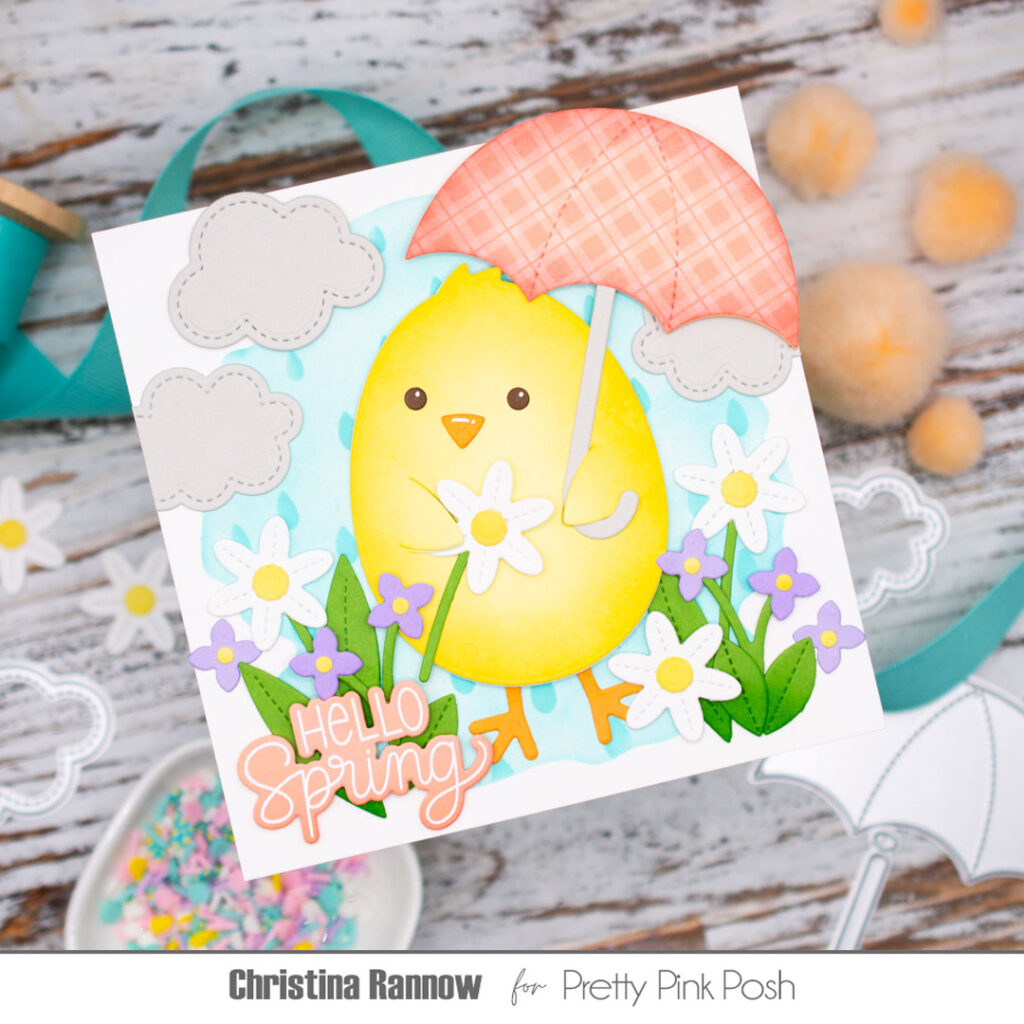
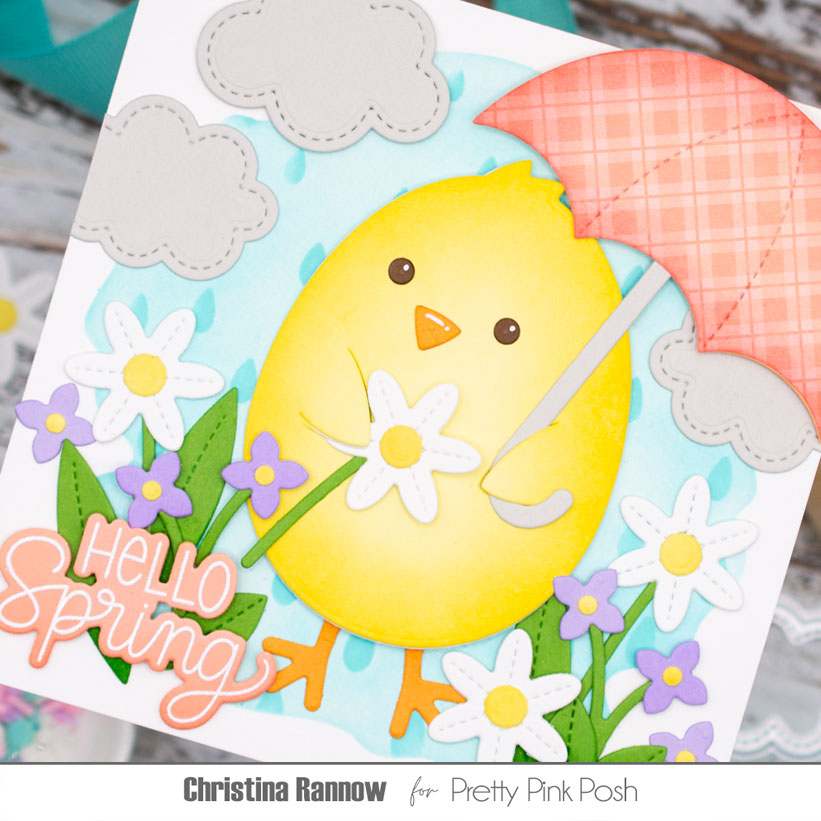
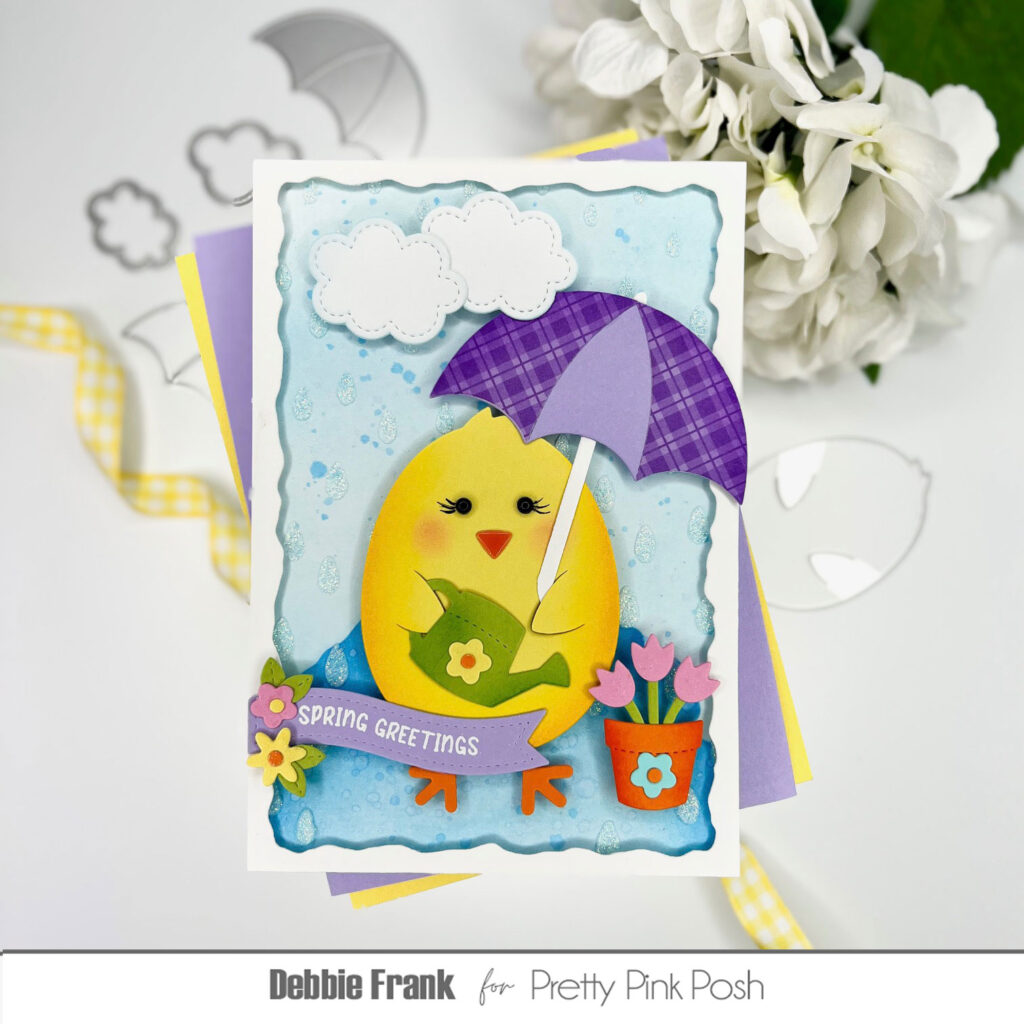
My first card features the newest addition to the “Holder” collection, the Chick Holder! This plump little chick is just the cutest, and I paired him with the umbrella from the Springtime Holder Additions and surrounded him with the lovely new Stitched Spring Flowers to create a rainy springtime scene.
My first step was to create the rainy background panel. I started with a piece of 5×5 white cardstock and two new stencils that are part of the spring release, the Watercolor Circle and Raindrops. I stenciled the Watercolor Circle first with Salvaged Patina Distress Ink, and then, leaving the stencil in place, I stenciled the raindrops over the watercolor circle using more Salvaged Patina ink. I set the panel aside while I got to work on some die-cutting.
For most of the die-cutting I started with colored cardstock but chose plain white cardstock for the daisies and a sweet plaid patterned paper for the umbrella. I added subtle shading to the chick, the leaves, and the umbrella by lightly blending a darker coordinating ink around the edges. After assembling the diecuts, I arranged them on my background panel and attached them with either glue or thin foam squares.
Just a couple more things to wrap up this rainy springtime card! First, I added a greeting from one of the new stamp sets, Spring Blooms. I heat embossed it with white embossing powder on peach cardstock and then die-cut it with the coordinating die. And lastly, I popped this 5×5 card front onto a card base that I made from a piece of white cardstock measuring 5 x 10 inches.
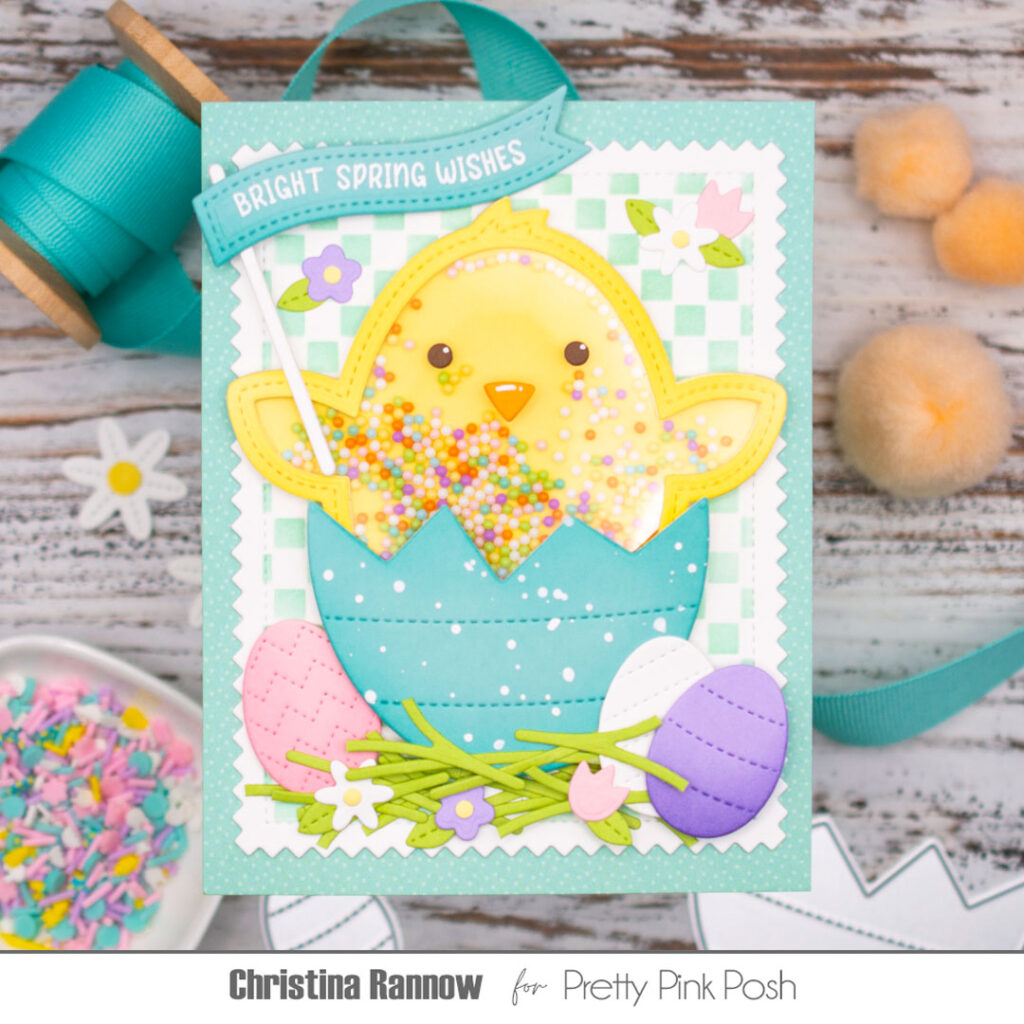
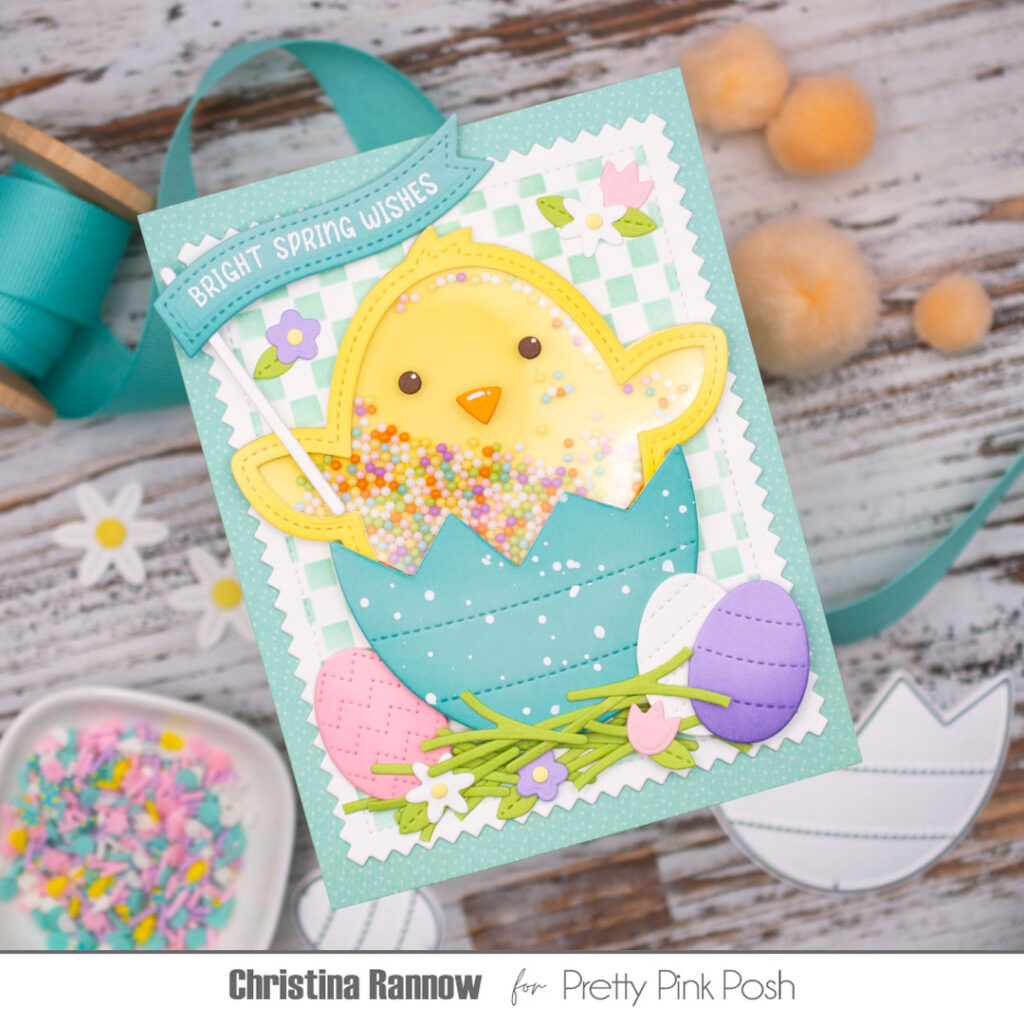
My second card is a playful shaker card featuring the Chick Shaker. This cutie is just as irresistible as the Chick Holder, especially when she’s popping out of an egg! I combined this sweet chick with new Bunny Hop Shaker Beads and the new Mini Checker Stencil that I think is a must-have for your crafty stash.
For this card, I started by creating the shaker element first. I used the Chick Shaker dies to die-cut the chick frame six times from yellow cardstock and stacked them together to be the walls of the shaker. Before securing the frames with glue, I sandwiched a piece of acetate between the top two layers to be the window of the shaker. Then I filled the shaker with the beads and finished up by attaching the backer piece to the stacked frames. Easy! The last steps were to add the chick’s face and the cracked eggshell she’s popping out of. I die-cut the eggshell from tidepool cardstock, added white spatter, and then attached it right over the chick shaker.
Next I created my background panel by first die-cutting the largest Pinking Rectangles from white cardstock and masking the edges before stenciling on the Mini Checker pattern with teal ink. Then I layered this onto a subtle tone-on-tone teal patterned paper panel. With the background completed, I attached the Chick Shaker to the panel with glue and moved on to the other elements of my card design.
I wanted my chick to be sitting in grass, so I reimagined some flower stems from the new Stitched Spring Flowers and layered them along the bottom. I found smaller egg dies in the Chick Holder set and the Easter Holder Additions set and die-cut them from pretty pastel cardstock. I tucked them around the chick and her egg and added small flowers that are accessories in the Springtime Holder Additions. For the sentiment, I heat embossed an Easter Banner Greeting with white embossing powder on one of the new banners from the Banner Greetings 3die set. Then I added the banner to a white “stick” and gave it to the chick to hold. So cute! Finally, I popped the card front onto an A2 card base.
Keep scrolling to find even more springtime inspiration from the design team!
Thanks so much for checking out these sneak peeks featuring new products from the upcoming spring and Easter release on February 5th.
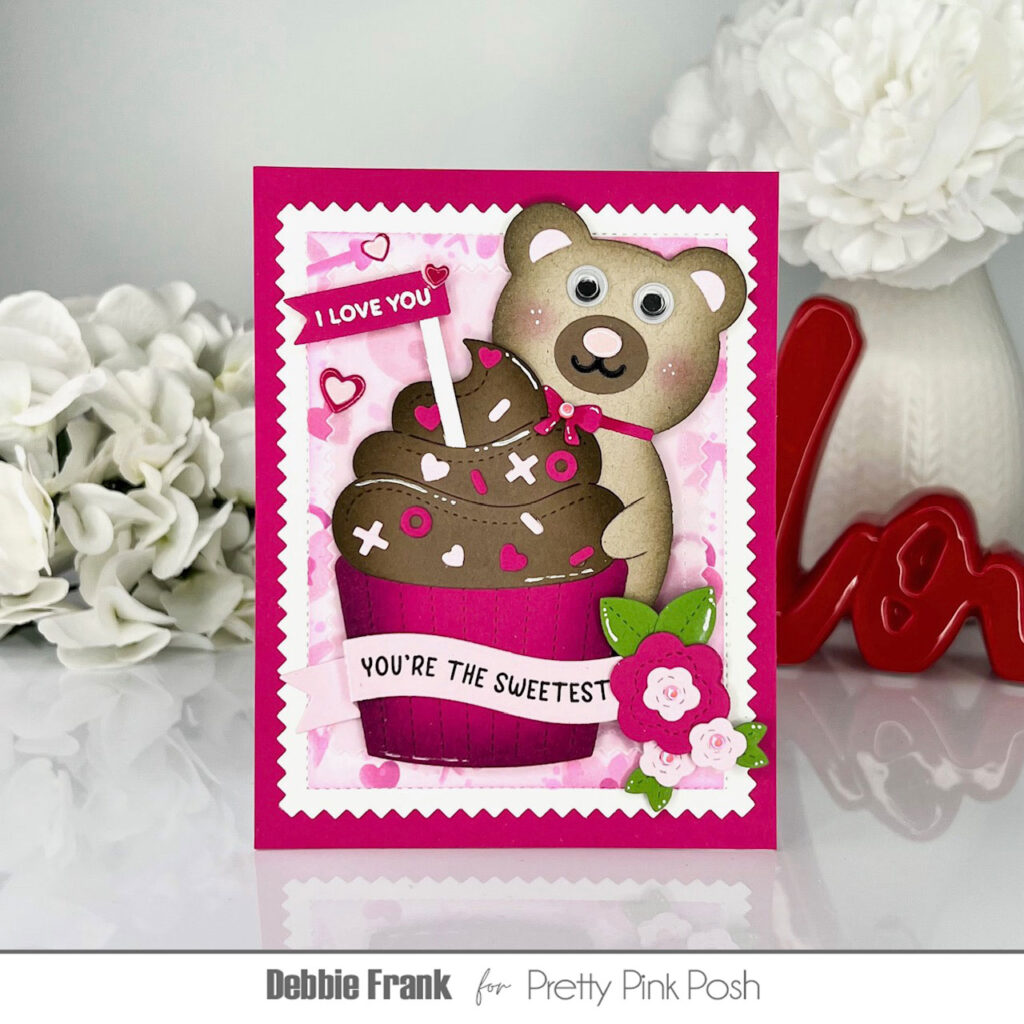
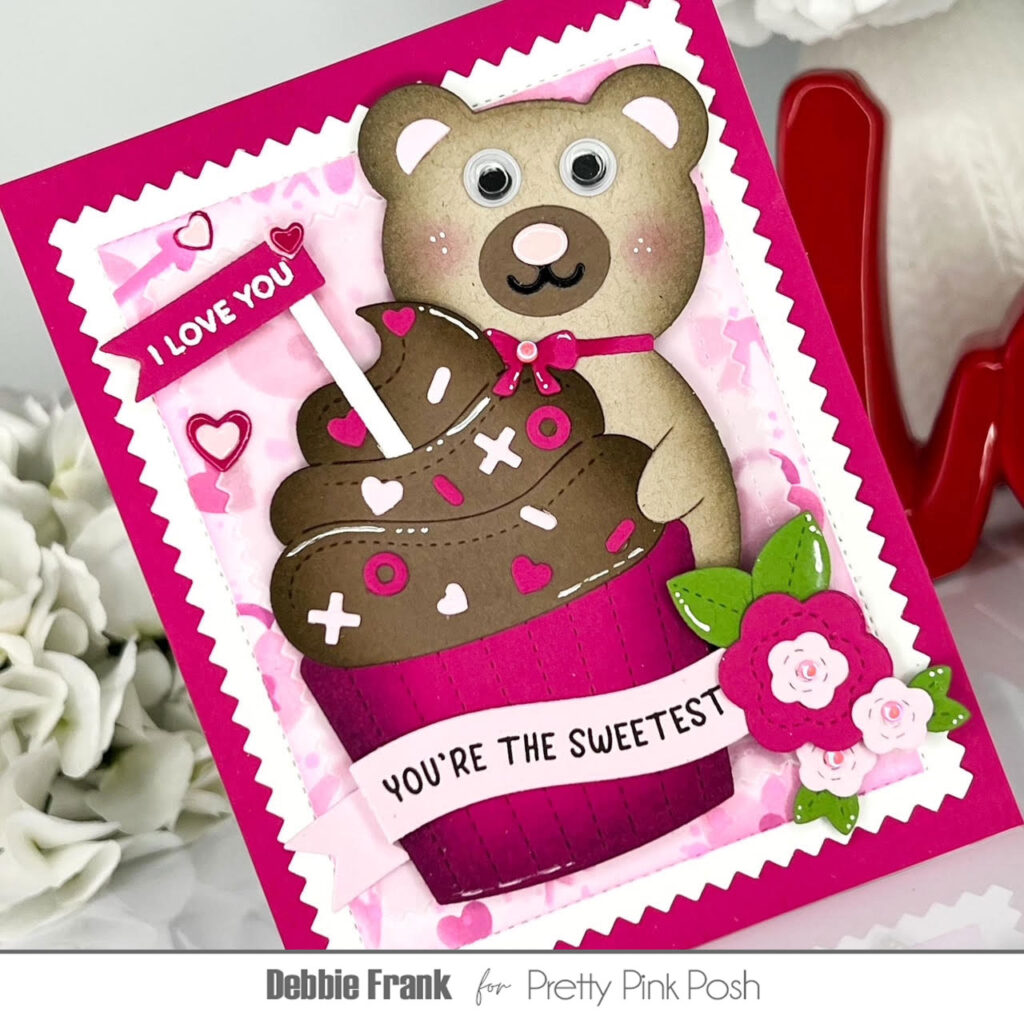
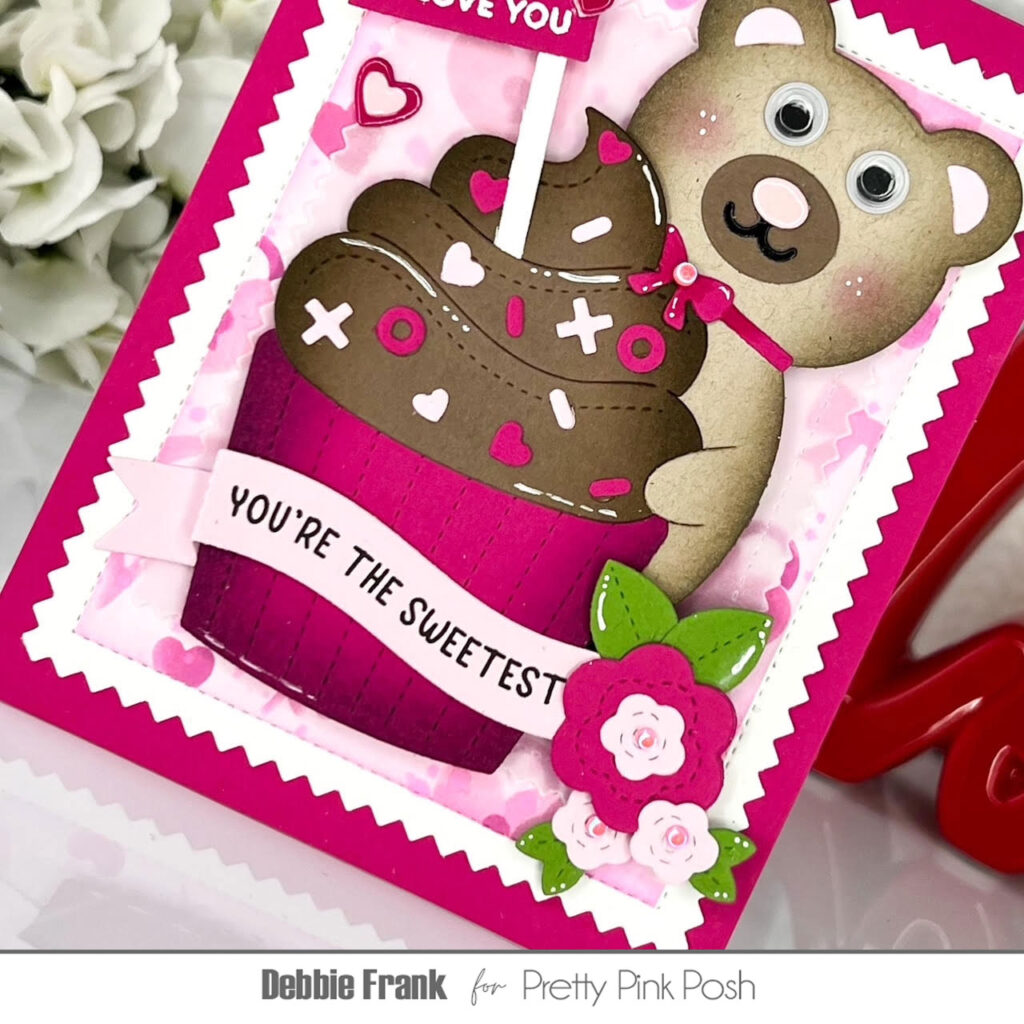
Hi crafty friends, Debbie here for the last day of Valentine Theme Week at Pretty Pink Posh! I love it when we can bring out previously released products back out to play with the newly released ones!
I started off with the largest Pinking Rectangle die, masking off the edges with lowtack tape. Then with the Layered Cupid Items Stencilover the top of the panel on a grip mat. I ink blended on two shades of pink ink, before I removed the tape I took the brush and lightly went over the panel to add the residual ink on it.
Adhering the panel on to a bright pink card stock for matting. Then with the second to largest Pinking Rectangle dieI die-cut out a vellum panel to lay over the stenciled panel.
After die-cutting out the Bear and the cupcake doing some shading and highlights. Of course some googly eyes for the bear. I attached them together and then adhered them on the vellum with foam squares. This gave me a good place to hide adhesive to add the vellum to the panel with liquid glue.
I felt like the bear needs a bow tie or something, so with the Valentine Holder Additions dies. I found the perfect size bow using the Gift box bow to wrap around his neck.
For the flag on the cupcake I die cut first the flag and the stamped and white heat embossed the “ I Love You” using the Sentiment Strips: Valentine stamp set.
To finish it off I added some Pink Blush Pearlsto the center of the flowers and the bow tie. Glossy Accents to the nose and the die-cut out hearts that I have floating and on the flag.
GIVEAWAY
For today’s giveaway, we are giving away a $50 Pretty Pink Posh gift card. All you have to do is leave a comment on this post sharing what images are your favorite for Valentine projects (chocolates, hearts, cupcakes, etc….)
All giveaways for Valentine Theme Week will end on February 3rd. We’ll share a post with all the winners on the PPP blog.
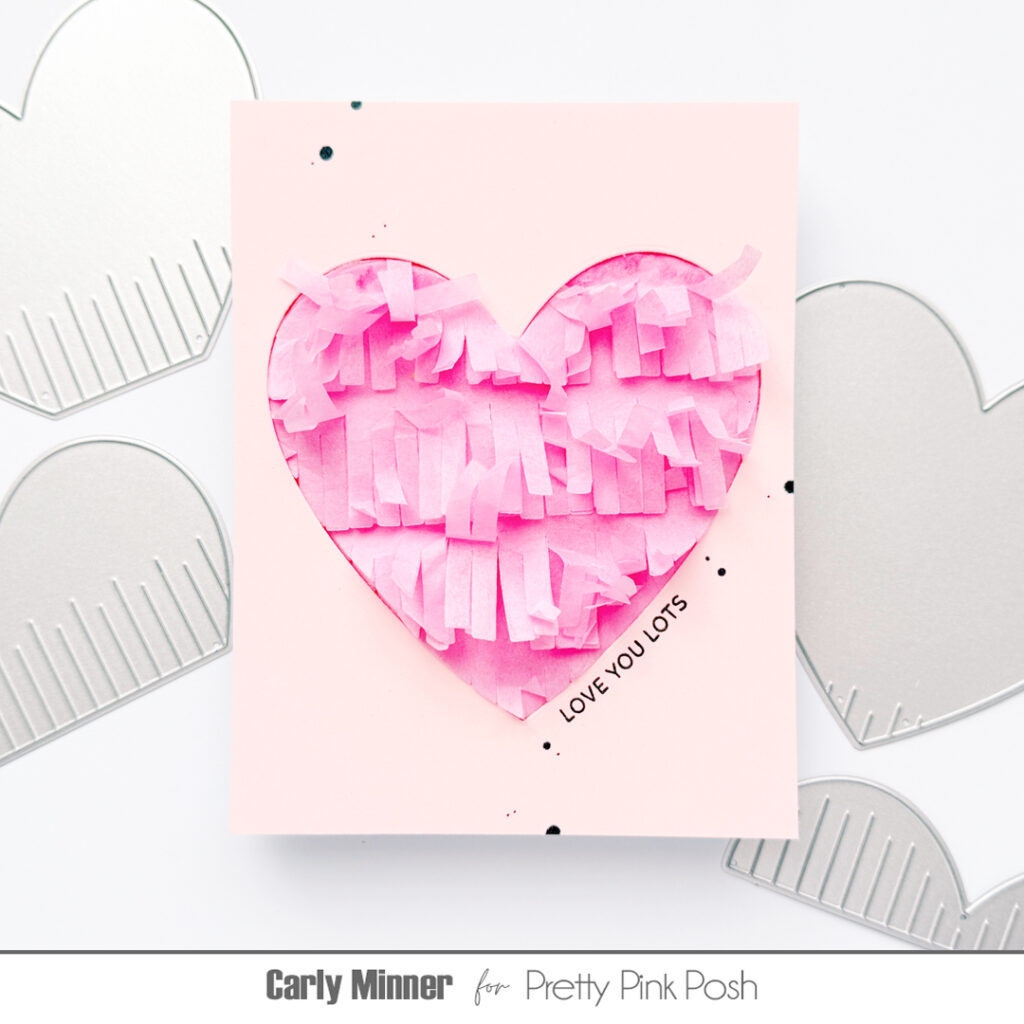
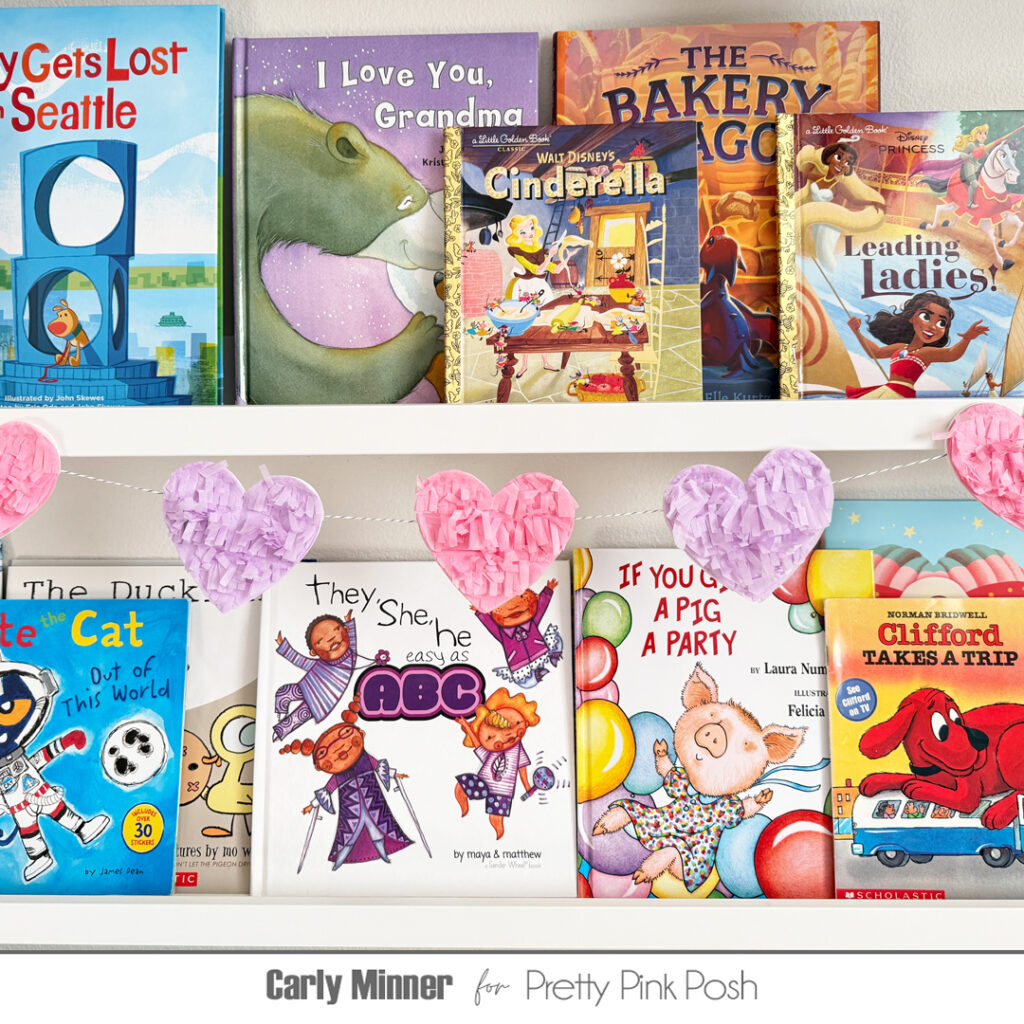
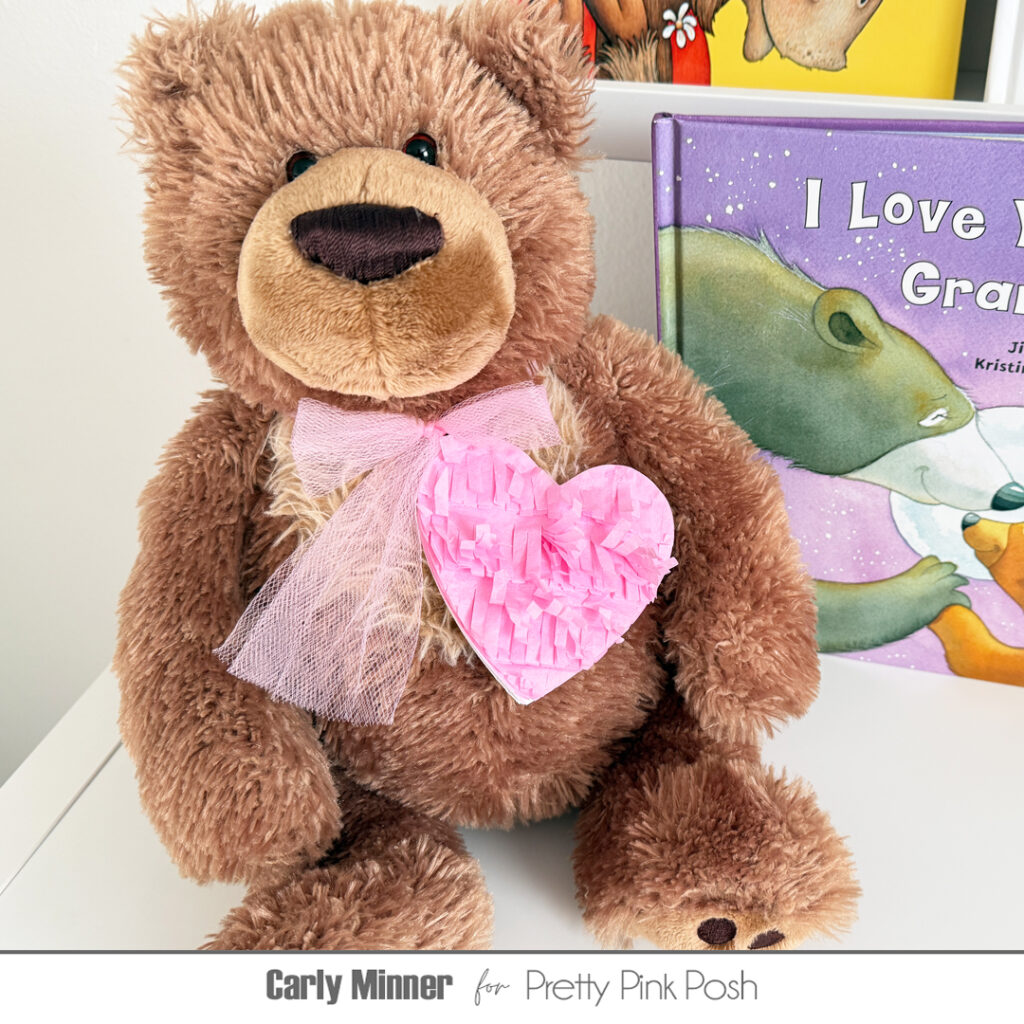
Hi Crafty Friends! Carly here and if you are looking for an extra special Valentine, I think I can help! I have three fun & fringey Valentine DIYs to share!
I am quite smitten with the Fringe Heart die set so today I want to show you how it makes a super cute card, an adorable shaped card/gift tag and a fabulous garland!
Here are the three Pretty Pink Posh products used for today’s projects:
Any kind of paper will work but I think tissue paper makes it extra in the best way!
P.S. Want to see one more project with the Fringe Heart? Check out this video and learn how to make a pinata card!
GIVEAWAY
For today’s giveaway, we are giving away a $25 Butterfly Reflections gift card. They carry a wide assortment of our products, along with other brands. Leave a comment on this post sharing your favorite crafting technique.
All giveaways for Valentine Theme Week will end on February 3rd. We’ll share a post with all the winners on the PPP blog.
Thanks so much for stopping by! I hope you were inspired by these projects and video!
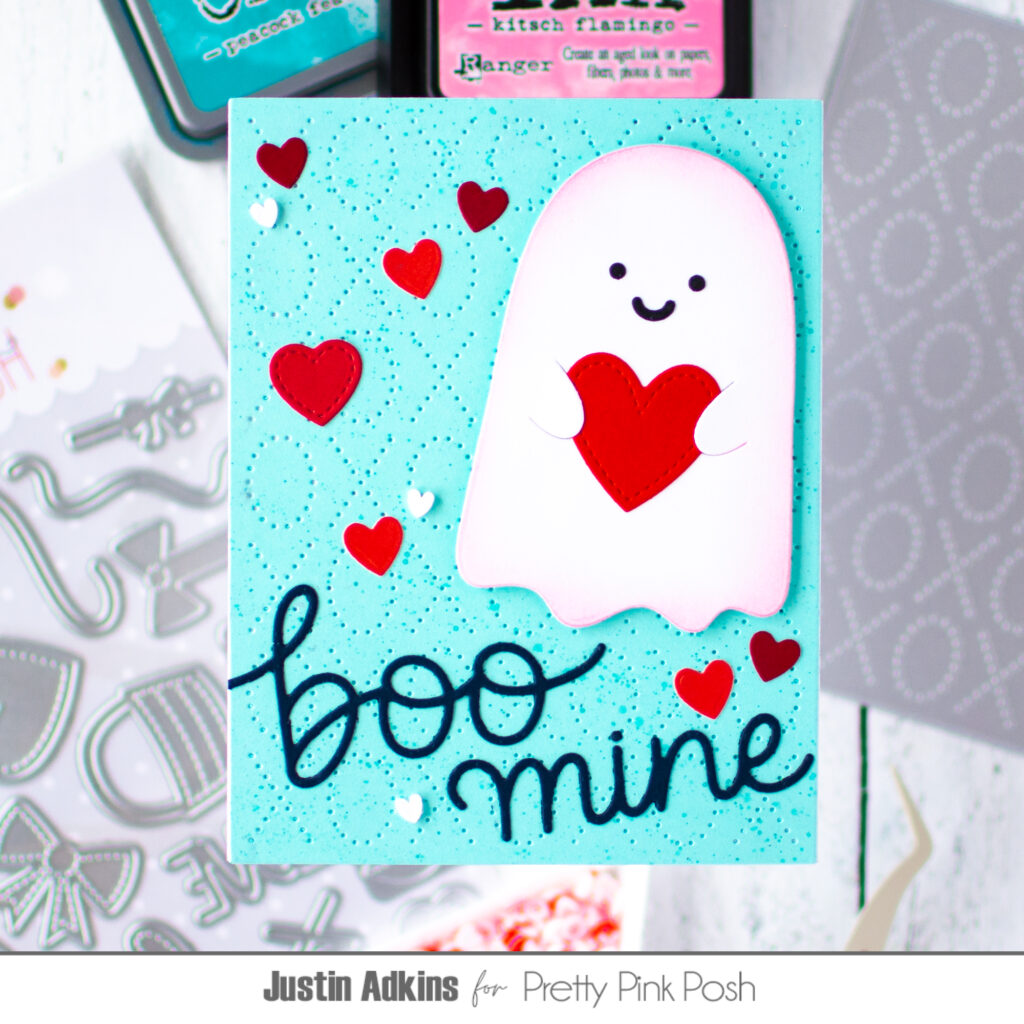
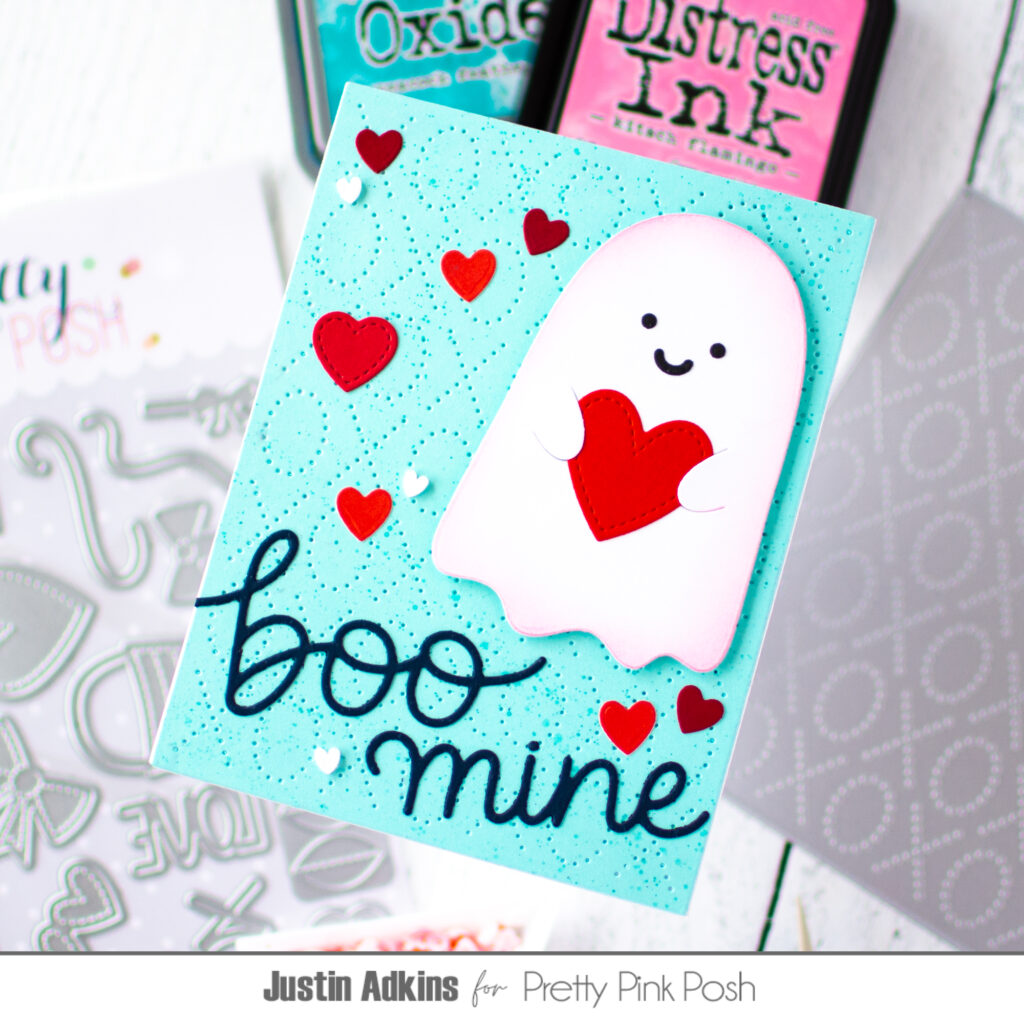
Hello my adorable spooks! Justin here, and I am so thrilled to be jumping in to share a boo-tiful card for our Valentine Theme Week! I love all things Halloween, which, most times, doesn’t overly translate well to Valentine’s Day. But, with a little bit of Pretty Pink Posh die set mash-up, I was able to create an adorable Valentine’s Day card featuring the Ghost Holder die set!
Below is a list of Pretty Pink Posh products that I used to create this card:
For this Valentine card, I initially struggled with my card layout because I was planning on a heavy ink-blending route for this card. When that wasn’t turning how I had envisioned, I took a step back and thought “what about an approach that incorporates minimal ink blending?”, which is the final direction I went in for this card!
This card ends up using only 2 different ink colors: For the first, I die cut the XOXO Pierced Plate Die from aqua cardstock, and splattered it with Peacock Feathers Distress Oxide Ink. For the second, I ink-blended the edges of my Ghost die cut, which was originally from Stark White cardstock, with Kitsch Flamingo Distress Ink to give my ghost a slight bit of color. Everything else that appears on this card was untouched by ink!
I had the idea to make a custom sentiment by combining the Large Boo Shadow Dies and the Be Mine Shadow Dies, so that my card read “boo mine”. Truthfully, the “boo” sentiment is slightly larger than the “mine” sentiment, but the way the letters appear on my card doesn’t make it too noticeable! I had decided to die cut the words from navy cardstock, and adhere them on a slight angle towards the bottom of my card panel.
Using the Valentine Holder Additions Die Set, I dressed up the rest of my card with hearts. I gave myGhost Holder a big red stitched heart to hold, and then I used the smaller heart dies that were included in the set for some further embellishments. I also had a larger red stitched heart die cut left over from a card that I created using the Heart Card Base Dies that I pulled in for some added variety. I used a couple different colors of red cardstock to add extra detail, and then also pulled in some white clay hearts from the Sweet XOXO Clay Confetti!
Thank you so much for stopping by the Pretty Pink Posh blog for some Valentine Inspiration! I hope this card leaves you with some fun ideas on how you can pull in some non-traditional holiday products to create cards for any holiday!
GIVEAWAY
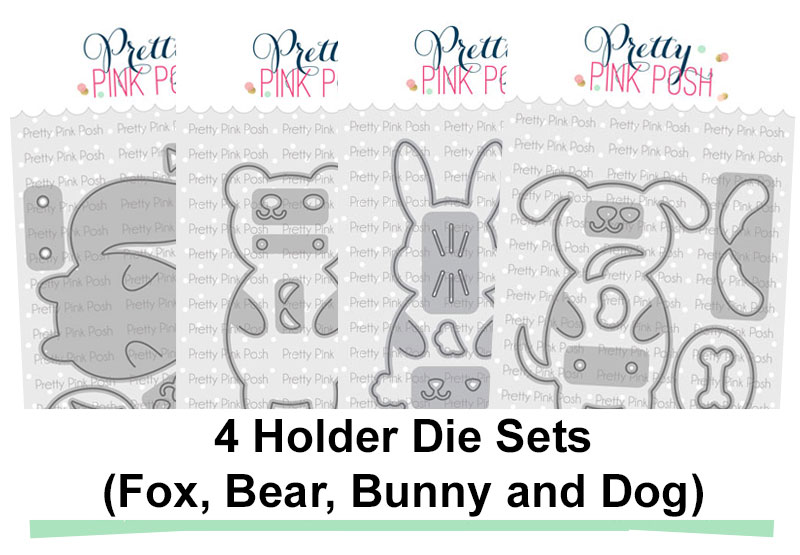
For today’s giveaway, we are giving away a prize pack featuring FOUR of our popular holder die sets. All you have to do is leave a comment on this post sharing how you got started in paper crafting.
All giveaways for Valentine Theme Week will end on February 3rd. We’ll share a post with all the winners on the PPP blog.
For more crafting inspiration, please be sure to follow me on Instagram and YouTube at @justanotebyjustin!