Author: PPP Designer

|

Winter Wonderland (New Products)

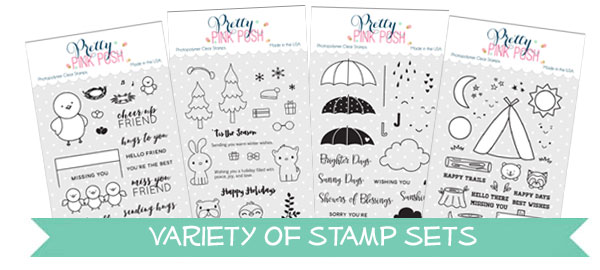
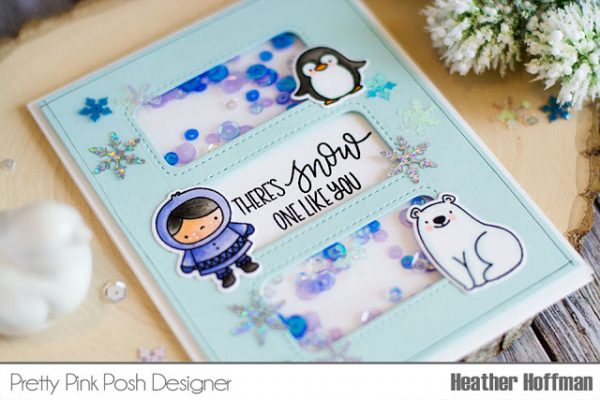
Good morning Pretty Pink Posh friends! Heather here this morning, and boy am I excited to be able to share a card using some of the absolutely DARLING new releases with you (they’ll be available on October 5th)! There are stamps, dies, and sequin mixes galore – I had a hard time deciding what to play with first! I ended up making a snowy winter shaker card.

cards-9-28-16-036-2

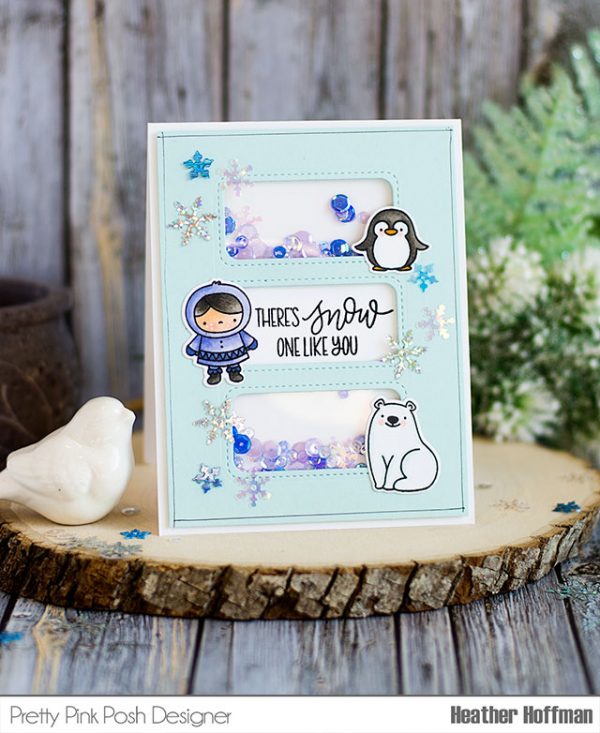
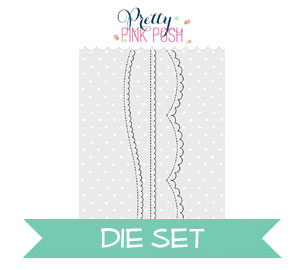
The new Stitched Pieces die is so fun and versatile – perfect for shaker or window cards. I can see lots of possibilities with this one! I used it to create a shaker portion on the top and bottom, and a window in the center for my sentiment.

cards-9-28-16-052
The adorable characters and sentiment are from the brand new Winter Wonderland stamp set – once I colored them up with Copics, I used the coordinating Winter Wonderland coordinating dies to cut them each out.
 cards-9-28-16-045

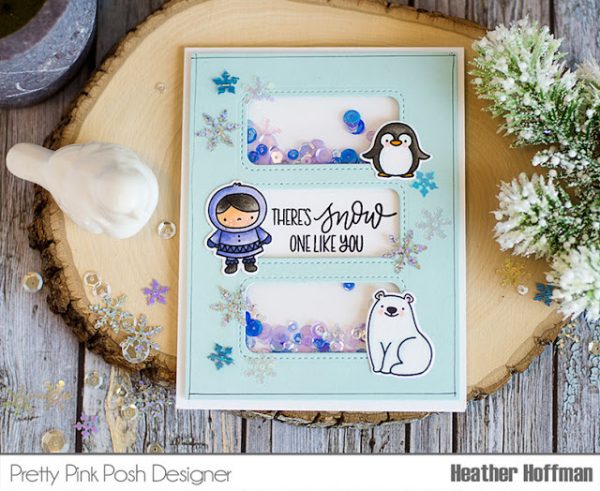
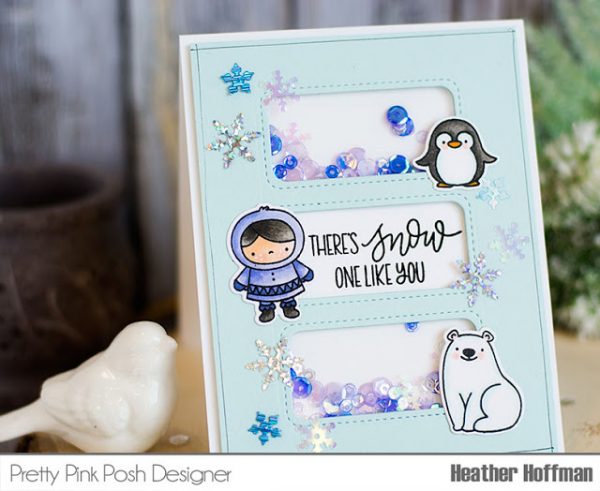
My shaker windows are filled with the beautiful new Winter Sparkle sequin mix, and I added snowflakes from another new sequin mix – Snowflake Sequin Mix – on the outside to embellish. A simple line around the outside with a fine line black pen and my ruler to help make it somewhat straight finish this off! See in the center how I left it open for the sentiment? This also adds great dimension to the card.

cards-9-28-16-060

What are you most excited for in the new release so far?

border

If you’re on Facebook, be sure to visit the blog hop event page HERE. We will have a $100 gift certificate giveaway on the event page once we reach 200 guests. Head over and join the fun and see sneak peeks leading up to the release and also the blog hop that is on October 13 & 14th!
bloghopfb

Thanks so much for stopping by today! Have a wonderful day!

|

Paper Piecing Made Easy

Hello crafters! Julia here and today I have a card for you showing off the Camping Friends set with a fun technique.

Pretty Pink Posh: Paper Piecing Made Easy

The crafting world is full of mysteries and for the longest time, I wondered by people would pierce paper and why I wasn’t seeing it on their projects. My brain had played tricks on me and one day, I realized I had misread the technique – it’s paper piecing, not piercing. Time to give it a try :)

Pretty Pink Posh: Paper Piecing Made Easy

I am using the new Camping Friends set and die set for this card. In addition, I am creating a background with a stencil and some Distress Inks and my blending tool. That will help my tent pop right off the card.

My contrast color on this card is white, and that’s why I left the grassy border I had die cut with a Lawn Fawn die white. It’s such a lovely contrast against the sun.

Pretty Pink Posh: Paper Piecing Made Easy

You know I like to add extra sparkle to my cards, so I used my Perfect Pearls spray again; in addition I also used some Copics to add shading to my patterned paper which I had glued to the die cut tent shape – hence paper piecing.

Want to see how to create this card from start to finish? Click on the graphic below!

Pretty Pink Posh: Paper Piecing Made Easy

campingfriendsgrass
Thank you for stopping by today! I hope you got inspired!

| | |

Creating A Snowy Scene + Video

Pretty Pink Posh: Creating A Snowy Scene

Hi friends! It’s Nina-Marie back with you today and I am sharing some inspiration for using the new Pretty Pink Posh STAMPtember exclusive set that was designed for Simon Says Stamp!

winterbirdfriendfoxfriends1
Pretty Pink Posh: Creating A Snowy Scene

This set called Winter Bird Friend is SUPER cute, and features some fun accessories that can be used to dress up the bird that is also  included in the stamp set. I wanted to use the set however to show you that you can use the accessories with some of your other favorite Pretty Pink Posh sets!

Pretty Pink Posh: Creating A Snowy Scene

I’ve paired the Winter Bird Friend set with the Fox Friends stamp set, also by Pretty Pink Posh, to create a cute snowy scene! I love how adorable the foxes look with their winter attire on… ready for a fun day in the snow!

Pretty Pink Posh: Creating A Snowy Scene

In today’s video, I’ll be sharing how I created this fun scene, along with tips and tricks on a few techniques I used during the card process!

Watch the video above   I  Watch the video in HD on YouTubeborder
Pretty Pink Posh: Creating A Snowy Scene

I hope this was inspiring to you and showed you how you can get even more use out of the fun images included in the Winter Bird Friend stamp set!  Thanks for spending some time with me today… I’ll see you again very soon!

|

Hexagon Window Cards

Hello there! It’s Vera Rhuhay here and today I have window cards featuring our Camping Friends stamp set, Rainy Days Additions stamp set and also the Stitched Hexagons dies.

I’m in love with the Stitched Hexagons dies. There are so many way to use them.

campingfriendsstitchedhexagons
Pretty Pink Posh: Hexagon Window Cards

Pretty Pink Posh: Hexagon Window Cards
And here is how I made my card:
  • I stamped the images on Bristol paper using Versafine ink pad, and colored with copic markers.
  • The clouds, the sun and the moon are heat emboss with white pearl embosing powder.
  • The background are made by blending with dye ink pad and added some Sparkling Clear Sequins for finishing touch.
 Pretty Pink Posh: Hexagon Window Cards
For the rest of the details on how I created my card, I will show in my five minutes video. Click the graphic below to watch it!

veravideo

 Thank you so much for stopping by! I hope you have a wonderful day!
| |

Fall Coffee Lovers Blog Hop

Pretty Pink Posh: Fall Coffee Lovers Blog Hop

Hello everyone, Joni here participating in the Fall Coffee Lovers Blog Hop. Pretty Pink Posh is one of the sponsors and we thought it would be a good time to share some sneaks of the upcoming products for the coming October 5th release.

Pretty Pink Posh: Fall Coffee Lovers Blog Hop

To begin my card, I first stamped the coffee images from the upcoming Christmas Friends stamp set. The different sized leaves and groundhogs are from the upcoming Giving Thanks stamp set. I also stamped the sentiment on the card base. Then, cut the larger frame from the Scallop Ovals dies to create a shaker for my card.

Pretty Pink Posh: Fall Coffee Lovers Blog Hop

For the inside of the shaker I used the 3mm Sparkling Clear sequins, Iridescent Mini Circle Confetti and the upcoming ¼’ Iridescent Star Confetti. 

Pretty Pink Posh: Fall Coffee Lovers Blog Hop

Here’s another closer look at the card and also the stamps!

Pretty Pink Posh: Fall Coffee Lovers Blog Hop

We hope that you enjoyed today’s card and look at the upcoming release. Also, we hope we inspired you to create a fun fall themed coffee cards for the blog hop.

We’ll be back tomorrow with a special post about an exclusive product- see you then!

|

Fox Family Photo

Hello crafters! Julia here and today I have a fun card for you showing off the Fox Friends stamp set from the August release! 

Pretty Pink Posh: Fox Family Photo

I wanted to create a silly card, just because I looked at the Fox Friends stamps and one of the foxes jumped out at me (pun intended!) and I thought it would be fun if he would be photo-bombing! (Have you ever followed Jennifer McGuire’s stream on IG? Her family is amazing at photo-bombing, so that’s probably where I got the idea from, LOL).

Pretty Pink Posh: Fox Family Photo

I stamped the foxes on copic friendly paper and used my alcohol markers to color them in. I like high-contrast coloration, so I even added a dark brown in to the color mix to make sure I got nice, deep shadows. I used the Scallop Circles die to create a window-opening on my front panel and sponged the card base behind it with some blue distress ink for additional contrast.

Of course I had to finish up my project with a few Espresso and Sparkling Clear sequins!

Pretty Pink Posh: Fox Family Photo

Want to see how to create this card from start to finish? Click on the graphic below!

Pretty Pink Posh: Fox Family Photo

foxfriends1scallopcircles
Thank you for stopping by today! I hope you got inspired!

| | |

Tutorial: Magnetic Bookmarks + Video

Pretty Pink Posh: Magnetic Bookmarks + Video

Hi everyone! This is Vera and today I have Hexagon Magnetic Bookmark to share with you featuring the Pretty Pink Posh Stitched Hexagons Dies.

Pretty Pink Posh: Magnetic Bookmarks + Video

Magnetic bookmarks are popular lately and they’re so easy to make! When I saw the Pretty Pink Posh Stitched Hexagons Dies I knew that there were so many options for both cards and other projects.

Pretty Pink Posh: Magnetic Bookmarks + Video

To create these magnetic bookmarks, I used white cardstock and flexible magnet sheet (you can use flexible magnet tape too). The images are Pretty Pink Posh clear stamps : Camping Friends | Holiday Pals | Rainy Days and the sentiments are from the Birdie Friends Stamp Set.  I blended the hexagon die cut with dye ink pad and colored the images using Zig Clean Color Real Brush. On the back side, you can write the words as desired using a black marker and white gel pen.

Pretty Pink Posh: Magnetic Bookmarks + Video

Here’s a video to show how I created these bookmarks from the start to finish.

Watch the video above   I  Watch the video in HD on YouTubeborderstitchedhexagonsmagnets
stampsets1
Thanks so much for joining me today! Hope you have a wonderful weekend!

|

Cascading Butterflies

Pretty Pink Posh: Cascading Butterflies

Hello friends!! Amy here. Today, I want to share a watercolor card using the Blissful Butterflies Stamp Set. For my card, I used my favorite technique – white heat embossing and loose watercoloring. This set is perfect for this technique! I chose to use colors close to the nature to make a refreshing get well card.

Pretty Pink Posh: Cascading Butterflies

Here are more details:

  1. On a watercolor paper, stamp the butterflies from Blissful Butterflies Stamp Set with Versamark ink. Pour white embossing powder and heat set with heat gun
  2. Blend Twisted Citron, Scattered Straw, Pine Needle and Cracked Pistachio distress inks on the butterflies. Brush water and more inks on top with a paint brush. Add white watercolor splatters and Perfect Pearl mist. Die cut the panel with SSS Basic Stitched Rectangle Die
  3. Heat emboss the sentiment from Birdie Friends Stamp Set using SSS Antique Gold embossing powder. Fussy cut out with scissors
  4. Adhere everything on SSS Fog card base with foam tape and glue. Embellish with various PPP sequins – 4mm Clear Droplets, 6mm Clear Droplets, 6mm Metallic Rose Gold, 4mm Bermuda Blue, 4mm Sunshine Glow and 4mm Peridot Mist

Pretty Pink Posh: Cascading Butterflies

butterfliesbirdie
I love this watercolor look so so much! Thank you so much for stopping by! I hope you have a wonderful day!

|

Butterfly Backgrounds

Hello Pretty Pink Posh friends!! Shannon here today with a watercolor background card created from the lovely new Blissful Butterflies stamp set and the Zig Clean Color markers. (We have found that the best price in the States is Amazon- they even have the new 80 pack!) 

Pretty Pink Posh: Butterfly Backgrounds

I started off by stamping all the butterflies in the set onto watercolor paper covering the whole background.

Pretty Pink Posh: Butterfly Backgrounds

You can make the background as full, or sparce, as you want. Also, if you want a more subtle look, you could use a brown or light gray ink.

Pretty Pink Posh: Butterfly Backgrounds

I then started coloring all my butterflies individually with my Zig Real Brush markers. I splattered of of the the colors onto the background for more interest.

Pretty Pink Posh: Butterfly Backgrounds

This is the part where you can really have fun and use a particular color palette, or create a bright and colorful card.

Pretty Pink Posh: Butterfly BackgroundsI stamped the hello sentiment from the set, along with the friend sentiment from the Rainy Days Addition stamp set with black ink onto a piece of Lavender card stock.

Pretty Pink Posh: Butterfly BackgroundsI then cut the scallop border on each side of my panel with Scallop Borders die before adhering onto a black card base. If you wanted to add a little extra sparkle, you could use the Wink of Stella brush or add some sequins to match your card.

Pretty Pink Posh: Butterfly Backgrounds

That’s it for my card today! Thank you for stopping by!
| |

Tutorial: Butterfly Notecards

Good morning Pretty Pink Posh friends! Heather here to share a couple watercolor Butterfly cards that are not only super easy to make, but perfect for using up pattern paper scraps! I’m using some of the newly released stamps and dies from Pretty Pink Posh – it was such a fabulous one!

Pretty Pink Posh: Butterfly Notecards
I started off by trimming my pattern paper edges. I use a lot of 6×6 paper pads, and when I trim them down to a normal A2 card size (4 1/4 x 5 1/2), I am left with a strip that is 1 3/4 x 6 inches. I used one of the scallop dies from the new Scallop Borders Dies to just barely cut off enough to form a border.
Pretty Pink Posh: Butterfly Notecards

Next, I used my MISTI to stamp my sentiment and little butterfly with it’s trail from Blissful Butterflies Stamp Set. The little “friend” is from the Birdie Friends Stamp Set. My favorite watercolor ink is Versafine, and by using my MISTI I was able to stamp twice to get a nice crisp, dark image. I stamped the sentiment first on all 3 pieces of watercolor paper, then added the butterfly, and finally the tail. This allowed me to place the butterfly as if it landed on the “l” in “hello” – I love that effect!

Pretty Pink Posh: Butterfly Notecards

Next, I used a waterbrush and some watercolors to add a simple watercolor wash, and once that dried a bit, a few splatters in the same colors. Then, once that dried again, I taped on my scallop strips, centering the scallops, and using a paper trimmer to remove the excess on the top and bottom.

Pretty Pink Posh: Butterfly Notecards

And finally – of course there HAD to be some sequins too, right? I love how versatile the Sparkling Clear Sequin Mix is – you can pretty much use them on anything, and you have every size you need! I use Glossy Accents with a fine tip applicator, and reverse action tweezers to adhere my sequins. I usually squirt a little Glossy Accents on a non-stick mat, pick up the sequins with my tweezers, dip them just a bit in the glue, then attach them to my card. Sometimes I dot the Glossy right where I want the sequins and then just set them in place.

Pretty Pink Posh: Butterfly Notecards

Here is a closer look at those little butterflies – seriously, aren’t they so cute sitting on the word “hello”?!?!?

Pretty Pink Posh: Butterfly Notecards
And here is a look at each card – just in case you wanted to see them each up close!

Pretty Pink Posh: Butterfly Notecards

Pretty Pink Posh: Butterfly Notecards

Pretty Pink Posh: Butterfly Notecards

scallopbordersbutterflies

sparklingink2kuretake

Thanks so much for stopping by today – have an absolutely wonderful day!!!