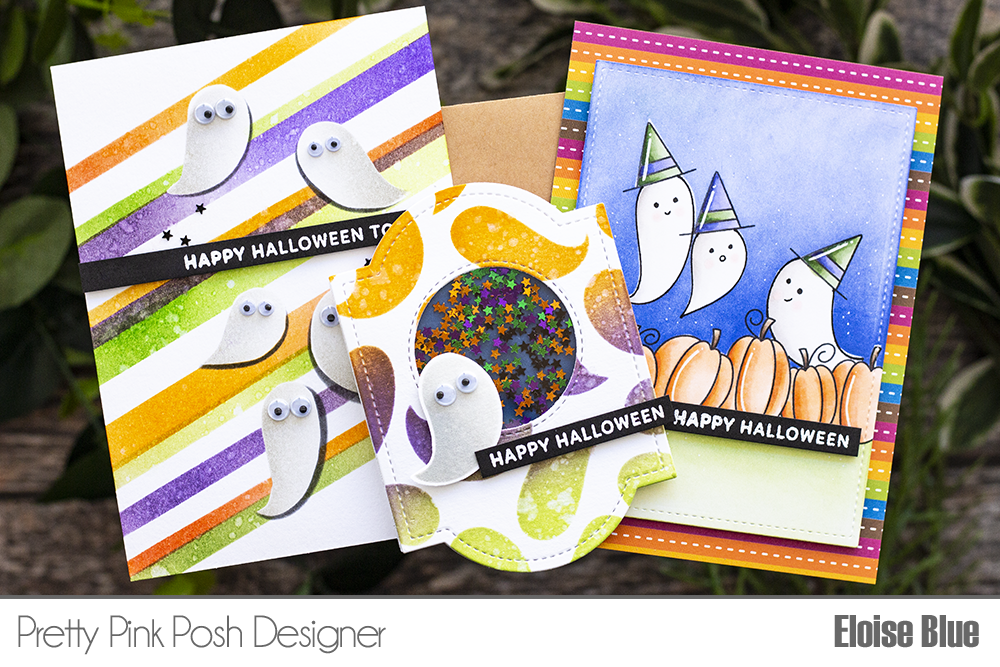
Hello friends, Eloise here and today I have three Halloween cards to share with you all using the Brush Strokes Stencil. I paired it with a few of the Halloween themed stamps in the most current release.
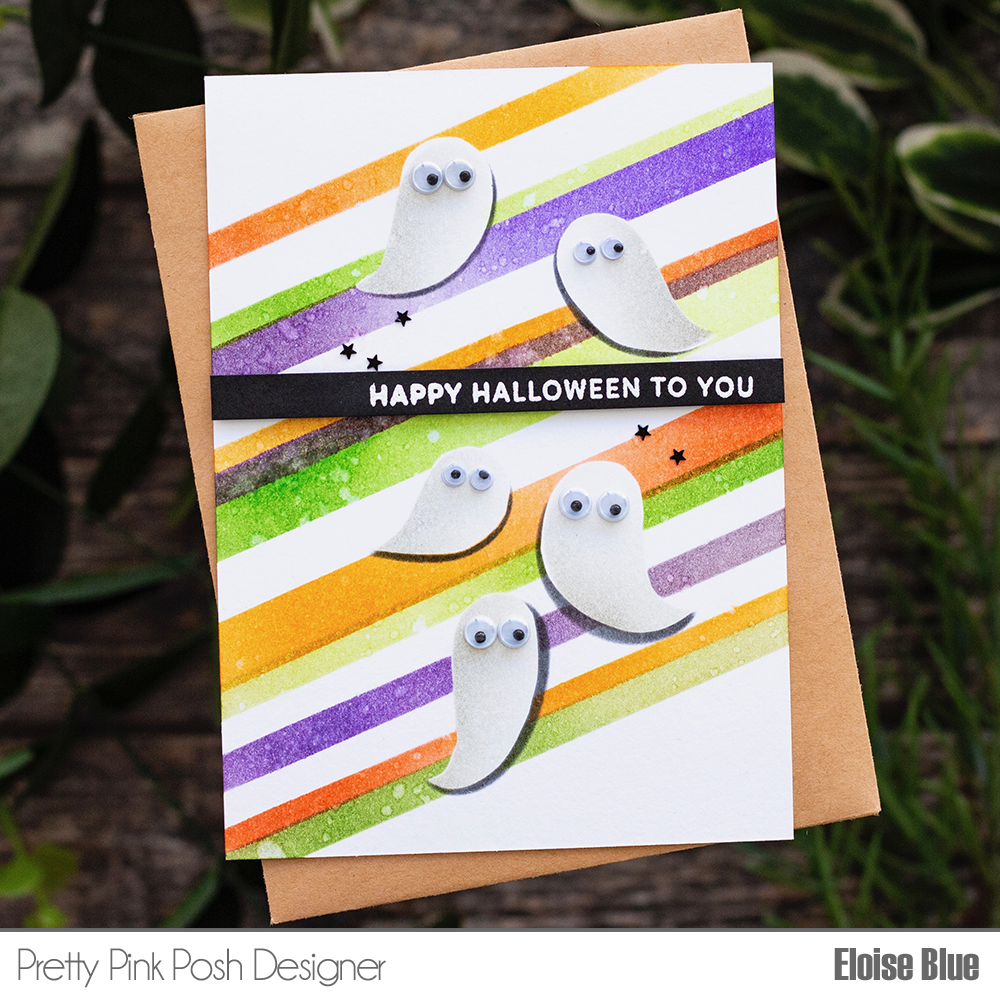
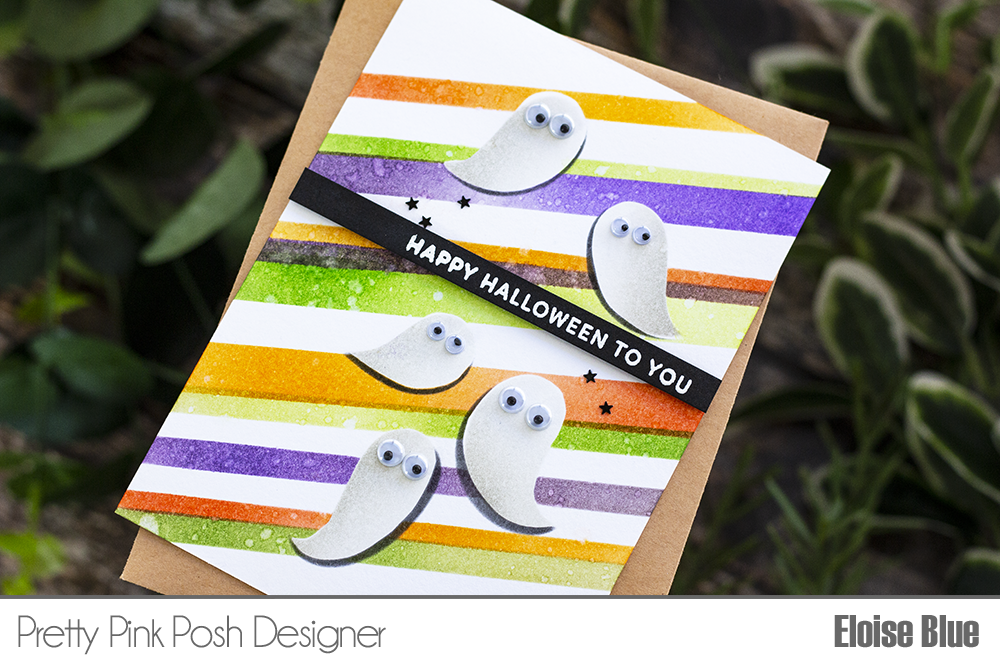
To start off my first card, I took a piece of watercolour cardstock and masked off individual “ghosts” from the Brush Strokes Stencil to ink blend onto the background. I used Pumice Stone Distress Ink and a little white pigment ink to blend them. Once they were all done, I made masks for them all using masking paper and adhered them over the top. I then used Washi Tape and the Wide Stripes Stencil to ink blend stripes over the background diagonally. I flicked on some water and dried it off with a heat tool.
I decided that the ghosts blended into the background too much, so I re-applied the masks and laid over the stencil and used some Black Soot Distress Ink to create a drop shadow on the each of them. Lastly, I adhered Silly Eyes to each of them using some glossy accents and white heat embossed the sentiment ‘Happy Halloween To You’ from the Boo Stamp Set onto a thin strip of black cardstock and adhered it straight across the card.
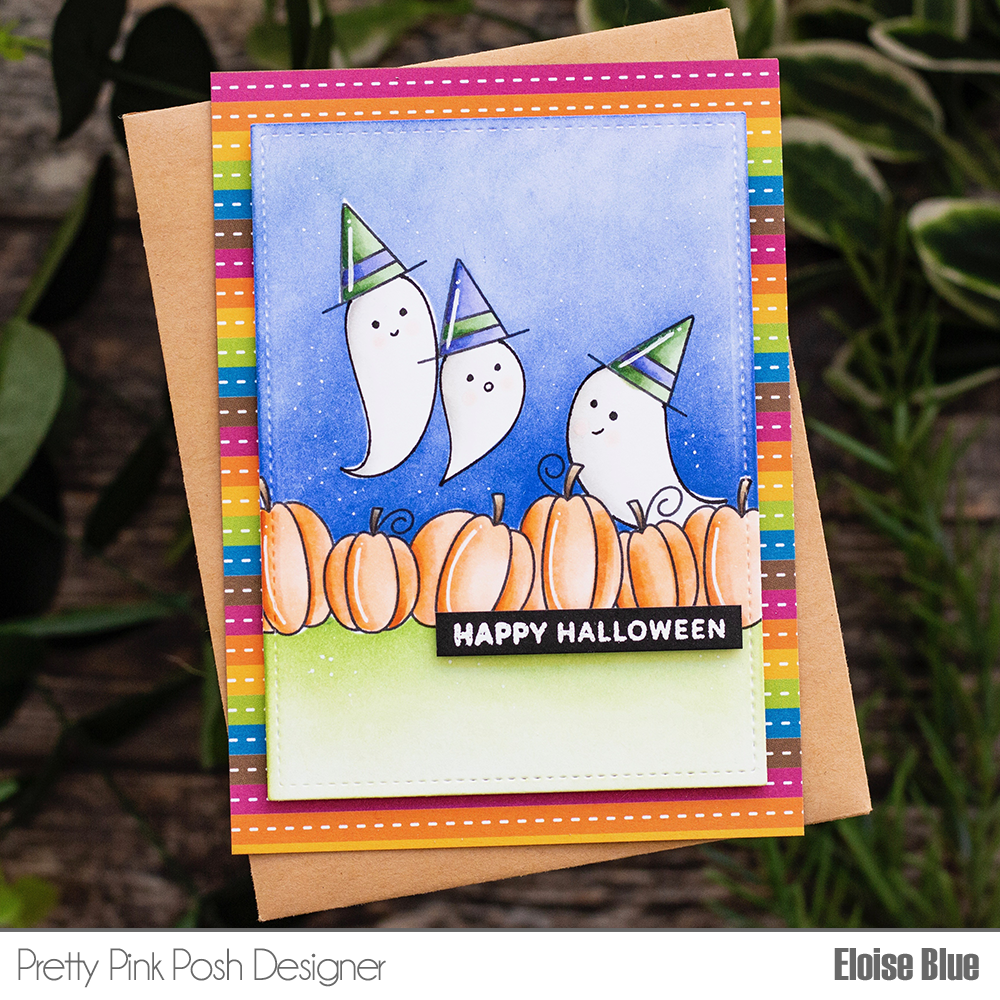
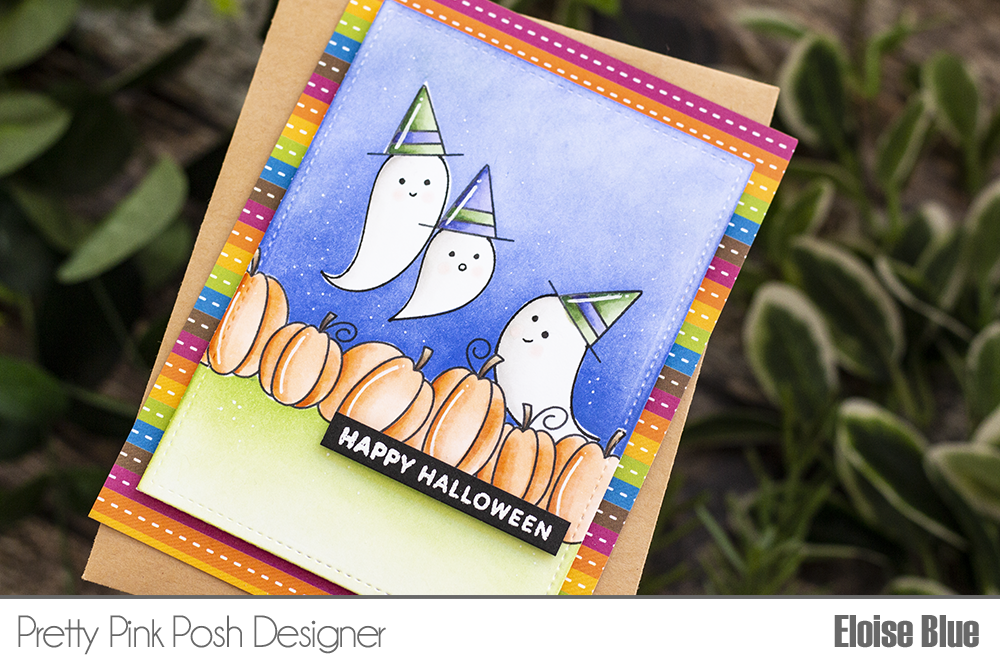
For the second card, I decided to turn the Brush Strokes Stencil into stamped images. I first took a piece of white cardstock and cut it down with the rectangle inStitched Notes Dies. I then used a stamping tool to stamp the pumpkin border from Fall Borders Stamp Set. I traced around the heads of the “ghosts” and then used the hat stamp from the Boo Stamp Set to stamp on the top of each of them. I erased the pencil lines, took the stencil and traced around each of the ghosts with a black marker. I then coloured everything in with Copic Markers.
After they were coloured, I drew faces on each of the ghosts using the same black marker. I then created masks for everything, adhered them on top and ink blended some Twisted Citron and Mowed Lawn onto the bottom and Blueprint Sketch for the top. I removed the masks and then white heat embossed the same ‘Happy Halloween’ sentiment from the Boo Stamp Set onto a thin strip of black cardstock. I adhered it to the card and then adhered the entire panel onto a piece of patterned paper.
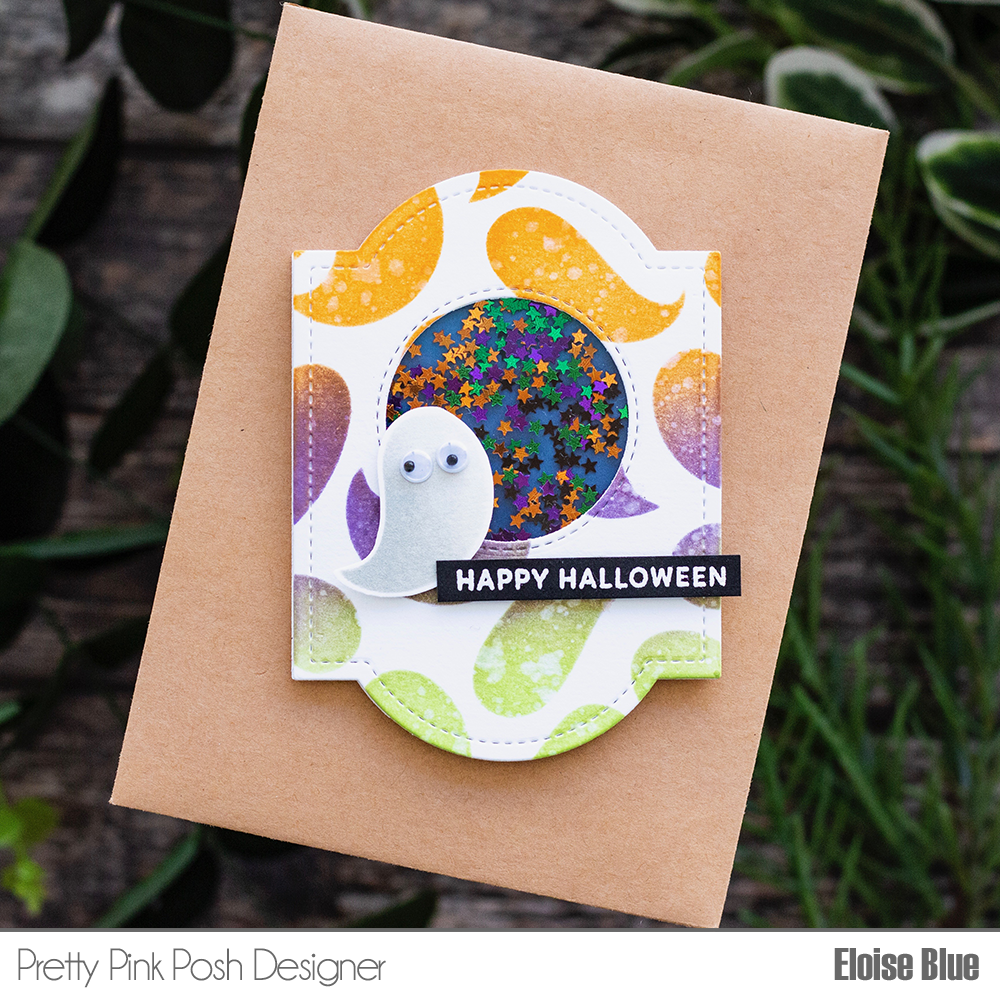
For my final card I wanted to create a mini shaker card. I started off with die cutting the Decorative Tag 2 three times, once from watercolour paper and twice from normal white cardstock. I used the Brush Strokes Stencil to ink blend some Wilted Violet, Carved Pumpkin and Twisted Citron Distress Inks over the top onto the watercolour cardstock tag. I flicked on some water and dried it off with a heat tool. I took a circle die and cut it from the centre and added acetate onto the back. I then took the one of the other white tags and adhered a piece of blue cardstock onto it. I added foam tape around the entire perimeter of the piece and added the star confetti’s inside. I then adhered my ink blended tag on top.
I then ink blended one of the “ghosts” from the Brush Strokes Stencil onto some more cardstock using Pumice Stone and white pigment ink, cut around it with scissors and adhered Silly Eyeson top. I then adhered it onto the front of my tag. I white heat embossed the same sentiment from the Boo Stamp Setonto a strip of black cardstock and adhered it into place. I then adhered the last tag I cut onto the back using a little bit of tape at the top and that finished off my third card.
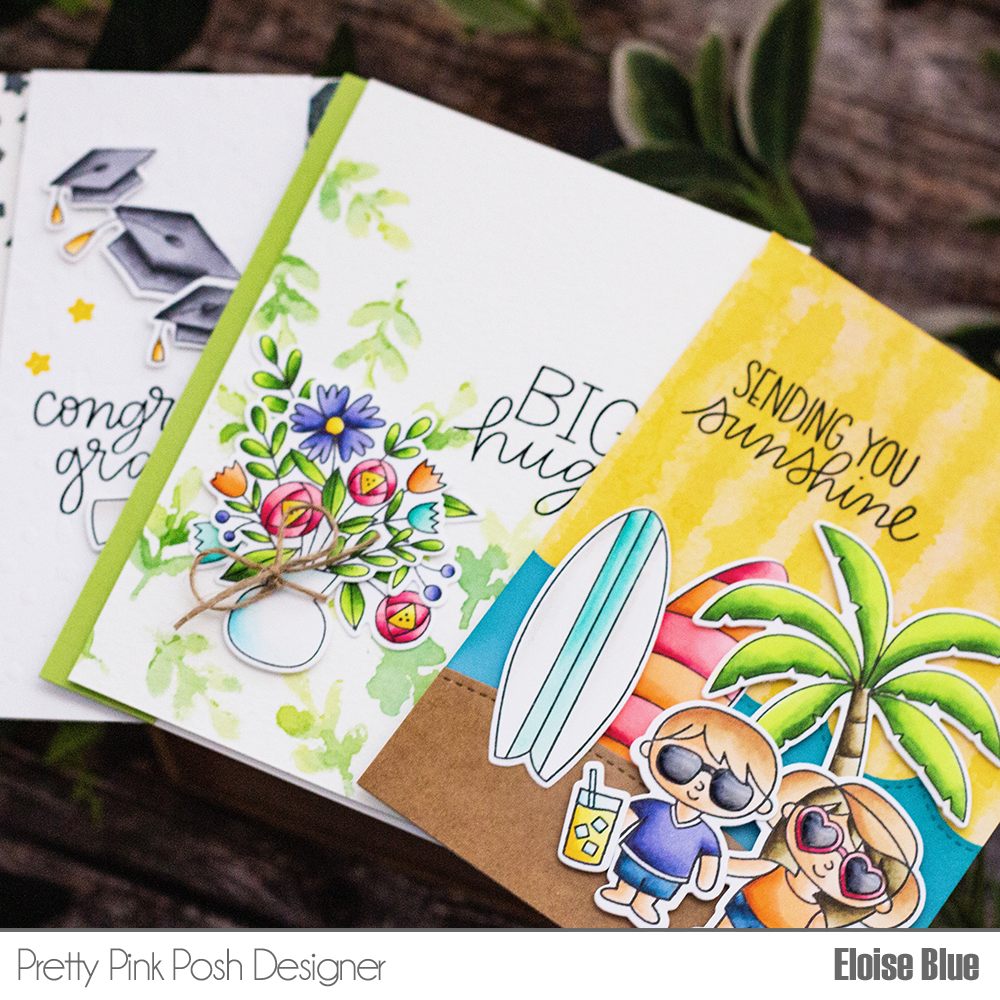
Hello friends, Eloise here and today I’m continuing on with the Stencils Video that was posted a little while ago. I shared 12 ways to use the newly released stencils using different mediums and techniques and in today’s video I’m using four of my favourite backgrounds that I created to make three cards.
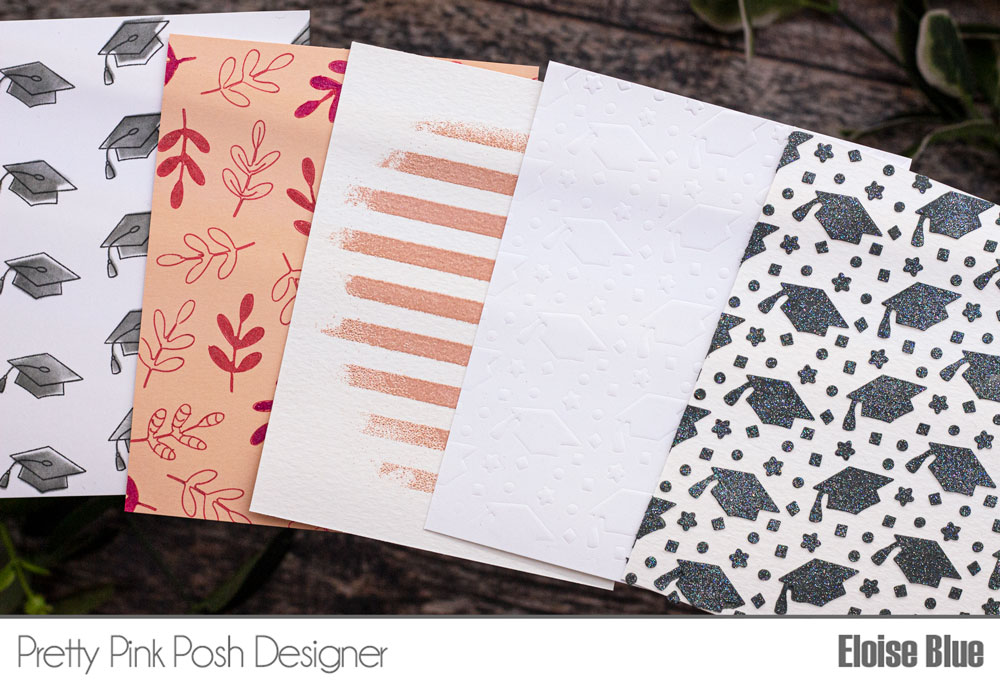
I started off with picking out the four backgrounds. I used the embossing paste and dry embossing backgrounds together using the Graduation Stencil, the water-coloured leaves background using the Leaves Stencil and also the bleached background using the Wide Stripes Stencil. I used various stamps from different releases to help decorate each card. Once I knew what stamp sets I was using, I stamped out my images, coloured them in with Copic Markers and cut them all out.
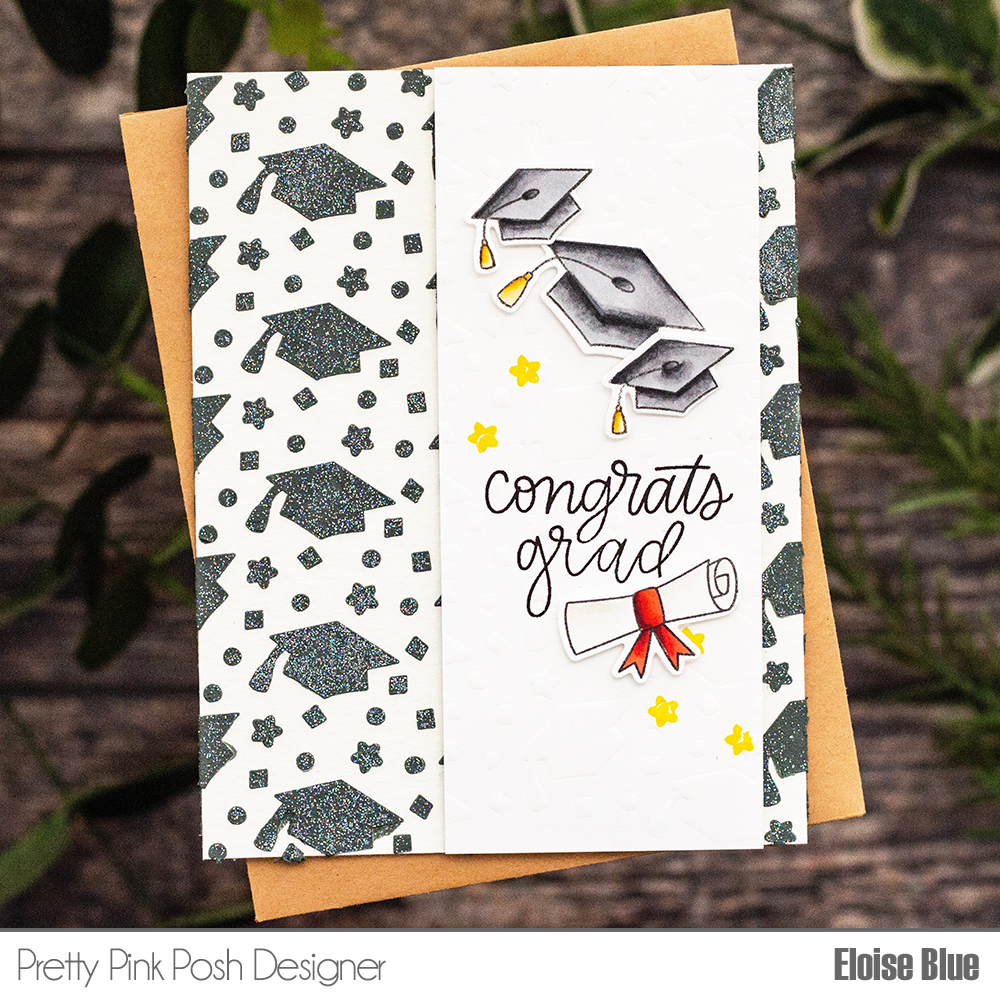
For my first card I used the embossing paste and dry embossed background. I also used the Congrats Grad Stamp Set for the images and sentiment. I stamped them out, coloured them in and then cut them out. I then cut down the dry embossed background to a thinner strip and adhered it onto my embossing paste background using foam tape. I then stamped the ‘Congrats Grad’ sentiment into the centre and stamped a few yellow stars around it as well. I added foam tape onto the back of the hats and scroll and adhered them into place. I lastly adhered the panel onto a white card base.
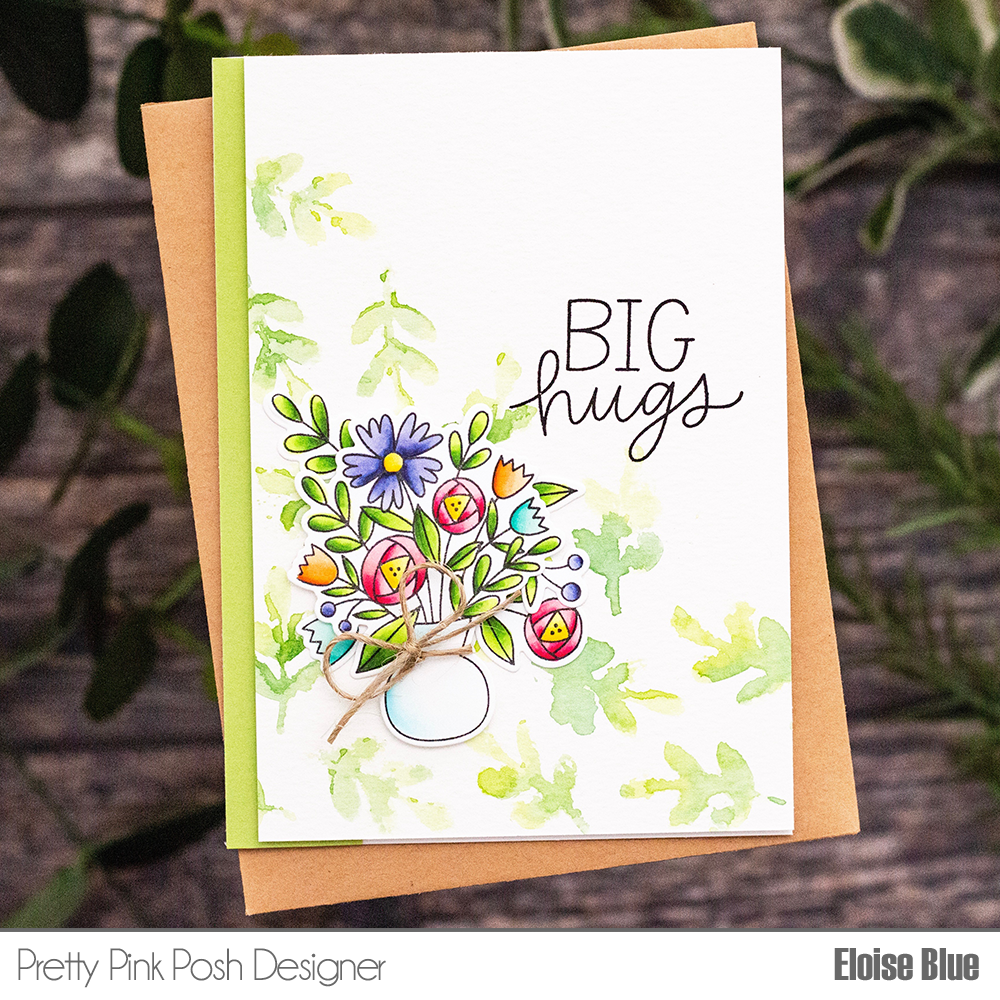
For my second card, I used the water-coloured leaves background. I used the Mother’s Day Stamp Set stamped and coloured in a few of the images, I then cut them out. I added foam tape onto the backs and adhered them into place on my card. I then used the Elephant Friends Stamp Set and stamped the ‘Big Hugs’ sentiment into place. I tied a small hemp cord bow onto the vase to give a little extra texture. I added a green strip of cardstock onto the left-hand side and adhered the entire panel onto a card base.
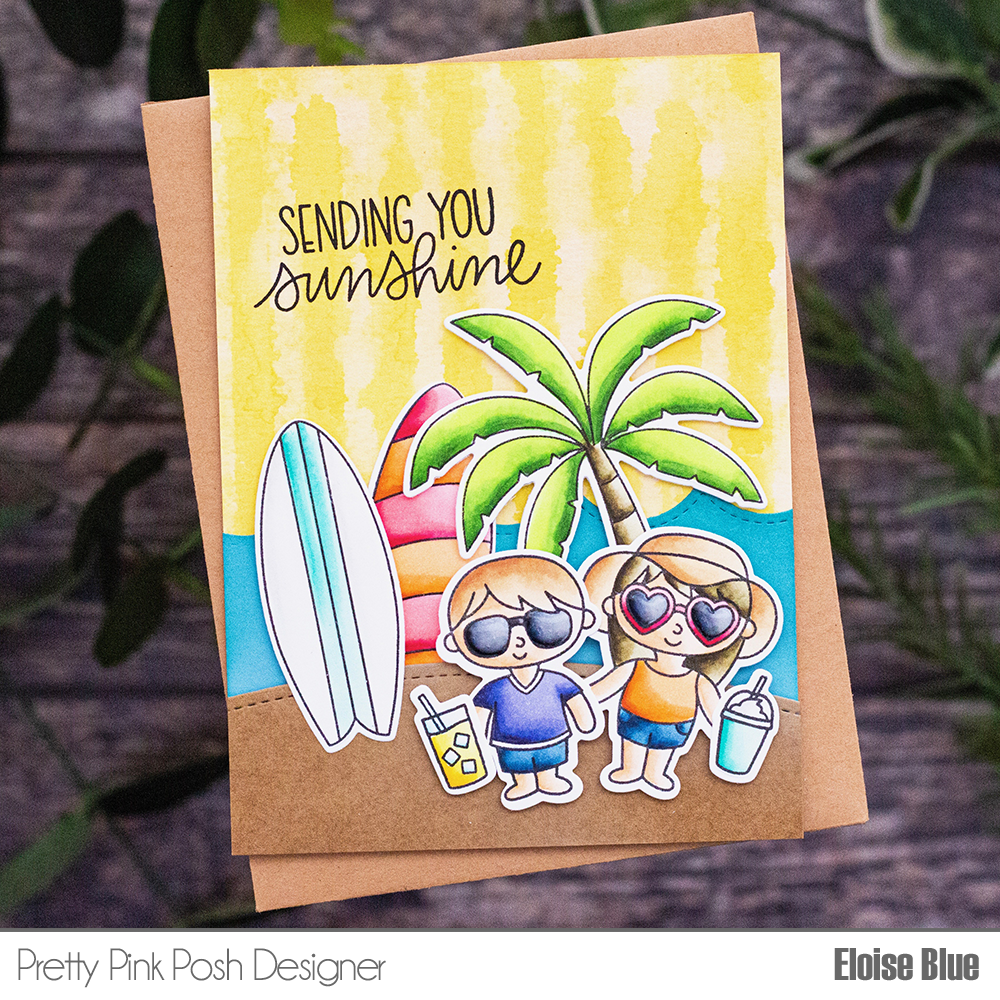
For my last card I used the bleached yellow sunray background. I used some images from Tropical Birds, Summer Friends and Summer Surfboards stamp sets, I stamped out some images and coloured them in. Once they were coloured, I cut them out. For my background as well as the bleached background, I used the Stacked Edges 1 Die and used the scallop one to cut a wave border on a blue piece of cardstock.
I then used the Stitched Borders 1 Die and used the curved one to cut from some brown cardstock. I added adhesive onto the backs of both of the pieces and adhered them down onto the sunray background. I then added foam tape onto the backs of the images and adhered them down into place. For my sentiment I used the ‘Sending You Sunshine’ from Summer Friends and stamped it in black ink on the top of my card.
That finished up all three of my cards today, using four of the stenciled backgrounds I made in a previous video. Thank you so much for stopping by today and I’ll catch you all next time.
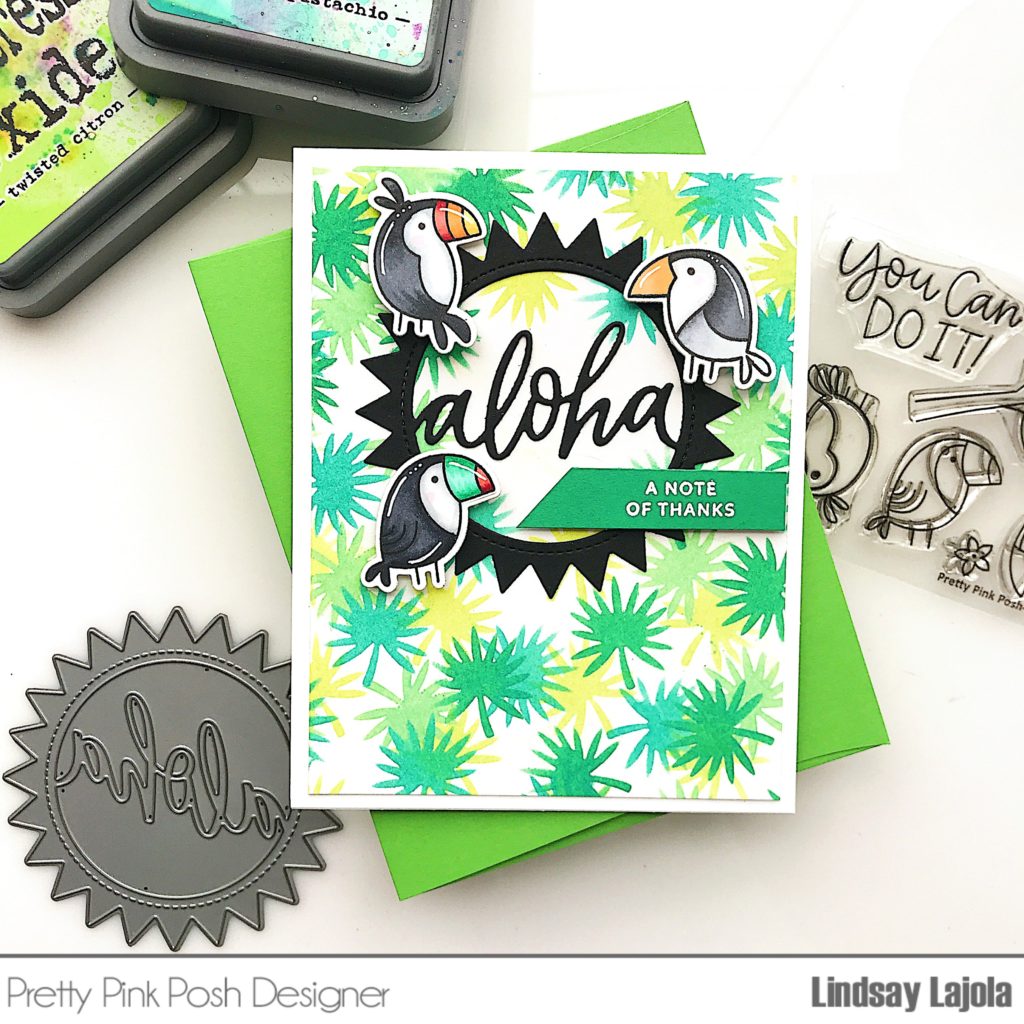
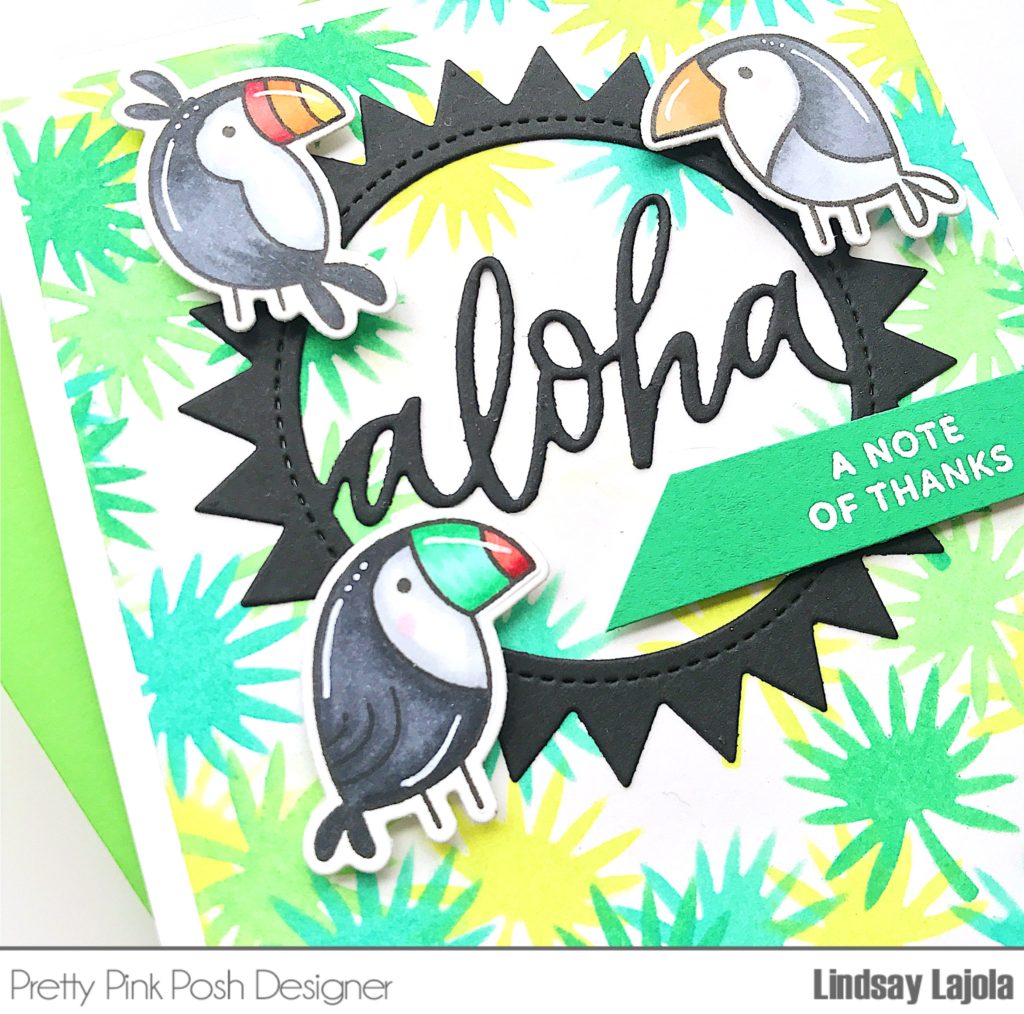
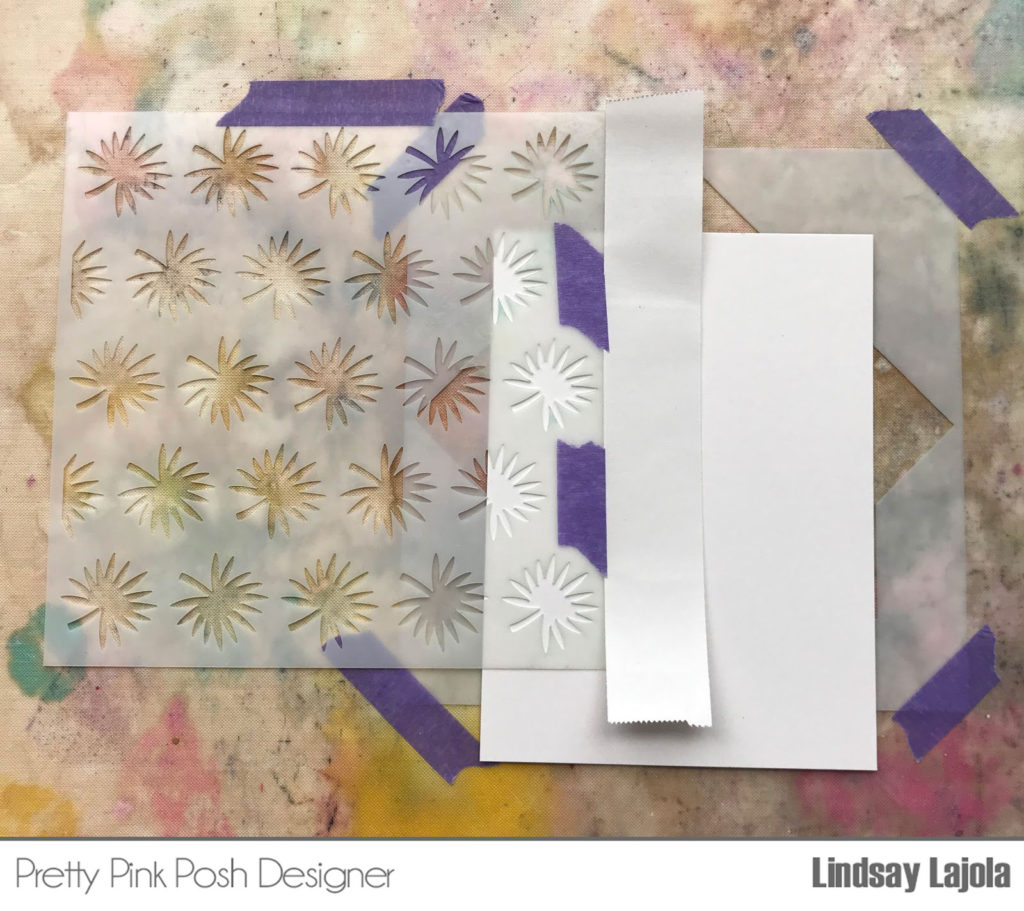
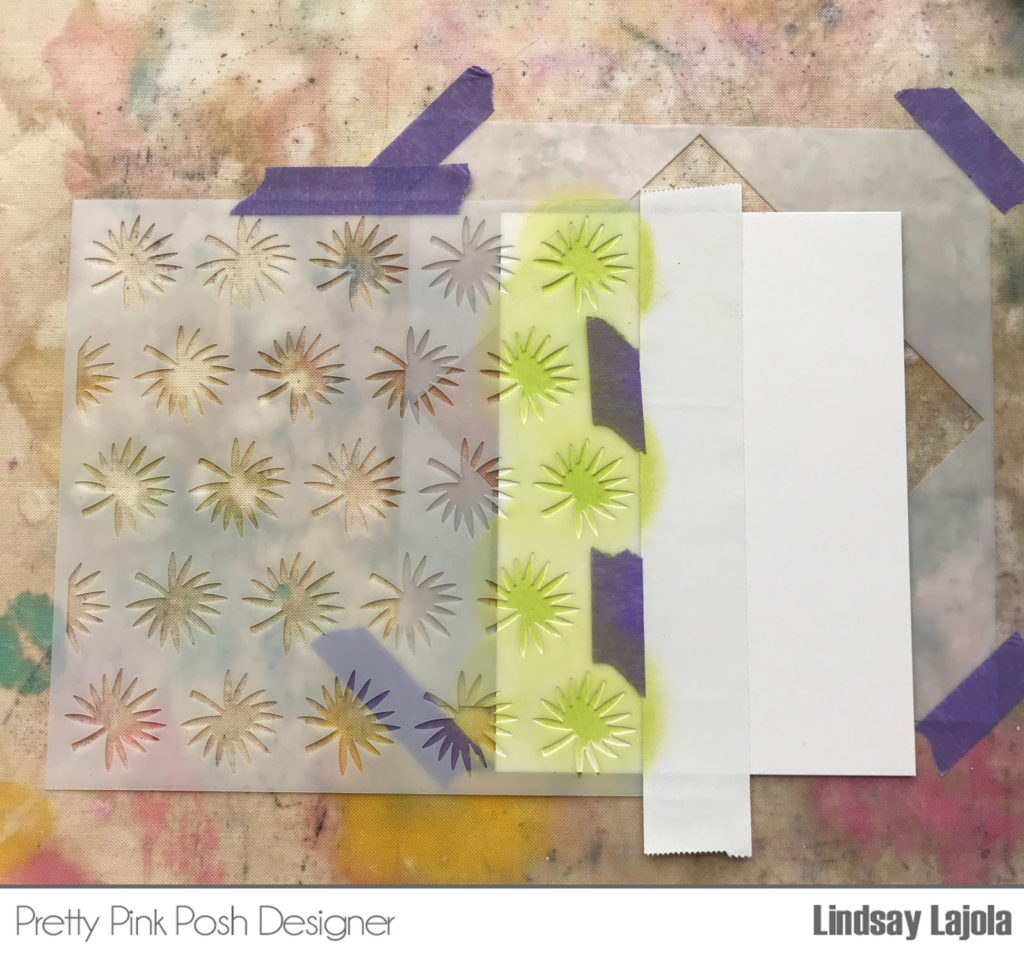
To begin, I cut a piece of smooth cardstock to 4” by 5 ½” to fit into the Gina K Wreath Builder 4” template. I watched a video by Jennifer McGuire on how to use the wreath builder template with stencils and I knew ALL of the PPP stencils would be so great for the technique! Check out her video here for even more details and amazing examples.
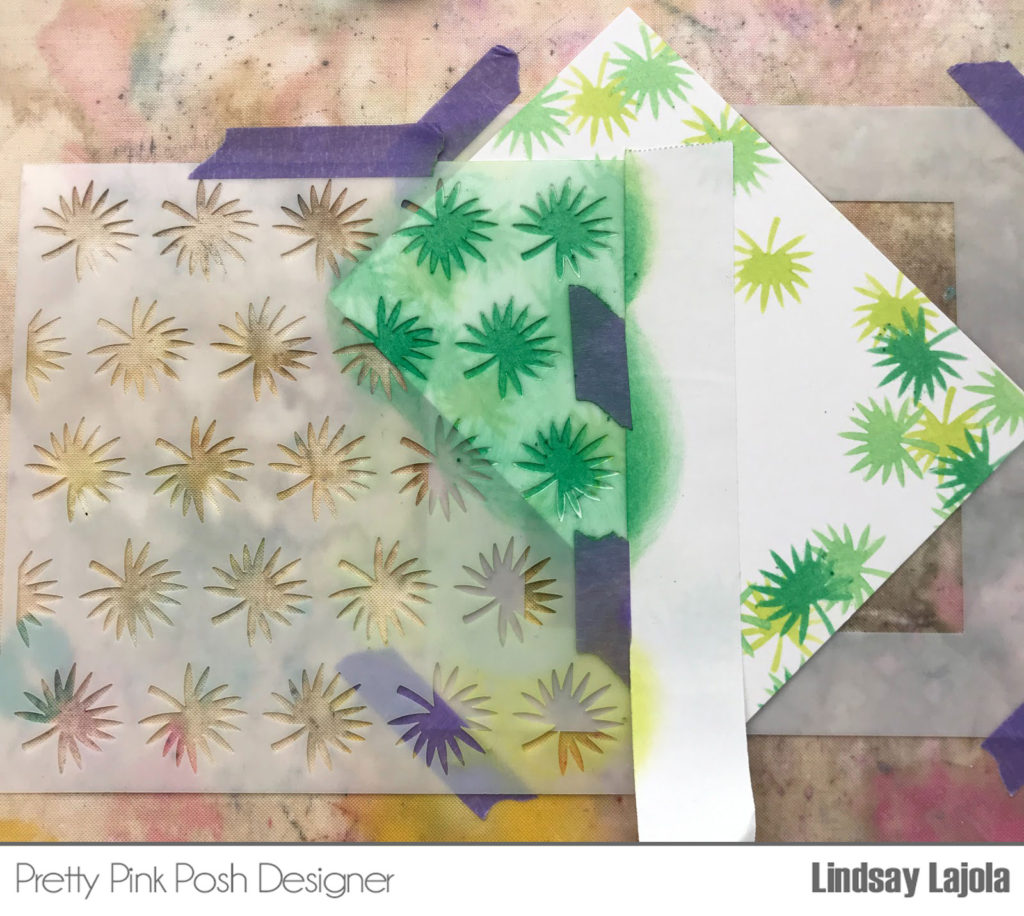
To set up the wreath builder and stencil, I taped down the wreath builder onto my craft mat. I added the stencil off to the side, taping the top of the stencil down to create a hinge in order to be able to move the cardstock around freely in between rotations. I started with the top part of the cardstock lined up as pictured, that is the edge that will always stay in the stencil as you rotate around to create the pattern. I then rotated the cardstock around in the wreath builder, changing up the ink blending colors as I went between Cracked Pistachio, Lucky Clover, and Twisted Citron.
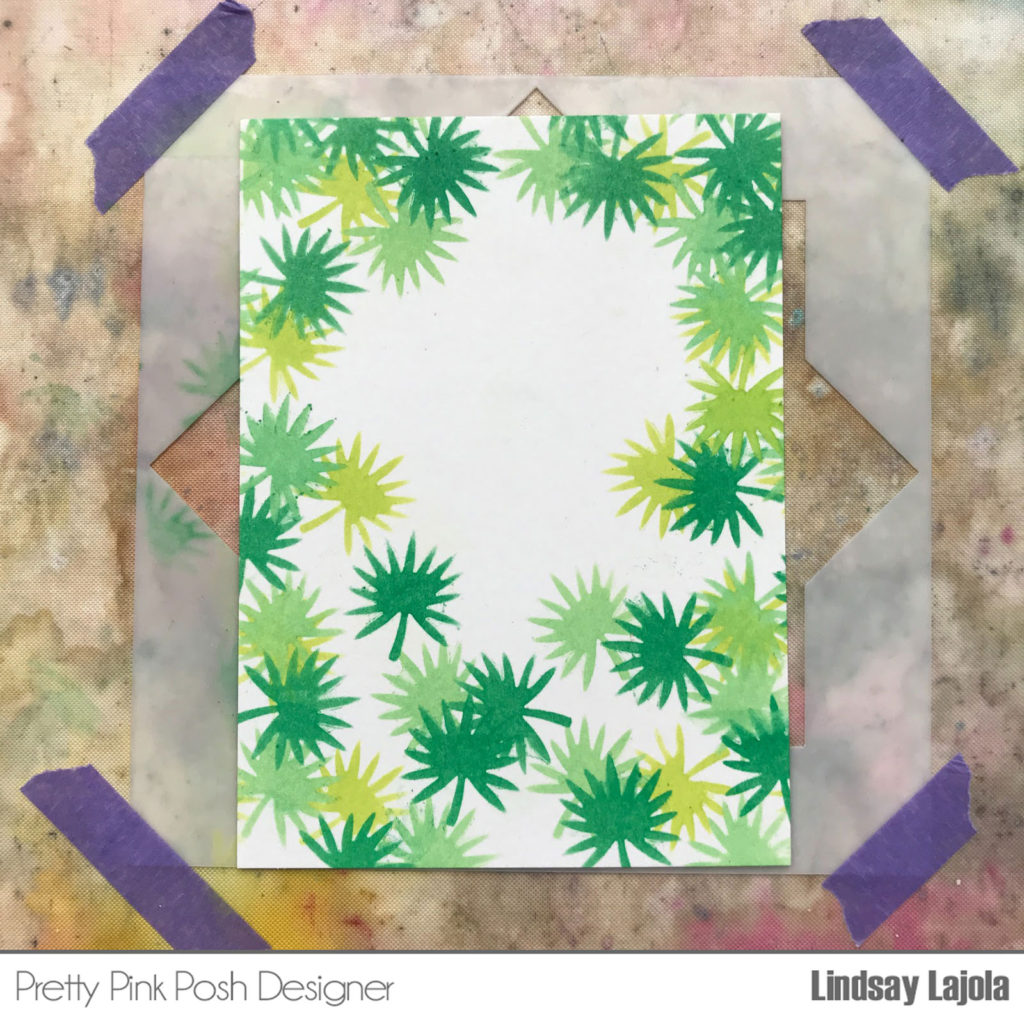
After I was done, I added in some individual leaves where I felt I needed a bit more color and ended up with this as the background.
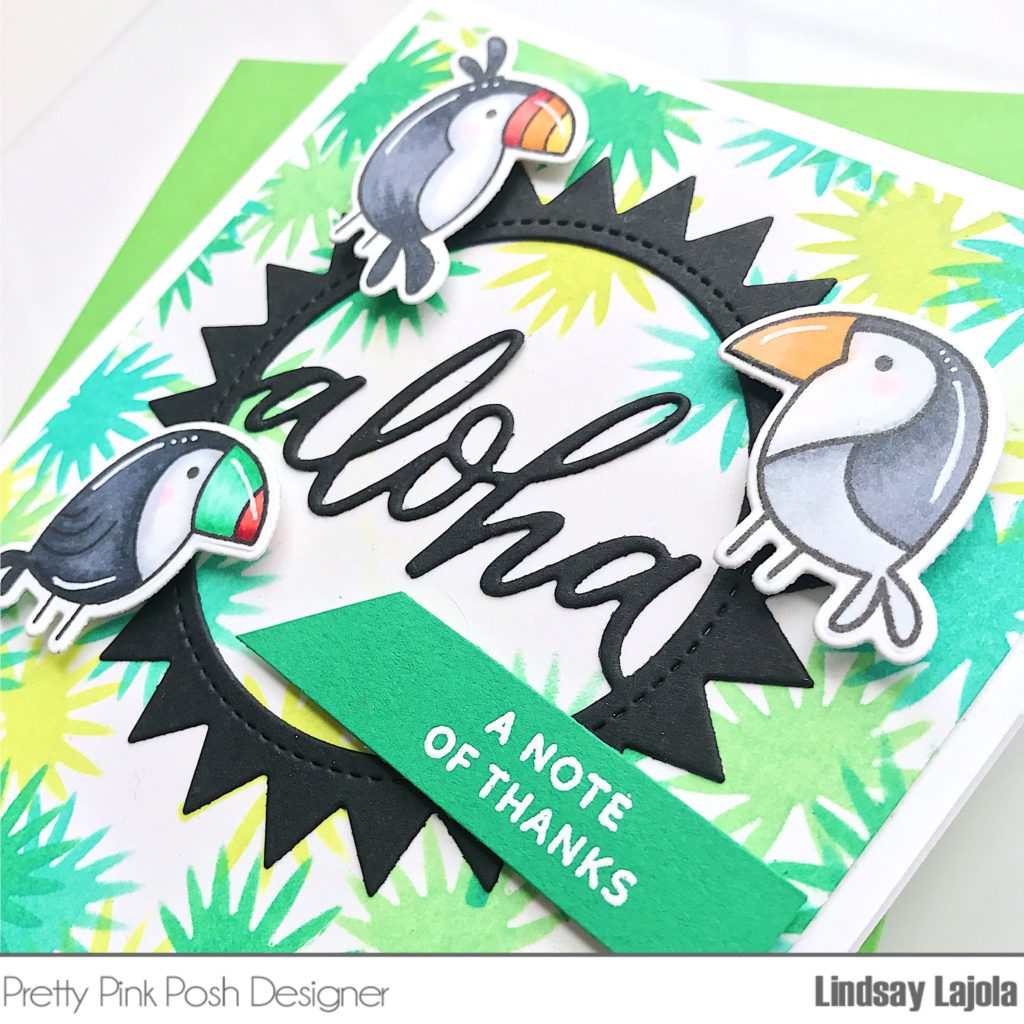
With the background complete, I started on my images from the Tropical Toucans Stamp Set and stamped them with a copic friendly ink and got to coloring with my copics. I added white details with a gel pen for a little pop.
For the sentiment I heat embossed the sentiment on matching green paper and paired it with a black die cut Aloha Shaker Die. I then arranged all of my die cuts around the white aspect of my background to finish up the card.
I hope you enjoyed this card and got some more ideas for how to use all the amazing stencils that PPP has to offer!
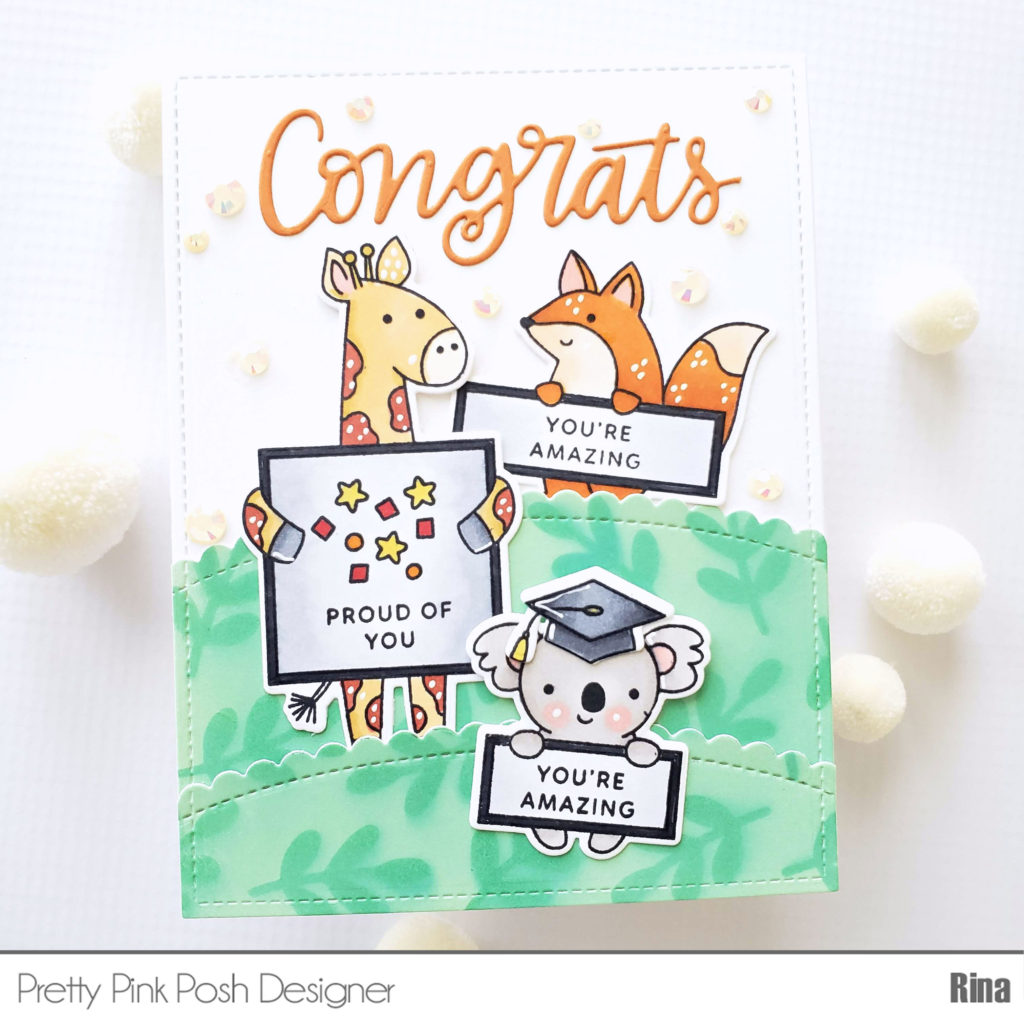
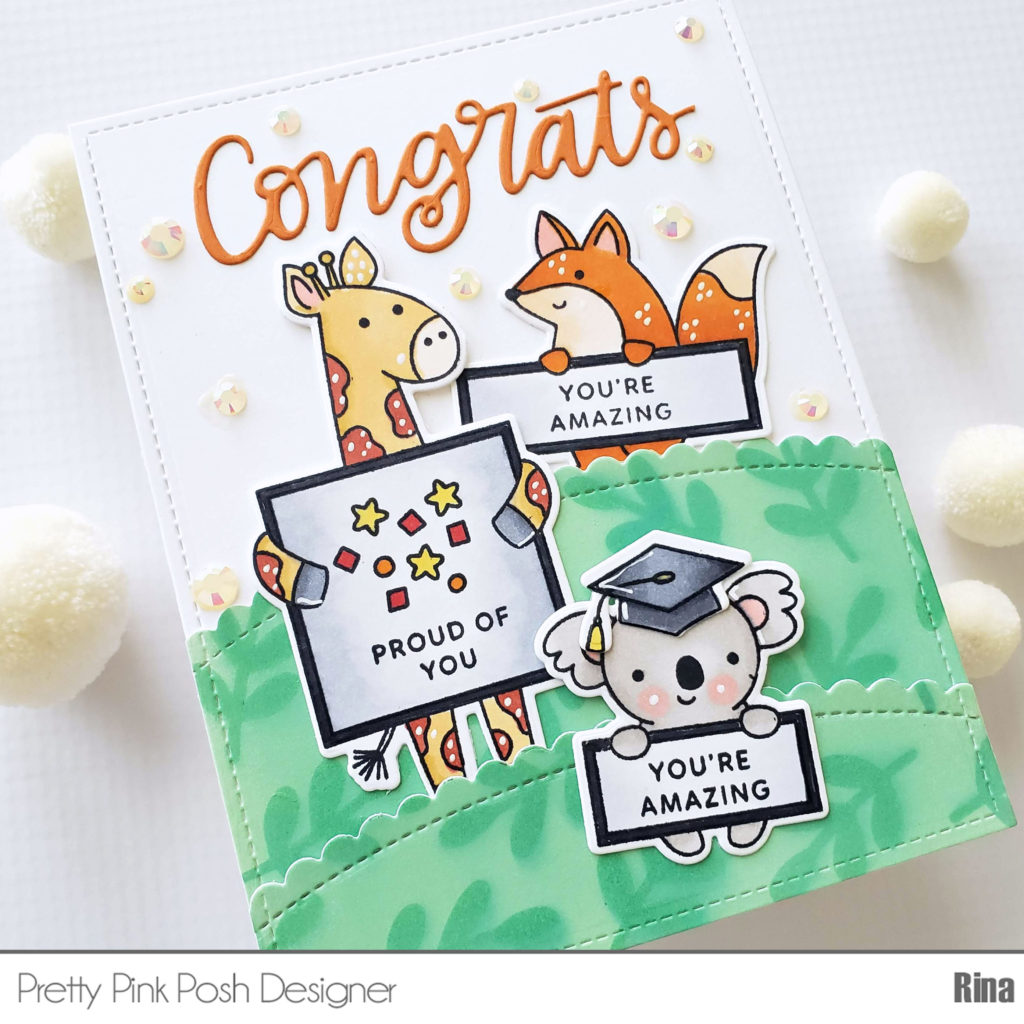
Hi everyone, Rina here with a congratulations card using the Animal Signs stamp set. I really enjoyed tailoring the signs to exactly what I wanted. Since it is graduation season, I also used the Congrats Grad stamp set to pair with the koala. The Pretty Pink Posh script dies are always a favorite of mine so I used theCongrats Script die.
I also wanted to take this opportunity to play with the new stencils. I created a fun landscape using theScallop Borders 2 dies and Distress Oxide ink in Cracked Pistachio and Lucky Clover. I used theLeaves Stencilto create texture on my landscape. I cannot wait to use the other stencils!
I colored my images in copic markers using the following
colors:
Y13, YR24, YR04, YR27
W1, W3
E51, E50, E55
C00, C1, C3, C5, C7
R20, R27
I finished off the card with the Buttercream Jewels, which added the right amount of sparkle!
I hope you enjoyed my card, have a wonderful day! Thanks for stopping by!
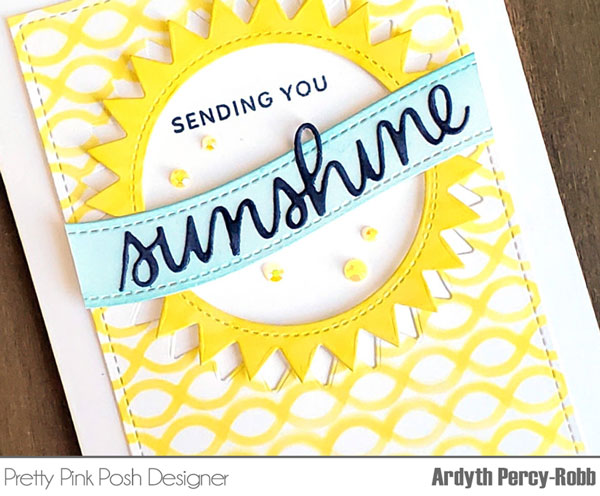
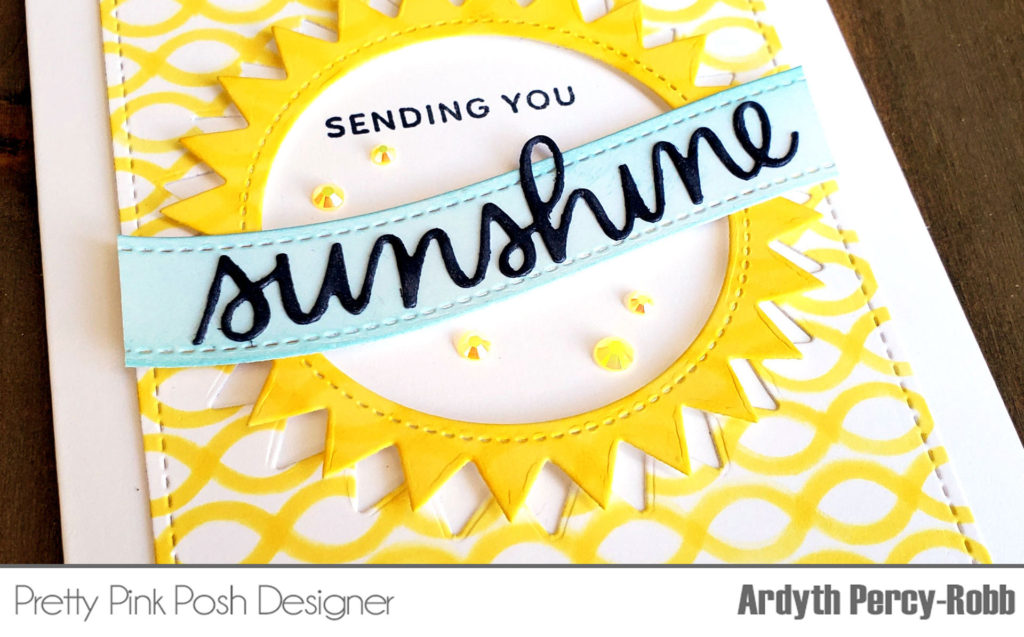
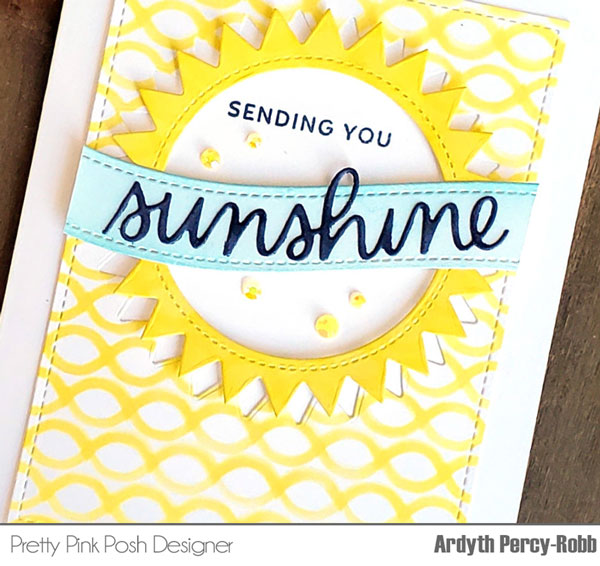
To start, I created a stenciled background with the new Waves stencil. I blended yellow ink through it onto a white card base and then lifted the stencil and turned it so that the waves were upside down.
I lined up the downward wave points on the stencil with the upward wave points on the cardstock and then blended ink through that. When I was finished, I had a fun, chain-like pattern.
I cut the Aloha Shaker die from the panel and trimmed it with the stitched rectangle die from Stitched Notes. I used scissors to remove the Aloha word from the sun frame, and then blended more yellow ink on it, so that the stenciled pattern was no longer visible.
I cut the new Sunshine Script die from white cardstock and coloured it with a dark gray Copic marker. I also cut a banner from one of the dies in the Stacked Edges 1 set, and blended blue ink along the edges for dimension and a pop of colour.
Because the Sunshine die cut is so narrow, it’s quite flexible and I was able to curve it to match the curve of the banner. I adhered the stenciled panel to a white cardbase then stamped a partial ‘Sending You’ sentiment from Tropical Birds inside the cut out sun, directly on the card base.
I put foam tape on some of the sun rays, and placed it onto the card, offsetting the rays, so that there was a doubled-up effect. Then I glued the sentiment banner on top – I used liquid glue on the edges and foam tape in the centre for support.
Finally, I chose some yellow jewels from the Citrus Mix and glued them above and below the sentiment strip.
I love how bright and sunny this card is, I hope you do too! There are so many possibilities with stencils and dies!
Hello friends, Eloise here and today I’m here to share twelve ideas on how to use the Pretty Pink Posh stencil bundle #1. In today’s video, I’m just sharing the techniques and hopefully in my next video I’ll share some ideas using the backgrounds I made.
Working from left to right, here is how I
made each background.
#1 – Colour then Stamp. For this first background, I took a piece of white cardstock, adhered it down and adhered my Graduation Stencil over the top. I then used washi tape to mask over the other images besides the hats. I ink blended some Black Soot Distress Oxide Ink over the top. I then removed the stencil and stamped over the hats using the Congrats Grad stamp set. Super simple and easy background with these stamps that match. If you want the confetti images back from the stencil, line up the stencil and then mask off the hats instead and ink blend over the rest of the areas.
I also did the same technique using the Leaves Stenciland Mother’s Day stamp set, which I will share the quick and easy card I made with that background at the end of the post.
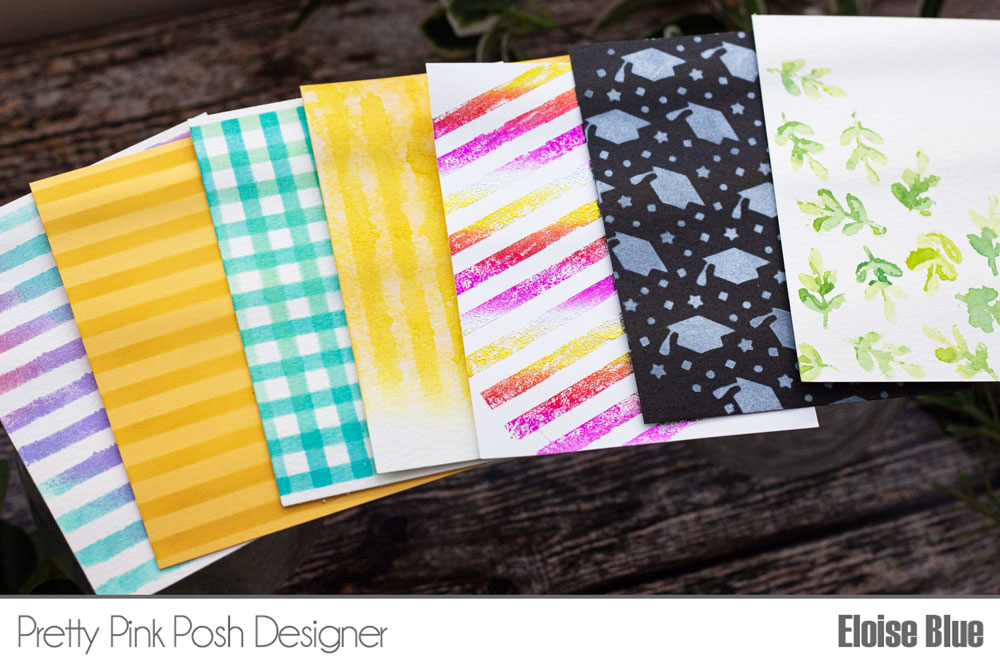
#2 – Tracing. I took a piece of apricot coloured cardstock and adhered it down into place. I then laid over the Leaves Stencil and traced around the shapes with gel pens. Then to show some examples I coloured a few in, drew random patterns in some or you can trace with a black pen and colour with a different colouring medium. I liked this idea more for a larger stencil with larger spaces to colour. But it still turned out okay and is another fun way to get more from your stencils.
#3 – Heat Embossing. I taped down a piece of white cardstock and adhered the Wide Stripes Stencilover. I then smooshed down my Versamark Ink and added some Rose Gold Embossing Powder over the top. I took a brush and brushed away some of the powder on the outsides and heat set it with a heat tool. I liked this way since you can use any embossing powder you own and being able to brush away whatever powder you don’t want is kinda nice so you can keep it in different areas.
#4 – Dry Embossing. I think this is definitely one of my favourite ways to use stencils. I ran a piece of white cardstock with my Graduation Stencilover the top through a die cutting machine. I made sure to use a metal shim and also the rubber embossing mats to allow the stencil to emboss and tada, the stencil pattern is embossed. I think why I like this way the best is because you can use it as a subtle background, add colour inside, etc. Also, stencils are cheaper than embossing dies which is also nice, as well.
#5 – Embossing Paste. I used some Texture Paste from Ranger and dyed it using Black Soot Distress Oxide Ink. I then took a piece of white cardstock, adhered it down and then adhered the Graduation Stencil over the top. I used a palette knife to spread the paste over and then before it dried, I sprinkled glitter over the top just for some added interest, but either way it looks good. I then removed the stencil (remember to clean it straight away) from the paper and set it aside to dry. Embossing Paste was huge a while ago and I still really like it; the clean-up is a little messy though.
#6 – Paints. So, for my next background, I used some acrylic paints. I have some Kaisercraft ones since I picked them up super cheap. I took a piece of white cardstock and put the Wide Stripes Stencilover the top. I then used little paint daubers and three colours of paint; a lavender, dusty pink and aqua and dabbed the colours over the stencil. I then removed the stencil and let it aside to dry. I really liked using the paints, I always look at paints as not really a card making supply. But using them over stencils just looks like Distress Oxide Inks or something; they blend really nice and they’re cheaper.
#7 – Tone on Tone. This one is super simple, not a lot of thought went into it but basically, I just wanted to create my own patterned paper. I love tone on tone and it’s definitely my most used patterned paper. So, using a light colour of cardstock; in my case yellow and then a darker yellow ink, I used the Wide Stripes Stenciland ink blended over it. Super simple but being able to create these easy backgrounds, eliminates me running out of my favourite pieces of patterned paper.
#8 – Layering. Layering stencils are super fun. I like it especially when you have a really open design and then you can layer like a polka dot or something over top to give it a little fake texture. But in this case, I ink blended some blue inks over the Wide Stripes Stencil horizontally, then rotated it 90 degrees, and ink blended the same colours again. This created a checkered sort of effect and brought new opportunities to a simple design of stencil.
#9 – Bleaching. To do the bleaching effect, I ink blend some Distress Inks / Oxide Inks (I’m using these because they react with water) onto watercolour paper. I then laid theWide Stripes Stencil over the top and sprayed over it with water. I blotted the paper with a paper towel and picked up the stencil. The parts where the stencil was stays the bright colour and the bits in between go lighter. I love the way this works out, it’s perfect for sunrays or a night sky or even to create the same tone on tone effect as earlier.
#10 – Foiling. So, a little while ago I got some Deco Foil Adhesive which is super cool for those of us that don’t have any machine to foil with. I took a piece of white cardstock, laid over the Wide Stripes Stencil at a diagonal and taped it down. I then took some of the liquid adhesive and a paint dauber and dabbed it over the top. Remember, whatever texture is left behind when you lay the adhesive down, the foil is going to pick up that texture. I set it aside to dry for around half an hour and then took a piece of foil, laid it over top and rubbed over the foil with my fingers where the adhesive is. I also used a bone folder at the end to really help stick down the last few bits. Foiling is super pretty and honestly; I will use it a lot more now that I don’t have to use a machine.
#11 – White Ink. I love using white ink on a dark colour of cardstock. It’s perfect for easy night skies, etc. This time I used the Graduation Stencil and ink blended white ink over the top of a black piece of cardstock. Super simple, but effective. You could do this with lighter colours of cardstock as well to create a more tone on tone effect as well.
#12 – Watercolour. Last idea this time around is to use watercolour. Watercolour is one of my favourite mediums since it’s so free flowing and gorgeous. So, I used the Leaves Stenciland a watercolour palette and painted over a selection of the leaves. I used two different tones of greens for them. I then lifted up the stencil and mopped up a few of the really wet areas with a paper towel. Obviously, this isn’t going to look perfect, but I like how it’s not perfect since it looks like you water coloured them yourself… even though you didn’t.
So that’s the twelve ways I’m sharing on
how to use stencils today. I then went off camera to create a card with one of
the backgrounds.
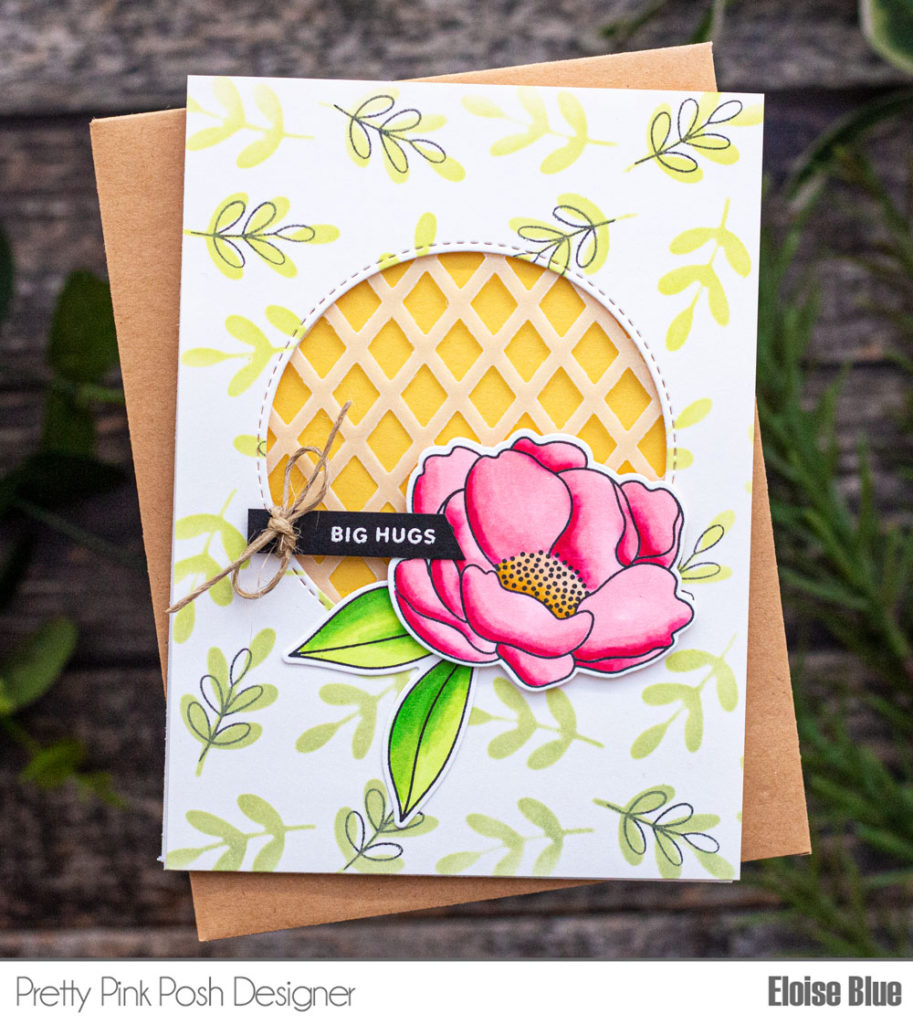
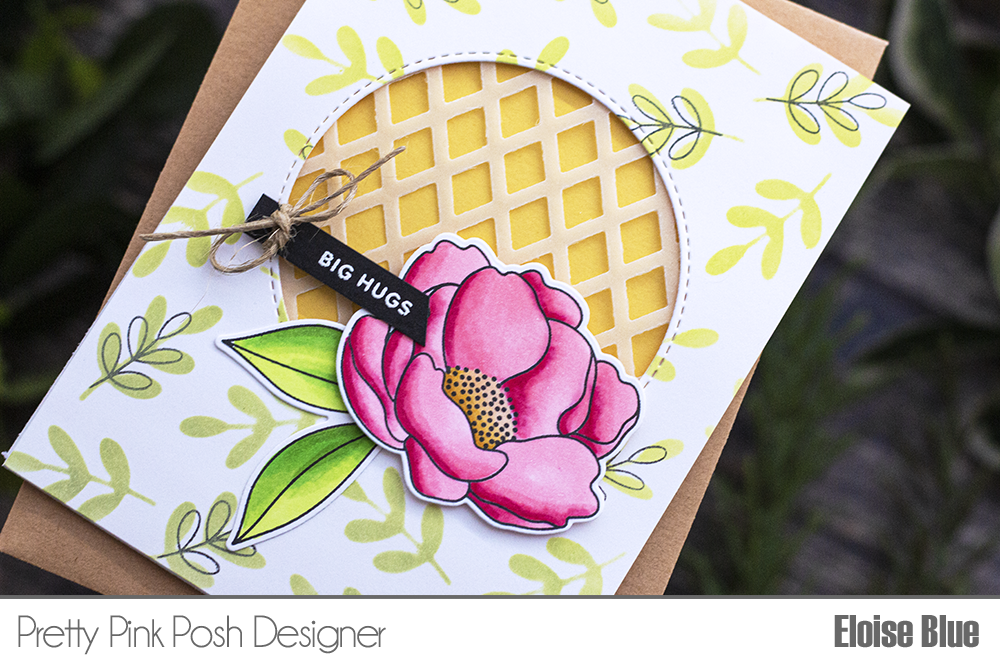
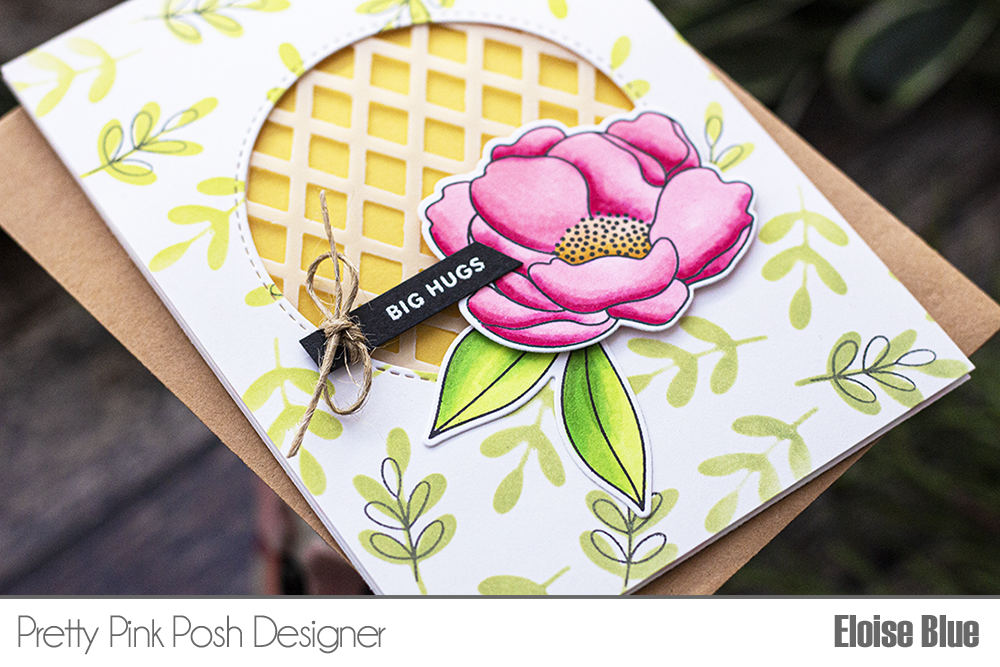
To start off my card, I stamped a couple of images from the Peonies stamp set and coloured them with Copic Markers. I then cut them out with the Peonies coordinating dies.
I then took one of the leaves backgrounds that I made in my video and die cut a circle from the centre. While I was die-cutting I cut the Lattice Background Die from vellum as well. I adhered the vellum lattice behind the circle and popped up the entire background on foam tape and adhered it to a yellow card base.
I then popped up the images on foam tape and adhered them into place as well. For my sentiment I used the ‘Big Hugs’ one from Elephant Friends and white heat embossed it onto a thin black strip of cardstock. I then tied a little hemp cord bow on one side and adhered that onto my card as well.
So, that finished up my super simple card for today as well as all the backgrounds I made. In my next video, I’ll be sharing a few card ideas using the backgrounds I made today.
Thanks so much for stopping by today and I’ll see you next time.
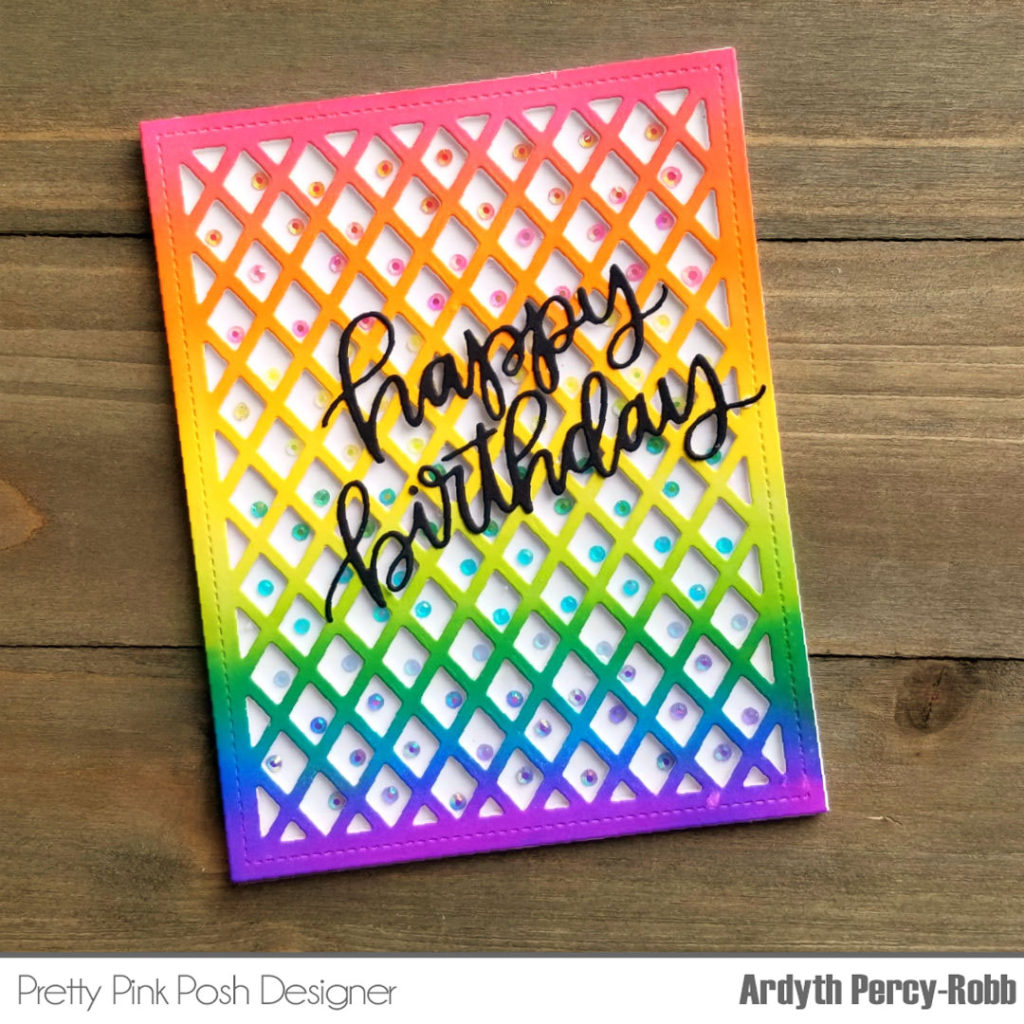
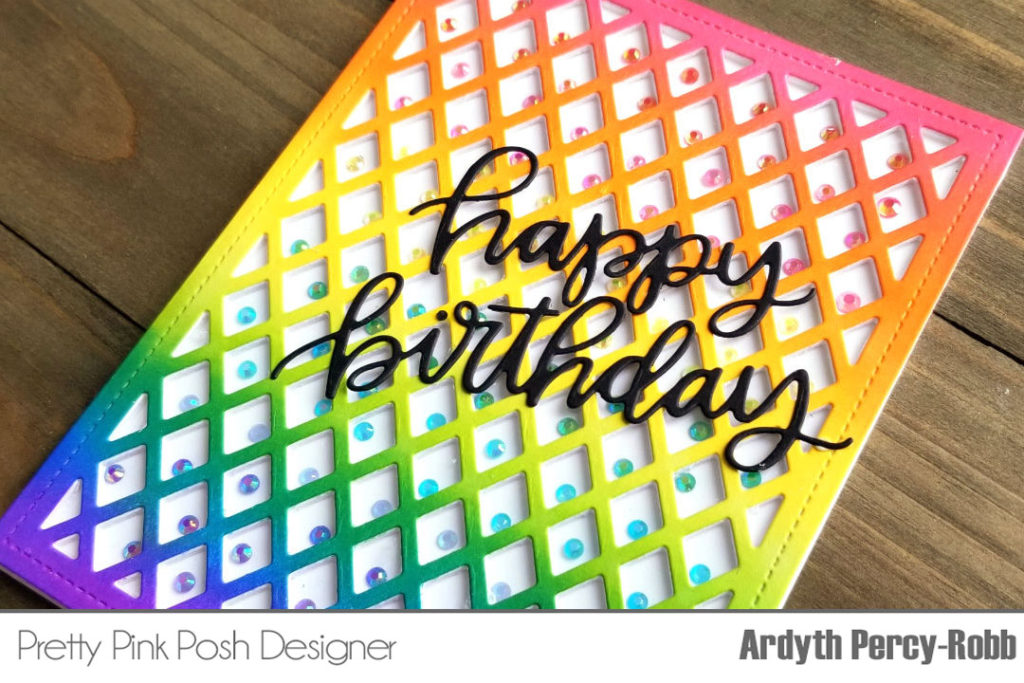
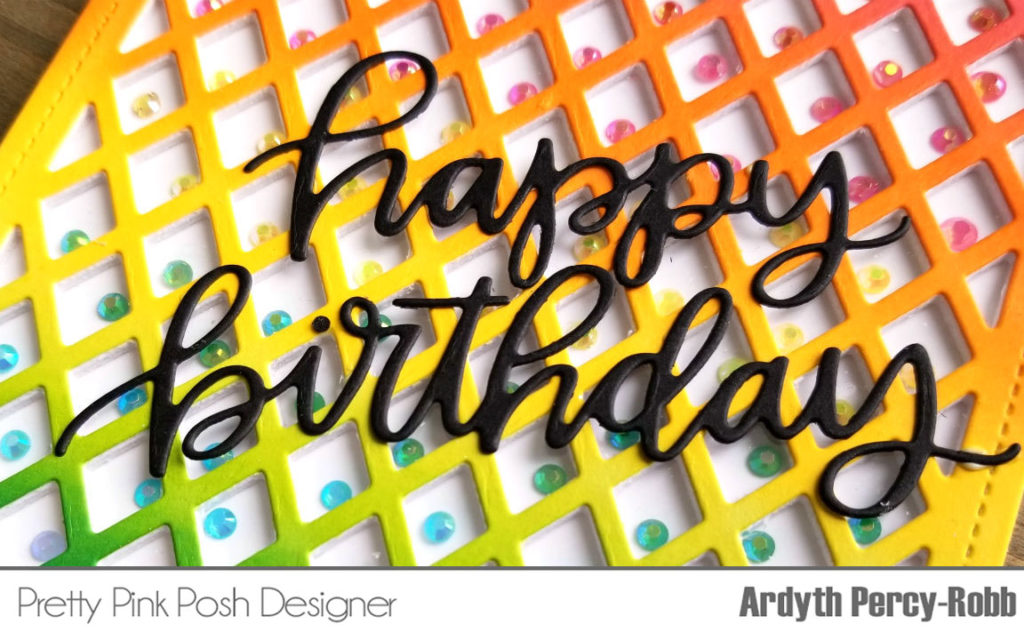
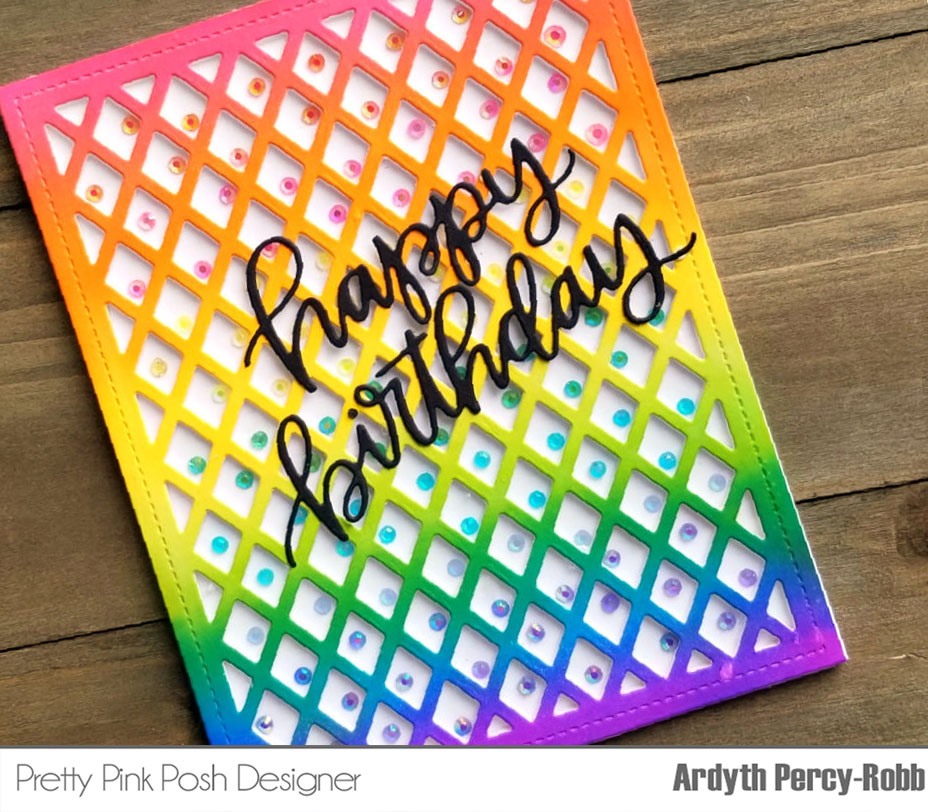
Usually when I build a shaker card, I use foam tape for the shaker walls. But you can also stack a die cut to create the walls and that’s what I did here. I started by cutting theLattice Background Die 5 times – 4 from plain white cardstock and 1 from a panel of cardstock that I had blended a rainbow of ink onto.
I used liquid glue to stack the 4 white die cuts and then glued a panel of acetate on top before gluing the rainbow die cut on the very top. When the glue was dry, I flipped it over, and there were lots of tiny windows just waiting to be filled!
I put one tiny jewel in each window, using a jewel pickerand craft pick to make sure that the faceted shiny side was facing out the window. I went in rainbow order, trying to match the rainbow on the front of the card.
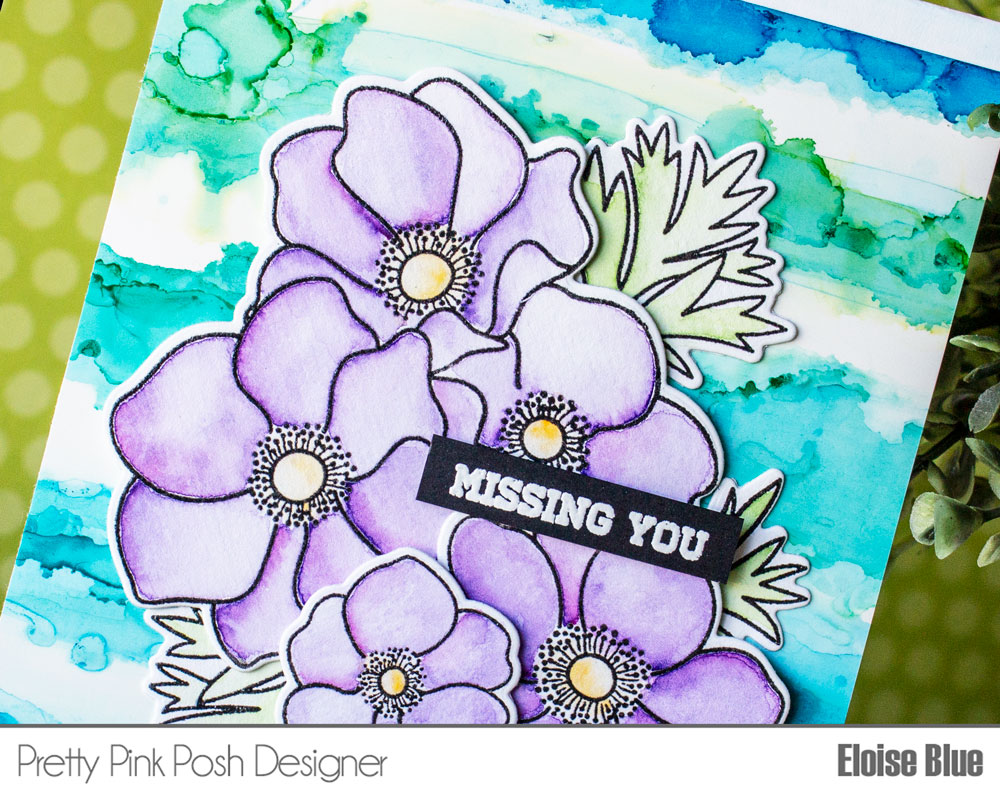
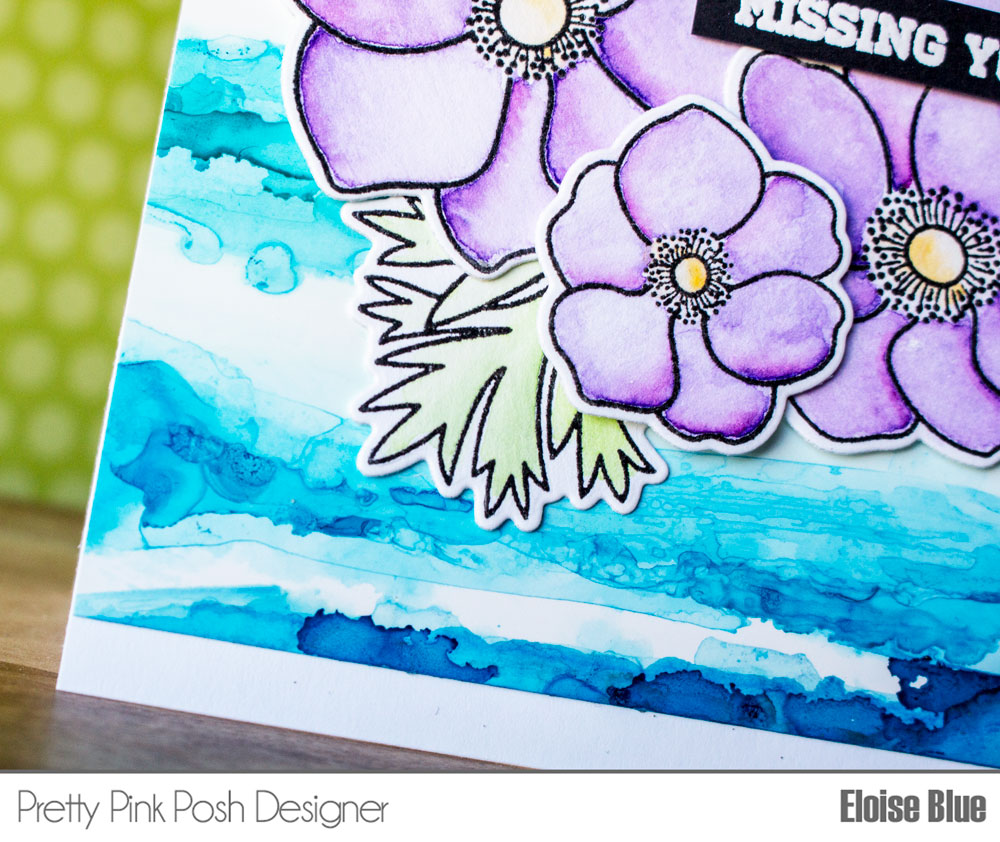
Hi friends, Eloise here and today I have a card to share with you all. I used the Anemones stamp set along with some alcohol inks to make a simple missing you card.
I started off with stamping out the anemones onto some watercolour paper with black ink and clear heat embossed over it. I then used my Mijello Mission Gold Watercolour palette and coloured them in with shades of purple as well as colouring the leaves green. Once they were coloured, I cut them out using the Anemonescoordinating dies and set them off to the side.
Next, I decided to do my striped alcohol ink background. I pulled several shades of blue alcohol inks out and used them to create a striped background. I used a paint brush along with water to help create the stripes today. I went from lightest to darkest down a piece of Yupo paper to create the background. I then dried it with a heat tool.
Lastly, I adhered all my flowers to the centre of the inked panel and then used the Camping Friends stamp set for the ‘Missing You’ sentiment. I white heat embossed it on a strip of black cardstock and adhered it onto my card as well.
Thanks so much for stopping by today, I hope you guys enjoyed and I’ll see you next time.
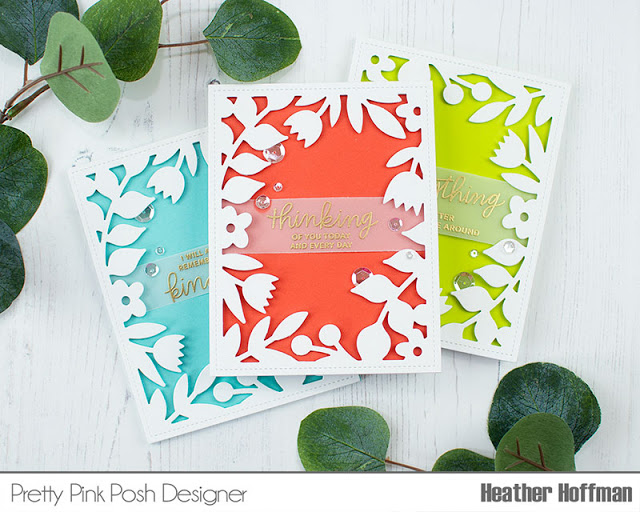
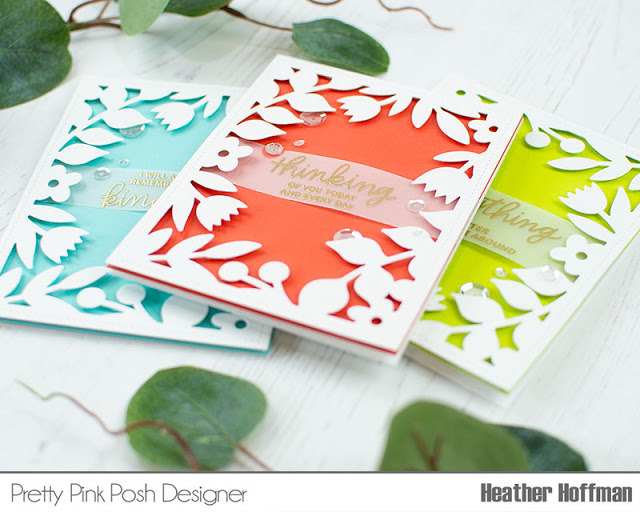
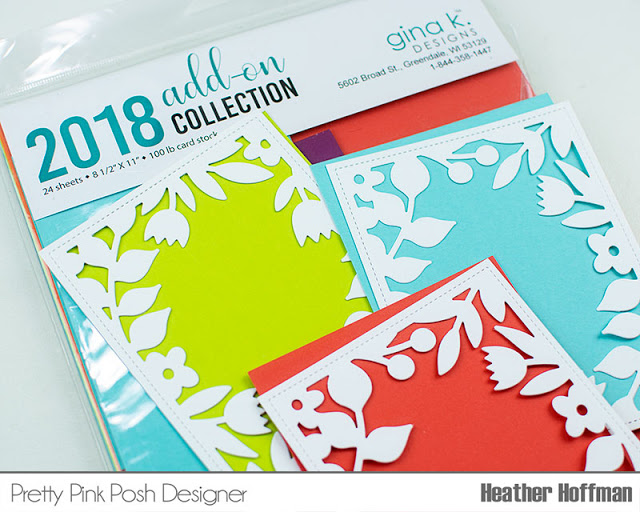
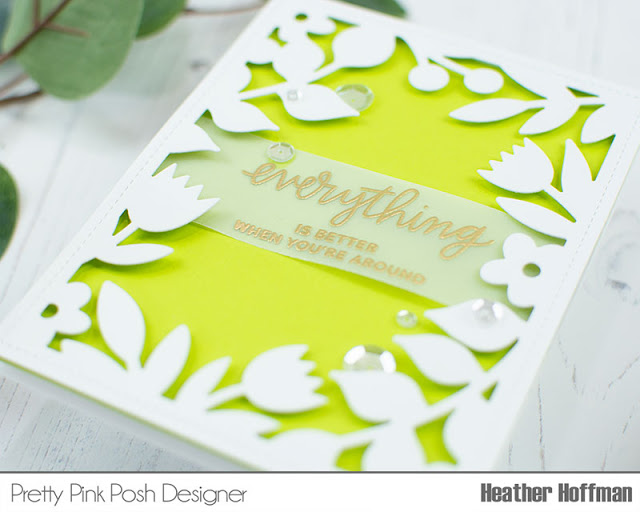
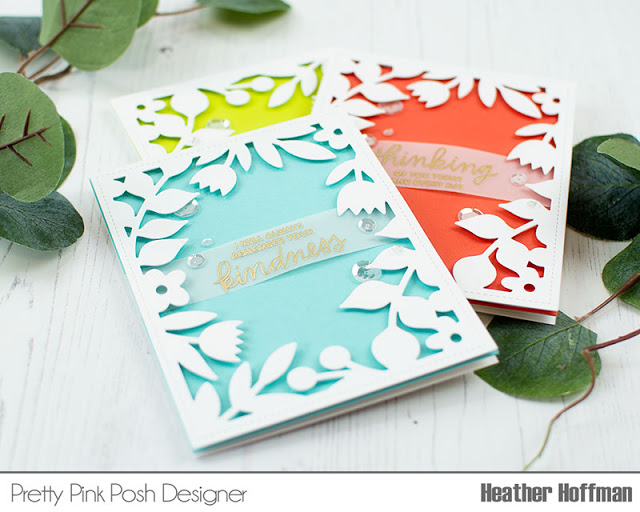
Good morning! Heather here and I’m sharing a fun set of cards created with the gorgeous Spring Frame Die – I love how they pop against bold colored cardstock, and make a perfect simple canvas for some lovely sentiments. This would be an easy way to create a set for gift giving, or to have on hand for lots of different occasions!
There is almost a graphic feel to these cards – and the vellum adds just the right touch of softness. Keep reading to see how these came together, step by step!
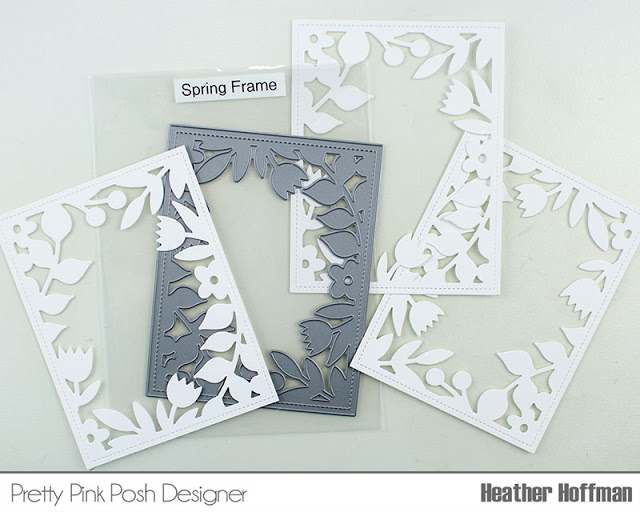
First up, you are going to need to die cut several of the Spring Frame from white cardstock. This die cuts like butter! And while there is lots of detail to make it gorgeous, there aren’t a ton of super tiny pieces to punch out, which I love!
Next, I chose some fun solid cardstock colors – there are all by Gina K Designs. The colors even look gorgeous together! I trimmed these down to fit behind the windows – so 4 1/4″ by 5 1/2″.
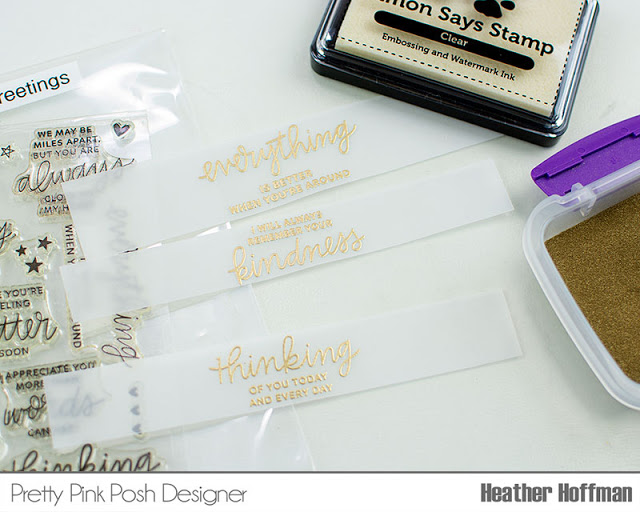
Next up – it was time to choose some sentiments! I heat embossed some sentiments from Thoughtful Greetings Stamp Set – a previous release – in gold on vellum, then trimmed them down into long strips, wider than the width of my card.
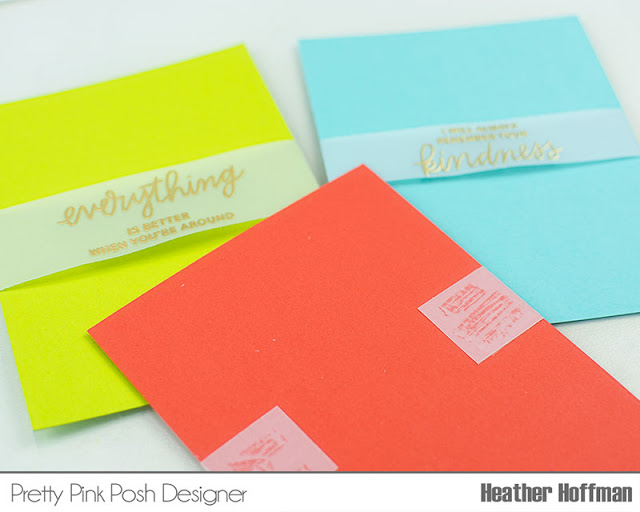
Next, I lined them up on my colored cardstock panels, folded the edges around to the back, and adhered them from behind. This way there is no need to hide the adhesive!
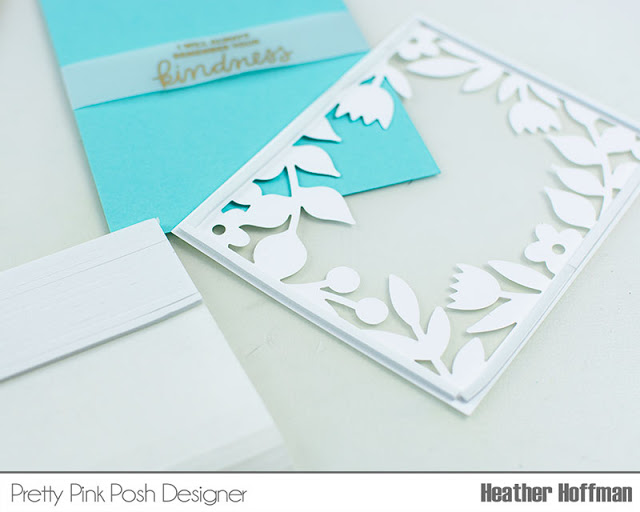
I used the handy Double Sided Foam Sticky Strips to adhere all of the Spring Frames over my cardstock panels – they are the perfect size to fit around the edges of this die, and it pops them up the perfect bit to add a bit of dimension.
The final finishing touch was a few Sparkling Clear Sequins adhered around for a bit of sparkle and shine!
And there you have it – a complete set, and super easy to put together!
Which color combo is your favorite? Or do you have a favorite sentiment?
Thanks so much for stopping by today – have an absolutely wonderful day!
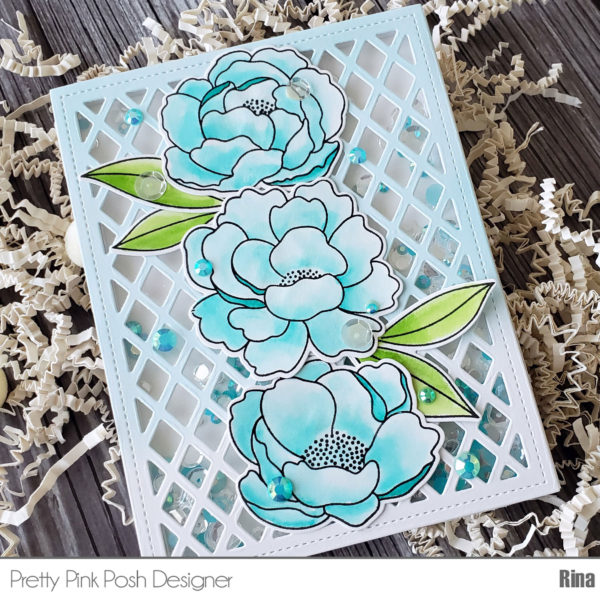
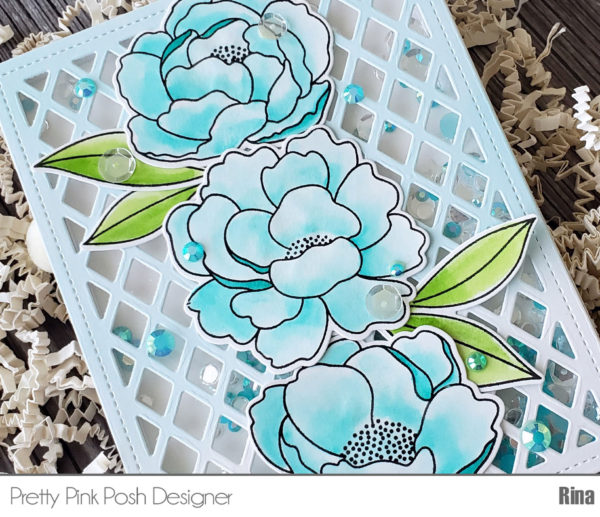
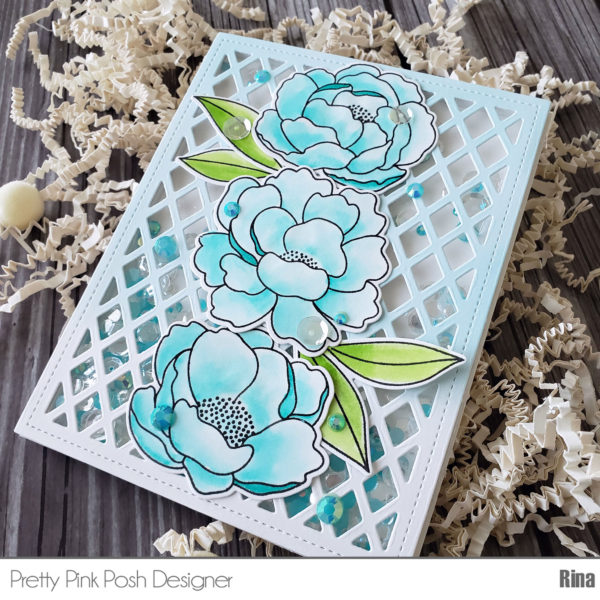
Hi everyone, Rina here with a fun floral shaker card. I have made this card a Mother’s Day theme, but you can make it for any occasion you want using a sentiment stamped on the inside of the card.
I used Bristol Smooth Surface cardstock stamped with Versafine Onyx Black ink to watercolor the images. I used the Peonies stamp set along with the Mother’s Day stamp set (for the inside of the card). I used two Zig Real Clean Color Brush Markers in Turquoise Green and Light Green. I adore these colors together.
I created the card front using the new A2 sized Lattice Background Die and lightly ink blended it with Tumbled Glass Distress Oxide ink.
I created my shaker card by adhering the acetate to the back of the Lattice Background die cut. And then applying double sided foam tape around the edges. I created a custom shaker mix to match with the images: