Hello friends! Tammy here with a sneak peek of the new Holiday Envelopes stamp set. This adorable set features two different envelope images, along with some fun sentiments and coordinating dies.
New release will be available October 17th.
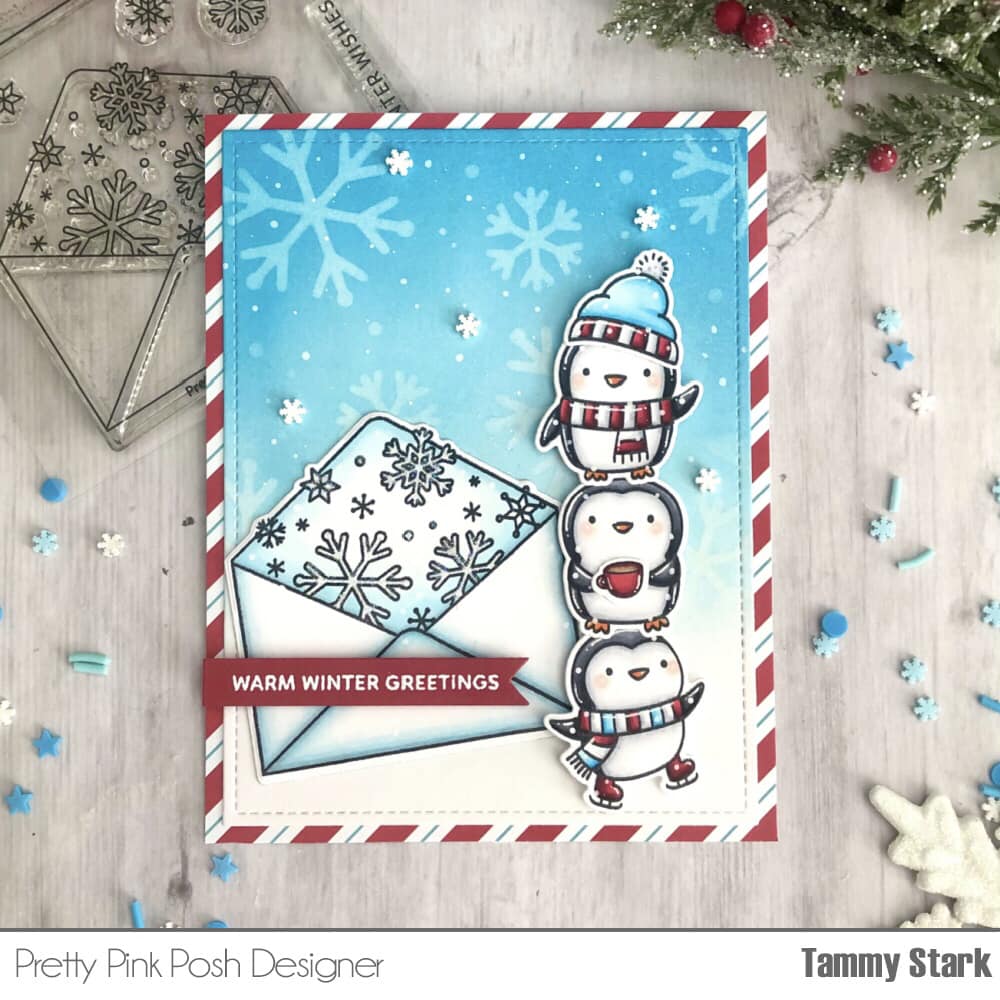
To begin, I stamped out the snowflake envelope, colored with Copic markers, and die cut it with the Holiday Envelopes coordinating dies. I added some fine white glitter to the snowflakes to add a touch of shimmer. Next, I stamped the penguins from Penguin Pals, coloring them with Copic markers before die cutting with the Penguin Pals coordinating dies.
Next, I ink blended a die cut rectangle with Broken China and Tumbled Glass Distress Oxide inks. I placed the new Layered Snowflake Stencils over the inked background and lightly inked some white pigment ink to create the subtle snowflake background. I then splattered some white acrylic paint (thinned with water) onto the stenciled background to add interest.
Next, I attached the inked rectangle onto striped patterned paper. I adhered the snowflake envelope image onto the background, then stacked the penguins on top of each other, attaching with foam tape for dimension. The sentiment was white heat embossed onto red cardstock sentiment strip, die cut from the Holiday Envelopes coordinating dies and attached with foam tape. Lastly, I added some white snowflake embellishments from the new Winter Snowflake Clay Confetti to add a finishing touch!
I hope you enjoyed today’s sneak peek! Come back tomorrow for another look at the October 17th release!
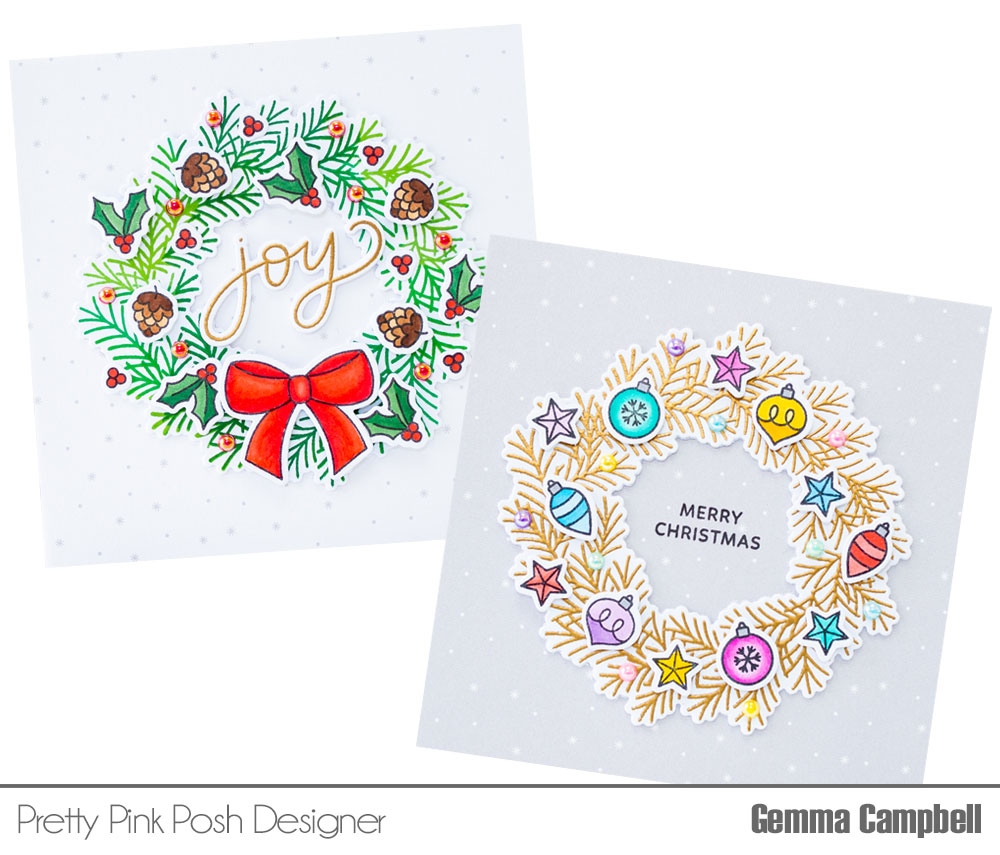
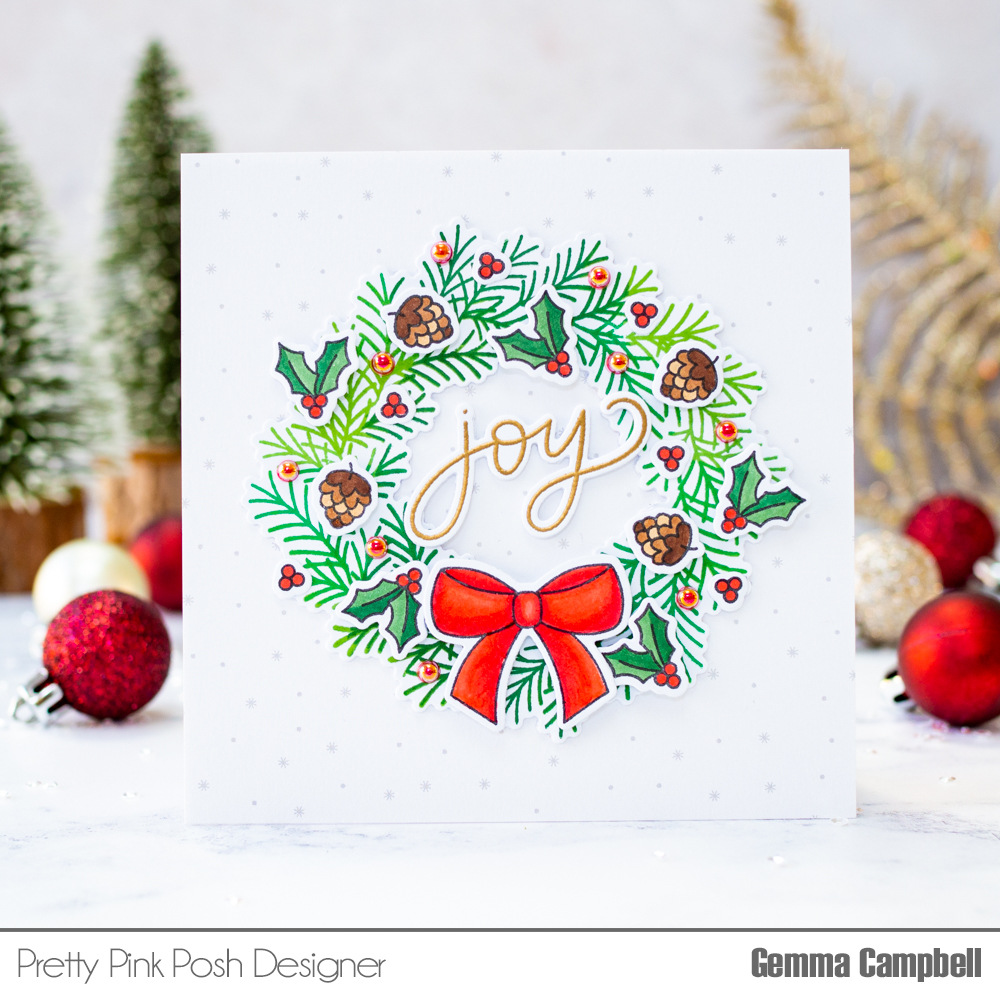
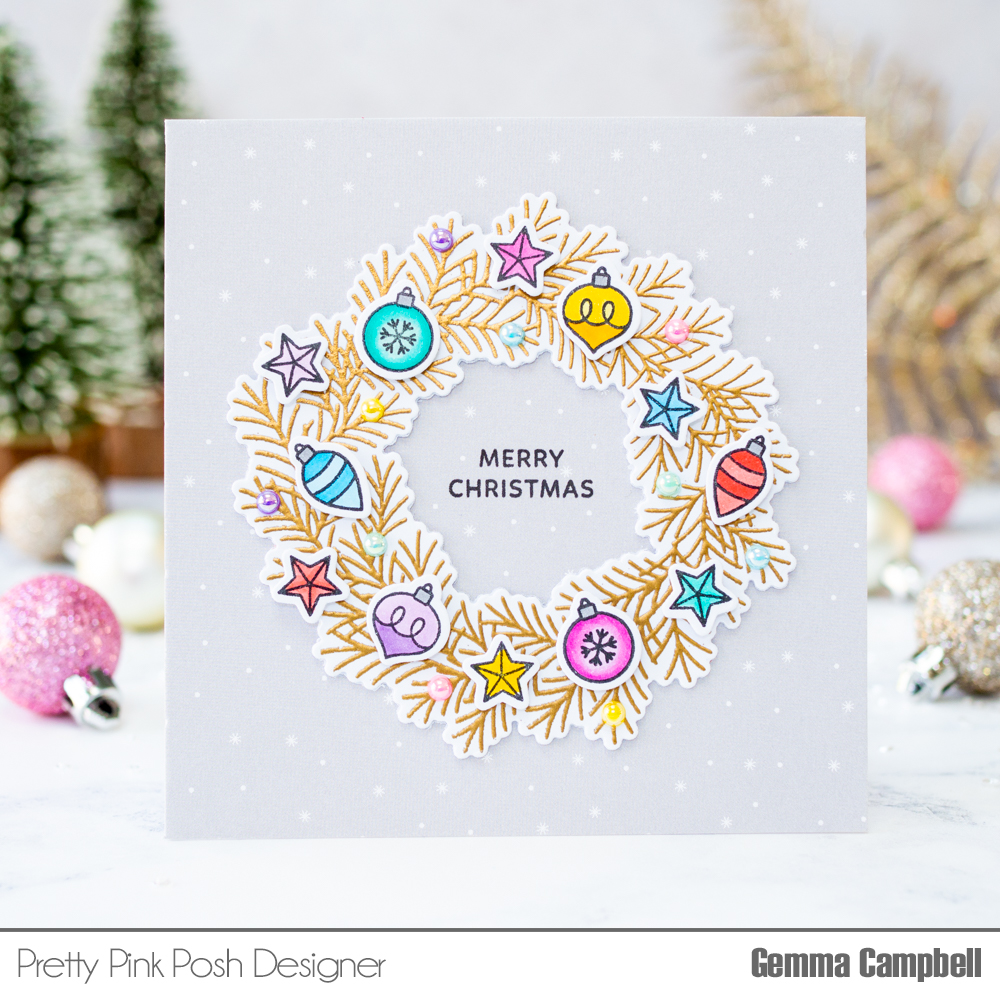
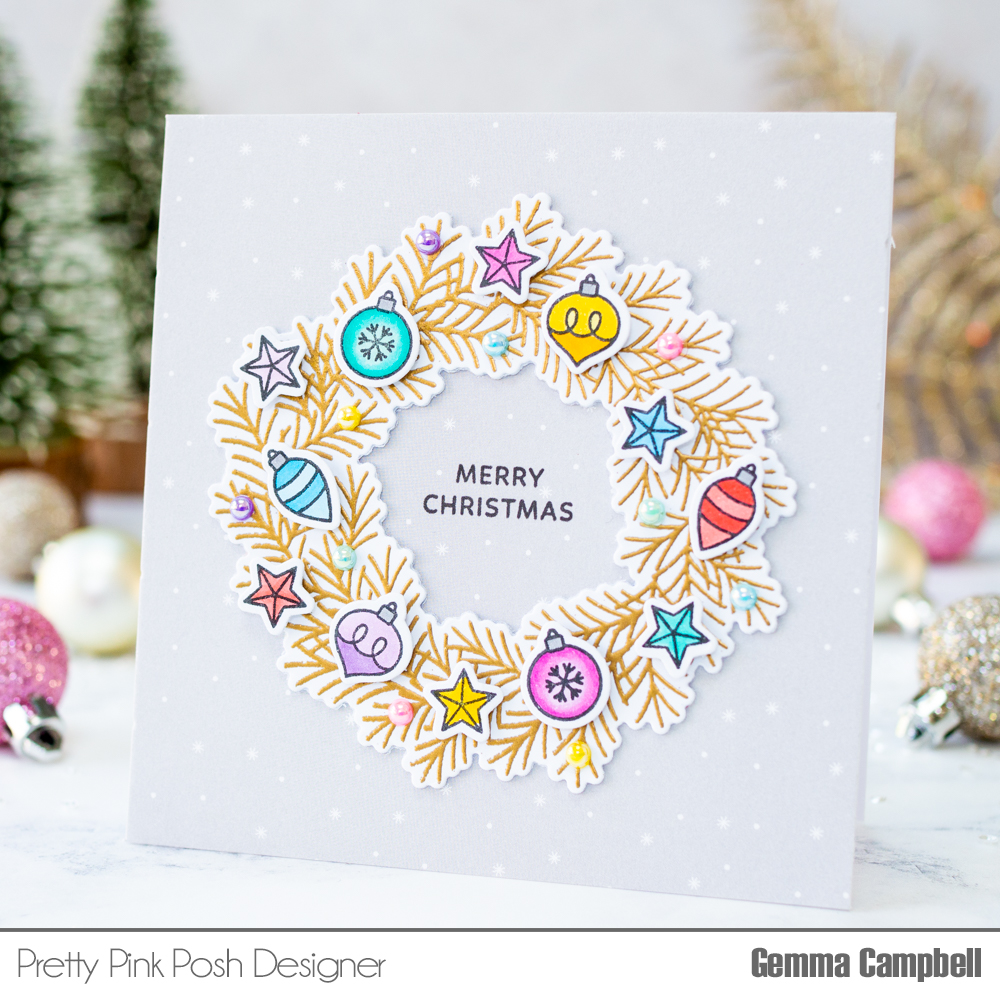
This fun set allows you to achieve different looks for your holiday cards, using the many smaller images from the stamp set on the wreath. I’ve created both a traditional card and a more modern card, to show this versatility.
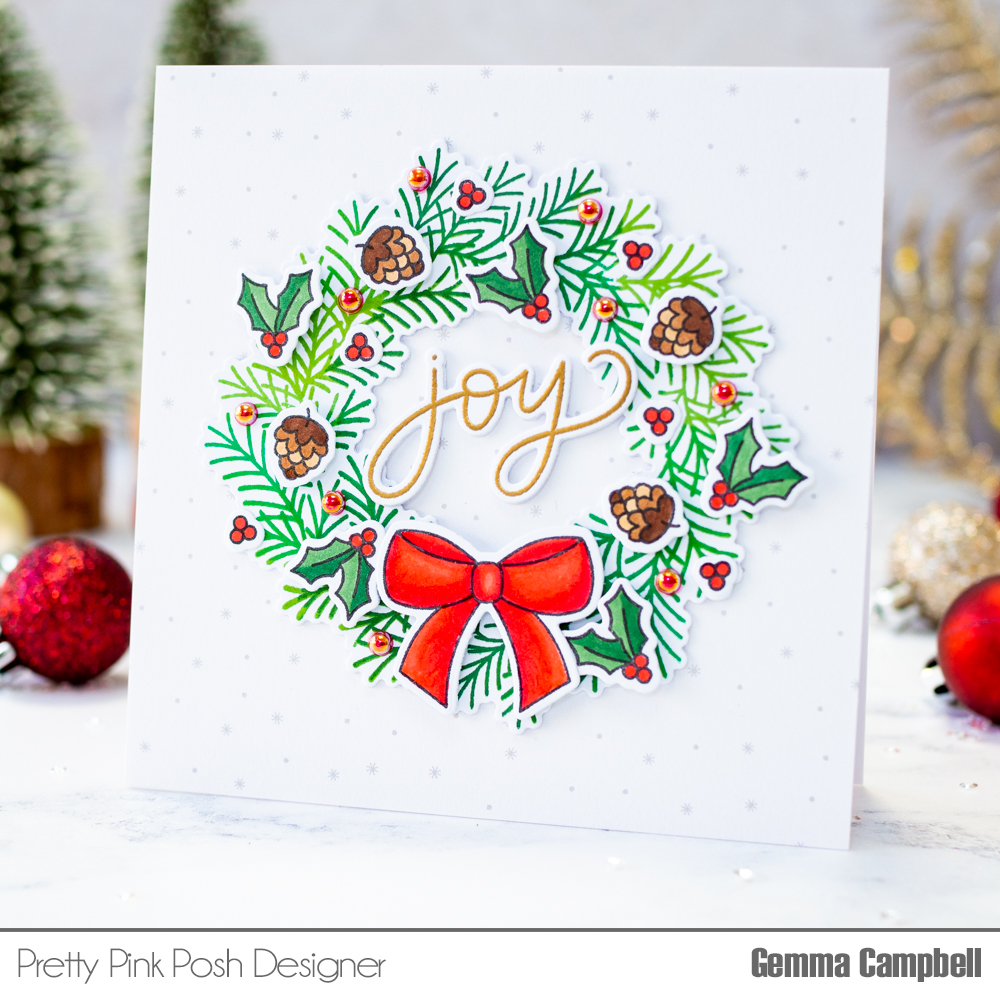
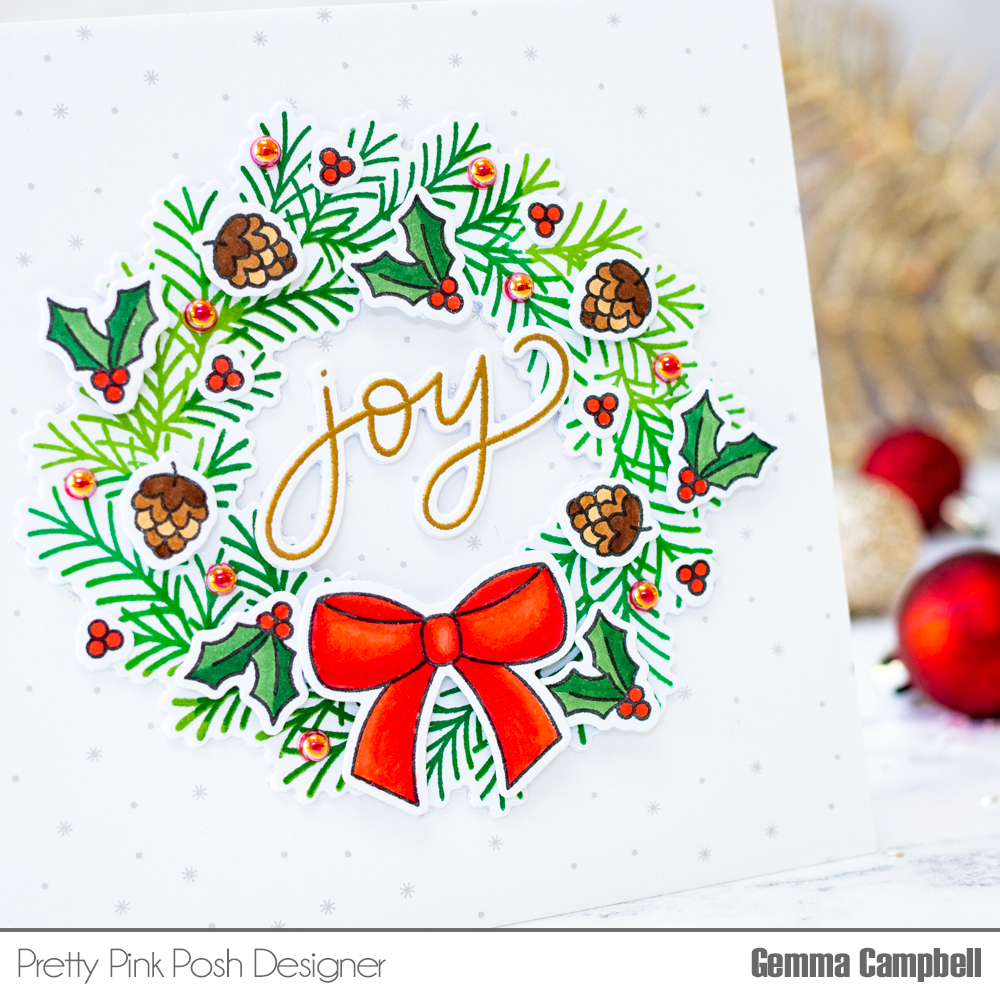
For the traditional wreath, I stamped the image using a few different green inks. I like the texture and variation this gives to the wreath. I decorated the wreath using the holly, berries, and pine cone images from thePine Wreath stamp set. I added a large red bow, also from the stamp set. All the images are coloured with copic markers and die cut with the Pine Wreath coordinating dies.
The lovely ‘joy’ sentiment, which I heat embossed in gold, is from the Pine Wreath stamp set and has a coordinating die. I think it looks so elegant with the wreath. I finished the card by layering the wreath over some patterned paper on a 4.75” square card base, then adding some of the newRuby Red pearls.
To create a more modern style of wreath, I heat embossed the wreath in gold for my second card. I decorated it with baubles and stars from the Pine Wreath stamp set, all coloured with copic markers. I also added some different coloured pearls to coordinate.
As with the first card, I layered the wreath over some patterned paper on a 4.75” square card base. I finished by stamping a sentiment, from the Pine Wreath stamp set, in the centre of the wreath.
Make sure you come back tomorrow for another sneak peek of the October 17th release!
Hi friends! It’s Dana here today and I am excited to be back sharing a sneak peek of the new stencils coming to Pretty Pink Posh on September 14th. This release includes four new stencils: Falling Branches, Layered Foliage, Layered Apples and Layered Sunflowers. Today I will be using two of the stencil sets so let’s get started…
New release will be available September 14th.
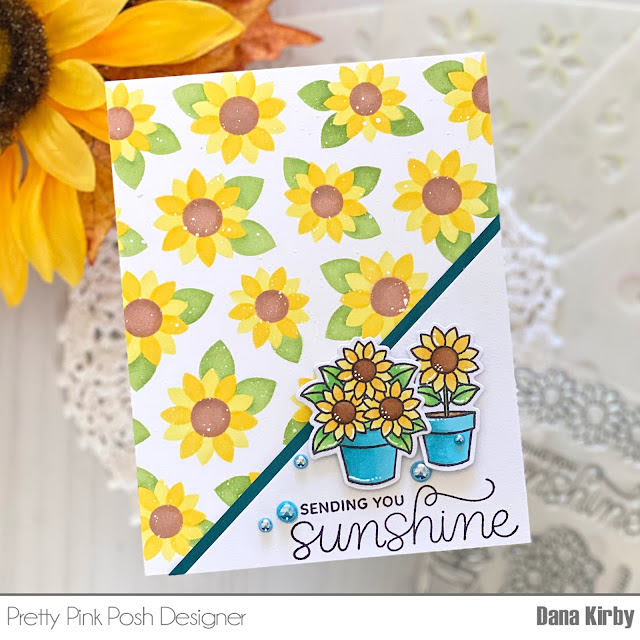
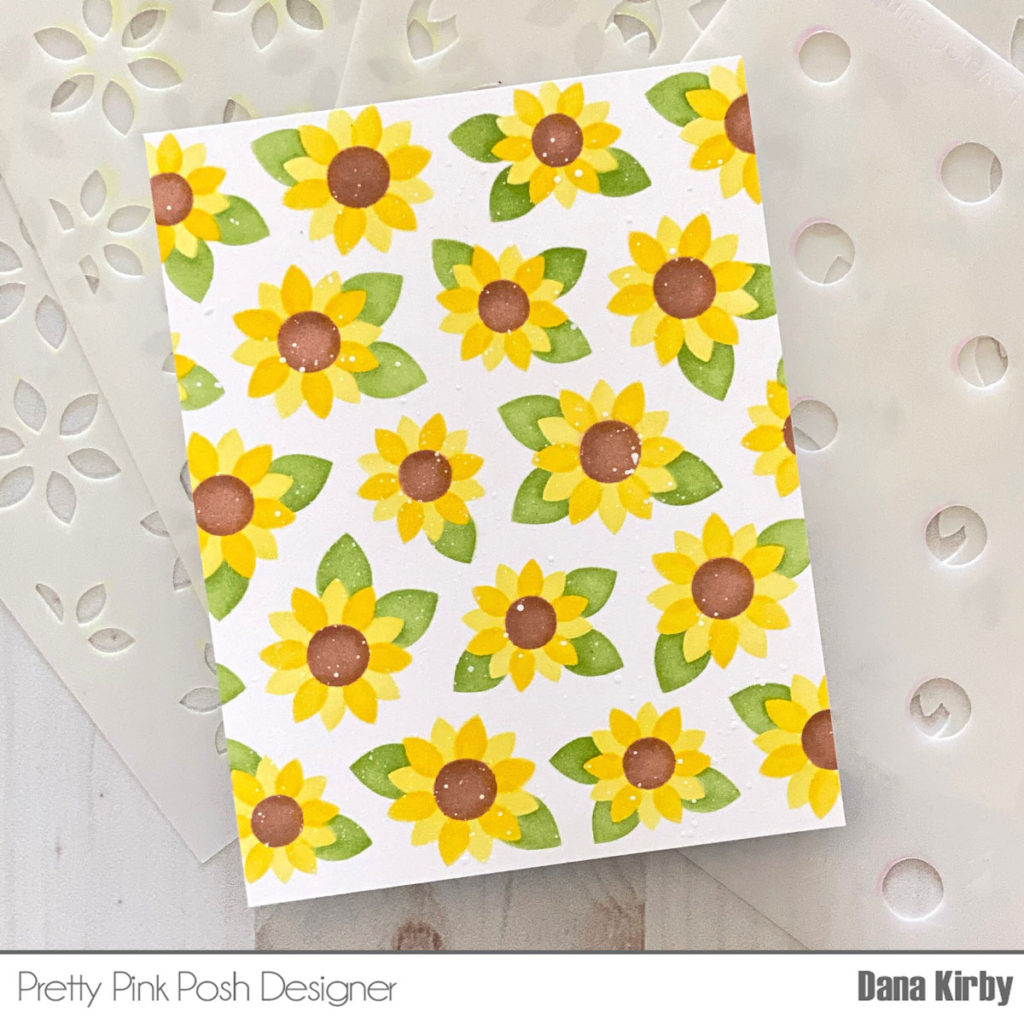
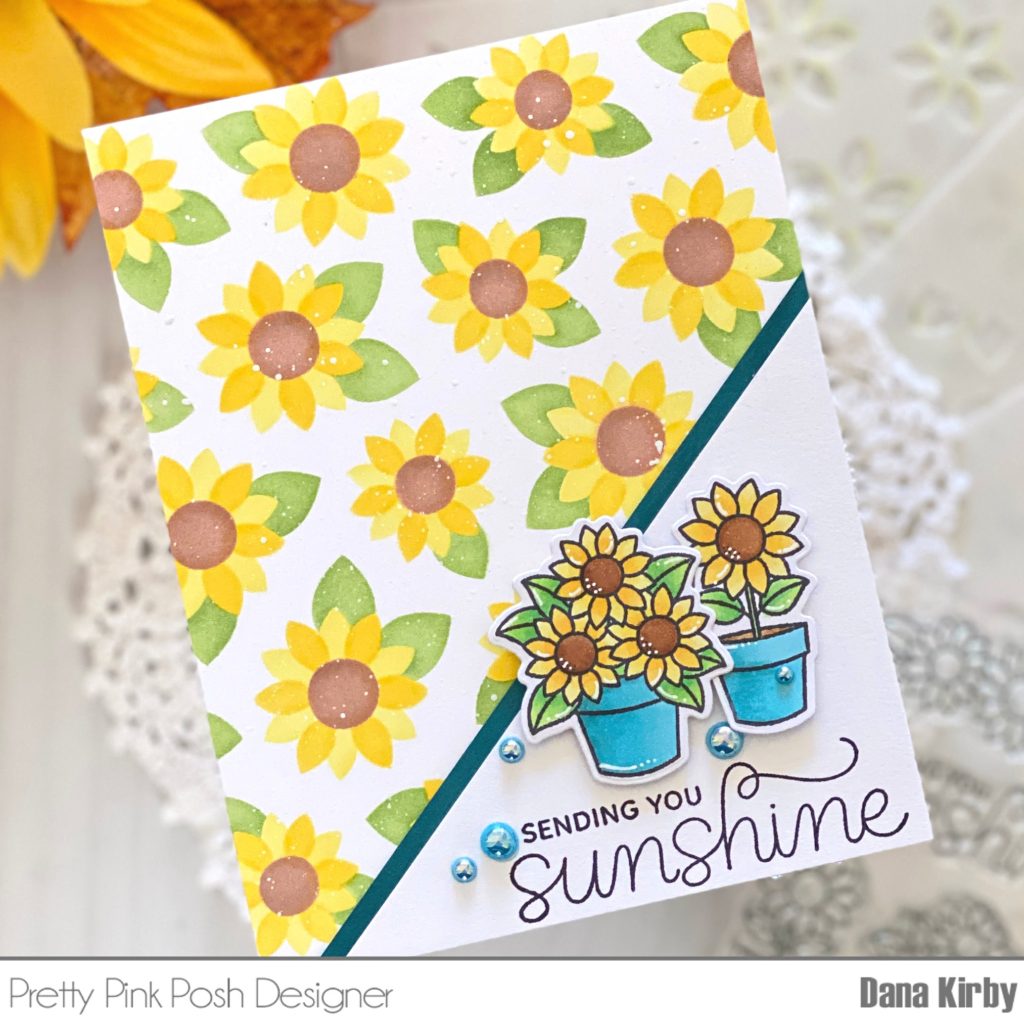
My first card uses the Layered Sunflowers stencilsto create my card panel. This is a four pack of stencils that layer together to create a fun background, perfect for fall and so much more. To make my panel I started with the leaf layer (green) and then it was easy to tuck in each petal layer into the openings on the leaves. So easy to use and everything lines up perfectly. Once my background was finished I added a few white splatters and set it aside to dry.
Next, I used the Potted Sunflowers set to stamp my sunflowers and sentiment. I colored the flowers with Copic markers and used the coordinating Potted Sunflowers die setto cut them out. I then mounted my sunflowers on a white pieces of cardstock that I had cut on a diagonal. Lastly, I added a few Pacific Blue pearls as a final touch.
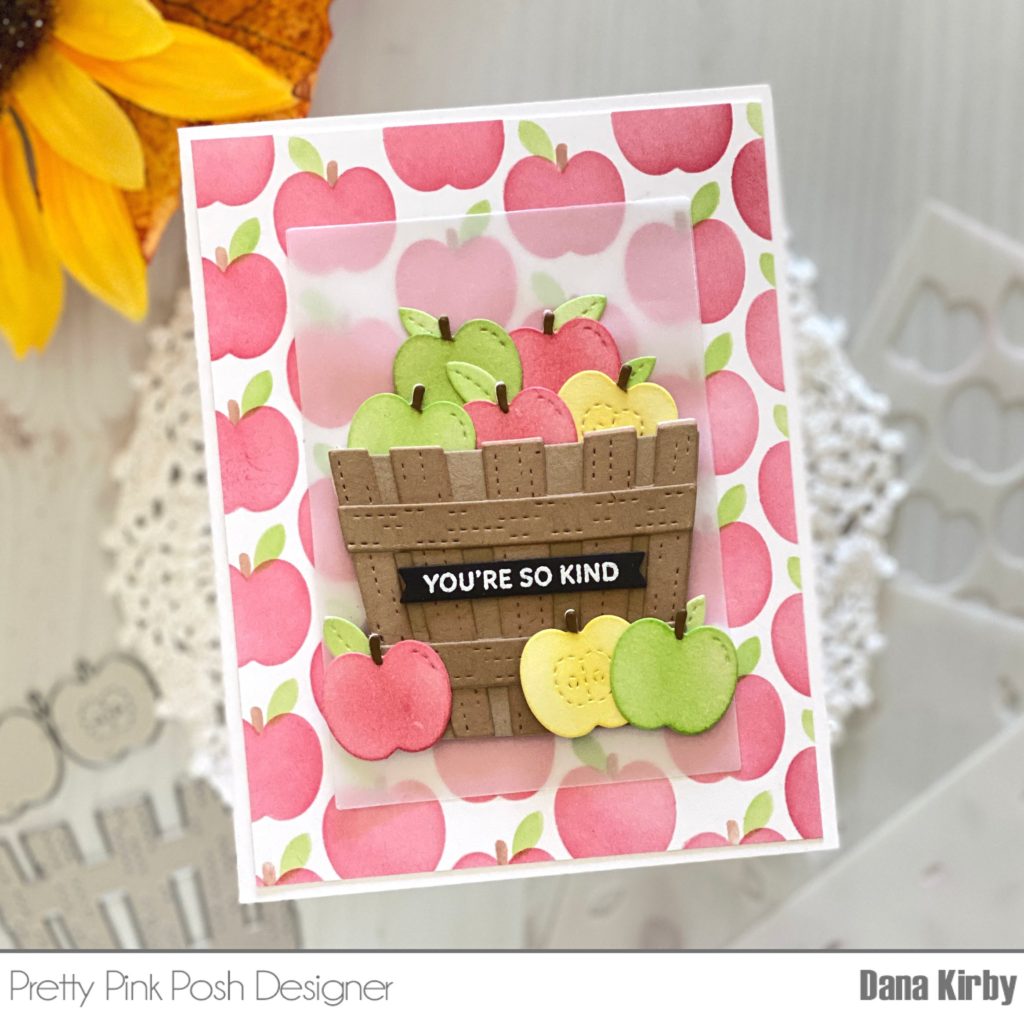
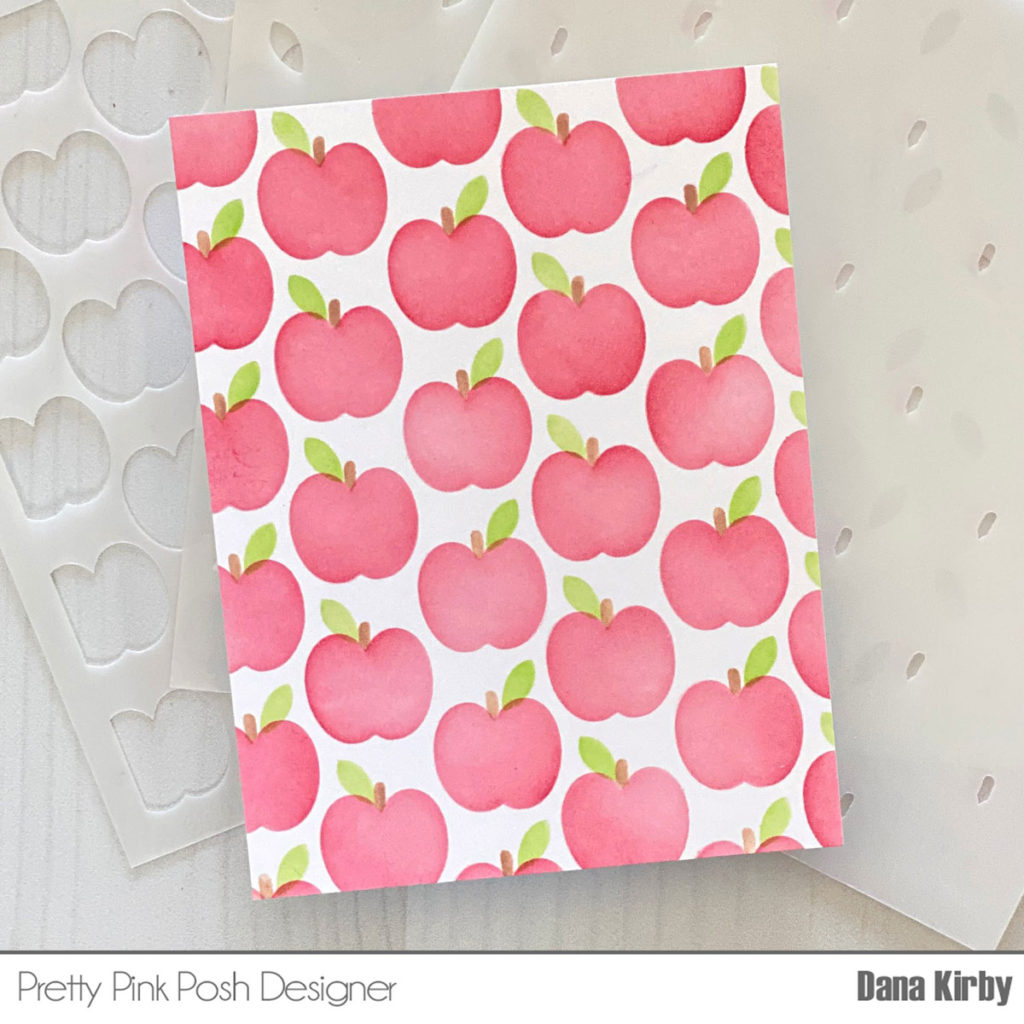
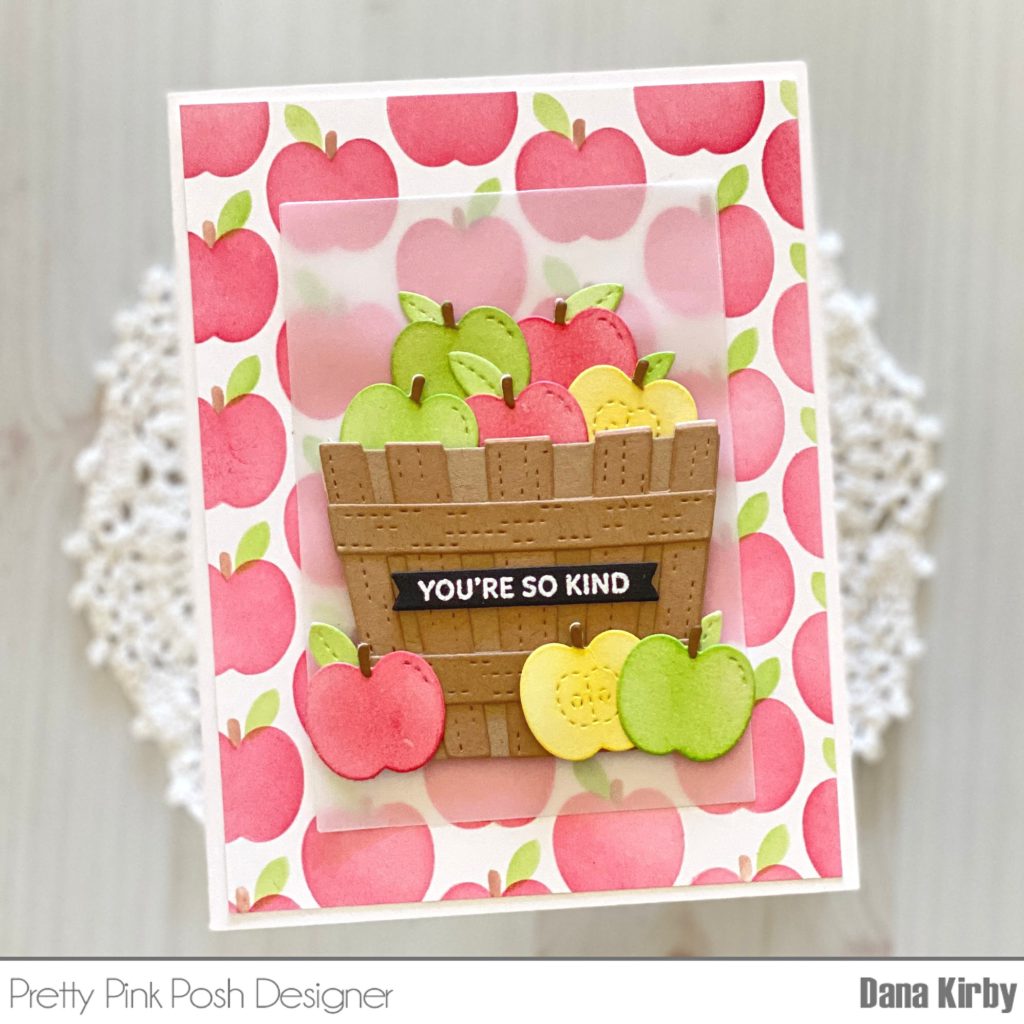
I started my card by using the Layered Apples stencil set to make my card panel. I once again used dye ink for each layer in red, green and light brown. These stencils are great for fall, but will also make a fun background for all of your school related cards and projects too.
Next, I used the Fall Basket die set to make my apple basket. I am in love with these dies! Although I just used the apples, there are lots of other fall dies included in the set. I mounted the apple basket onto a piece of vellum and then attached it to my card panel. Lastly, I used the Potted Sunflowers set to stamp my sentiment.
Thanks for joining me today. Join us tomorrow as we reveal the products and the bundles go live!
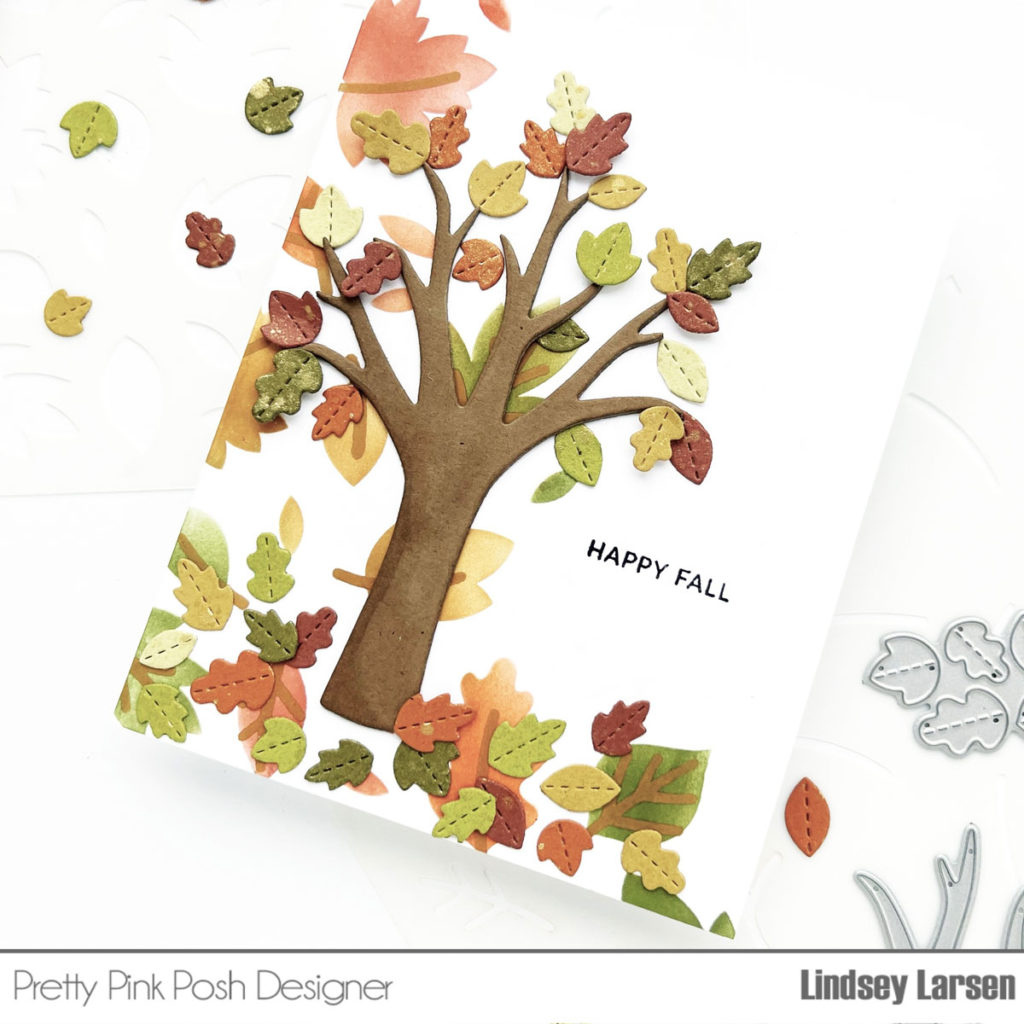
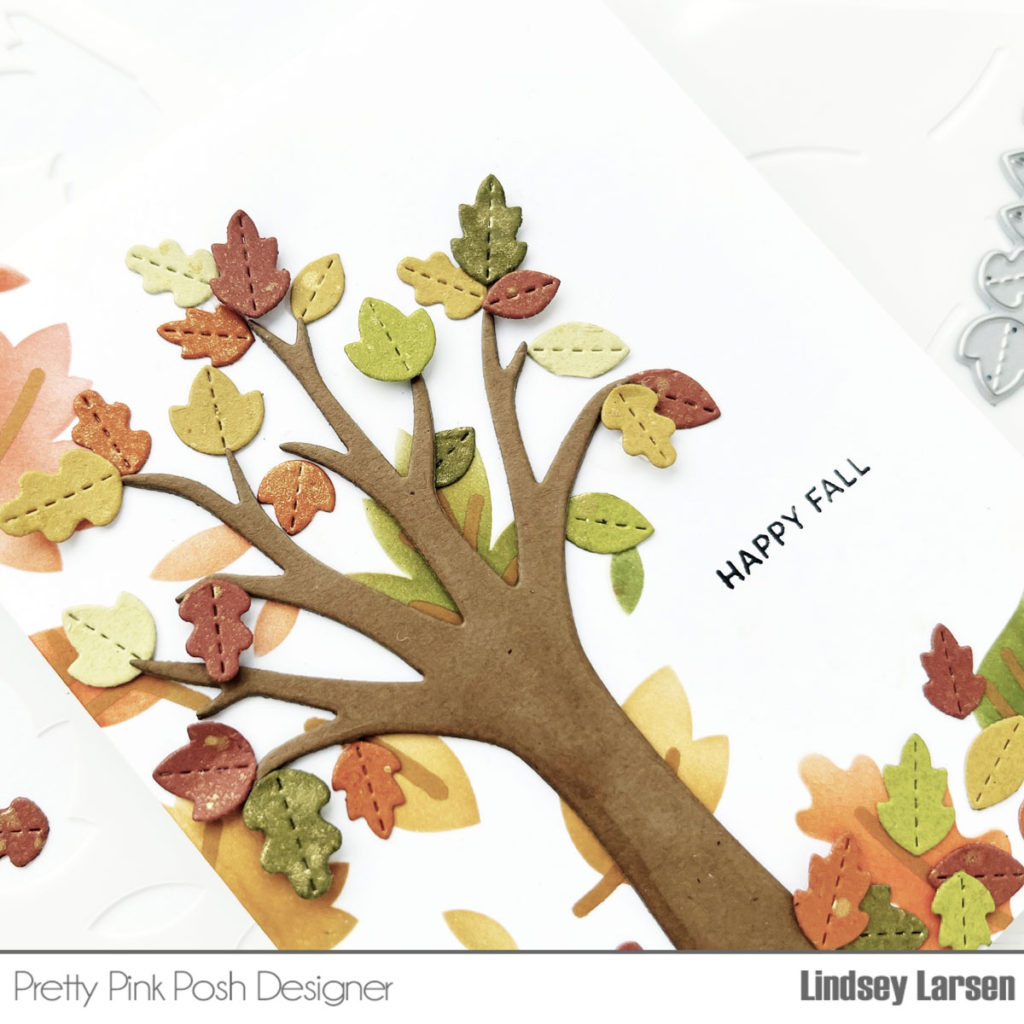
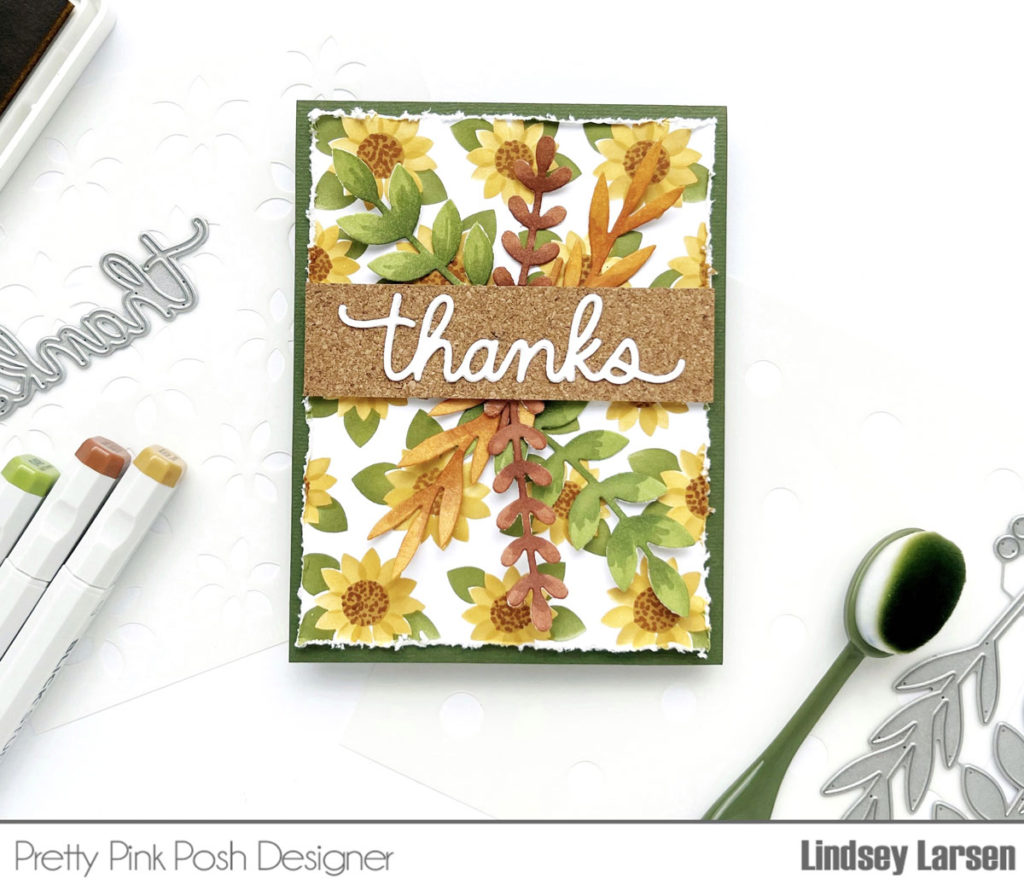
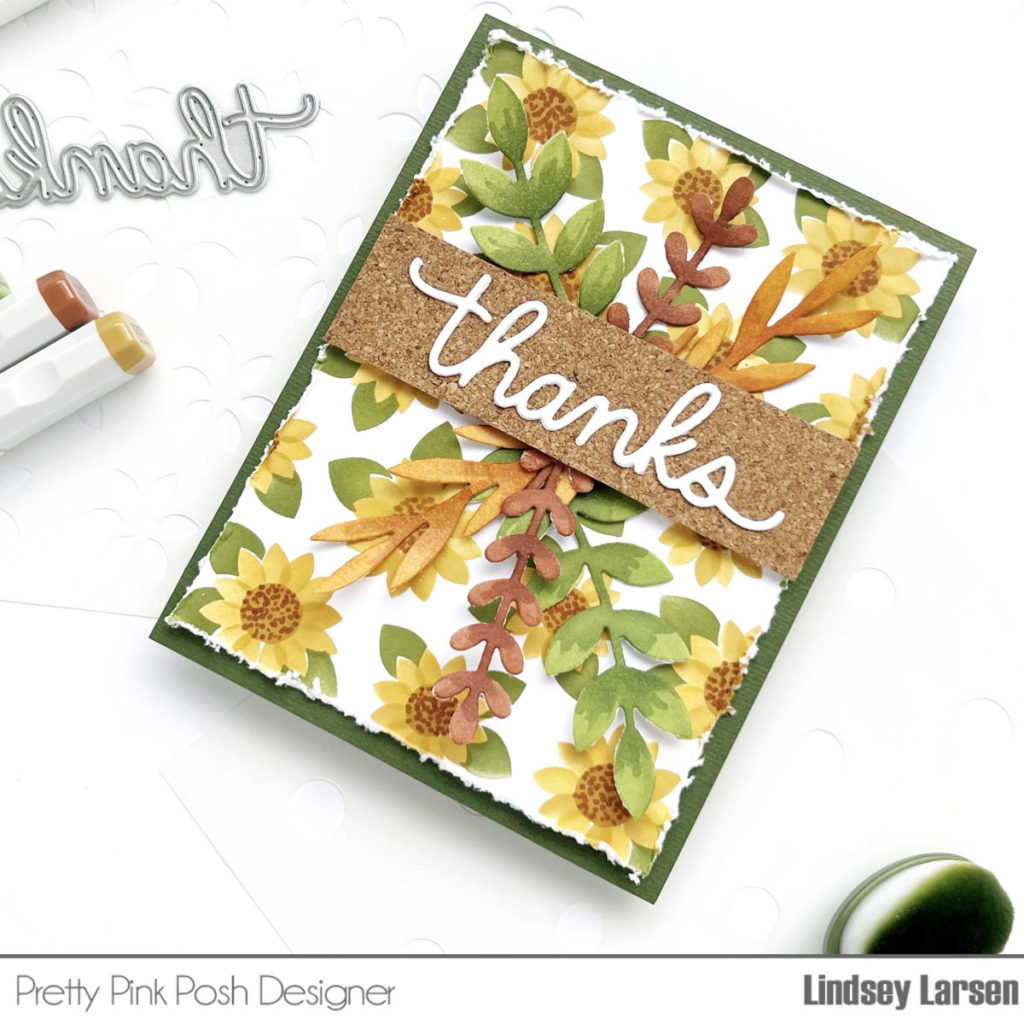
Good morning! It’s Lindsey and I’m excited to be giving you a sneak peek at many of the amazing soon-to-be-released dies. I’ve paired them up with several stencils, and with the exception of one little sentiment stamp, my cards were made entirely with dies and stencils. Let’s get started!
New release will be available September 14th.
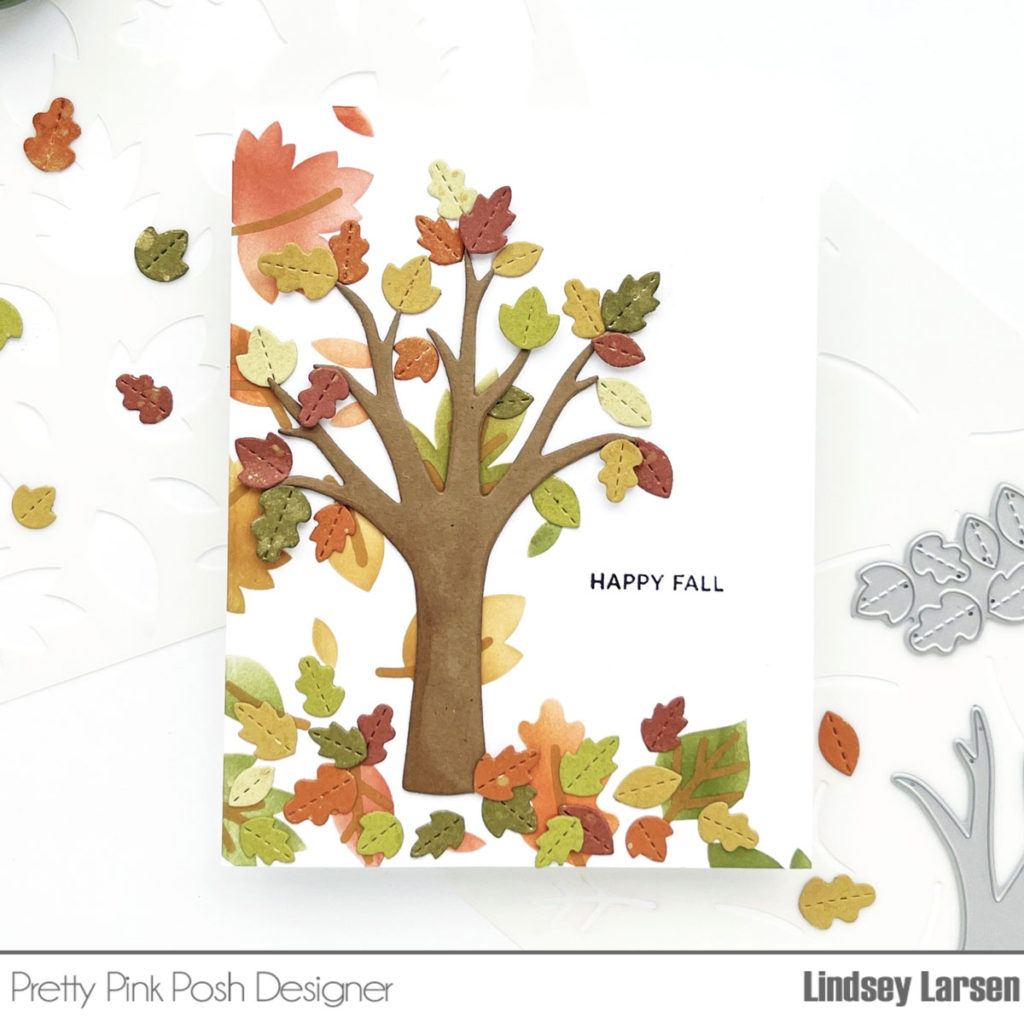
First up is the fun Fall Tree Die. Don’t be fooled by the name, this will be wonderful all year, but since the autumn season has begun in my neck of the woods, I’ve fully embraced it.
My card started with theLayered Foliage Stencils. I used an assortment of autumn colors and blended a portion of the stencil on my card. I love how it looks like these leaves are trickling down to the ground.
Next, I die cut the tree and several colors of leaves. I sprayed on some gold to mimic the little blotches that appear as the leaves start to die. I arranged the leaves on the tree, popping a few up at varying heights, and sprinkled several across the ground. The final step was stamping on a small sentiment from theFall Envelopes Stamp Set.
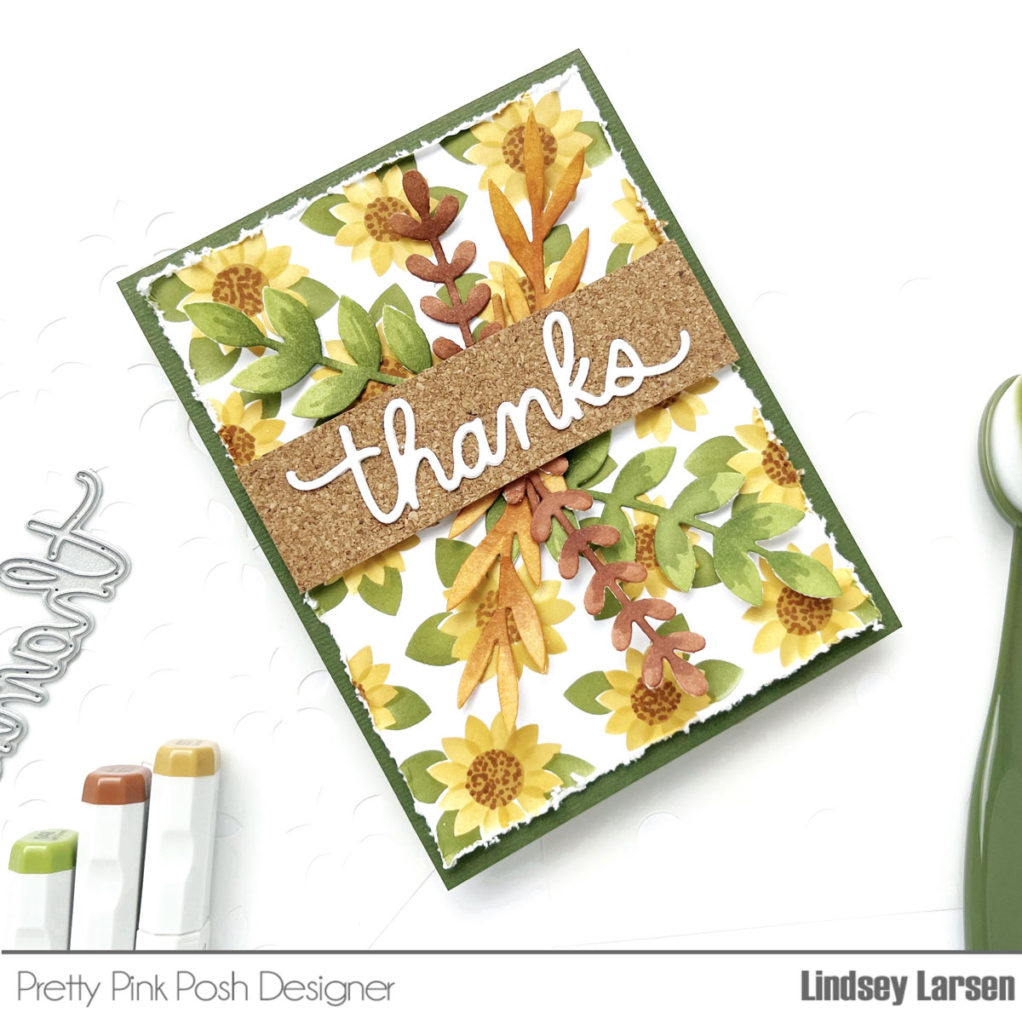
My second card gives you a peek at one of the new sentiment dies called Thanks Script. I stuck with traditional autumn colors and created a background using the Layered Sunflowers Stencils. They’re wonderful!
After blending on the ink, I used a marker to add some dots to the flowers’ centers. Then I distressed the edges of the entire panel.
I die cut and colored a few of the leaf stems from the previously released Fall Foliage Dies and arranged them in the center of my card.
Finally, I added a strip of cork and then the newThanks Scripton top. This card is full of texture, which makes me so happy.
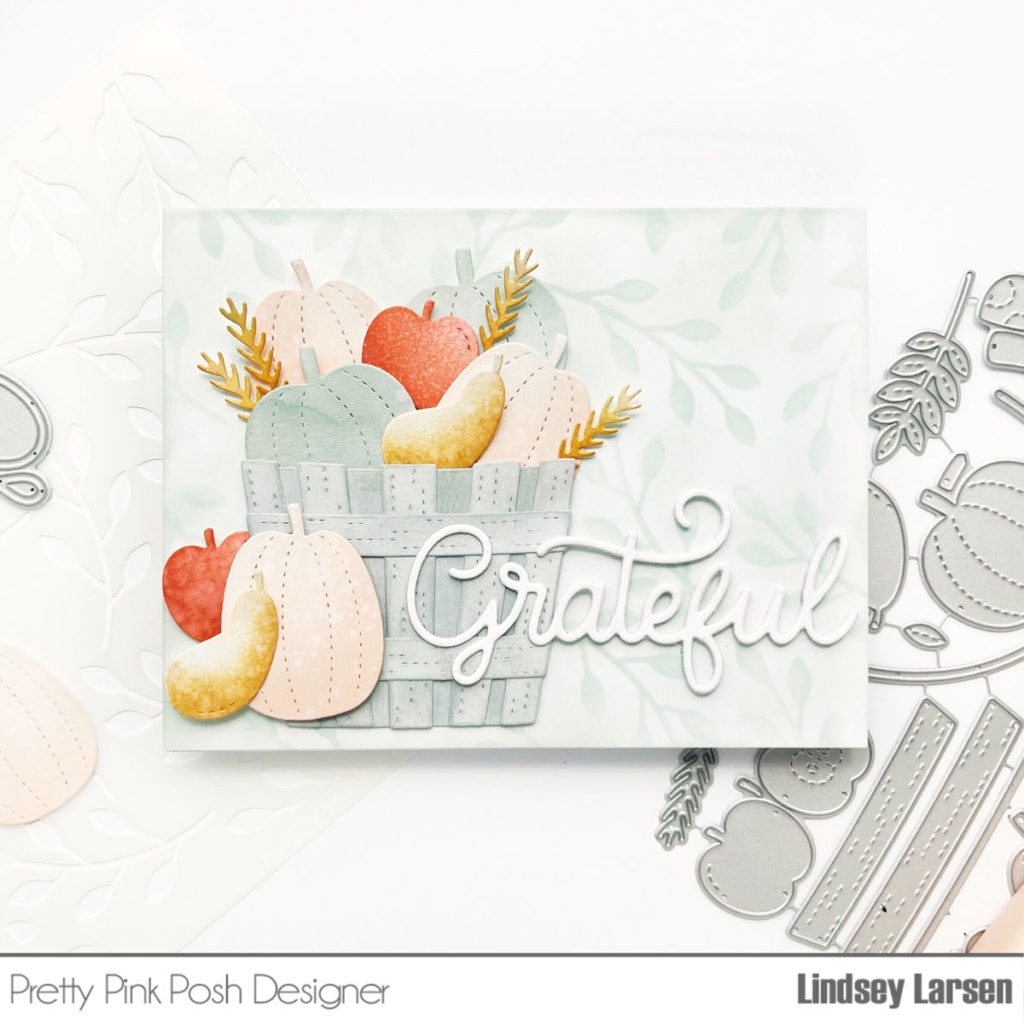
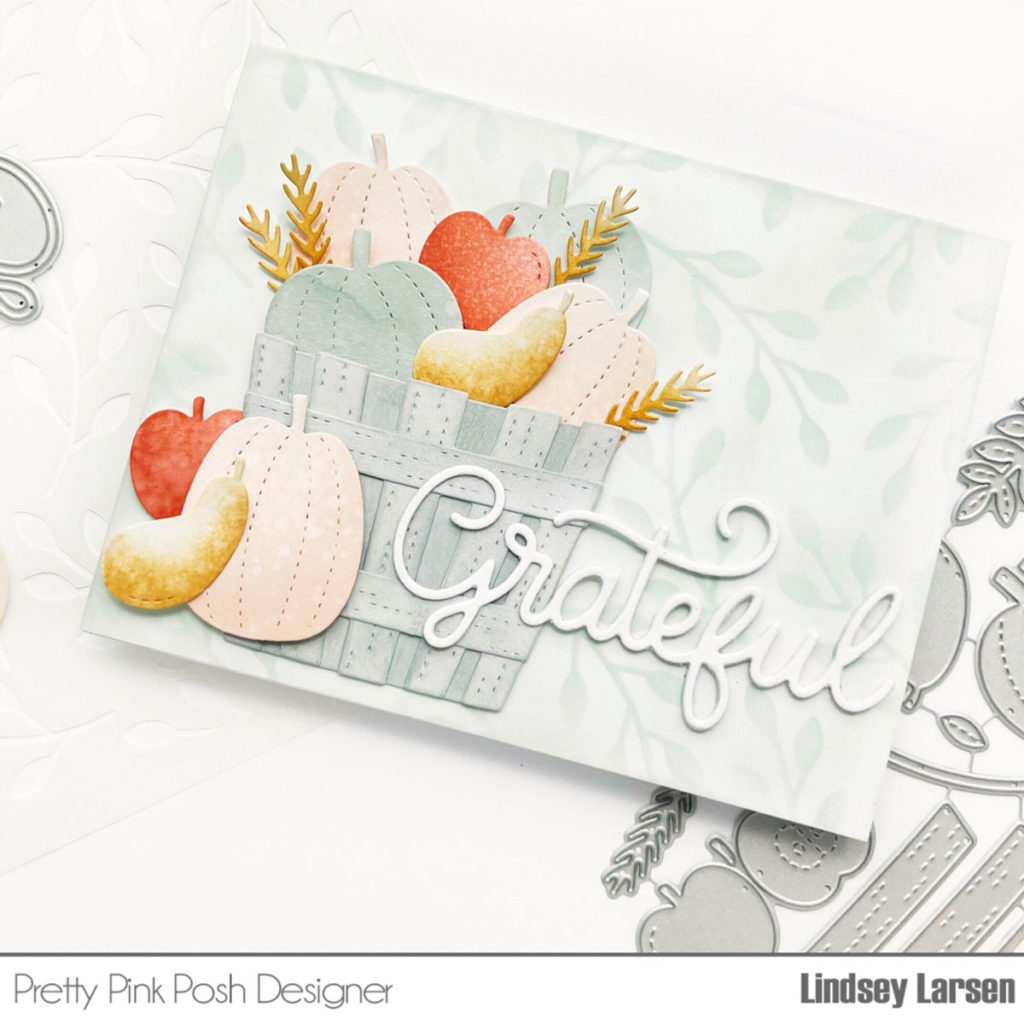
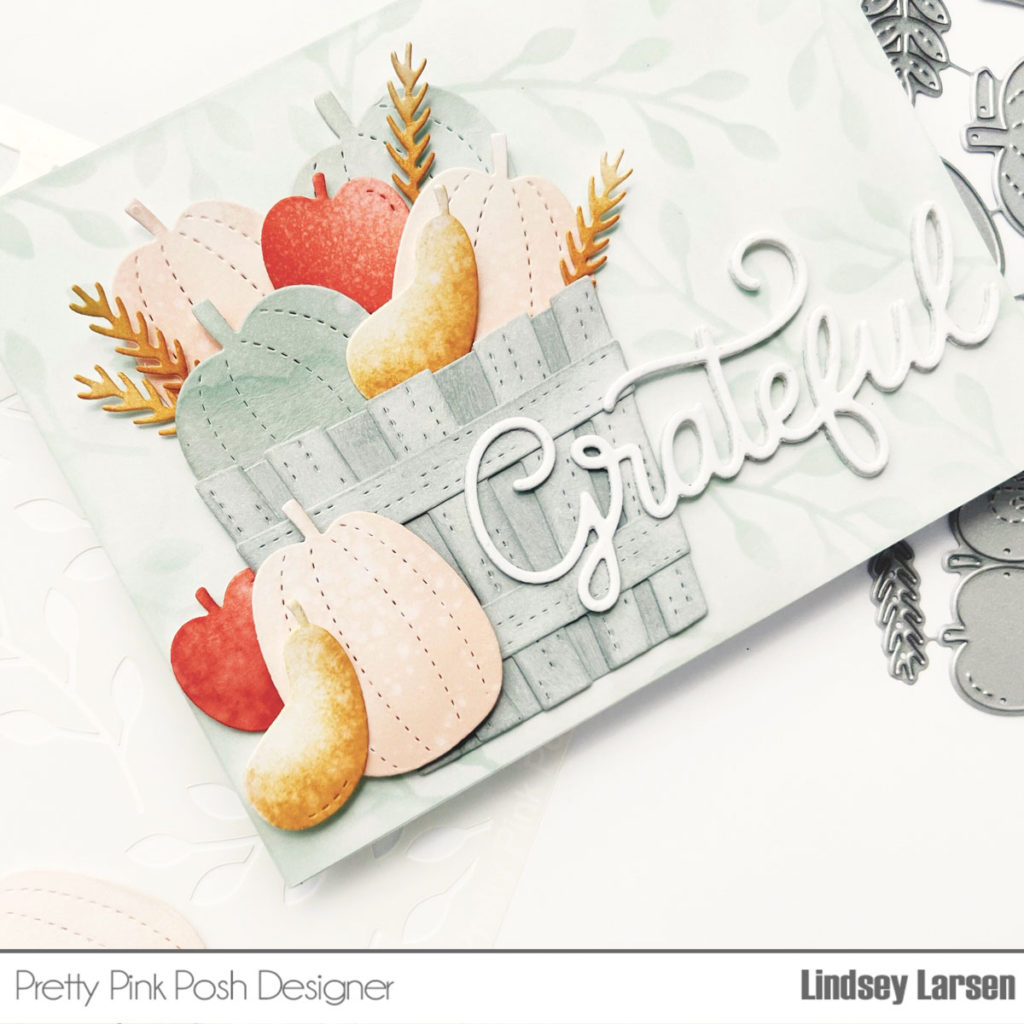
My final card uses the fabulous Fall Basket Dies. You are going to LOVE these! The basket will be a great addition to your crafty supplies and the fillers are darling. They work great on their own, too!
I switched gears here and decided to use a more muted color palette. All the heart eyes for this one! :) After cutting and blending ink on several of the fillers (pumpkins, squash, apples, wheat), I spritzed them with water. It’s subtle, but I love the effect. A quick note: there are cute little stem dies that can be cut and added to all of these, but I did not use them on this card.
The basket is four pieces plus a handle if you choose to use it. I blended grey ink on all the pieces and then “white washed” them by swiping a white ink pad over all of them. I adhered all the basket pieces together and stuffed it full of autumn cuteness. I only adhered just the bottom of each filler, so there would be a lot of dimension,
I wanted to maintain the soft feel of the card, so I blended a soft greenish-blue on my card base, and used the same color to lightly blend leaves on top using the new Falling Branches Stencil. When my background was finished, I add my filled basket and a few more die cuts around it.
The last thing I needed was a sentiment, which came from the newGrateful Script die. It’s absolutely beautiful! I layered it about five times, which gave it wonderful depth and made it feel like a chipboard piece.
Thanks so much for joining me today! I had so much fun creating with the new dies, and I know you will too. Make sure you come back tomorrow for sneak peeks of the new stencils!
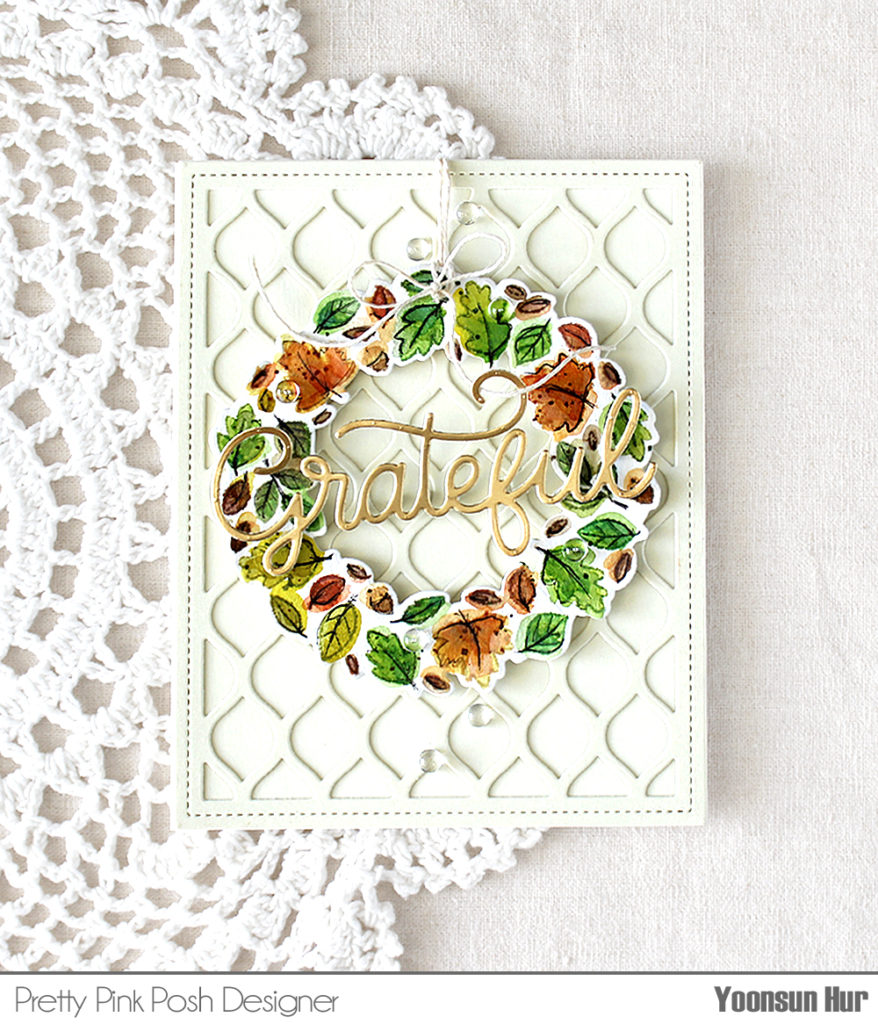
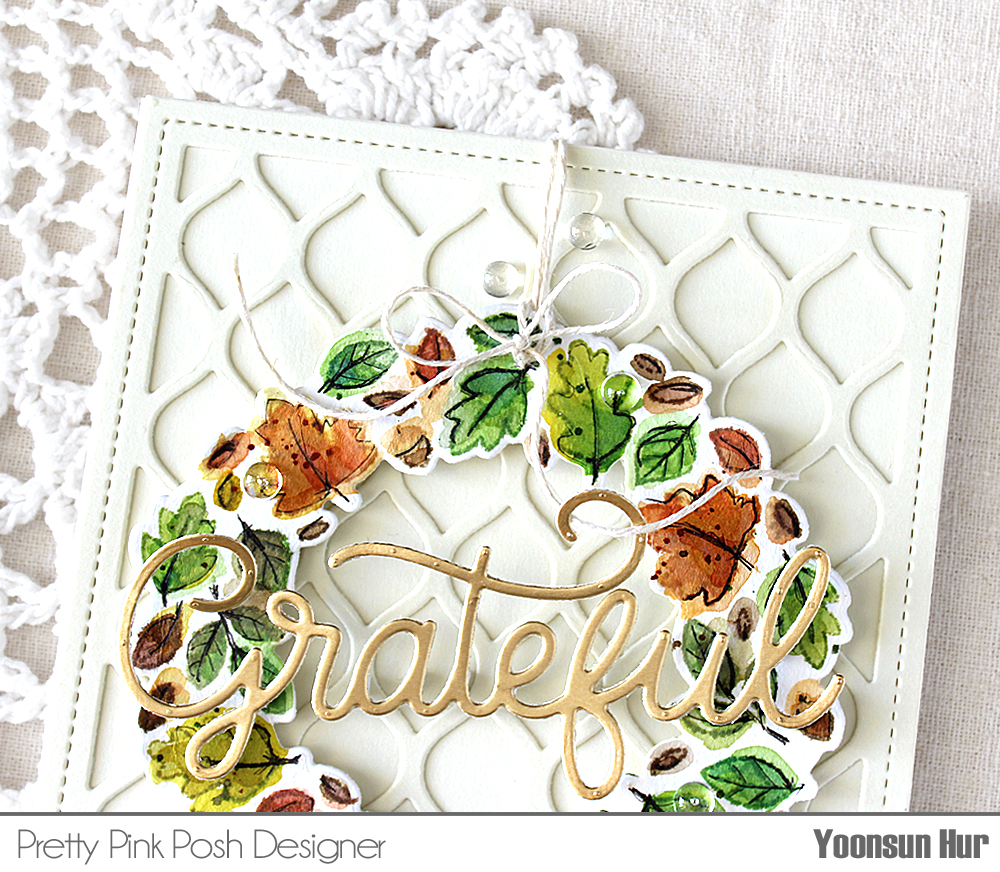
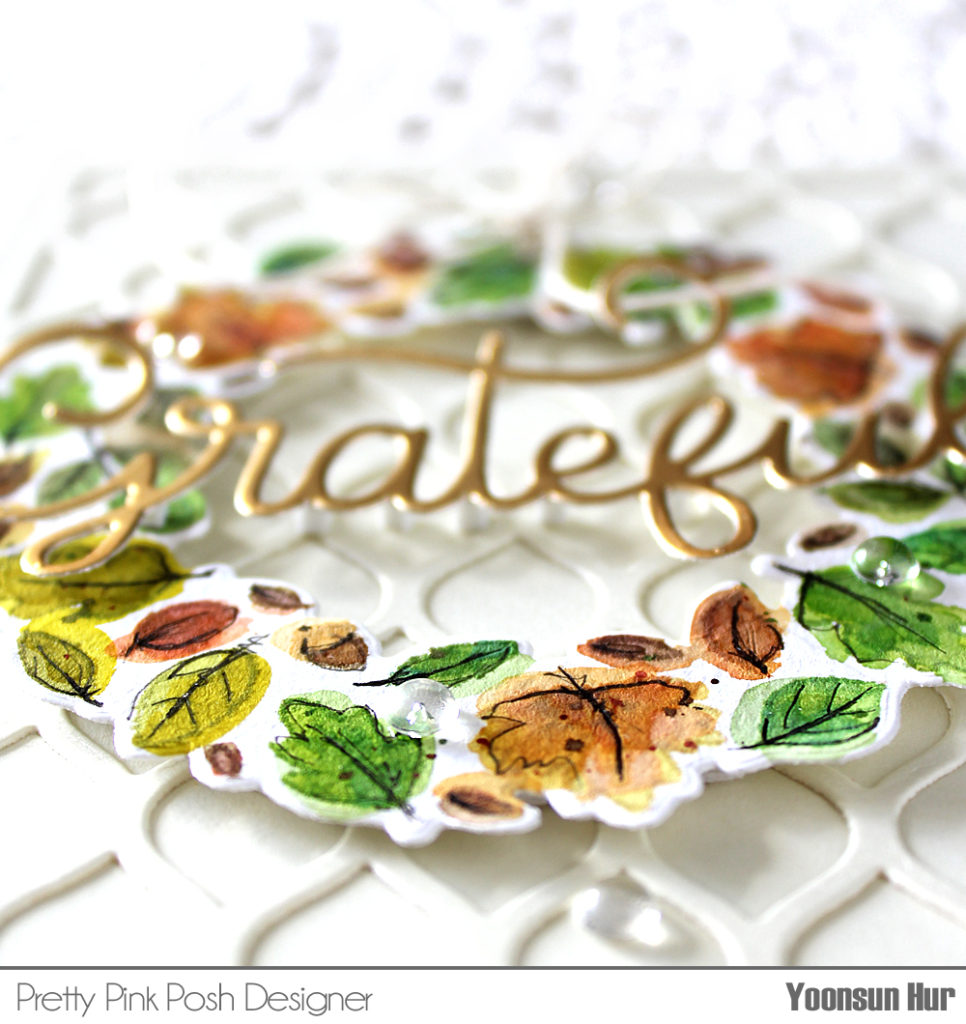
Hello crafty friends! It’s Yoonsun here to share my autumn card with the new Autumn Leaf Wreath stamp set along with another new Grateful Script die. Autumn is the best season to make the most beautiful cards, right?!!
New release will be available September 14th.
I started by stampingAutumn Leaf Wreath onto watercolour paper using pale beige dye ink. I then watercoloured the stamped image with some green, orange and brown Distress inks. Once the autumn wreath was dry, I die cut it with the coordinating die. I lightly drew all autumn leaves using Copic Multiliner Marker 0.05mm Black along the stamping line.
For the sentiment, I die cut the Grateful Script from metallic gold cardstock. I die cut the Pretty Petals Background panel from thick white cardstock as well. I mounted the background panel on white card base using double-sided tape first, and then added all elements as shown in the picture using foam tape.
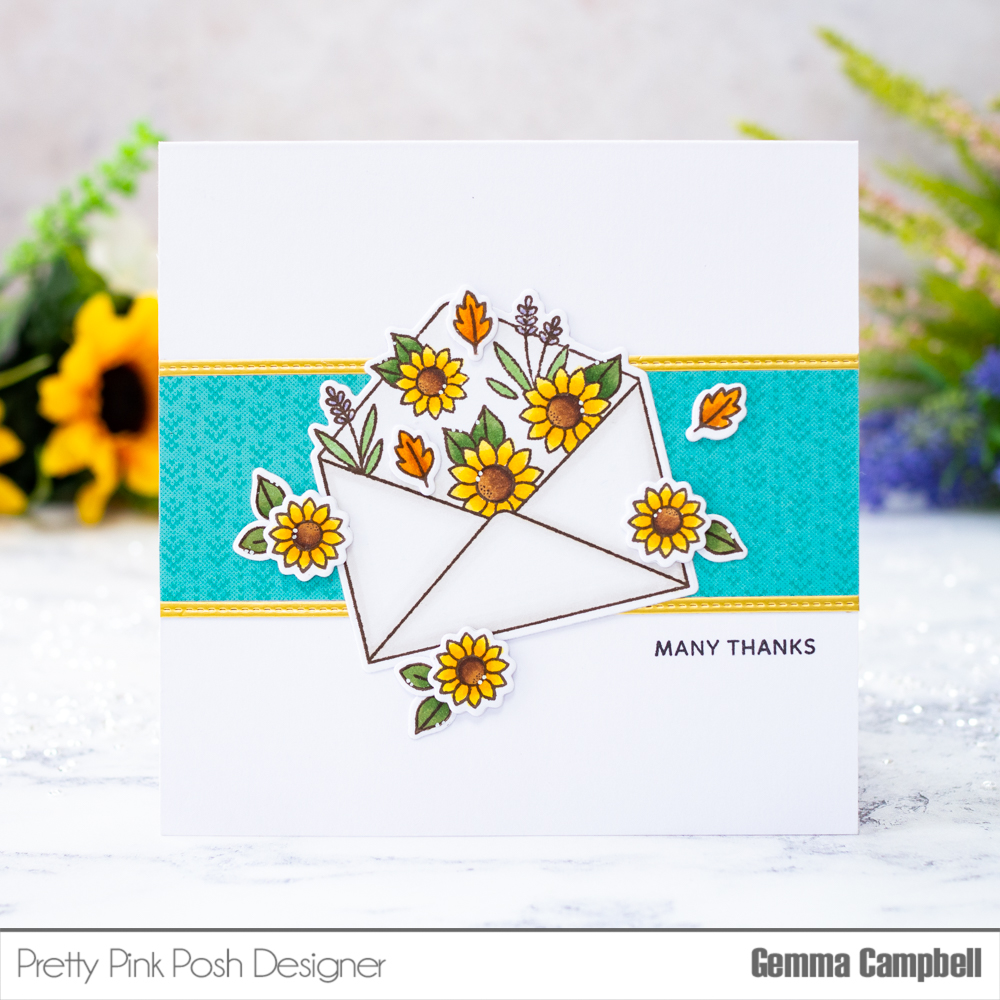
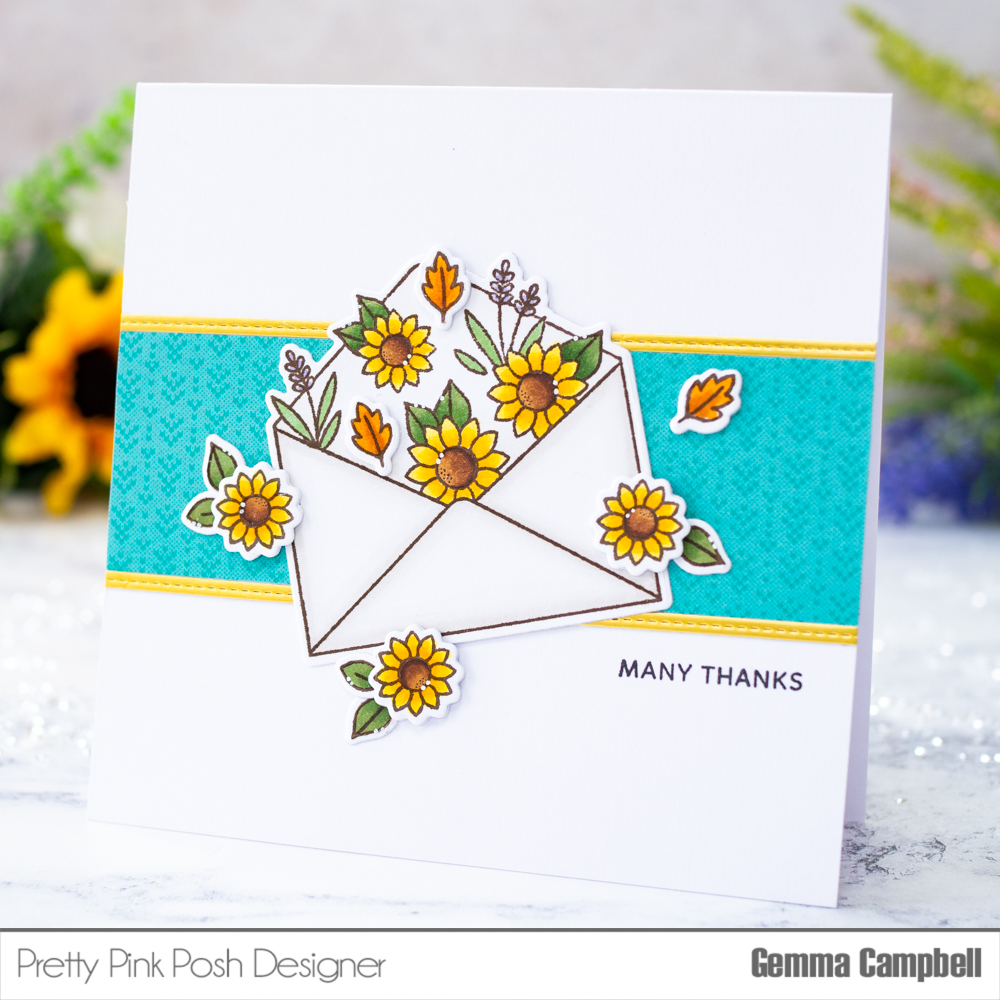
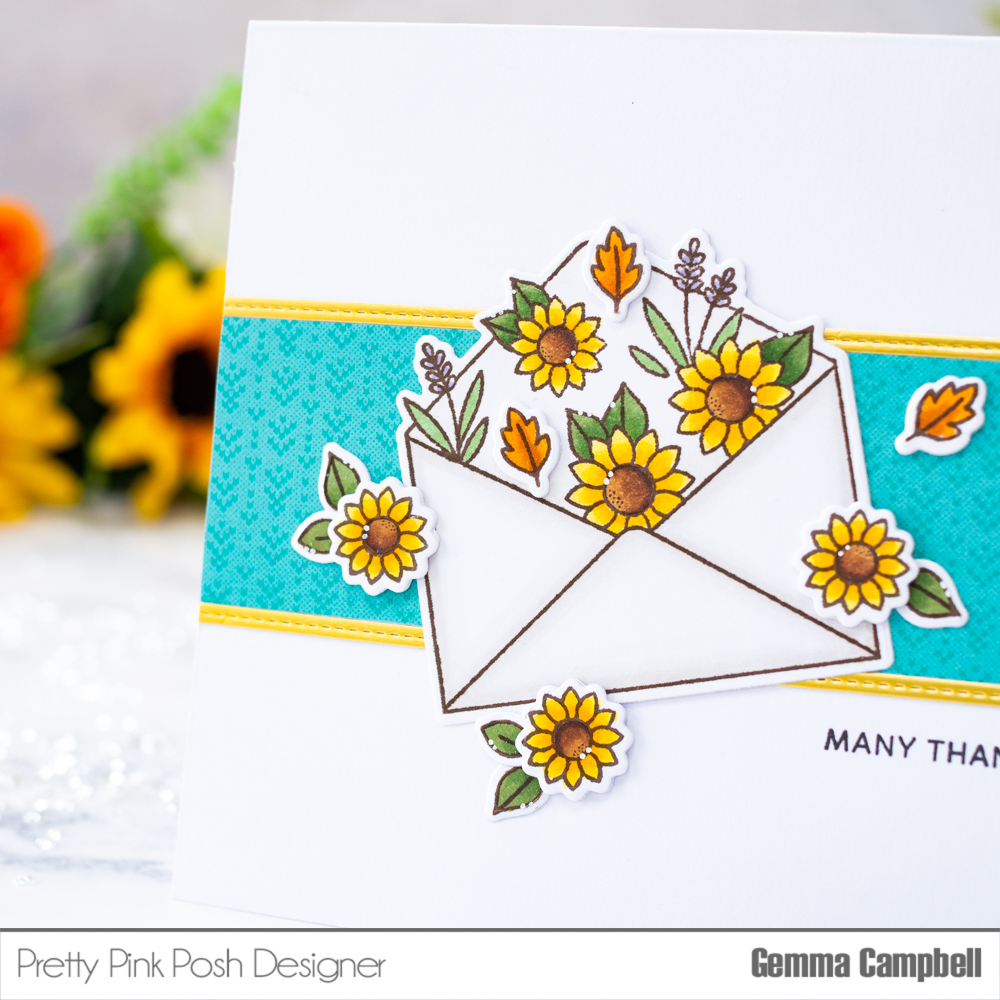
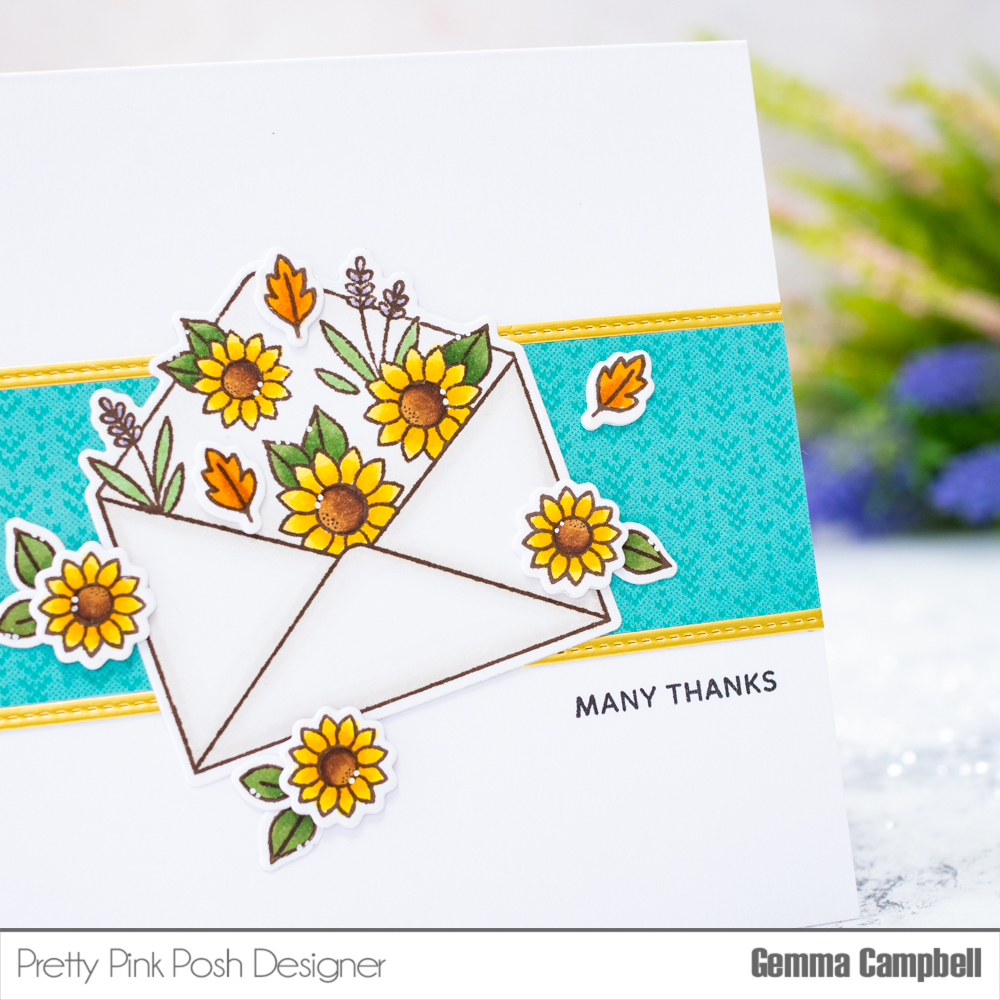
Hello, Gemma here today with a sneak peek of the new Fall Envelopes stamp set. There are two envelope stamps in this set, along with accompanying images and sentiments.
New release will be available September 14th.
Sunflowers are a favourite of mine so I stamped out the sunflower envelope and coloured it with copic markers. I also stamped and coloured some of the smaller images, then die cut everything with the coordinating dies.
On a square card base, I adhered a strip of patterned paper across the centre. I also added thin strips of satin gold card either side, cut using theStitched Strips die set.
I stamped a sentiment from theFall Envelopes stamp set under the patterned paper, then adhered the envelope at an angle in the centre of the card. I added the smaller images around the card, with additional die cuts behind for dimension.
Stop by tomorrow for another day of sneak peeks! Thanks for joining us today!
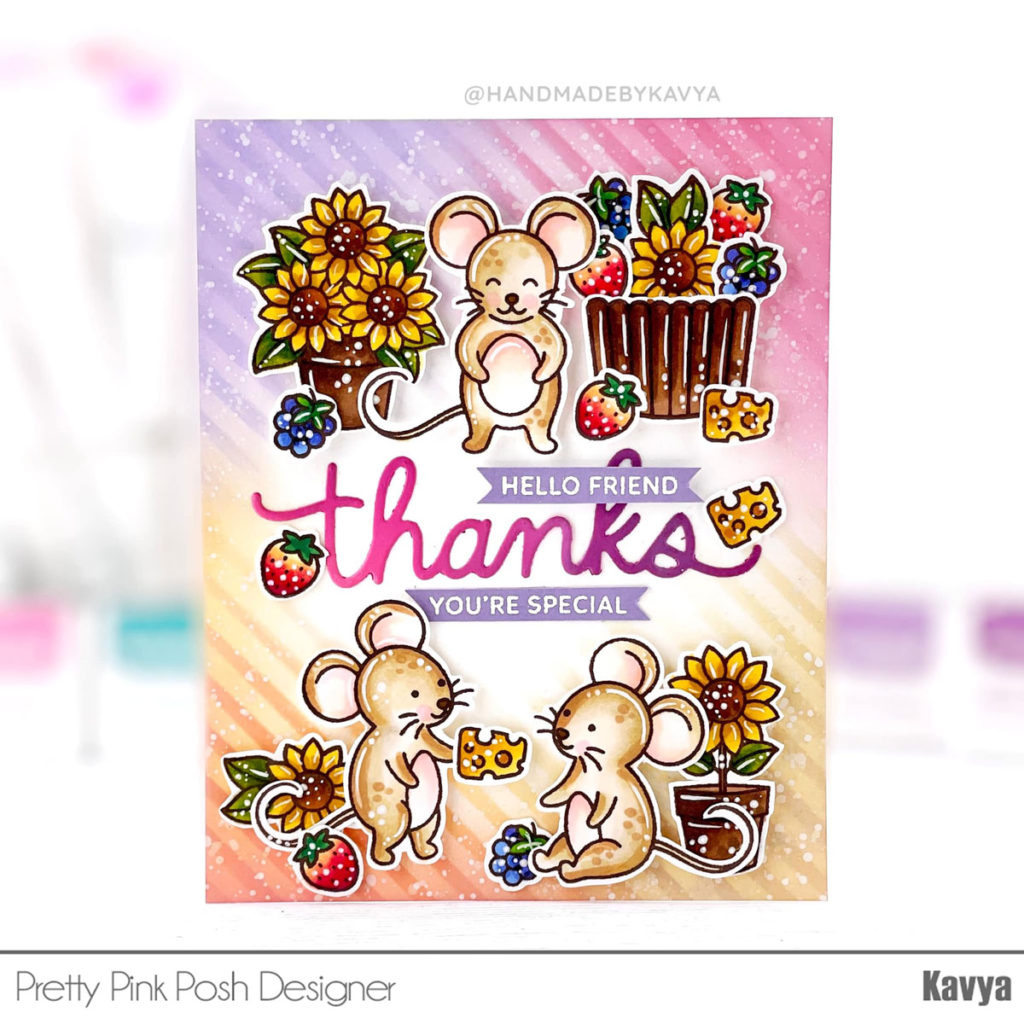
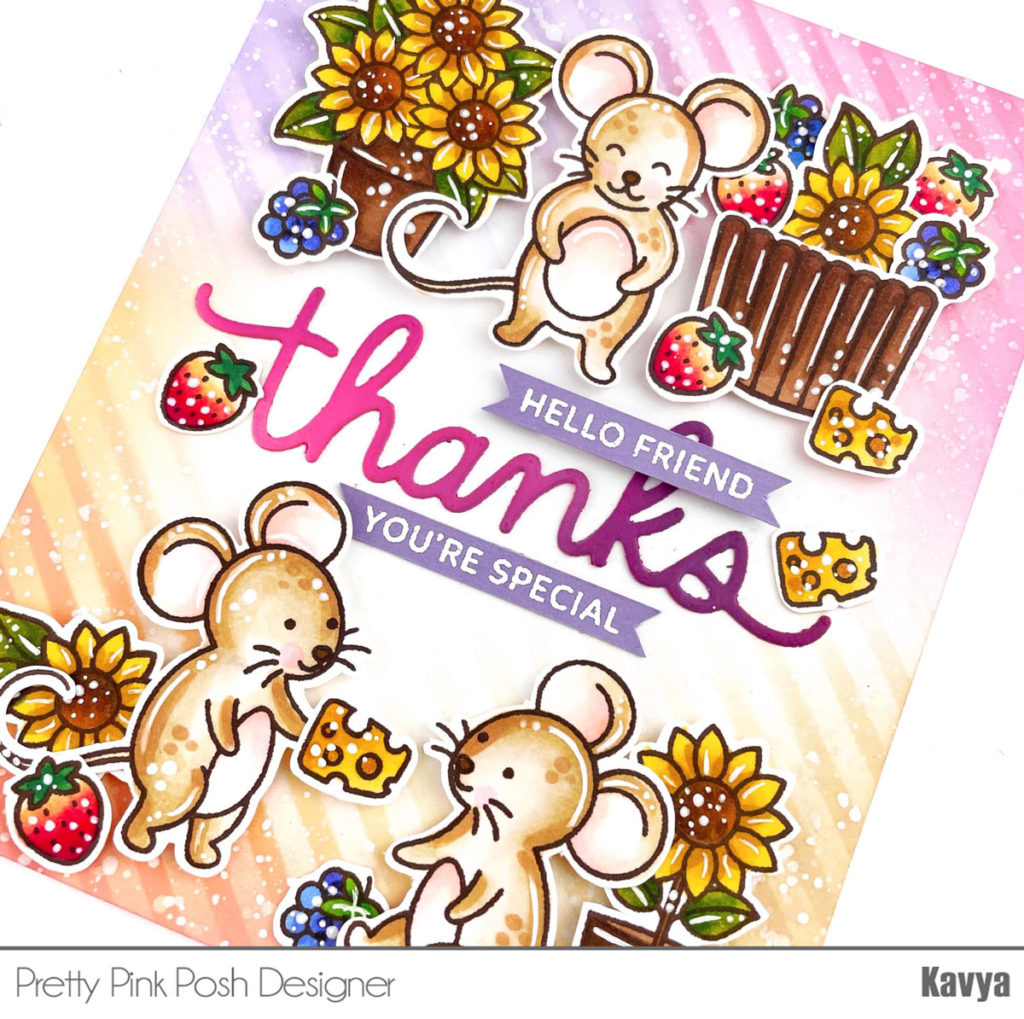
Hi folks, it’s Kavya and I have a sneak peek of the new release. I am a huge fan of color so I obviously enjoy fall as I can go crazy with the warm color palette. Today, I am showcasing the newMouse Friends and Potted Sunflowers stamp sets.
New release will be available September 14th.
I first started off by creating my background by ink blending using Pinstripe stencil and shades of pink, purple and tan dye inks. As always, I splattered some white paint to make my background dramatic. Then, I stamped and colored a bunch of images fromMouse Friends and Potted Sunflowerswith alcohol ink markers.
To finish off my card, I die cut the word ‘thanks’ using the new Thanks script dieand ink blended one end using purple dye inks. Add some heat embossed sentiments from Mouse Friends and you are done!
I hope this post inspires you! Check back tomorrow for more inspiration of the new release!
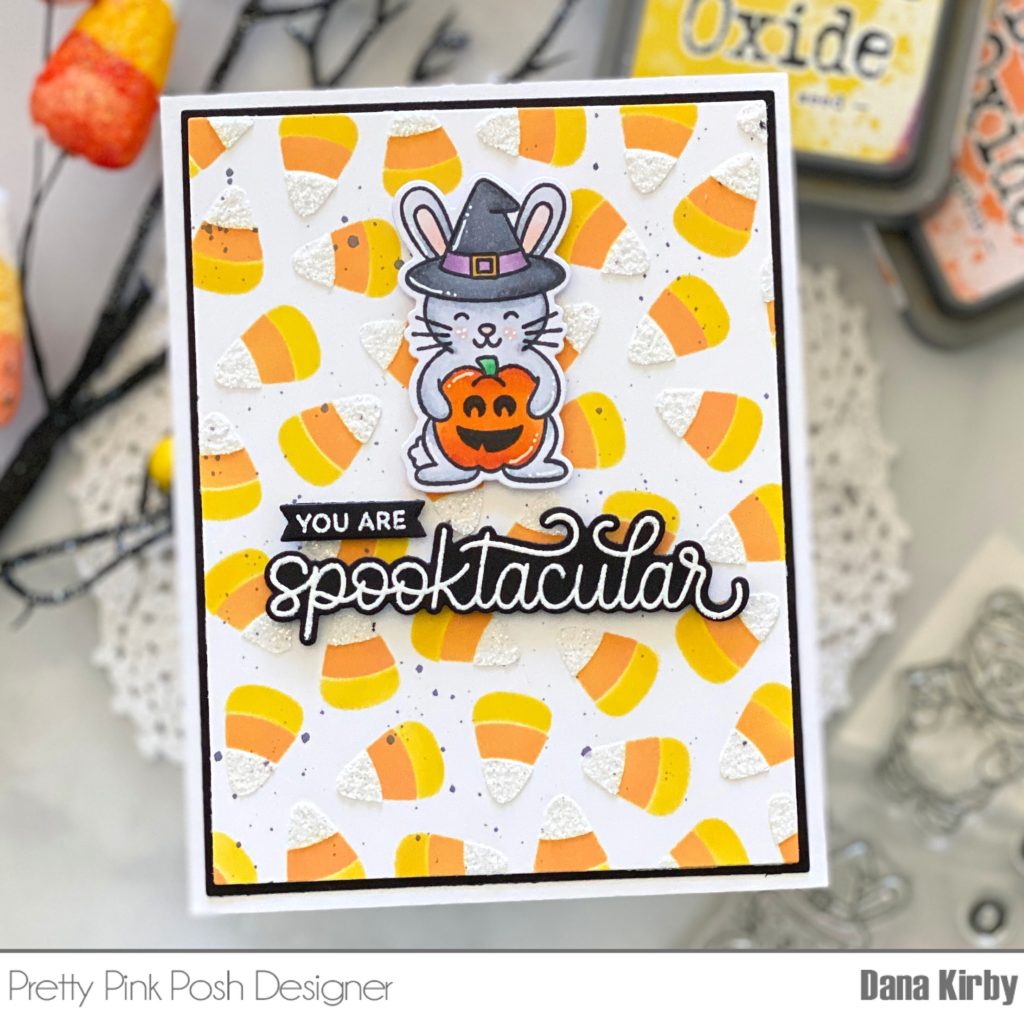
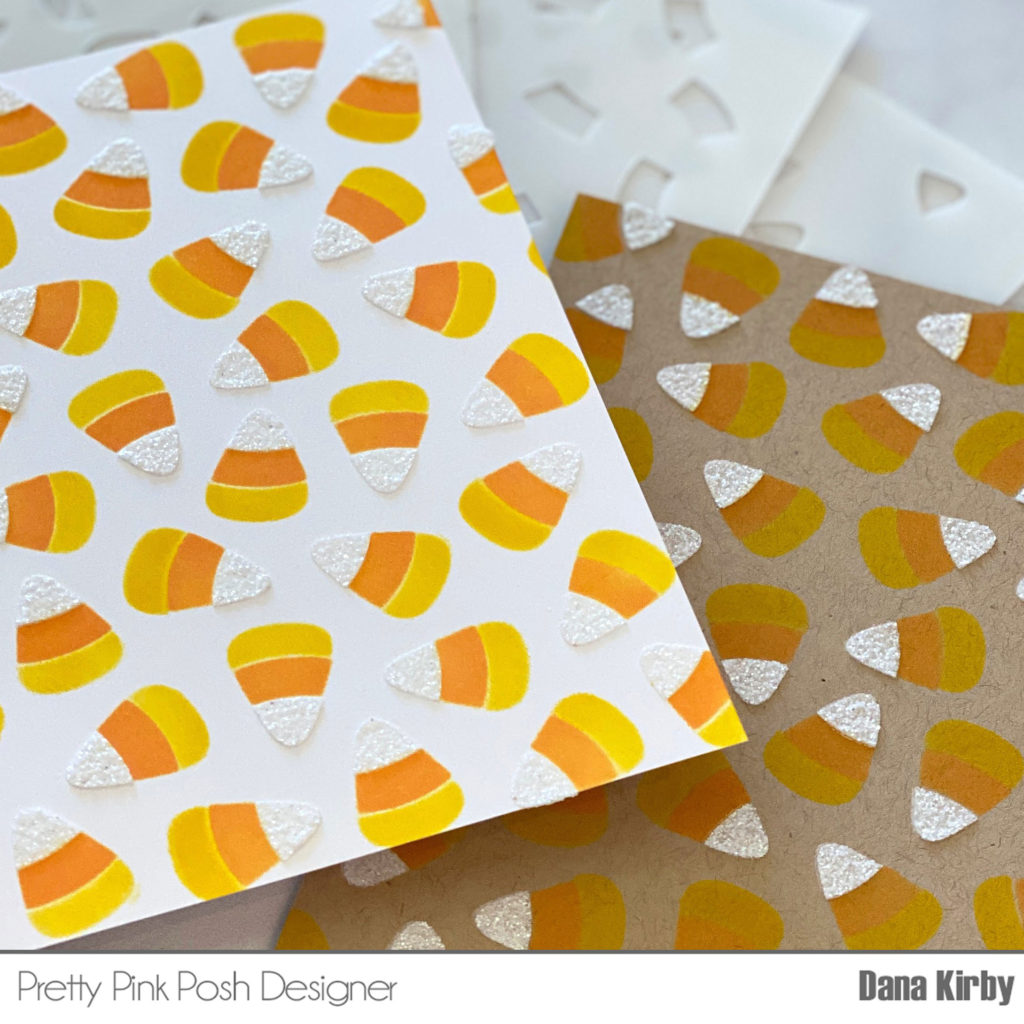
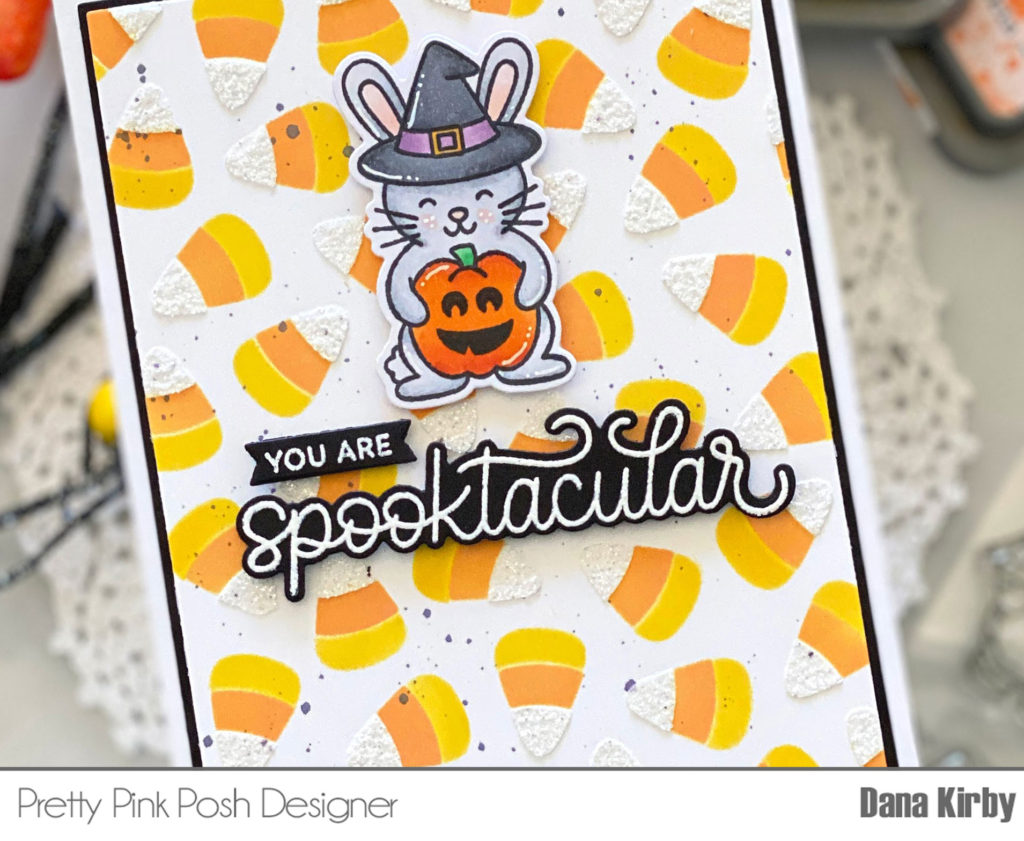
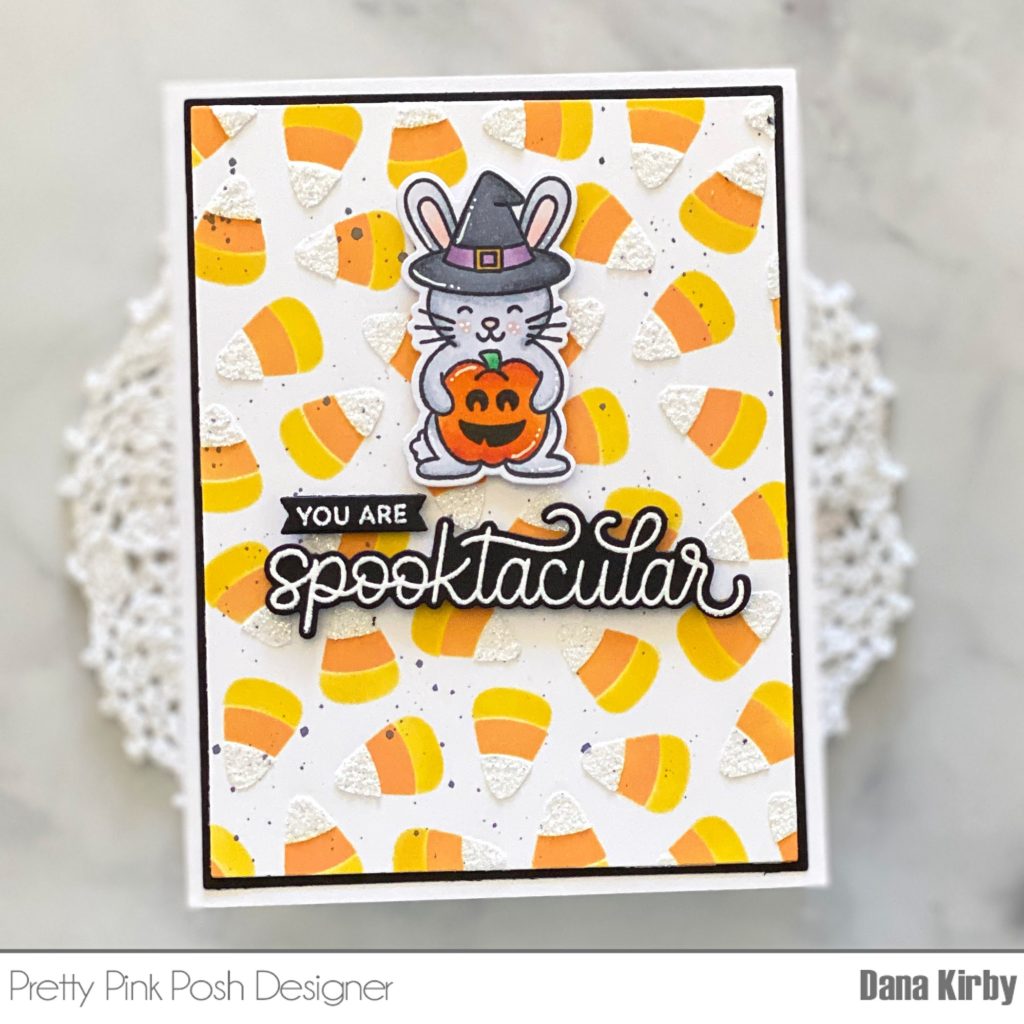
My first card uses the Layered Candy Corn stencil. This is a three pack of stencils that are so fun and easy to use. Each layer allows you to add another color and build your candy corn. I used Distress Oxide ink in Mustard Seed for the first layer. The second layer uses Distress Oxide ink in Carved Pumpkin. For the third and final layer I used Glitz Glitter Gel in white. I love the added detail the glitter gel adds to the panel!
Next, I added a few black splatters to my panel and set it aside to dry. To finish my card, I used the adorable new Halloween Critters set to stamp my Halloween rabbit and sentiment.
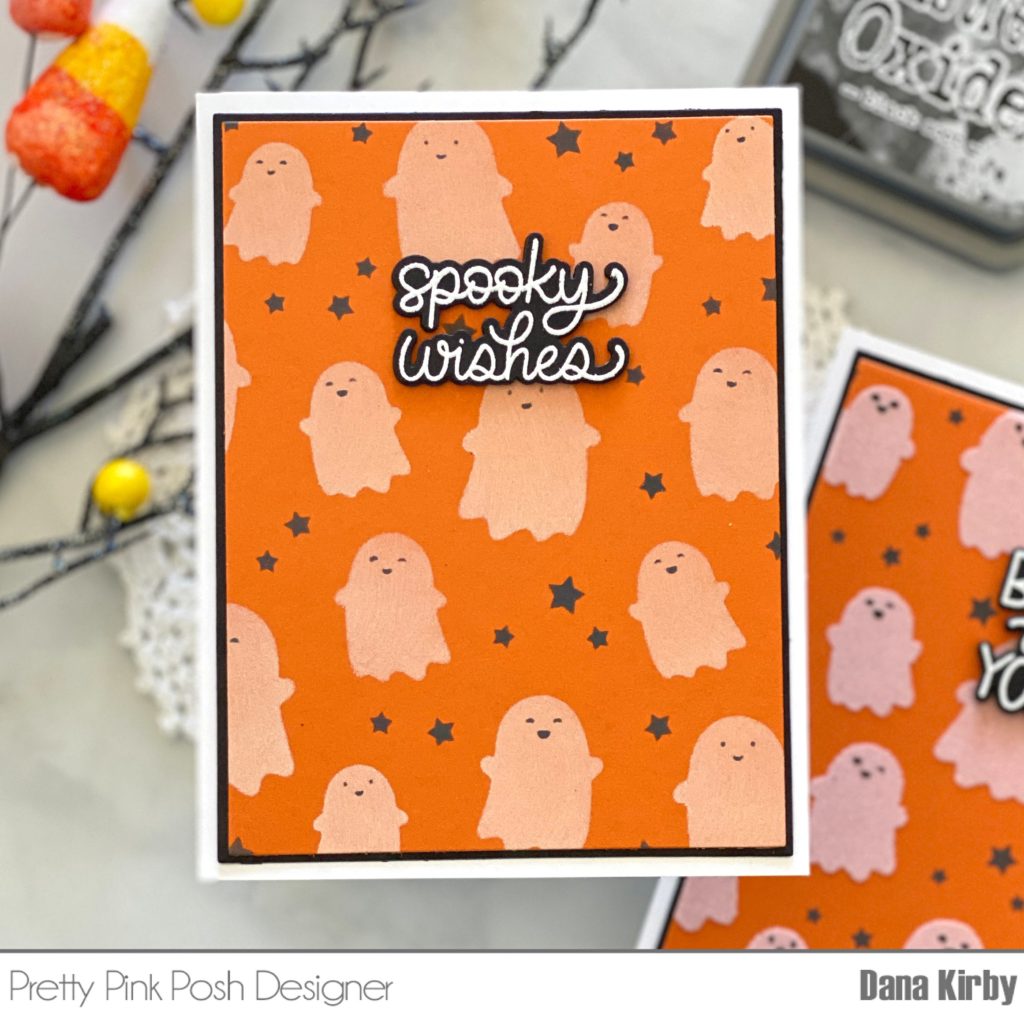
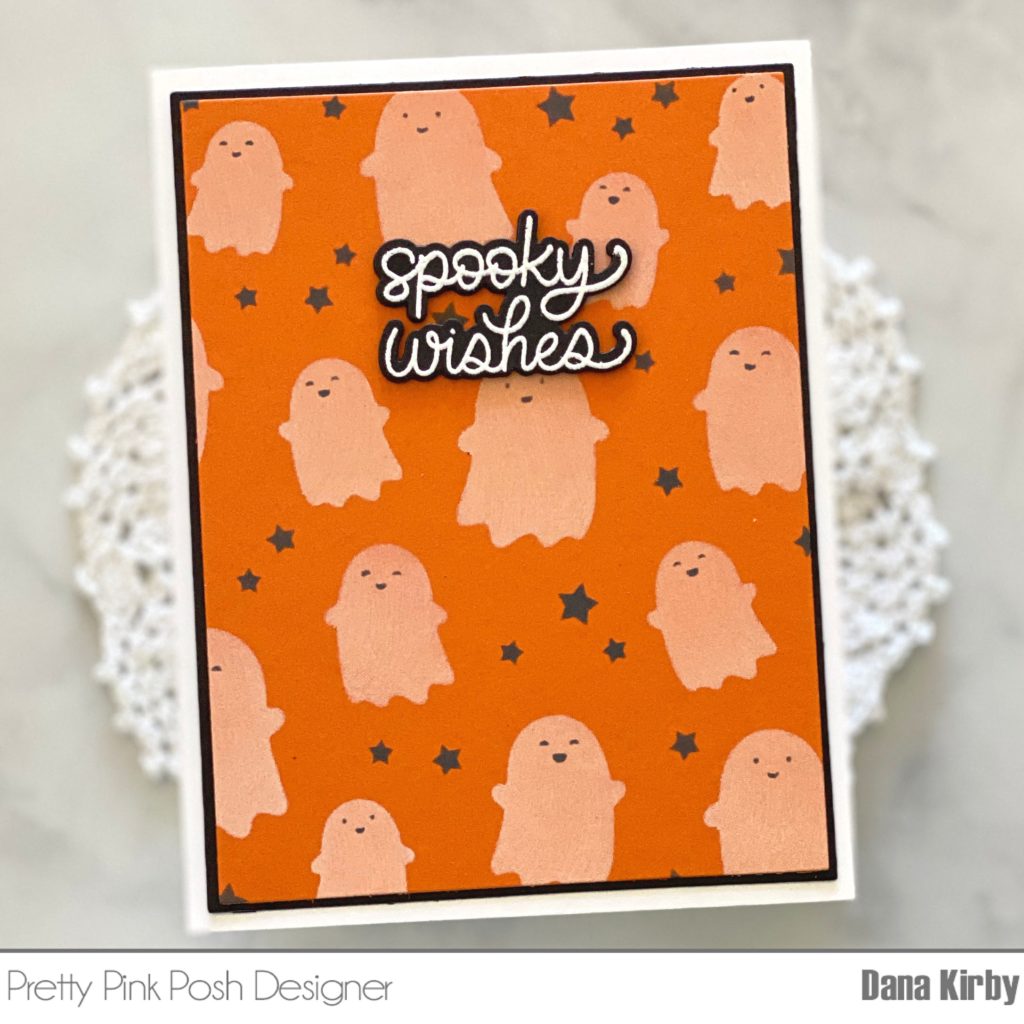
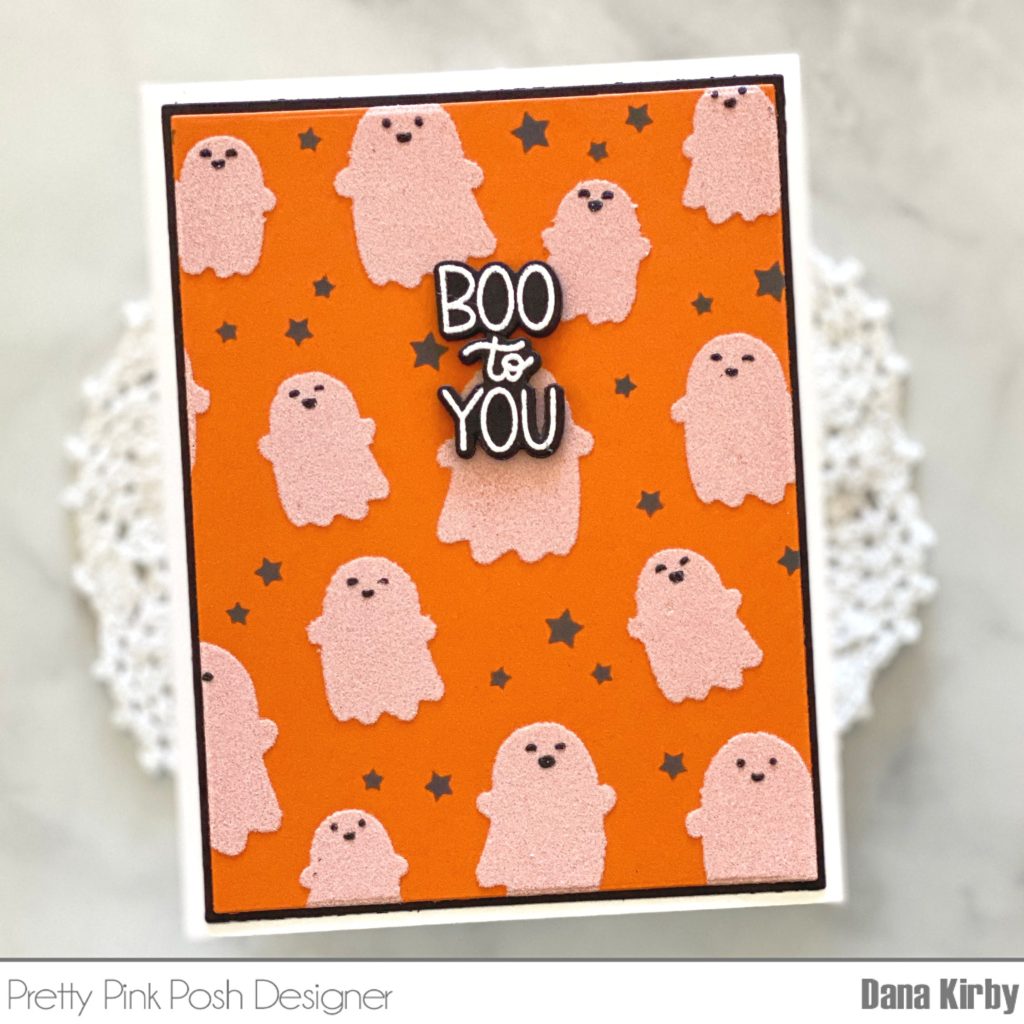
This is also a three pack of stencils. For my first layer (the ghosts) I used white pigment ink. I then used Distress Oxide ink in Black Soot for the stars and ghost faces (layers two and three).
To finish my card, I used a sentiment from the new Ghost Friends stamp set. Using white pigment ink is such a fun and easy way to create your ghost, but I thought it would also be so cute to use White Flock from Therm O Web.
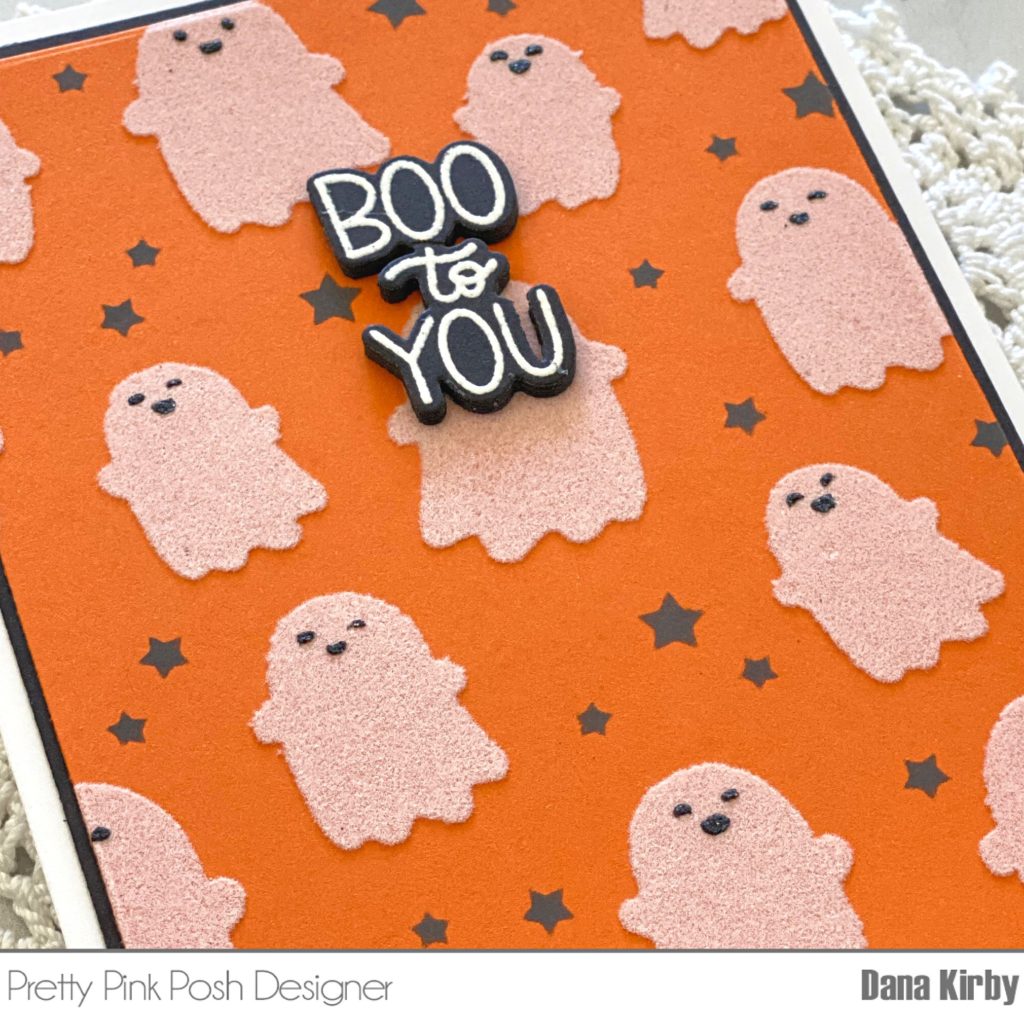
I started my card by applying Transfer Gel to the first stencil. Once the Transfer Gel was dry I ran it through my laminator with a White Flock Transfer Sheet. I love the fuzzy texture. Next, I used Black Soot ink to add the stars around the ghost. For the third layer I used the Glitz Glitter Gel in Black to add faces to the ghost. Lastly, I once again used the Ghost Friends set for my sentiment.
Thanks for joining me today. I hope you enjoyed my cards and I can’t wait to see what you create with these fun new products.
Hi folks, Kavya here with a sneak peek of the August 10th release!
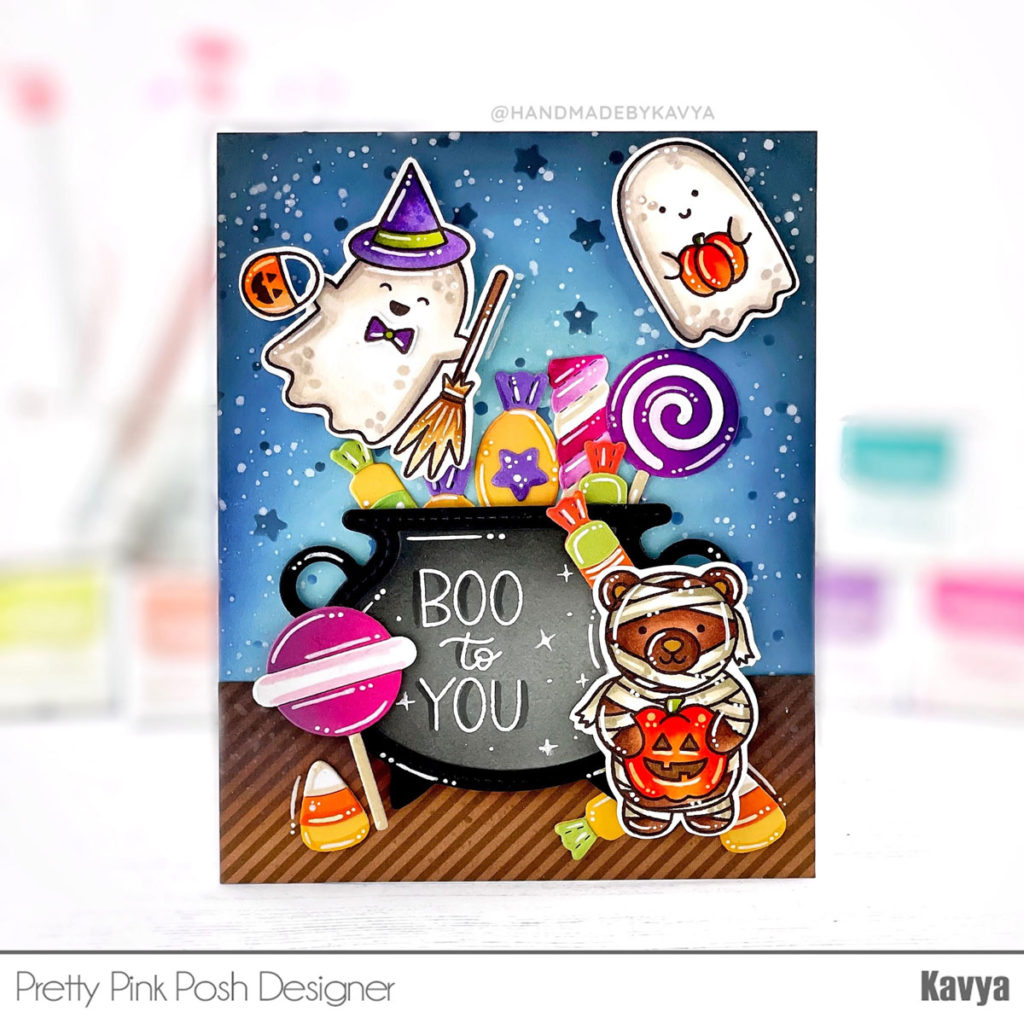
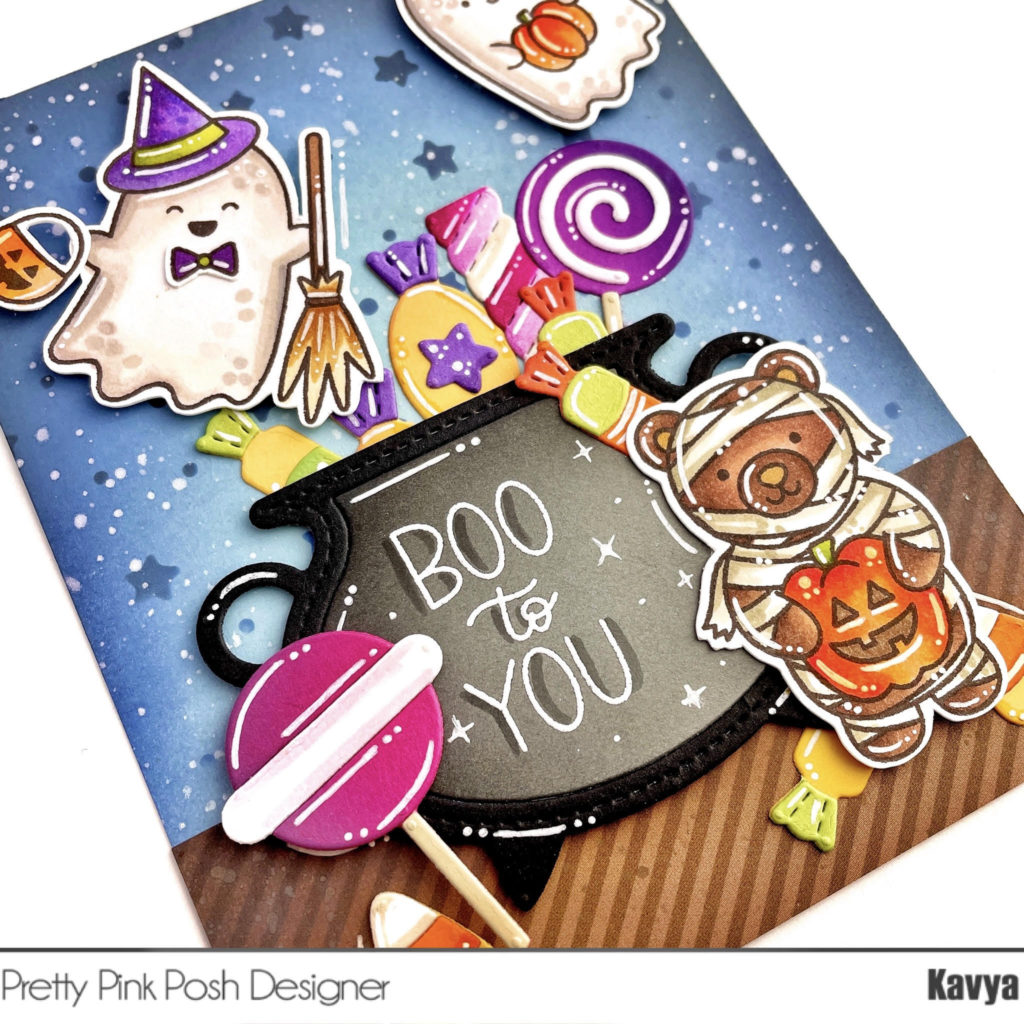
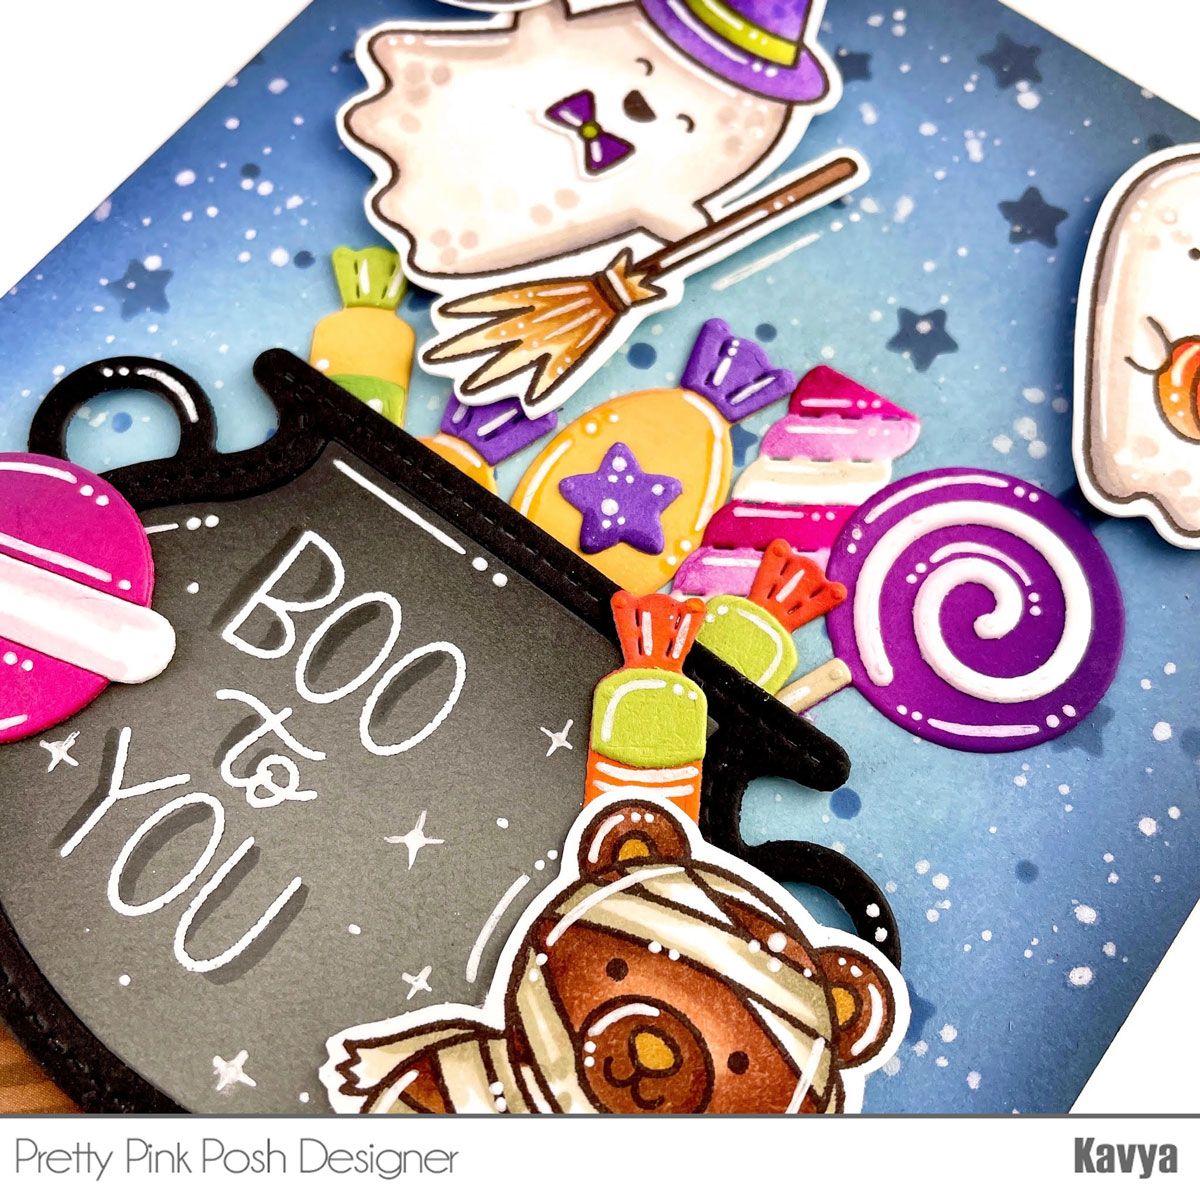
Halloween is usually a creepy holiday and is mostly associated with darker colors, but PPP’s Halloween release is just so adorable! I can’t get enough of all the cute critters and how perfectly well they all pair together. Today, I will be showcasing two new dies- Cauldron Shakerand Candy Treats die sets. My first card uses both of them in a Halloween themed card but my second card is a birthday themed card using the candy treats! They are truly versatile. :)
I first started off by creating my background by ink blending Black Soot and Faded Jeans distress oxide inks on a pale blue cardstock. I also ink blended the stars using the Starry Background stencil. I added a strip of brown patterned paper at the bottom for the land. You can also use a striped stencil to achieve the same effect.
Then, I diecut a bunch of candies from Candy Treats using different colored cardstock. I also die cut a Cauldron Shaker using gray and black cardstock. As always, ink blended the edges and added white gel pen details to make them more realistic. Then, I stamped and colored critters from Ghost Friendsand Halloween Critters. I heat embossed a sentiment in the middle of the cauldron and I was done with my card! The cauldron can also be used to create a shaker card. :)
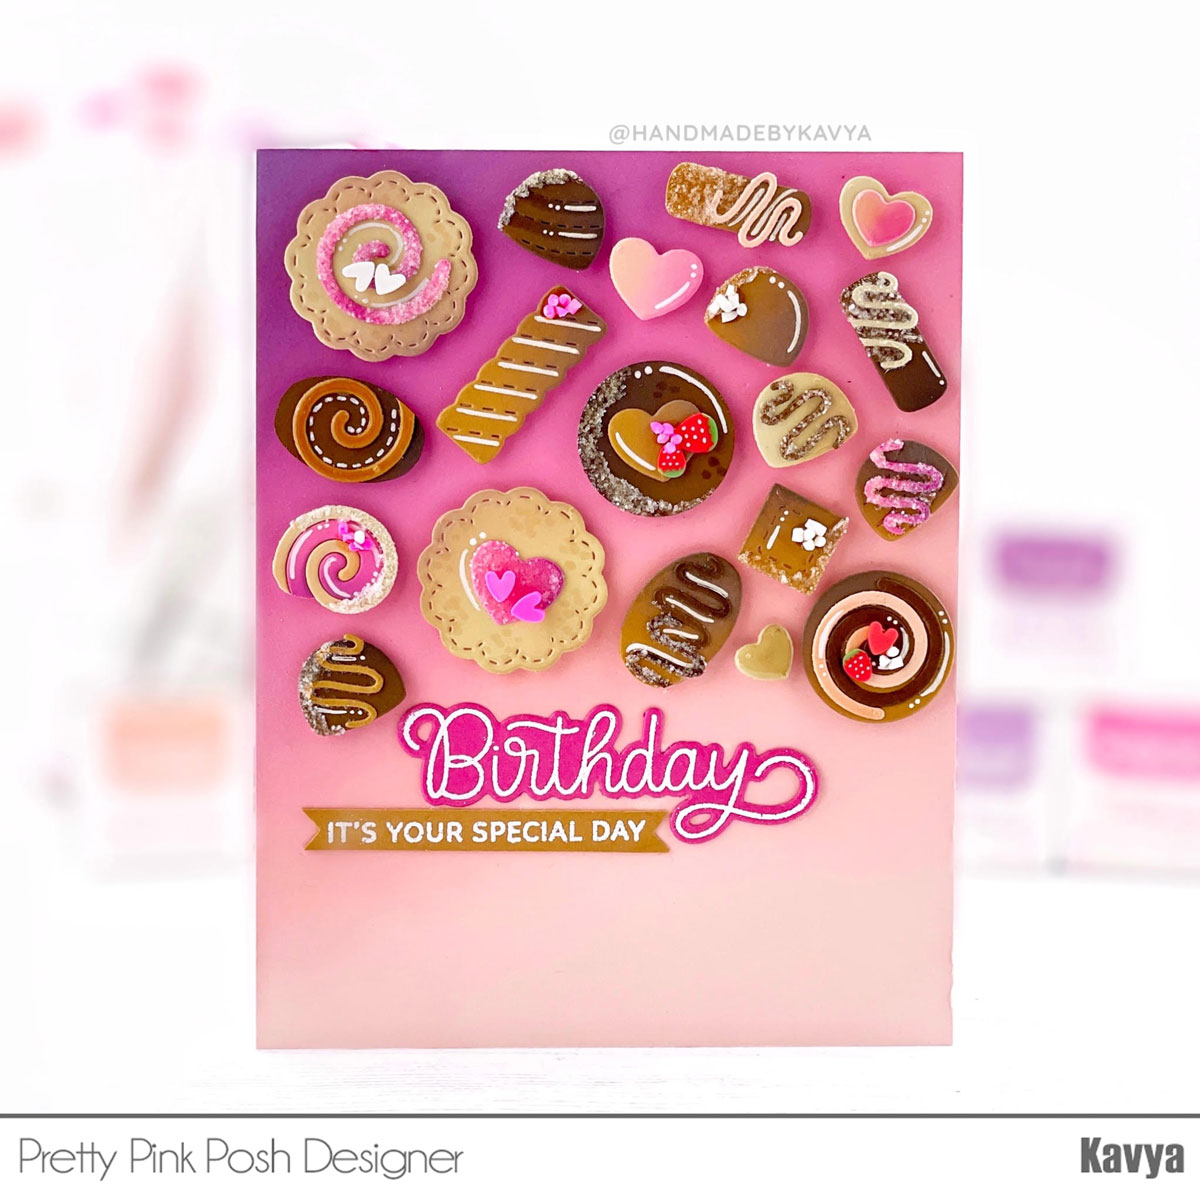
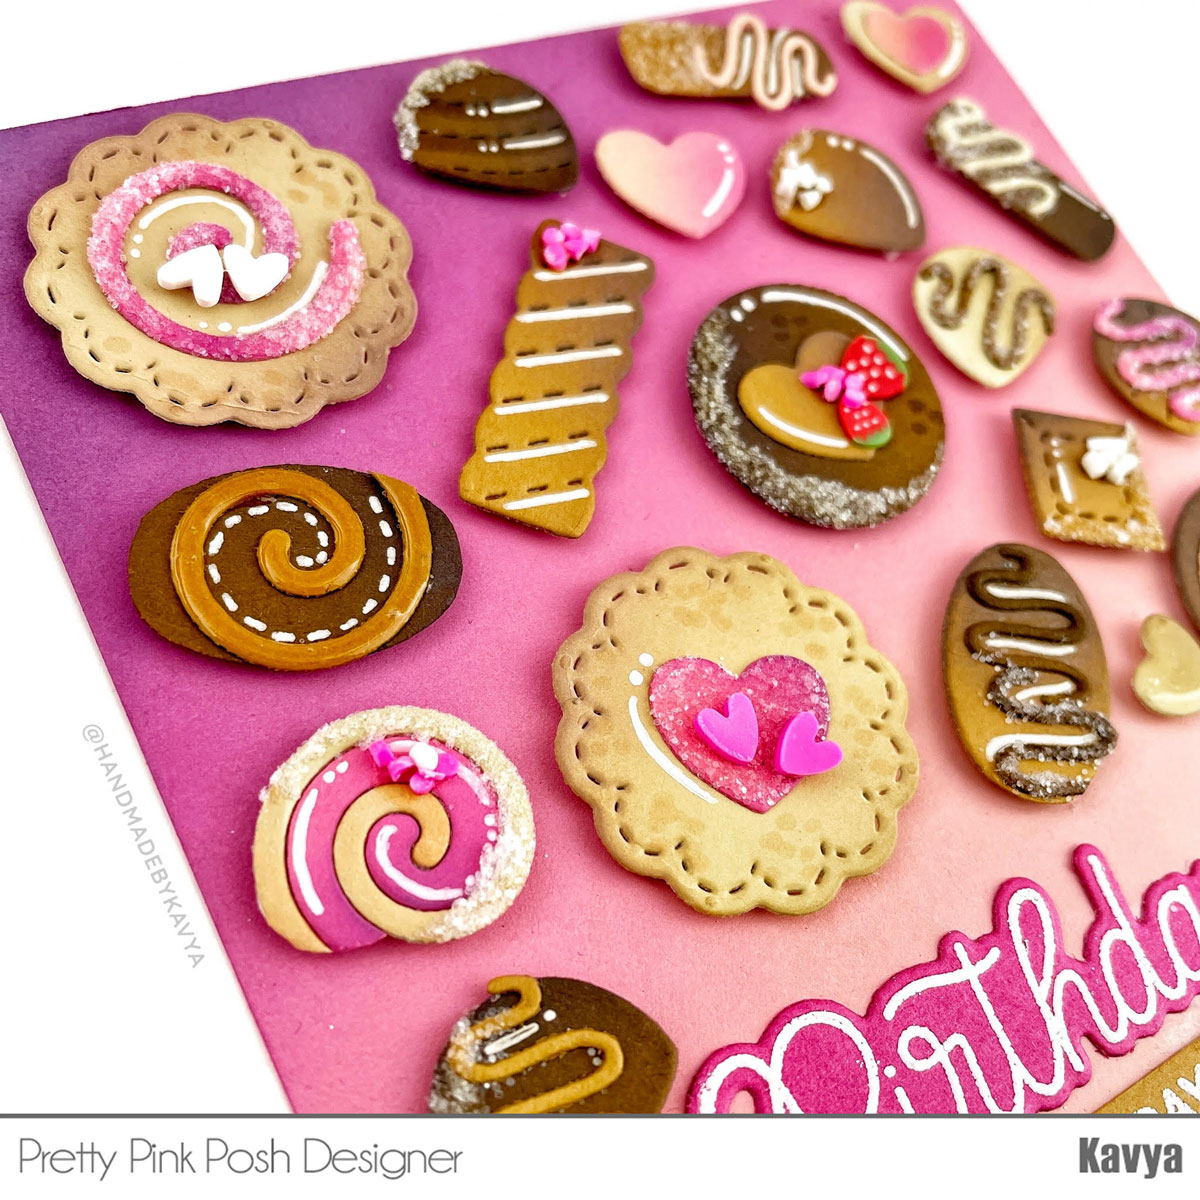
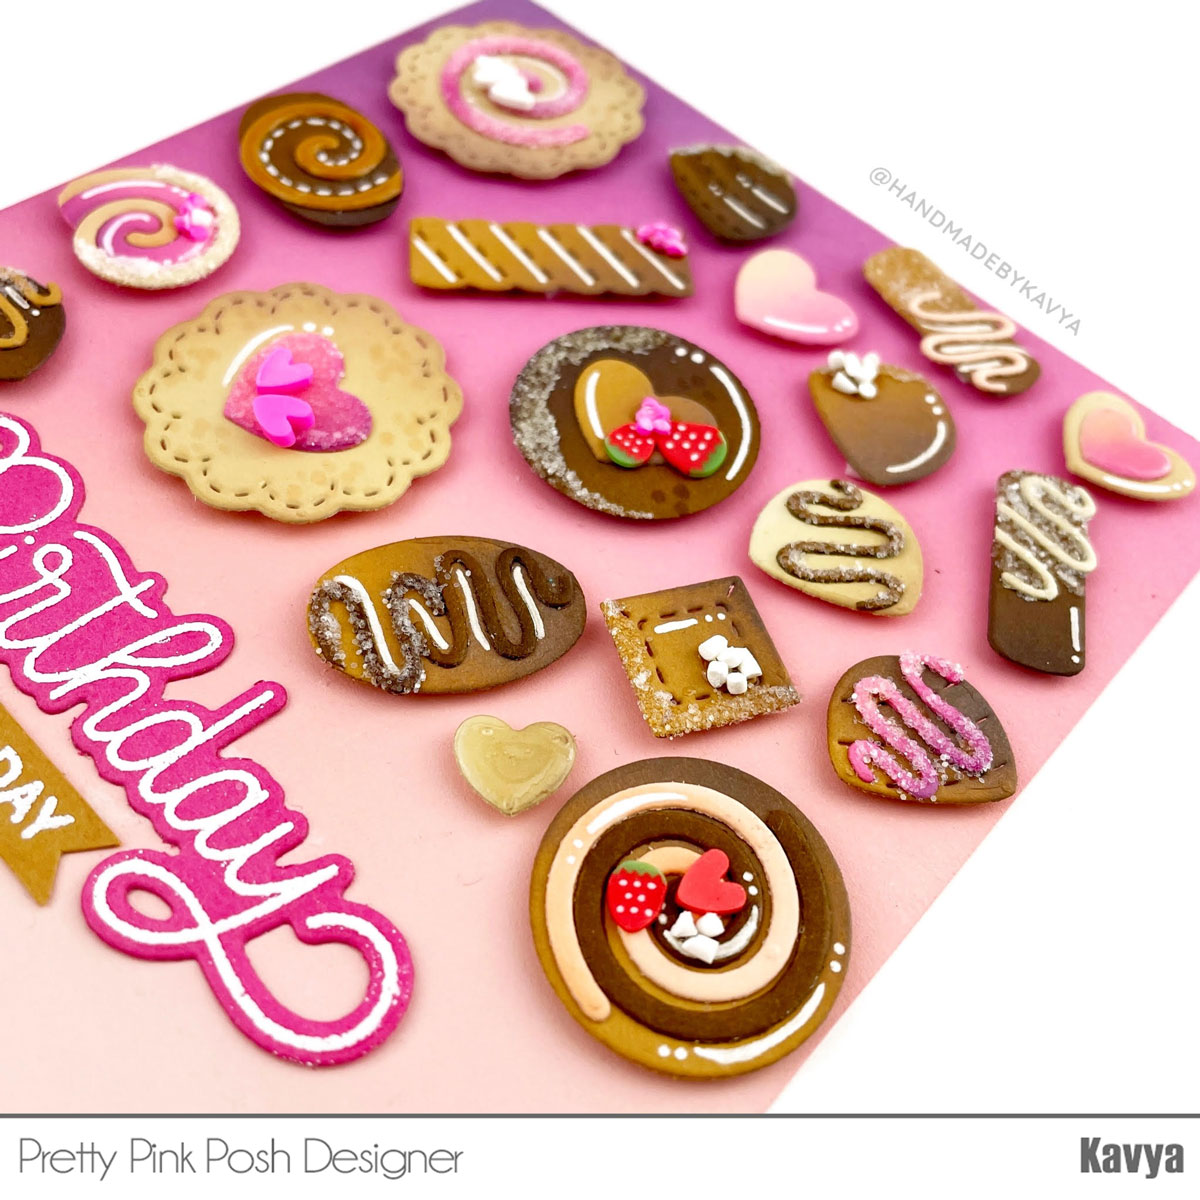
My next card is a birthday card using theCandy Treats die. This die set can be used all year long and can the different bits and pieces can be mixed and matched to create unique pieces of candies and chocolates all year long!
I simply used pieces of brown and pink cardstock for all the chocolates. I tried to make them more realistic by ink blending the edges using matching dye ink and by adding details using a white gel pen and clay confetti embellishments like Clay Confetti Wheel #3(fruits) and White Clay Hearts confetti. I also chopped up the clay sprinkles into tiny pieces, added dimes ion using glossy accents and added some transparent glitter on the edges of some chocolates.
Later, I created my background by ink blending seedless preserves, picked raspberry and saltwater taffy distress oxide inks on pale pink cardstock. I added the chocolates and finished it off by adding a sentiment from Birthday Scripts and Celebration Scripts stamp sets.
That’s it! I hope you liked all the projects that I made today. Stop by tomorrow for a look at the new stencils coming!
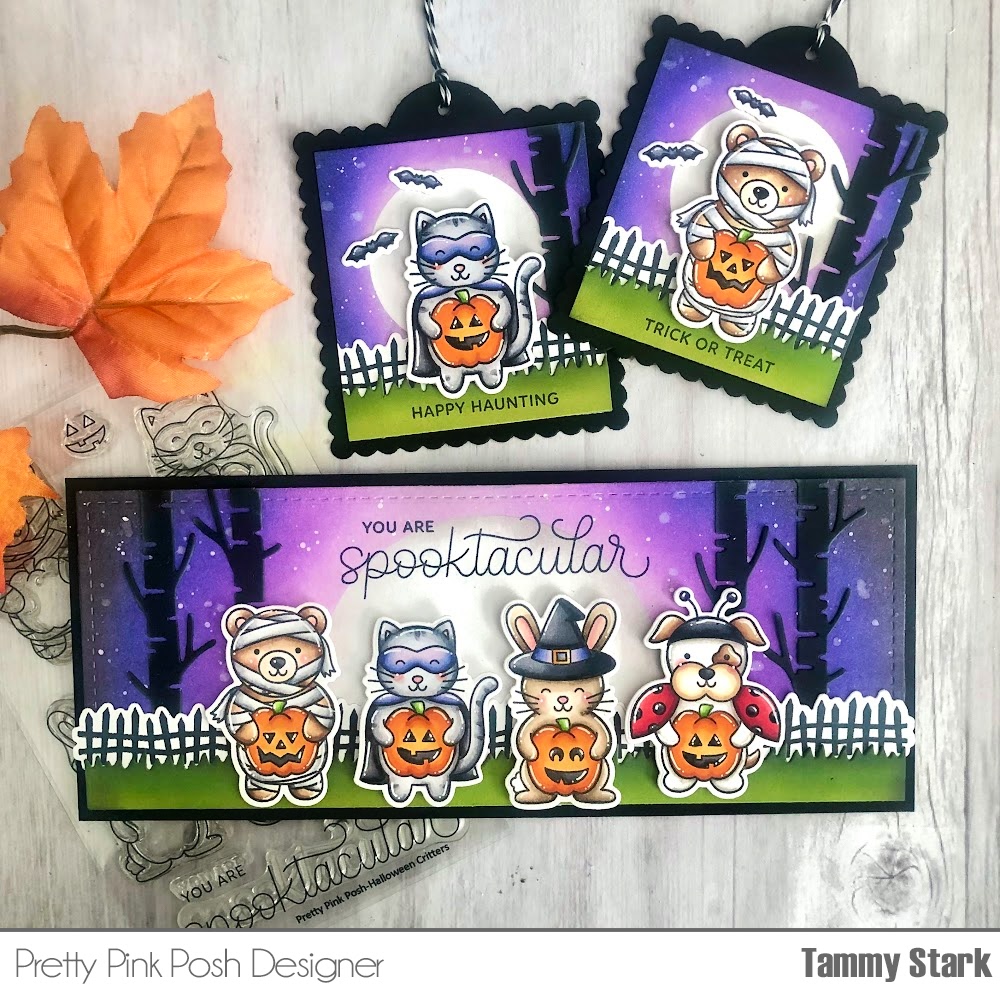
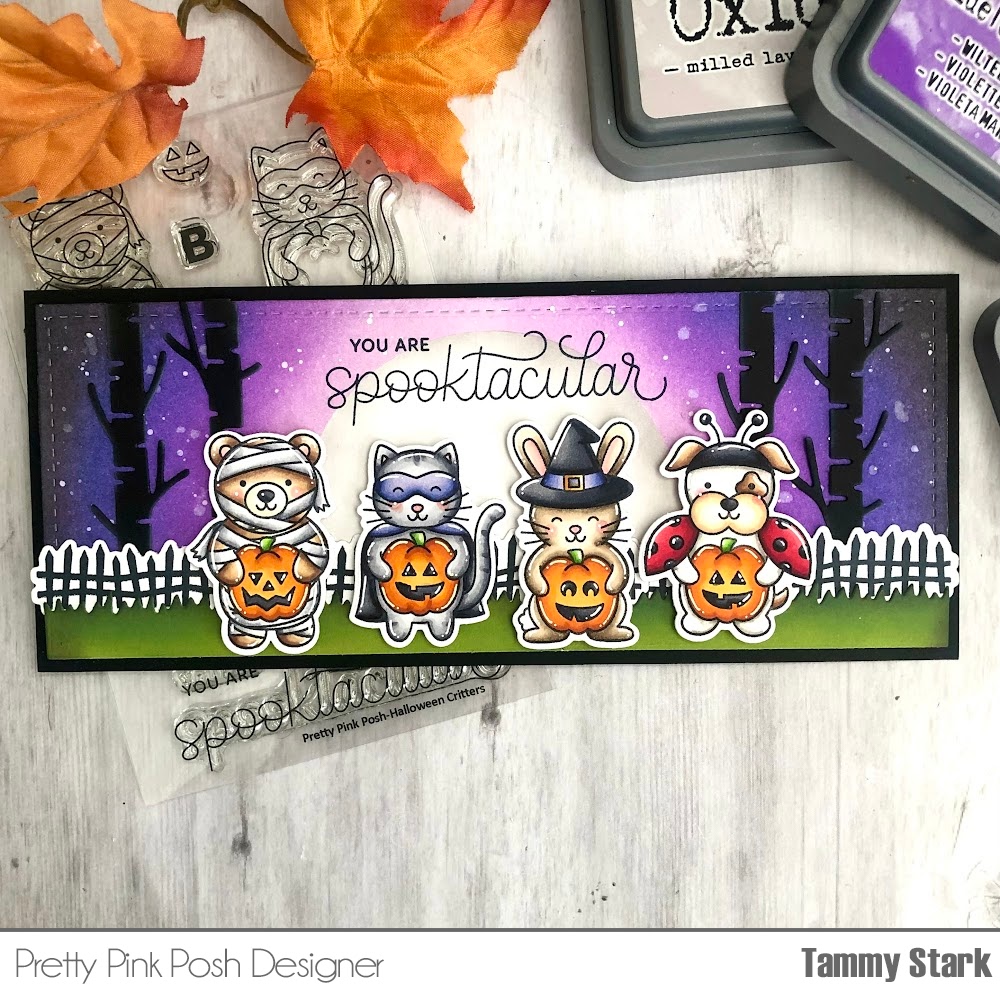
Hello friends, Tammy here! The upcoming Halloween release (releasing on August 10th) from Pretty Pink Posh is absolutely SPOOKTAKULAR! I had so much fun creating this slimline card and coordinating tags using the new Halloween Critters and Halloween Borders stamp sets!
To begin, I stamped the images from Halloween Critters, colored with Copic markers, and die cut with the Halloween Critters coordinating dies. Next, I cut a piece of Bristol smooth cardstock using the largest die from the Slimline: Peekaboo Windows Dies. I cut a circle from masking paper and placed it in the middle of the panel and ink blended the background using Milled Lavender, Wilted Violet, Blueprint Sketch, and Black Soot Distress Oxide inks. I removed the masking paper and lightly inked the moon with gray ink to give the moon some dimension.
Next, I die cut 2 grassy borders from green cardstock and birch trees from black cardstock using the Nature Essentials Dies. I then stamped the spooky fence 2 times in black ink from the Halloween Borders stamp set and die cut the borders using the Halloween Borders coordinating dies. I attached the grassy borders to the bottom of the inked panel, then tucked the fence borders under the grass, overlapping them to fit the length of the card. I then adhered the black birch trees to my card before attaching the critters with foam tape for dimension. Lastly, I stamped the sentiment in black ink across the moon and attached the completed card to a black 3 1/2 x 8 1/2″ card base to finish.
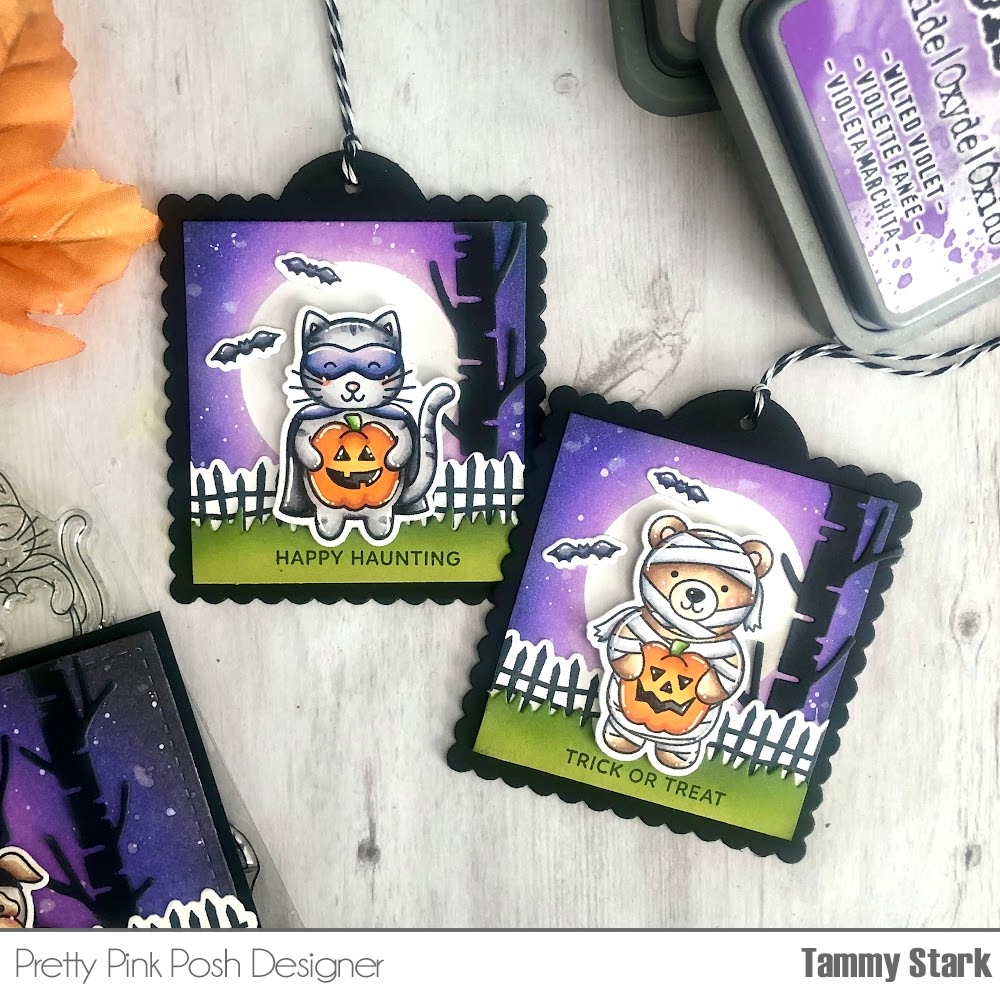
Next, I created a fun set of tags to coordinate with the slimline card.
I stamped the images from Halloween Critters, colored with Copic markers, and die cut with the Halloween Critters coordinating dies. Next, I cut 2 black scalloped tags using the Scallop Square Tags. I then cut Bristol smooth cardstock to fit inside the scallop tags and ink blended then as I did the slimline card. I then stamped the spooky fence 2 times in black ink from the Halloween Borders stamp set and die cut the borders using the Halloween Borders coordinating dies. I attached the grassy borders to the bottom of the inked panel, then tucked the fence borders under the grass, cutting off the edges to fit the width of the tag. The birch trees were tucked behind the fence borders before attaching the critters with foam tape. I stamped the sentiments from the Halloween Envelopes stamp set in black ink along the grassy borders, then finished off the tags by adding a couple of stamped bats, also from Halloween Envelopes.
Thanks so much for stopping by! I hope you are inspired to create some Halloween projects with the fa-BOO-lous new Halloween release!