Hi friends! It’s Dana here today and I am excited to be back to share a sneak peek of two of the new stencils that are part of the Birthday Release! I have two cards to share today so let’s get started…
New release will be available February 24th
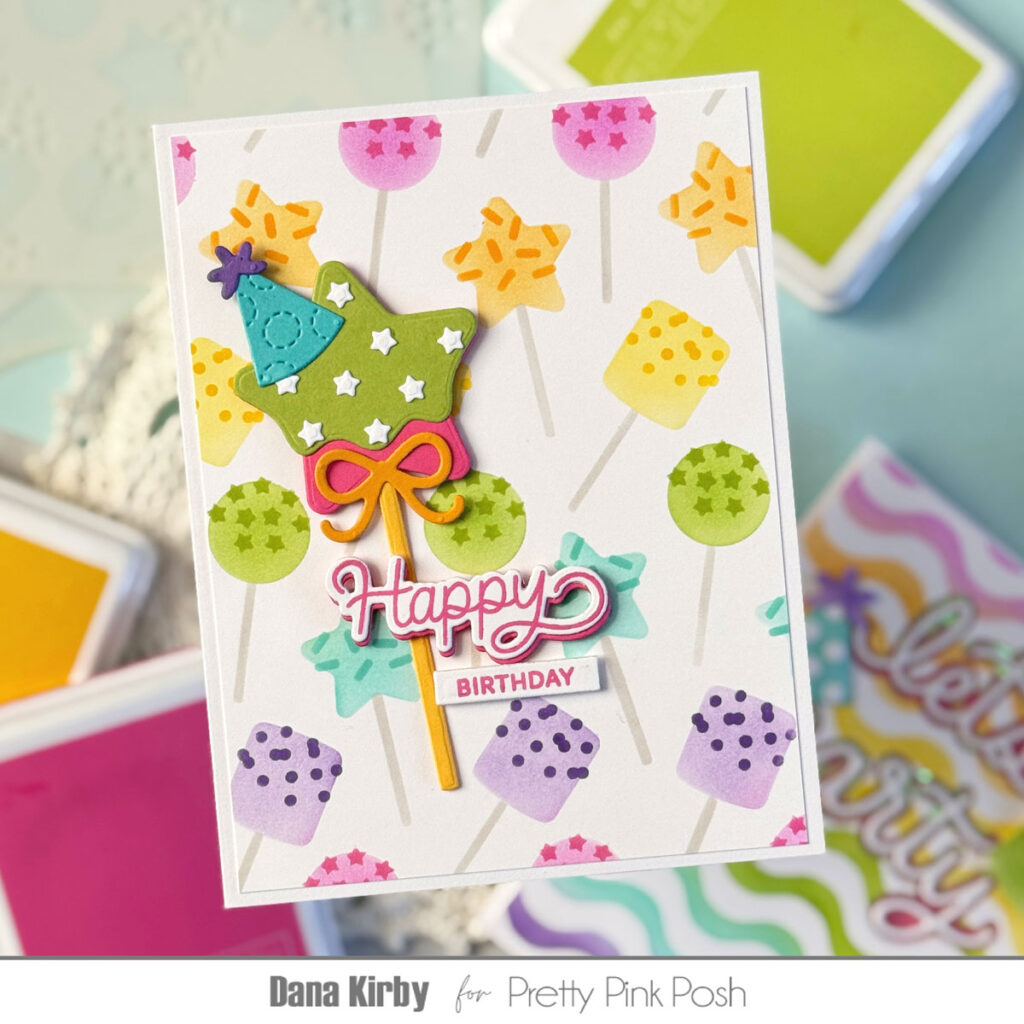
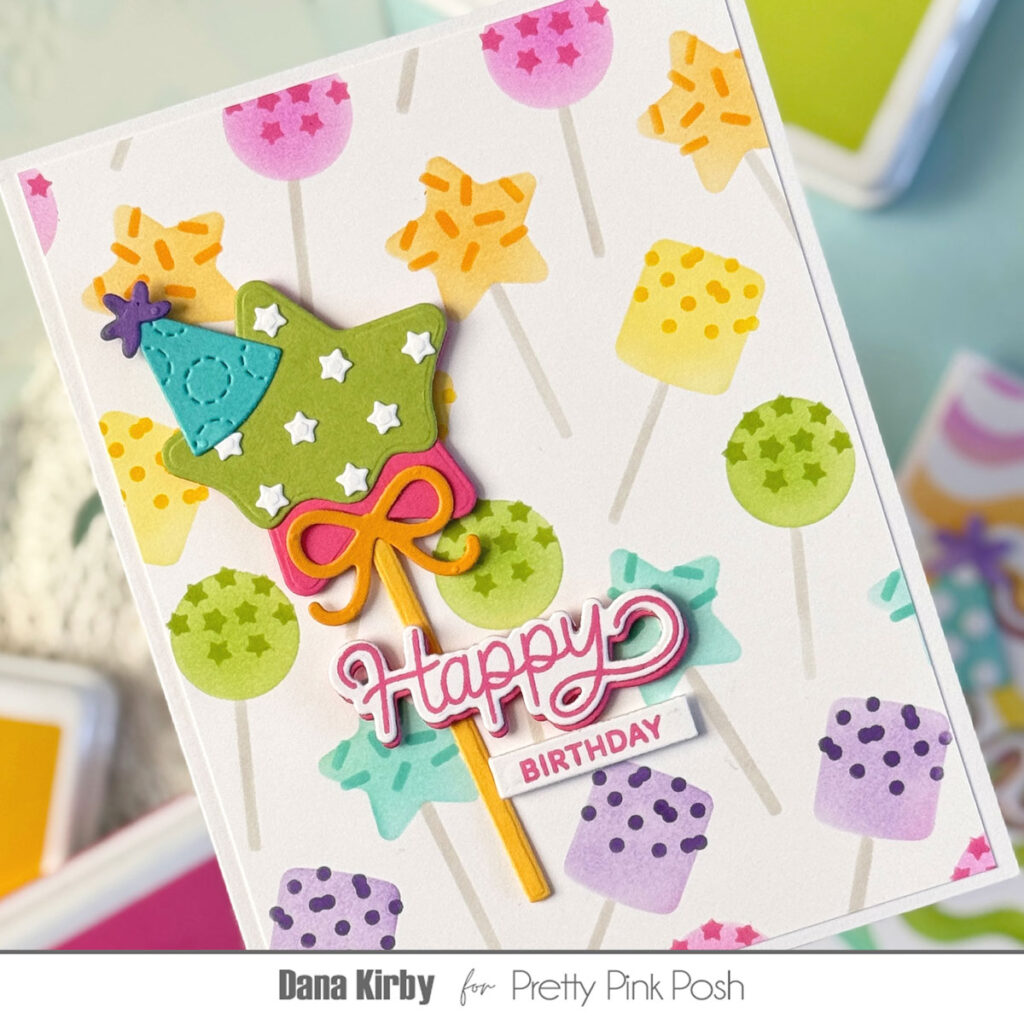
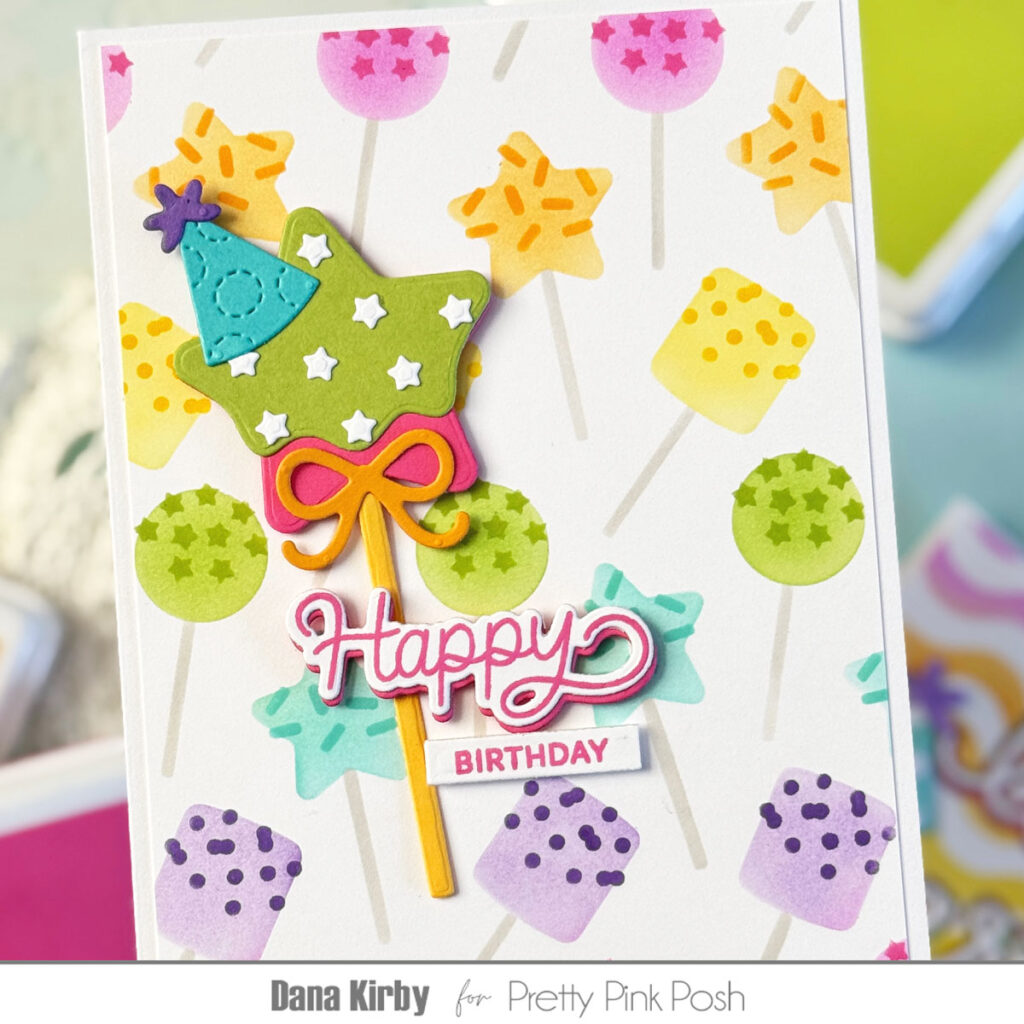
I started my first card by creating my card panel with the Layered Birthday Cake Pops stencil set. This is a set of three stencils that layer together to create the sweetest card panel. I used dye inks and finger daubers for my blending.
Next, I used the fun Birthday Cake Pops die set to create my cake pop. This set of dies coordinates perfectly with the Layered Birthday Cake Pops stencil set but also works great on its own. So many fun possibilities!
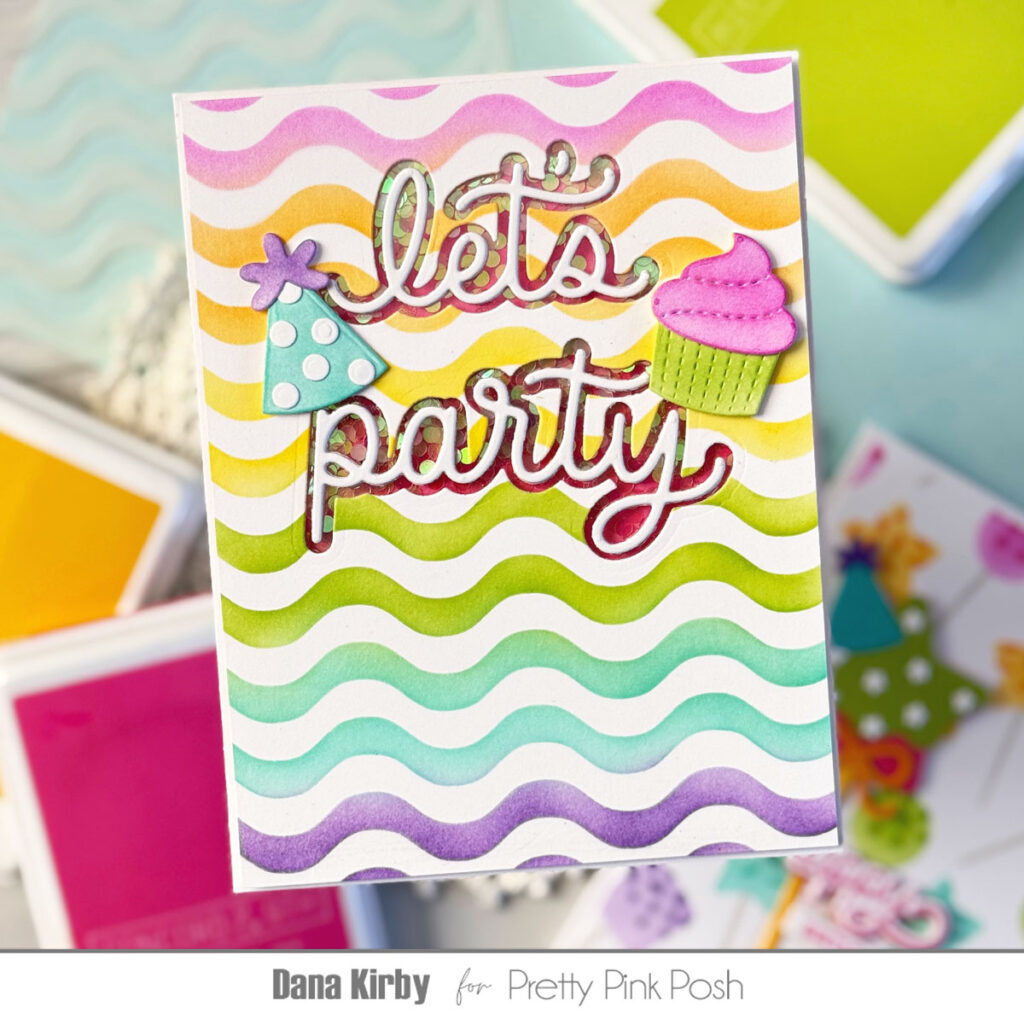
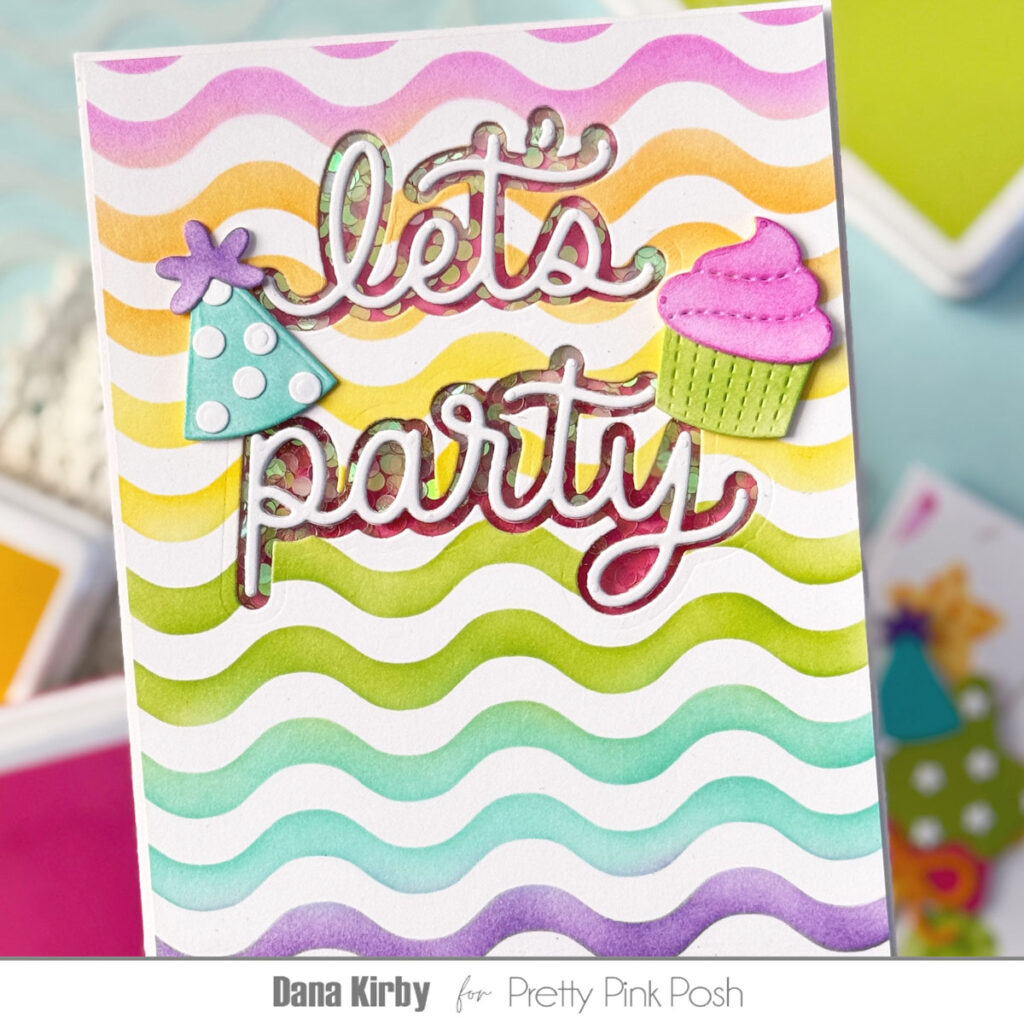
I started my next card by using the Wavy Stripes stencil to create my card panel. This is such a fun stencil and I love that it can be used for so many occasions. I again used finger daubers and dye ink for my blending.
Once my panel was finished I used the Let’s Party Shadow die set to create my opening for my shaker. I attached acetate to the back of the opening and filled the shaker with the Iridescent Mini Circle Confetti. I then die cut the Let’s Party sentiment and attached it directly onto the acetate. Lastly, I used the Birthday Holder Addition dies to create my party hat and cupcake.
Thanks for joining me today and I hope you enjoyed my cards. I can’t wait to see what you create with these fun new products!
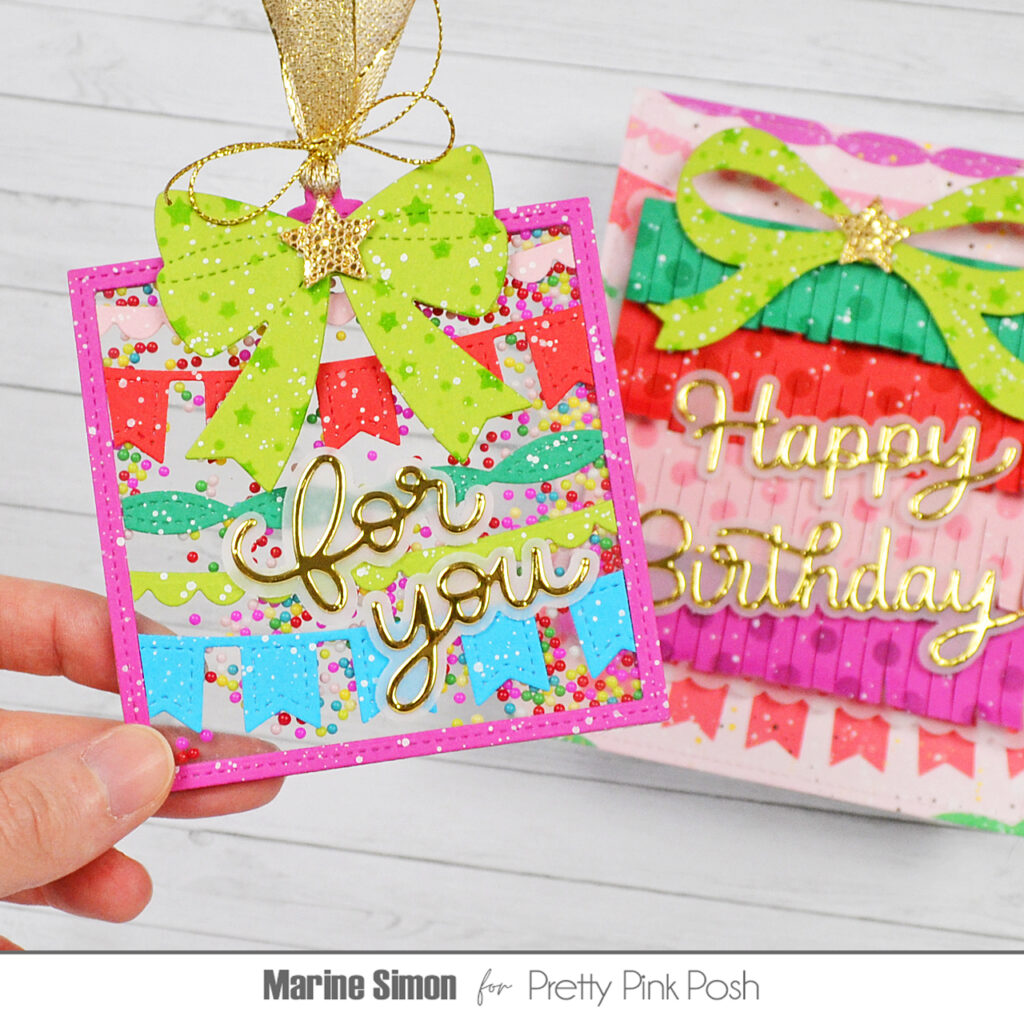
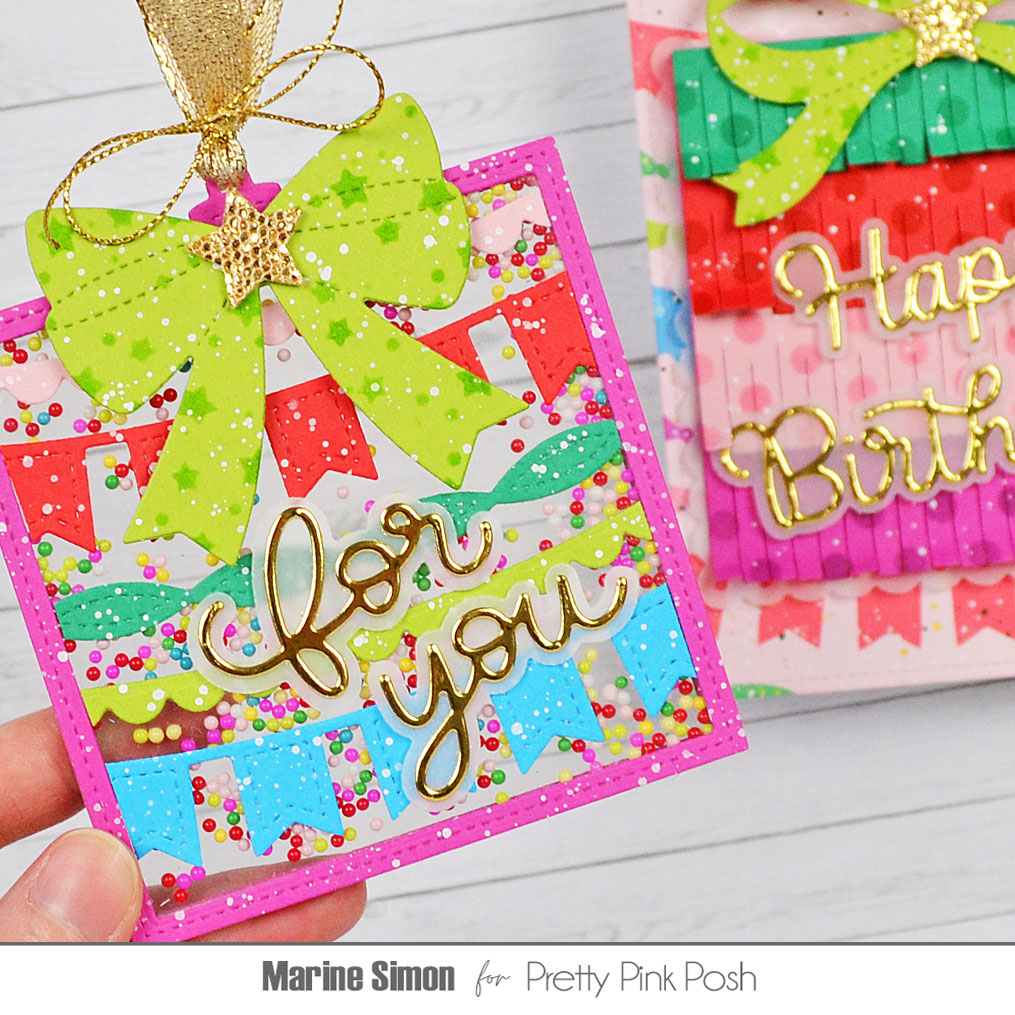
Hello crafty friends, Marine here, I’m super happy to be back on the blog with this new set of card and tag showcasing die sets from the February 2025 Release! This release is absolutely amazing, and I had a blast working on very colorful projects with all the new products, finding inspiration in the gorgeous Party Time shaker beads mix.
New release will be available February 24th
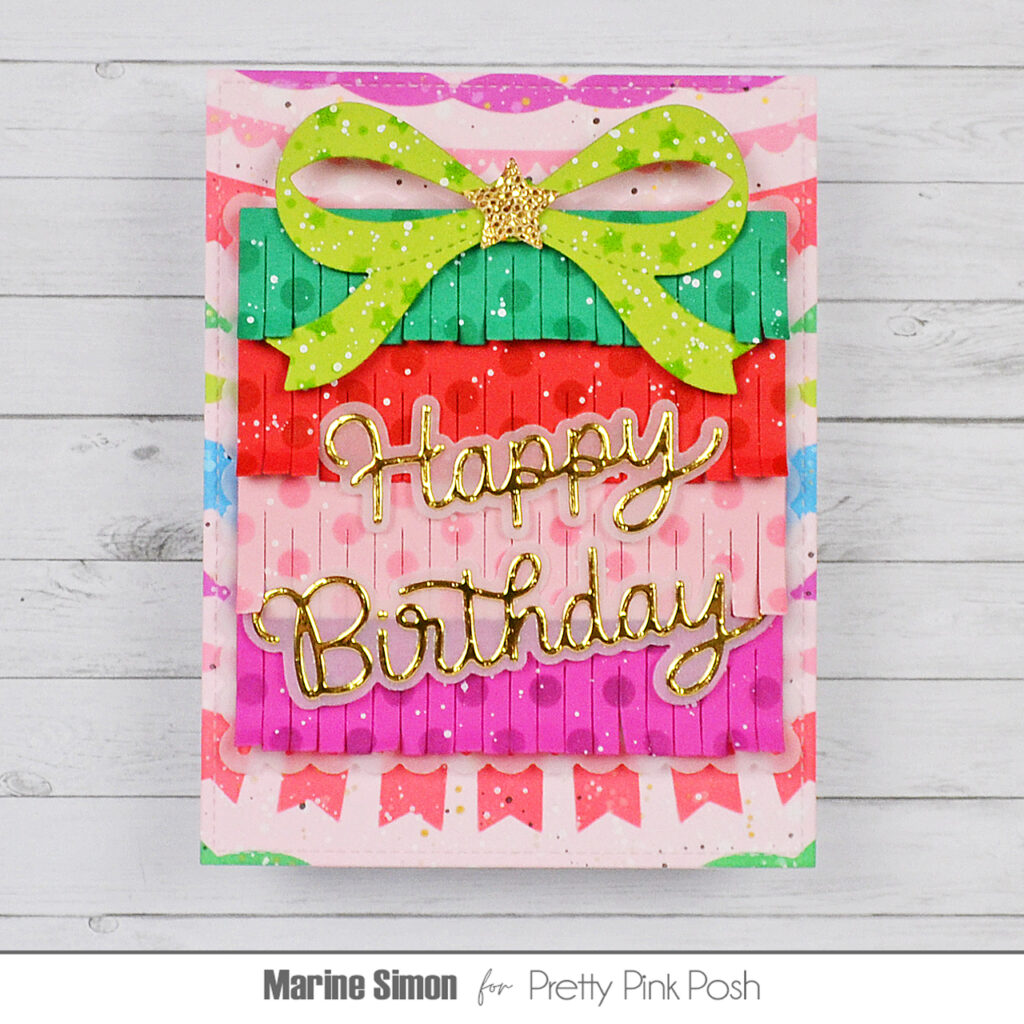
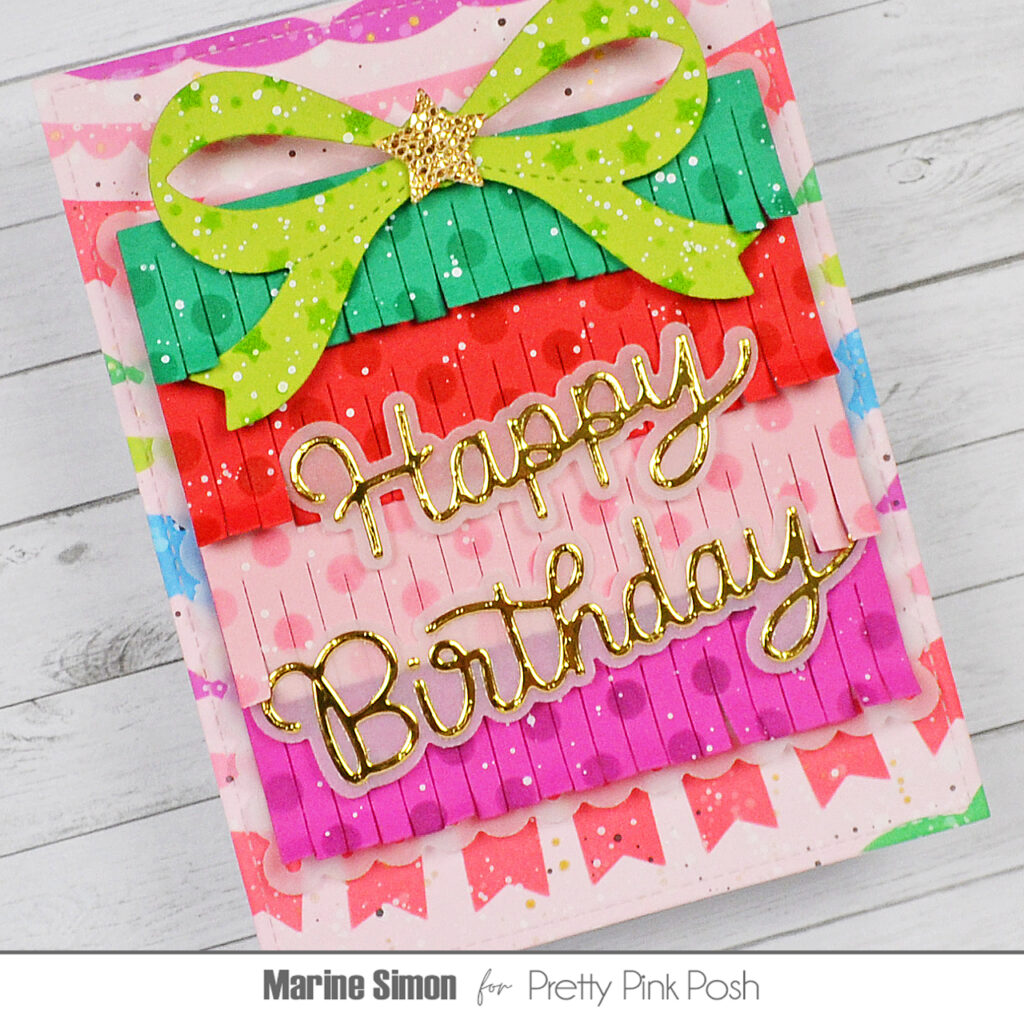
I started off with the card, and cut a 5,5 x 4,25 inches Strathmore bristol smooth panel that I entirely covered with spun sugar oxide ink first. Next I used the Layered Garlands stencil to add a colorful pattern to my panel with seedless preserves, worn lipstick, lumberjack plaid, lucky clover, mowed lawn and salty ocean oxide inks. I splattered water on my panel and dried it with a paper towel, mixed some copic opaque white ink water and used a slim brush to add more splatters to my panel, and then I did the same with fossilized amber distress spritz and with black soot oxide ink to add more shine and contrast.
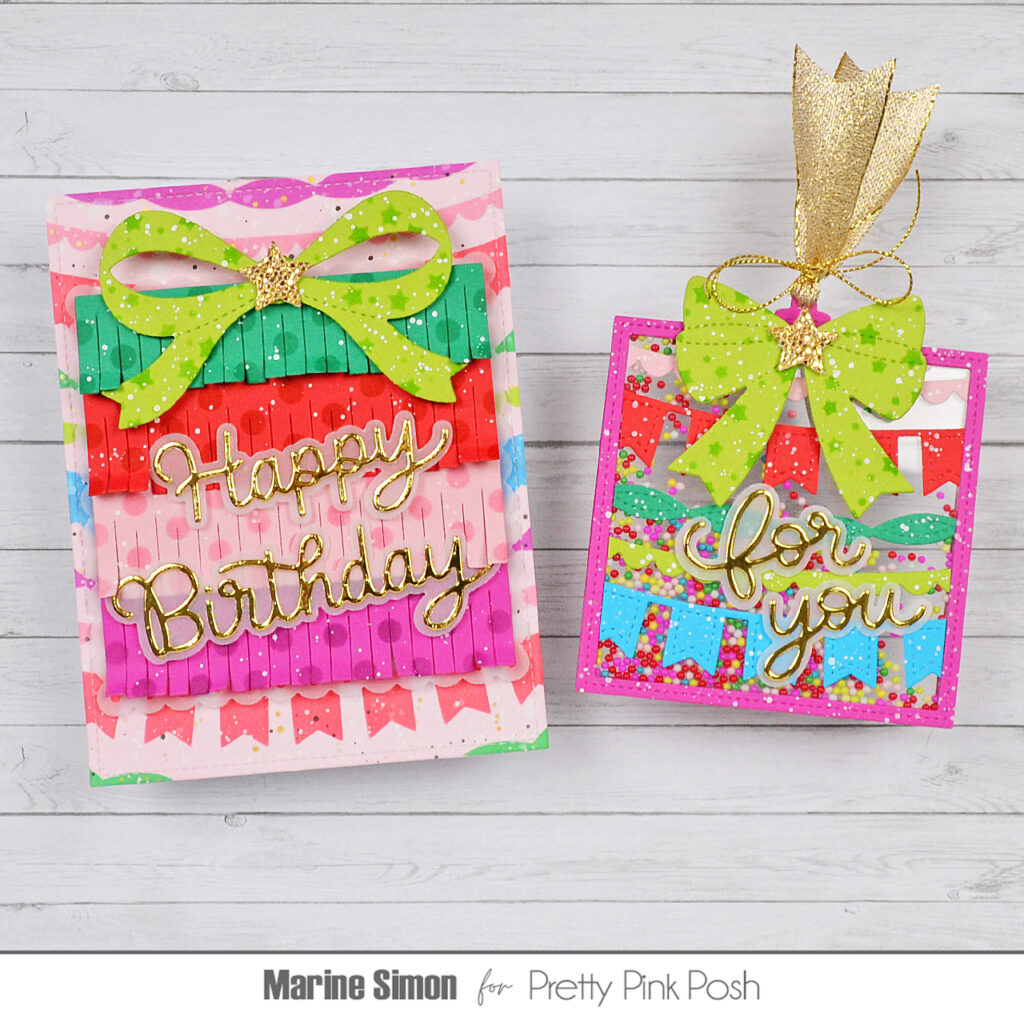
Next I cut the four sections of my Fringe Present, as well as the bow, out of colored cardstock. I added dots to each piece of the present using the Medium Polka Dots stencil along with matching distress inks, and stars to the bow using the Starry Background stencil. I added splatters of copic opaque white ink to all those elements, and while everything was drying, I cut a star out of gold glitter cardstock using a Onesie Shaker die and a large Eyelet Square out of vellum. I also cut the Happy Birthday Shadow pieces out of gold mirror cardstock and vellum, and assembled my greeting.
I assembled the four Fringe Present pieces using 1mm foam squares, attached the present to the vellum Eyelet Square panel using 1mm foam tape, and then stuck the whole piece to my Layered Garlands panel using foam tape again. The bow, star and greeting were attached using 1mm foam squares, I lifted the fringes with my fingers, and then moved on to the tag.
I absolutely love to create see-through shaker tags, I always follow the same steps, so here is how I built it:
1. Cut a Present Shaker frame out of colored cardstock and a whole Present Shaker panel out of acetate 2. Attach the frame to the acetate panel using liquid glue 3. Flip the panel over and add foam strips at the back of the frame all along the four edges 4. Pour Party Time shaker beads inside the frame 5. Cut another Present Shaker out of acetate and stick it to the foam strips 6. Cut the handle using a Build An Ornament die and attach it to the acetate, right at the top of the tag 7. Cut another Present Shaker frame and stick it to the acetate panel to finish the back of the tag nicely
Next I cut all the pieces to decorate the present. I cut the bow using another Present Shaker die, as well as Streamers out of colored cardstock. I added the same pattern to the bow as the one on the Fringe Present card using the Starry Background stencil, and added copic opaque white ink splatters to the bow, streamers and present frame. I cut a gold glitter star using a Onesie Shaker die, cut the For You pieces out of gold mirror cardstock and vellum, and assembled my greeting. I attached the bow at the top of my Present Shaker and the golden star on top using foam squares, added gold ribbon and twine to the handle, and finally stuck my greeting on the Streamers using liquid glue.
And that’s it! Oh how I love all those bright and happy colors, I can’t wait to share more birthday projects with that same color palette! Thanks so much for stopping by, I hope you enjoyed today’s projects. See you next time!
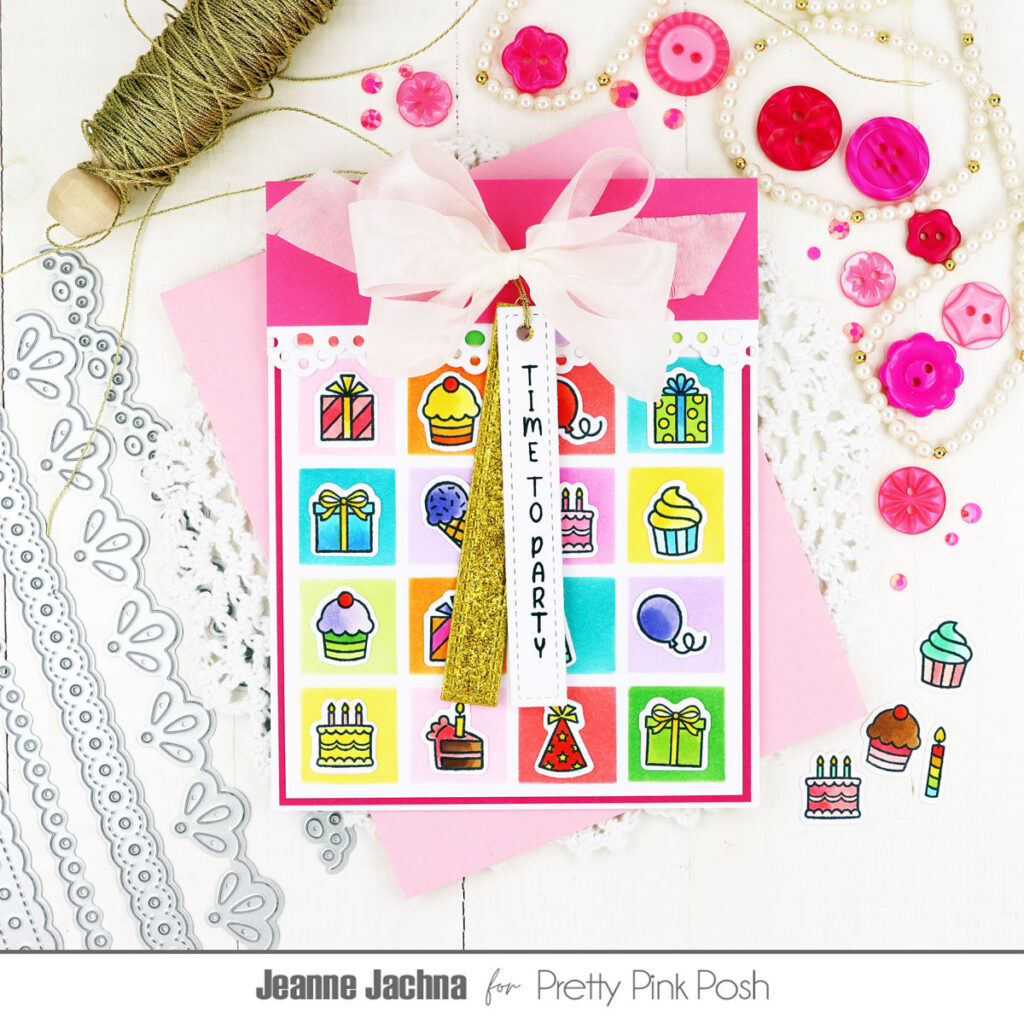
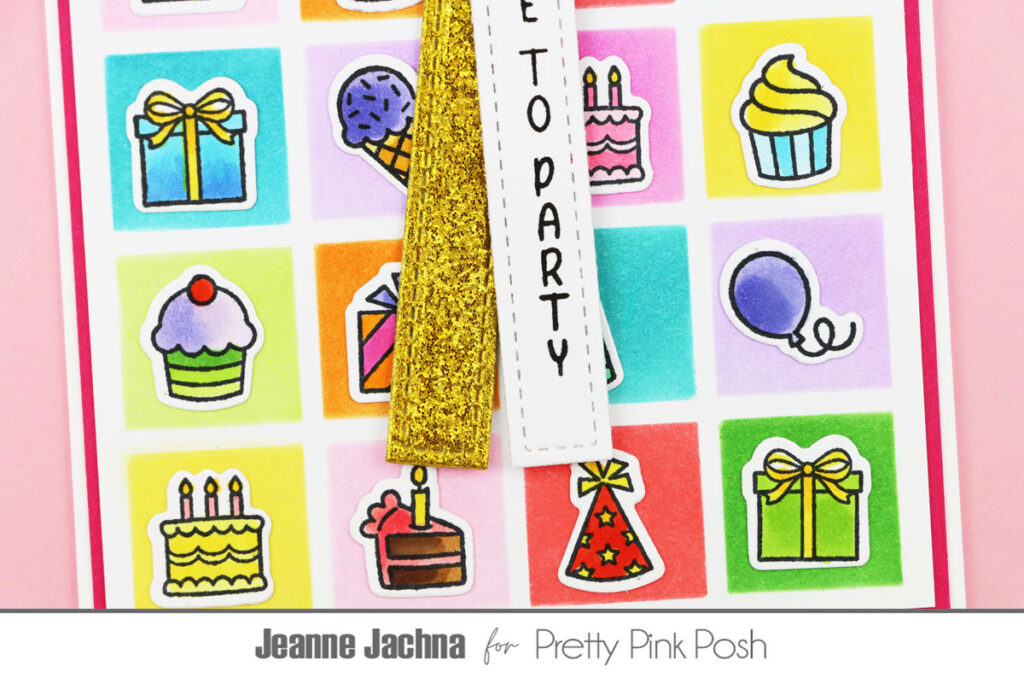
Hi friends, it’s Jeanne here today and I’m so excited to share a sneak peek of the new Birthday Icons Stamp Set! This is the latest addition to the Icons collection that already includes Valentine, Fall, Halloween and Holiday. The stamp set includes 12 iconic images that capture the symbols of the event including cake, presents, balloons and party hats!
New release will be available February 24th
The coordinating die set includes all the cuts for the 12 images as well as stackable shapes to mat the images. This time the largest outer circle is a zig zag award shape. I cut mine from gold glitter paper so that they really shine!
The mini Icons sets do not include sentiments so they’re perfect for pairing with your favorites. I used the new Upright Greetings: Birthday today on my cards.
What I love best about the Icons series is their versatility. I used theSquare Grid Stencilto create a panel of colorful boxes that I topped with bright Birthday icon images.
A double cut Sentiment Stripstamped with an Upright Greeting: Birthday sentiment makes a perfect little tag to adhere to my card.
My cards today feature primarily pink, but wouldn’t they look great in just about any color customized for the birthday you’re celebrating?
I hope you’ll stop by tomorrow when we’ll be showing more projects made with this new release! I just know you’re going to love it!
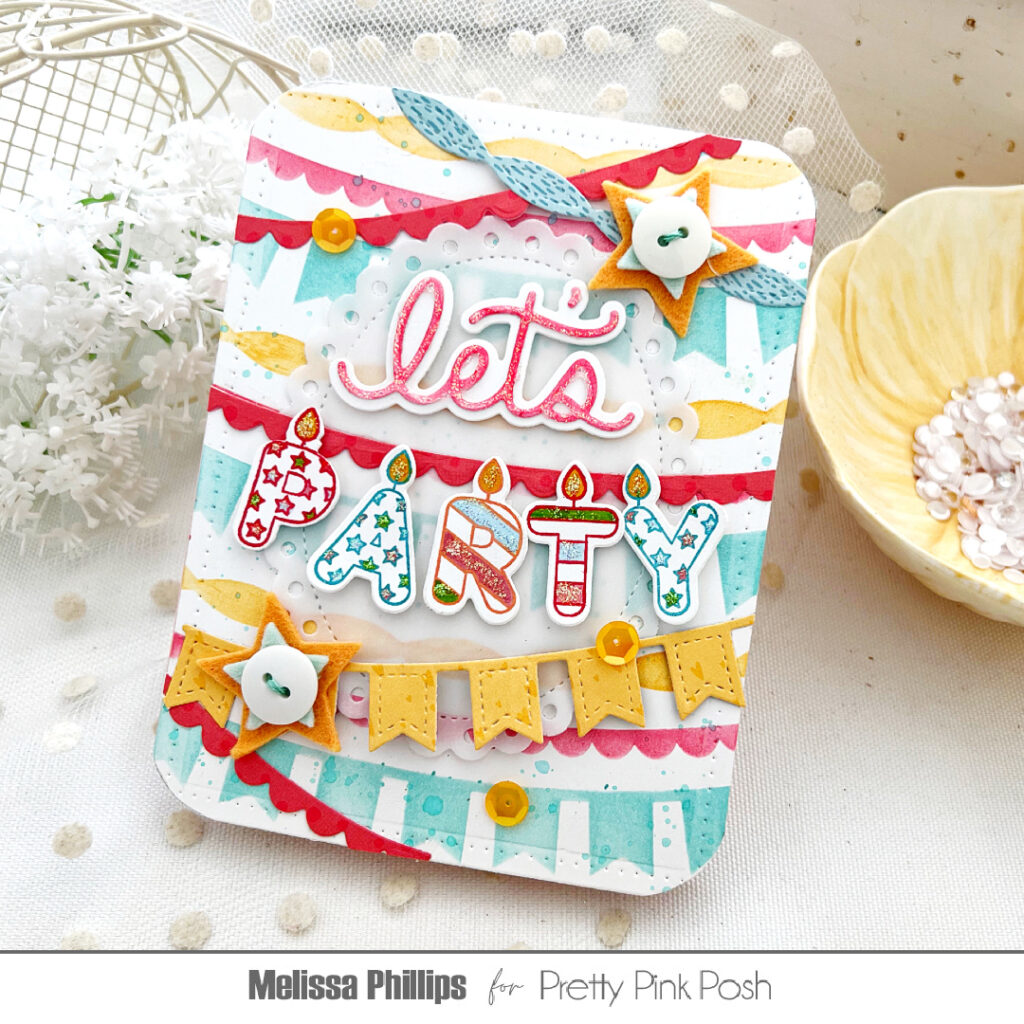
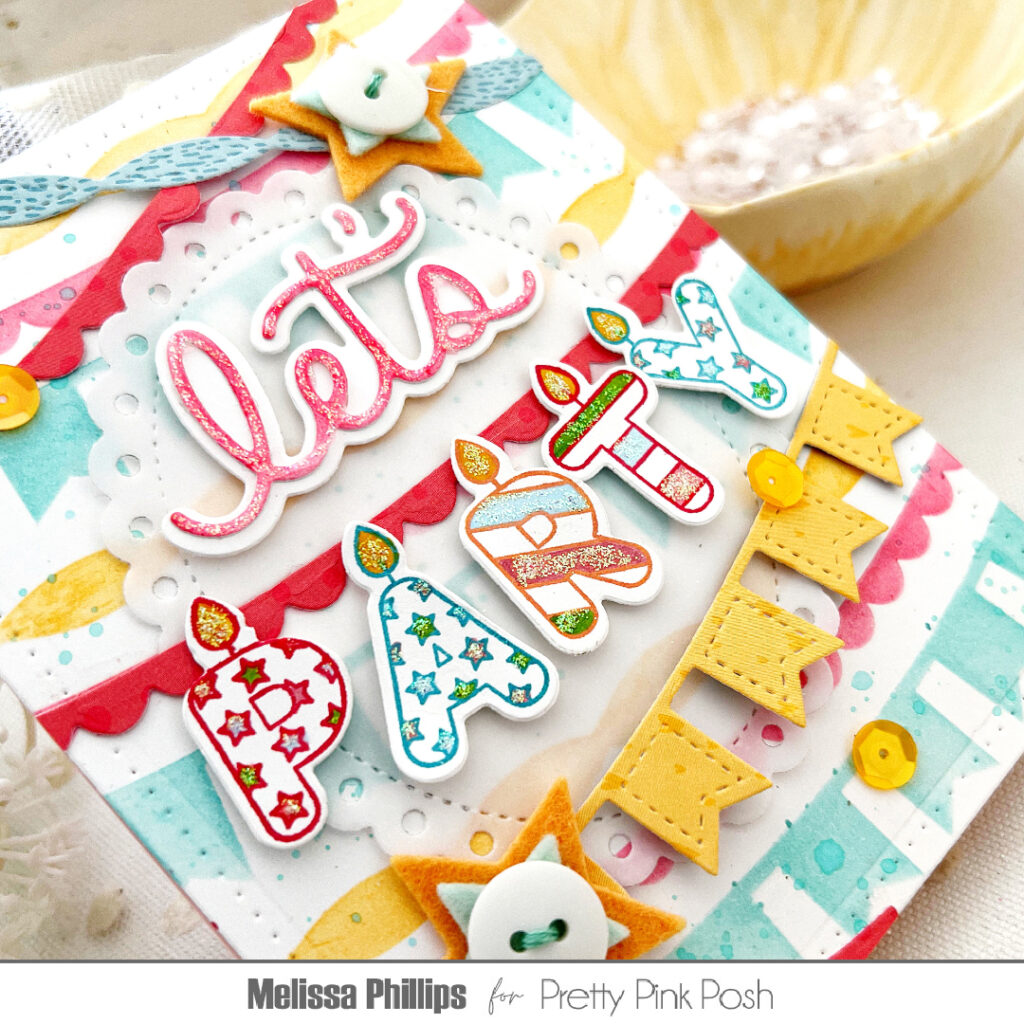
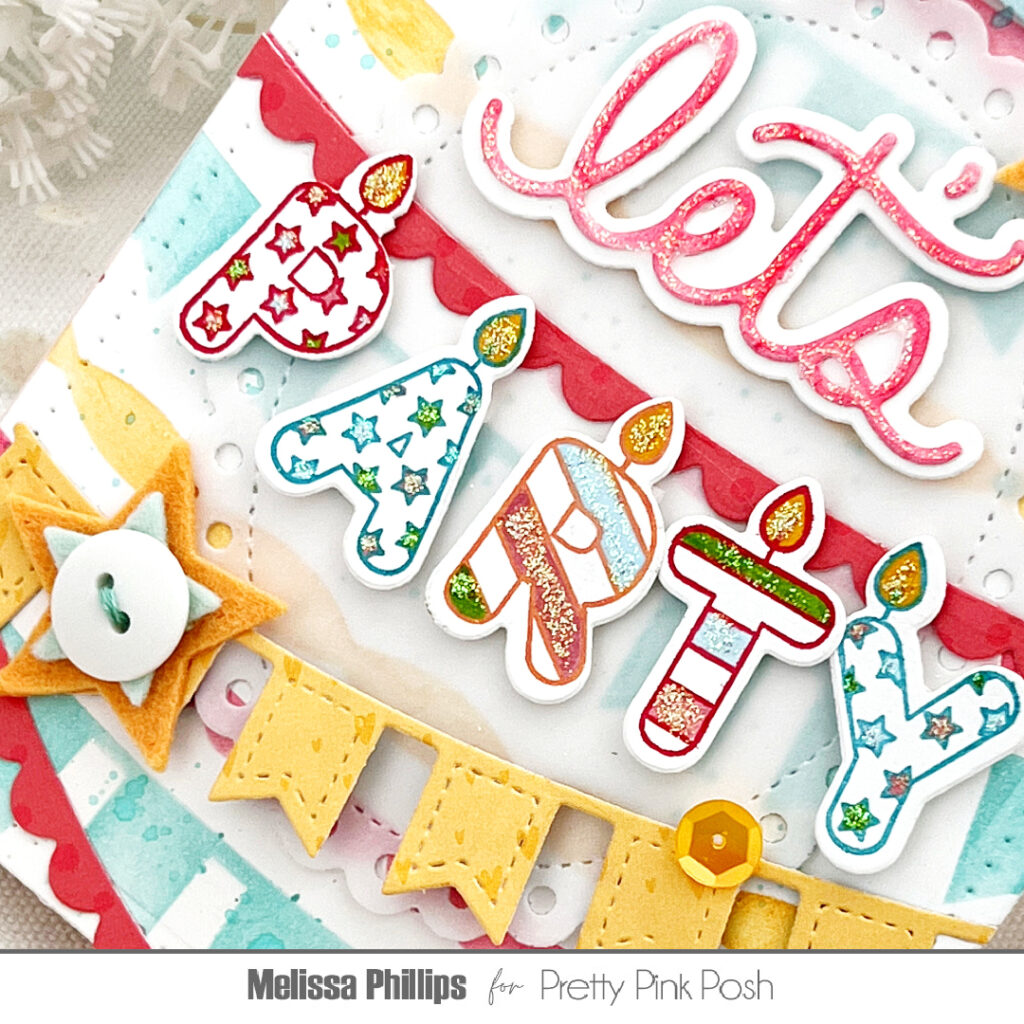
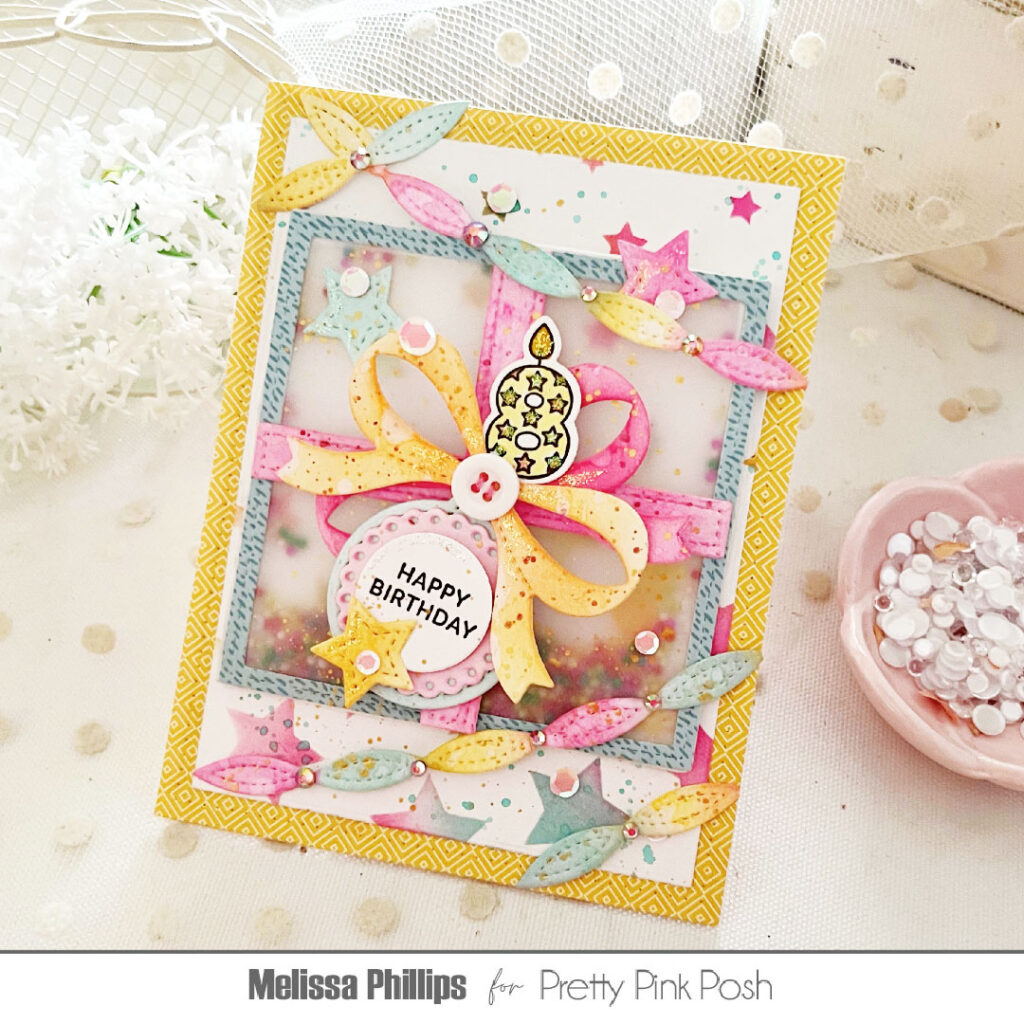
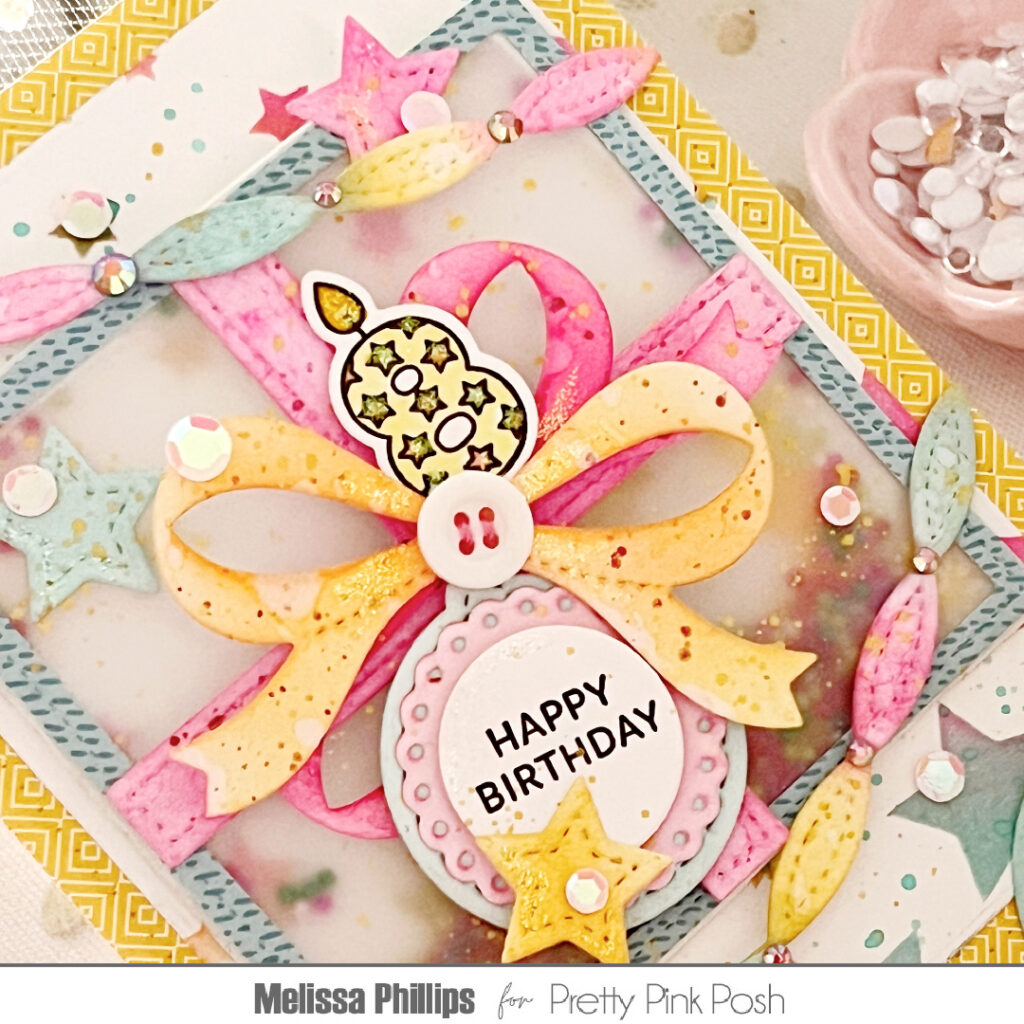
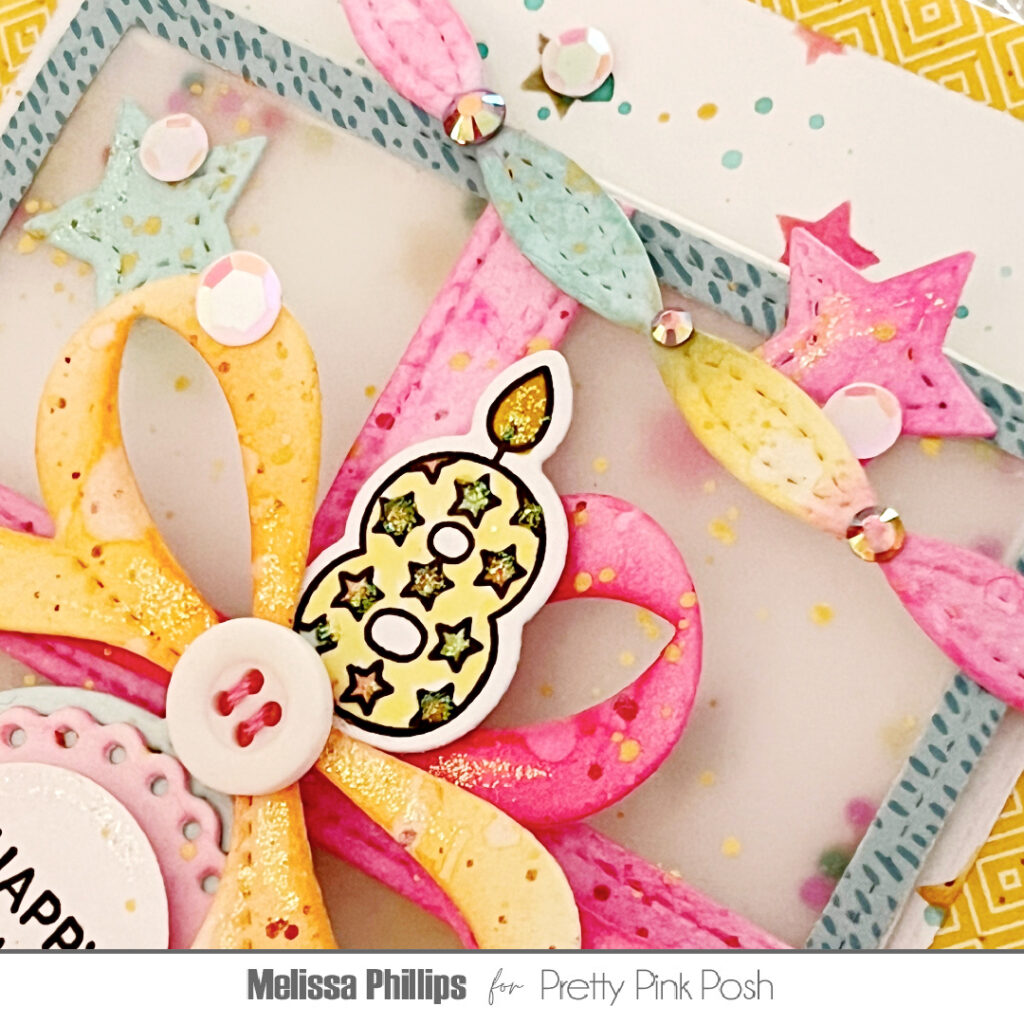
Hello everyone! This is Melissa and I’m here to share a couple of cards made with the playful Number Candles and Alphabet Candles stamps and dies. You’ll love customizing your cards using these cute and creative new products. Let’s get started!
New release will be available February 24th
My first card uses the Alphabet Candles stamps and coordinating dies to create a banner across the center of the card. I’ve spelled out “Party” and added “Let’s” using the Let’s Party Shadow Dies.
Each of my Alphabet Candles is hanging from a streamer, die cut using the new and oh, so darling Streamer dies. My background on my card was created using the new Layered Garlands Stencils. This stencil set is so much fun to mix and match colors with!
You might notice my vellum layering piece that I used to soften my background, cut using the Eyelet Ovals dies. I adore these sweet shapes and they create such perfect layers. My felt stars were cut using the Stitched Stars dies and are so much fun to stack together and top with a tiny button.
My next card uses the new Present Shaker dies to create a fun, wrapped up package on the center of my card, complete with birthday sprinkles inside!
Before adhering my shaker, I used the Cascading Stars Stencil to create a festive card base. Next came my pretty package, tied up with a bow using the Present Shaker dies once again. I love that this set comes complete with two different styles of bows.
I tucked in my Alphabet Candle, selecting the number “8” for my darling niece’s birthday, and then added a tag with my sentiment stamped across the front. I created this using the Mini Tagsand Valentine Icons dies.
To finish, I draped banners across the front using the Streamer dies once again. These are such irresistible products, perfect for celebrating birthdays throughout the year! Thanks for joining me.
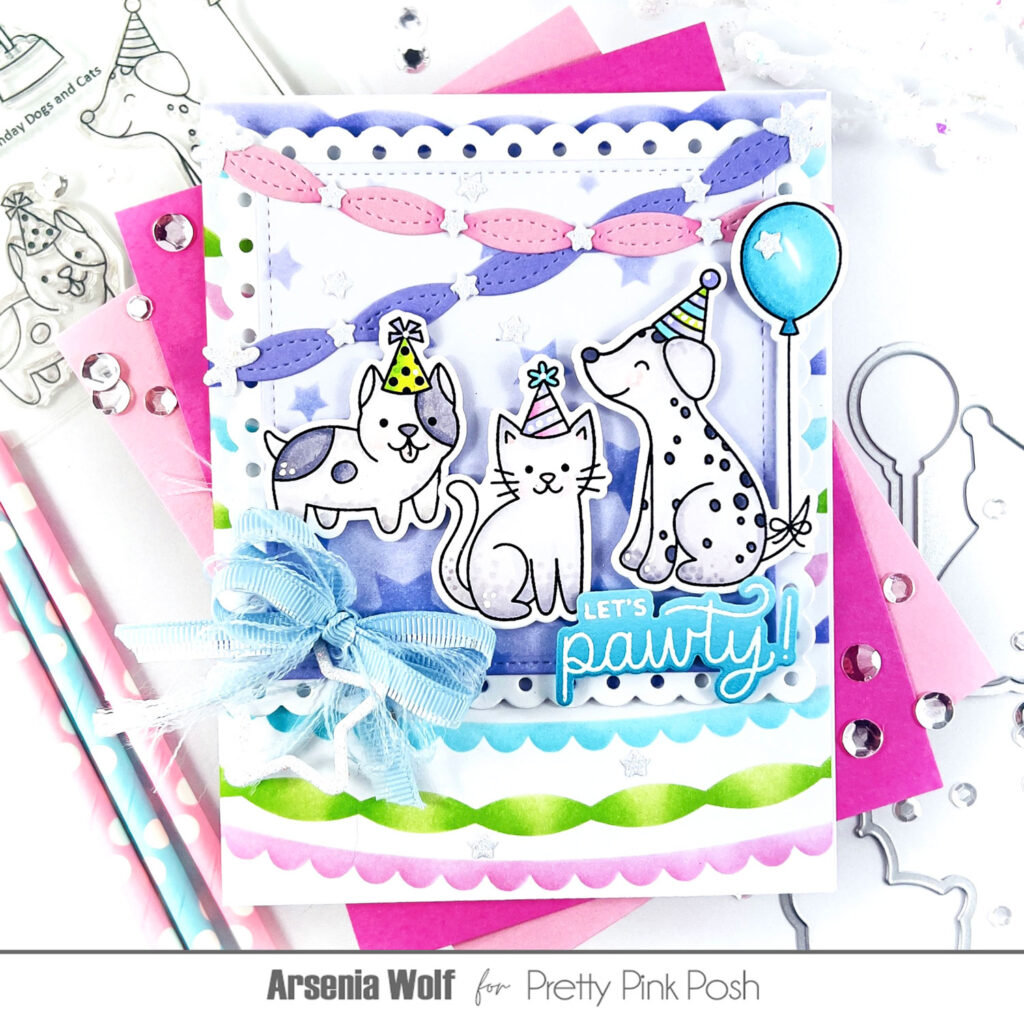
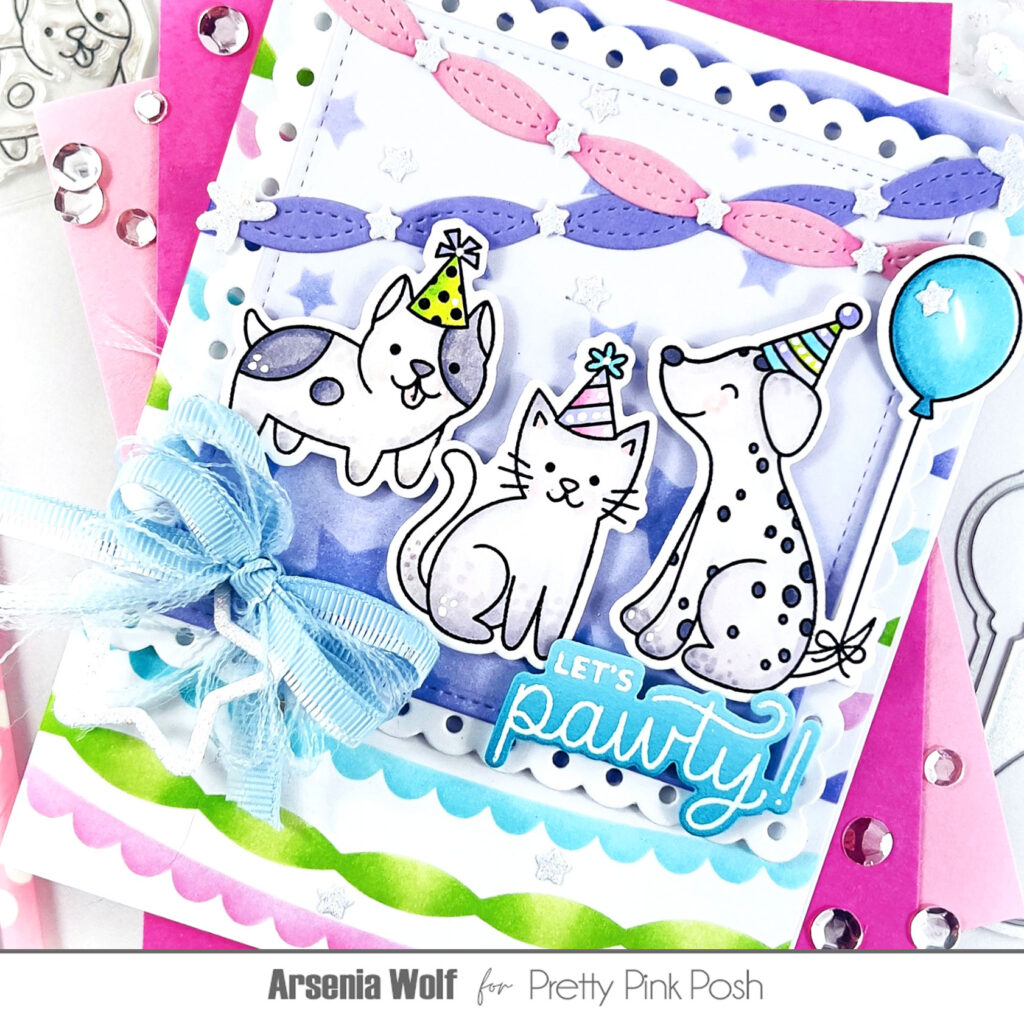
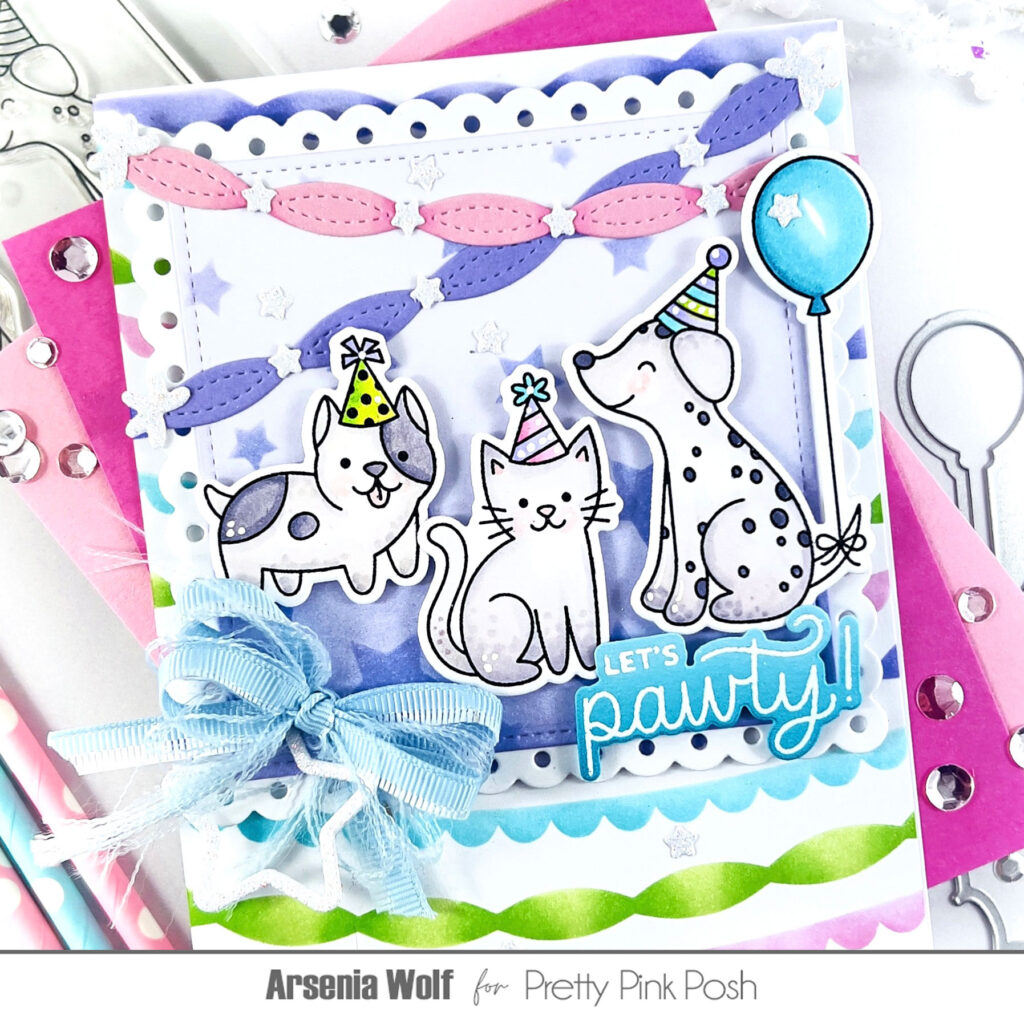
Hello, Crafty Friends! Arsenia here, excited to share a sneak peek using the brand-new Birthday Dogs and Cats stamp set with coordinating dies! These images are absolutely adorable, making them perfect for crafting fun birthday cards for both children and adults. Let’s dive in!
New release will be available February 24th
For my first card, I began by stamping, coloring, and die-cutting the cute images from the Birthday Dogs and Cats stamp set using the coordinating dies. To create the card panel, I turned to the new Layered Garland stencil set – a favorite of mine for creating gorgeous backgrounds! I then used the largest die from the Eyelet Square Die Set, leaving it white for a clean and simple border.
Next, I grabbed the new Present Shaker Die Set—which the square die fits perfectly on the eyelet square die—and did some ink blending over it using the new Cascading Stars stencil, another fun new addition. Once the square image was adhered to my card front, it was time to arrange the adorable Birthday Dogs and Cats images.
I then added extra flair using new dies, including the new Streamer Dies, Birthday Holder Additions Dies, and Birthday Cake Pops Dies. Trust me, you’re going to love these new products! To finish it off, I stamped a sentiment from the Birthday Dogs and Cats stamp set and added a sweet bow with ribbon and a star charm. Ta-da—my card was complete! I had so much fun creating with these products and absolutely adore this new release!
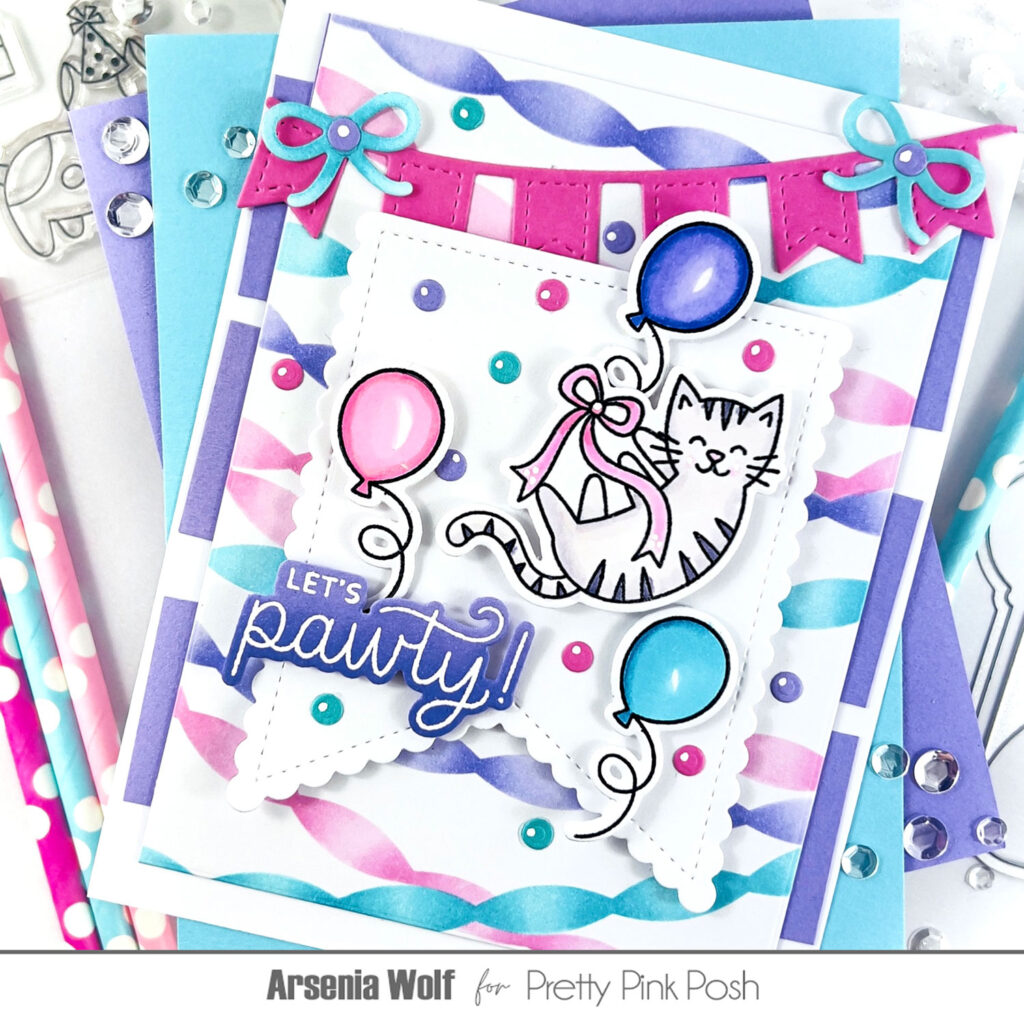
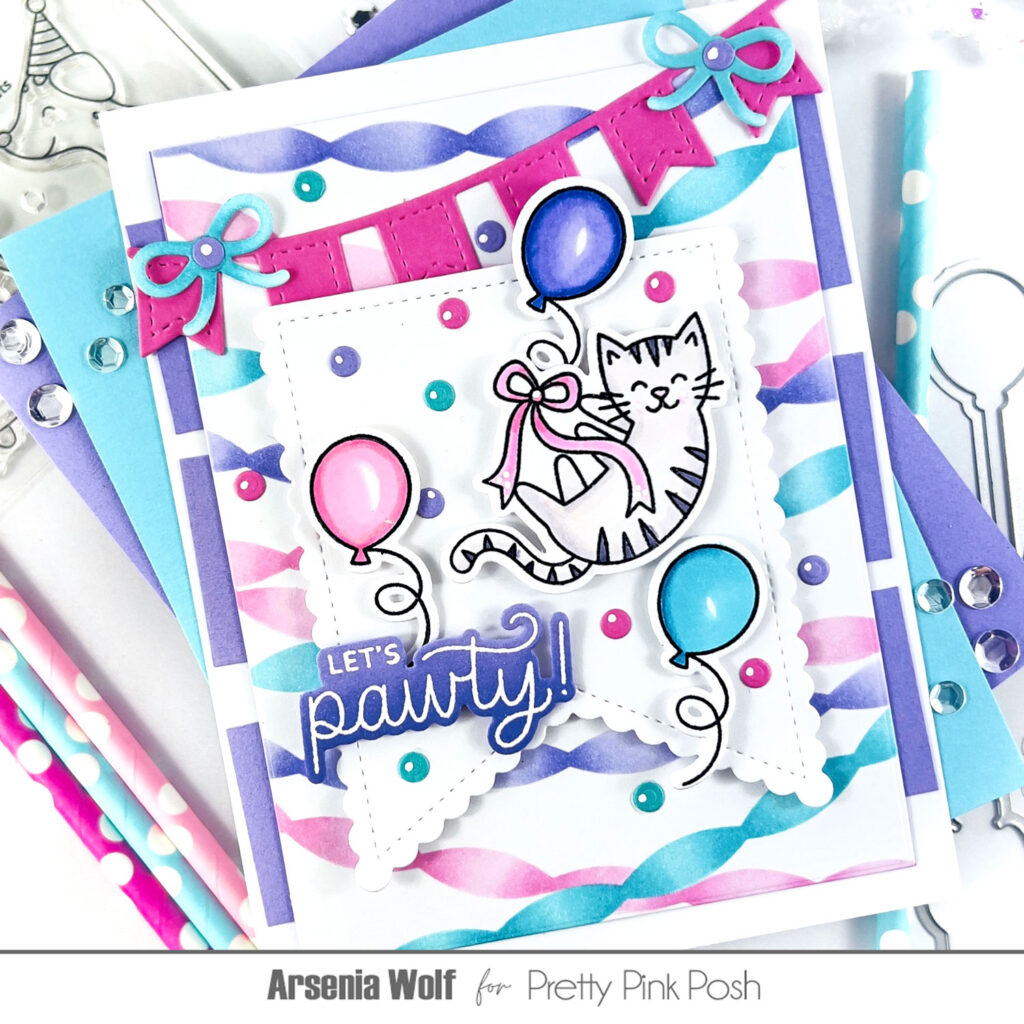
For my second card, I once again used the new Layered Garland stencil set, cutting the panel down to 5 x 3.75 inches. For the card base, I adhered 1.25-inch strips of cardstock, then attached the stenciled panel on top.
Now, get ready for another sneak peek! I used the new Scallop Flag Tags Dies—specifically the second-largest die—as a perfect backdrop for my images. I also incorporated a die from the new Streamer Dies Set and added some bows from the Beautiful Bows Die Set to give the card a festive touch.
I then arranged the images on the Scallop Flag Tag and adorned it with dies from the new Birthday Cake Pops Dies. The cute balloons are from the Birthday Wreath Stamp Set with coordinating dies. To add a little extra detail, I used a white gel pen for highlights and finished the card with a sentiment from the Birthday Dogs and Cats stamp set. And just like that, my second card was complete, and I couldn’t be happier with how it turned out!
I hope you’ve enjoyed this sneak peek! The new Birthday Dogs and Cats stamp set is such a joy to work with, and I just love their adorable expressions. Thank you so much for stopping by today. I can’t wait for you to get your hands on this new releases – the products are perfect for any birthday celebration. Wishing you all a wonderful day filled with creativity!
Hello crafty friends, it’s June! Today I have a card to share using some of my favorite older products.
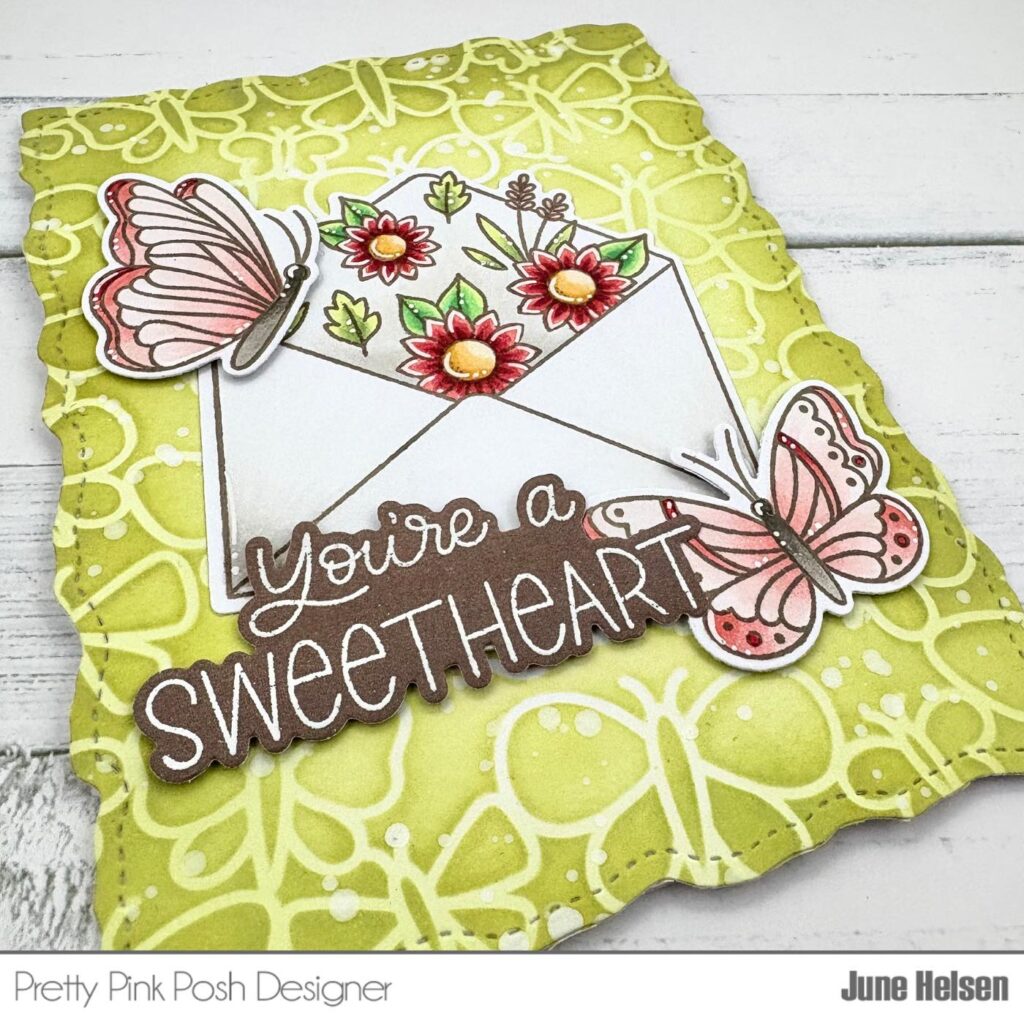
One of the first Pretty Pink Posh products I had my eyes on, even before joining the team as a guest designer, was the Beautiful Butterflies Stamp Set. I love butterfly-themed everything and I think these ones are like the name suggests, beautiful!
I usually make cards where these butterflies are the main focus, but this time I wanted to add one of theFall Envelopes in the center so the butterflies could flutter around it. I’m so over the winter cards by now, so I went with a green, pink and red color palette for my images to get ready for spring. I stamped them in brown ink instead of black to make everything look a bit softer.
To add onto the butterfly theme, I stenciled a green background using the Butterfly Background stencil. I went with Shabby Shutters and Rustic Wilderness Distress Oxide. I also splattered some thinned out white acrylic paint on my panel like usual. I cut it out using my favorite background die, the Stitched Torn Rectangle.
I embossed one of the sentiments from the newly released Valentine Greetings stamp set on some brown cardstock, which compliments the brown ink I used for the stamped images. Even though it’s a Valentine’s Day themed set, I think these sentiments are very useful for occasions outside of Valentine’s Day to! Many of them are neutral enough to use on any card to give to someone you appreciate.
I really like how the card ended up looking, there’s almost a vintage look with the color scheme while still being colorful and spring-y! I hope you enjoyed reading about my card as much and I enjoyed making it :)
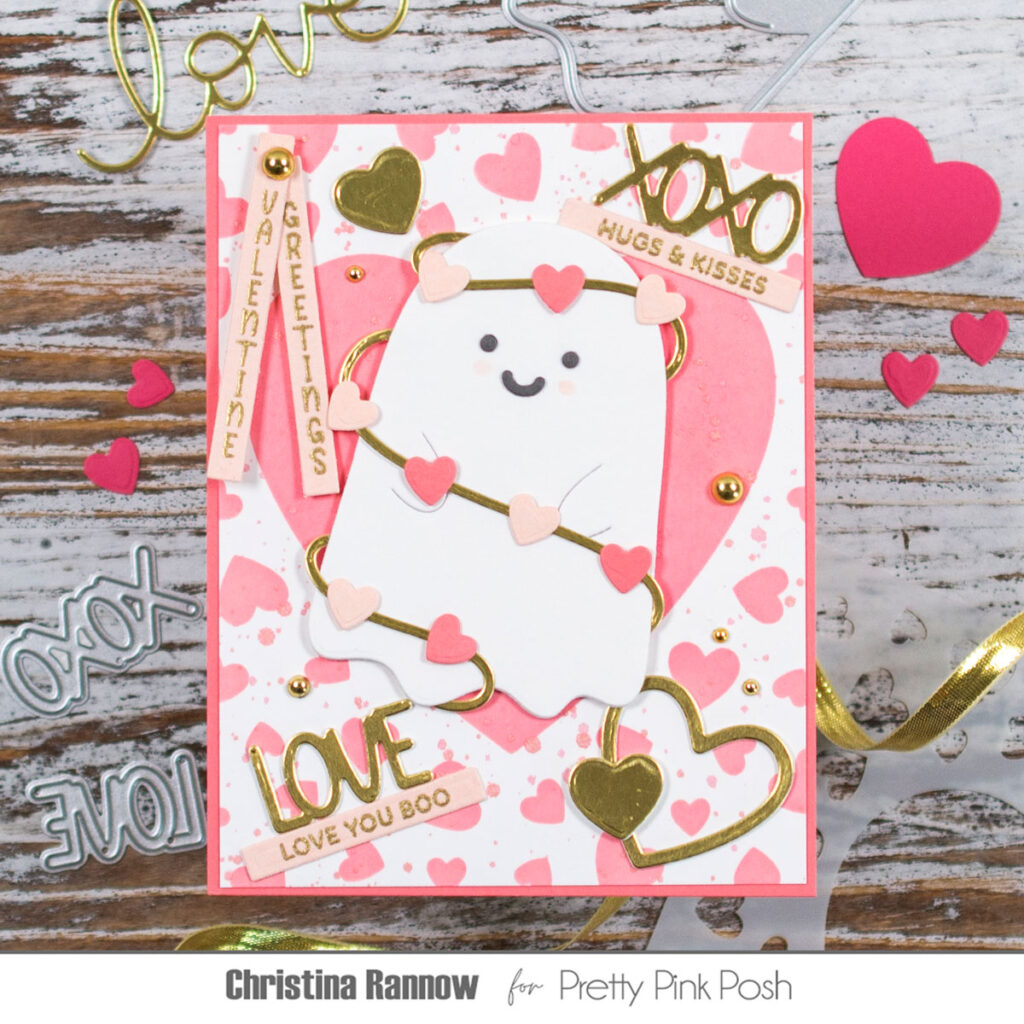
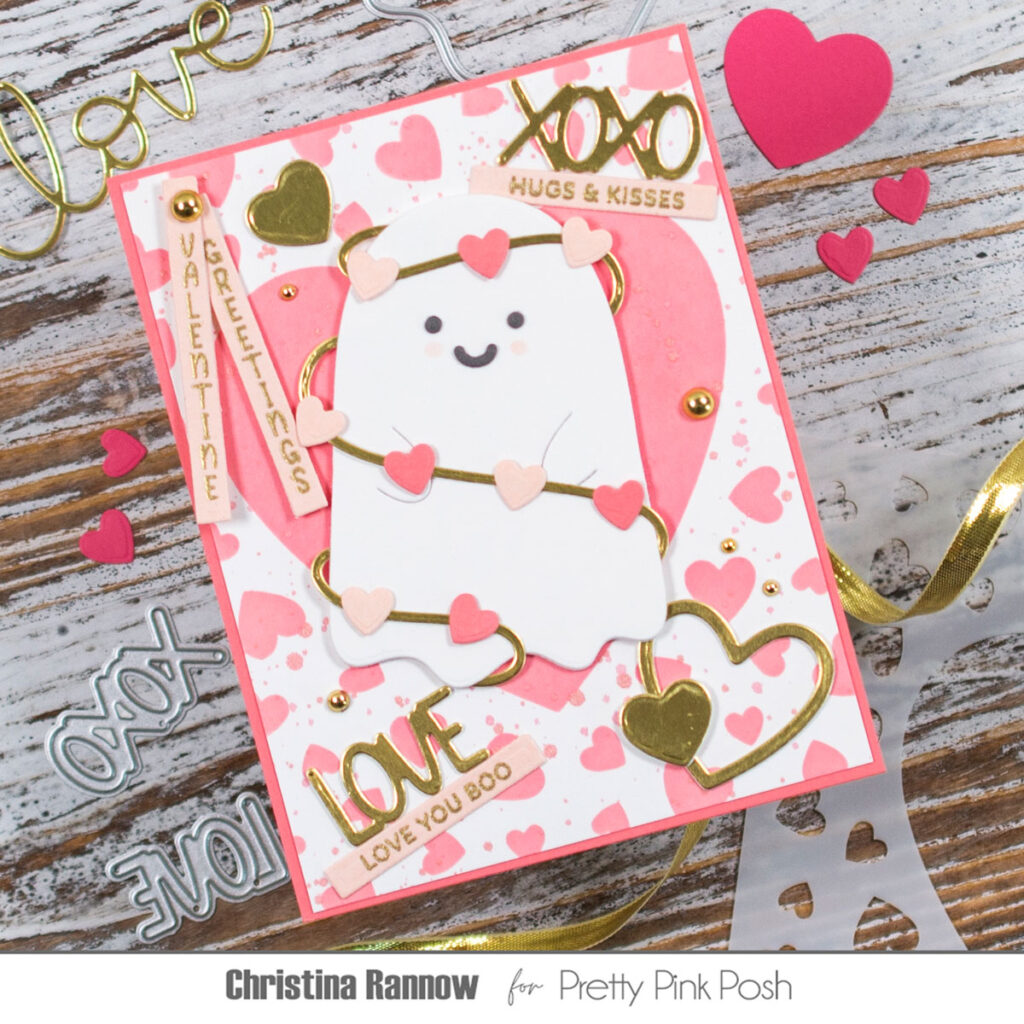
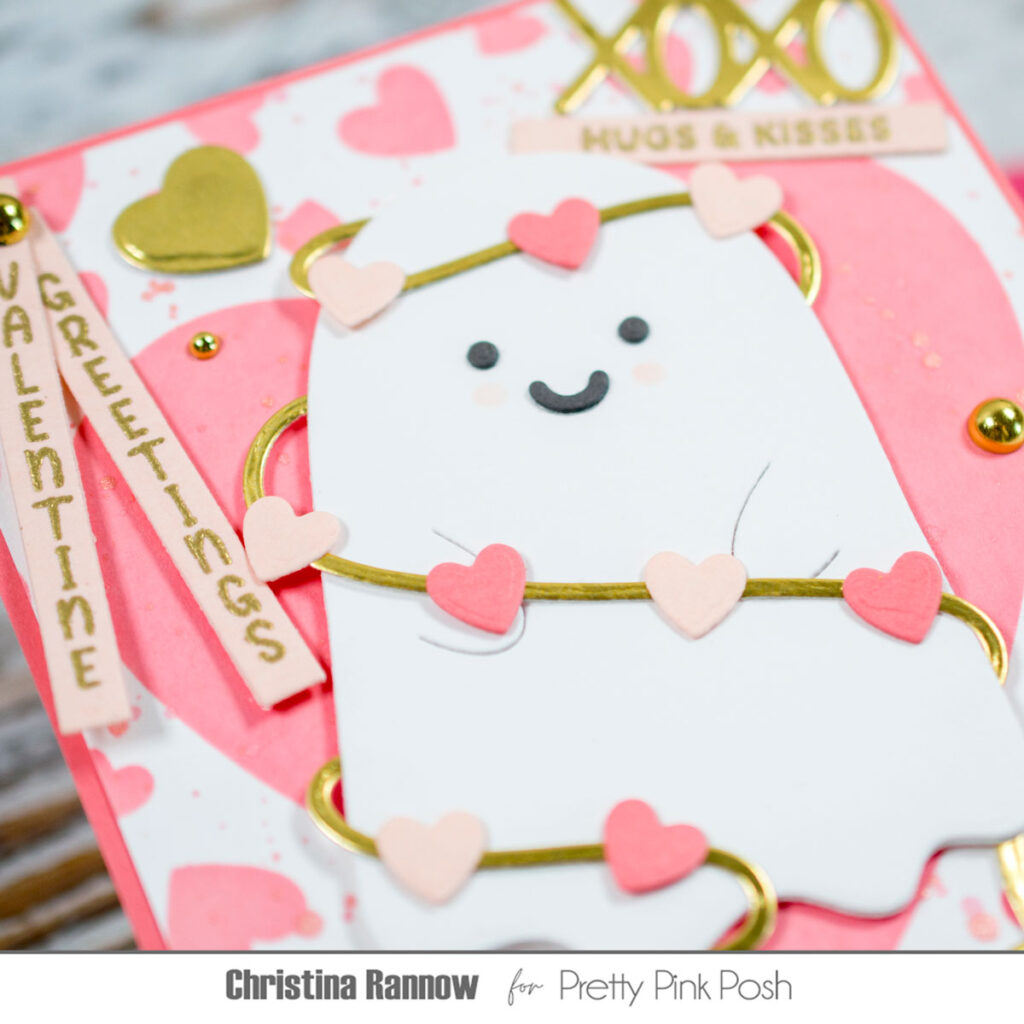
Hello! Christina here to share a sweet Valentine’s Day card featuring some of the newest goodies over in the PPP Shop. For this project, I used the popular Ghost Holder Die and the new coordinating Valentine Holder Additions to create the most darling Boo, perfectly accessorized for Valentine’s Day. Let’s get started on this easy but boo-tiful card!
I started by stenciling the background with Saltwater Taffy Distress Ink on a 4 x 5 ¼ inch white cardstock panel and then spattering it with Sugary Gumdrop Mica Stain for a little sparkle. I mounted this on an A2 cardstock panel in a coordinating color to finish the background.
Next I die cut all the elements for my design. For the ghost, I used white and grey cardstocks and added pink cheeks with Copic marker R00. The other cardstocks I used were matte gold, a soft pink, and a salmon color.
With everything die cut, I assembled the ghost and the heartstrings and then attached it to my background with foam squares. I used liquid adhesive to attach the hearts and the large text die cuts.
My final steps were to heat emboss sentiments with gold embossing powder on pink cardstock, die cut them with sentiment strips, and then attach them to my card front. The finishing details were to add the metallic gold pearls for a little something shiny.
And that’s all there is to creating this Valentine’s Day card featuring everyone’s favorite ghost friend! Thanks so much for following along and I’ll see you next time!
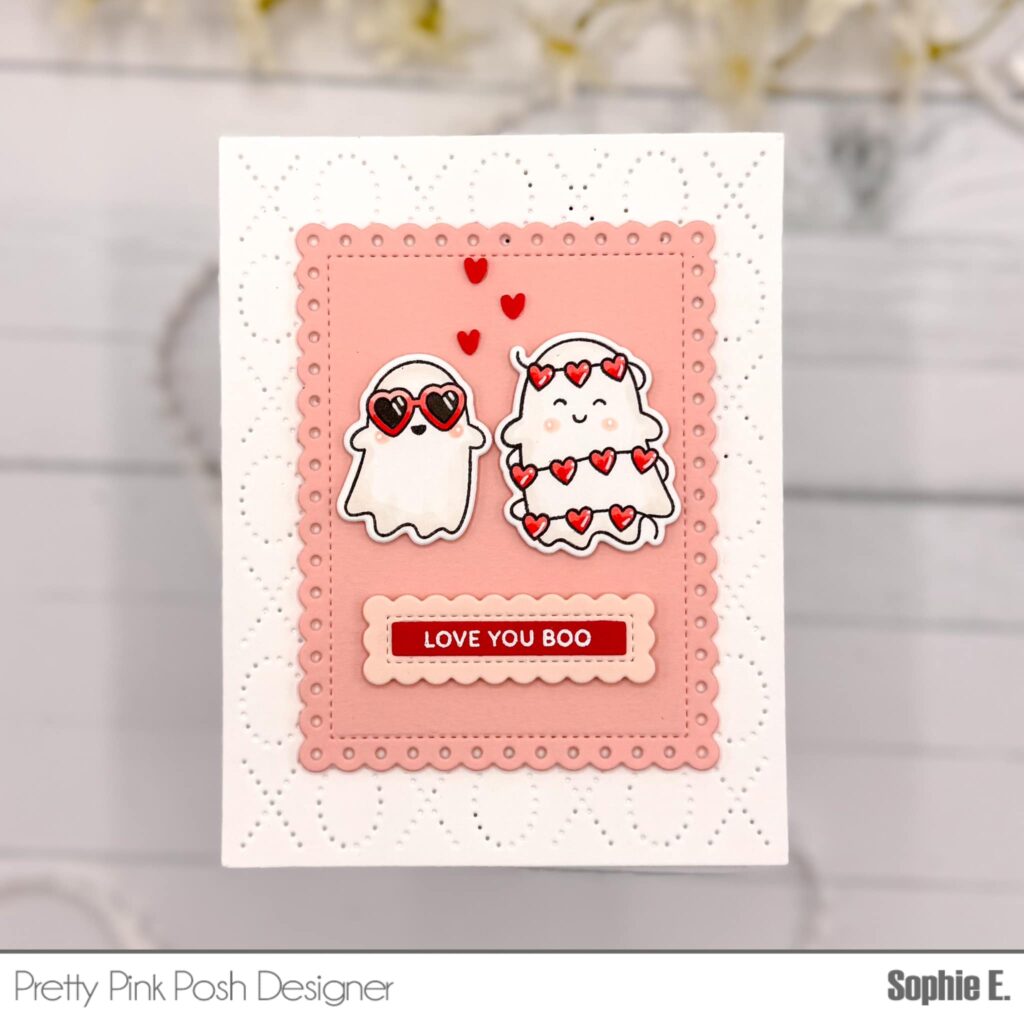
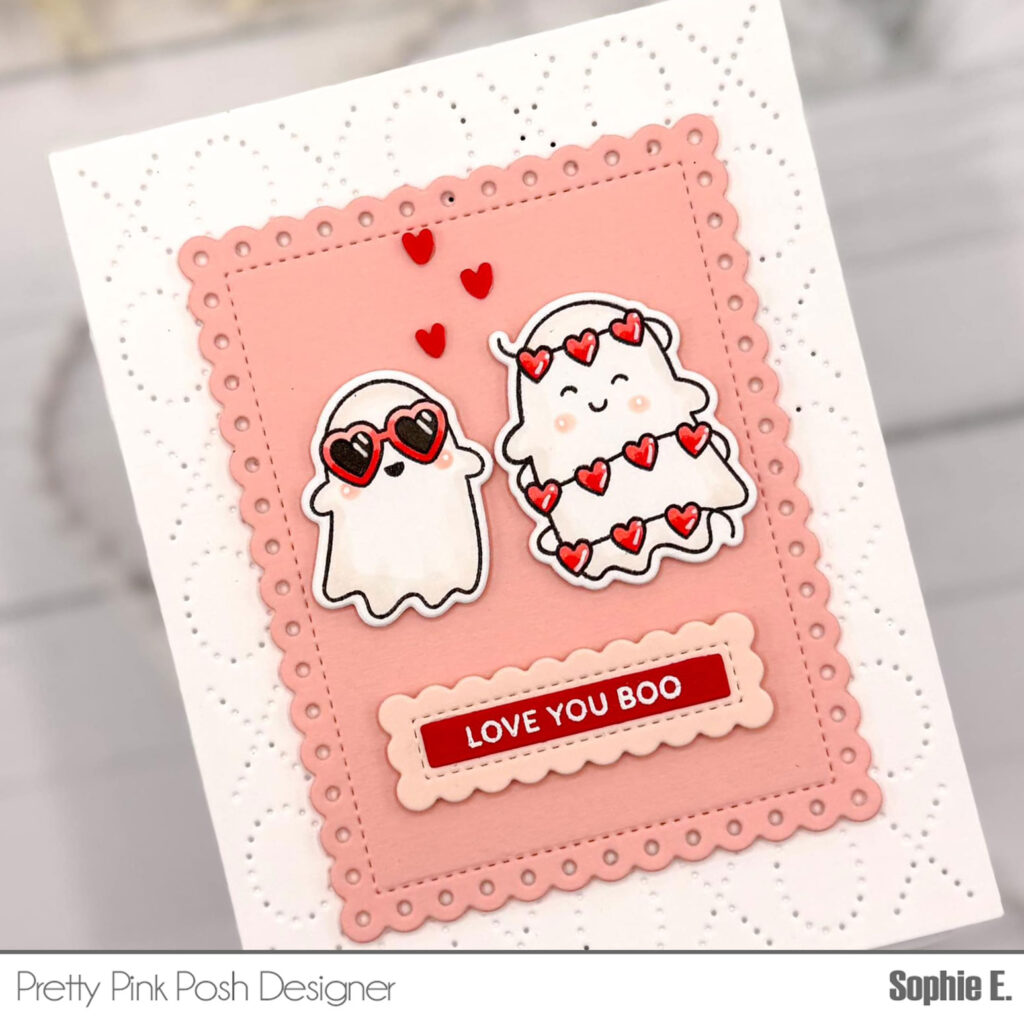
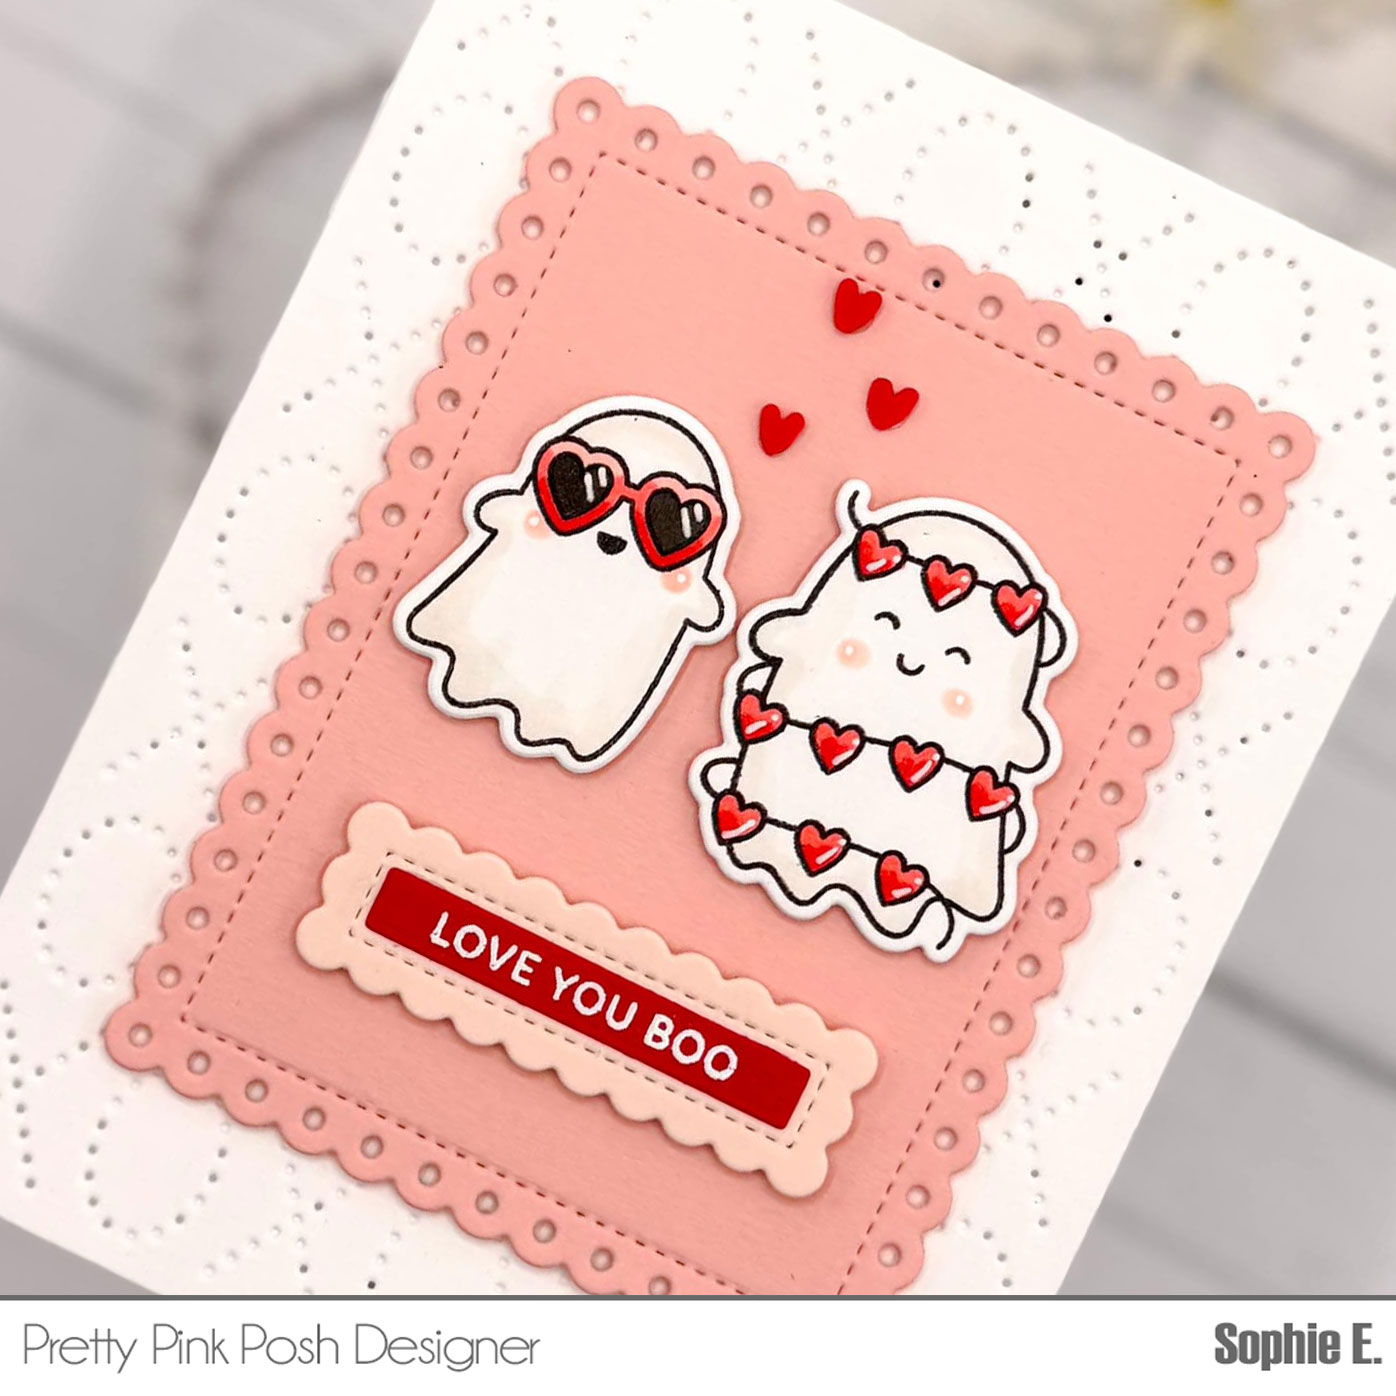
Hi crafty friends! Sophie here to share a fun Valentine’s card that is super cute with a dash of spooky.
For my card I featured the Valentine Ghost Friends stamps and coordinating dies! When I saw this set I gasped – I mean look at how cute that little ghost with the heart sunglasses is! I love the play on “boo” with all of the different sentiments included in this set as well.
I first stamped and colored my ghosts with Copic markers. I kept the coloring simple, you can find the markers listed below:
I used the new XOXO pierced cover plate to add some subtle texture to my background and the Eyelet Rectangle dies to cut a pink panel to frame my ghosts. The sentiment is from the stamp set and was cut out with the Sentiment Strips dies. I LOVE this set – it is so versatile and offers so many fun options for layering. There are scalloped banners, fishtail, and plain rectangles with or without stitching! It really is a valuable set and so handy to have.
As a final finishing touch I used 3 red hearts from the Strawberry Valentine clay confetti to frame out this little scene. I already have a few more cards planned with these cute little ghosts and this project came together so quickly because ghosts really don’t need much coloring.
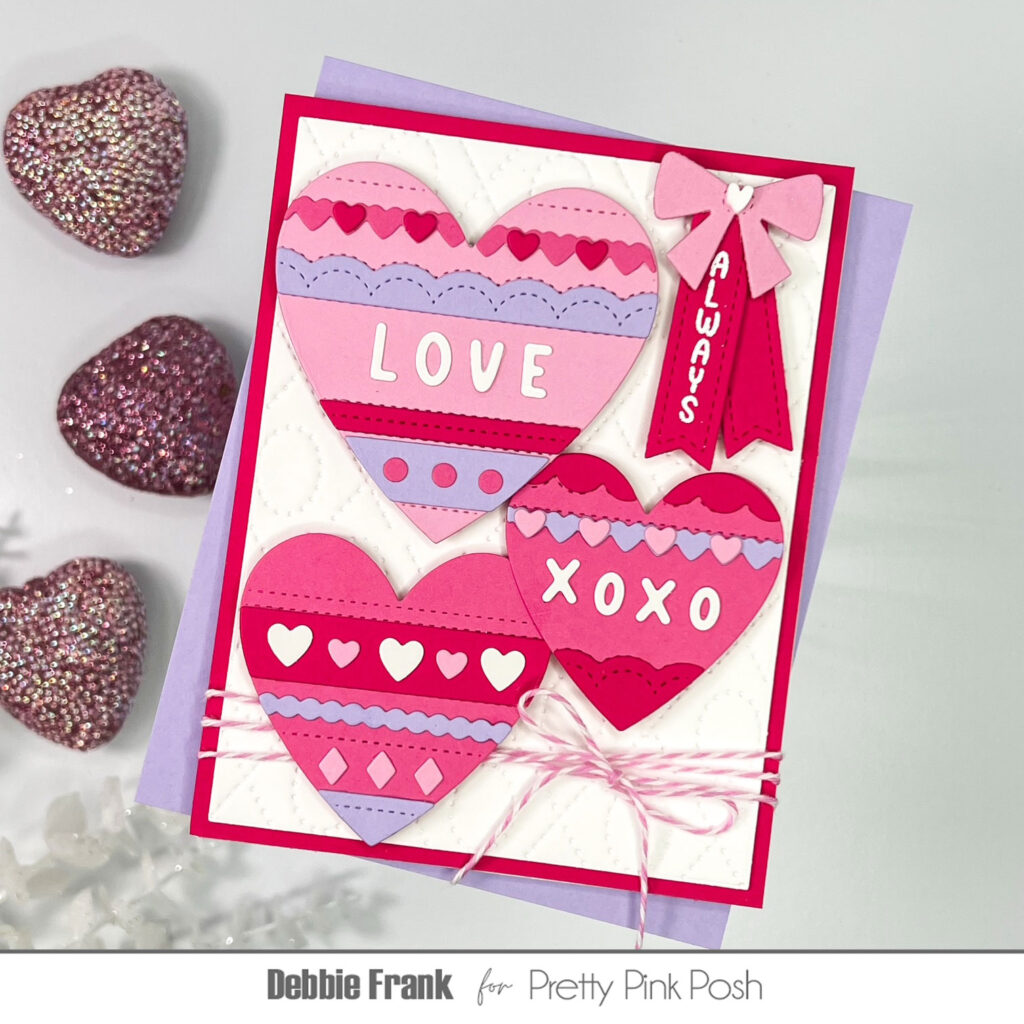
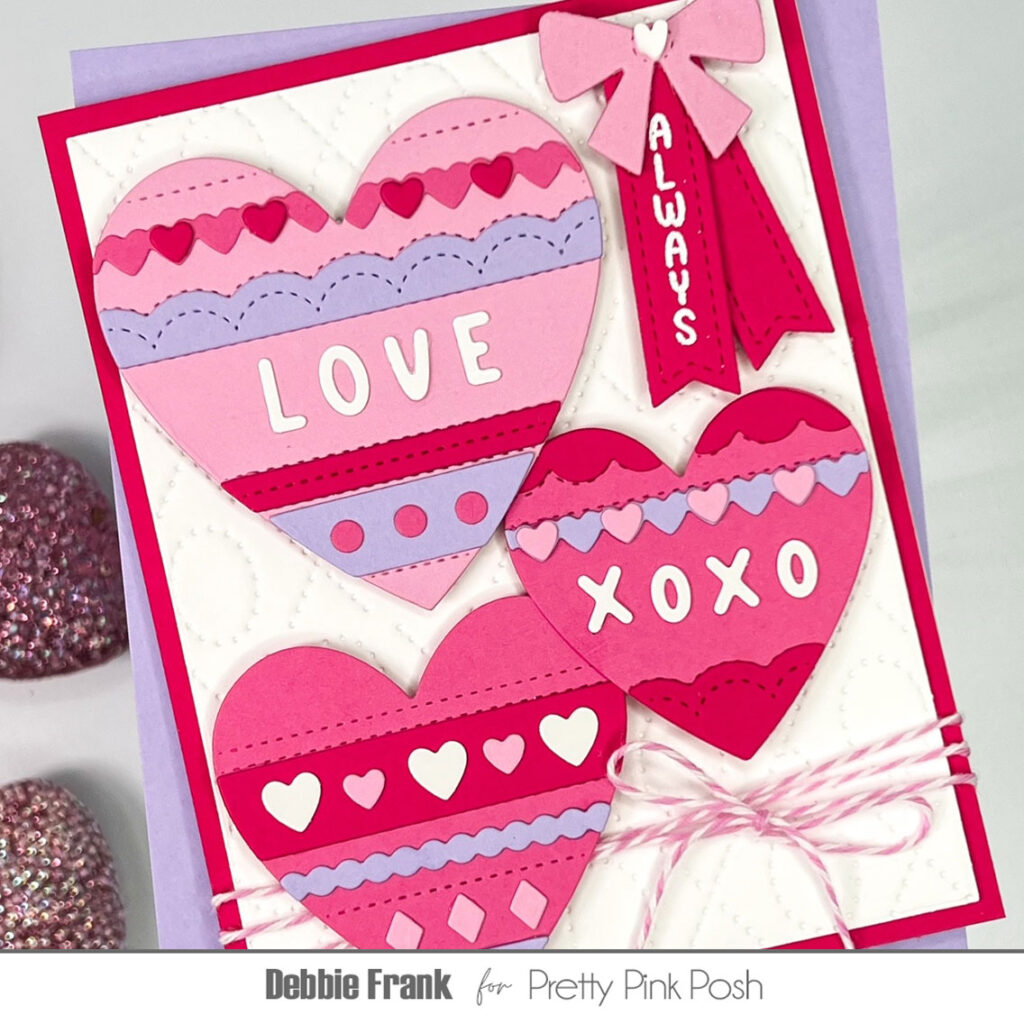
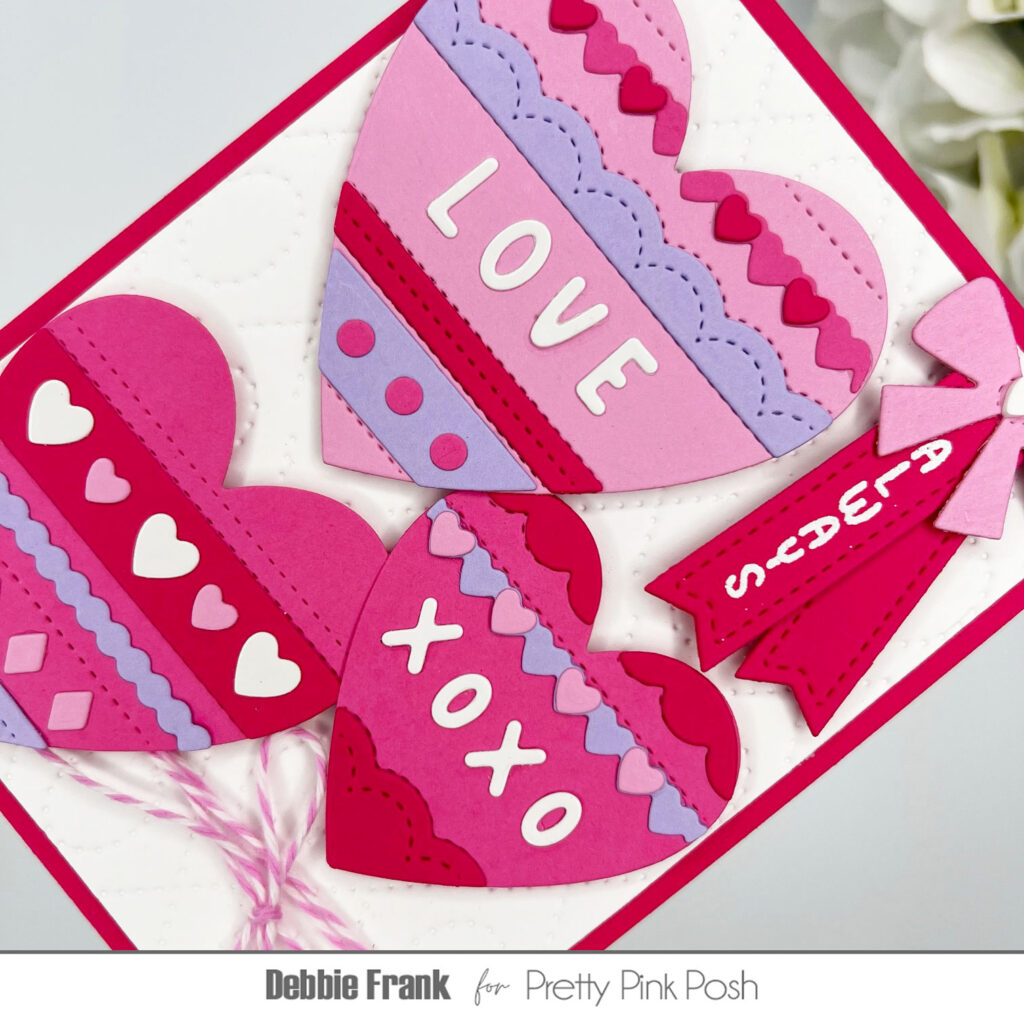
Hi friends Debbie here today! Sharing the Build-a-Heart Die! For Christmas I bought myself a new Anna Griffin Empress with large plates, and it is wonderful! Also using my color cube and grabbed colors that I loved for Valentines- threes shades of pink, lavender and glossy white card stocks. Once they were cut I put the into a Craft Stax for storage. That way when I needed more I was all set.
I started off with the XOXO Pierced Plate Die, and ran it through my P6 with the rubber mat to make a more pillow look rather than a pierce. Trim it down on all sides by 1/8th inch. and mat with the brighter pink.
Building the hearts I wanted and popped them up with 3D foam.
From my stash I have a light pink and white twine I wrapped around the panel three times and tied in a bow. Attach the hearts on and adhere to a portrait top fold card base.
Thanks for stopping by and stay crafty my friends!
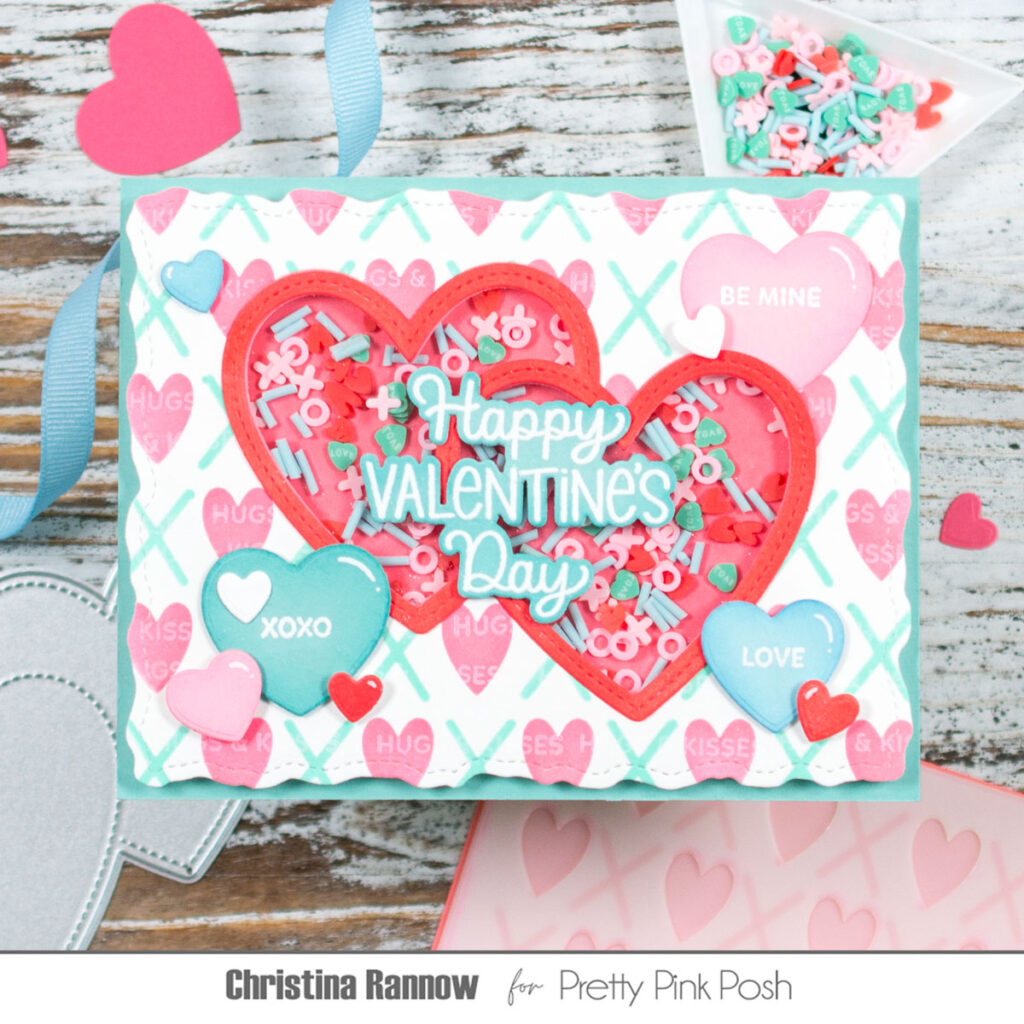
Hello crafty friends, it’s Christina! If you follow me, you know I love shaker cards, so I couldn’t help but make one more Valentine shaker this season. I chose the new Double Heart Shaker and filled it with the super cute XOXO Clay Confetti pieces. I used the confetti pieces as the pastel color inspiration for my card design, including the Layered XOXO stenciled background. So grab your foam tape and let’s get started!
My first step was to create the background. I stenciled the X layer and the heart layer on a white cardstock panel with Rhubarb and Tidepool Pawsitively Saturated Inks. Then I stamped Hugs & Kisses across the panel with white pigment ink. I just used a small stamp block for this step. Lastly, I die cut the panel using the largest Stitched Torn Rectangle die.
My next step was to create the shaker component. First I die cut another Stitched Torn Rectangle from white cardstock to be the base, and then, for the shaker window, I die cut the Double Heart from the stenciled background panel. I used this shaker window opening as a template to attach a Double Heart, inked with Apple Pawsitively Saturated Ink, to the shaker base. This is what we will see through the shaker window. Now, I attached a piece of acetate, trimmed to size, over the shaker window on the reverse side of the background panel with double-sided tape. Then on the base panel, I attached foam tape around the Double Heart, creating wells, and then across the rest of the panel. I used a thin foam strip to divide the hearts into two separate shakers, but that step is optional. I filled the wells with the XOXO Confetti and used the corner of my Misti to perfectly align the top background panel to the base panel.
With the shaker component completed, I got started on the remaining elements. First I die cut a Double Heart frame, inked it with the Apple ink color, and attached it to the outside of the shaker window. Next I die cut multiple hearts from colored cardstock and lightly inked the edges with a darker ink color for some shading before heat embossing a few of them with small sentiments. I also heat embossed Happy Valentine’s Day on teal cardstock with white embossing powder and die cut it with the coordinating die. I attached most of these elements with foam squares, otherwise with liquid adhesive. And lastly, I attached the shaker panel to an A2 teal cardstock base.
Thanks so much for following along with my pastel Double Heart shaker! I’ll see you again soon!