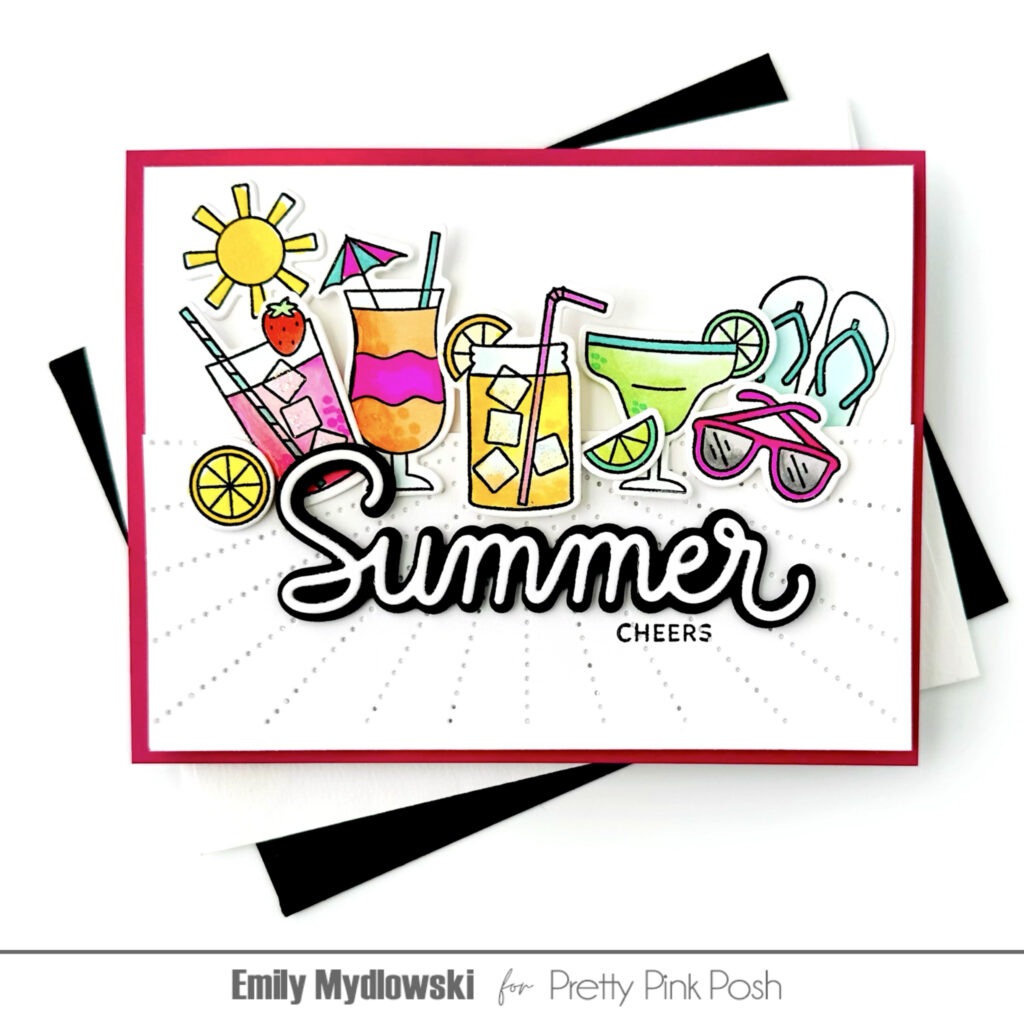
Hi friends! Emily Mydlowski here with you today bringing the vacation vibes with a cheerful summer card with bright tropical colors and all the fun of a relaxing day by the pool with fruity drinks and citrus slices to sunglasses, flip-flops and a glowing sun.
I stamped all the images from theSummer Sips stamp set using VersaFine Nocturne Clair Ink and embossed them with clear embossing powder. I used the coordinating dies to cut all the images. For the coloring, I selected an assortment of OLO markers in vibrant summertime colors and added sparkle and shine to the drinks using glossy accents and diamond Stickles.
I cut a white Sunburst Pierced Plate panel in half and layered all the Summer Sips images across the horizon. I arranged the images at different angles and heights to keep the design visually even while still feeling playful. For extra dimension, I used foam adhesive of various heights to adhered all the images.
I anchored the design with a black and white Summer die cut with a smaller stamped “Cheers” tucked underneath. To complete the card, I added the decorated panel to a bright pink cardbase. I just love how this clean and simple design captures the sunshine and happiness of the season! Cheers and Happy Summertime Sips!
Thanks so much for stopping by and Big Paper Hugs!
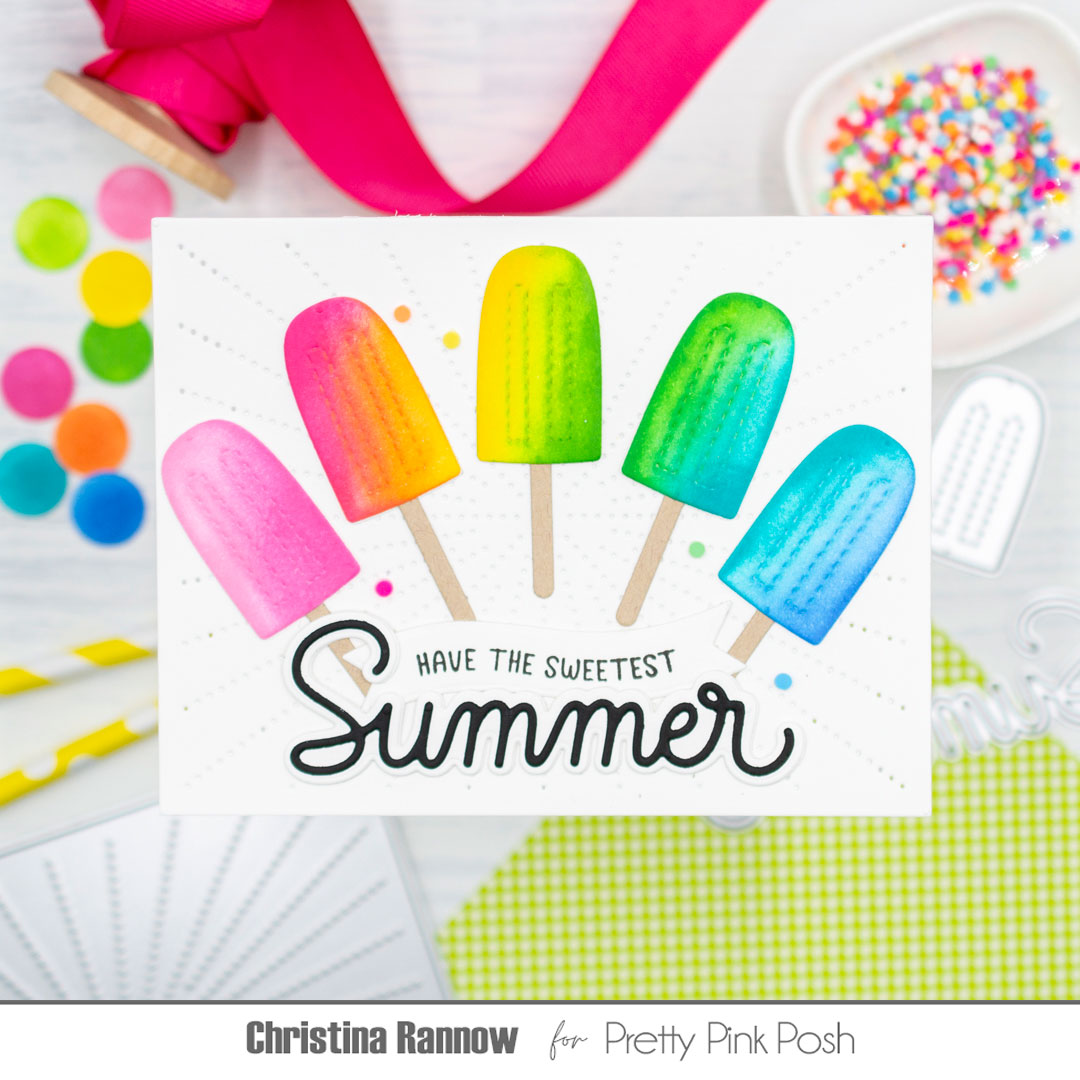
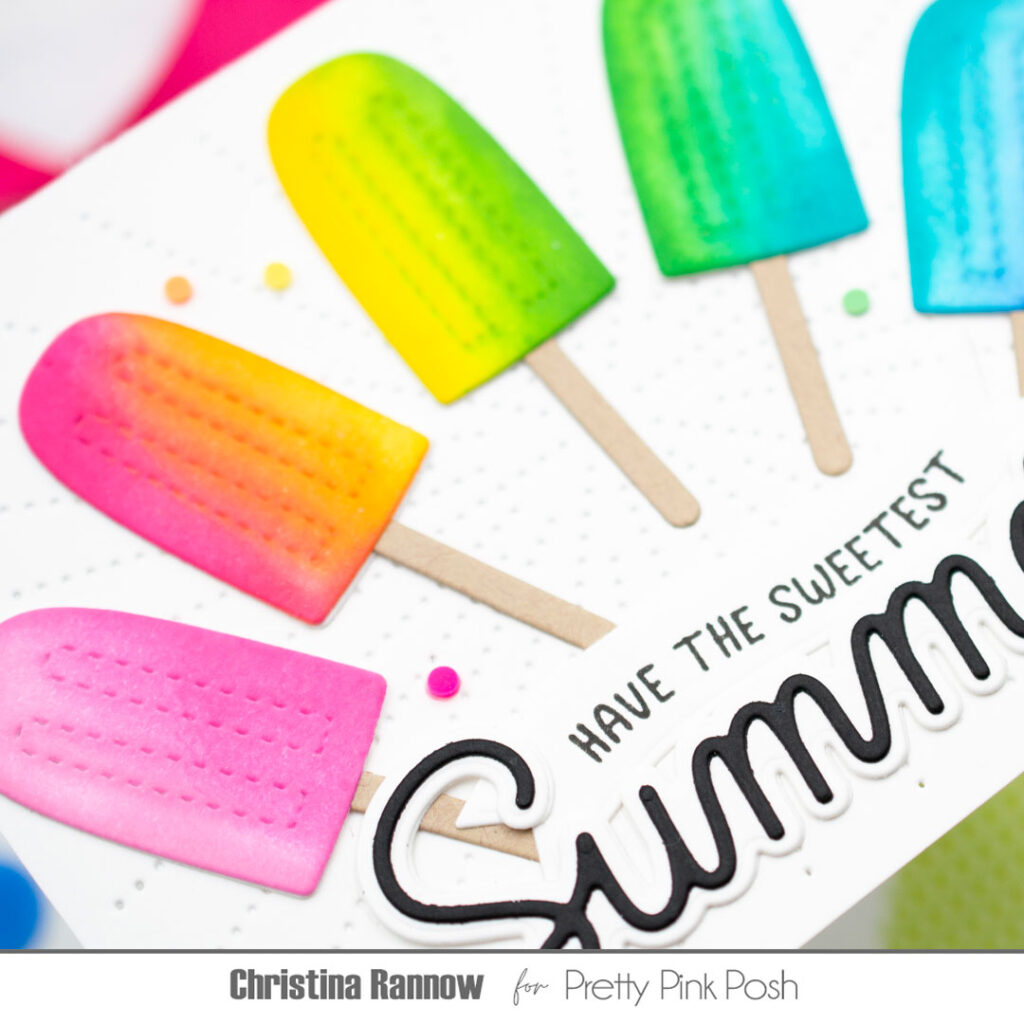
Hi friends! It’s Christina and I have the sweetest summertime card to share with you today! My card features the popsicles that are included in the new Summer Bucket Additions die set. I think these popsicles are just the cutest, and I knew they would make a bright and cheerful summertime card all on their own. I combined them with some other new products from the latest collection, including the Sunburst Pierced Plate and the Large Summer Shadow Dies. Take a peek at my supplies for this card, and then we’ll get started!
My first step was to create the rainbow of popsicles that is my focal point for this landscape card design. I started with a large piece of white cardstock and ink-blended a variety of inks from different companies across the entire panel. I used Kitsch Flamingo, Picked Raspberry, Twisted Citron, Mowed Lawn, and Peacock Feathers Distress Inks along with Sherbet, Zest, and Cadette SSS Pawsitively Saturated Inks to create my blend. Then I die-cut the popsicles from the areas I liked best and added the popsicle sticks.
Next, I die-cut the Sunburst Pierced Panel from white cardstock and arranged the popsicles on it in an arc shape, securing them with glue. I customized the banner sentiment by combining sentiments from two Banner Greetings Stamp Sets, Summer and Valentine, to say “have the sweetest.”
I paired this with the Large Summer Shadow Dies that I die-cut from white and black cardstocks. The finishing touch was to add a few clay confetti as embellishment before popping the card front onto a card base.
Thank you so much for reading, and I hope you have a sweet summer!
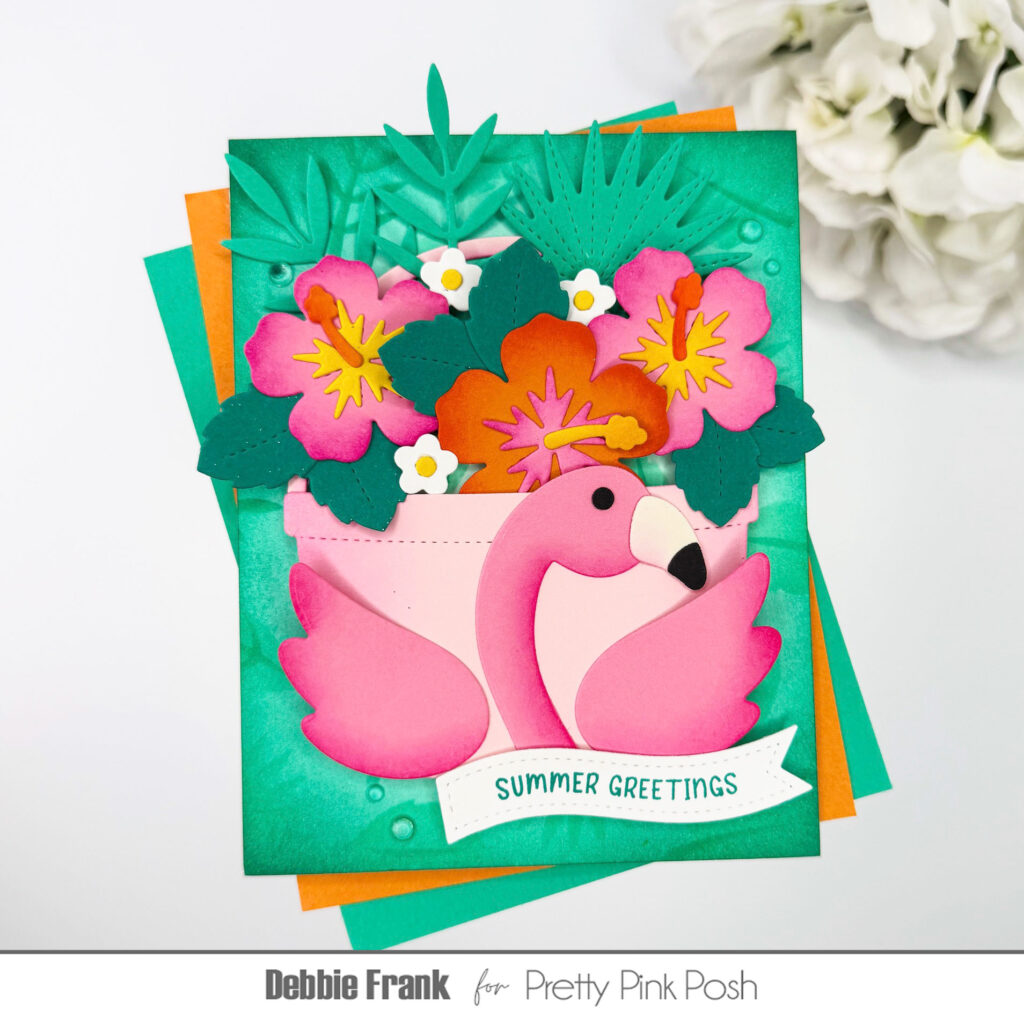
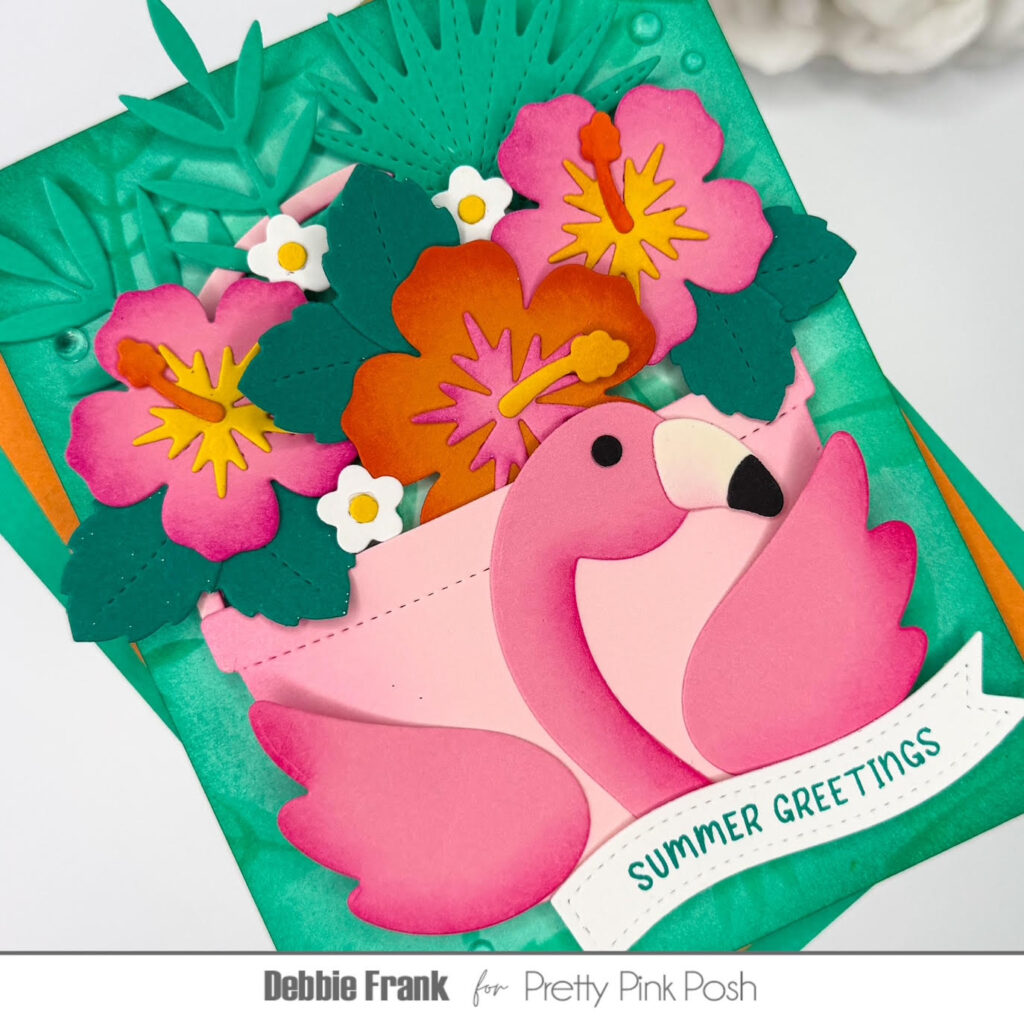
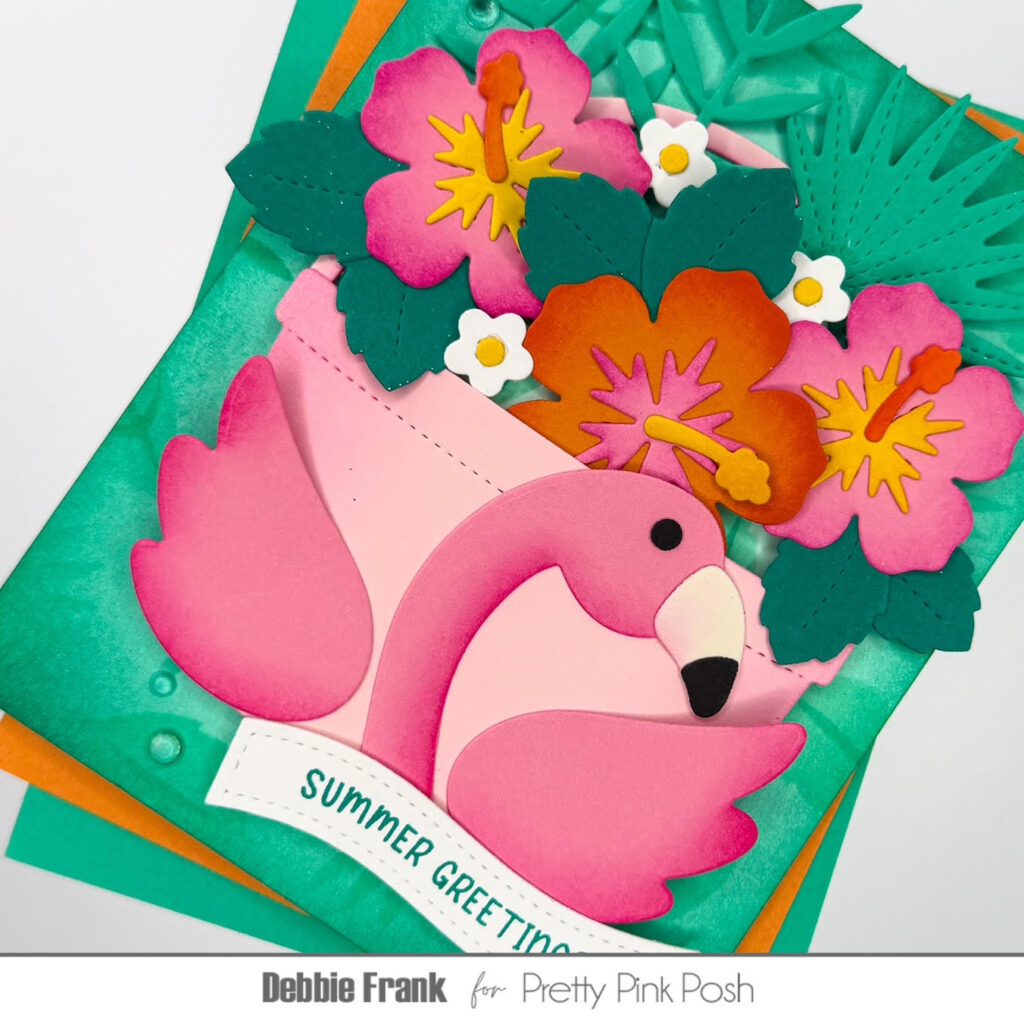
Hi crafty friends, it is Debbie here! I’m super excited to share the new Summer Bucket Additions Dies from the June release here at Pretty Pink Posh. I adore this Flamingo Add-on with the previously released Candy Bucket Dies. I went with florals in my bucket filling it up using the Hibiscus Flower Dies.
I started off with the Layered Tropical Leaves Stenciland a standard A2 panel of Neenah card stock on a grip mat. With both layers I inked them with teal dye inks in two shades. After I was done with the two stencils I went back over the panel with residual ink on my brush. Then with the darkest teal ink I went over the edges of the panel.
Next, I die-cut out the Candy Bucket and the Summer Bucket Addition Flamingo. Adding dimension on the edges with a dye ink. Then I die-cut out two of the small Hibiscus Flowers from pink card stock. And went back and die-cut out the medium size from the orange card stock.
Once I started to lay out my design I needed some smaller flowers to fill in between the Hibiscus Flowers, with the Summer Holder Additions Dies there is a small flower die that I die-cut out from white card stock.
I love floral baskets with spike plants making it more funky! So with the Tropical Leaves Dies, I die-cut out some of the leaves from a green teal card stock and tucked them in behind the flowers.
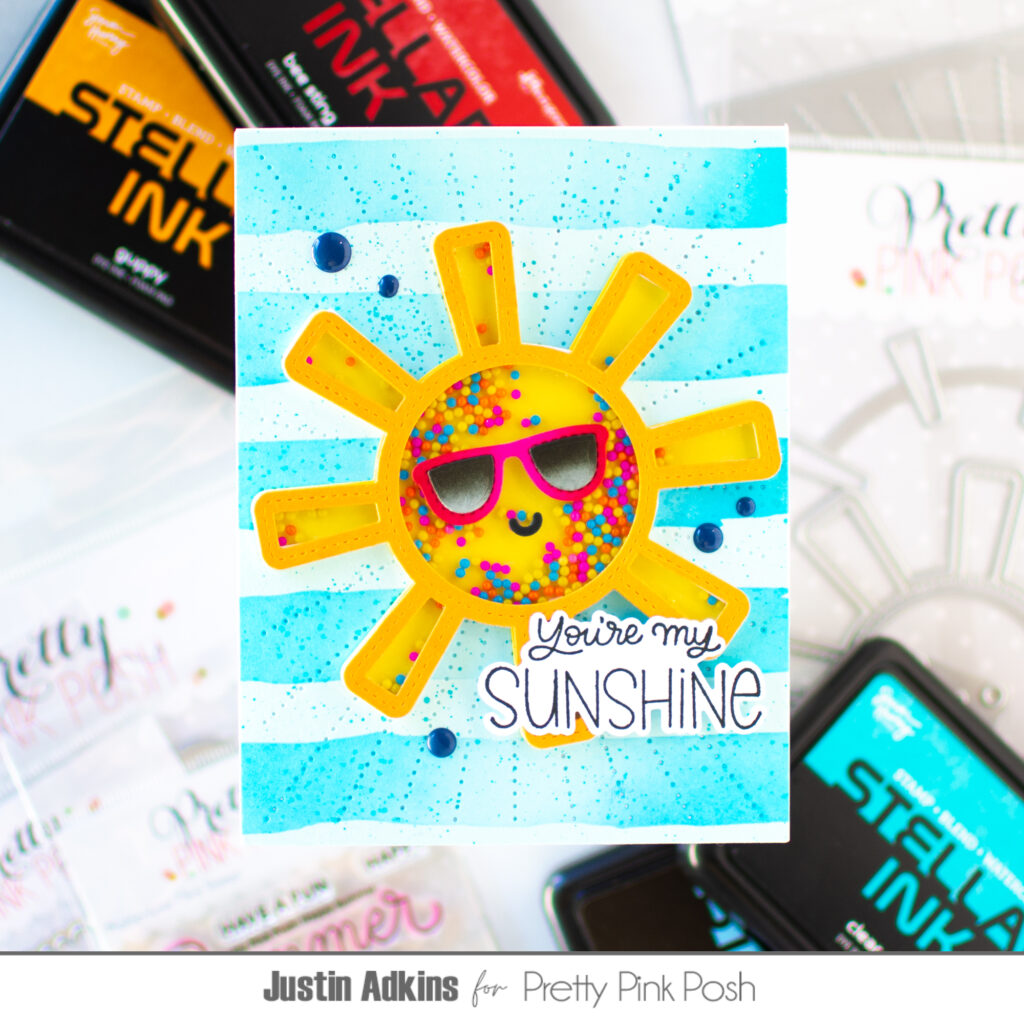
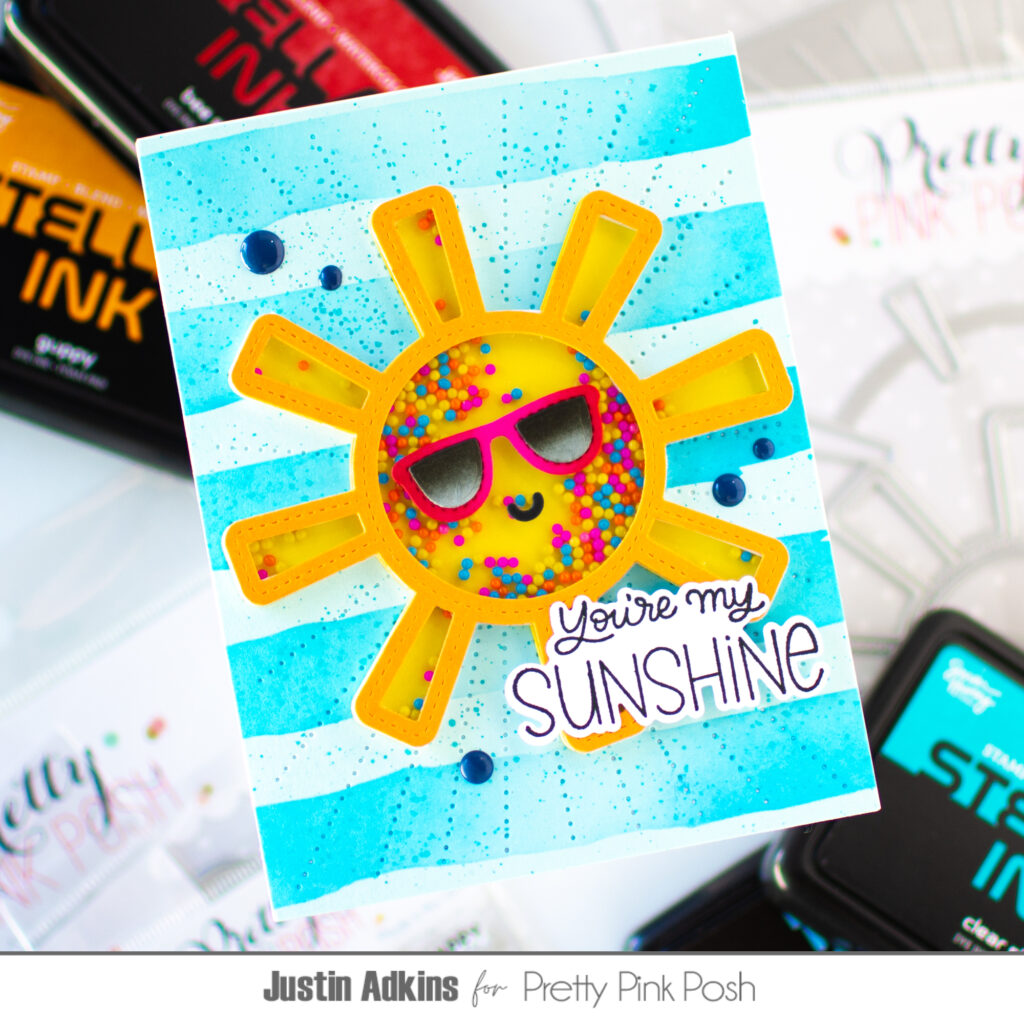
I had so much fun creating this playful shaker card with a smiling sun that’s ready for summer adventures! If you’d like to see exactly how this card came together, be sure to check out my full video tutorial on the Pretty Pink Posh YouTube Channel.
To create the background, I used the Watercolor Strips Stencil with bright blue ink blending to give the card a fun beachy feel. I then added texture with the Sunburst Pierced Plate before creating the adorable shaker sun using the new Sun Shaker Dies.
The sunglasses from the Summer Holder Additions Dies add extra personality, while the colorful Beach Party Shaker Beads bring plenty of movement and sparkle. I finished the card with the “You’re My Sunshine” sentiment from the Happy Summer Stamp Set, creating a card that’s perfect for sending sunny wishes all season long.
Don’t forget to follow me on Instagram and YouTube at @justanotebyjustin for even more crafting inspiration!
Thanks so much for stopping by today! See you again soon!
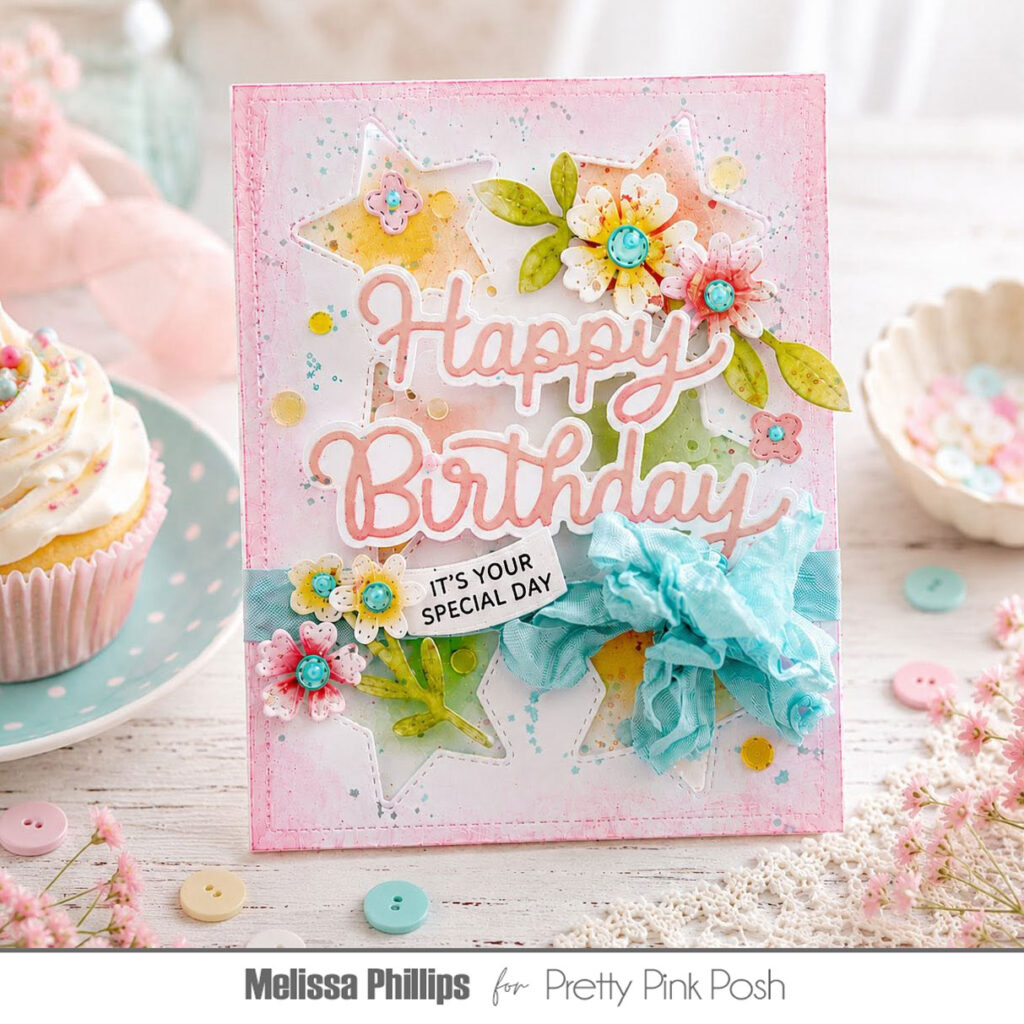
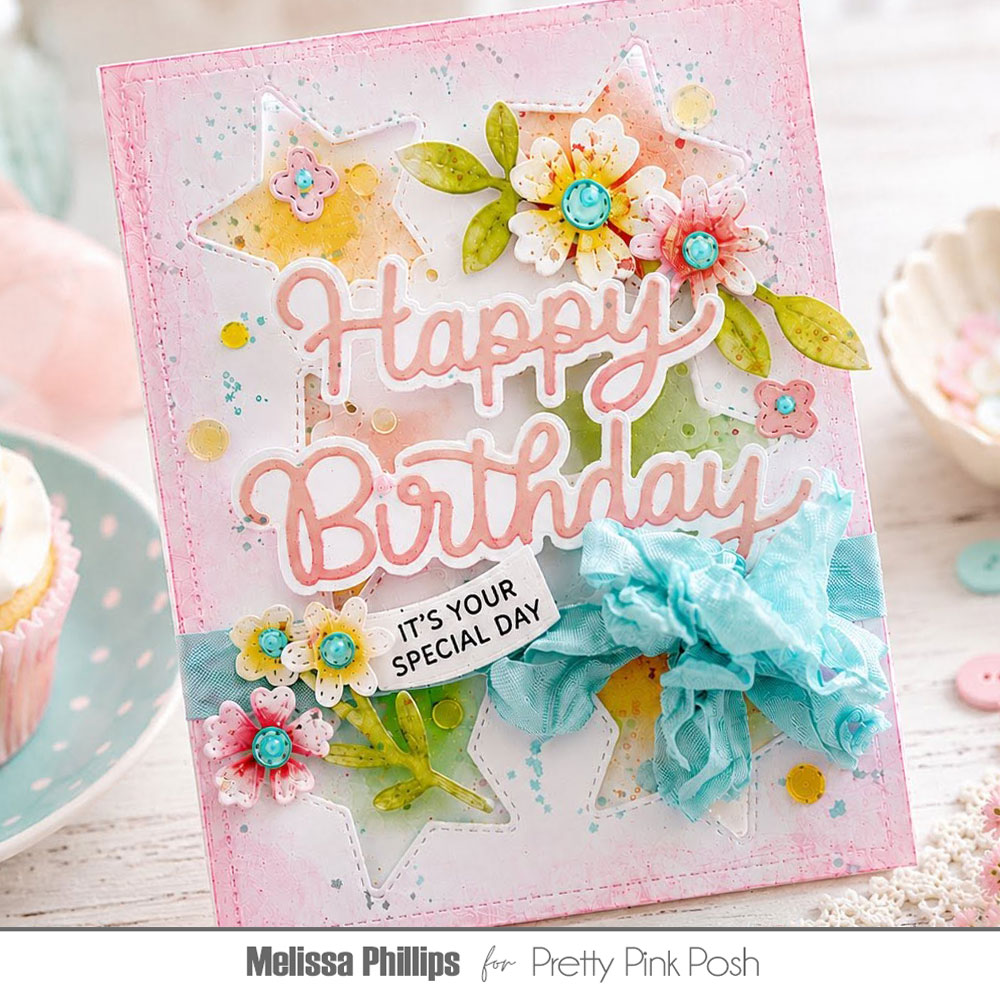
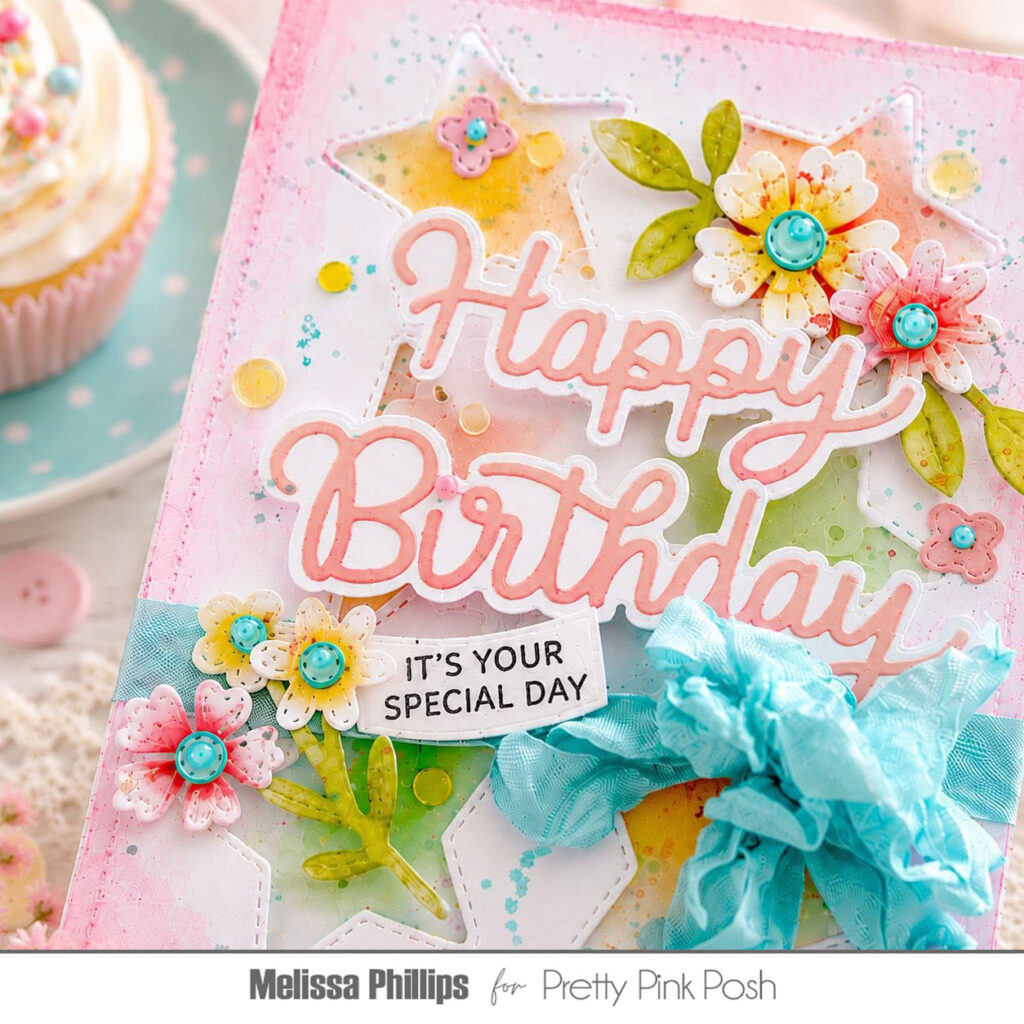
Hi Everyone! It’s Melissa here with you today, and I’m bringing you a fun, happy birthday card, using some playful and unique Pretty Pink Posh products. My birthday is just around the corner, and I thought it would be fun to create a card to celebrate!
I began with theStar Cover Plate Die and layered it over a block of white cardstock using dimensional adhesive. Before layering the two together though, I added color to the base layer that you could see peeking out from each star. I focused on my favorite pastels in pinks, yellows, aquas, and a bit of green.
Next, I die cut a vellum layer from the Eyelet Diamonds Dies. I added it to the center of my card, just above the scrunched seam binding bow that I wrapped around the lower portion of my card.
My sentiment was die cut using the Happy Birthday Shadow Dies and I added them to the center of my card to shine in the spotlight!
I couldn’t wait to bring in a bit of florals and chose to use the Spring Foliage Dies. I love their sweet, pierced details and the variety of shapes and sizes they come in. After I nestled them in a few of the star-shaped openings, I added one last detail in the form of a secondary sentiment. I used the Party Time stamp set and added my chosen sentiment to a die cut Banner Greetings 3 die. I tucked it under a few flower petals on a fun diagonal.
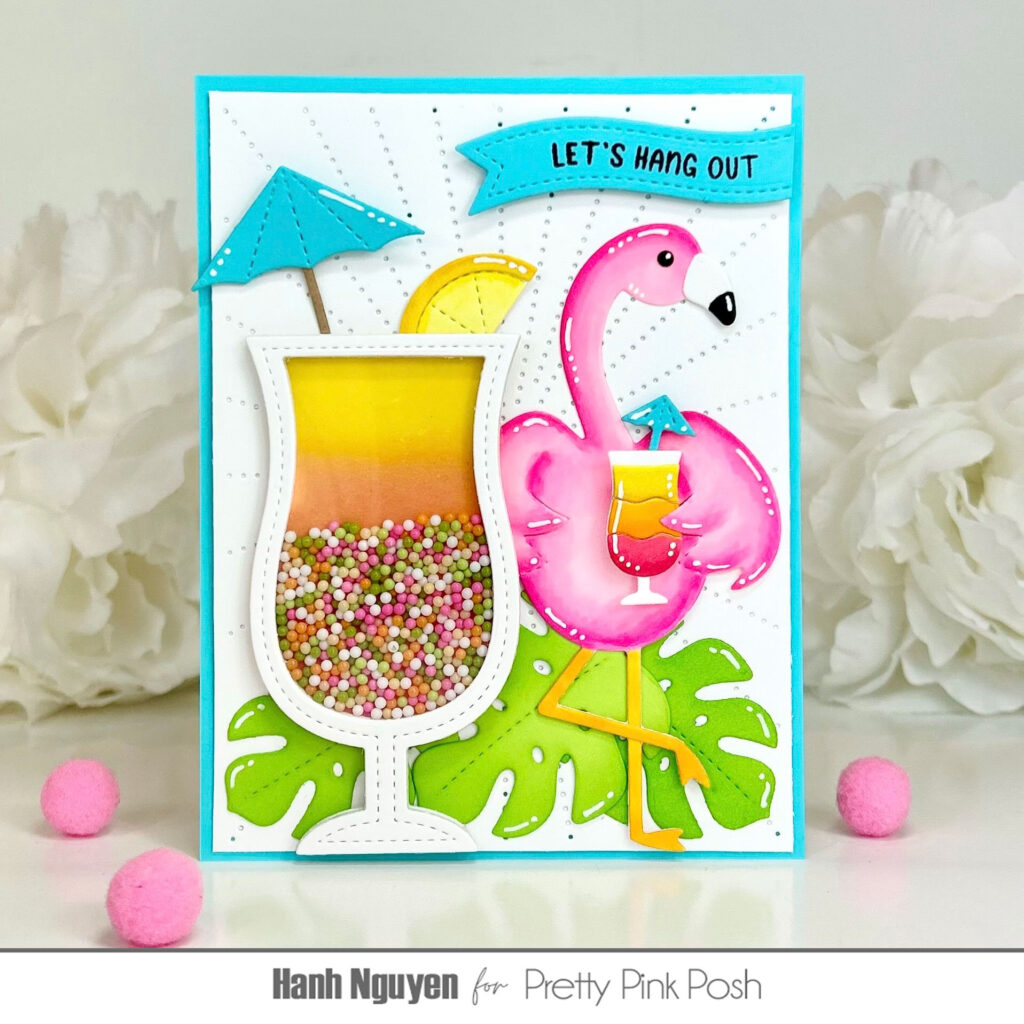
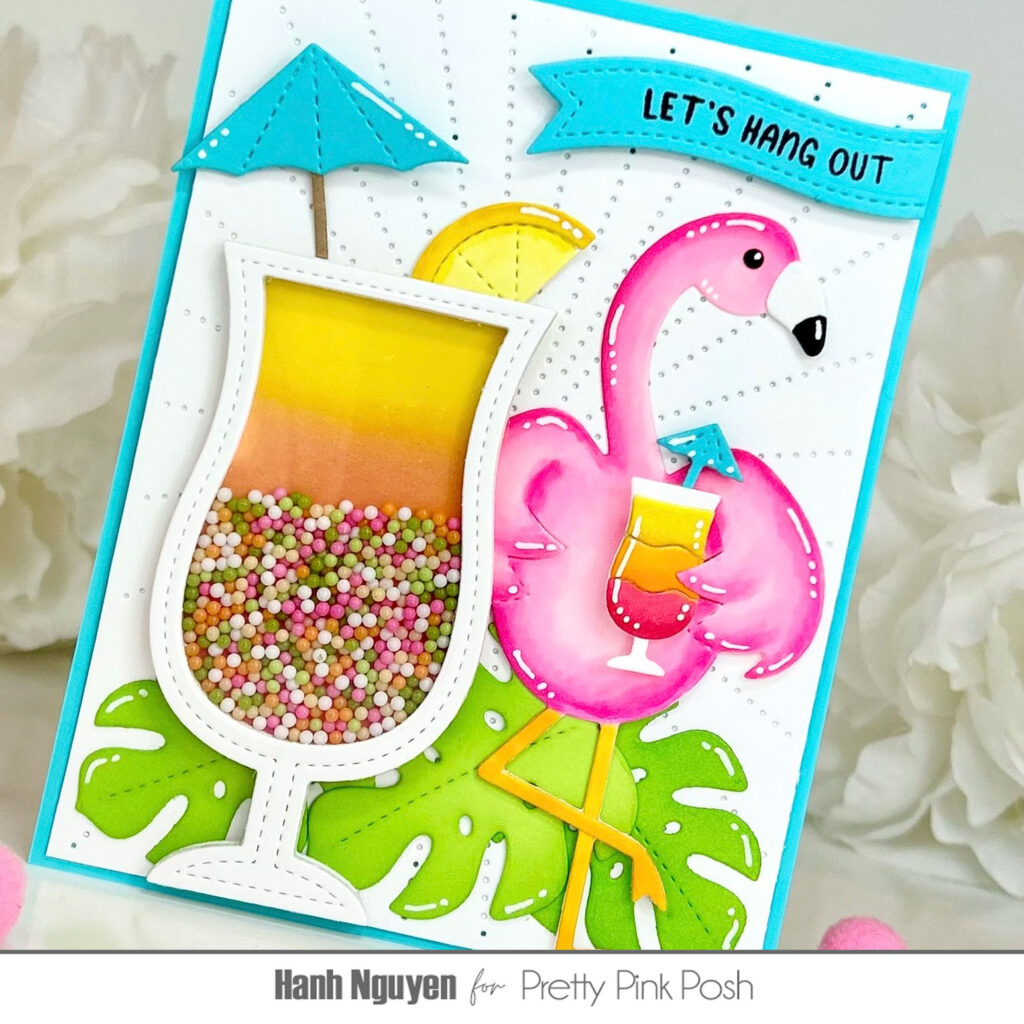
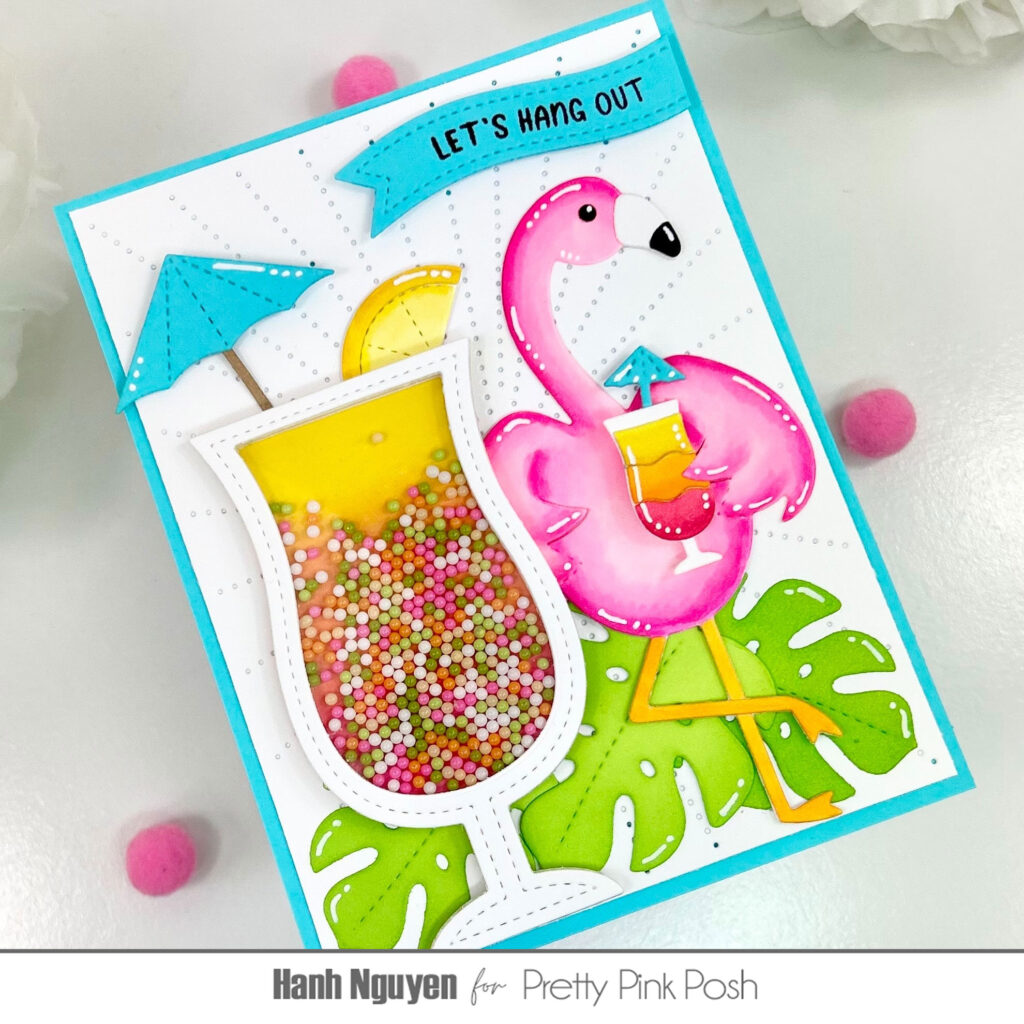
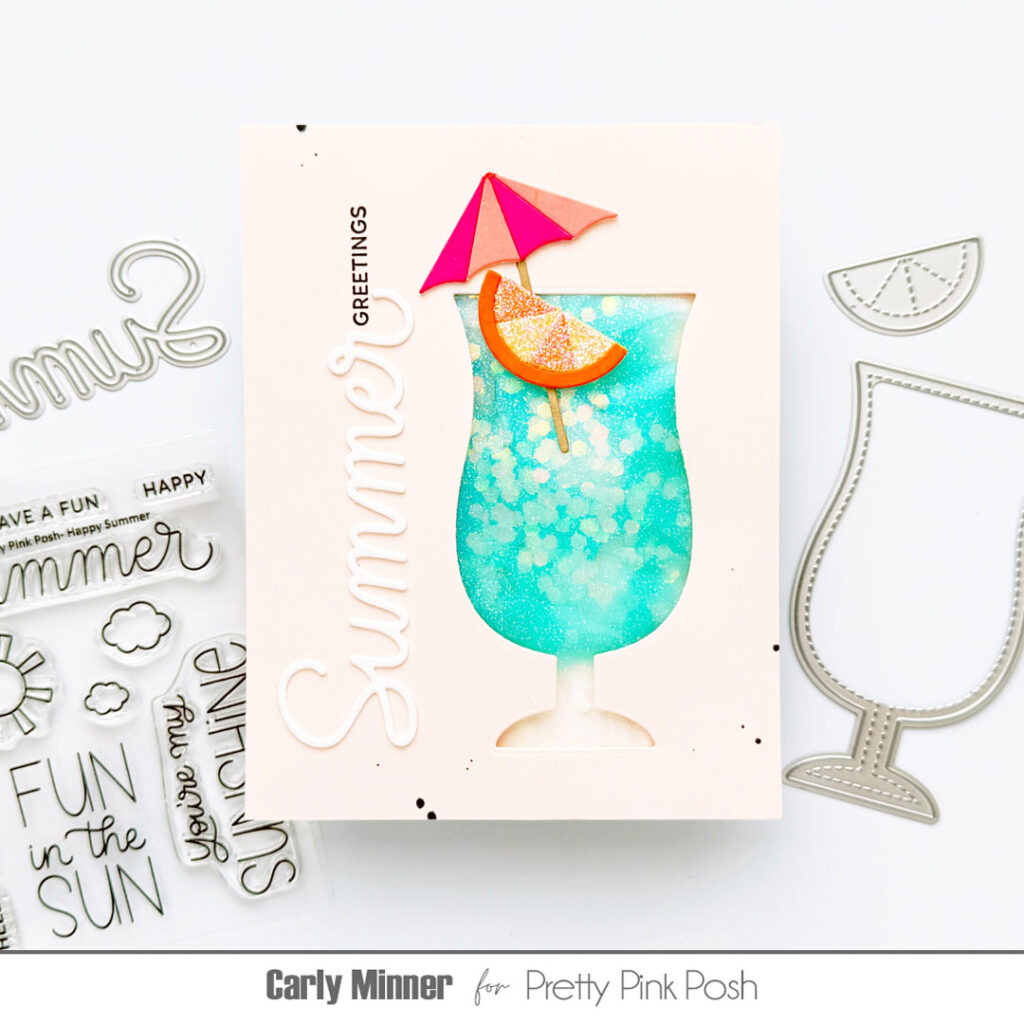
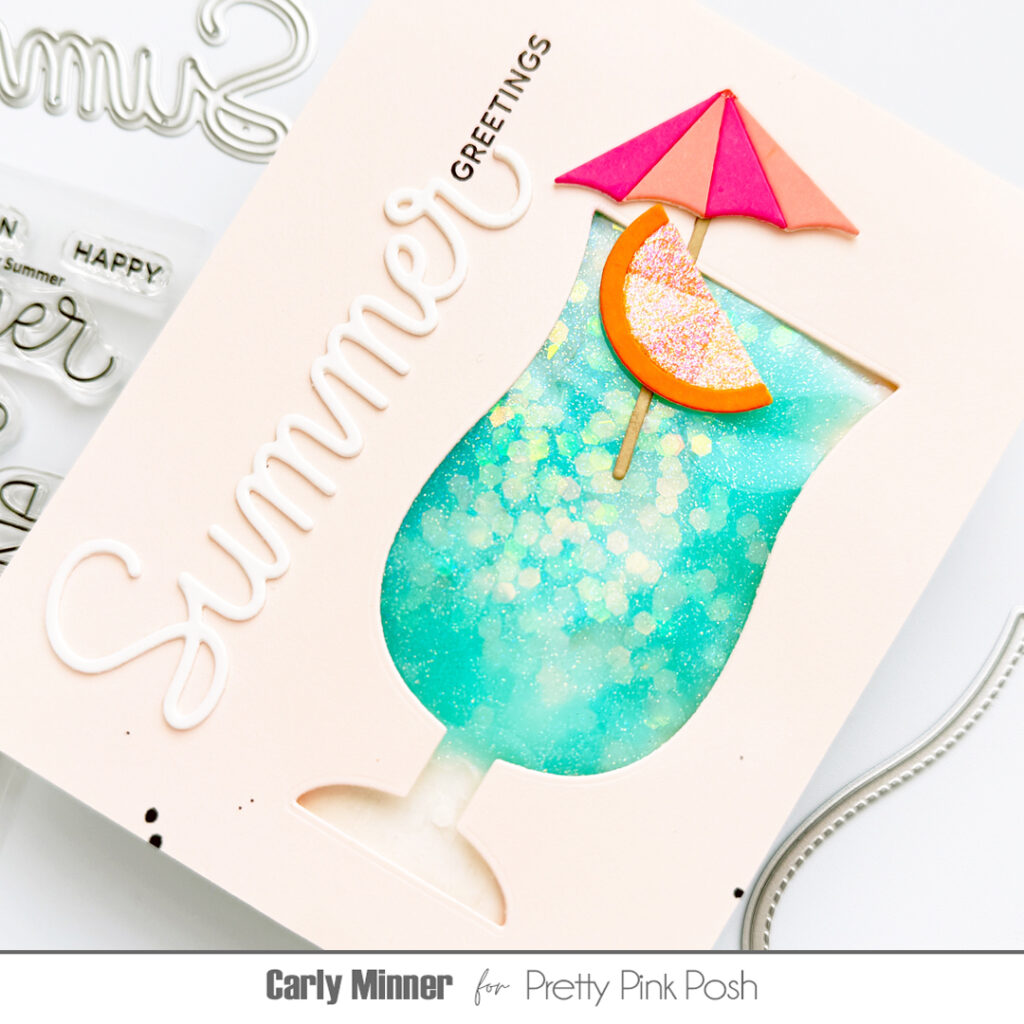
For the shaker, I used the Summer Drink Shaker Dies to diecut two solid glasses (one out of Bristol Smooth cardstock, one out of clear acetate) and six white glass outlines (using the glass die and inside window die together). I ink blended color onto the solid glass with Squeezed Lemonade, Mustard Seed, Ripe Persimmon, Picked Raspberry Distress Oxide inks. Five of the six glass outlines were stacked and adhered to each other with liquid glue before they were adhered to the inked solid glass to create the shaker well. I added some Rainbow Sherbet Shaker Beads into the well before closing off the shaker with the clear acetate solid glass diecut. I topped off the shaker with the last white glass outline.
Next, I diecut the large umbrella and lemon slice using the Summer Drink Shaker, the flamingo using the Flamingo Holder Dies, the small glass and umbrella using the Summer Holder Additions Dies and the leaves using the Tropical Leaves Dies out of teal, kraft, white and black cardstock. I ink blended with leaves with Mowed Lawn Distress Oxide ink. And I colored the remaining white diecuts with Copic markers and highlighted with a white gel pen. I assembled the elements with liquid glue.
For the background, I used the Sunburst Pierced Plate Die to diecut a white panel which was then slightly trimmed down and matted with a piece of teal cardstock. I adhered the leaves, shaker and flamingo using liquid glue. I did pop some foam tape behind the large umbrella and small drink for a bit of dimension. The panel was adhered to a white A2 cardbase (4.25” x 5.5”).
For the sentiment, I stamped the “Let’s hang out” sentiment from the Summer Banner Greetings stamp set with Memento Tuxedo Black ink onto a piece of teal cardstock. I used one of the dies from the Banner Greetings 1 Dies to diecut out the sentiment. It was then adhered to the panel with foam tape.
I appreciate you taking the time to stop by and visit today. I hope you liked my card and are inspired to check out all of the amazing summer themed products from the latest release. Be sure to head on over to the Pretty Pink Posh Shop for more info and inspirations.
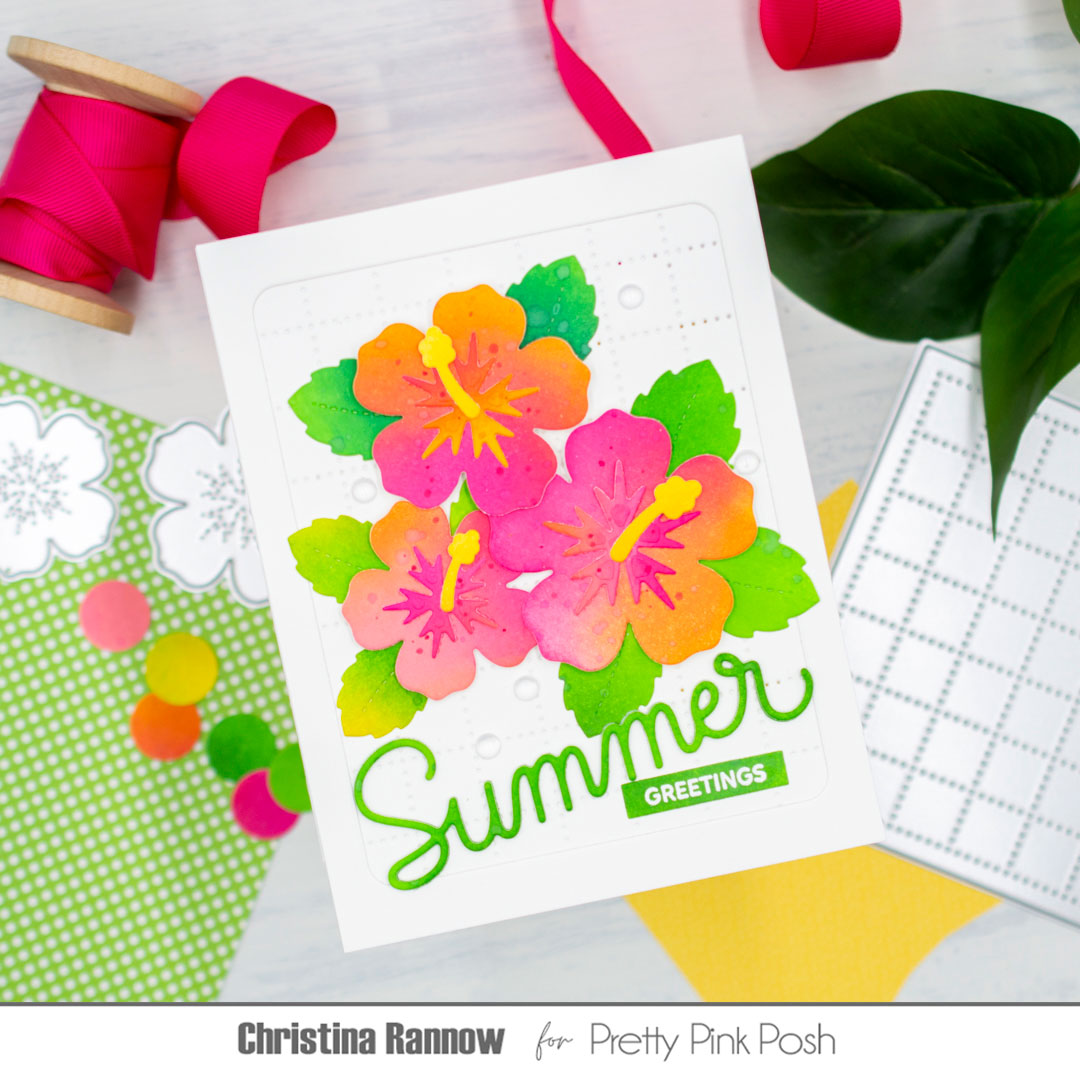
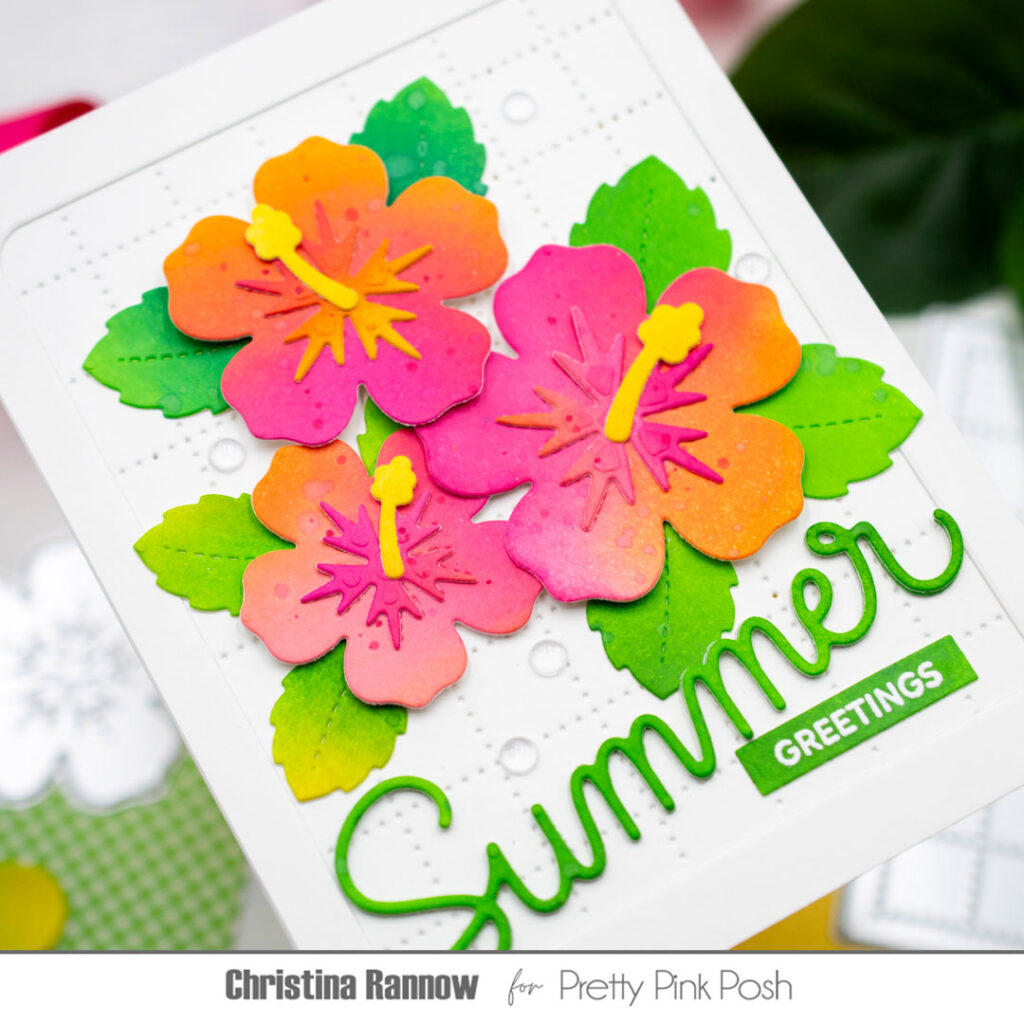
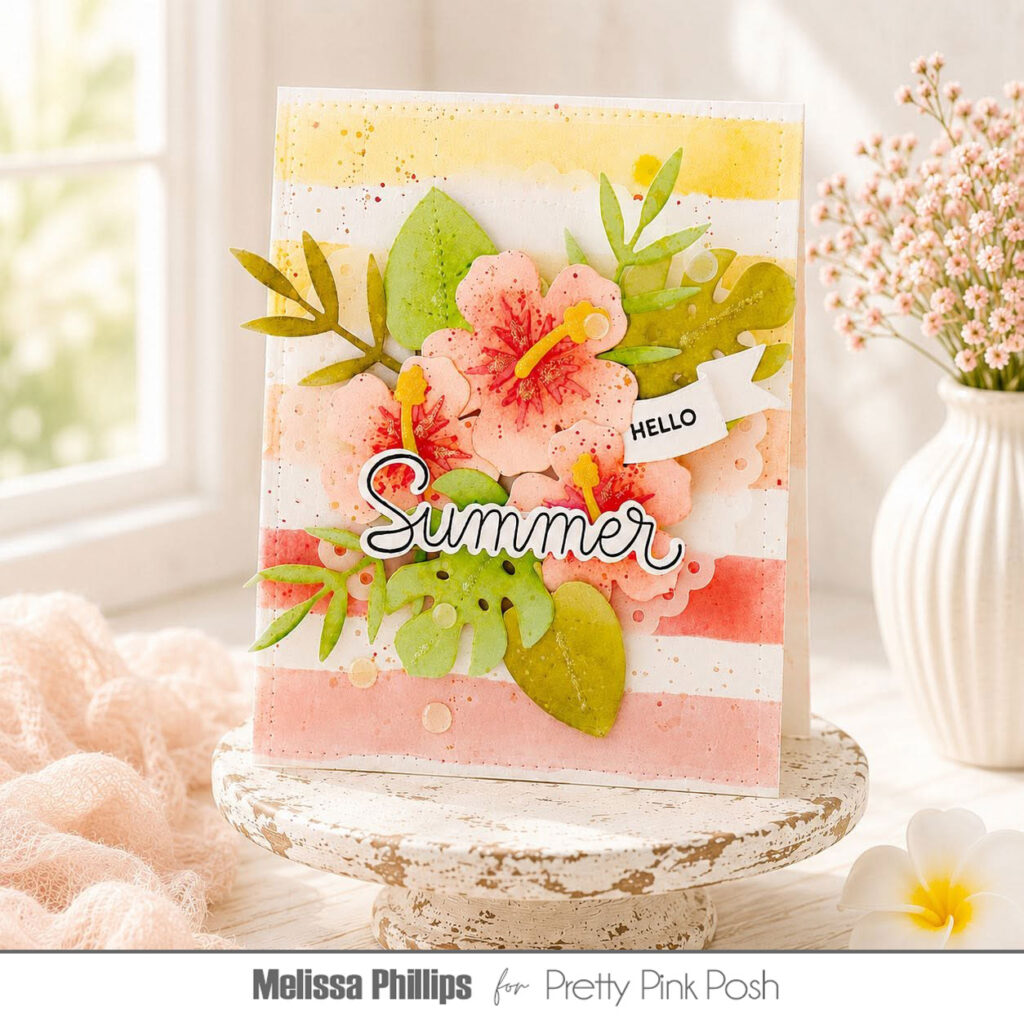
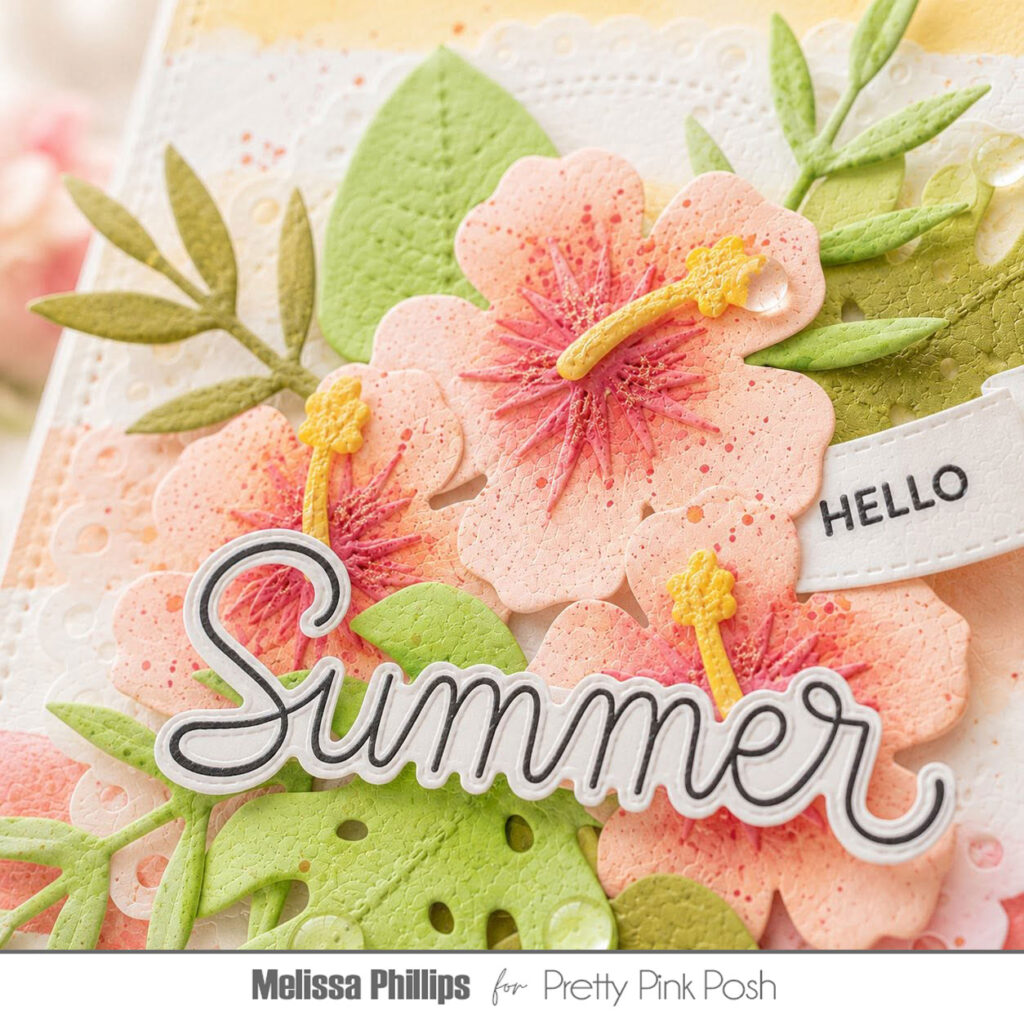
Aloha! Christina here to share a vibrant floral card design showcasing the new Hibiscus Flowers Dies. These ink-blended beauties are easy to create and make the perfect focal point for your card design. I combined them with a big, bold greeting, the Large Summer Shadow Die,and to contrast the scripty text and the organic shapes of the flowers, I gave them a geometric background using the Checkered Pierced Plate. Check out my supply list and then I’ll walk you through the steps to create this vibrant floral card.
My first step was to create the vibrant ink-blended flowers that are my focal point. I started by ink-blending Distress Inks onto a white cardstock panel. I chose Kitsch Flamingo, Picked Raspberry, Carved Pumpkin, Squeezed Lemonade, and Mustard Seed, blending them across the entire panel before spattering the panel with not only more ink but also plain water too. This gave the ink-blending some texture and interest. Then I die-cut the flowers and the flower centers from the ink-blended panel, positioning the dies on the areas that I liked the best.
I used the same process for the leaves of the flowers, choosing Mowed Lawn, Twisted Citron and Pine Needles Distress Inks for the ink-blending.
My next step was to assemble the die-cuts and arrange them on a white Checkered Pierced background panel. I used foam squares to attach the flowers and tucked the leaves underneath, securing them with glue. I decided to frame up my design and used the largest Rounded Stitched Rectangle to die-cut a white cardstock panel and used the negative space as the frame.
To finish things up, I used the leftover green ink-blended cardstock panel to die-cut the word “summer” and heat-emboss the word “greetings” with white embossing powder before die-cutting it with a sentiment strip. I combined them on my card front and added some 4 mm Clear Dropletsfor embellishment. Finally, I popped the card front onto a top-fold card base.
Thank you so much for reading and I hope you’re inspired to do some ink-blending of your own! See you again soon!
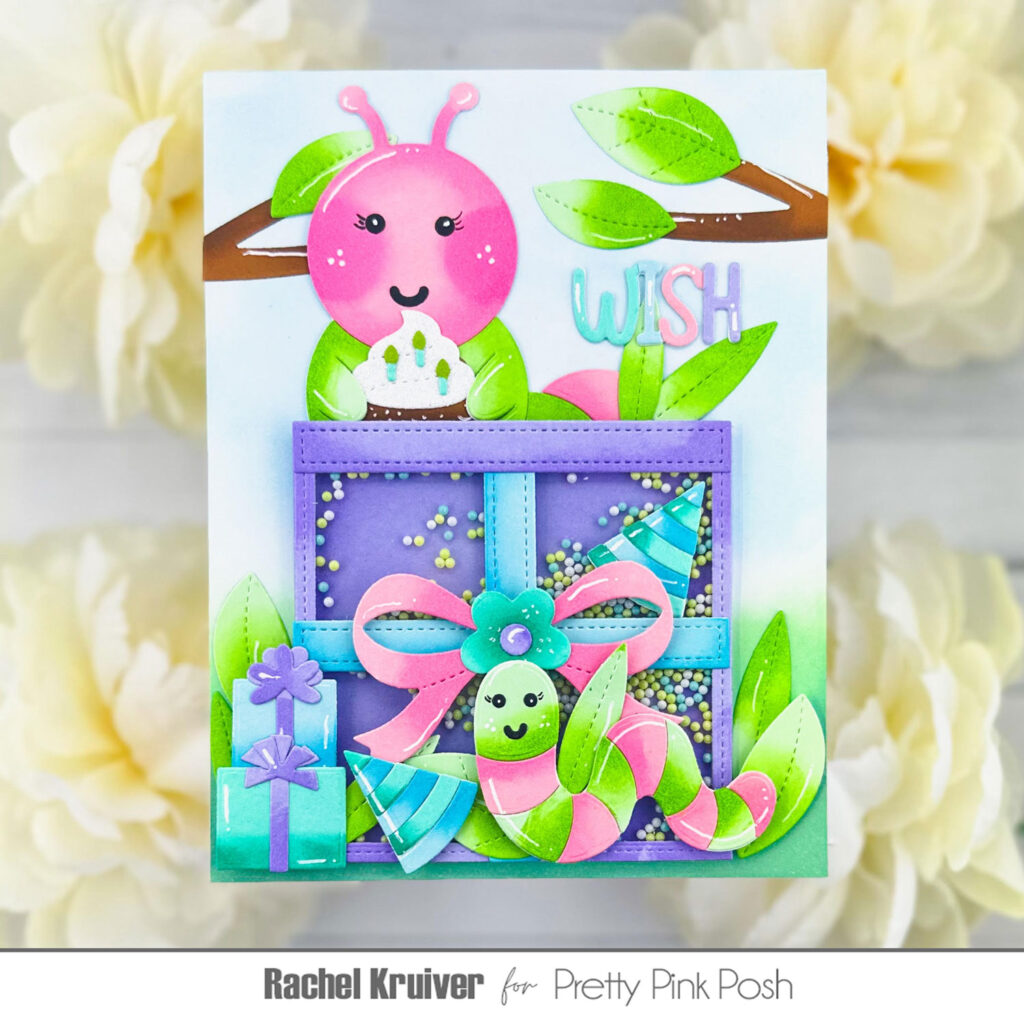
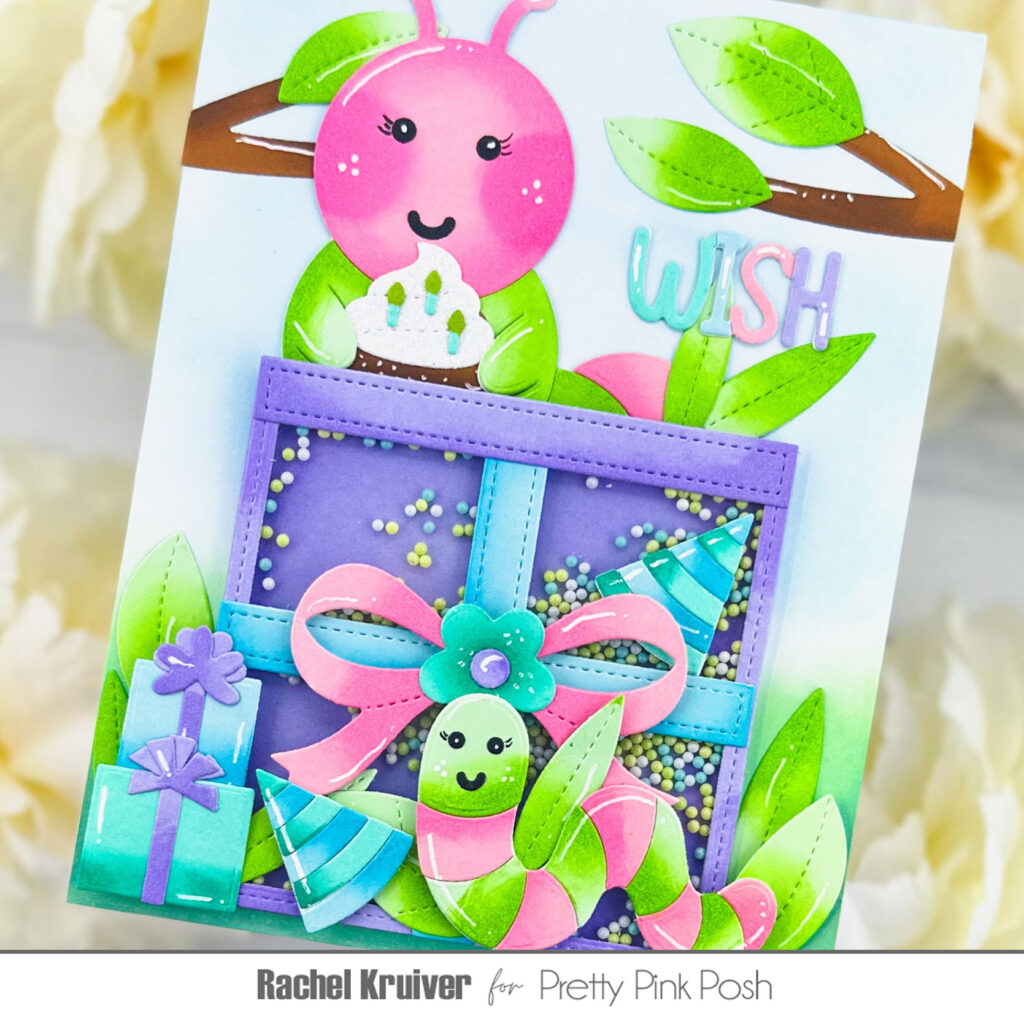
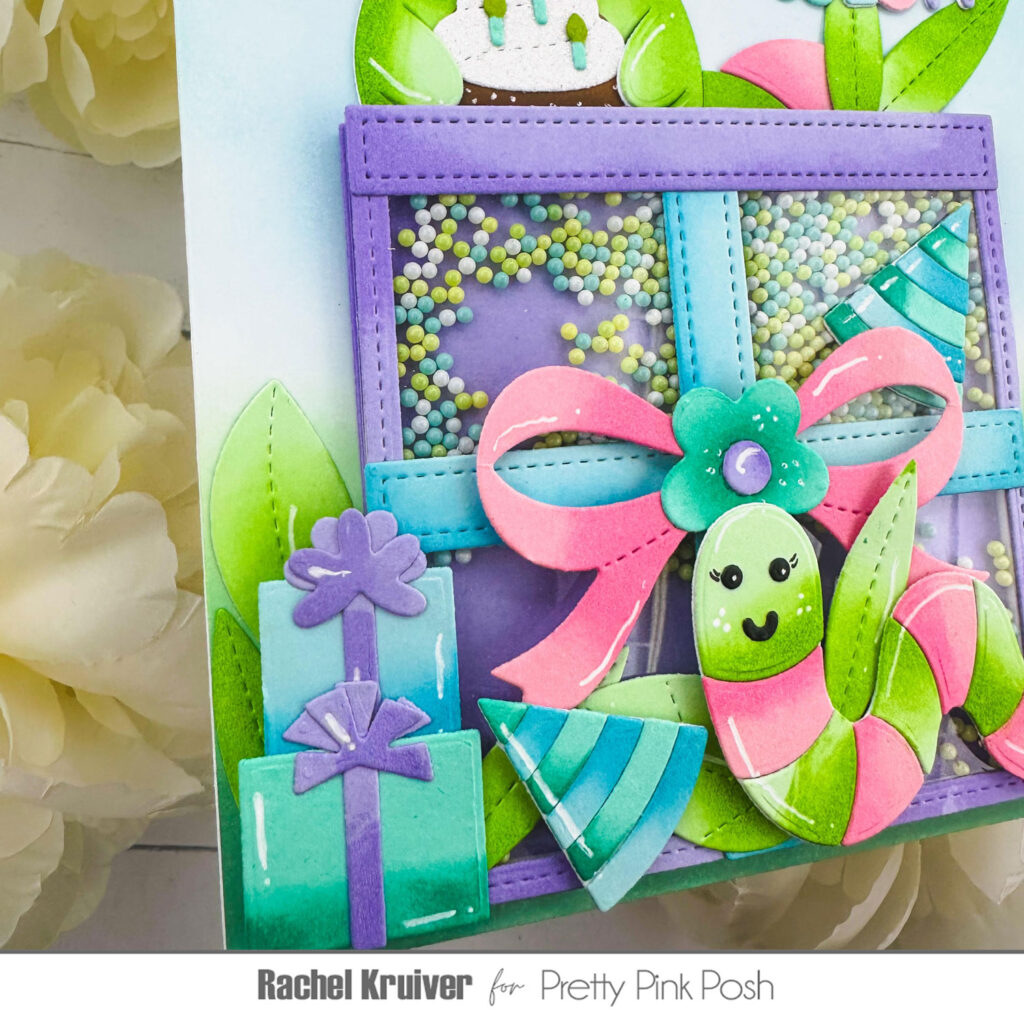
Hi crafty people! It’s Rachel here today with a bug-tastic shaker party card. I always love a shaker card; it is one of my favorite types of cards. Today I mixed and matched some products from the May 2026 release with older products. Mixing and matching my Pretty Pink Posh products is always so fun!
Let’s start with creating our card base. I cut a piece of white paper to 6 1/2 x 5 inches. I needed a larger size to fit all my elements onto the card. Part of the bottom I ink blended in green, and the top in a light blue.
Then I started working on my present shaker by die-cutting all the elements from pastel colors. I used the Present Shaker Die. The acetate I attached to the backside of the frame and adhered to the details while my shaker was still flat. After that, I went around my purple base piece from the present die with thin foam strips. Filled it up with the Spring Breeze Shaker Beads and put my frame on top.
I die-cut all the elements I wanted to use to create my bugtastic party. I chose Stitched Bugs Die, Caterpillar Holder Die, Everyday Branches Die and the Birthday Holder Additions Die. Add ink blending around the edges to create shading. Assembled all of them and started laying it out on my card base. I like to do this before going in with adhesive because you can still play around with the position of all your die cuts.
For my sentiment “Wish” from the Birthday Holder Additions die, I thought it would be fun to die-cut it out of the colors I used on my card. So, I die-cut it 5 times, four times out of the colors I used on my card and once out of white to layer my colored letters on. I used my small scissors to cut each letter out of a different color, then used liquid glue to attach them to my white cut cardstock.
Then it was time to assemble my card; I used a combination of liquid glue and foam tape for this. I always like to have different heights on my cards. Especially when working with a shaker. So, I can have some elements of the same height as my shaker piece.
Thank you for taking the time to read my blog post. I hope you like these treat boxes and are inspired to make your own. Mix and match your products to decorate them.
Don’t forget to follow me on Instagram @cards.byrachel for more crafting inspiration.
I used the Summer Drink Shaker to create a window and then I made a squishy pocket to fit behind it. It looks like a yummy tropical drink and it’s fun to squish!
I used glitter paste colored with reinker but there are many other mediums you could try, I’ve even heard that hair gel is fabulous! And I used a laminator pouch but scrap plastic or even a sandwich bag would work too.
Thanks for stopping by! I hope you enjoyed today’s tutorial.
Hi Everyone! It’s Melissa here with you today, bringing you some summer sunshine! I absolutely adore the June Pretty Pink Posh Release and have been creating some fresh, fruity, summertime goodness to share with you. Let’s get started!
I began by using the new Watercolor Strips Masks Stencils. I used a variety of colors to mimic a sunset or sunrise on a warm summer day. I think these stencils would be so much fun to create a plaid background with…I’ll try that with my next card :).
Next, I die cut flowers and leaves using the Tropical Leaves Diesand Hibiscus Flowers Dies. I cut them from shades of green and pink and then added a bit of ink blending to deepen and brighten the colors a bit. I arranged them in the center of my card in a fun tropical cluster.