|

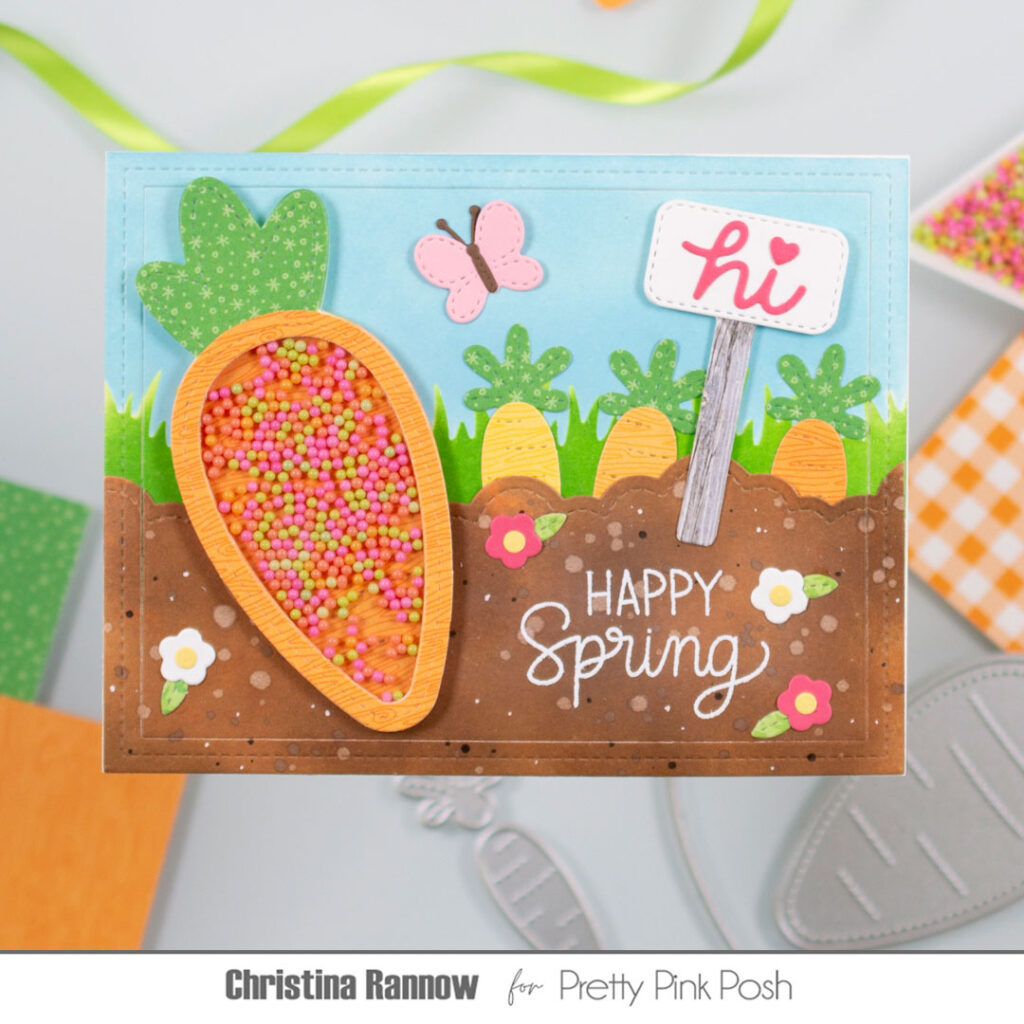
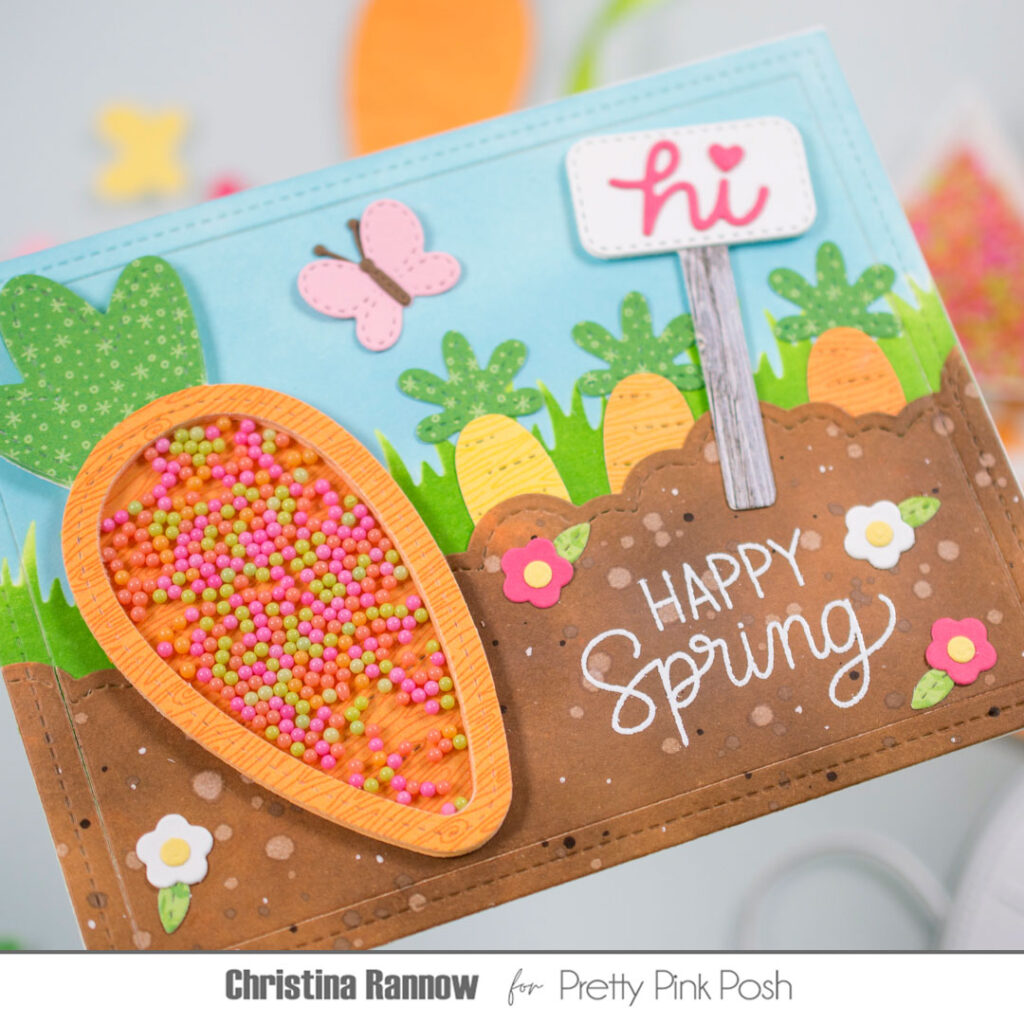
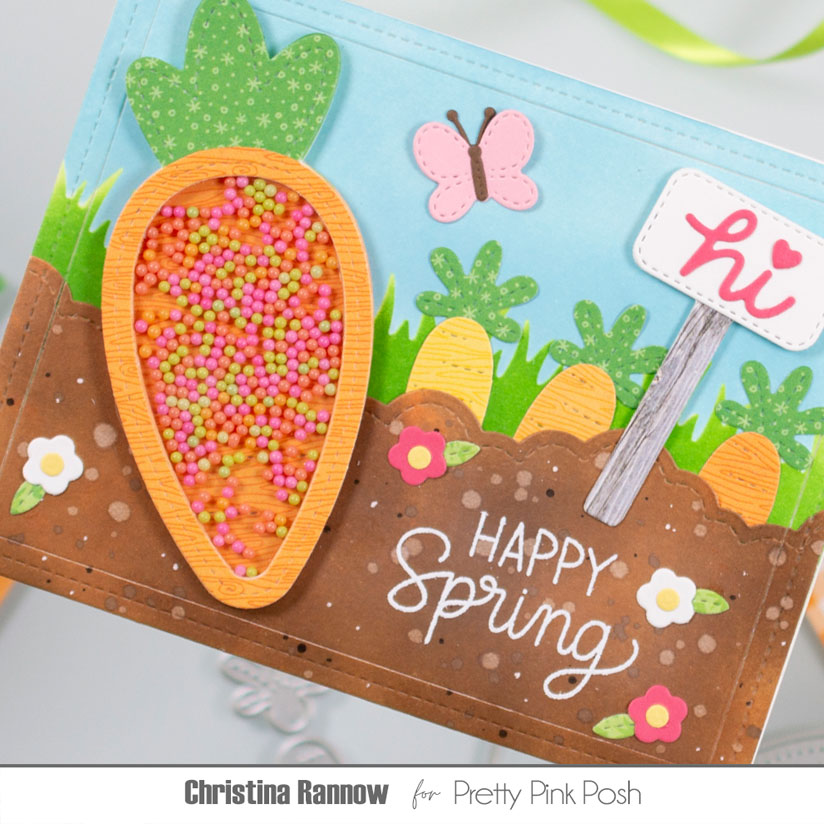
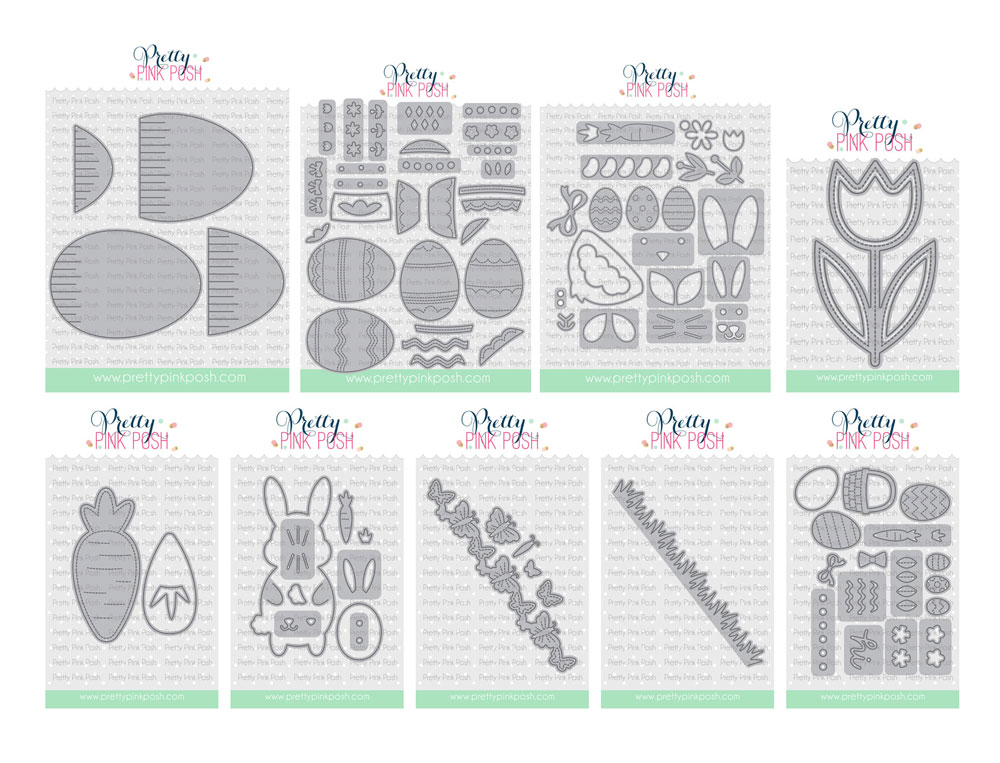
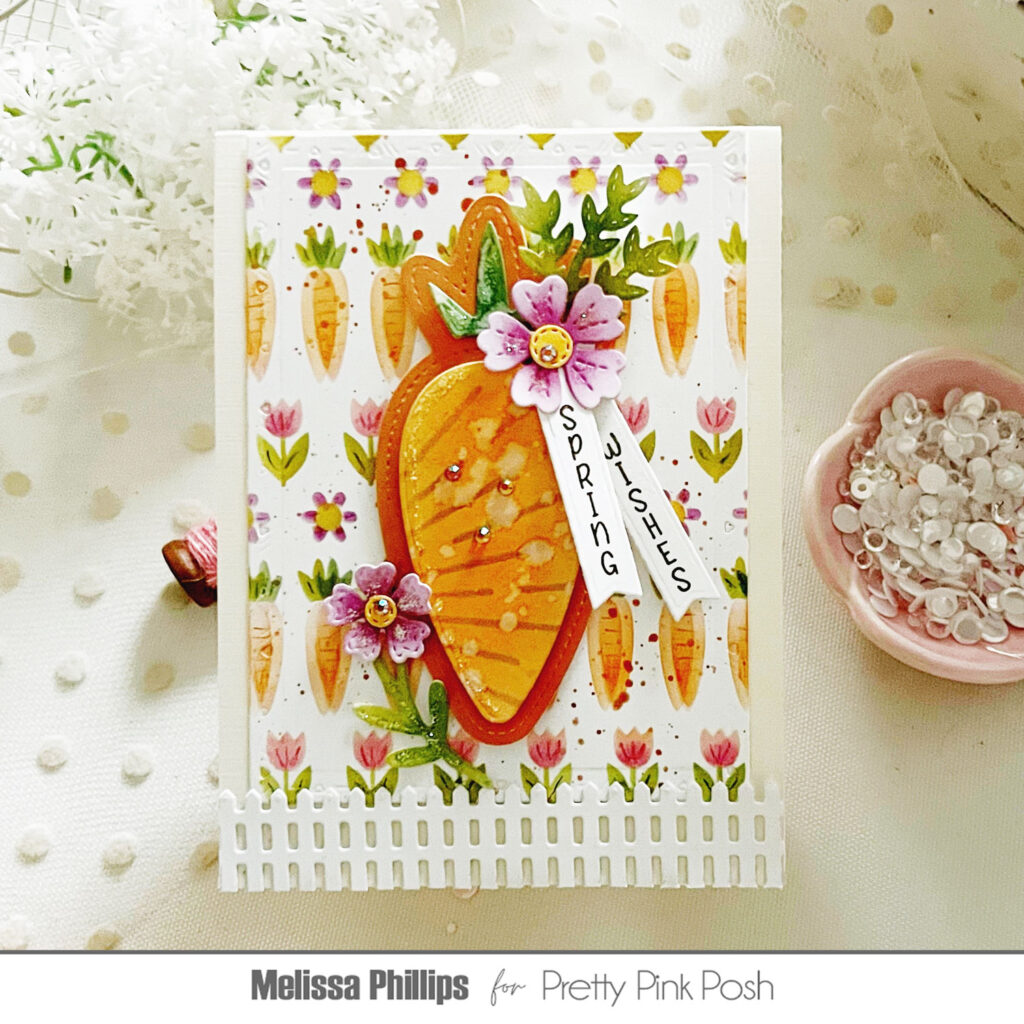
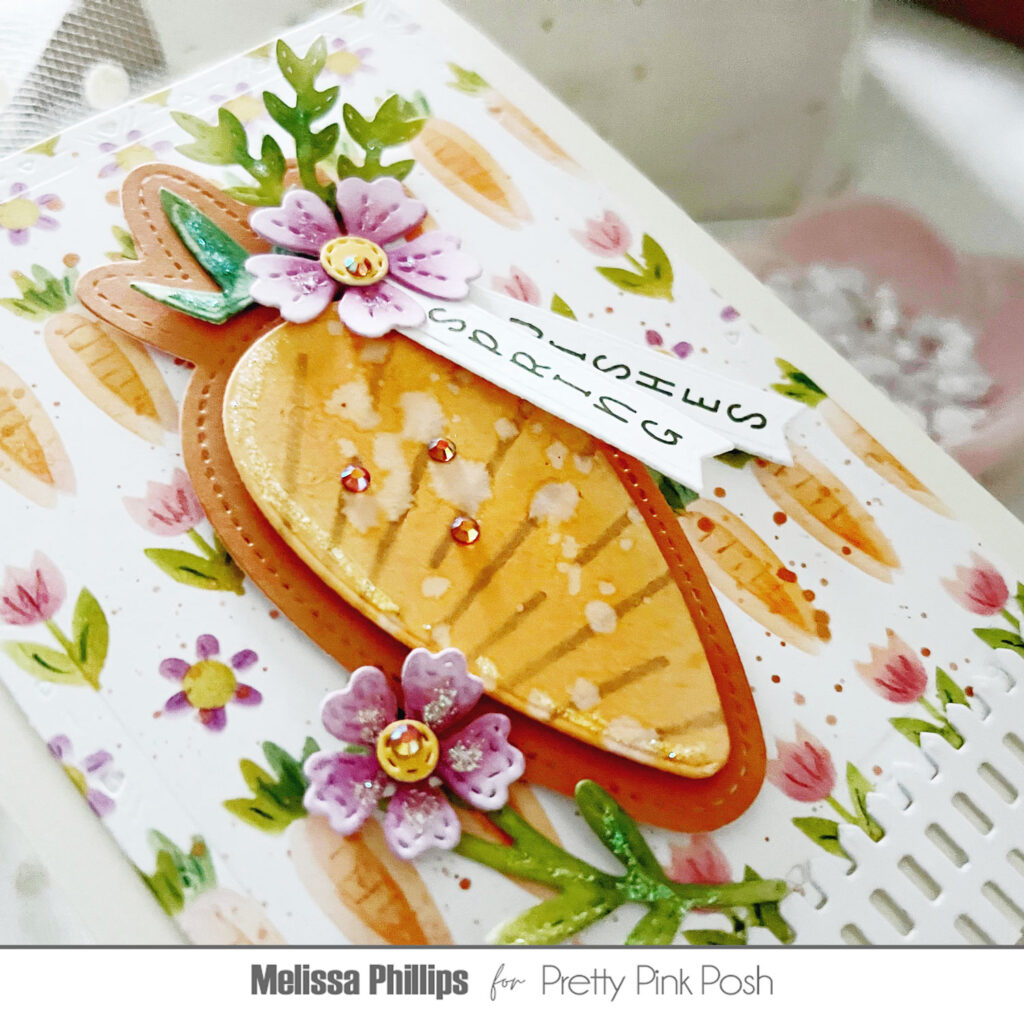
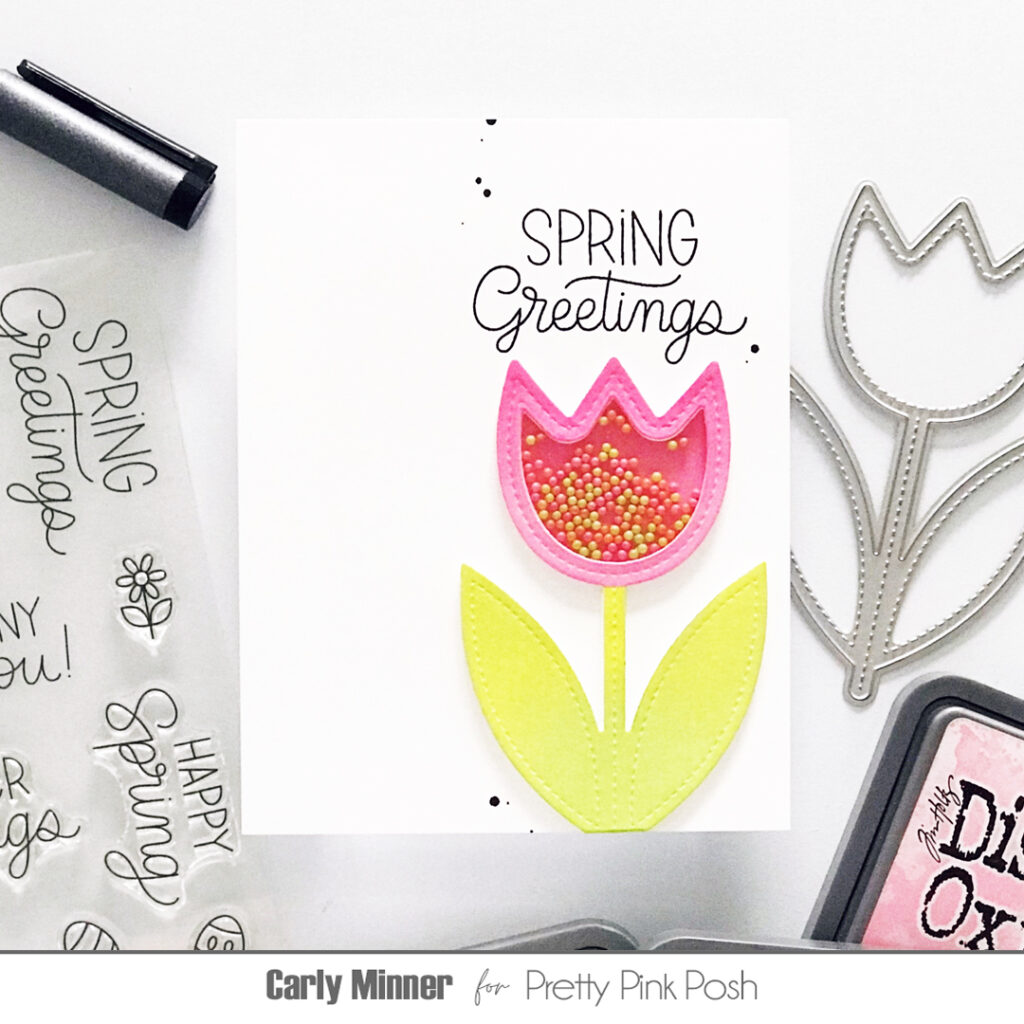
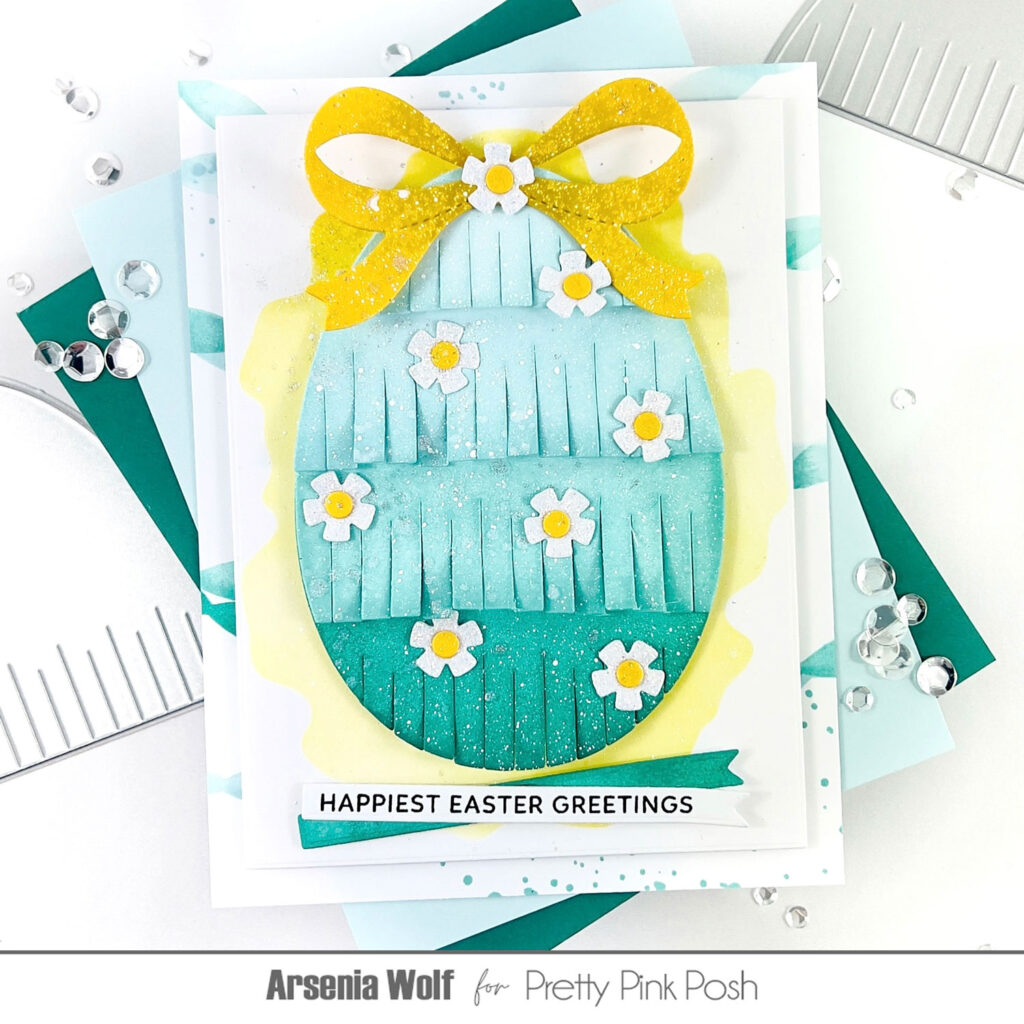
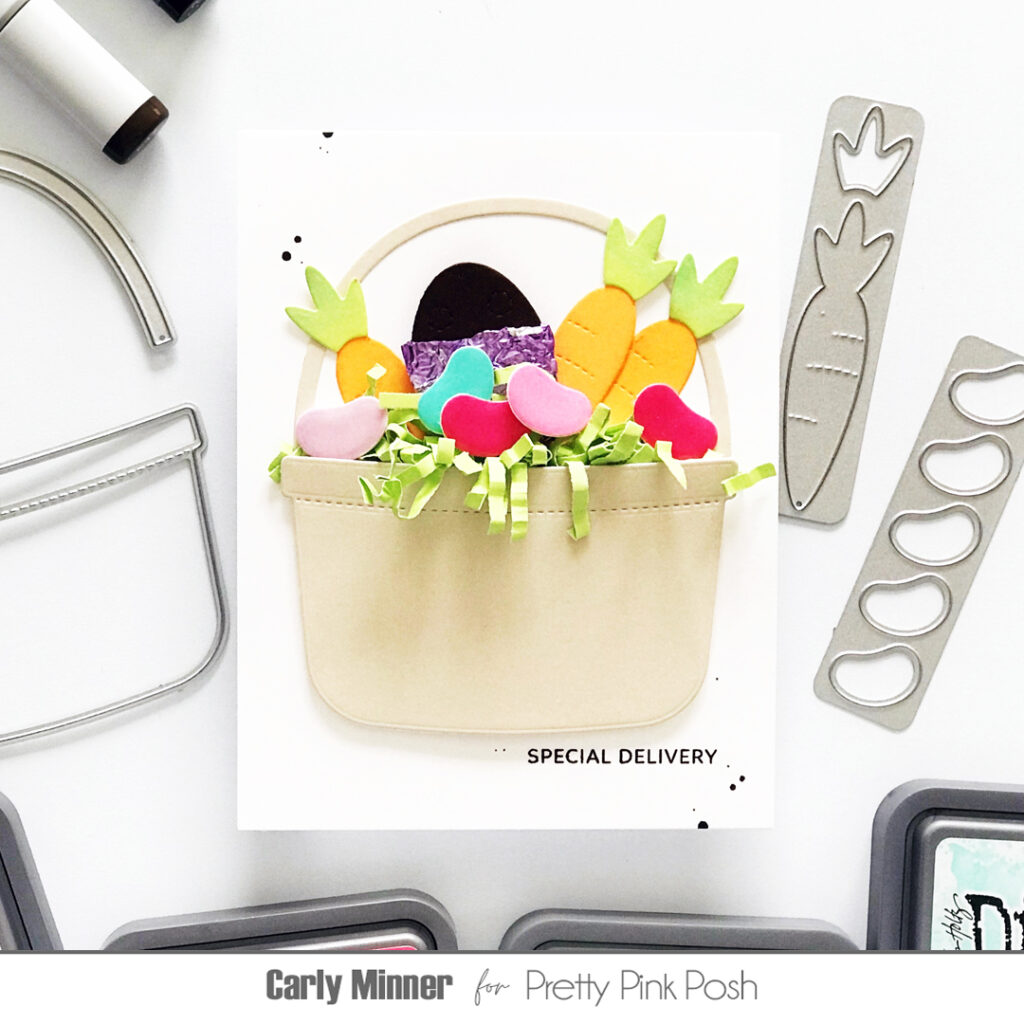
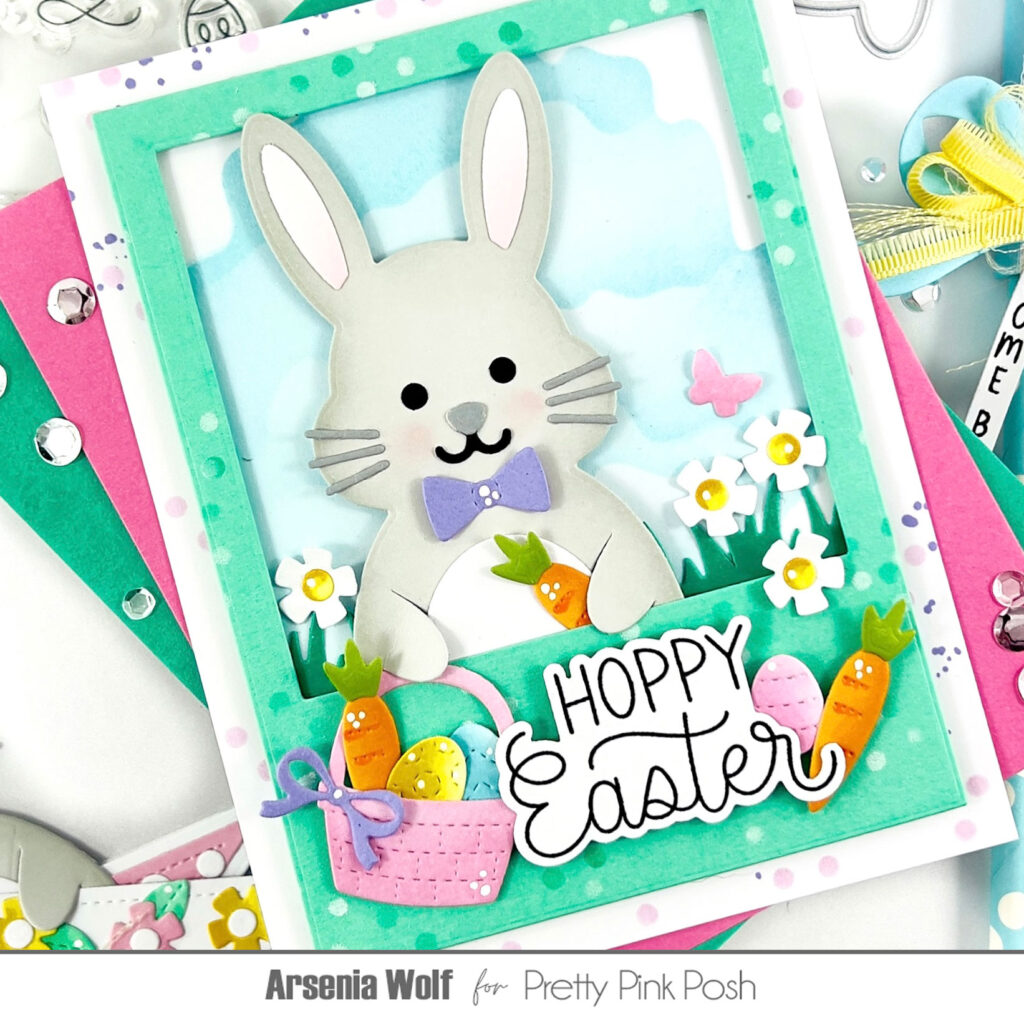
Spring Carrot Shaker

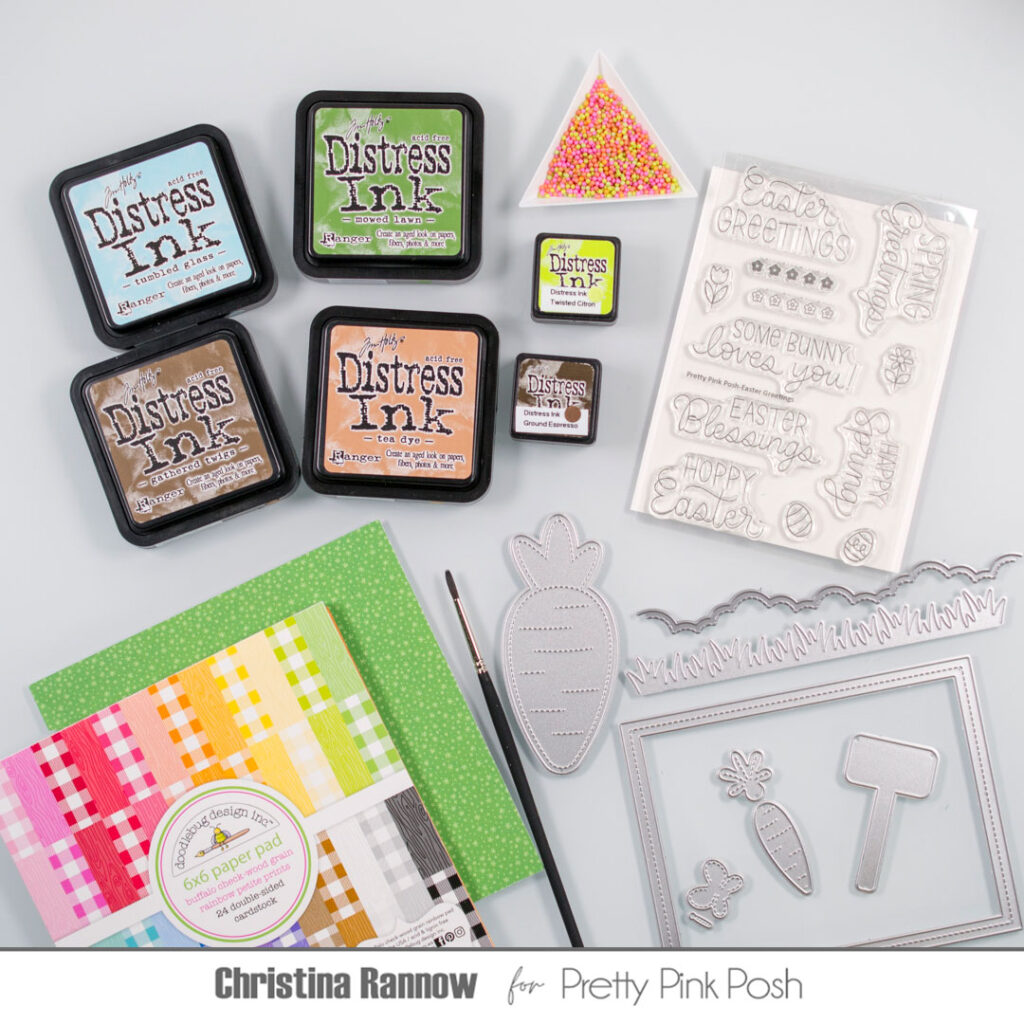
Hello crafty friends, June here! Today I’m sharing one of the cards I made using the new Easter release. It’s not an Easter card though, there’s lots of fun products included that can be used for all types of spring related cards. One of my favorites is the Carrot Shaker, which might be meant for an Easter bunny themed card, but it works so well for a normal spring card aswel! 

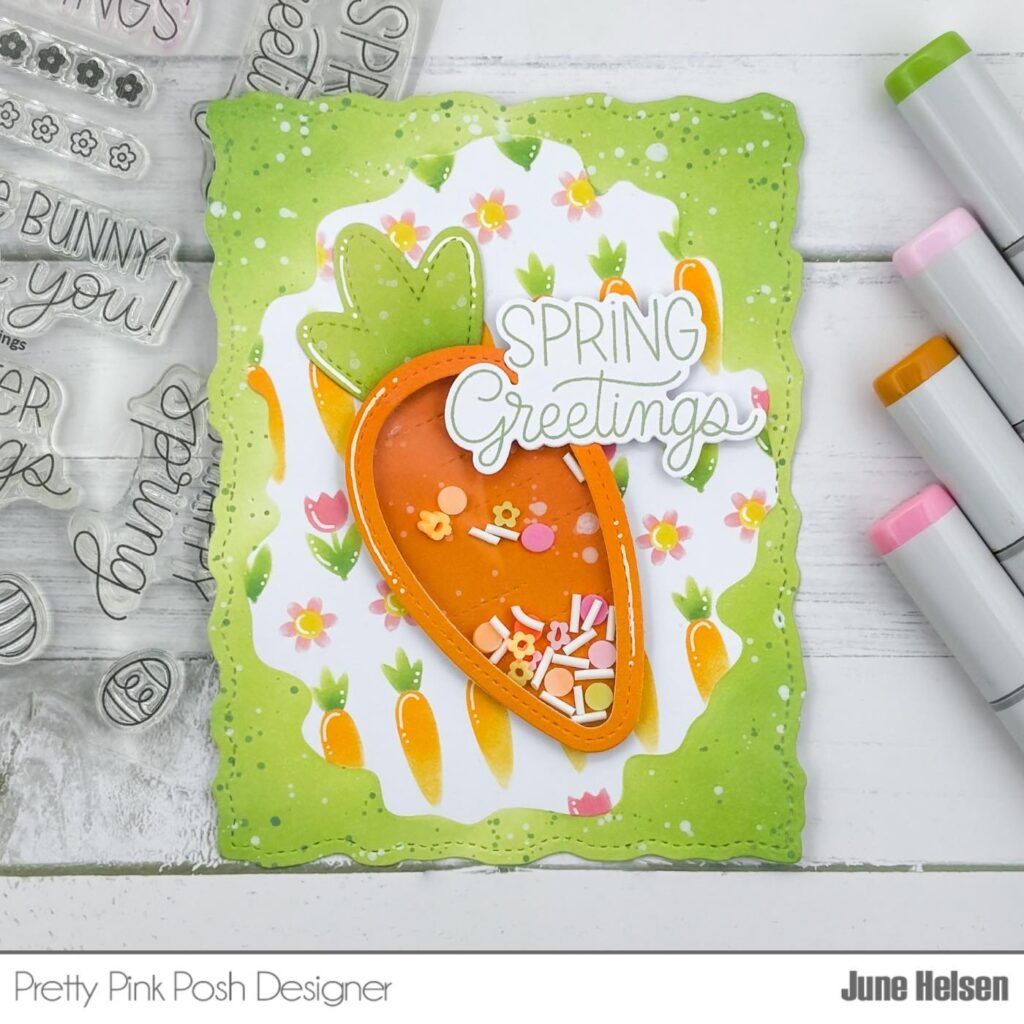
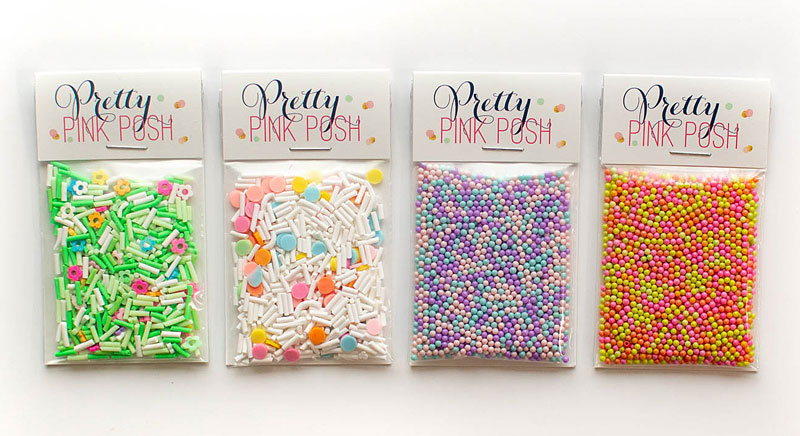
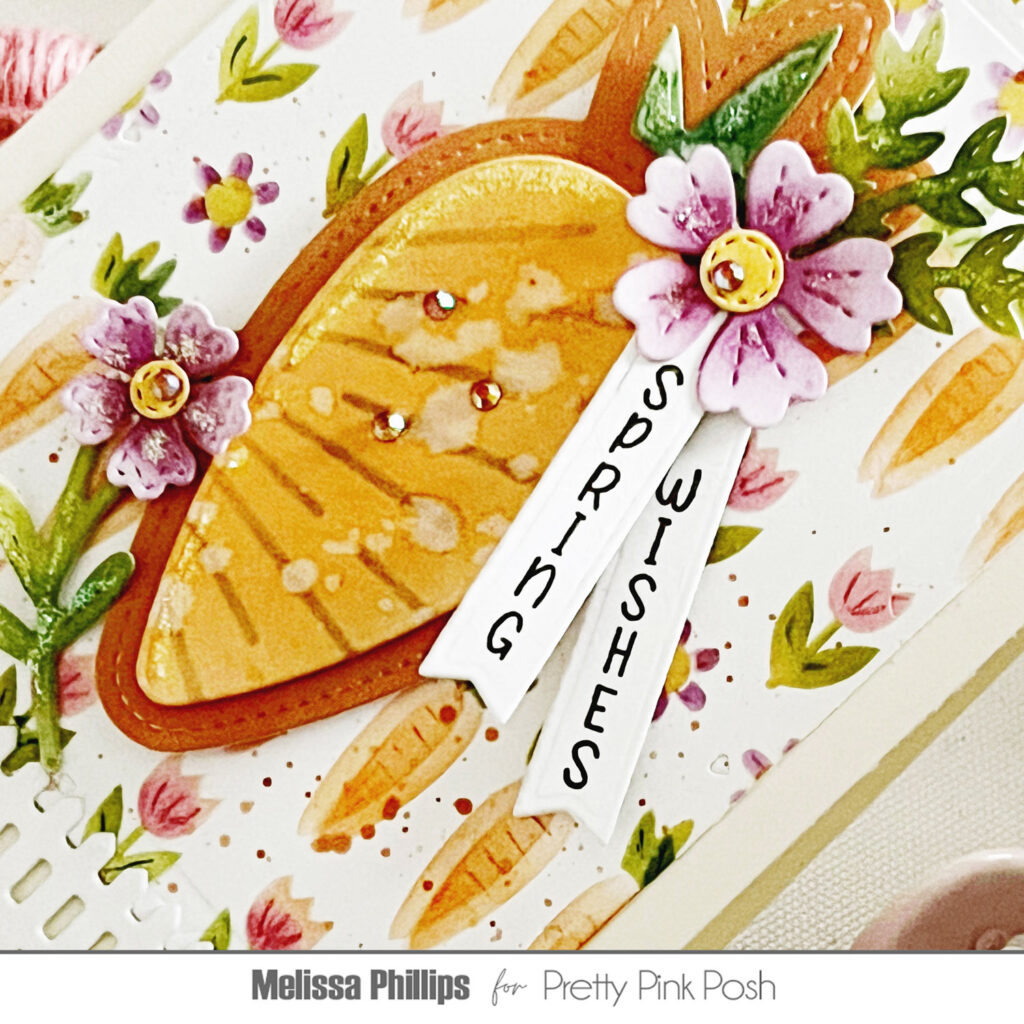
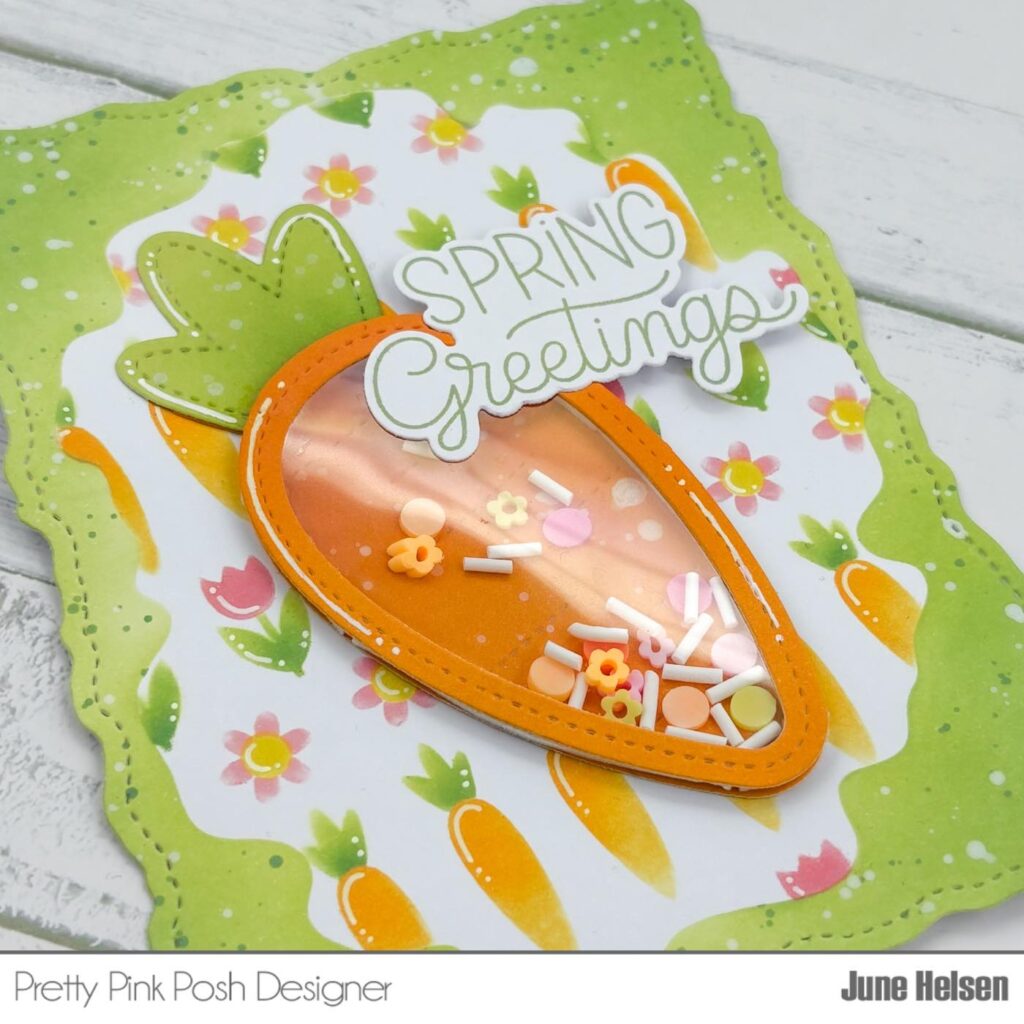
I cut out my carrot pieces from colored cardstock and did some light ink shading to give it some dimension. I wanted a bit of texture as well, so I splattered some white thinned out acrylic paint on my pieces. I filled my shaker with a combination of the Hippity Hop Mix and the Spring Flowers Mix. I got a bit nitpicky and carefully selected the shaker bits I wanted, because I wanted to keep the color scheme as minimal as I could. 

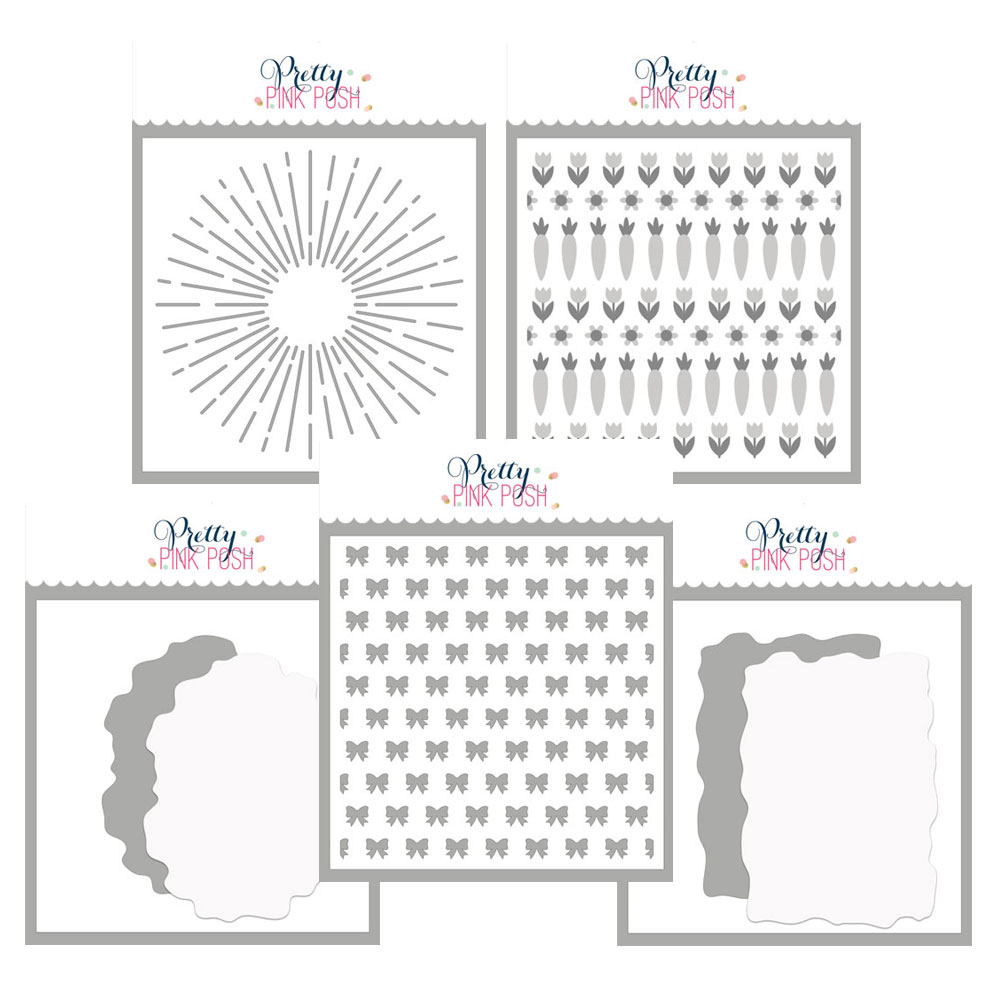
Okay now, this is the part I’m so excited for! All stencils in this release are totally up my alley, but the Watercolor Oval and Watercolor Rectangle take the cake. These can be used to create a simple watercolor-like color blend in the background, but I wanted to go even further and add a pattern to the shaped window. 

I used both the oval and the Springtime Borders on top of each other to create a pattern that matches my theme. I used 4 stencil total for this as there are 2 layering stencils in the Springtime Borders pack, and both an oval window AND its negative space in the Watercolor Oval pack. It was so much fun seeing this come together! I love layering stencils, but sometimes they’re just a bit too distracting for a full background. I love how I was able to add a green border around my pattern this way so the pattern didn’t take up my entire background panel. I feel like this opens up an entire world for me and I can’t wait to revisit the layering stencils from older releases to do something similar.

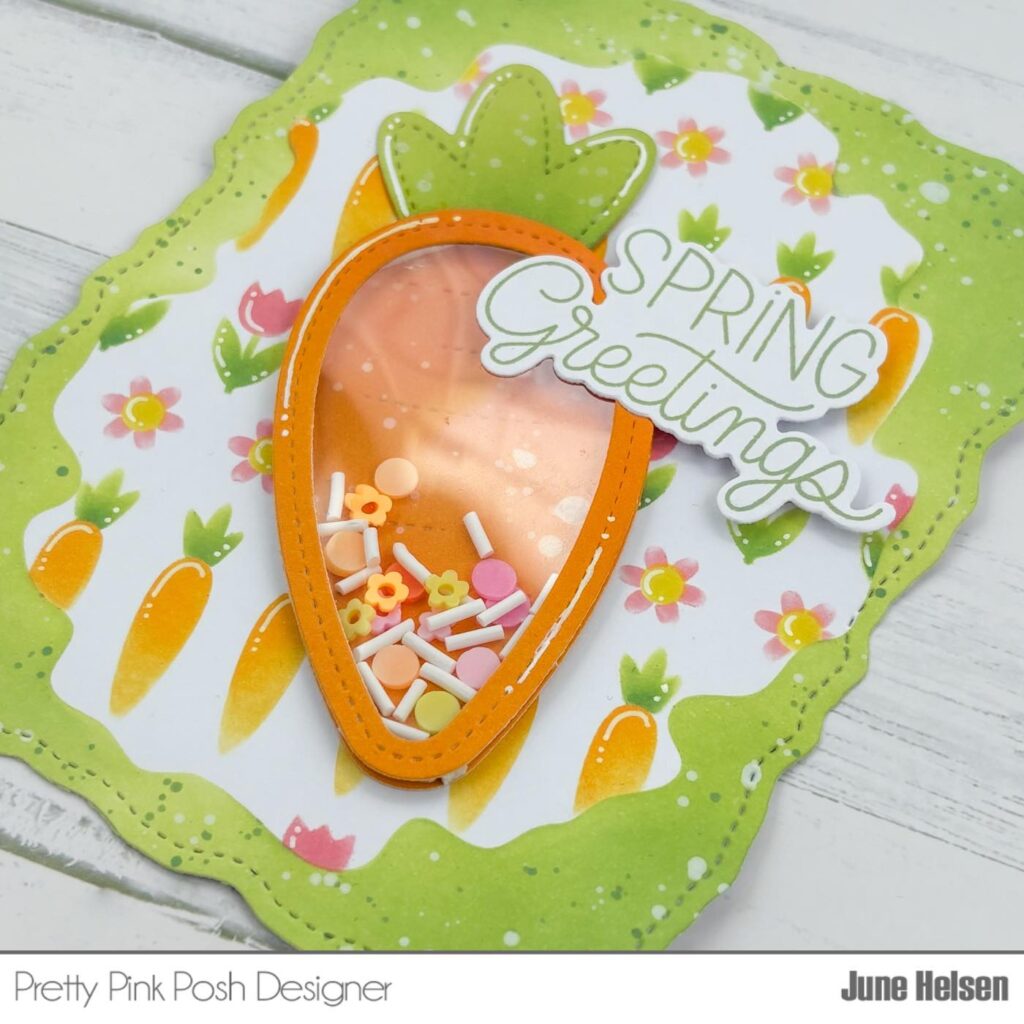
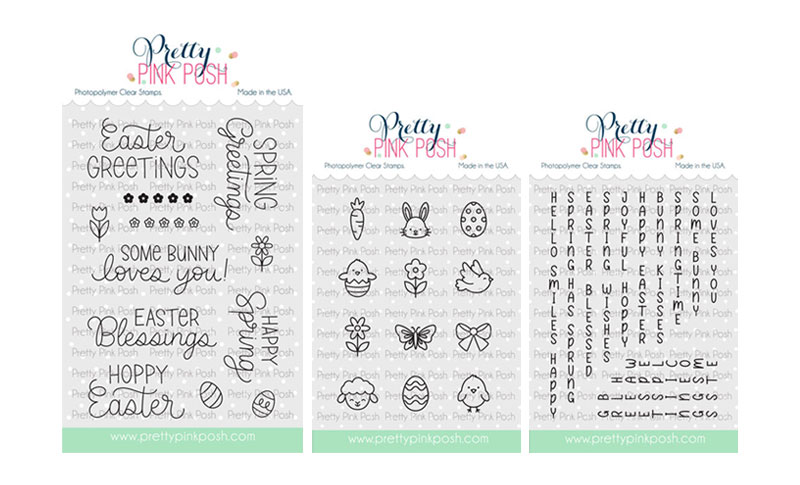
To finish up my background, and making it a bit more textured, I added white gel pen details on the pattern and white and green splatters on the border. I used the largest Stitched Torn Rectangle to cut it out because I thought it matched the jagged edges of the stencil really well. I added one of the spring themed sentiments from the Easter Greetings on top of my carrot to finish my card.

And that’s it for today! I just can’t say enough good things about this release. I would’ve never thought an Easter release would be so right up my alley, but here we are! Something about all these new products gets me so ready for springtime!

|

Hoppy Easter Bunny

Hello, Gemma here today to share a fun Easter card featuring the new Bunny Holder from the March release.

I began by die cutting the pieces from the Bunny Holder. I also added some cheeks to the bunny, using a die from the Halloween Mug Additions die set.

On a mini slimline card base, I stamped a sentiment from the new Easter Greetings stamp set. Below this, I adhered the bunny so just the head and shoulders would be on the card. I trimmed away the rest.

Next, I die cut lots of mini Easter eggs, using dies from the new Easter Holder Additions set. I adhered these to the card around the bunny and sentiment, keeping the top part of the card clean and simple.

I hope you have been able to check out the new release, there’s a lot of fun items. Thanks for stopping by!

| |

March Release Now Available + Product Video

The March 2025 Release is now available in the Pretty Pink Posh Shop and select retailers that carry our products. If you missed our post yesterday, we revealed all of the products in picture form, but if you would like to see them in a video, Mindy has that for you today!

Watch the video above  I  Watch the video in HD on YouTube


Hi friends! Christina here to share this adorable spring garden scene featuring the new Carrot Shaker from the latest PPP Easter release. I used some previously released dies to round out the scene, and I snuck in the new Grass Border die, but I used it as a stencil! Keep reading to find a supply list and the instructions for creating this garden scene with a fun carrot shaker addition! Let’s get started!

Carrot Shaker Dies – stenciled grass
Grass Border Die
Sugar Pop Shaker Beads
Easter Greetings Stamp Set
Fancy Cake Dies – stitched border
Spring Mug Additions Dies – butterfly
Big Easter Cupcake Dies – small carrots, flowers, sign
Fall Basket Dies – small leaf

LF Puffy Cloud Border – dirt layer
Doodlebug Patterned Papers
Mowed Lawn & Twisted Citron – grass
Tea Dye, Gathered Twigs, and Ground Espresso – dirt
Tumbled Glass – sky

My first step was to create the background garden scene. I started by die cutting the grass border from scrap cardstock and using it to stencil grass on a white 4 ½ x 5 ½ inch cardstock panel. Then I used the same grass border “stencil” as a mask to ink the sky. I didn’t bother inking the bottom of the panel because it would be covered with the dirt layer. To make the dirt layer, I die cut a cloud border from another 4 ¼ x 5 ½ inch white cardstock panel and inked it with the Distress inks. I spattered the dirt panel with water and with Ground Espresso Distress Ink for lots of texture.

I let the dirt panel completely dry before stamping and heat embossing a sentiment in white in the lower right-hand corner. Then I die cut both background panels with the stitched frame and attached the dirt panel to the grass and sky panel, leaving the top open so I could tuck some carrots into the dirt!

My next step was to die cut all the elements for the garden scene. I used patterned paper for the small carrots and tucked them into the dirt. I die cut the flowers, the butterfly, and the sign and attached those to the scene after assembling them.

My final step was to construct the carrot shaker. I kept things simple and assembled the shaker separately and then attached it to my scene. I started by die cutting six carrot frames and stacking them together to create the walls of the shaker. Then I attached a full size carrot die cut from orange patterned paper to be the base of the shaker and added the shaker beads. Lastly, I die cut another carrot frame from orange patterned paper and attached a piece of acetate to the reverse side before securing it to the top of the shaker. To complete this garden scene, I added a green carrot top die cut from patterned paper and then attached the completed shaker to the scene.

And that completes this fun springtime garden scene! Thanks so much for reading about my latest PPP card design. See you soon!

March 2025 Product Reveal

Hello friends! It’s time to reveal all of the products that are part of the March 19th release. This collection features eggs, bunnies, tulips, butterflies, and more to inspire all your upcoming Easter projects!

Here’s a look at the three new stamp sets that will be available for purchase: Easter Greetings, Easter Icons and Upright Greetings: Easter.

Here are the nine individual die sets that will be available: Fringe Egg, Build An Egg, Easter Bucket Additions, Tulip Shaker, Carrot Shaker, Bunny Holder, Butterfly Border, Grass Border and Easter Holder Additions.

This month we have five new stencils: Line Bursts, Springtime Borders (2 layer), Tiny Bows, Watercolor Oval w/ Mask and Watercolor Rectangle w/ Mask.

There are two new clay confetti mixes and two shaker bead mixes this month: Spring Flowers clay confetti, Hippity Hop clay confetti, Spring Pastel shaker beads, and Sugar Pop shaker beads.

We have a limited amount of bundles available where you can buy this release in one easy click. Plus, you’ll save 10% off when you buy it all together.

We will see you tomorrow as we show you the new products in a video and the products go live individually!

| | |

March Intro: Tulip Shaker + Butterfly Border + Carrot Shaker

Welcome to the day 3 of sneak peeks for our March 19th release! We are thrilled to introduce this collection of Easter-themed products, many of which are perfect for your spring projects as well. Today we’ll be highlighting the Tulip Shaker, Butterfly Border and Carrot Shaker die sets, but you’ll also get glimpses of some other new products as well!

New release will be available March 19th

Watch the video above  I  Watch the video in HD on YouTube


Hello everyone! This is Melissa and I’m here to share a couple of cards made with the beautiful, new Pretty Pink Posh stencils. If you love stencils as much as I do, you’ll absolutely want to add these to your crafting stash. I’ve also incorporated the darling Carrot Shaker and Tulip Shaker dies. Let’s get started!

My first card uses the Watercolor Oval Stencil topped by the Line Bursts Stencils to create my background.  I love layering stencils, and this is a fun way to do just that.  I wanted a soft, daylight sky with some sun rays shining in the distance and these two stencils created just the look I was going for.

I then added in my Tulip Shaker dies, creating a layered flower instead of a shaker flower. I love the versatility of these delightful dies!  I added patterned paper to my leaves and tulip topper to bring in some pattern and texture.

A couple of pretty flowers on each side of the tulip were cut using the Easter Bucket Addition dies and then the Grass Border across the bottom…such a fun die for Spring and any time of the year. Lastly, I added a sentiment at the top using the Easter Greetings stamps. All that was left was to add some adhesive pearls and Stickles glitter to add some shimmer and shine.

My next card uses the new and oh, so adorable Springtime Borders Stencils to create my background. I used colored pencils to add detail to the carrots, tulips, and leaves. I offset my carrots and carrot tops a bit to create the look of a bundle of carrots…another fun way to use these stencils.

Next, I added my die cut Carrot Shaker adding florals at the top and bottom using the Spring Foliage dies in soft purples and greens. I used my Line Bursts Stencils once again across the front of my carrot to resemble lines you may see across the front of any carrot.

I used the sweet, Upright Greetings Easter stamps to create my sentiment and tucked them under the petals of my flowers.  This is such a fun way to add a sentiment, don’t you think?  I added a tiny die cut Picket Fence border across the bottom to finish,  

Ready to see the darling projects from some of the team? These colors are making us long for the flowers to start blooming and the sun to shine (it’s been so dreary here in Washington).

We hope you enjoyed this sneak peek. We’ll be back tomorrow with a full picture reveal of the release!

| | |

March Intro: Build An Egg + Fringe Egg + Easter Bucket Additions

Welcome to the day 2 of sneak peeks for our March 19th release! We are thrilled to introduce this collection of Easter-themed products, many of which are perfect for your spring projects as well. Today we’ll be highlighting the Build An Egg + Fringe Egg + Easter Bucket Additions die sets.

New release will be available March 19th

Watch the video above  I  Watch the video in HD on YouTube


Hey crafty friends! Arsenia here, back with a sneak peek of some egg-cellent new products that are going to make your crafty heart skip a beat! Get ready to meet the whimsical, fun, and oh-so-practical Build an Egg Dies and Fringe Egg Dies! These dies are perfect for crafting everything from cards and tags to cake toppers, cupcake toppers, party straws, and SO much more! I’ve got two cards to share today—so grab a cuppa, sit back, and let’s dive in!

For my first card, I’m playing with the Build An Egg Dies—and let me tell you, it’s a blast! I started with a clean, white card base and paired it with the dreamy new Watercolor Oval Stencil for my card panel. Then, I die-cut three of the four eggs from the Build An Egg Die set using white cardstock. Time for some ink blending fun! I blended in gorgeous shades of blue and green, giving the eggs a fresh, pastel look.

Next, I added loads of little decorative pieces from the Build An Egg die set, all in matching colors. And here’s the trick—don’t overthink it! Just have fun and go wild with your color combos! I adhered the eggs to the card panel, added a cute bows (from the new Easter Bucket Additions die set in yellow and vellum), and finished off with the sentiment from the new Easter Greetings stamp set and the coordinating dies for the perfect touch!

Of course, no card is complete without a little sparkle, so I splattered some shimmer all over the panel—voila! The card is done and it’s a pastel masterpiece.

Now onto my second card—featuring the brand new Fringe Egg Dies! I started by creating a soft background using one of my favorite stencils from the last release, the Layered Garlands stencils. For the card panel, I used the new Watercolor Oval Stencil to create a perfect base for my fringed egg.

I die-cut all four pieces from the Fringe Egg Die set in white cardstock, then blended on some more fun blue-green ink. The fringe effect is so fun and textural—love it! I assembled the egg with a little glue, and decided to give it a pop of floral goodness using the Easter Holder Additions Dies. These little flowers in white glitter paper are just the right touch of sparkle.

To finish things off, I topped the egg with a sweet paper bow, created with the Present Shaker Dies (because why not?). For the sentiment, I turned to an oldie but goodie—the Sentiment Strips: Easter stamp set. Using the Sentiment Strips die set, I cut out the sentiment, flagged the end for a fun detail, and added it all to the card panel.

Of course, no card would be complete without a little extra sparkle—so I splattered some shimmer all over, and ta-da! The card is ready to shine!

Ready to see some samples by the team? You’re in for a treat!

I hope you’re as excited as I am about these egg-citing new products! The Build an Egg, Fringe Egg and Easter Bucket Additions dies are sure to be some of your new favorites in your crafty stash. Honestly, the possibilities are endless!

| |

March Intro: Bunny Holder + Easter Holder Additions + Grass Border

Welcome to the first day of sneak peeks for our March 19th release! We are thrilled to introduce this collection of Easter-themed products, many of which are perfect for your spring projects as well. This release includes three stamp sets (two with coordinating dies), five stencils, nine standalone dies, and four embellishments.

New release will be available March 19th

Watch the video above  I  Watch the video in HD on YouTube


Hello, crafty friends! Arsenia here, and I am absolutely thrilled to share a sneak peek of something super fun and oh-so-cute! Today, I’m diving into the brand new Bunny Holder Dies, Easter Holder Additions Dies, and Grass Border Die — and let me tell you, these little bunny friends are beyond adorable! The possibilities are endless, so let’s hop right into some crafting!

I wanted to create a fun, whimsical scene, so I made a picture frame using the Present Shaker Dies from the last release (a total favorite of mine!). For the card base and frame, I used the classic Swiss Dots Stencil (a longtime favorite). But the real magic happens inside the frame — I used the brand new Watercolor Oval Stencil to create a dreamy blue sky with fluffy clouds. Simply rotate the stencil and voilà — instant cuteness!

For the bottom of my picture, I added the Grass Border Die (another must-have from this release!). Now it was time for the star of the show — the Bunny Holder Dies! This bunny is just too cute, and putting him together was a breeze. I glued him right into the picture frame and then added some adorable touches with the new Easter Holder Additions Dies. To finish things off, I used the new Easter Greetings Stamp Set with coordinating dies — I absolutely adore the mix of fonts in this set! And ta-da — my card is complete!

I’m obsessed with making party straws for every occasion, so I just had to make some adorable ones with these new dies! For the first one, I started with the Party Flags Die Set (another favorite from last release). I added white polka dots on a pink flag base and then layered it with cute waffle flowers from the Easter Holder Additions Dies. I created my bunny using the Bunny Holder Dies, and she’s holding a cute carrot from the Easter Holder Additions Dies! To finish the flag, I added the bow from the Present Shaker Die and topped it off with a frayed yellow bow for some extra texture. I finished it off with a sentiment from the Upright Greetings: Easter stamp set.  It’s totally adorable, and I can’t get enough of how the bunny is holding that carrot!

For my second party straw, I used the Party Flags Die Set again but added some fun texture with the Circle Grid Stencil. The bunny from the Bunny Holder Dies is holding a basket full of carrots (also from the Easter Holder Additions Dies!), and of course, I topped it off with the Present Shaker Dies bow and a frayed yellow bow for texture. I finished it off with a sentiment from the Upright Greetings: Easter stamp set.

Here are some more samples from the team featuring three of the new dies sets, along with some of the other new products.

We hope you enjoyed the first sneak peek of the March 19th release. We’ll be back tomorrow with another look at the new Easter collection!

| | |

Festive & Fun Fringe Present + Video

Hi Crafty Friends! Carly here and I love fringe! I think it is so festive & fun so of course I was over the moon when Pretty Pink Posh released the Fringe Present die set! Truly I’ve been smitten with all the Fringe Hearts and Fringe Trees too!

Watch the video above  I  Watch the video in HD on YouTube

I love to use tissue paper with the fringe dies for lots of fluffy texture and I think it makes this mini card EXTRA in all the right ways! 

And how cute is this mini card?!! The small size of the card allows the bow to hang over the edge but still fit nicely in an envelope. Or it makes a really fun card to add to a gift bag because the reinforced bow makes it sturdy enough to hang!

Thanks so much for stopping by!

|

Changes to Sneak Peeks!

Hello, friends! I wanted to let you know that we’ll be doing something a little different for this upcoming Easter release. In an effort to bring you more inspiration, we’ll be changing things up for these sneak peeks. Each day leading up to the release, we’ll highlight a few die sets, stamps and stencils and we’ll also have a video showcasing them. In addition, we’ll be showcasing even more samples from the team!

We can’t wait to kick off the official sneak peeks tomorrow. We’ll see you then!

|

Let’s Pawty Present

It’s pawty time! Hi Friends, it’s Emily here with you today sharing a cute birthday card design using the adorable Birthday Dogs & Cats Stamp & Coordinating dies with the Present Shaker dies.

To get started, I stamped all the images with Memento Tuxedo black ink and colored the images with an assortment of Copic & OLO markers. I can’t get over how pawsitively cute the cats and dogs are in this set…with their party hats, bows and balloons. 

For the BIG present background, I cut all the pieces using the Present Shaker in white cardstock & pattered paper. I ink blended the inside of the box and topper with a teal inks and finished with white paint splatters. 

I adhered all the present pieces together and added a glitter bow to the box top. I angled the box top as if it is about to pop open with a great big birthday surprise. 

I adhered all the party animals and their accessories to the present background making sure the kitty had his fish and the puppy had her bowl and bone. To finish the card, I added the black and white heat embossed “It’s Pawty Time” sentiment to the center of the present. 

So there we are friends, a playful birthday card using the Present Shaker (not as a shaker) combined with the cutest party animals! Thanks for stopping by and Big Paper Hugs!