Hello friends! It’s time to reveal all of the products that are part of the August 7th release.
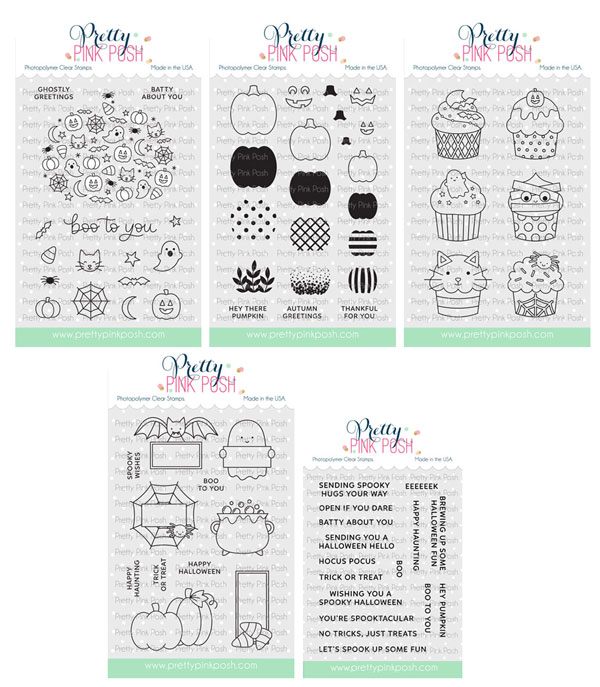
Here’s a look at the five new stamp sets that will be available for purchase: Boo to You, Decorative Pumpkins, Halloween Cupcakes, Halloween Signs, and Sentiment Strips: Halloween.
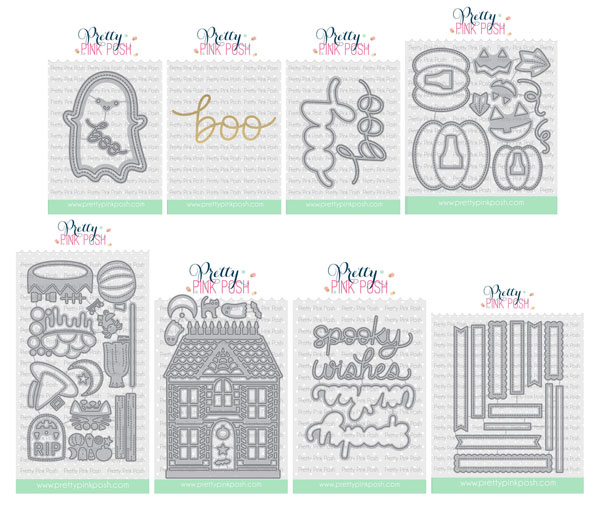
Here are the individual die sets that will be available: Ghost Shaker, Hot Foil- Large Boo Script*, Large Boo Shadow, Stitched Pumpkins, Halloween Mug Additions (designed to be used with the popular Winter Mug dies), Halloween House, Spooky Wishes Shadow and Sentiment Strips.
*The shadow dies work individually, or you can use them in conjunction with the hot foil plate!
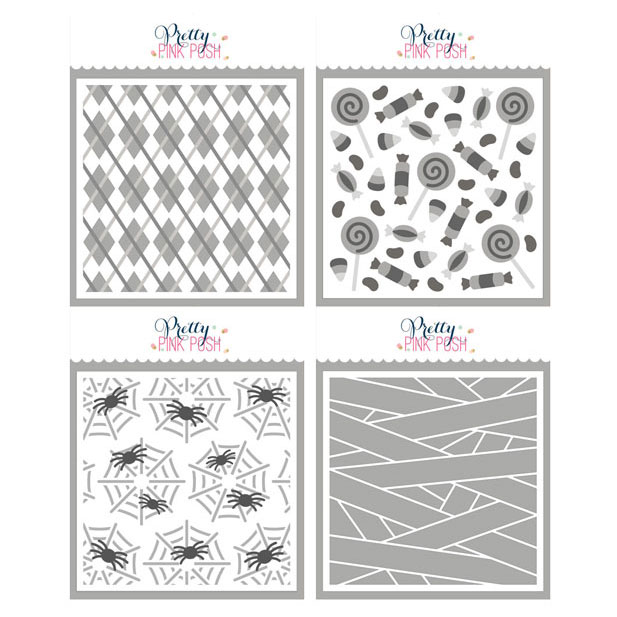
This month we have four new stencils: Layered Argyle (3 layer), Layered Candy Treats (4 layer), Layered Spider Webs (2 layer)and Mummy Wrap.
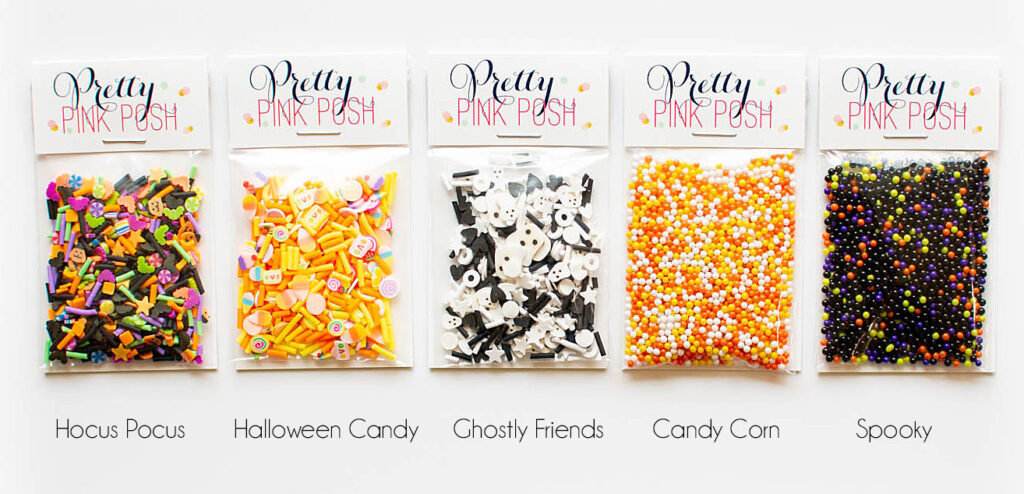
There are five new embellishments this month: Hocus Pocus, Halloween Candy, Ghostly Friends, Candy Corn shaker beads and Spooky shaker beads.
We have a limited amount of bundles available where you can buy this release in one easy click. Plus, you’ll save 15% off when you buy it all together.
Due to not everyone owning a hot foil machine, we did NOT include the hot foil plate in this bundle.
We will see you tomorrow as we show you the new products in a video and the products go live individually. Plus, we will be kicking off our three day blog hop!
Good morning! It’s Lindsey here today, and I’m giving you a sneak peek of some of the fun, new dies releasing this month. You are going to love them!
New release will be available August 7th
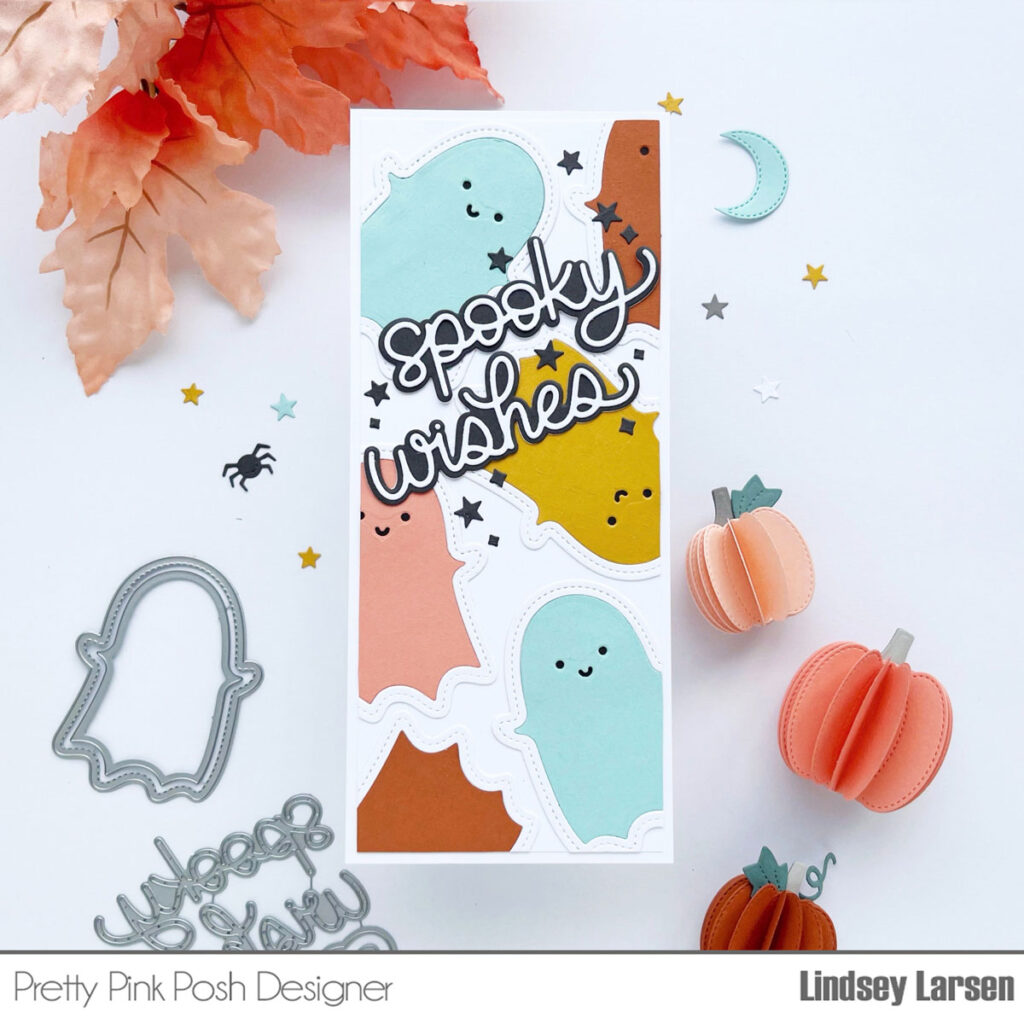
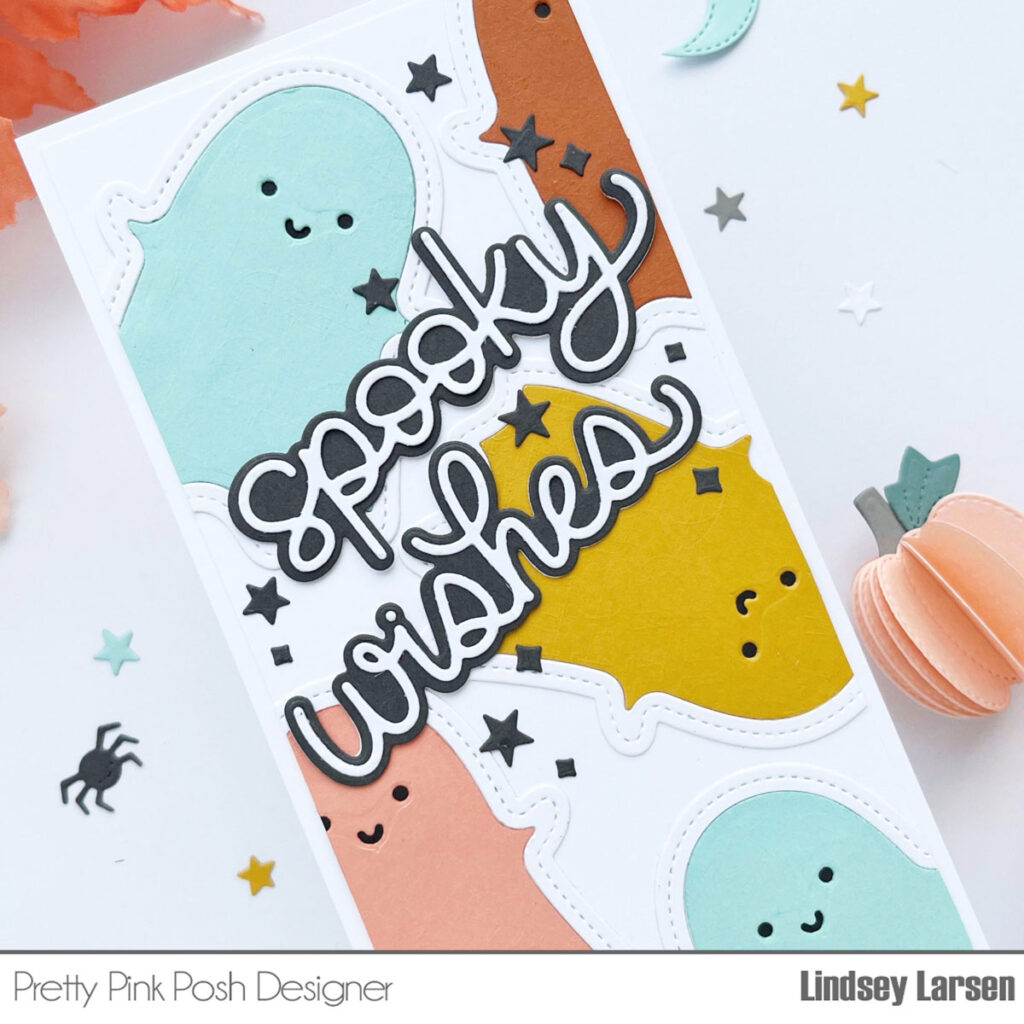
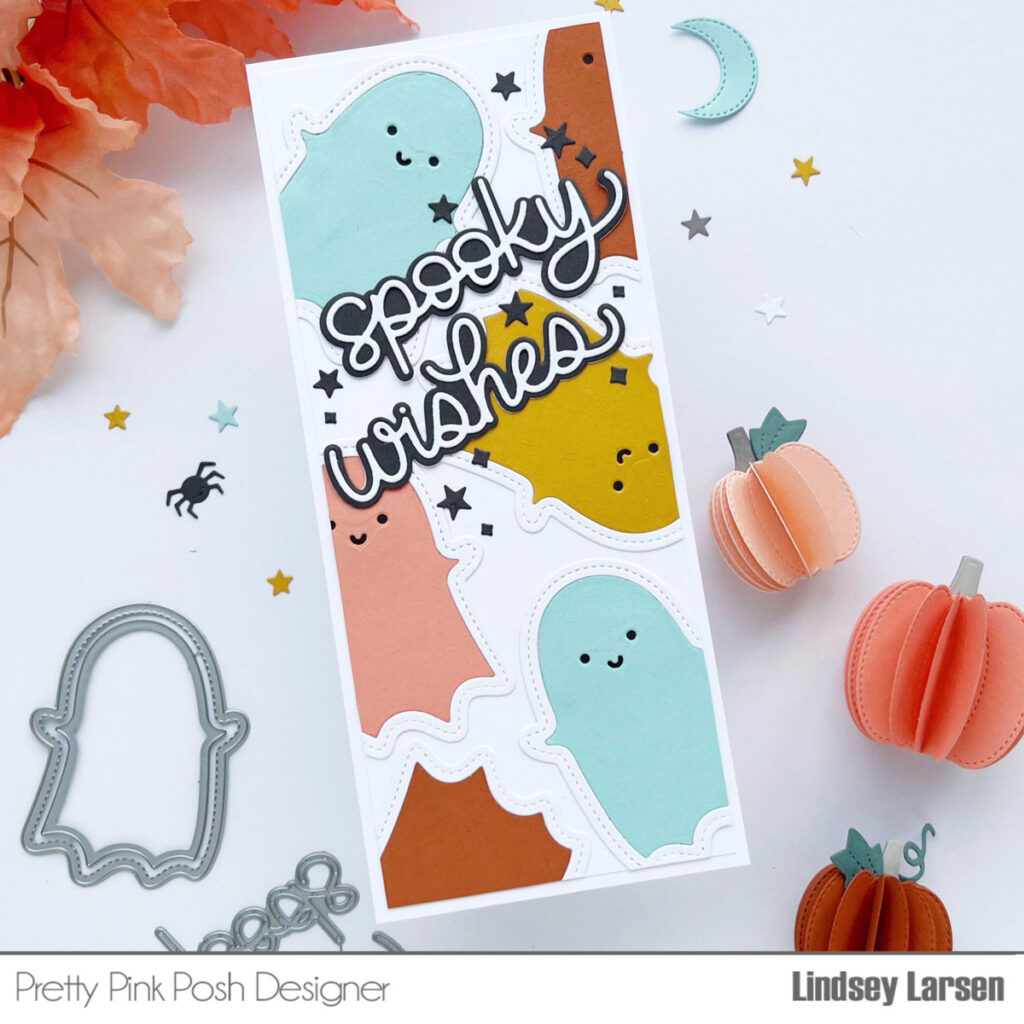
First up is a spooky cute card that was inspired by a blanket I saw. I loved the colorful ghosts, so I recreated it using the new Ghost Shaker Dies.
This fabulous sentiment is the Spooky Wishes Shadow Dies. I adore the size and scale of the shadow dies and was happy to see this one added to the lineup. For a little extra magic, I added various stars and diamonds from the new Halloween Mug Additions.
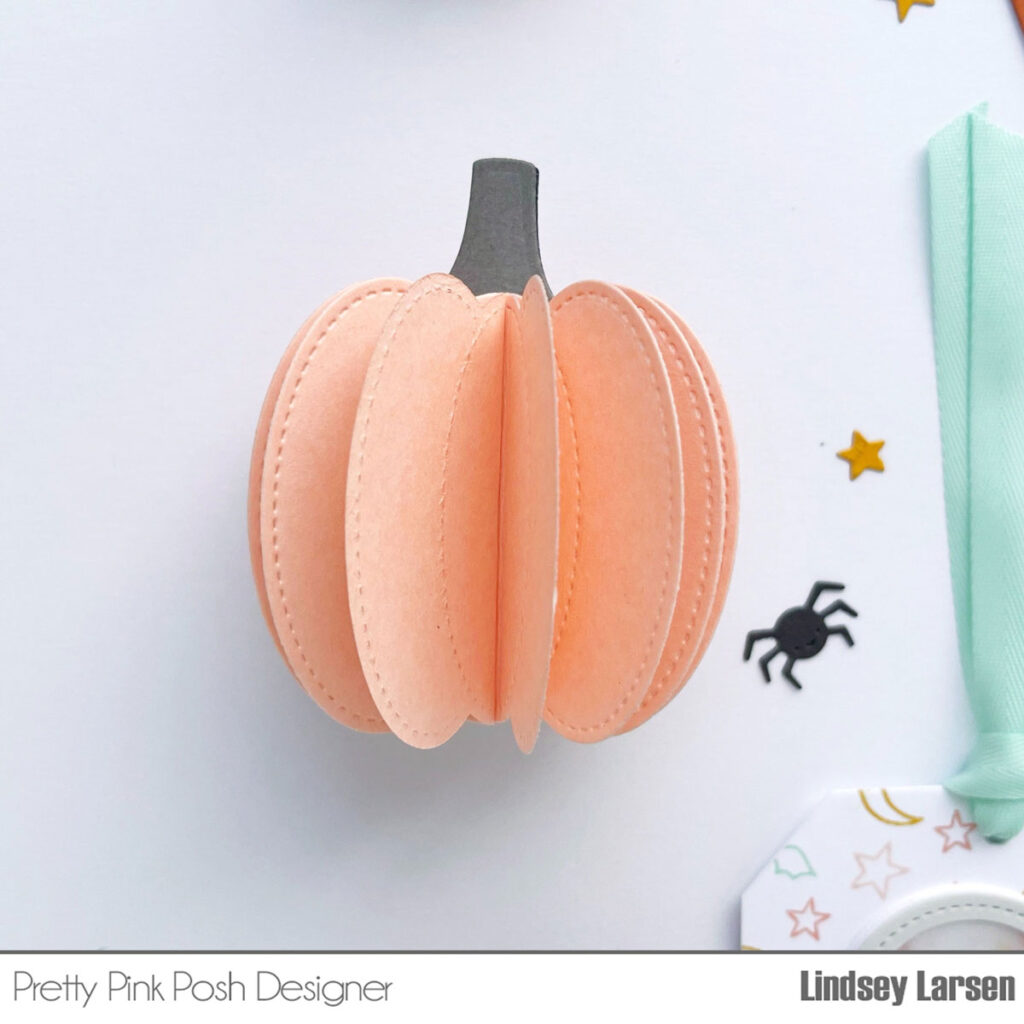
Did you notice the little pumpkins in the photographs? That’s actually another peek. I created those using the new Stitched Pumpkins Dies. It’s a set full of creative possibilities! They look cute as is or in 3D like I did here.
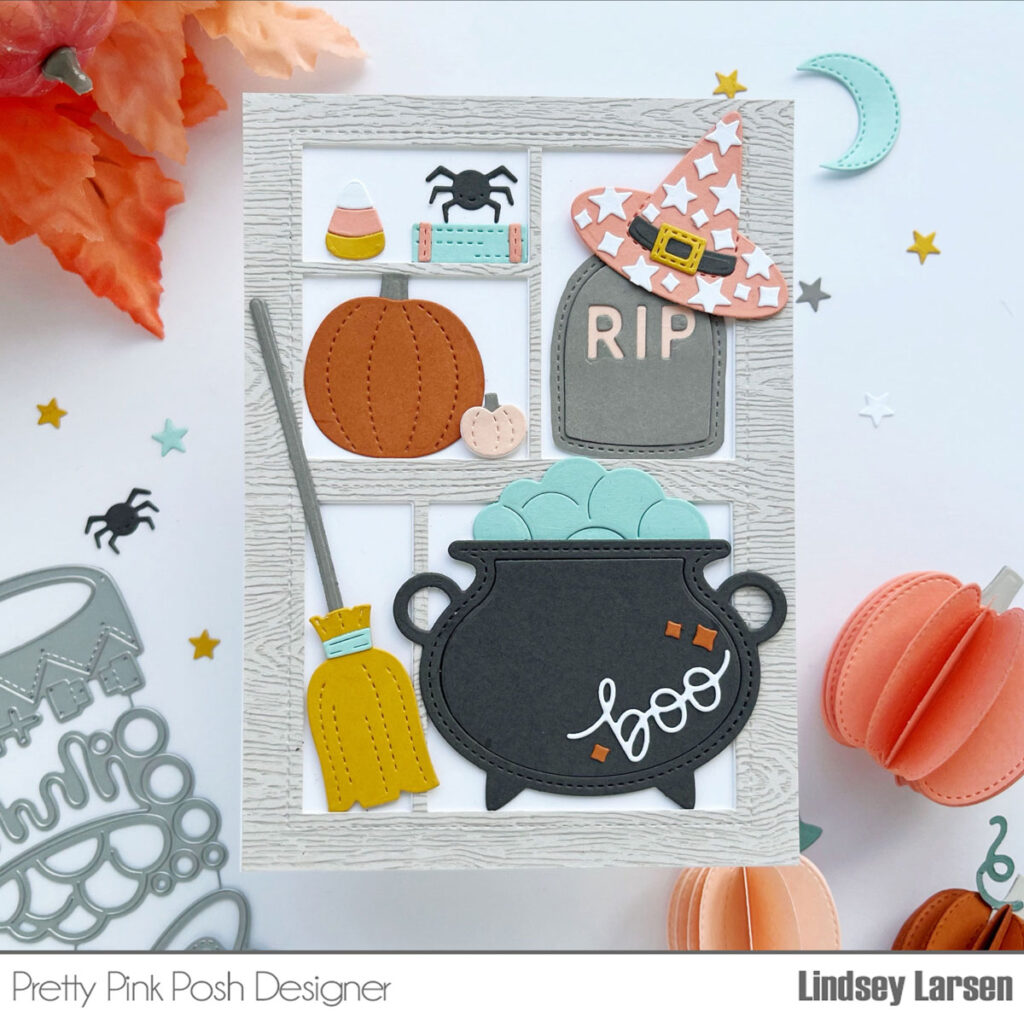
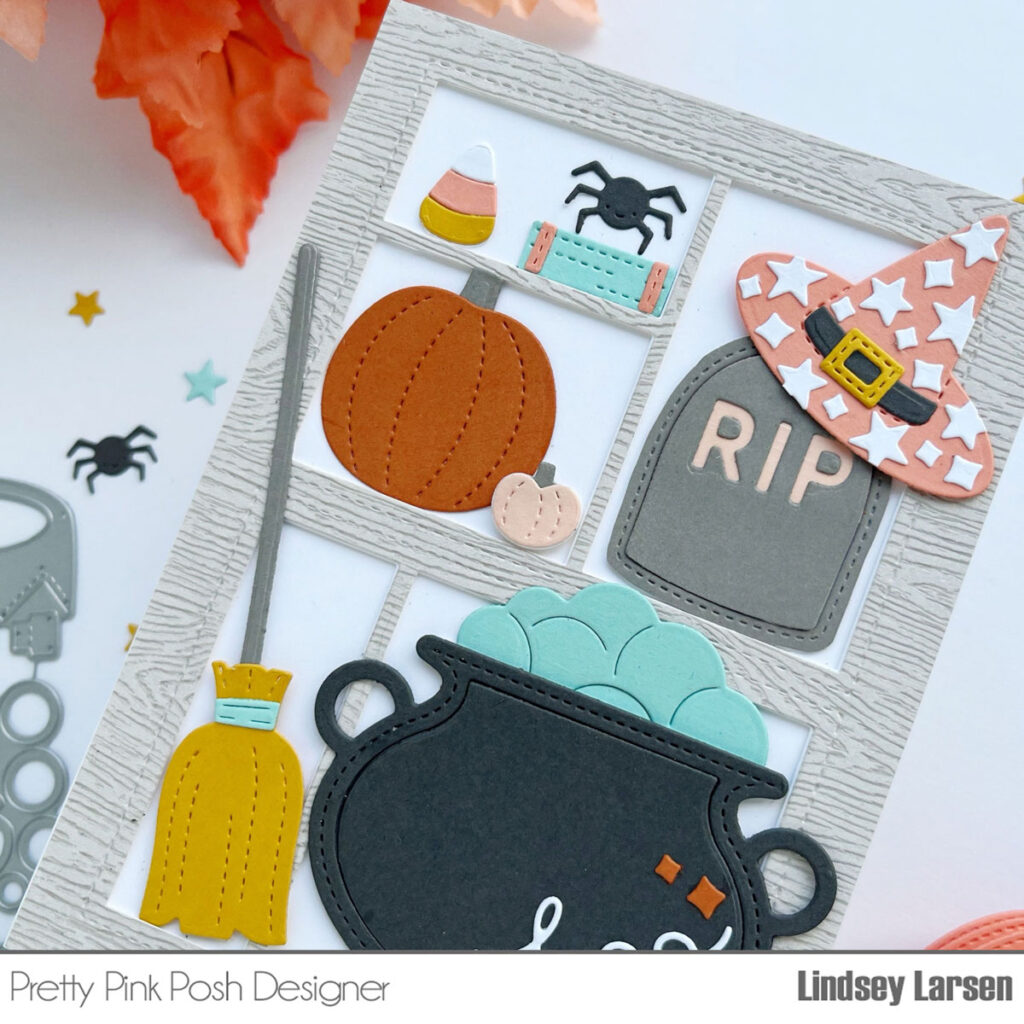
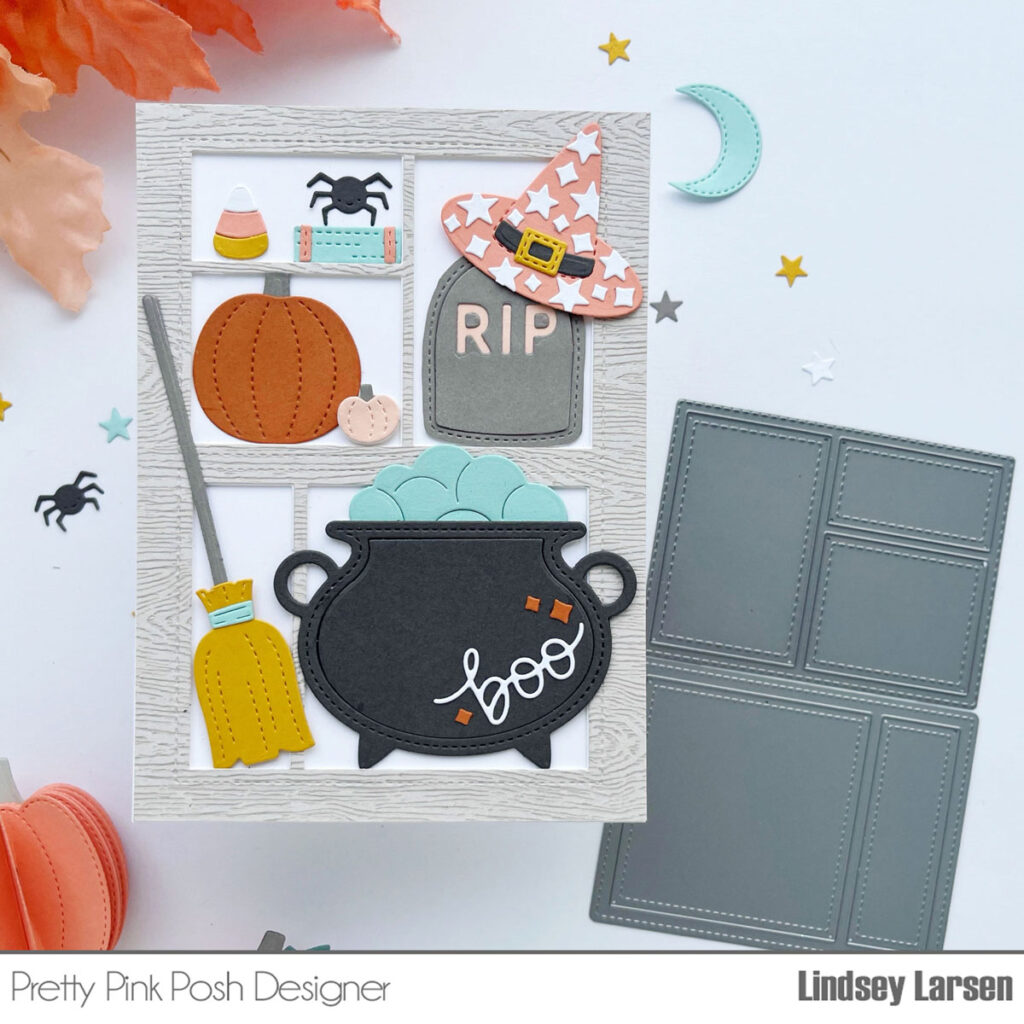
I’ve created lots of cards for this release, and this next one is a favorite of mine. It’s an A6 card (4.5″x6.25″), so it’s a little bit larger in size, which I’m really enjoying lately. There are so many cute things that I need more space to fit them all in!
My children have old letterpress (typeset) drawers hanging on the walls in their rooms. They fill the little cubbies with all their tiny treasures. When I saw the cute dies in the Halloween Mug Additions, I immediately thought of those shelves and knew they would make the perfect fillers.
To create the little shelves/cubbies, I stacked theStorybook 1 and Storybook 5 dies on top of each other. I taped them together, so I could run them through the die cut machine several times. Layering 3 pieces of 110 lb. cardstock gave the shelves some depth. For the top layer I used woodgrain paper that I have had in my stash for a few years just waiting for the perfect project to use it on. This was it!
Then I got to work filling the shelves with Halloween cuteness! First up is the witch hat. I die cut all the pieces from the Halloween Mug Additions included the stars and diamonds that I used to adorn it. I set it on top of the tombstone. The tombstone die is designed to create a window in your mug, so the stitching is on the outside. I ended up fussy cutting it out, though, and layering a few of the center tombstone shapes on top of each other for added dimension.
I filled a second shelf with the two pumpkins included in the set, although I opted for a chunkier stem on the larger pumpkin, which I found in the Stitched Pumpkins Die set.
The upper shelf is filled with a candy corn from the previously released Candy Treats dies. Next, I trimmed down one of the stitched rectangles in the Halloween Mug Additions(they can be used for mummy wrap…) and made it into a book. The little coral strips on the book were trimmed from the buckle die and the spider on top is also included in the Halloween Mug Additions.
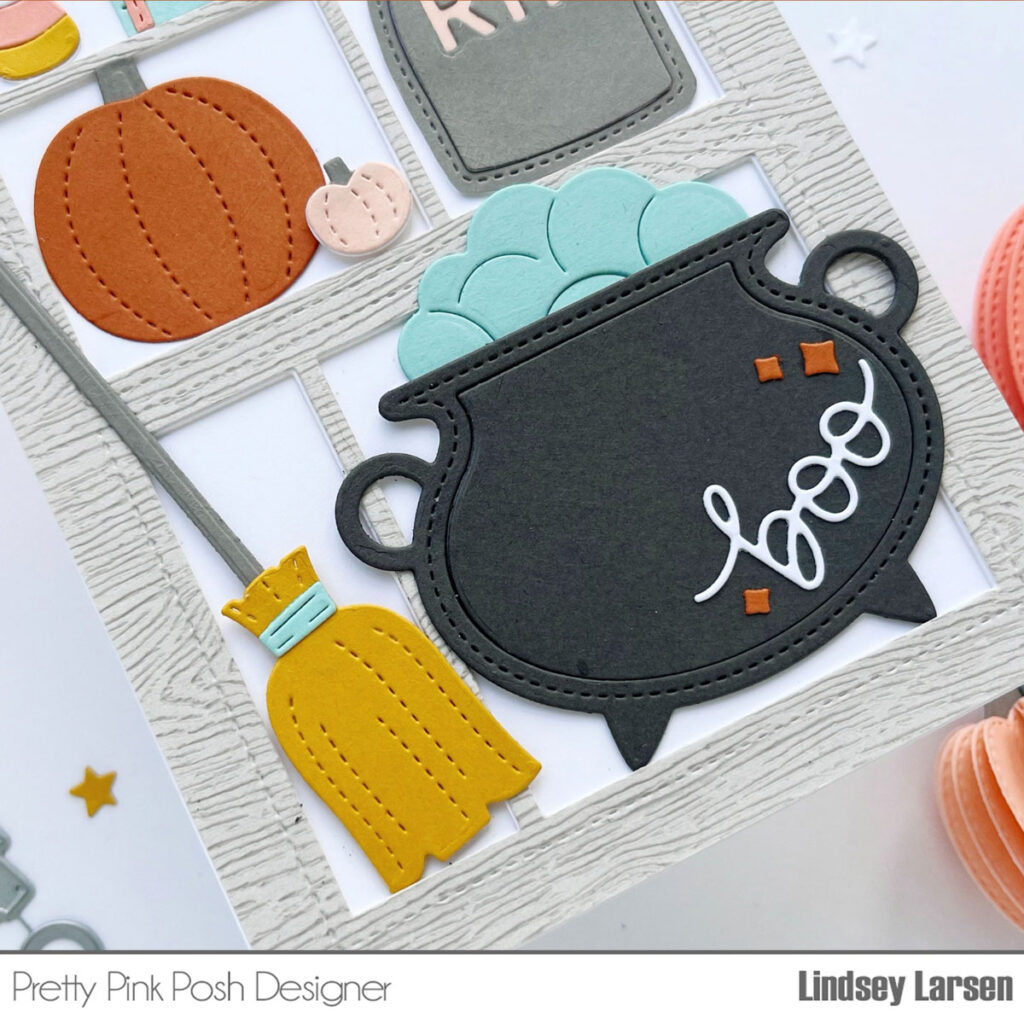
Now for the bottom row – a darling broom and a bubbling cauldron. I was delighted to see that the new bubbles fit perfectly in the previously releasedCauldron Shaker! I wanted to dress the cauldron up a bit more, so I added “boo” from the Ghost Shaker dies and a few diamonds. If you couldn’t tell, I was really enjoying adding those to all the things.
Thanks so much for joining me today. Join us tomorrow as we reveal the release in picture form, so you can start to get your wish lists together and/ or purchase your release bundles!
Hi friends! It’s Dana here today and I am excited to be back to share a sneak peek of two of the new stencils coming to Pretty Pink Posh. The new release is packed full of fun new products for Halloween and so much more. Let’s get started…
New release will be available August 7th
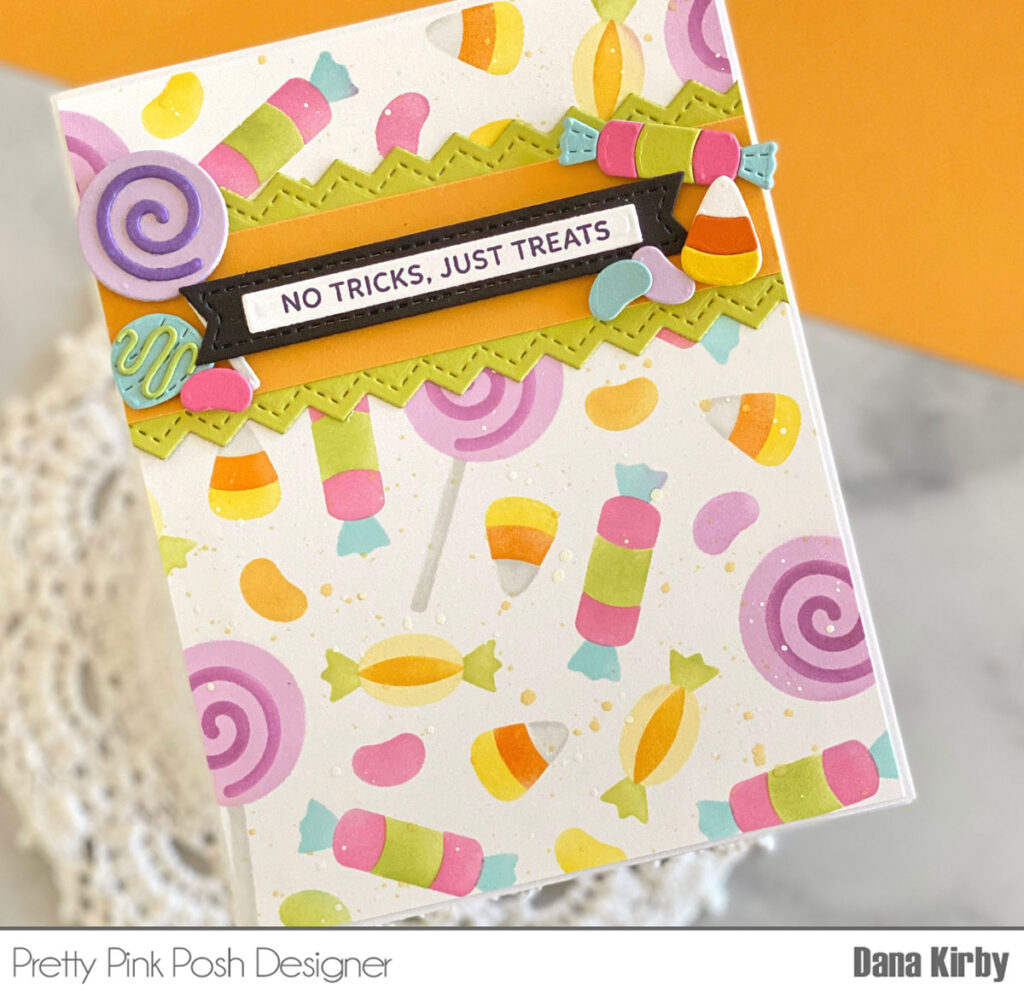
My first card uses the Layered Candy Treats stencil set. This is a four pack of stencils that layer together to create a fun candy background. I used finger daubers and dye ink for my blending. I then added a few yellow splatters to my panel for a little added detail. Such an adorable candy background! I love that this stencil can be used for Halloween and beyond.
Next, I create my sentiment with the new Sentiment Strips: Halloween stamp set and Sentiment Strips dies. I mounted the banner on a strip of cardstock that I created with the zigzag die from the Stitched Borders 1 die set. I then use theCandy Treats dies set to make a few coordinating candy pieces to finish my card.
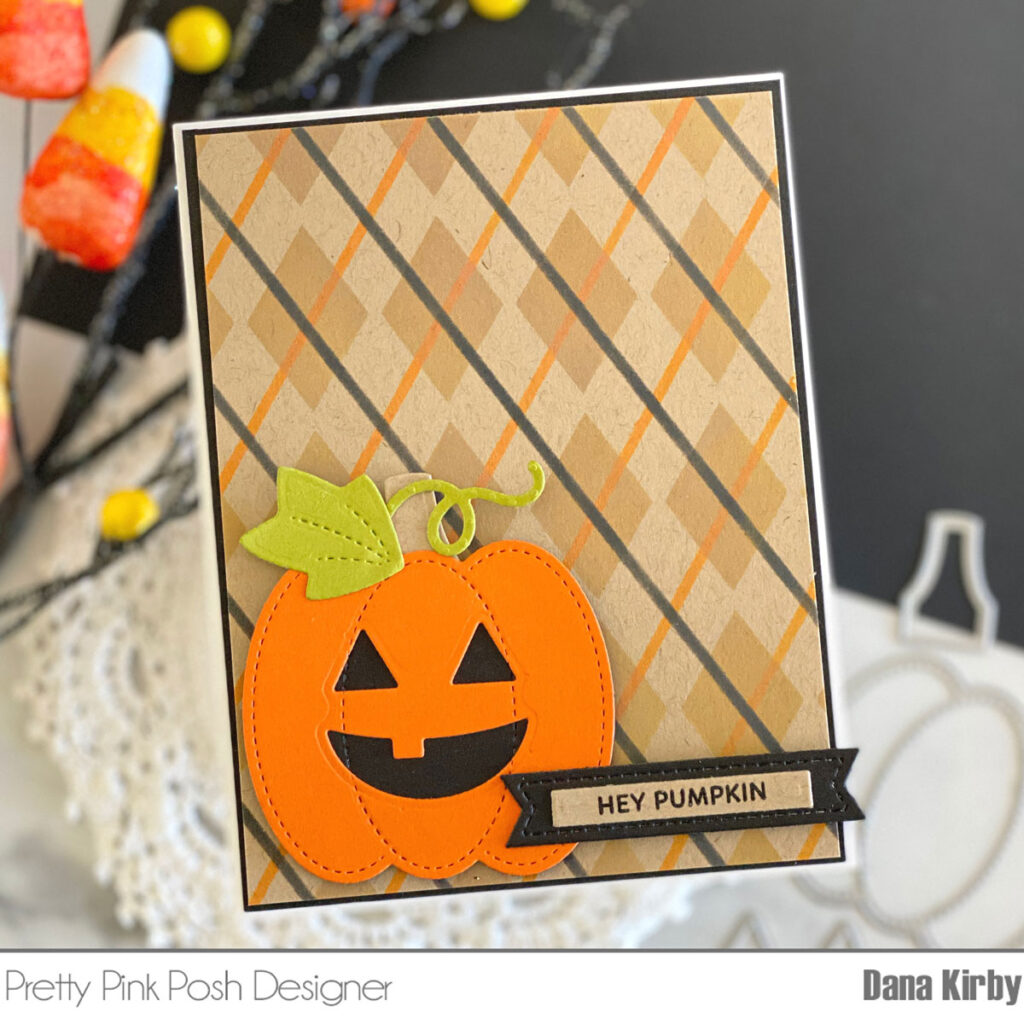
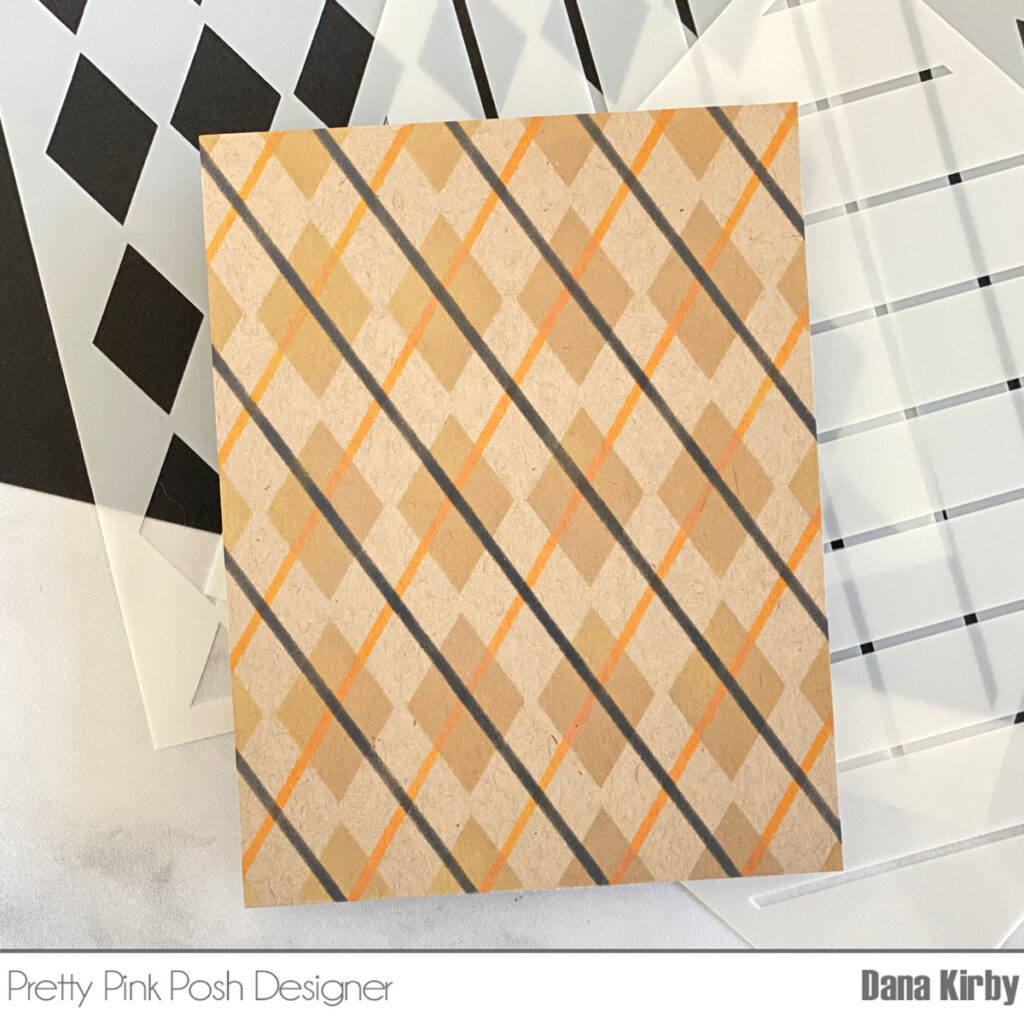
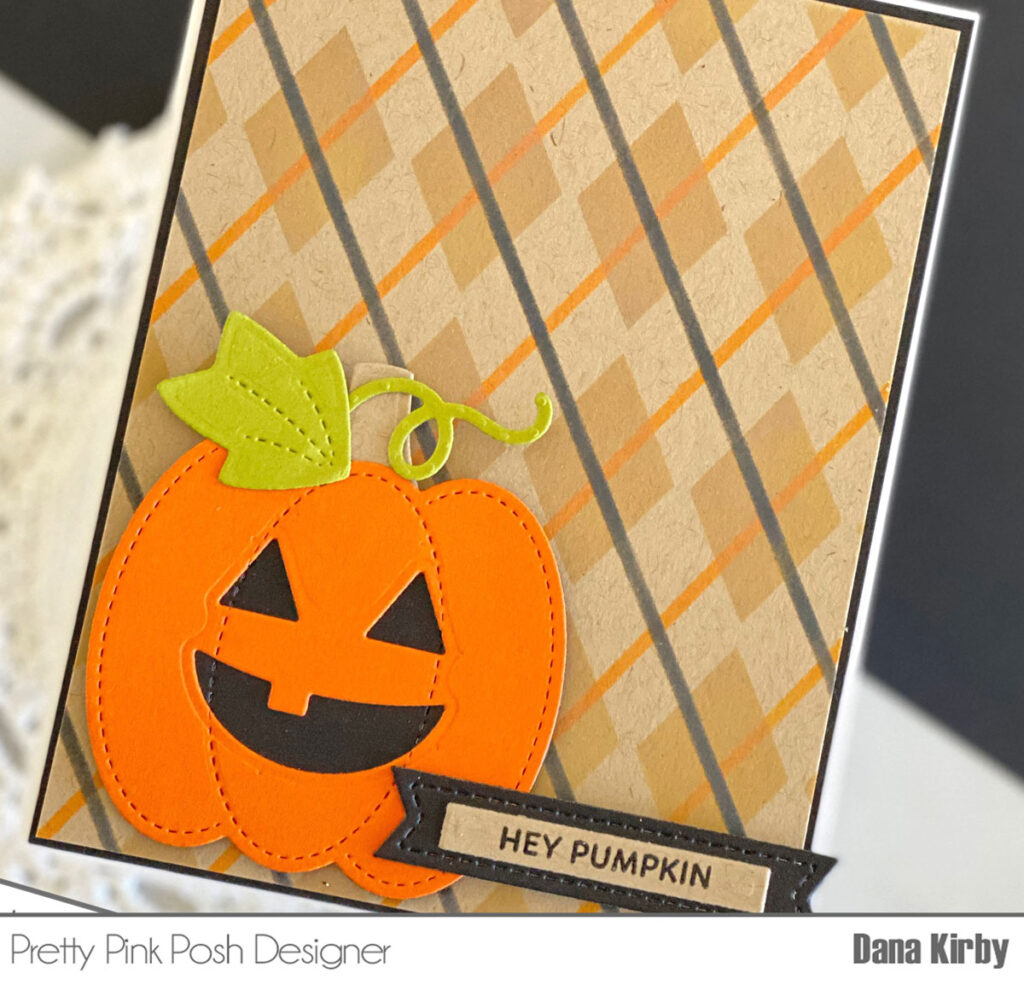
For my next card, I used the Layered Argyle stencil set to create a more “traditional” Halloween card.
I started my card by using the Layered Argyle stencil set to create my card panel. This is a set of three stencils that layer together to create a fun argyle pattern. I used Distress Oxide Ink in: Brushed Corduroy, Carved Pumpkin and Black Soot for my blending. The color possibilities with this stencil are endless. I can’t wait to use it for Christmas!
Next, I used the Stitched Pumpkins die set to create my cute little jack o’ lantern from colored cardstock. Lastly, I used the Sentiment Strips: Halloween stamp set and Sentiment Strips dies for my sentiment.
Thanks for joining me today! I know you will love these amazing new stencils and I can’t wait to see what you create with them!!
Hello, everyone! Melissa Phillips here and I am so very happy to be with you sharing a sneak peek of the August Release!
New release will be available August 7th
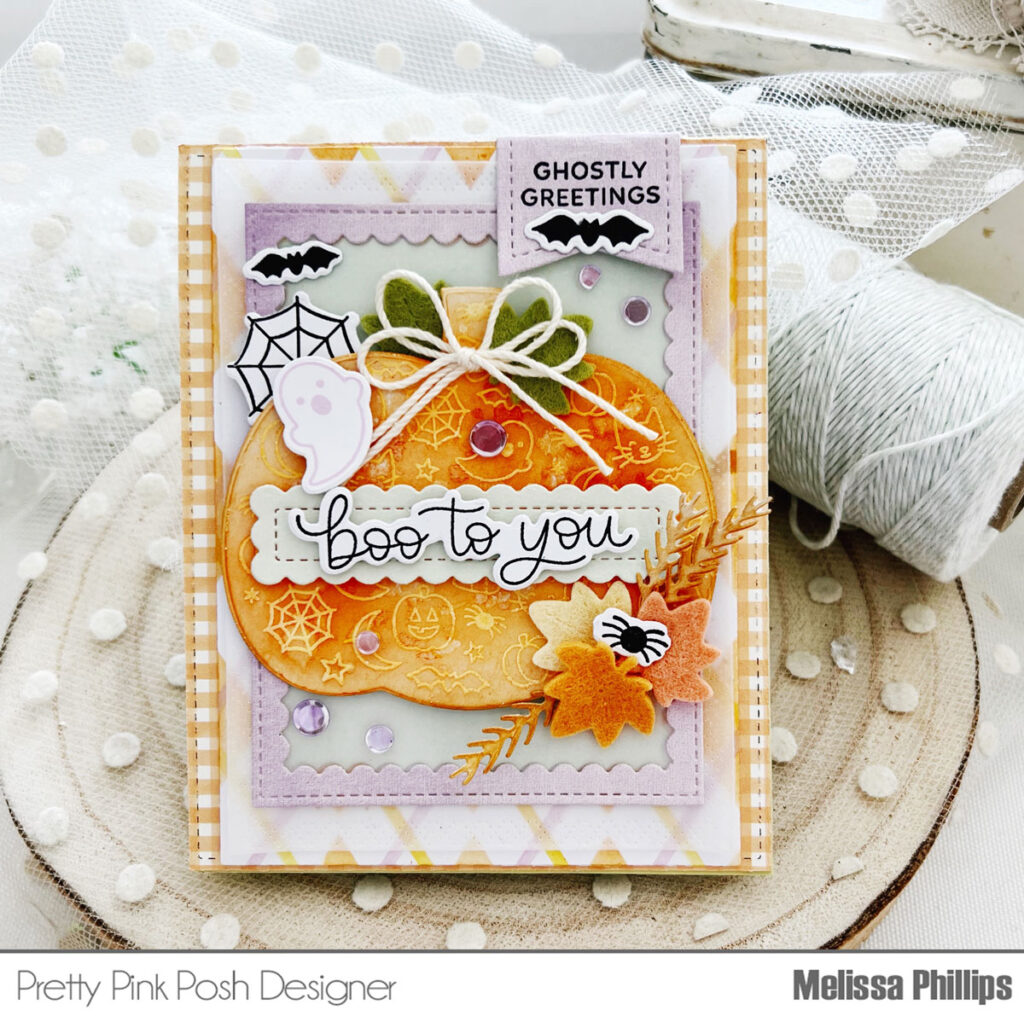
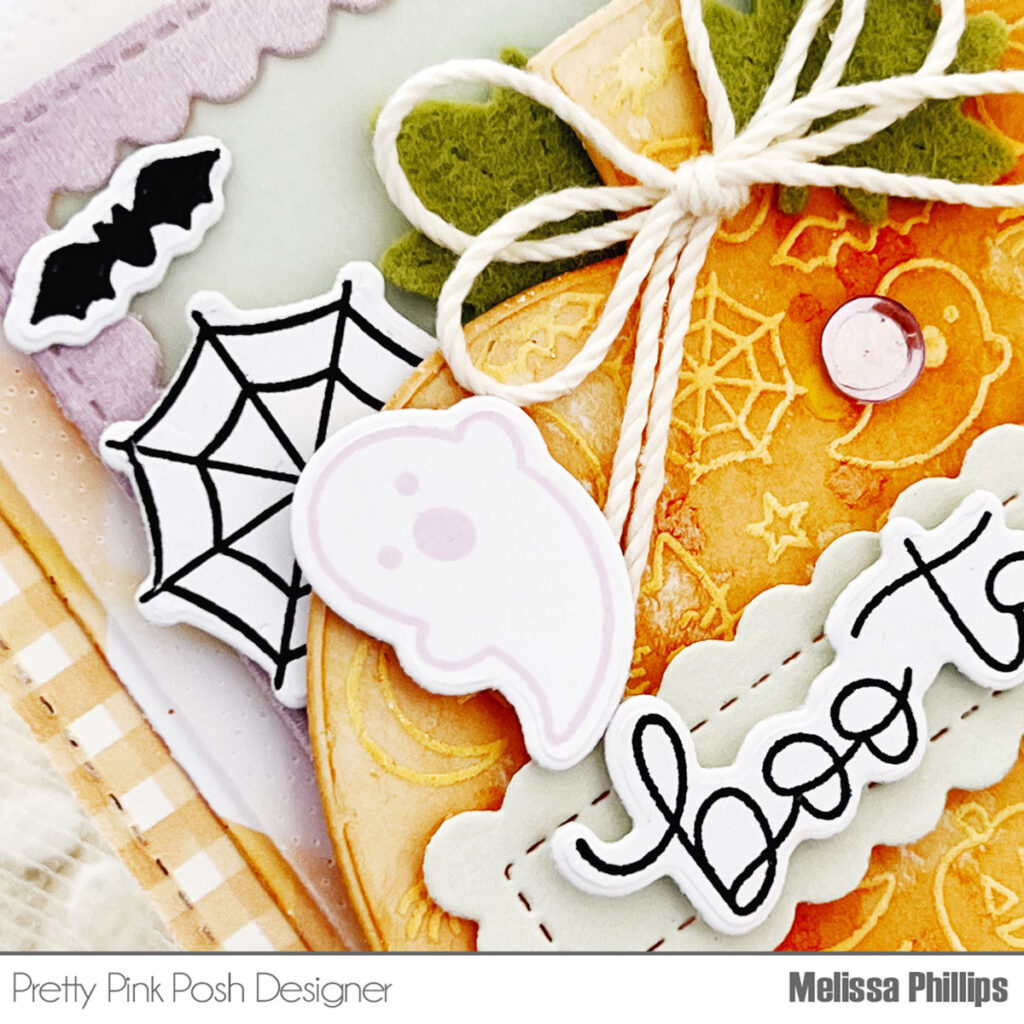
I’m sharing a card and tag created with the new Boo to You stamp set and coordinating dies. It’s so fun to be diving into all things fall and Halloween. I love this time of year and had so much fun using these new products.
I die cut my Boo to You pumpkin from white cardstock and then stamped the details with the Boo To You stamp set using watermark ink. I coated my pumpkin with white embossing powder and used my heat gun to set the powder. I then sponged ink over my embossed area and this allowed the details to show through very subtly.
My sentiments are from the Boo to You stamp set and coordinating dies as well as the cute and not too creepy spider web, ghost, bats, and spider. I layered my main sentiment over a die cut Sentiment Strip…don’t you love the scallops? My upper sentiment was stamped on a die cut Mini Tag…the perfect size to fold over the top of my card.
At the top and bottom of my pumpkin, I used leaves and wheat stalks from the Fall Basket die collection, cutting some from felt and some from paper. They make the perfect finishing accents. Behind my scene, I used the darling, new Layered Argyle stencils to create my background. The Scallop Frames dies framed everything in perfectly.
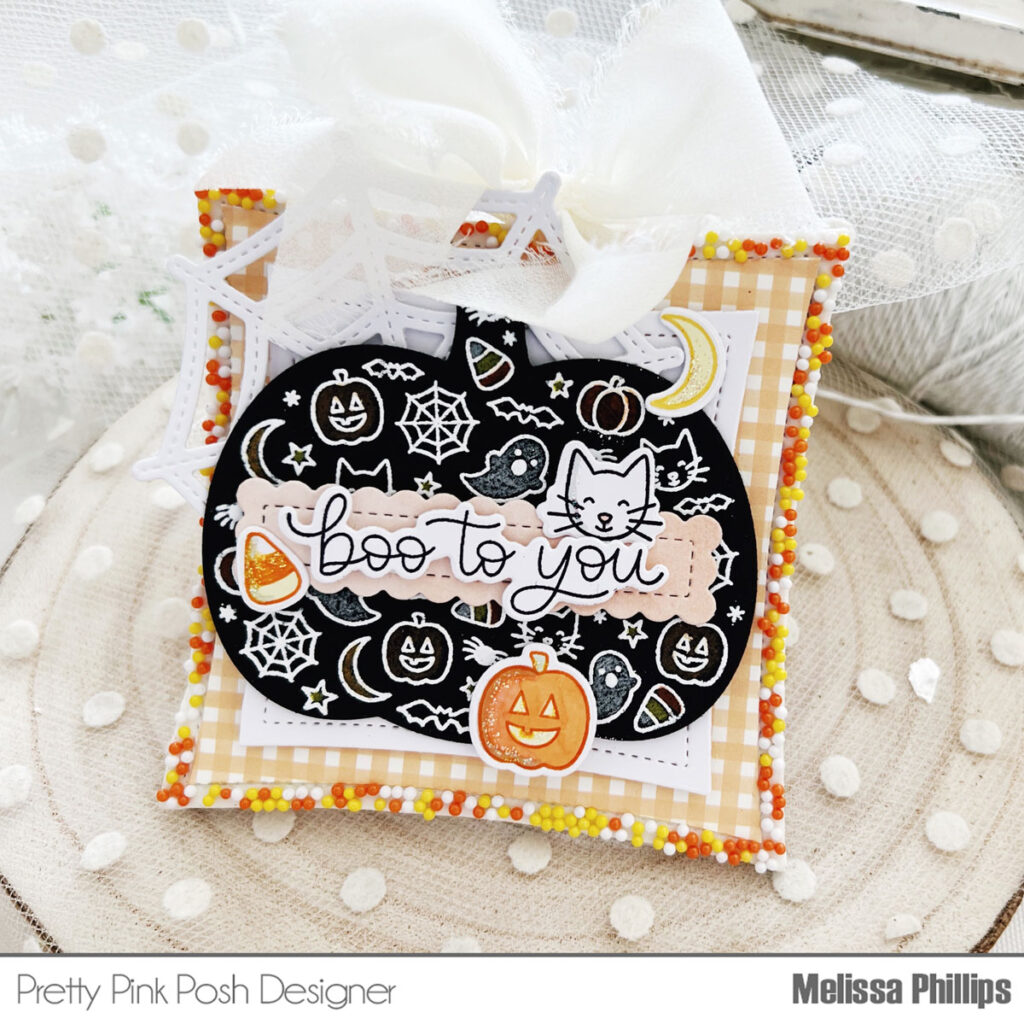
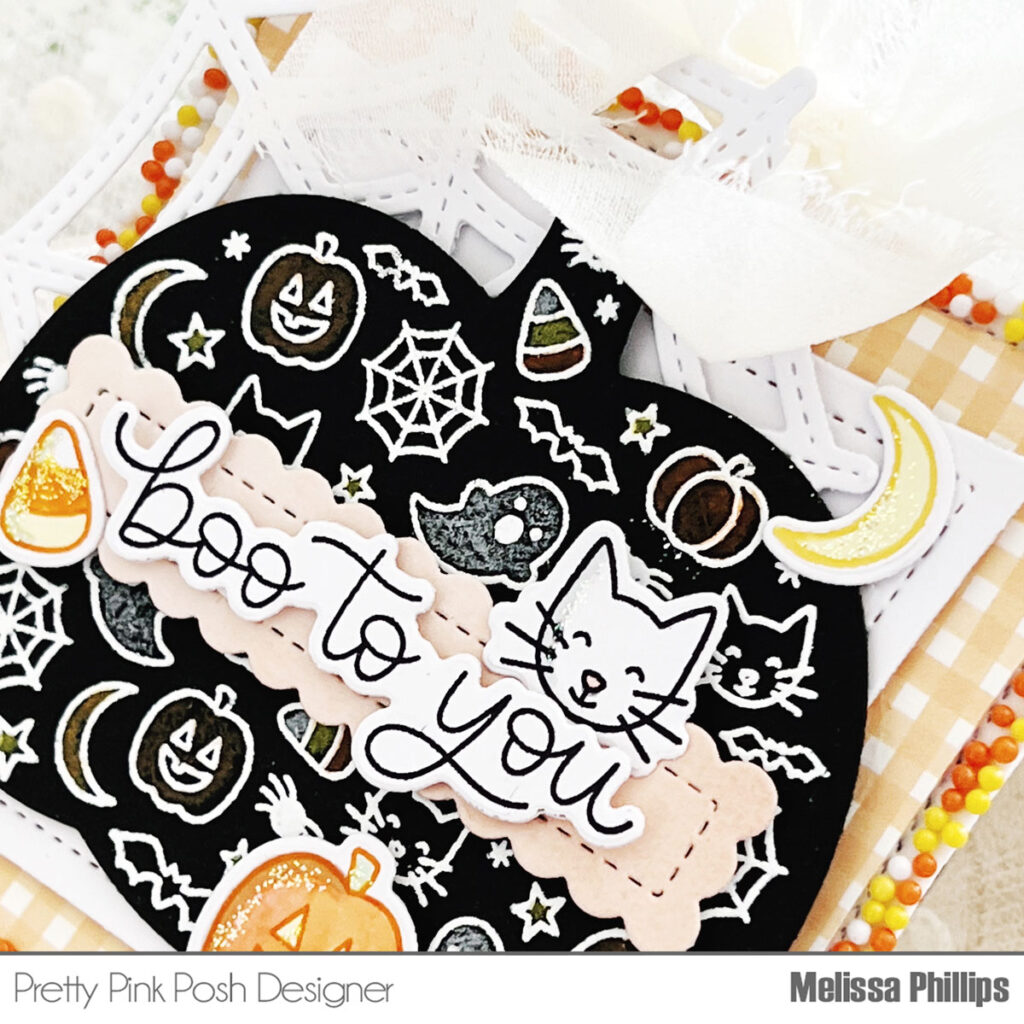
My next projects is a tag created using the Wonky Stitched Squaresas my tag base. I added some fun Halloween sprinkles around the outside of my square and layered on my Boo to You die cut and stamped pumpkin to the center.
I die cut it from black cardstock and then heat embossed the detailed images in white embossing powder. My colored pencils brought in a bit of color to the images inside my pumpkin.
I added a die cut spider web, cut using the Spider Web die. Lastly, I added in tiny stamped accents from the Boo to You stamp set…all that’s left is to attach it to my package of Halloween goodies. I can’t wait for fall to arrive!
Join us tomorrow for another look at the August 7th release. Thanks for stopping by!
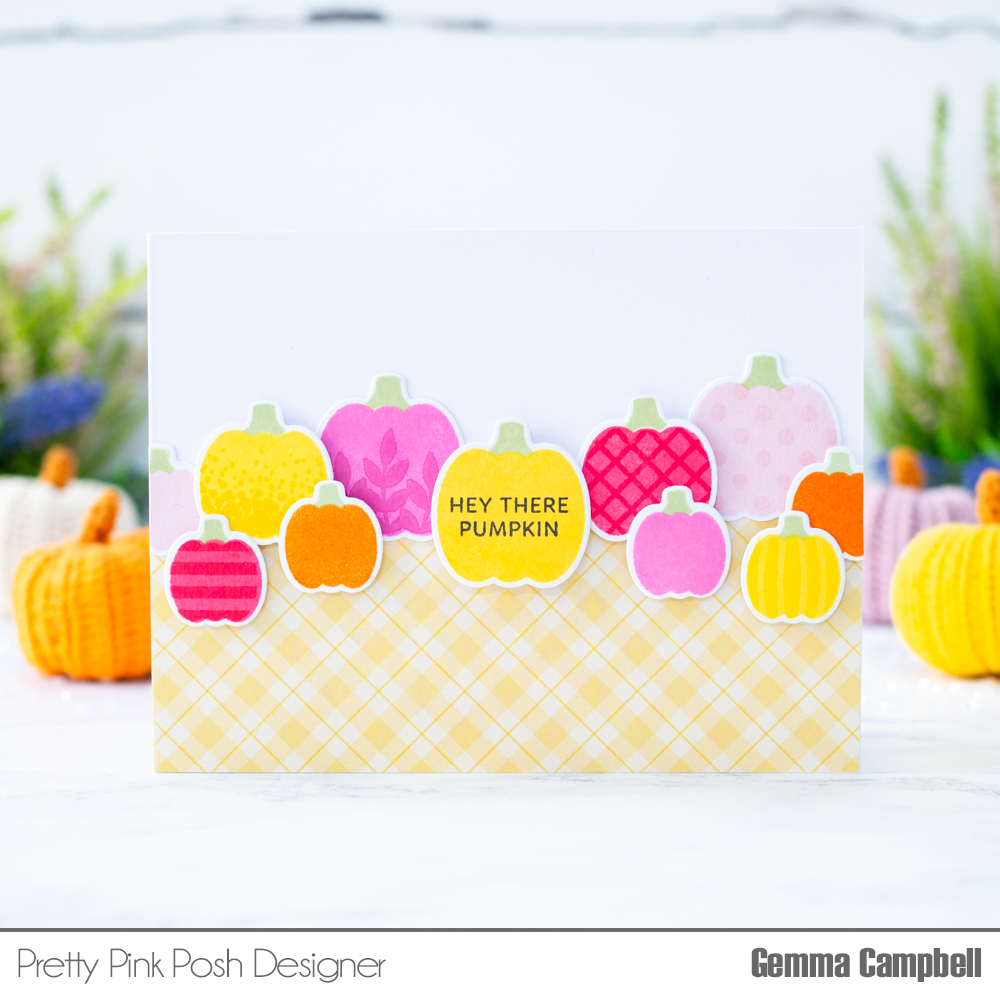
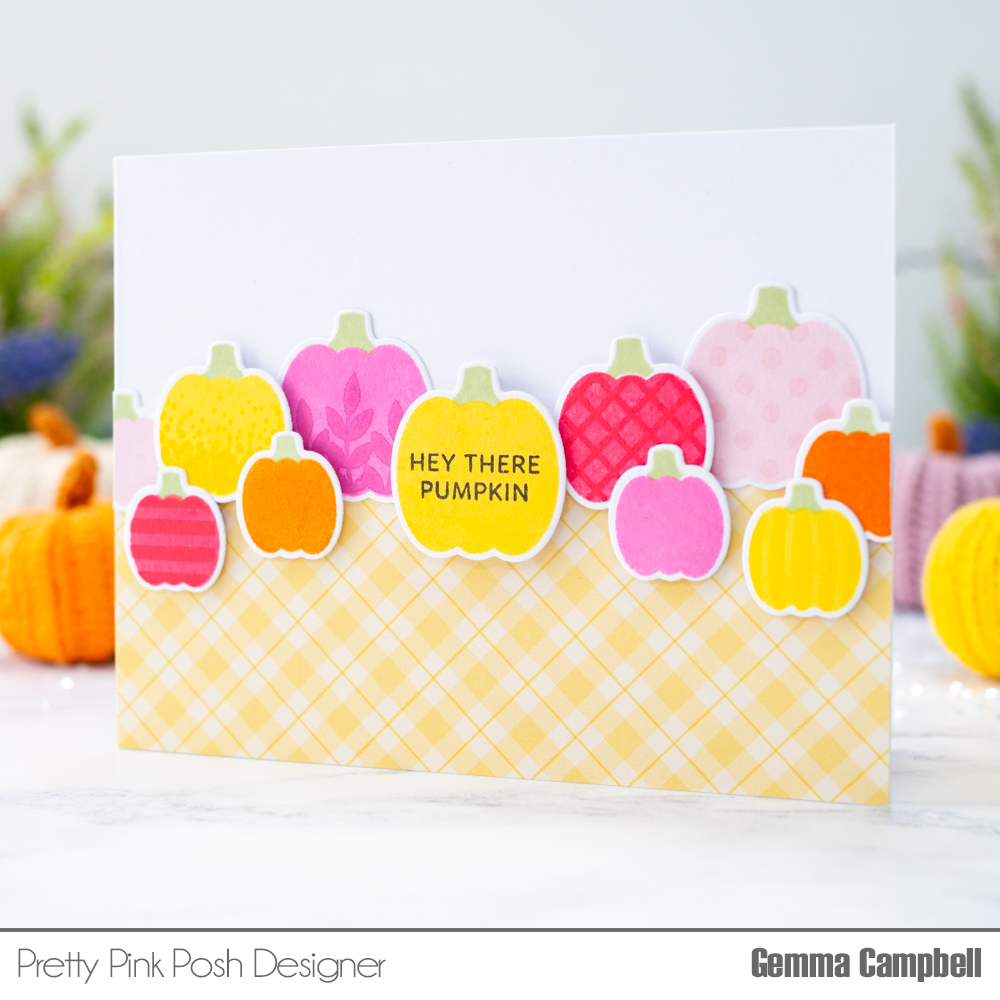
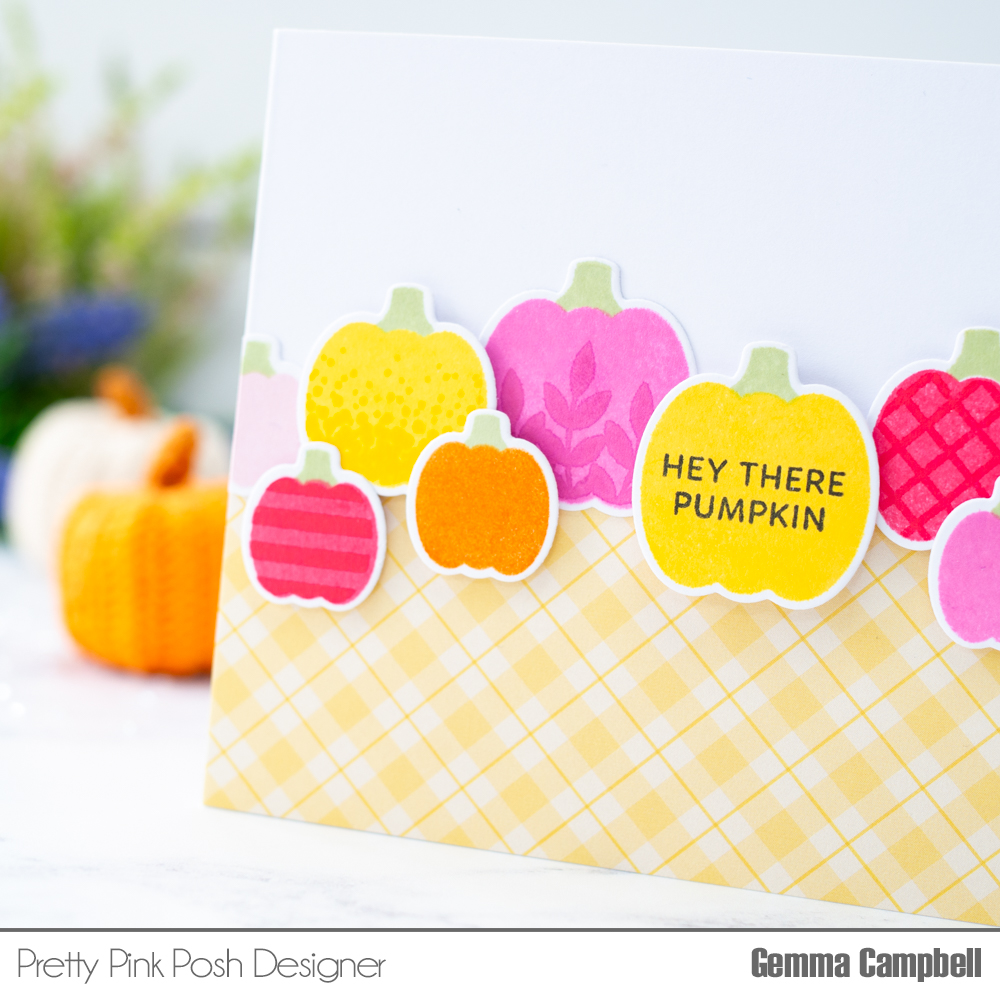
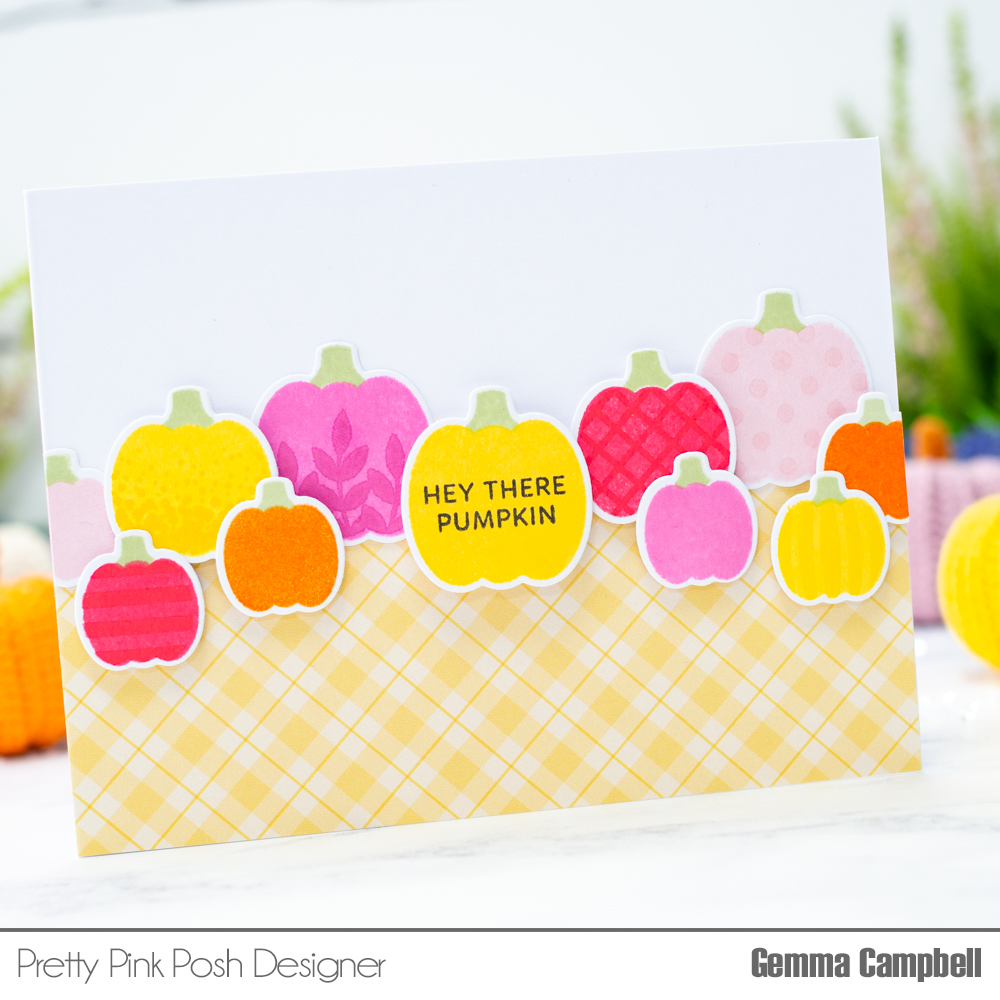
Hello, Gemma here today and I’m excited to share a sneak peek of the Decorative Pumpkinsstamp set, part of the August release.
New release will be available August 7th
Similar to the Birthday Balloonsstamp set before it, this set has both outline and solid pumpkins in 3 sizes, along with decorative patterns and sentiments to add to the pumpkins.
Using the solid outline pumpkins, I stamped them out in pinks, yellow and orange, then die cut them out with the coordinating dies. The pumpkin stalks are separate stamps and I found it easy to add these after the pumpkins were die cut.
Next, I added decorations to the pumpkins. I used the same inks for the patterns, to create a tone on tone look. On one of the largest pumpkins, I stamped a sentiment from the Decorative Pumpkinsset in black ink.
I adhered a strip of patterned paper to an A2 landscape card base, then added the pumpkins. I used a mix of liquid glue and foam tape to get dimension. The sentiment pumpkin is popped up with two layers of foam tape.
I didn’t feature these on my card today but there are also images of Halloween pumpkin faces in the stamp set, plus two additional sentiments, making this a versatile set to add to your collection.
Thanks so much for joining me today! Stop by tomorrow for another sneak peek of the August 7th release!
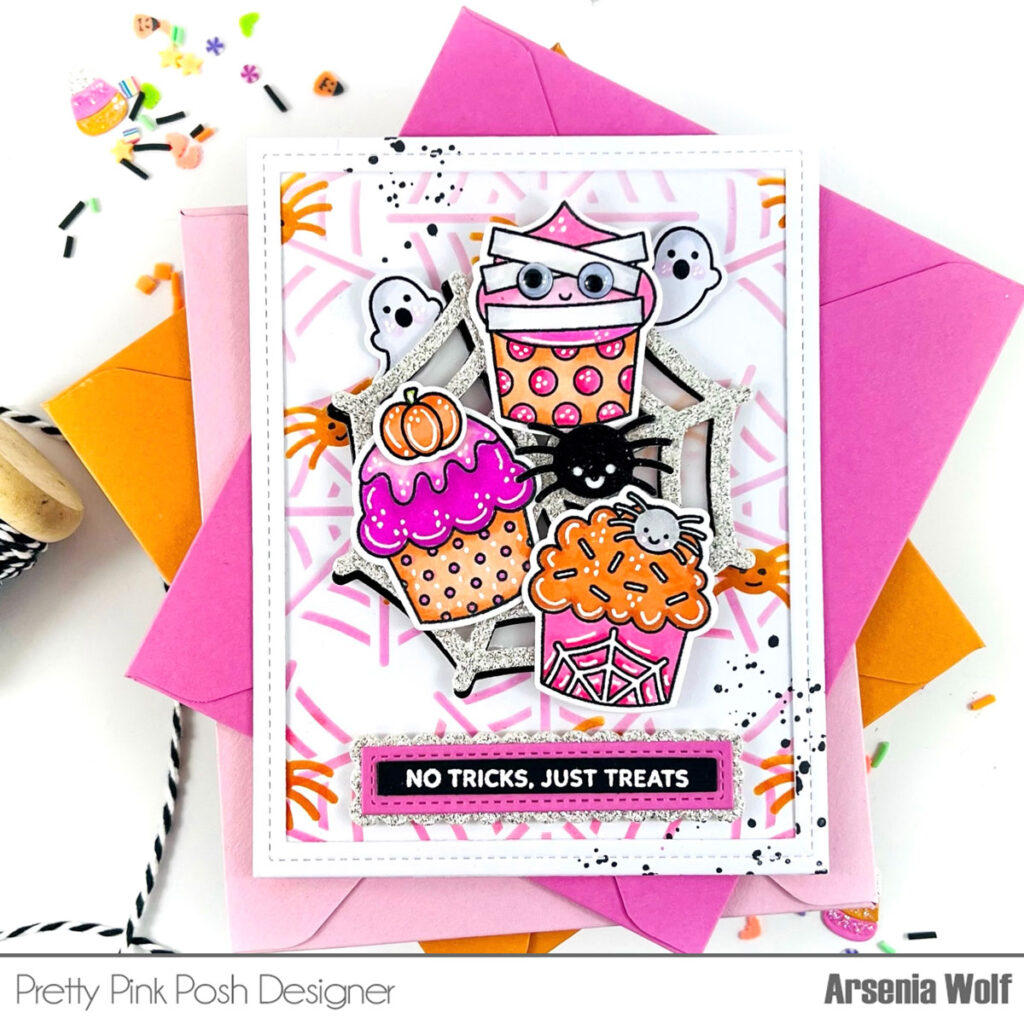
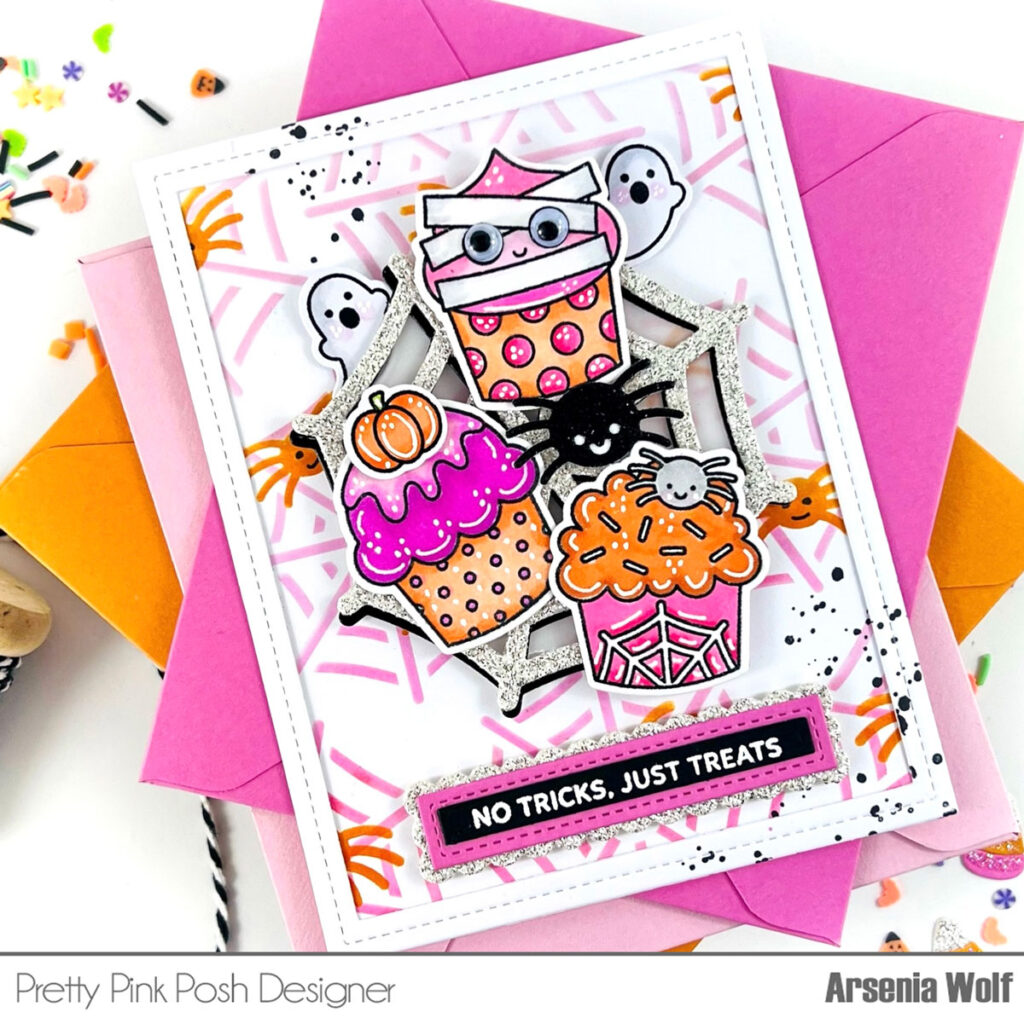
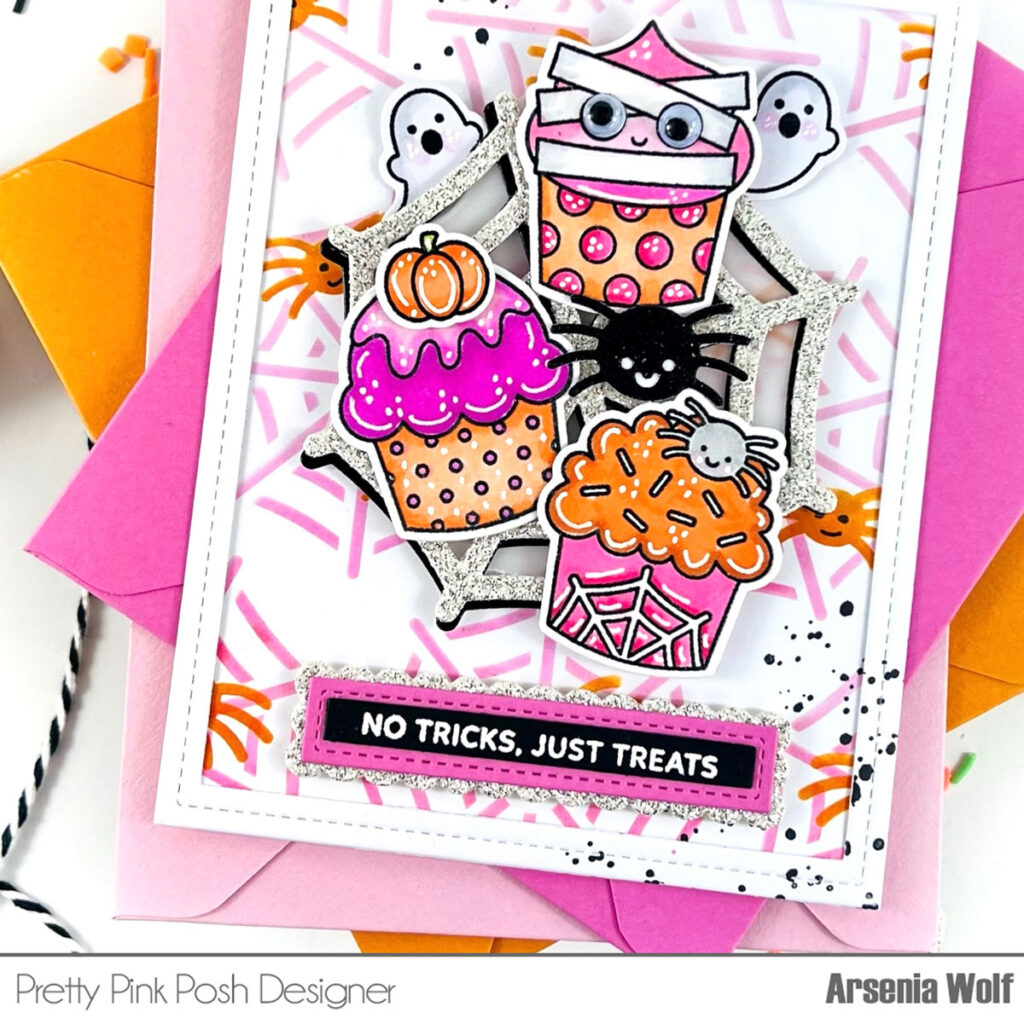
Hello friends, Arsenia here! I’m super excited to share this fun sneak peek using the Halloween Cupcakesset and Sentiment Strips: Halloween sets. The cupcakes are super adorable. I adore Halloween crafting and my go-to color palette is pink and orange. Let’s get started!
New release will be available August 7th
First, I stamped and colored the images from the Halloween Cupcakes set with my Olo Markers. (O2.2, O2.4, RV0.1, V0.3, and V0.4) Next it was time to work on my background, I used a new super fun stencil from this release called Layered Spider Webs. I inked up the webs in a pink dye ink and the spiders in orange dye ink. I added some black splatters to the top left and lower right of the card panel. I decided to add the stitched frame from the Fancy Cake die set and of course I had to add some black splatters to the frame!
I needed a resting place for the sweet cupcakes, so I went to my stash and decided to use the super fun Spider Web die set from last year. I did the first layer of the web in black and the second in glitter cardstock and offset the two webs so the black web would appear as a shadow. I did a bit of fussy cutting to add a vellum behind the spider web.
I adhered all the elements to my card base and decided to add a few more embellishments. The ghosts and pumpkin are from a super cute new set called Boo to You. I added some googly eyes to the mummy cupcake, and lots of white gel pen highlights. Embellishments done!
The next and final step is the sentiment, and it was easy peasy with the new Sentiment Strips: Halloween and Sentiment Strips dies. Oh my word, the new Sentiment Strips are so FUN! For the first layer I used the medium scallop strip die in glitter card stock. The second layer is medium stitched strip die with pink cardstock, and the final strip was black card stock with white embossing.
Thank you so much for stopping by. You’re going to LOVE the new release- it’s chock full of lots of Halloween goodness!
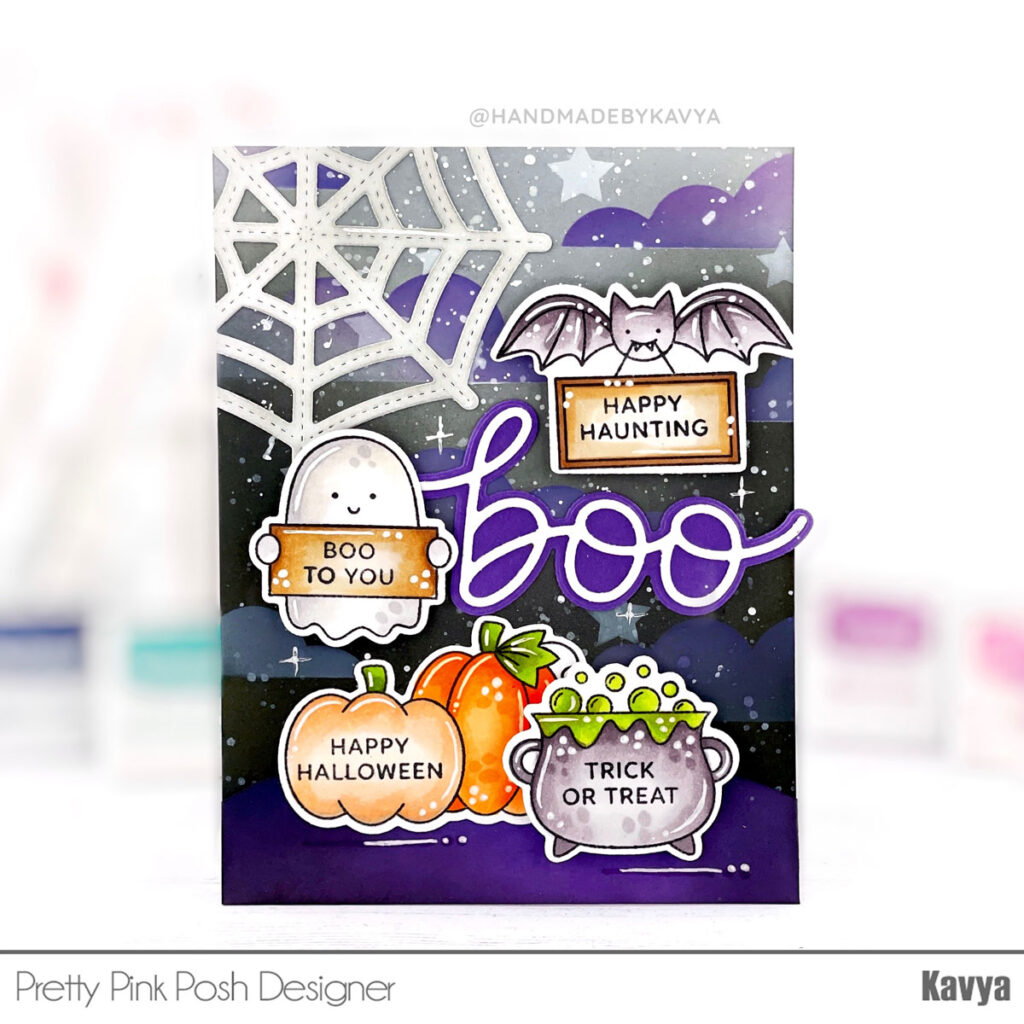
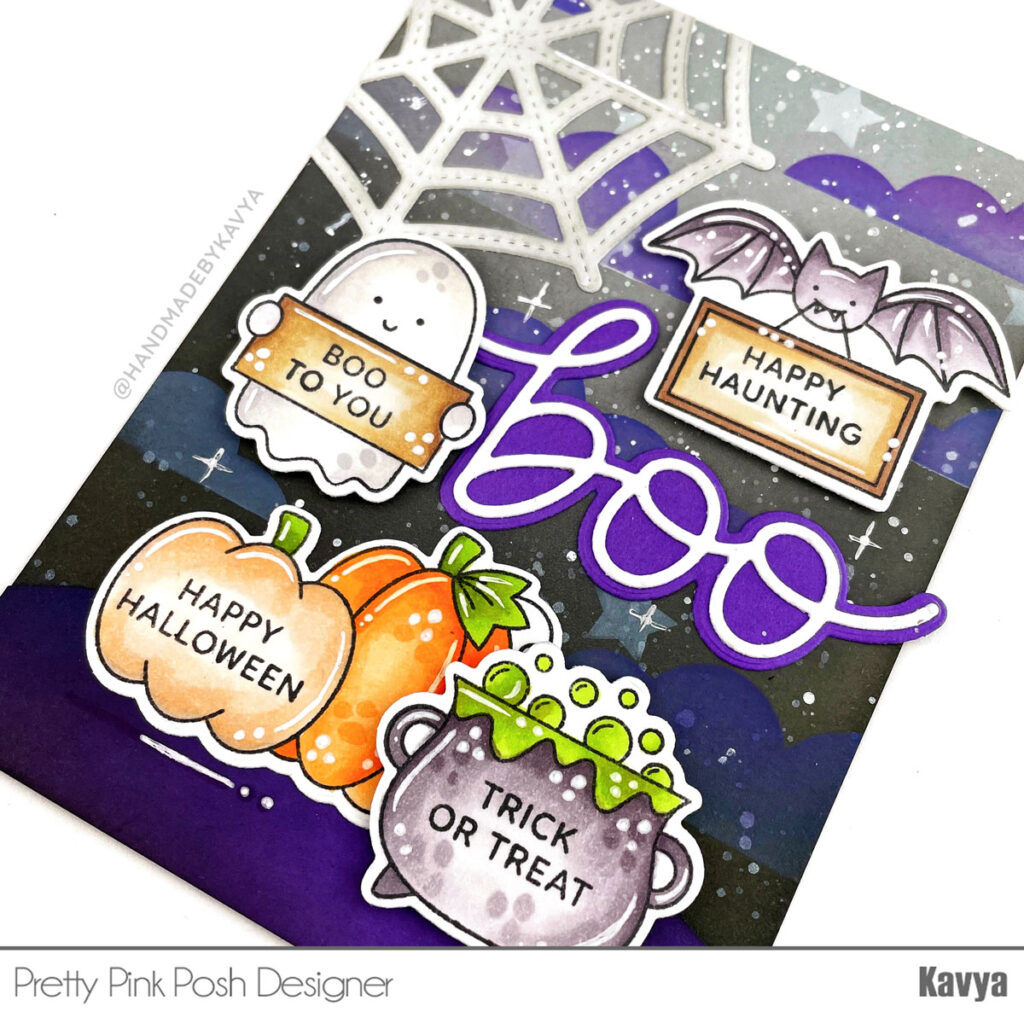
Hi folks, Kavya here with a fun Halloween project using the latest release! No one can make Halloween cuter than Paulina. This release is absolutely adorable and I had a blast pairing it with a bunch of my favorite past Halloween products too!
New release will be available August 7th
I started off by stamping and coloring a bunch of images from the new Halloween signs stamps set. Then, I created my background by ink blending gray cardstock with black and used the Spooky Sky stencilto ink blend a starry night sky. Then, I adhered all the stamped images and added diecut Spider Web and Large Boo Script to finish off my card!
I hope this inspires you to mix and match some of the older products with the newer release, they all work together beautifully! Stay tuned this week for lots more sneak peeks!
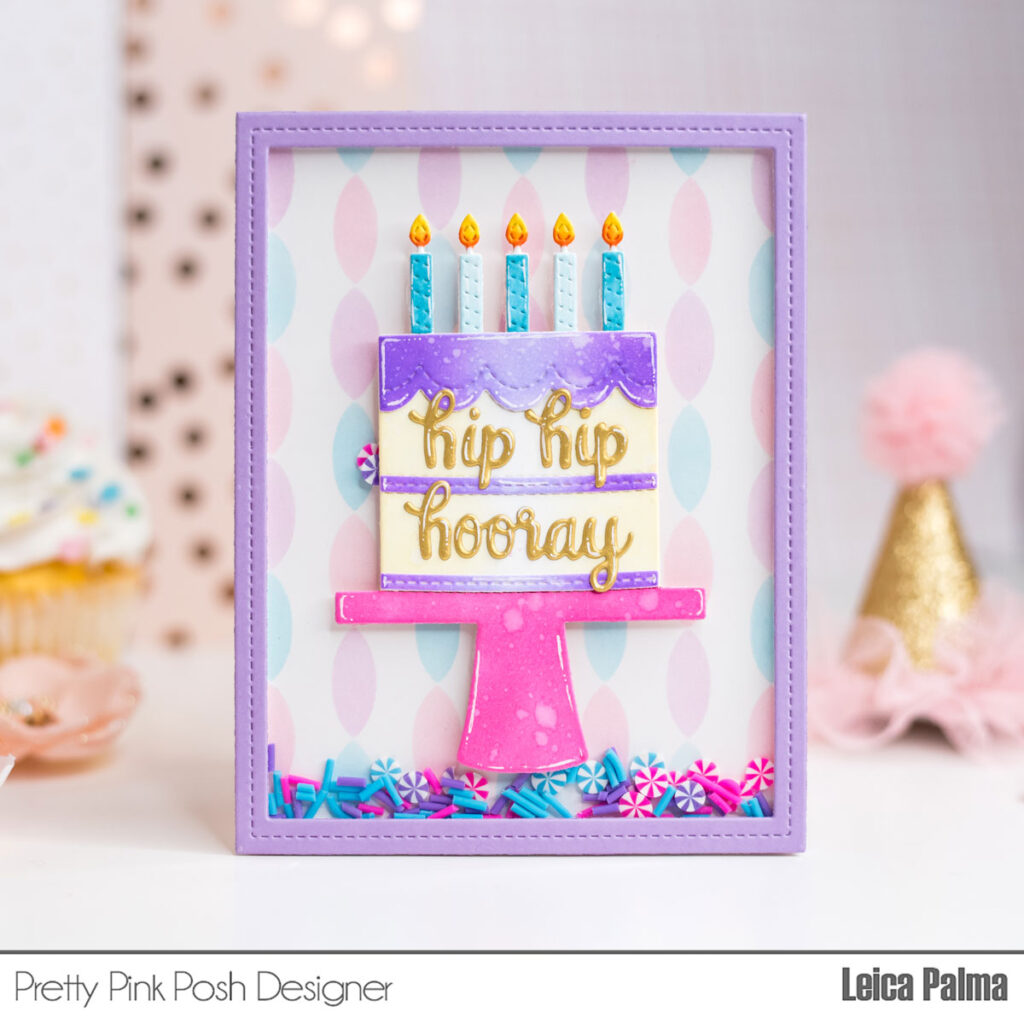
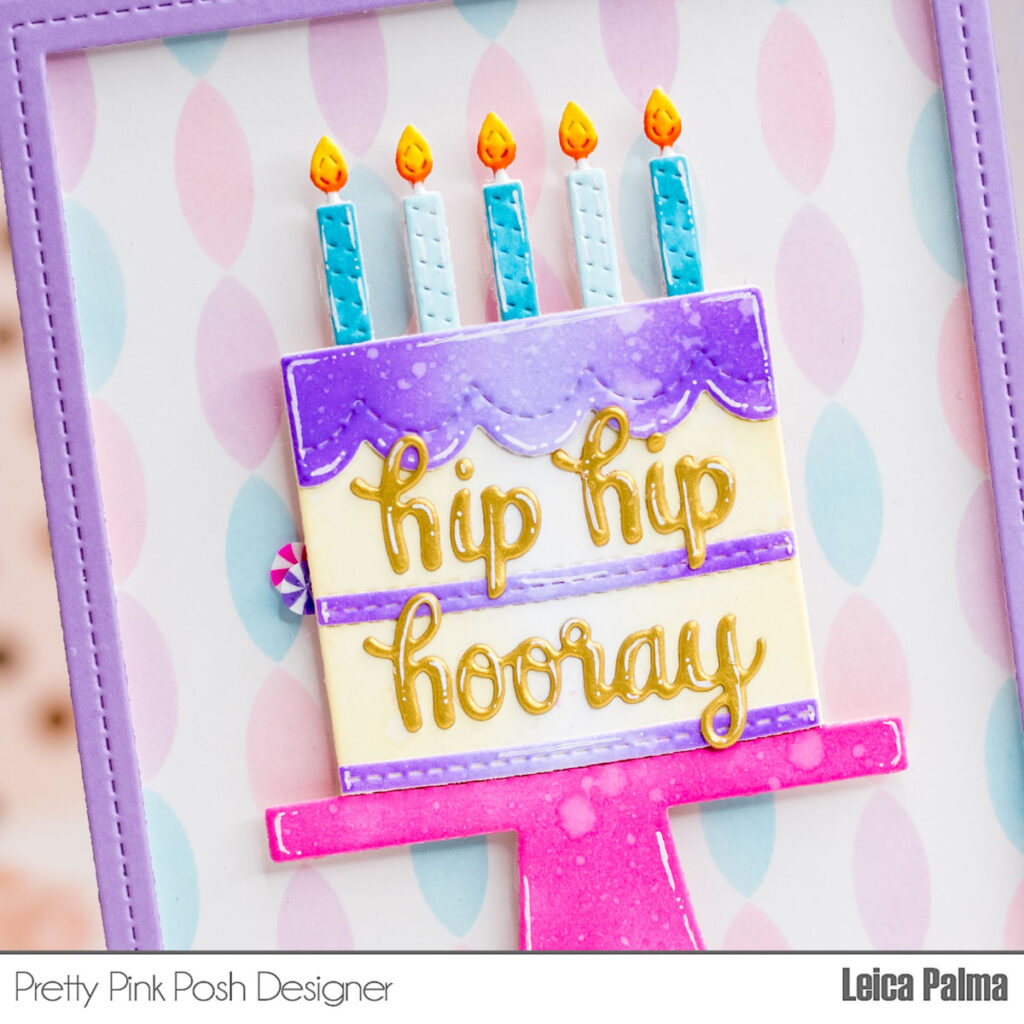
Hello hello! It’s Leica here today on the PPP blog. I’ve got a fun birthday card to share with you and the color palette of my card is inspired by the Party Swirls Clay Confetti. Blue, pink, and purple – I love these colors together!
I first started by ink blending through theStreamers Stencils with Milled Lavender, Spun Sugar, and Tumbled Glass Distress Oxide Inks. I then cut the frame from the Fancy Cake Dies in purple cardstock and made a shaker card by adding acetate and foam tape onto the frame. I filled the shaker with half a teaspoon of Party Swirls Clay Confetti.
Next, I cut the cake twice in white cardstock. I ink blended the cake stand with Picked Raspberry Distress Oxide Ink. For the cake, I used Antique Linen and Wilted Violet for the icing. The candles are ink blended with Broken China and Tumbled Glass Distress Oxide inks. I sprayed the die cut pieces with water for an oxidized effect and I also splattered some white ink. Next, I colored the flames with Copic markers. Then I cut the “hip hop hooray” in gold cardstock and glued it on the cake. I glued the cake in the middle of the card as the focal point. Lastly, I adhered the cad panel onto an A2 size card base.
That’s all for this shaker card. The frame from theFancy Cake Diesmakes it super easy to create a shaker card – just add acetate and .25” foam tape around the frame. I hope you’ll try this method to make a shaker card. Tag us on Instagram #prettypinkposhstamps
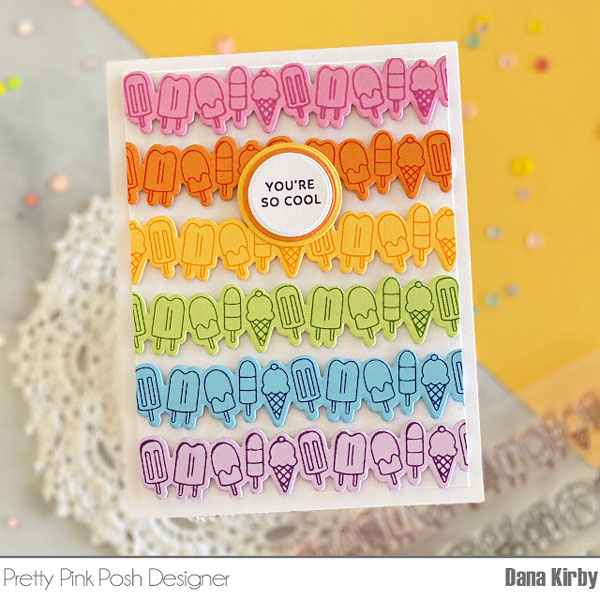
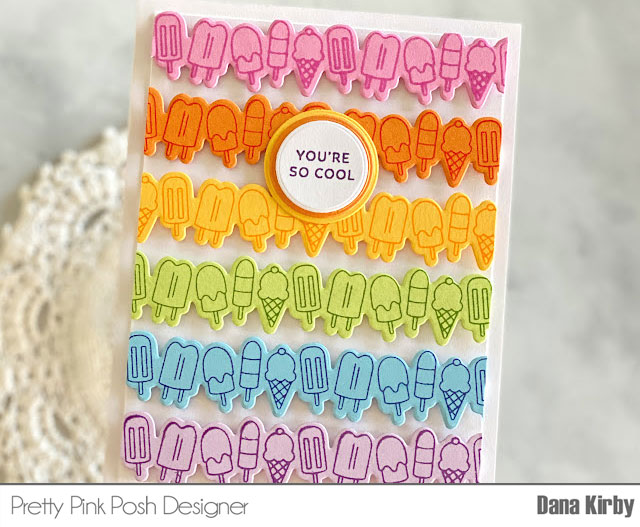
Hi Friends! It’s Dana here today with a fun summer card to share with you all.
For my card, I used the Summer Borders stamp and coordinating dies. I stamped the ice cream border on colored cardstock and then used the coordinating Summer Borders die to cut them out. Once my borders were die cut I attached them to a card panel with foam tape for a little added dimension. I trimmed the panel down and attached it to an A2 card base.
To finish my card, I used theSummer Fun stamp set for my sentiment. Although these border sets are fun to color, I think they also work great to stamp on colored cardstock for a quick and easy card. I hope I inspired you to give this design a try.
That is all for today… A clean and simple card, perfect for summer! Enjoy your day!
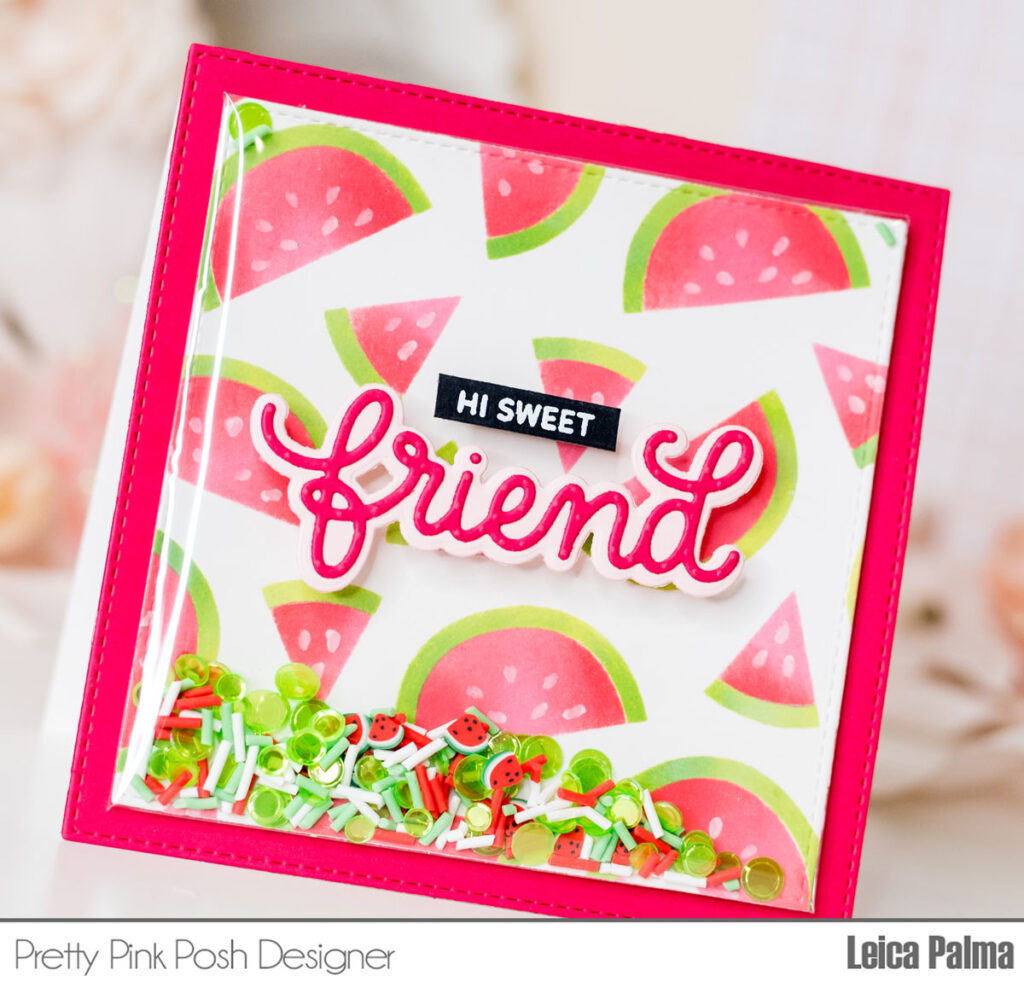
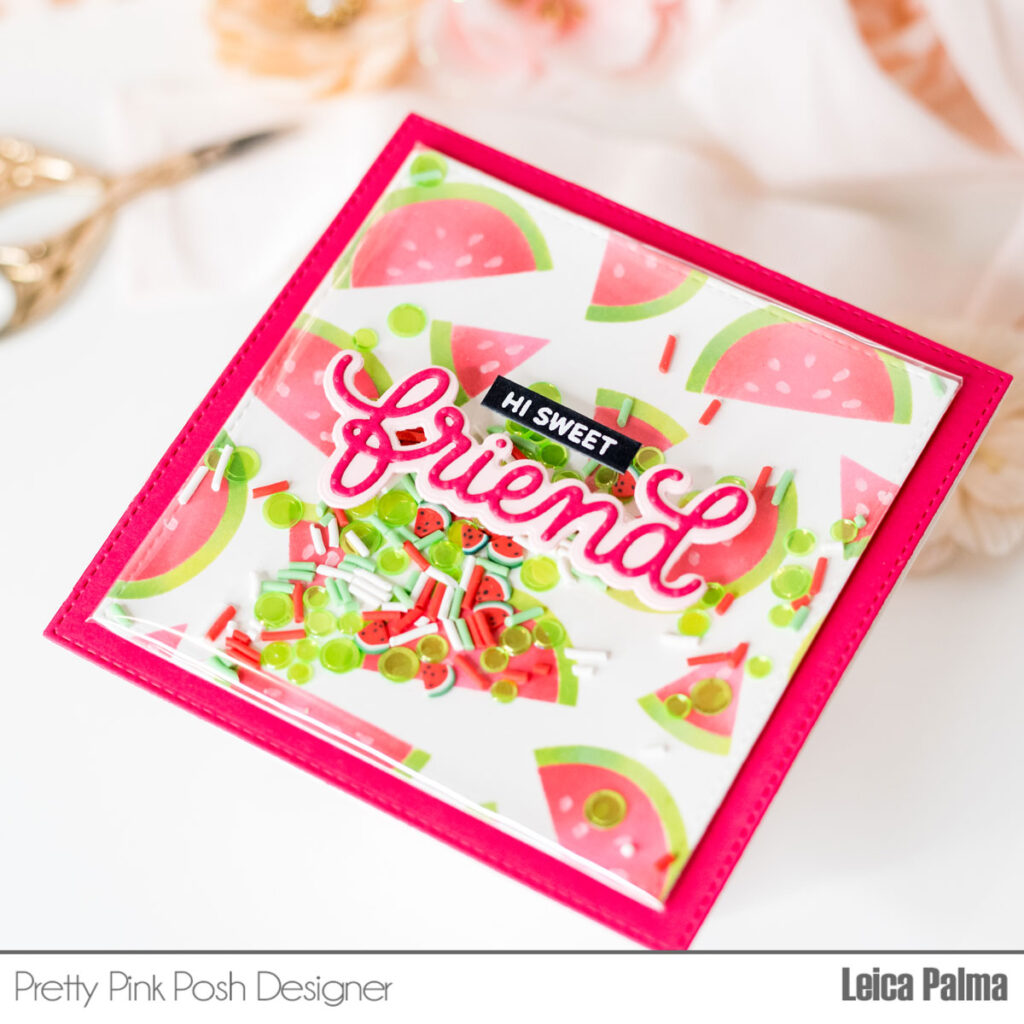
Hey there, my crafty pals! It’s Leica here, and I’m super excited to share a really cute shaker card that I made using the amazing fruit products from Pretty Pink Posh. This card is not only adorable but also incredibly easy to make. Trust me, it’s a breeze! So, let’s dive in, and I’ll show you how you can create your own shaker card that will bring a big smile to your recipient’s face.
To start, I used a 4-inch square piece of white cardstock as the base for my card. The main feature of this card was the Layered Watermelon Stencil, which created a playful watermelon background. I used a combination of colorful inks like Festive Berries, Mowed Lawn, Twisted Citron, Worn Lipstick, and Glacier White to give the card a fresh and summery vibe. To make it a shaker card, I added a sheet of acetate around this panel, making it interactive. For the shaker elements, I used a mix of Lime Shimmer and Watermelon Crush. These cute little embellishments added a touch of whimsy and brought the watermelon theme to life.
Next, I mounted the watermelon panel onto a 4.5-inch square red cardstock for a fun pop of color. Then, I used the Watermelon Stamp Set to heat emboss the words “Hi Sweet” onto a strip of black cardstock. To make the sentiment really stand out, I cut the word “Friend” from red and pink cardstock and glued it onto the clear plastic.
Finally, I made a 4.5-inch square white card base and glued the card panel onto it. And voila! That’s it for my card.
I hope you enjoyed my shaker card and that it inspired you to create one of your own. Have an awesome day!