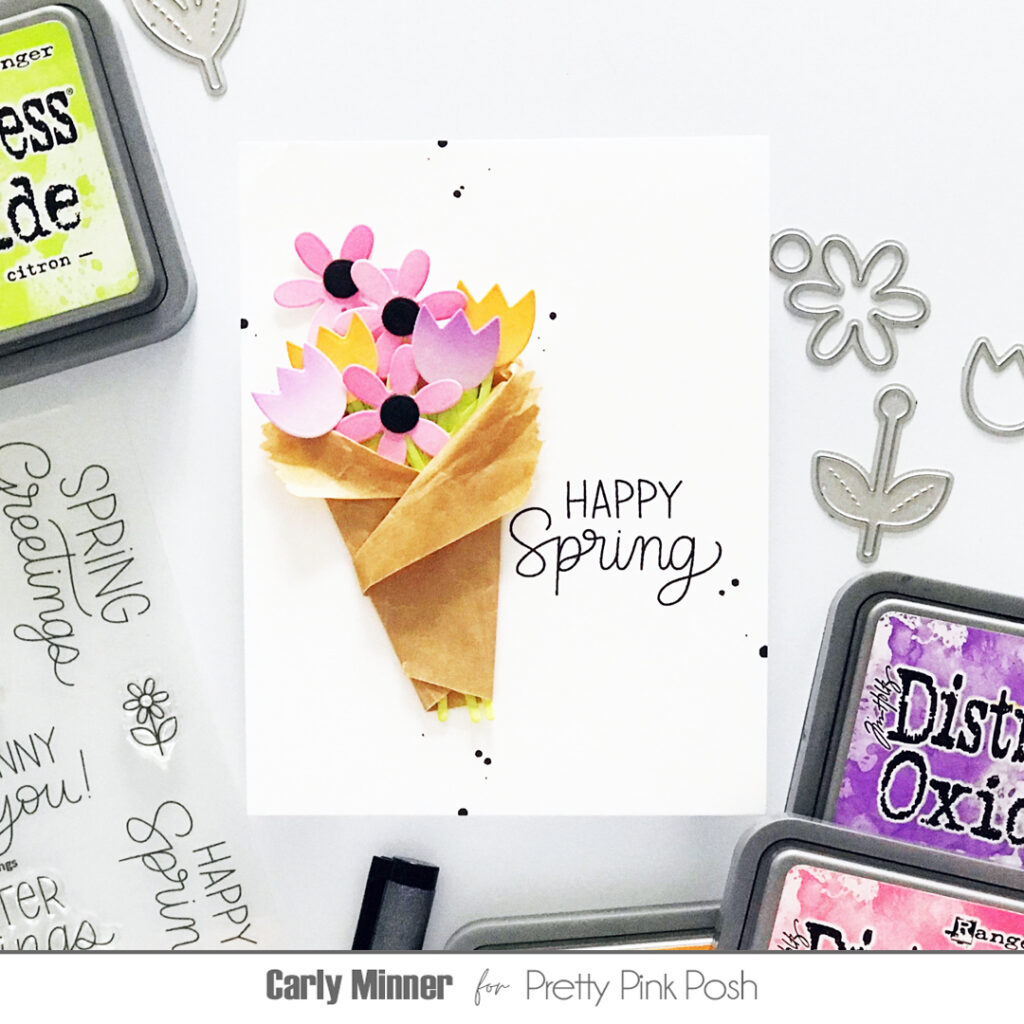
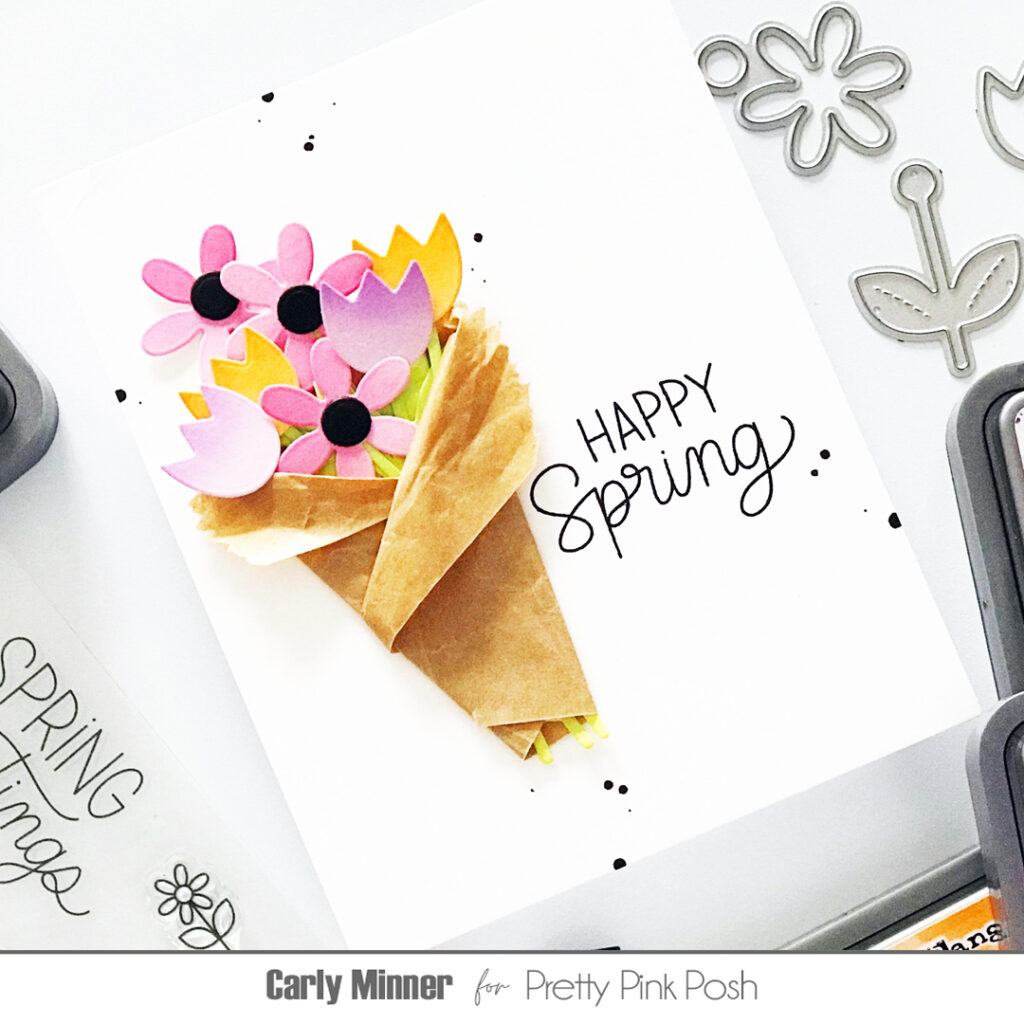
Hi Crafty Friends! Carly here and my Easter cards are finished but while all the sets are on my desk I’m going to make some spring cards too! There are so many fun shapes that overlap…grass, carrots, butterflies, bows and of course flowers!
Hi crafty friends! Rebecca here with with a shaker card made with the Tulip Shaker Dies. The great thing about Pretty Pink Posh releases is that many of the sets work so well together!
So I started by cutting out the Grass Border Die. Then I cut the Tulip Shaker Dies out of a piece of A2 blue cardstock. Next, I adhered a piece of acetate to the back. I added foam tape in a rectangle around the tulip window. I poured Sugar Pop Shaker Beads into the rectangle then removed the foam tape backing pieces and placed a white A2 piece of cardstock on top to trap the shaker beads inside.
I cut the tulip out of pink and green cardstock and created frames to adhere on top of the window. I popped up the grass on top of the bottom of the tulip stem.
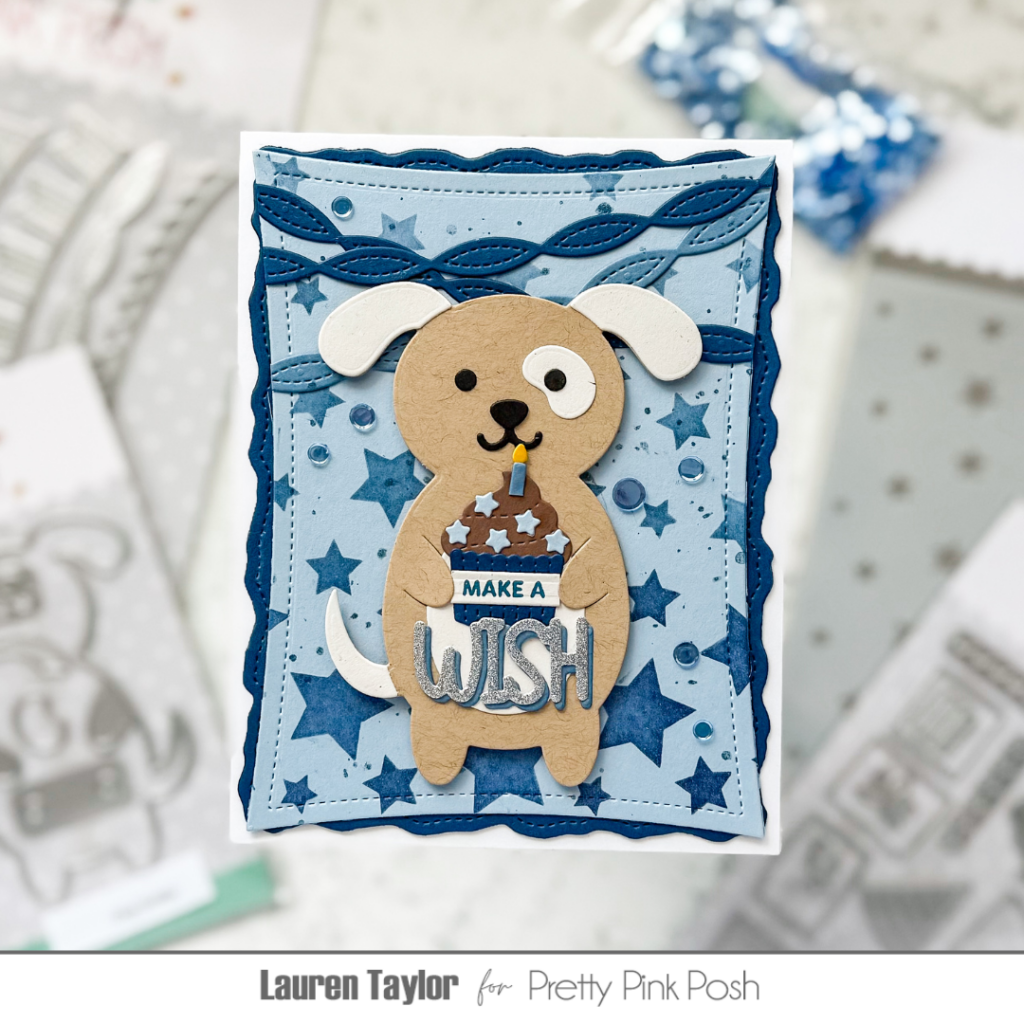
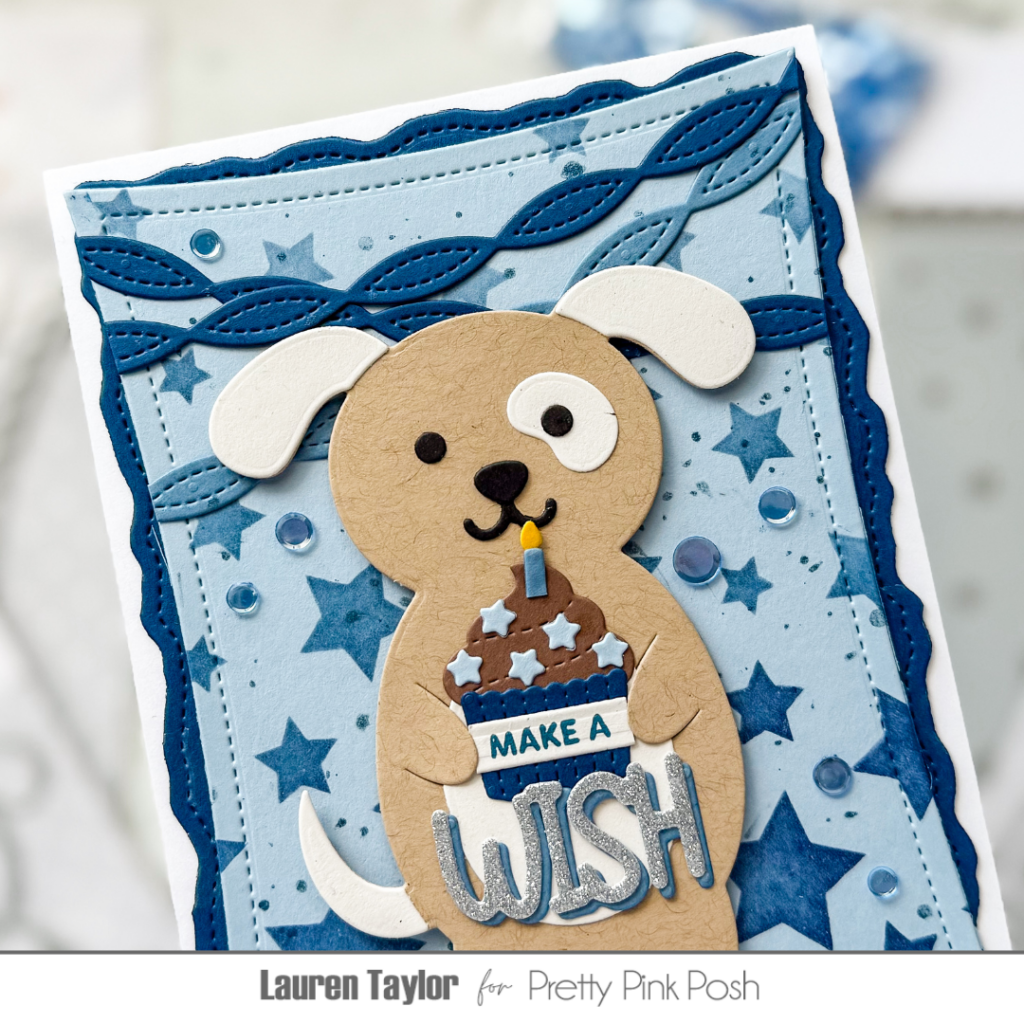
To create this card, I began by die-cutting various elements from blue and neutral craft cardstock. The background was stenciled using the Cascading Stars Stencil and Distress Inks in Stormy Sky, Faded Jeans, and Chipped Sapphire, creating a stunning gradient effect. I assembled an adorable dog using the Dog Holder Dies. The Birthday Holder Additions Diescontributed a charming cupcake and candle, while the Streamer Dies added a party flair. The “wish” sentiment was die-cut from sparkly silver cardstock with a blue drop shadow, and “make a” was stamped onto a sentiment strip.
Layering was key to this design. I adhered the stenciled background to a dark blue stitched torn rectangle, then added the streamers, ensuring they aligned with the wonky stitched rectangle. To add a touch of shine, I splattered Faded Jeans Distress Spritz onto the background. The dog and cupcake were popped up with foam adhesive for dimension. I adorned the card with Blue Shimmer Confetti, strategically placed to cover any accidental smudges.
I’m absolutely in love with the tone-on-tone look and the playful pup that takes center stage! If you’re eager to see all the details and follow along step-by-step, be sure to watch the YouTube video. You’ll witness the magic of these Pretty Pink Posh products and discover how to create a card that’s sure to bring joy. Happy crafting!
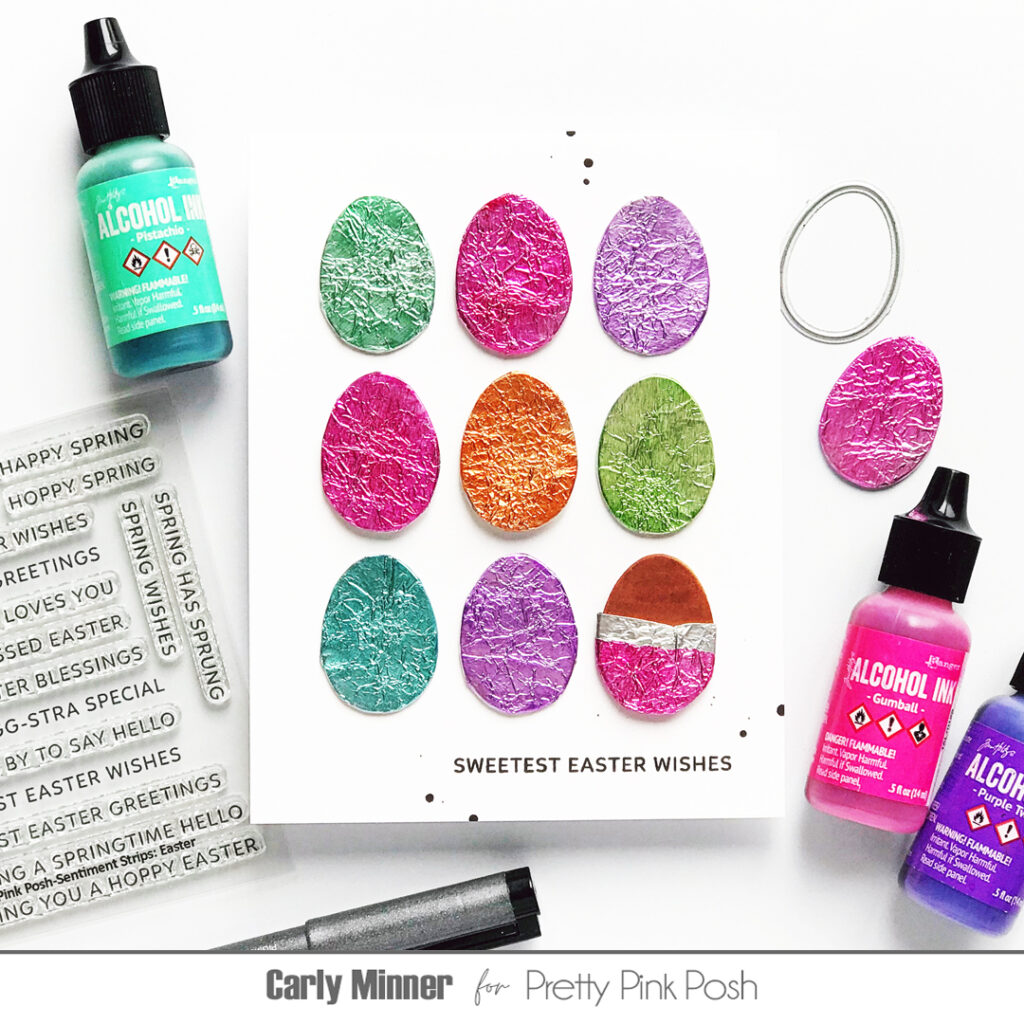
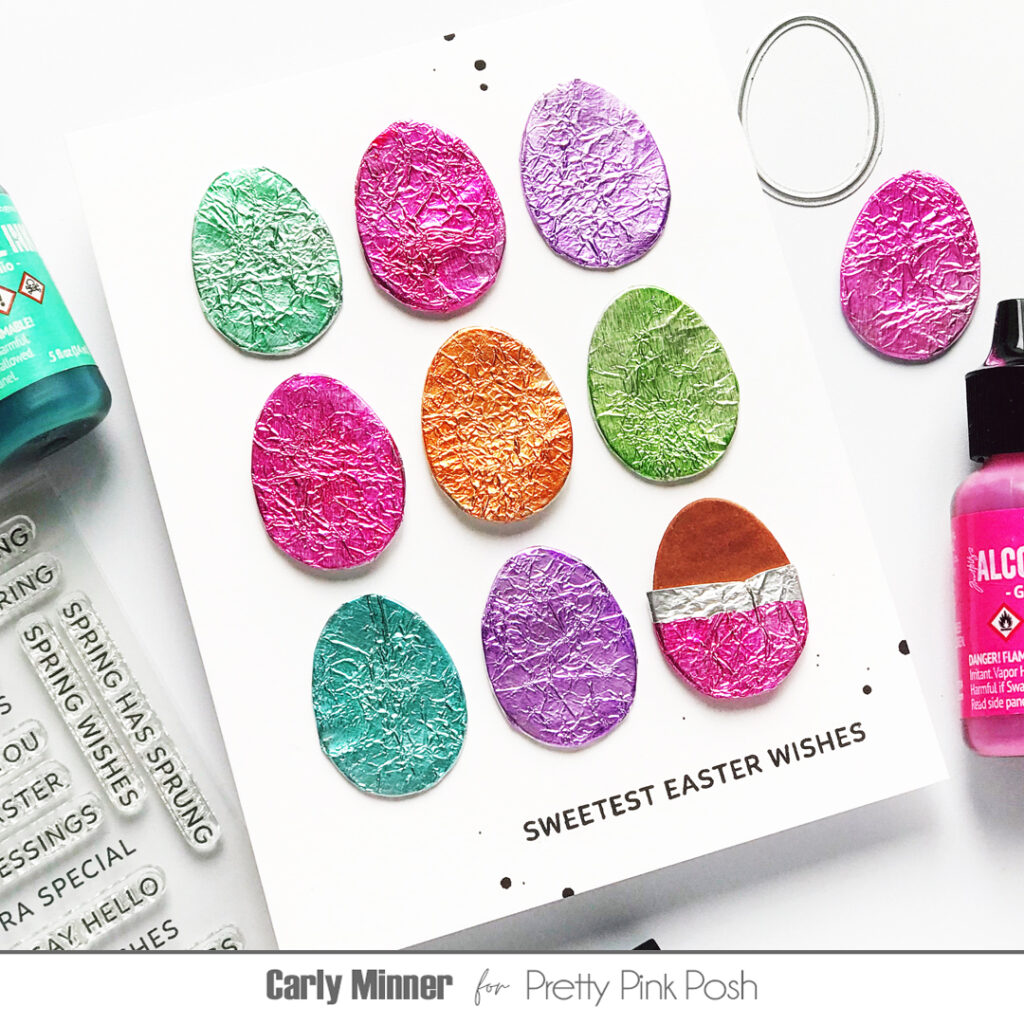
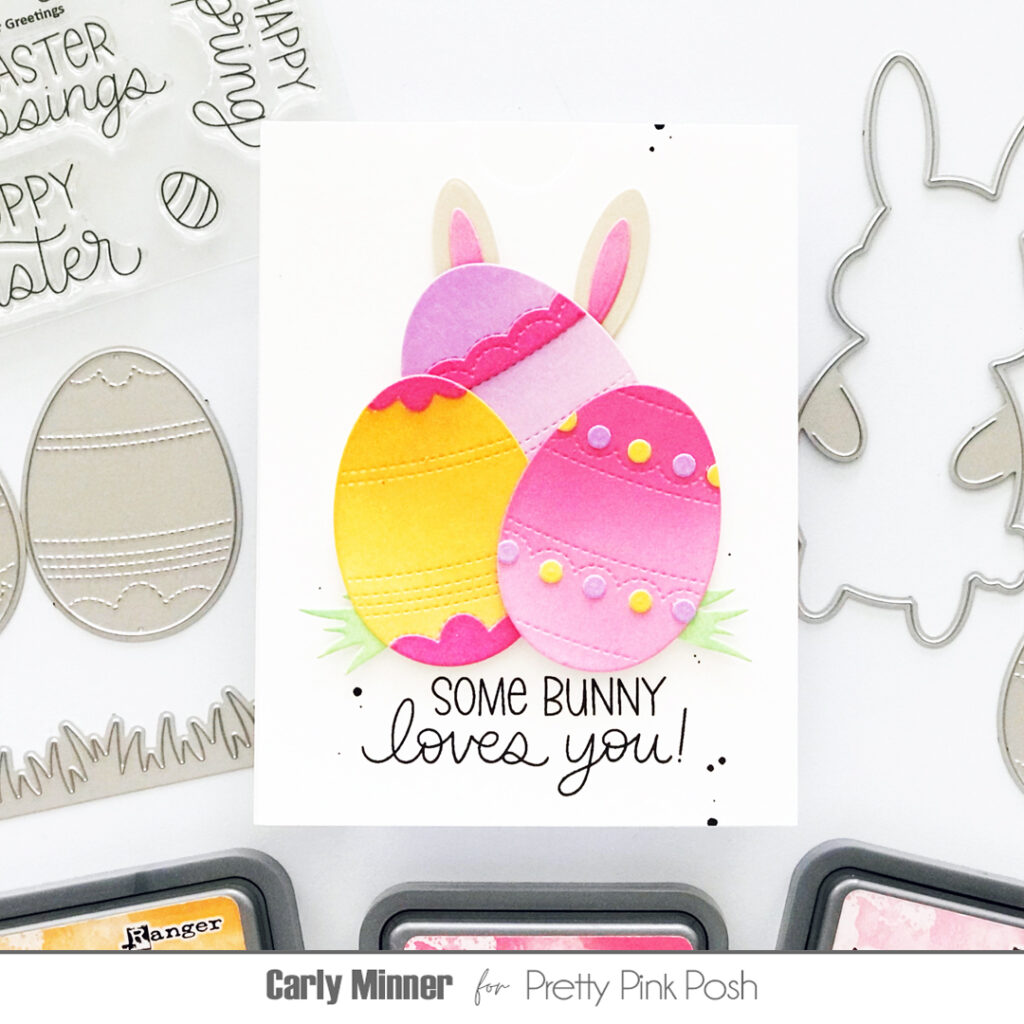
Hi Crafty Friends! Carly here and I might love candy even more than I love cardmaking so I’m delighted when the two things can come together like this chocolate foil egg card!
Creating foil wrapped “chocolate” eggs is super easy! You need die cut eggs like the one I used from the Easter Holder Additions set(or also the big ones from the Build An Egg set would be adorable). You need a little foil from your kitchen to wrap the eggs and a little alcohol ink to make them fun Easter colors! And don’t forget a sweet sentiment from the Sentiment Strips: Easter set!
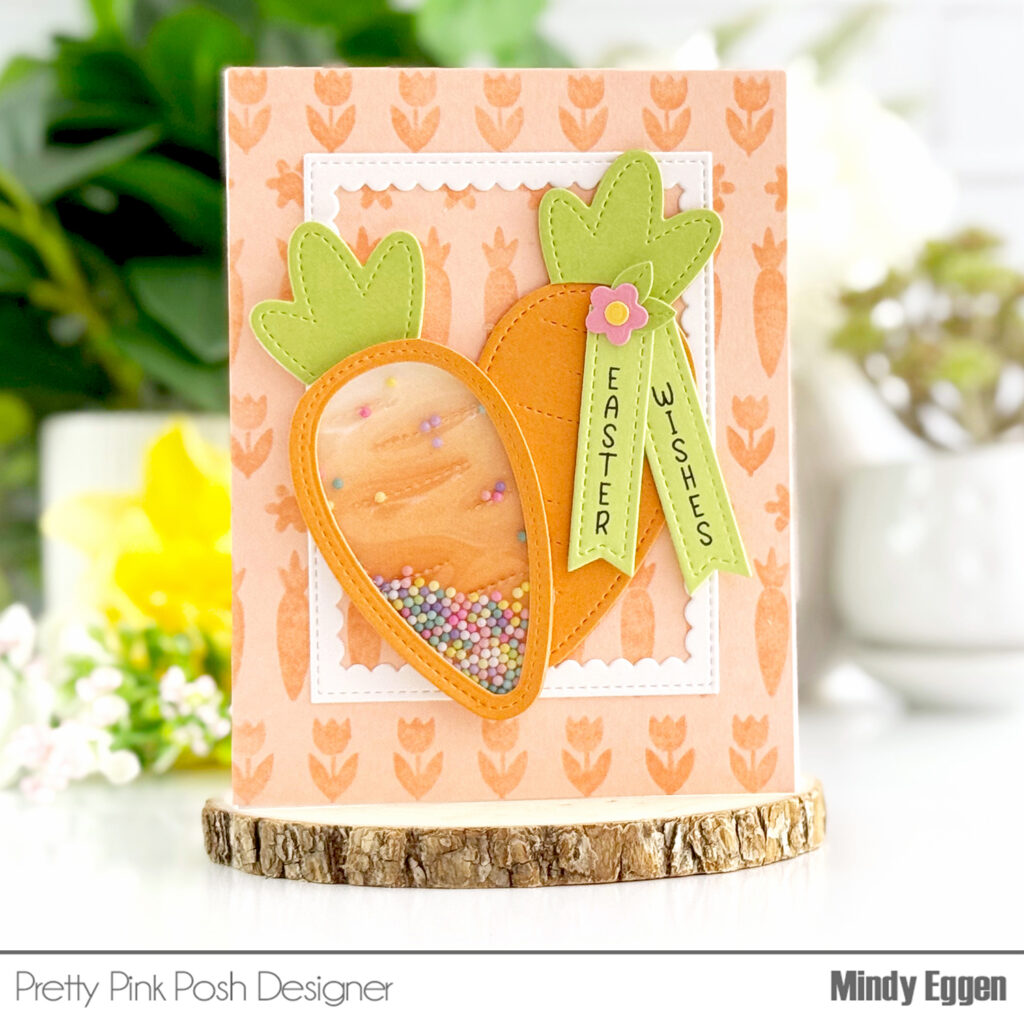
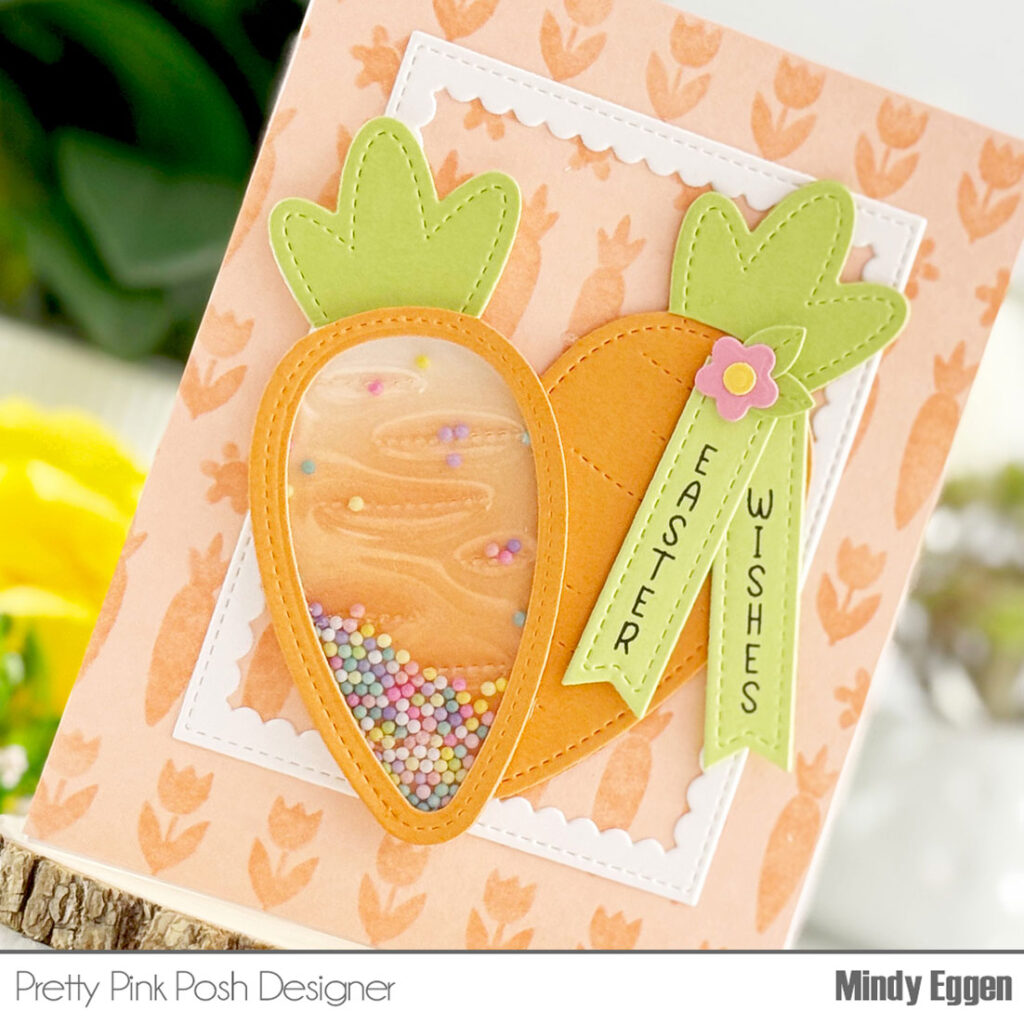
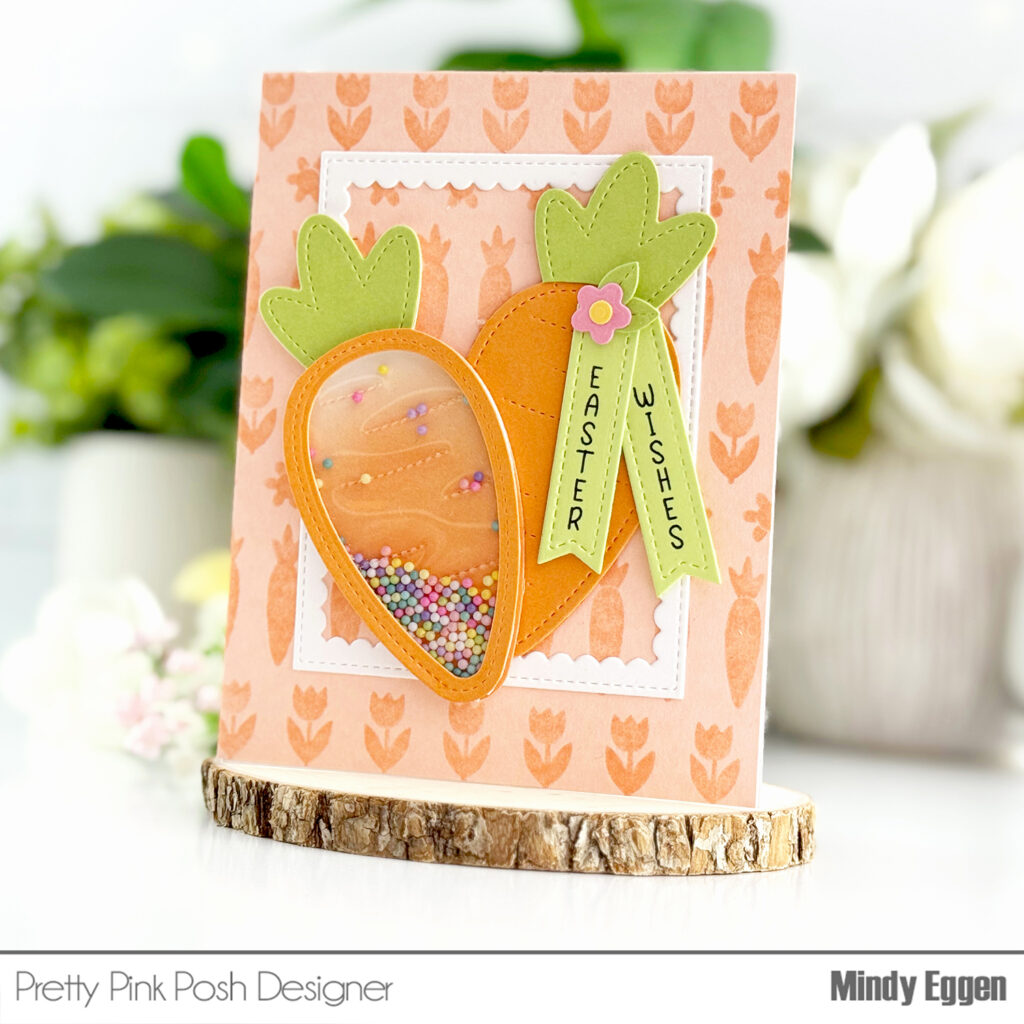
Hey friends! It’s Mindy here and I’m so excited to share this fun and festive carrot shaker card—just in time for Easter! It’s the perfect mix of cute and playful, and I can’t wait to walk you through how it all came together.
To start off, I created a tone-on-tone background using the Springtime Borders stencil, then added a frame from the Scallop Frames die to ground my die-cut elements and bring the design together.
The Carrot Shaker is super versatile—you can use it to create a classic die cut or turn it into a fun shaker element… I decided to do both!
You can either stack multiple die cuts to build up your shaker element or use foam tape—and I’m sharing a super handy tip in the video for working with foam tape!
The extra flower at the top is from the Easter Holder Additions set, but there are so many great die sets from Pretty Pink Posh that include small images perfect for adding little details like this!
I hope you enjoyed today’s Easter inspiration and feel inspired to give these fun shaker cards a try! They’re such a joyful way to send a little springtime cheer.
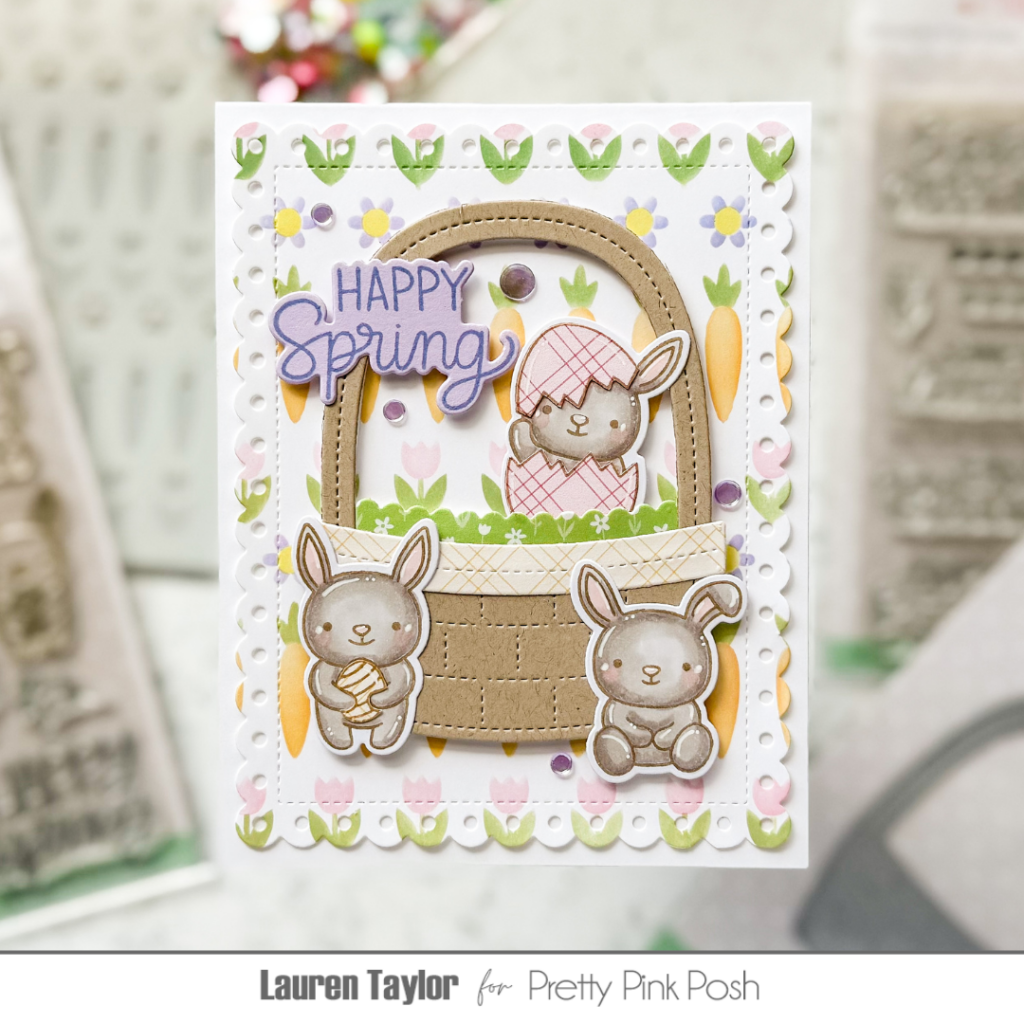
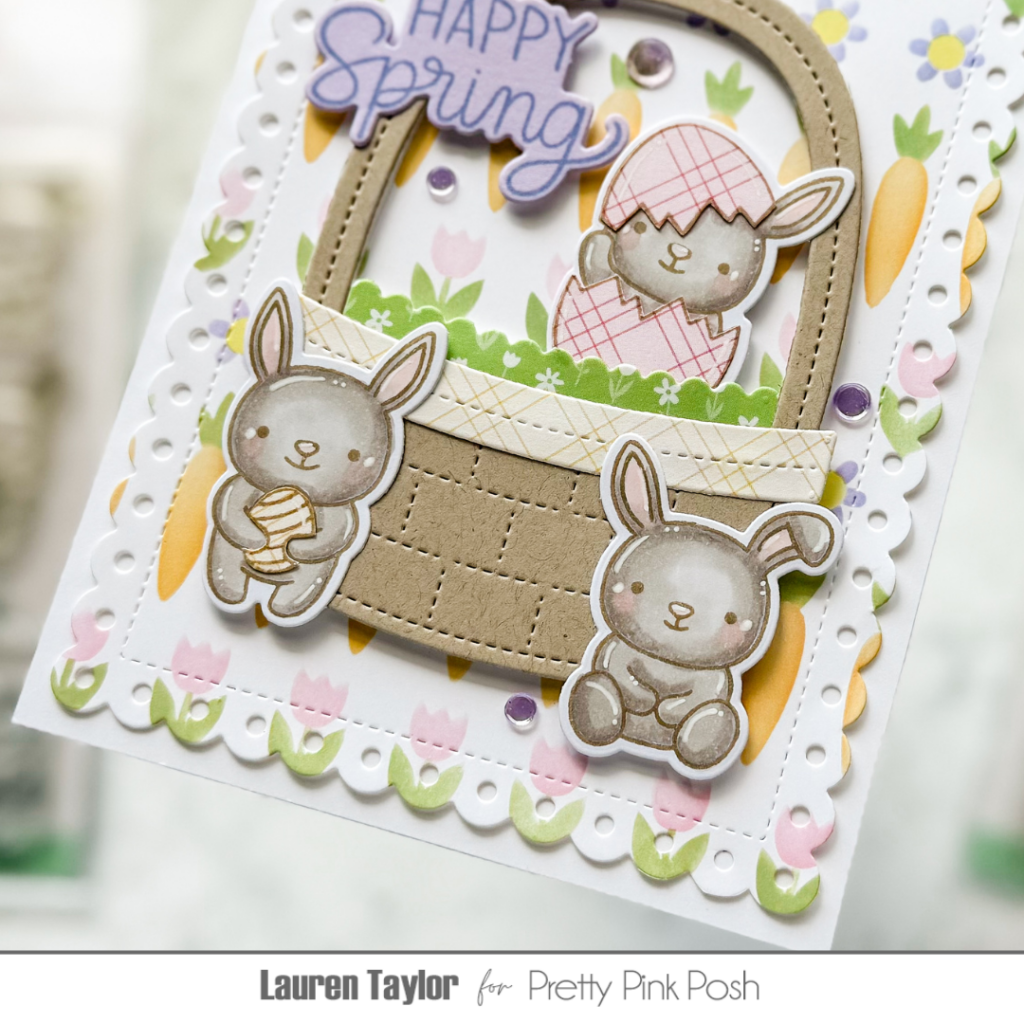
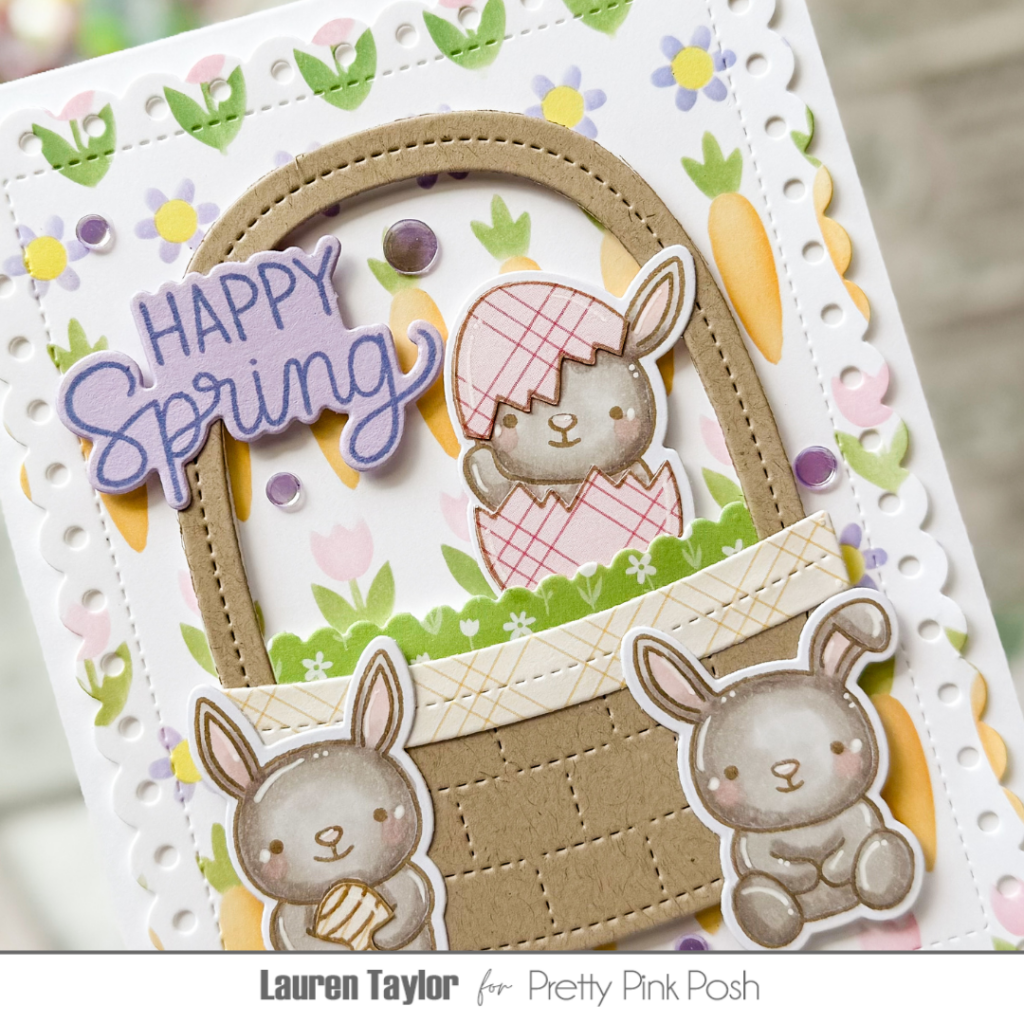
I began by die-cutting my Easter basket and creating a pastel stenciled background using Distress Inks in soft, springy hues.
The layering stencils were key to creating the charming floral and carrot border. I used Spun Sugar, Shaded Lilac, Dried Marigold, Squeezed Lemonade, and Shabby Shutters Distress Inks to bring the designs to life. I then assembled my Easter basket with patterned paper accents. The Bunny Friends were stamped, colored with alcohol markers, and paper-pieced with pastel patterned paper for their eggs, adding a fun touch to mix in coloring and patterned paper.
After arranging the bunnies and basket, I stamped “Happy Spring” from the Easter Greetings set onto lilac cardstock. I then adhered all the elements to an A2 card base, using a mix of foam and liquid adhesive for dimension.
To finish, I added Rainbow Shimmer Confetti for a touch of sparkle. I’m absolutely delighted with how this card turned out and how well all the Pretty Pink Posh products work together! Happy crafting!
This pull-tab design is very easy to make and you don’t even need a special die set! Look through your stash for a circle to make a notch and something to make a channel.
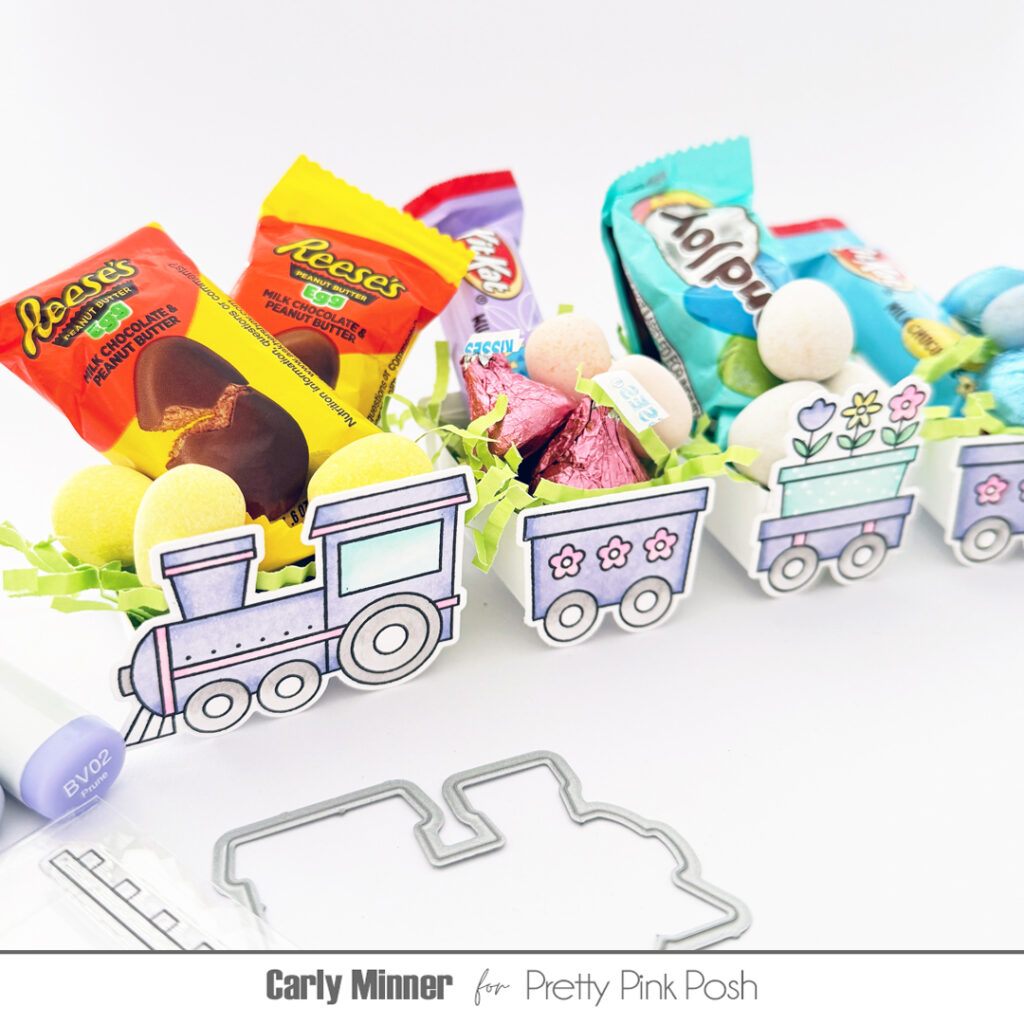
Hi Crafty Friends! Carly here and I’m getting so excited for spring…the sunshine, the flowers, the candy…I love Easter candy! And since I love Easter candy so much, I decided to create a little treat train to fill with candy!
I’ve made these little treat trains before (HERE) and they are so fun every time! And they are truly so easy to make with a simple formula for creating a box, which you can see in the process video!
Thanks so much for stopping by! I hope you’ll join us again tomorrow for another day of Easter inspiration.
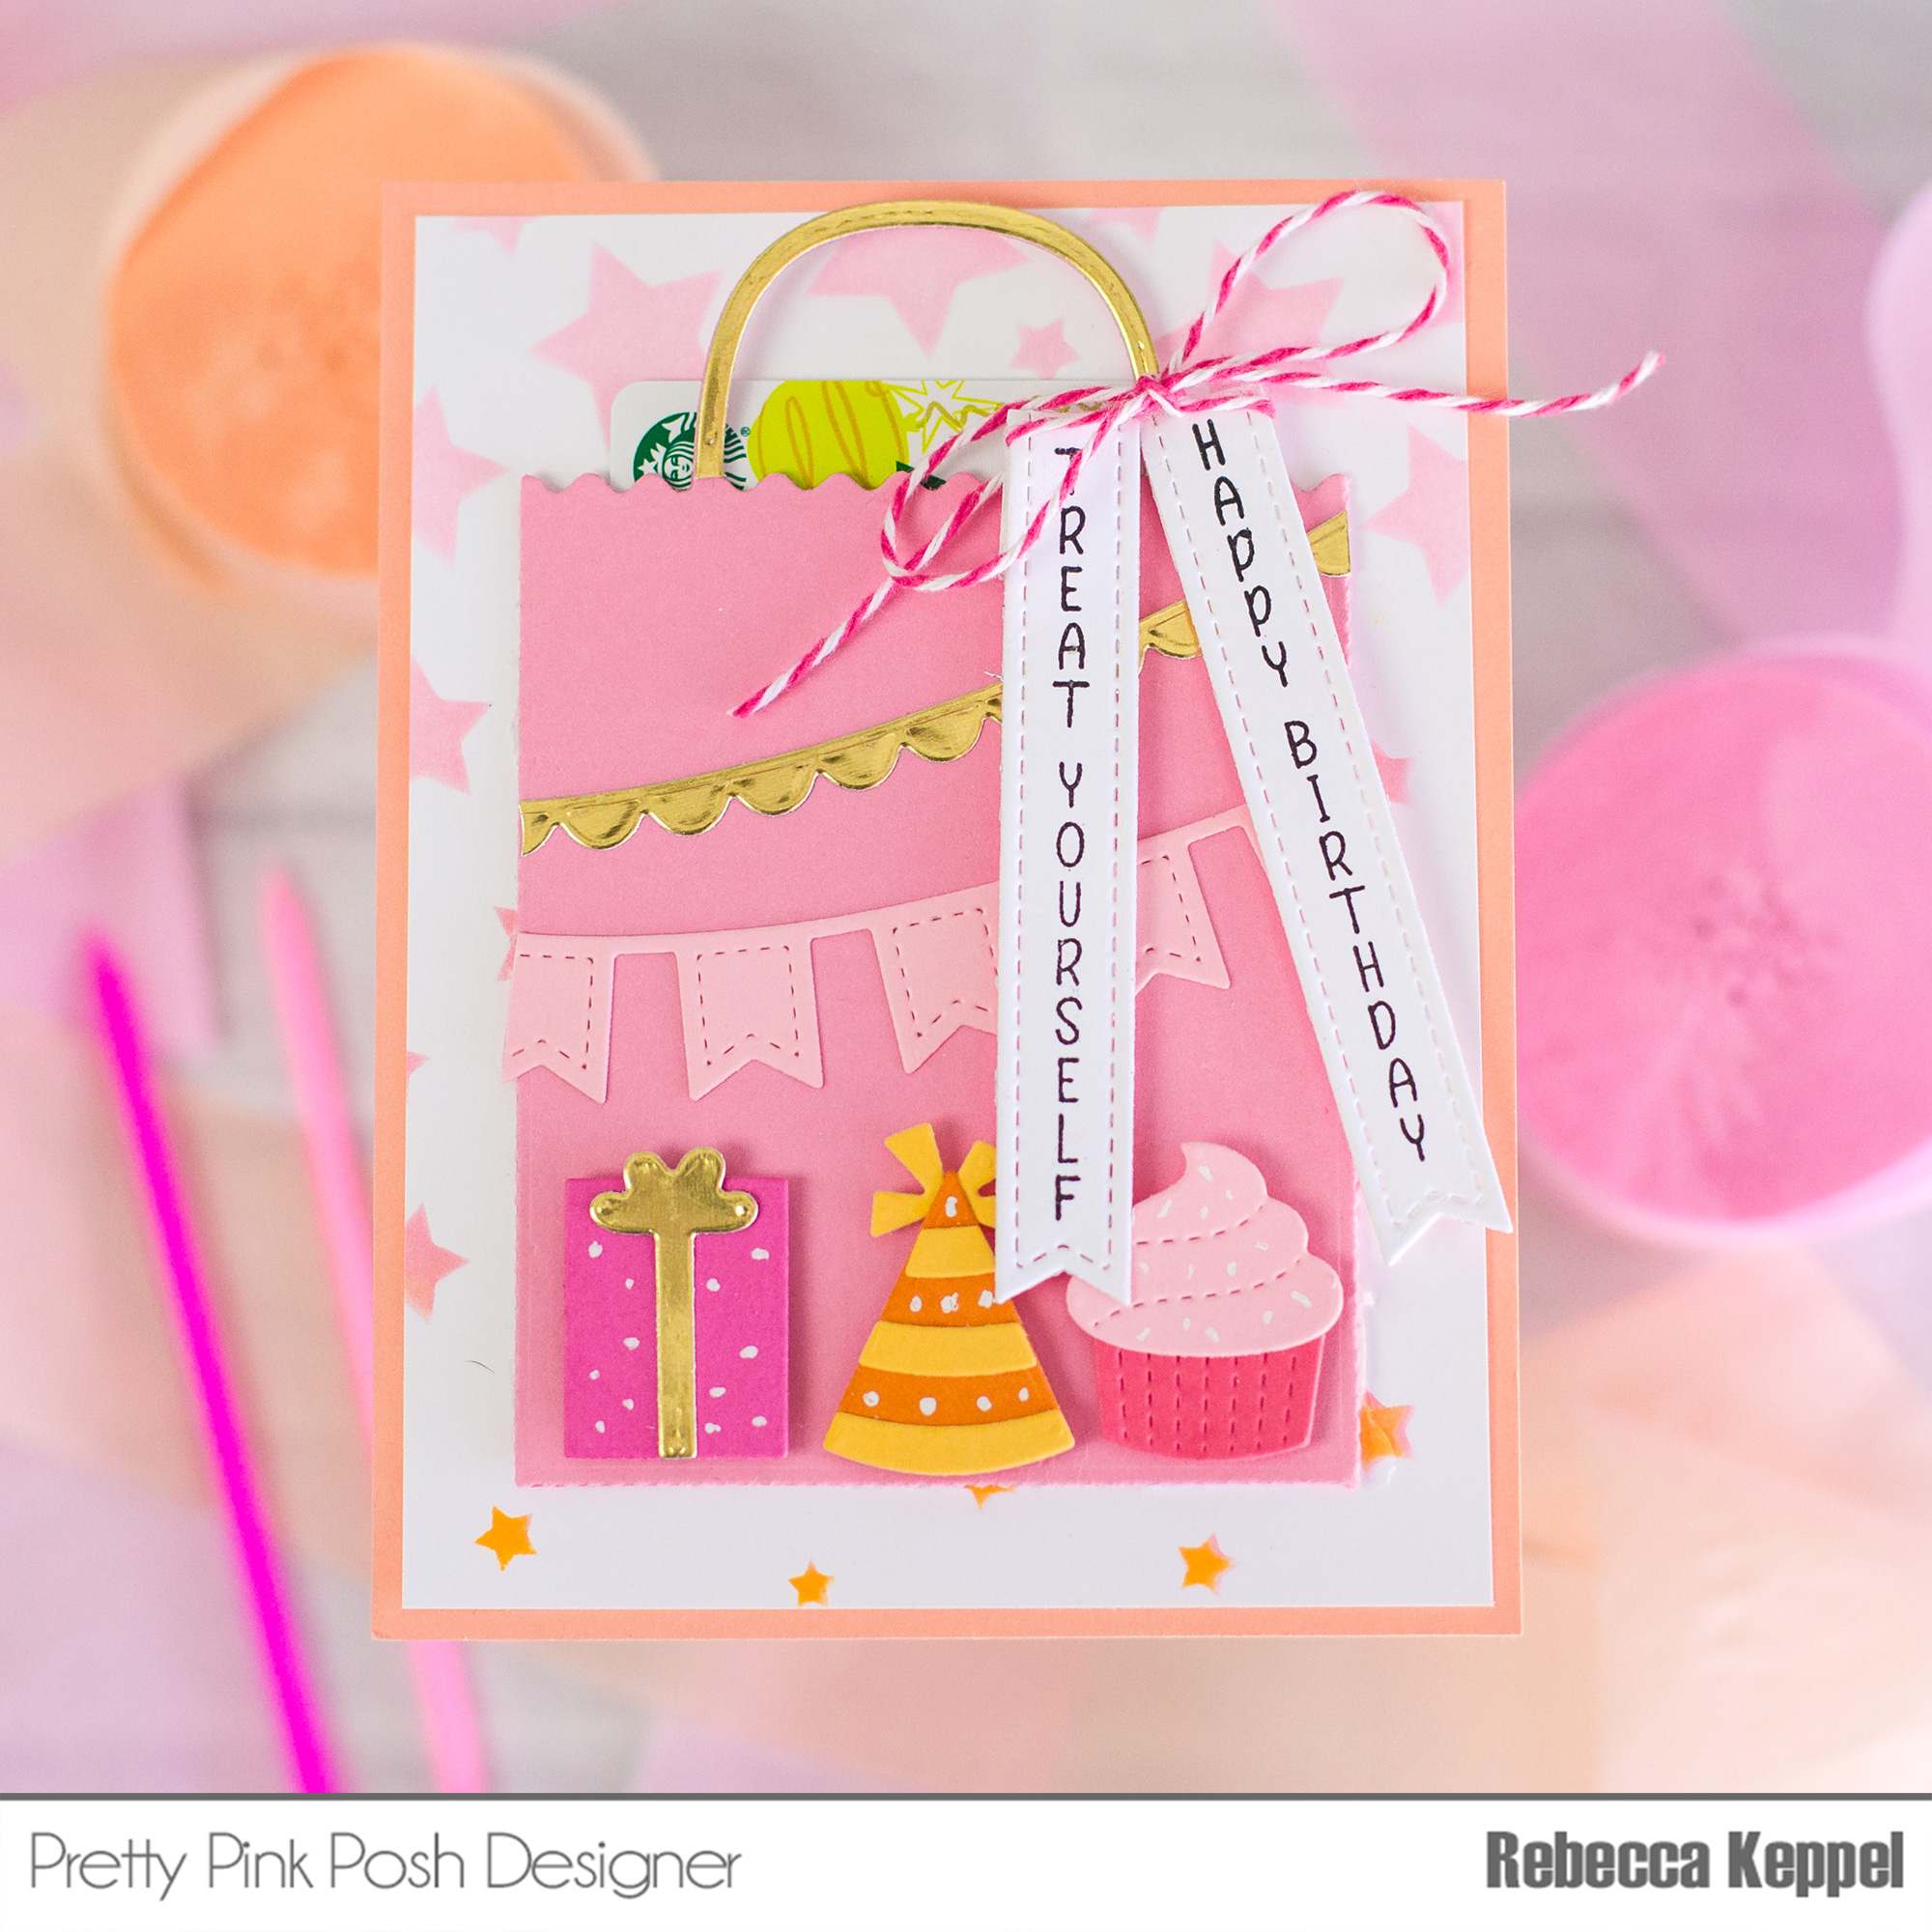
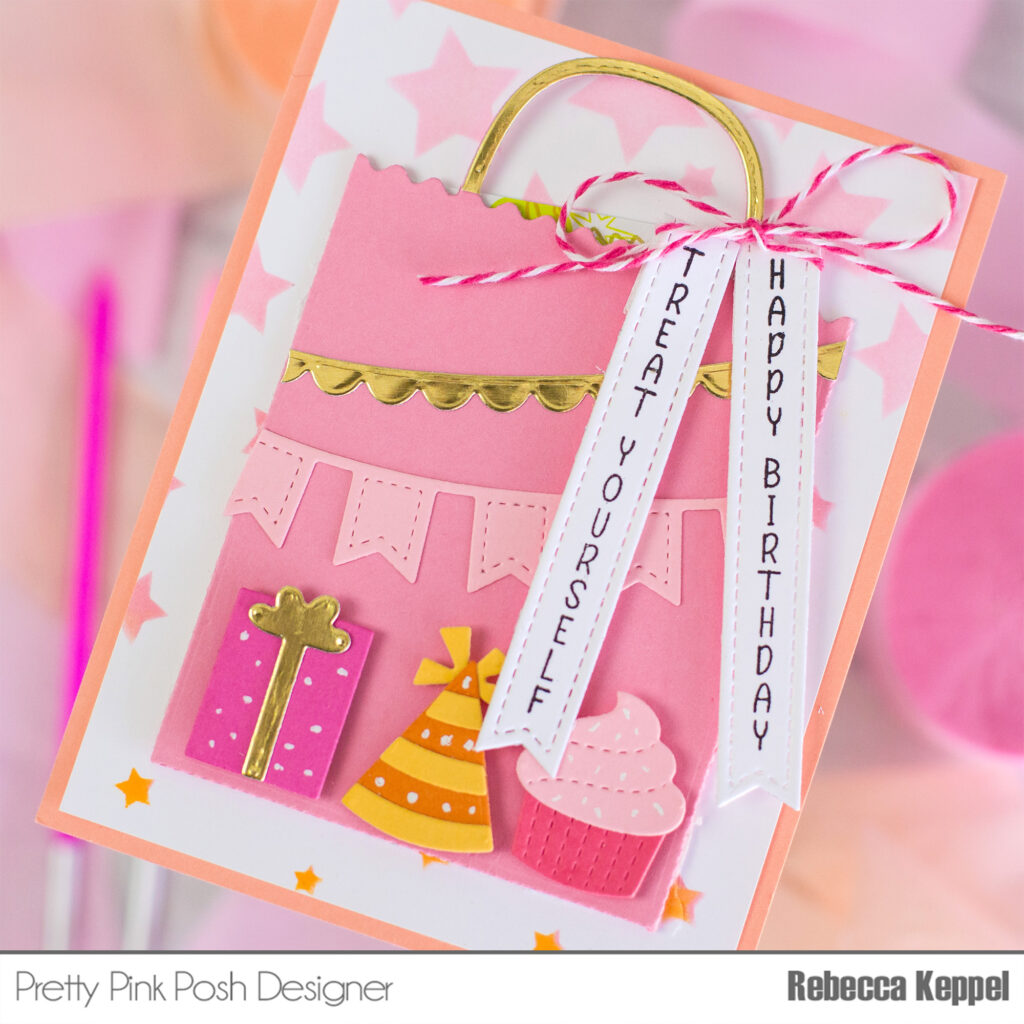
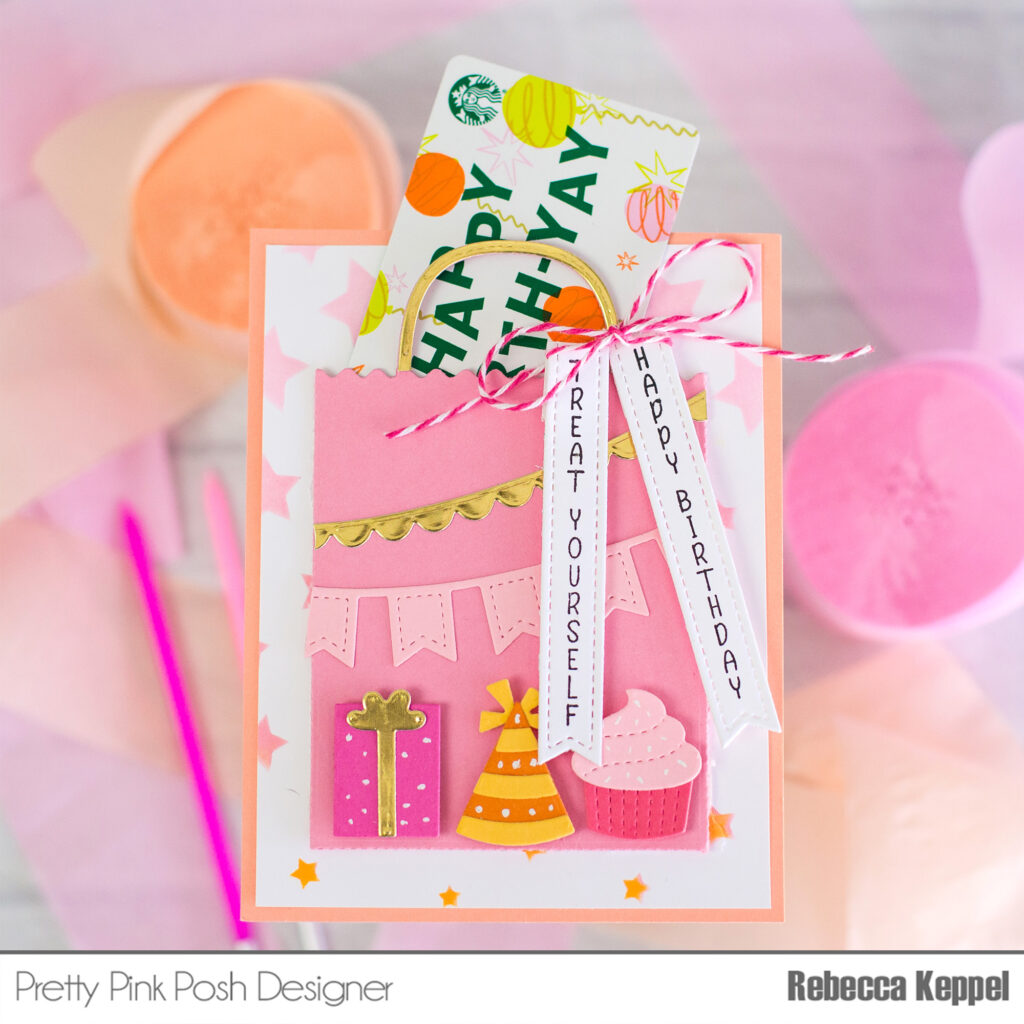
Hi crafty friends! Rebecca here with a birthday card gift card holder! I love creating gift card holders so it’s so easy to give a quick last minute birthday gift!
To create this gift card holder, I started by creating the background with the Cascading Stars Stencil in a gradient of colors. Cut the panel down to 4×5.25” and matte on one of the colors of cardstock.
Then I cut the previously released Gift Card Bag Dies out of a coordinating color of cardstock. There are easily foldable flaps on three sides of the gift bag so bend them back, add double sided tape and then adhere down to the stars background.
For a sentiment, I stamped two of the Upright Greetings: Birthday Stamp Set and then cut them out with one of the Sentiment Strip Dies. Fold the tops of the flag back and fold over twine. Adhere them with foam squares and then tie a bow with the twine. Now you can slide your gift card into your decorated birthday gift bag!
I hope you’ll give this combination of stamps and dies a try so that you have a quick gift to give in a last minute situation!
The March 2025 Release is now available in the Pretty Pink Posh Shop and select retailers that carry our products. If you missed our post yesterday, we revealed all of the products in picture form, but if you would like to see them in a video, Mindy has that for you today!
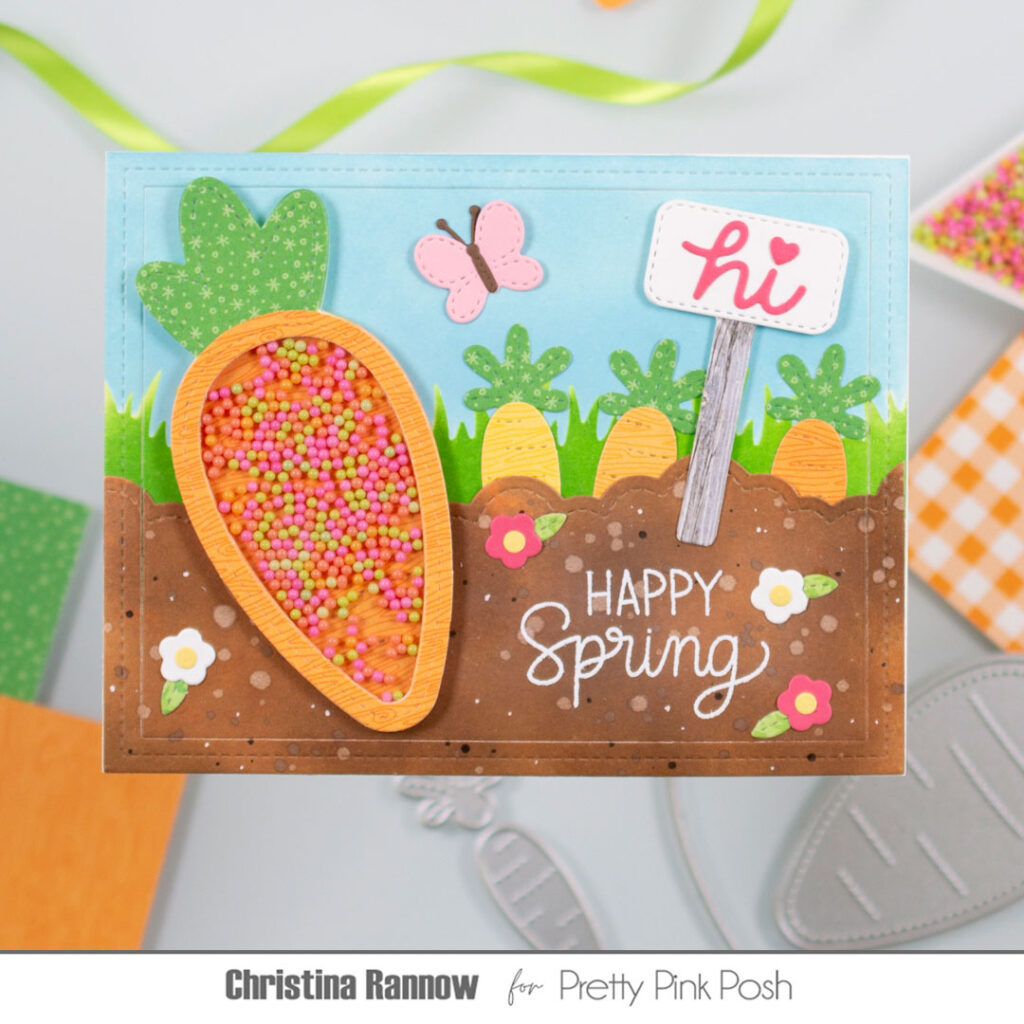
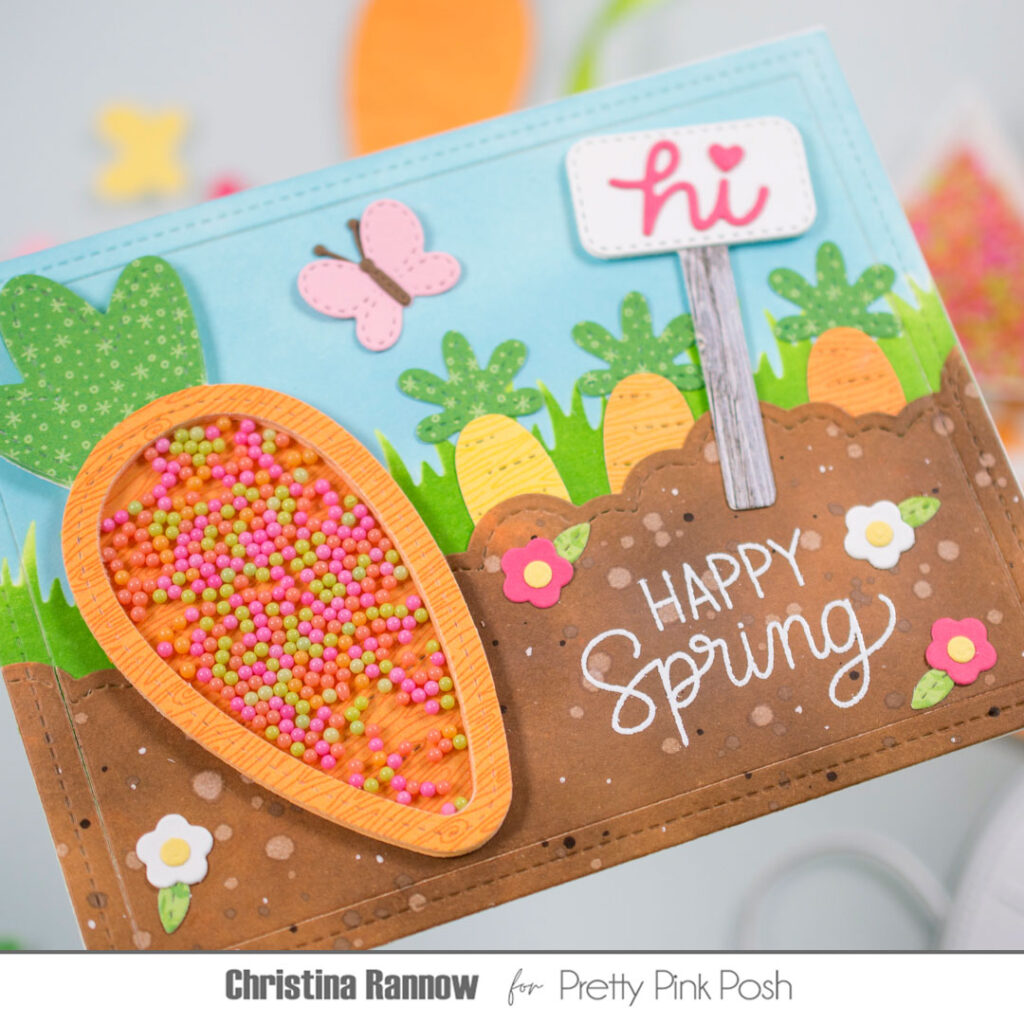
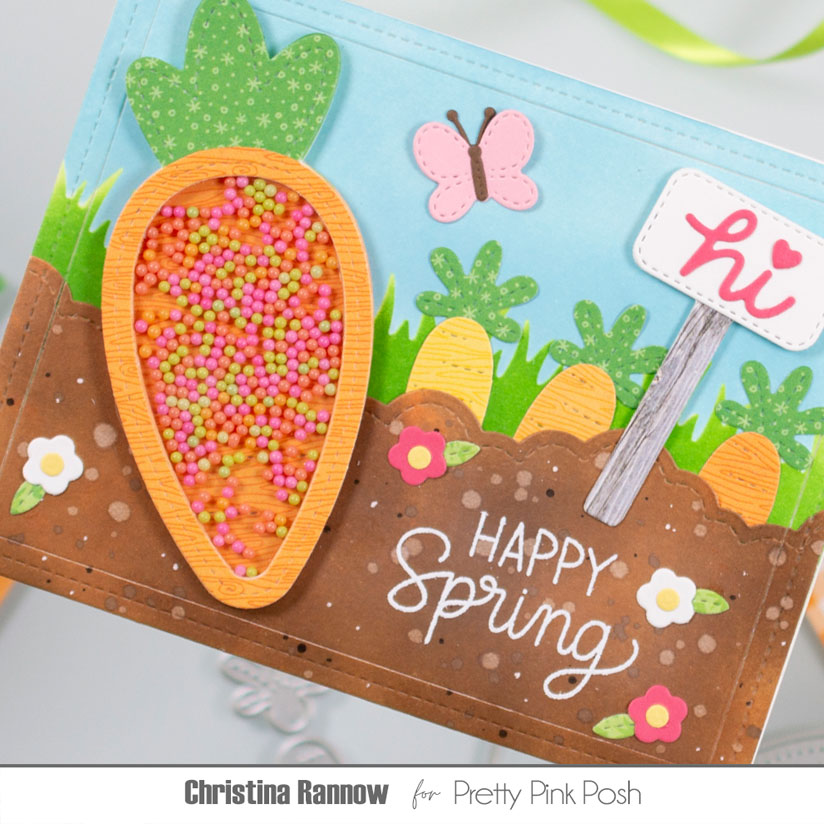
Hi friends! Christina here to share this adorable spring garden scene featuring the new Carrot Shaker from the latest PPP Easter release. I used some previously released dies to round out the scene, and I snuck in the new Grass Border die, but I used it as a stencil! Keep reading to find a supply list and the instructions for creating this garden scene with a fun carrot shaker addition! Let’s get started!
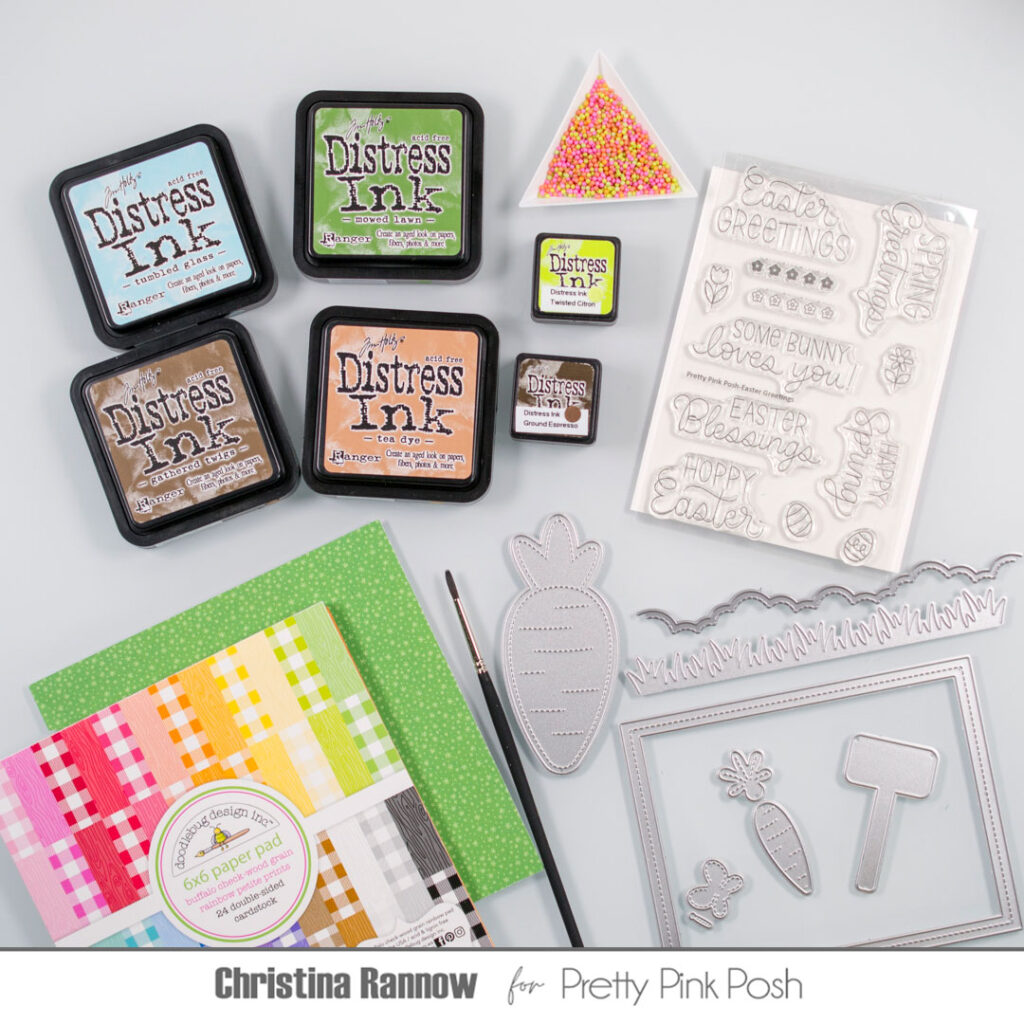
My first step was to create the background garden scene. I started by die cutting the grass border from scrap cardstock and using it to stencil grass on a white 4 ½ x 5 ½ inch cardstock panel. Then I used the same grass border “stencil” as a mask to ink the sky. I didn’t bother inking the bottom of the panel because it would be covered with the dirt layer. To make the dirt layer, I die cut a cloud border from another 4 ¼ x 5 ½ inch white cardstock panel and inked it with the Distress inks. I spattered the dirt panel with water and with Ground Espresso Distress Ink for lots of texture.
I let the dirt panel completely dry before stamping and heat embossing a sentiment in white in the lower right-hand corner. Then I die cut both background panels with the stitched frame and attached the dirt panel to the grass and sky panel, leaving the top open so I could tuck some carrots into the dirt!
My next step was to die cut all the elements for the garden scene. I used patterned paper for the small carrots and tucked them into the dirt. I die cut the flowers, the butterfly, and the sign and attached those to the scene after assembling them.
My final step was to construct the carrot shaker. I kept things simple and assembled the shaker separately and then attached it to my scene. I started by die cutting six carrot frames and stacking them together to create the walls of the shaker. Then I attached a full size carrot die cut from orange patterned paper to be the base of the shaker and added the shaker beads. Lastly, I die cut another carrot frame from orange patterned paper and attached a piece of acetate to the reverse side before securing it to the top of the shaker. To complete this garden scene, I added a green carrot top die cut from patterned paper and then attached the completed shaker to the scene.
And that completes this fun springtime garden scene! Thanks so much for reading about my latest PPP card design. See you soon!