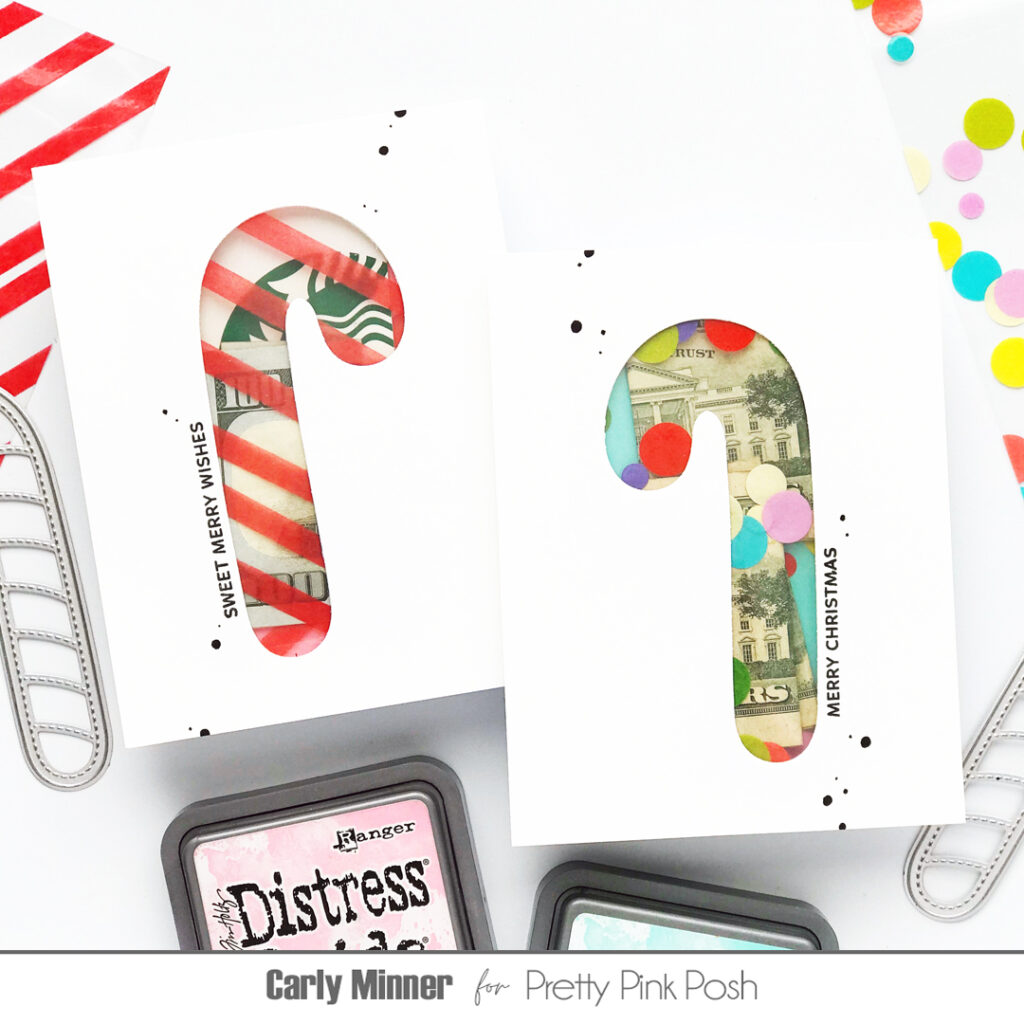
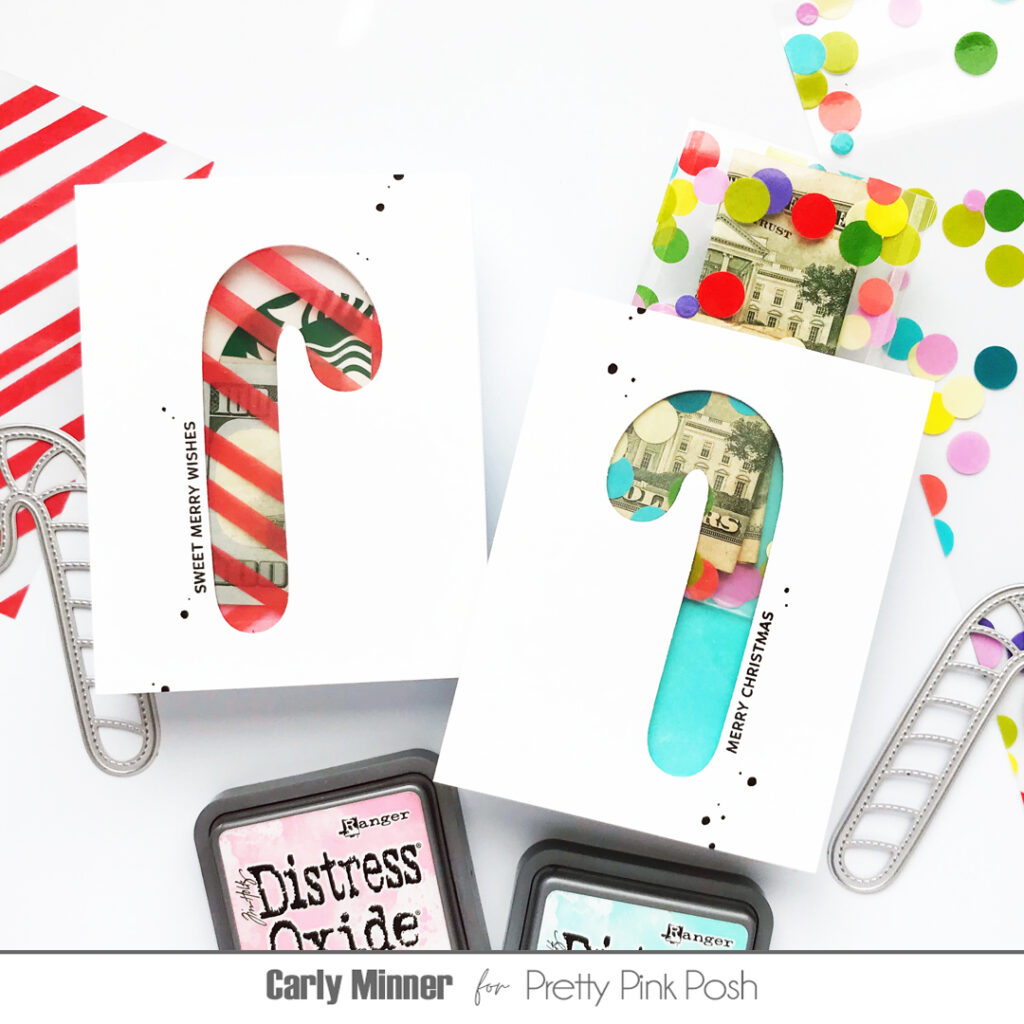
I love all of the Pretty Posh Shaker dies for making shakers but they are also awesome just for the negative die cut space! They make some of the best windows!
I used the base layers from the Candy Cane Shakers to create windows and then created an acetate pocket to fit behind it that can hold gift cards and money. I love the result! It feels like such a fun way to customize a gift that could feel impersonal. Just think of the possibilities for holiday shapes like this or this or this!
I hope these projects and video inspired you this holiday season.
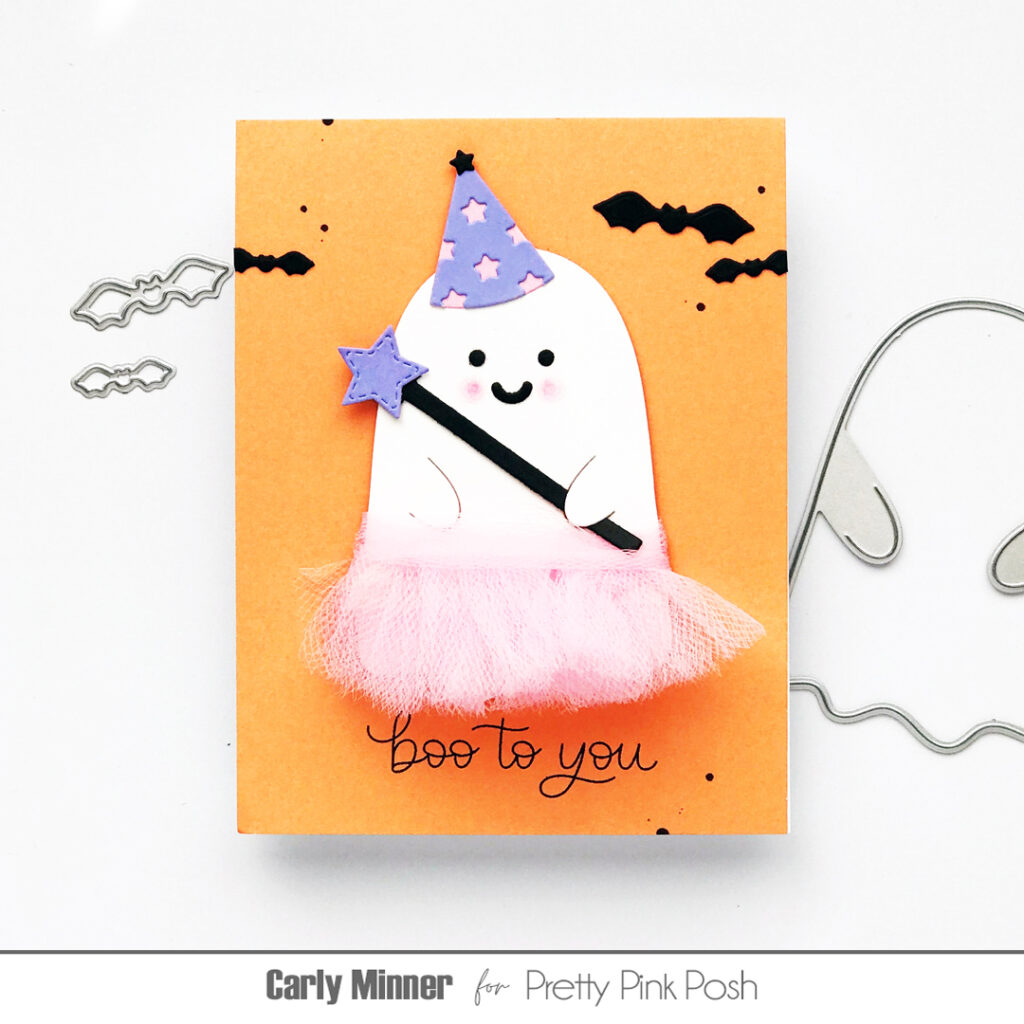
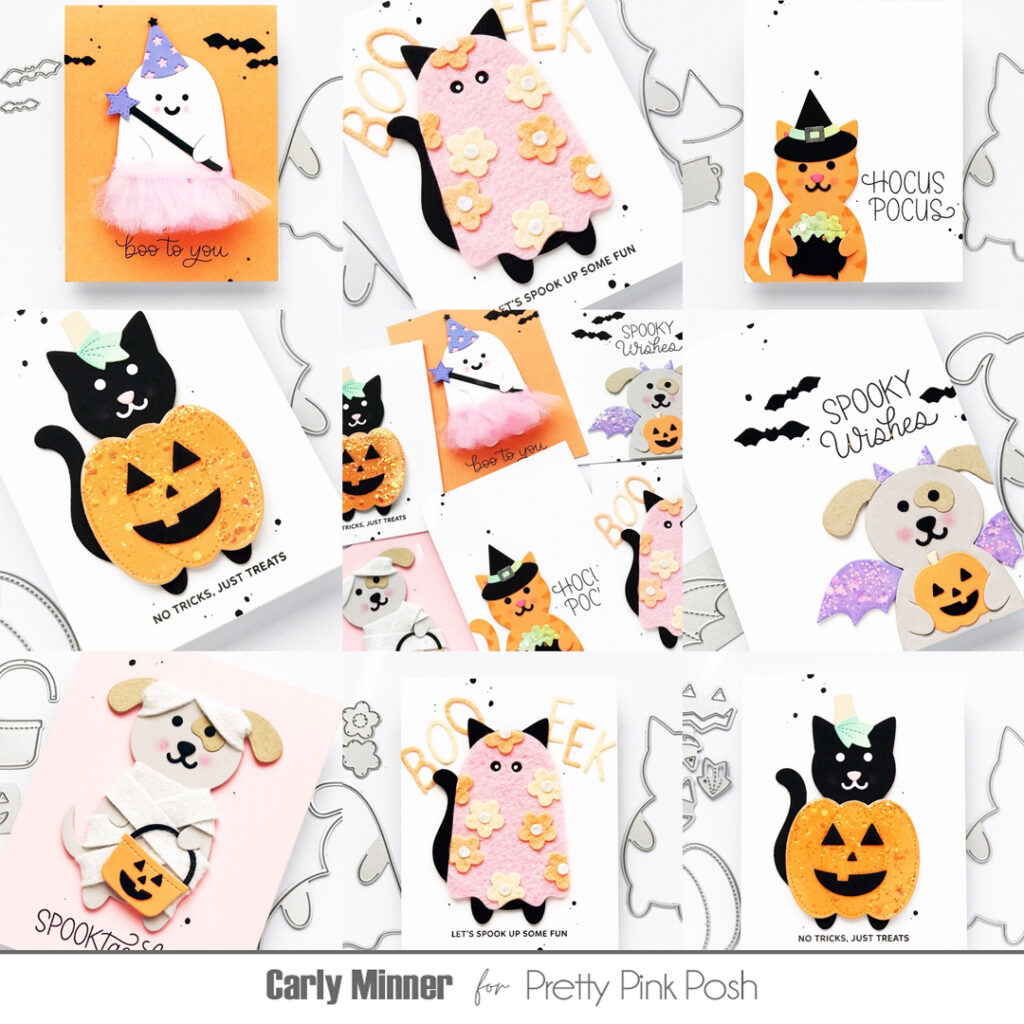
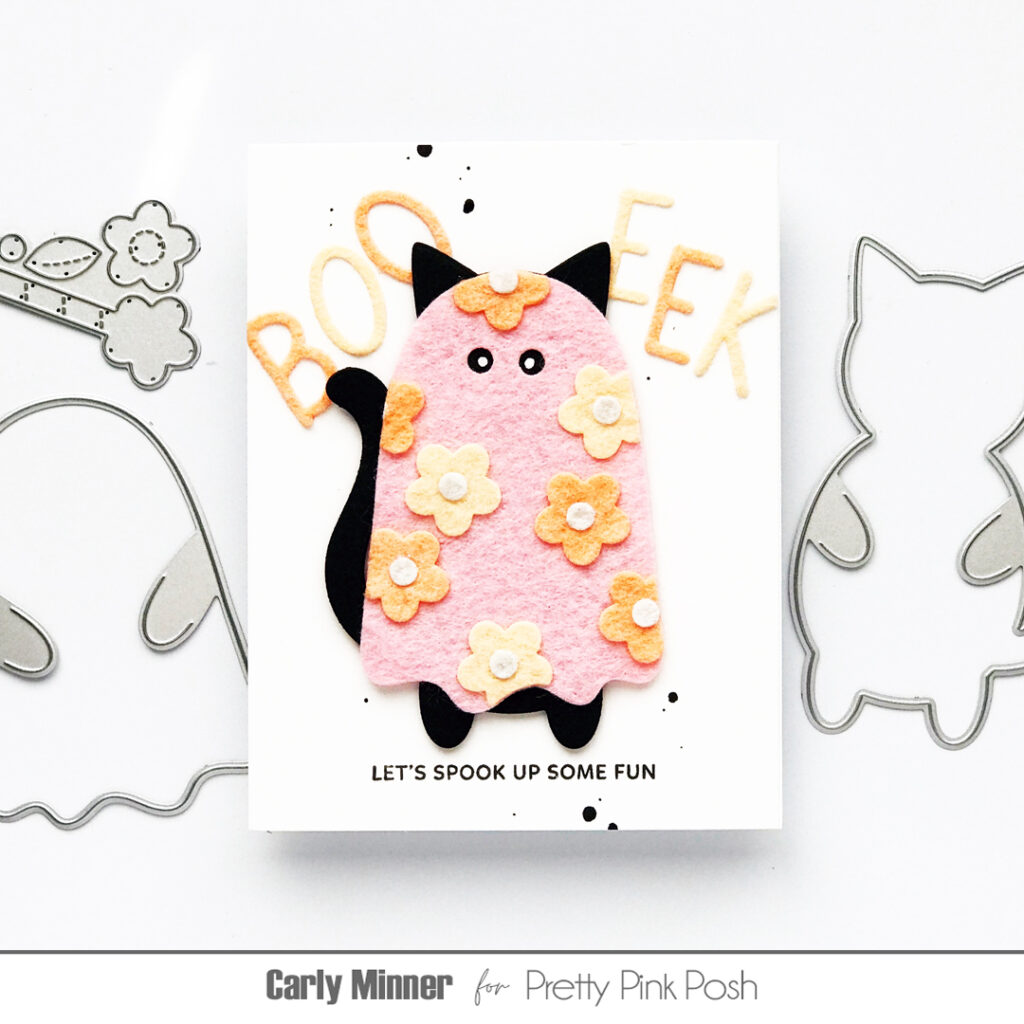
Hi Crafty Friends! Carly here and you might already know how much I adore all the Pretty Pink Posh holder dies (and if you don’t know, the answer is SO MUCH). Last Halloween I turned the Ghost Holder into a ballerina and it was one of my favorite cards of the year!
And my favorite of the bunch is the combo of the Ghost Holder and the Cat Holder. It looks like the kitty borrowed a floral bed sheet to make a costume!
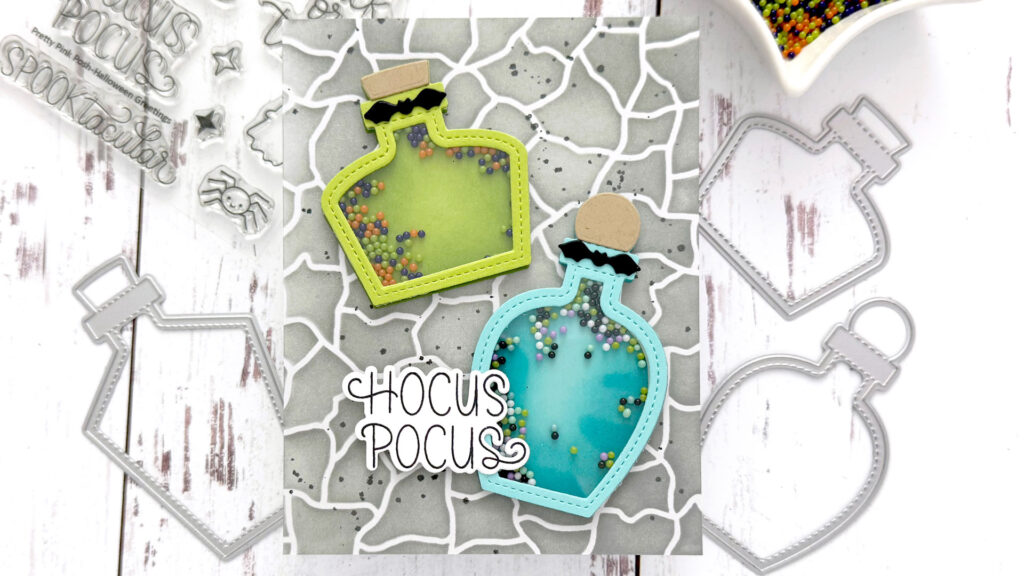
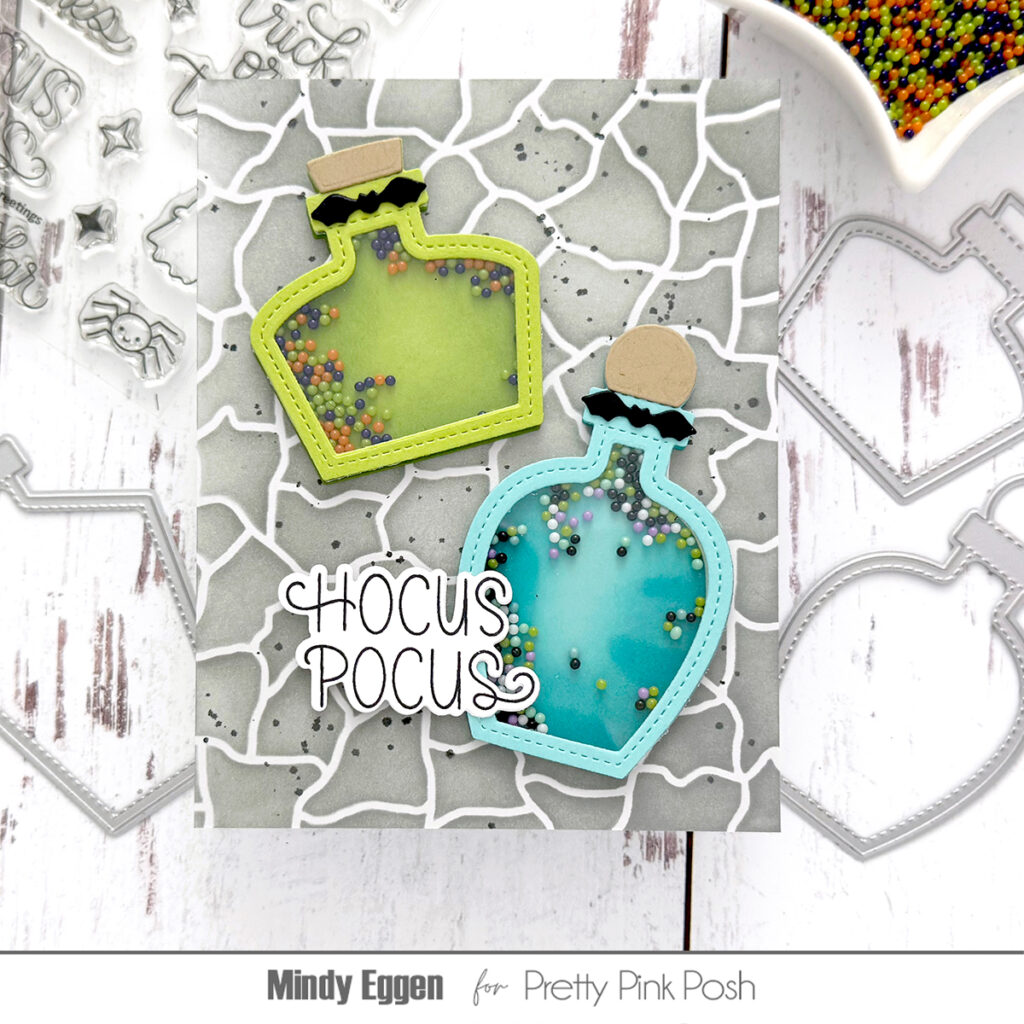
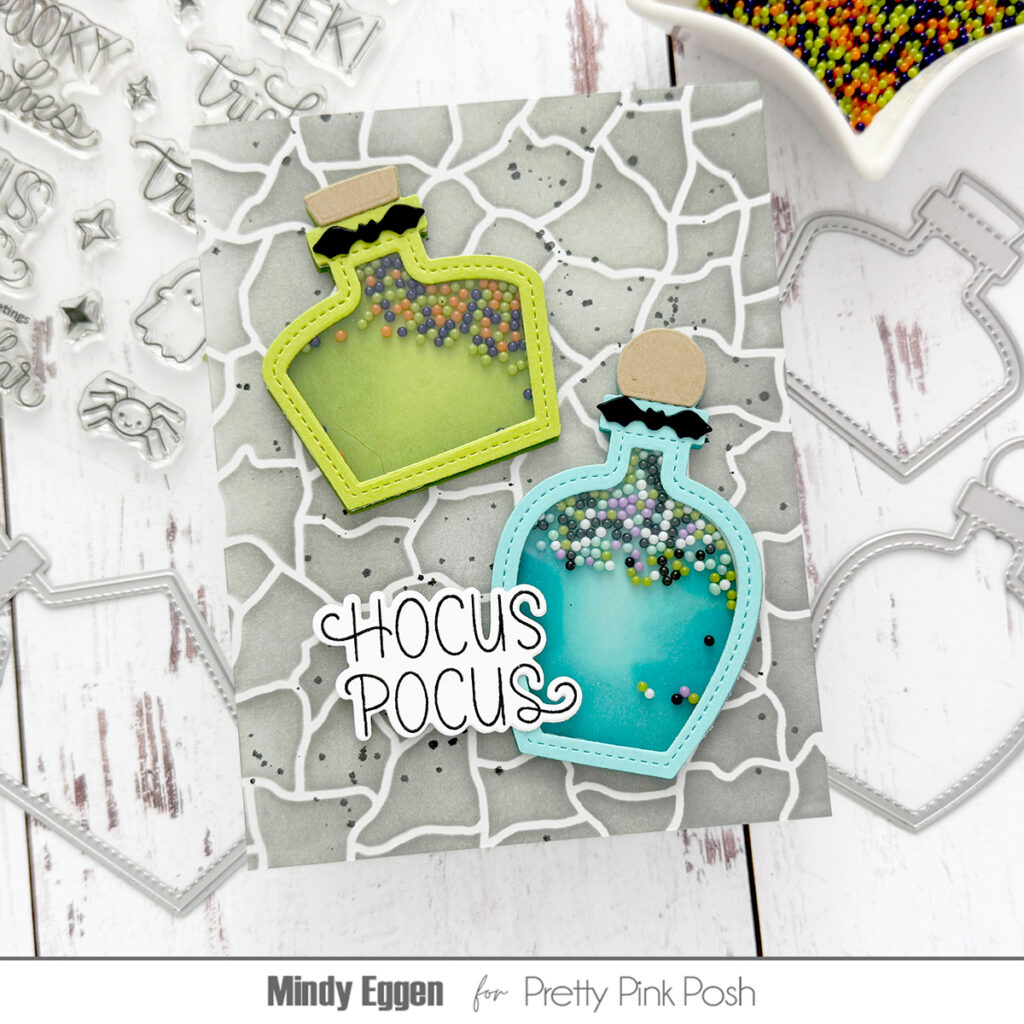
Welcome, friends! It’s Mindy Eggen, and today I’m sharing a tutorial for making potion bottle shaker cards that are full of Halloween fun and a touch of spooky charm.
I started by creating a moody, textured background using the Crackle Stencil on Fog cardstock, layering in Hippo ink for depth. To give it a little extra eerie flair, I flicked Black Soot Distress Spray Stain across the panel with a paintbrush, creating splatters.
For the potion bottles, I die cut shapes from Sea Glass and Jelly Bean Green cardstock using the Potion Bottle Shakers die set. Then lightly ink blended the base pieces to add dimension and visual interest.
The real magic comes from the shaker elements: the blue potion bottle is filled with the Spellbound shaker mix, while the green potion bottle holds the spooky Halloween Night shaker beads—both adding movement and color to the card.
To bring everything together, I added a sentiment from the Halloween Greetings stamp set. The result? A fun, interactive card that’s perfect for Halloween or anytime you want to add a little potion-inspired enchantment to your creations.
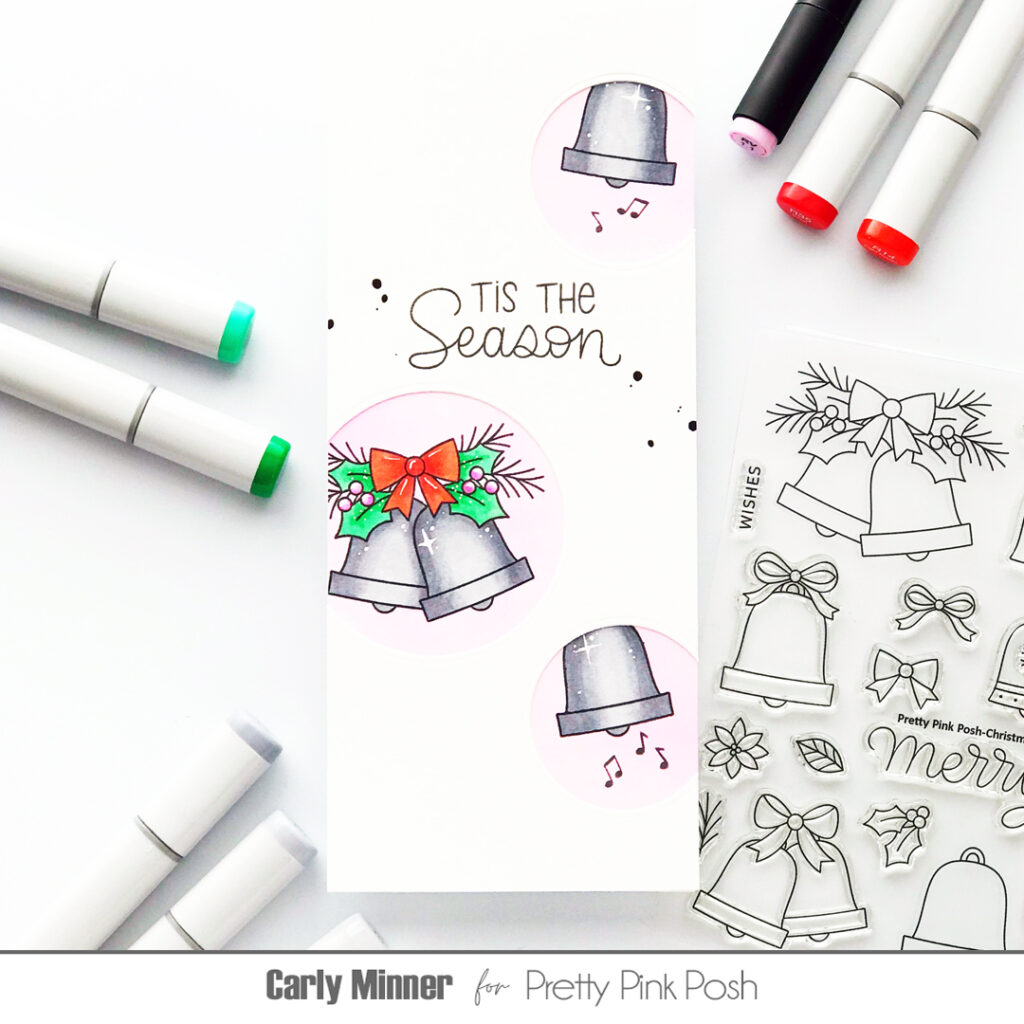
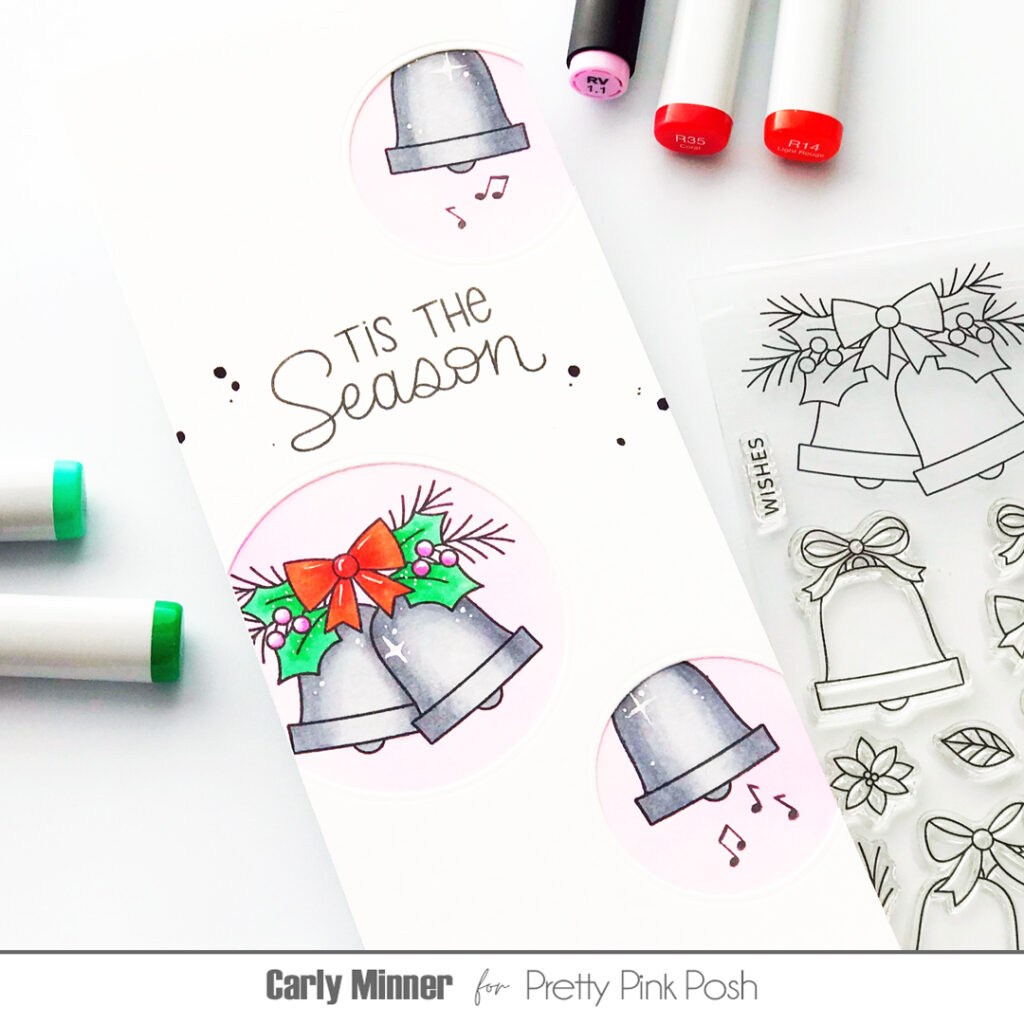
Hi Crafty Friends! Carly here and I’m excited (and a little nervous) to share my first coloring tutorial with you! When I saw the PPP Christmas Bells, I immediately heard Silver Bells in my head and I wanted to try coloring them a little more realistically than I would usually attempt.
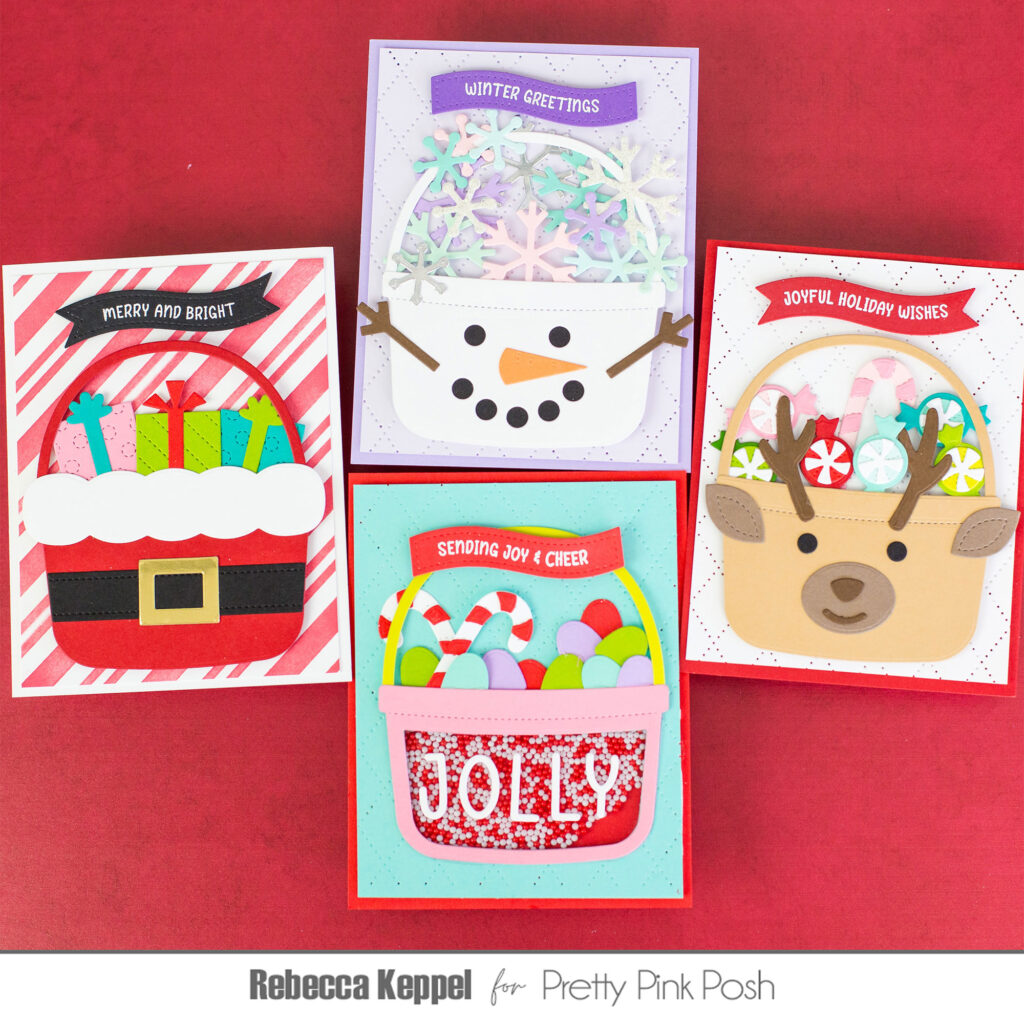
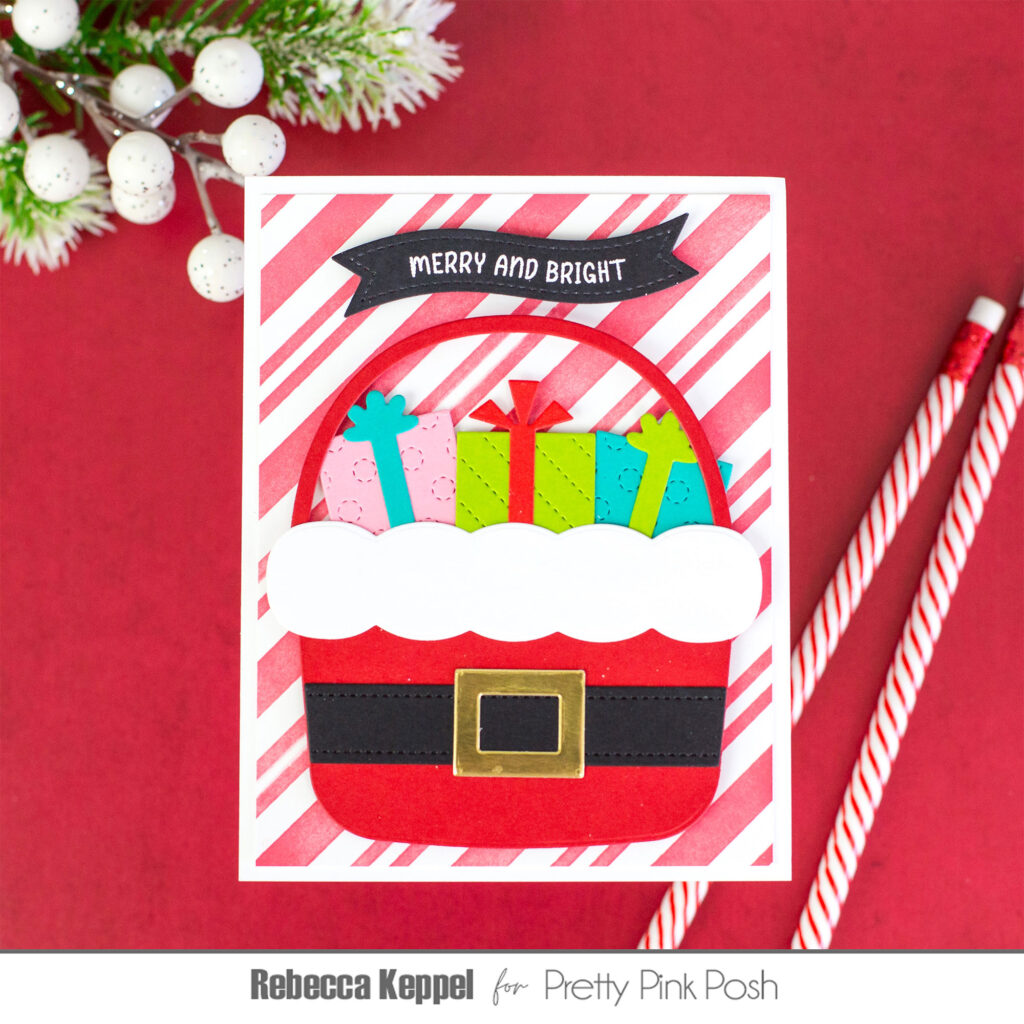
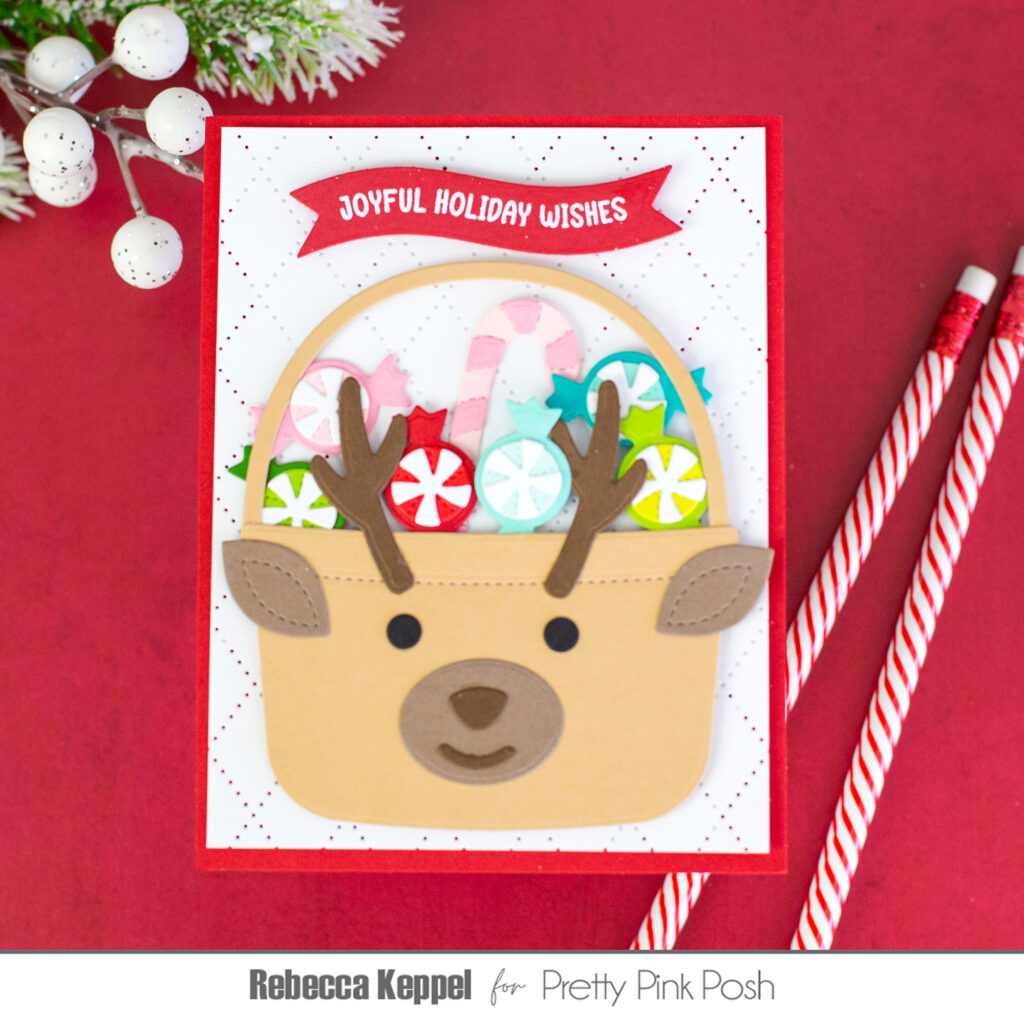
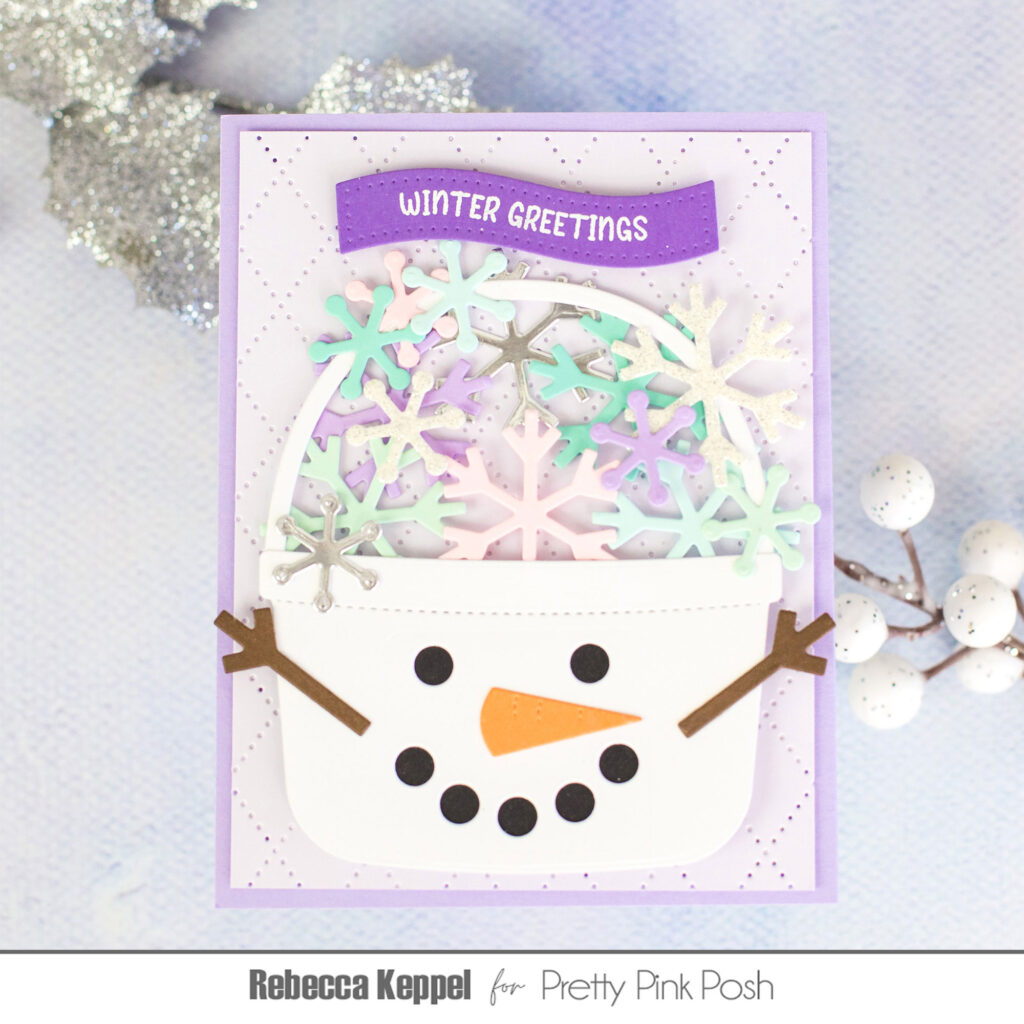
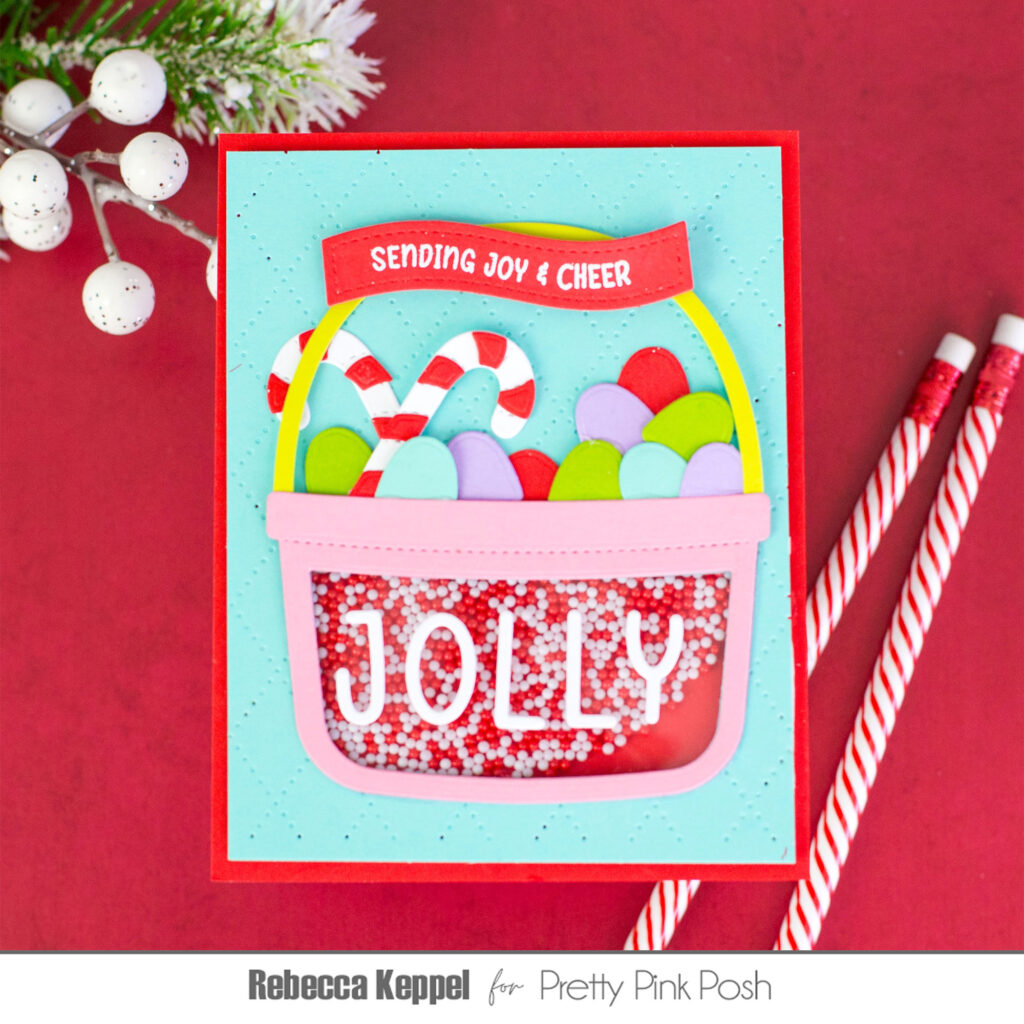
As an “additions” die set it is meant to pair with the original Candy Bucket Dies. From the original die set you can cut out the buckets and handles. Then the Christmas Bucket Additions Dies has elements to add to the buckets to make them look like Santa, a reindeer or a snowman. The original Candy Bucket Dies also has a inner bucket shape that can be used to cut a window out of the bucket, making it into an adorable shaker.
For my Santa bucket I filled the bucket with presents. The Christmas Bucket Additions Dies comes with two presents dies and 2 ribbon/bow dies.
For the reindeer bucket, I filled it with peppermint candies. The Christmas Bucket Additions Dies comes with a layering die that creates a striped round candy and a wrapper.
With the snowman bucket I used the two snowflake dies to fill the bucket. And for the shaker I filled it with candy canes and gum drops from the die set and then added Candy Cane Shaker Beads to the shaker element.
Hi friends, it’s Carly! I’m excited to share a project using the brand new holiday release.
This project is part of our September Video Hop! Check the description in the video for links to the next stop so you can keep hopping along for tons of holiday inspiration.
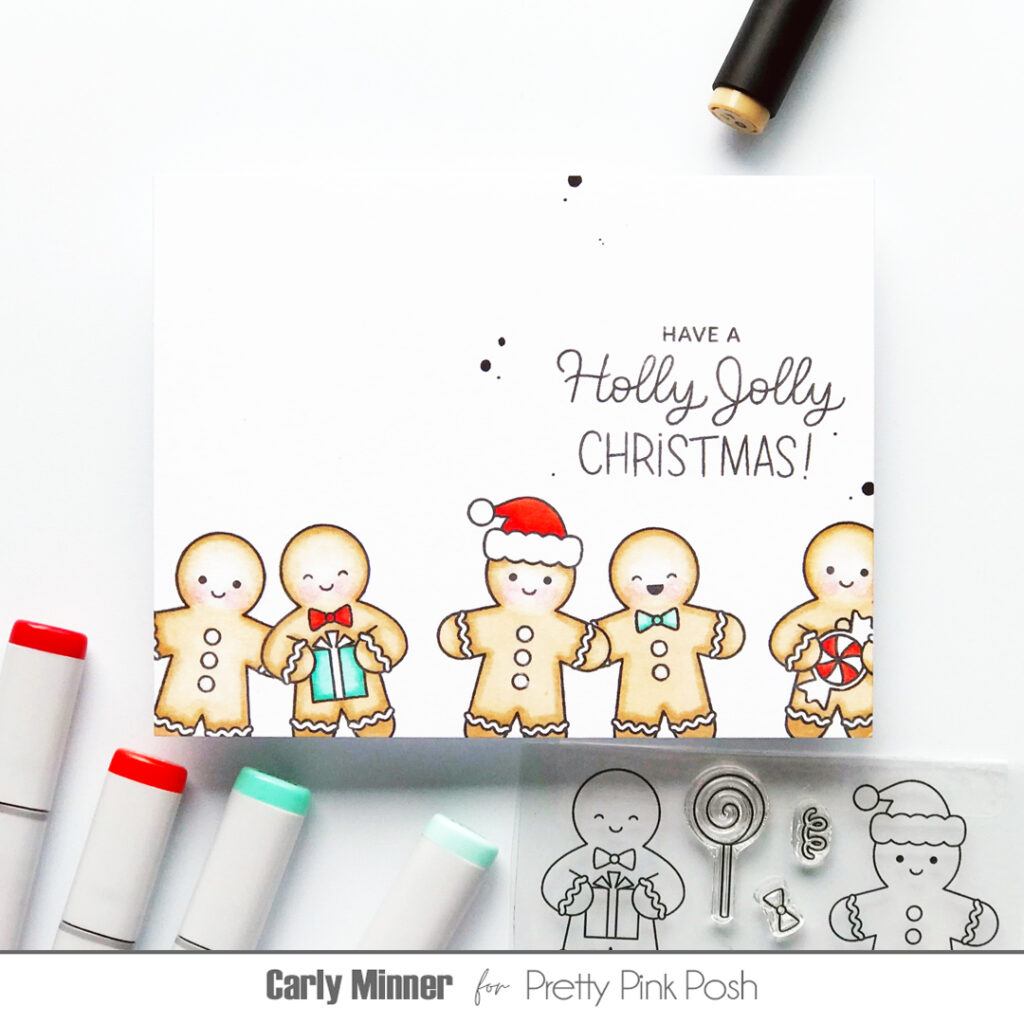
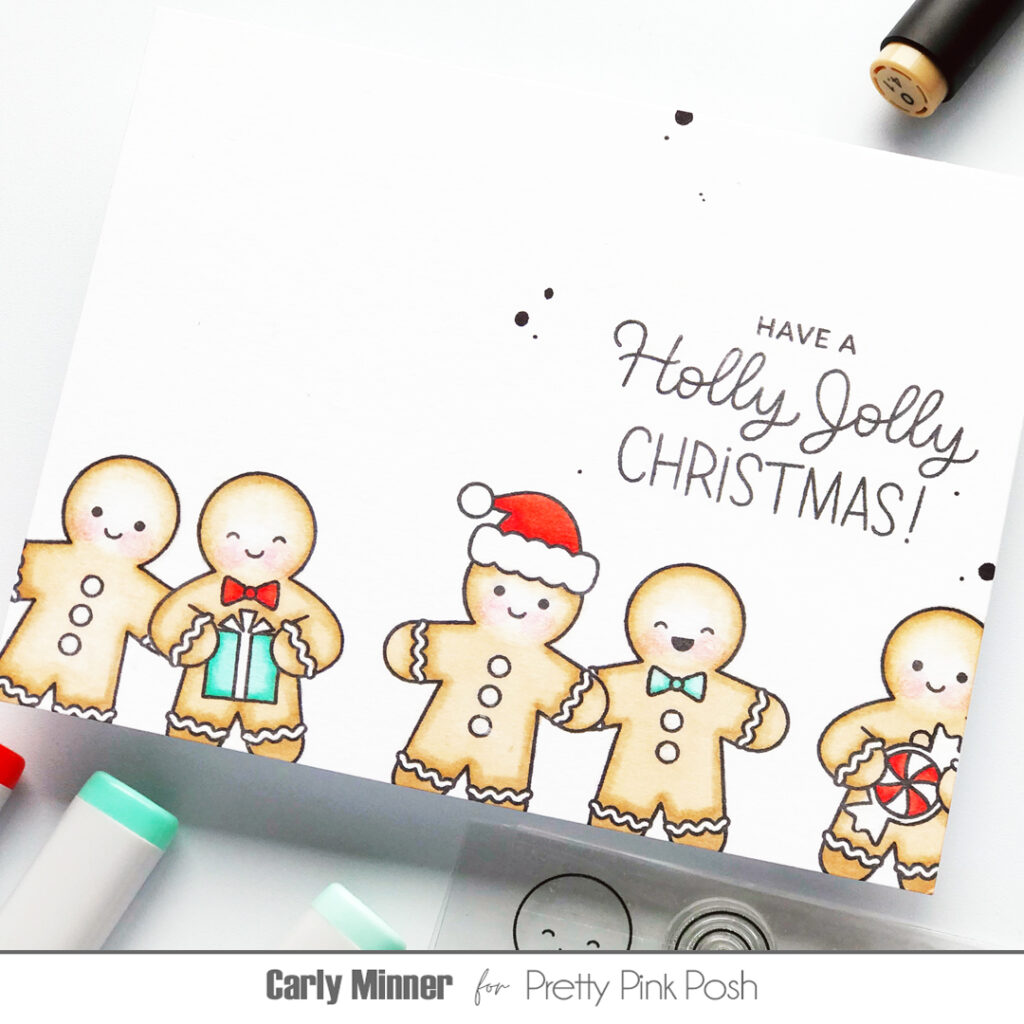
Do you have a favorite stamping technique? Simple masking is one of my favorites and it is so easy! It’s one of the first stamping techniques I learned and I still love it for creating clean & simple one layer cards!
If you haven’t tried masking yet, basically it is a technique that allows you to layer images by stamping one and then covering it with a temporary mask before you stamp the next image.
For this sweet Gingerbread Friendscard I did a little simple masking so that the gingeys could be standing together.
Here are my top masking tips…
make a plan before stamping…which images should look like they are “in front” because they will need to be stamped first. A sketch can help in the planning or even stamping it all first without masking.
start with post-its…there are lots of options for low-tack, stamp-able masking paper but try it with a Post-It first. Then if you love the technique of masking you can invest in more supplies.
stamp masks in permanent ink…using a waterproof/permanent ink for stamping the masks will keep ink from transferring from the masks to your project while you are using them.
to make the mask…just stamp on the Post-It, fussy cut the image out aiming for the middle of the stamped line and then it’s a little temporary masking sticker! And make masks last longer by putting a piece of clear packing tape on top before cutting out.
have a black pen handy…a black pen can help “fix” any of the stamped lines that might have been missed because of a mask. I’m not great with fussy cutting so often my masks aren’t perfect but I can fix it with a pen. I like to use Copic Multiliners when I know I’m going to color with alcohol markers
have a white gel pen handy…it makes a great “eraser” for any little bits you didn’t mean to stamp or any coloring that went outside of the lines.
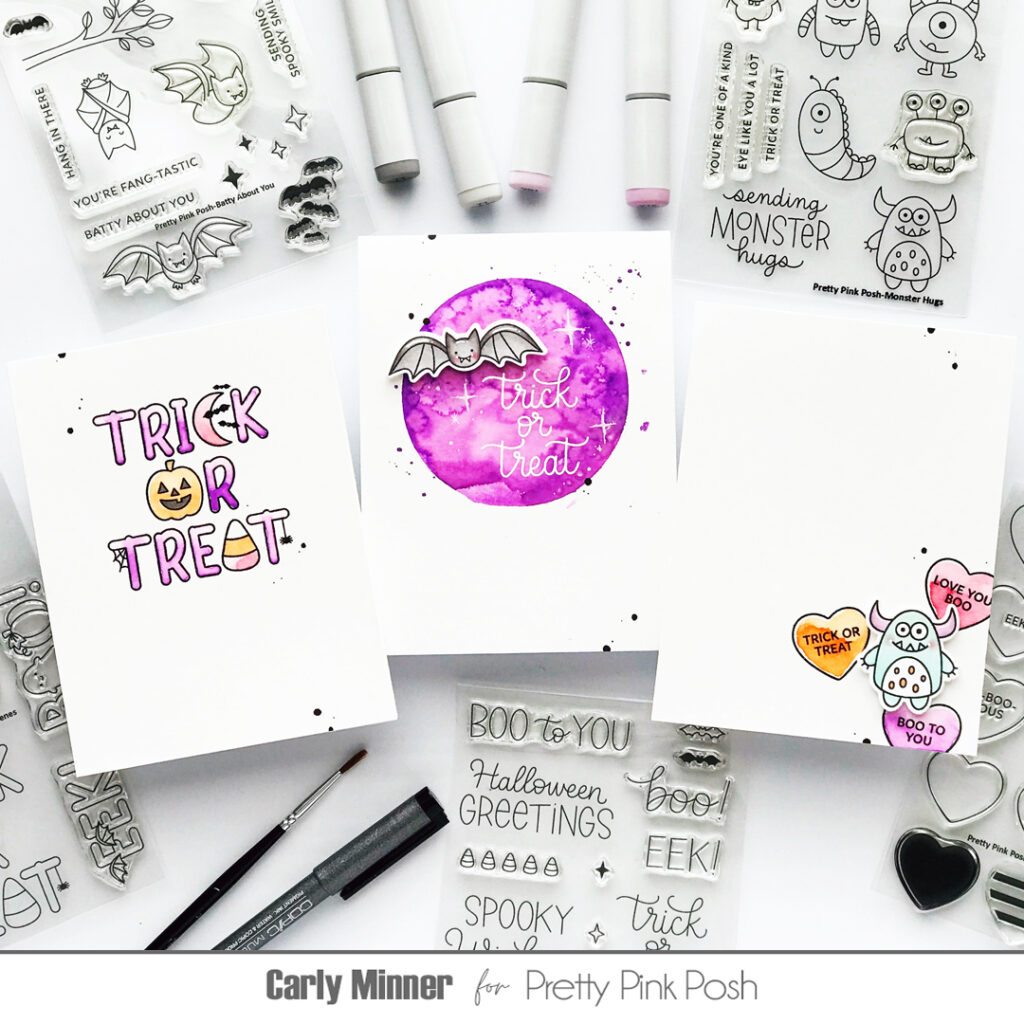
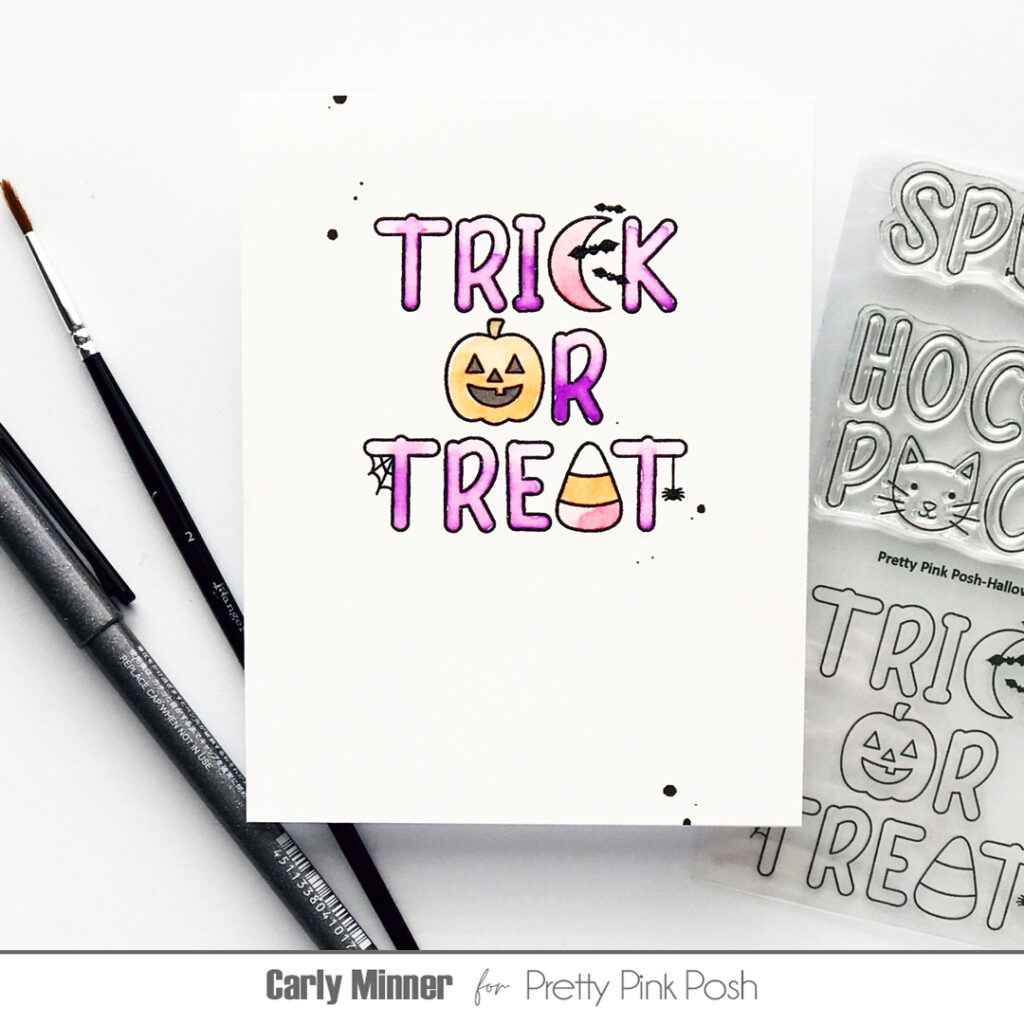
Hi Crafty Friends! Carly here and when I first started making cards, simple watercoloring was my favorite way to color stamped images because it’s easy to do with supplies you likely have on hand. And it doesn’t have to be precise or perfect, in fact I think it benefits from a little messiness!
use watercolor cardstock that can stand up to water without too much warping & piling. It can also help to tape your cardstock while painting.
stamp using a permanent ink that won’t bleed when water is added. I even like to stamp in black and emboss with clear powder to create a “wall” to keep my paint in the lines.
use water based inks to paint with.
to clean up little mistakes, use a small brush with clean water or even a baby wipe. And if the color doesn’t lift up as much as you would like, you can cover mistakes on white cardstock with a white pen.
smoosh the ink pads (or drop reinkers) onto a non-porous surface such as an acrylic block or plate to create a palette.
use more water to dilute color or less for a bold vibrant result.
allow drying time between each layer of watercolor. To speed things up you can also dry with a heat tool between layers.
I hope you were inspired by these cards and video. Thanks so much for stopping by!
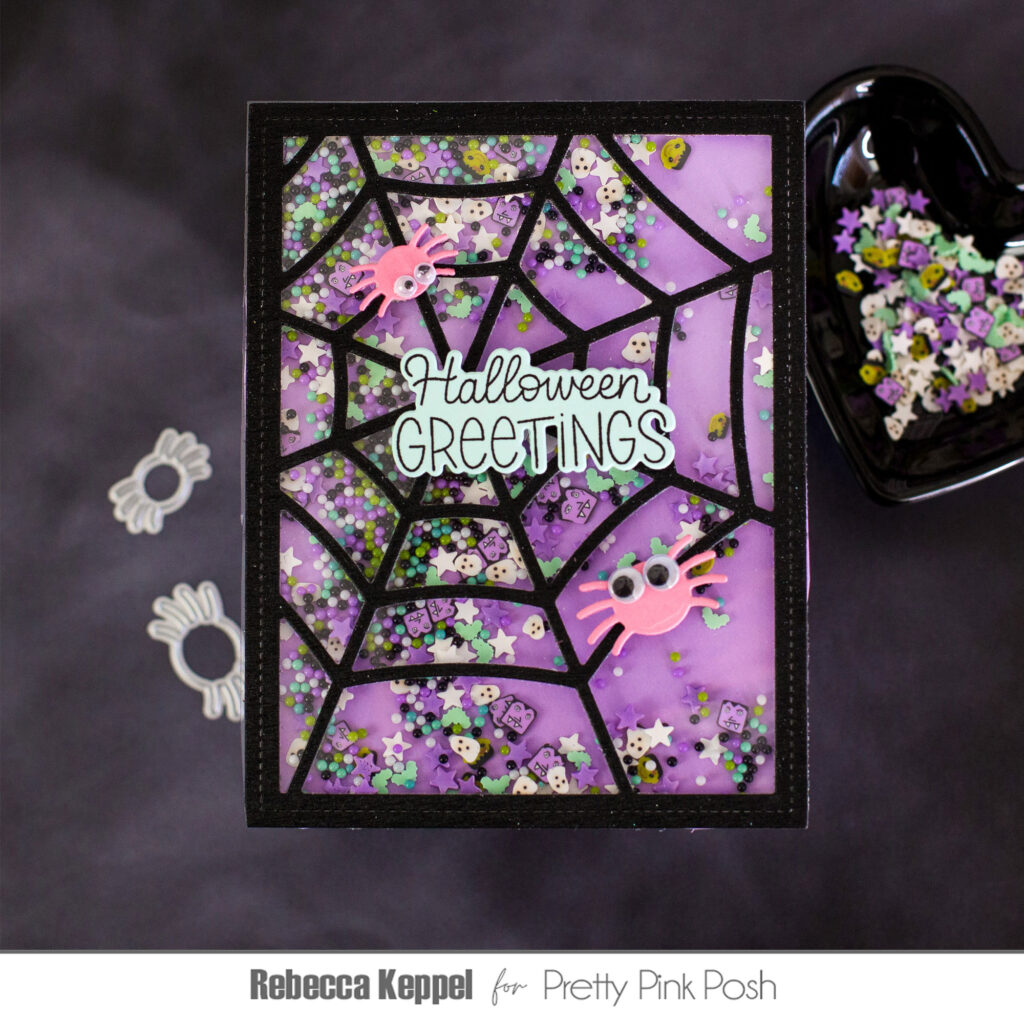
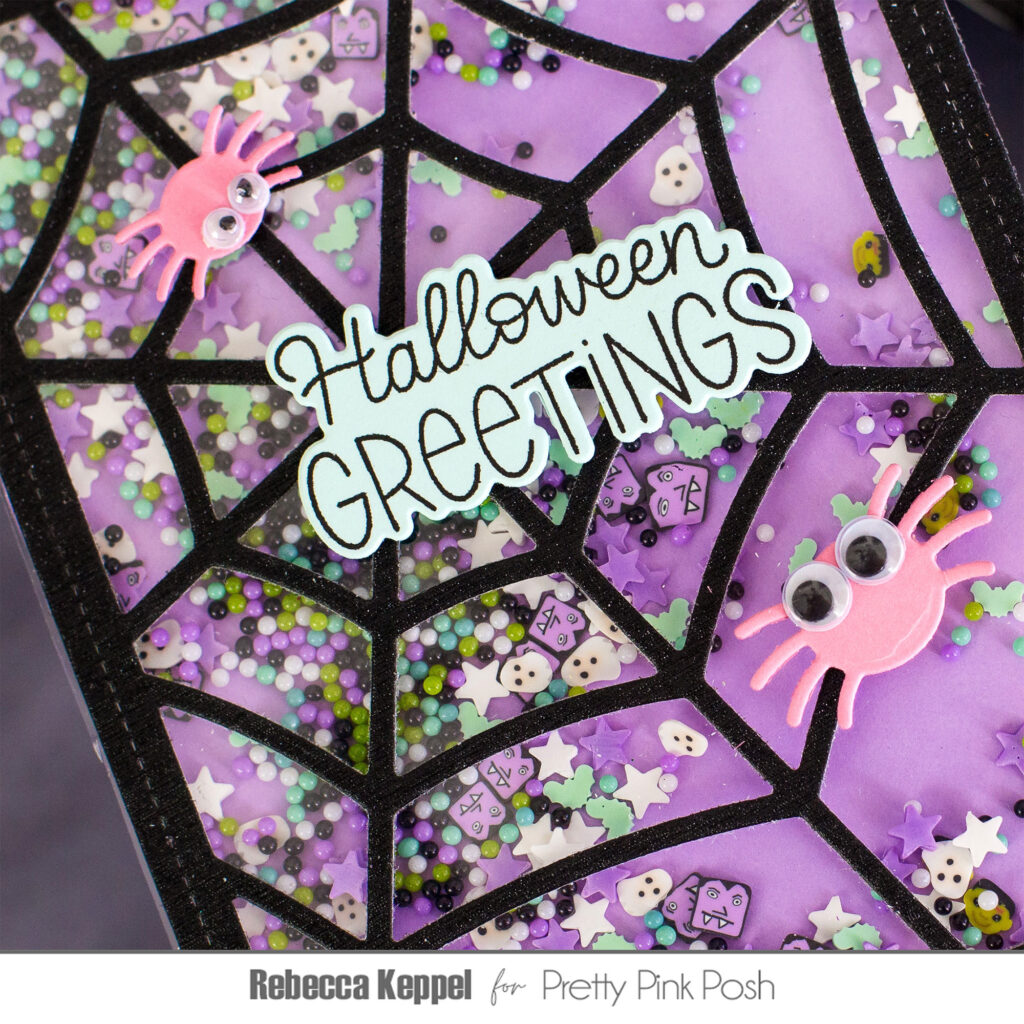
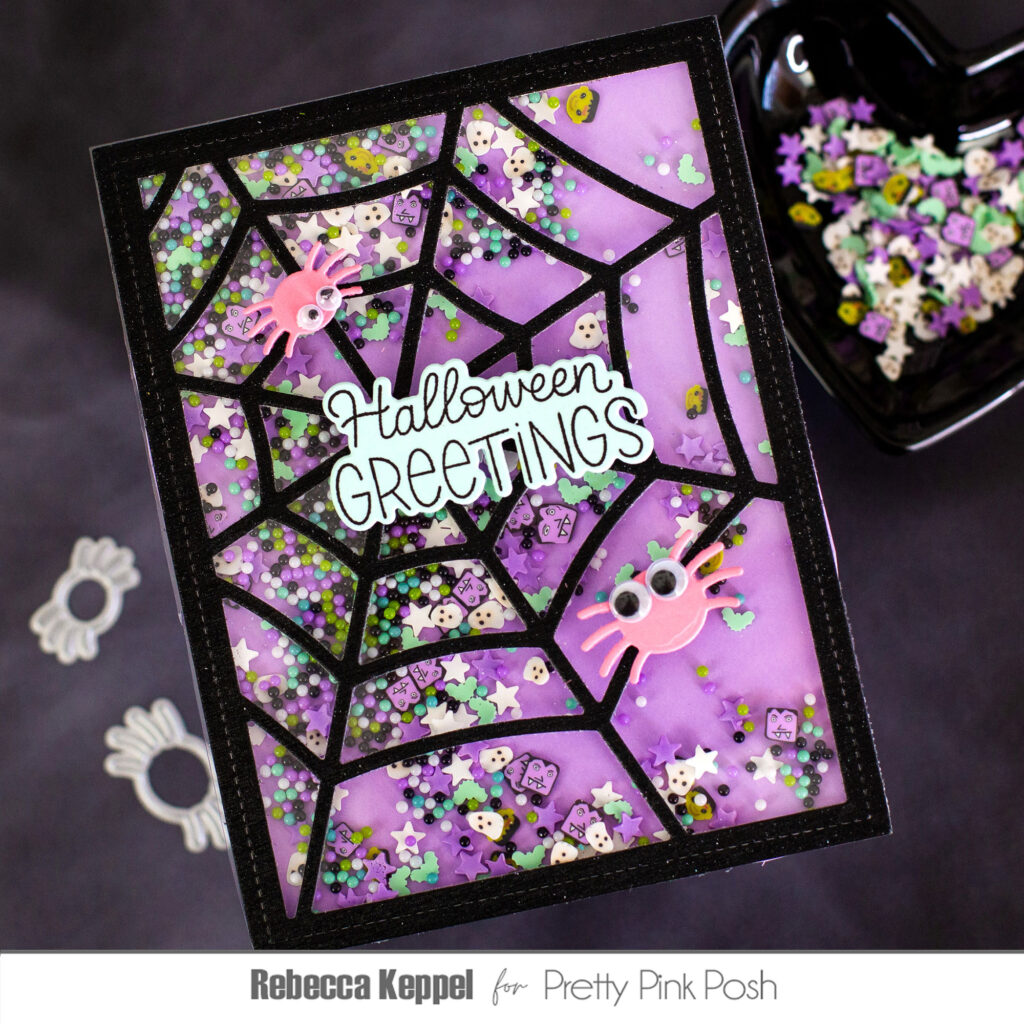
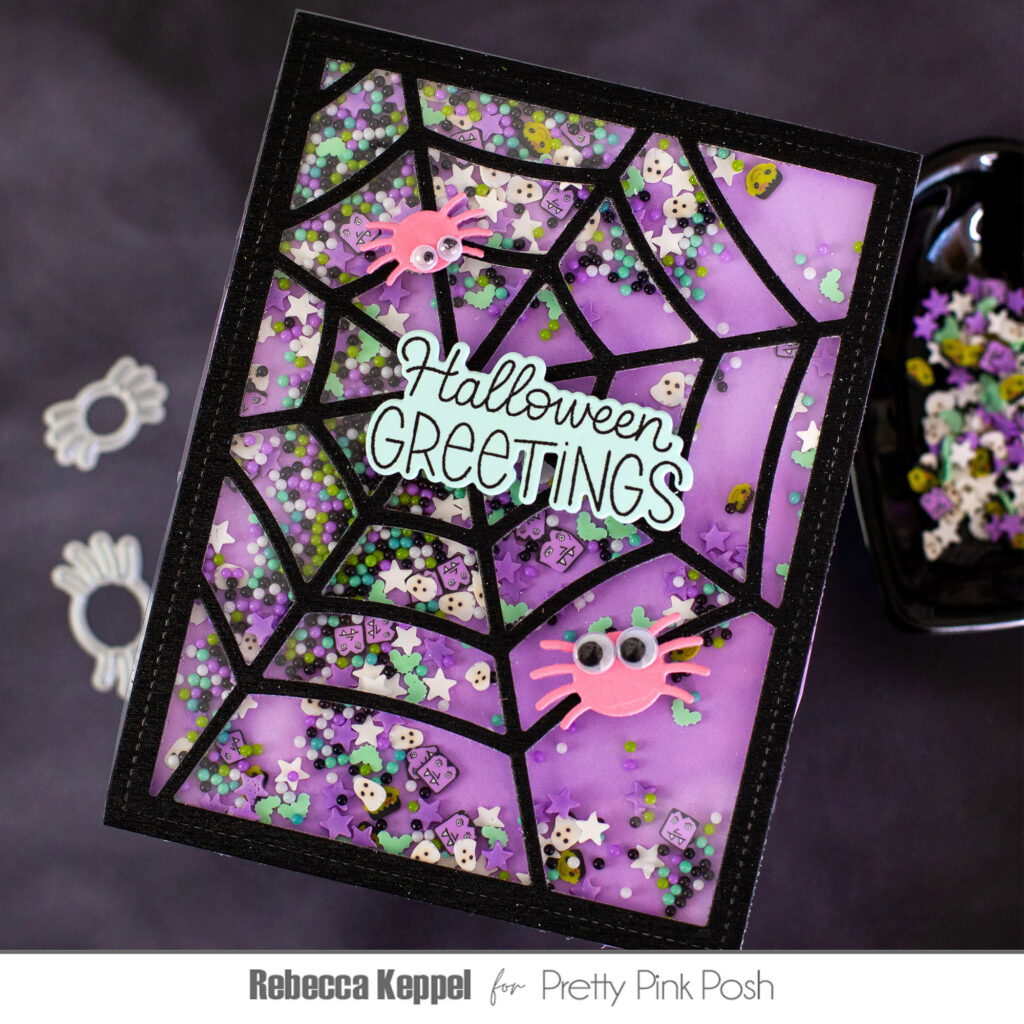
Hey crafty friends! I’m Rebecca Keppel and I love making Halloween cards! The only thing that’s more fun than a Halloween card is a Halloween shaker card! So today I am sharing an edge to edge shaker card made with the Spider Web Panel Die.
The great thing about this panel die is that it has a rectangular A2 sized frame around the edge that gives you just enough room to run thin foam strips behind it. So I simply cut the Spider Web Panel Die out of some speciality black cardstock and adding thin lines of liquid adhesive on the back so that I could adhere it to an A2 piece of acetate.
Once that was dry, I used thin foam strips around the edges making sure that each foam strip touches at the corners.
Next I removed the adhesive backing of the foam strips and poured some Halloween Friends Clay Confetti and Spellbound Shaker Beads in the middle of the foam strip rectangle. Then add a piece of A2 cardstock on top of the foam strips, trapping the shaker beads and confetti inside.
To finish off my card, I added a couple of spiders from the Spider Web Panel Die die cut from pink cardstock. Foam adhesive is a great way to add additional dimension behind the spiders and sentiment. And for a silly look I added some googly eyes to the spiders.
And that’s it! I love edge to edge shakers because you can put a ton of shaker goodies inside and they make such a great noise when the shaker beads slide back and forth!
I hope you’ll give this easy edge to edge shaker a try! Thanks so much for stopping by!
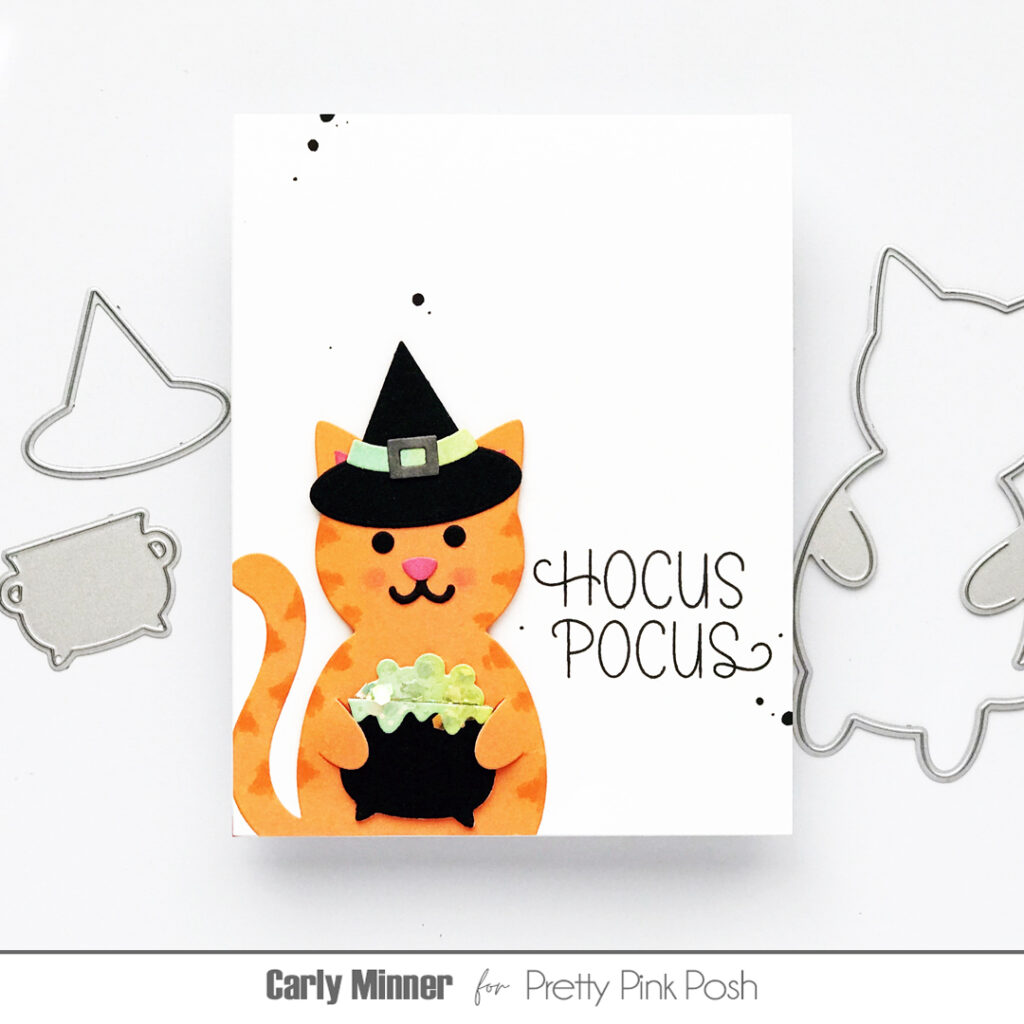
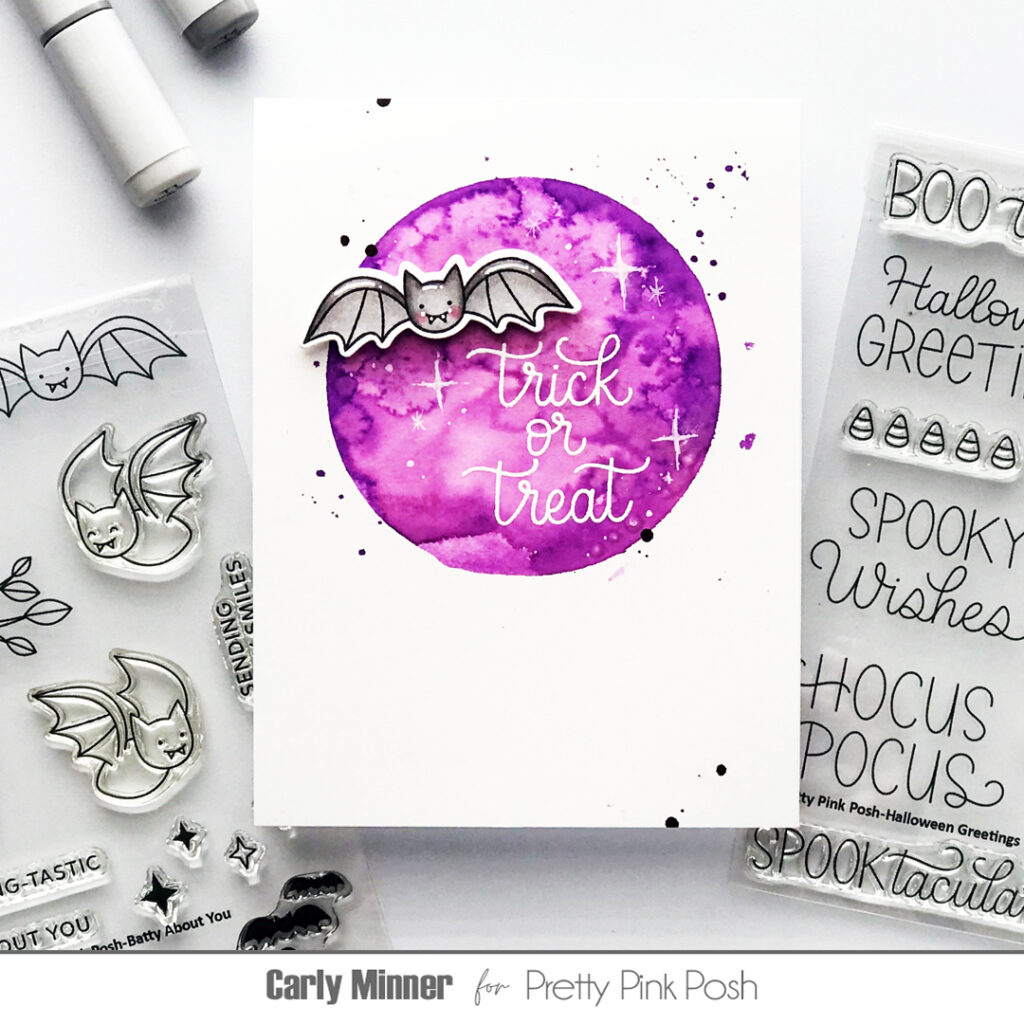
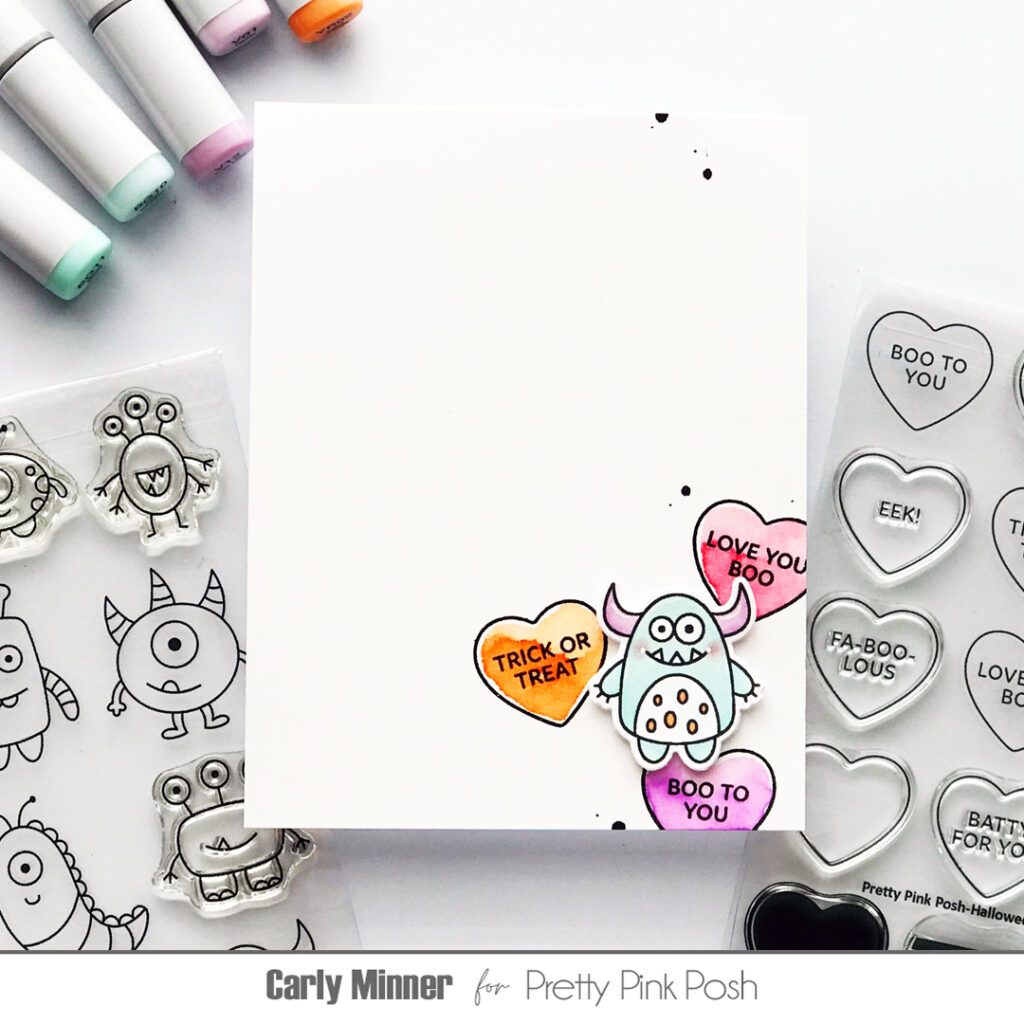
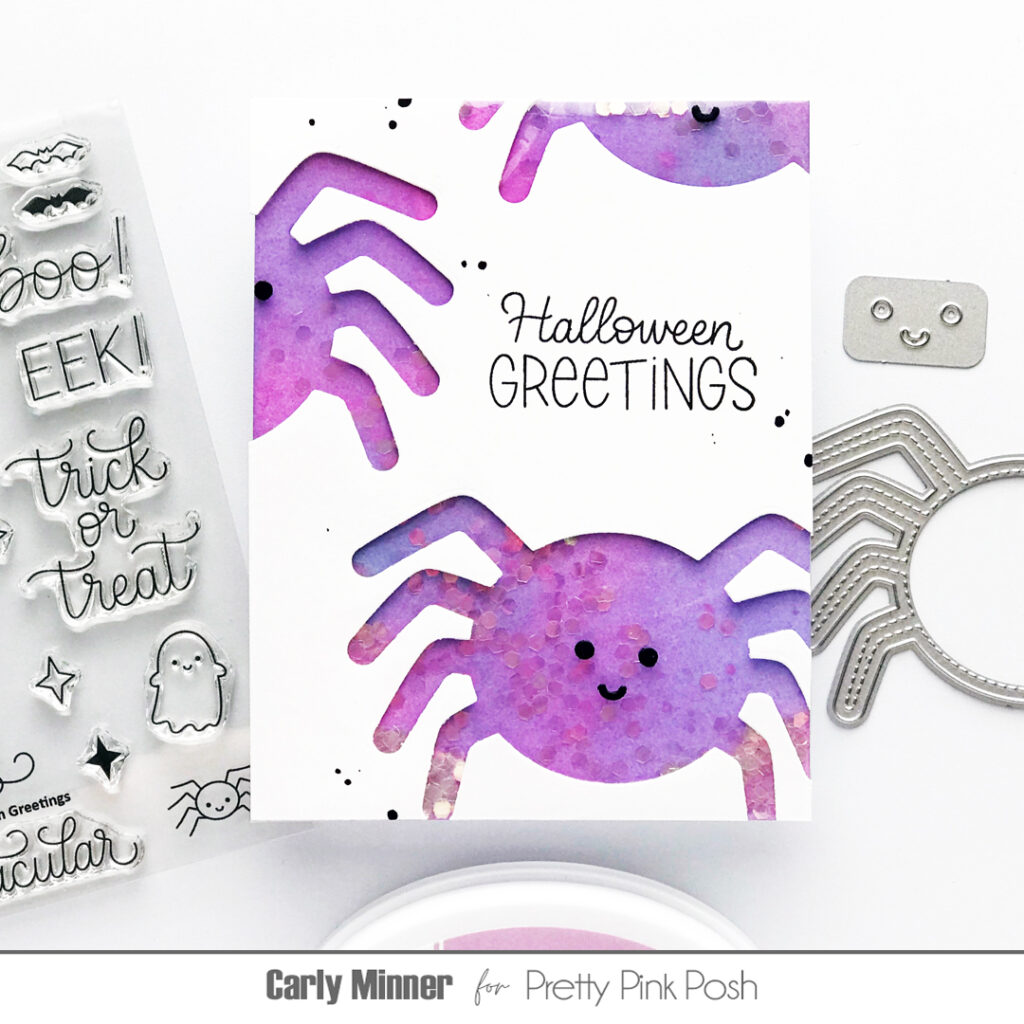
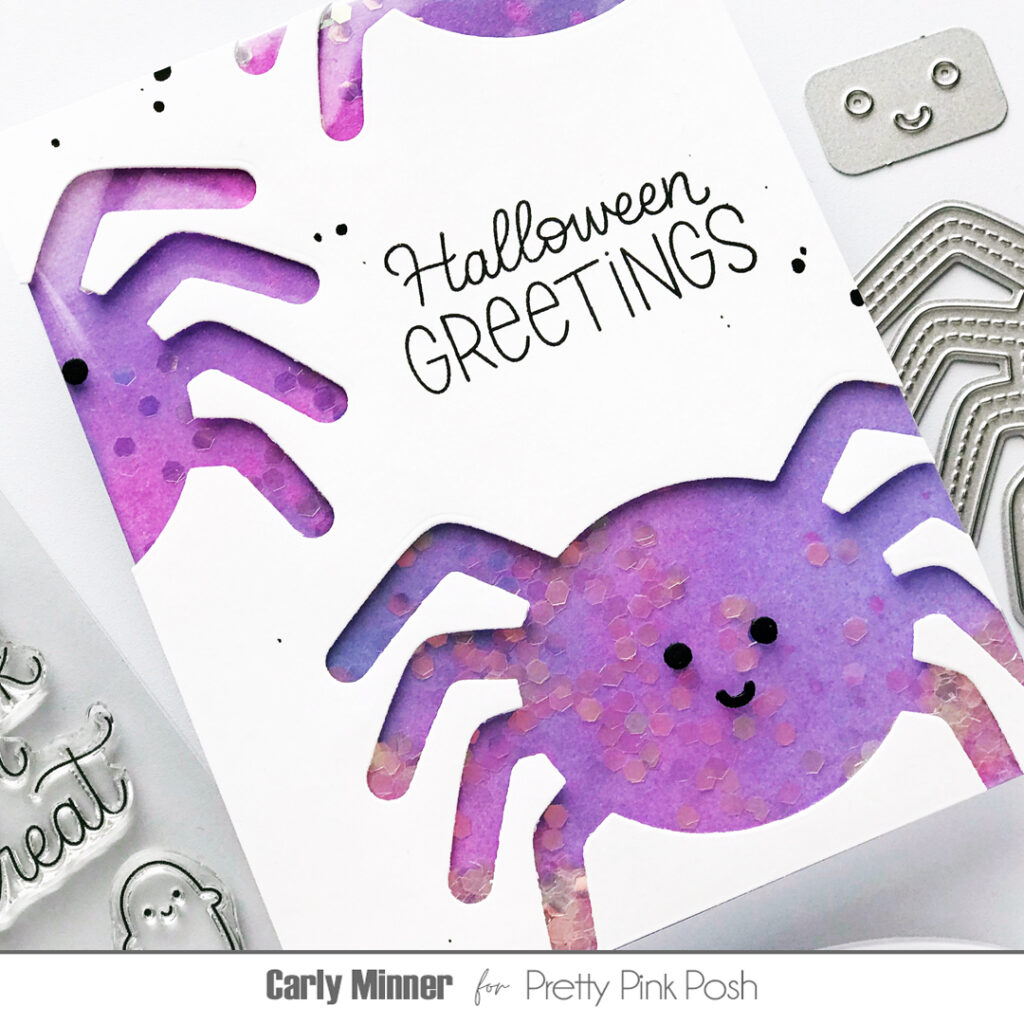
Hi Crafty Friends! Carly here and I am so excited to share my latest card with you because not only is it my favorite type of card but it’s my favorite holiday too…a Halloween shaker!
Pretty Pink Posh always makes the CUTEST Halloween goodies and the latest release does not disappoint!!! The Spider Shaker is just adorable!!! I love the clever design of all of PPP’s shaker die sets because not only can you create a shaker container but you can also use the large negative space for shaker windows!
And not only is this card cute (if I do say so myself,) it is also flat & easy to mail and it uses some “crafty trash” aka plastic packaging!
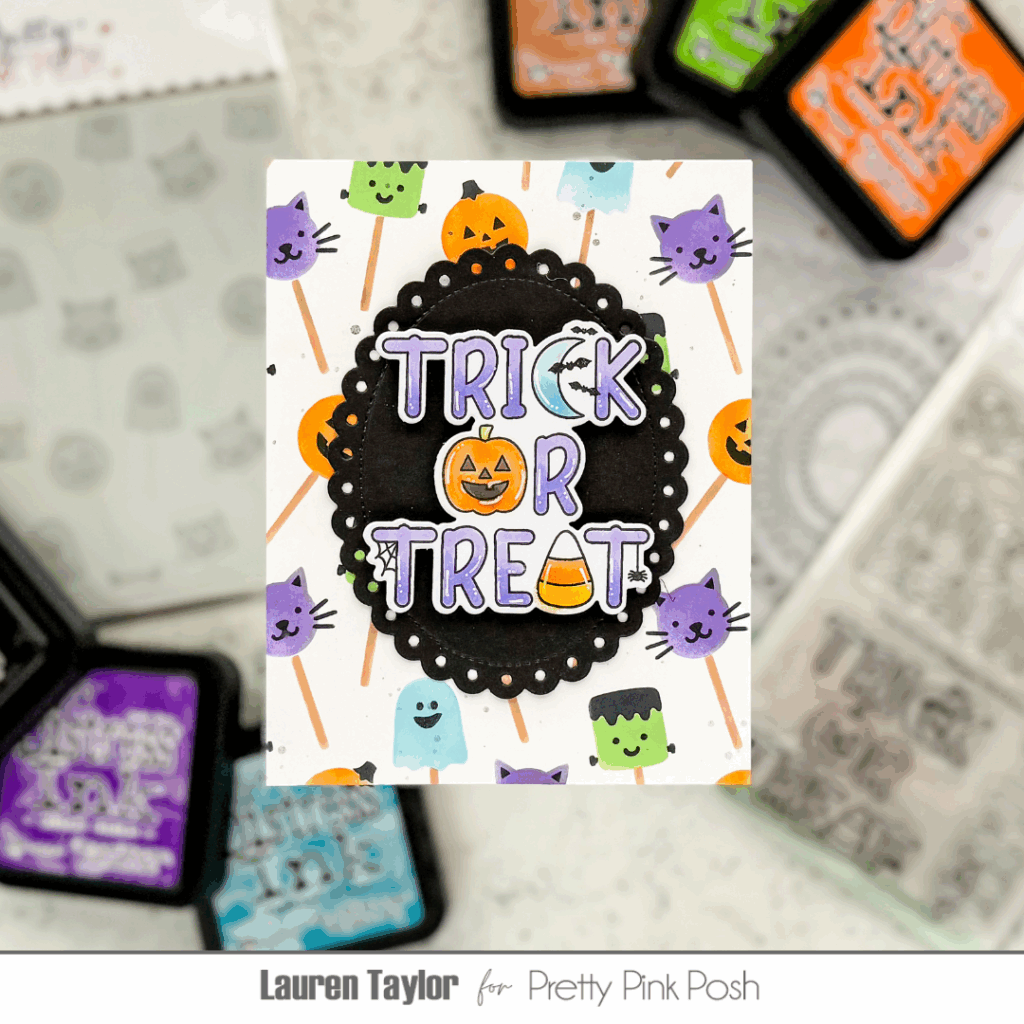
Hi friends, it’s Lauren Taylor! I’m excited to share a project using some of the brand-new products from the Pretty Pink Posh August 2025 Halloween Release.
This project is part of our August Video Hop! Check the description in the video for links to the next stop so you can keep hopping along for tons of Halloween inspiration.
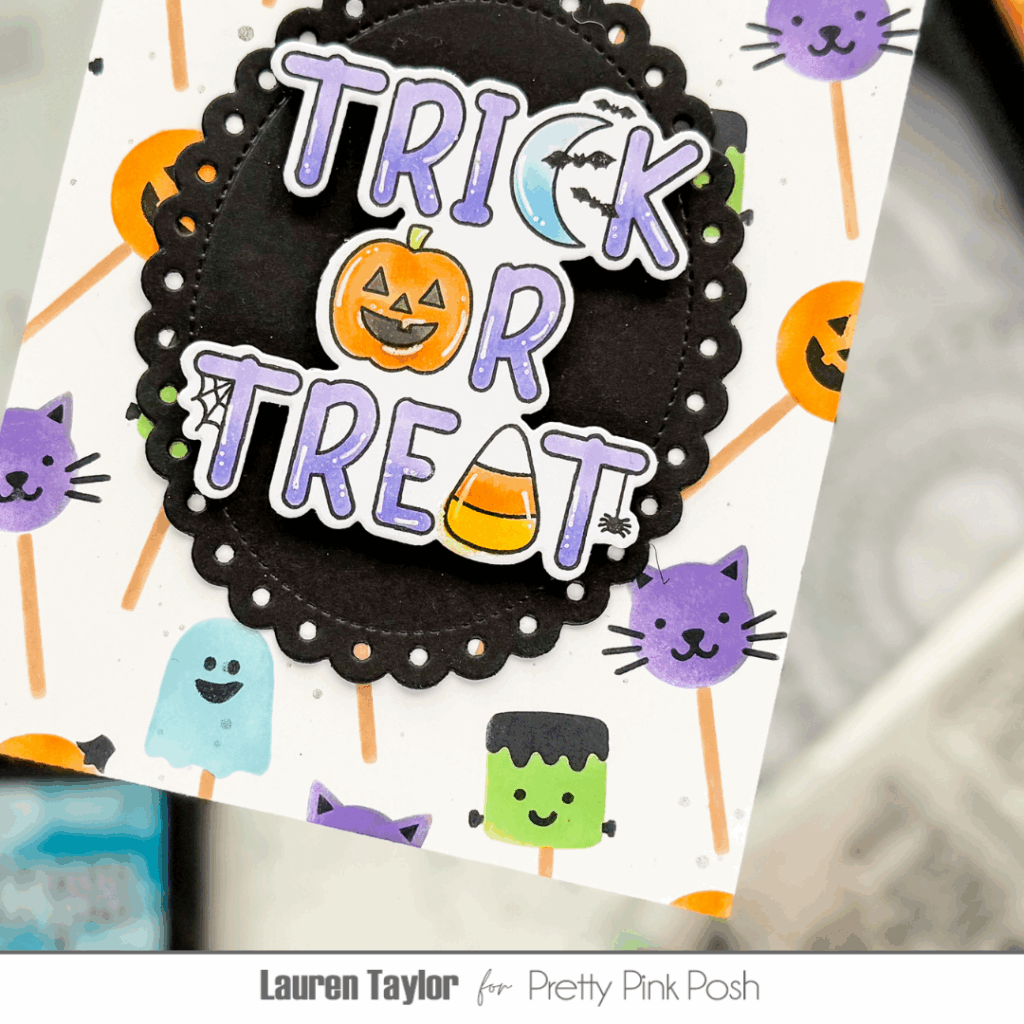
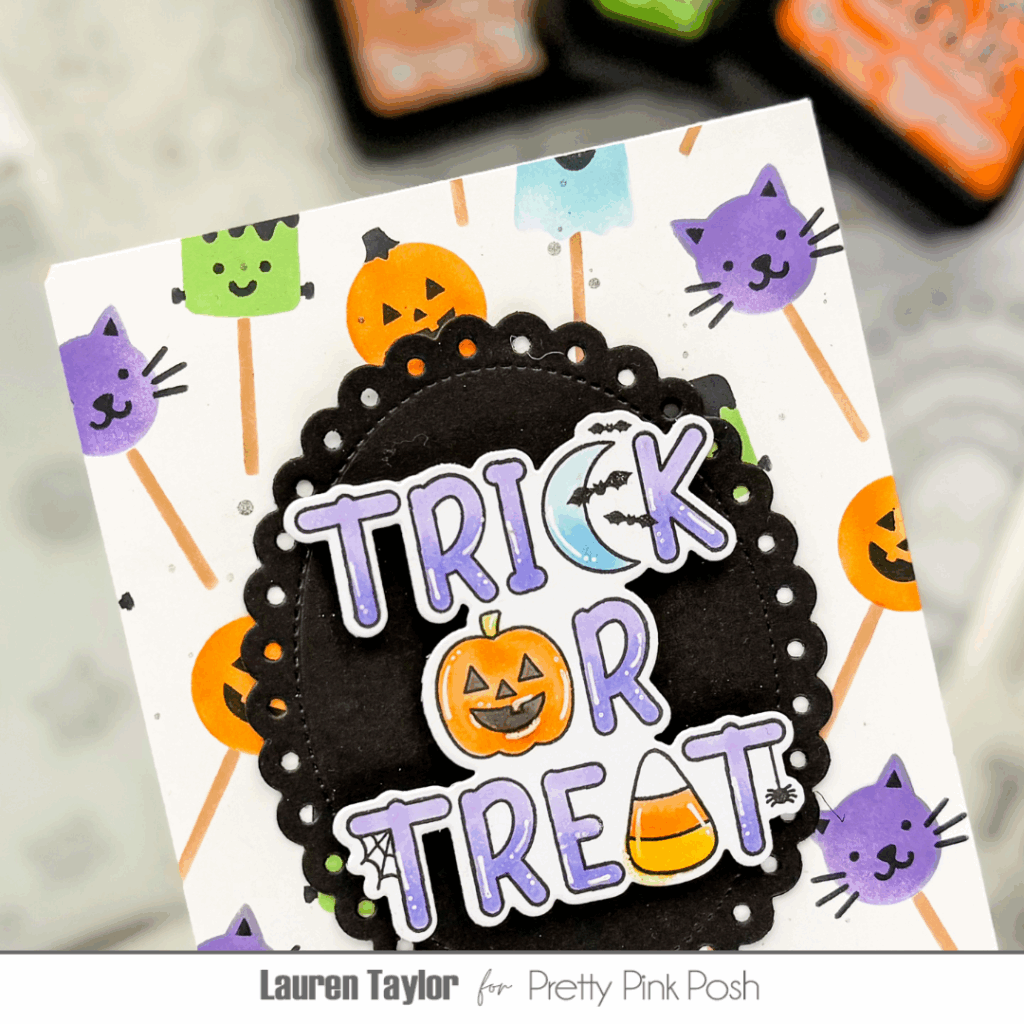
I started with an A2 panel of white cardstock and layered the Halloween Cake Pops Stencils to build my background. For the first stencil, I inked the pumpkins in Carved Pumpkin, the ghosts in Tumbled Glass, the Frankenstein pops in Twisted Citron, and the cats in Wilted Violet Distress Inks. Then, I used Black Soot for the second stencil to add all the adorable faces and details, and finished with Tea Dye for the cake pop sticks. After splattering Hickory Smoke Distress Spray for some shine, I set my panel aside to dry.
For the sentiment, I stamped “Trick or Treat” from the Halloween Word Scenes Stamps, colored it with coordinating OLO markers to match the background, added white gel pen highlights, and die cut it using the Halloween Word Scenes Coordinating Dies. To help the sentiment stand out, I adhered it to a black oval from theEyelet Ovalsdie set with foam strips before gluing everything to my background.
To finish, I attached the completed panel to a white A2 card base. I love how the colorful cake pops create such a playful vibe, and the bold sentiment really pops against the black oval!
Don’t forget to hop along to the next video in the description for more amazing Halloween projects from the Pretty Pink Posh team!