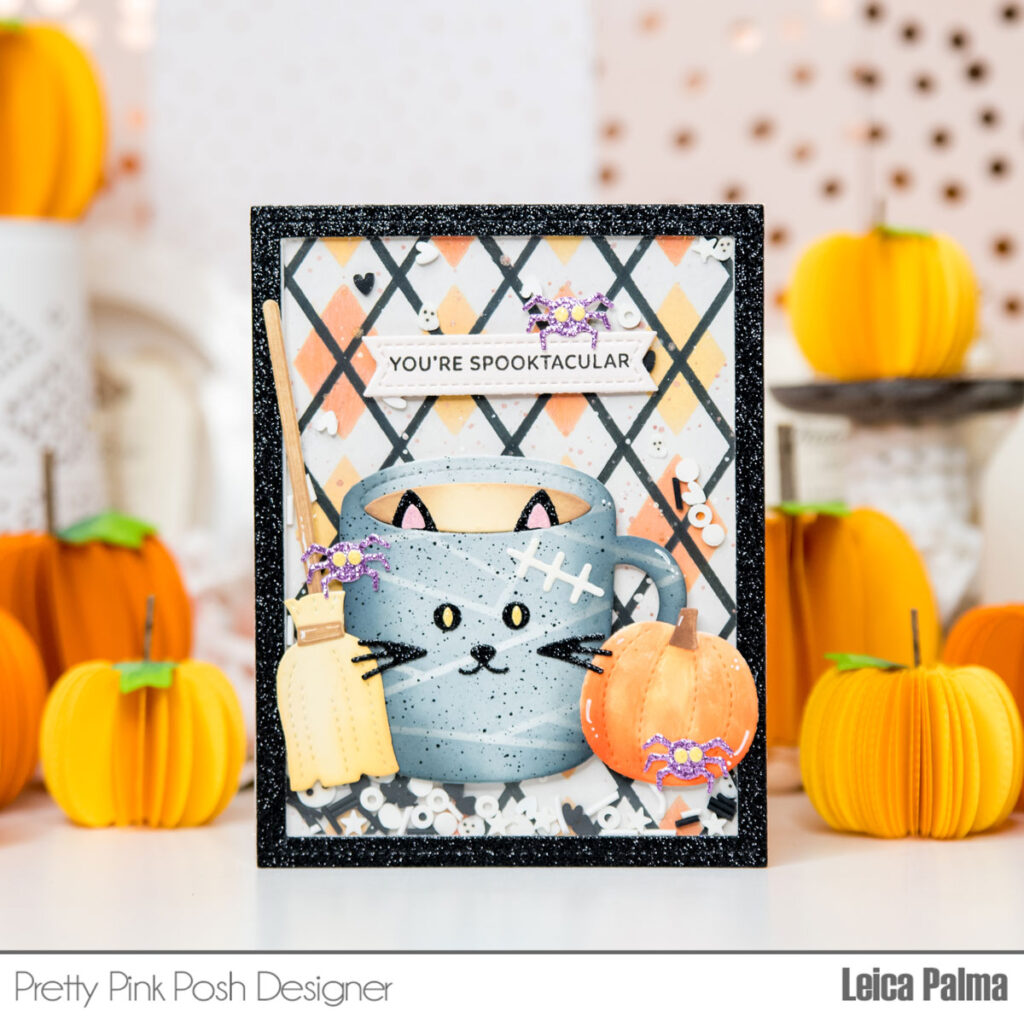
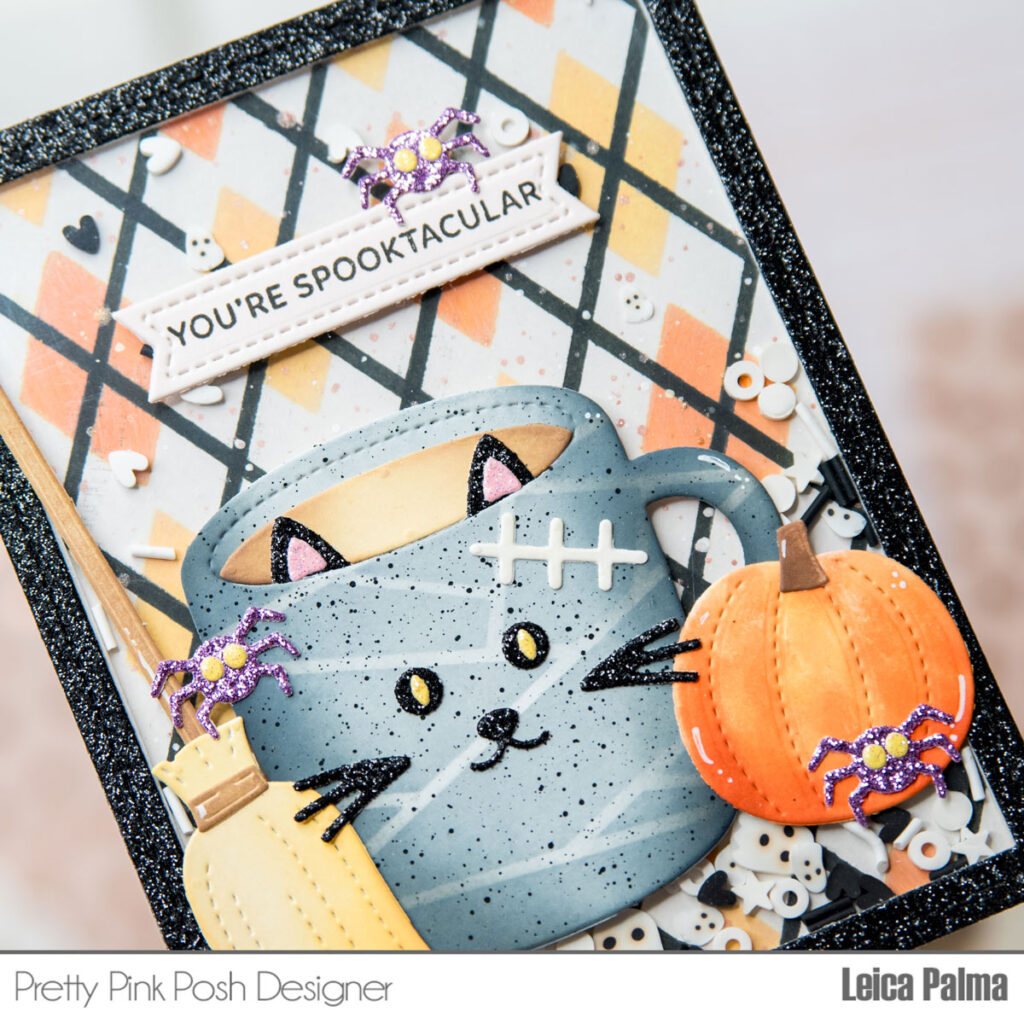
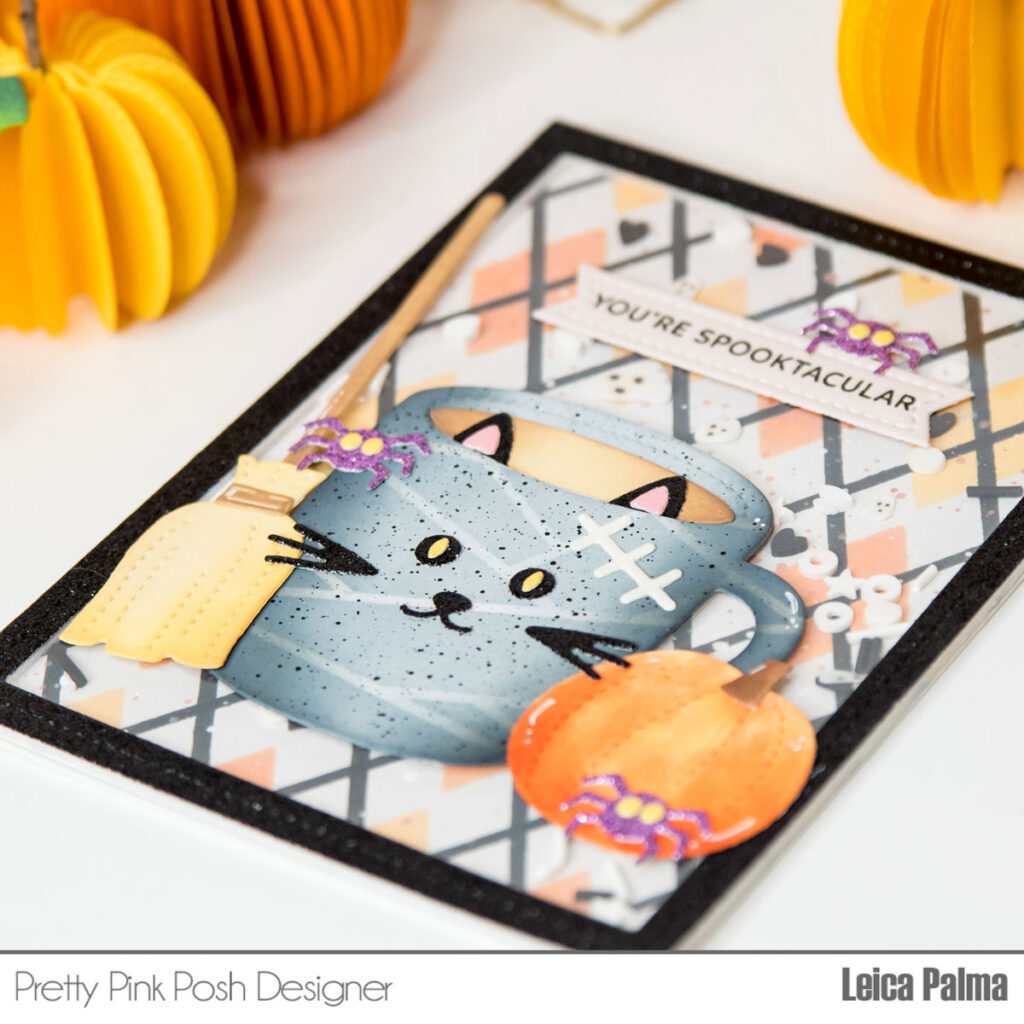
Hey, friends! It’s Leica here, and I’m thrilled to share a fun Halloween shaker card featuring the new Halloween Mug Additions dies and other awesome items from the August 2023 release.
To start, I created the shaker element by cutting an A2-sized card panel from white cardstock. I added a cool stenciled background using the Layered Argyle Stencils and some Distress Oxide Inks in Black Soot, Dried Marigold, and Spiced Marmalade. To make it even more interesting, I splattered some rose gold acrylic paint.
For the shaker frame, I used black glitter cardstock and cut it with the frame die from the Fancy Cake Dies. Inside the shaker, I used the Ghostly Friends Mix for some spooky fun.
Next, I cut out the elements from the Halloween Mug Additions Dies and added color to them using a finger dauber. I used the Mummy Wrap Stencil to give the mug a cool pattern. To add a sentiment, I used the Sentiment Strips: Halloween stamp setand the Sentiment Strips dies. To make it even spookier, I added some spiders cut from purple glitter cardstock. Finally, I glued the card panel onto an A2-sized white cardstock.
I hope you enjoyed today’s card share. Thanks a bunch for stopping by and see you next time!
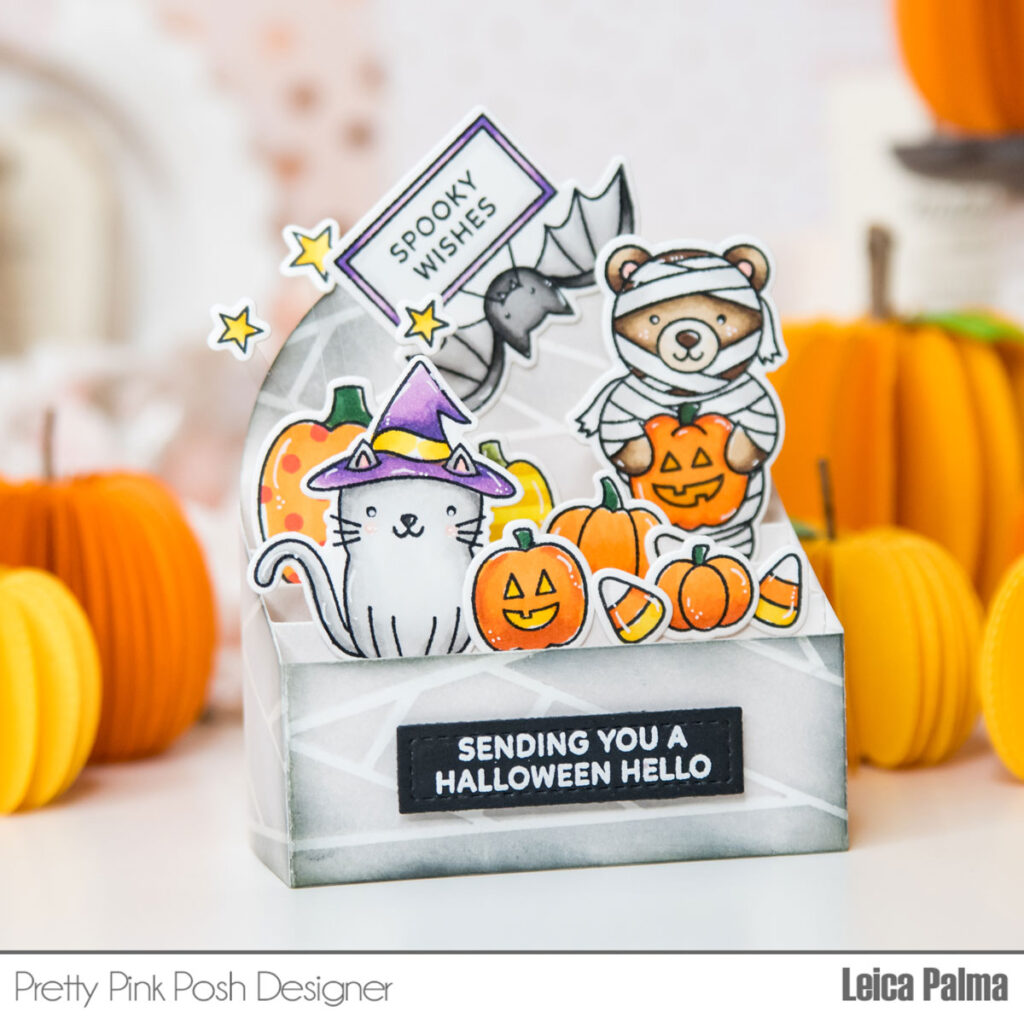
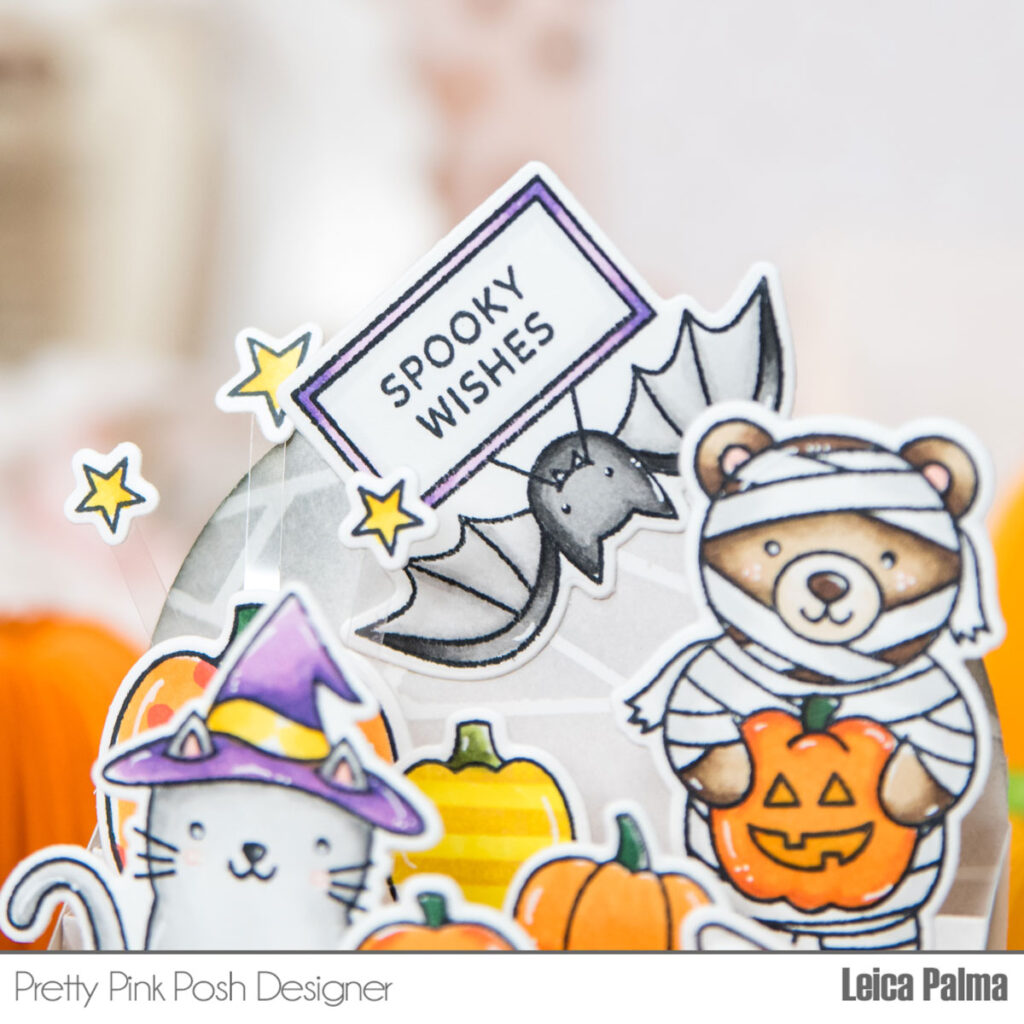
Hey, friends! Leica here and I’m excited to share a fun box card featuring a mix of new and previously-released stamps from PPP. Let’s dive right in!
To start, I cut the Scallop Box Card using white cardstock and stenciled it with the Mummy Wrap Stencil before putting it all together. For the inserts, I blended them with Lost Shadow Distress Oxide ink for a cool effect.
Next, I stamped and colored the adorable images from the Halloween Critters, Halloween Pals, Decorative Pumpkins, and Halloween Signs stamp sets. After that, I used the coordinating dies to cut them out and glued them to the inserts of the box card. Oh, my favorite is definitely the bat hanging upside down – so cute!
Lastly, I white heat embossed the sentiment from the Sentiment Strips: Halloween on black cardstock, cut it with the Sentiment Strips and foam mounted it to the front of the box card for some extra dimension.
Thanks a bunch for stopping by and I hope I’ve inspired you to create a box card for Halloween. Have an awesome day! Happy crafting!
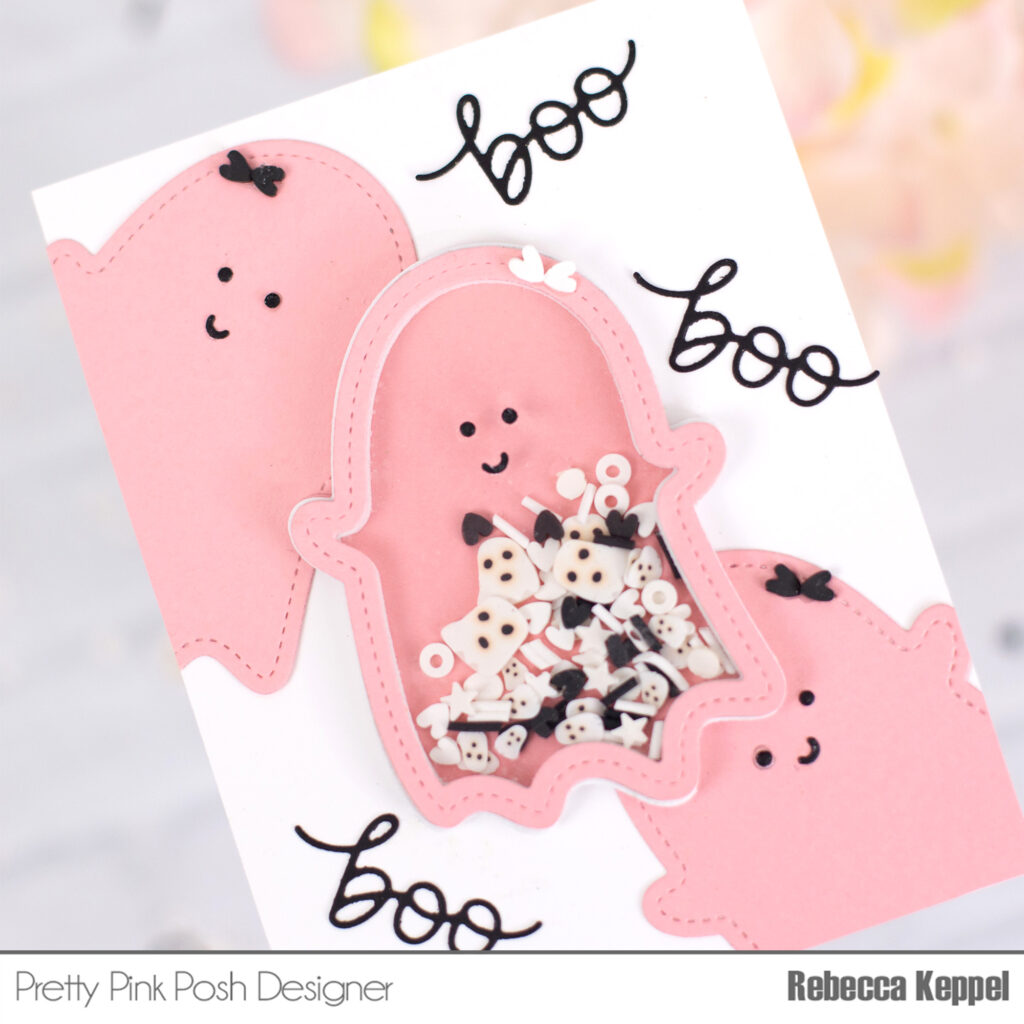
Hi crafty friends! Rebecca here today to share a fun Halloween shaker card! This shaker card is made with the Ghost Shaker Dies and is so fun because it is made with non traditional colors.
The Ghost Shaker Dies come with everything you need to cut the base of the ghost, the shaker frames and the acetate shaker window. I cut my ghosts out of pink cardstock for a fun look, but if pink is not your thing, you can use any color you like for your card. I filled my shaker with the Ghostly Friends Clay Confetti which includes black and white ghosts, hearts, sprinkles and more.
The Ghost Shaker Dies even comes with small dies for the eyes and mouth for your ghost and a boo script sentiment. I used all of those to complete the two flat ghosts and the one shaker ghost. And for a fun touch, I added two of the hearts from the Ghostly Friends Clay Confetti on each ghost to make a bow! This cute die set literally has everything you need to make fun, whimsical Halloween cards with no need for stamping!
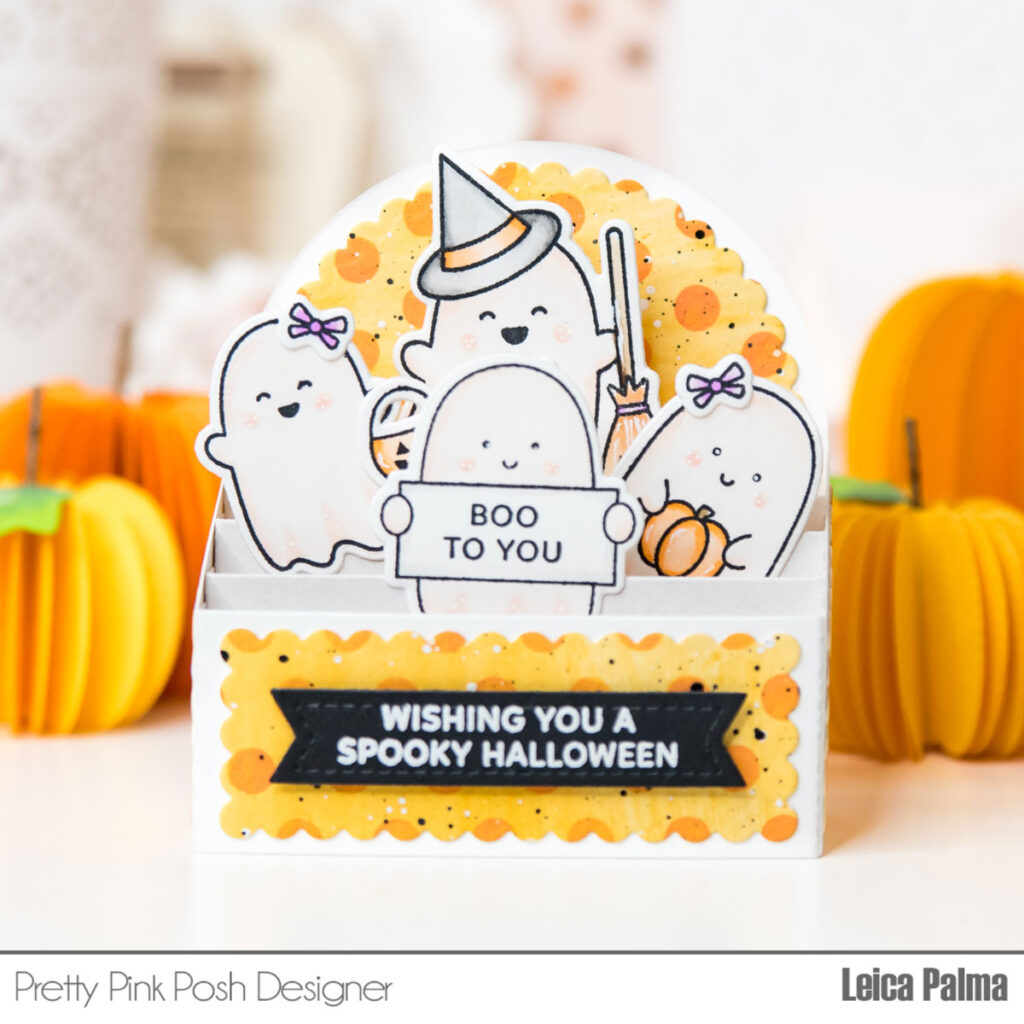
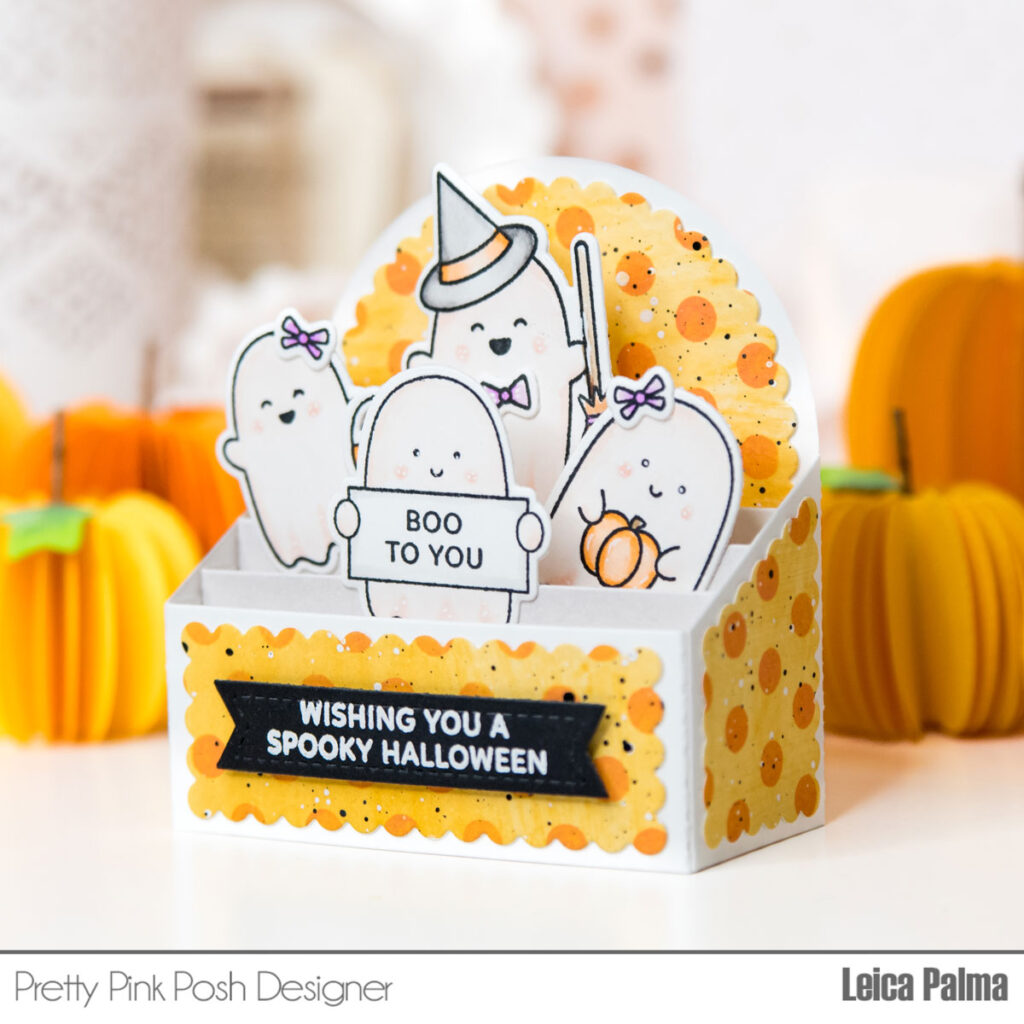
To start, I assembled the Scallop Box card using white 80lb cardstock. For the background, sides, and front panels, I added orange watercolor to watercolor paper and stenciled some adorable dots using the Medium Polka Dots Stencil with Spiced Marmalade Distress Oxide ink. I then cut the inserts and inked them with Lost Shadow Distress Oxide Ink.
Next, I stamped and colored the adorable ghosts from the Ghost Friends and Halloween Signs stamp sets. After that, I used the coordinating dies to cut them out and glued them to the inserts of the box card.
And that’s it! My Halloween box card is complete. Thank you so much for stopping by, and I hope I’ve inspired you to create your own box card. Happy crafting!
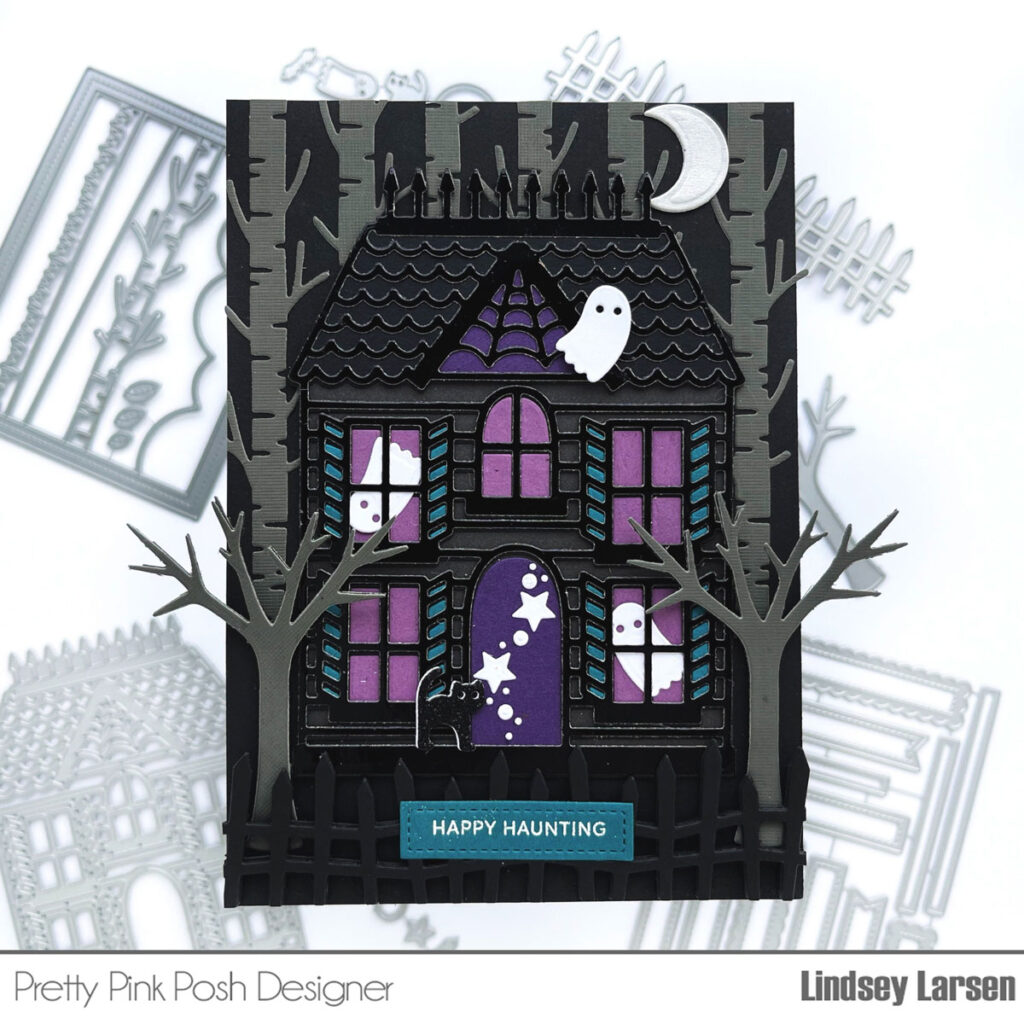
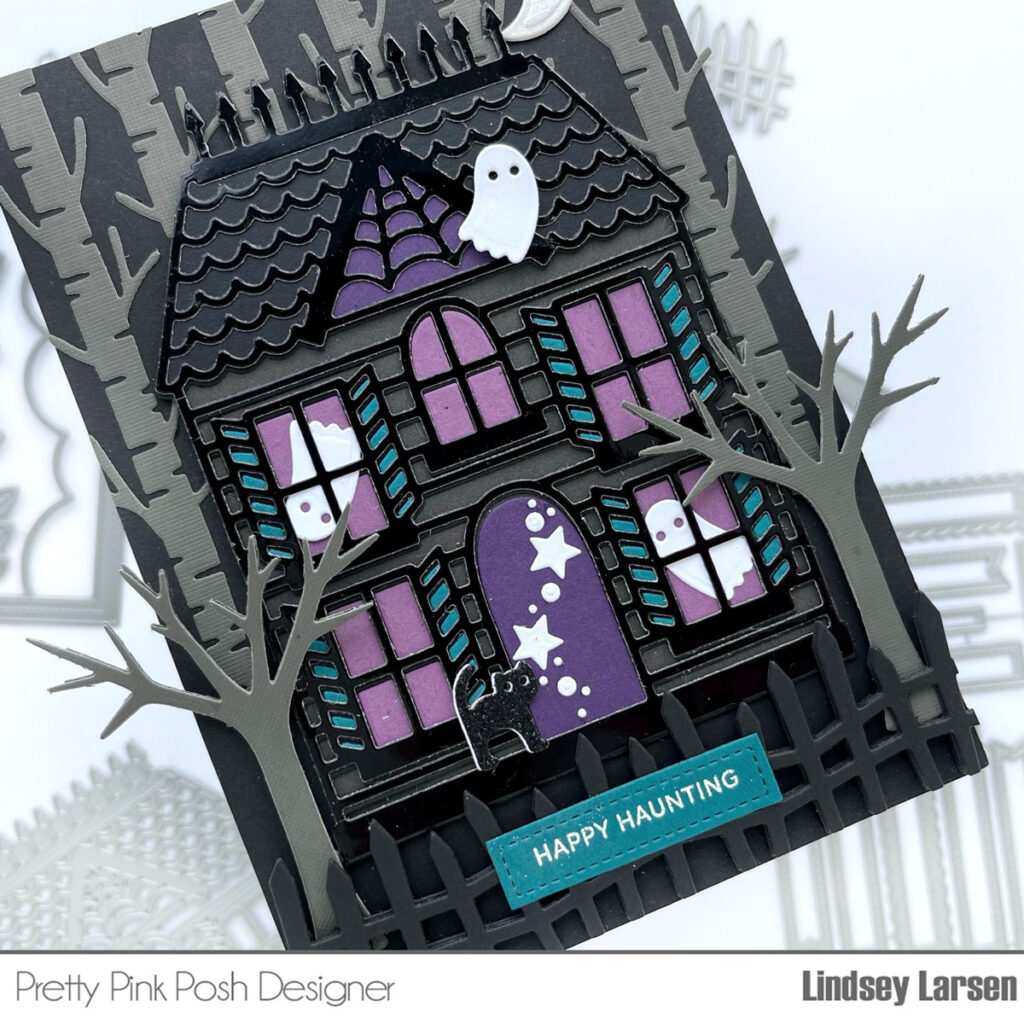
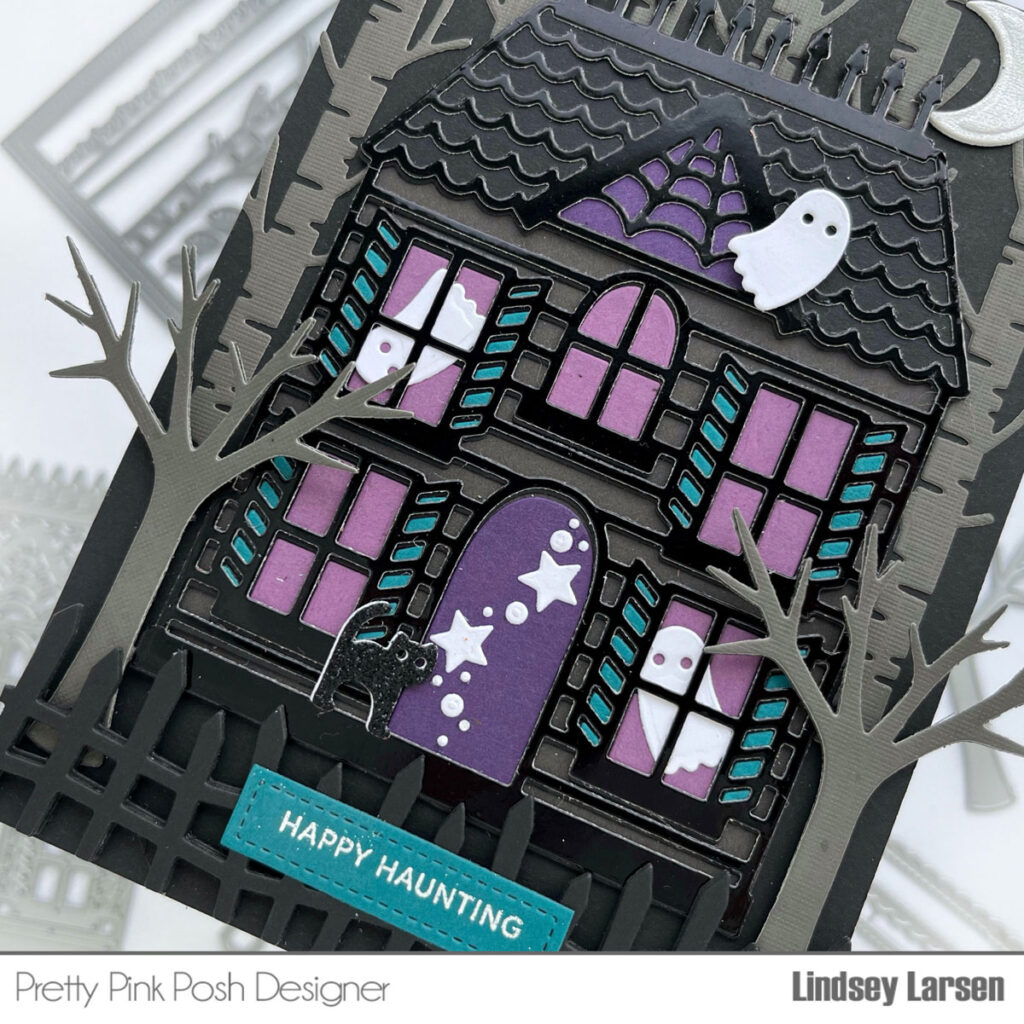
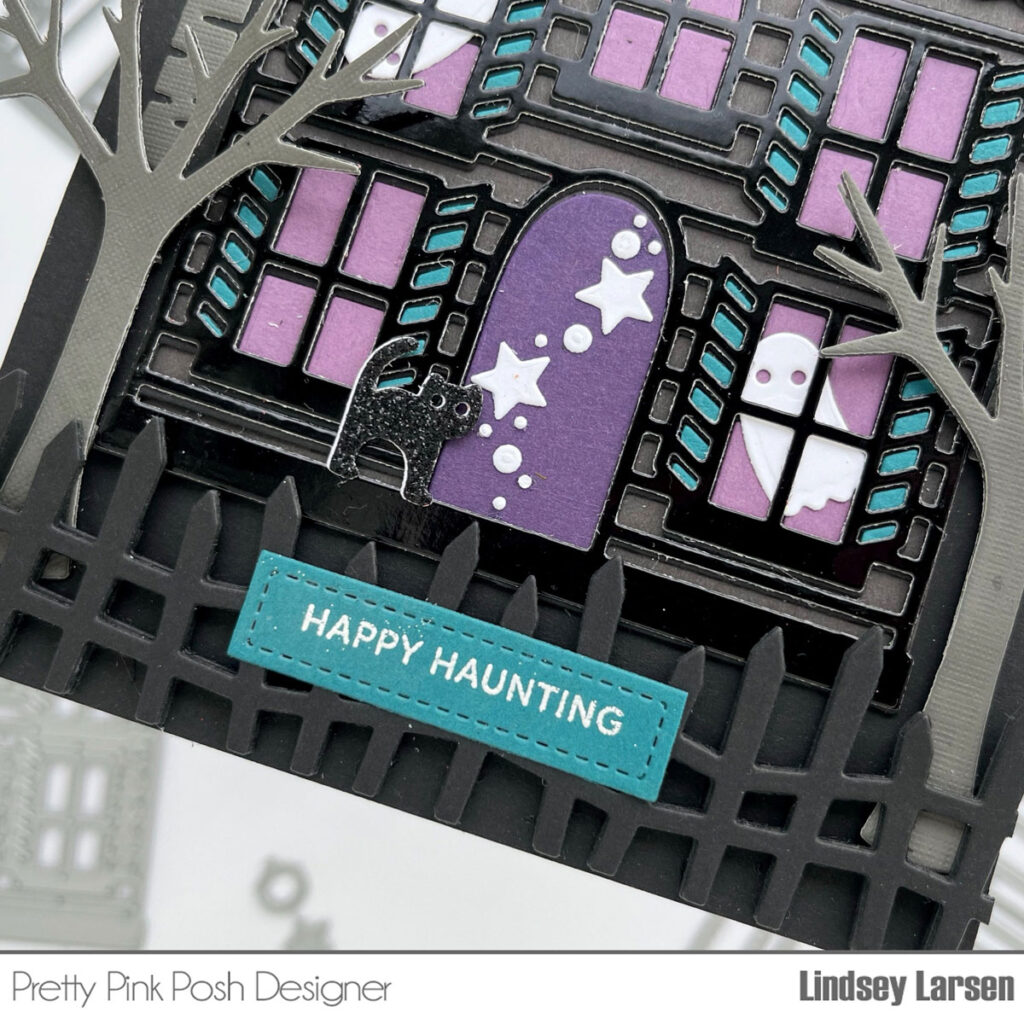
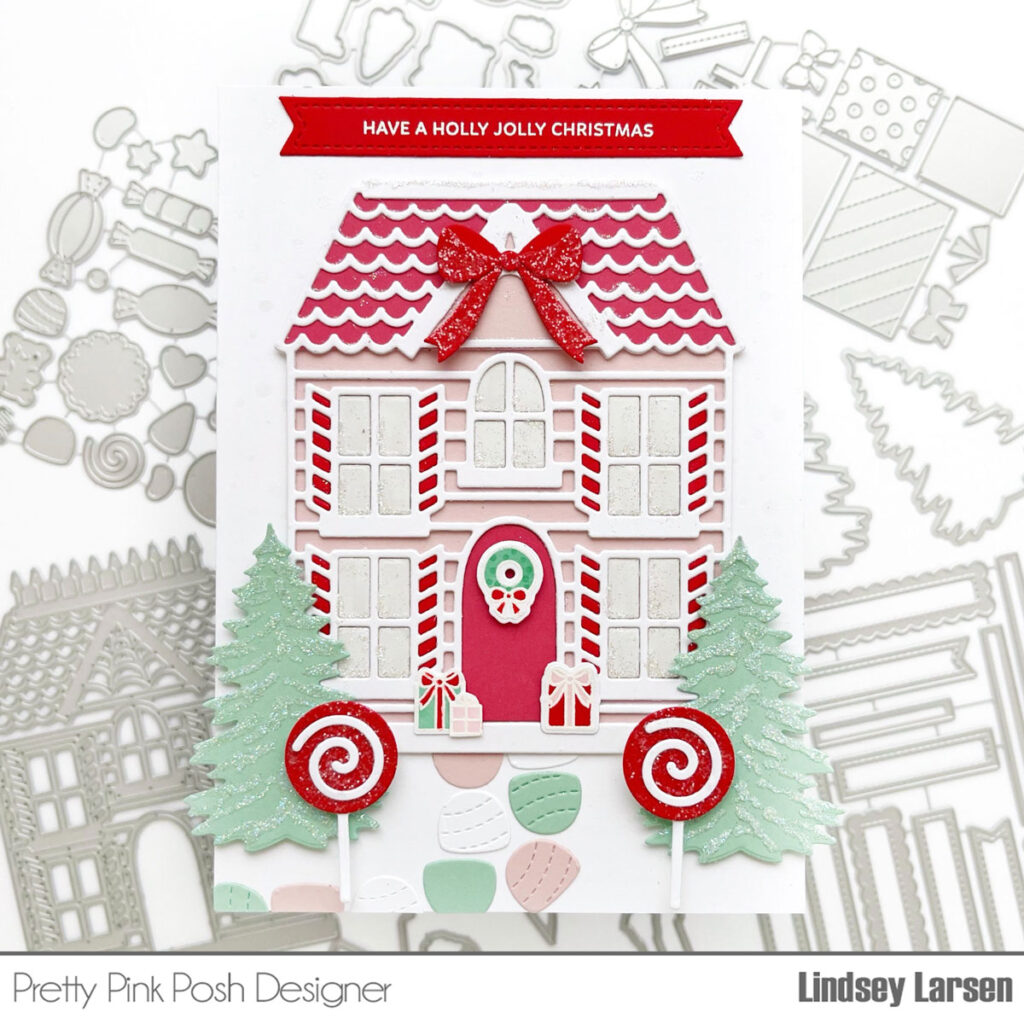
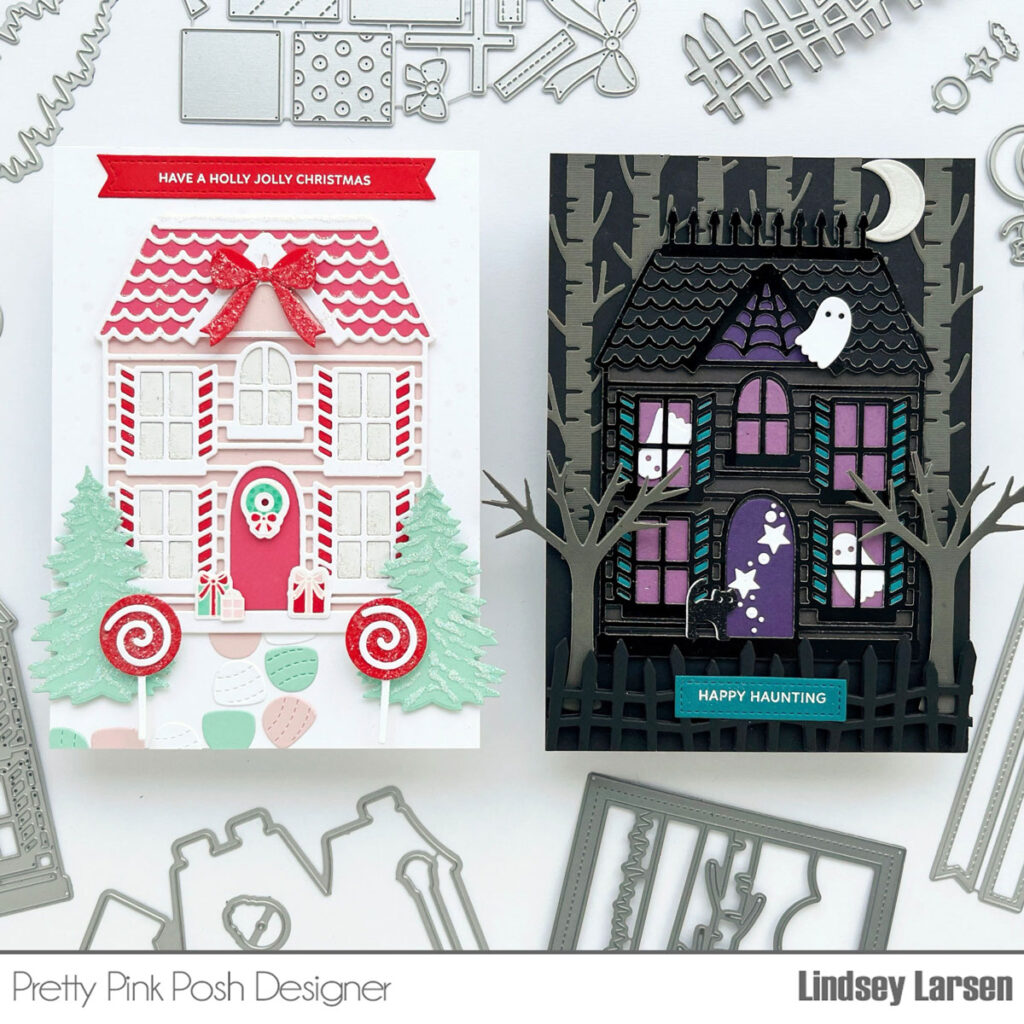
Good morning! It’s Lindsey here today and I’m sharing some cards made with one of my most favorite die sets from this month’s release–the Halloween House. This die is fantastic because it cuts the entire house outline in one piece, and then you can choose how many colors/layers you’d like to add back inside. And I had so much fun doing just that!
The Halloween House die is large and will fill an entire card front. I wanted to have room for a (somewhat) spooky night scene around the house, so I chose to make a larger 5×7 card. I fully embraced Halloween on this one, and built my card mostly out of different shades of black and grey For added dimension, I die cut the house outline three times with a shiny black cardstock and glued them together. Then I layered back in a few shades of purple and teal for the windows, door, and shutters. I love how it makes it look like the house is glowing inside.
This die set comes with a few extra Halloween images, so I used them to up the spooky cute factor by adding some floating ghosts, magical stars, and a black, sparkly cat. I backed the cat with a white cat slightly offset to create a bit of shadow, which helped him stand out more against this otherwise dark card.
Next, I set out to finish the scene. I added a forest of trees behind the house using the tree from the Nature Essentials Dies. The moon is one of the additional dies included in theHalloween House set. Next, I added two trees to the front yard using the Fruit Tree Die. Finally, I layered several of the previously released Spooky Fence Die and added a sign with a greeting from the Sentiment Strips: Halloween stamps and dies.
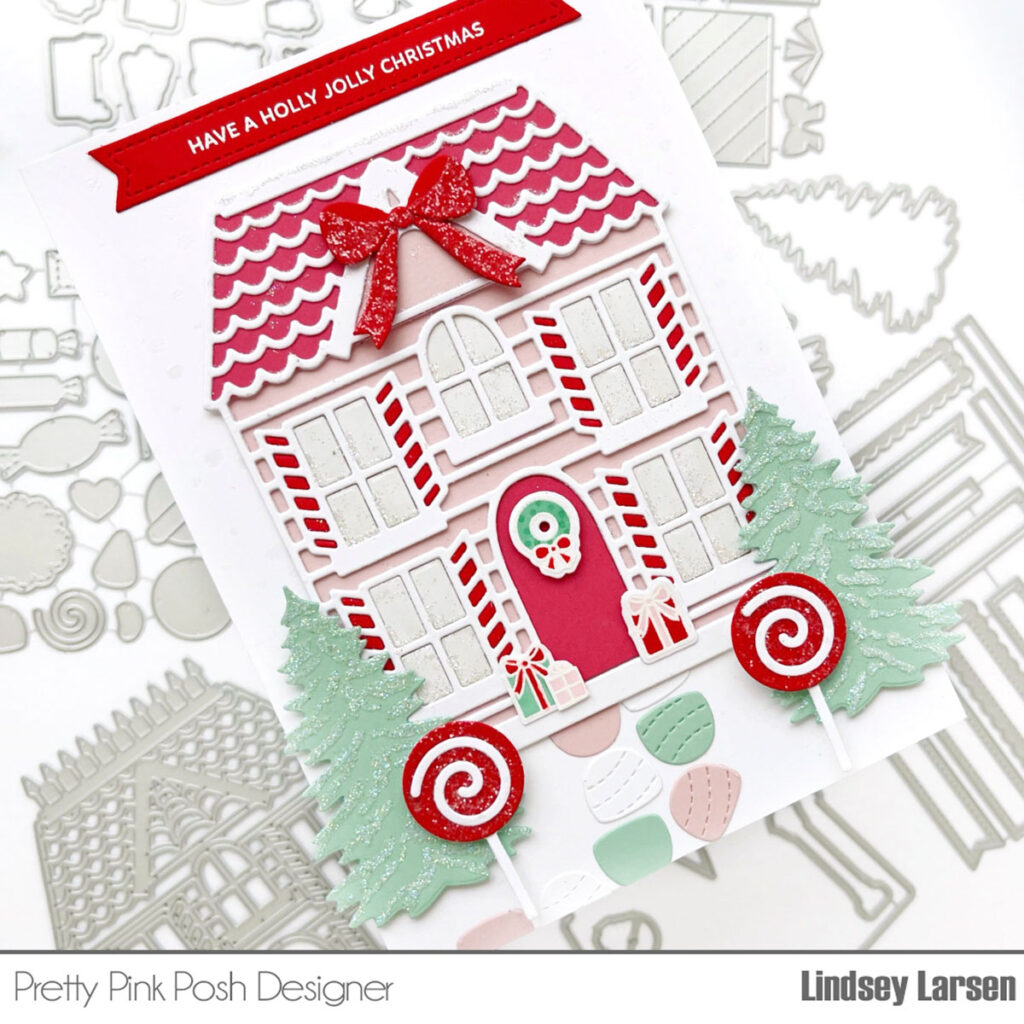
While this die may be named the Halloween House die, you are definitely not limited to creating just haunted houses. To show its versatility, I recreated the same card for a different season.
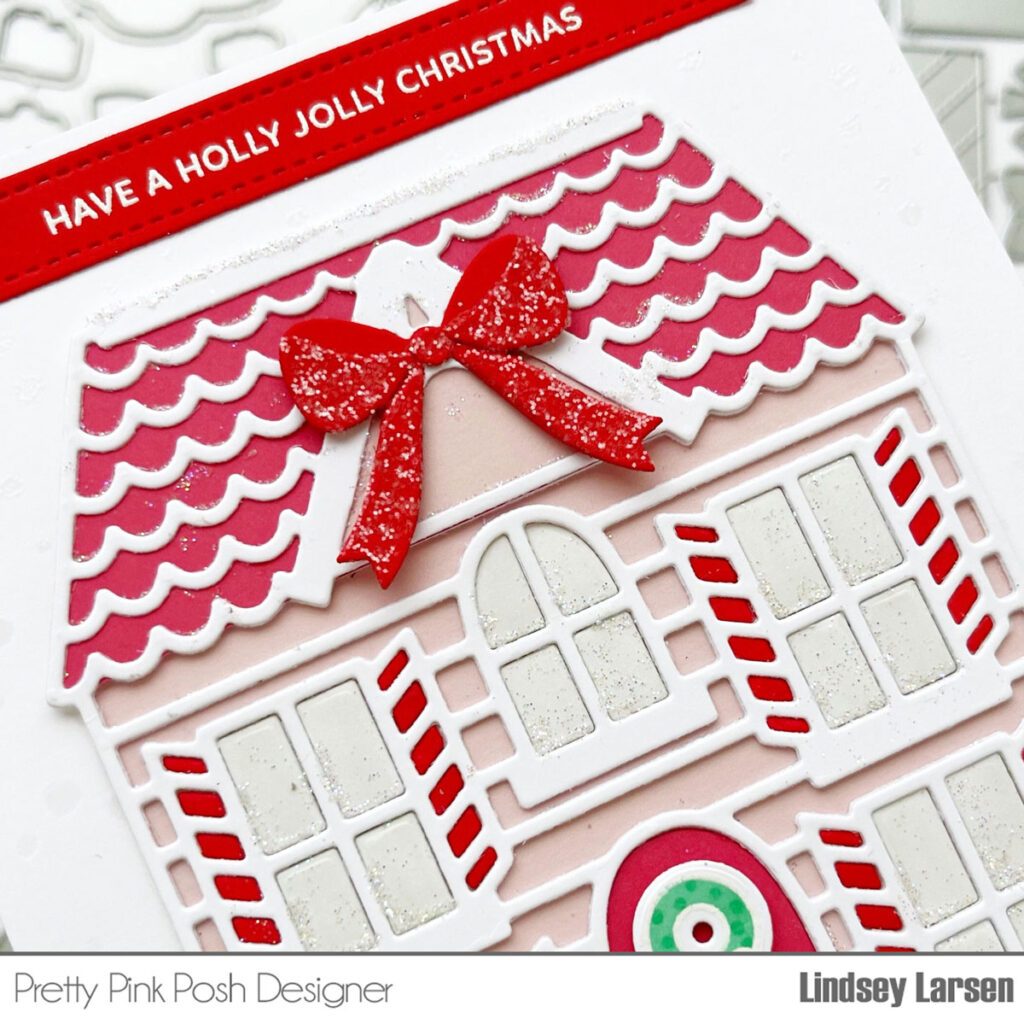
I pictured gingerbread and fancy sugar cookie houses when I created my Christmas card. To transform the Halloween House, all I did was swap out the colors and trim off the spiderweb from the roof’s eave. I added a glittery bow (cut from the Build A Gift Dies) there instead. I couldn’t believe how different the house looked with such small changes!
I opted for a simple background and embossed snow using theSnowfall Stencil. Then I repeated the trees in the front yard using the smallest tree in the Pine Trees Dies. I wanted the card to be sugary sweet, so I added glittery snow to the trees, window panes, and roof top. To further decorate the yard, I added a gumdrop walkway and peppermint lollipops using the Candy Treats Dies.
This cute holiday house needed an inviting doorstep, so I added packages using gifts in various sizes from the Village Additions and Happy Santa stamps and dies. I also added a wreath from the Village stamp set to the door.
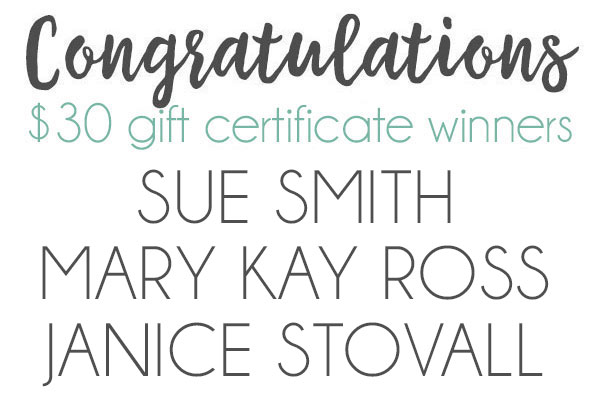
Hello! It’s time to announce the three winners of the August blog hop posts HERE, HERE, and HERE. Here are the lucky winners of the $30 gift certificates…
Winners, email me within 7 days to claim your prize!
If you would like even more inspiration with the new release and are on Instagram, we also have a four day Instagram hop with four more chances to win a $30 gift certificate if you leave a comment before August 22nd!
We hope you were inspired by all the inspiration from the hops!
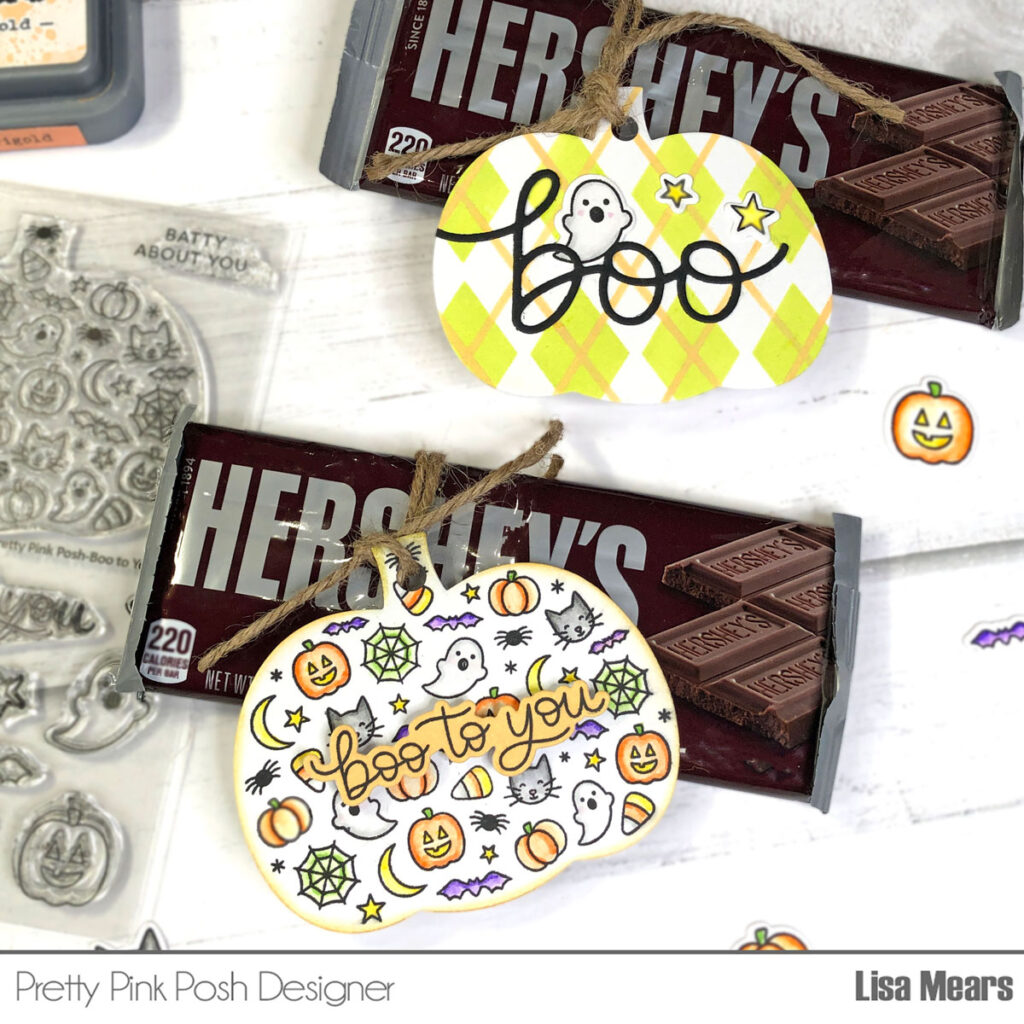
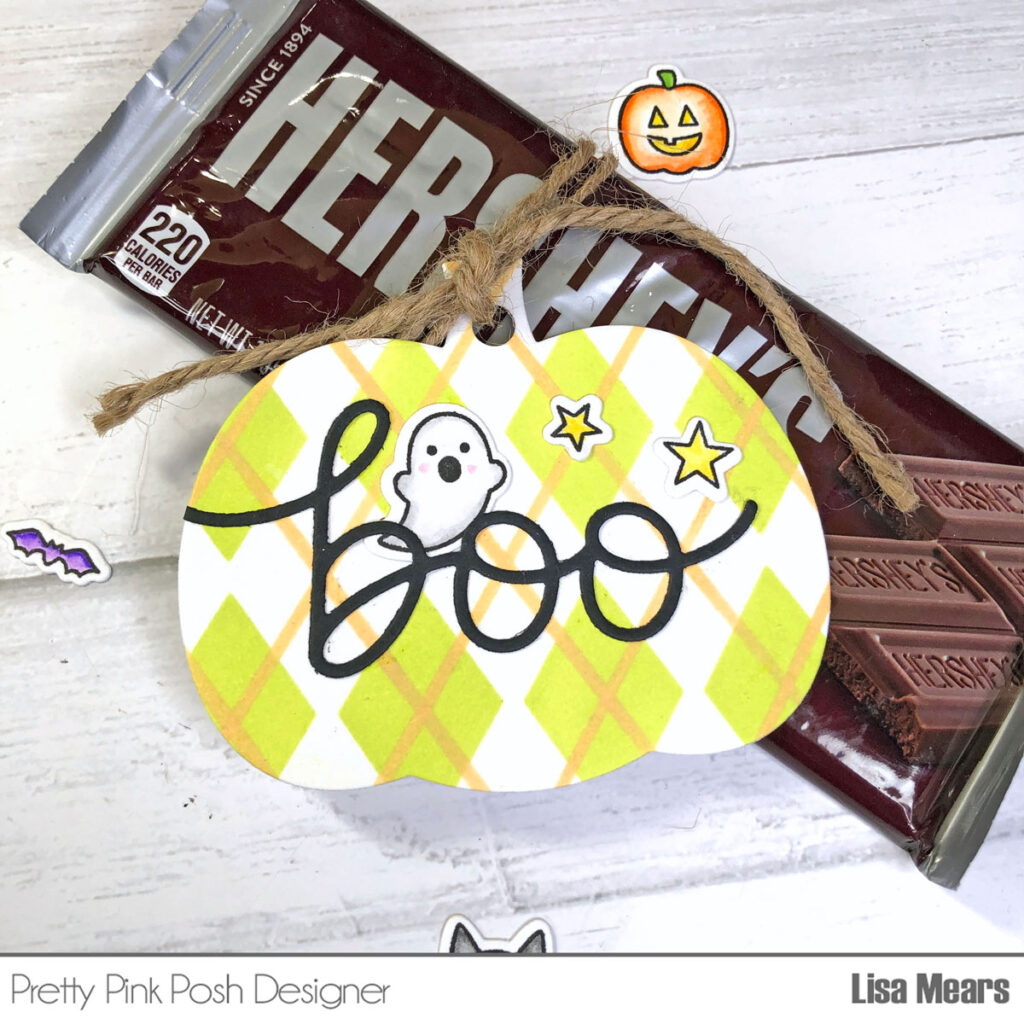
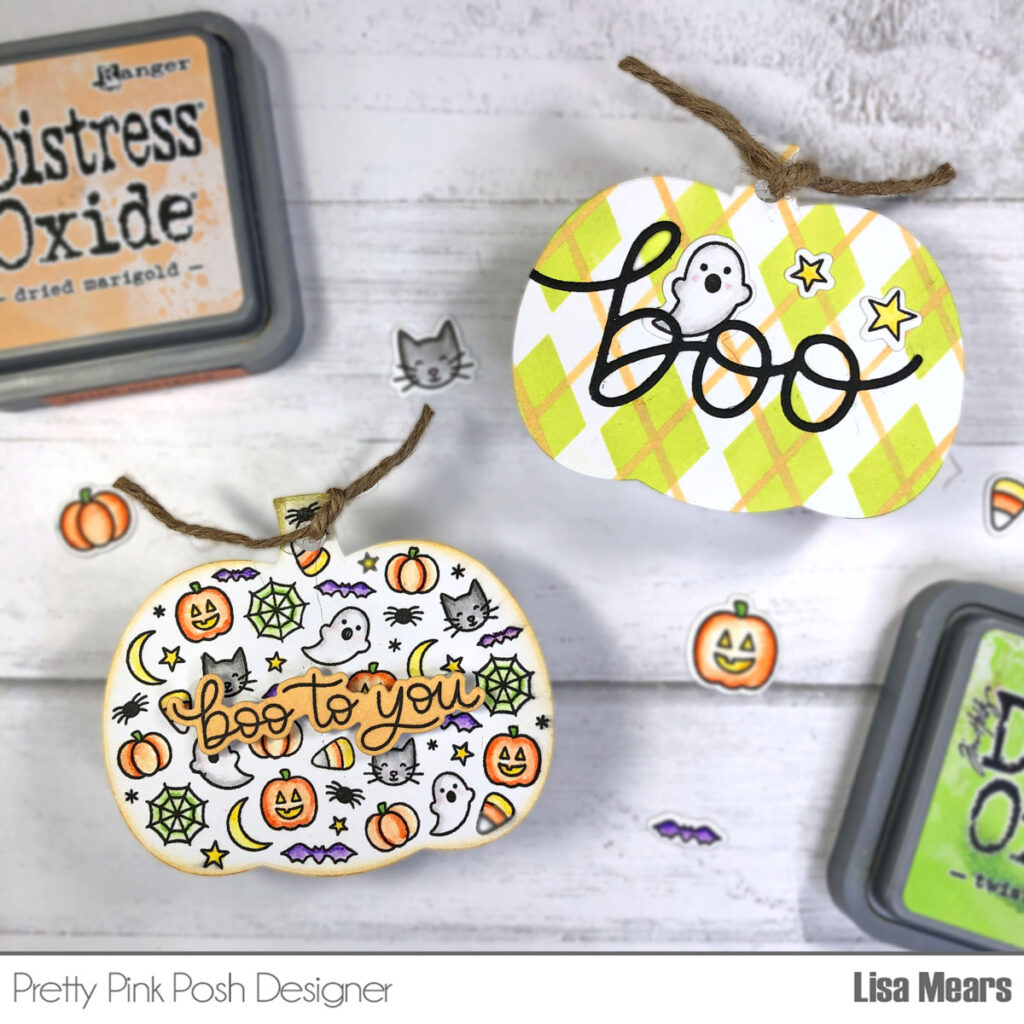
For my tags, I used the large pumpkin from the Boo to You stamp set. The pumpkin stamp is made up of several Halloween icons such as ghosts, pumpkins, spider webs, candy corn, and more.
I stamped the pumpkin onto Bristol Smooth cardstock and colored it with Zig Clean Color Real Brush pens in the following colors:
Bat: Violet and Blender Pumpkin with Face: Orange, Yellow, Light Green, Blender Pumpkin without Face: Orange, Light Green, Blender Candy Corn, Orange, Yellow, Light Gray, Blender Cat: Dark Gray, Blender Ghost: Light Gray, Sugar Almond Pink, Blender Spider Web: Light Green Stars: Yellow
After coloring the pumpkin, I die cut it with the coordinating pumpkin die. Next, I added some orange ink around the edges of the pumpkin shape and then added the sentiment to the top.
For my second tag, I stenciled a piece of cardstock using the Layered Argyle Stencil. I used Distress Oxide Inks in the following colors: Twisted Citron and Dried Marigold. I die cut the stenciled background using pumpkin die from the Boo to You die set.
I just love these Halloween tags. They are perfect to add to a Halloween treat which can be given to friends, family, co-workers, and trick-or-treaters for Halloween.
Thank you for stopping by today. Have a great day!
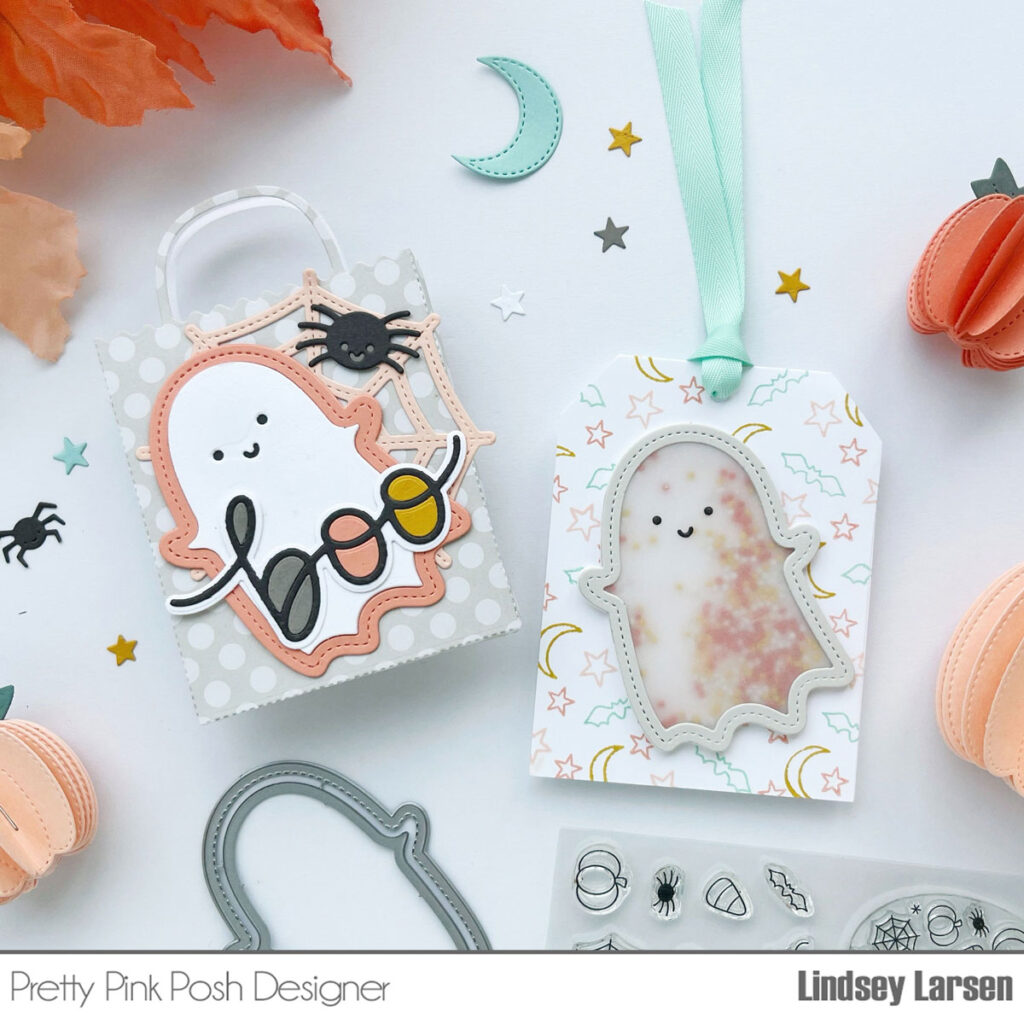
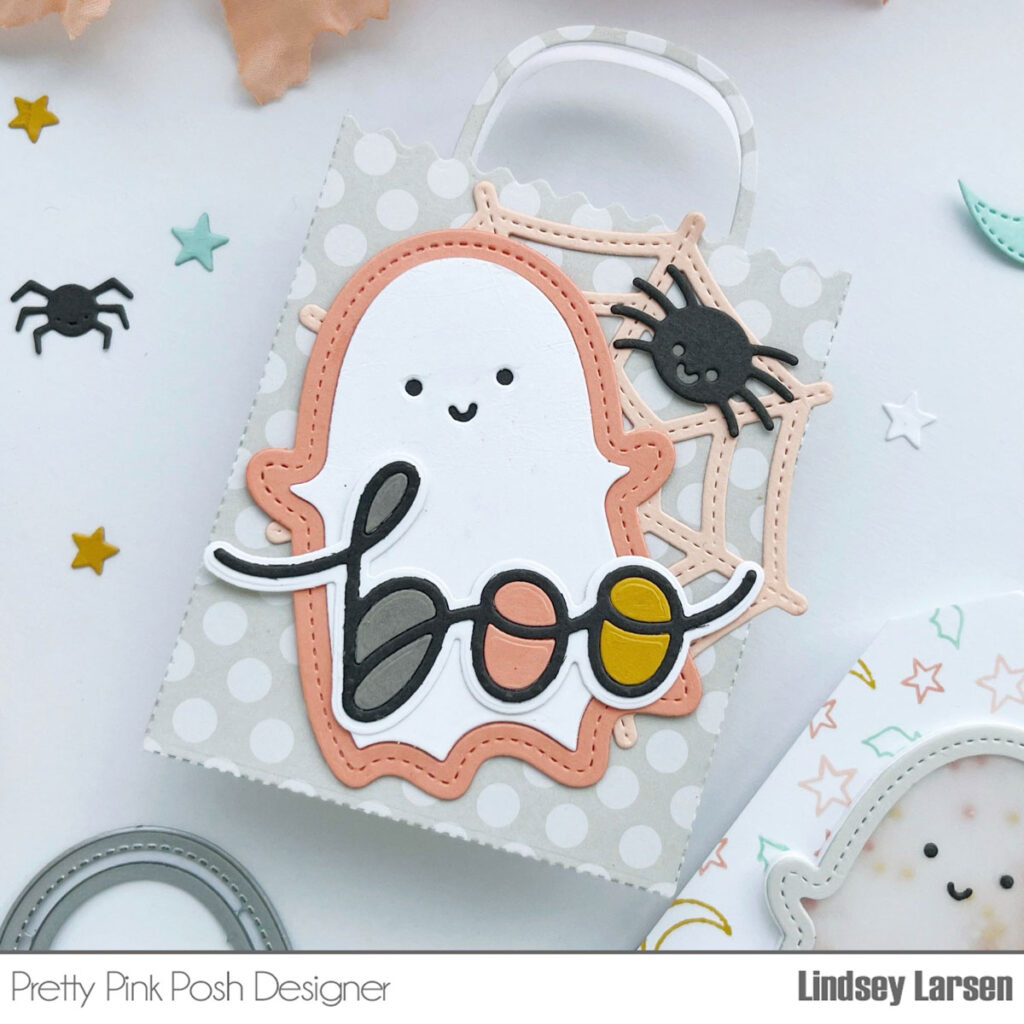
Hello! It’s Lindsey here today and I’m trying to plan ahead with teacher gifts, so I created a little gift bag and tag using the new Halloween release.
I made the gift bag with the previously released Gift Card Bag Dies. This was one of the quickest projects I made! I love that with just two cuts of the die you can have a darling gift bag in no time. It’s the perfect size for a candy/treat, jewelry, gift card, etc. I used patterned paper to speed the process up even more. I decorated the bag using the Ghost Shaker, Spider Web, and Large Boo Shadow Dies.
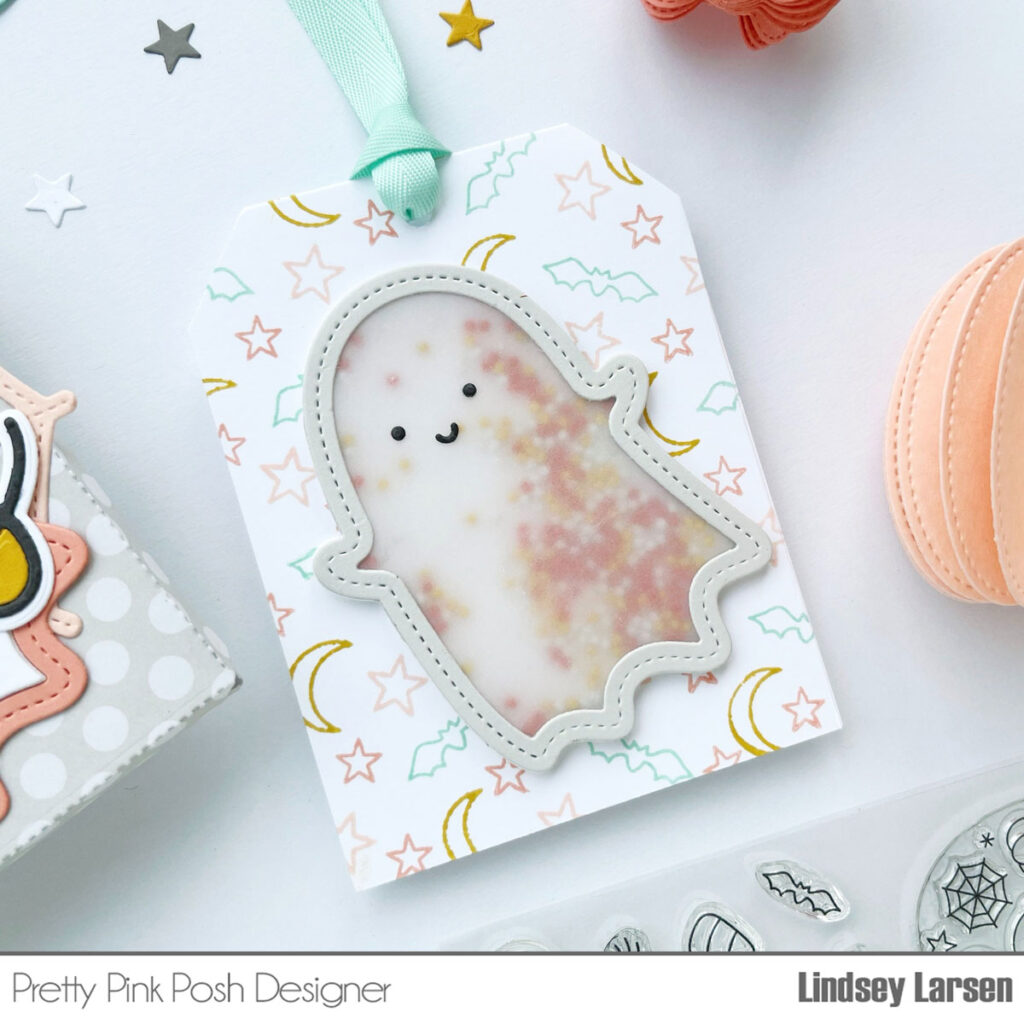
And while those dies were out, I cut the ghost a few more times to use on my tag. This time I made him into an actual shaker. I used vellum because it felt a little more ghost-ish to me :) and filled it with the new Candy Corn Glass Beads. This may seem silly, but I LOVE the sound these beads make. I can’t tell you how many times I’ve picked this little ghost up and given him a shake.
I finished my tag off by simply stamping some little images from the Boo to You stamp set.
I’m so glad you joined me today. I hope I’ve inspired you and look forward to seeing what you create with this fabulous new release!
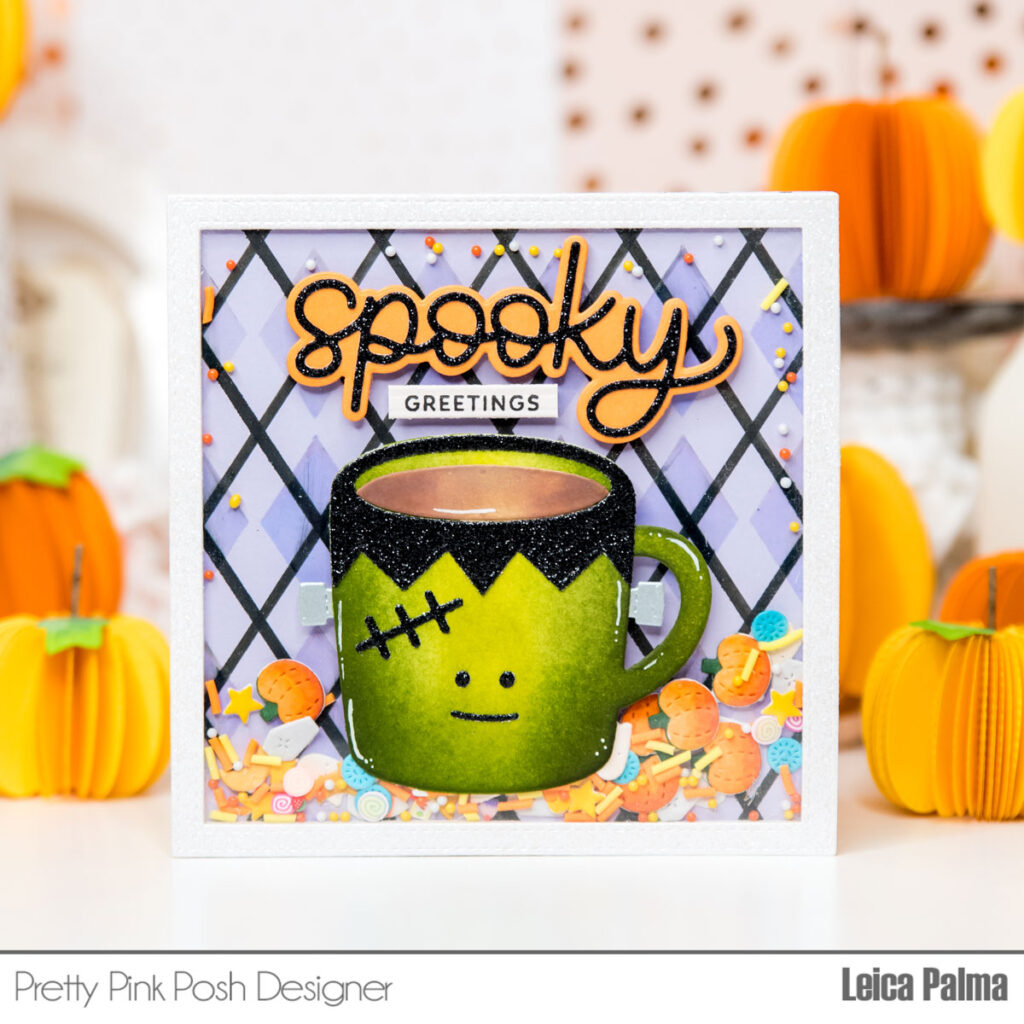
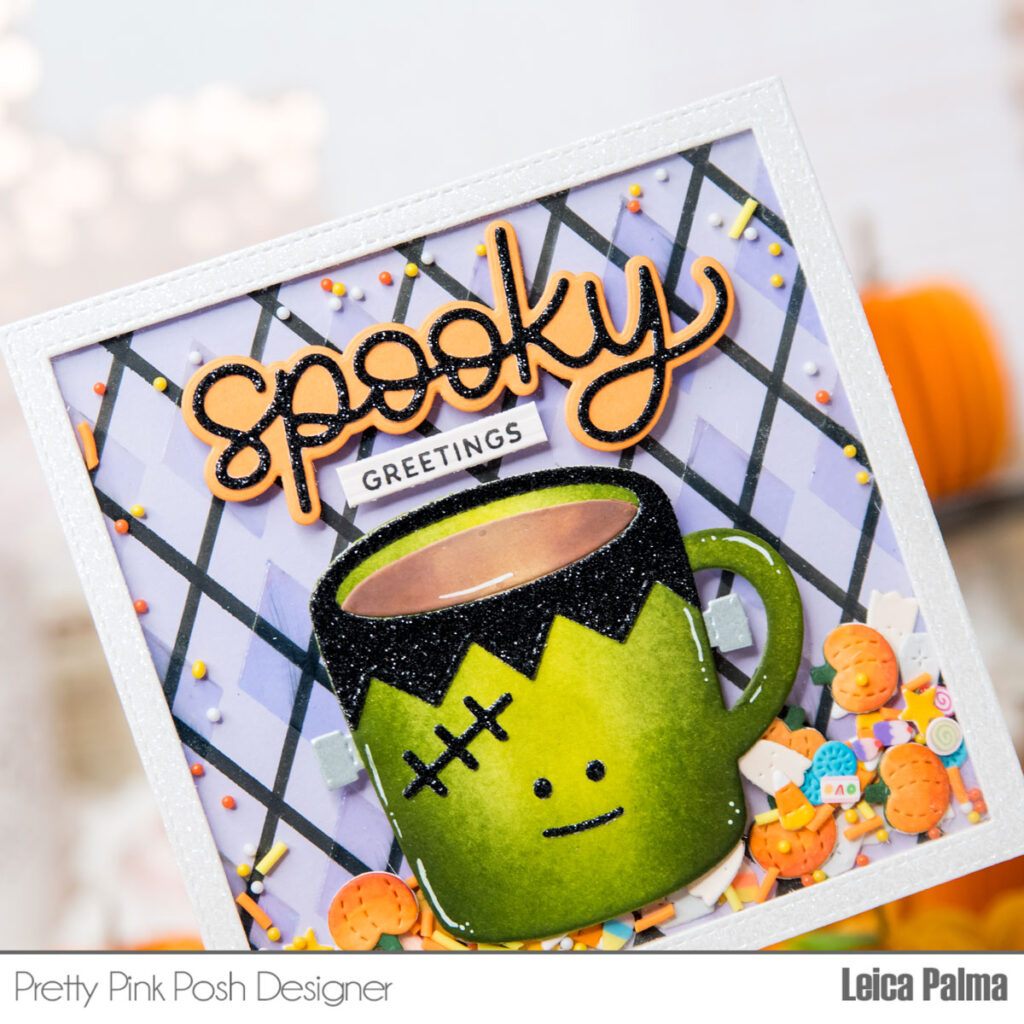
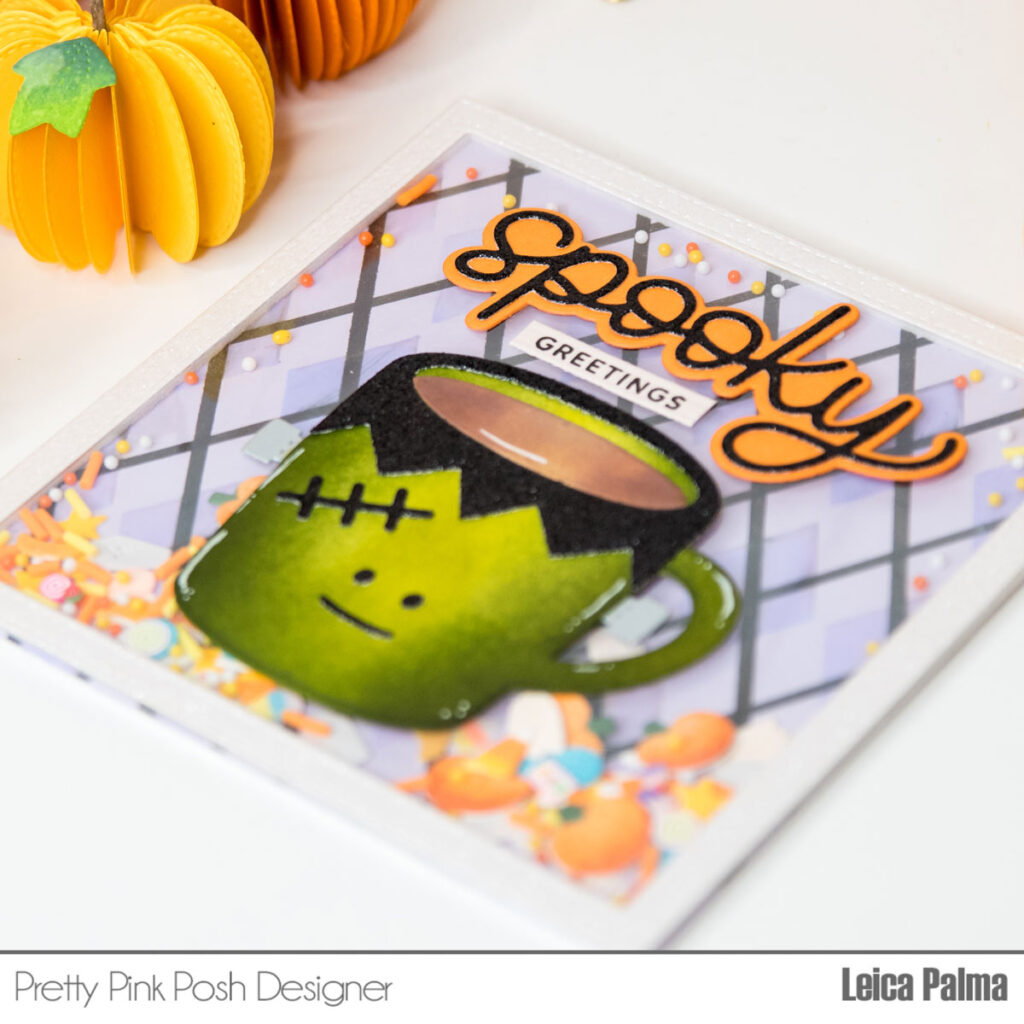
Hi, crafty friends! Leica here and I’m excited to share a Halloween shaker card using the new Halloween Mug Addition Dies. I’m absolutely in love with theWinter Mug Dies and all the additions that were previously-released. And this Halloween set is no exception!
To start, I created a 5-inch square background for my shaker by using the Layered Argyle Stencils on purple cardstock. I used some Distress Oxide inks like Black Soot and Wilted Violet. Then, I cut a square frame from white glitter cardstock and added acetate and foam tape around it to create the shaker well. Inside the shaker, I added some Halloween Candy Mix, and I also colored some of the small dies from the Halloween Mug Additions dies with copic markers before tossing them in.
Next, I cut the mug from the Winter Mug Dies and added the Frankenstein elements from the Halloween Mug Additions Dies. I ink blended them with Distress Oxide inks and glued the mug to the front of the card panel. For the sentiment, I cut the word “spooky” from theSpooky Wishes Shadow dies in black glitter cardstock and the shadow in orange cardstock. Then, I stamped “greetings” on a strip of light pink cardstock and glued it to the card panel. Finally, I glued the card panel onto a 5-inch square white card base.
That’s it for my shaker card. I hope I’ve inspired you to create some shaker cards with the Halloween Mug Additions Dies. The small dies are perfect for shaker bits, and you can customize the colors using markers or inks.
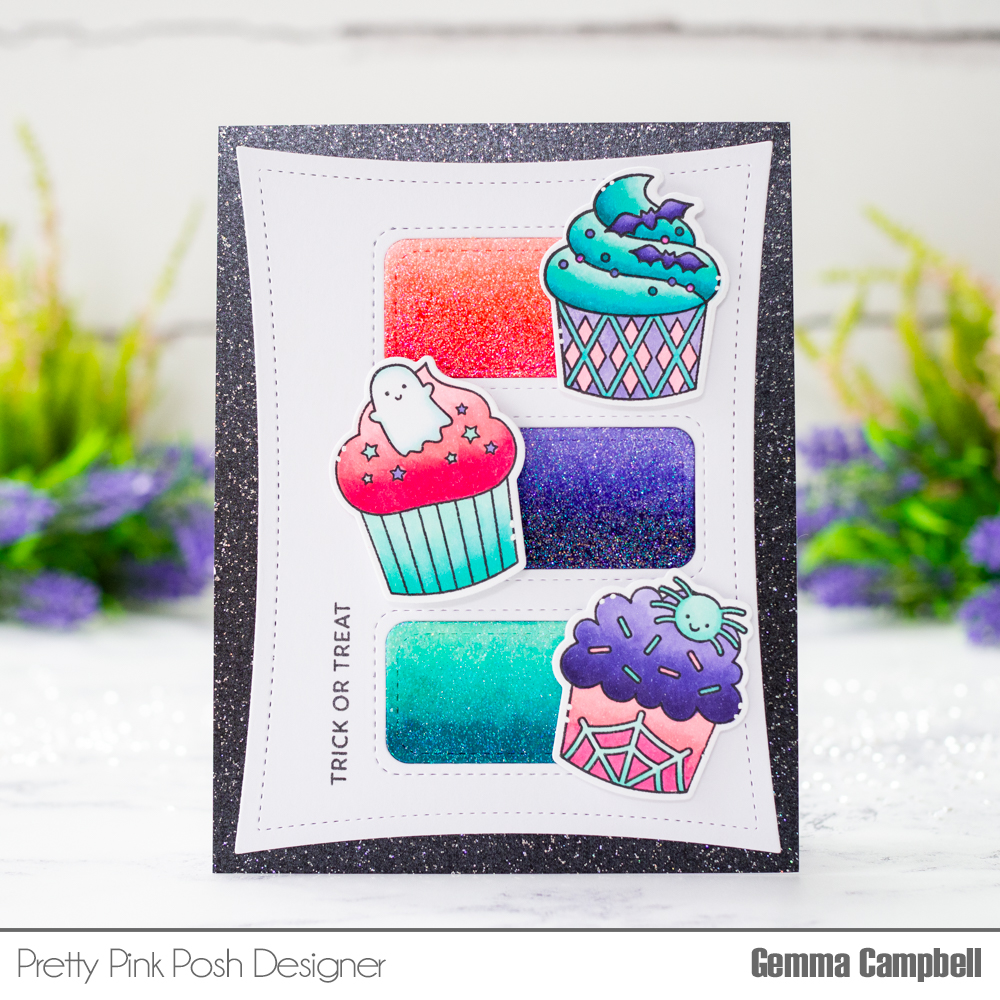
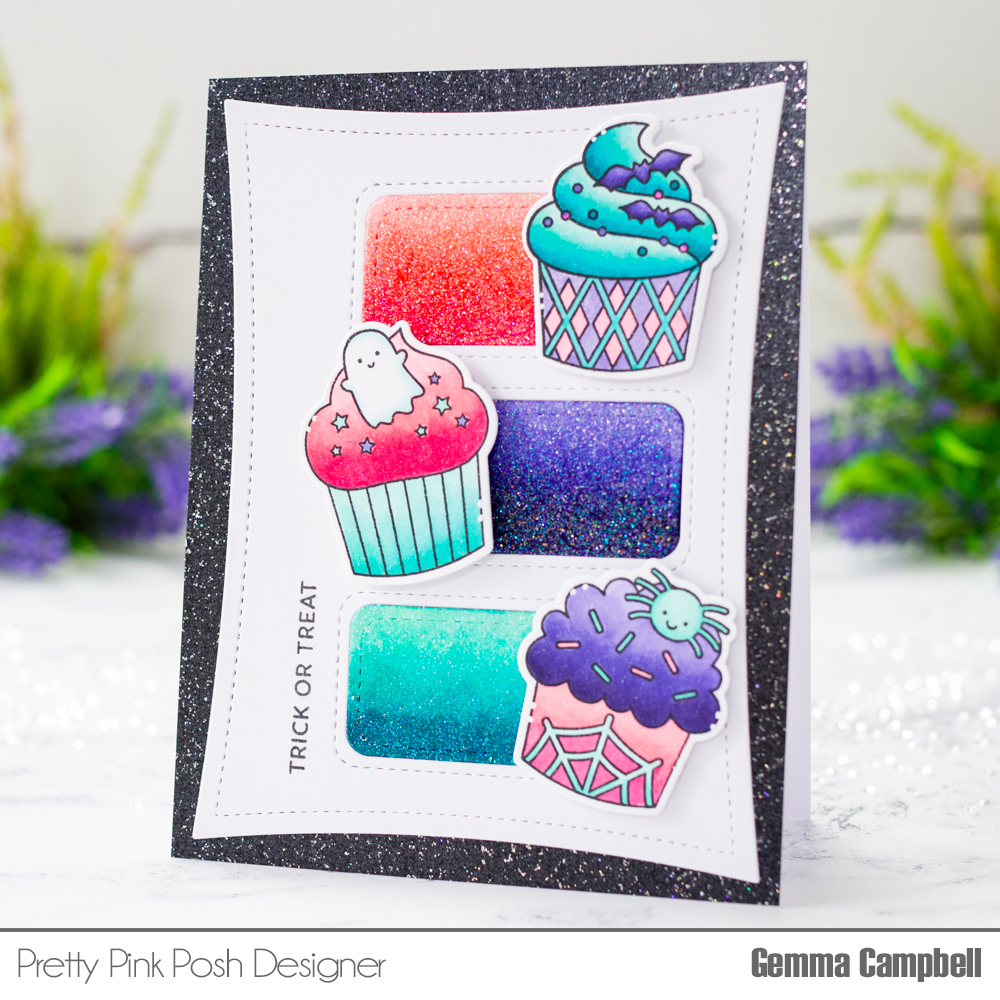
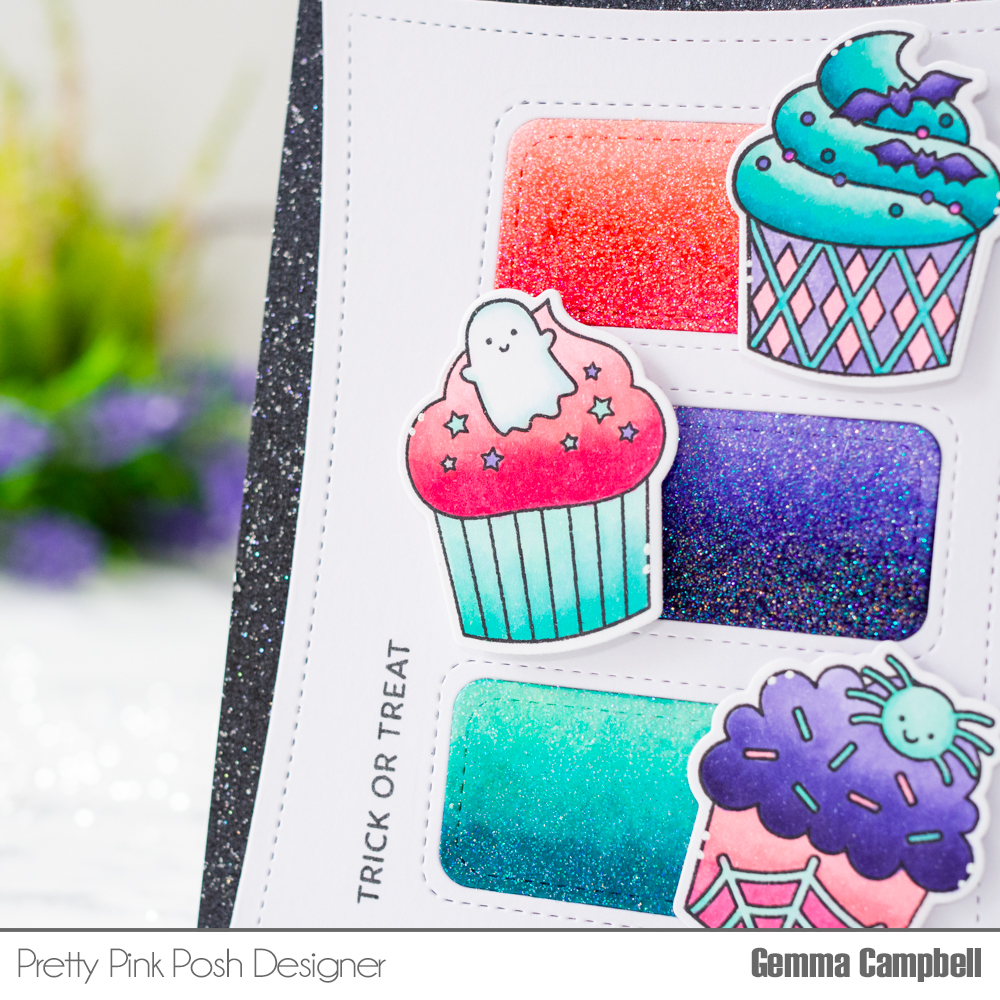
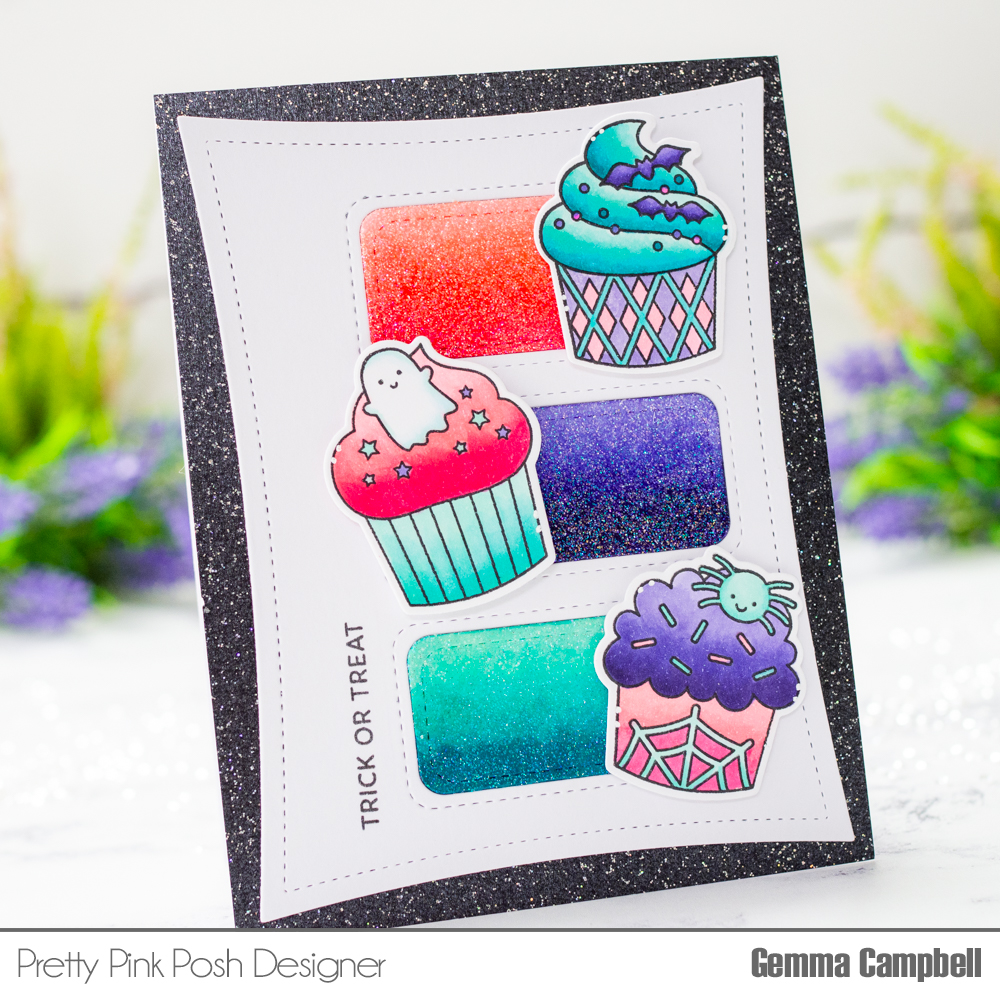
Hello, Gemma here and today I’m sharing a card using the new Halloween Cupcakesstamp set. I love the bold bright colours of Halloween and chose a colour scheme of pink, purple and turquoise.
I began by stamping out 3 of the cupcakes and colouring them with copic markers. I then die cut them out with the Halloween Cupcakes coordinating dies.
For my background, I first used the largest die in the Wonky Stitched Rectangles die setto cut a panel of white card. From this, I used the Stitched Pieces dieto cut some windows in the panel. This is one of my favourite PPP dies.
On the die cut insert pieces, I used the same copic markers to colour each one in. I wanted them to match my cupcake colours but knew it could be tricky to find a patterned paper or ink that matched. To add some sparkle, I covered each one with embossing ink, then embossed them with WOW Neutral Ultra Shimmer embossing powder.
On an A2 card base, I adhered a piece of black pearl sparkle card, followed by the white Wonky Stitched Rectanglepanel. I added the sparkly insert pieces, then used foam tape to add the cupcakes to finish.