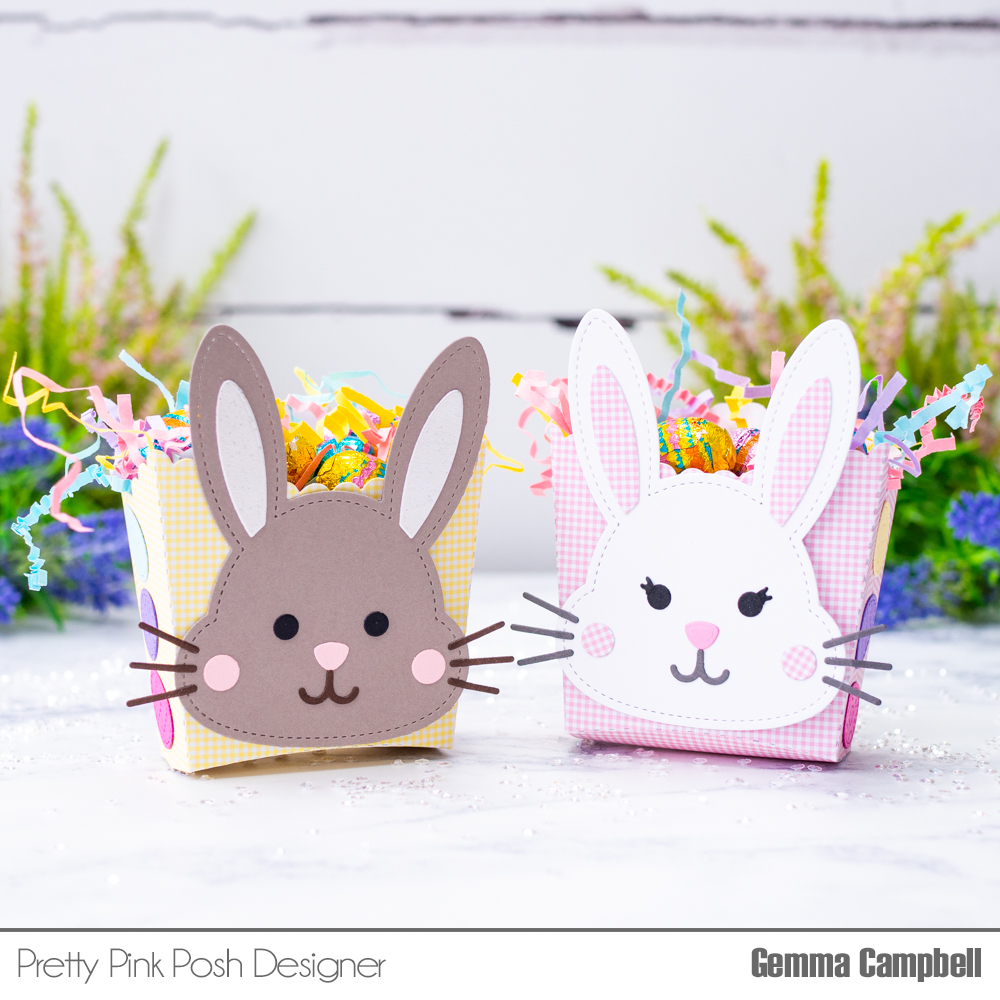
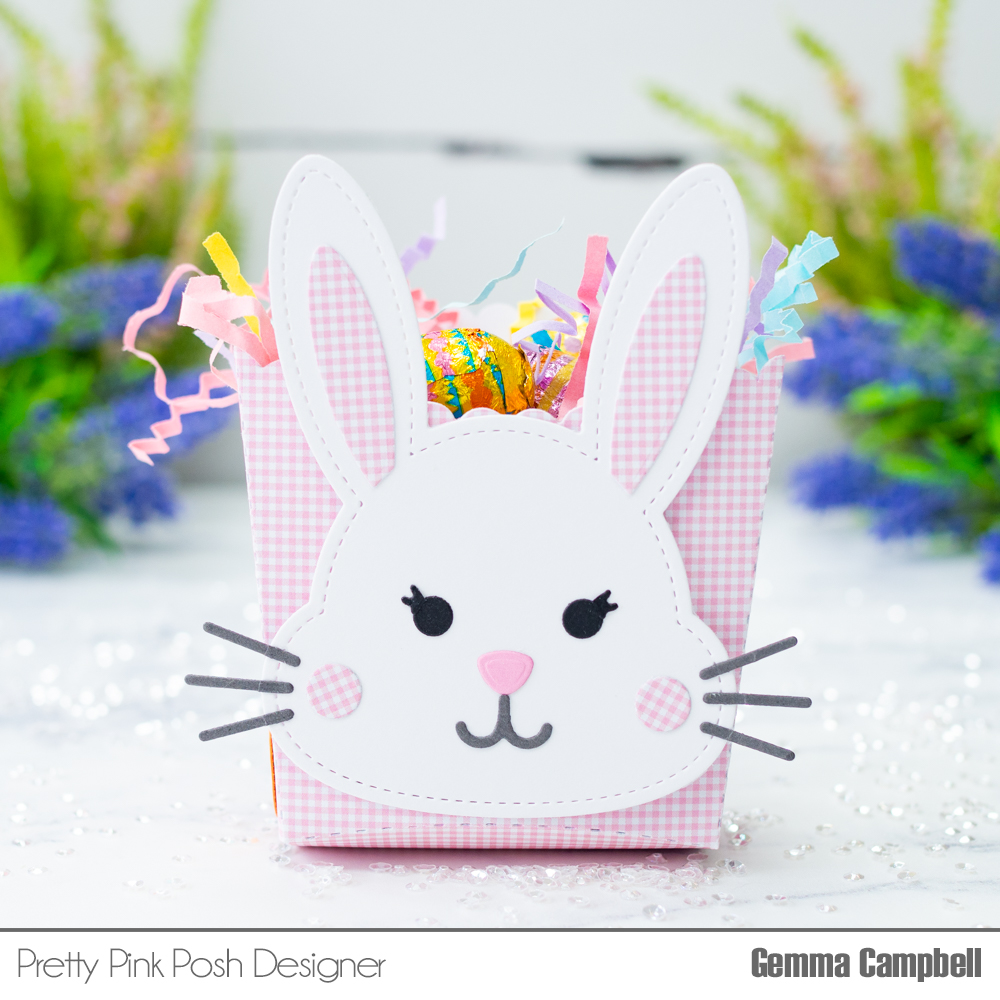
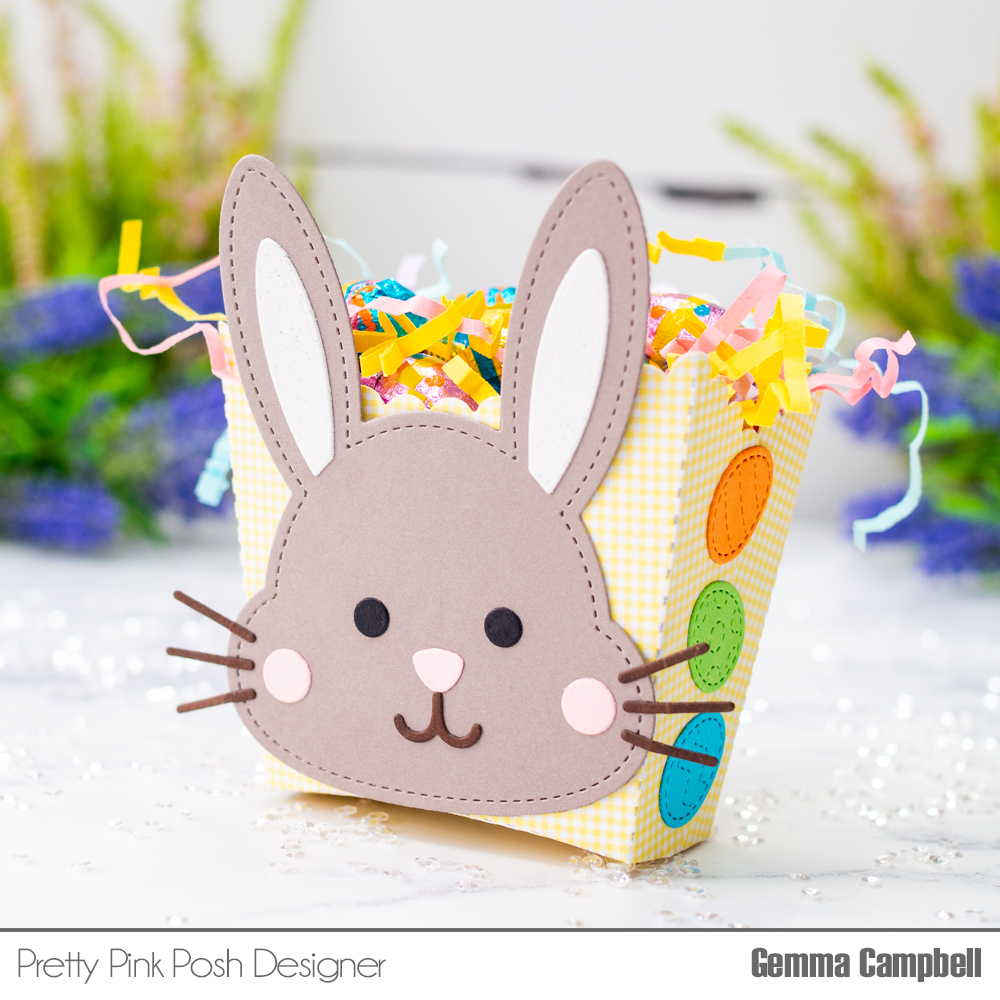
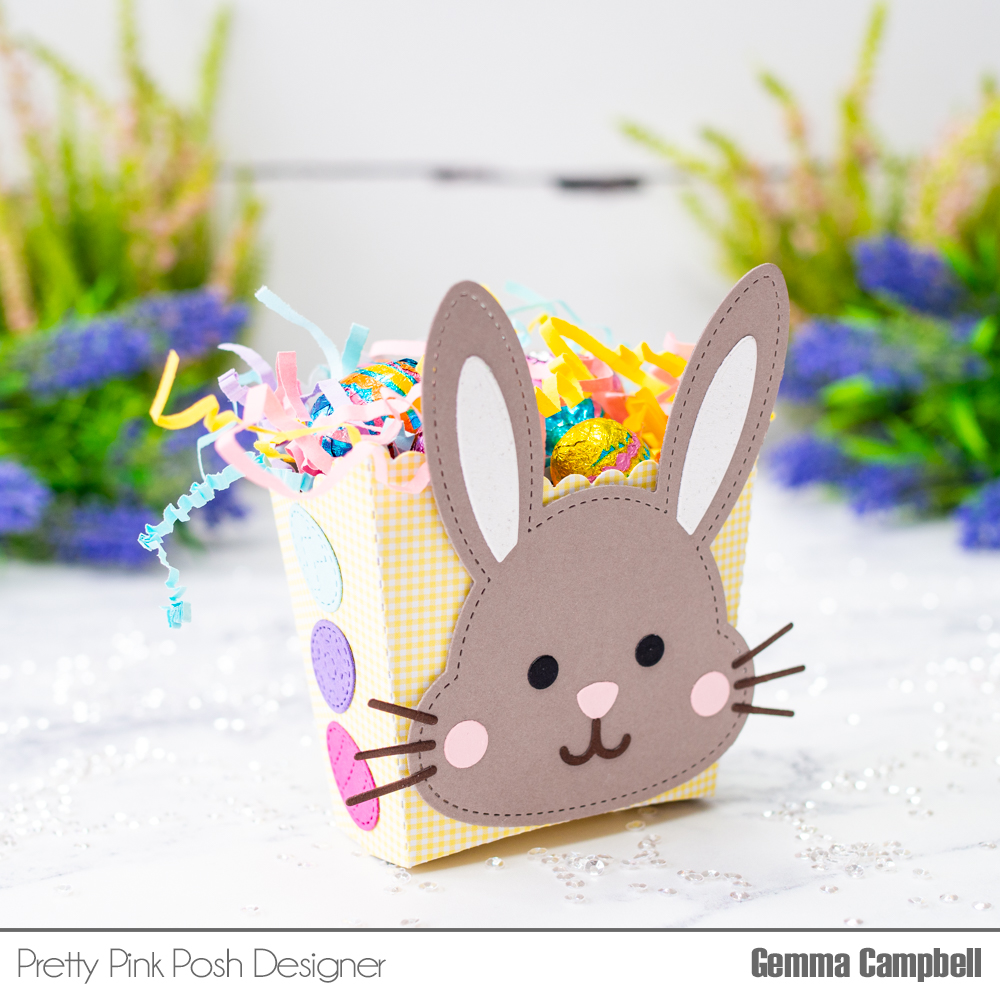
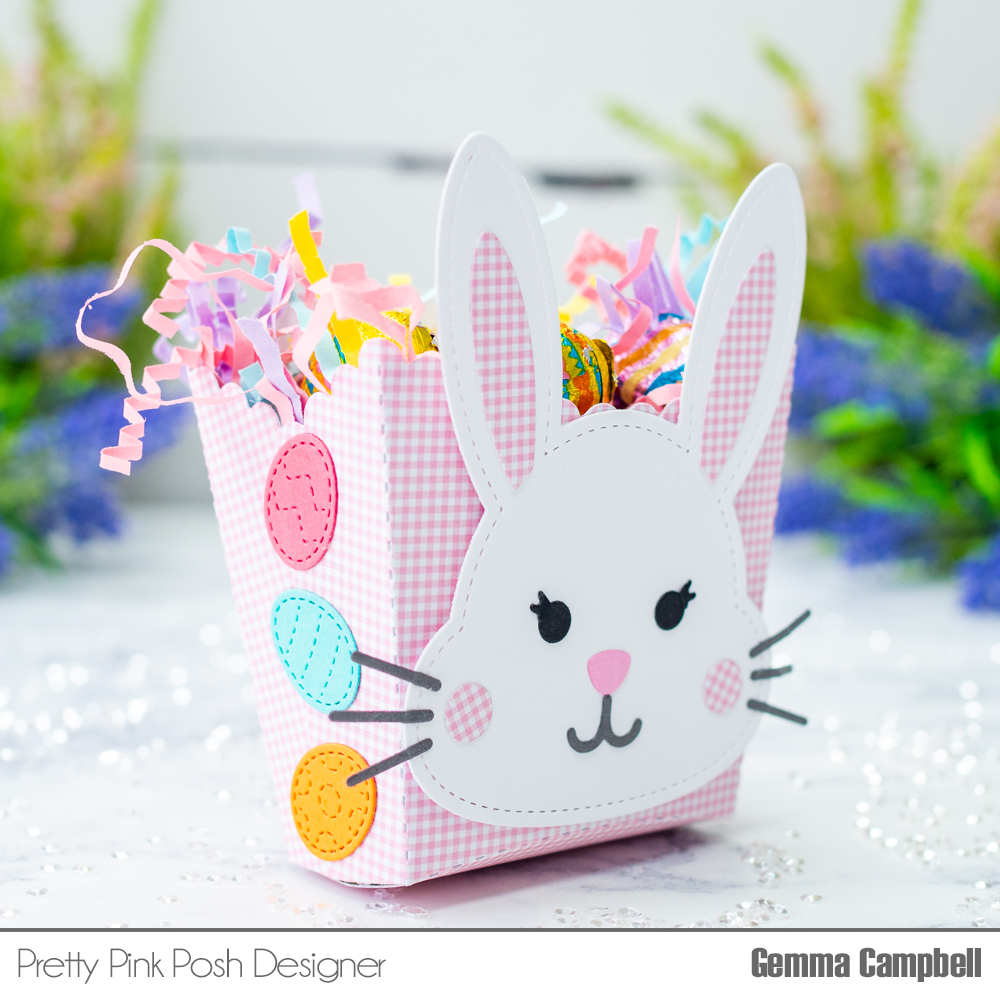
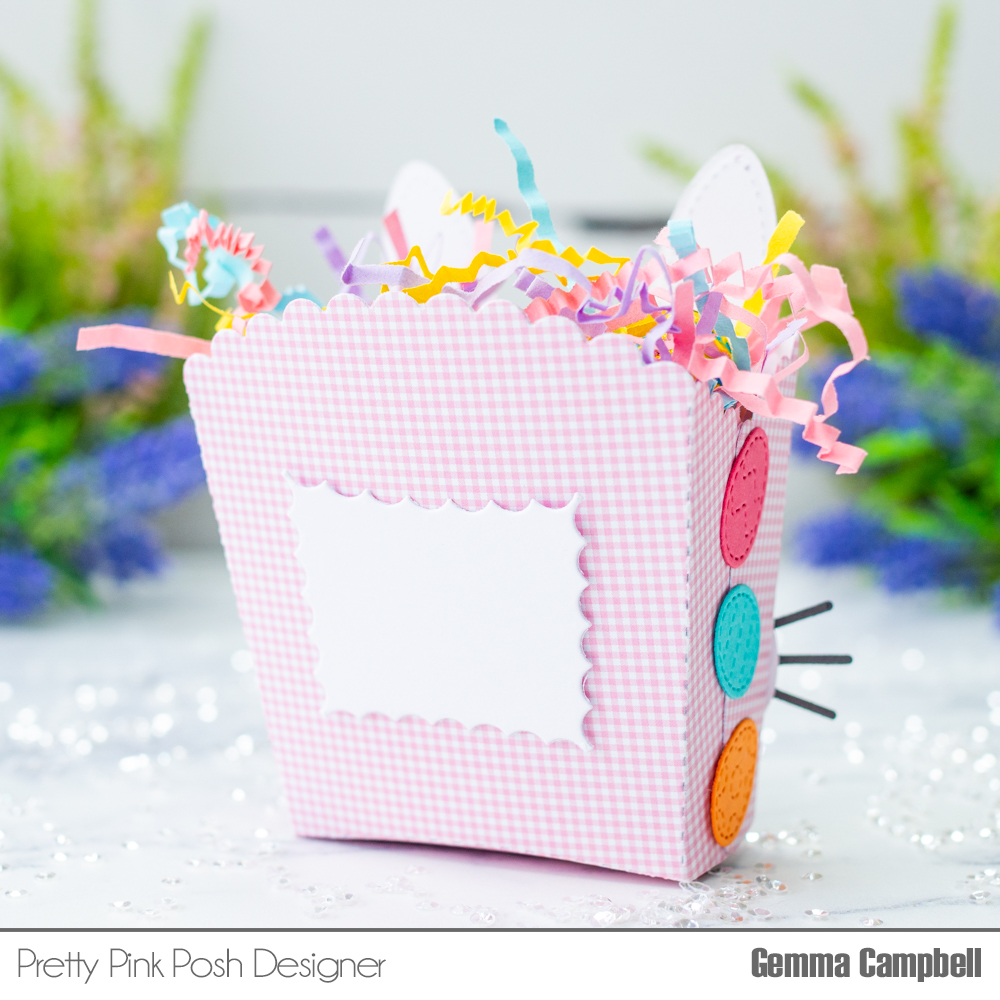
Hello, Gemma here today to share some treat boxes, perfect for gifting Easter chocolate.
I began by die cutting the Birthday Treat Box from gingham card. These boxes are really easy to put together. I added double sided tape on the sides, then folded the die cut boxes along the scored edges and secured the sides with the tape.
Next, I die cut the Bunny Face Shaker from brown and white card. I also die cut the ear pieces, nose, mouth and whiskers using the same die set.
I adhered the bunnies to the front of the treat boxes, along with a white card piece on the back for a written message. The die for this piece is from the Birthday Treat Boxset.
To add some more decoration, I die cut a rainbow of individual eggs from the Easter Egg Borderset. I adhered three eggs on each side of the boxes to finish.
I hope these boxes inspired you to create cute Easter treat boxes. Thanks for stopping by!
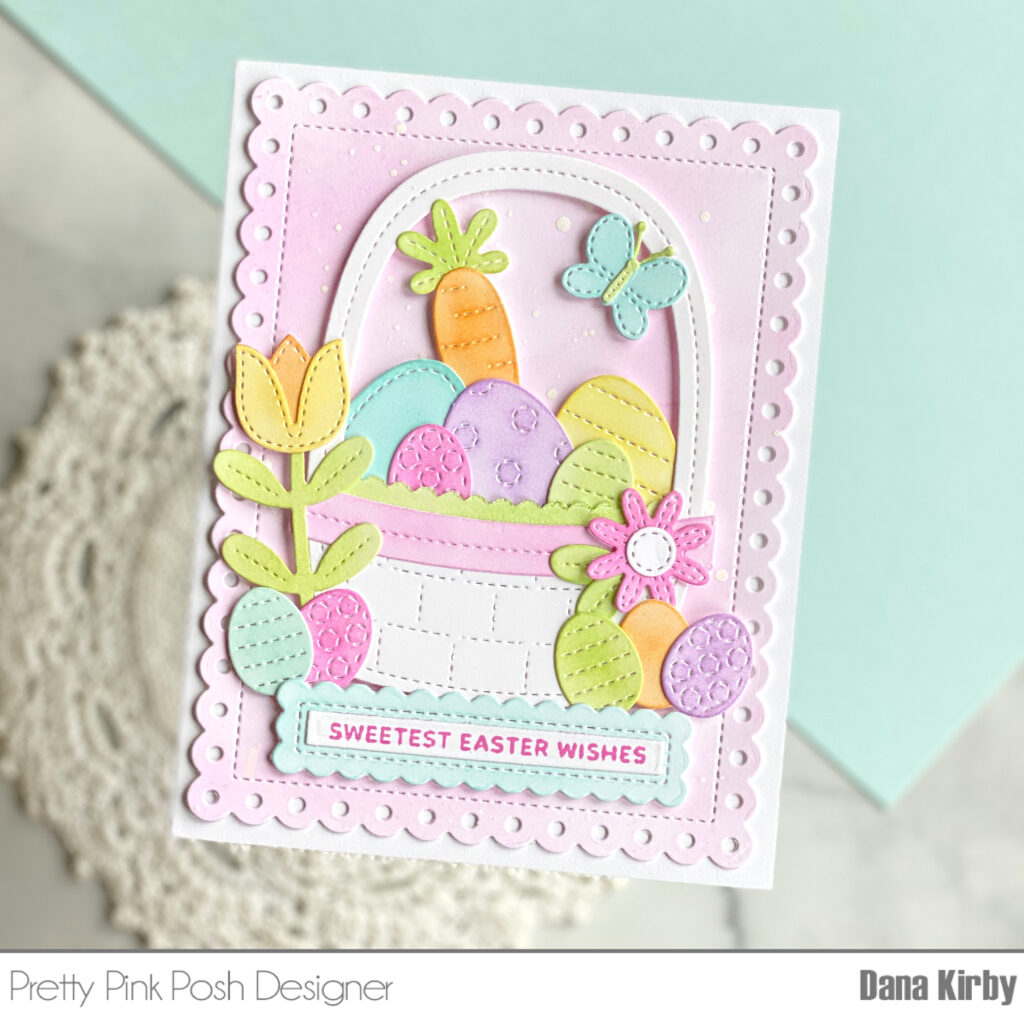
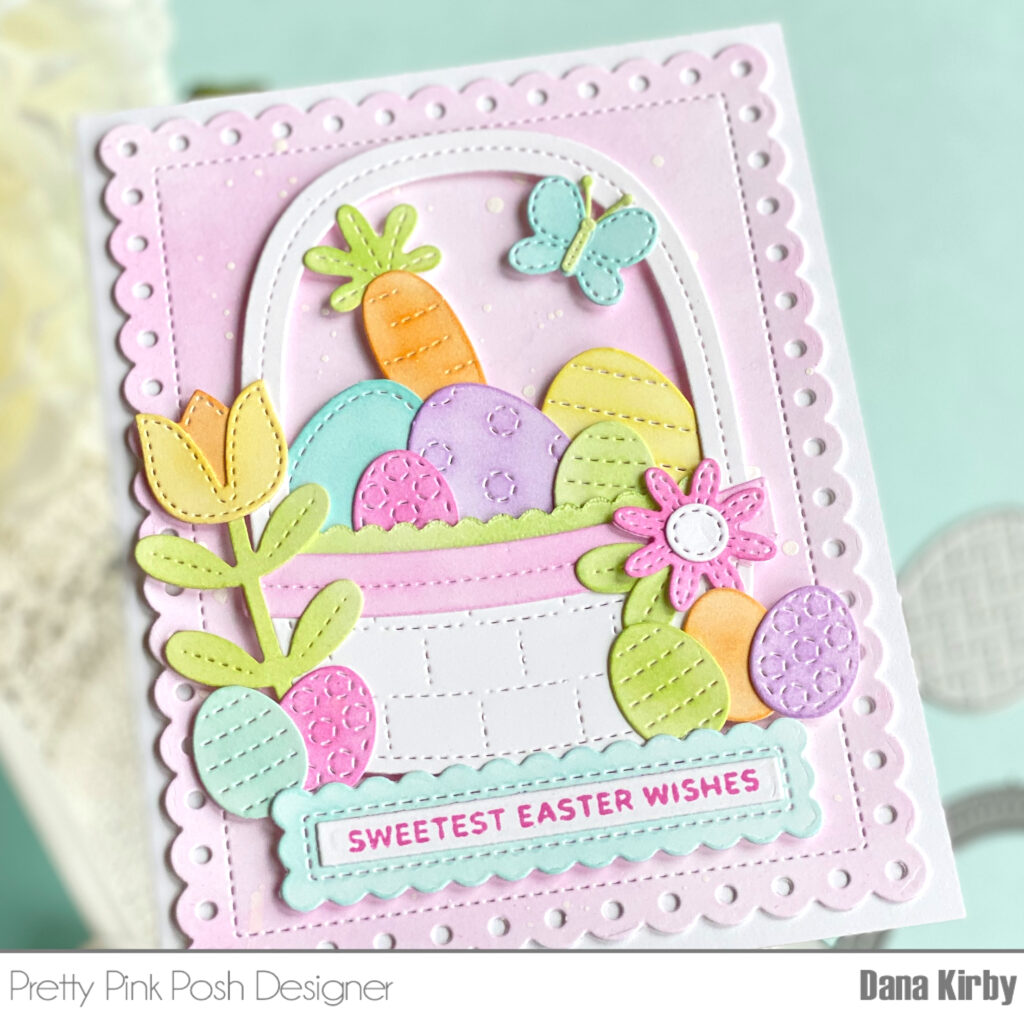
Hi friends! It’s Dana here today and I am back with an Easter card to share with you all. The new release is packed full of so many amazing new dies sets! I love how they all can be mixed and matched to give you so many options. I decided to combine a few sets and create an Easter basket full of springtime goodness for my card today!
I started my card by using the Stitched Eggs, Spring Mug Additions and Big Easter Cupcake die sets to die cut all of my images. I die cut the images from white cardstock and used small blender brushes to add color to each individual die. Next, I used the Easter Basket die to die cut my basket. I love this die for Easter, but I find I use it for lots of other occasions too. It’s the perfect size and there are so many fun ways to fill it!
For my card panel I used the large Eyelet Rectangle die. I ink blended the panel with a soft pink ink and added a few white splatters for a little added detail. I attached my basket to the center of the panel with foam adhesive and then filled the basket with all the different springtime images. Lastly, I used the Sentiment Strips: Easter stamp set and Sentiment Strips dies for my sentiment.
Thanks for joining me today and I hope I inspired you to create an Easter basket of your own.
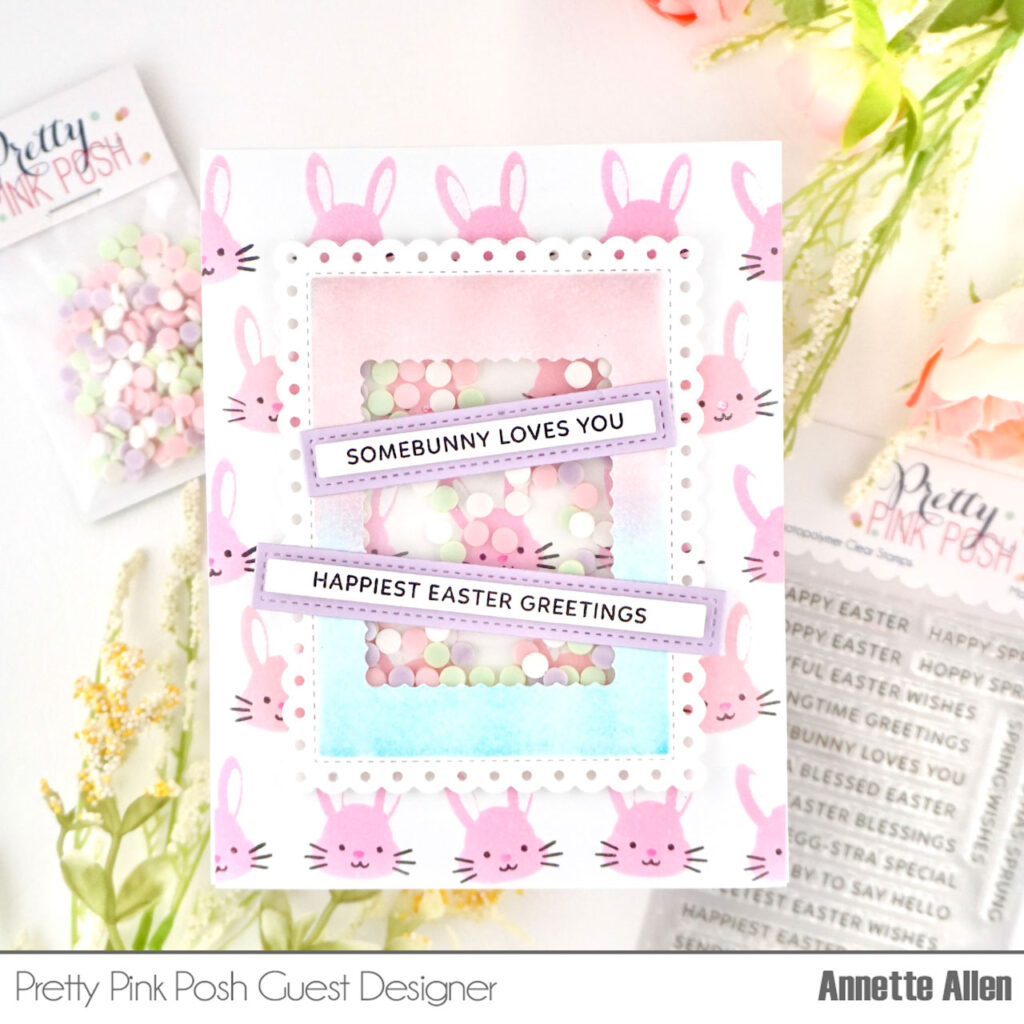
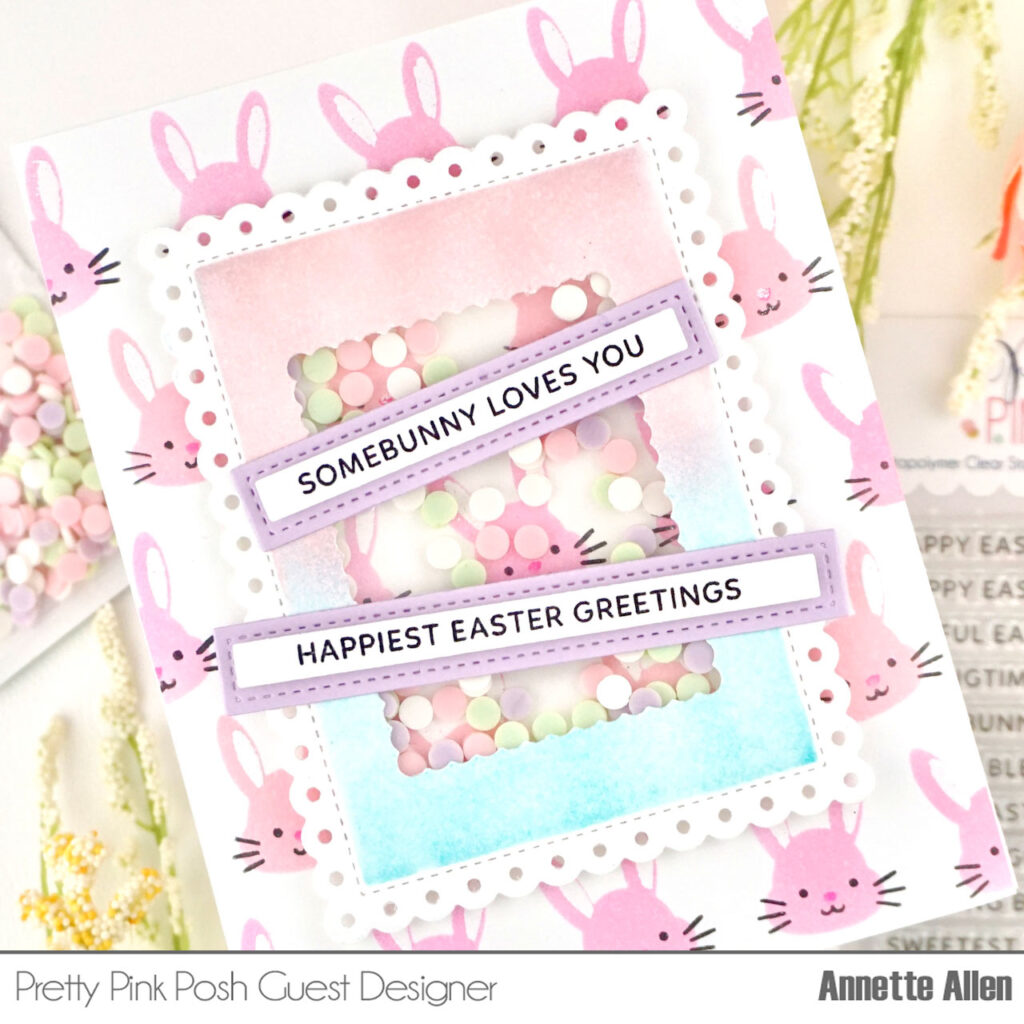
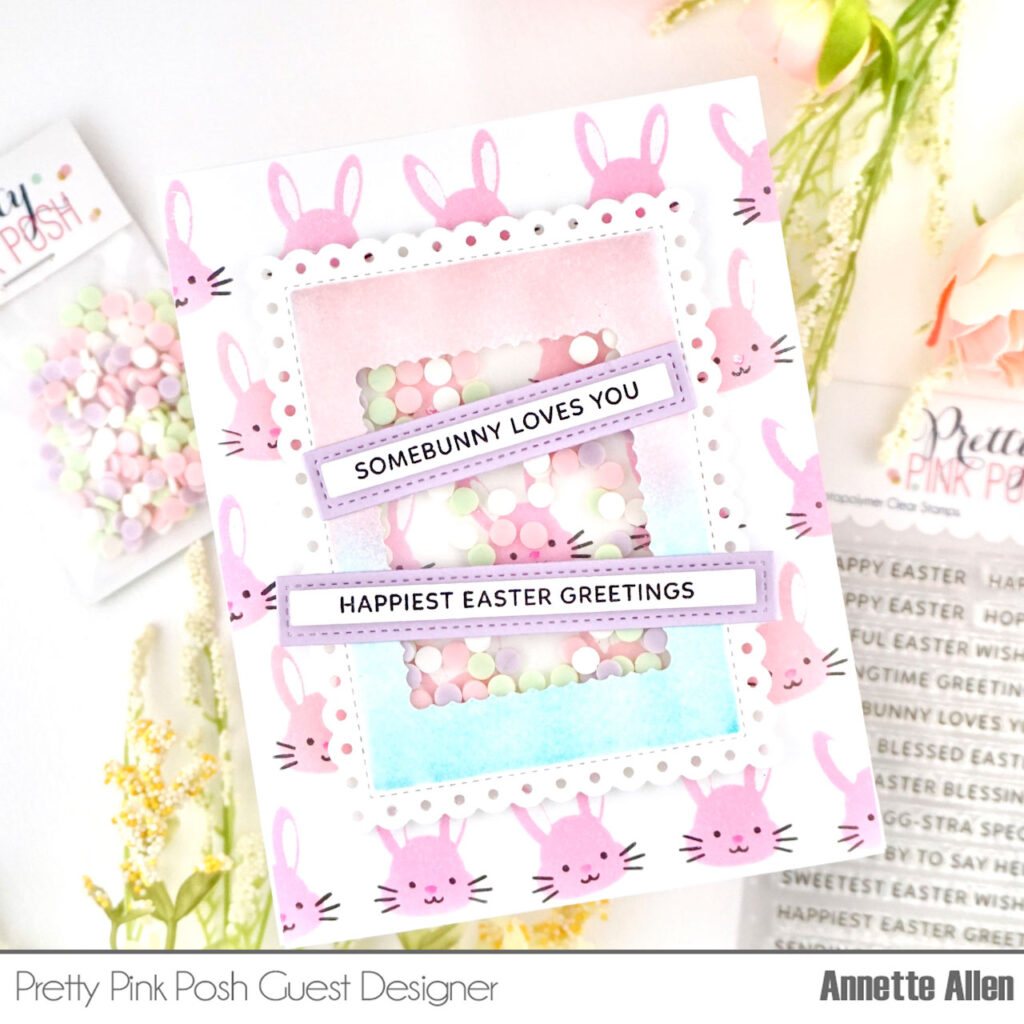
Welcome Pretty pink Posh friends… Annette Allen here with you today with this Spring filled guest design post. I am so excited to have this opportunity to share with you today.
Create card on white cardstock A2 size.
Cut a panel on white cardstock A2 size and stencil these cute newLayered Bunny Facesusing pink ink on the first (A) stencil, Black ink on the second (B) stencil and for the third (C) stencil we are going to use embossing ink only on the ears and for the nose a darker pink. Remove the stencil and add some white embossing powder to the ears and heat emboss to activate it.
Adhere your panel to your card base using liquid glue.
Die cut the second largest Eyelet Rectangles die on white cardstock. Leave your die in place and ink blend some pink and teal onto your panel. The die will act as a mask, as you can see in the photo the outer edge is still white.
Now die cut the third largest Eyelet Rectangle in the center of your large Eyelet Rectangle we just die cut. This will create a window. Cut a piece of acetate that will cover your open space of your rectangle and adhere it to the back using tear tape.
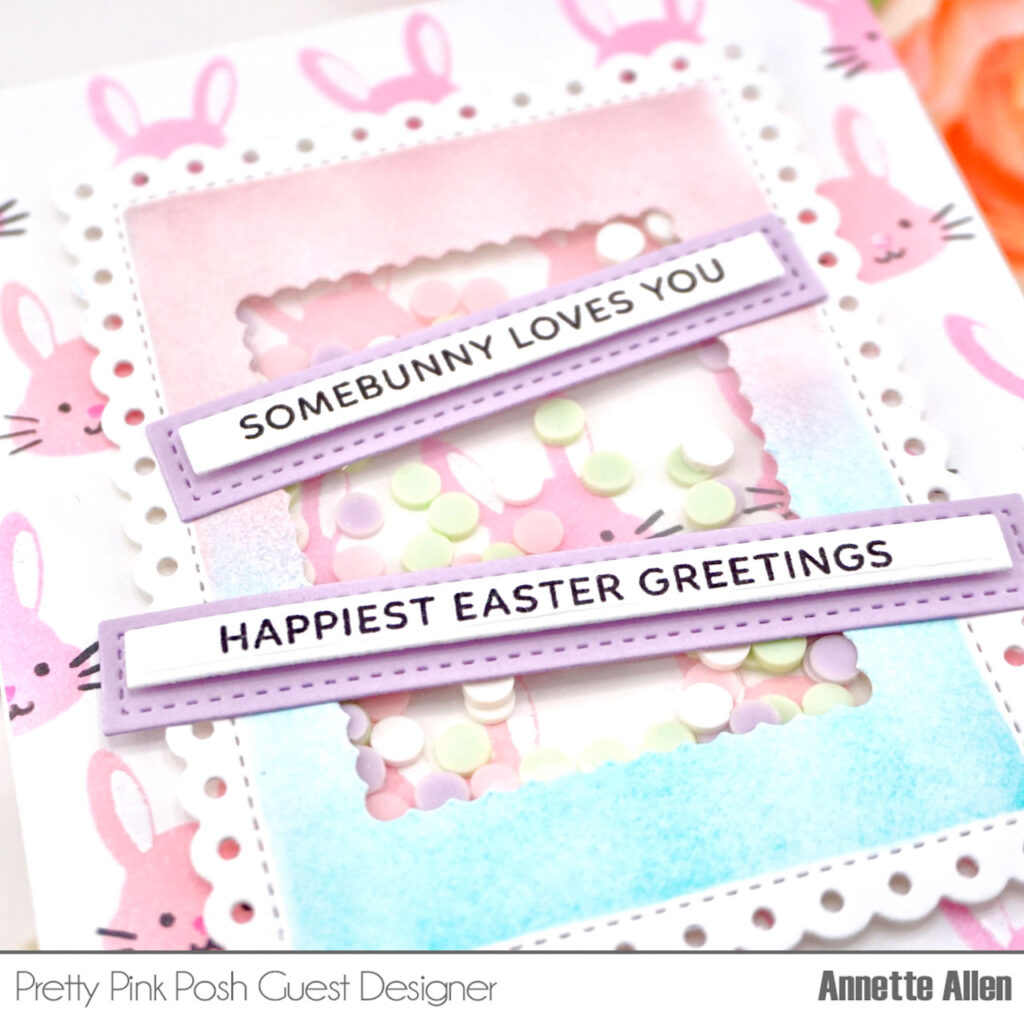
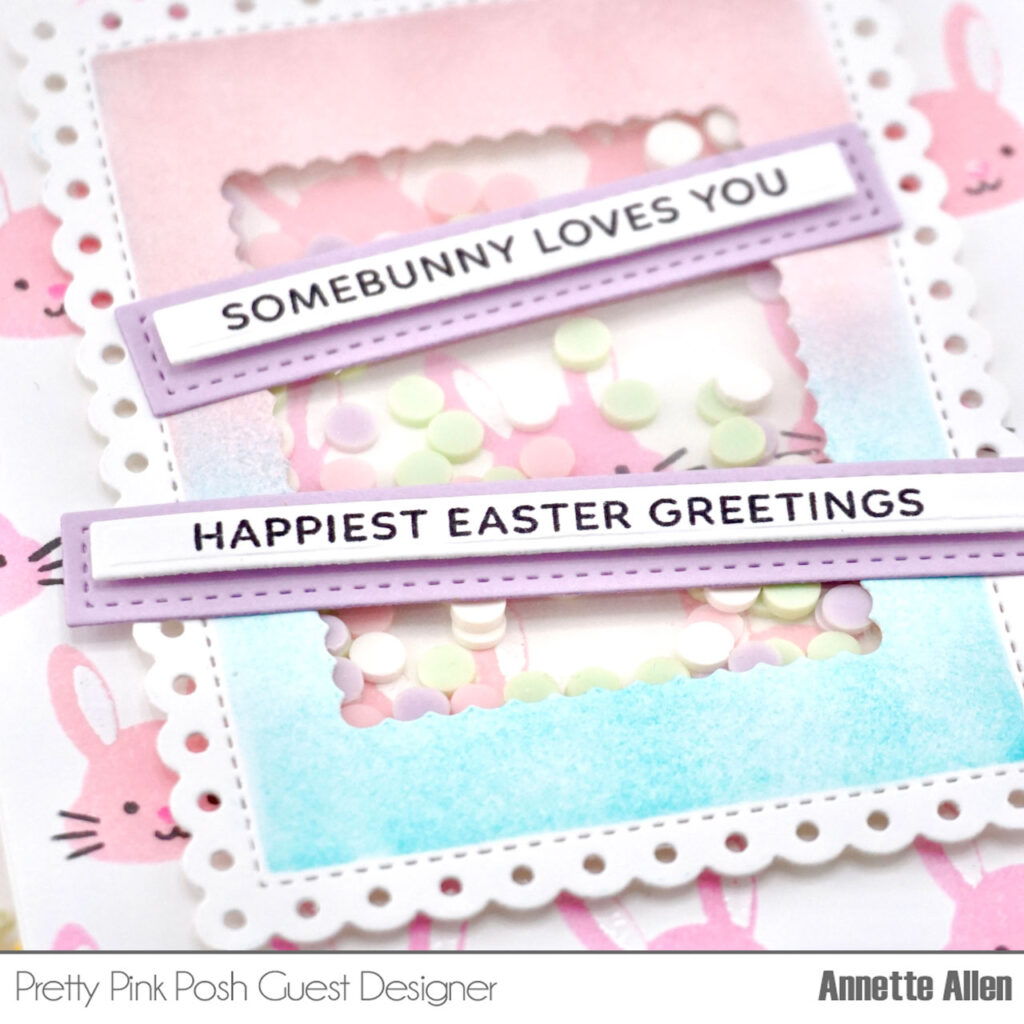
Now add some foam tape to the back of your rectangle. When covering the back make sure to leave no gaps around the center rectangle. We don’t want those fun shaker bits to escape. Add some of those fun new Cotton Candy Mix to the center of your shaker. Make sure all the Cotton Candy is sitting flat.
Peel the protectant layer of your foam tape and this is where it gets a little tricky. You can either create another small panel with the Layered Bunny Faces stencil to add to the back to close up your shaker or flip your card onto the back of the shaker, just make sure you do it straight.
Die cut the sentiments using the Sentiment Strips. Pick the proper size for your sentiment. Die cut the coordinating decorative Sentiment Strips on light purple cardstock and adhere them to the back of each of the sentiments using foam tape. Adhere your sentiments to your card using tear tape.
I hope you enjoyed this fun shaker card fill of cute bunnies and lots of shaker goodness.
Thank you for letting me share with you all today.
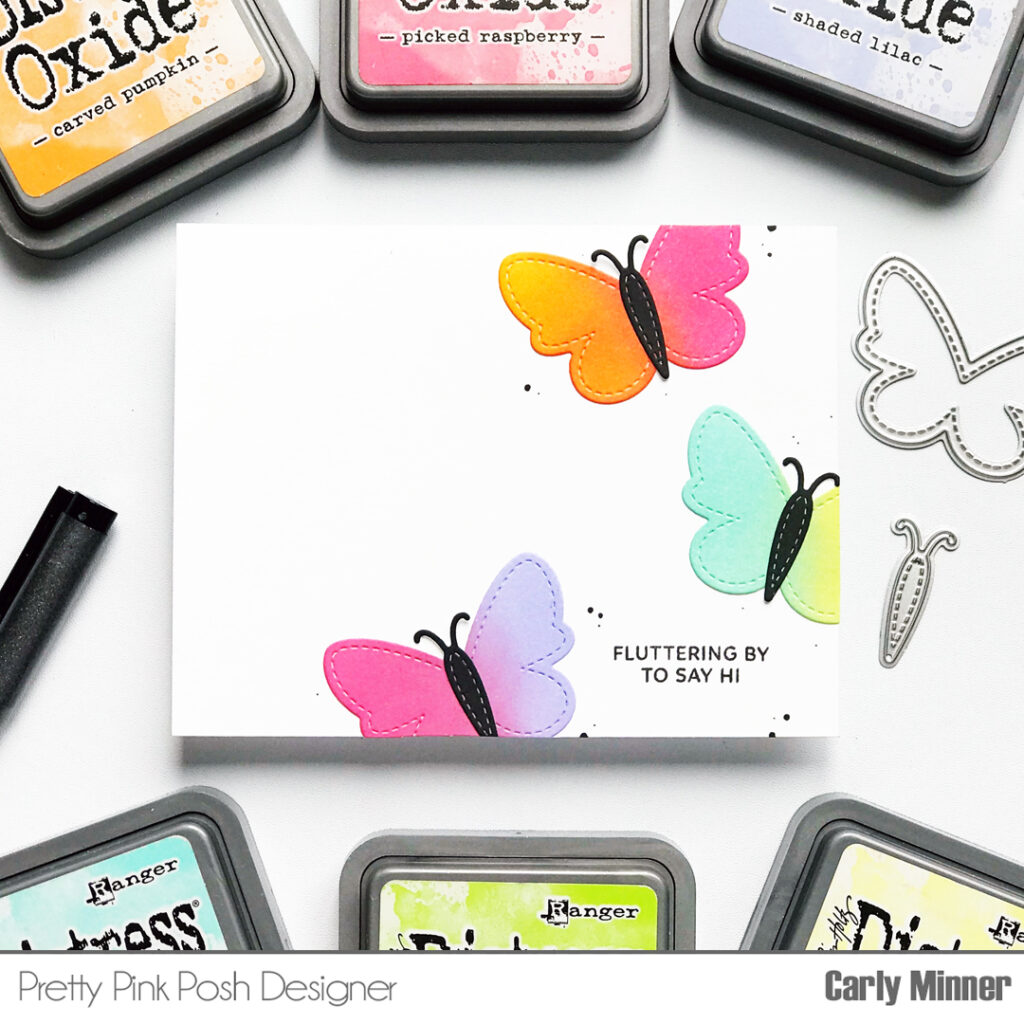
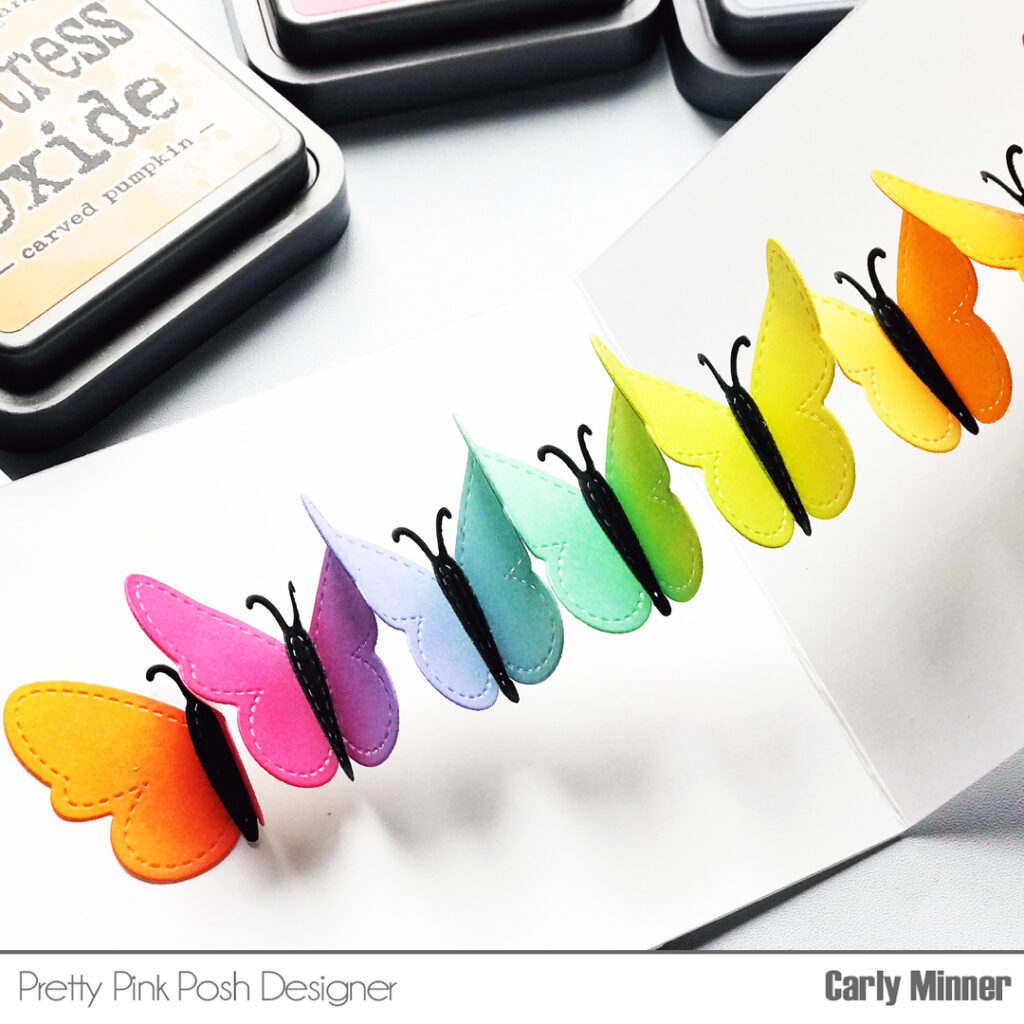
Hi Crafty Friends! Carly here and I can’t wait to share my latest card with you! It’s got butterflies, rainbows and a surprise inside…perfect for spring!
The Stitched Butterflies die set on the card front make for a cute, clean & simple card! But the butterflies also look amazing adhered together and hidden inside for a rainbow surprise!
The interactive element is so easy to do and can easily be customized to make your card more or less dimensional.
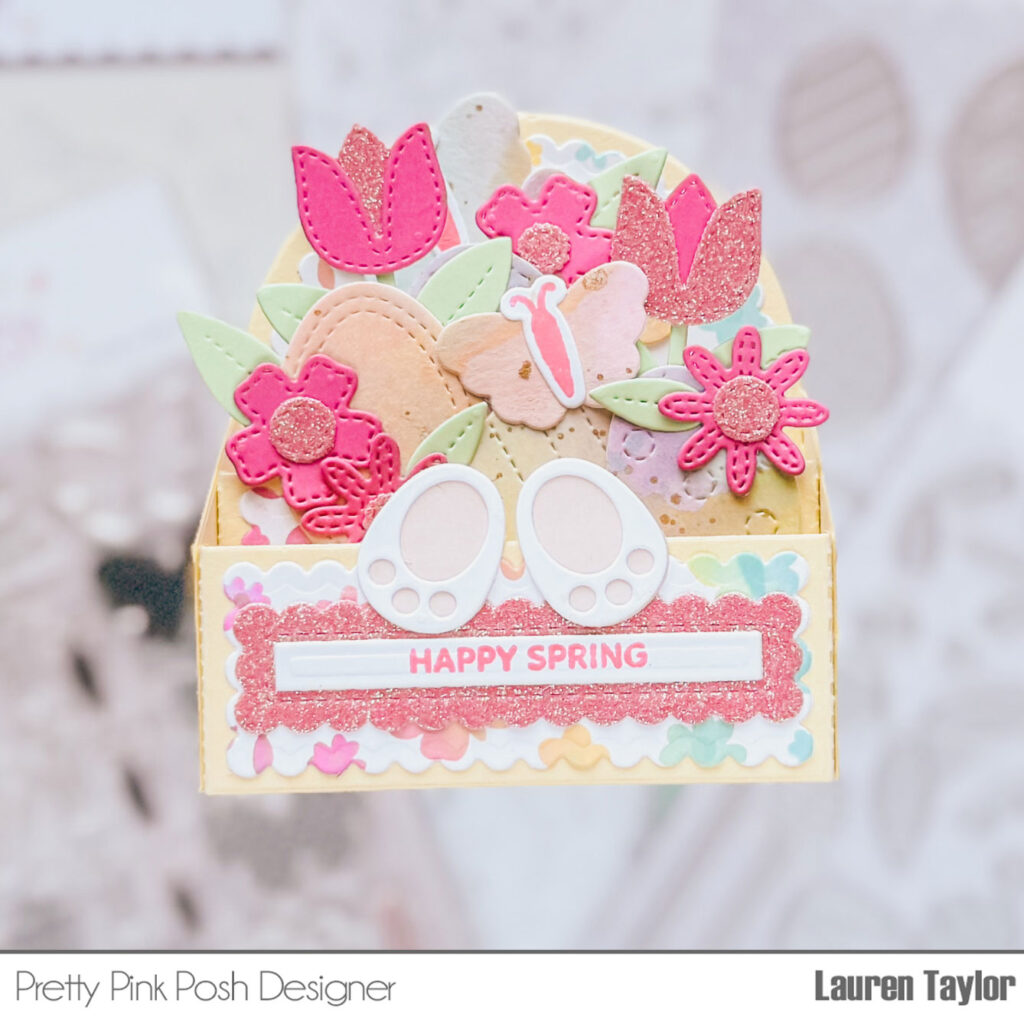
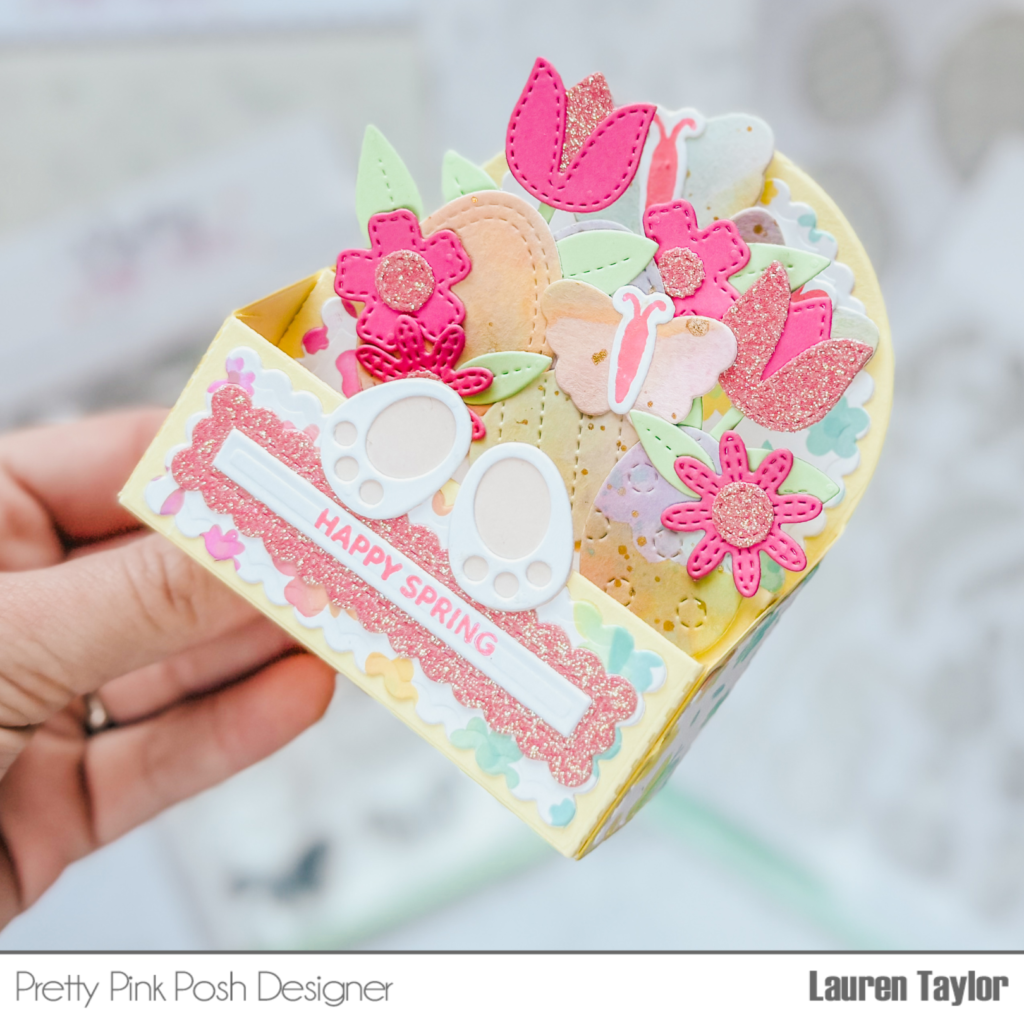
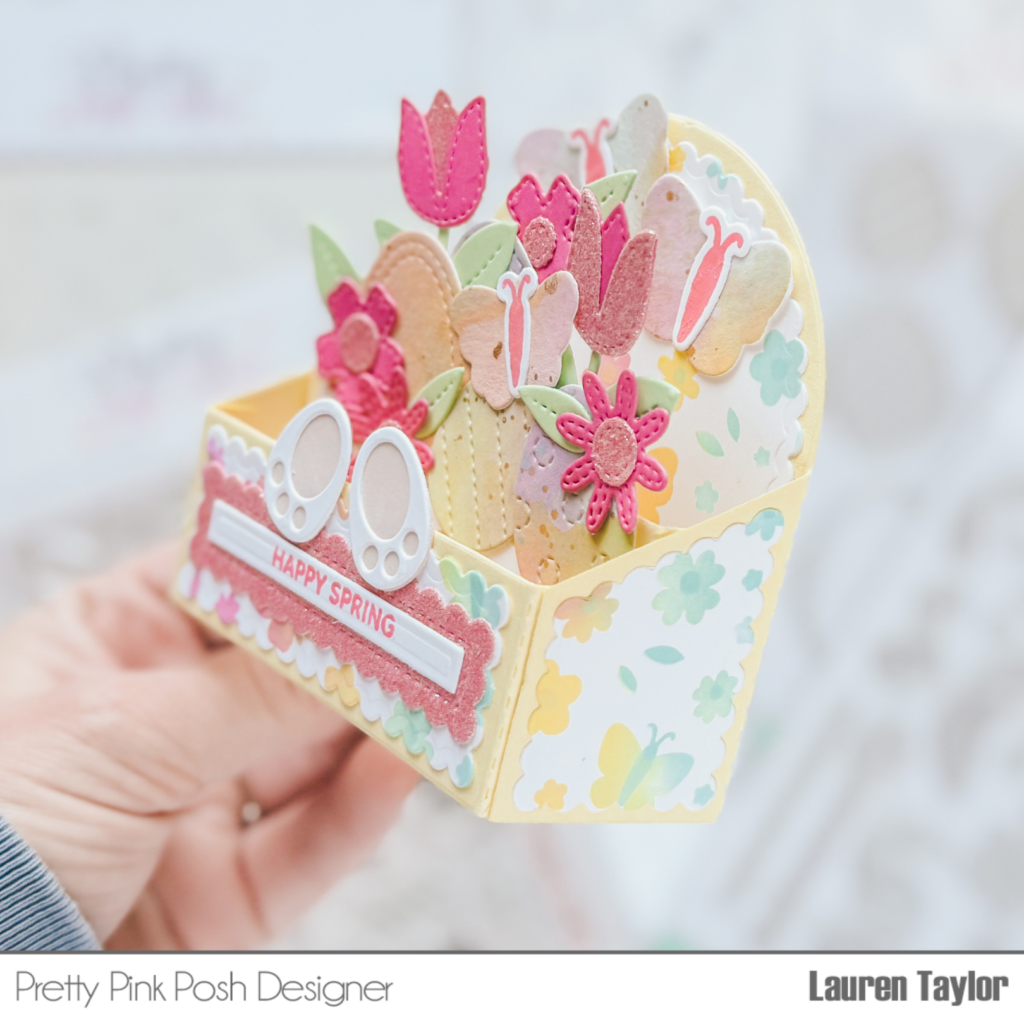
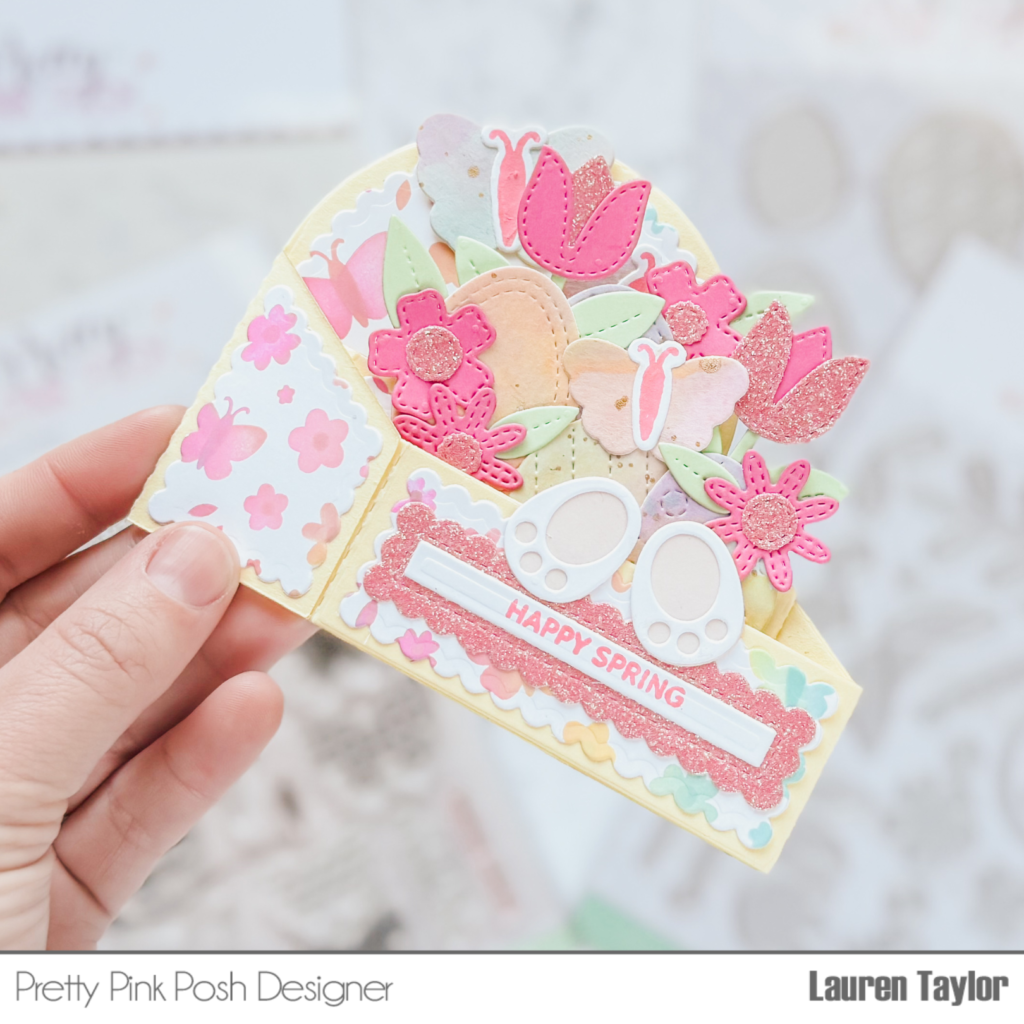
Hi, friends! It’s Lauren and I am back with a new video on the Pretty Pink Posh YouTube channel today. I’m continuing my collection of making holiday themed box cards with Spring and Easter!
I started with die cutting the Scallop Box Card Dies out of yellow cardstock for the base pieces and smooth, white cardstock for the scalloped pieces to do some ink blending. I used the new Layered Butterfly Floral Stencils with Distress Oxides in Picked Raspberry, Saltwater Taffy, Salvaged Patina, and Squeezed Lemonade to create the design on the scalloped die cuts. I assembled the Scallop Box Card base together and added the stenciled scalloped pieces to the panels.
Using a large piece of watercolor cardstock, I used the same Distress Oxides to ink squish and blend all the colors to give a watercolor look. I also splattered on gold watercolor for some sparkle! When it was dry, I used theStitched Eggs DiesandDecorative Butterflies coordinating dies to cut out eggs and butterflies. I die cut as much as I could out of the panel, but only a used a few for today and I’ll save the rest for a future project.
I glued all of the layering dies together and created a scene on the shelf piece of my box card with the eggs, butterflies and flowers. I love the softness of the eggs and bright pink of the flowers! I stamped my sentiment from the Decorative Butterflies stamp set onto my die cuts and added the sentiment to the front of the box card. My little bunny feet are sticking up above the sentiment and they’re my favorite part of the box card!
Box cards have been so fun to make and I love having my Valentine, St. Patrick’s Day and now Easter box cards on my desk! I’d love to know what I should make for May – probably something for Mother’s Day? What would you like to see?!
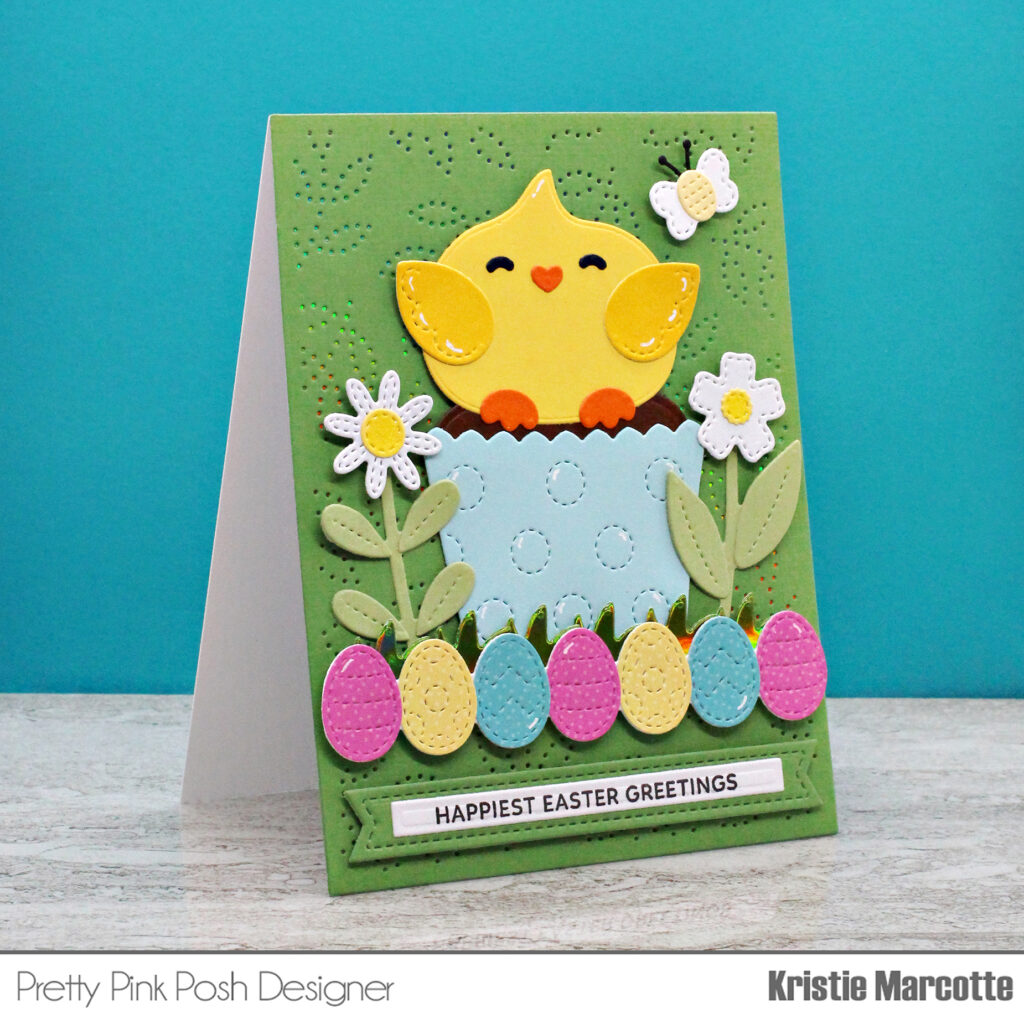
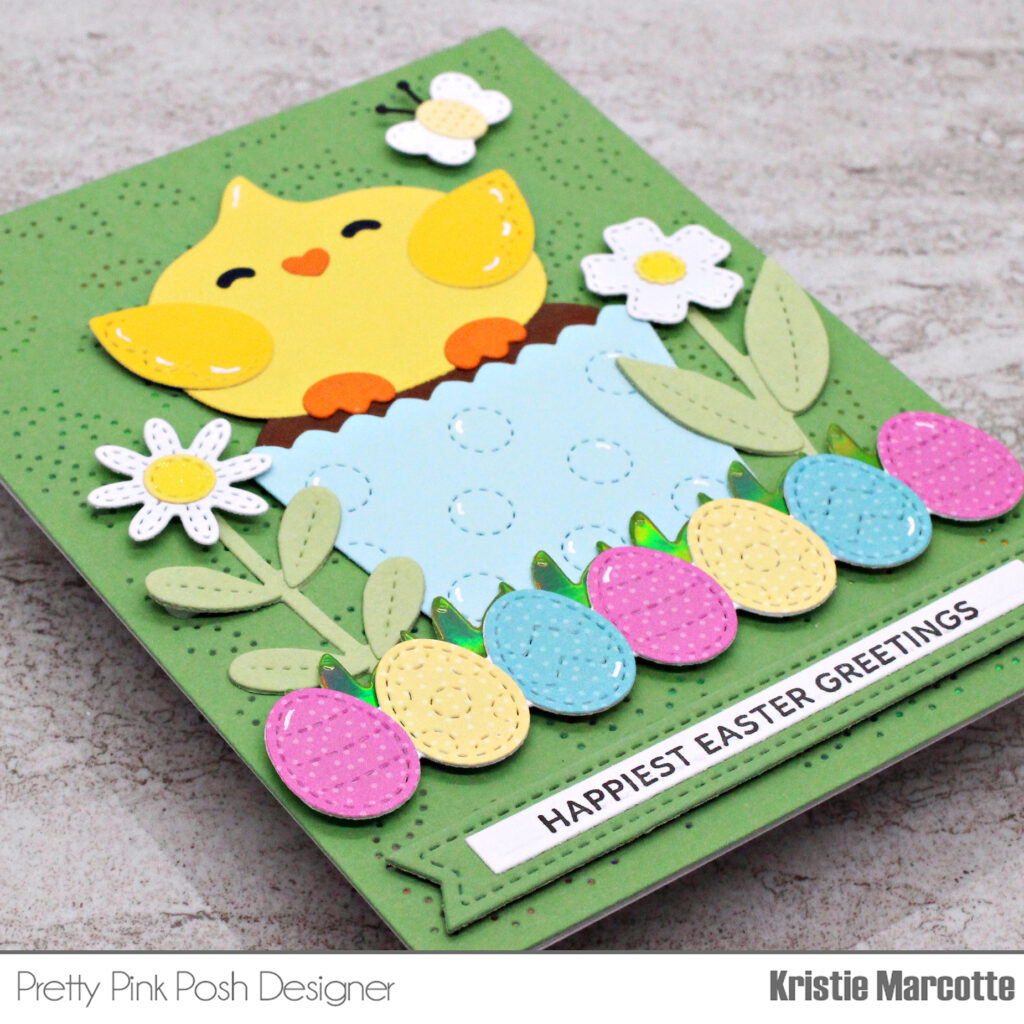
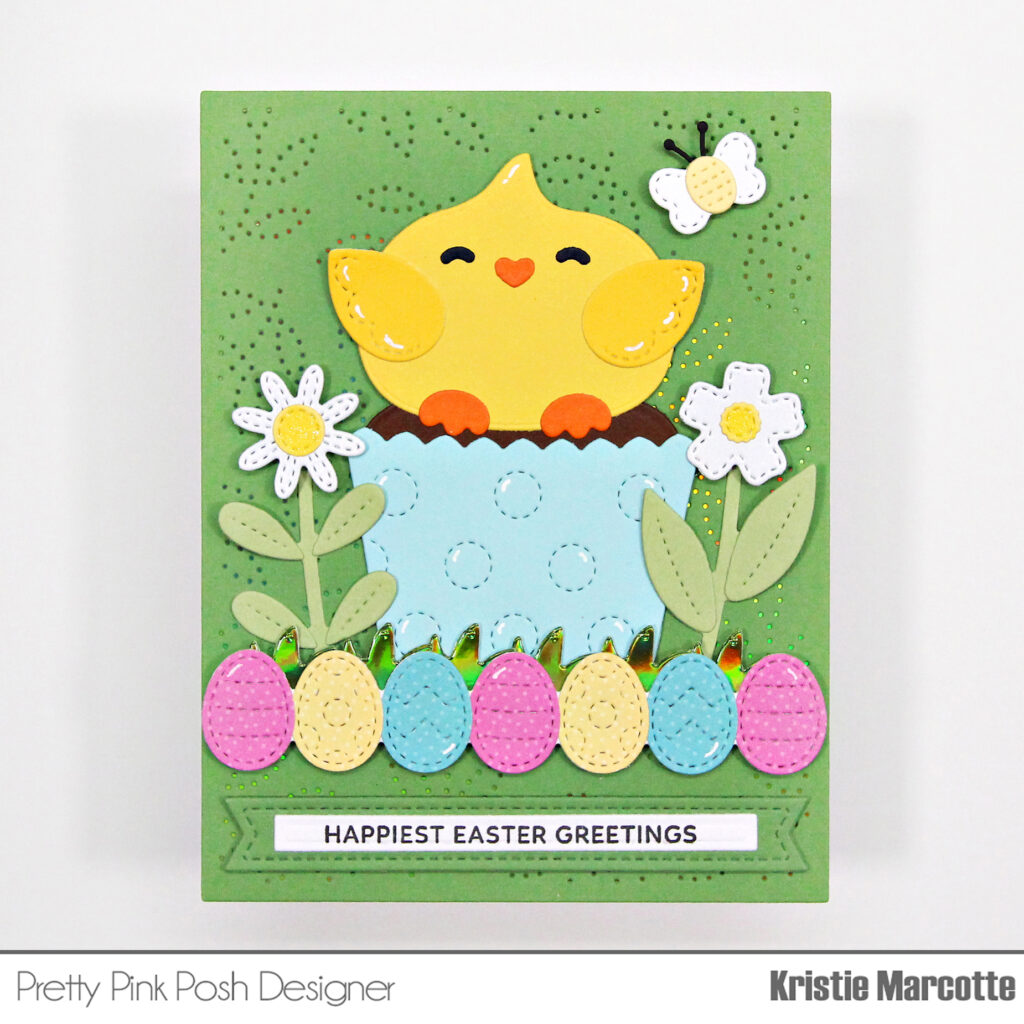
Hello friends! It’s Kristie here and I’m having so much fun playing with the new spring and Easter products in Pretty Pink Posh’s latest release! My card today features the Big Easter Cupcake die set. I made a chocolate cupcake with yellow frosting decorated as a cute chick! So fun!
For the background of my card, I used the Pierced Leafy Vines Plate. For a little extra sparkle, I added a piece of green iridescent cardstock behind the pierced cardstock paper. The iridescent shine is visible through the pierced holes an adds a lovely detail. Especially when the light hits it just right.
For final touches, I added a little bee and a couple flowers using dies from the Spring Mug Additions set. This card was so fun to make! I love the cheerful colors! Perfect for an Easter card.
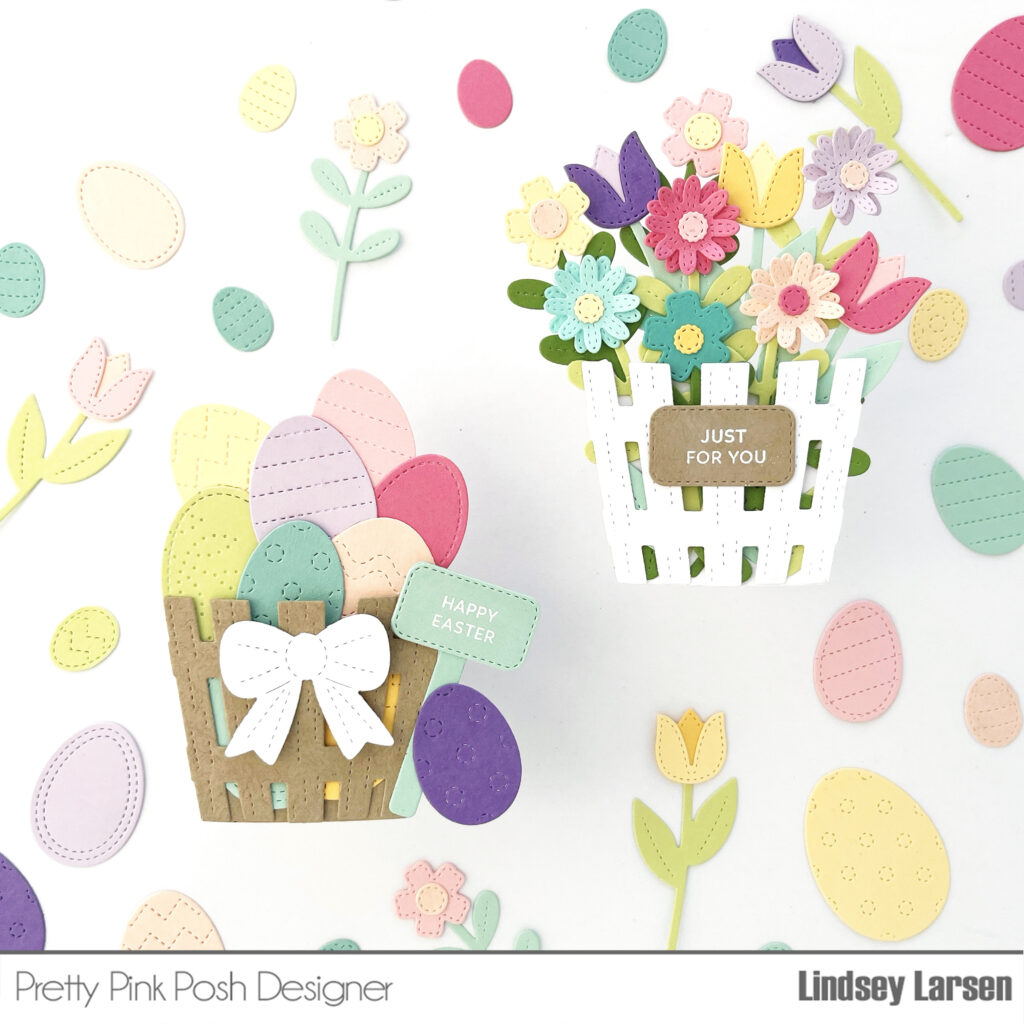
Hello, friends! It’s Lindsey here, and I have two spring tags to share with you today that use the same design two ways.
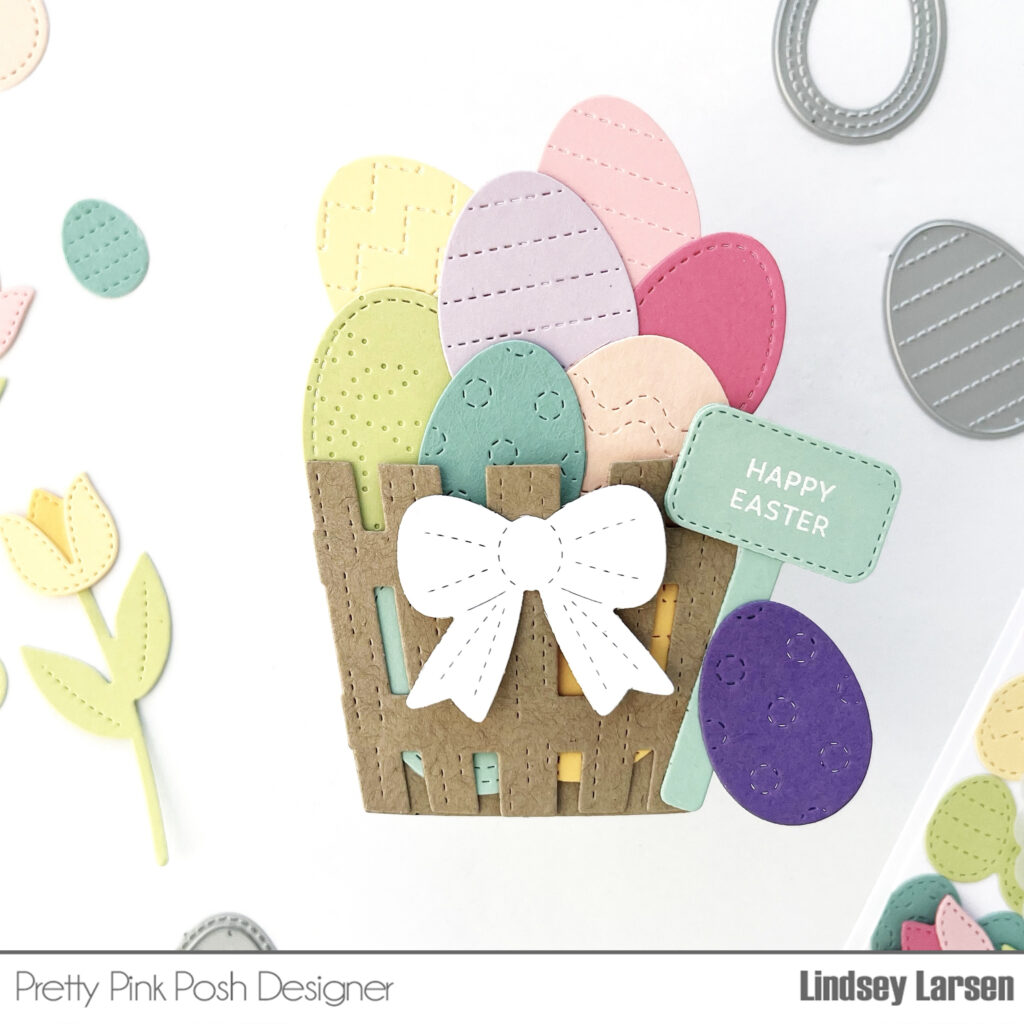
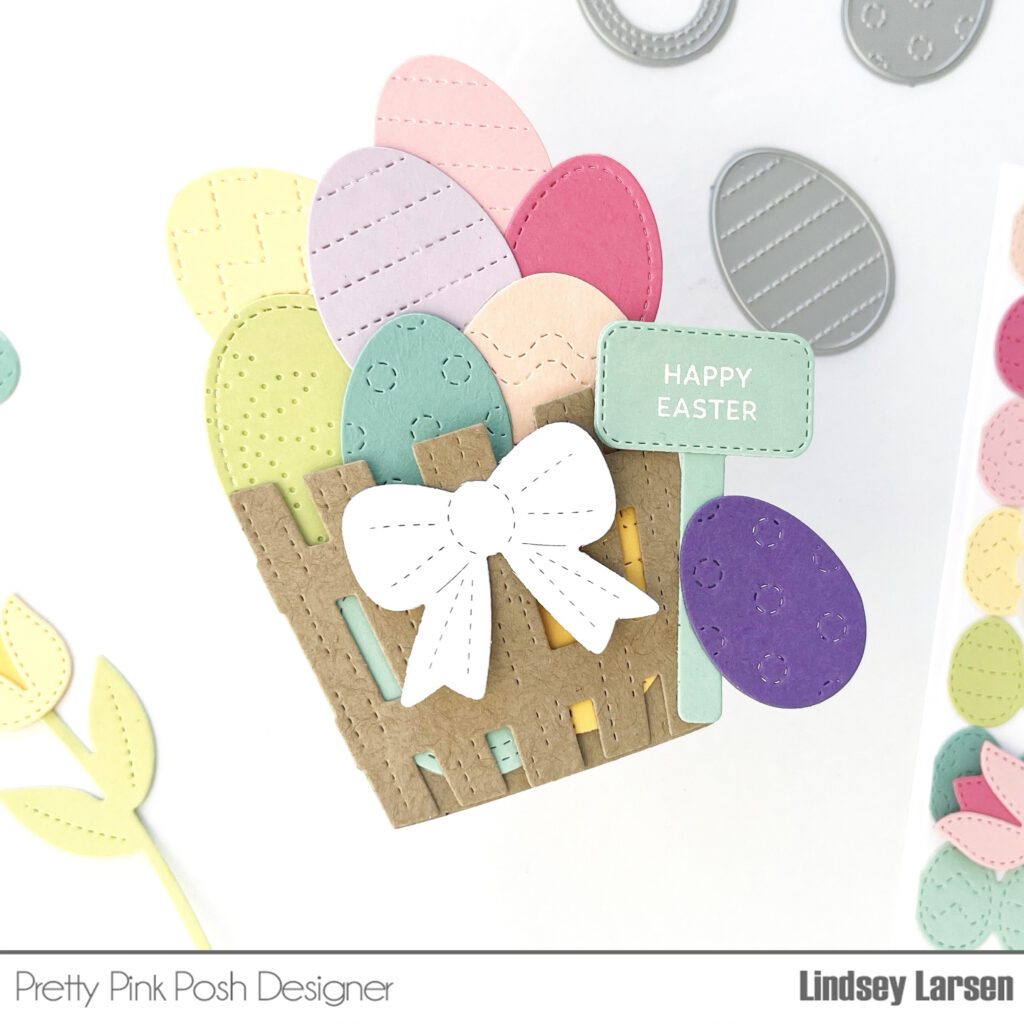
Easter is just around the corner, so first up is an Easter tag. I pulled out the previously releasedFall Basket Dieand cut just the two main basket pieces. Then I filled the basket full of colorful stitched eggs. The Stitched Eggs Diescome in a variety of designs and a couple of them cut just the stitched outline, leaving lots of creative options. On one of the solid eggs (the green egg), I added leaves using the Pierced Leafy Vines Plate.
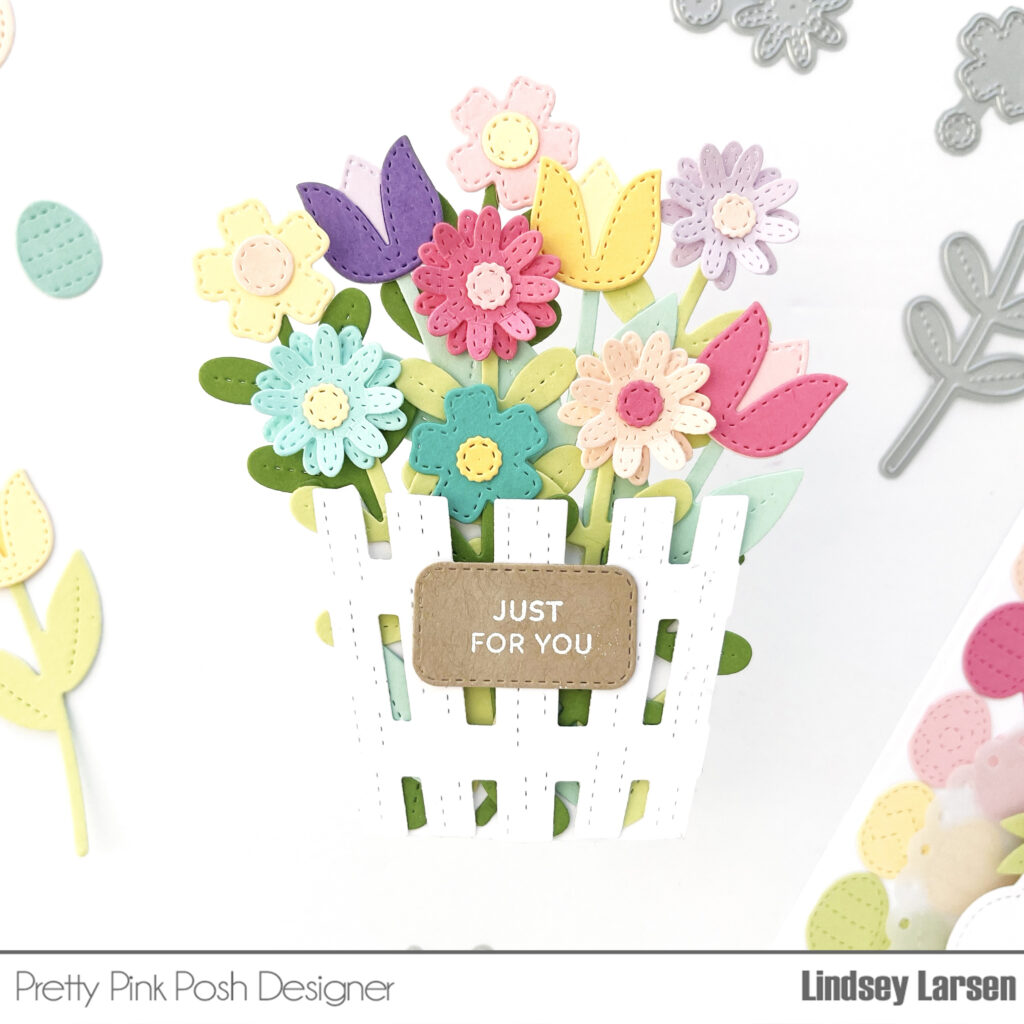
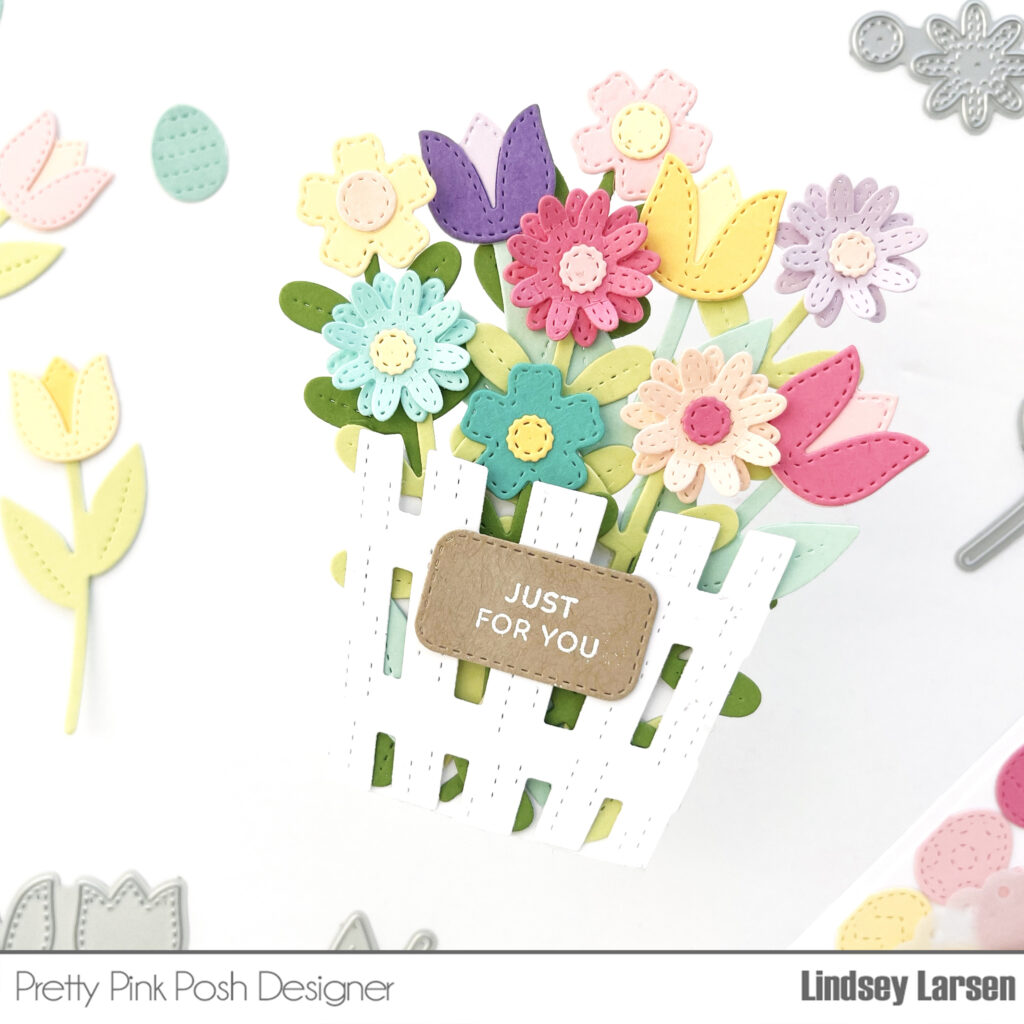
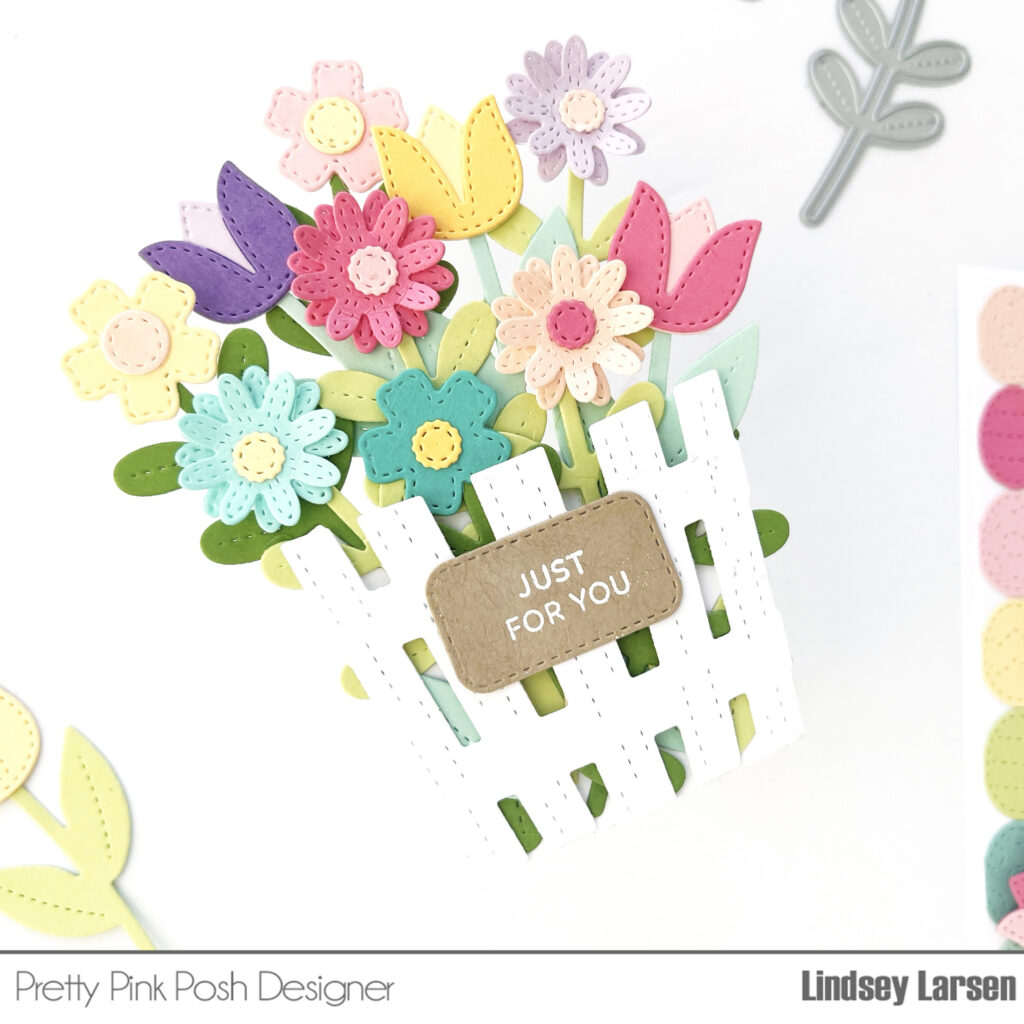
On my second tag, I repeated the same design, but made it suitable for lots of occasions. It would be great for Mother’s Day, birthdays, or even just to let someone know you care.
I used the same dies and stamps, except I swapped out the eggs for the flowers in the Spring Mug Additions. I just love how the basket makes them look like fresh picked flowers.
This time I opted to simply add a label to the basket instead of using the full sign and chose a different sentiment from the Spring Jar stamp set.
Thanks so much for joining me today! I had so much fun making these tags, and I hope that they’ve inspired you.
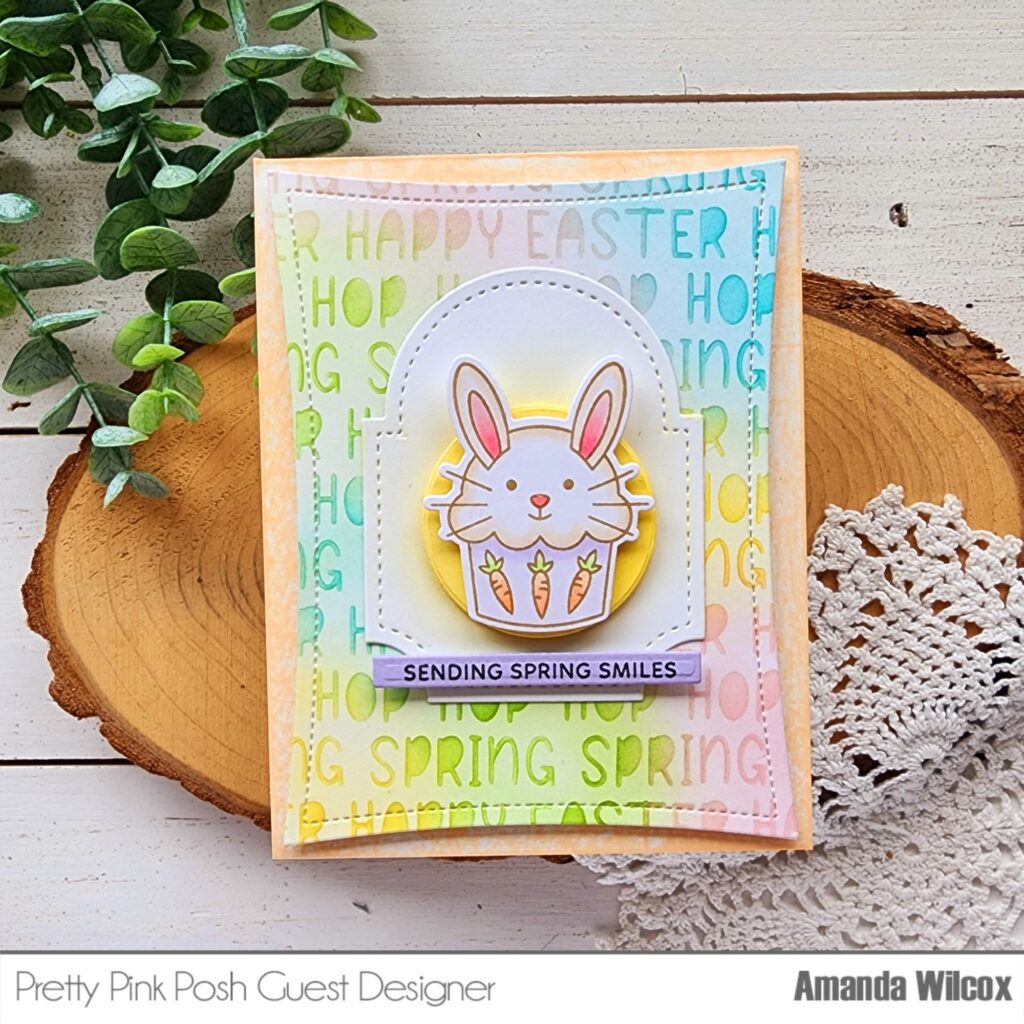
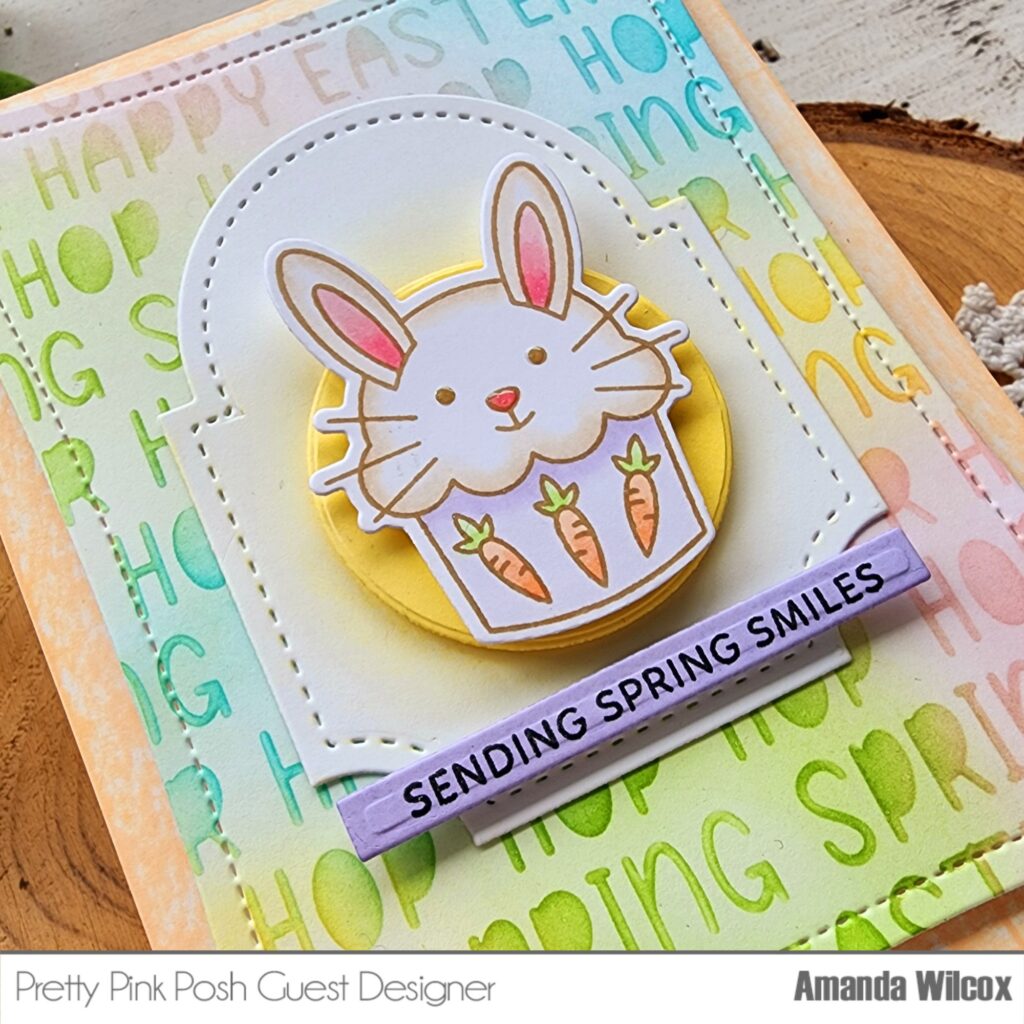
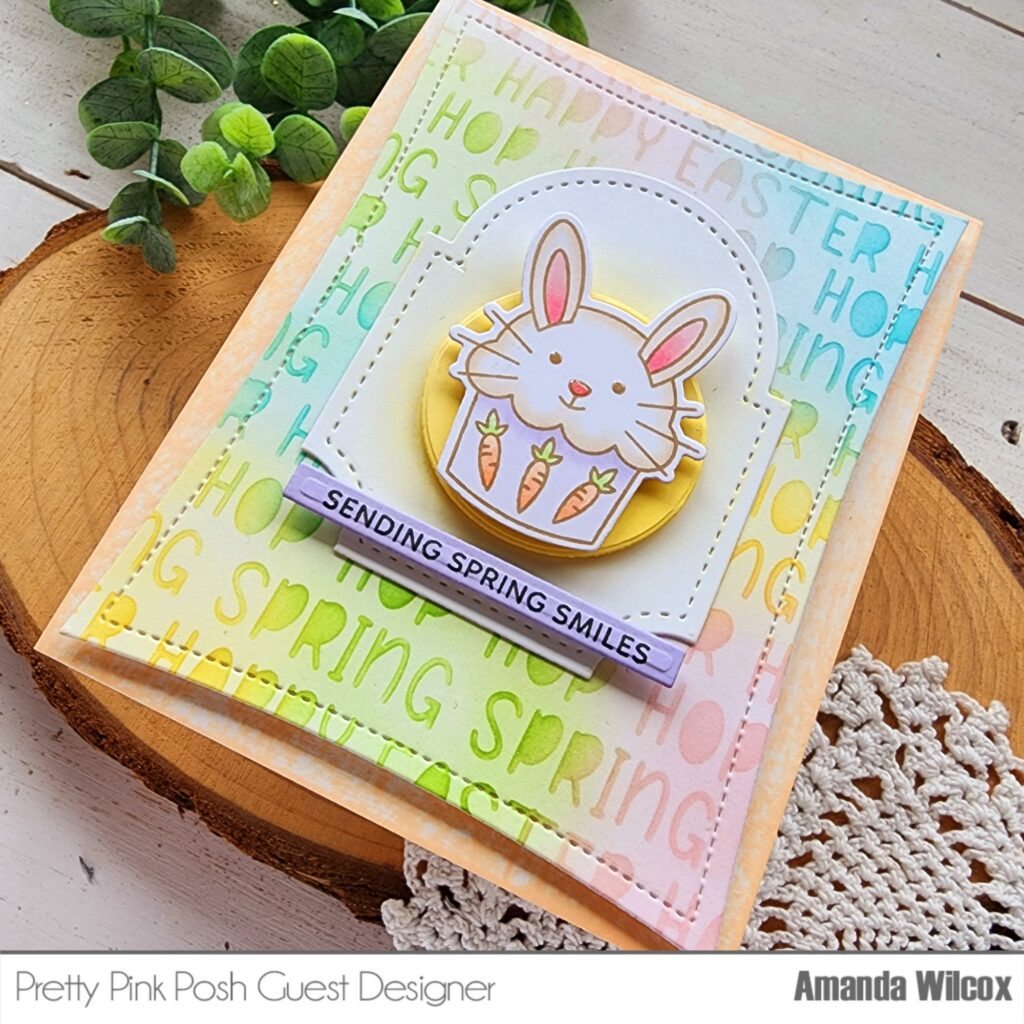
Hello crafty friends! This is Amanda from Twiddler’s Nook. I’m excited to be on the Pretty Pink Posh blog today sharing a card I created using the new March release of goodies, plus some previously released dies that I seem to reach for over and over again.
I started by stamping my bunny cupcake image from the Easter Cupcakes set using a brown copic-friendly ink. I colored the image and used the coordinating die to cut it out. Then I switched gears to stenciling my background panel.
For that, I layered the Easter Words stencil over a piece of white cardstock and randomly inked it with light and bright spring colors. After I removed the stencil I went over the panel with the same color in all the different areas. This brings another layer to the words and colors in the white background at the same time. Once that was done I used the largest Wonky Stitched Rectangle dieto cut the panel out.
I cut a white tag and yellow circle using the Spring Circles coordinating dies and ink blended a yellow shadow on the white tag. I layered all my pieces with foam squares, then glued the tag to the stenciled panel with liquid glue.
Then, I stamped a sentiment from the Easter Train setand cut it out with a Sentiment Strip dieand popped it up below my cupcake. Before popping the whole thing up on a card base, I took a light orange ink pad and drug it across the edges for a textured inky look.
For finishing touches I just added glossy accents to the bunny’s nose and eyes.
Are you ready for Easter yet? We’re excited at my house! I appreciate you sharing your time with me. Have a fabulous day!
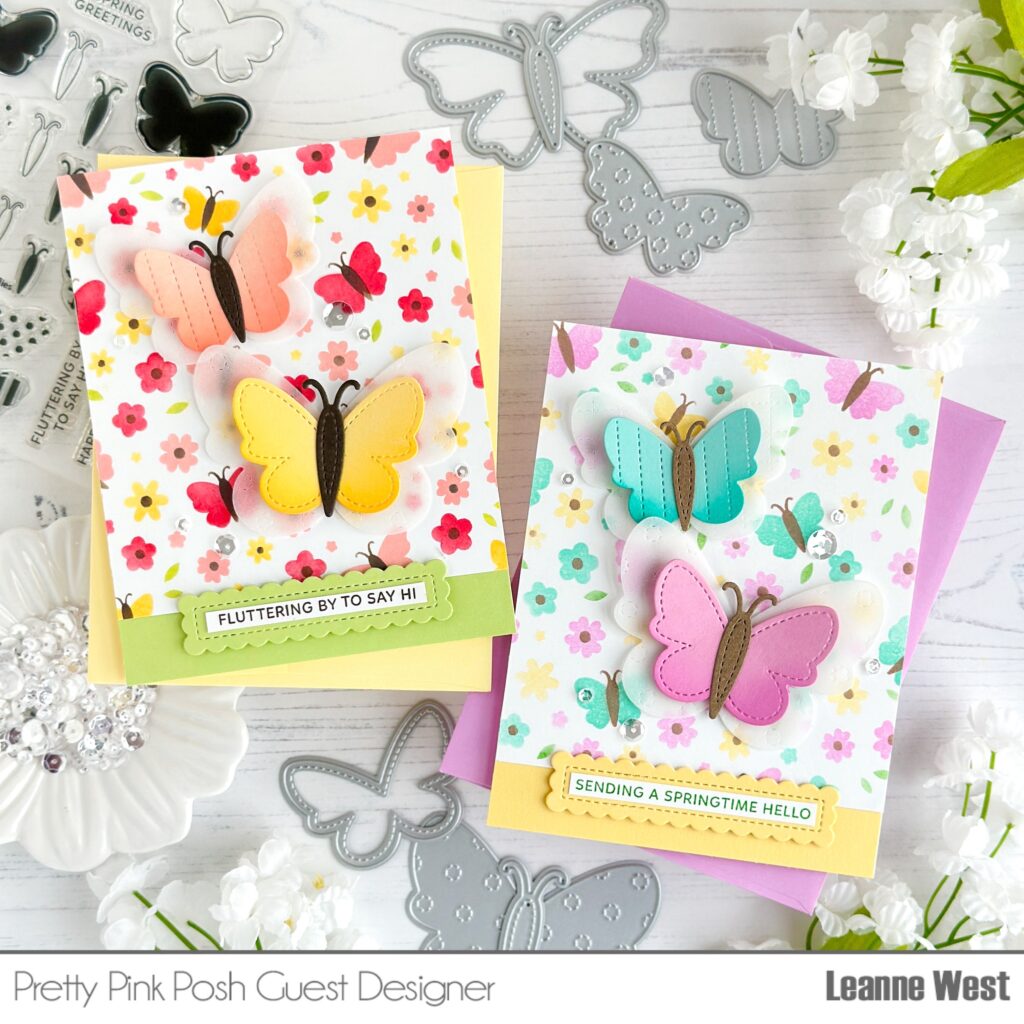
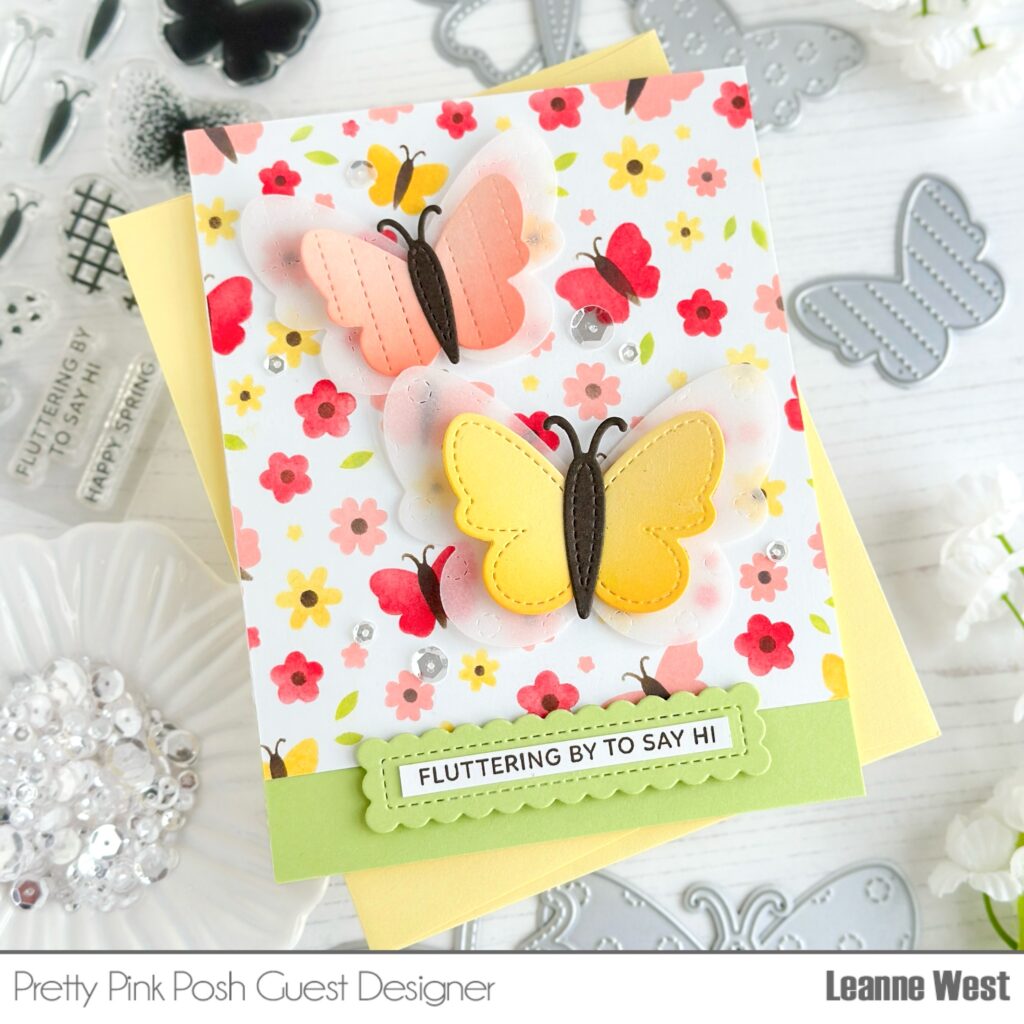
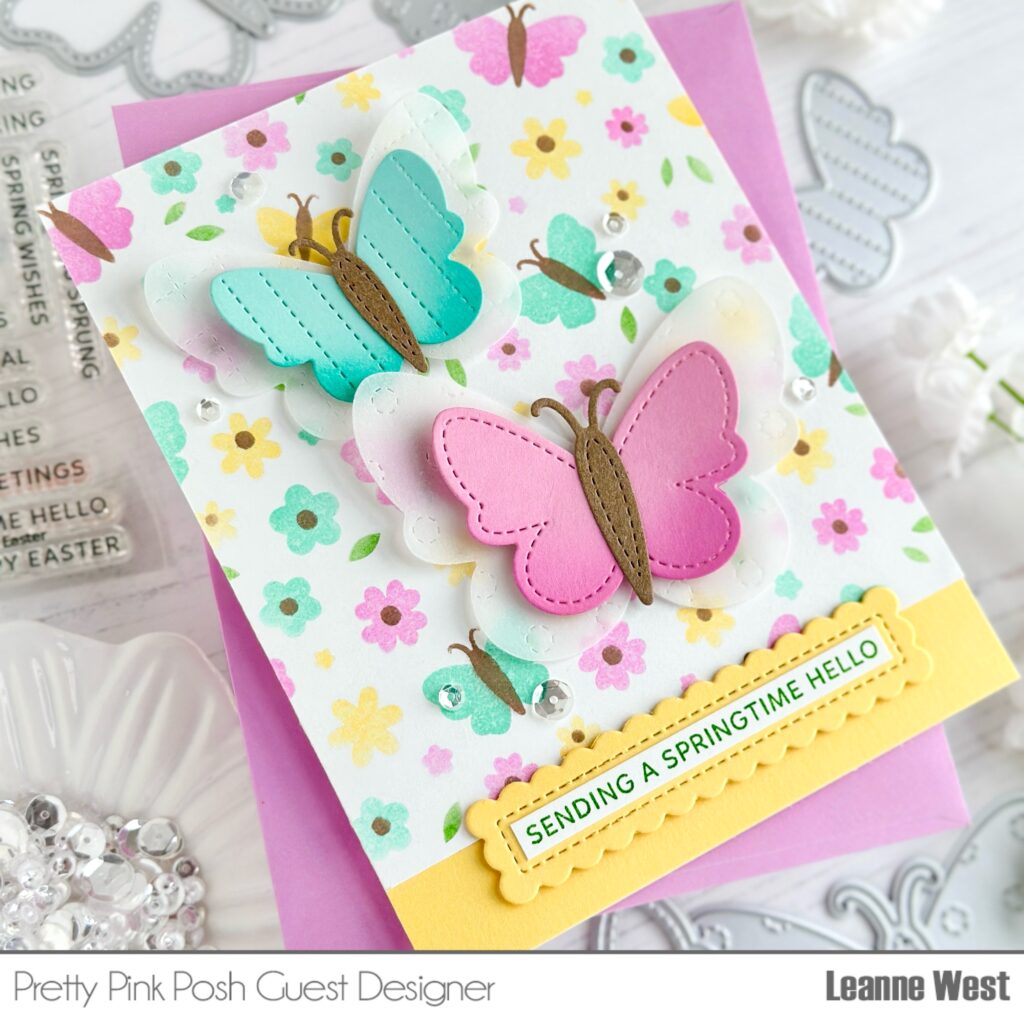
Hello everyone! Leanne here and I’m thrilled to be guest on the blog today. I have a duo of butterfly cards to share. Both my cards feature a stenciled background and die cut layered butterflies. I created the backgrounds for my cards with the new Layered Butterfly Floral Stencil Set. Trust me when I say this stencil set is very addictive. I could not stop playing with it! I kept wanting to try out different color palettes. I’m sharing a couple favorites from my stenciling session.
I have trimmed my stenciled panels down so they fit onto an A2 size card base. The length of these panels is 4 7/8″ inches. I wanted them to be a bit shorter than A2 length so I could add a strip of card stock at the bottom. I thought this would help draw attention to the sentiment. The sentiments I used come from two new stamp sets… Decorative Butterflies and Sentiment Strips: Easter. I used a die from the Sentiment Strips dies to create the stitched scalloped pieces I’ve adhered my sentiments to.
For each card I have added two layered butterflies. There’s many sizes to pick from in the new Stitched Butterflies die set. I chose four different ones. I die cut the back layer from vellum. The top layers are die cut from card stock to match my stenciled color palettes. I lightly inked the bottom edge of each card stock butterfly just to add some subtle shading. I adhered the layers together with thin foam tape. This gives a nice little bit of separation from the two layers and adds some dimension.
To finish off these cards, I added a scattering of Sparkling Clear Sequins. These are my go to embellishments when I want to add a little bling but not distract from the main elements on the card.
This card design is quick, easy, and definitely fun to make. It would be perfect for mass producing to make gift sets of note cards. The butterfly theme can go for many occasions just by switching up the colors and sentiments. I have a feeling I’ll be reaching for these new butterfly dies and stencils often this spring and summer.
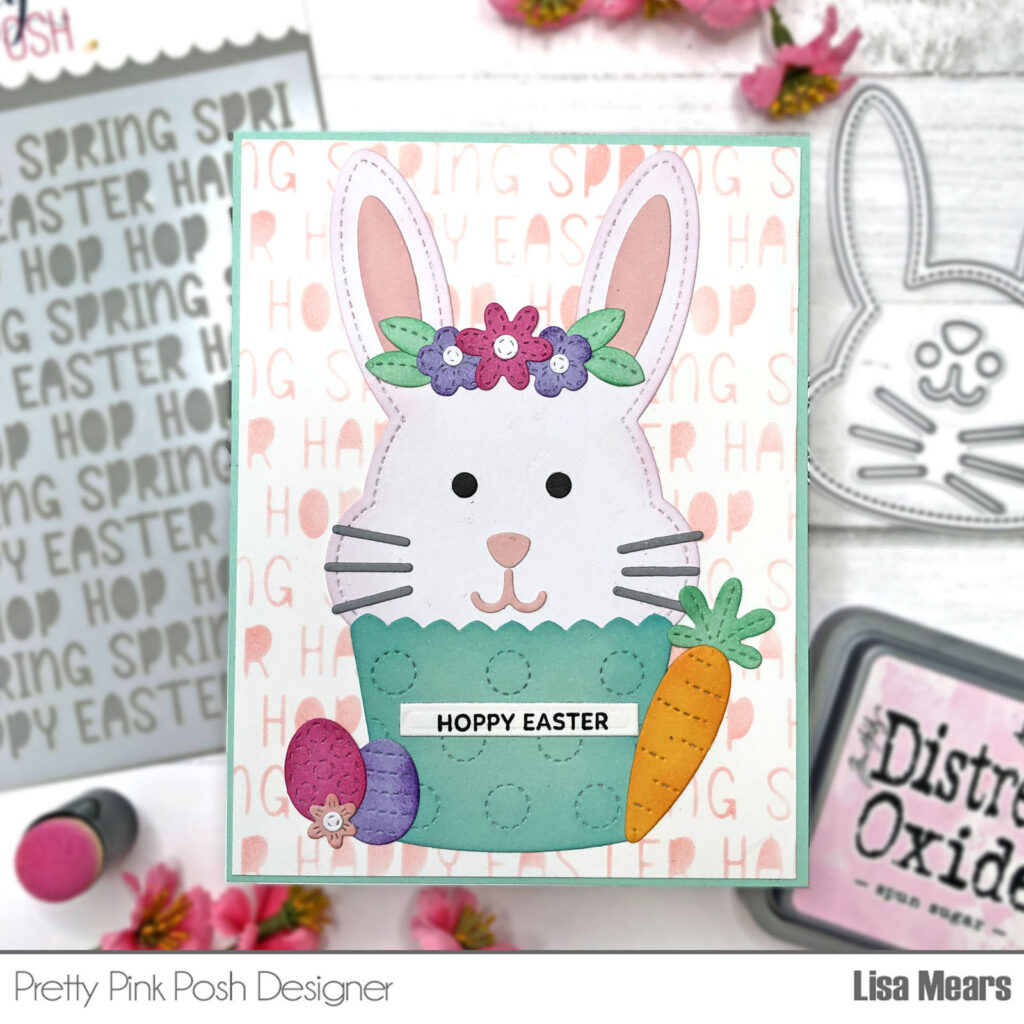
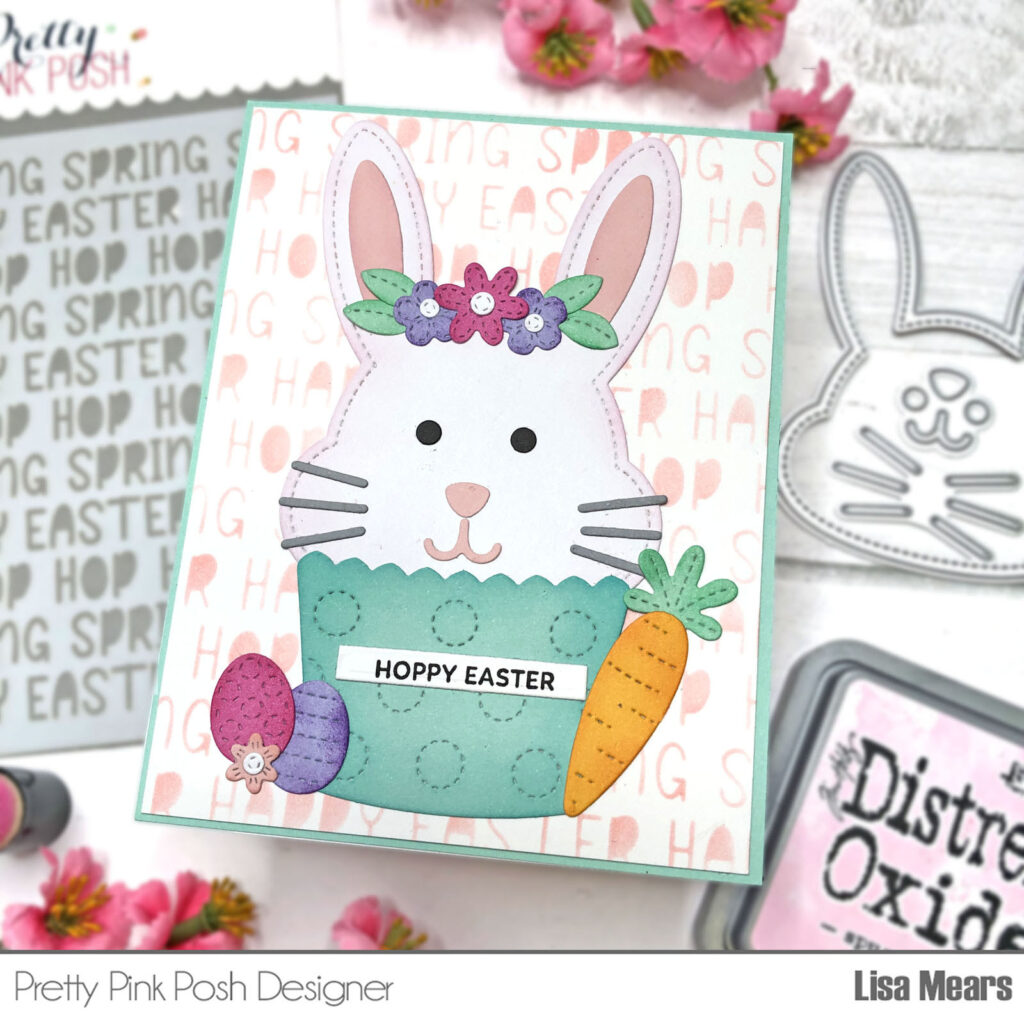
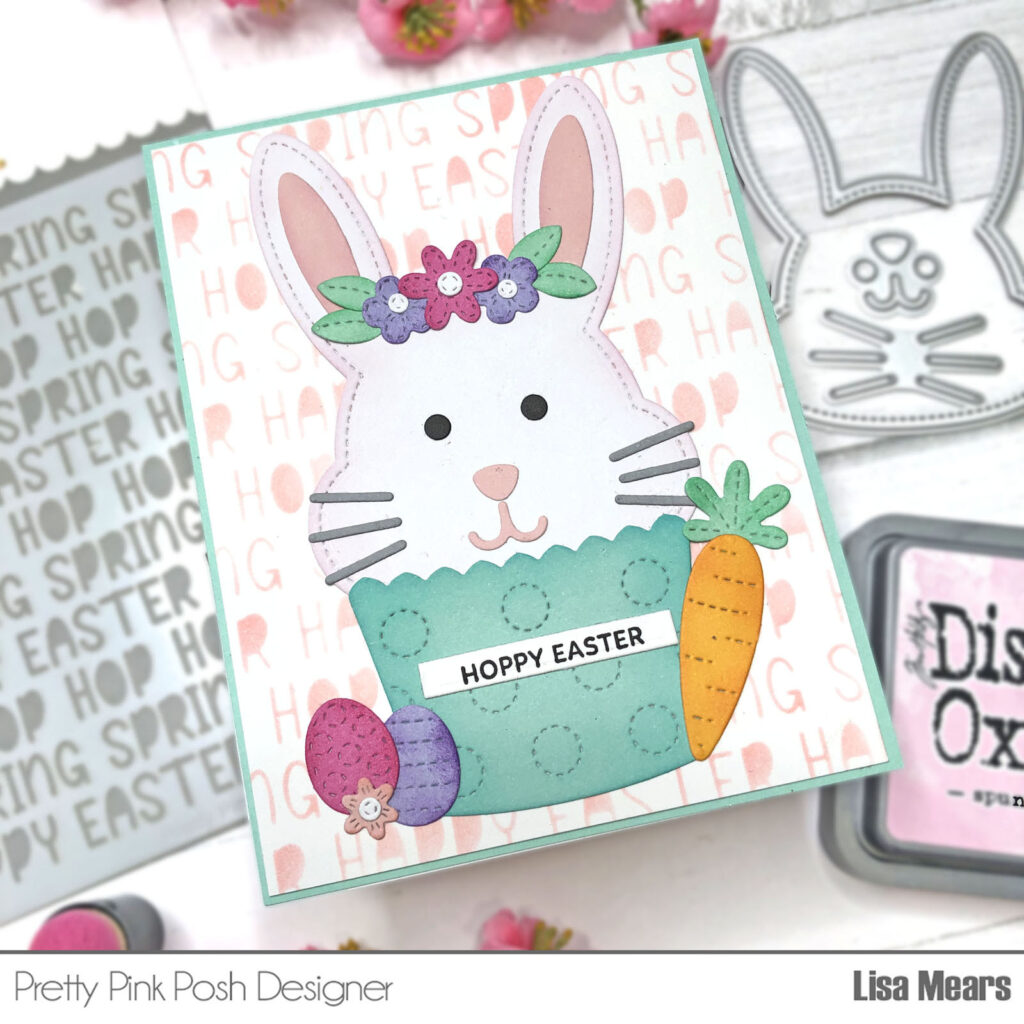
Hi crafty friends! It’s Lisa Mears on the blog today. My card features an adorable Easter bunny cupcake. I used products from the new Easter and spring release to make my card.
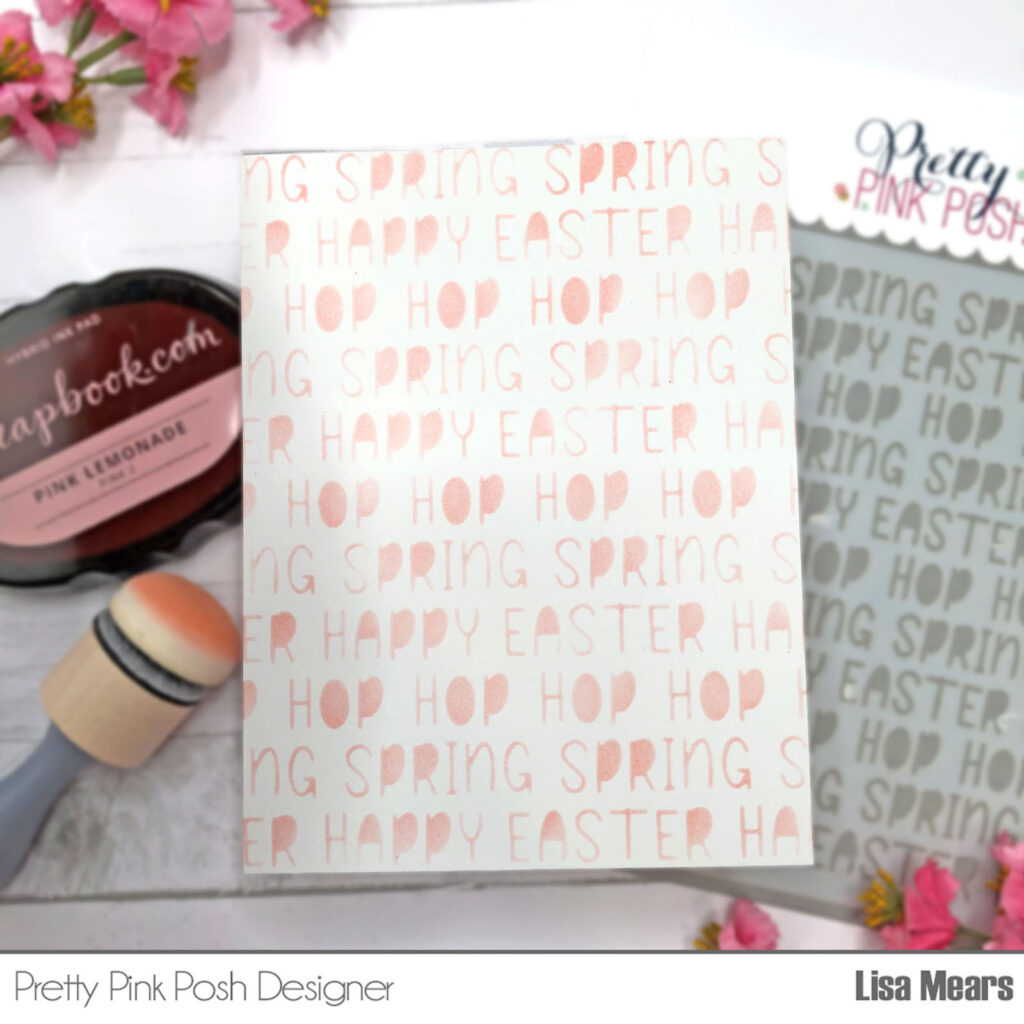
For the background of my card, I used the Easter Words Stencil. This stencil is perfect for Easter cards with words such as “Spring,” “Happy Easter,” and “Hop, Hop, Hop.” I inked the stencil with Scrapbook.com Pink Lemonade ink. I chose this ink because it closely matches the pink cardstock I used for the bunny’s ears.
I used the Bunny Face Shaker dies for the Easter bunny face. This die set can be used to make a bunny face shaker, but I didn’t use it as a shaker for my card. I love how it fits perfectly on top of the cupcake wrapper from the Big Easter Cupcake dies.