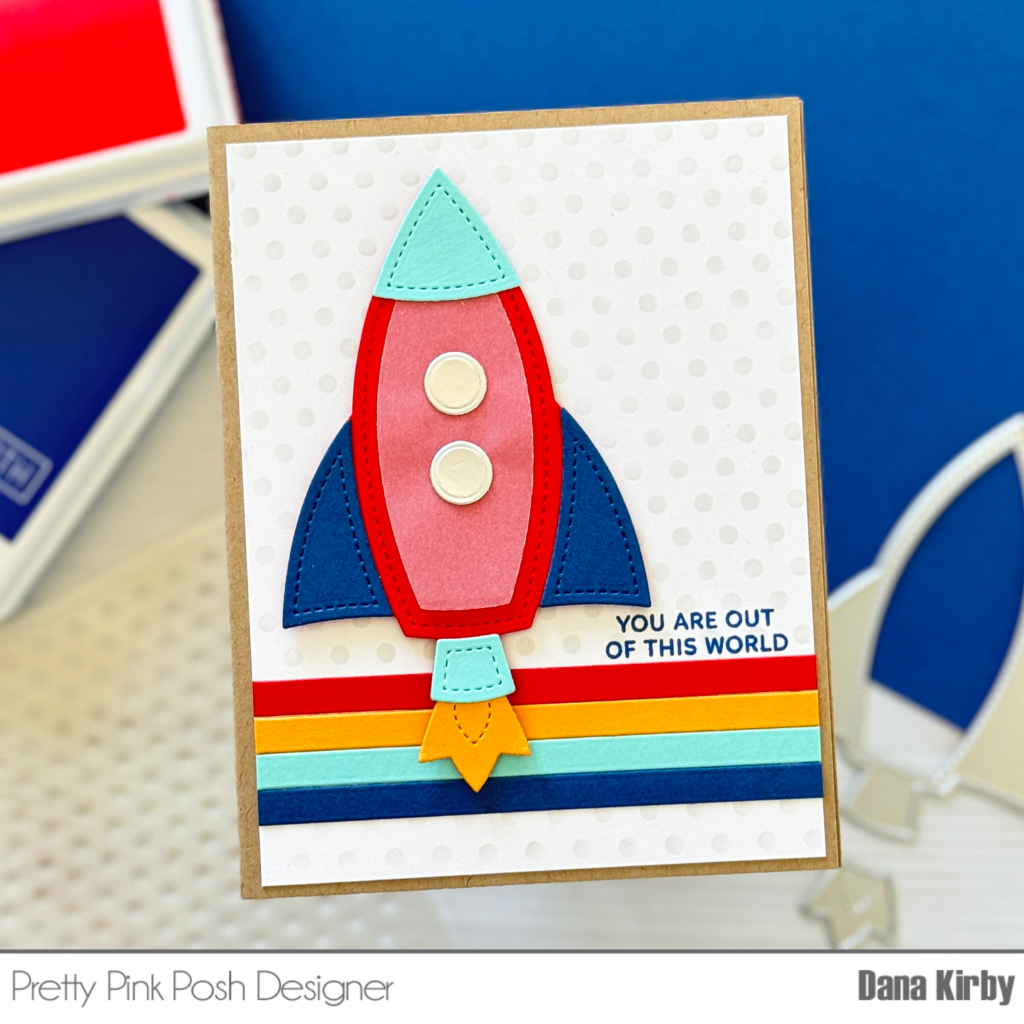
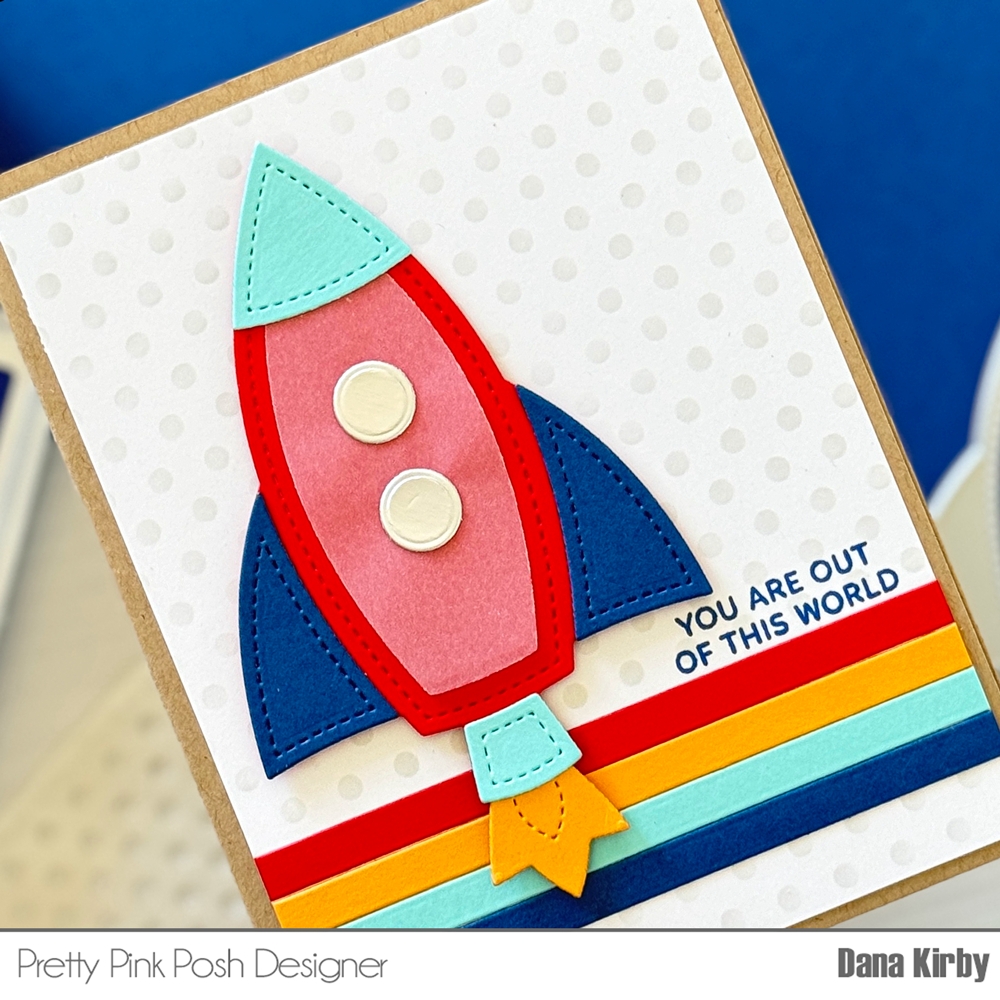
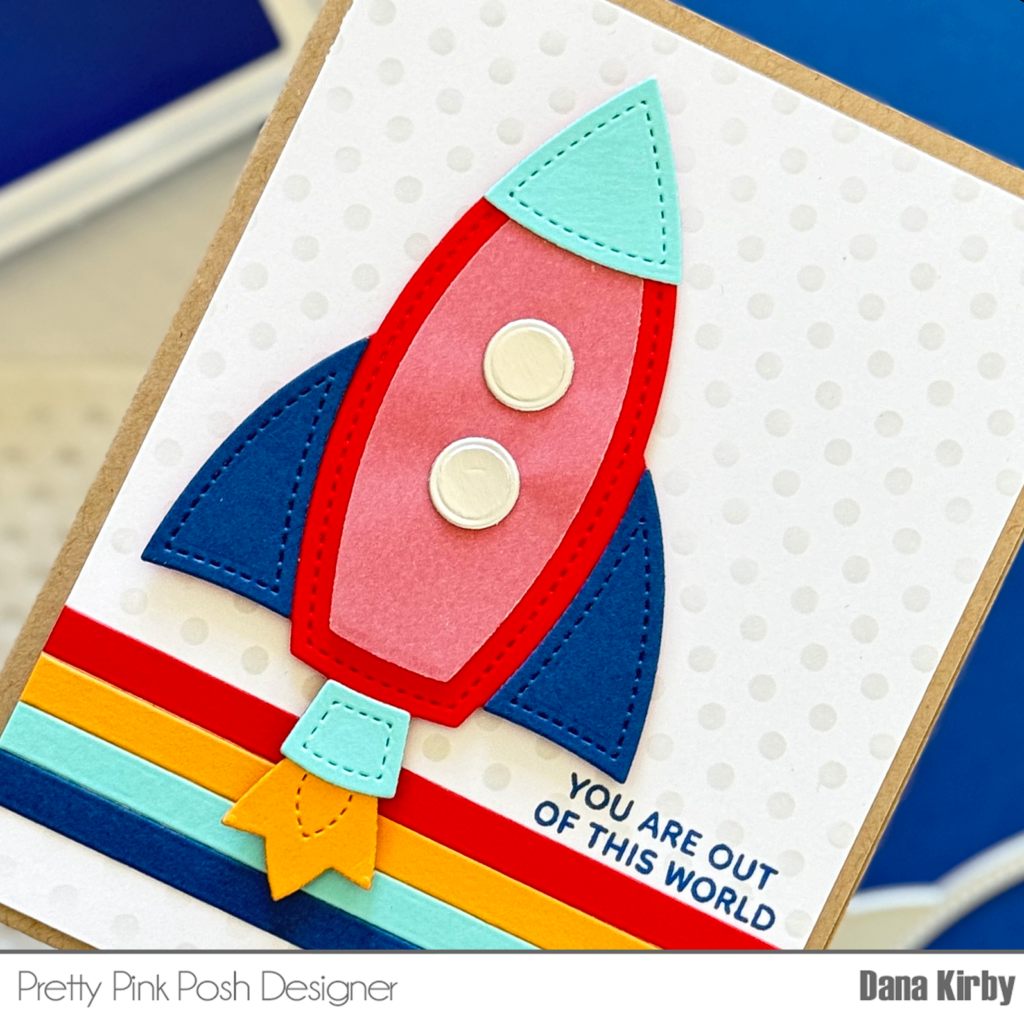
Hi crafty friends! It’s Dana here today and I am sharing a clean and simple card that uses the fun new Rocketship Shaker die.
I started my card by making my card panel with the Medium Polka Dot stencil and a soft gray ink. I then used the Simple Strips diesto create my four cardstock strips for the bottom of my card.
Next, I used theRocketship Shaker die setto create my fun rocket. I love how these dies can be used to create a shaker or also used to create a more simpler design as I did here. Once my rocket was assembled I attached it to my card panel with foam adhesive. Lastly, I used theOuter Space stamp set to stamp my sentiment directly onto my panel. I then trimmed my panel down and attached it to a kraft card base to finish my card.
Thanks for joining me today and I hope you enjoyed my card.
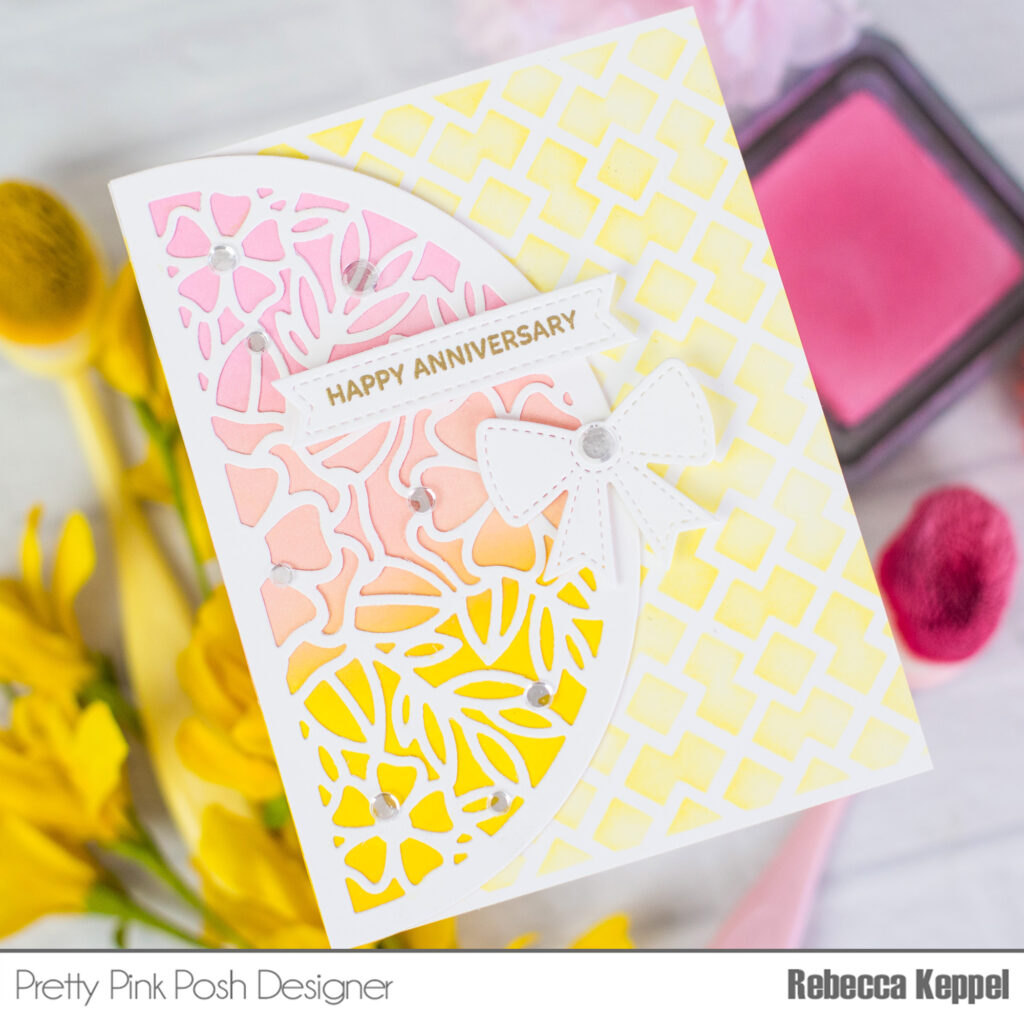
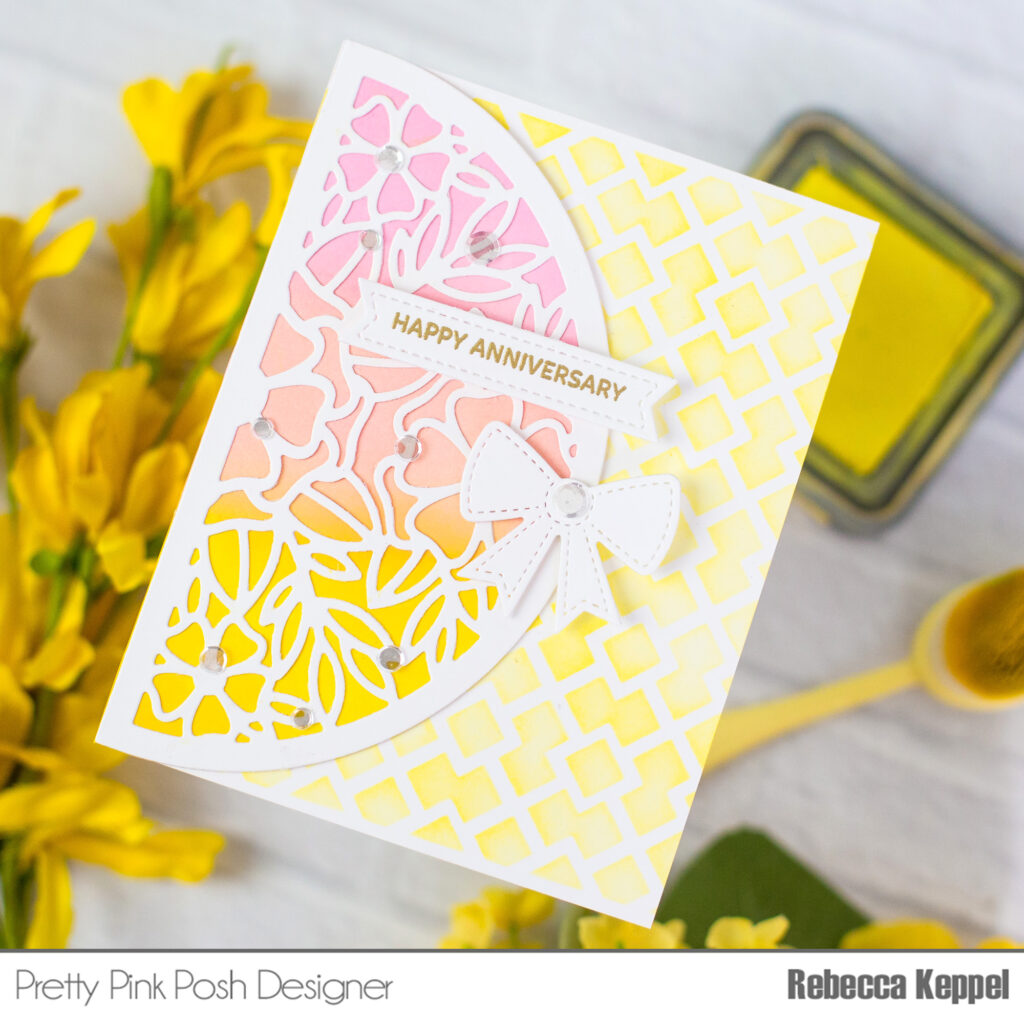
Hi everyone! Rebecca here with a super easy ink blended anniversary card. To start off I grabbed the Fancy Lattice Stencil and placed it over an A2 piece of white cardstock. Using a blending brush and Distress Oxide Squeezed Lemonade ink, I lightly blended ink over the stencil. This light blend creates a pretty subtle background for the card.
Next I used the Floral Semicircle Dies and cut both the stitched semicircle and the floral semicircle dies out of white card stock. I held the stitched semicircle in place on my Waffle Flower grip mat and blended three colors of Distress Oxide ink (Kitsch Flamingo, Saltwater Taffy and Mustard Seed) on top. Again I used blending brushes and started off with a very light blend. I went back over each color lightly adding several layers of color and making sure that I blended out any harsh lines between the colors.
I adhered the floral Semicircle on top of the stitched semicircle using fine lines of liquid adhesive and then adhered that over the stenciled background. The flat edge of the semicircle lines up perfectly with the side of an A2 card. I die cut a bow out of white cardstock using the Beautiful Bows Dies and popped it up on the rounded edge of the semicircle. Then I used the Sentiment Strips Occasions Stamp Set to stamp a “Happy Anniversary” sentiment in black ink on white cardstock. I die cut that sentiment with the Sentiment Strips Dies. Finally I adhered a smattering of Clear Confetti Mix(my absolute favorite embellishment to add to just about any card) for some shine! I hope you’ll give these ink blending techniques a try!
It’s time to announce the team for this upcoming design term. It’s bittersweet to say farewell to any designer, especially those who have become part of the Pretty Pink Posh family. However seasons in life change and sometimes goodbyes are necessary. We are saying a fond farewell to Davina, Lindsey, Melissaand Sindhu but we do hope to see them again in the future for guest design positions!
We are welcoming Debbie and Christina to the Pretty Pink Posh team and are so excited to see their future PPP projects!
In honor of the new team, we are doing a big $100 gift certificate giveaway! Leave a comment on THIS post on 3 designs/ products you’d like to see from us in 2025.One lucky comment left by July 8th will win a shopping spree. Congratulations to Pam Dunbar on being our lucky winner. We’ll email you to get your gift card code sent over!
Be sure to give lots of love to the designers! We can’t wait to read your comments and suggestions!
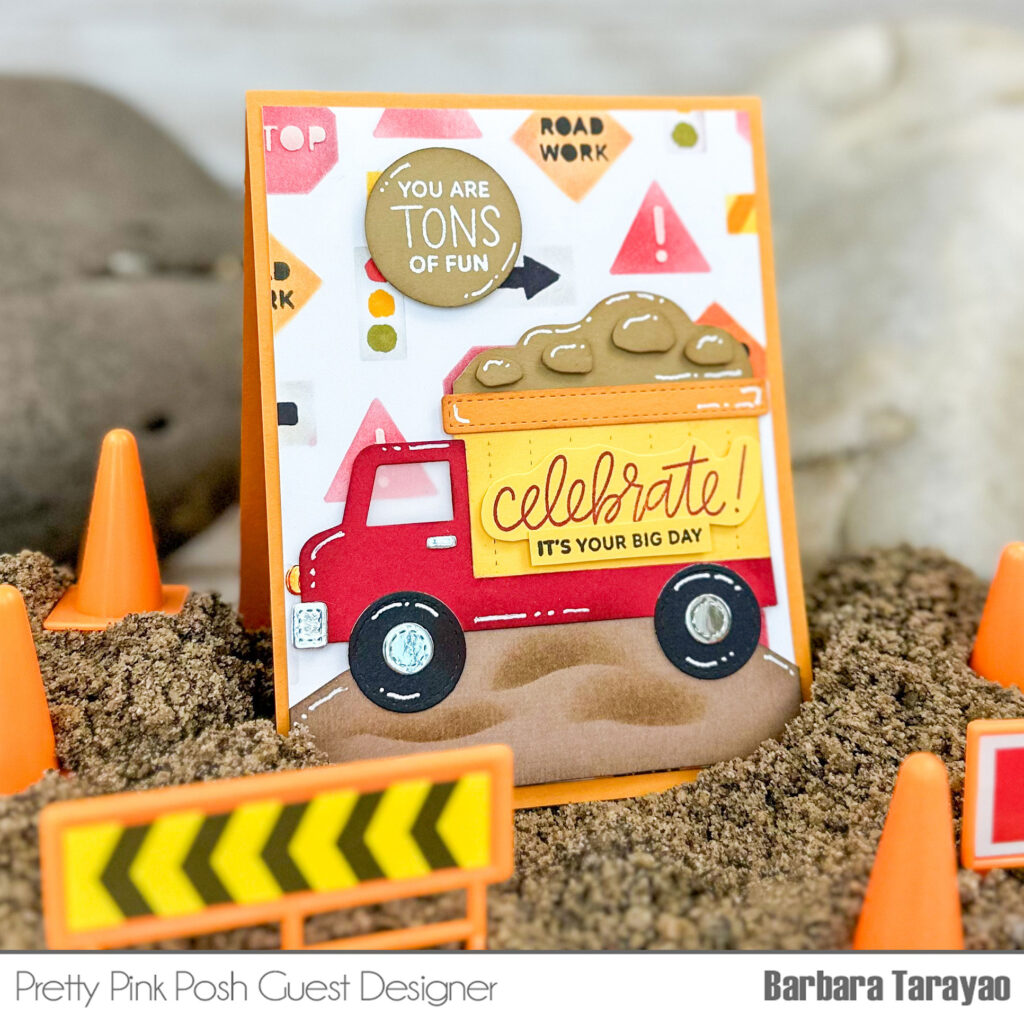
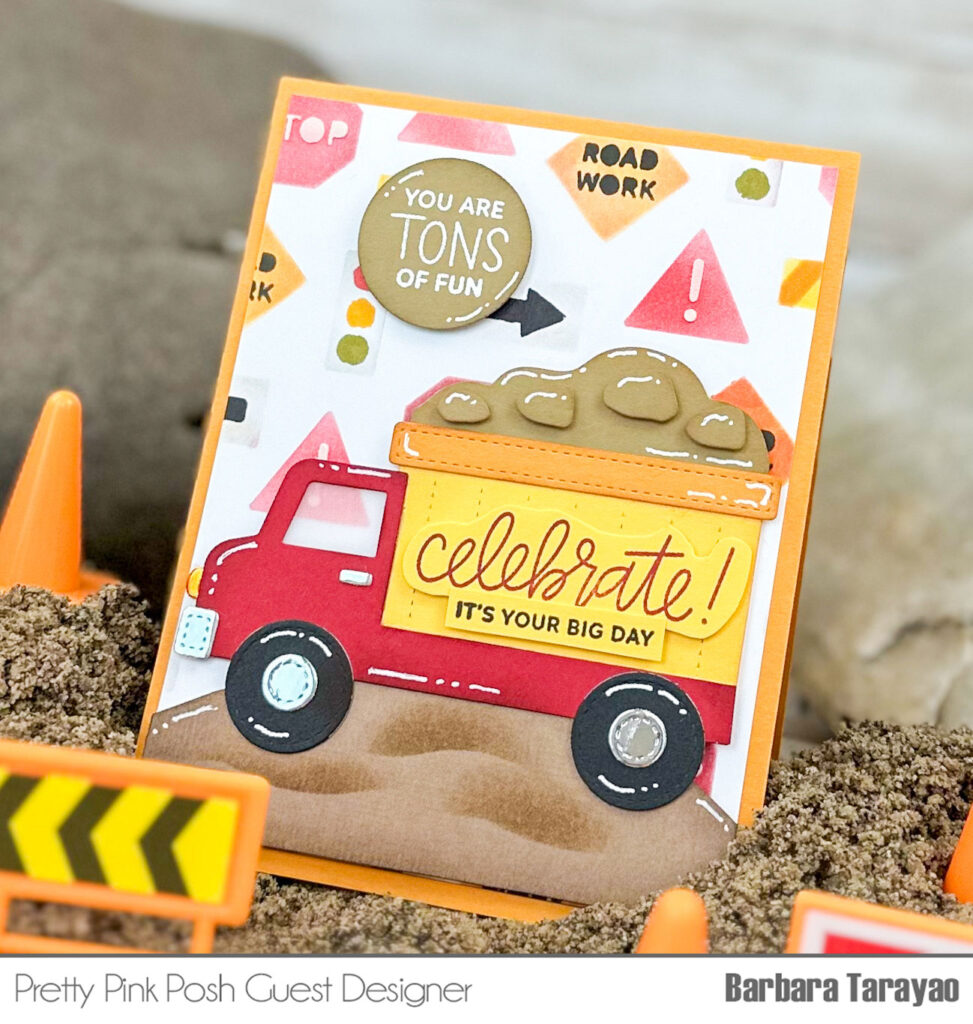
Hello crafty friends! It’s Barbara here and I am happy to share a fun project using a couple of the products from the new June release.
I created this A2 size card base from orange colored cardstock. I then took a piece of white cardstock using the new Layered Street Signs stencils to create a fun background. I trimmed it down to leave a bit of a border. I then die cut all the pieces from the newBig Dump Truck die set from more colored cardstock.
I adhered them together and added it to the stenciled panel with a sentiment stamped with white embossing ink and heat set with white embossing powder. Such a fun die to play with!
I really enjoyed playing with this stencil and die set from this release and I hope you liked this card!
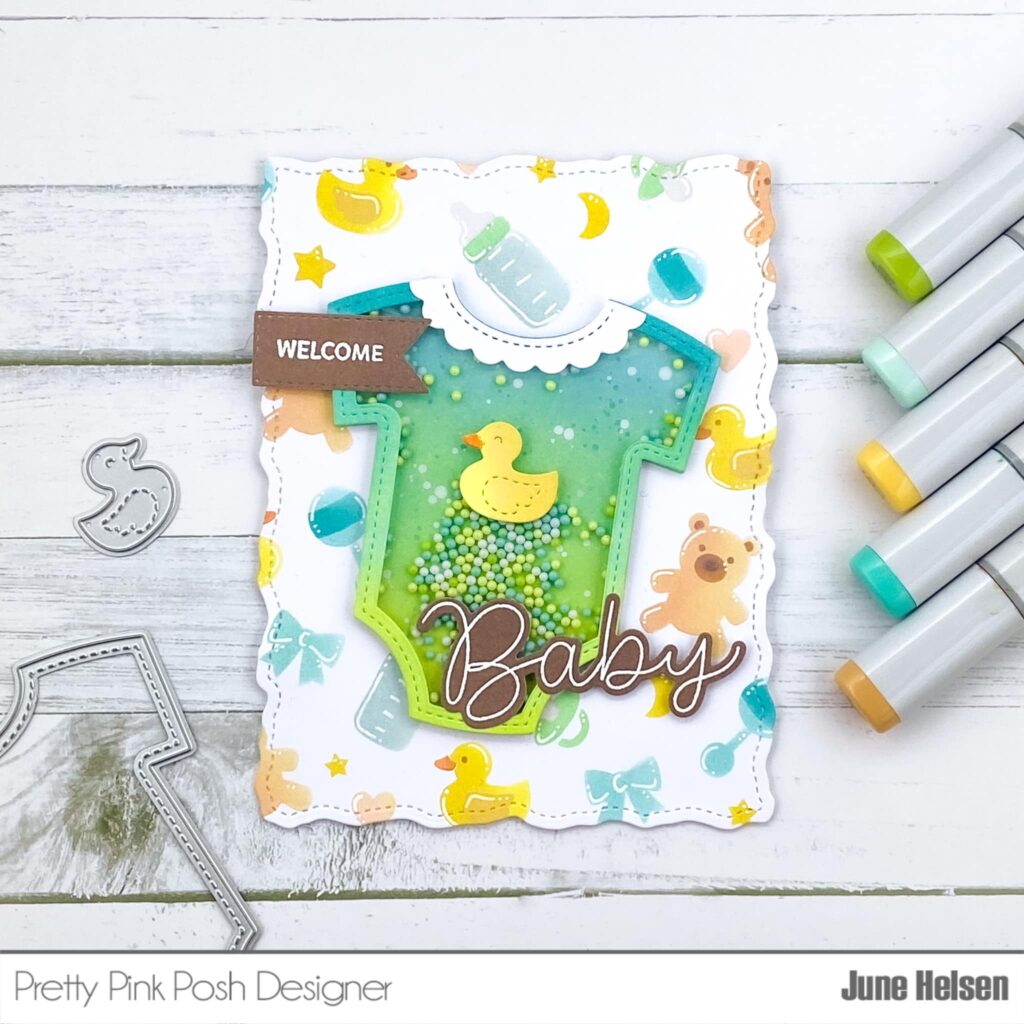
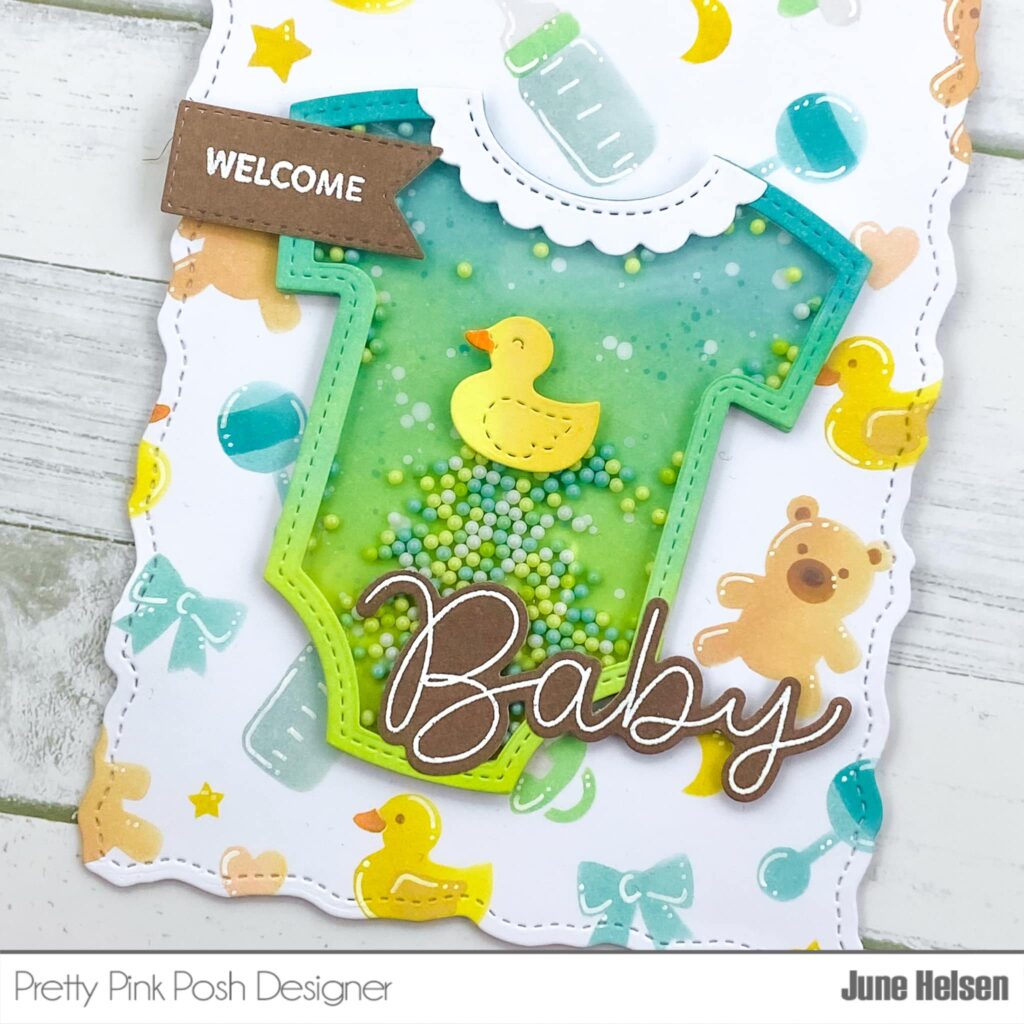
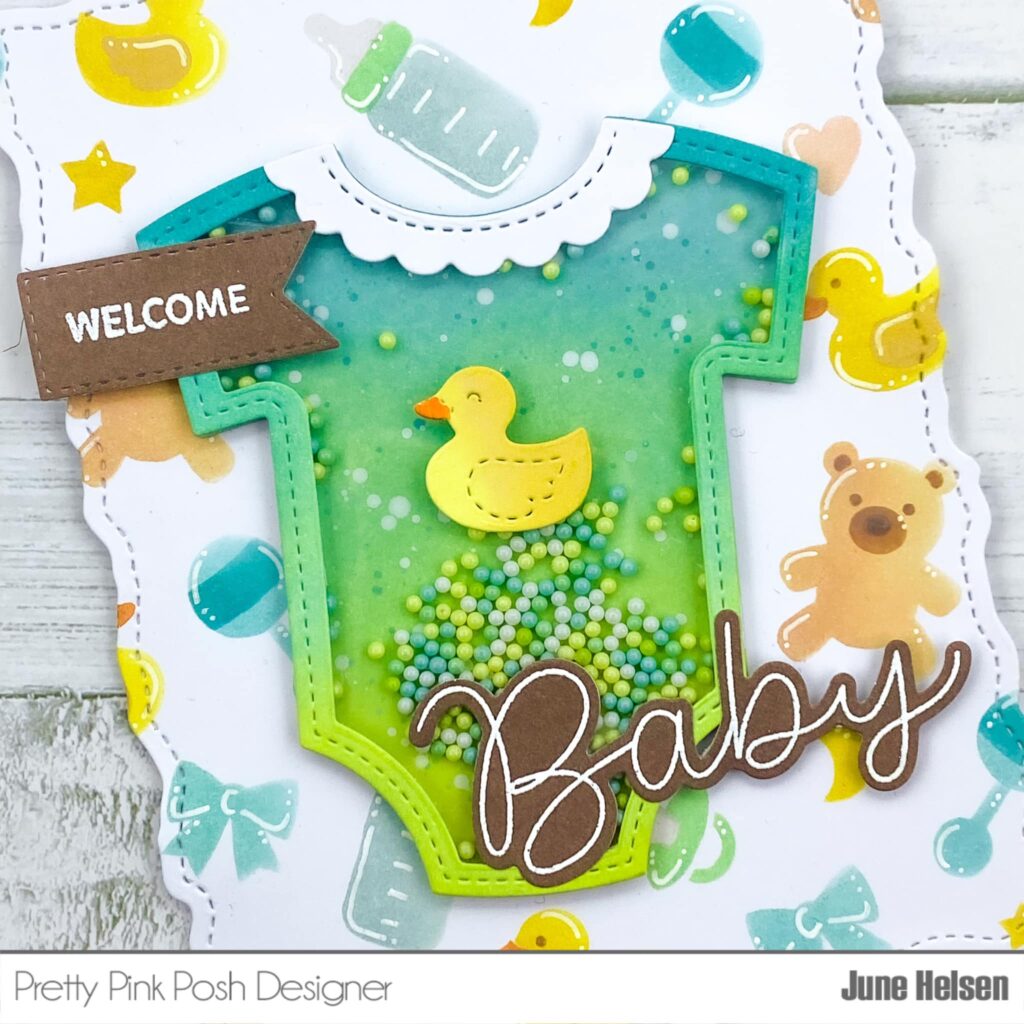
Hi everybody, it’s June here! Today I’ll be showcasing some of the cute baby products recently released.
I used the new Onesie Shaker Dies to create a central focal point for my card. I blended a gradient on the border piece using Twisted Citron, Cracked Pistachio and Peacock Feathers Distress Oxide. I used those same colors with a lighter hand on the backing piece to not distract too much. I did want to add a bit more detailing though, so I splattered some Peacock Feathers and Mowed Lawn Distress Oxides and thinned out white acrylic paint on my back piece.
I love how customizable the onesie is! I personally went for the lace collar and rubber duckie to go on top of my shaker. I knew I wanted to try out a certain new stencil for the background, so the duckie just HAD to be there. Also, I was excited to see that the color palette I chose matched perfectly with one of the new shaker bead packs, the Spring Breeze Shaker Beads. This is one of my favorite shakers I’ve made so far because everything just matches so perfectly!
For the background, I went a bit out of my comfort zone again. I already talked about being intimidated by layering stencils before, but each time I see these beautiful stenciled cards my fellow Design Team members create, I really want to give it another go. So that’s what I did!
I used a variety of Distress Oxides and small blending brushes to carefully color in each image from the Layered Baby Wreath Stencil. I used a light hand so I could create a slight gradient look to the images. I tried to bring back my main colors and also used a bit of brown for the teddy bears. Going into this, I thought it would be a very stressful process for a perfectionist like myself, but I genuinely had an amazing time and lifting up my stencil made me smile each time! After I finished the stenciling work, I added some white gel pen detail like I would do with stamped images. I cut out my background using the largest of the Stitched Torn Rectangle Dies.
Because I used brown for the teddy bears, I thought it would be a good idea to bring back that color in my sentiment. I embossed the ‘Baby’ from the Baby Animals stamp set onto a brown piece of cardstock with white embossing powder. I did the same for the ‘welcome’ sentiment from that set and I cut it out using the banner from the Big Celebration Cupcakes Dies. I adhered both of them using foam tape to match the height of the shaker piece.
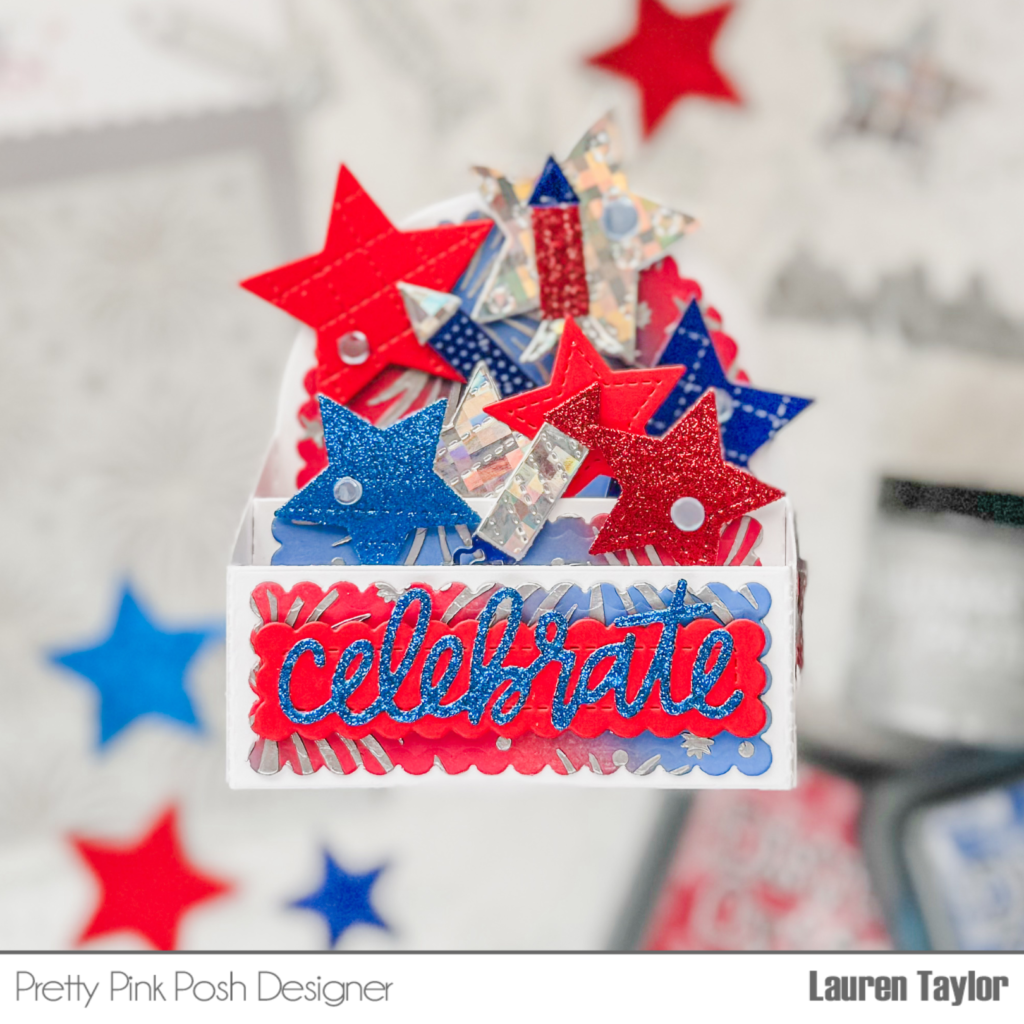
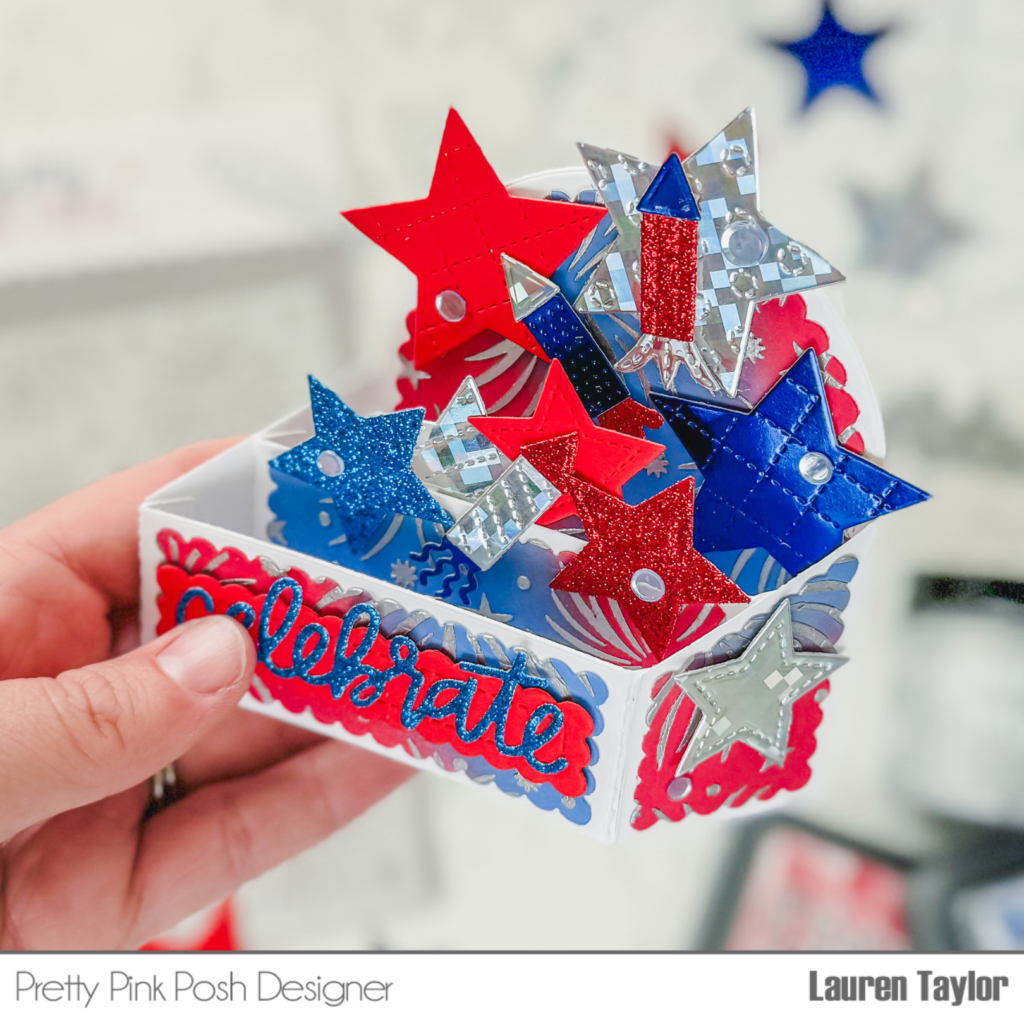
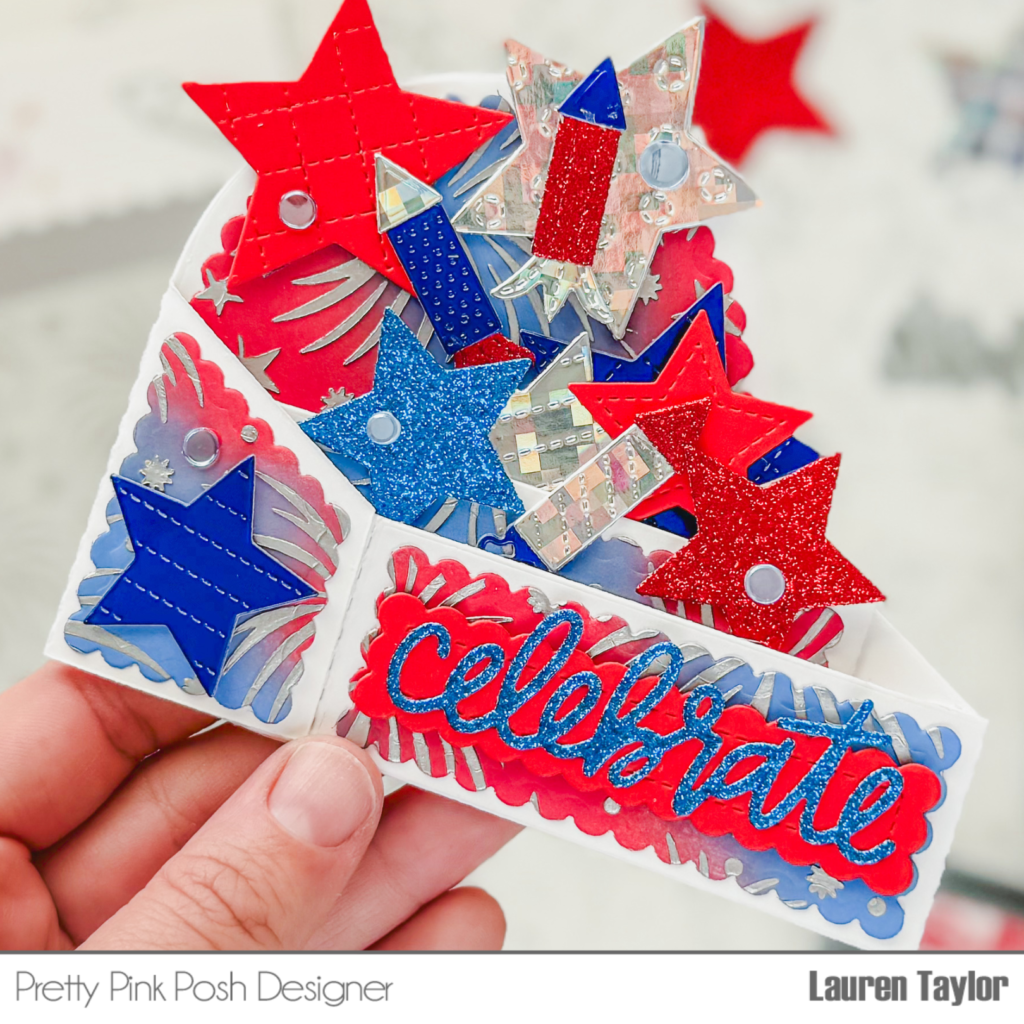
Hi, friends! It’s Lauren and I am back with a new video. We are continuing my box card series with a celebratory card for the upcoming US holiday, Independence Day or 4th of July! I kept the card basic in case you are not from the US or do not observe the holiday, you can switch out the colors to make it a New Year’s Day card or for any other celebratory day or event.
I started with getting lots of die cutting done – the Scallop Box Card base out of white cardstock, a scalloped Sentiment Strip from red cardstock, the sentiment from Gift Card Bag in blue glitter cardstock, and finally fireworks from the Big Celebration Cupcake and smaller stars from the Stitched Stars die sets in different types of red, blue and holographic cardstock – solid, glitter and shiny!
To make the stenciled background, I added Blueprint Sketch and Lumberjack Plaid Distress Oxides to a piece of white cardstock by ink blending with brushes. Once a large enough space was covered, I used the Fireworks Stencil with Silver Lining Lunar Paste to add the stenciled design. I set that aside to dry; once it was dry, I cut the scallop pieces from the Scallop Box Card Dies.
I assembled the box card together, added the stenciled scallop pieces and scattered the stars and fireworks on the card using thin, 1mm foam squares. I adhered the sentiment to the sentiment strip and popped that up on the front of the box card. For some final touches, I added a few Blue Shimmer Confettiaround the box card for some extra shine.
I hope you like this month’s box card and let me know your suggestions for a future holiday!
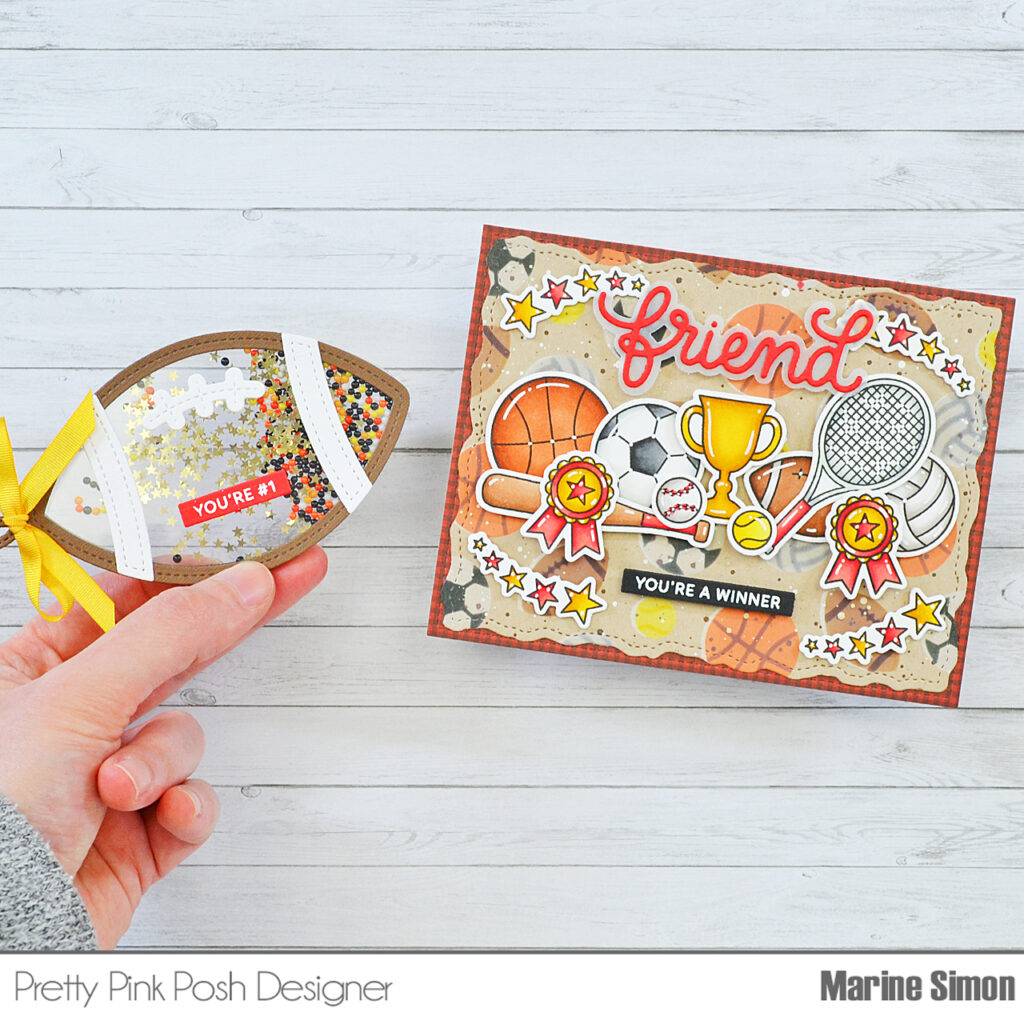
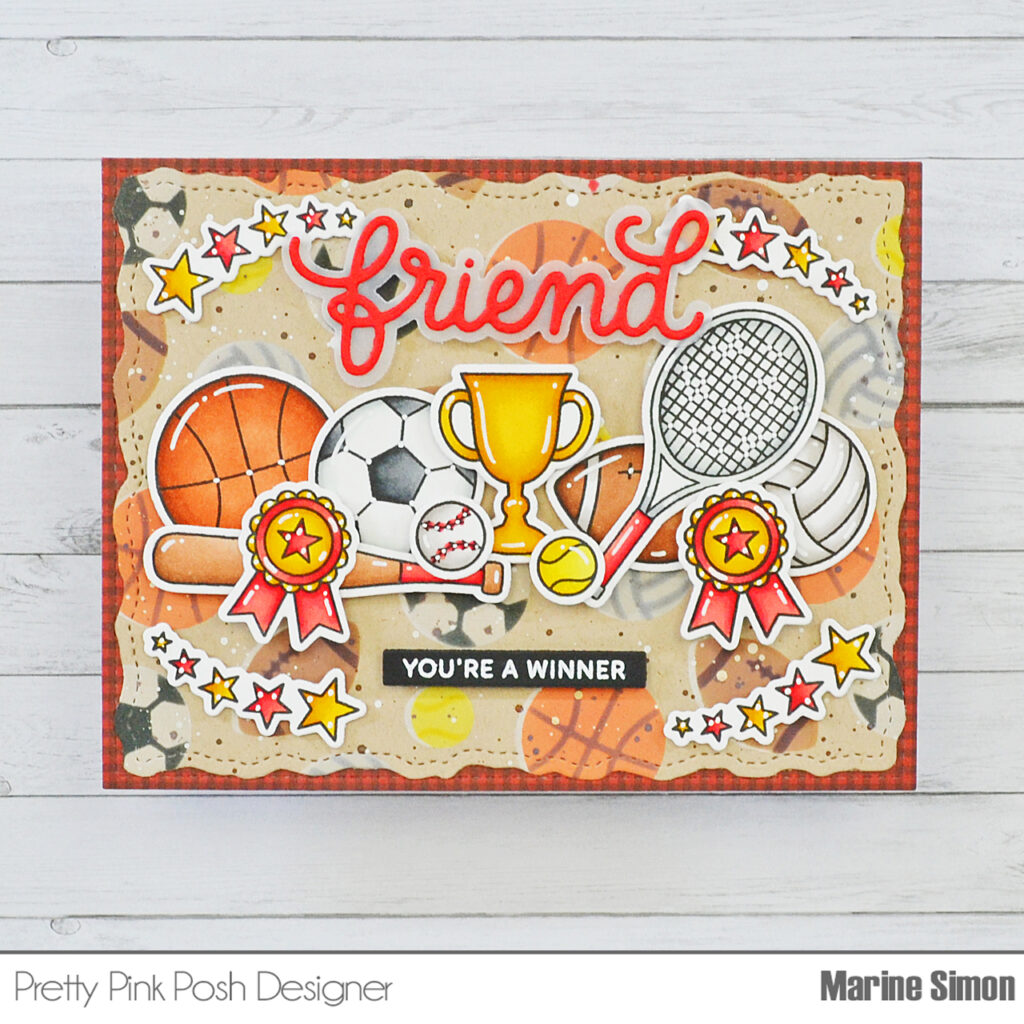
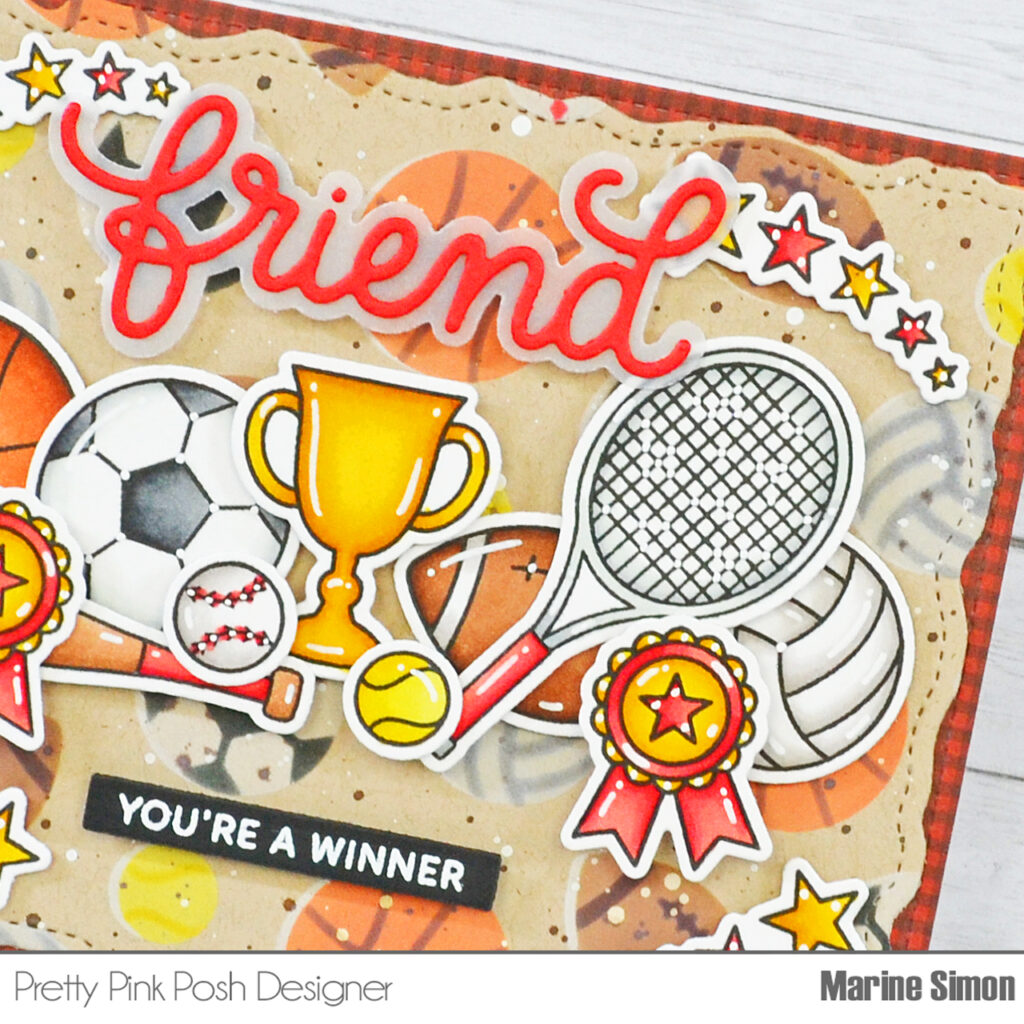
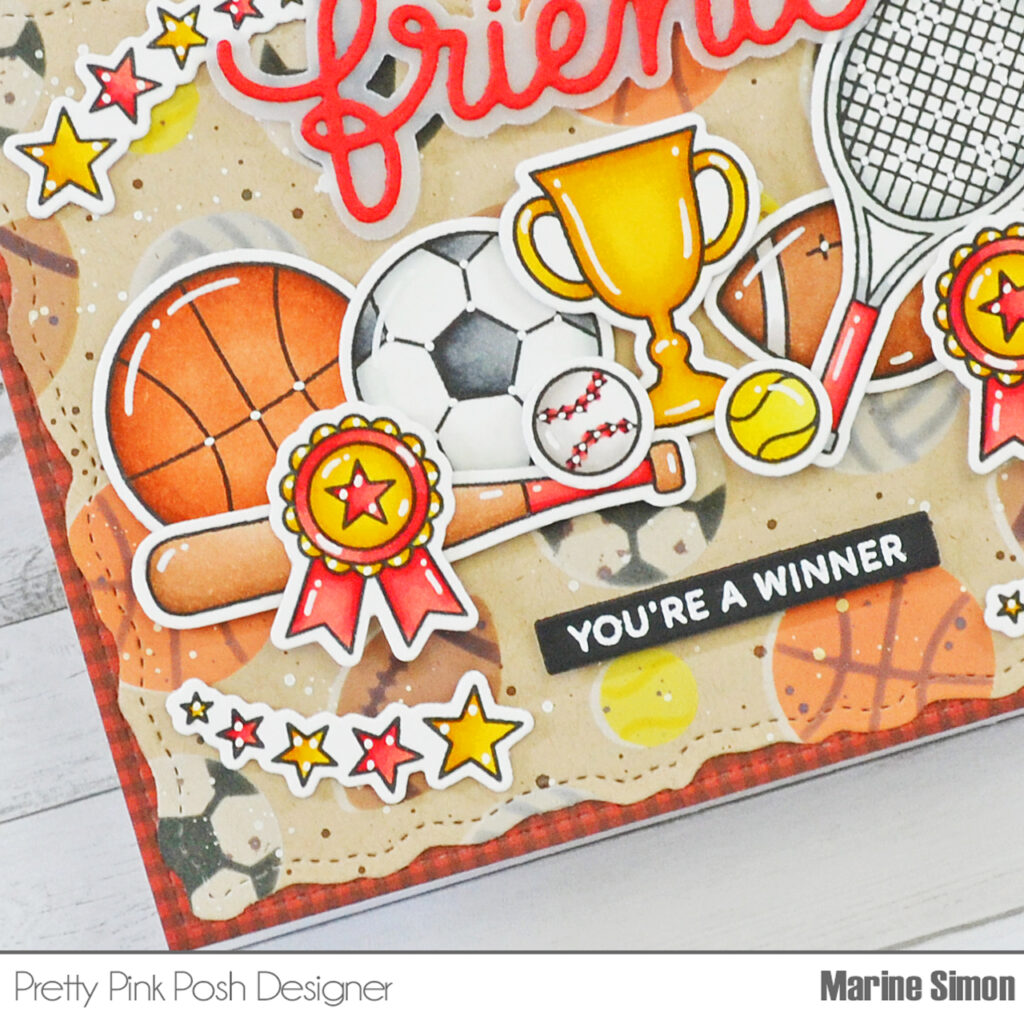
I started off by cutting a Stitched Torn Rectangle kraft panel that I stenciled using the Layered Sports Balls stencils. When I stencil on kraft cardstock, I like to create a white base first, so that the colors I apply next pop on the paper. So I taped the stencil A on my panel, and used white pigment to make this white base. I kept the stencil A in place, but shifted it a little bit to the right, and used oxide inks to make the first layer of my sports balls. Next I taped the stencil B on top of my panel, and used more oxide inks to add details to my sports balls.
Here are the oxide ink combinations I used:• Basketball – rusty hinge + vintage photo• Football – vintage photo + ground espresso• Soccer ball – lost shadow + black soot• Tennis ball – squeezed lemonade + mustard seed• Volleyball – pumice stone + hickory smoke
As always, I added texture to my panel: I mixed some ground espresso oxide ink with water, and used a small brush to add splatters to my background, and then did the same with copic opaque white ink.
I set my panel aside to dry, and stamped all the Sports images on 80lb Neenah solar white cardstock using an alcohol marker friendly black ink. I cut them all using the matching dies, and colored everything using my Spectrum Noir Illustrator markers and my Graph’it brush markers.
I attached the images on my Layered Sports Balls panel using 1mm and 2mm foam squares, and then added highlights and details using a white gel pen. I stamped “You’re a winner” from Sports on black cardstock, and trimmed it into a slim banner using a Sentiment Strips die that I attached below the images. I also cut “Friend” out of red cardstock, as well as its shadow out of vellum, using the Friend Shadow die set. I stuck “Friend” on its shadow using liquid glue, and then attached the whole piece above the images using 2mm foam squares. To finish my card, I cut a 5,5 x 4,25 inches black and red gingham panel, attached it to a kraft card base, and then stuck my panel on top using double sided tape.
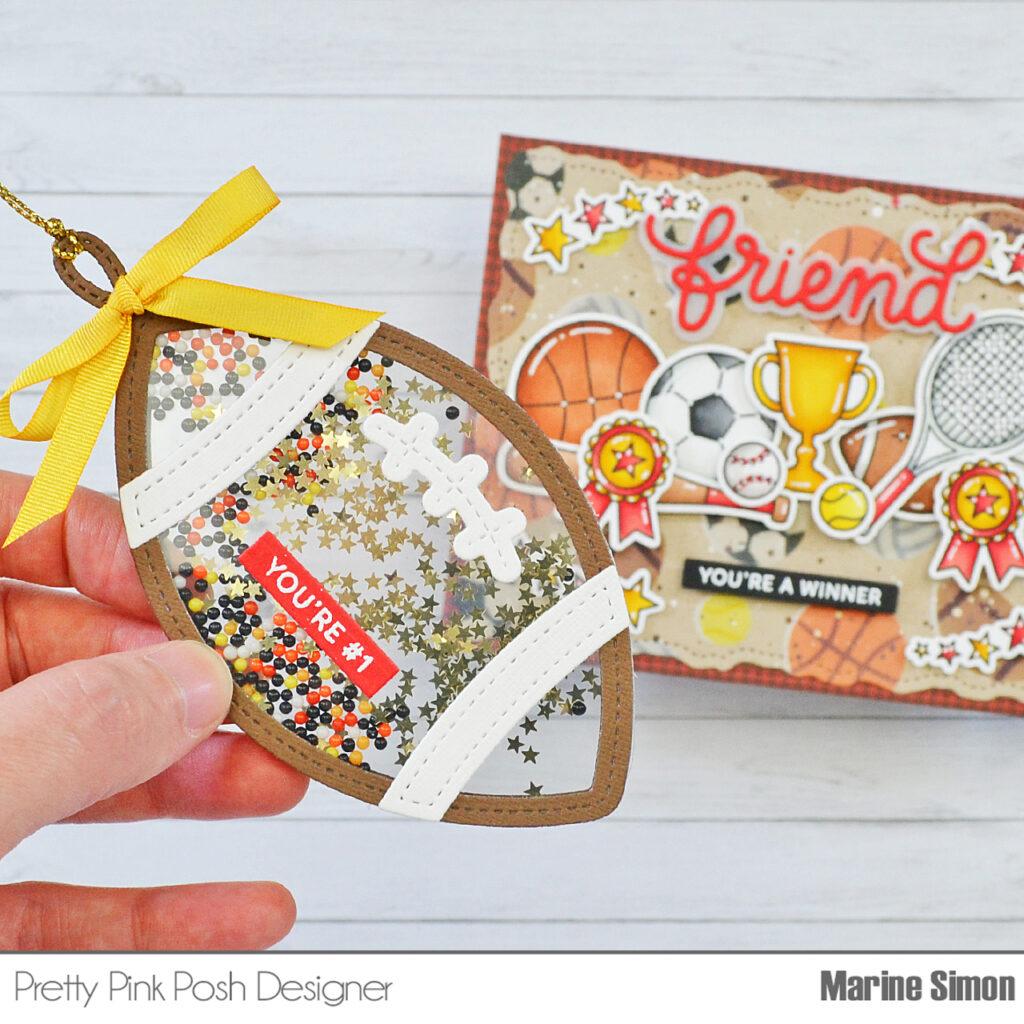
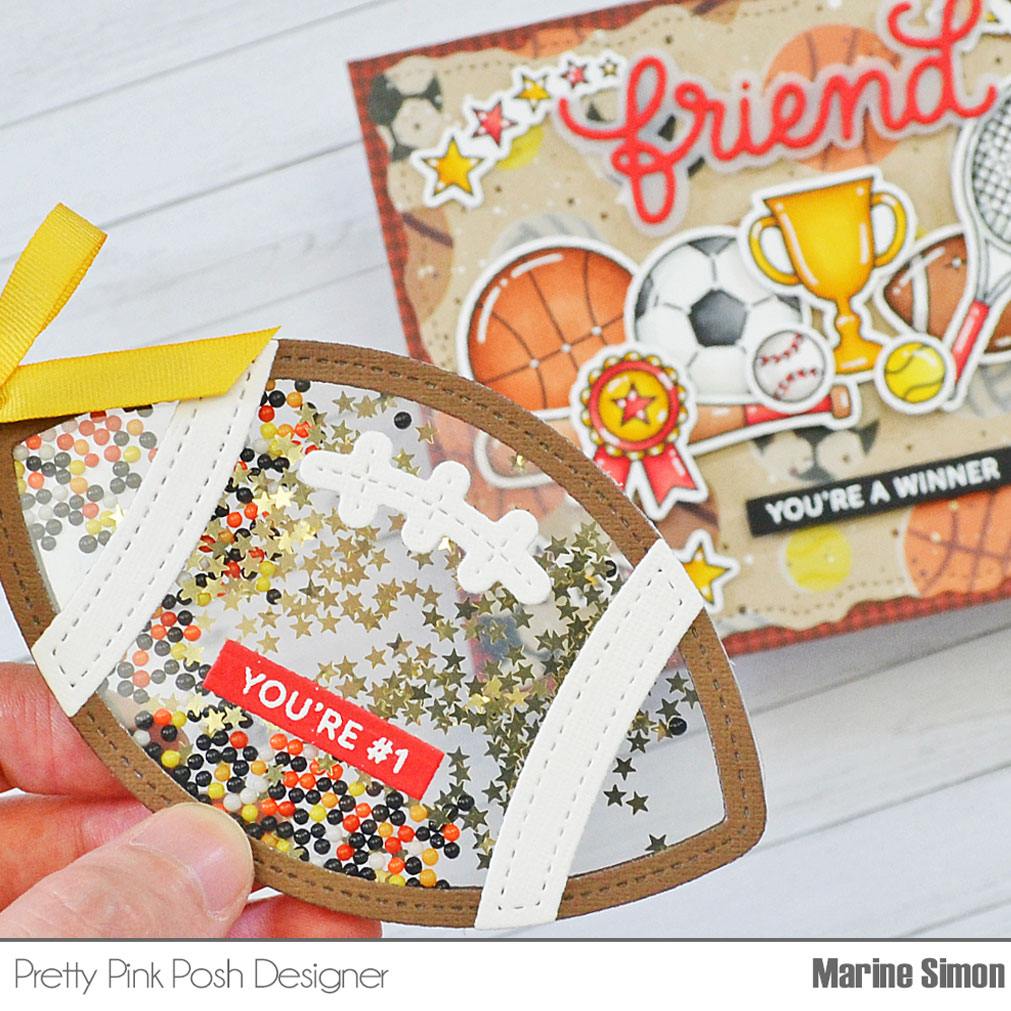
Next I created my Football Shaker see-through tag, and here are the different steps to build and assemble it:
1. Cut a football frame out of brown cardstock, cut a whole football out of acetate, and attach the football frame on the acetate football using liquid glue 2. Flip the piece over, cut the tag handle using a Build A Stocking die, and attach it on one end of the football using liquid glue 3. Add foam strips behind the frame, directly on the acetate, following the shape of the football 4. Pour Gold Mini Star confetti, as well as Construction Zone shaker beads on the acetate 5. Cut another football out of acetate, and attach it to the foam strips to close the shaker 6. Cut another brown football frame, and stick it to the acetate to finish the back of the tag nicely
Once the Football Shaker base was done, I glued the white decorative pieces, added gold thread on the handle, and attached a yellow bow right below it. I also white heat embossed “You’re #1” from Sports on red cardstock, trimmed it into a slim banner using a Sentiment Strips die, and stuck it to the acetate using liquid glue.
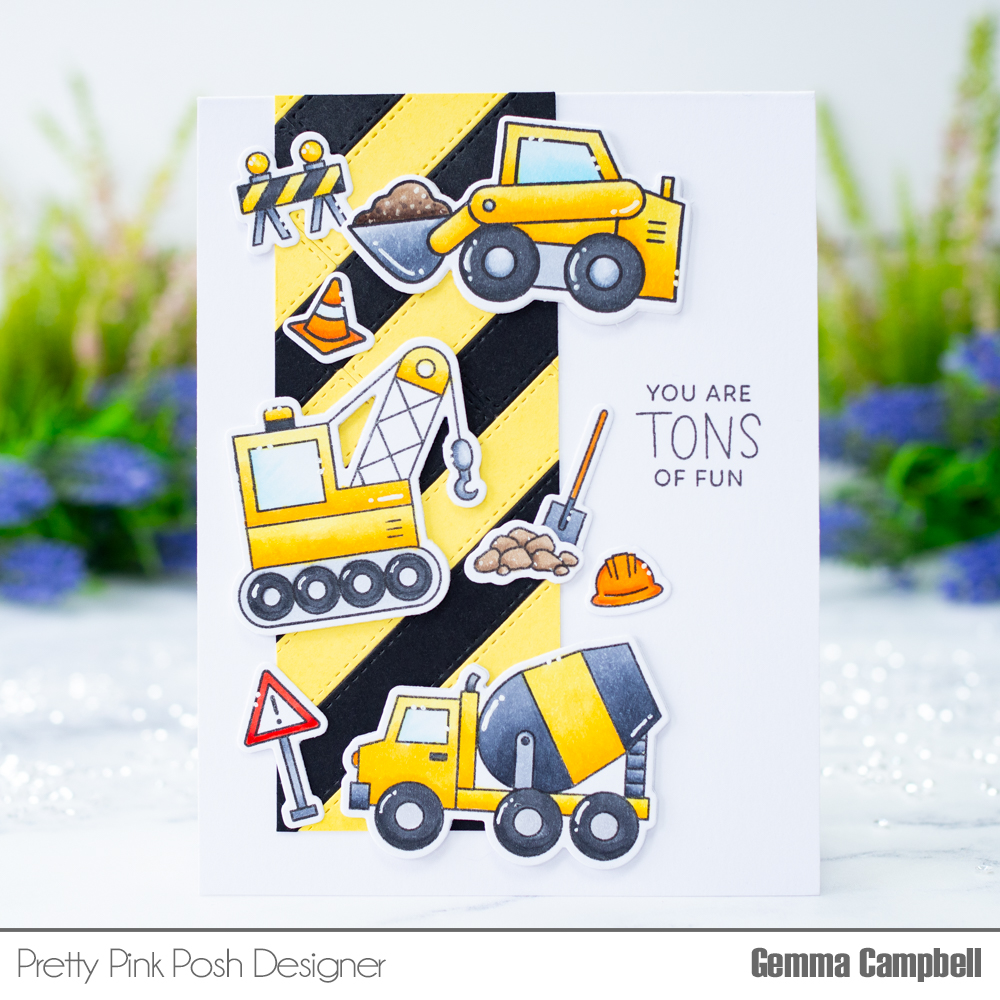
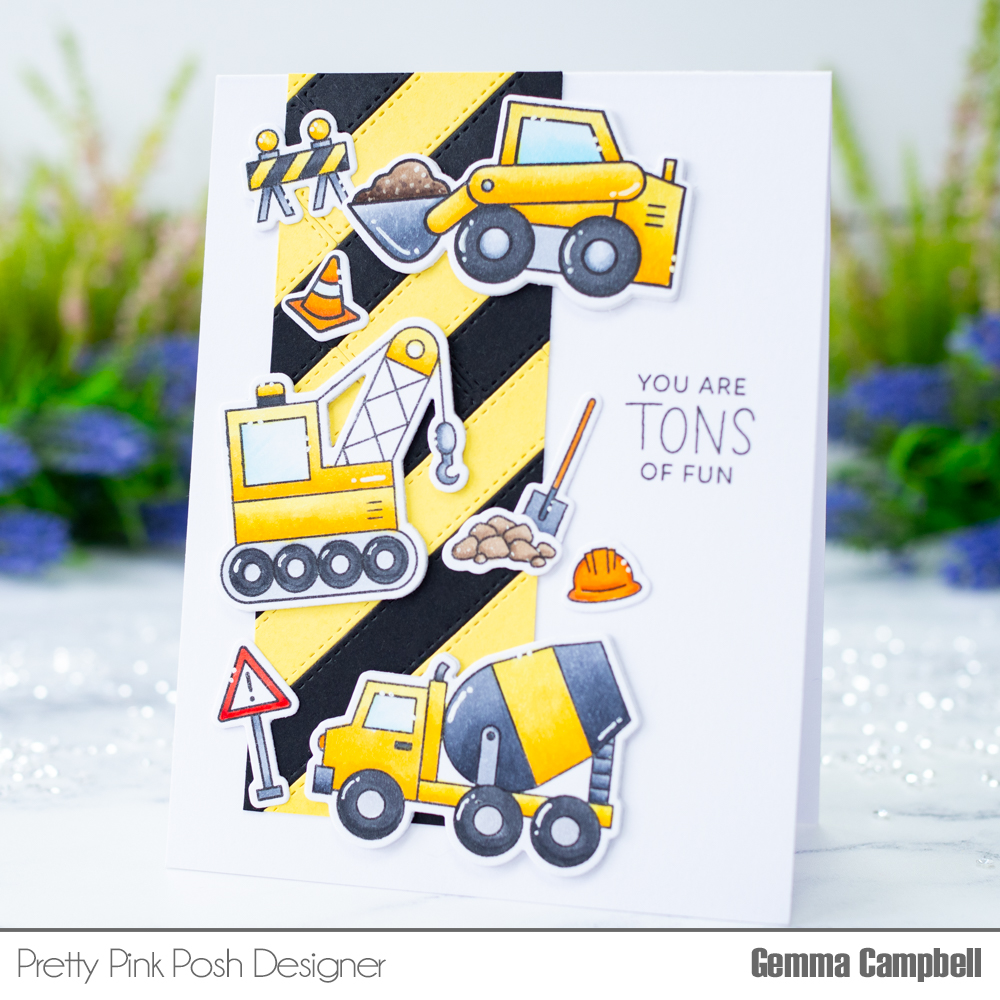
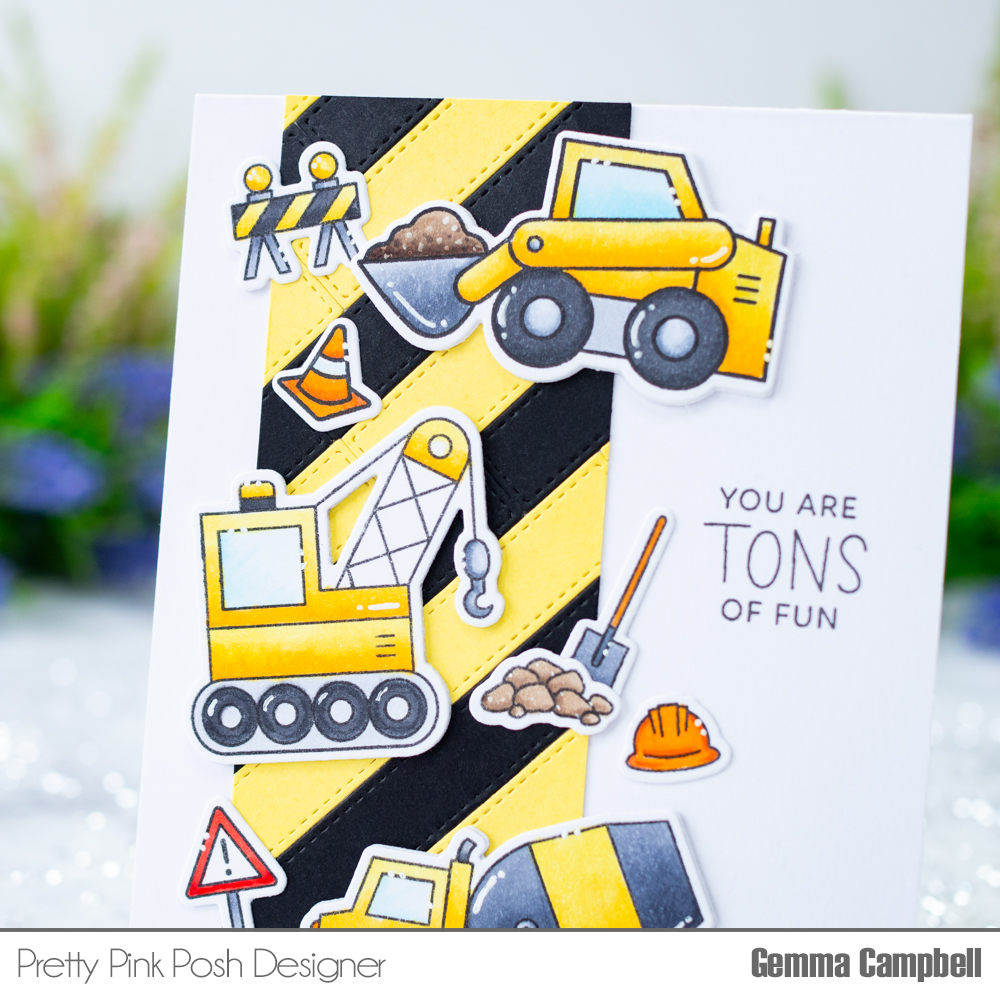
I began by stamping out the images from both sets and colouring with copic markers. I chose a colour palette of yellow and black, but you can colour these vehicles in a range of colours. I then die cut the images with the coordinating dies, and added a couple of die cut layers behind the vehicles for dimension.
Copic marker colours
Construction vehicles: V13-17 N5-7 C1-5 B000-00
Hard hat: YR04 16 18
Traffic cone: BG000 YR04 16 18
Safety barrier: N5-7 Y13-17 C3-5
Spade: YR27 C3-5
Dirt: E43-44
Warning triangle: R24-27 C3-5
Next, I cut strips of black and yellow card, using the Stitched Strips die set. I adhered these to a thin piece of paper, in a diagonal pattern, trimming away any overhanging edges.
I adhered the stitched strip panel vertically on an A2 card base, leaving a little white space along the bottom edge. I then stamped a sentiment from theConstruction Additions stamp setto the side. Finally, I adhered the images over the panel to finish.
I hope you were inspired by this card. It is so fun and easy to create boy cards with these new products!
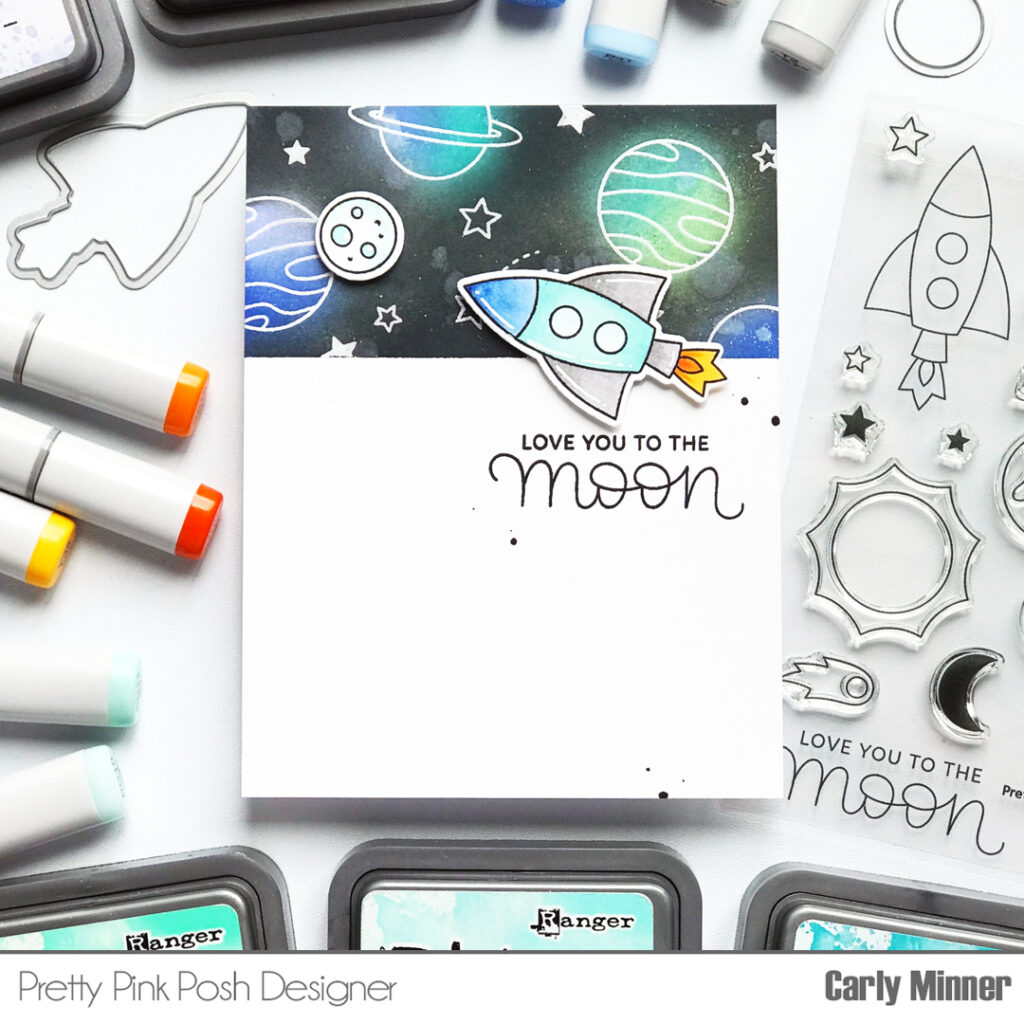
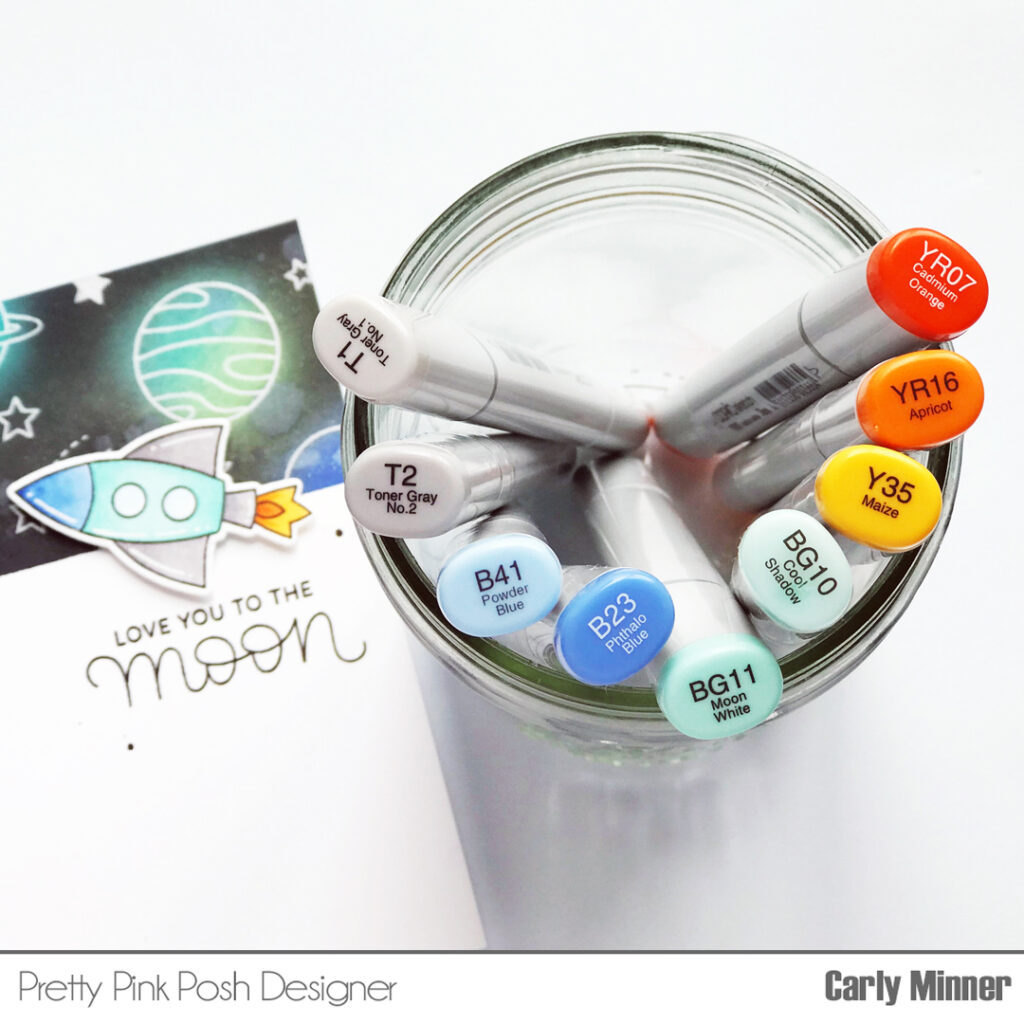
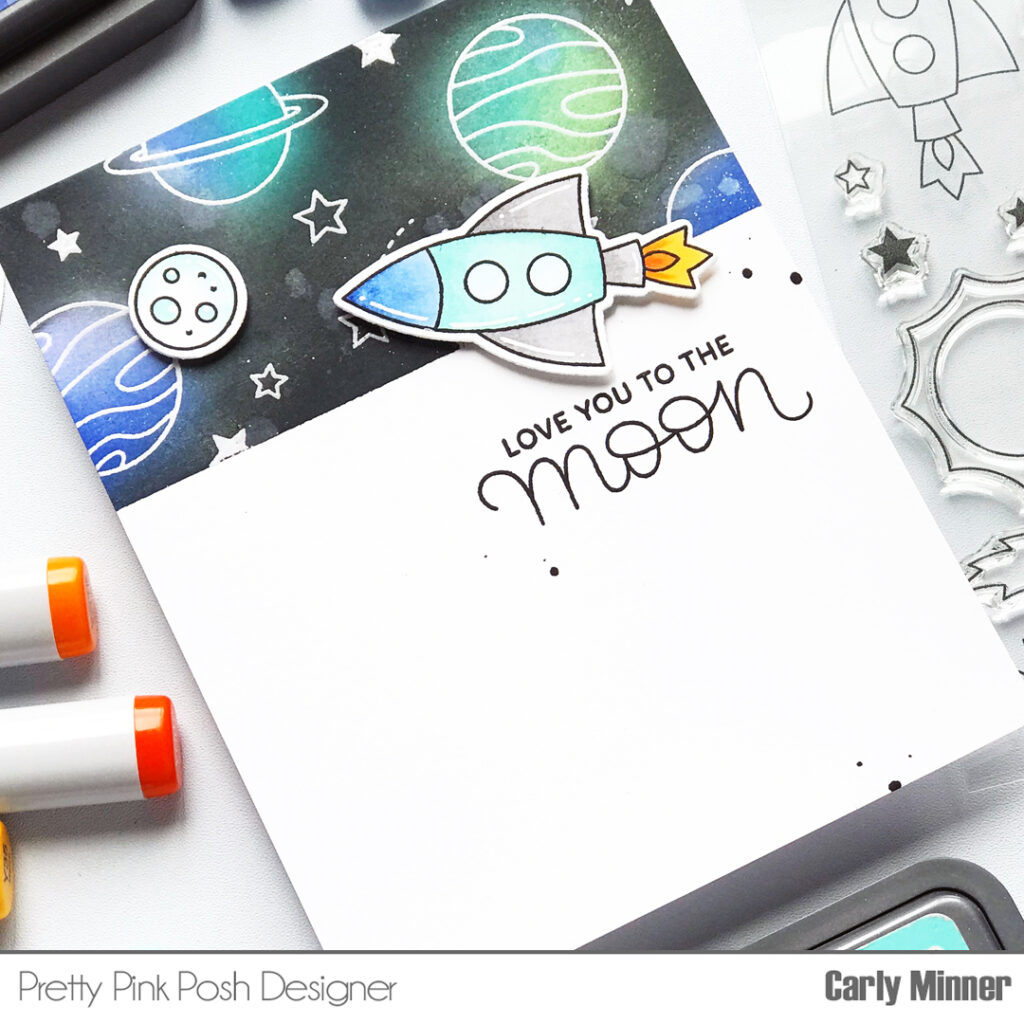
This card has so many of my favorite cardmaking techniques…masking, emboss resist and ink blending! But even with all those techniques, it’s so easy to make!
After masking a section of my card panel (and see my hack for skipping measuring in the video), I stamped planets and stars from the Outer Space set with clear embossing ink. Then I embossed with clear powder. I repeated that process until I was happy with the background.
Next I ink blended over the embossing with Distress Oxide inks (Shaded Lilac, Blueprint Sketch, Peacock Feathers, Salvaged Patina & Cracked Pistachio). I love the way the embossed images resist the ink. It’s magic!
I finished the card with stamped, die cut and colored images from theOuter Space set and a stamped sentiment too!
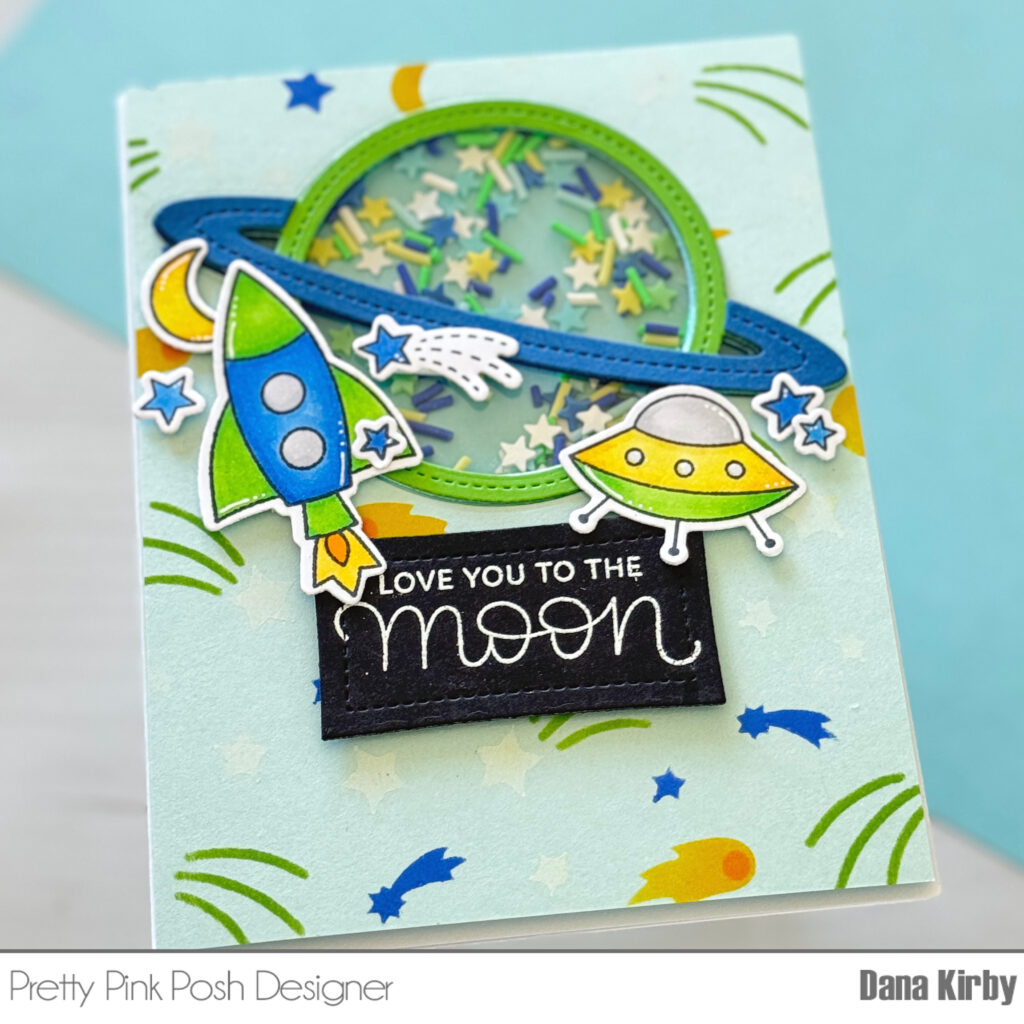
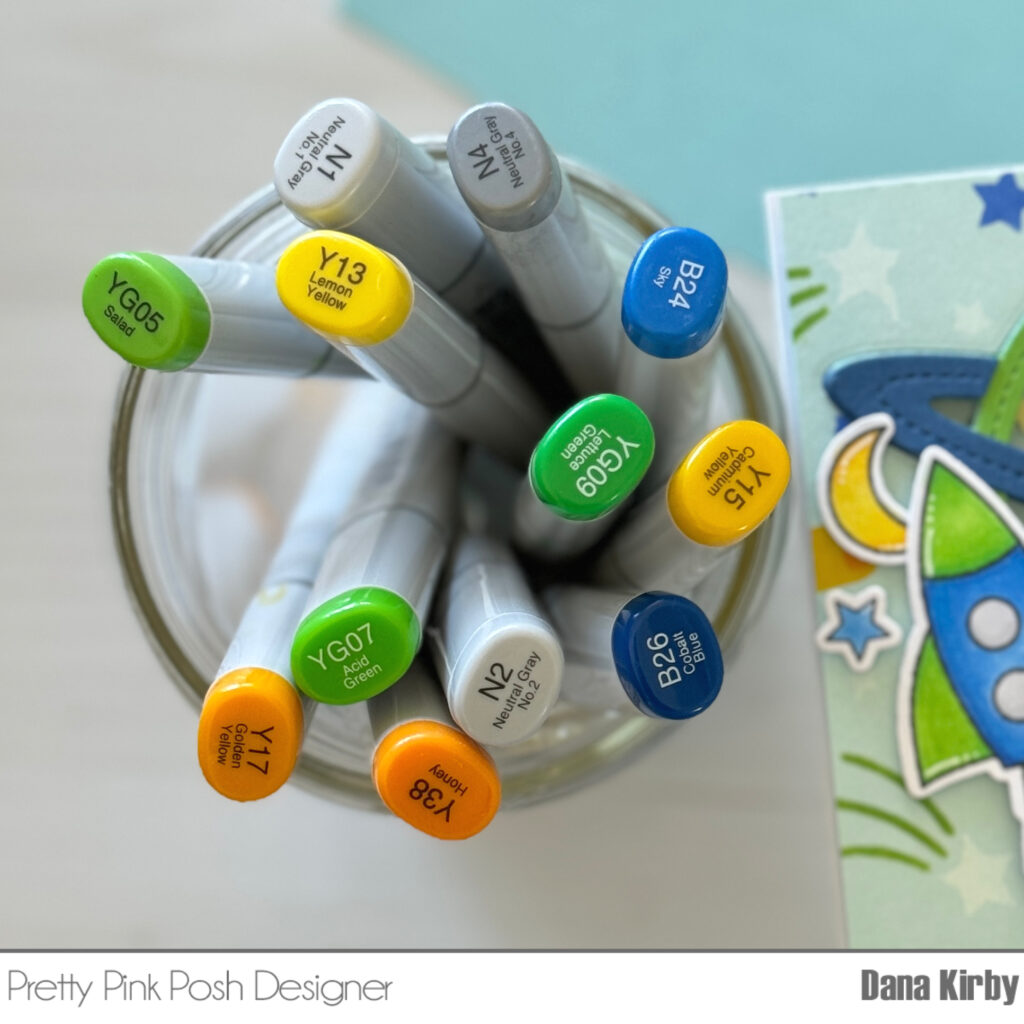
Hi friends! It’s Dana here today and I am back with a fun shaker card to share with you all.
I started my card by creating my card panel with the Layered Shooting Stars stencil set. This is a set of two stencils that layer together to create a fun star/space themed panel. I used Distress Oxide ink (Blueprint Sketch, Mowed Lawn, Mustard Seed, Carved Pumpkin and white pigment ink) for my blending. Next, I used the Planet Shaker die to create my shaker opening in the center of my panel. I added acetate to the back of the opening and used the Planet Shaker dies to create my frame. I filled the shaker with the Stargazing Mix and used foam adhesive to seal my shaker closed.
Lastly, I used the Outer Space stamp set to stamp my sentiment onto a black rectangle that I die cut with the smallest Wonky Stitched Rectangle die. I heat set the sentiment with white embossing powder and attached it to my card along with the Outer Space images.
Thanks for joining me today and I hope I inspired you to create a shaker card of your own.