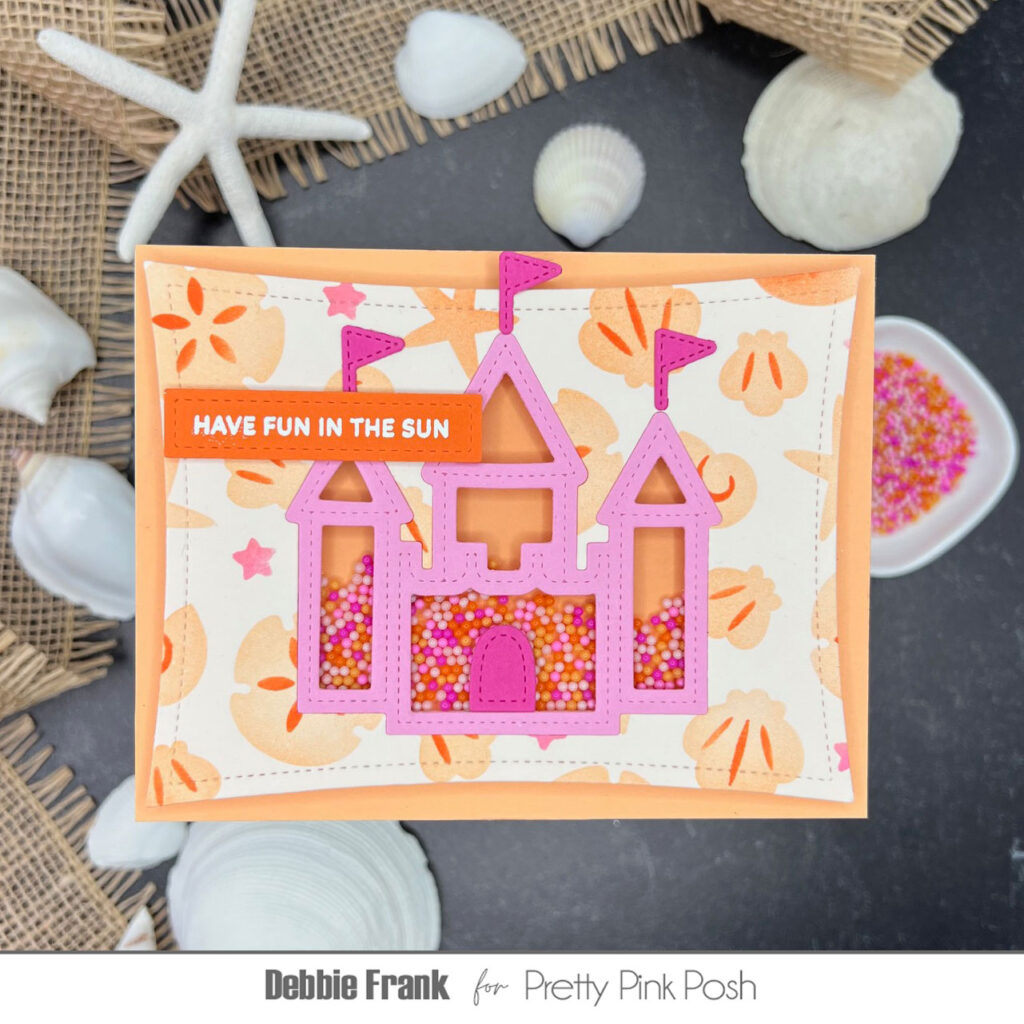
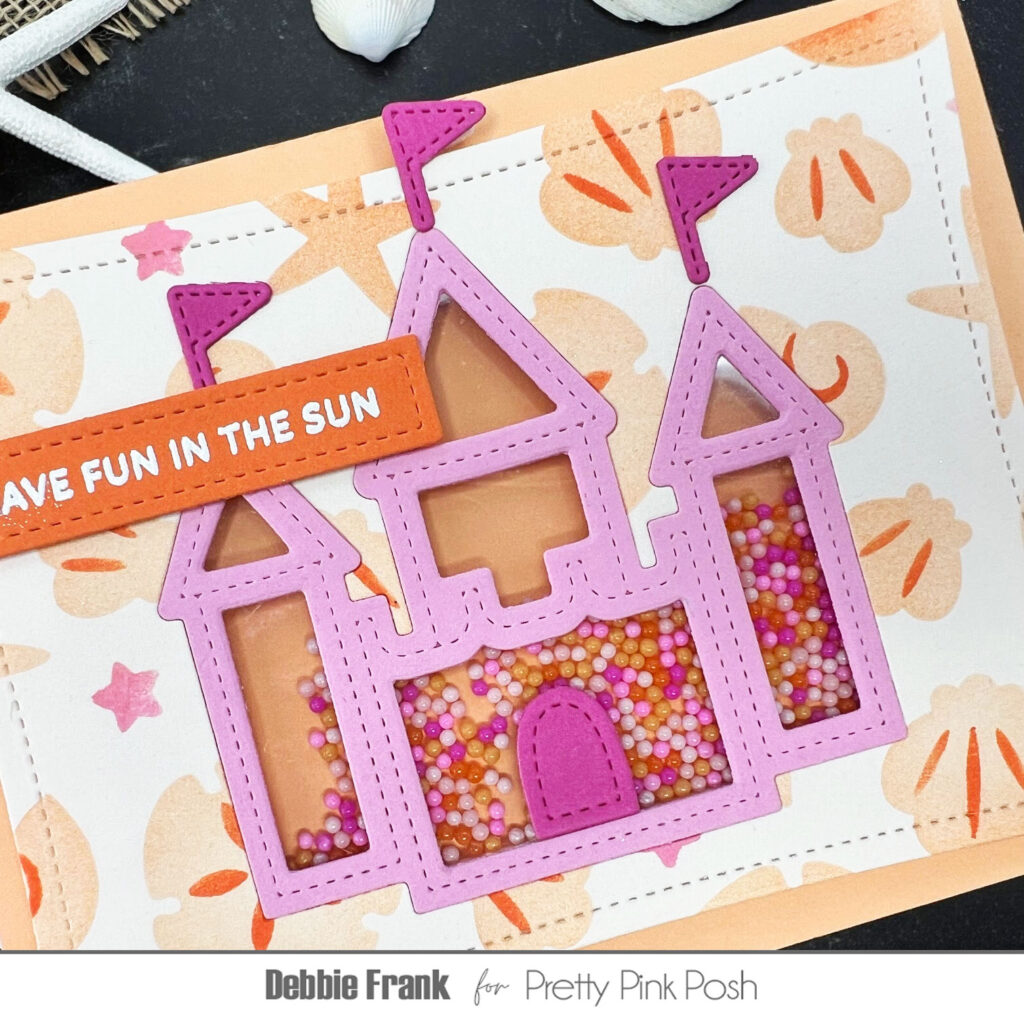
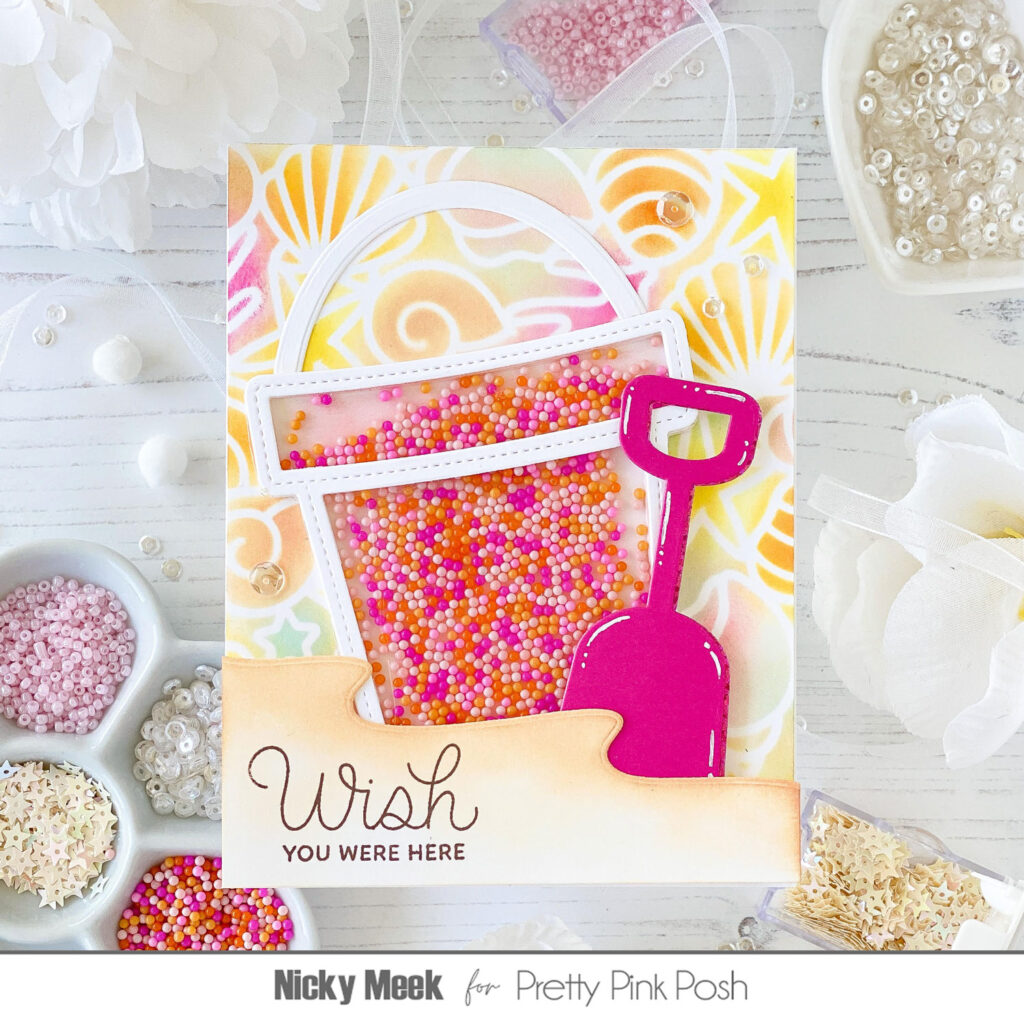
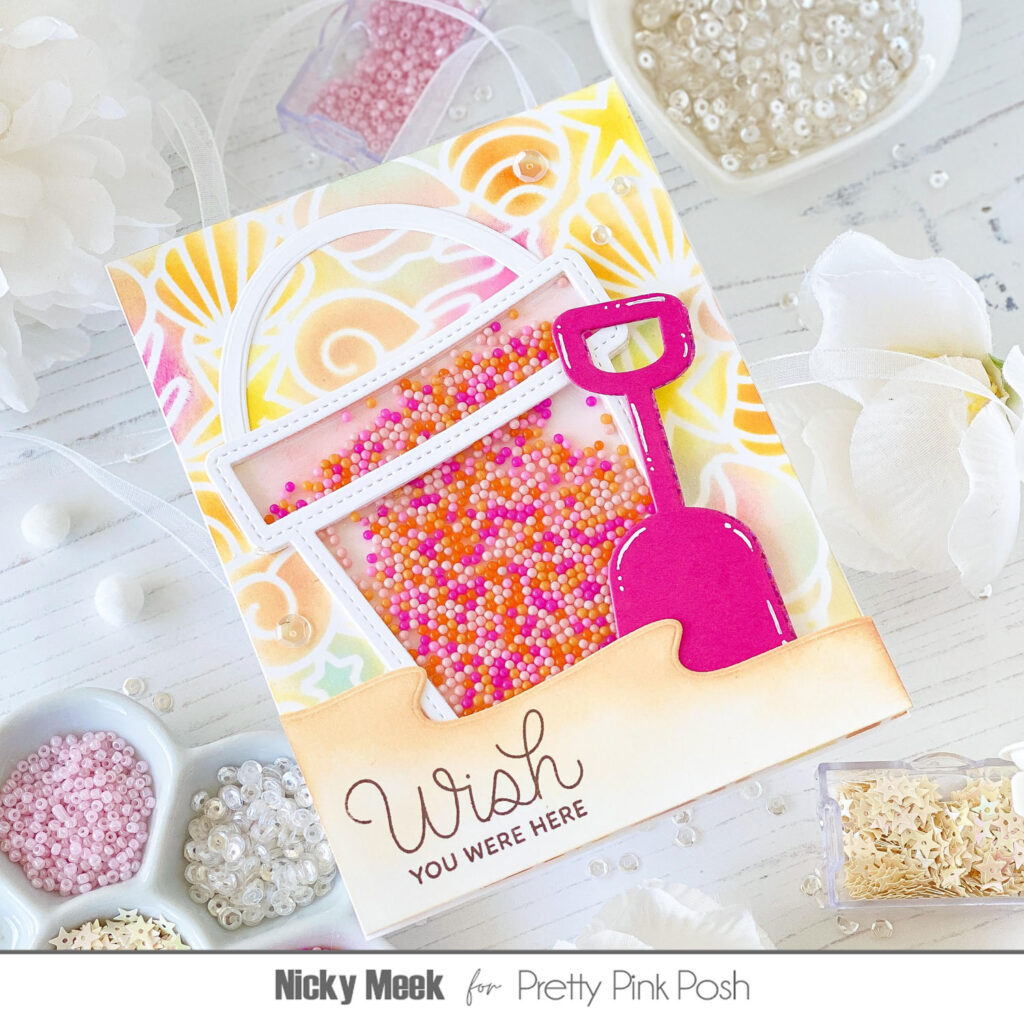
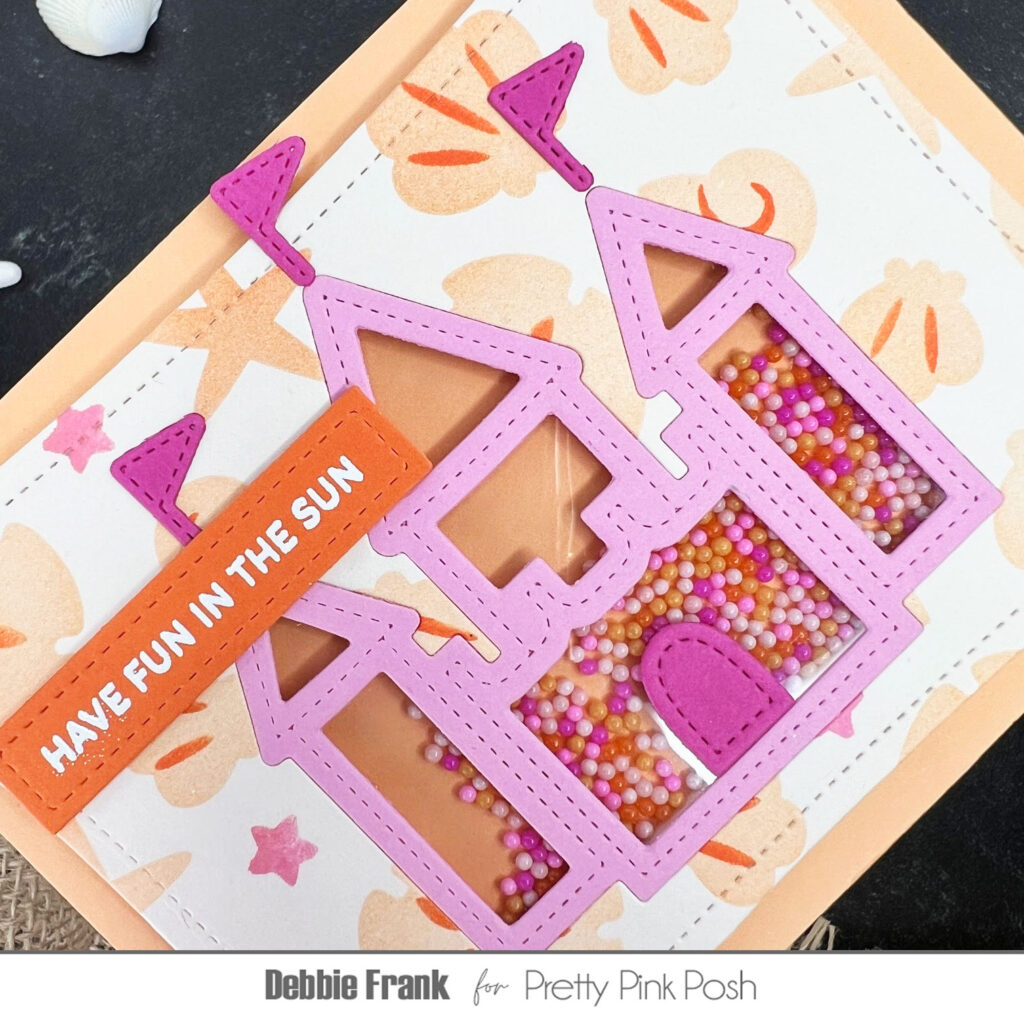
Hello crafty friends! I hope you’ve been enjoying all the birthday festivities so far. Barbara here and I am so happy to have a chance to share a project I made for Pretty Pink Posh’s 10th birthday celebration!
For this project, I used the brand new Party Balloons die set. I used the technique of die cutting the balloons out of a variety of toned colored cardstock to create a background.
I created an ink blended panel with soft gray distress ink and arranged the balloons on the panel to make them look like they were flying around. I adhered them with foam squares and then added the LargeCelebrate Shadow die cut from gold cardstock for a festive look.
We are having a special gift offer and discount code to celebrate the birthday festivities!
PRIZES: be sure to leave comments on each stop. We are giving away 5 $30 gift certificates to random comments (1 winner each day) left before February 16, 2024 at 11:59 PM PST. We’ll be announcing the winners on the PPP blog, so be sure to return and see if you are one of the winners and/ or sign up for our blog posts to your email!
Hello crafty friends, Marine here. I’m thrilled to be sharing with you this card featuring the new Interactive Cakedie set. I love interactive cards, they’re so fun to make, so I was over the moon when this new die was released!
I started off by creating a fun rainbow background on a 5,5 x 4,25 inches Strathmore bristol smooth panel. I first applied and blended oxide inks in a clockwise direction, starting from the top left hand corner: kitsch flamingo, dried marigold, squeezed lemonade, twisted citron, salvaged patina and shaded lilac. Next I used the Birthday Words stencil and more oxide inks to bring more interest to my panel, creating a tone on tone look, using picked raspberry, spiced marmalade, mustard seed, mowed lawn, peacock feathers and wilted violet. And as always I added texture: I mixed some black soot oxide ink with water and used a small brush to make splatters all over the panel, and then did the same with copic opaque white ink.
I knew that I wanted to add multiple greetings inside the cake, but I still wanted to have a bold sentiment right above my Interactive Cake, so I cut “Celebrate” from the Gift Card Bag die set out of gold glitter cardstock and out of white cardstock. I glued the gold glitter word on top of the white one, but shifted it a tiny bit to the right to create a white border, and then attached my “Celebrate” at the very top of my panel using liquid glue.
Next I moved on to the Interactive Cake, and started off by working on the upper part. I cut the top piece out of a fun polka dot pattern paper, as well as a white circle border and multiple colored circles that I glued on the circle border in a rainbow order using liquid glue. Next I attached this border at the very top of my cake panel using 1mm foam squares, and then cut more elements such as the white pull tab and six colorful candles and lights. I attached those different pieces at the top of my cake panel: the pull tab in the center and three candles on either side. I also white heat embossed three different Sentiment Strips: Birthday greetings on colored cardstock, trimmed them into slim banners using Sentiment Strips dies, and attached them on my cake panel right below the rainbow circle border using liquid glue.
Next I moved on to the lower part of my Interactive Cake. I cut the bottom piece out of the same polka dot pattern paper as before. I also cut another white circle border, as well as colorful circles that, again, I glued on the white border in a rainbow order using liquid glue. I attached this circle border at the very bottom of my cake panel, and then cut more items such as a couple of pink scallop decorative pieces and six gold glitter hearts that I attached on the cake using 1mm foam squares.
To build my cake, I first added 1/8″ (= 3mm) foam strips at the back on the bottom piece of cake, along the very left and right edges and along the very bottom edge as well, leaving the scallop shaped top edge with no foam. I placed the top piece of cake behind the bottom piece, right between the foam strips, peeled the backing papers off the foam, and attached my cake on another bottom panel I had cut before, creating this way some sort of a pocket in which the top part of the cake can slide in and slide out.
The last thing I did was to add some morning dew nuvo drops on each candle to make them sparkle. And that’s it! I had a blast creating this bright rainbow Interactive Cake card, and I hope you enjoy the result.
We are having a special gift offer and discount code to celebrate the birthday festivities!
PRIZES: be sure to leave comments on each stop. We are giving away 5 $30 gift certificates to random comments (1 winner each day) left before February 16, 2024 at 11:59 PM PST. We’ll be announcing the winners on the PPP blog, so be sure to return and see if you are one of the winners and/ or sign up for our blog posts to your email!
Hello everyone! Leanne here and I’m so excited be a guest on the blog today. I have some fun birthday cards to share showcasing the new Big Birthday Cupcake dies. If you loved the Big Valentine Cupcake die set then you’ll definitely be interested in this new cupcake set.
These cards are 4bar size. The 4bar size is 3 1/2 inches by 4 7/8″. It’s such a cute size and makes a perfect little note card to enclose with a gift. The cupcakes fit nicely on this size too!
I was inspired by the color palette of the Berry Smoothie Shaker Beads. It’s such a pretty mix of pinks and blues. I pulled card stock from my stash matching those colors to create my cupcakes using the Big Birthday Cupcake dies.
Once I had the cupcakes assembled, I adhered them to a decorative panel created with the second largest Eyelet Rectangle die. The Sentiment Strip Birthday stamp set had the perfect greetings to add to my cards. I stamped them right onto the cupcake frosting part.
It’s a little hard to see in the photos, but I applied some Glossy Accents and Stickles Glitter to the sprinkles on each cupcake. This added a bit of sparkle and shine. That’s it and these cards are ready for gifting! They were so quick and easy to make. I’m sure they would be fabulous in many other color combinations.
We are having a special gift offer and discount code to celebrate the birthday festivities!
PRIZES: be sure to leave comments on each stop. We are giving away 5 $30 gift certificates to random comments (1 winner each day) left before February 16, 2024 at 11:59 PM PST. We’ll be announcing the winners on the PPP blog, so be sure to return and see if you are one of the winners and/ or sign up for our blog posts to your email!
The February 2024 Release is now available in the Pretty Pink Posh Shop and select retailers that carry our products. If you missed our post yesterday, we revealed all of the products in picture form, but if you would like to see them in a video, Mindy has that for you today!
Hello crafty friends, June here! Today I’m sharing a new card featuring a lot of the new products from the birthday release.
I knew I wanted a very colorful background, so that’s what I started working on first. I used the Birthday Words Stencil and various colors of Distress Oxide to create an ombre background. For the fade itself I used Milled Lavender, Shaded Lilac, Salvaged Patina and Cracked Pistachio. For the stenciled layer I used a darker shade of each of those colors, which were Seedless Preserves, Dusty Concord, Peacock Feathers and Lucky Clover. I used a very light hand to apply these colors. To finish off my panel I also splattered some thinned acrylic paint on it.
One of my favorite products from this release is the Cake Shaker die. I cut it out of cream colored cardstock and made it into a shaker using some acetate and foam tape. I combined shaker bits from both the Over The Rainbow and the Berry Smoothie Mix to get the perfect color combination.
I added the candles from the Interactive Cakedie set on top of the cake and for some extra embellishments, I also added the scalloped piece that’s included in the same die set. I cut them out of different colors of cardstock and added some light ink blending on the sides for some extra definition.
For my sentiment, I stamped the ‘Party’ script from the Party Timestamp setonto some black cardstock and I embossed it with white embossing powder. I completed the sentiment by adding the ‘it’s time to’ at the top of my card panel. I adhered everything in place and tadaaaa! My festive shaker card is all done!
We are having a special gift offer and discount code to celebrate the birthday festivities!
PRIZES: be sure to leave comments on each stop. We are giving away 5 $30 gift certificates to random comments (1 winner each day) left before February 16, 2024 at 11:59 PM PST. We’ll be announcing the winners on the PPP blog, so be sure to return and see if you are one of the winners and/ or sign up for our blog posts to your email!
Hello friends! It’s time to reveal all of the products that are part of the February 7th release. This release is one that I am so proud of as everything works together, or you can pair it with some “older” PPP products!
We have a limited amount of bundles available where you can buy this release in one easy click. Plus, you’ll save 15% off when you buy it all together.
Due to not everyone owning a hot foil machine, we did NOT include the hot foil plate in this bundle.
In honor of us turning 10 and having our big birthday celebration, coupon code and a free gift offer valid February 7-February 17, 2024, or while supplies last.
We will see you tomorrow as we show you the new products in a video and the products go live individually. Plus, we’ll kick off our FIVE days of blog hops, festivities and so much fun!
Hi, friends! It’s Lauren and I am so excited to be sharing a sneak peek at two of the new stencils that will be released. It was hard to pick which two to create with first, but I absolutely love the new Half Stars Stencils and Layered Birthday Wreath Stencils so here are two cards with these stencil sets to inspire you today!
New release will be available February 7th
For the first card, I knew I wanted to use the Half Stars Stencils as I loved sharing the Half Hearts Stencils last month! I wanted to go with Earth tones for this card, so for the (A) stencil I did every other column of stars with Distress Oxides in Mustard Seed and Peeled Paint. Then I used Breakup Blue Lunar Paste for the (B) stencil.
When the stenciled stars were dry, I trimmed the panel to 4×5-1/4” and adhered it to a panel of dark blue cardstock cut to A2 in size, 4-1/4×5-1/2”. I used new dies from this upcoming release, Party Hats Dies and Happy Birthday Shadow Dies, to add some fun birthday elements to the card in coordinating colors. For some extra shine, I used some Mossy Green Confetti around the party hats!
Onto the brighter, second card! I couldn’t figure out the color scheme I wanted to use to stencil the Layered Birthday Wreath Stencils, so I just used all of them! For all three layers of the stencil, I used pinks, oranges, yellow, greens and blues of Distress Oxides. I used small brushes for the tinier details and masked when I needed to to get all the details colored in.
I really could not bear to cut any part of this stenciled wreath away, so I made a big card! My card base measures 5-1/2×5-1/2” and I used a 1/4″ corner rounder. I layered on a piece of blue cardstock with the same dimensions, before adding my stenciled panel. I trimmed it down to 5-1/4×5-1/4″ and used the same corner rounder.
Using coordinating colored cardstock, I cut out Birthday Candles and layered them together onto the card with foam adhesive. I also hot foiled the Happy Birthday Hot Foil Plates with gold foil and used the coordinating Happy Birthday Shadow Dies to cut the sentiment out. The sentiment was also popped up with foam adhesive under the candles.
I hope you enjoyed this sneak peek of the new Half Stars Stencils and Layered Birthday Wreath Stencils. I hope you’re excited for this new release just as I was to receive these stencils to give you inspiration today!
Good morning! It’s Lindsey here today, and I am excited to give you a sneak peek of the fabulous new dies releasing this month. There are so many! I know you are going to love them.
New release will be available February 7th
I am a HUGE fan of the Big Valentine Cupcake Die Setthat released last month, and I was delighted to see another cupcake release this month in the same fabulous size and scale. The Big Birthday Cupcake Dies have so much to offer! You’ll find a new cupcake shape, new cupcake wrap pattern, fabulous banner + sentiment, and fun extras.
Using the new Big Birthday Cupcake Dies, I created a yummy cupcake with chocolate ganache and sprinkles on top. And of course, a little birthday candle (from the Interactive Cake Dies) to top it off.
The background was created using the Star Cover Plate and the Pierced Stars Plate. (Love them both!) Two of the star cut outs from the Star Cover Plate made perfect little cookies to sweeten the card just a bit more. And since this card is going to my niece, I personalized one of the new Party Balloons with her age by using the number dies found in the Graduation Mug Additions.
The finishing touch was the fabulous banner from the Big Birthday Cupcake Dies.
Okay, I have to admit that when I first saw the Big Birthday Cupcake Dies, I immediately wanted to turn them into a giant stack of ice cream…so I did! Say hello to card number two!
The only thing I needed to find was an ice cream cone…aaand the largest party hat in the new Party Hat Dies worked fabulously! :) (And just FYI, the Fruit Bowl Dies would be perfect for making an ice cream sundae. Definitely on my list of to-do’s!)
To create the cone, I die cut the party hat, and then I ran it back through the machine twice using the cupcake liner die to add the stitched detail. By rotating the die in the opposite direction with each pass I was able to create an overlapping stitched pattern. The cute sentiment is the script portion of the new Happy Birthday Shadow Die.
I also added glossy accents which makes the chocolate fudge dripping down look good enough to eat. This giant stack of ice cream wouldn’t be complete without a cherry on top, so I added one courtesy of the Valentine Mug Additions. Finally, the previously released Layered Confetti Stencilsseemed the perfect way to add a little somethin’ to the background.
For my last card I wanted to give you a peek of as many of the new die sets as I could, so I used them to create a fun birthday background. This also shows how beautifully and seamlessly the dies all work together.
This card showcases the new Birthday Candles, Party Balloons, and Party Hats all of which come in a variety of shapes and designs, many with stitched details. I also added stars from the Star Cover Plate as well as a small stitched star from the Big Birthday Cupcake Dies.
For my sentiment I used the Happy Birthday Shadow dies again, but this time I used both layers.
Thanks so much for joining me today! I hope that my cards have gotten you excited for the may new dies releasing this month. I’m curious…which die is your favorite??
Make sure to come back tomorrow to see more sneak peeks. You are going to love what’s coming up next!
Hi folks, Kavya here with another fun sneak peek showcasing the new Party Time stamp set! If you have any party themed set from PPP, you need to get this ‘extension pack’. It’s filled with so many focal points that make scene building easy!
New release will be available February 7th
I started off with some Buttercream and Linen colored cardstock. This is my go to color combo for background if I am looking for an alternative for who the cardstock but still want to draw attention to the focal point. I then stamped, colored and die cut images from Party Time, Piñata Partyand Party Friends. I created a pennant banner using dies from Graduation Mug Additions. I finished off the card using a sentiment from Party Time.
I hope you liked this fun project. Check your stash now and see what other stamps you could use with this die set! Stop by tomorrow for another look at the birthday release!
Hello everyone! This is Melissa and I’m here to share a couple of cards made with the adorable Patterned Presents stamps and coordinating dies.
New release will be available February 7th
On my first card, I stacked a trio of stamped and die cut Patterned Presents to adorn the center of my card. I layered them over a die cut, vellum Wonky Stitched Square that was layered over a die cut Fall Circles bracket. I love how vellum softens everything and creates gorgeous layering too!
My background was created using the darling Pierced Stars Plate that I had sponged yellows, pinks, and aquas over. I then added a scalloped, decorative pop of pink patterned paper across the bottom of my card, cut using the Eyelet Borders dies.
My sentiment is from the new Birthday Train stamp and coordinating dies and is layered over the cutest banner, cut using the new, Big Birthday Cupcake die set. This is a must-have die collection, with so many possibilities! I added in a felt die cut bow topping my Patterned Presents and felt stars, all cut using the Big Birthday Cupcake die set. Such a fun card to create!
I’ve used the sweet Patterned Presents once again on my second card, beginning with the fun, and oh, so cute, Layered Birthday Wreath Stencils. I stenciled these images on a die cut Stitched Torn Rectangle, all of which created the most fun background for my Patterned Presents.
I die cut my Patterned Presents from patterned paper and layered them over Scallop Ovals die cuts. I love that the Patterned Presents can be stamped and colored in, stamped in with solid colors, or die cut from patterned paper. There are so many fun ways to use this delightful stamp set!
To finish, I added in two sentiments, one uses the Patterned Presents stamp set and is stamped on a die cut Mini Tagsand adhered at the top corner of my card. I added a die cut star from the Big Birthday Cupcake dies and a banner that contains my second sentiment, which is from the Party Time stamp set. I love how all of these creative February products combine so perfectly together…such a party!
Hello crafty friends, Arsenia here! First, Happy 10th Birthday to Pretty Pink Posh! I’m thrilled to share these sneak peeks using the Birthday Cupcakes stamp set with coordinating dies and Birthday Train stamp set with coordinating dies! The images are fun and coordinate well with past products. I absolutely adore these products!
New release will be available February 7th
For my first card I stamped, colored, and die cut the images from the Birthday Cupcakes stamp set. I colored the images with Olo alcohol markers and added some white gel pen highlights. For my background I took a A2 card panel and added some strips of cardstock using the Stitched Strips Dies. Once I adhered the strips to the card panel, I added a frame using the Wonky Stitched Rectangles Dies. I decided to add a few more elements to card, I pulled out a fun birthday set from last years release called Wish stamp setwithcoordinating dies. This set coordinates perfectly with the Birthday Cupcake Set! I adhered all the images to the card base.
To finish the card, I added a sentiment from the new Sentiments Strips Birthday stamps! I adhered the sentiment to one of my most used die sets, Sentiment Strips Dies! I added lots of clay confetti from the new Over the Rainbow Mix! I adhered the clay pieces to resemble a faux shaker and ta-da all done!
Now onto my second card using the adorable Birthday Train stamp set with coordinating dies! This train is becoming a favorite of mine in my crafty realm! I stamped and colored the images with an array of Olo markers. For the background I took a A2 card panel and added some strips of cardstock using the Stitched Strips Dies. I then ran the panel through the die cutting machine using a brand-new product called Pierced Stars Plate Die, I love the extra texture it adds to the A2 panel. I added a few faux black splatters to the top left corner and the bottom right corner. I adhered the images to the panel and decided I needed a frame. I used the Fancy Cake Dies and I love the way it framed the images.
To finish card, I stamped one of the sentiments from the Birthday Train stamp set and adhered the sentiment to some layered Sentiment Strips Dies! I added a few extra balloons from a fun birthday set from last year’s release called Wish stamp setwith coordinating dies. My last step was to add some white gel pen highlights and I absolutely love how this card turned out.
Friends the release is amazing, it’s chock full of Birthday goodness! Lots of fun stuff, stay tuned for more sneak peeks, blog hops, and Instagram Hops all in celebration of Pretty Pink Posh 10th birthday. I’m so grateful to be a part of this amazing celebration! Pretty Pink Posh has superb, fun, timeless products! Happy Birthday Pretty Pink Posh and many more to come!!!