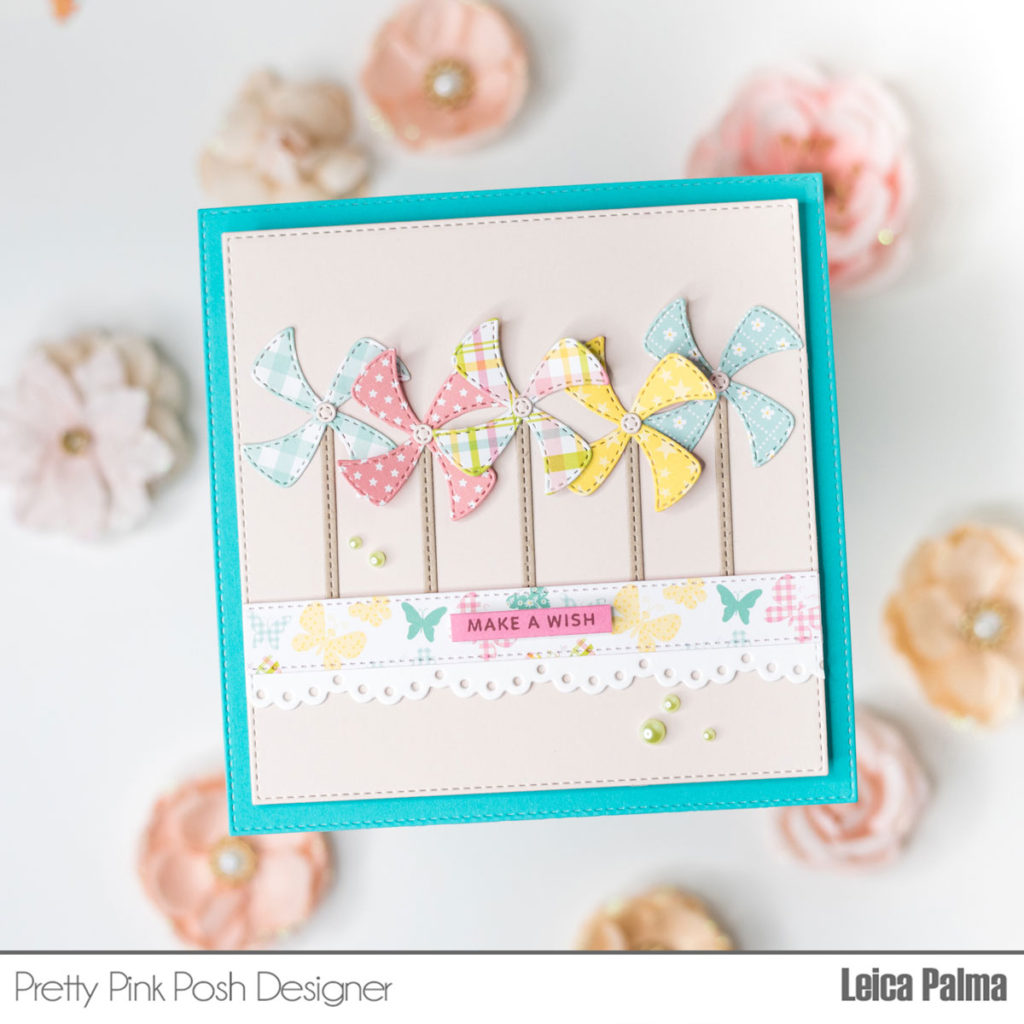
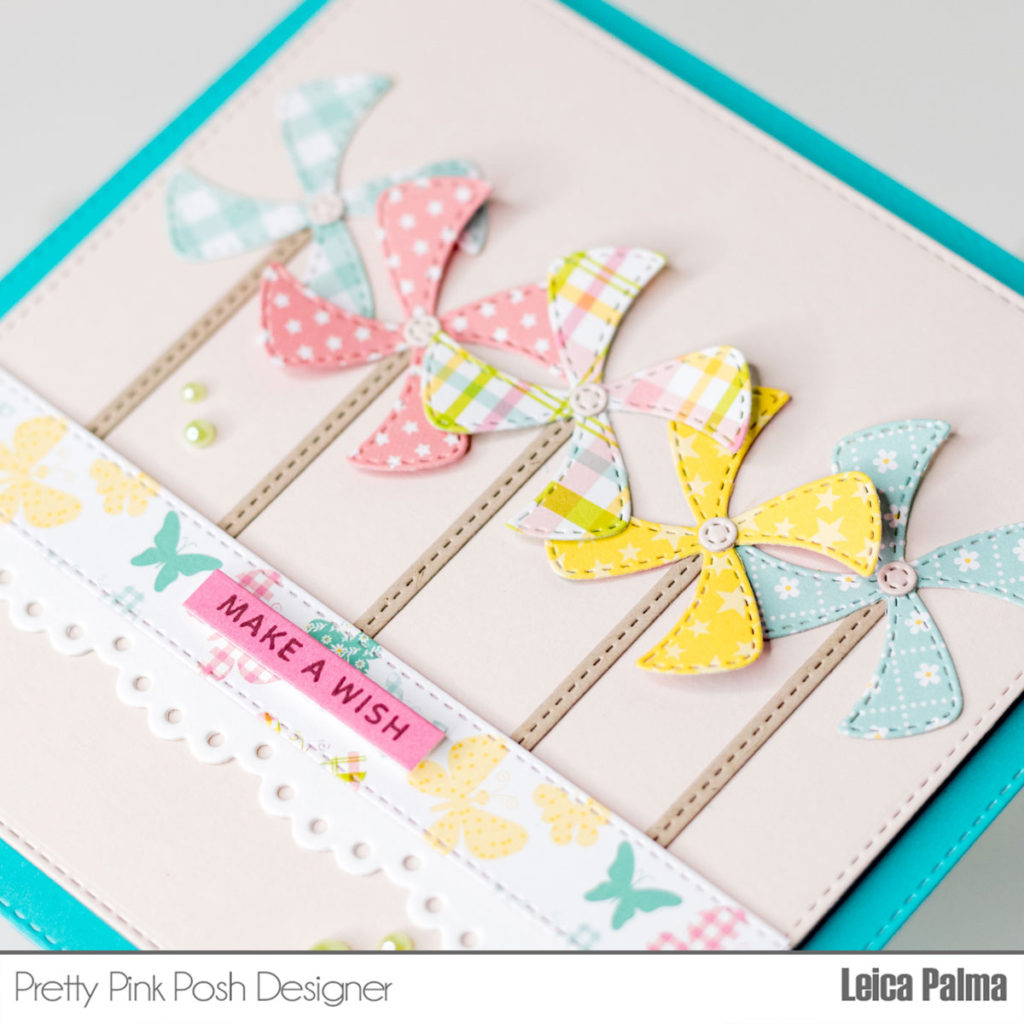
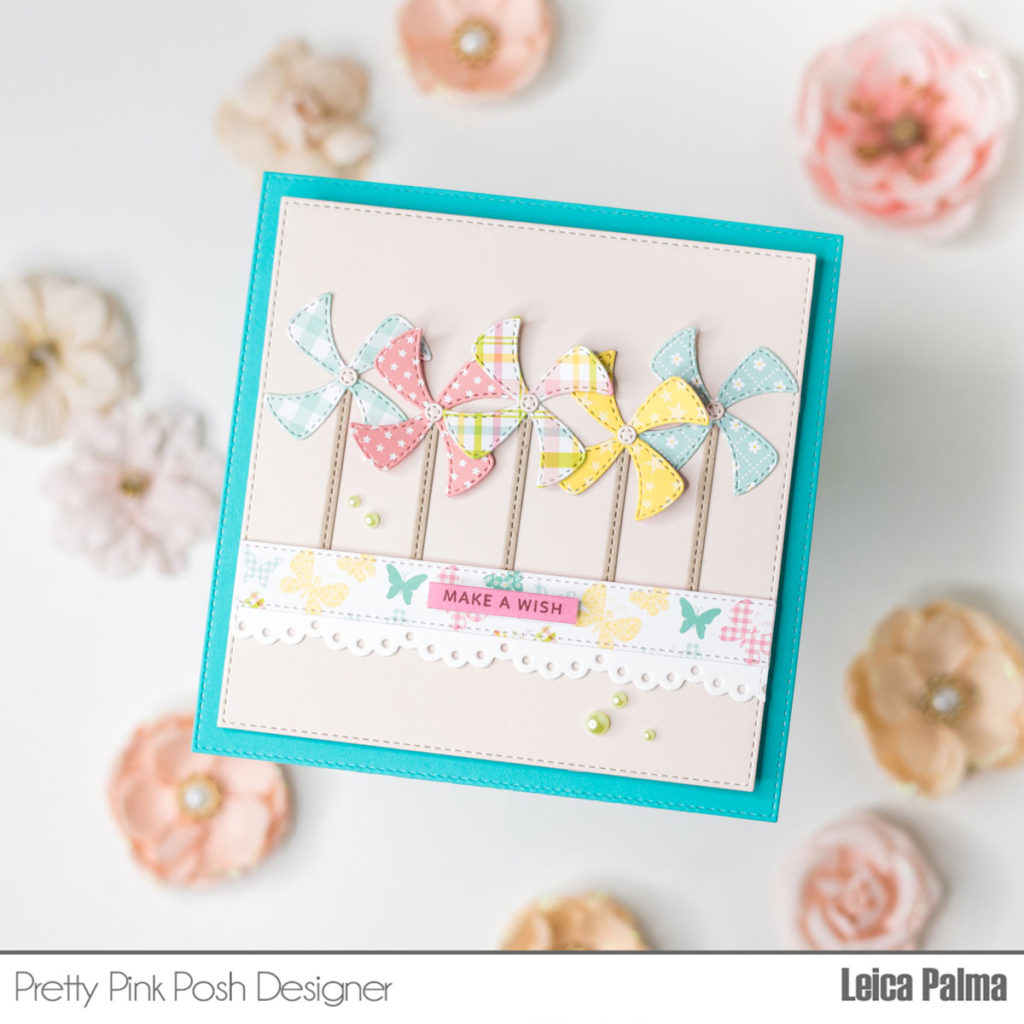
Hello, crafty friends! It’s Leica here today and I am sharing a birthday card, featuring the new Flat Pinwheels Dies. These pinwheels are so cute and perfect for your Spring cards and other paper crafts.
To begin, I cut the smallest of the Flat Pinwheel Dies in patterned papers. For the wands, I used one of the strips from the Stitched Strips Dies and cut them in kraft cardstock. I also cut a .5 inch strip in patterned paper to go across the card and the eyelet border in white cardstock.
I adhered all the elements onto the panel with liquid glue. To add dimension to the flat pinwheels, I suggest adding the glue only to the center of the pinwheels and slightly lift up the pinwheels with your fingers. The sentiment is stamped onto a strip of pink cardstock and foam mounted onto the panel. I also adhered a fewLimeade Pearls for added interest. Lastly, I adhered the card panel onto a card base.
Thanks so much for stopping by the blog! I hope that I’ve inspired you to create cards using the Flat Pinwheel Dies. I think these pinwheels will make beautiful Spring and Summer cards, as well.
Hello, Gemma here today with a card featuring lots of lovely new products from the March release.
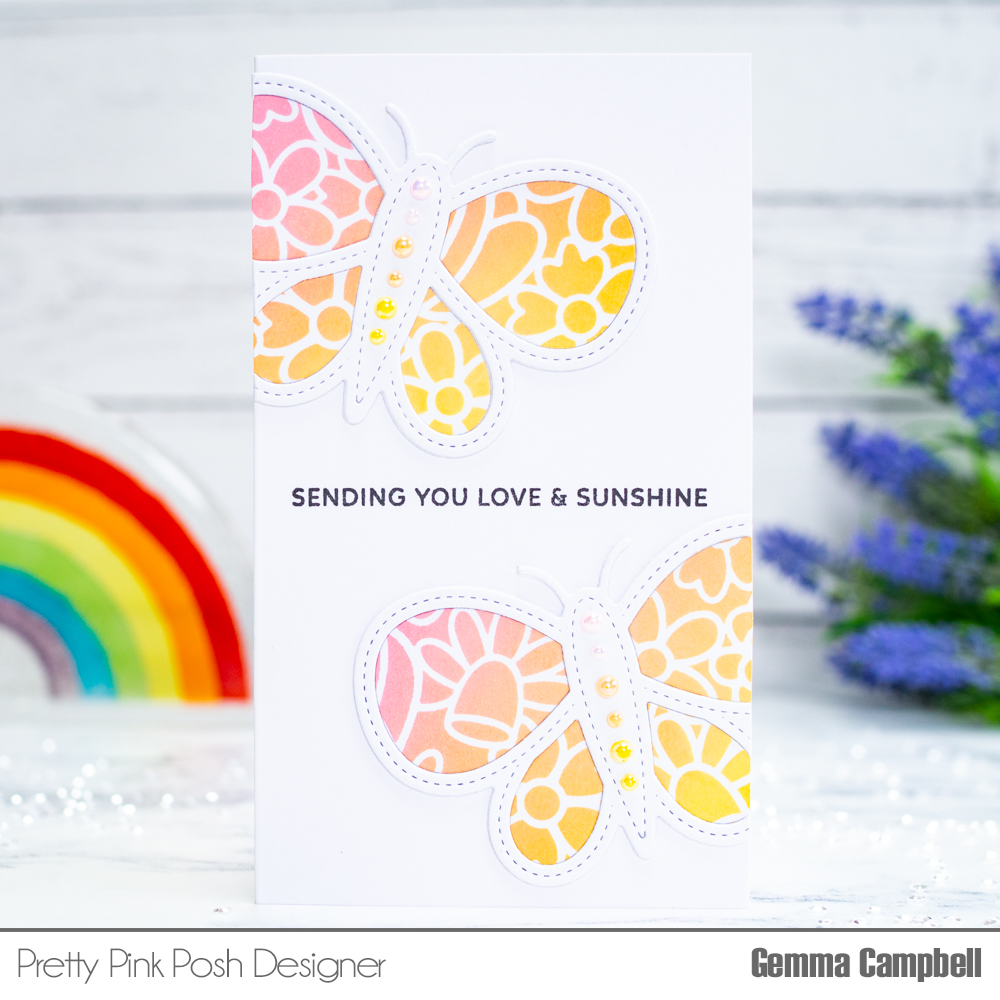
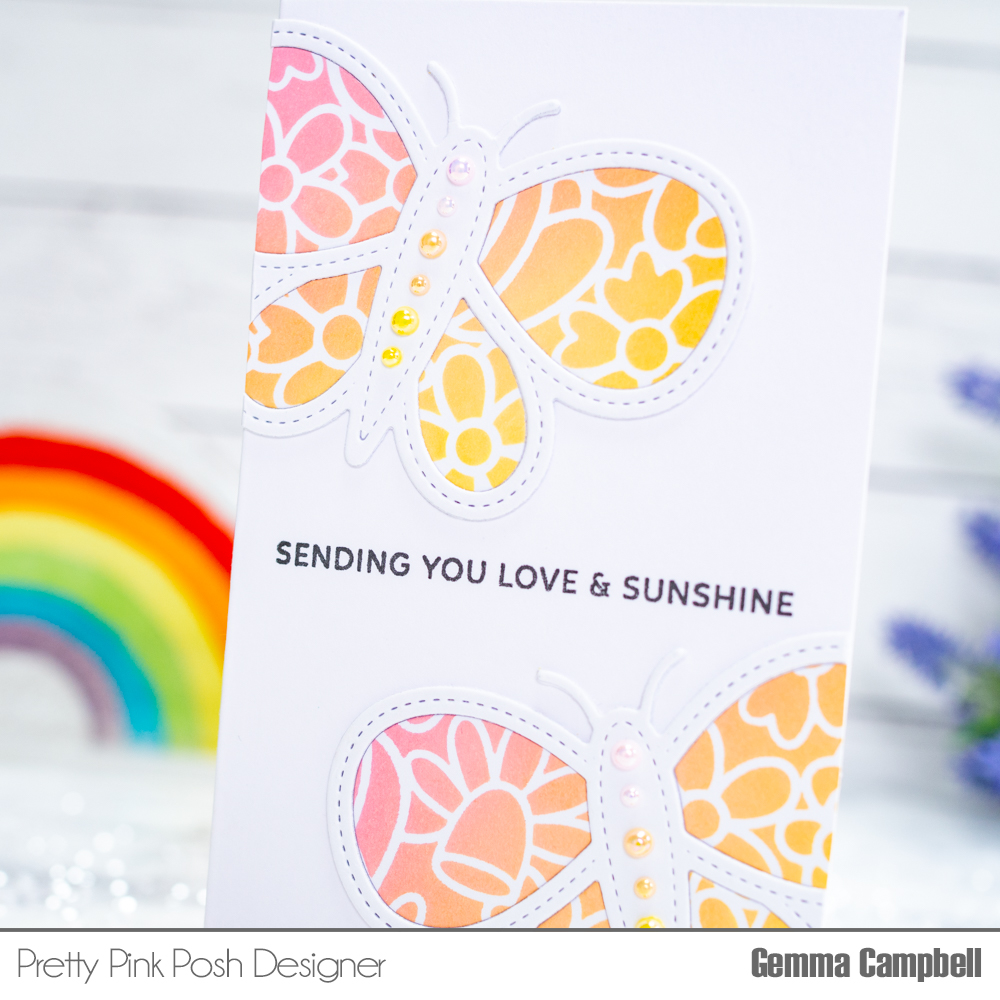
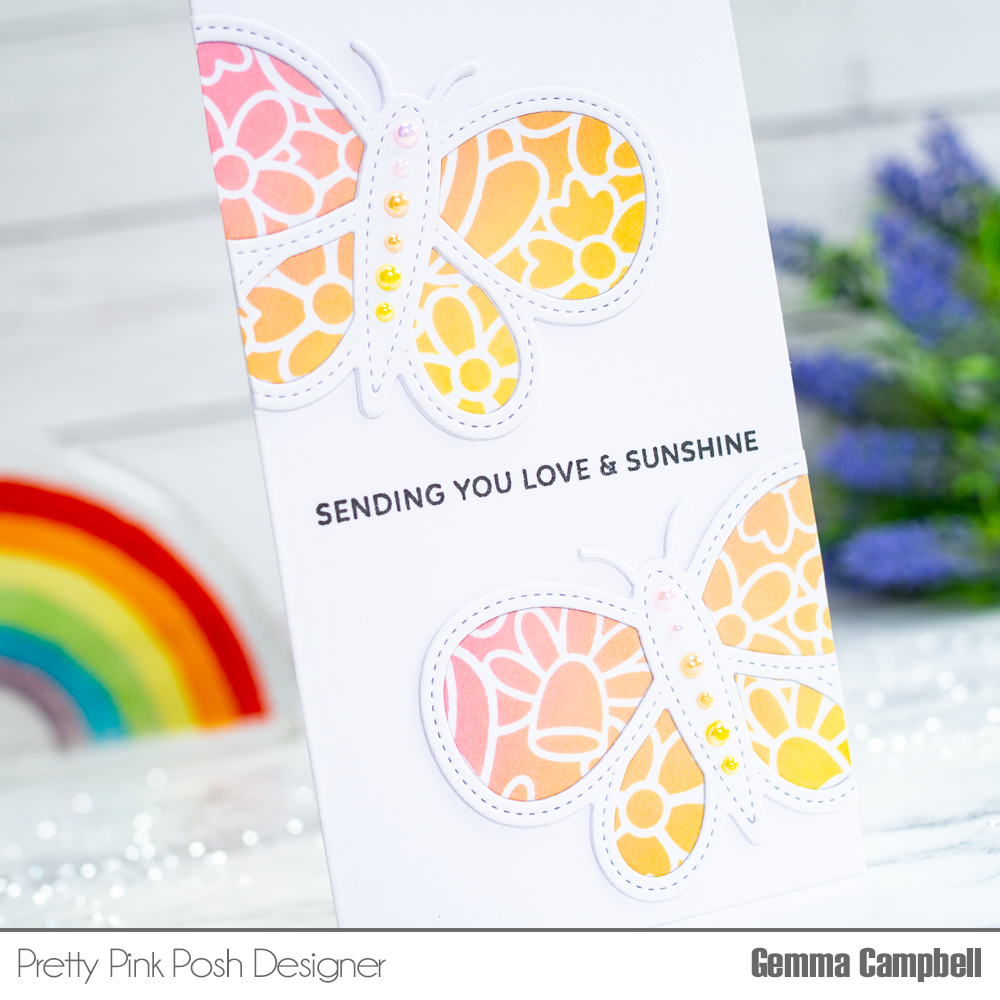
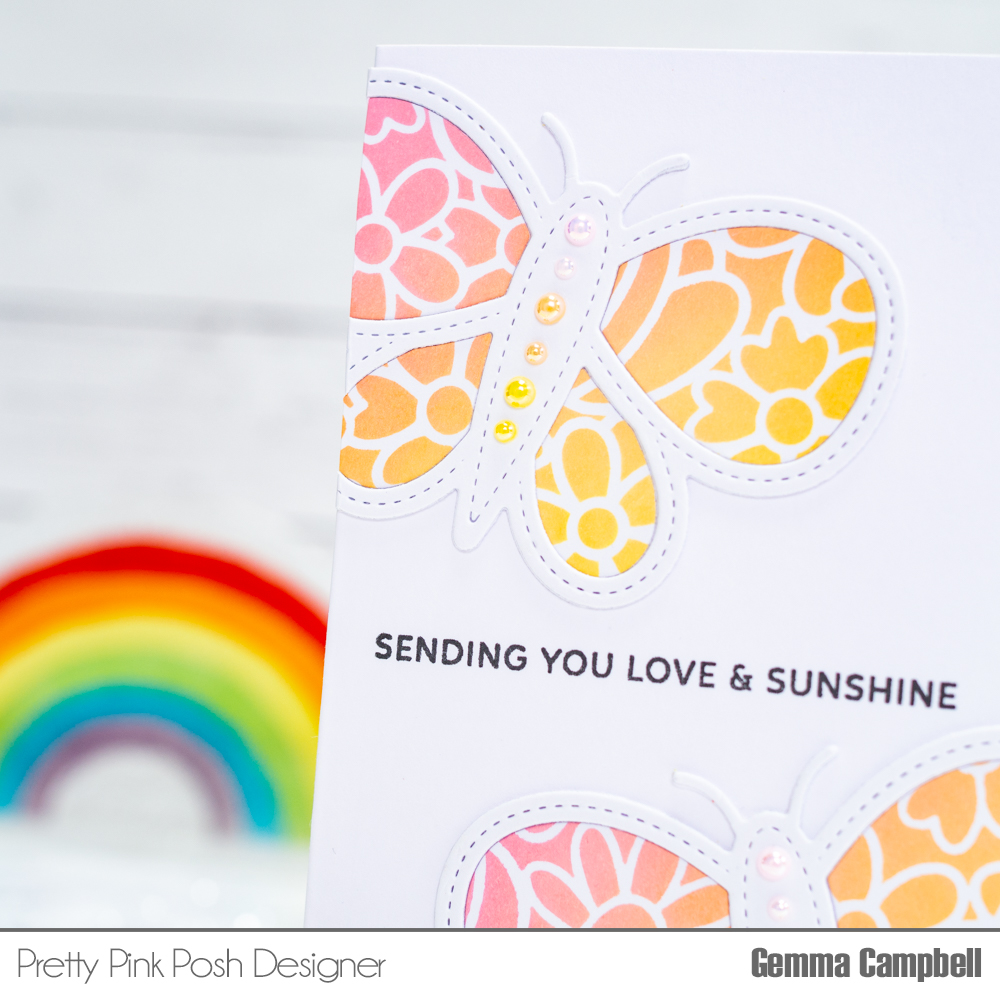
I began by creating a background, using the new Floral Background stencil with distress oxide inks. From this, I die cut the new Butterfly Shaker two times. I’m only using the inside pieces on this card but the butterfly frames can be kept for another card.
I die cut the Butterfly Shaker four times from white card as well, layering two of the die cut frames together for dimension.
On a mini slimline card base, I stamped a sentiment from the new Hugs stamp set. I then adhered the two white Butterfly Shakerdie cuts to the card.
I added the stenciled pieces inside the butterfly frames, then cut away any excess overhanging the edges. As a finishing touch, I added some pearls to the centre of the butterflies.
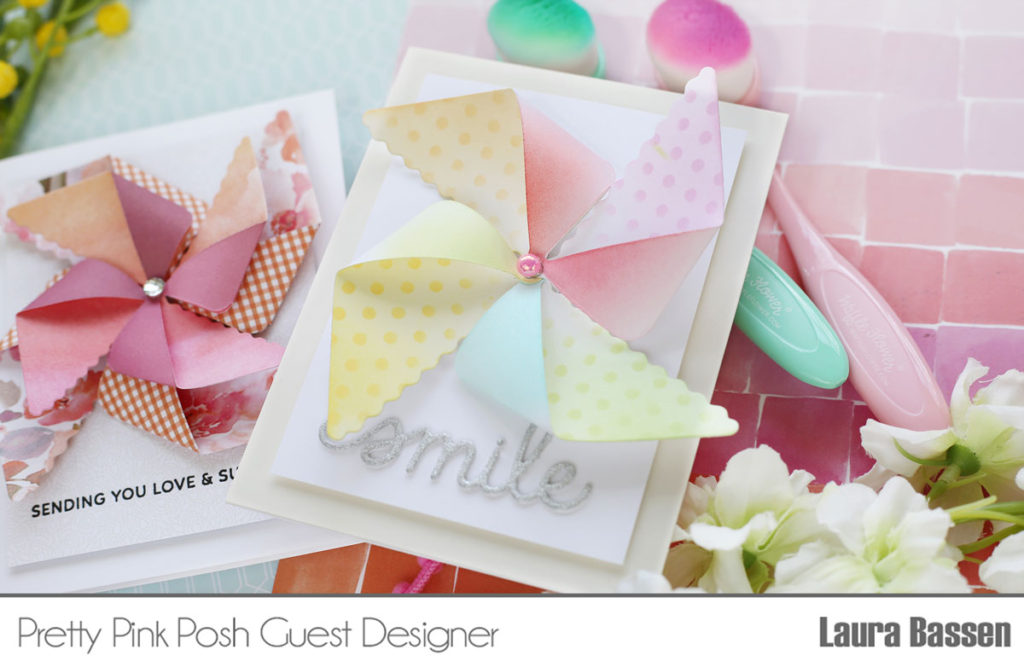
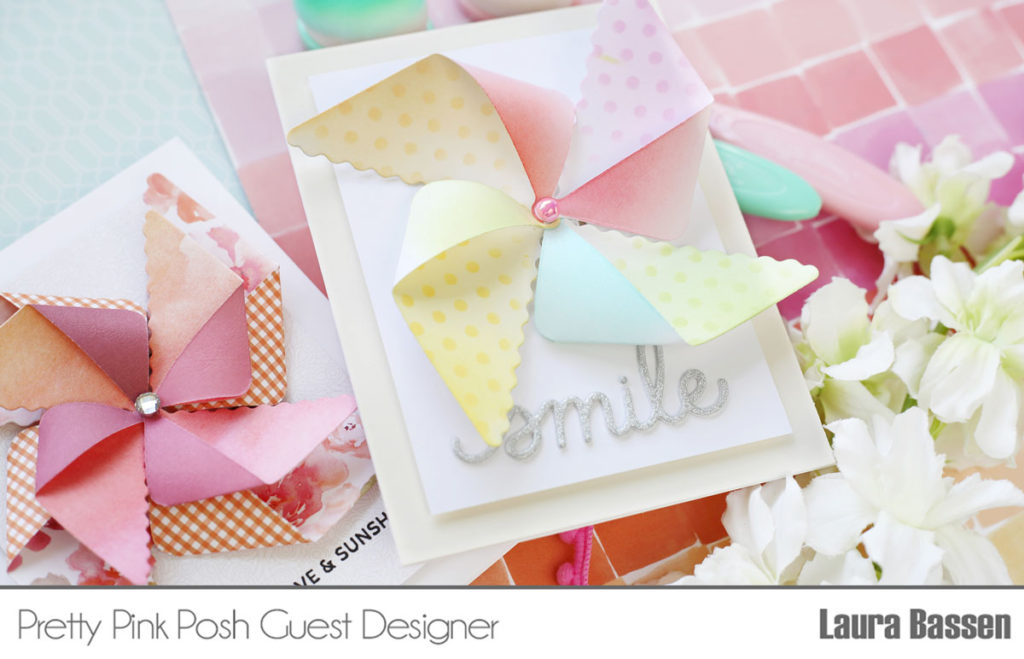
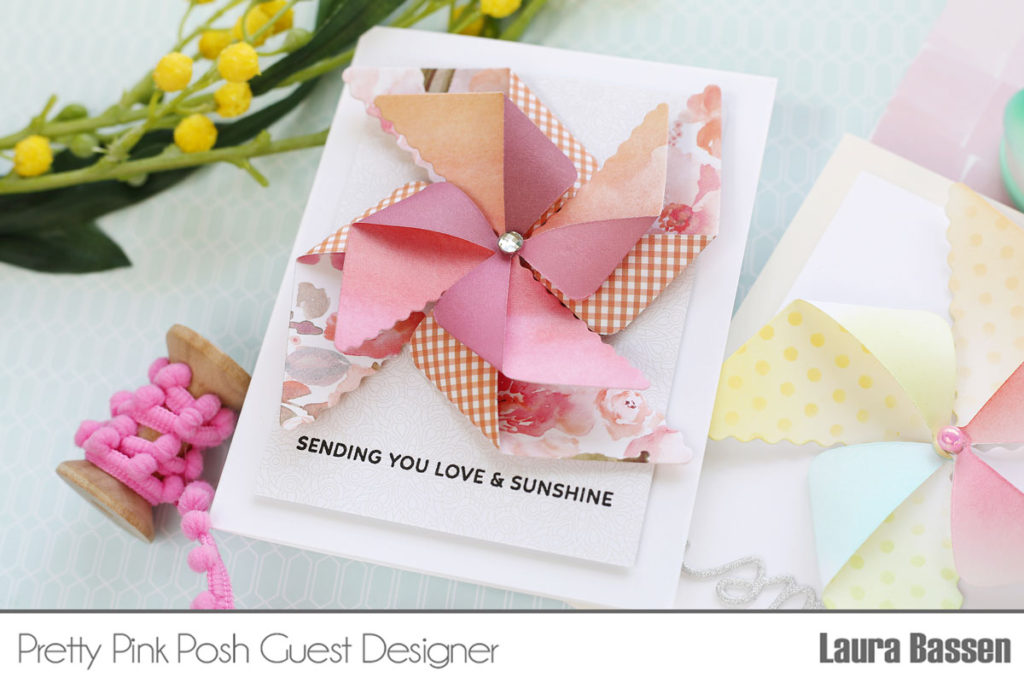
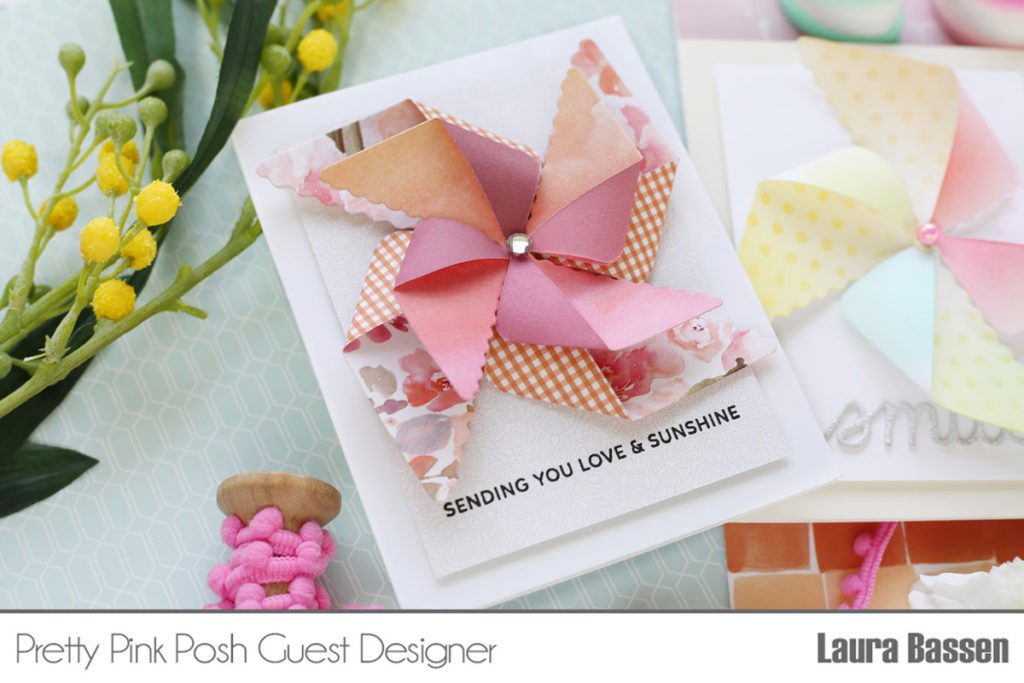
Hi there! Laura here and today I have a couple of projects to share featuring the fun, new 3D Pinwheel Die. There are so many fun ways to use these pinwheels from topping straws, pencils, gifts & cupcake toppers and of course to put on cards.
For this first card I die cut the pinwheel with white cardstock and added color by blending ink and using theMini Polka Dots Stencil. I adhered the pinwheel onto a rotating glider that allows the pinwheel to spin for a fun, interactive element. I used the Smile Script Die for the sentiment with silver glitter cardstock.
This next card uses both the large and the smaller 3D Pinwheel dies with double-sided pattern paper.
If you haven’t stopped by the PPP Instagram recently, we have a three day Instagram happening now. It’s packed full of more inspiration with this brand new release.
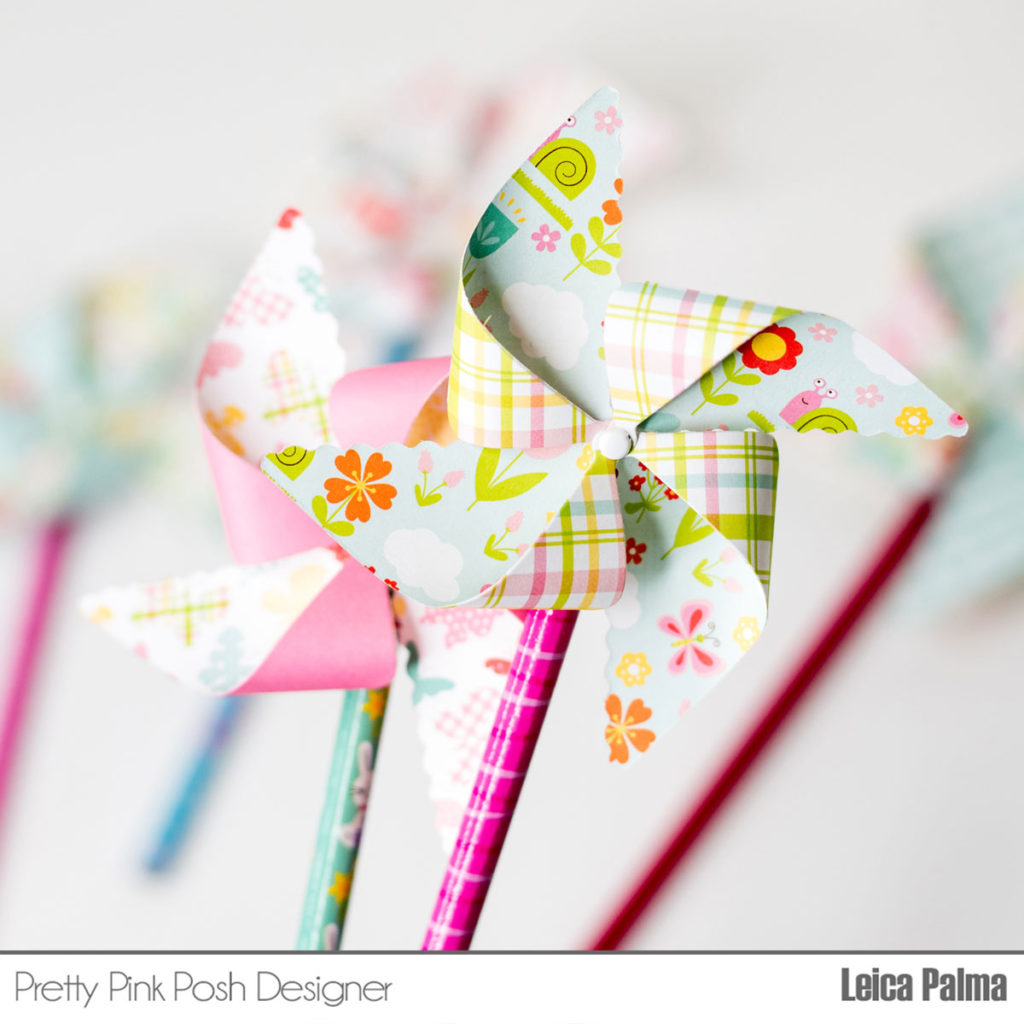
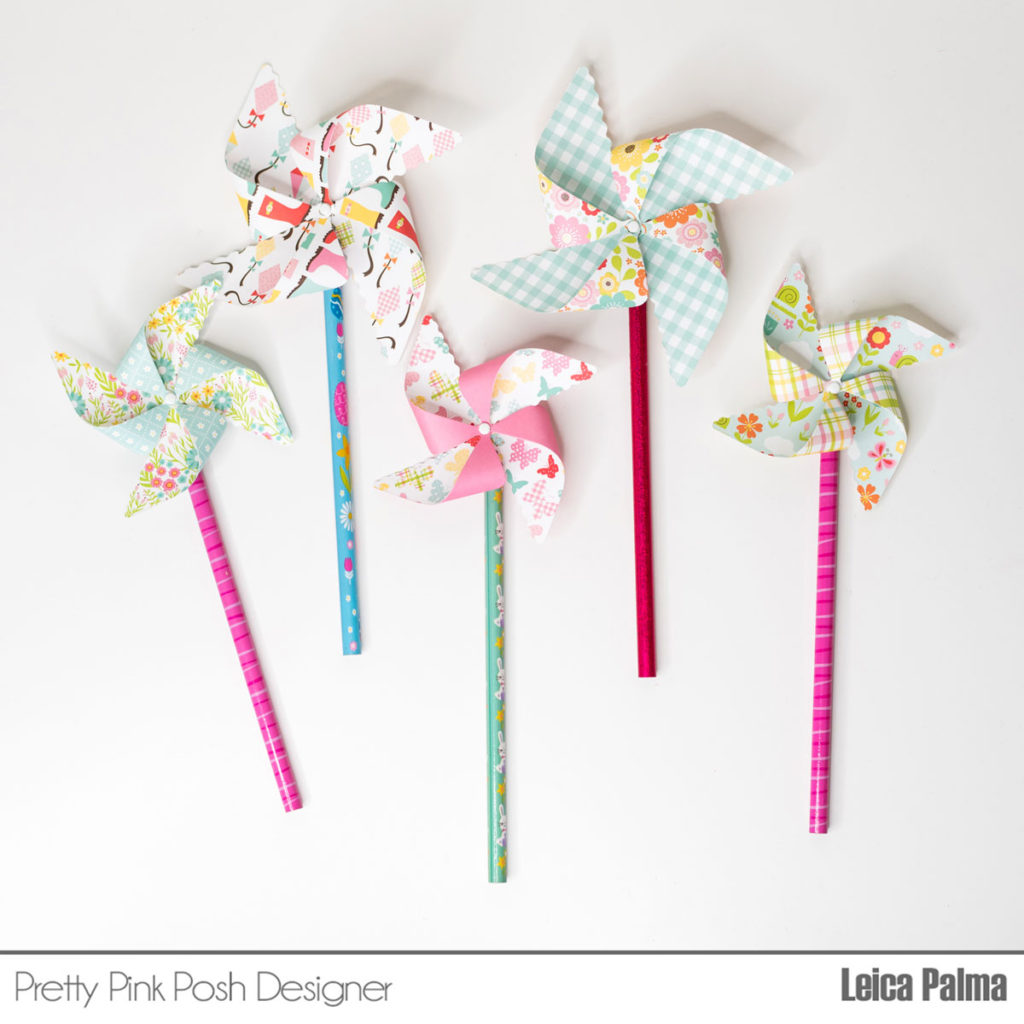
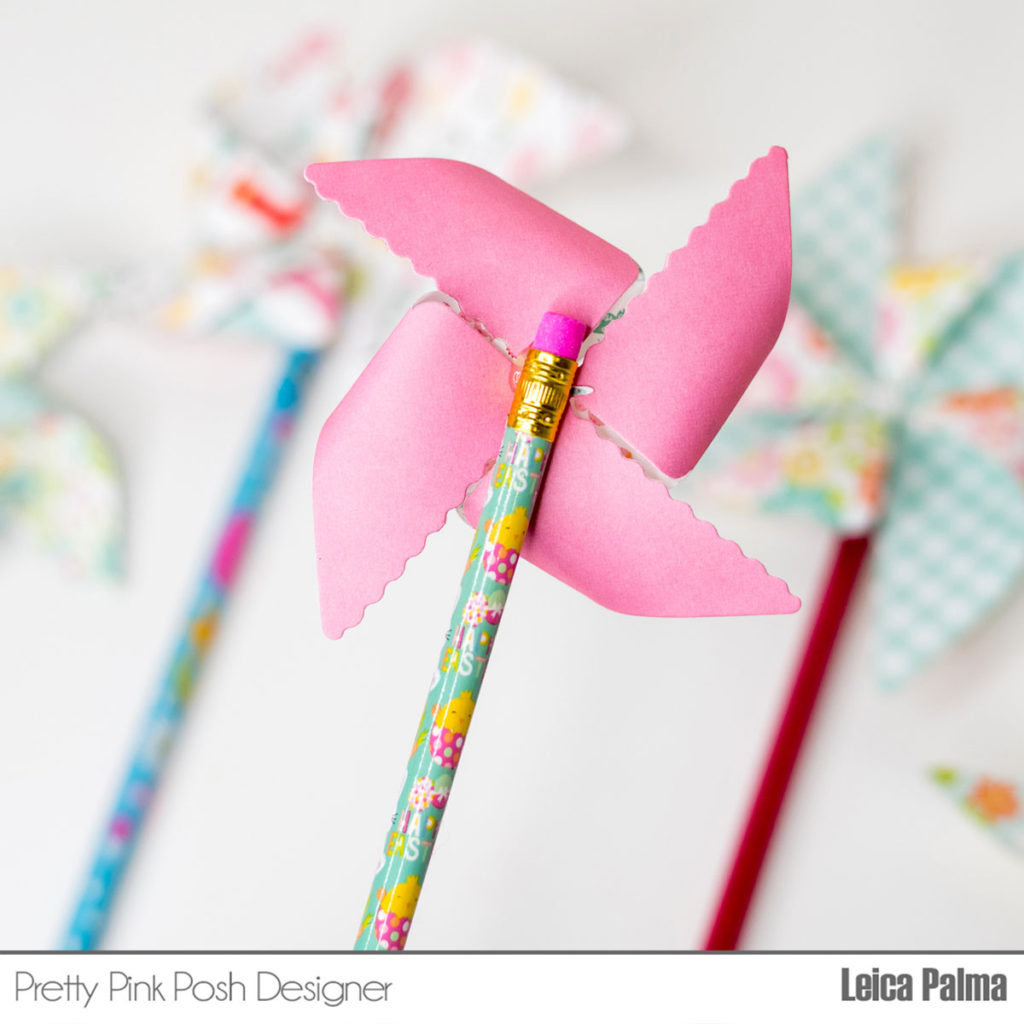
Hello, crafty friends! It’s Leica here today and I have a fun project using the new 3D Pinwheel Dies. These are so simple to make, thanks to this die cut, and I’ve made a few to include in Easter gift bags for my daughter and friends.
Supplies needed: Brad Hot Glue Patterned Paper Pencils (or Paper Straws) 3D Pinwheel Dies
I first cut the Pinwheel Dies in Spring-themed patterned papers. Next, I curved the corners towards the center and lined up the holes using a brad, which holds them together. Lastly, I adhered each pinwheel to a pencil, using hot glue.
These turned out so cute and I plan to have a crafty day with my daughter so we can make more for her friends. Thank you so much for stopping by today! Make sure to share your pinwheel projects with us – we’d love to see them!
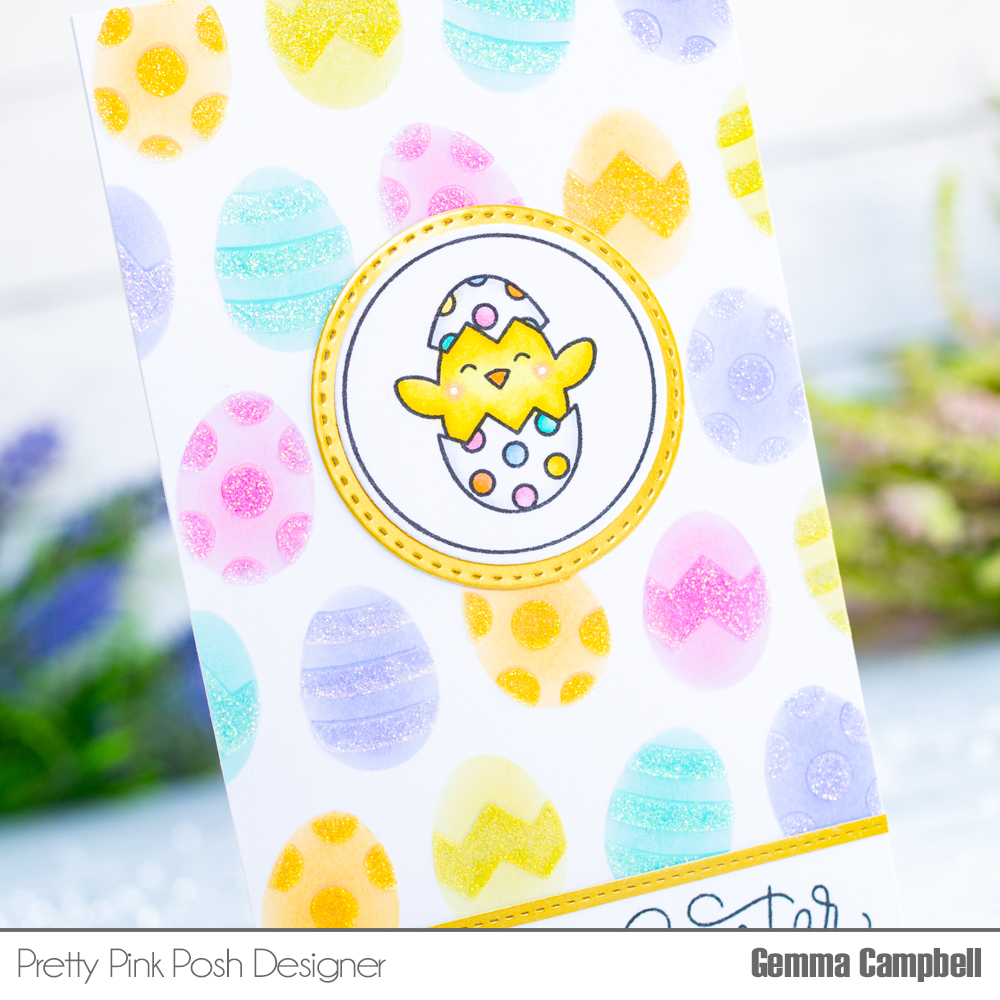
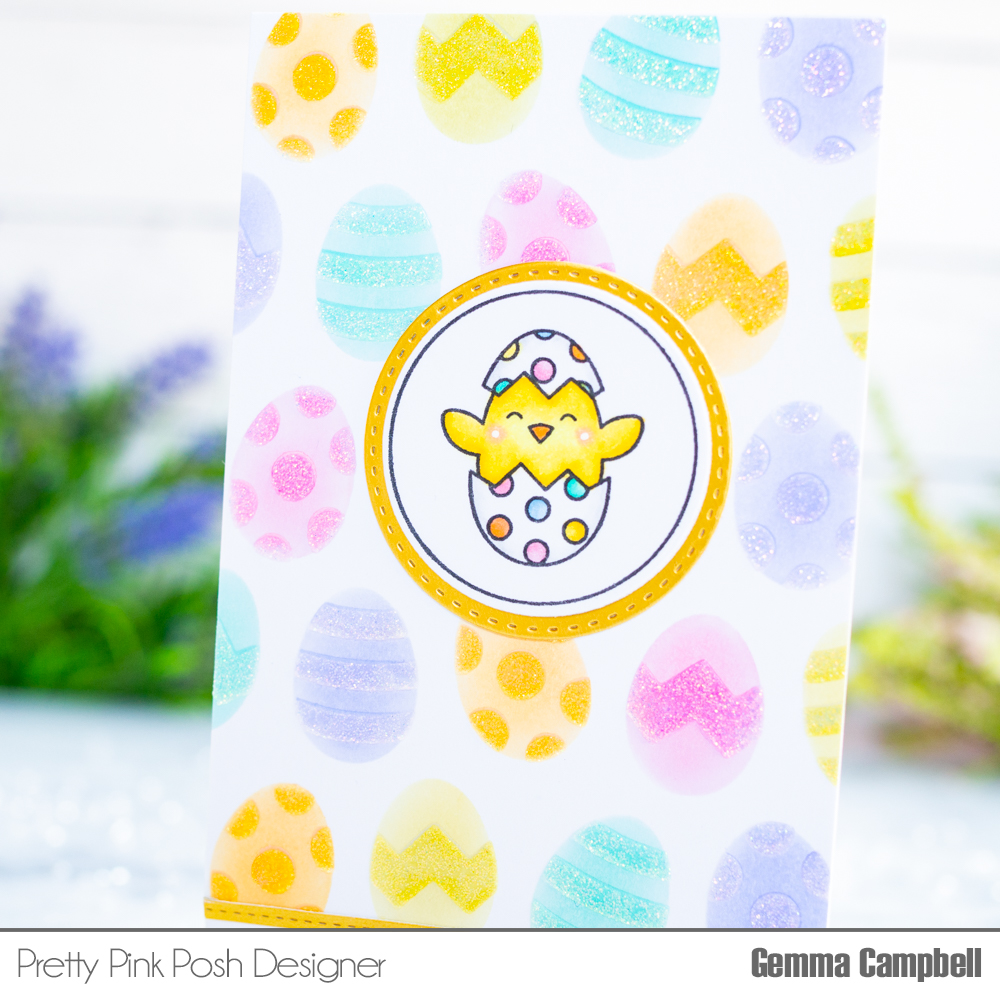
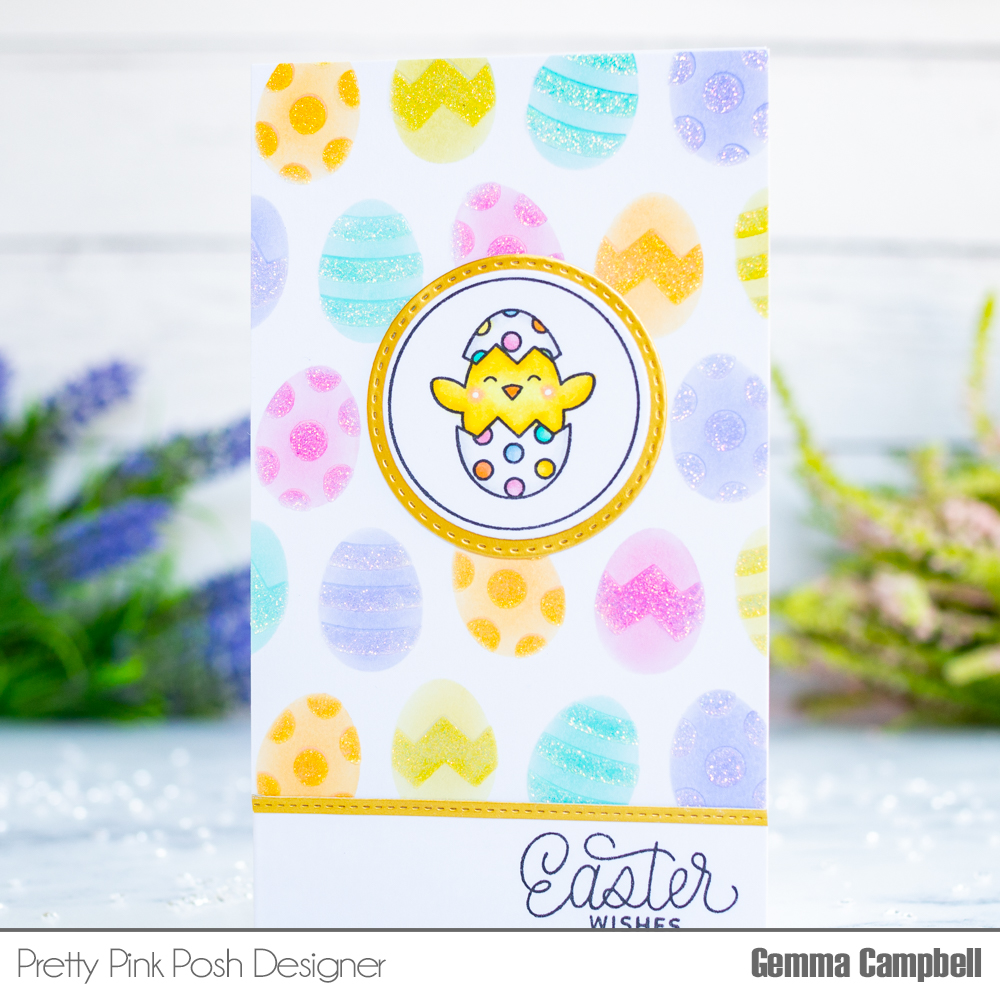
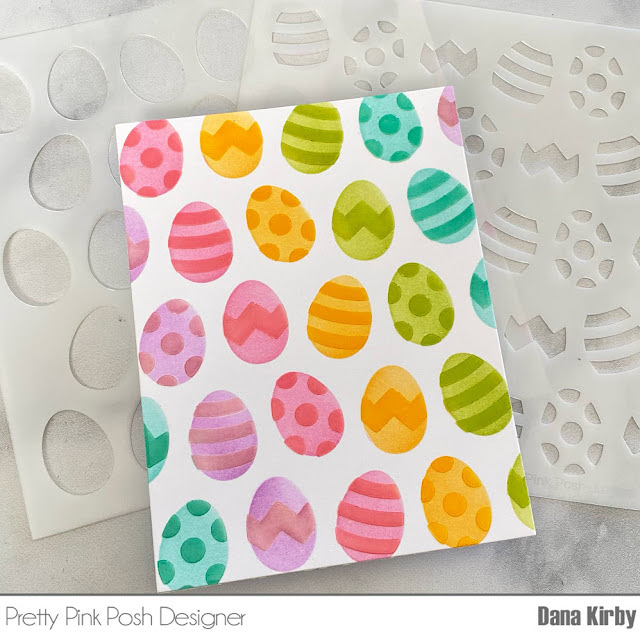
I began with a panel of white card, cut to 6″ square. I taped the first layer of the Layered Eggs stencil set over the panel, then inked it with distress oxides. Although I didn’t use them on this card, I was inspired by the pretty pearl colours in the March release.
I kept the inking on the first layer light, so I could use the same inks to add a heavier layer of colour with the second stencil in the set. This one adds the patterns to the eggs.
I cleaned the stencil, then repositioned it over my panel so I could add a layer of Nuvo Moonstone Glimmer Paste. This is a clear glitter so will pick up the colour of the patterns underneath. Make sure to clean the stencil well after using any kind of paste. I then left the panel to dry overnight.
Next, I stamped and coloured an image from the Easter Circles stamp set. The coordinating die for this set includes a pretty layer that also cuts a stitched circle slightly larger than the die for the images. I used this to cut a circle of satin gold mirror card to layer behind the image, and mounted the image on top with foam tape.
I’m enjoying making mini slimline cards at the moment, so I cut my stenciled panel down to 3.5″ wide x 5″ tall. The slightly shorter length allows space for a sentiment to be stamped on the card base. The sentiment is selectively stamped from two older stamp sets – Easter Bunniesand Simple Sentiments.
I adhered the panel to my card base, then added aStitched Strip of the gold card along the joining edge. I then adhered the Easter Circlesimage to finish.
PRIZES: be sure to leave comments on each stop. We are giving away 3 $25 gift certificates to three random comments (1 winner each day) left before March 20, 2022 at 11:59 PM PST. I’ll be announcing the winners next week, so be sure to return and see if you are one of the winners.
I hope you are inspired to create cards with the new products and were inspired by this three day blog hop! Join us tomorrow for the start of our three day Instagram hop!
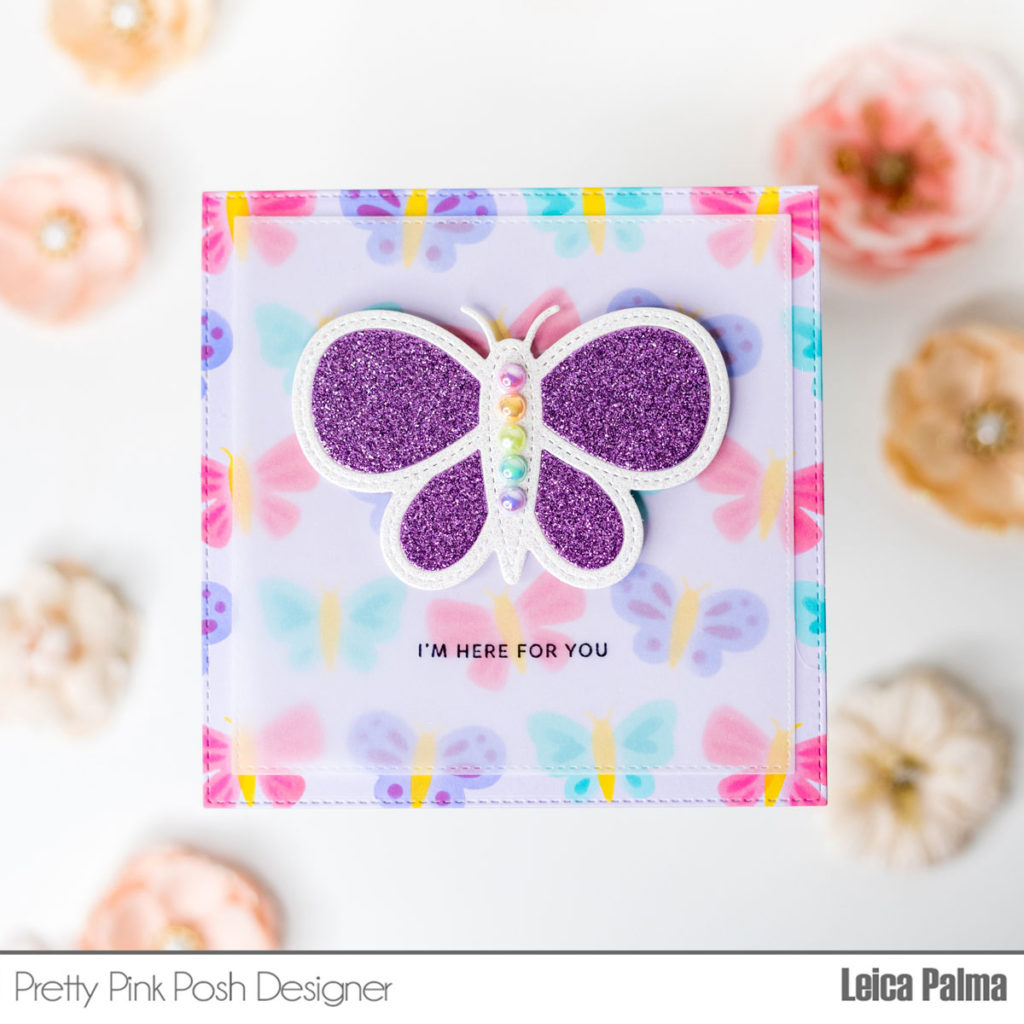
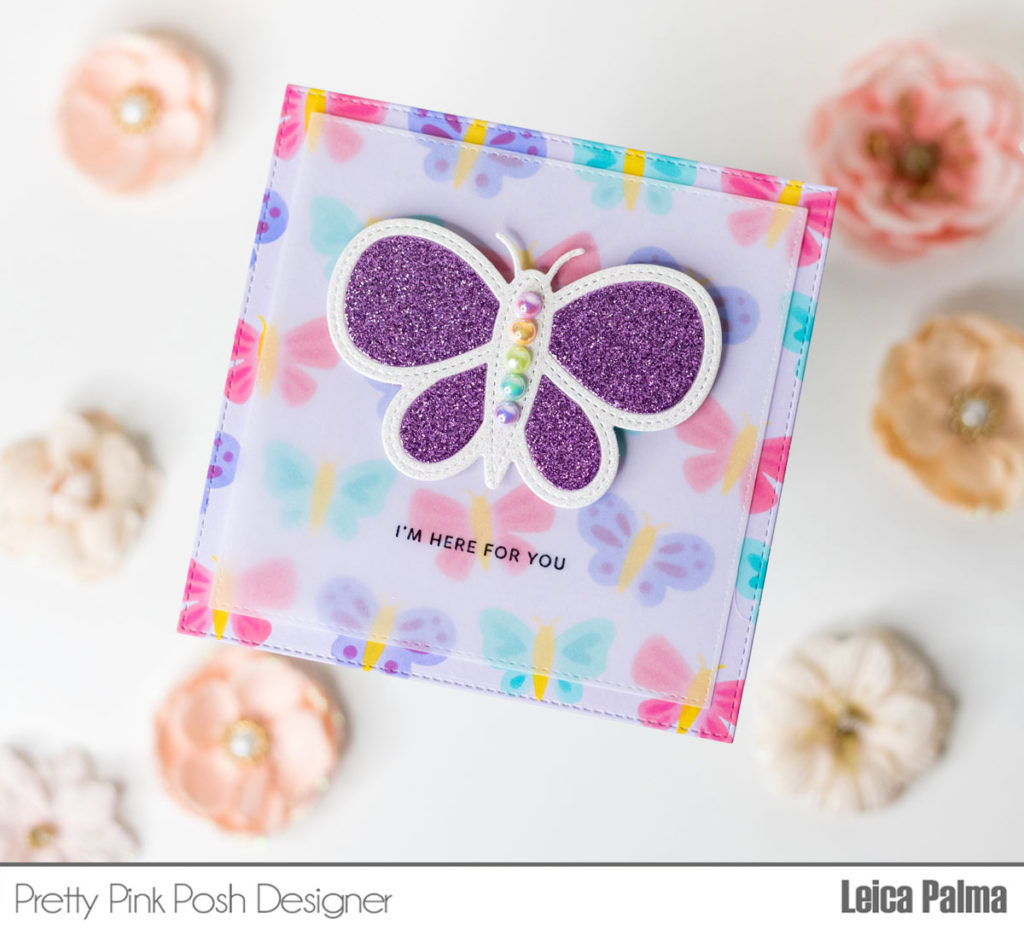
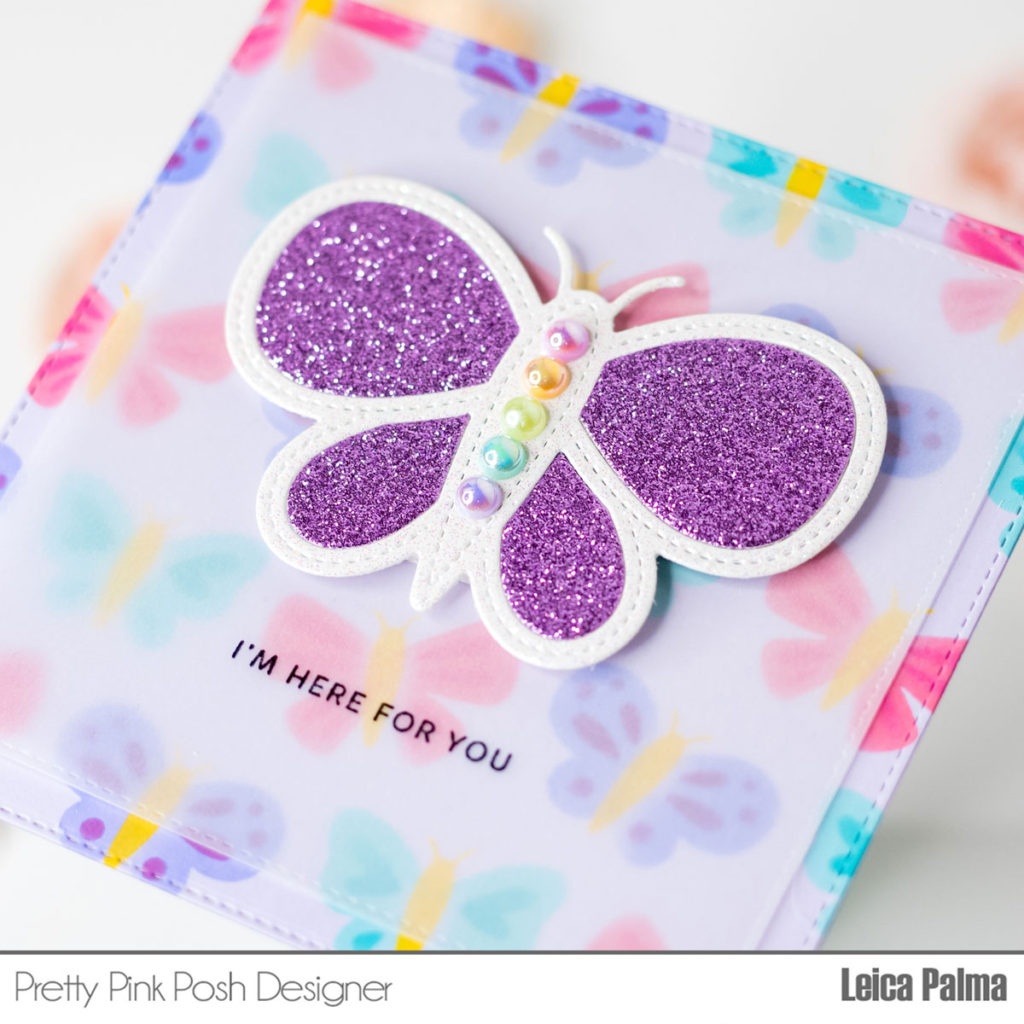
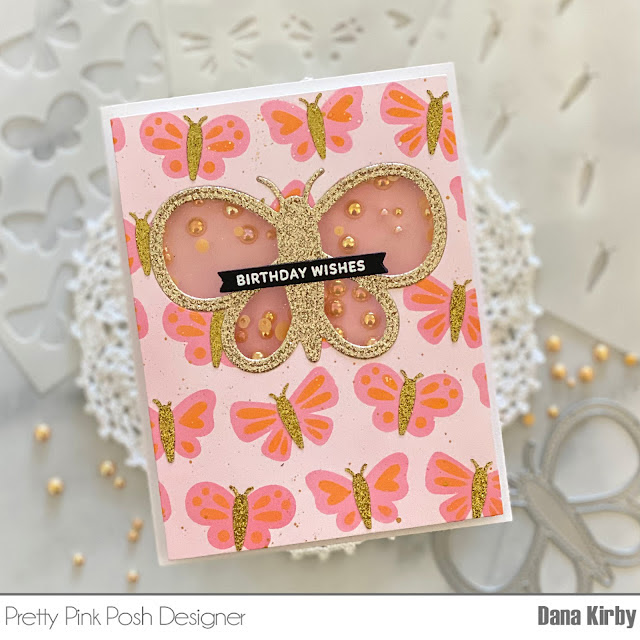
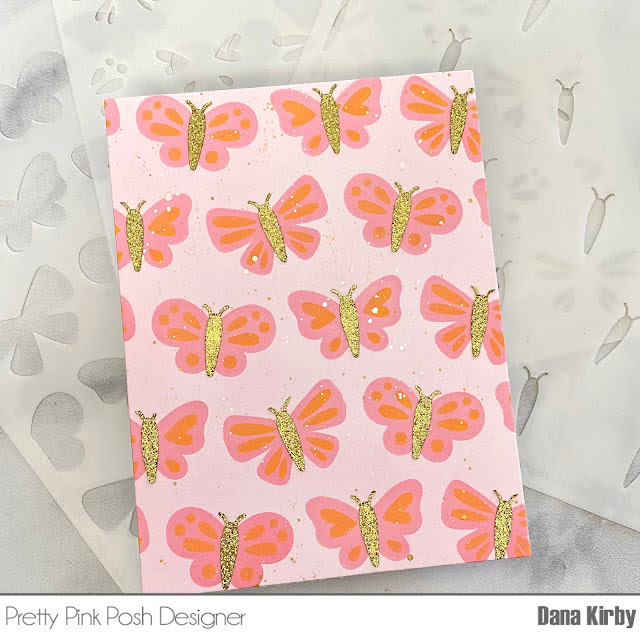
Let’s begin! I first cut a 5” square panel in purple cardstock. I ink blended through the Layered Butterflies Stencils with Distress Oxide Inks – Worn Lipstick + Picked Raspberry, Salvaged Patina + Peacock Feathers, Shaded Lilac + Seedless Preserves, and Mustard Seed.
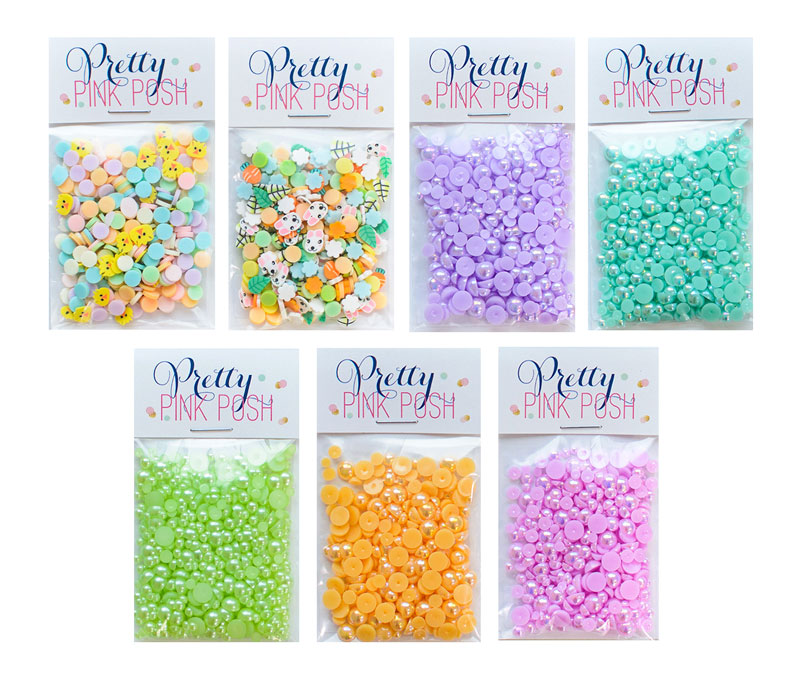
Next, I cut a 4.5” square panel in vellum to layer on top of the stenciled panel and stamped the sentiment with Stazon Jet Black Ink. I then cut theButterfly Shaker Stencil twice – one in white glitter cardstock and one in purple glitter cardstock. I inlaid the wings of the butterfly and foam mounted it on top of the vellum panel. I then adhered the vellum on top of the larger panel and added the new pearls (Creamsicle, Light Orchid, Limeade, Pansy Purple, and Sea Foam) to add pops of color to the butterfly. Lastly, I adhered the card panel onto a 5” square card base.
PRIZES: be sure to leave comments on each stop. We are giving away 3 $25 gift certificates to three random comments (1 winner each day) left before March 20, 2022 at 11:59 PM PST. I’ll be announcing the winners next week, so be sure to return and see if you are one of the winners.
The March 2022 Release is now available in the Pretty Pink Posh Shop and select retailers that carry our products. If you missed our post yesterday, we revealed all of the products in picture form, but if you would like to see them in a video, Heather has that for you today!
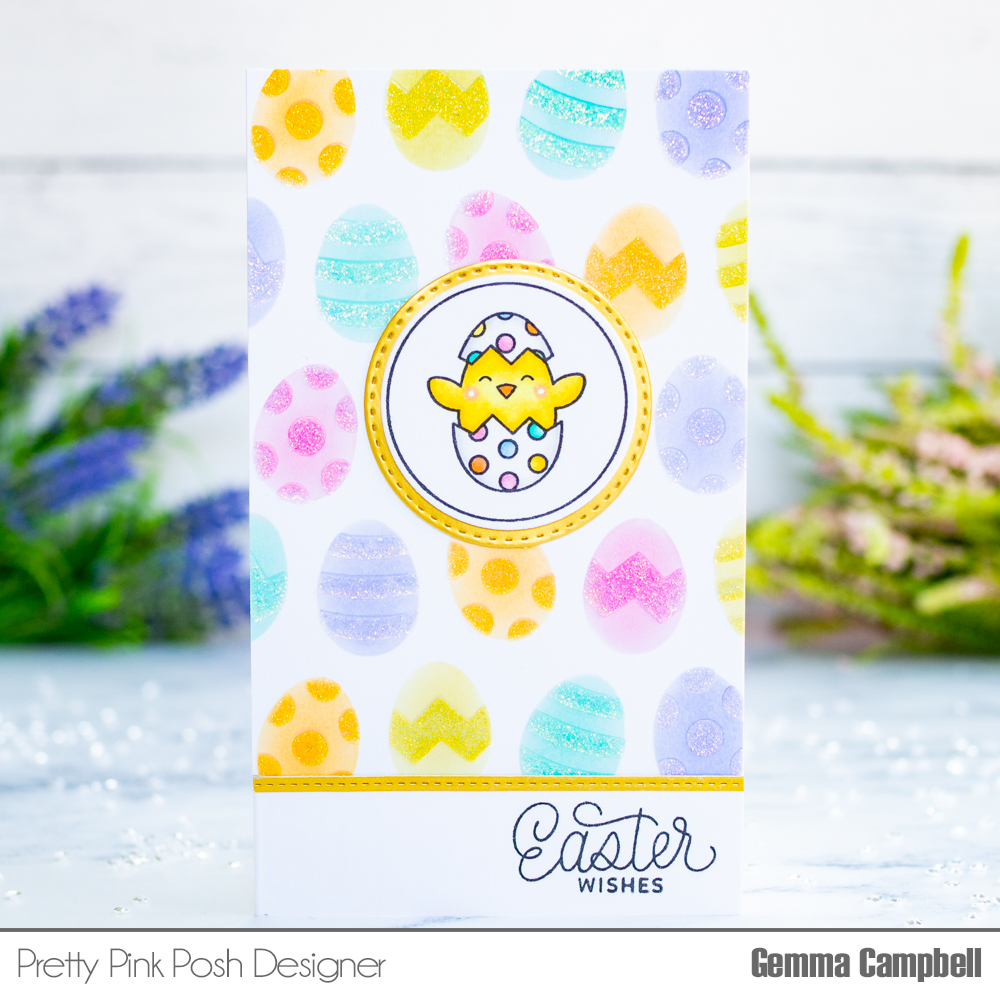
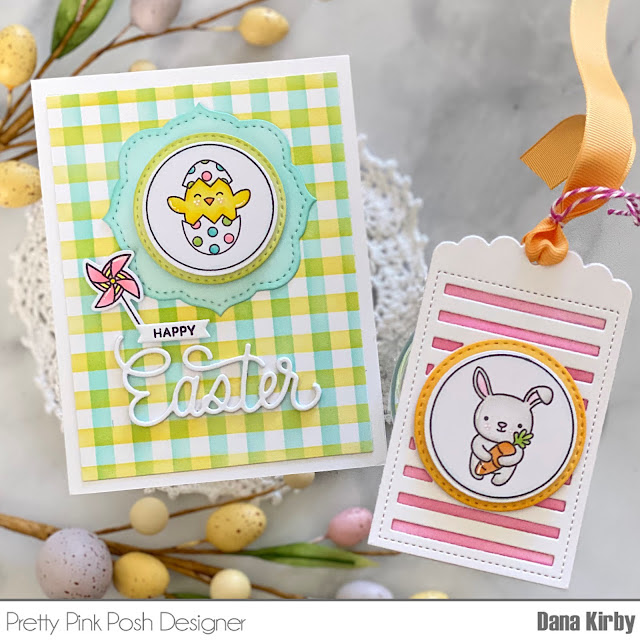
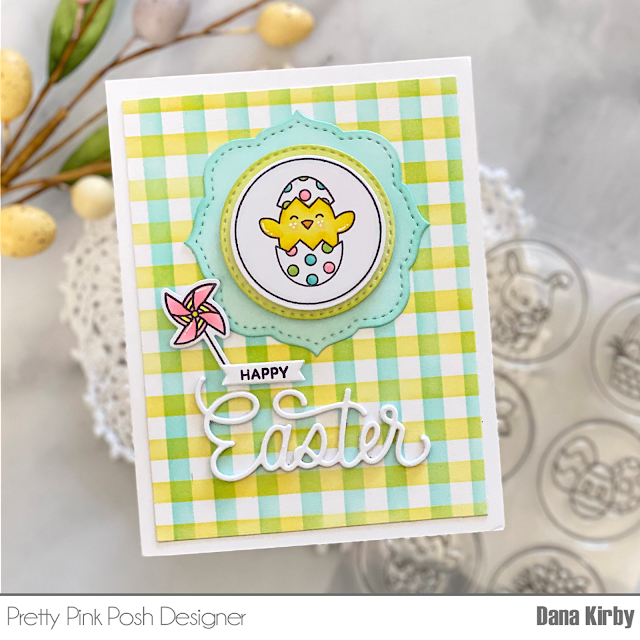
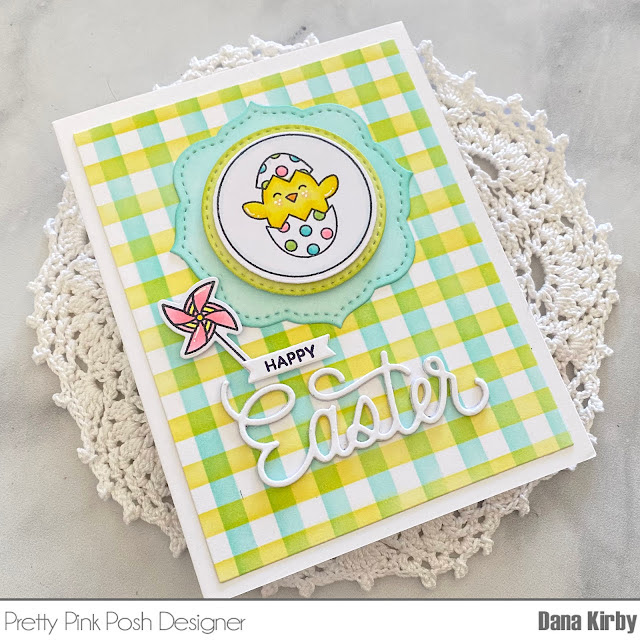
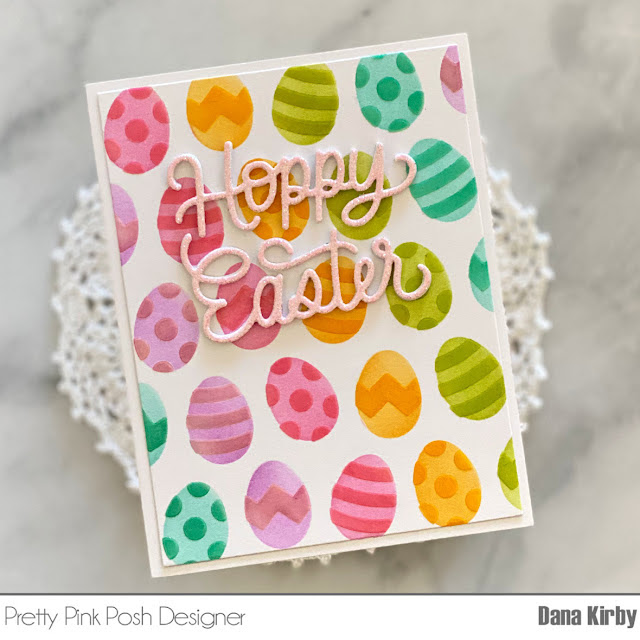
Hi friends! It’s Dana here today sharing a fun Easter card and gift tag. For my projects, I am using the Easter Circles stamp set. I just love the images in this set. They are so adorable and perfect for all of your spring and Easter crafting.
I started my projects by stamping my images with the Easter Circles stamp setand the Easter Signs set(pinwheel). I colored the images with Copic markers (RV13/11/10 C17/15/13, YG13/03, BG 23/11, YR14/12 W22/1/0) and used the Easter Circles dies and Easter Sign dies to cut them out. Next, I added dye ink to the Easter Circles diesin coordinating colors. I love how these dies include the stitching detail, so sweet!
For my card panel, I used the Wide Stripe stencil. I placed the stencil on my panel vertically and added aqua ink. I then turned the stencil horizontal and added yellow ink to create a plaid design.
To finish my card I used the Hoppy Easter Script die to die cut my sentiment. I then used the Birthday Scripts stamp set to stamp the word Happy onto a white banner. Lastly, I attached all of my images to the card panel with liquid glue and foam adhesive.
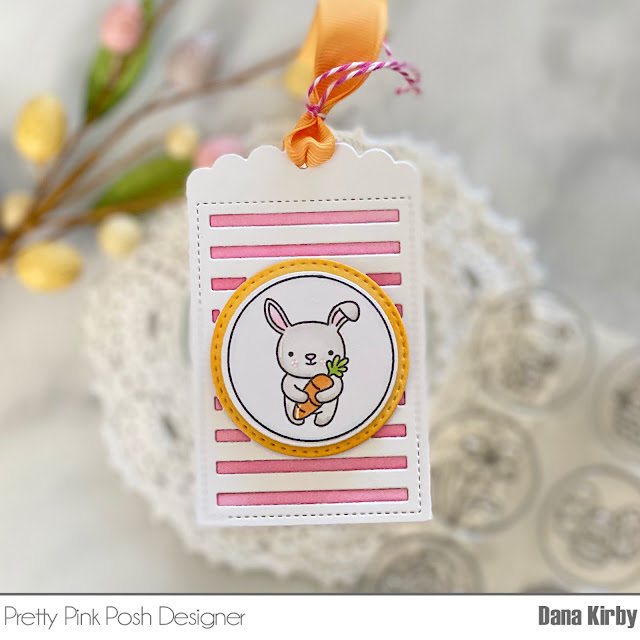
For my tag, I used the bunny from the Easter Circles stamp set. I mounted the circle onto a tag that was created with theBirthday Circles tag die. I love how all of the circle sets and dies can be mixed and matched. It gives you so many possibilities. I can’t wait to tie this tag onto some Easter treats!
PRIZES: be sure to leave comments on each stop. We are giving away 3 $25 gift certificates to three random comments (1 winner each day) left before March 20, 2022 at 11:59 PM PST. I’ll be announcing the winners next week, so be sure to return and see if you are one of the winners.
Hello friends! It’s time to reveal all of the individual products that are part of the March 14th release.
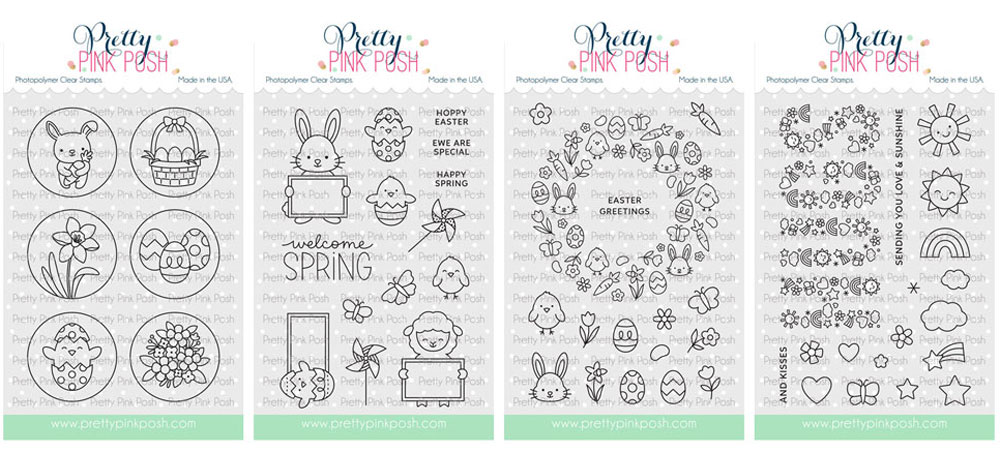
Here’s a look at the three new stamp sets that will be available for purchase (and all have coordinating dies available for purchase separately):Easter Circles, Easter Signs,Easter WreathandHugs.
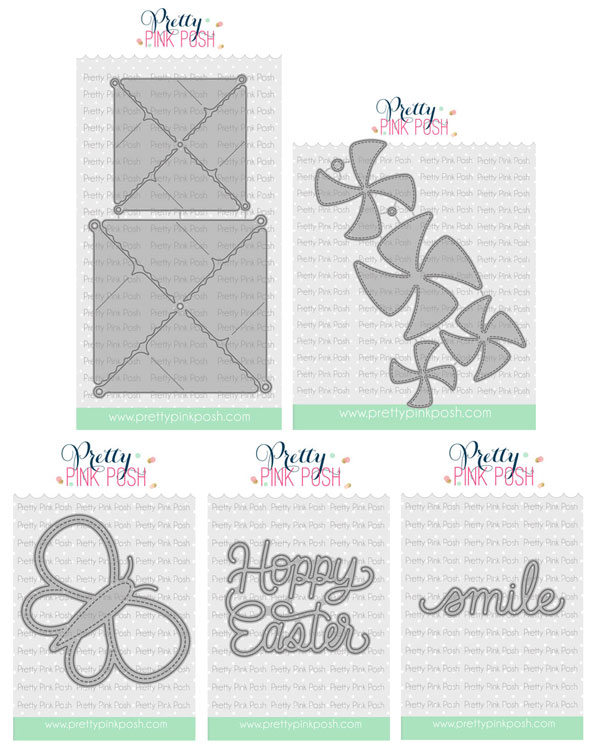
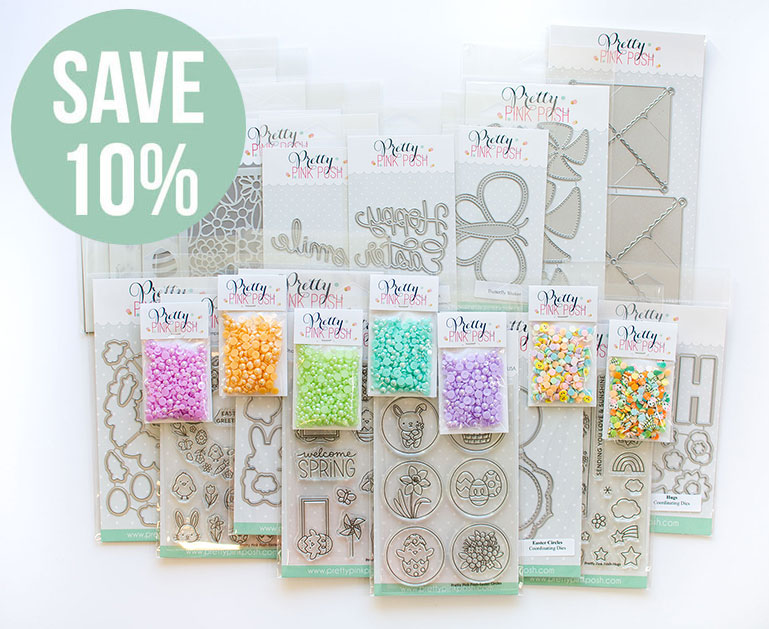
We have a limited amount of bundles available where you can buy the whole collection in one easy click. Plus, you’ll get 10% off when you buy it all together.
We will see you tomorrow as we show you the new products in a video and the products go live individually. Plus, we will be kicking off our three day blog hop!
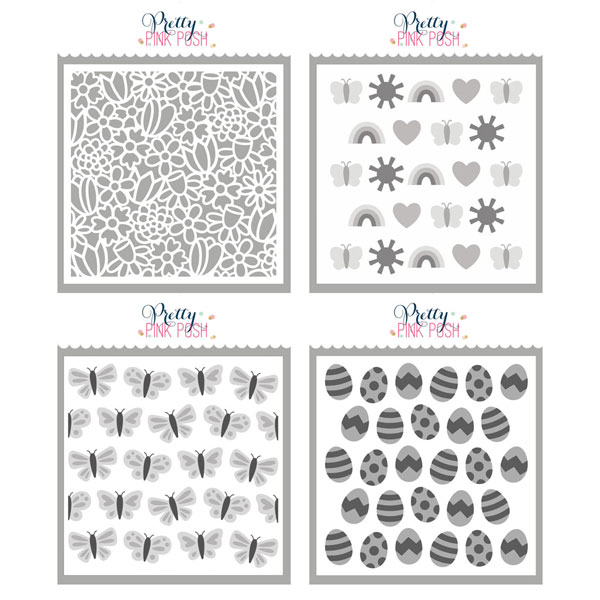
Hi friends! It’s Dana here today sharing a sneak peek of some of the new stencils coming to Pretty Pink Posh on March 14th. The stencils for this release center around Easter and spring. There are four different stencils being released, which include Layered Eggs, Layered Butterflies. Happy Days and a Floral Background.
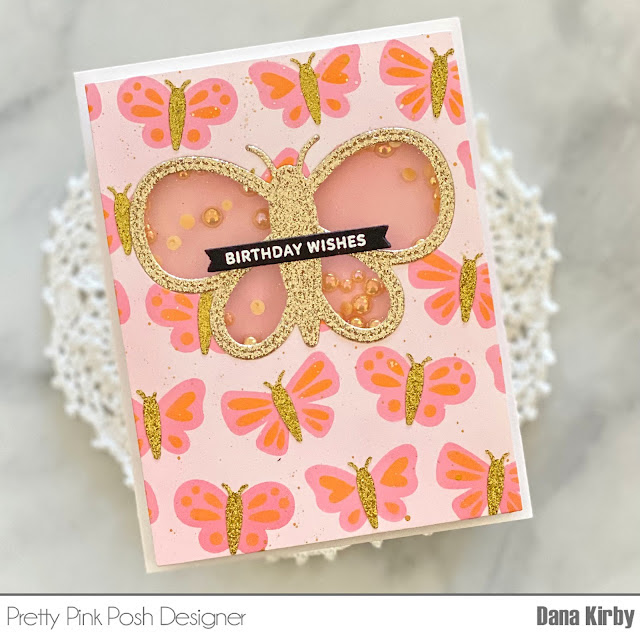
My first card uses the Layered Butterflies stencil. I started my card by ink blending Distress Oxide ink in Spun Sugar onto my card panel to give it a soft pink look. I then used the first butterfly layer and Distress Oxide ink Worn Lipstick to create my butterflies. For the second layer, (butterfly detail) I used Carved Pumpkin ink. For the third and final layer, I addedGlitz Glitter Gel in Gold for the butterflies bodies. To finish my panel I added a few splatters with gold paint for a little added detail.
Once my panel was dry, I used the new Butterfly Shaker die to create my shaker window. I added acetate behind the window and inlaid a butterfly in the opening that had been die cut with gold glittered paper. I filled my shaker with the new Creamsicle Pearls and closed up the opening with foam adhesive.
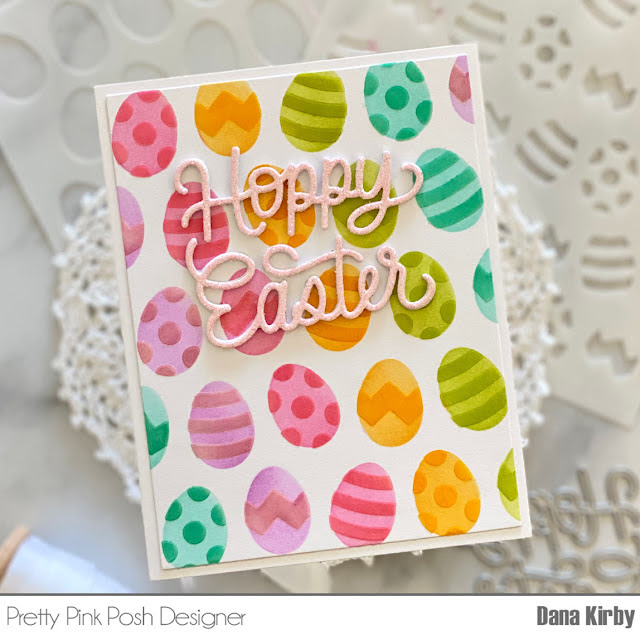
My next card uses the new Layered Eggs stencil. I just had to create the eggs in a rainbow of colors! There are two stencils included in this set and they are so easy to use and line up. I did some simple masking and used tone on tone dye ink. On my final layer I did add a layer of Ranger Texture Paste in Transparent Gloss to give the eggs some extra shine and texture.
To finish my card I used the Hoppy Easter Script die. I die cut the sentiment three times with white cardstock and once with a light pink glittered cardstock I had in my stash. I then stacked the dies for some added dimension before attaching them to my card panel.
Thanks for joining me today. I hope I inspired you to give these new stencils a try… I know you won’t be disappointed. They are so fun and easy to use!
Join us tomorrow as we reveal all of the new products in picture form so you can start to compile your wish lists for the March 14th release date!
Hello Friends! It’s Raquel here today sharing some sneak peeks of the new dies coming to Pretty Pink Posh on March 14th.
There are some very innovative dies for this upcoming release! The moment I saw them I knew I’d be creating some fun and happy themed designs.
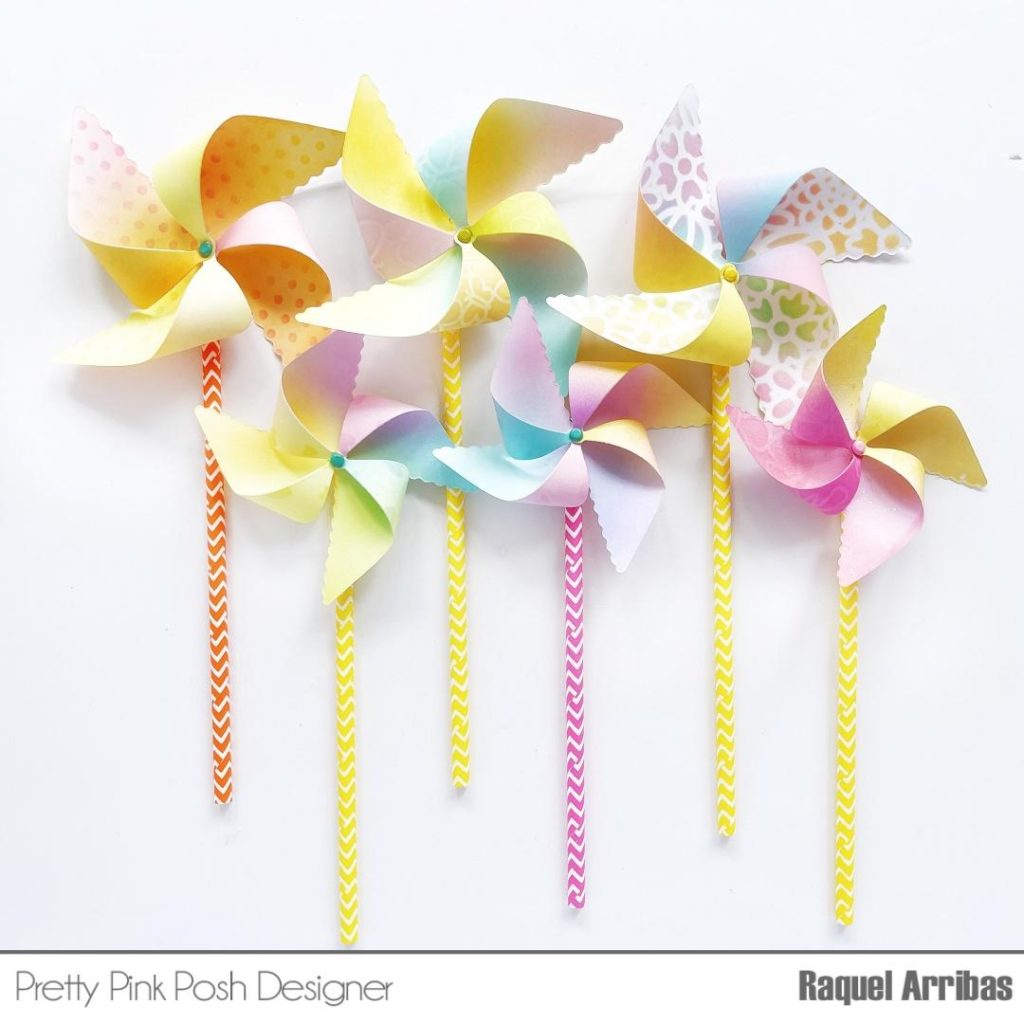
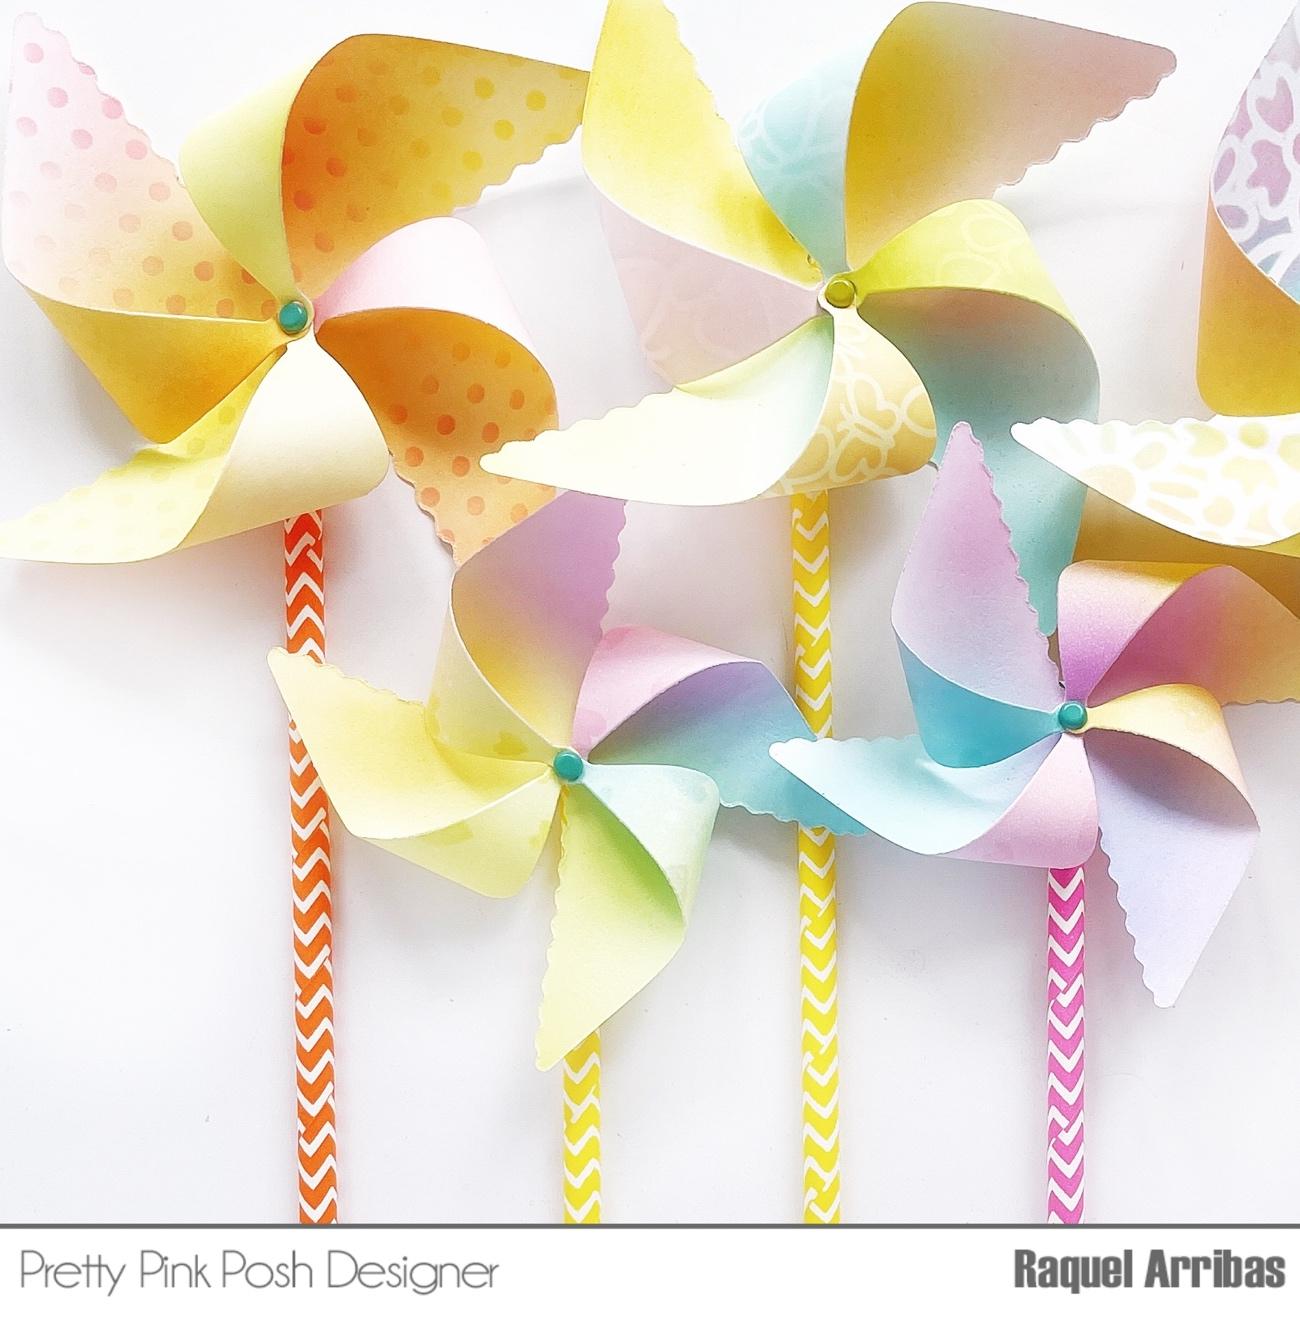
These project features the new 3D Pinwheels dies. They come in two sizes, and I just love them! You can be as creative as you want and use pattern paper or create your our paper.
I decided to do the later, so I grabbed my Distress Oxide Inks and some stencils.
I used the new Floral Background Stencil and theMini Polka Dot Stencilin some of the pinwheels and colored them using several pastel colors: Squeezed Lemonade, Kitsch Flamingo, Spiced Marmalade, Twisted Citron, Cracked Pistachio and Salvaged Patina.
Once the ink blending was done, I just used these gorgeous dies to cut out three small pinwheels and three bigger ones. Then I folded them towards the center and secured them with a mini brad.
Lastly I just glued some colorful straws to the back with permanent glue. So easy!!! These are just perfect for any celebration, and I can assure they look stunning in real life.
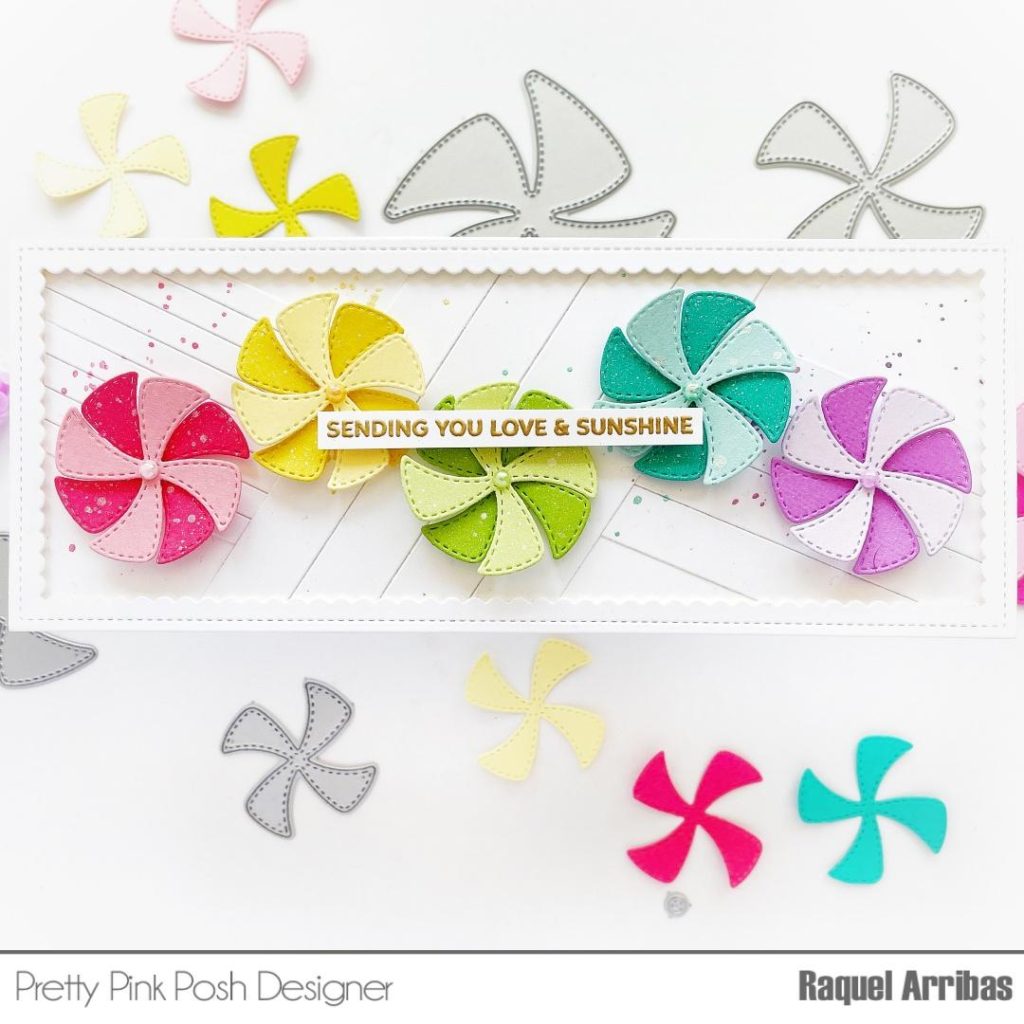
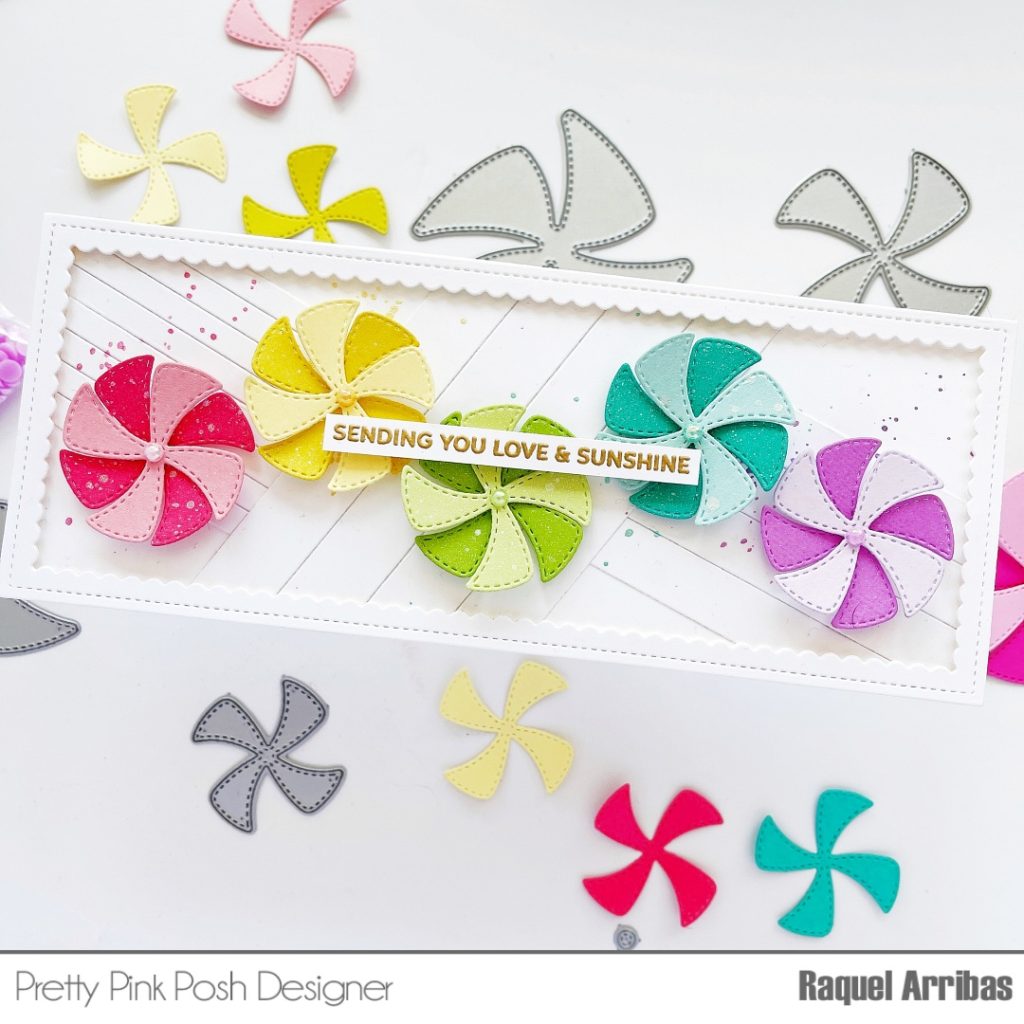
My next project features the Flat Pinwheels. These can also be used in any celebration project or incorporate them into cards. I wanted to use as many pinwheels as possible in the same project so I used the smallest one.
I cut out several pieces in different colors and foam mounted them using theSlimline Scallop Frames. To add some texture to this colorful project, I added some white strips I had previously cut out with the Simply Strips dies.
I glued them to the front layer and arranged my pinwheels trying to make them look like if they were moving. I also added some spatters and some of the new Pearls.
I gold heat embossed the sentiment from the new Hugs stamp set and placed it in the middle. I love how this card turned out. These colorful pinwheels pop out so beautifully against the white background.
I hope you have enjoyed I gave you some ideas to create some fun and unique projects with this one of a kind dies.