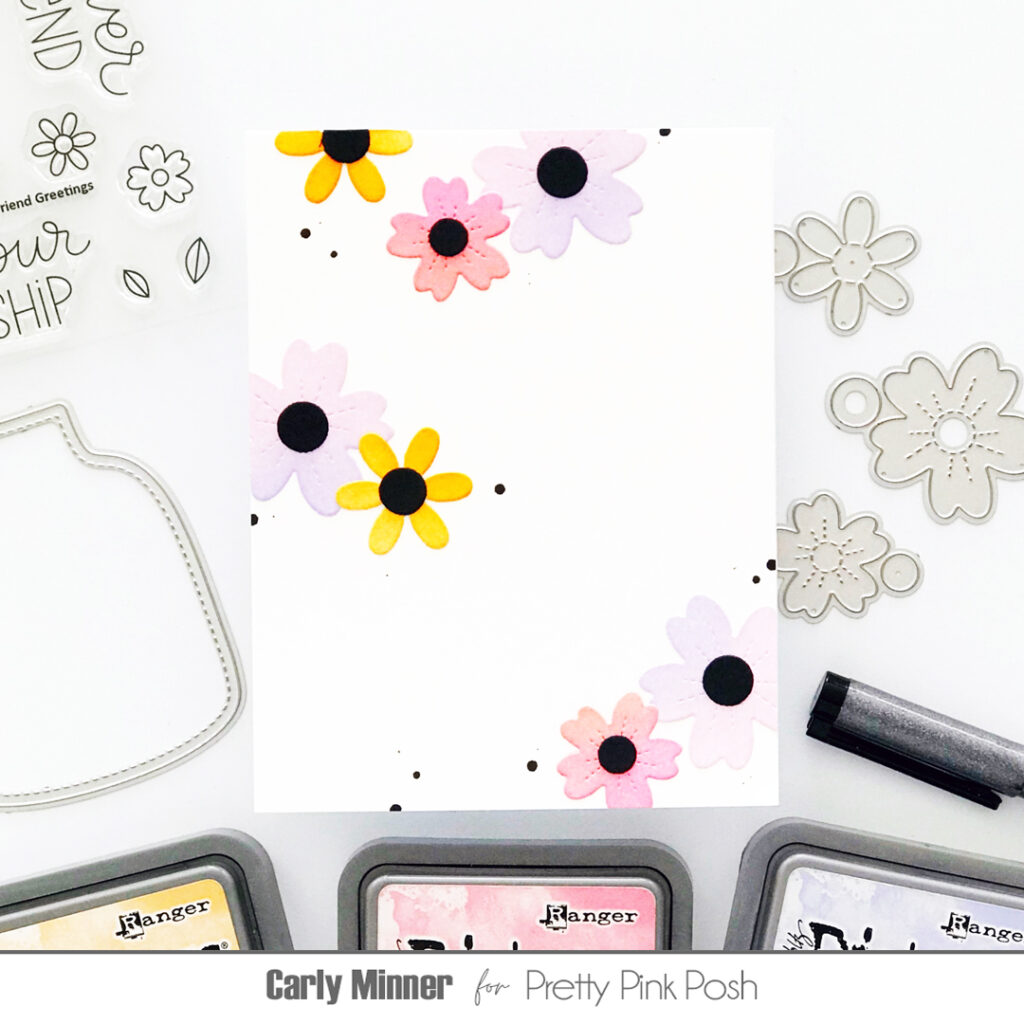
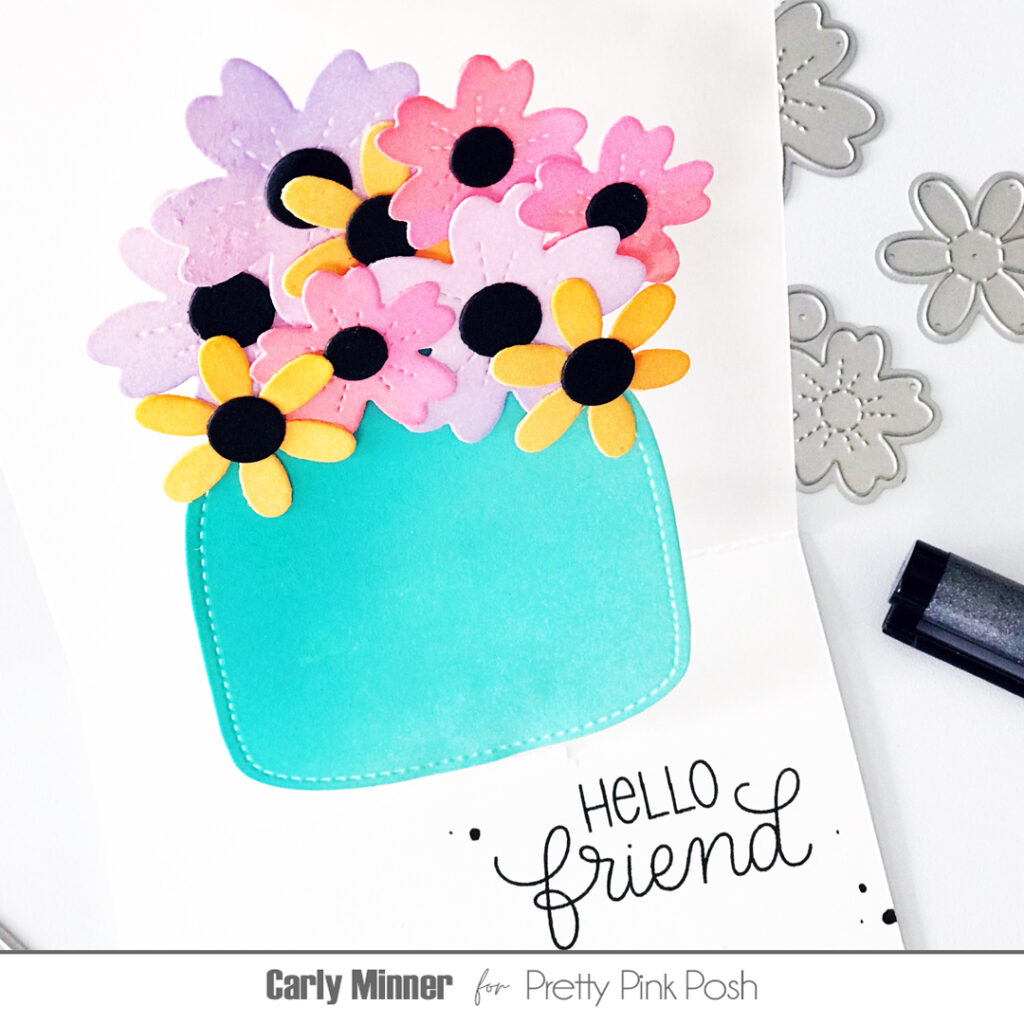
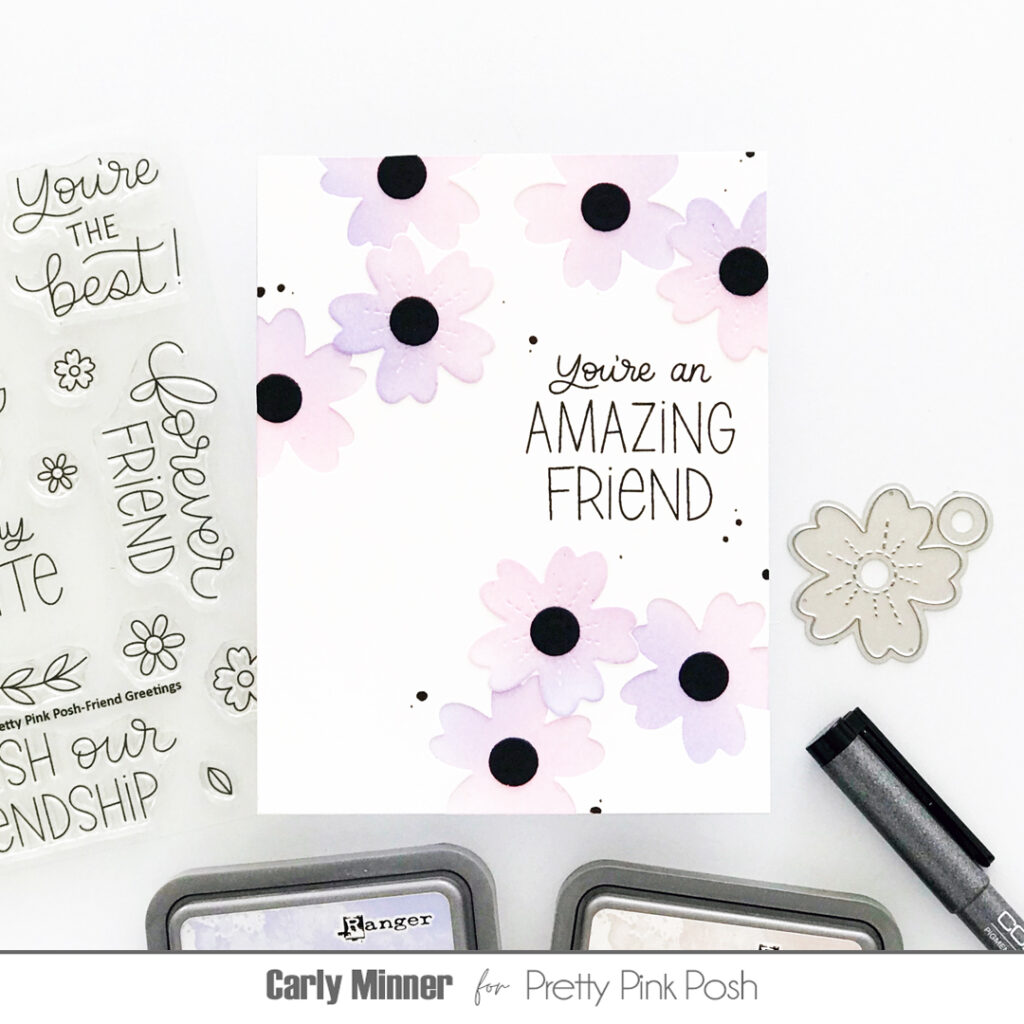
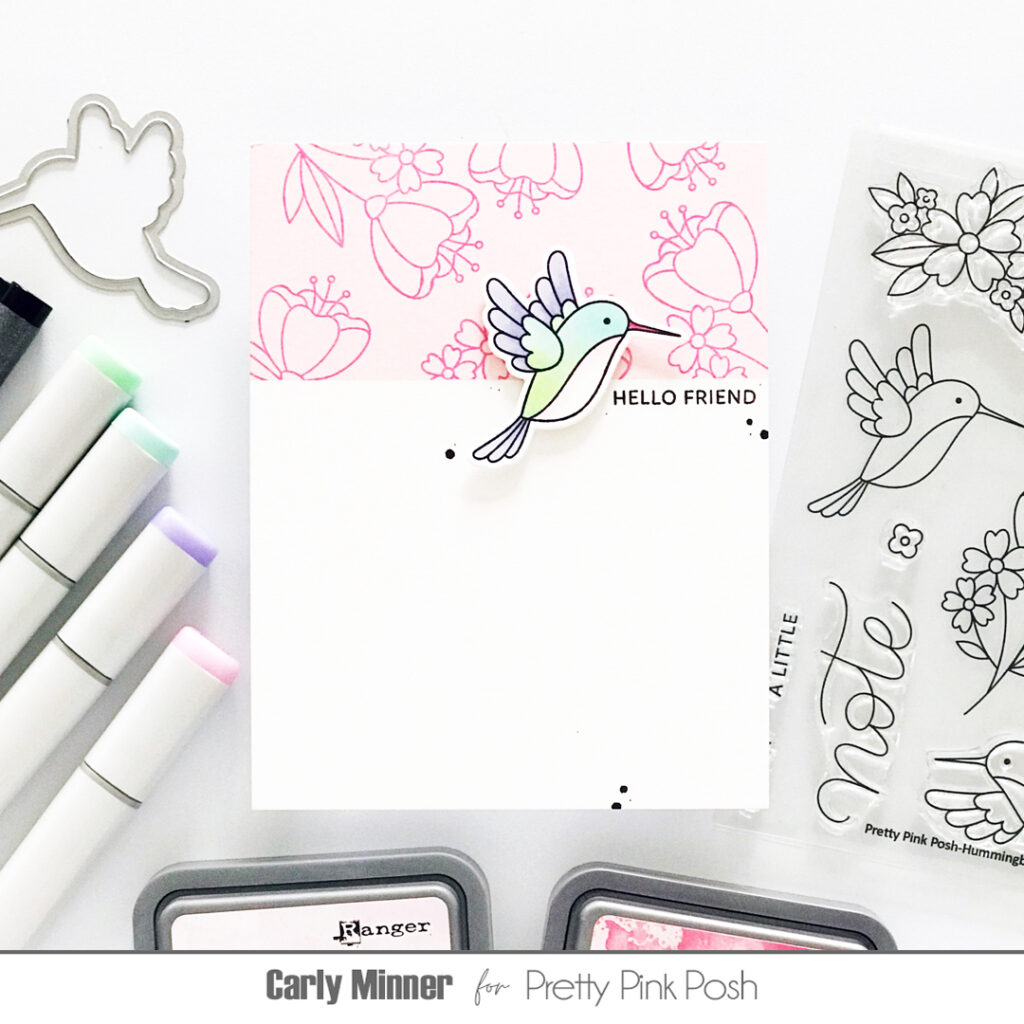
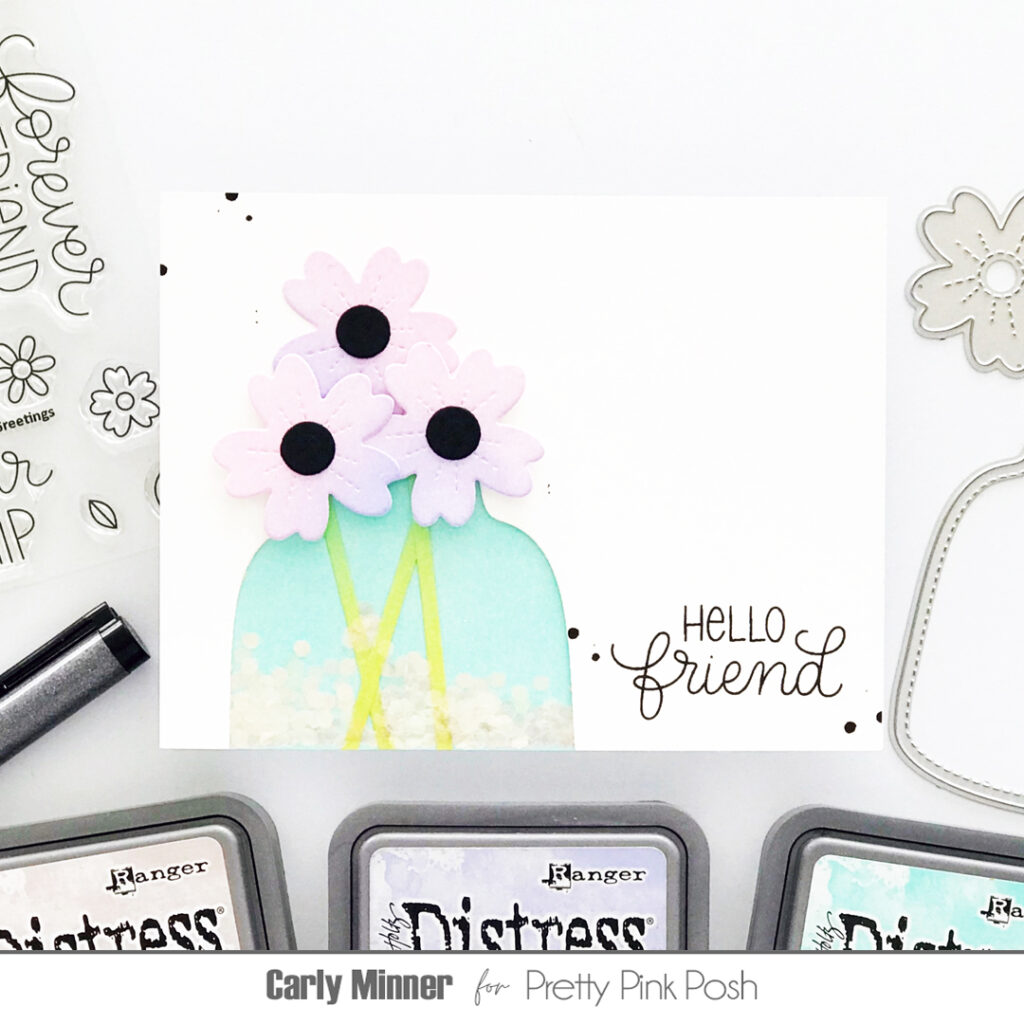
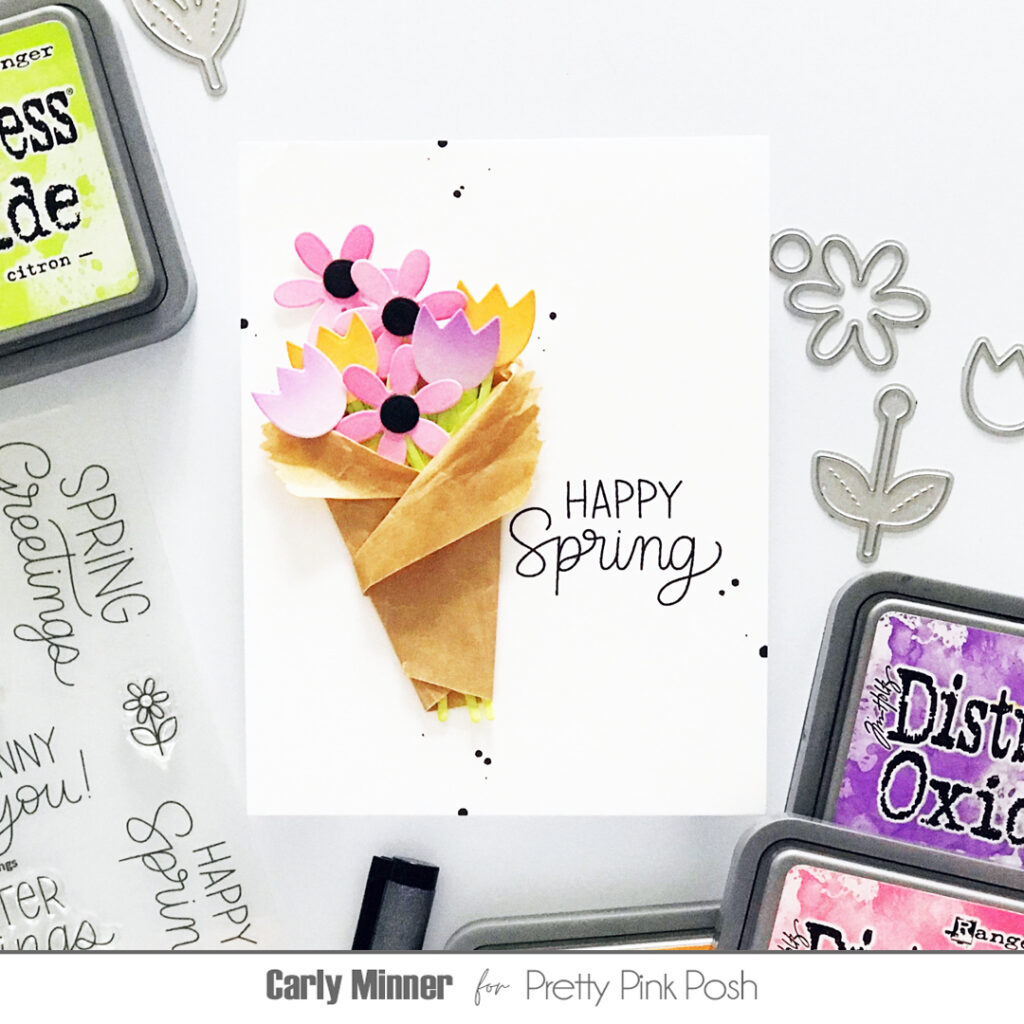
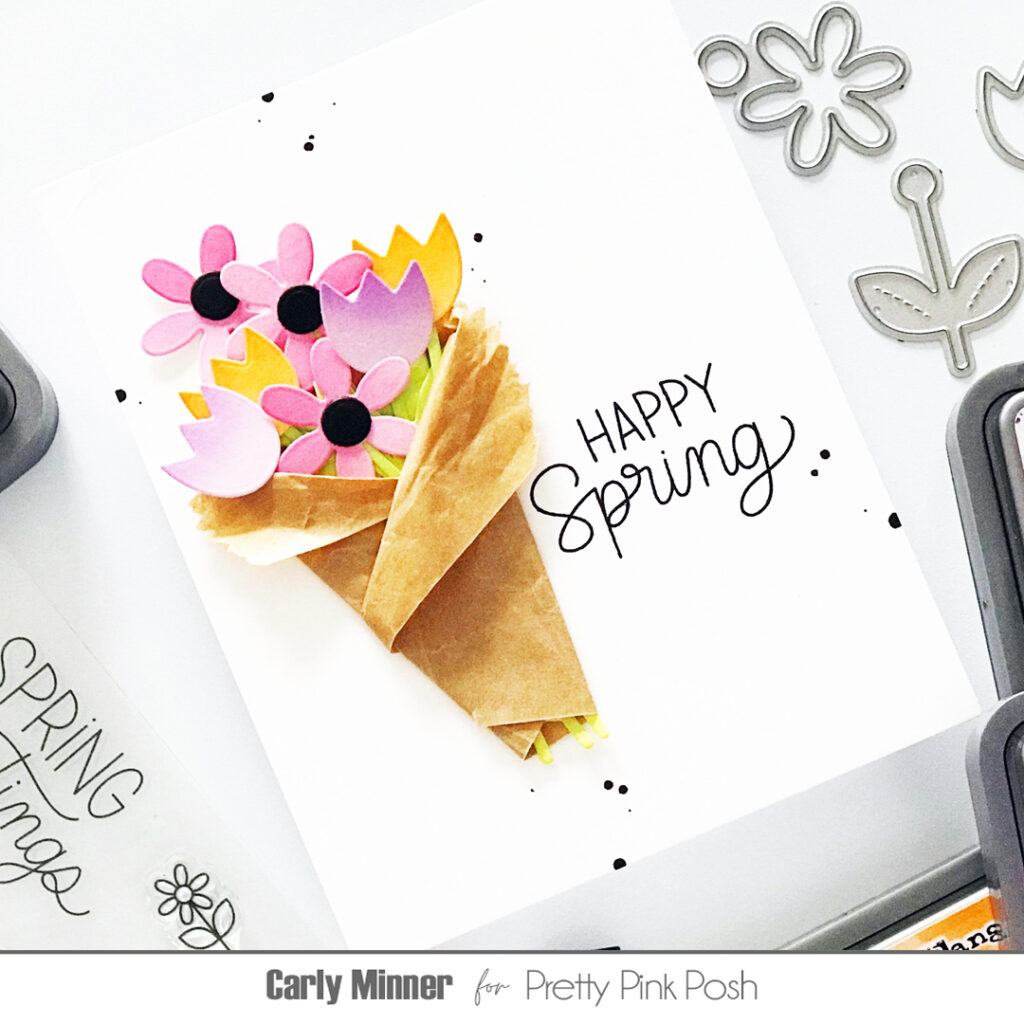
Hi Crafty Friends! Carly here and I have a cute and super easy interactive card design to share with you! Easy is a non-negotiable for me with interactive cards, LOL!
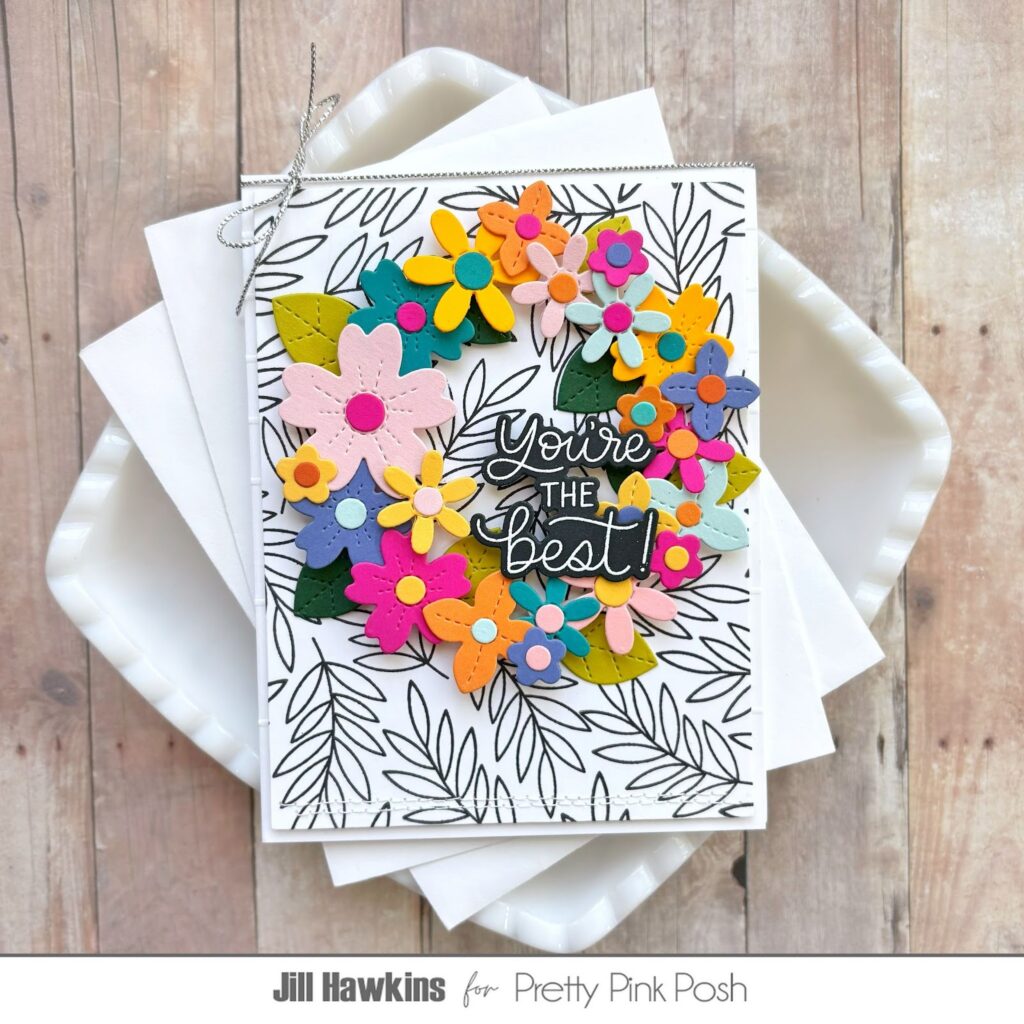
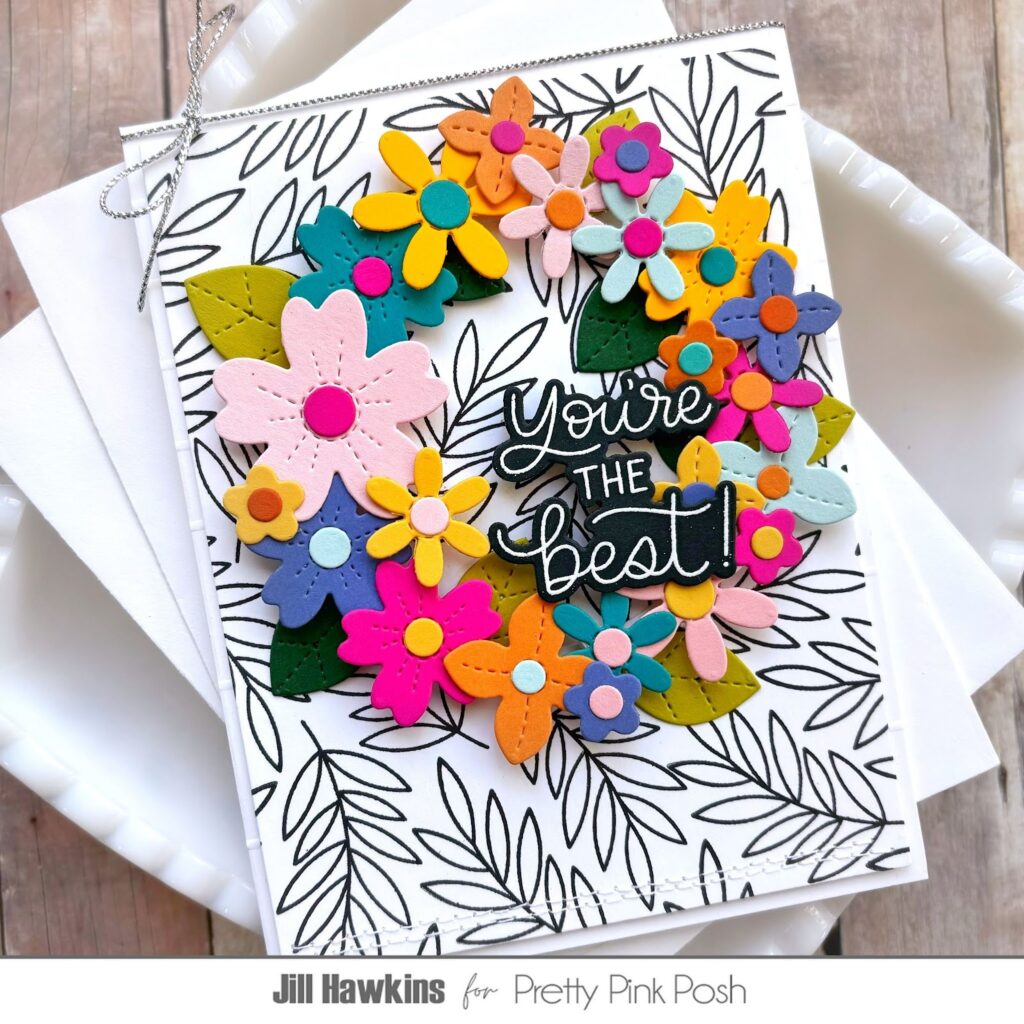
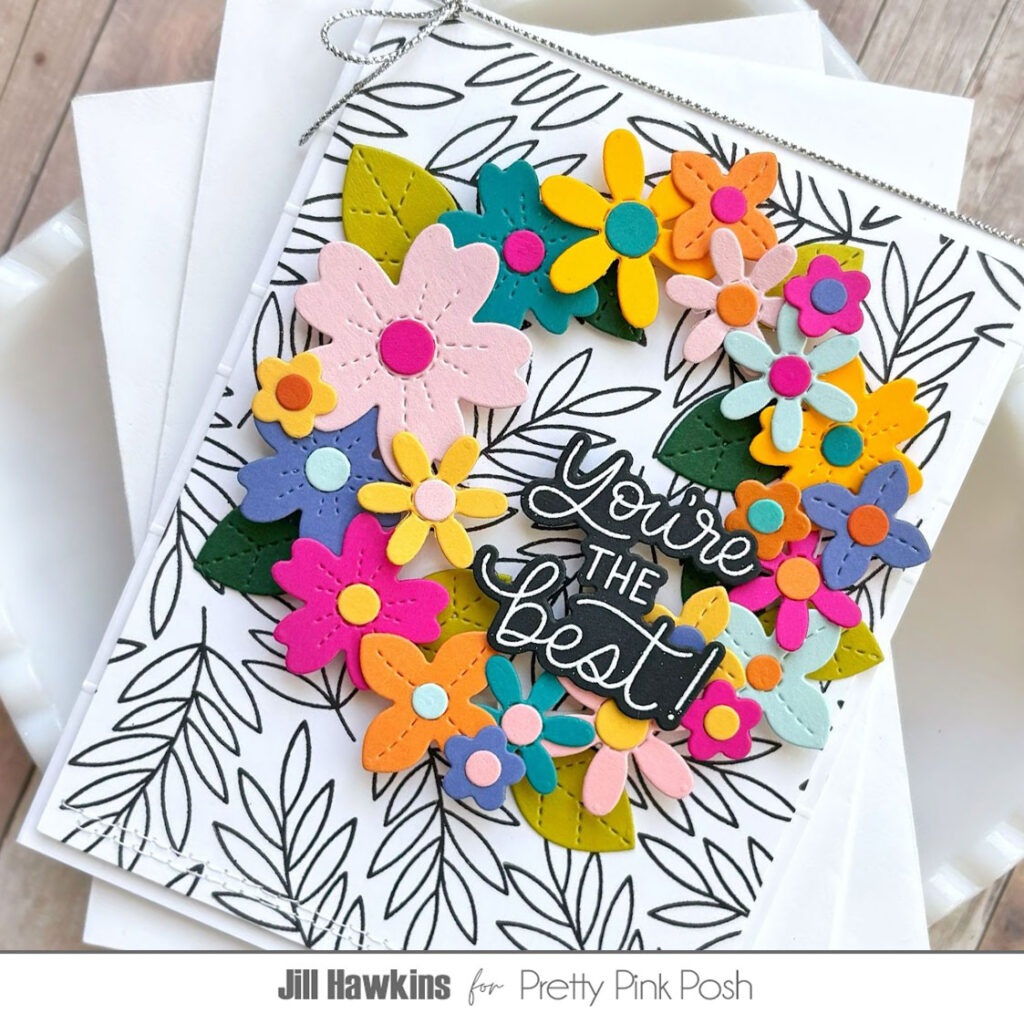
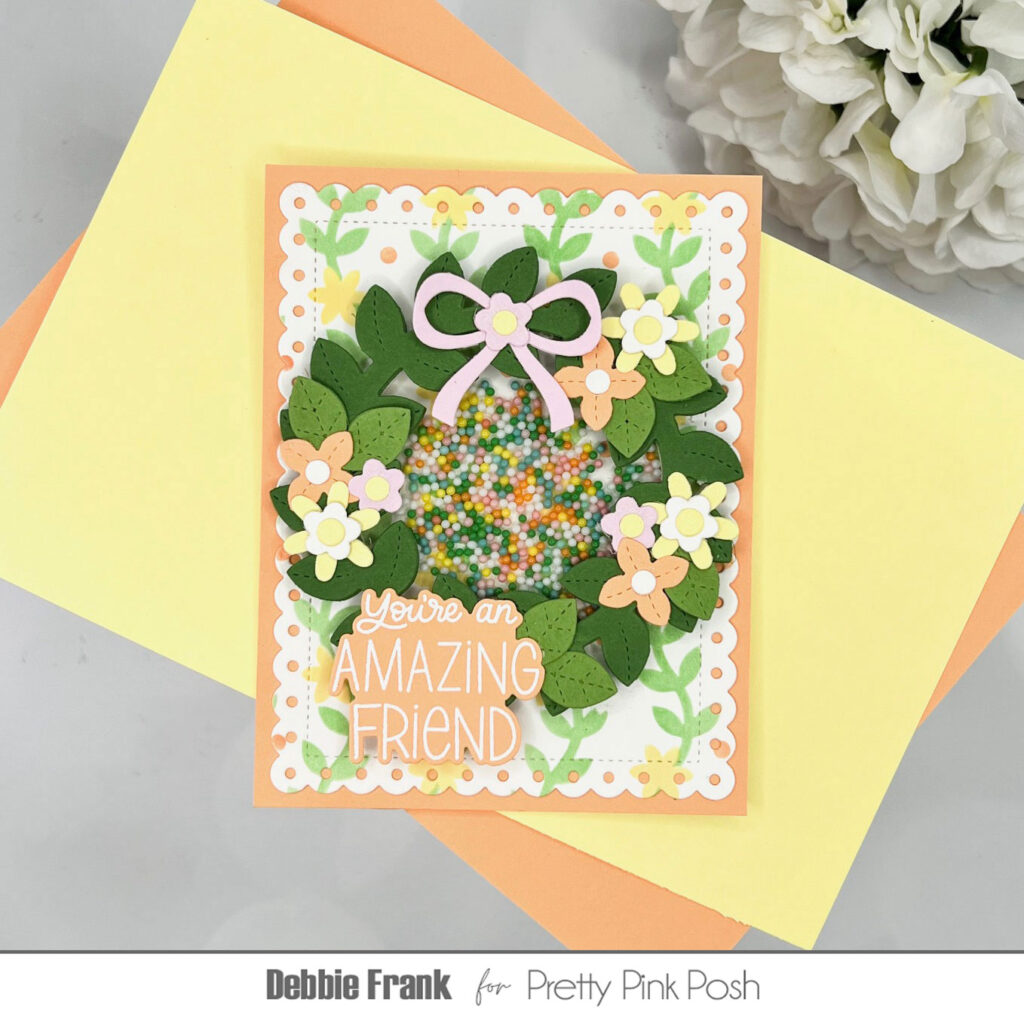
Happy Day to you all Crafty Friends! It’s Jill here today to share this sweet card with some of the new Pretty Pink Posh products recently released!
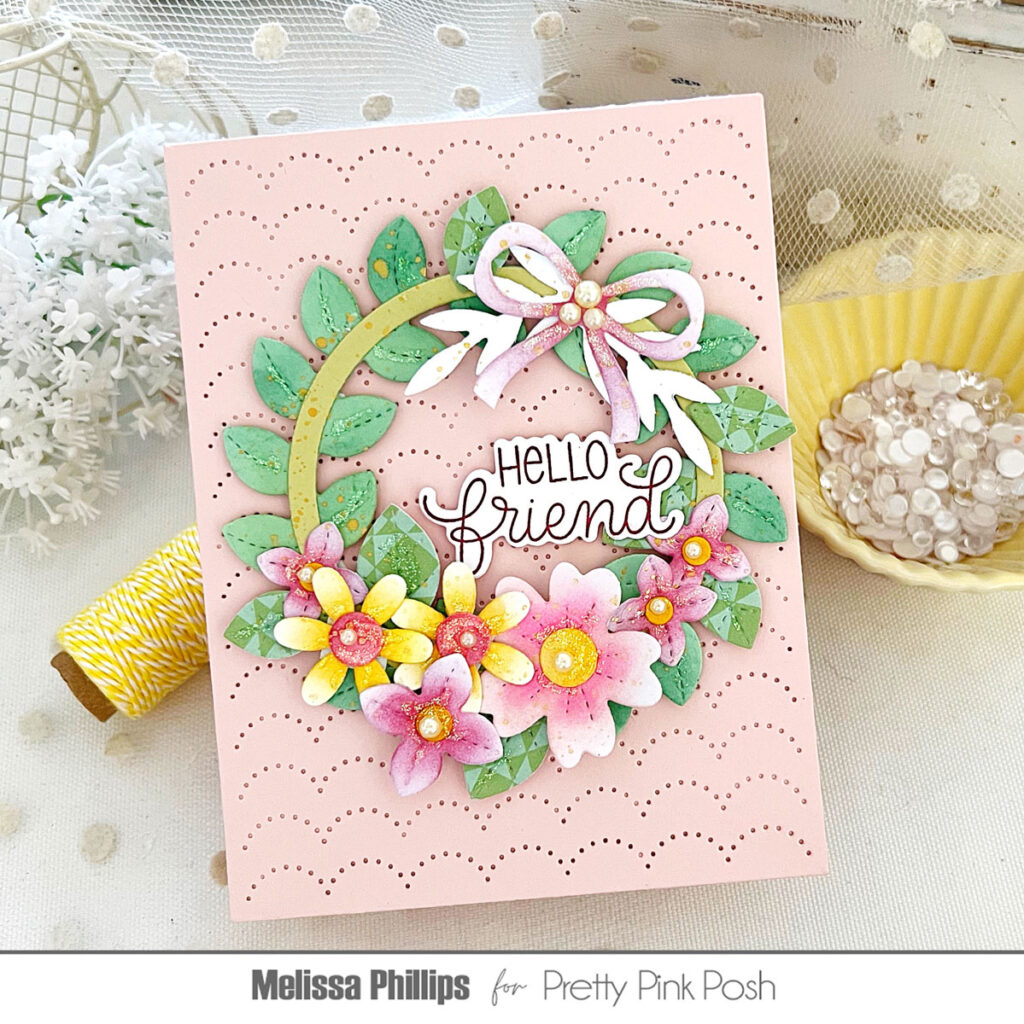
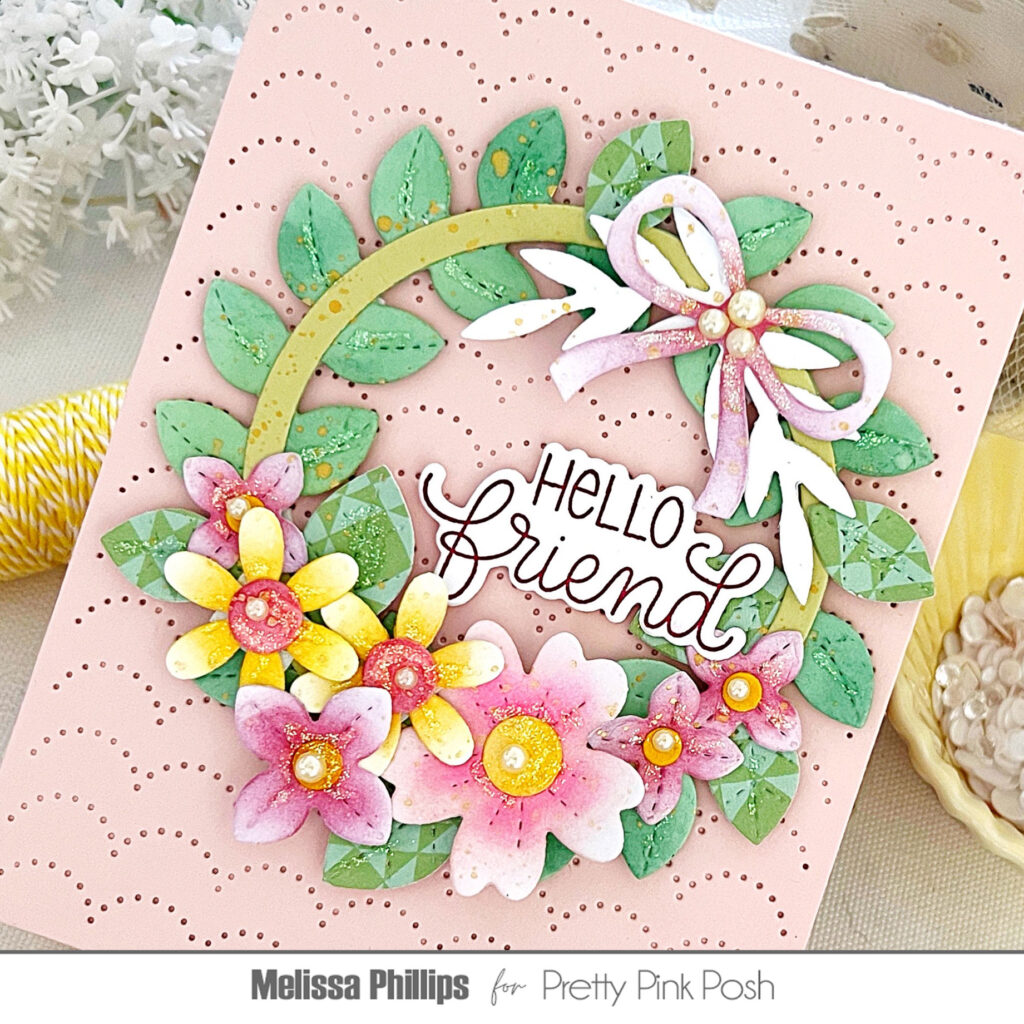
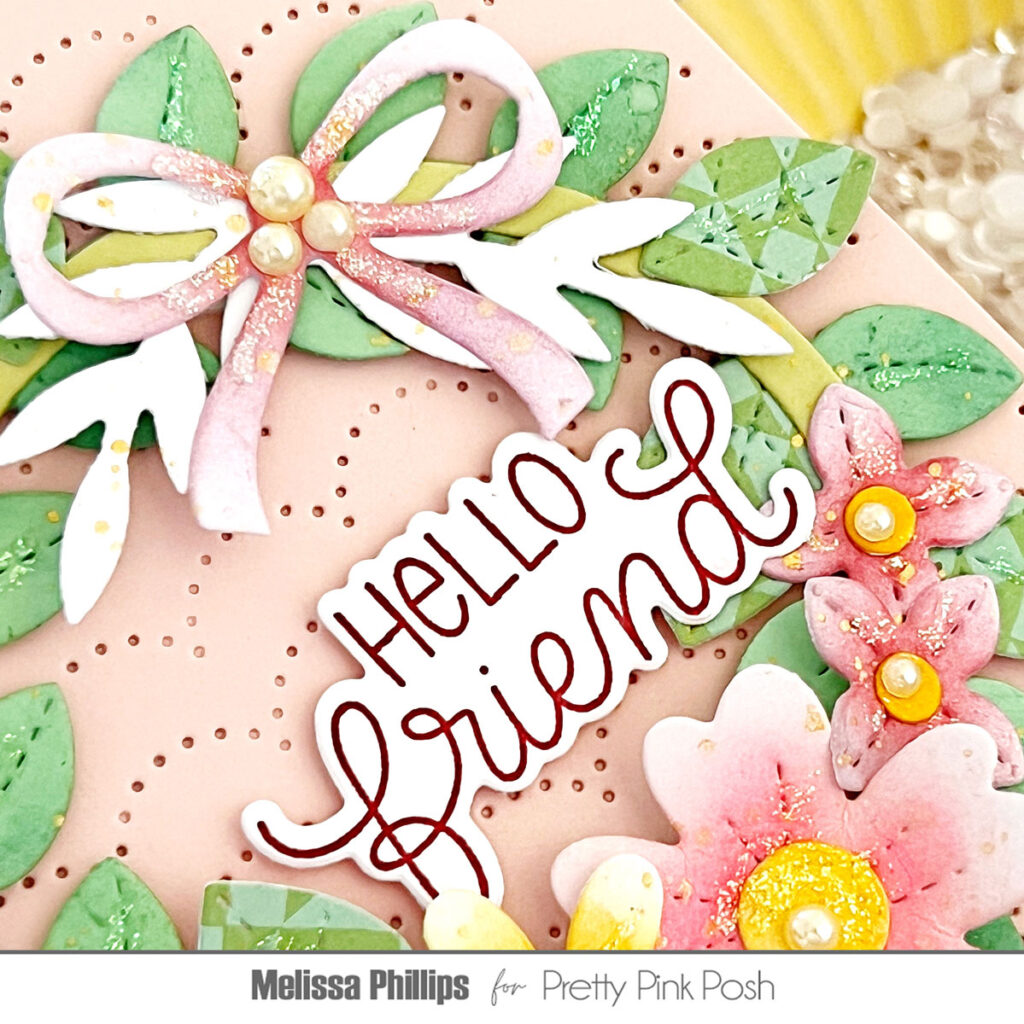
I couldn’t resist reaching for the Floral Wreath Builder, as I love all the different whimsical flowers the die set contains. I decided I wanted to go big with lots of different colors and layers. I can’t say “going big” would be my normal course of action, but I think this card turned out so fun and spunky!
First, I created the black & white background using the leafy frond stamp from the new Simple Thanks set. This set is adorable in its size and succinct simplicity. I could easily make a quick stack of Thank You notes with the stamps and the die set.
Once that was ready to go, I die cut the circle wreath and used that as a guide to shape and layout all my floral die cuts on this wreath.
This is an excellent way to use up all those scraps of cardstock you have saved up! Plus, it’s fun to create a big stack of die cut flowers and leaves to build your wreath with!
Once you’ve built your wreath, I’d recommend taking a quick photo with your phone, so you know where you had everything. Then you can either move your die cuts off to the side and rebuild as you go, or you can grab a small piece of Press N Seal to pick up your whole layout with and glue right back into place.
I decided to use dimensional foam adhesive with mine, so I took the scoot-off-my-panel and rebuild approach. It definitely took a little more time, but I think the result worth it.
To finish this off, I had some stitched lines on the panel and a sentiment from the Friends Greetingsset, using heat set white embossing powder.
This card makes me smile and I hope it makes you smile too! Thanks for spending a little time checking out my project here today–Have a great day ahead!
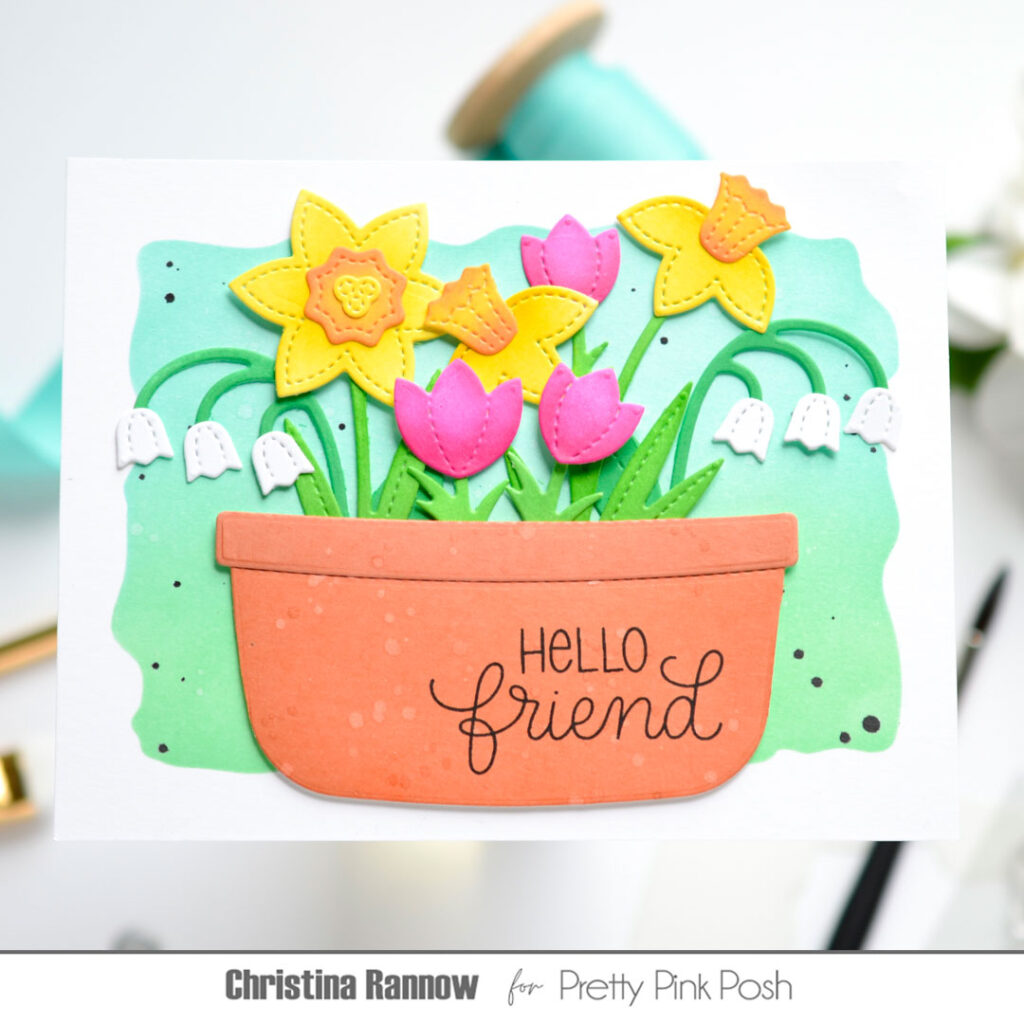
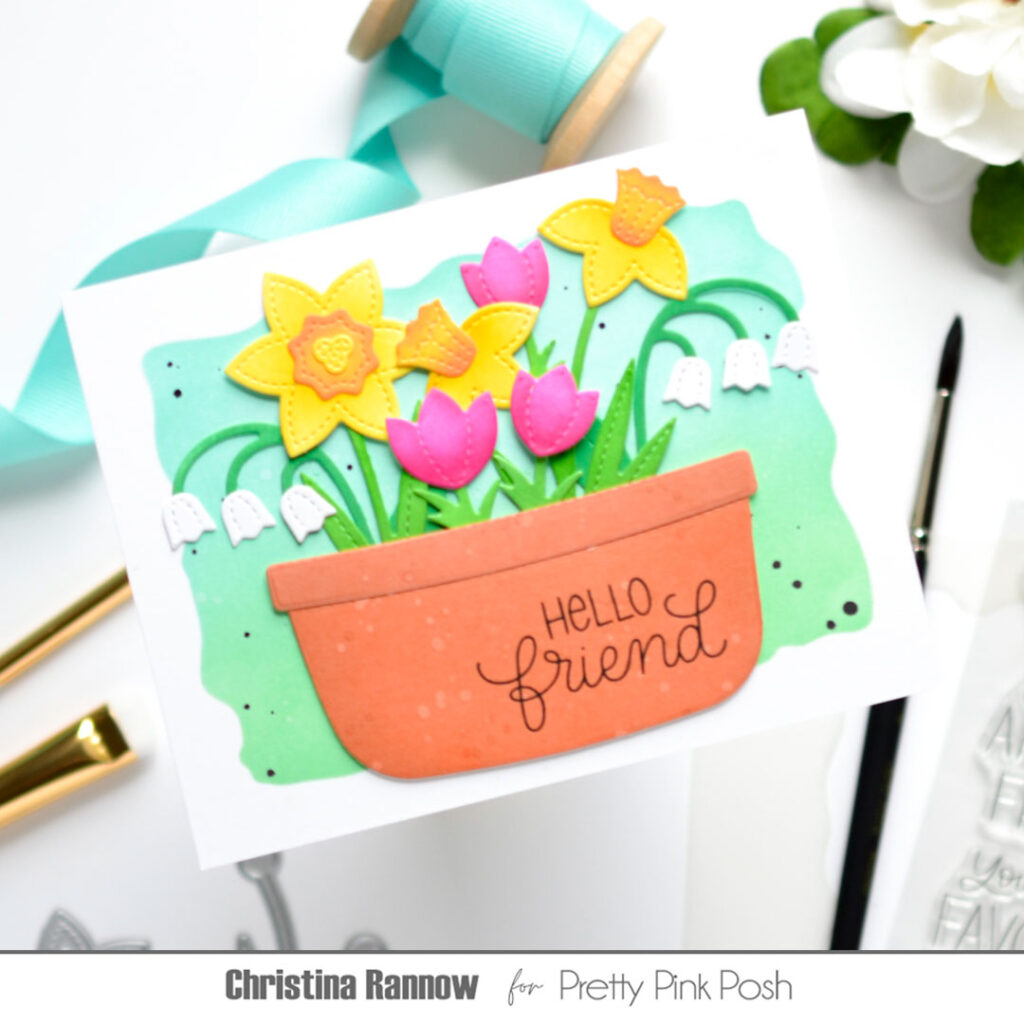
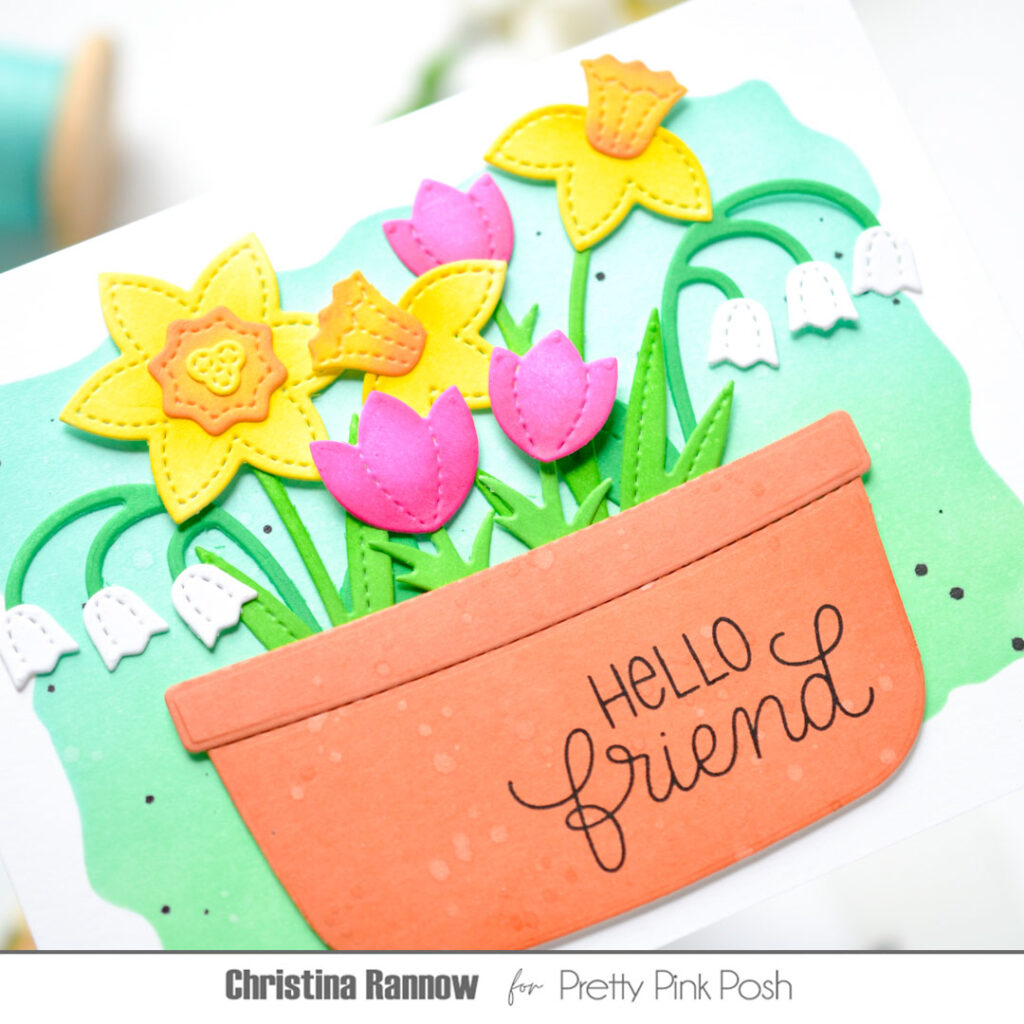
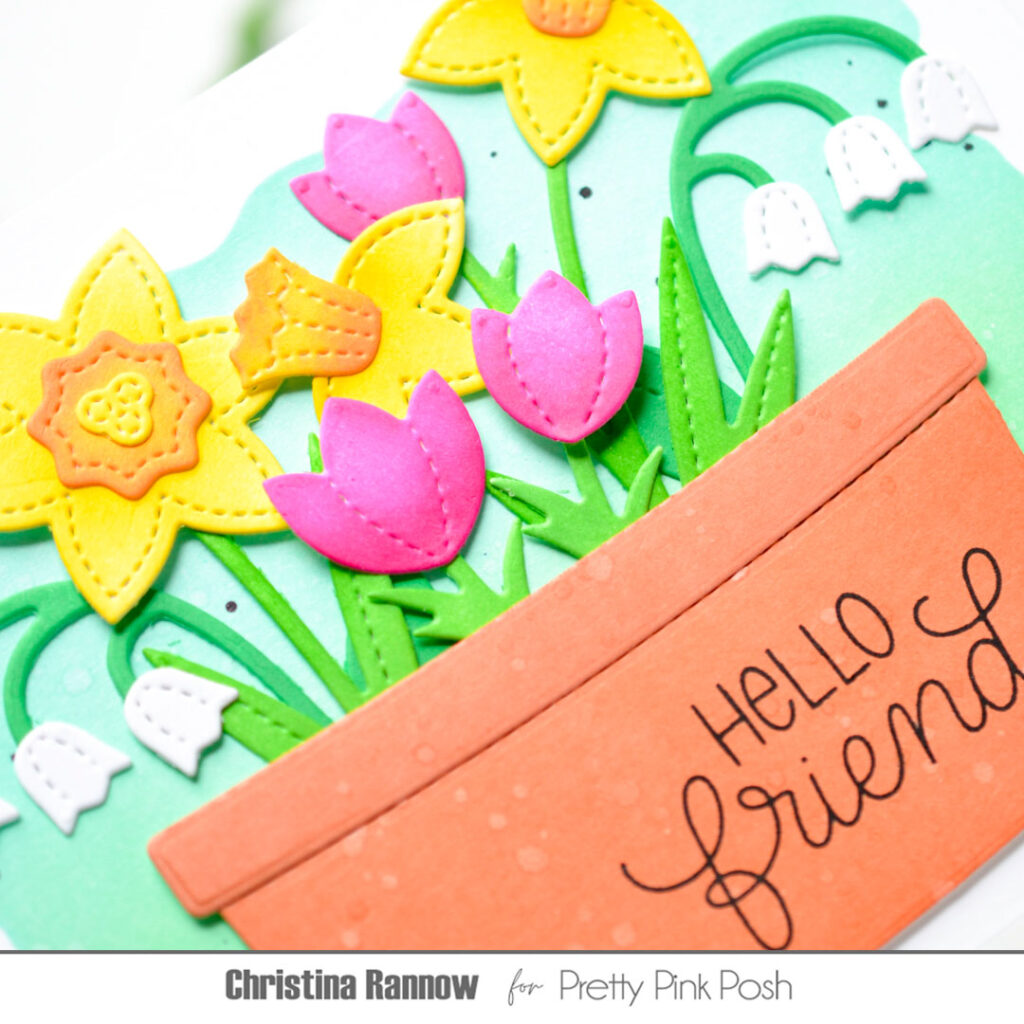
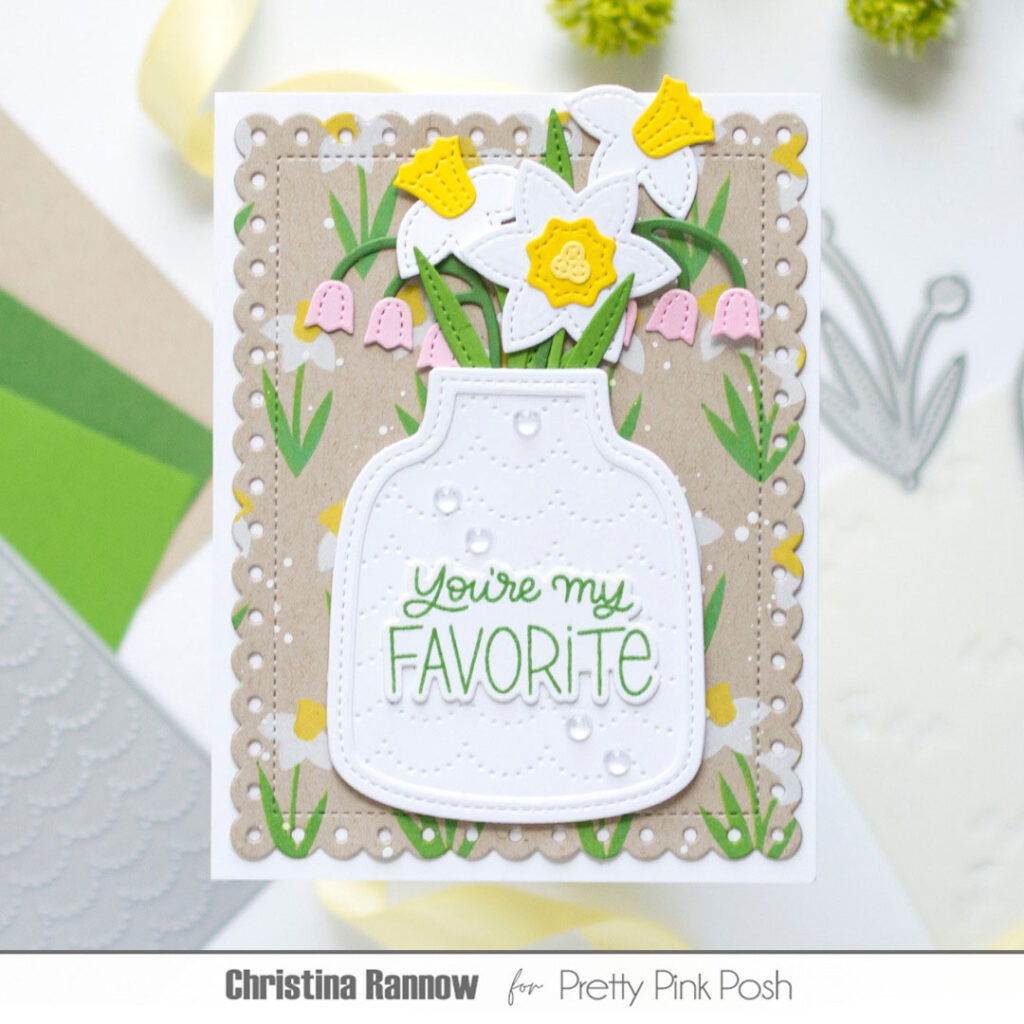
Hello! Christina here, and today I’m sharing a beautiful floral card design featuring the new Spring Florals set from the May release. I pulled in a couple of previously released goodies to complete my design, like the Candy Bucket that I did some creative die cutting with to make a clay pot. And because lately I’ve been loving the look of inked die cuts, that’s what I did for this floral card. Keep reading to find a supply list and all the details about how I used the supplies to make this floral card. Let’s get started!
I started by creating the stenciled background panel. I used the Watercolor Rectangle stencil and blended Spring and Tidepool Pawsitively Saturated Inks for a soft and dreamy backdrop. I left the stencil in place and then first splattered some water across the panel before also lightly splattering Spellbinders Onyx Silk.
With the background panel finished, I got to work die cutting all the elements for my card from white cardstock. First I die cut the candy bucket and then shifted the die up a little on the die cut, keeping the sides aligned, and then die cut it again. This shortened the bucket, making it look more like a pot, and because the orientation of the card is landscape, it also gave me more room to tuck in flowers. Then I moved on to die cutting all of the flowers and greenery.
With the die cutting finished, my next step was to ink the die cuts using more Pawsitively Saturated Inks. For the pot, I used Clay and Nutmeg and then splattered it with water for some texture. I used Zest, Honey, and Sherbet for the daffodils and Peony and Rose for the tulips. I decided to leave the lily of the valley white, and for the greenery, I used Lucky and Fairway.
Finally, I assembled the die cuts, and before attaching them to my background panel, I stamped a greeting on the pot with black ink. Then I attached the pot to my background panel with foam squares, leaving space to tuck in all the flowers. Some flowers were secured with glue and others with foam squares to create dimension. The last step was to attach the panel to an A2 card base.
Thanks so much for reading about my floral card design featuring the new Spring Florals die set from the latest release. See you again soon!
The May 2025 Release is now available in the Pretty Pink Posh Shop and select retailers that carry our products. If you missed our post yesterday, we revealed all of the products in picture form, but if you would like to see them in a video, Mindy has that for you today!
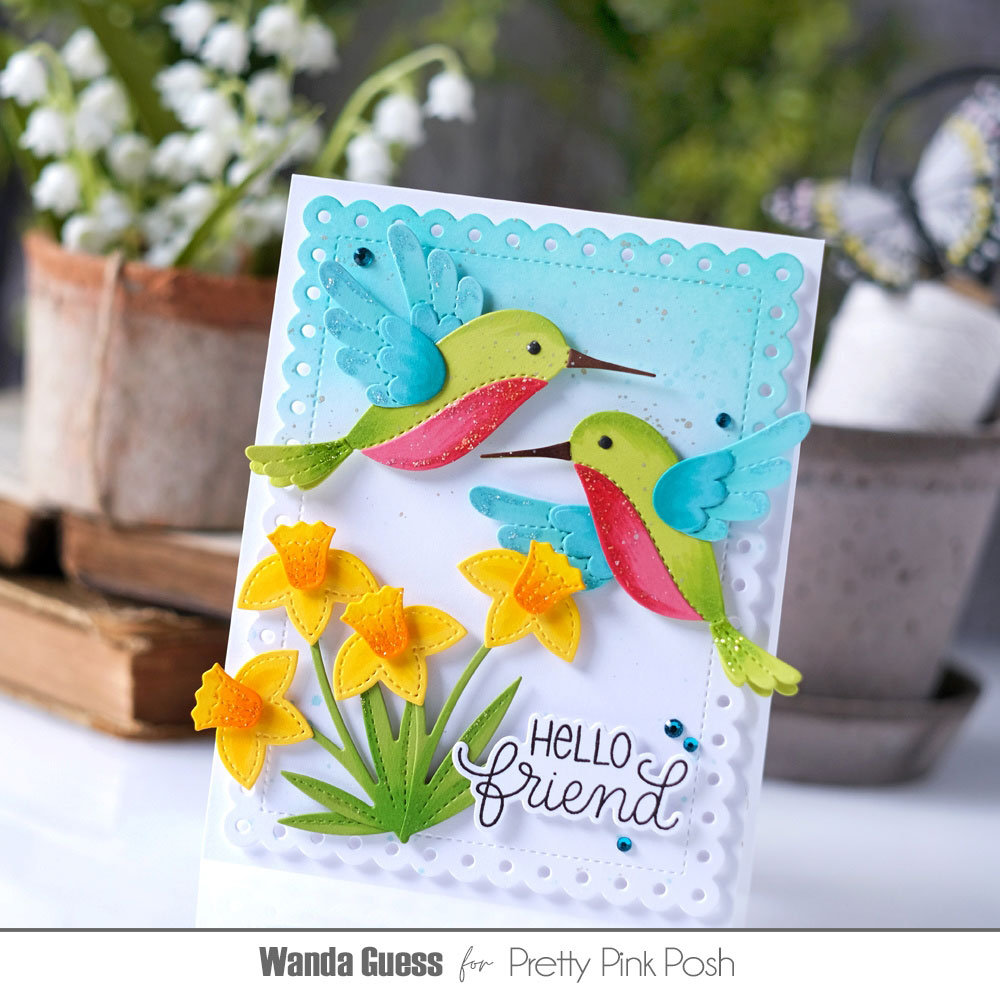
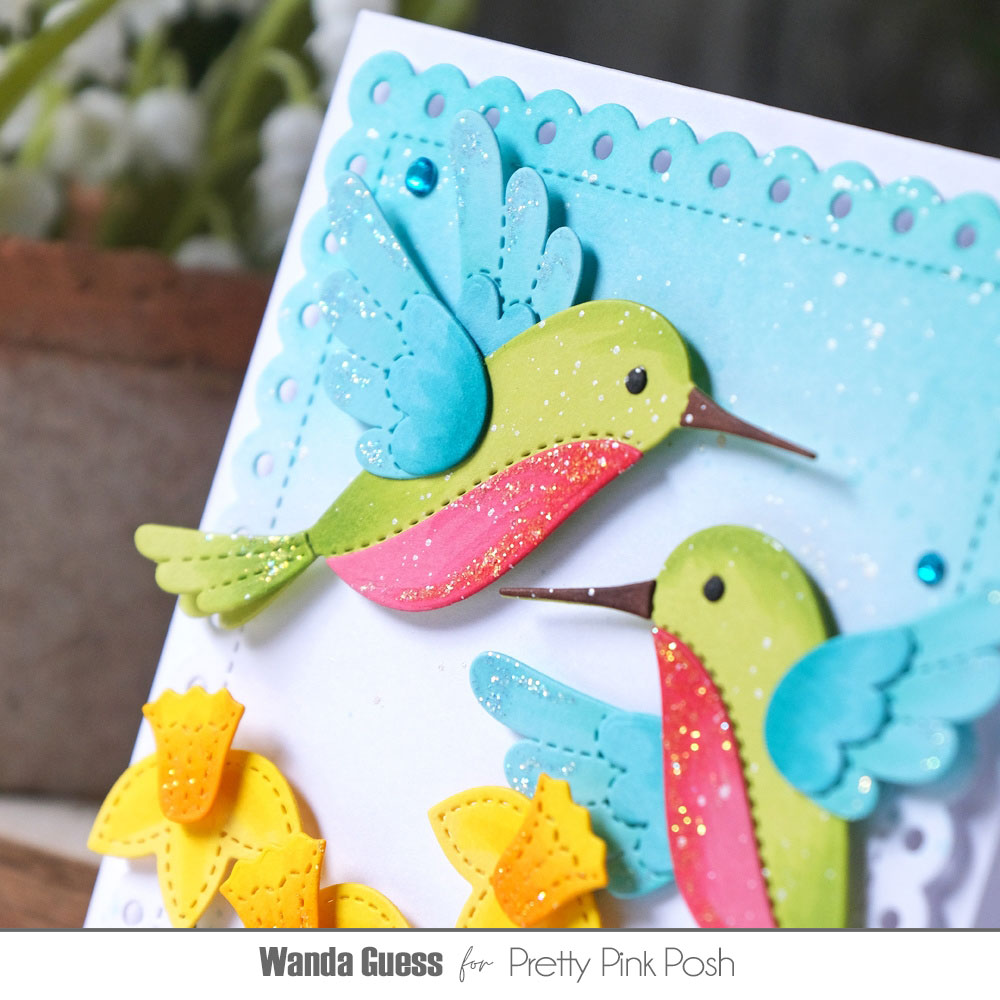
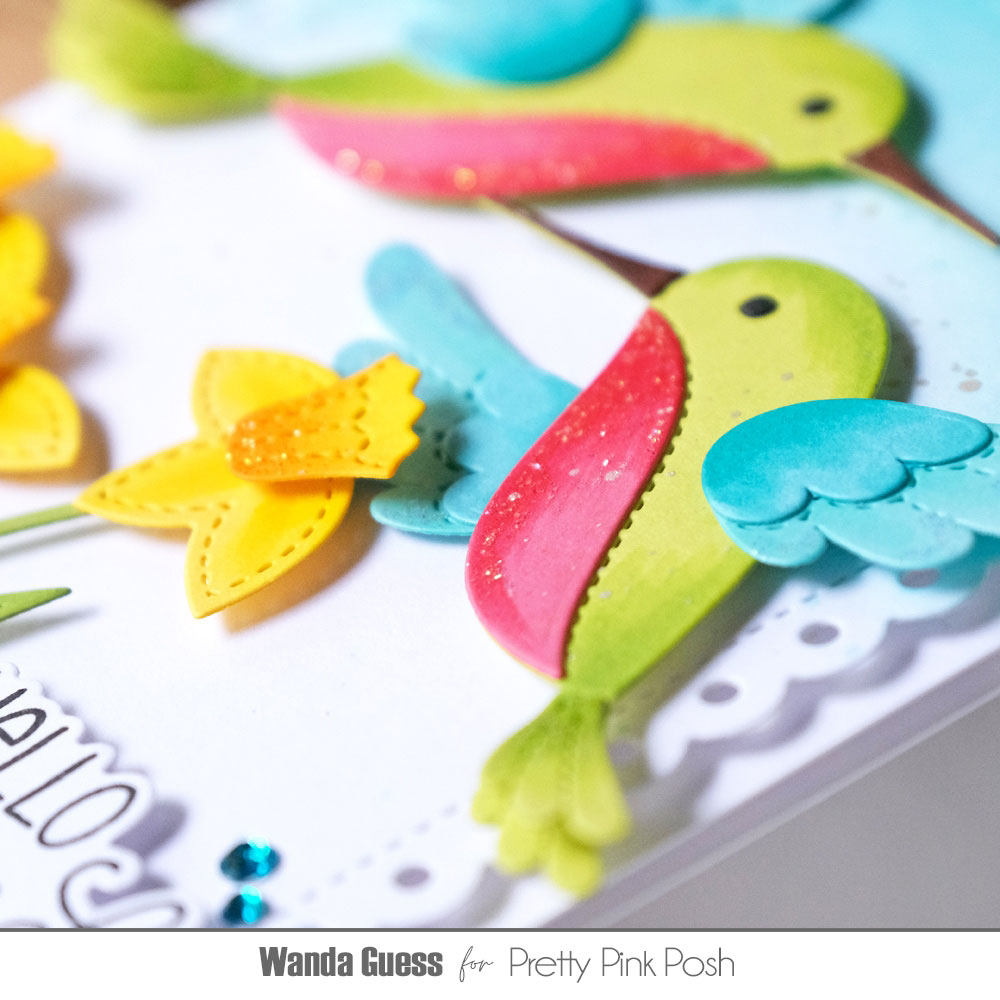
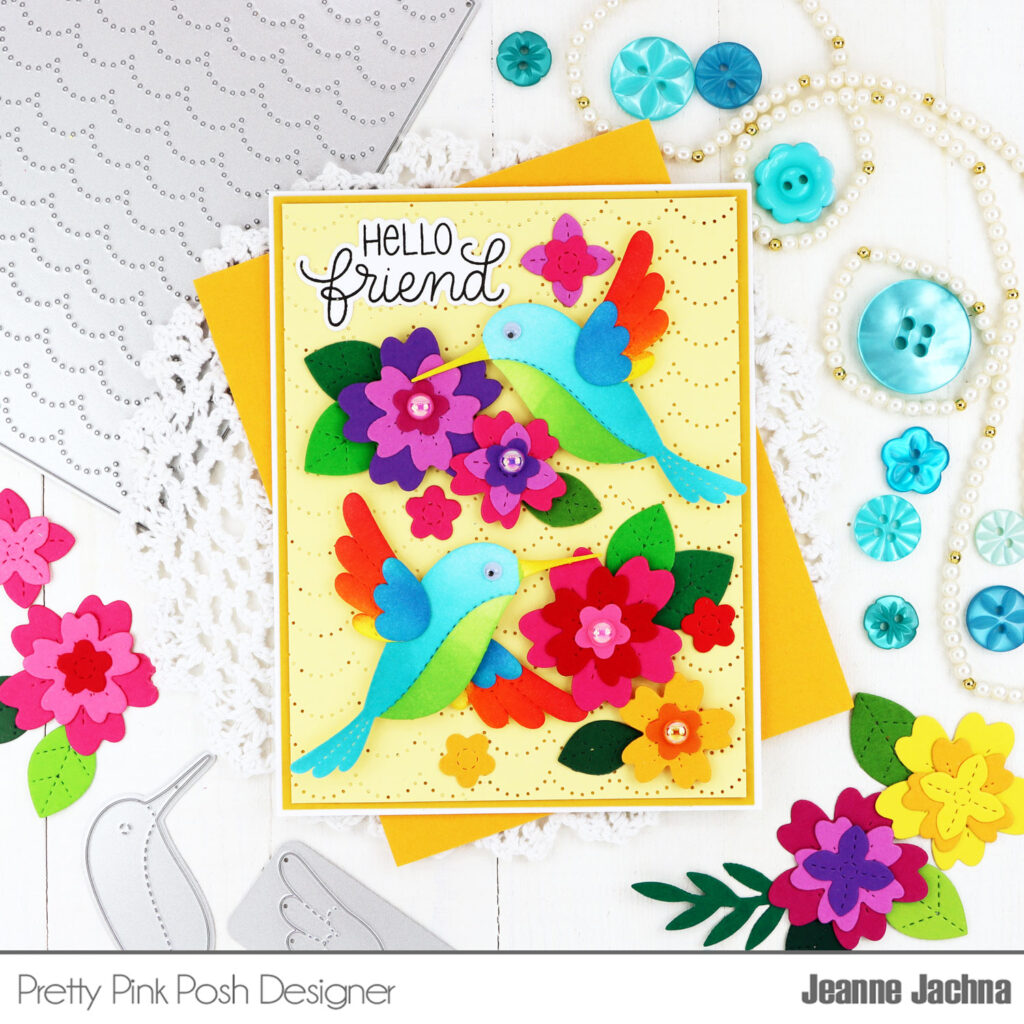
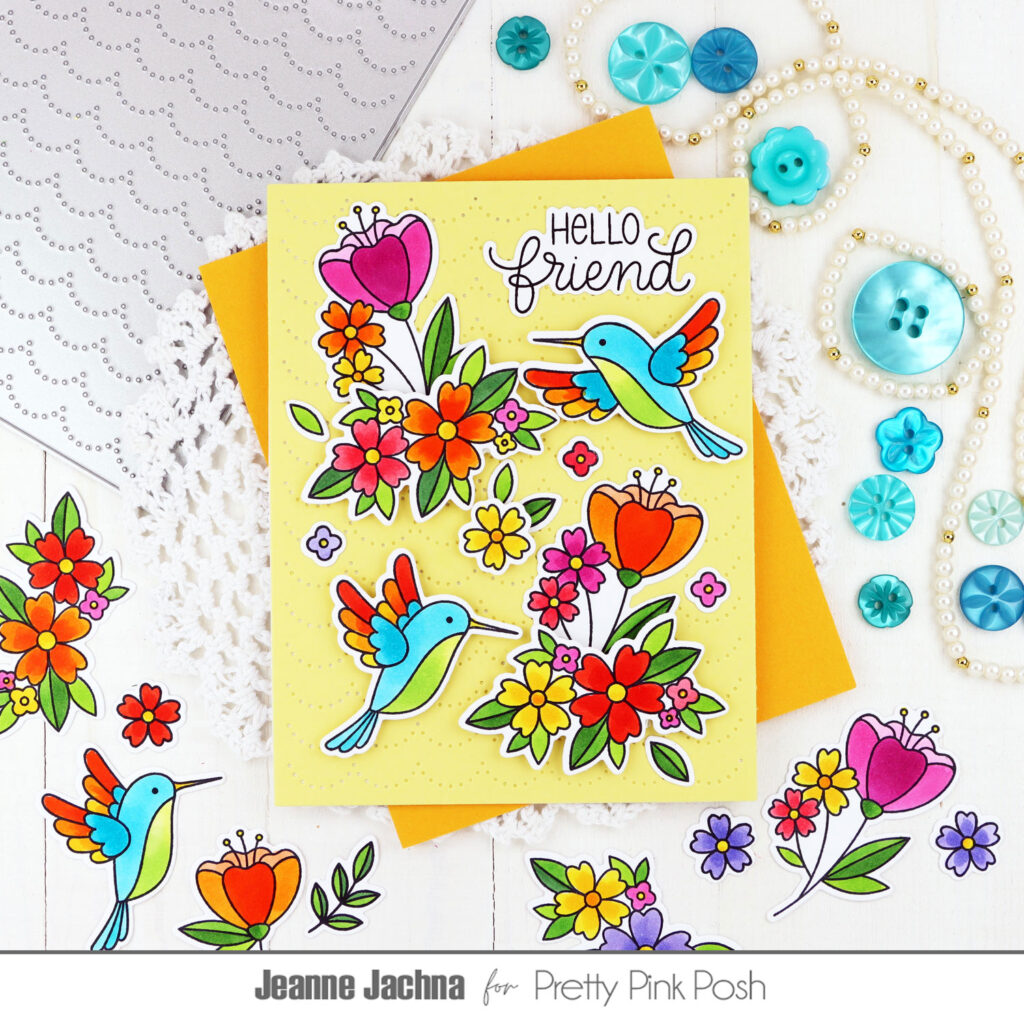
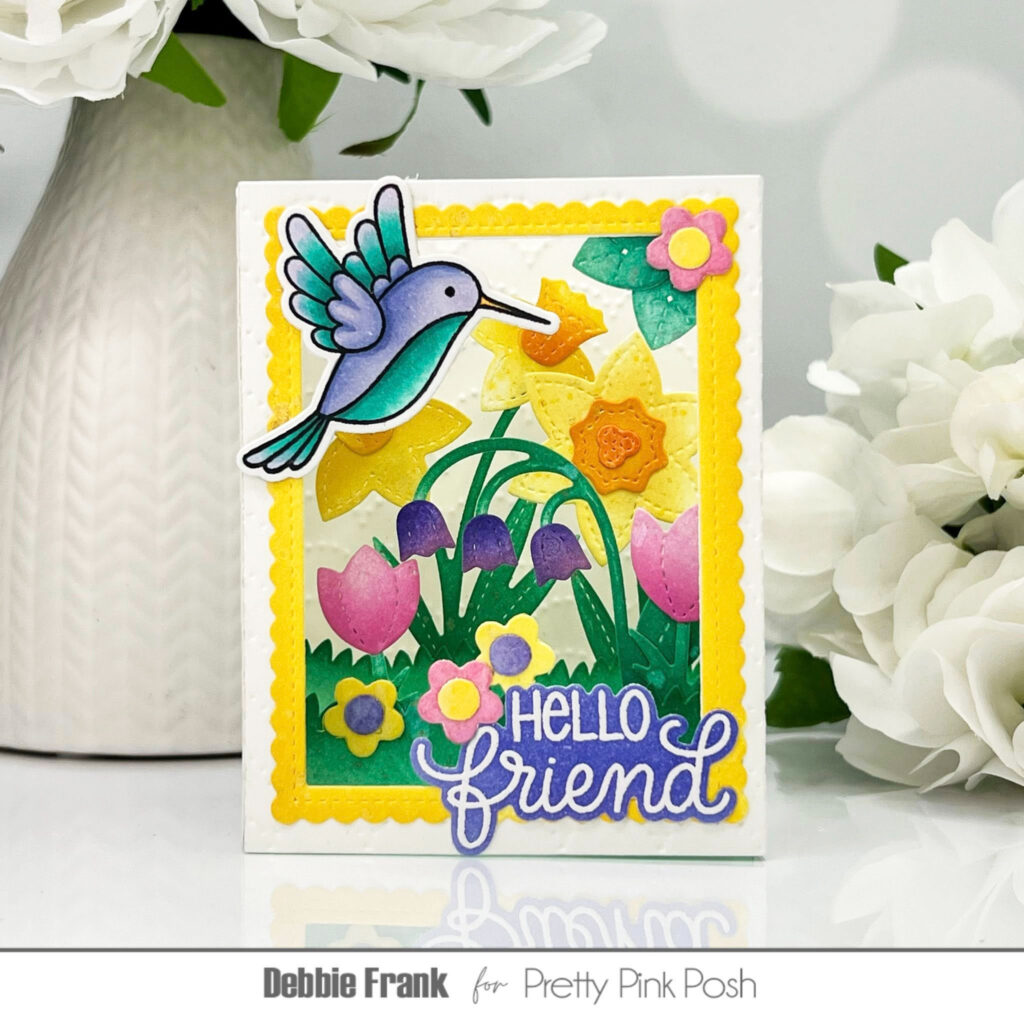
Hi there my crafty and creative friends! It’s Wanda here, guesting on the awesome PPP Blog today! I am very happy to join you for the new release this beautiful month of May! Time for pretty flowers and lovely birds! The prelude to Summer. The warmth of the sunshine, and bright, happy colors too! It’s all good!
I started this card by making my background. I die cut the Eyelet Rectangle and then used a blending brush and Salvaged Patina Distress Ink to ink just the top part of the card. I wanted it to look like a vivid Summer sky. I splattered on more Patina Ink and Silver paint splatters.
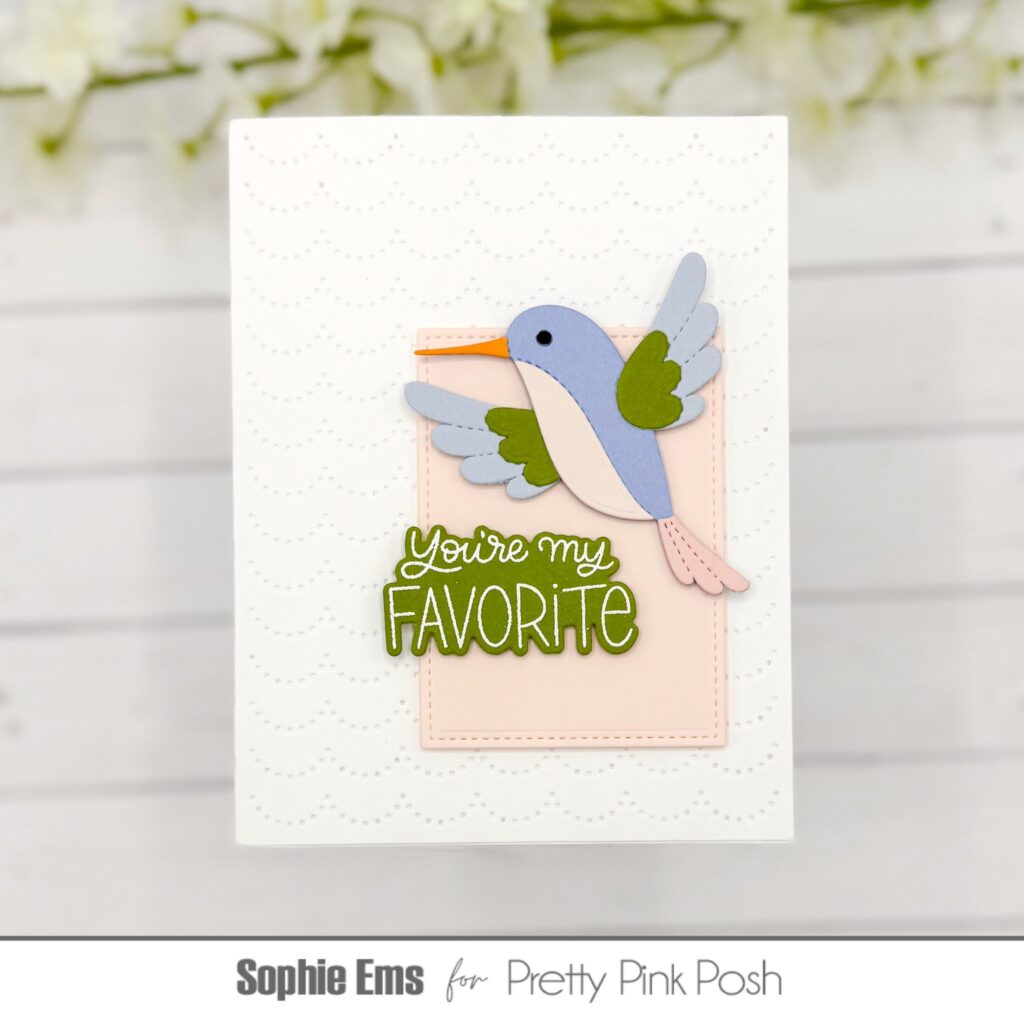
Next I used bright cardstocks and die cut out all the pieces for the hummingbirds and the daffodils. I used Copic Markers to add shading to all the die cut pieces. I assembled the two birds and the daffodils using liquid glue. I added lots of Diamond Stickles to everything to look like shiny hummingbirds, and dewy flowers.
I stamped the sentiment using the new Friend Greetings(I LOVE these) stamp set and die cut it with the matching dies. Hello Friend! It’s the perfect all occasion sentiment! Then, I added a few gems for just a little bit more sparkle.
Thank you so much to PPP for letting me share a project with you today. Wishing you a delightful and warm day. Keep on crafting!
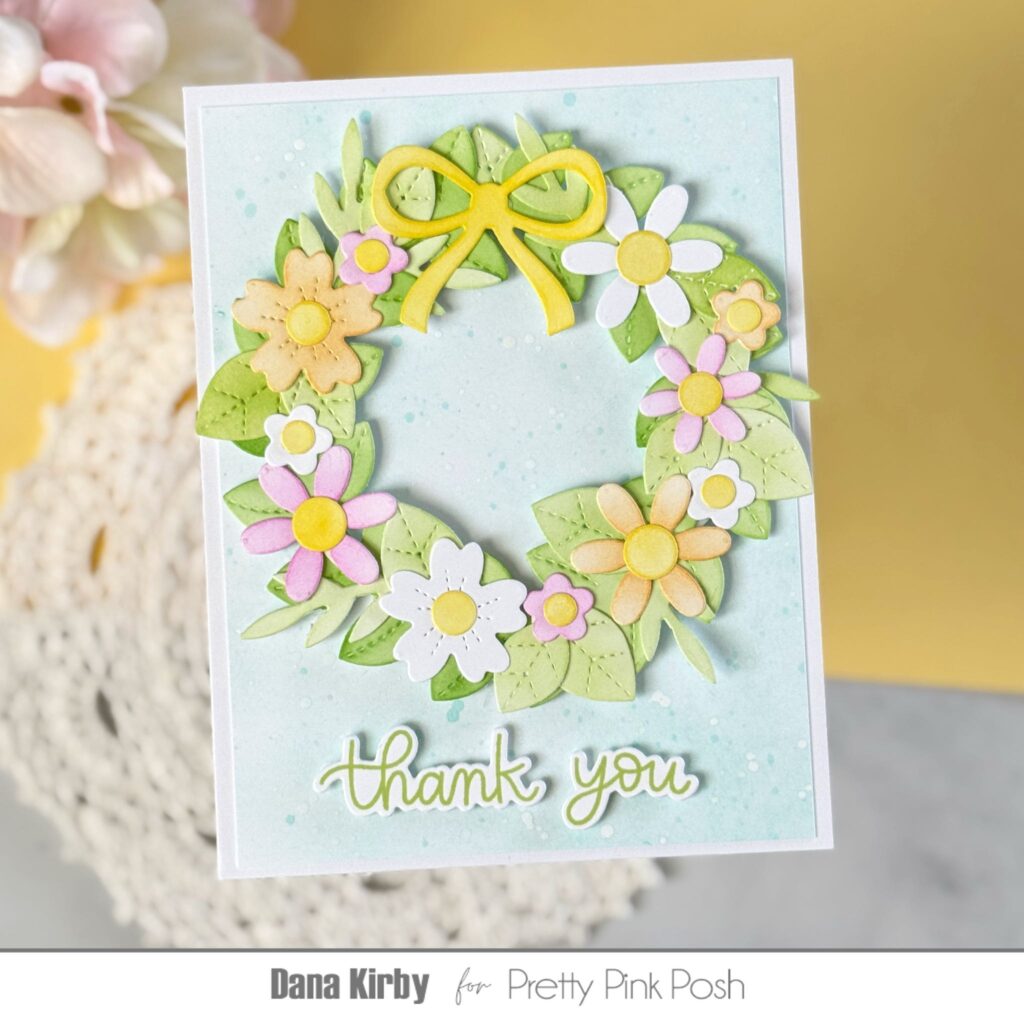
I began my first card using the beautiful Scallops Pierced Plate. This die is so delicate, detailed, and truly irresistible. The pierced detailing adds so much charm and sweet personality to any card.
The Floral Wreath Builder was used to create my focal point…it is a stunner! I chose to arrange my flowers across the bottom of my wreath adding a bow and more wispy leaves at the top. I die cut a few of the leaves from patterned paper and scattered them around my wreath.
My sentiment is from the new Friend Greetings stamp set anddies and is the perfect size to nestle inside the opening of my wreath. You’ll love arranging your florals in creative ways around your own wreath!
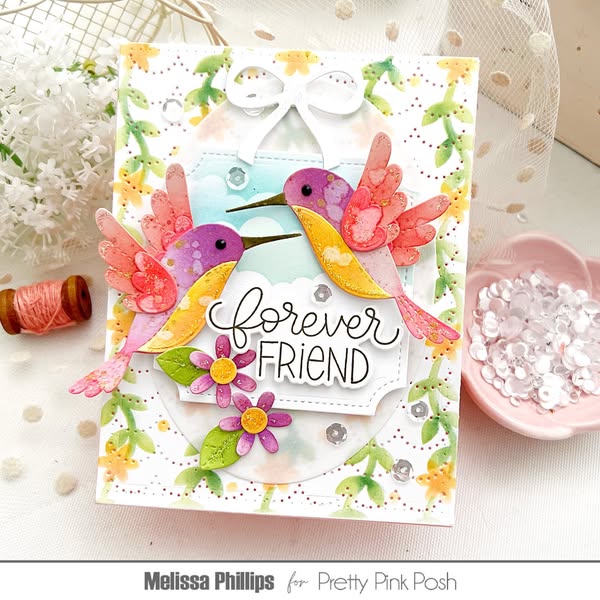
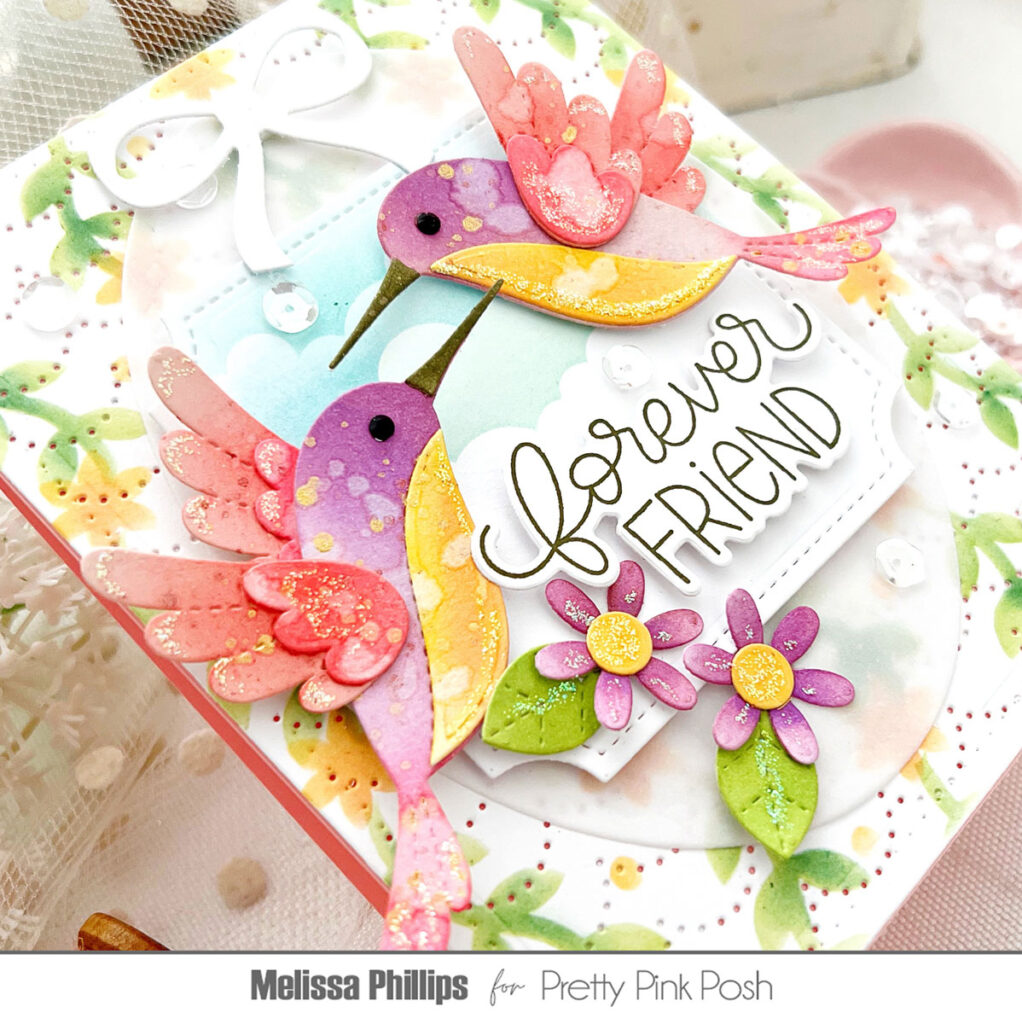
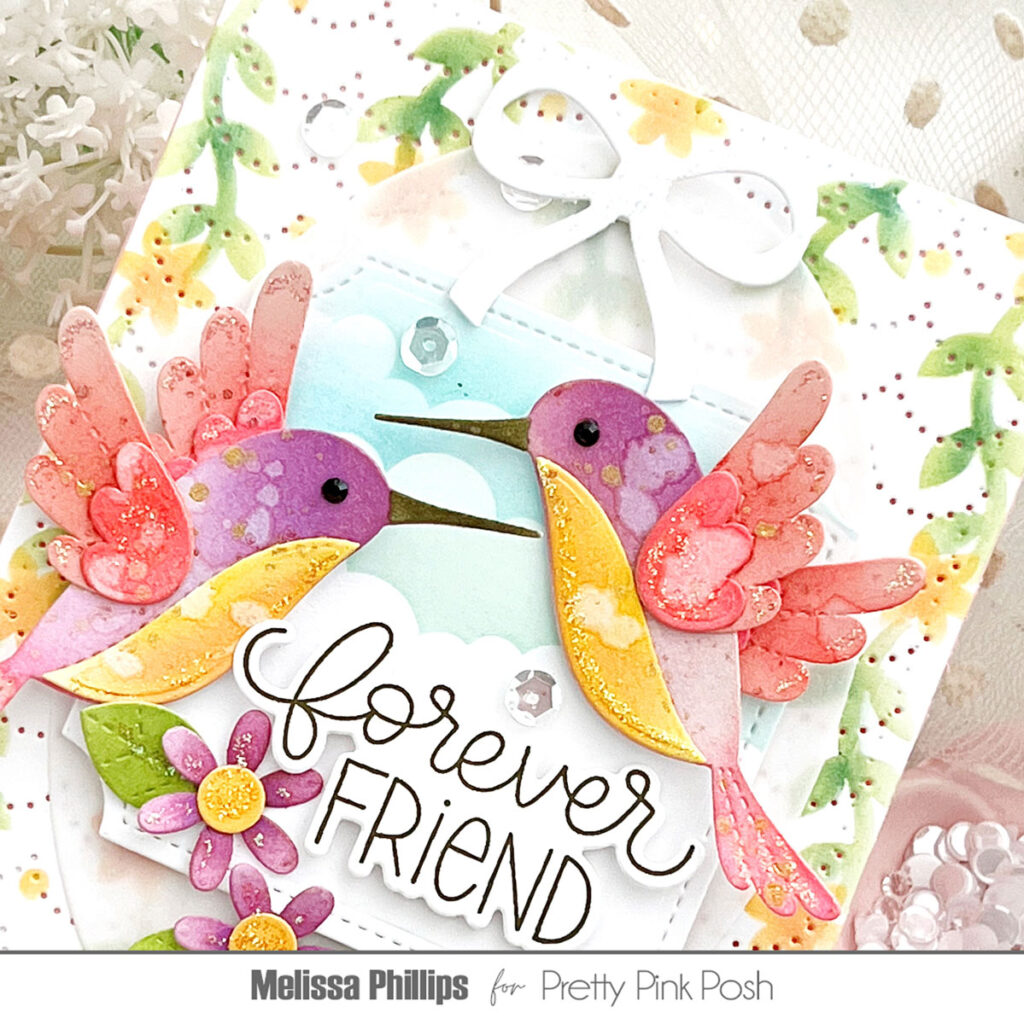
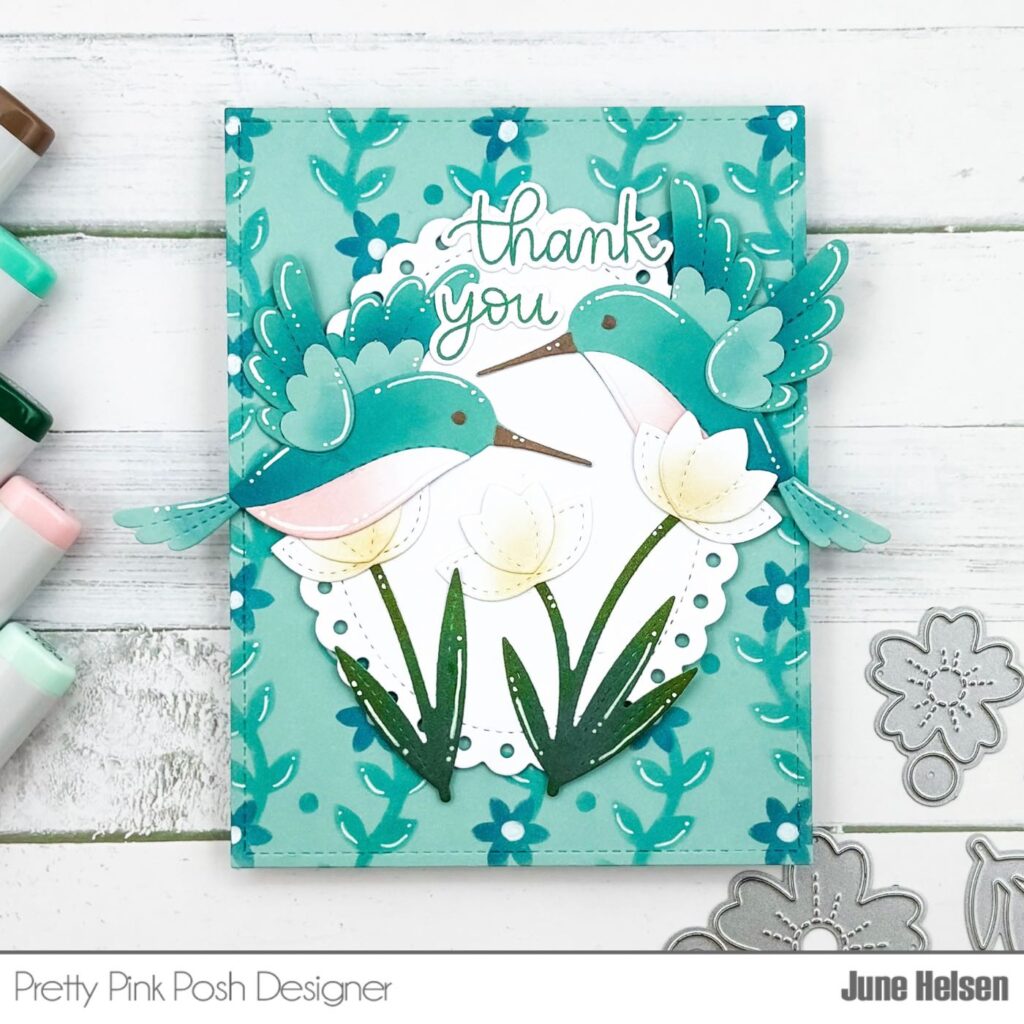
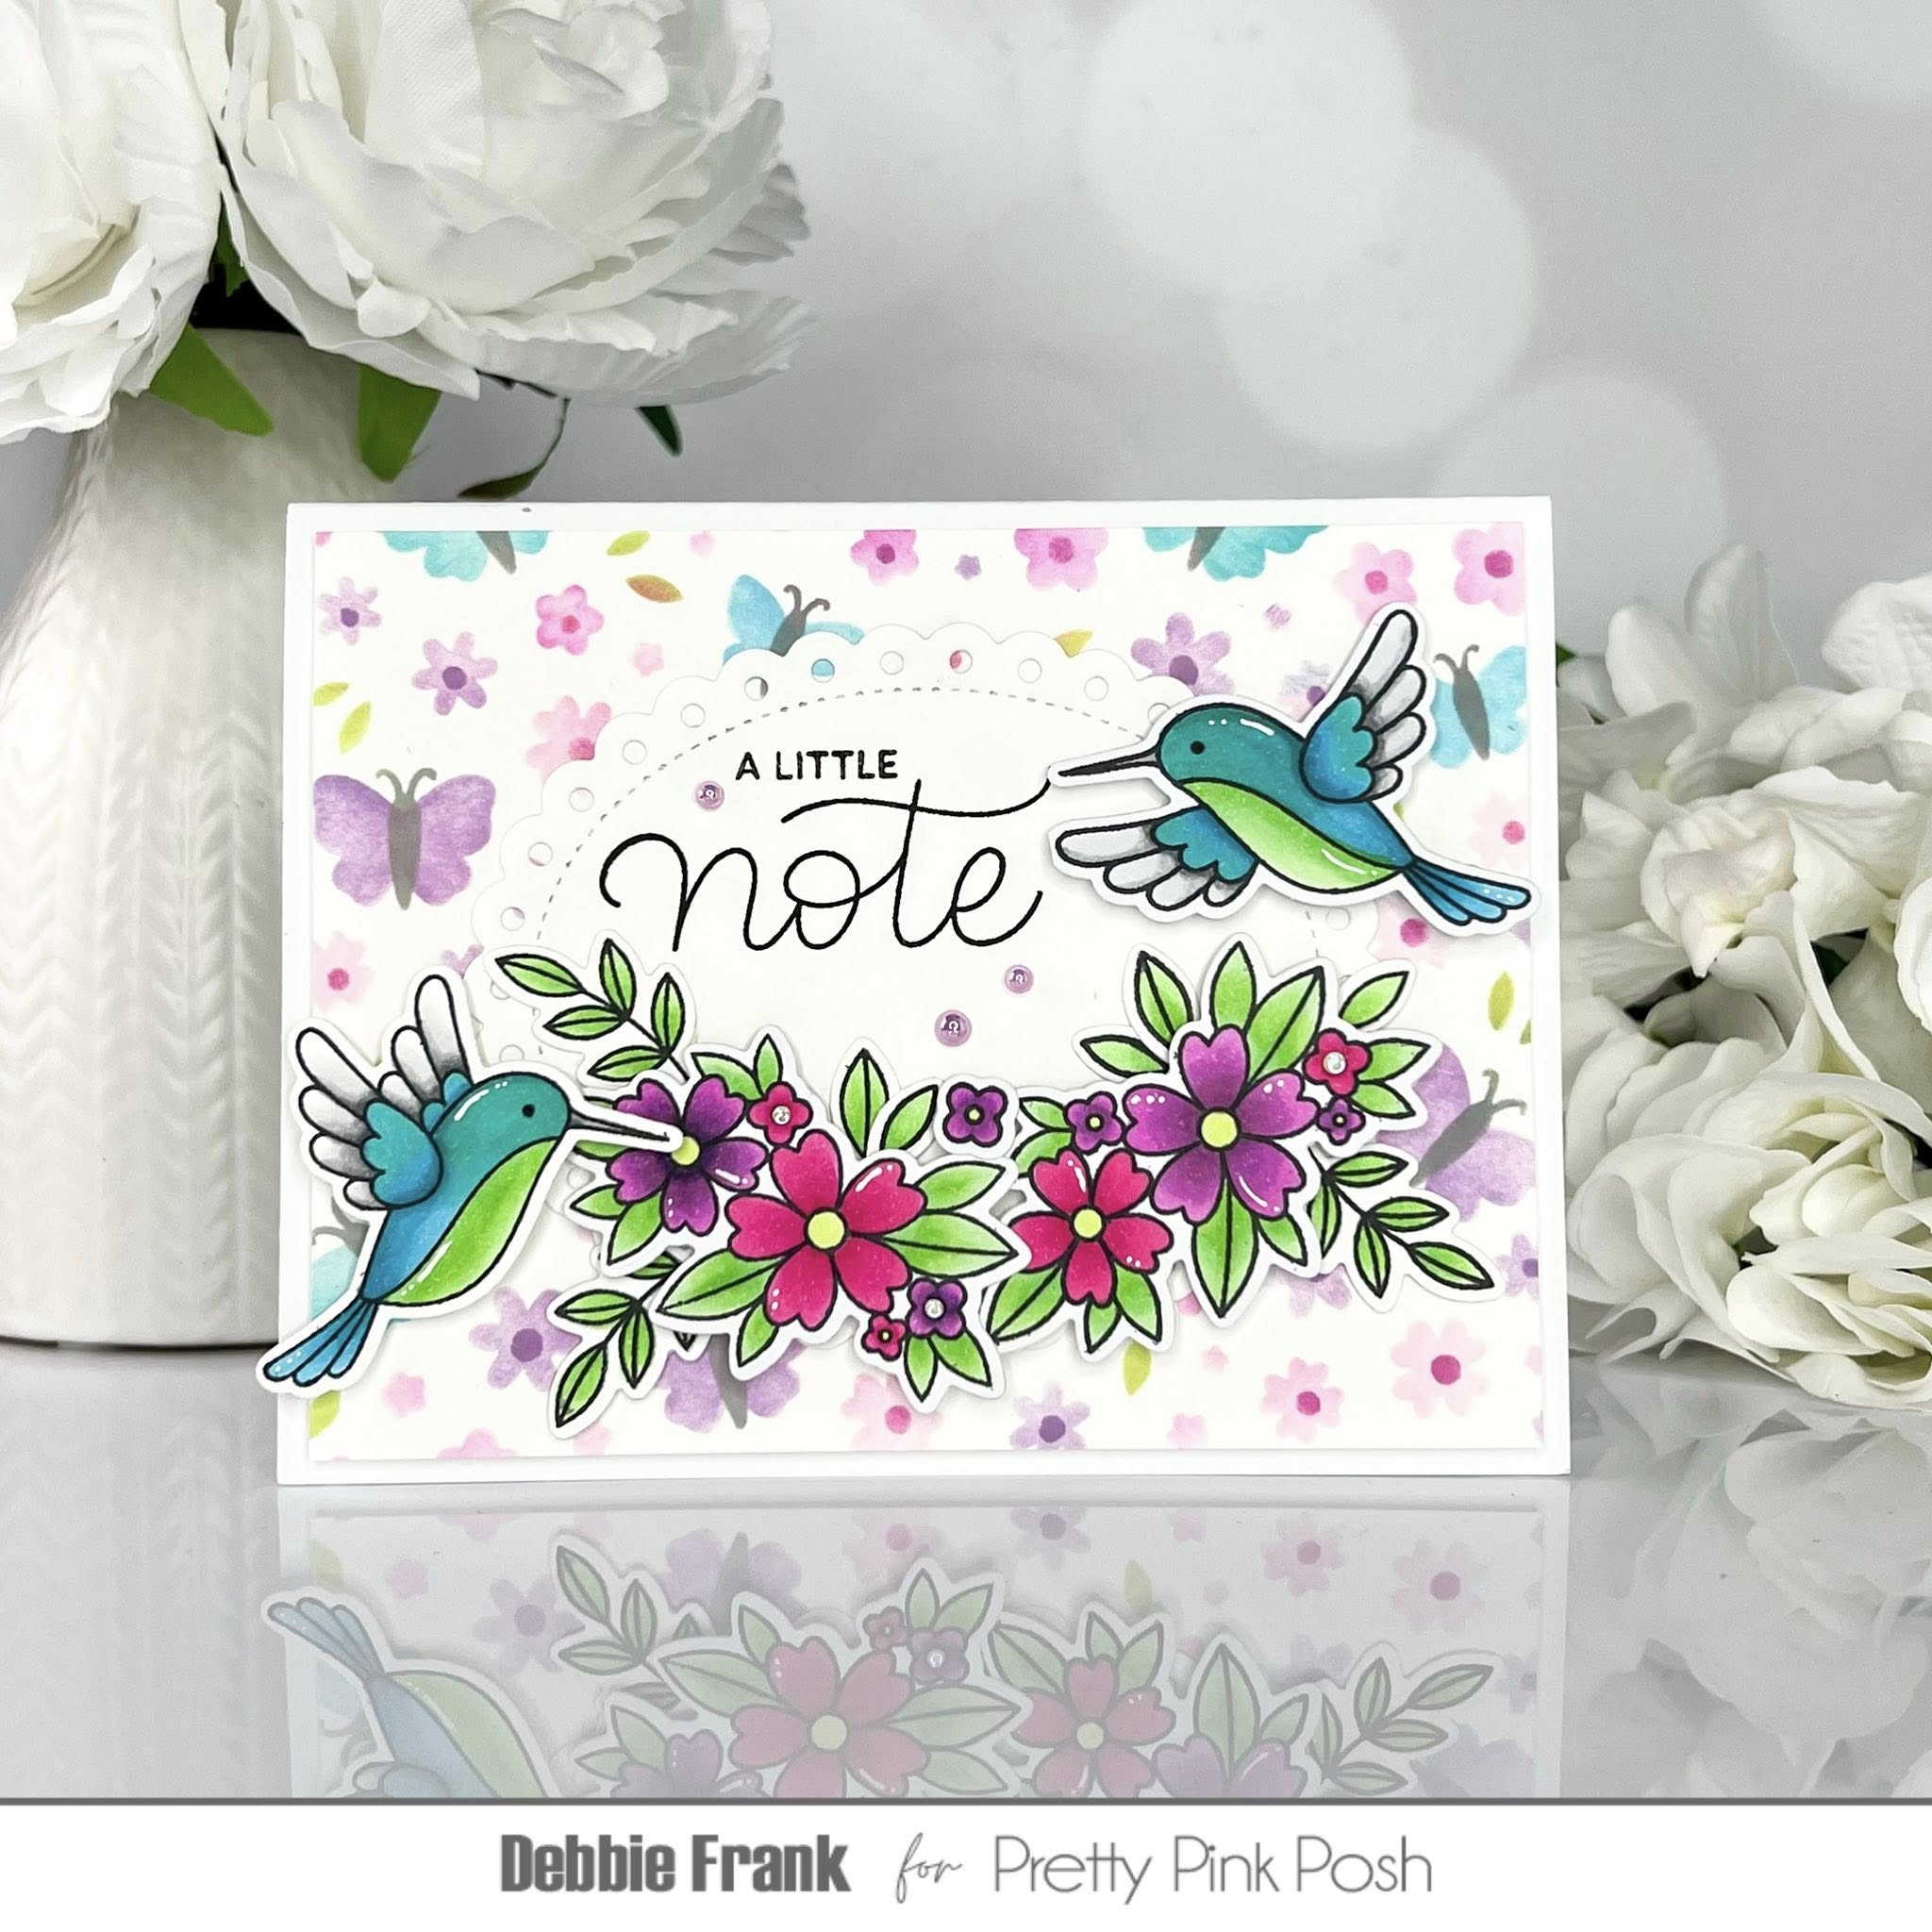
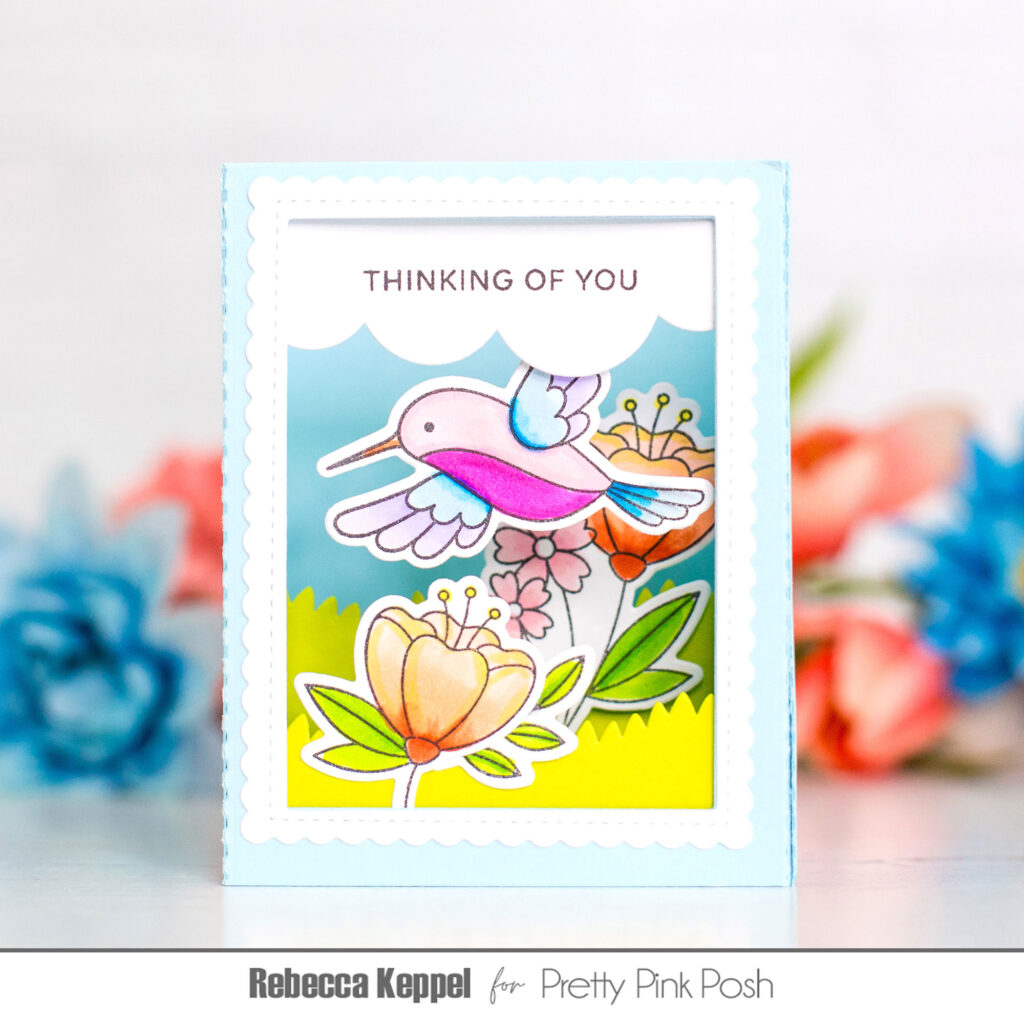
My next card uses the newStitched Hummingbird dies. These tiny birds bring in so much color and charm…I adore them! I ink blended both of my birds then added water droplets to create a soft, ethereal, watercolor look and feel.
They are layering over a Notched Squares diethat I stenciled to create a cloudy, sunshiny sky. Once again, my sentiment is from the Friend Greetings stamp and dies sets. I love this sentiment, don’t you?
Welcome to day 3 of sneak peeks for our May 7th release. This release includes five stamp sets (four with coordinating dies) that are so fun and easy to create with.
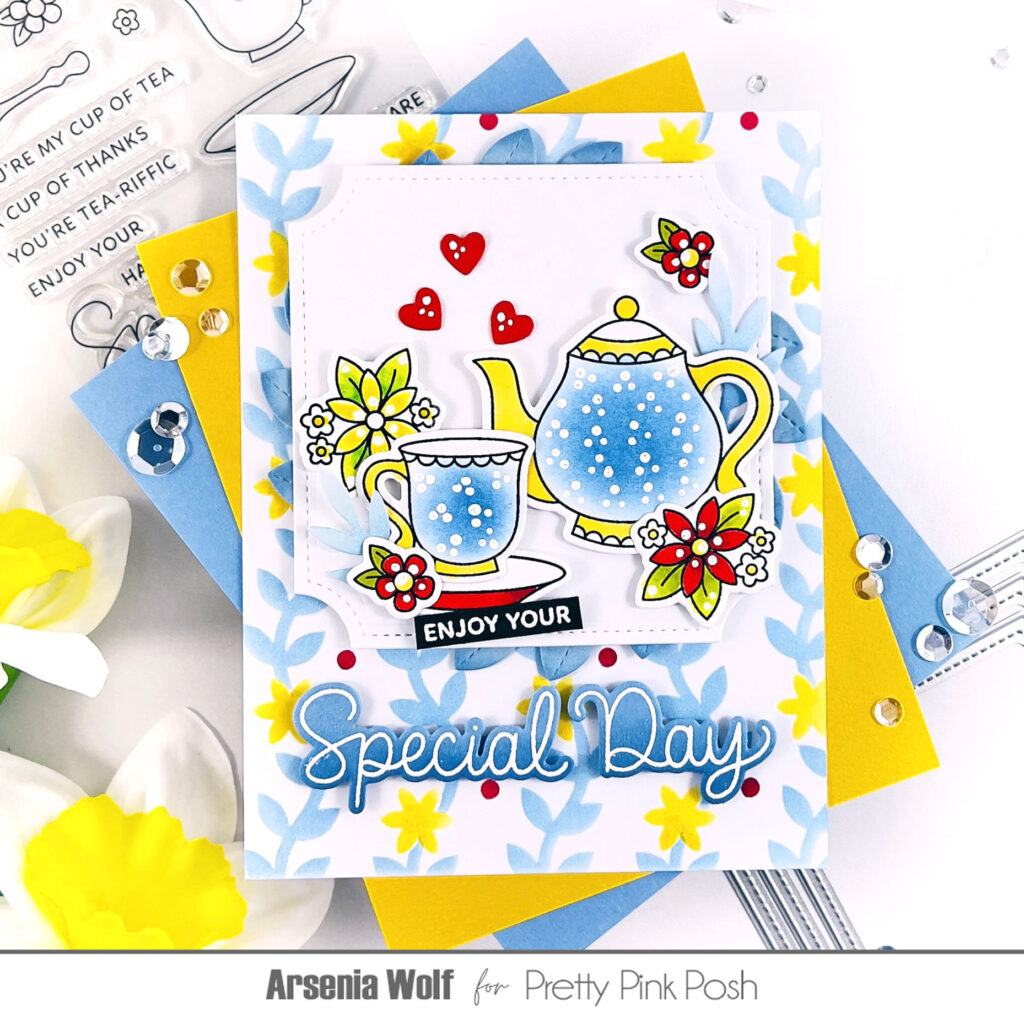
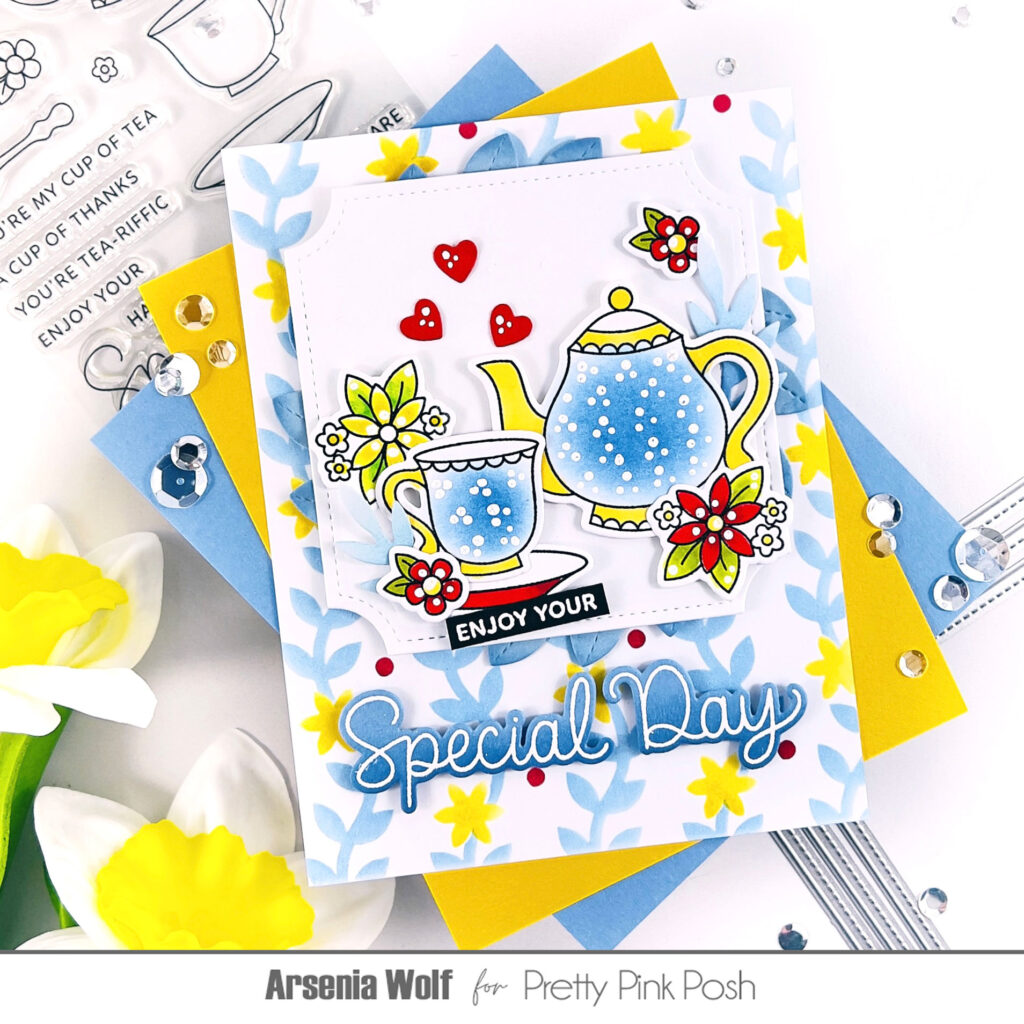
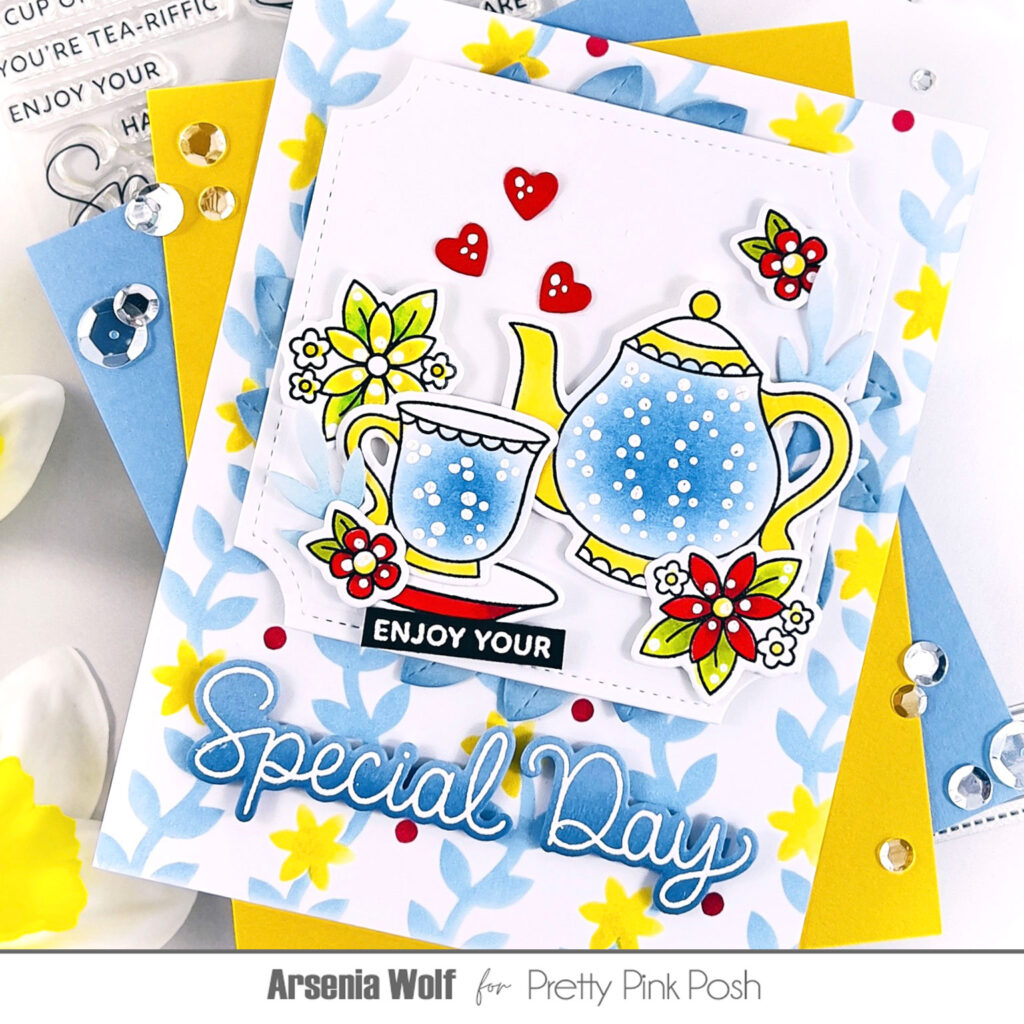
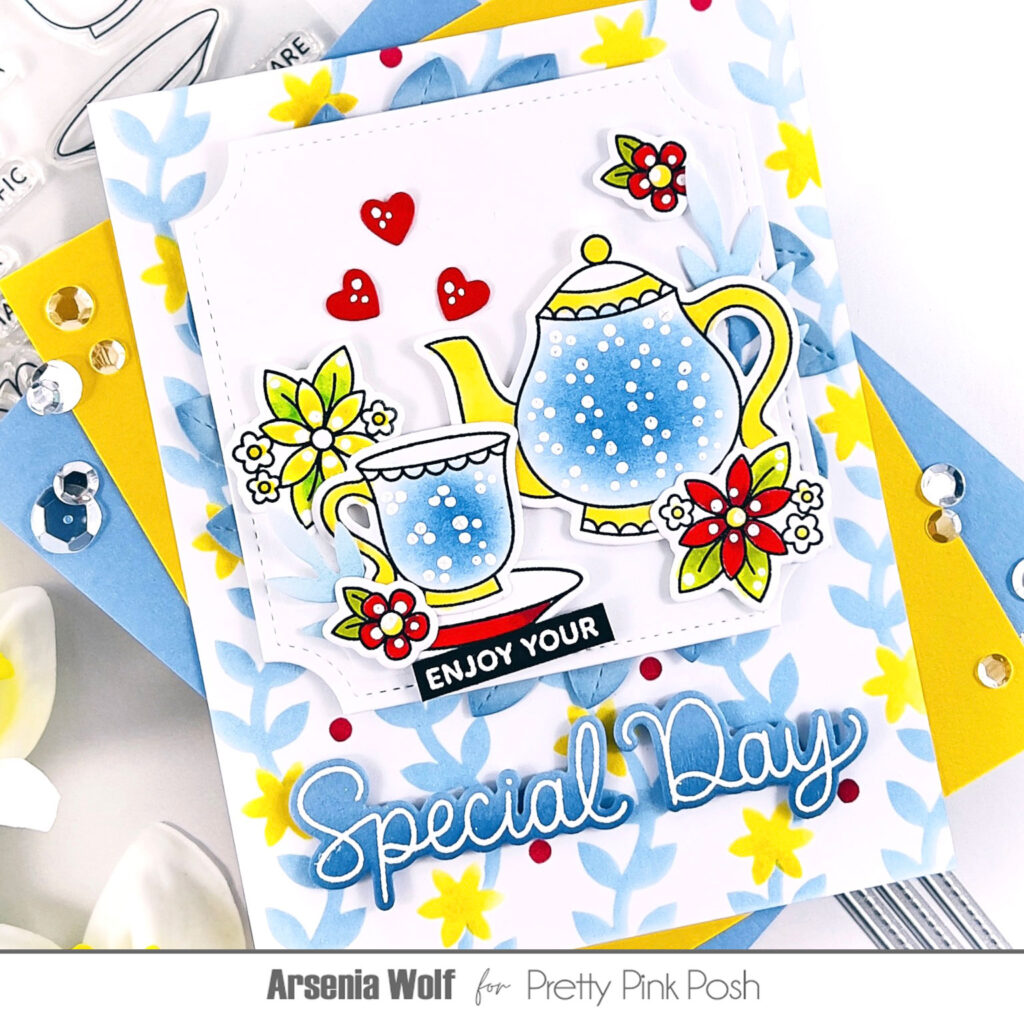
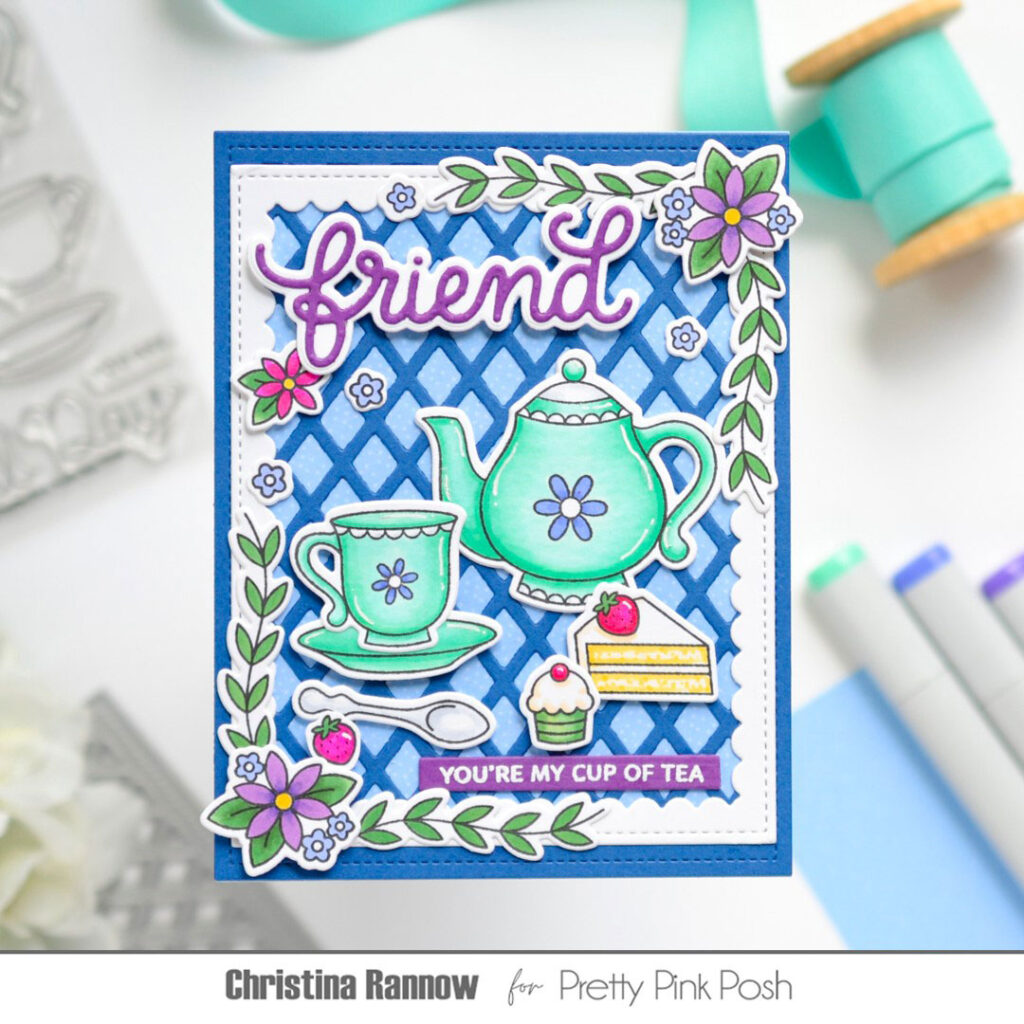
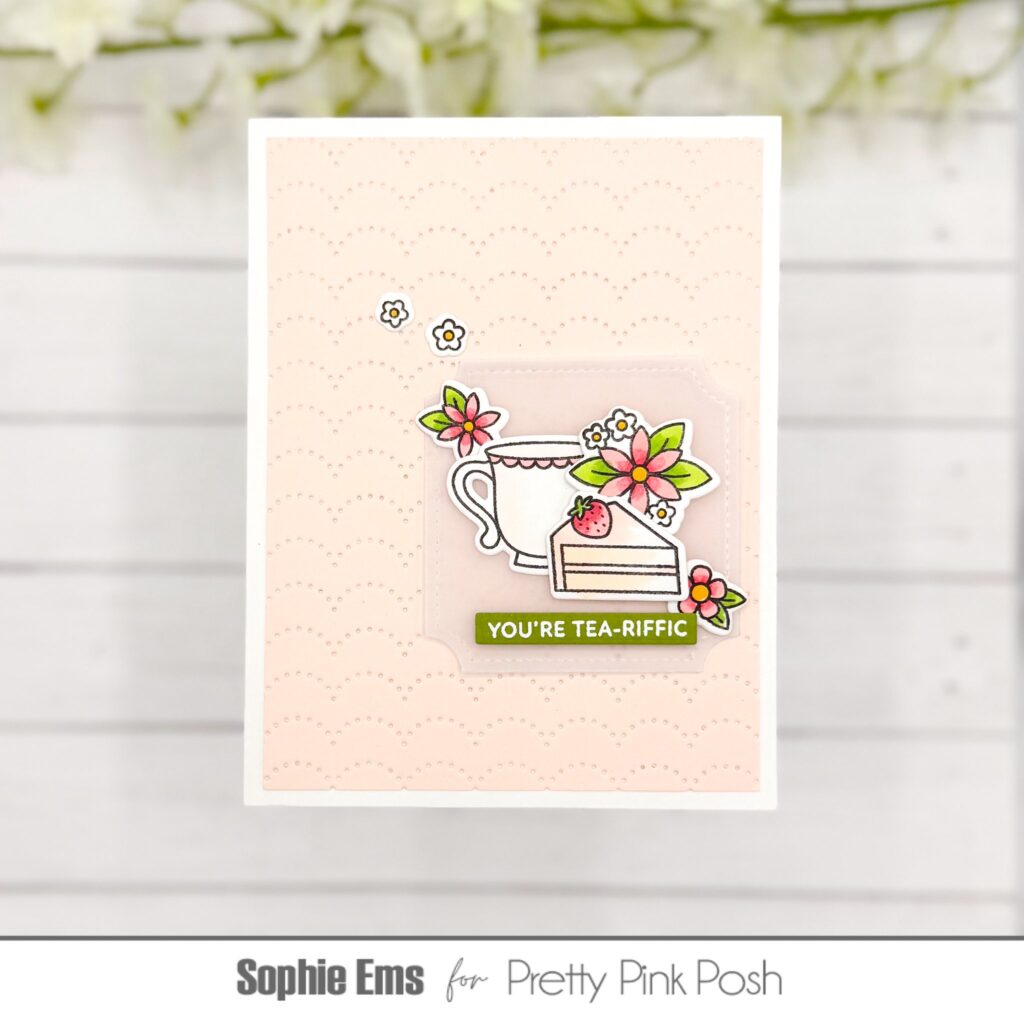
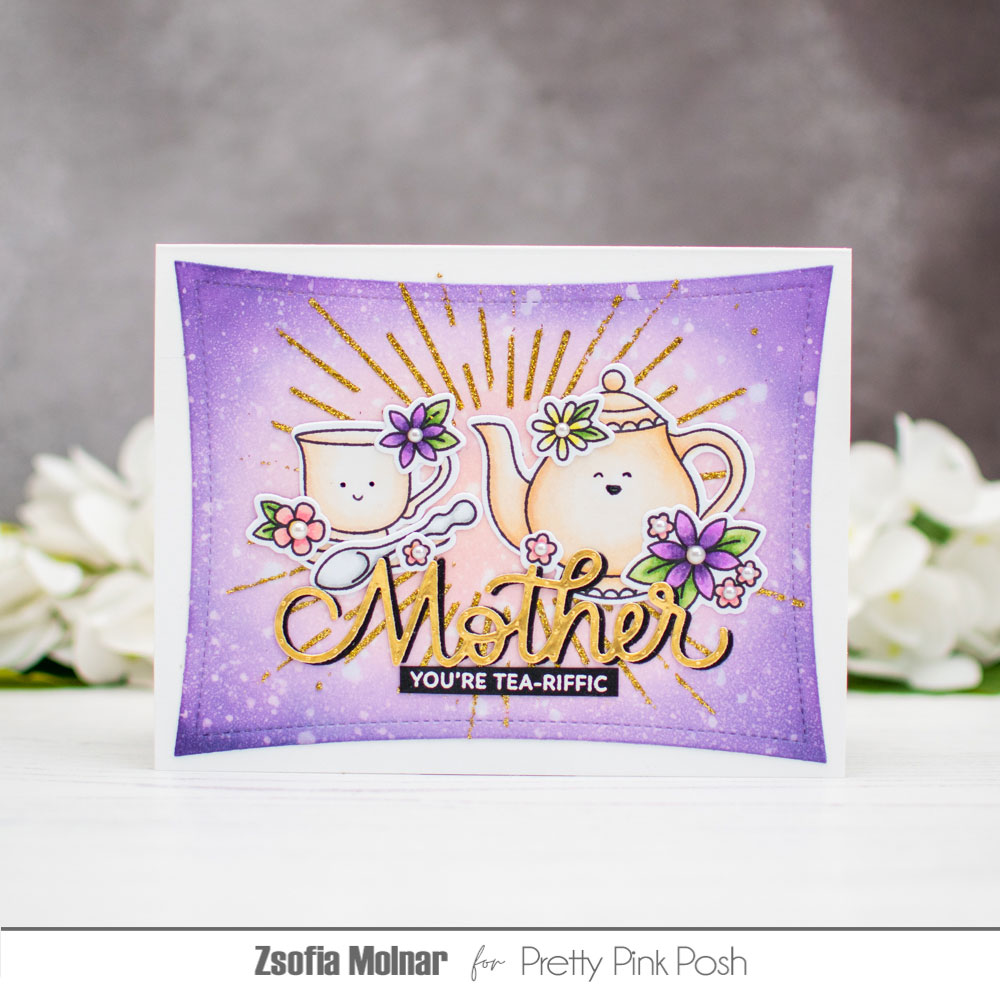
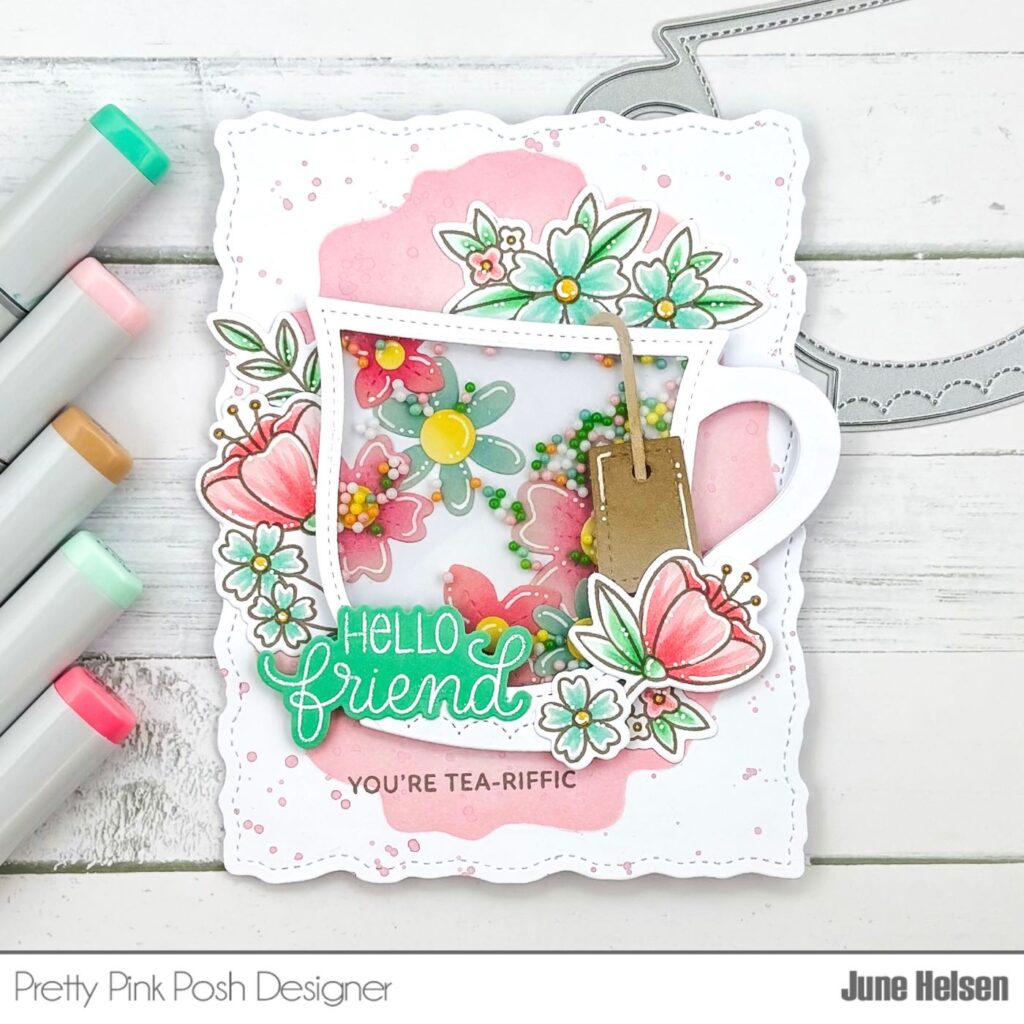
Hey there, crafty friends! It’s Arsenia here, and I am steeping with excitement to spill the tea on a sneak peek that’s as sweet as sugar cubes in your favorite cuppa!
I’ve been brewing up something special with the delightfully whimsical TeaTime Stamp Set—and yes, I absolutely brought the coordinating dies to the party. This charming set is overflowing with creative potential for all kinds of occasions, but today, I’m serving up a cheerful birthday card! Because let’s be real… can you ever have too many birthday cards on hand? (Didn’t think so.).
So grab your favorite beverage and settle in—because this crafty moment is steeped in fun (you know I had to).
First, I stamped out the sweet images from the Tea Time Stamp set and colored them in with my trusty Olo Markers, using soft blues, sunny yellows, and bright red tones. Then came the magical moment—cutting them out with the Tea Time coordinating dies. And let me tell you, these images? Absolutely adorable.
For the background, I played with the fabulous new Layered Blooming Vines Stencil—and oh my goodness, I’m obsessed! I used dye inks in shades that matched my colored images for a cohesive, whimsical look that totally ties the scene together.
To anchor the design, I reached for my new go-to: the Notched Squares Die Set. It created the perfect little frame for my tea party to unfold.
To finish it all off, I tucked in a few leafy bits from the new Floral Wreath Builder Die Set(another must-have—you’ll see why soon!), stamped and die-cut the perfect sentiment using the Tea Time setwithcoordinating dies, and sprinkled in a few hearts from the Build A Heart Die Set for that extra dash of sweetness.
And voilà—one charming, cheerful birthday card all done and dusted! I’m totally in love with how it turned out, and I can’t wait to show you even more tea-rific inspiration soon.
Stay tuned, crafty friends—there’s so much more fun on the way!
I hope you’re as excited as I am about these new stamps as we are. The possibilities are endless!
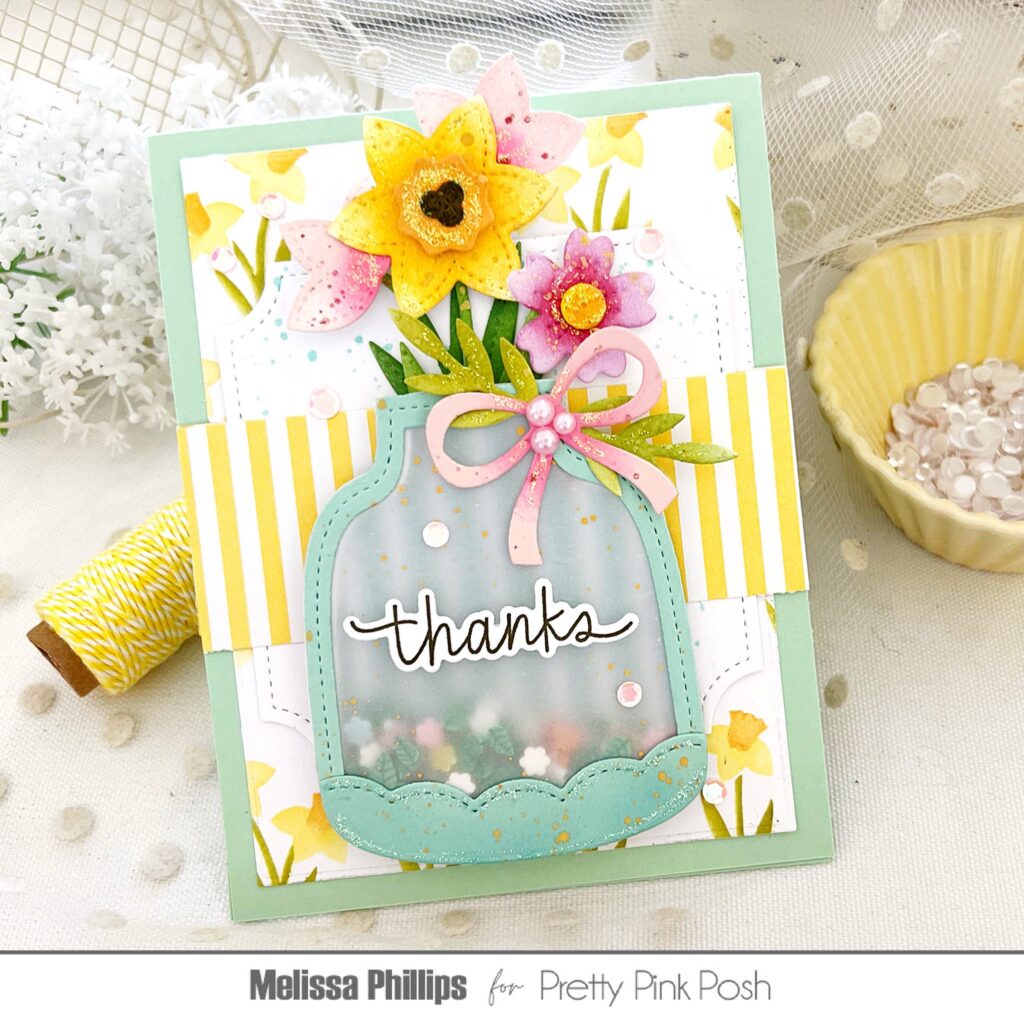
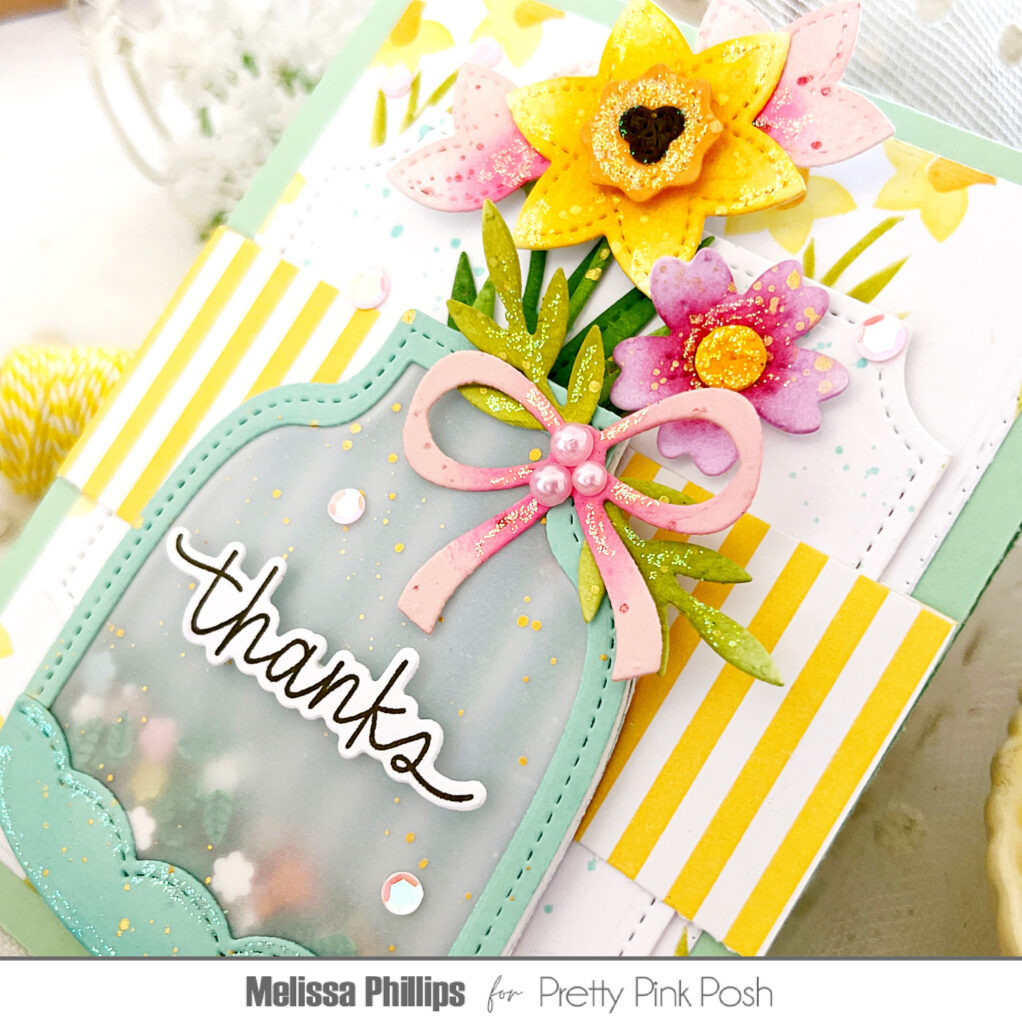
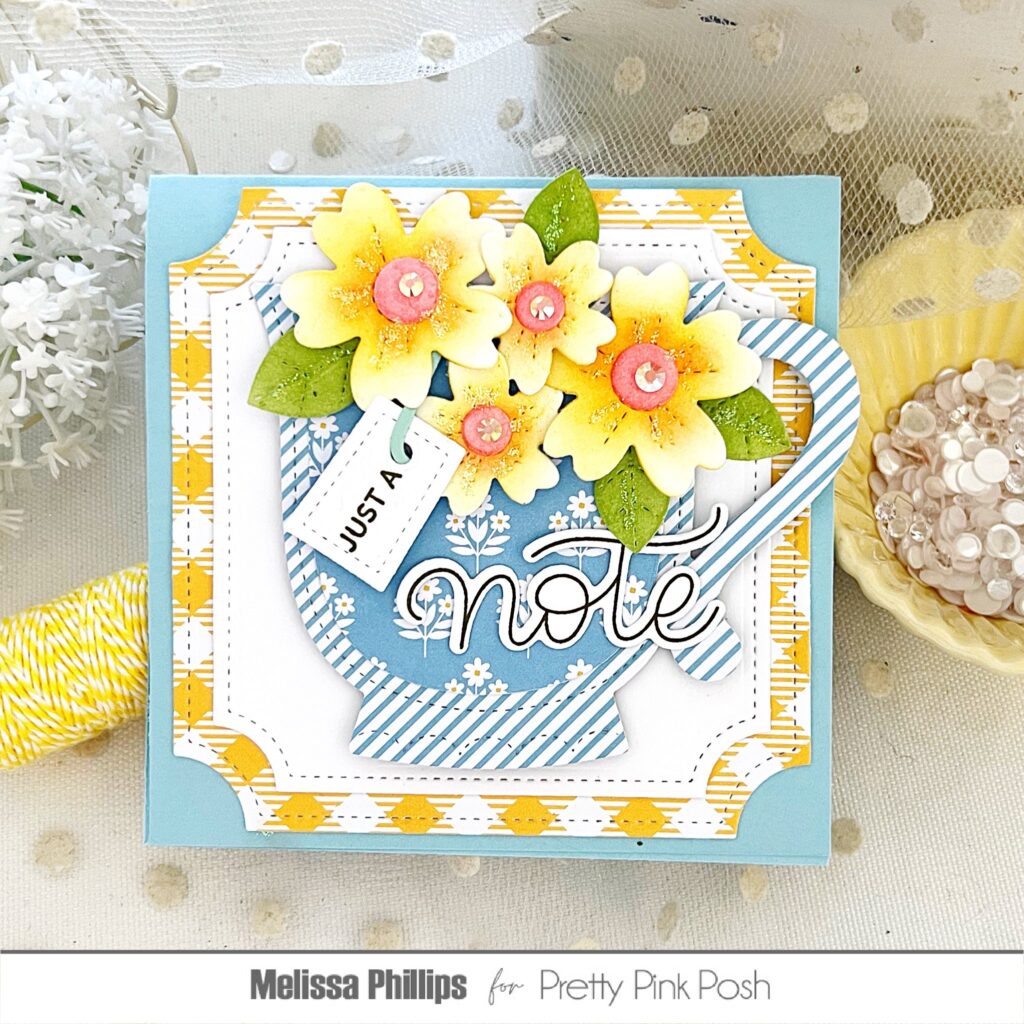
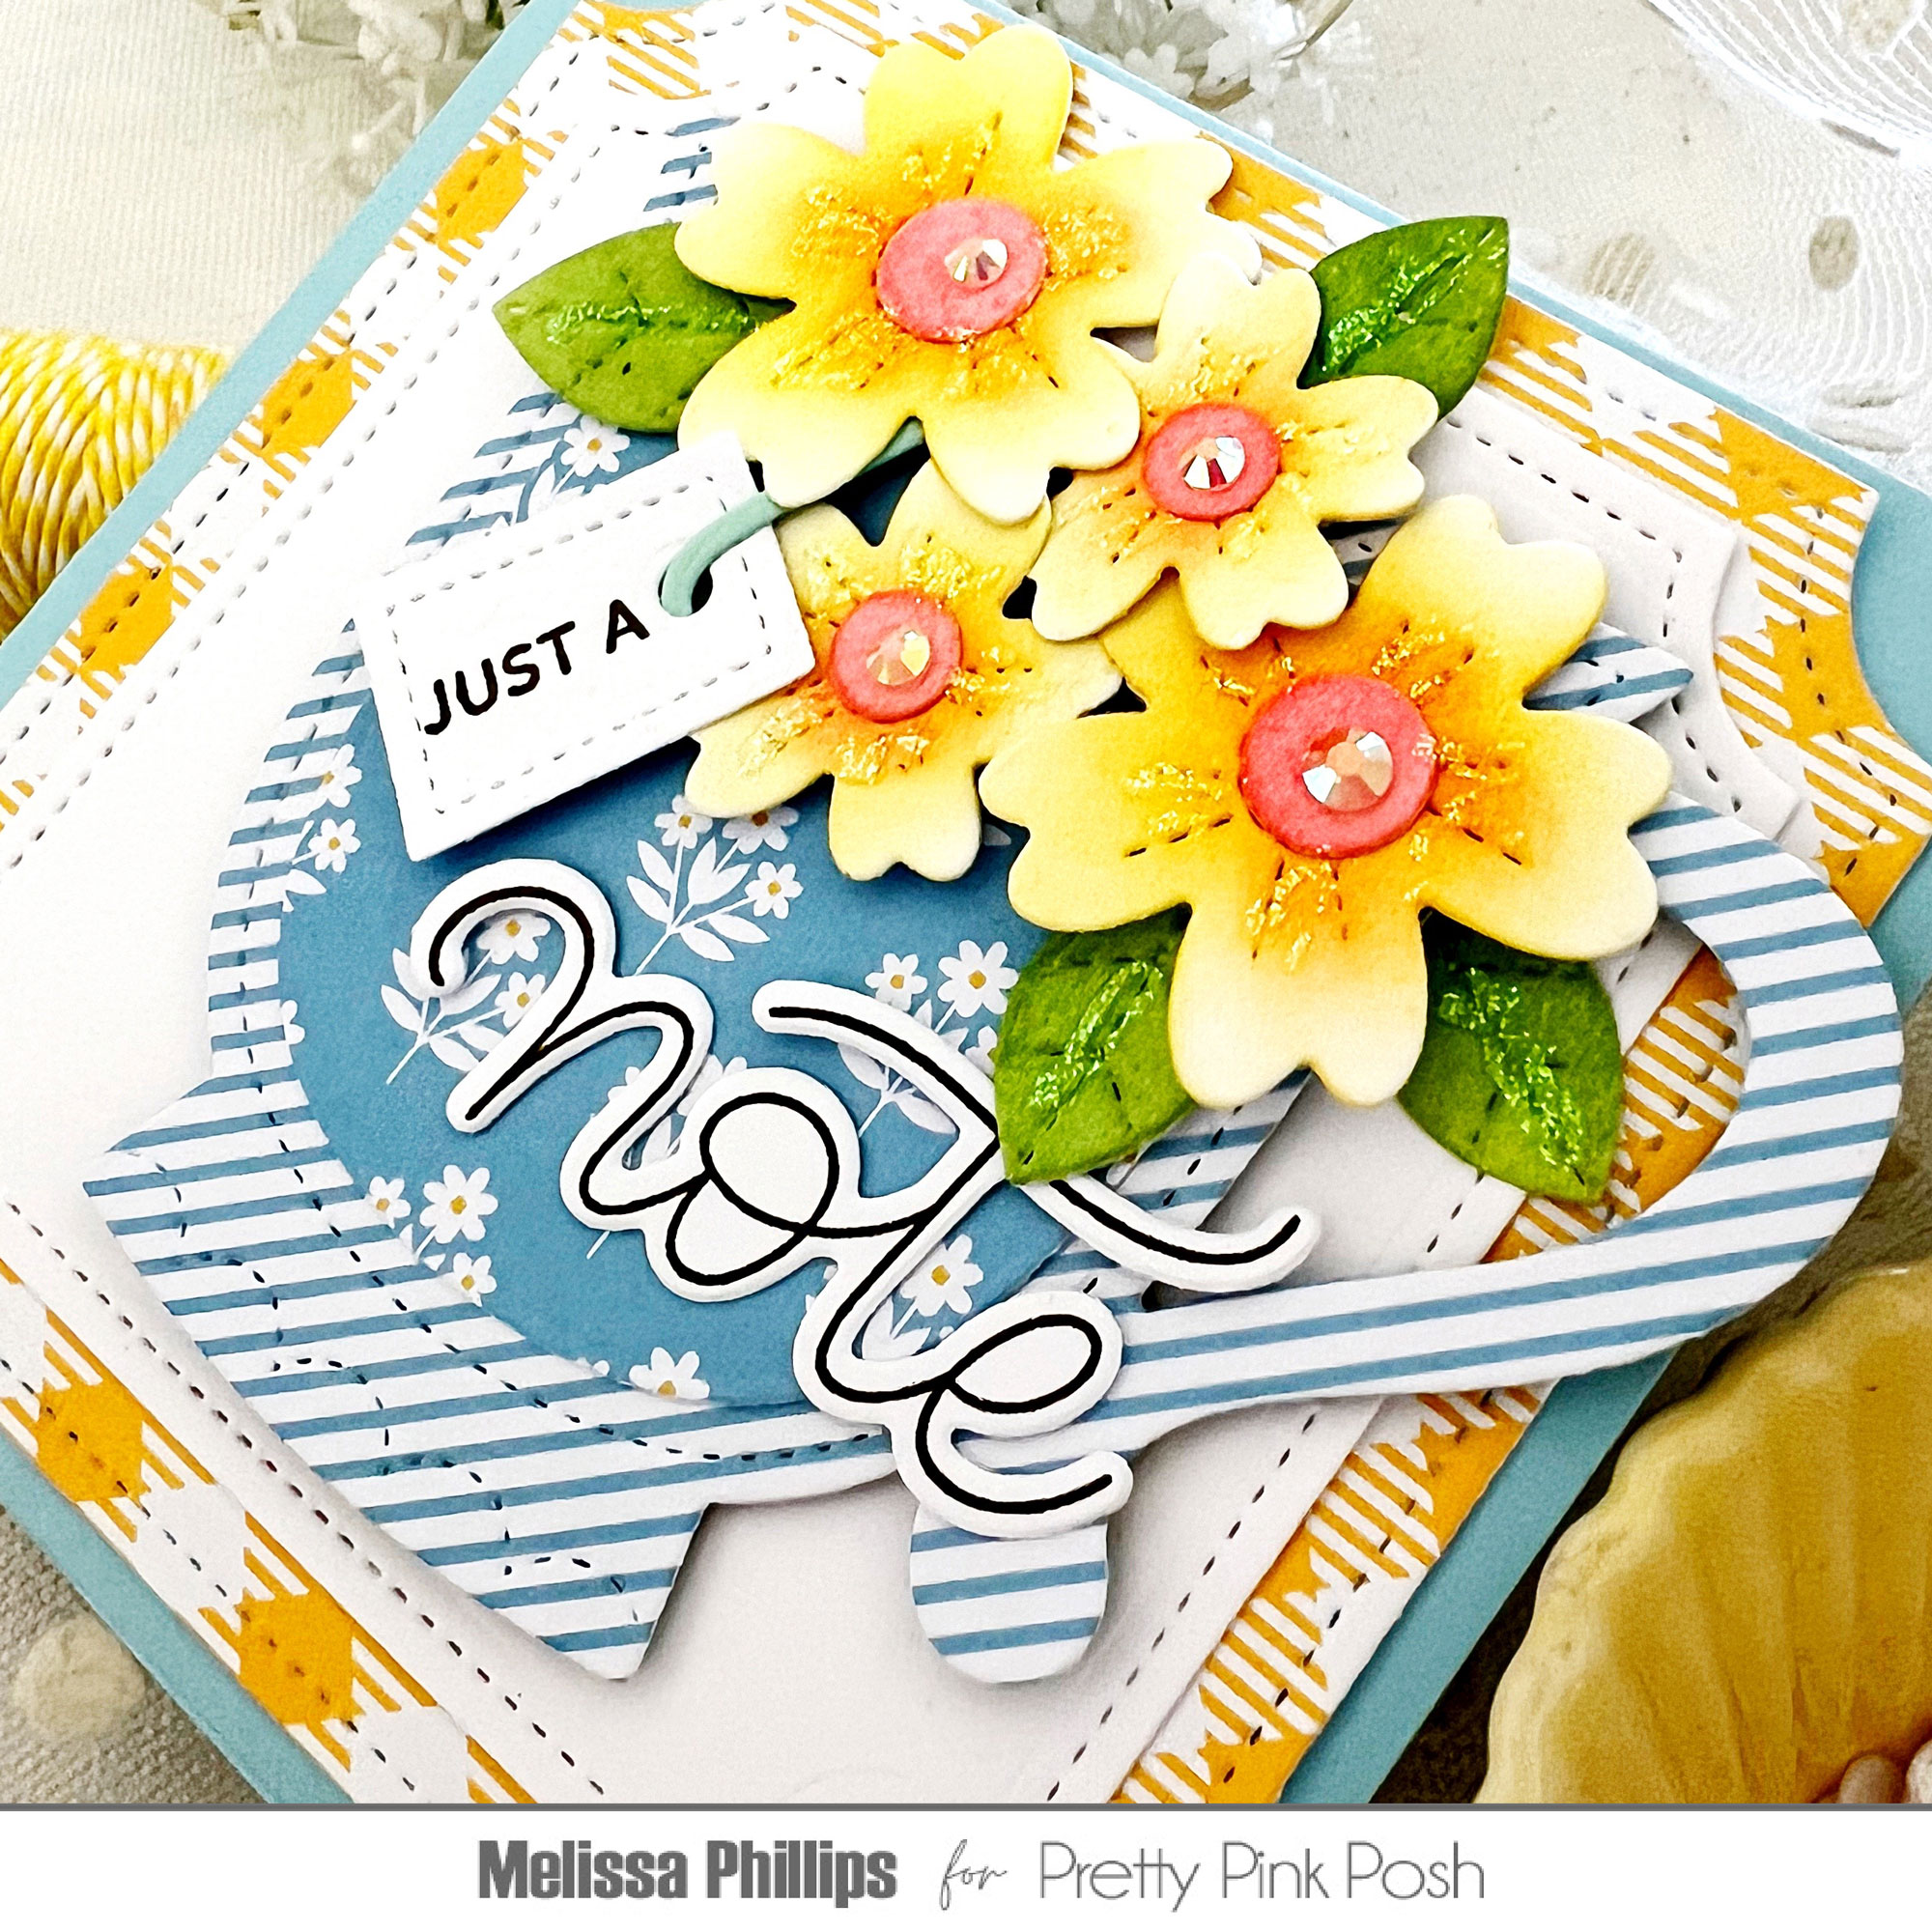
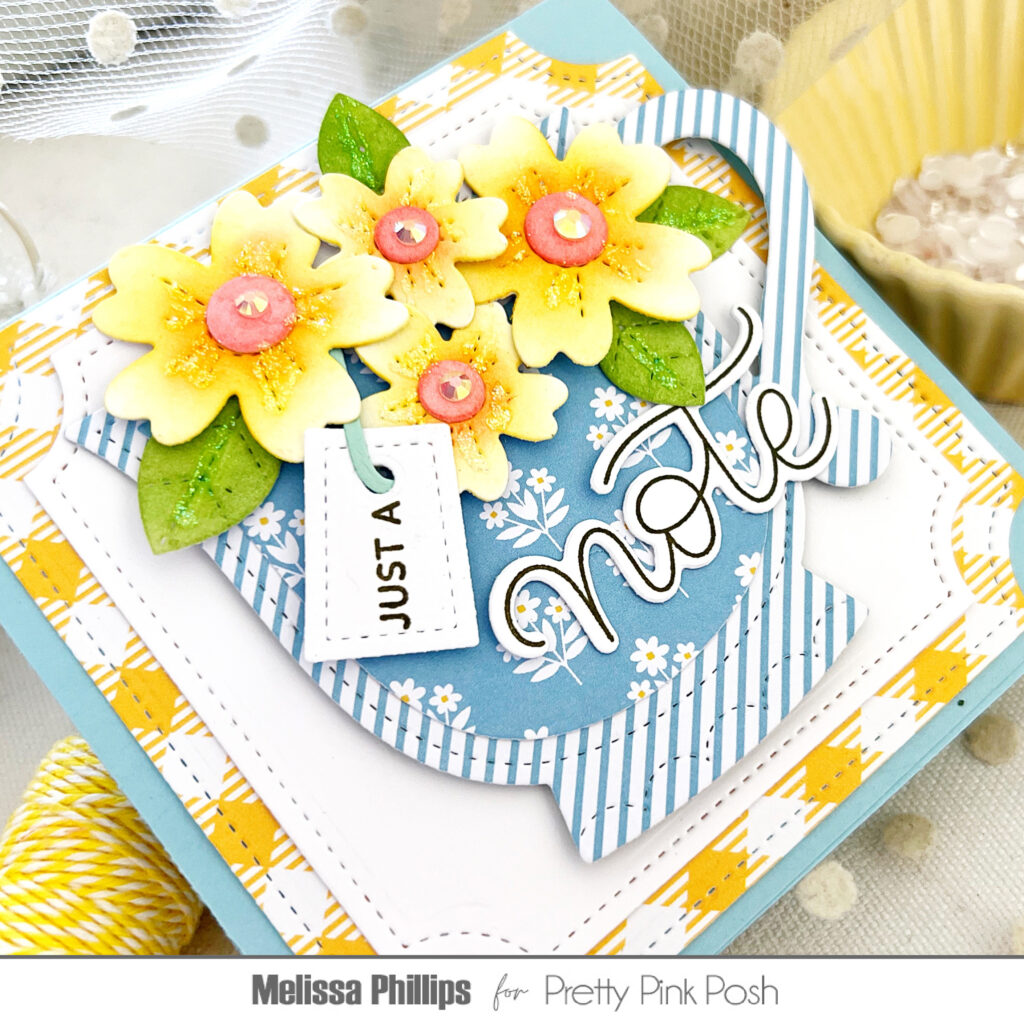
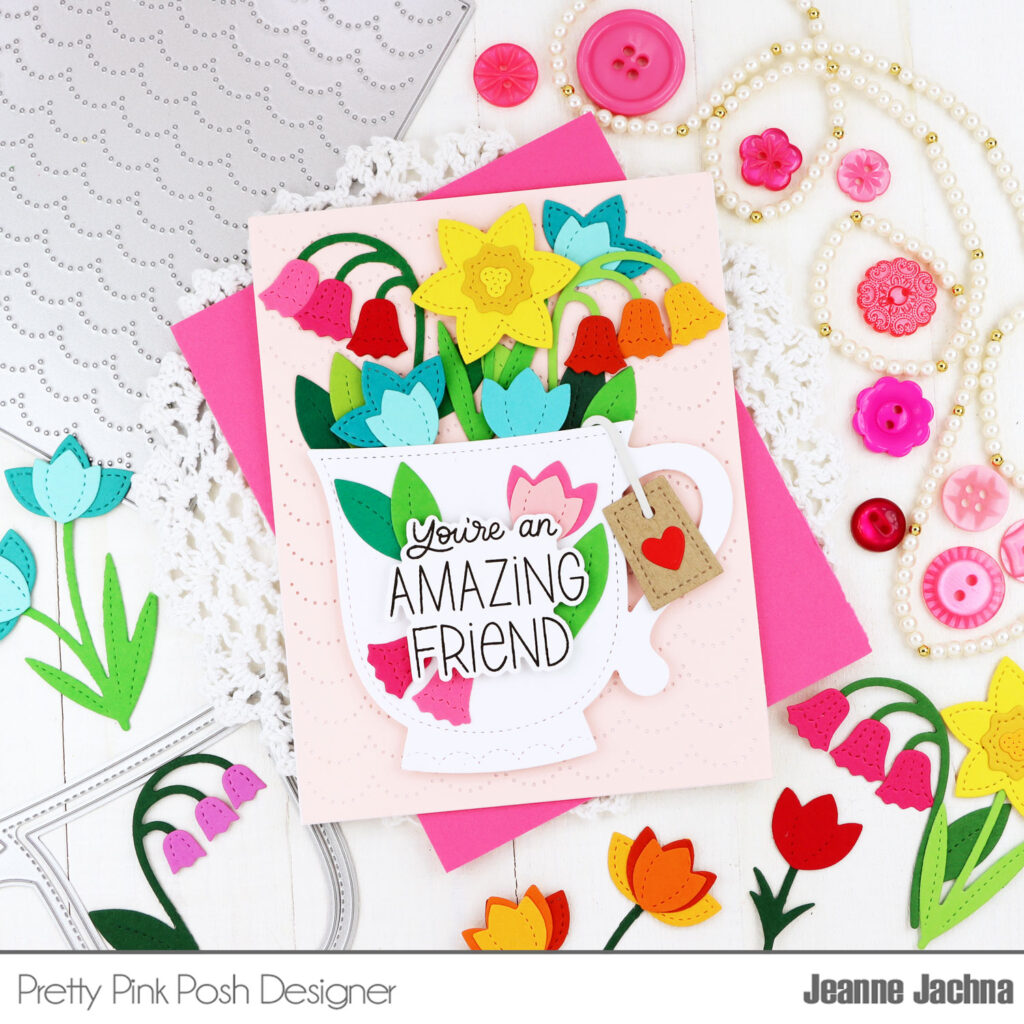
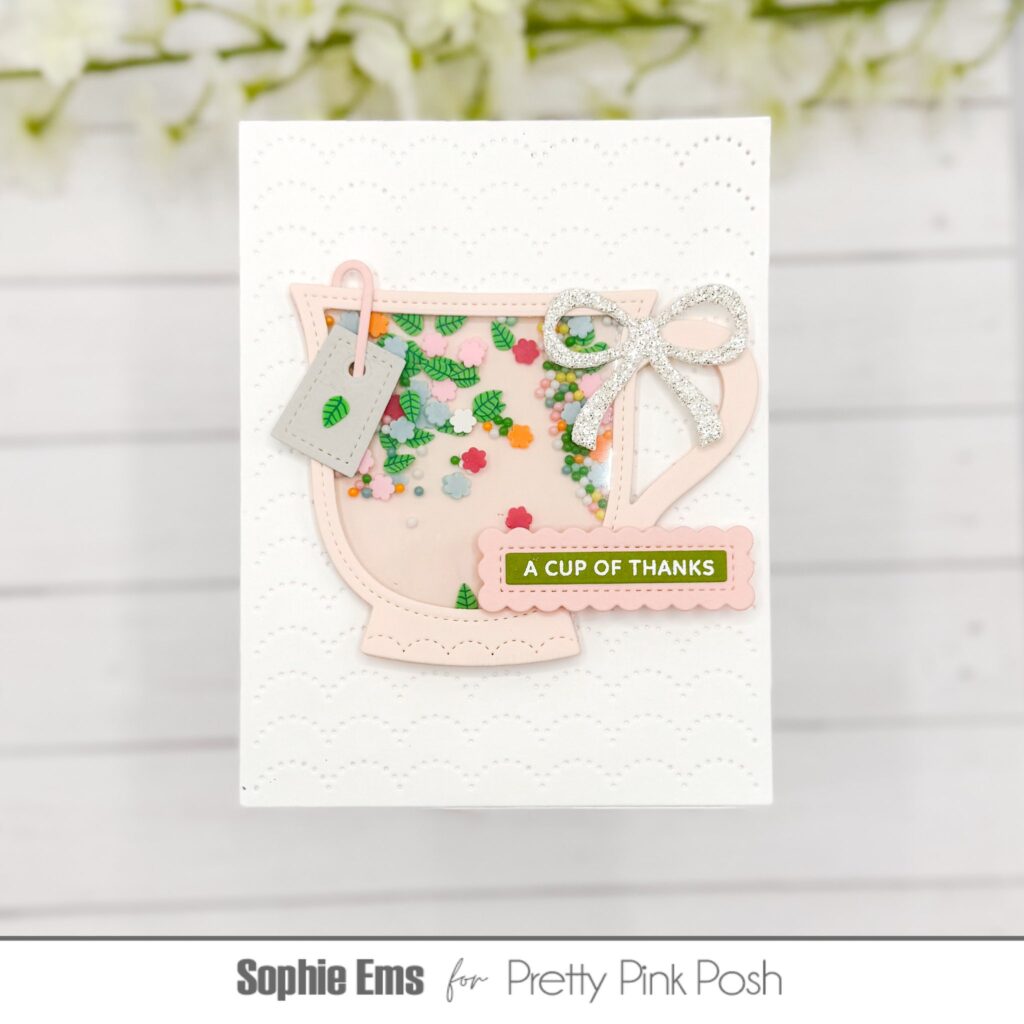
Hello everyone! This is Melissa and I’m here to share a couple of cards made with the beautiful, new Vase Shaker, Teacup Shaker, and Notched Squares dies. If you love creating with dies as much as I do, these products were made for you. Let’s get started!
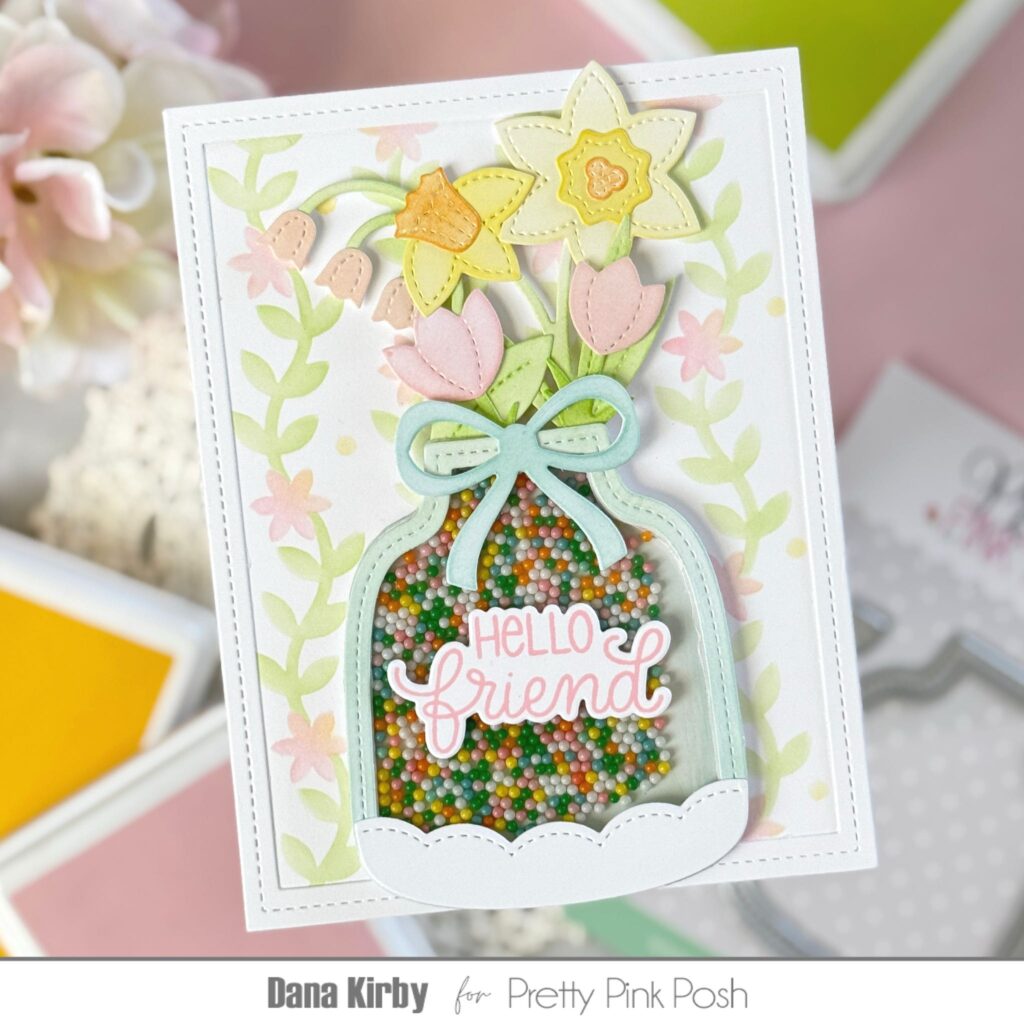
My first card uses the delightful Vase Shaker…oh how I love it! I die cut it from aqua cardstock, using an aqua striped patterned paper as the base layer. I filled it full of sequins, clay confetti, and seed beads. I used a thin vellum instead of acetate to create my shaker, allowing the filler to shine through very subtly.
I filled my vase with darling blooms, cut using the new Floral Wreath Builder and Spring Floral dies. The bow from the Floral Wreath Builder was the perfect touch at the top of my vase.
The irresistible new Layered Daffodils stencilswere used to create my background, stenciling in colors to coordinate with the yellow daffodil in my floral arrangement. I then used one of the larger Notched Squares dies to layer under my vase to create a nice landing space for my focal point. My sentiment is from the new Simple Thanks stamps and dies and is the perfect size to grace the center of my shaker.
My next card uses the new and oh, so adorable Teacup Shaker. I can’t get over how cute this is and the color choices, patterns, and personality are endless! I cut my teacup from patterned paper in coordinating patterns and colors.
I chose to use flowers from the Floral Wreath Builder die collection to fill my cup, ink blending them in yellows and oranges. I added my sentiment on the die cut tea bag that comes with the set and stamped it using the new Hummingbird Floral set. The coordinating die is so graceful and sweet and looks perfect across the front of my teacup.
Once again I’ve used the Notched Squares diesto create my base layers, using a fresh gingham as the bottom layer followed by a white center layer. These dies are definitely must-haves in your crafting stash!
This sweet May release is absolutely a breath of fresh air! Creating with them is truly inspiring and full of possibilities. Thanks for visiting!
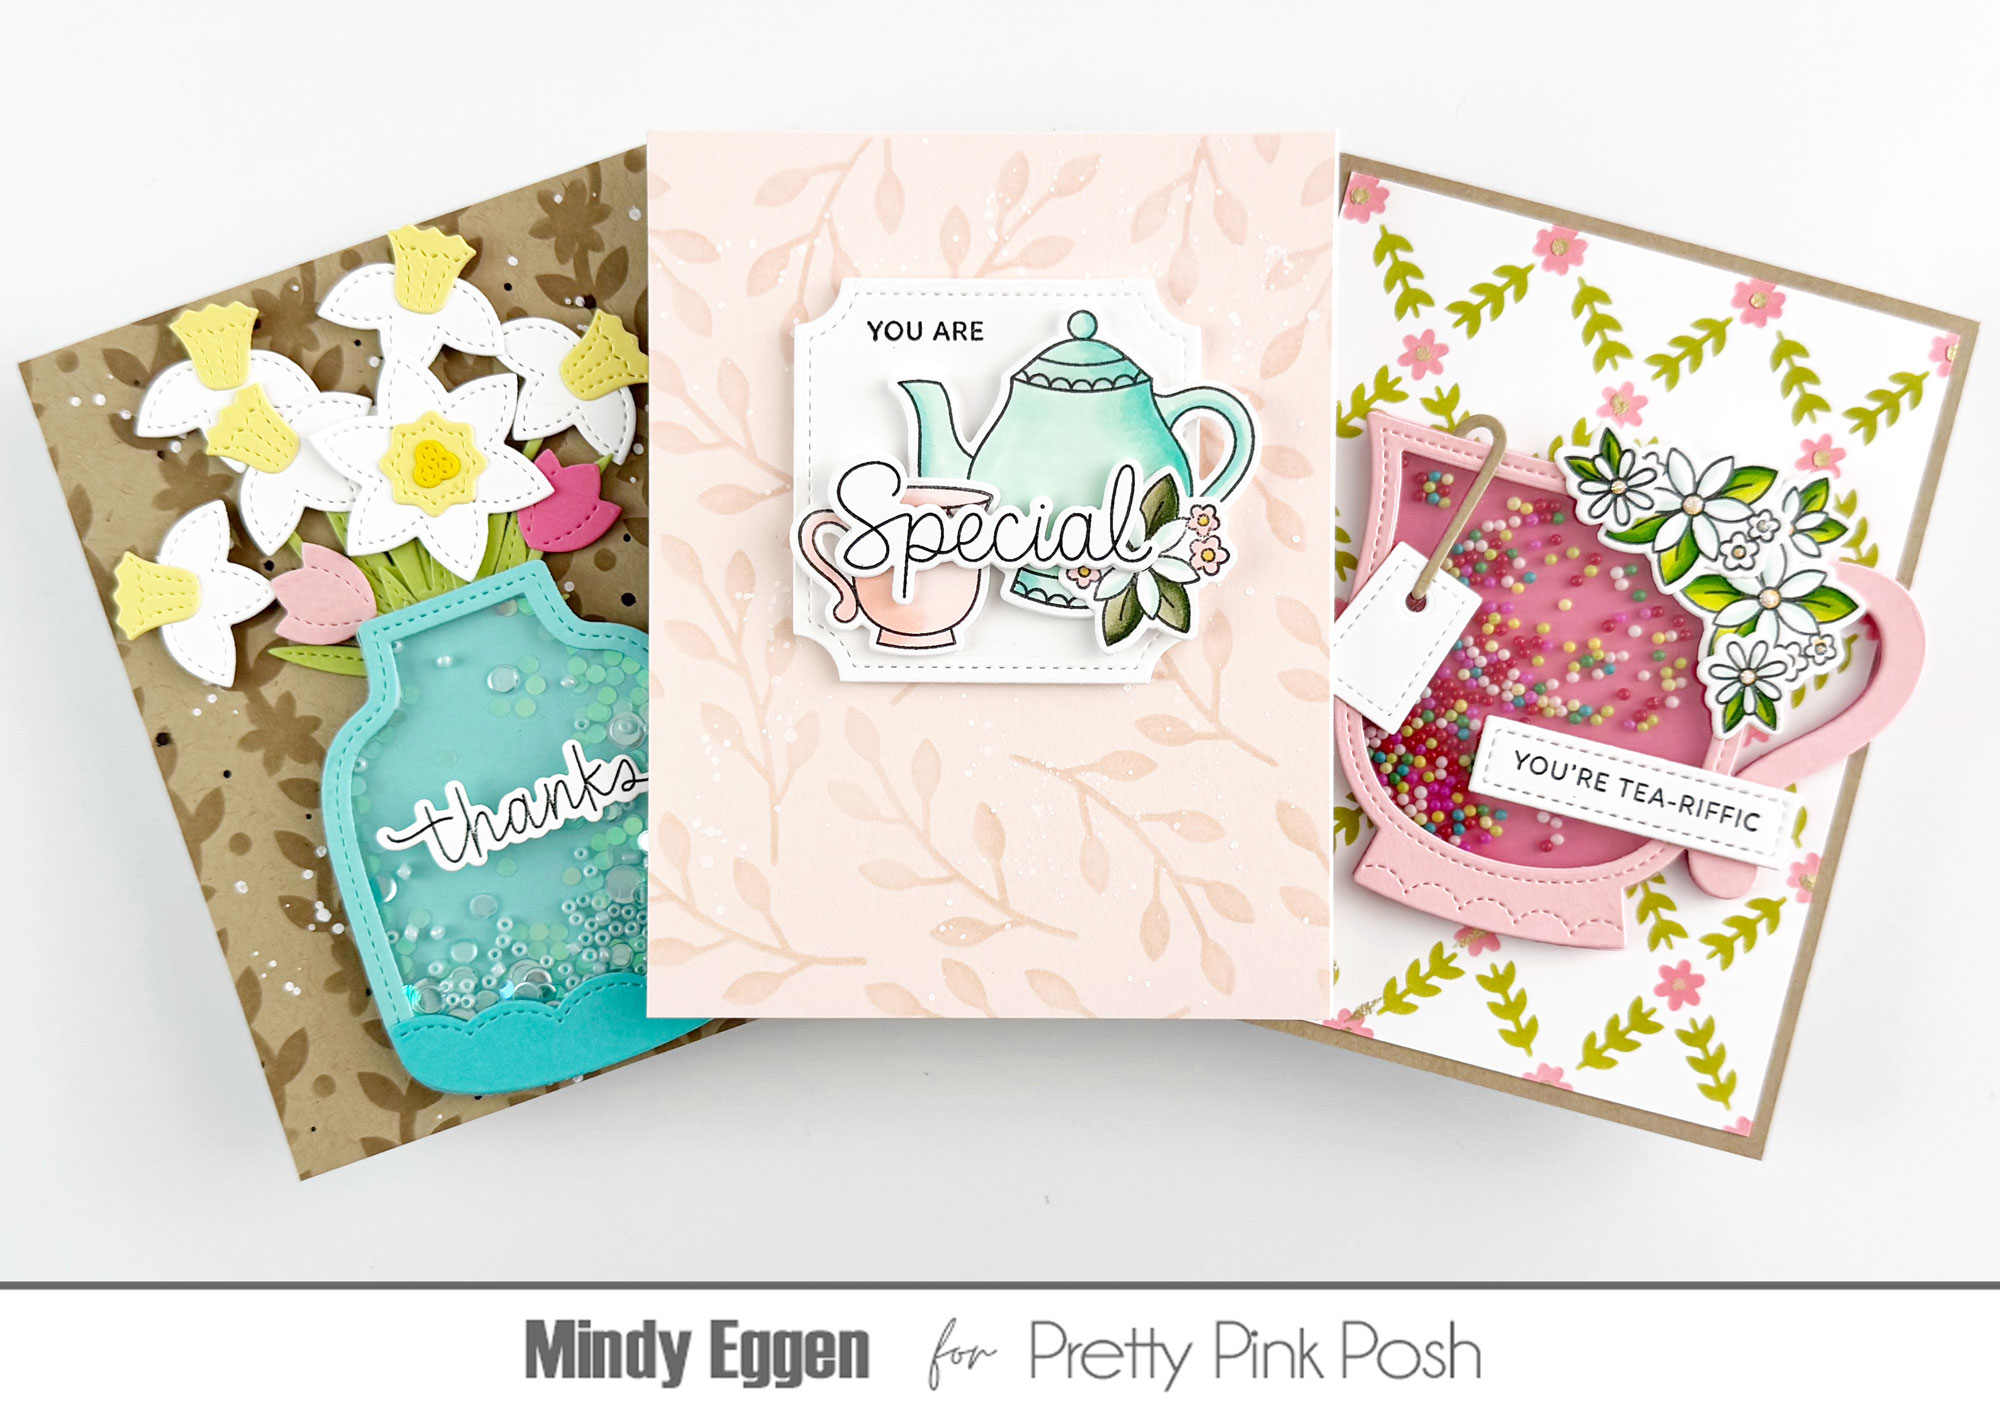
Here are some more samples from the team featuring three of the new dies sets, along with some of the other new products.
I hope you’re as excited as I am about these gorgeous new products!
Welcome to the first day of sneak peeks for our May 7th release! This release includes five stamp sets (four with coordinating dies), three stencils, eight standalone dies, and four embellishments.
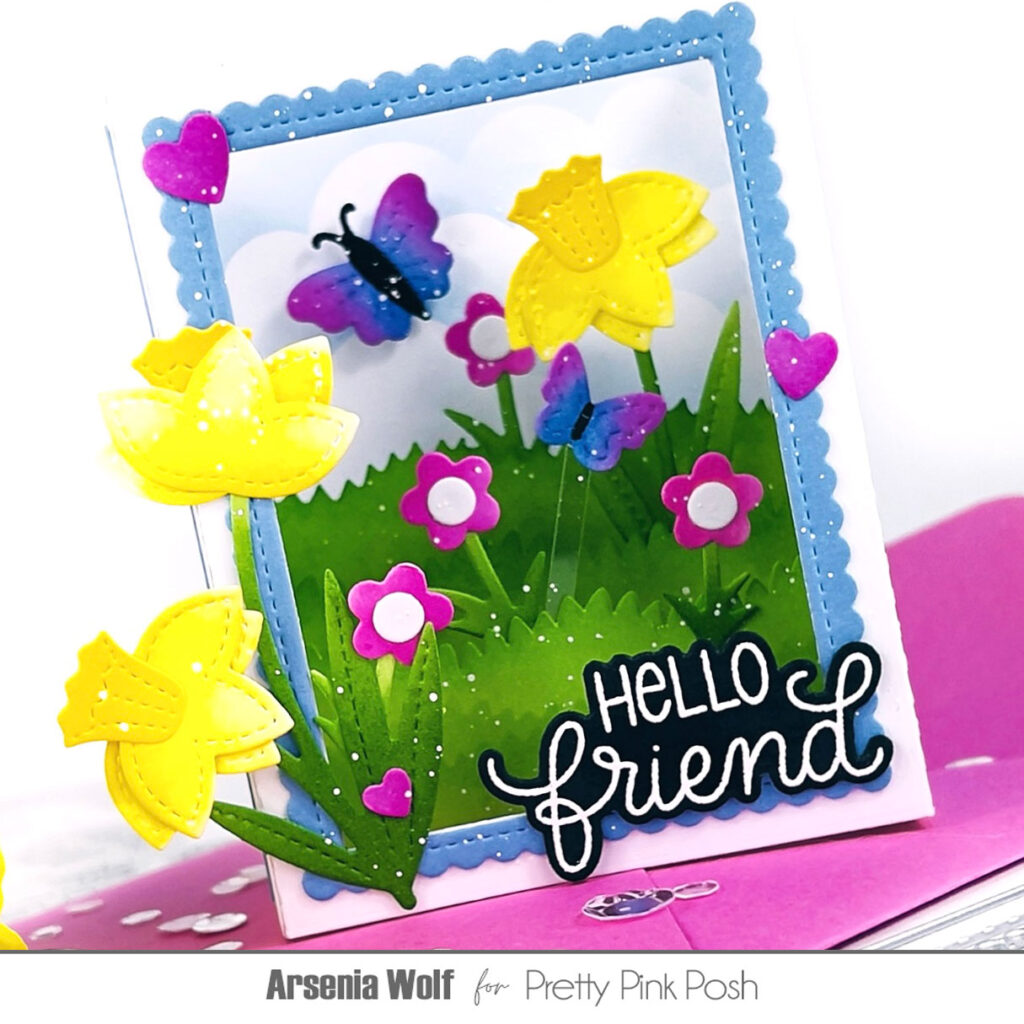
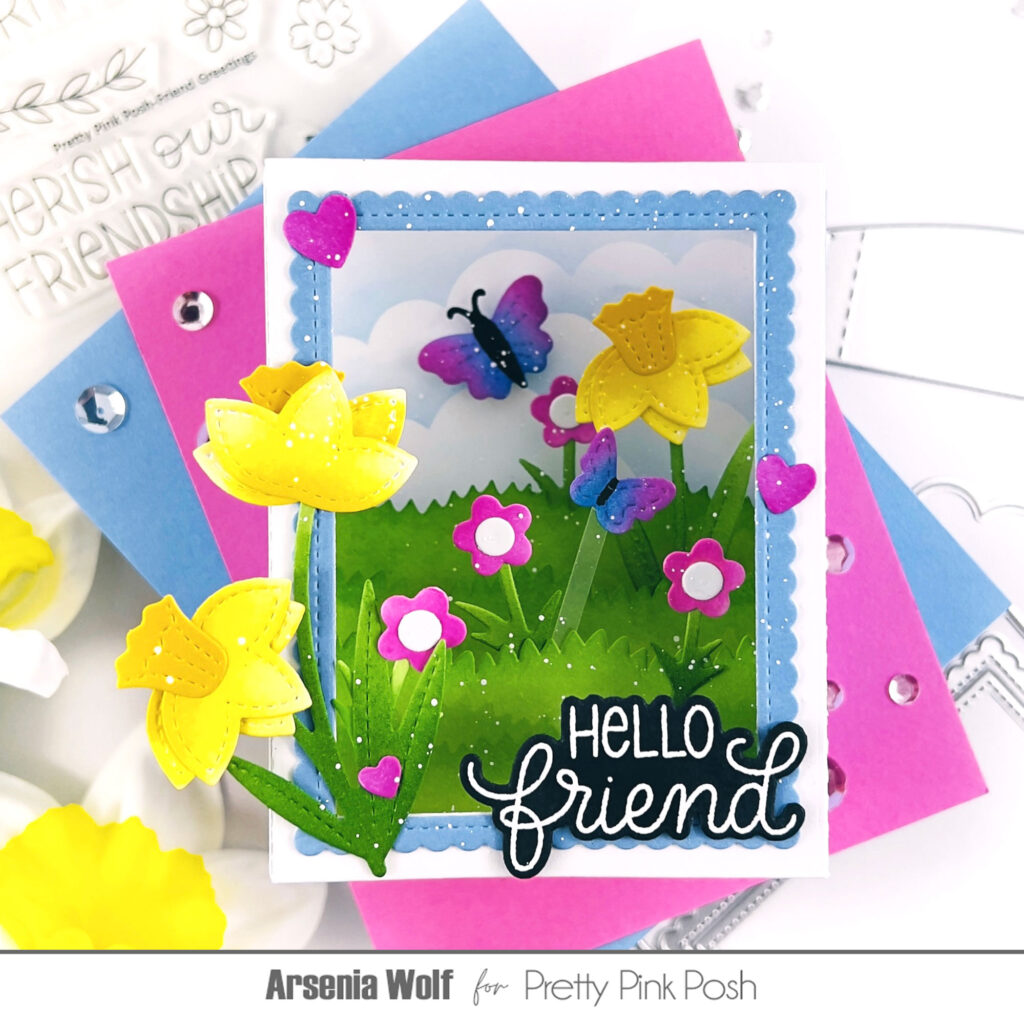
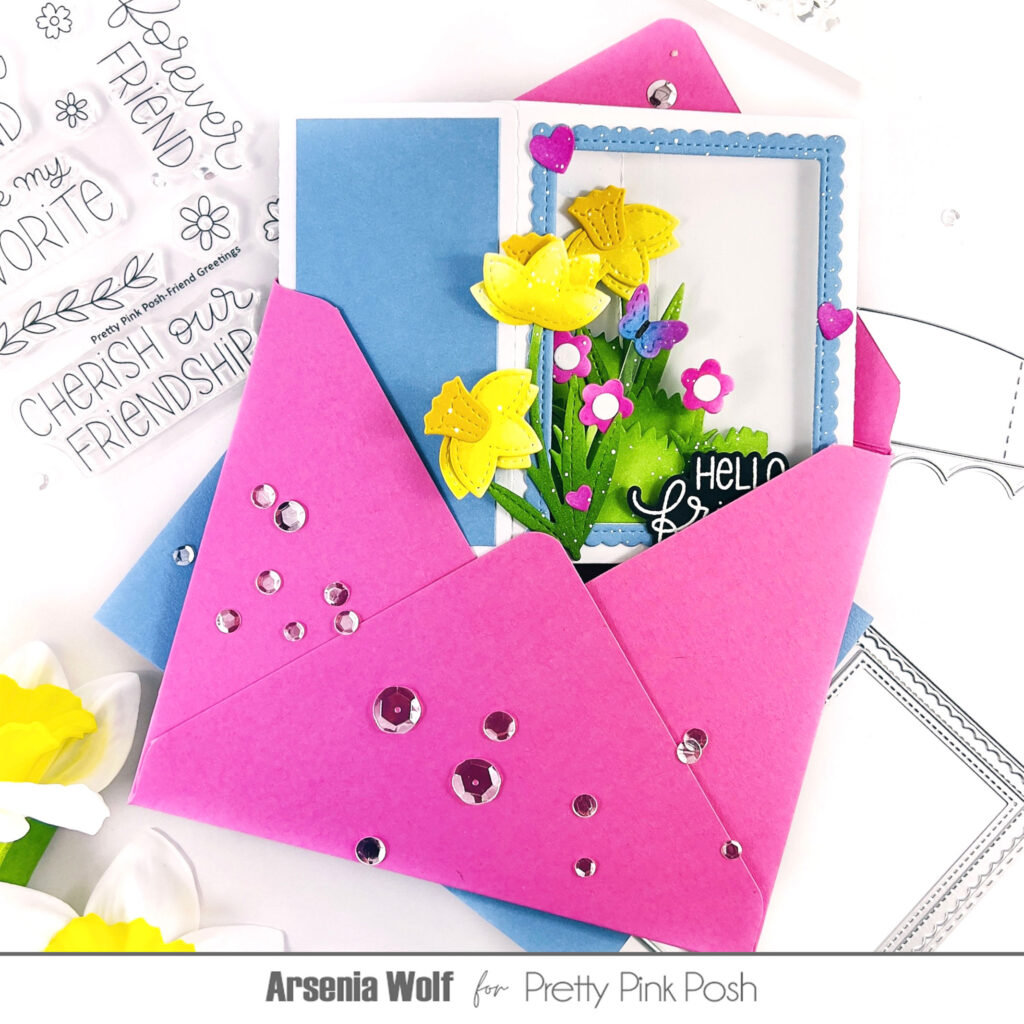
Hey crafty friends! Arsenia here, and I’ve got something super exciting to share—a first look at the brand new, dimensional Shadow Box Die Set! This little gem is all about BIG impact. It’s a 3D dream come true, and the best part? It’s ridiculously easy to put together.
Whether you’re going for cute, classy, or totally out-of-the-box (pun intended), the creative possibilities are endless. Seriously, once you start playing with it, your crafty brain will be buzzing with ideas!
I had an absolute blast creating this dreamy little shadow box card, and I’m so excited to share how it came together! Let’s dive in:
First things first—I grabbed my trusty Shadow Box Die Set and cut out the base and tier pieces from white cardstock. Using the cloud die from the same set, I created a quick stencil and added some soft, whimsical clouds to the back panel of the shadow box. It instantly gave the whole scene a floaty, beautiful vibe!
Next up: the grassy hills. I used the tiers I’d already cut and transformed them with the grass die (yep, also in the Shadow Box Die Set). A little green dye ink brought those hills to life—so fresh and springy!
Time to assemble—and let me tell you, this shadow box comes together like a dream. Super easy, super satisfying.
Once it was built, I had so much fun decorating both the inside and outside of the box. I went wild with florals from the brand new Spring Floral Die Set—it’s quickly become a favorite of mine! I also added some delicate details from the Butterfly Border Die Set for an extra touch of whimsy.
Final touch? A few white paint splatters for a little sparkle! And voilà—my springtime shadow box card is complete! Best part? It fits perfectly in an A2 envelope, making it super easy to mail to someone special.
Ready to see some samples by the team? You’re in for a treat!
We hope you enjoyed the first sneak peek of the May 7th release. We’ll be back tomorrow with another look at the new collection!
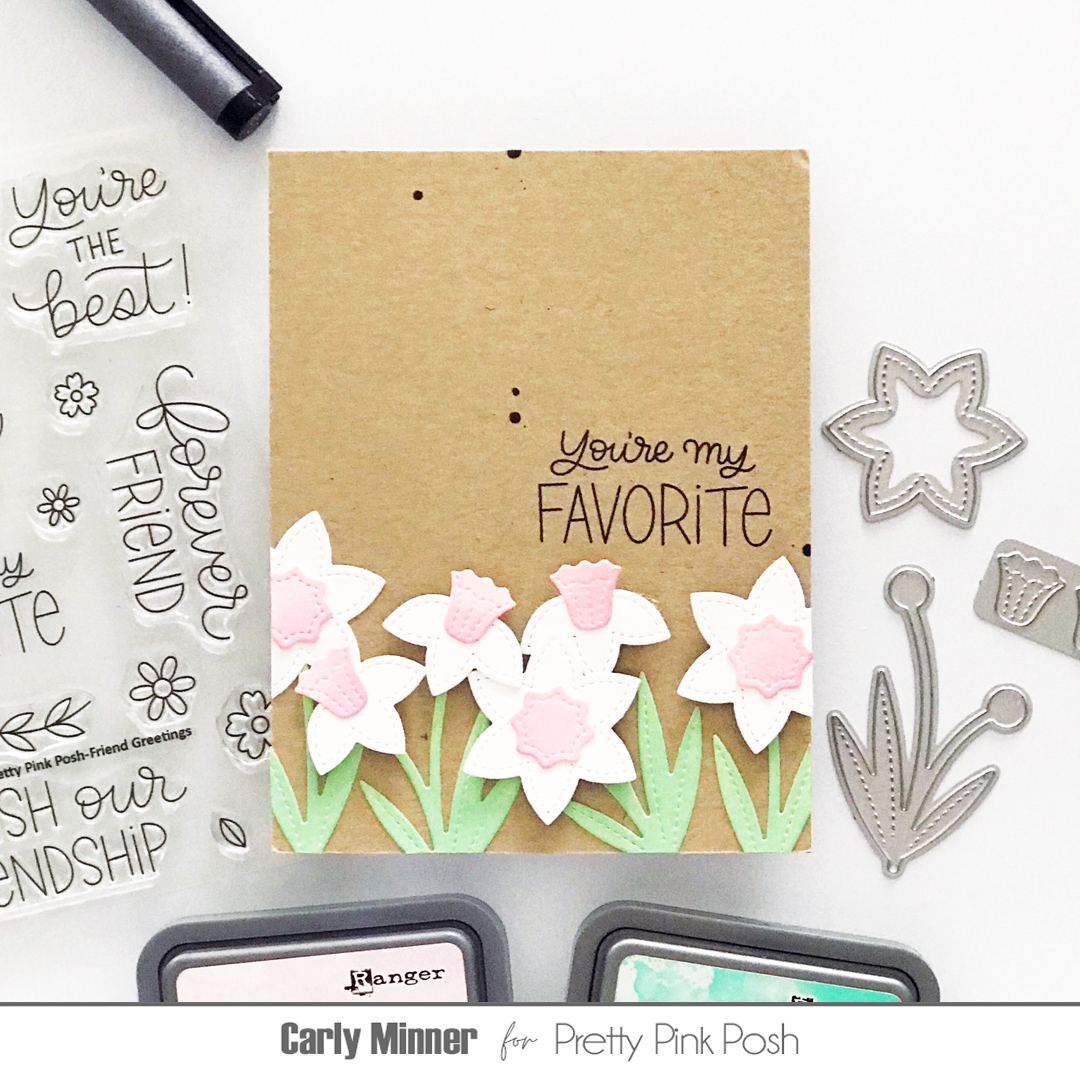
Hi Crafty Friends! Carly here and my Easter cards are finished but while all the sets are on my desk I’m going to make some spring cards too! There are so many fun shapes that overlap…grass, carrots, butterflies, bows and of course flowers!
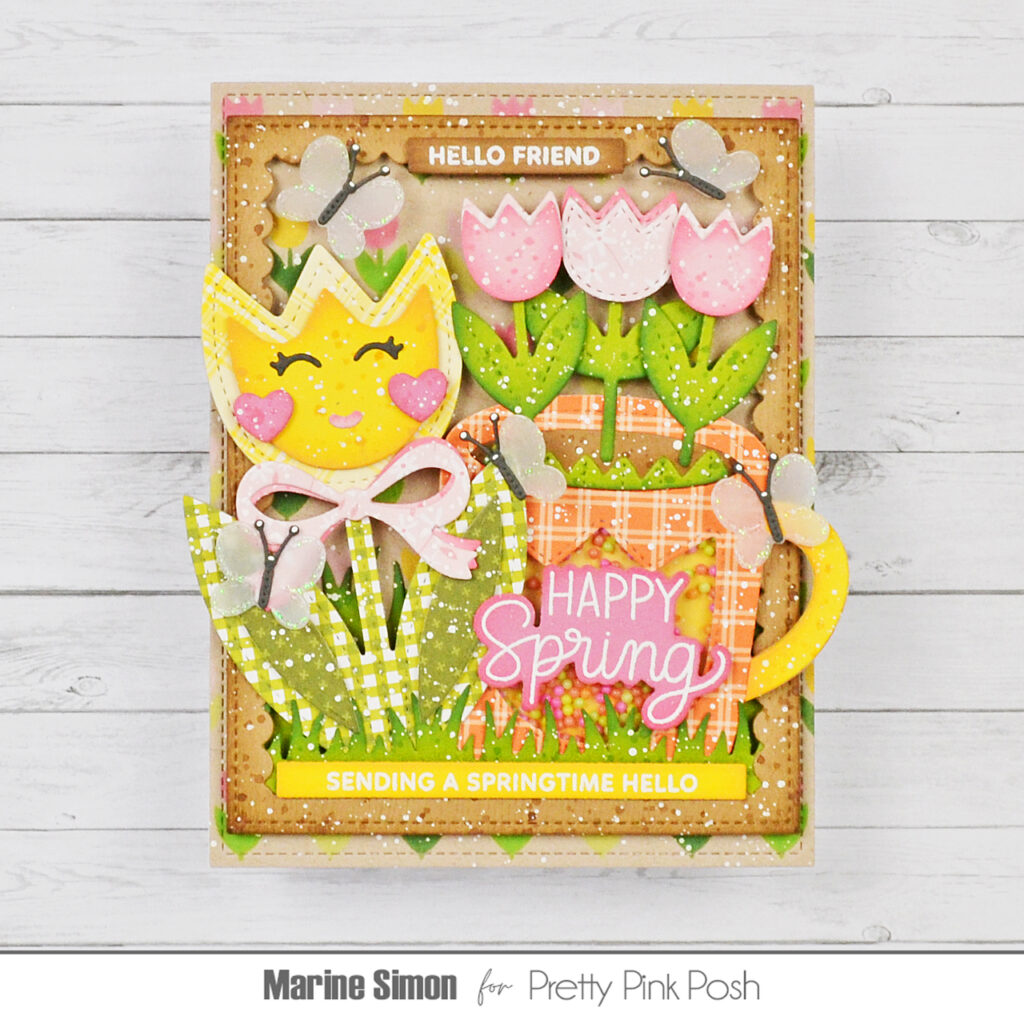
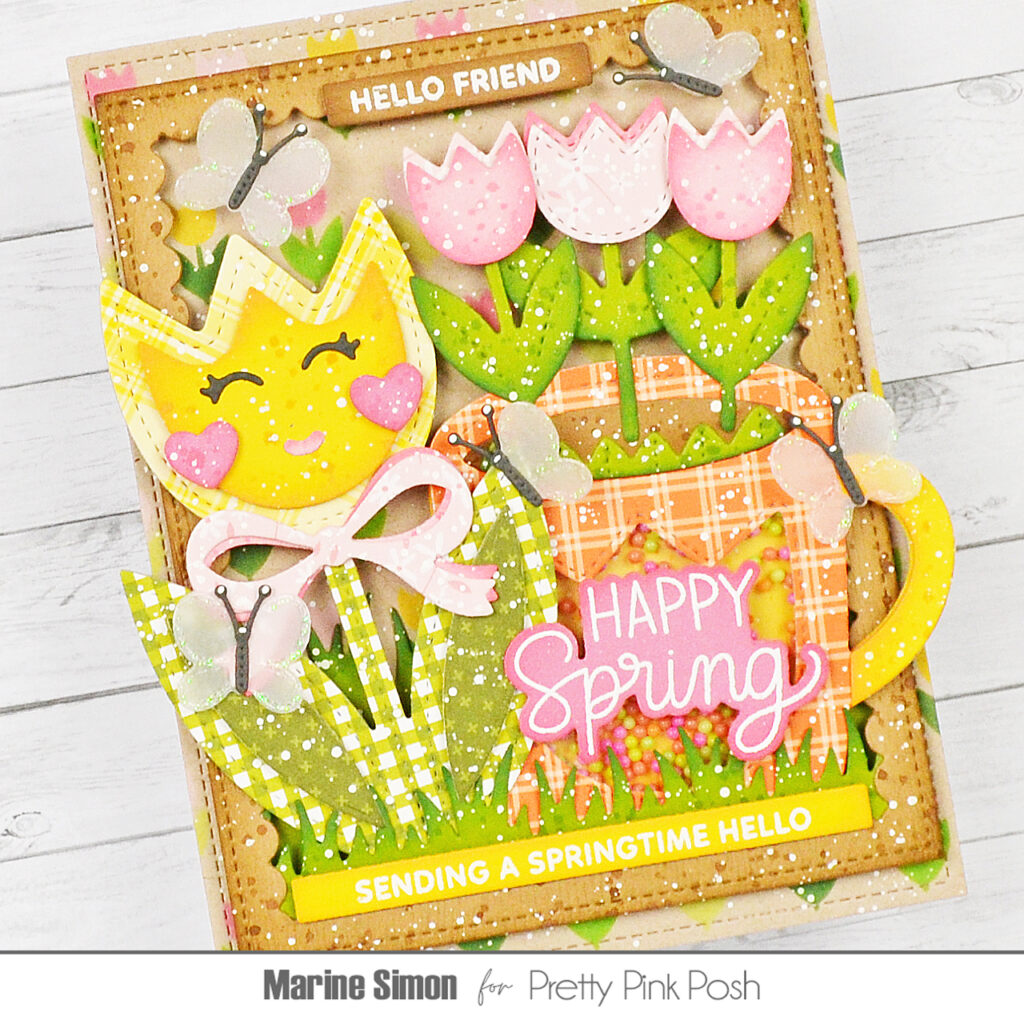
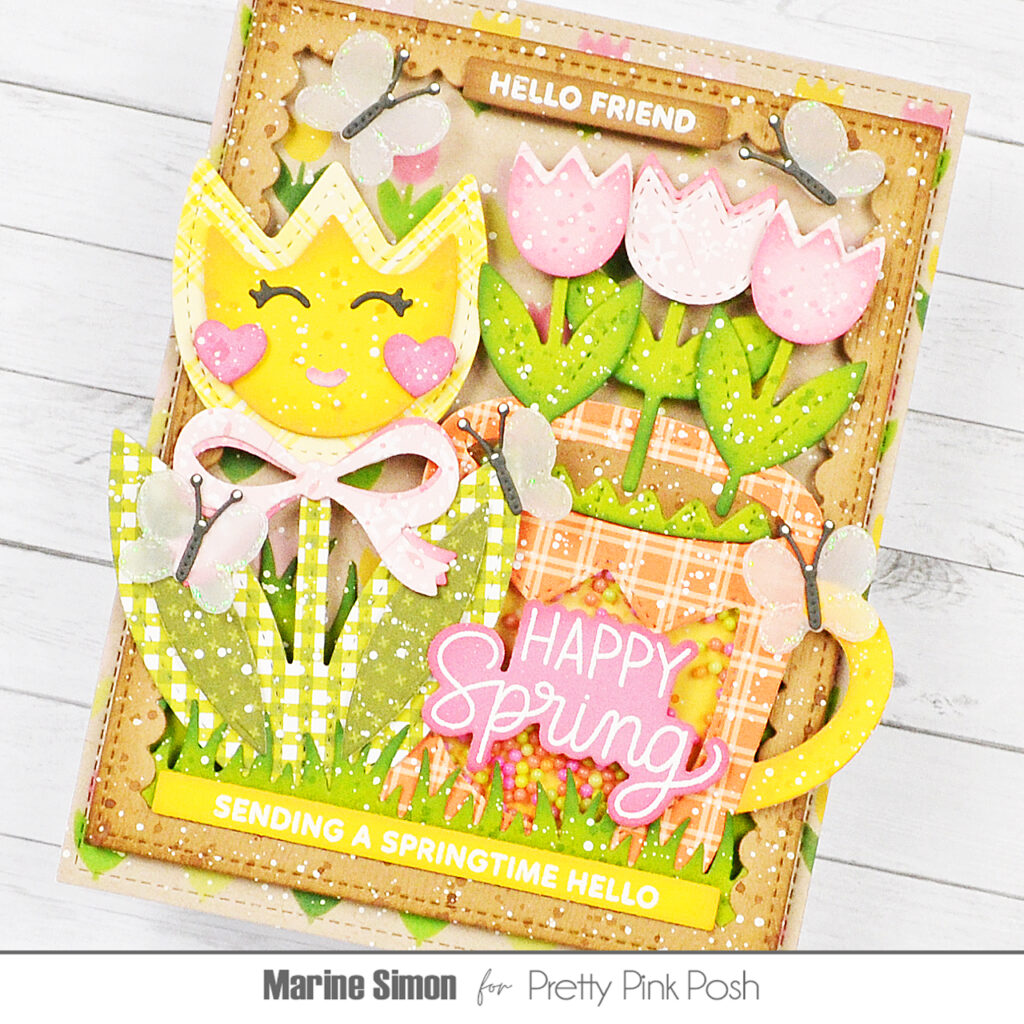
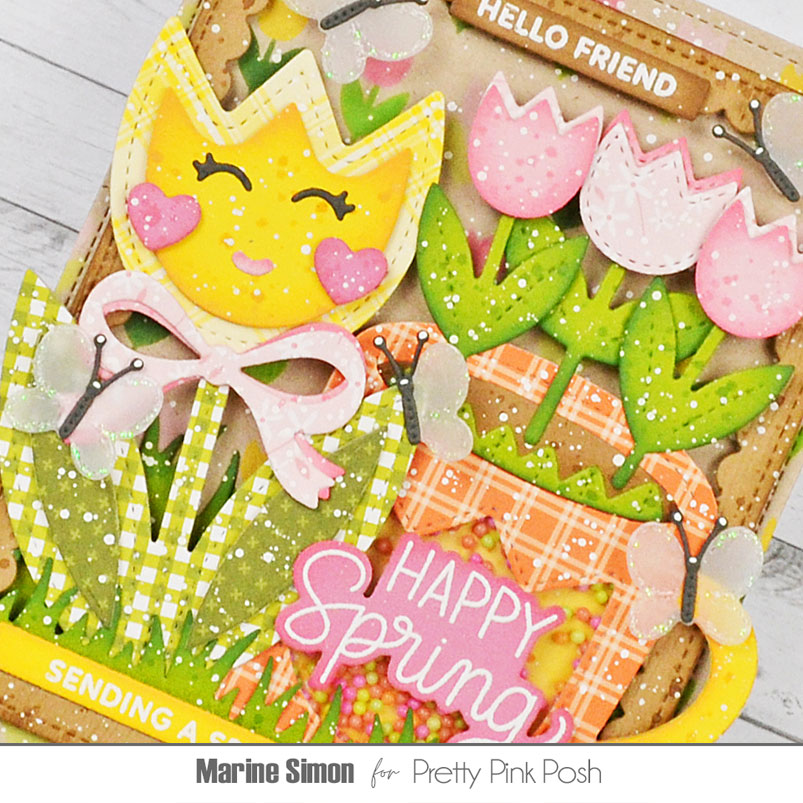
Hello crafty friends, Marine here, I’m very happy to be back on the blog with this lovely Spring themed shaker card showcasing products from the March Release, as well as a few more from previous years. When I saw the Tulip Shaker, I immediately pictured a tulip themed card with a shaker mug. I love how cute and pretty it turned out, and I hope that it will inspire you to mix your “old” products with new ones to create amazing projects.
I started off by working on the background components. I cut a 5,5 x 4,25 inches panel out of kraft cardstock and used the Springtime Borders stencils to create a tulip background. There are also carrots and daisies on those stencils, so I simply masked those sections off with washi tape, and created rows of pink and yellow tulips all over the panel using oxide inks: for the pink tulips I used spun sugar and worn lipstick, for the yellow tulips I used fossilized amber, and for the greenery I used mowed lawn and rustic wilderness. I mixed copic opaque white ink with water and used a slim brush to add splatters on my panel, and set it aside to dry.
I cut a large Scallop Frame out of brown woodgrain cardstock, added a little bit of vintage photo distress ink to the edges, mixed some of that same ink with water and added splatters to the frame, did the same with white ink, and set the frame aside with my panel to dry. Next I cut a 4 inches wide piece of green cardstock and cut two Grass Borders out of it: the first one about 1 inch tall, and the second one about 2 inches tall. I added a little bit of rustic wilderness distress ink to the sprigs and splatters as well, and again, set them aside to dry.
Once all the elements above were dry, I assembled them. I attached the slim Grass Border at the very bottom of the back of the Scallop Frame using liquid glue, stuck the tall Grass Border behind the first one using 2mm foam squares, added 2mm foam strips at the back of the Scallop Frame on the four sides, and centered the frame on my Springtime Borders panel.
Next I worked on the shaker mug, and built it just like the shaker tags I often create. Here are the different steps:1. Cut a Winter Mug out of orange plaid pattern paper, and used the tulip window die from Spring Mug Additions to cut an opening in my mug2. Cut a Winter Mug out of acetate, and attached it at the back of the orange mug using liquid glue3. Still at the back of the mug, added 2mm foam strips all around the tulip window and on the rest of the mug as well4. Poured a bunch of Sugar Pop shaker beads inside the tulip window5. Cut another Winter Mug out of yellow pattern paper, and stuck it to the foam strips to totally close the shaker mug6. Cut one more Winter Mug out of yellow cardstock, added a little bit of fossilized amber distress ink to the edges and splatters, trimmed the handle and stuck it to the orange mug using liquid glue.
I cut all the bits and pieces, tulips, bows, etc. out of pattern papers and cardstock, added matching distress ink to the edges of the cardstock pieces, matching splatters and white splatters as well, and once everything was dry, I assembled the different elements using 1mm foam squares and liquid glue.
I attached everything to my Springtime Borders panel, starting with the Winter Mug and the Tulip Shaker that I tucked between the Grass Borders and stuck using foam squares. I planted three tulips in the mug, gave the tulip a cute face and a bow, and added fluttering butterflies here and there. Next I stamped three different greetings on colored cardstock: “Hello friend” from Mouse Friends on brown cardstock, “Happy Spring” from Easter Greetings on pink cardstock, and “Sending a springtime hello” from Sentiment Strips: Easter on yellow cardstock. I cut them using the matching dies and Sentiment Strips dies, added a little bit of matching distress ink to the edges, and then attached them to the card using foam squares. Finally I added details to the butterflies bodies using a white gel pen, and applied white blizzard nuvo drops to the edges of their wings for a nice sparkling touch.
And that’s it! I hope that you like this happy and cheerful Spring shaker card! Thanks so much for stopping by, and see you next time.