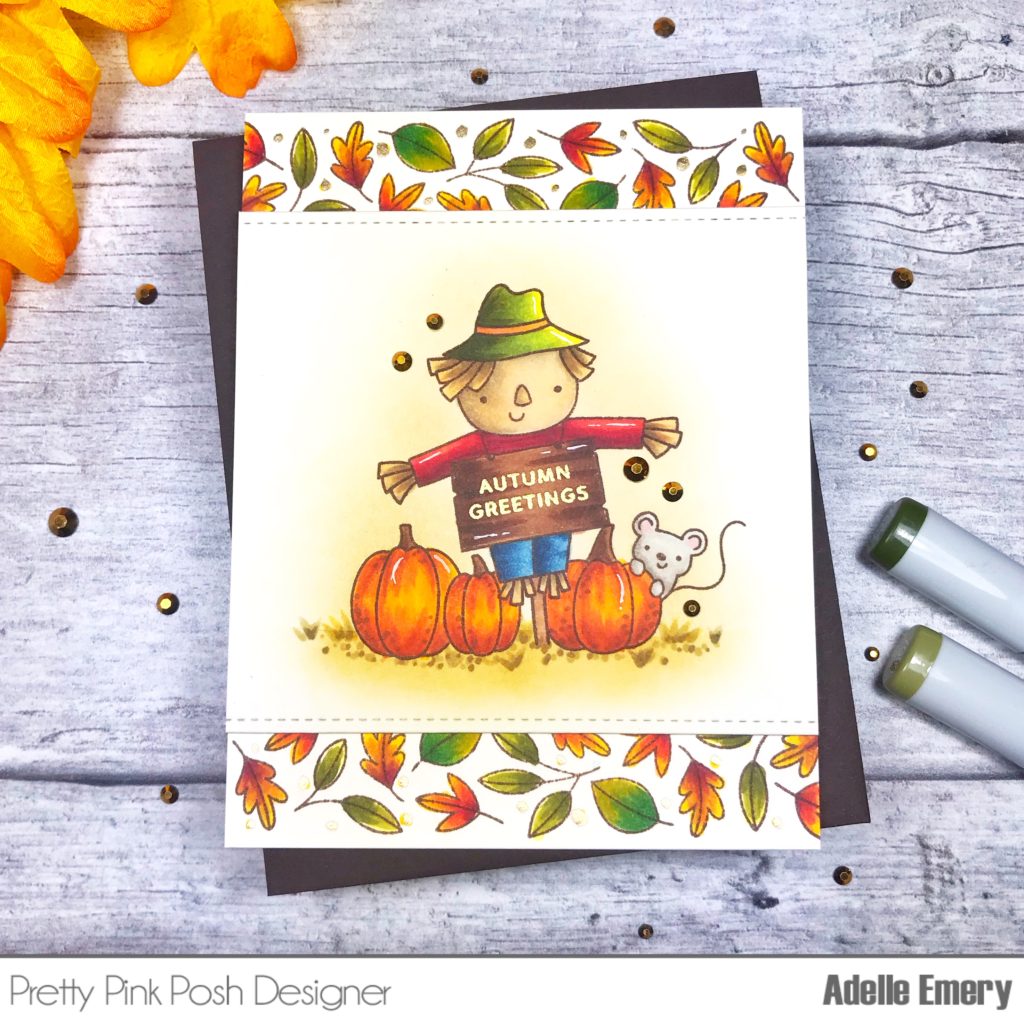
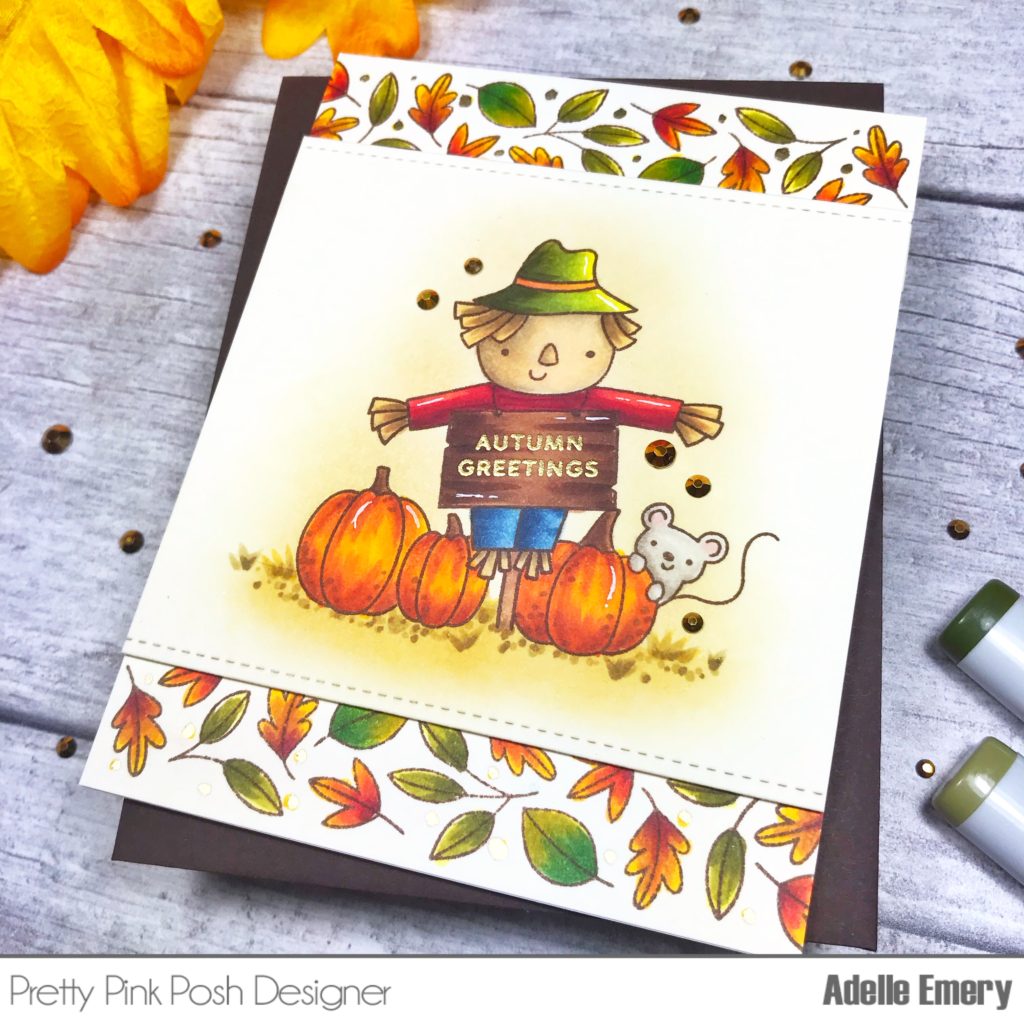
Hi crafters! Adelle here. It’s the close of Fall Theme Week from Pretty Pink Posh and today I’m featuring a couple of stamp sets from both current and past releases. I hope you’ve taken advantage of the 15% off in the Fall Section of the Pretty Pink Posh store- TODAY is the last day to save!
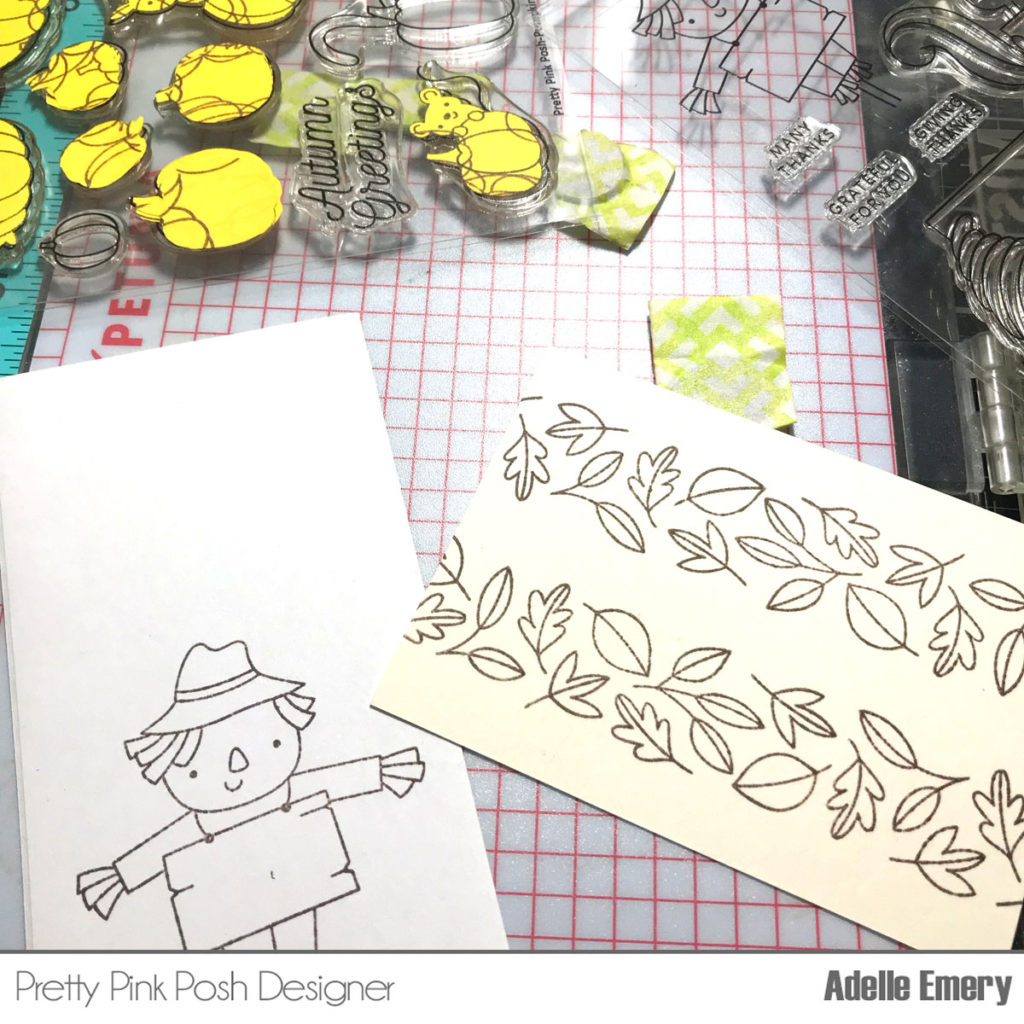
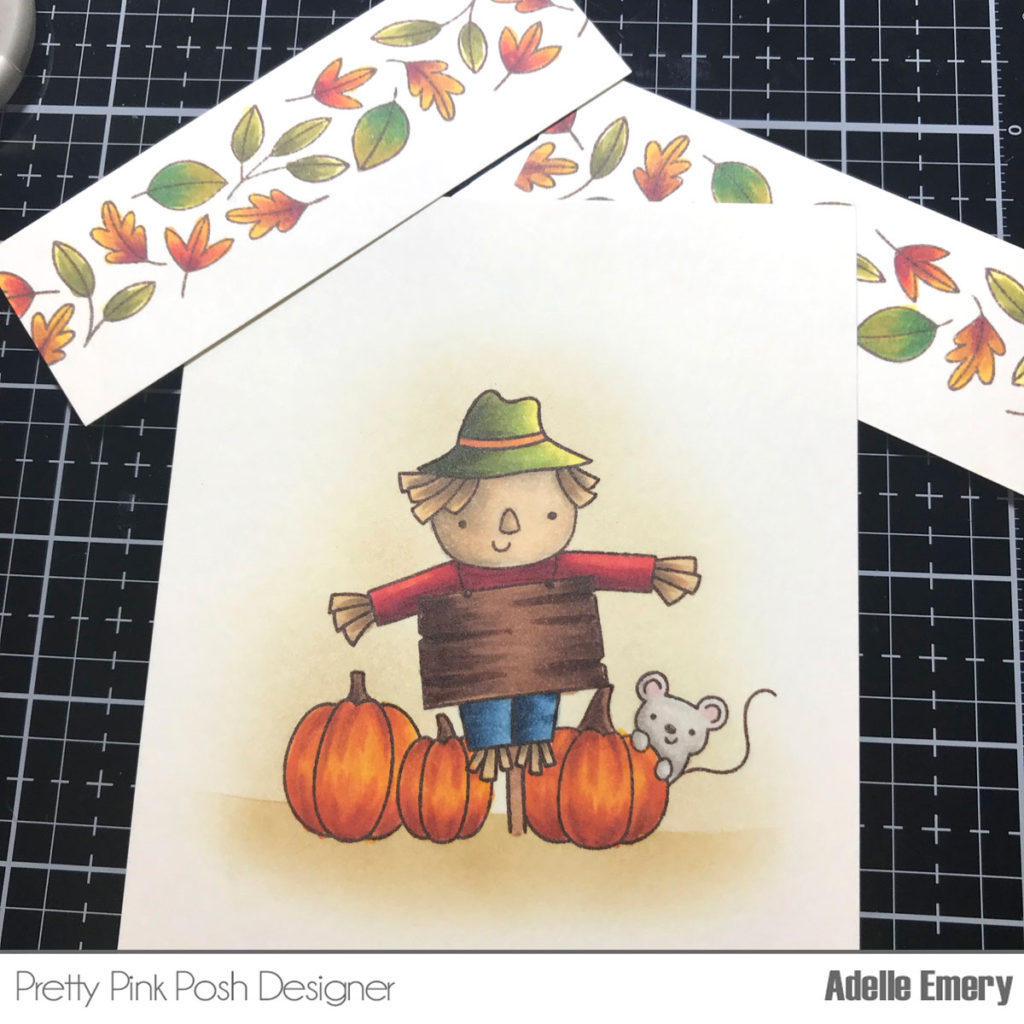
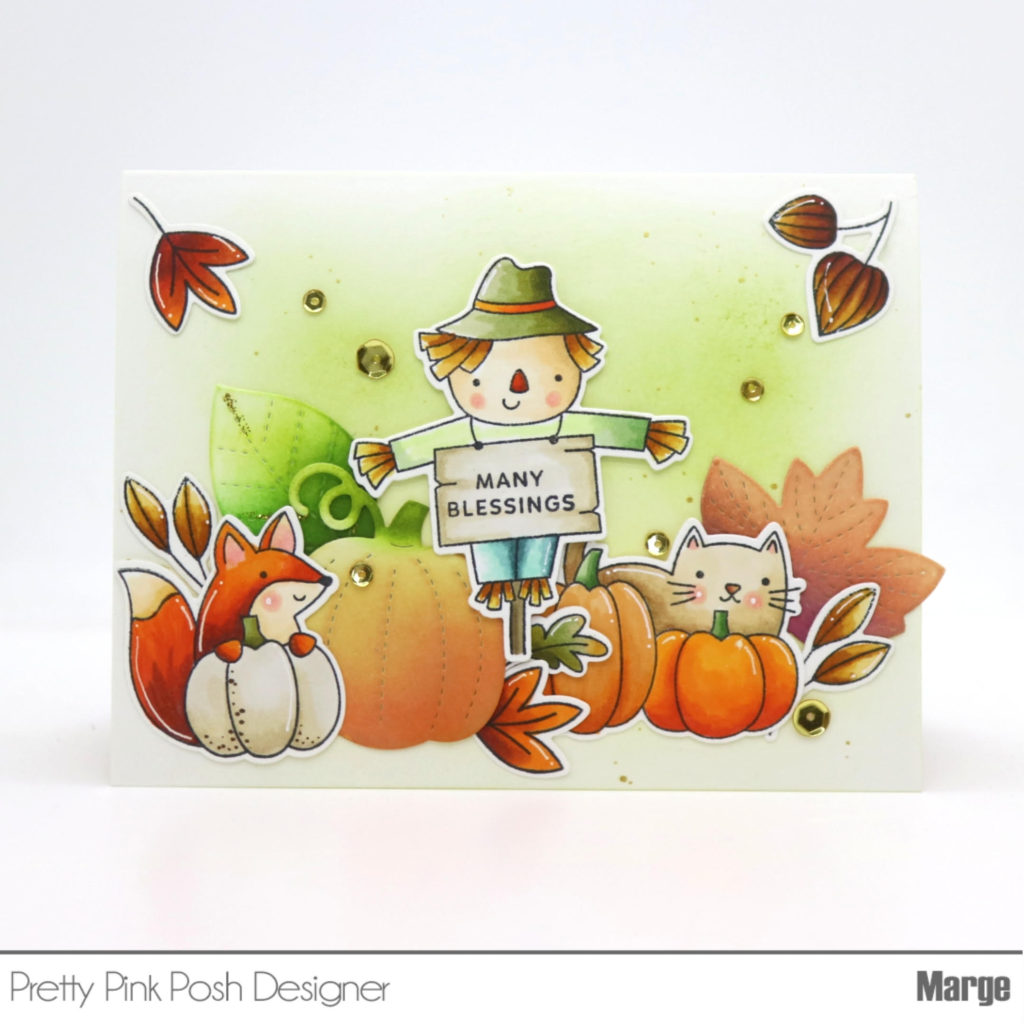
On ivory cardstock, I stamped the scarecrow and some pumpkins and colored with Copic markers. I then reapplied the masks and used Scattered Straw and Brushed Corduroy Distress Inks to create a smooth blend behind the scene.
After coloring the leaves and scene, I used a border from the Stitched Borders 2 die set to size down the colored panel. I glued the 2 leaf panels to a card base and used thin foam to pop up the colored scene. I finalized my project by embellishing with Metallic Gold Jewels.
Thanks for stopping by and I cannot wait to see what you create for your fall scenes! Visit us tomorrow for a brand new week of inspiration for your Halloween projects!
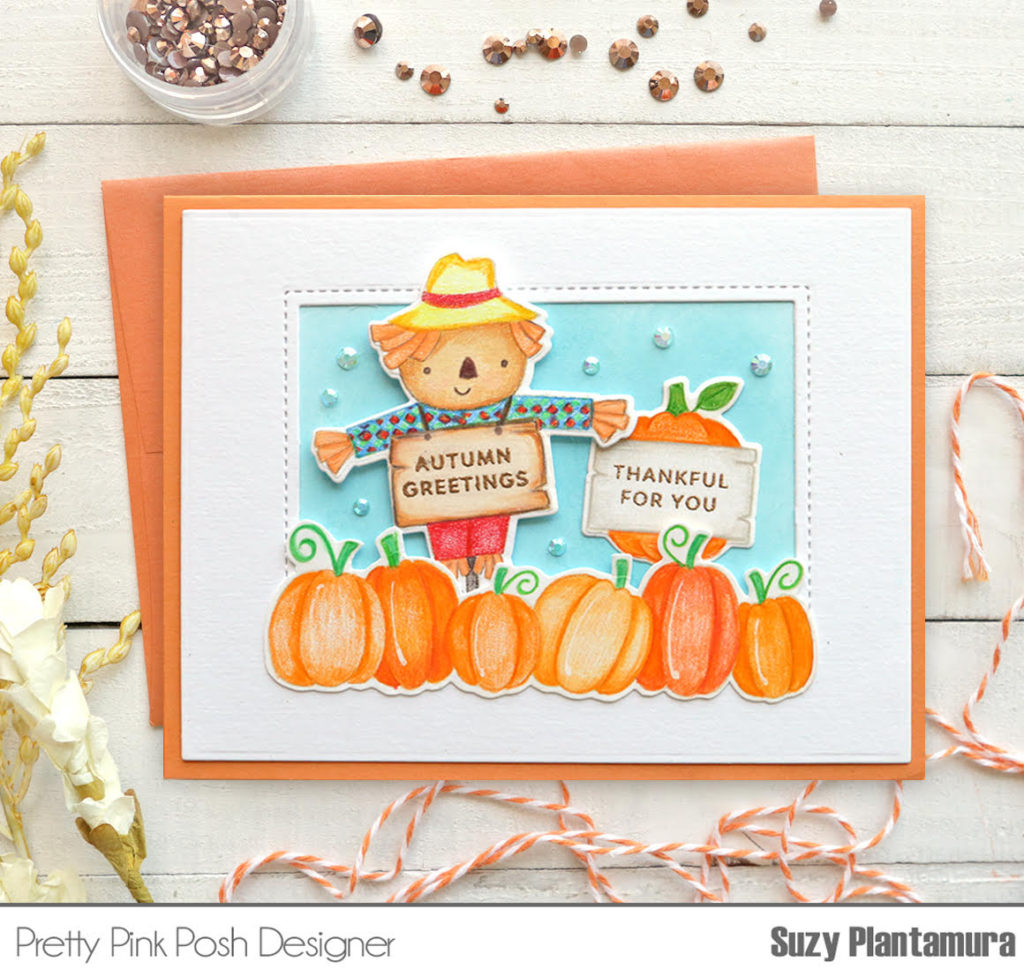
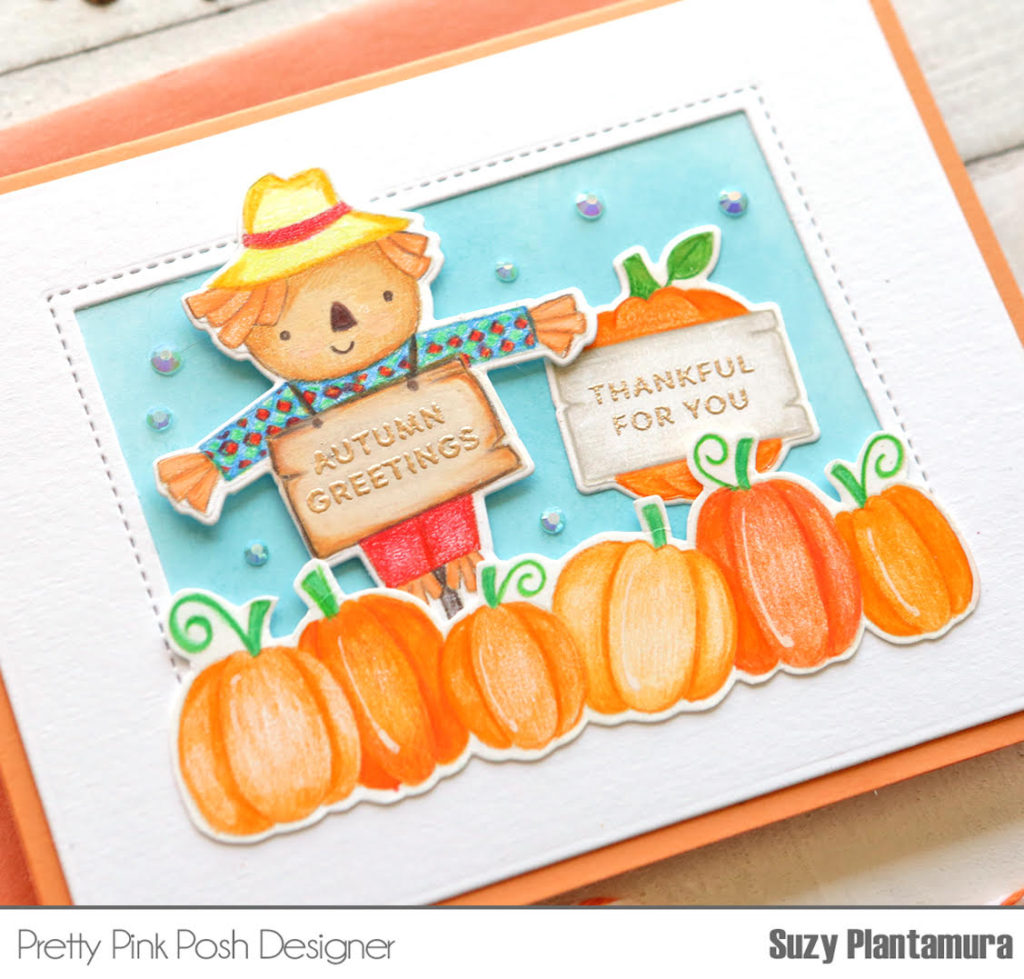
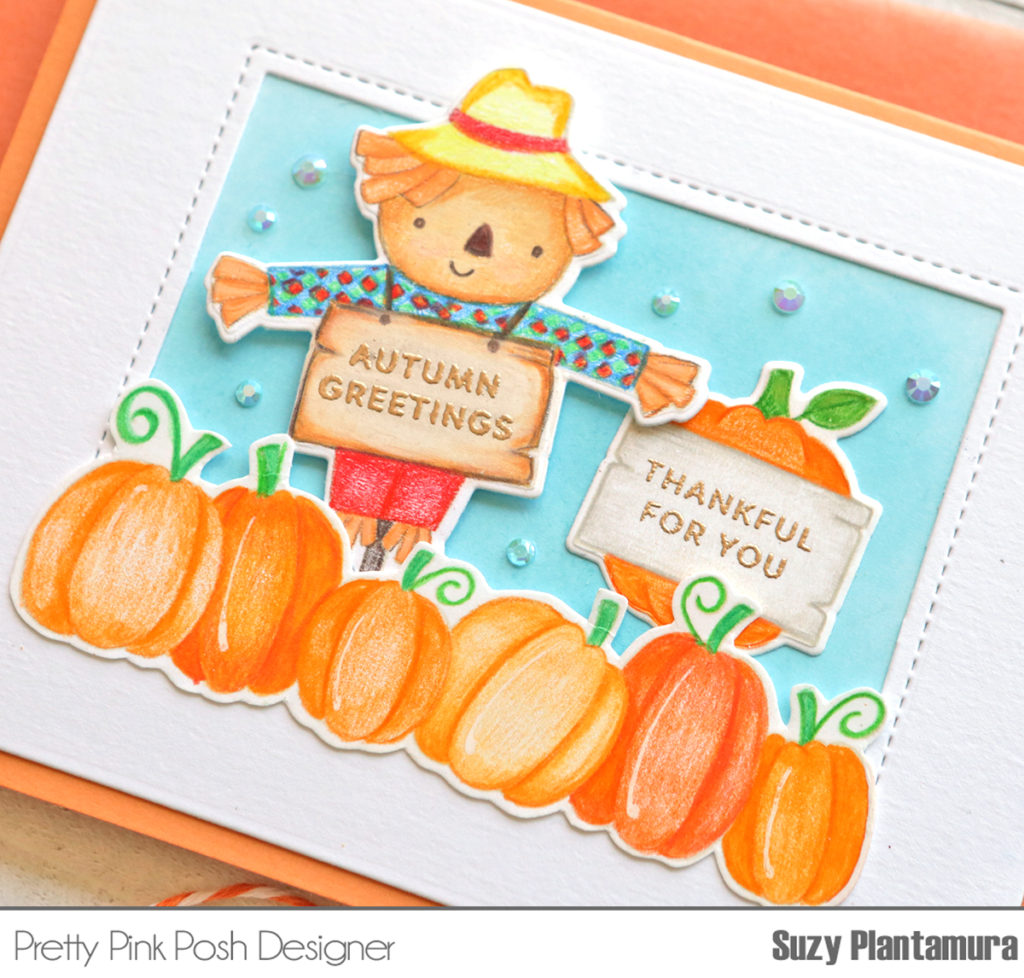
Hi Pretty Pink Posh friends! Suzy here and today I have a card to share with you for Fall Week using several of the newest Fall products. I’ve combined the Fall Borders Stamp Set with the Fall Signs Stamp Set.
I started my card with a Storybook Die(any of them work). I die-cut it and then cut the inside pieces out so I had a stitched square opening for the front of my card. This is a great way to use your Storybook dies in another way! I used blue Distress Ink over white cardstock for the area behind the opening. I then attached my card front to an orange card base.
Next, I stamped all of the images from both stamp sets on white cardstock using a light tan ink for no-line coloring. I colored in all of my images with colored pencils (my favorite coloring medium).
I embossed the greetings in the stamp set on the two signs using an Antique Gold embossing powder. I then attached them to the front of the card using foam tape behind the scarecrow. I cut two of the pumpkins off the border so it fit perfectly underneath the opening. I added some Sea Glass Jewels around the sky to finish the card.
Thanks so much for visiting today and I hope you are enjoying all this inspiration during Fall week. I bet you are also enjoying the beautiful leaves and weather! Happy creating friends!
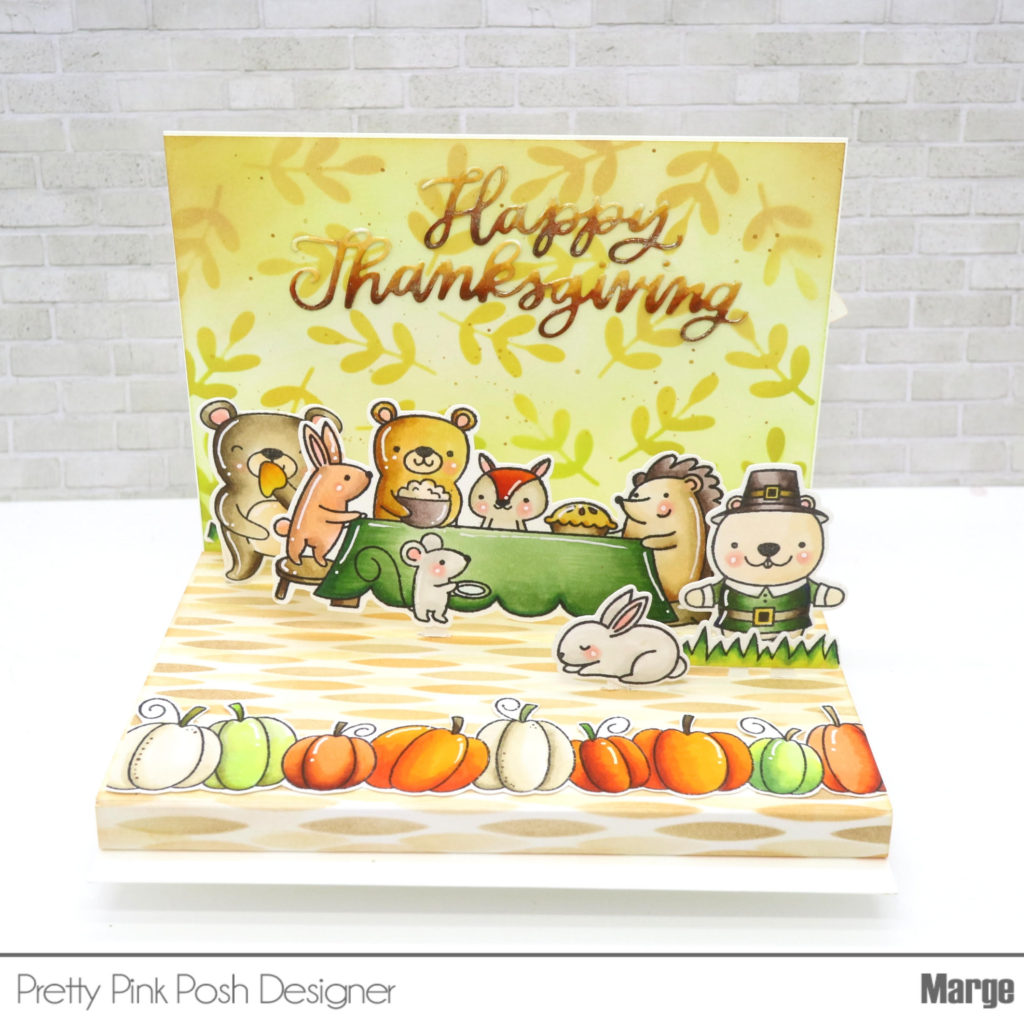
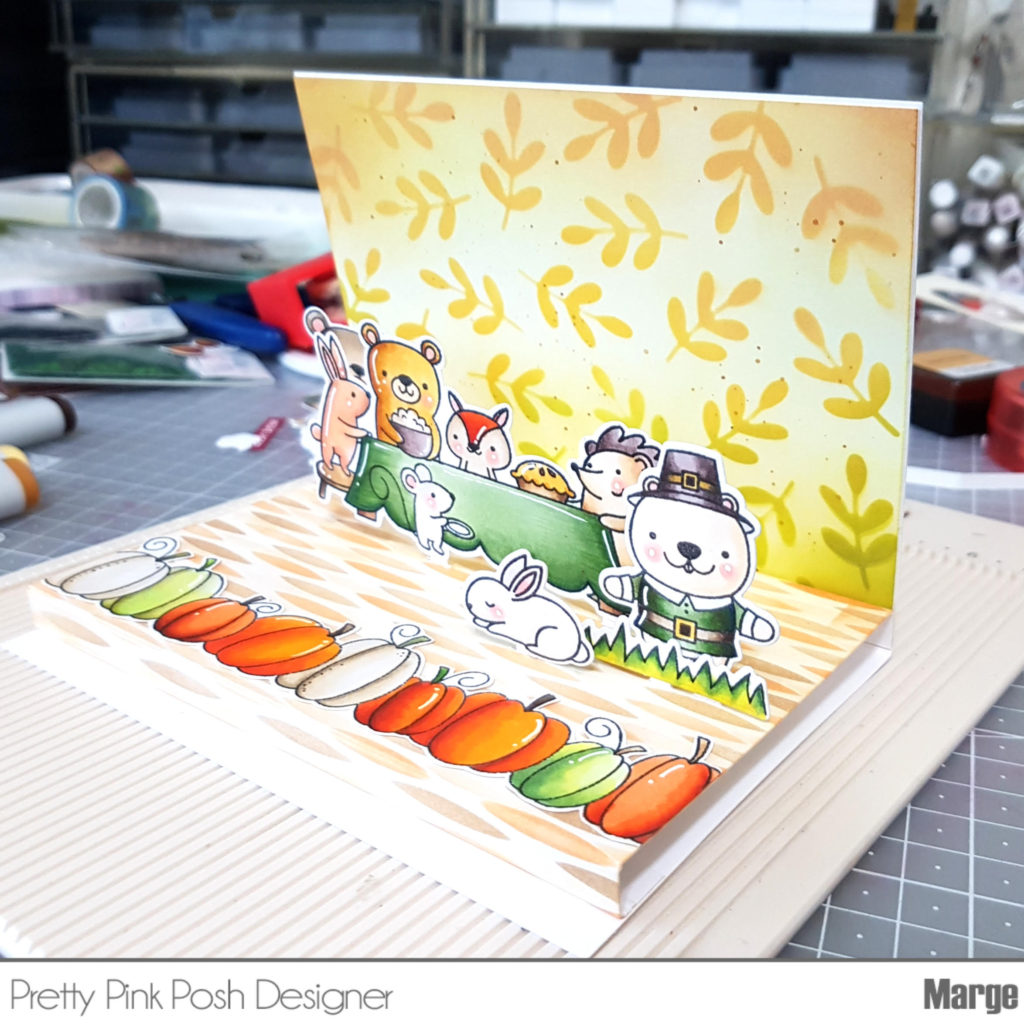
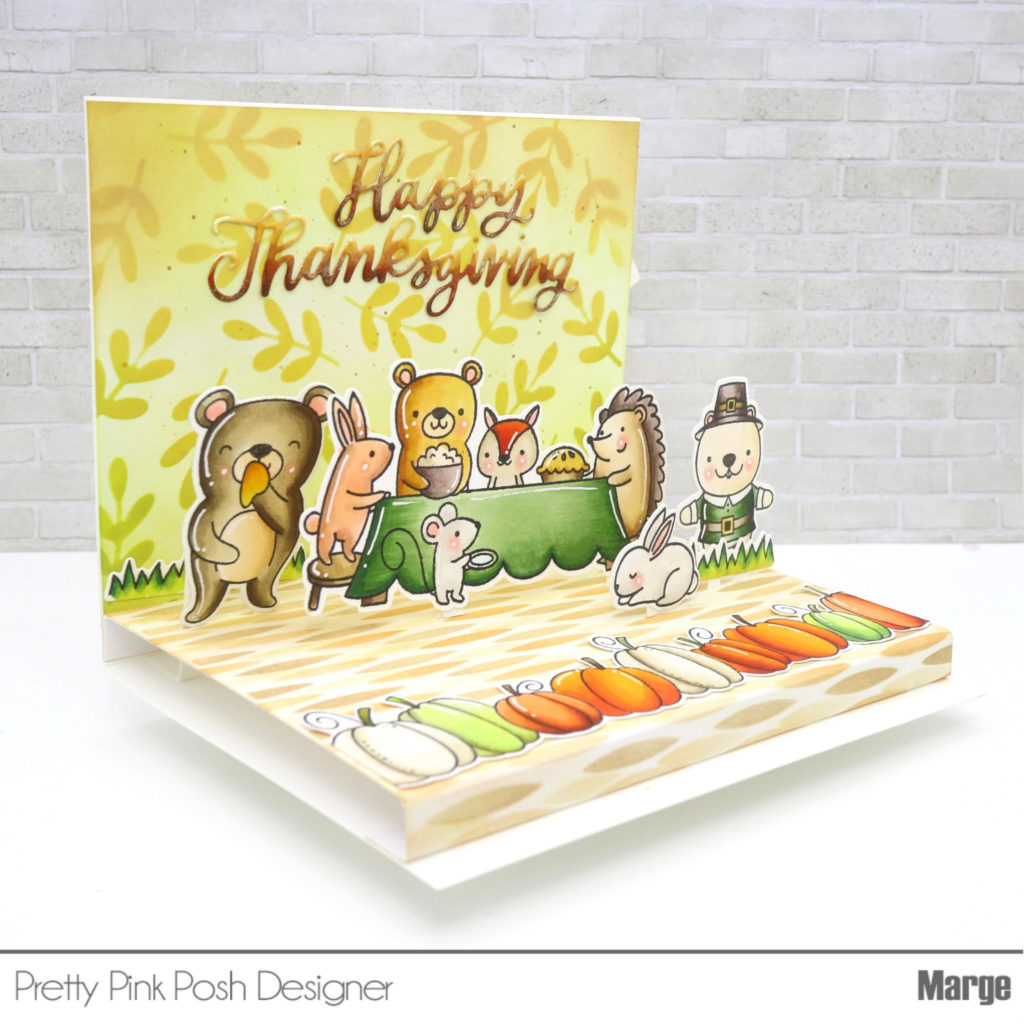
Hi, everyone! It’s Marge here with you for the Day 5 of Fall Theme Week. Today I’m going to share a Pop Up Standing Card with a happy thanksgiving scene with a step-by-step tutorial.
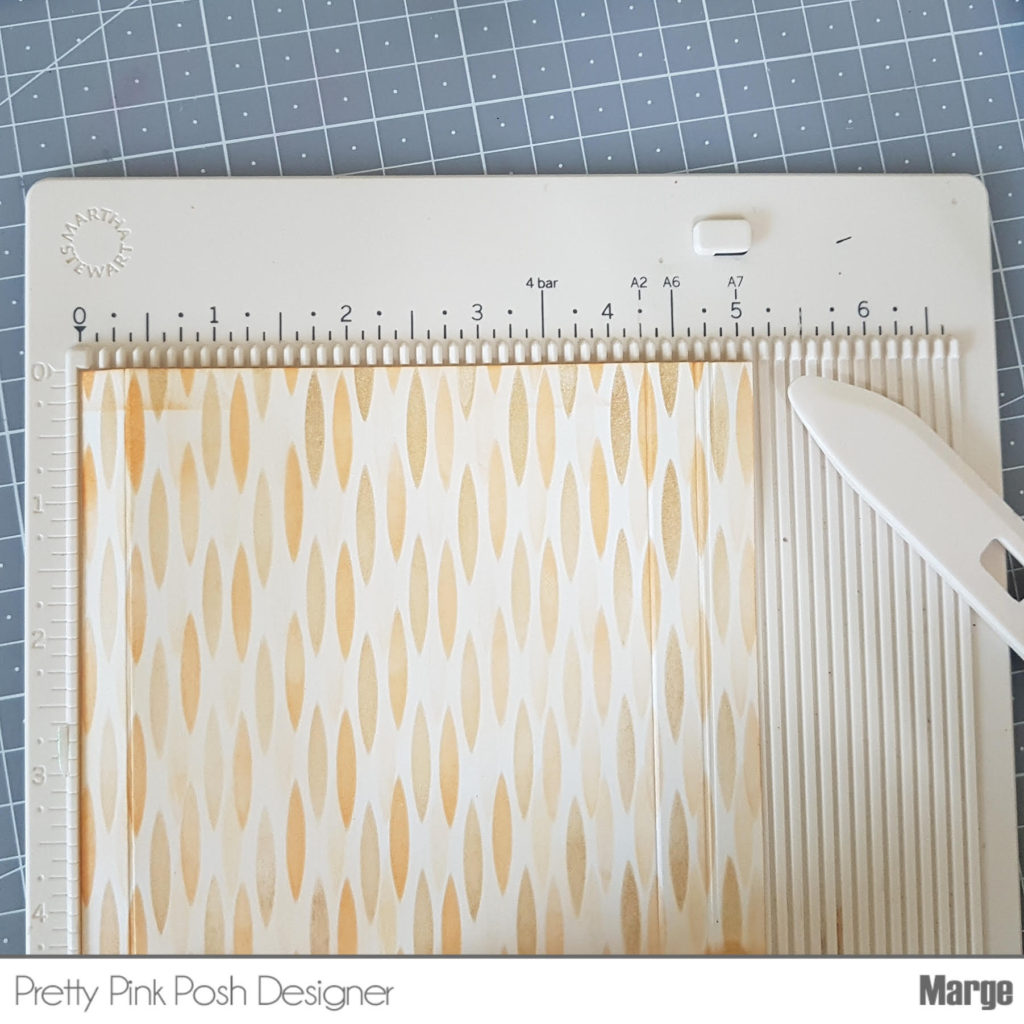
2) Cut another piece of Bristol Paper into 5×5.5inch, add patterns using Wafers Stencil. Do the same stenciling three times by moving the stencil on the paper to the side a little so that all the space are filled with patterns.
3) Score straight lines at 3/8, 4 1/4, and 4 5/8 inch along the 5″ side. The first 3/8 inch wide part will be glued onto the back wall.
4) Place die-cut images face down on the floor and mark cut slits at their bases using a pencil. Make sure that the images do not lay over the front edge or they will pop out of the card when you fold it.
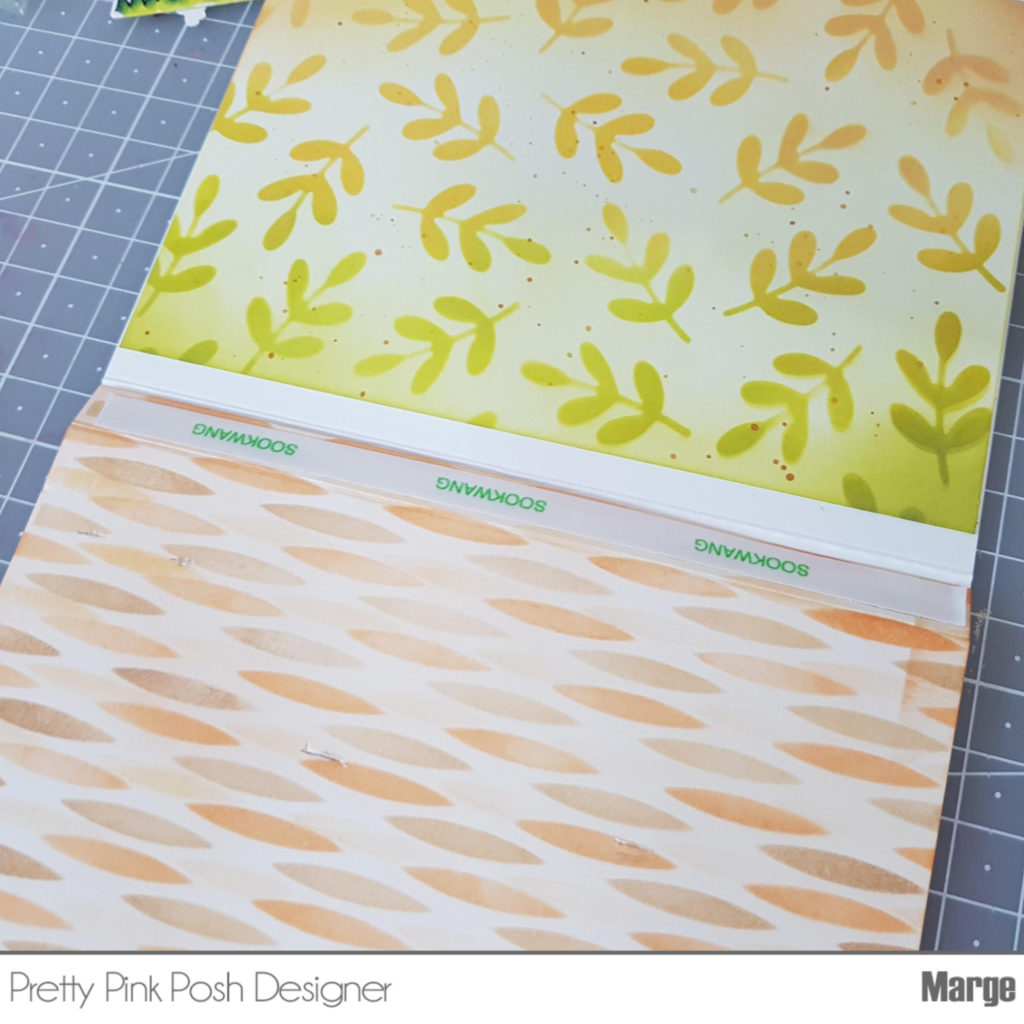
5) Use a knife to cut the marked slits, then adhere the 3/8 inch wide part of the floor to the back using double-sided tape or glue.
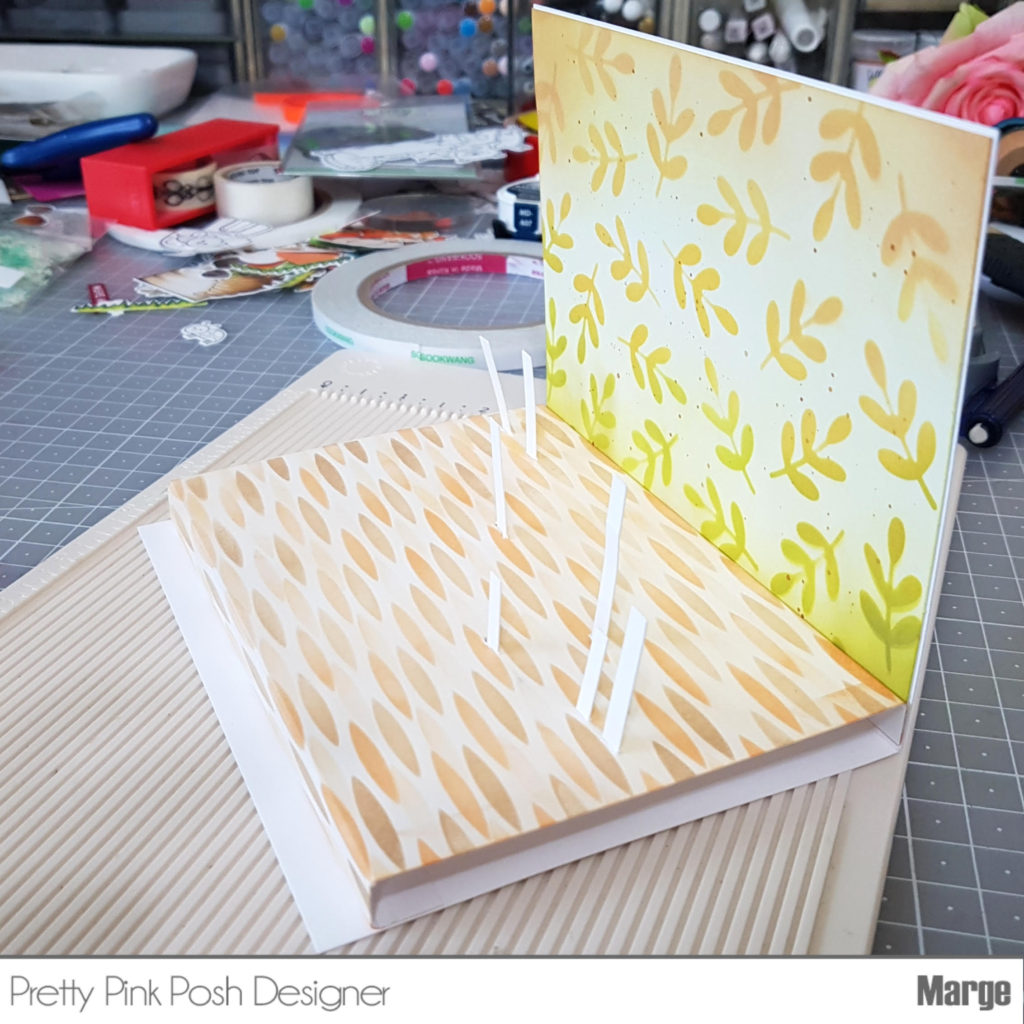
6) Now you need L-shaped props that are foldable to support the images when stand-up and to flat down the images when you fold the card. Cut several thin strips from heavyweight white card stock, make scores on the one-third of each strip. The length and width of strips are totally dependant on the height and width of your stand-up images. Just make sure that the bottoms of your L-strips are firmly glued to the bottom of card base under the floor.
7) Insert L-strips into the slits of floor, position them to stand up perpendicular, apply glue on the bottom of each strip, now hold down the floor so that the glued surfaces are adhered to the bottom of card base.
8) Adhere the front part of the floor to the card base to set up the floor.
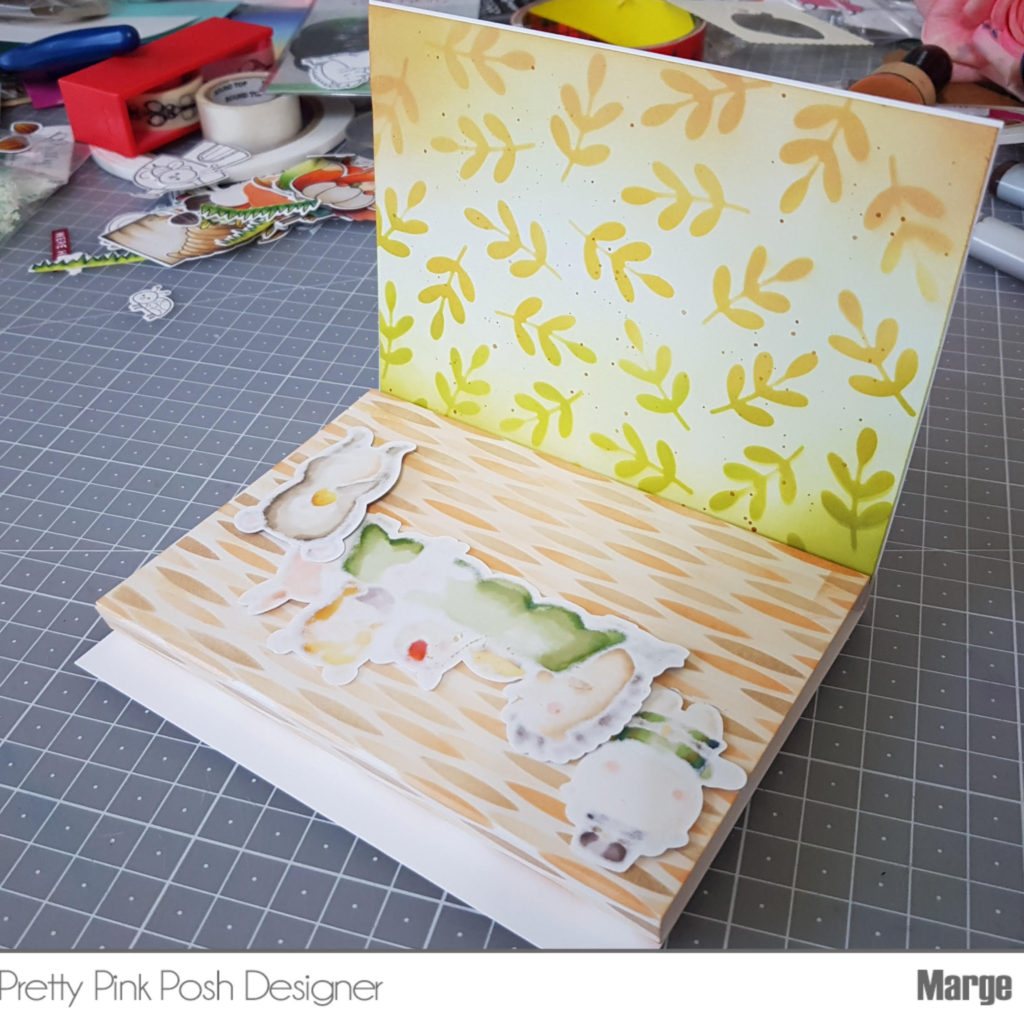
9) Adhere the colored images to the L-strips and the floor using glue or tape as shown in the picture.
10) Cut Happy Thanksgiving Script Die from white paper, color the die-cuts using Copic Markers (E29/E09/YR27/YR24/YR21/Y21), add sparkles on it using Wink of Stella, and glue them on the wall behind the scene.
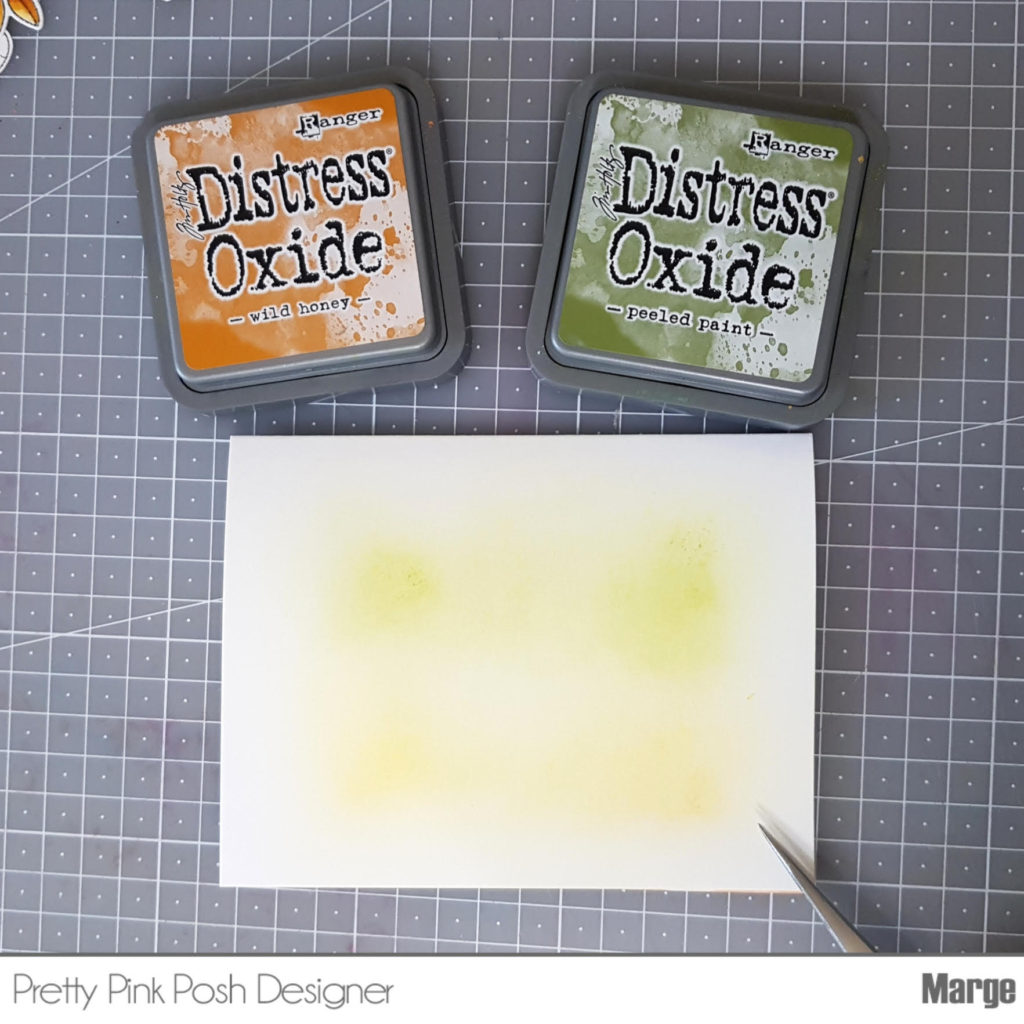
< Outside > 1) Create some subtle colored background by adding Wild Honey and Peeled Paint onto the outer surface of the card base.
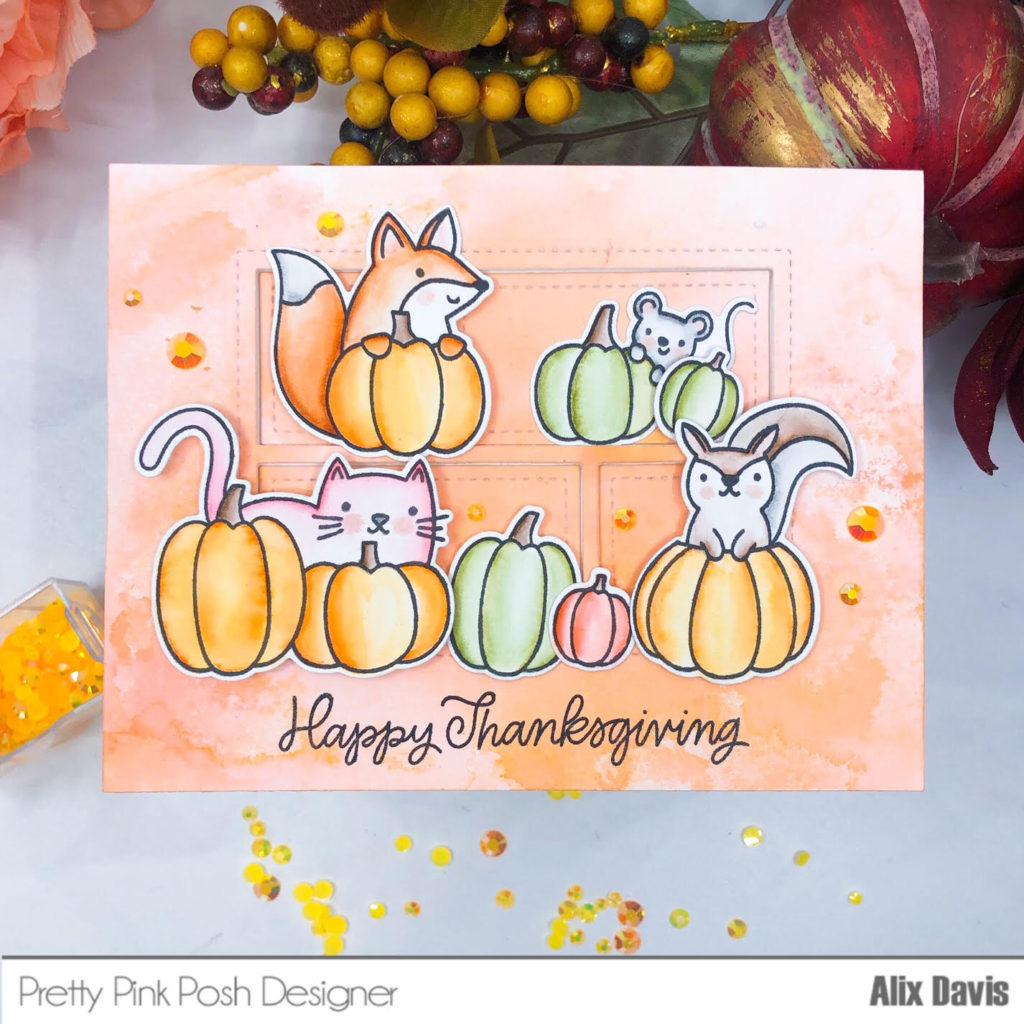
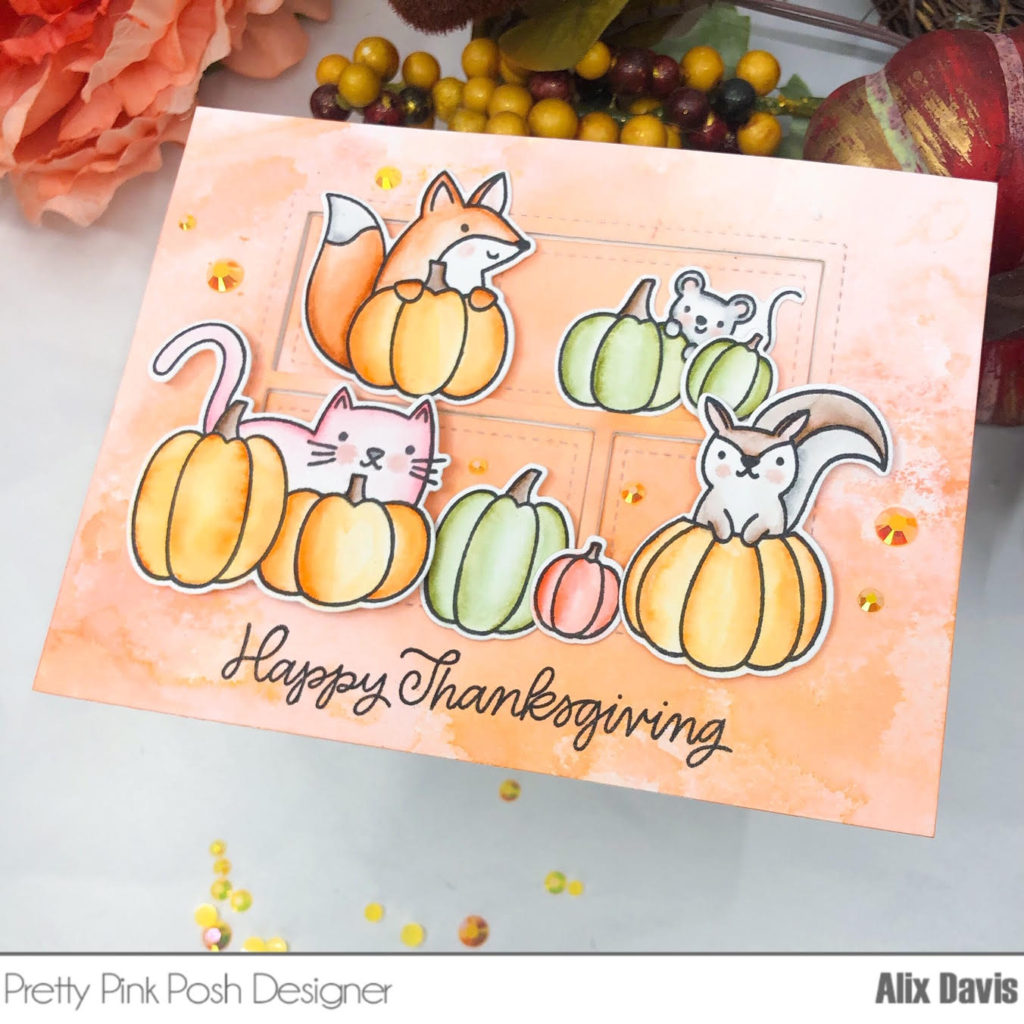
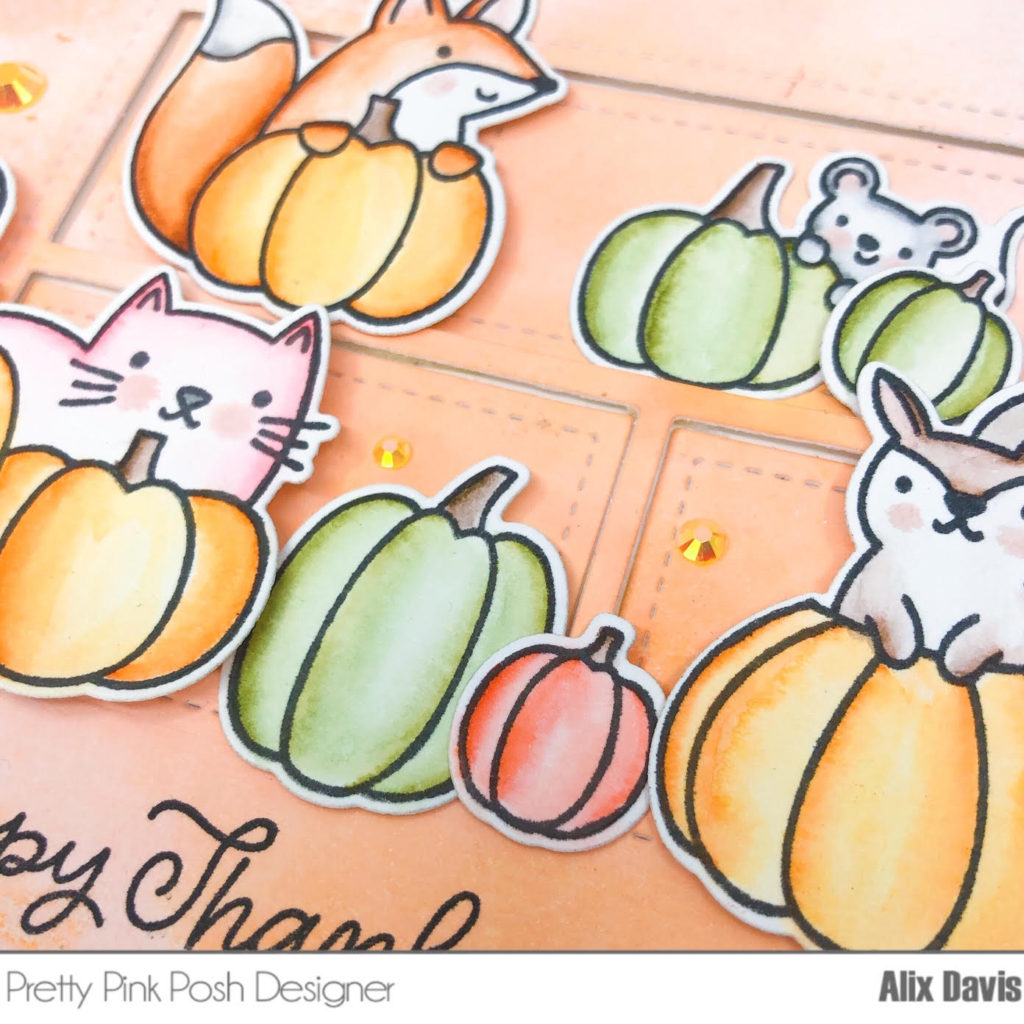
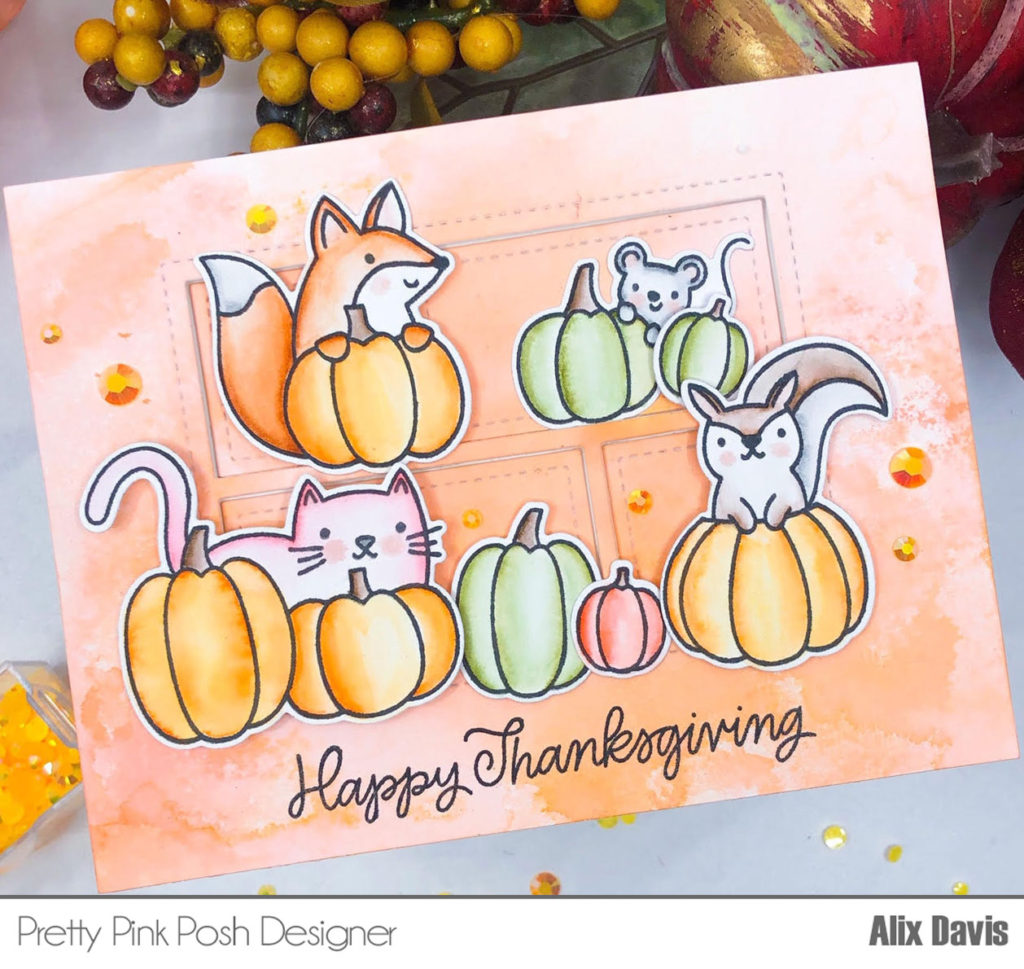
Welcome to Day 4 of Pretty Pink Posh Fall Theme Week! Alix here sharing a card I made with one of our lovely fall stamp sets called Pumpkin Patch Critterspairing with other great products. The weather is getting cooler where I live. So I started to decorate inside and front porch. I can never have enough pumpkins to celebrate the fall season.
To made my card, I mixed 3 colors of Zig Clean Color Real Brush Markers with water and smashed the liquid onto a piece of A2 sized watercolor paper. Once the paper was dry, I die cut my center window using Storybook 6 Die, then I attached the pieces on to an A2 sized card base using liquid adhesive and foam tapes.
I stamped all chosen images from Pumpkin Patch Critters Stamp setwith Versafine Onyx black ink onto Bristol smooth paper and colored them with Zig Clean Color Real Brush Markers. I die cut them with theCoordinating Diesas well. I attached them onto my prepped background. To create dimension, you could add some foam squares. If you stick with some fall traditional colors which are orange, red, yellow and green, you can not go wrong with the color combo.
I stamped the sentiment “Happy Thanksgiving” from Thanksgiving Scene Stamp setonto the bottom portion of my card and I also added some Jewels in Marigoldto embellish my card.
Now it’s your turn to start your fall project. Please head to our Fall section during this theme week to receive a 15% discount on all items!
Join us tomorrow for another fun day of fall inspiration from the team!
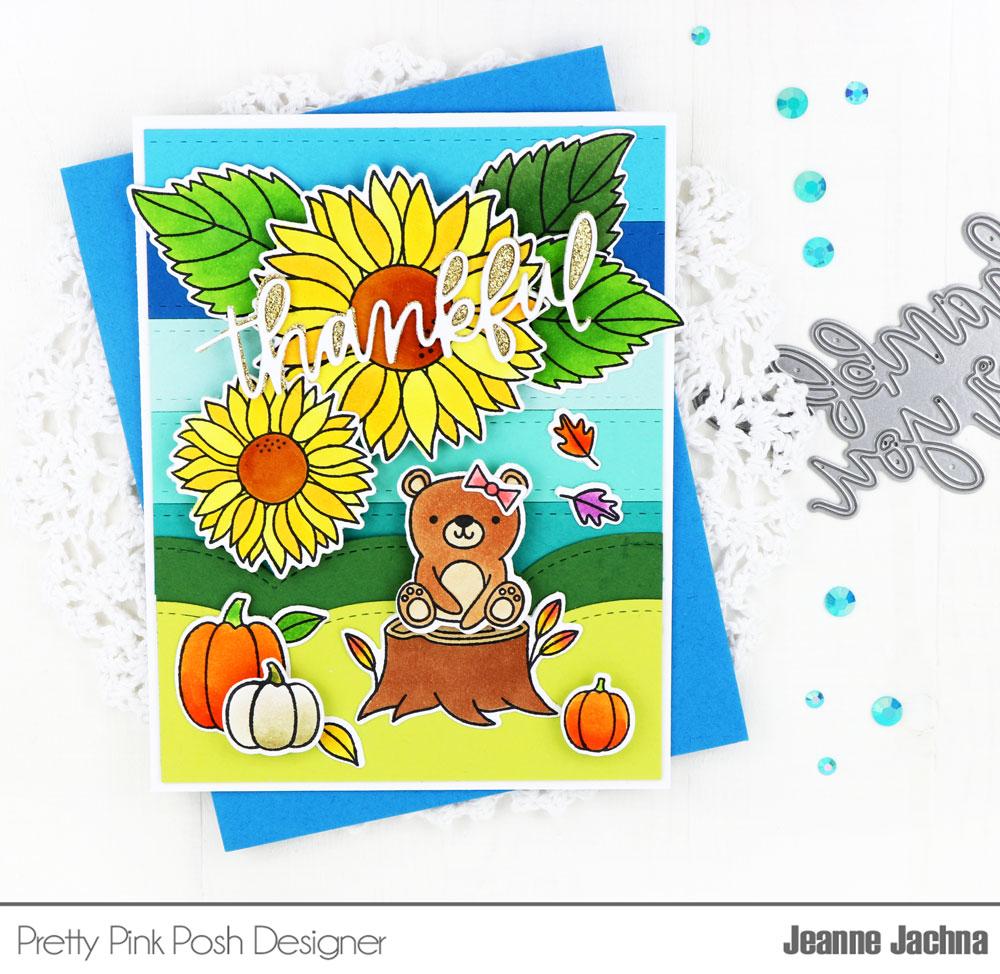
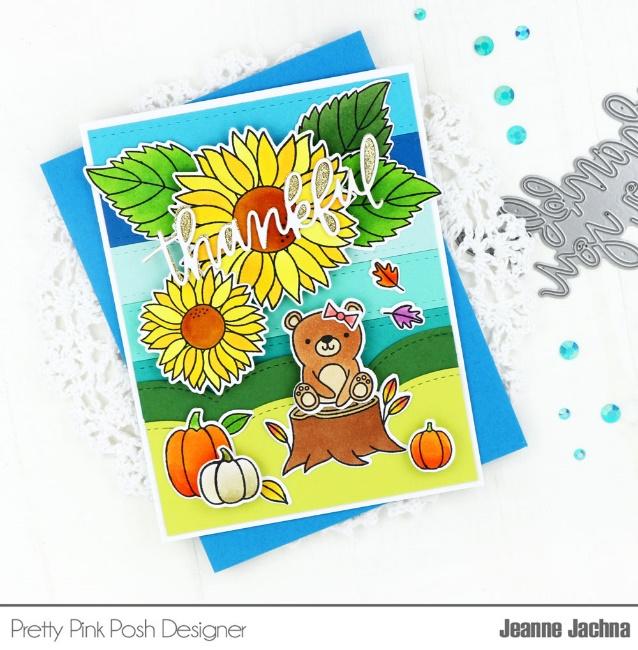
Hi friends! It’s Jeanne here today celebrating Pretty Pink Posh Fall Theme Week. There are so many beautiful fall dies and stamp sets in the shop that the hardest part is deciding what set to play with! I want them ALL! So I incorporated a few on my card today!
And great news! Celebrate fall and save 15% on all items in our Fall section during this theme week!
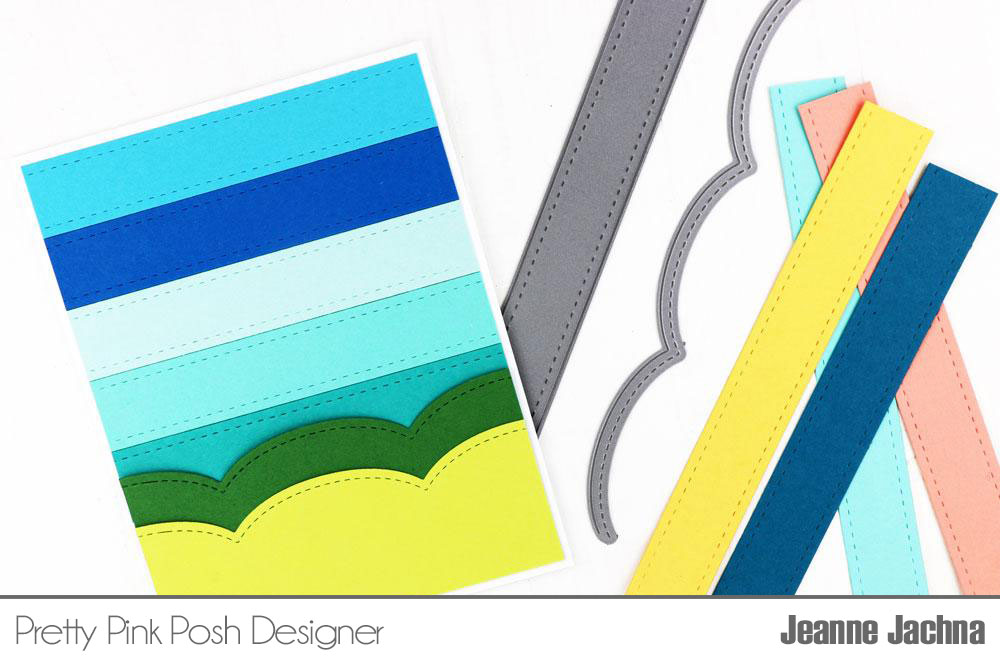
If you know me then you know I’m ADDICTED to COLOR! My favorite technique hands down is COLOR BLOCK. I love the bold colors and the clean designs achieved with this look.
I love the Stacked Edges border dies in the shop. They’re perfect for stacking layers without adding a lot of bulk, and the stitched edge detail is Whenever I die cut the border edges I cut several at a time. Its a great way to use up scraps and your left with a bunch of pretty colorful strips ready to play with!
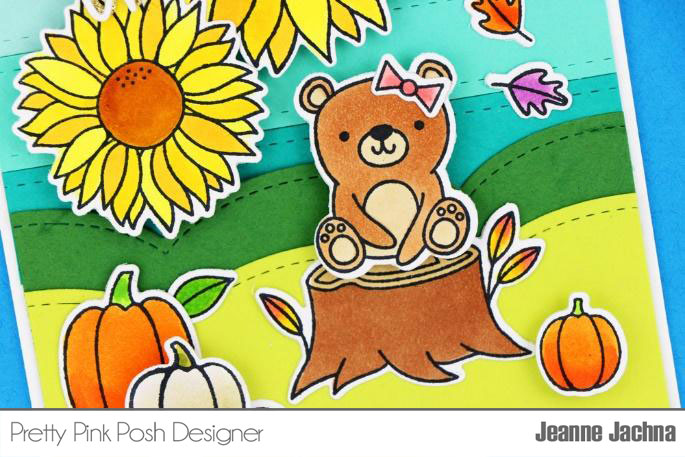
This little scene features the new Bear Friends stamp set. I love the little bow that can be used as a bow tie for the papa bear, or to add a girly look to the little ones in the set. The pumpkins are from the Pumpkin Patch Critters set.
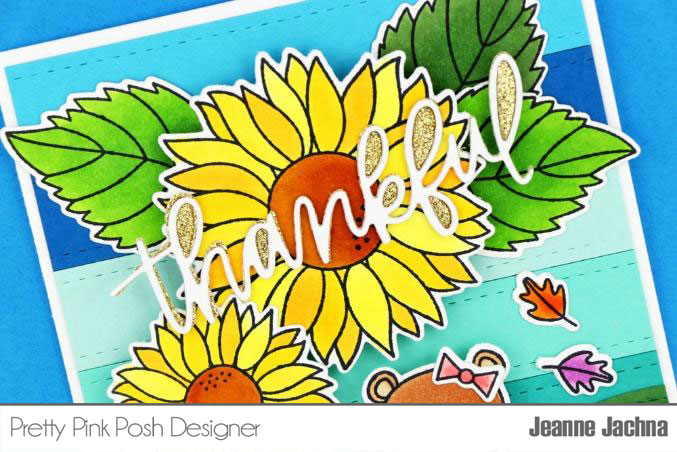
I topped the irresistibleSunflowers with “Thankful” from the Thankful for You Script die. I cut the die once from gold glitter paper, and a second time from white card stock. I left the loops open so the gold can peek through.
I hope you liked my card and that you are inspired to make an fall card today! Thank you for stopping by and have an amazing day!
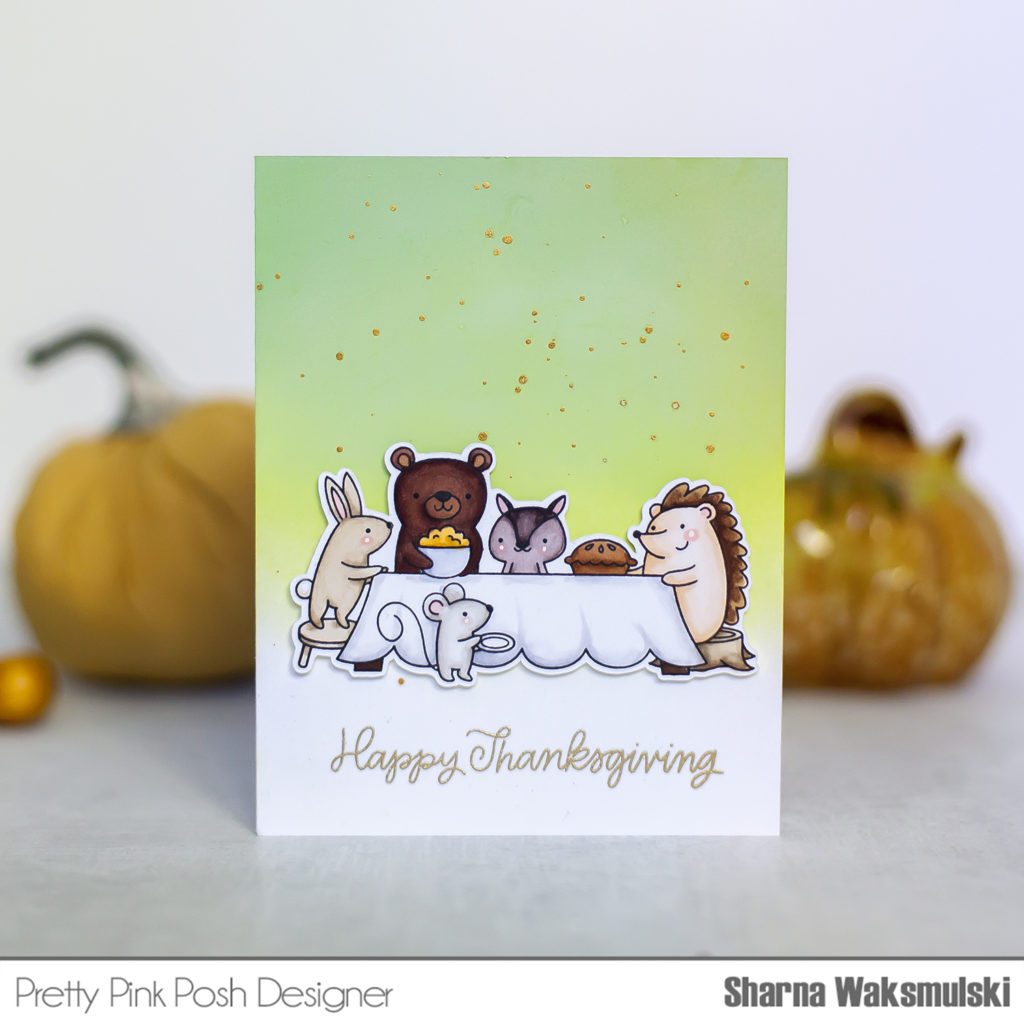
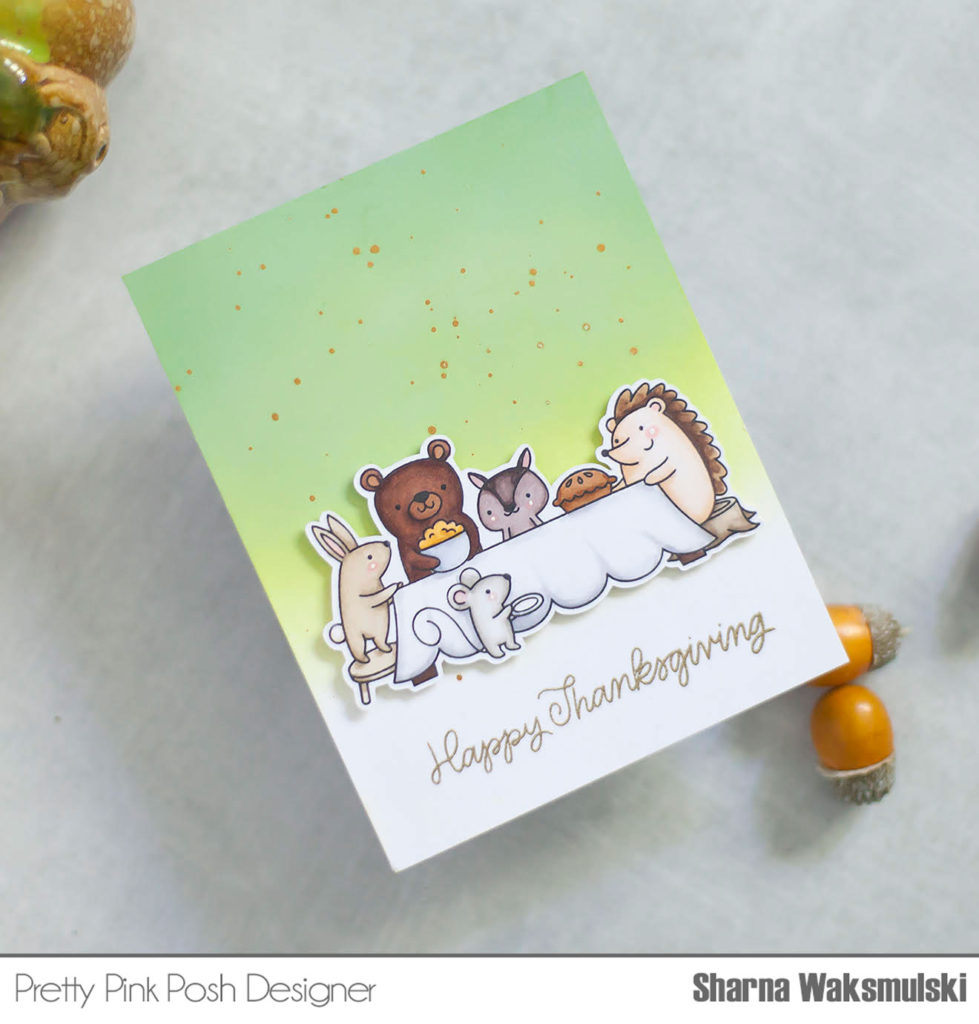
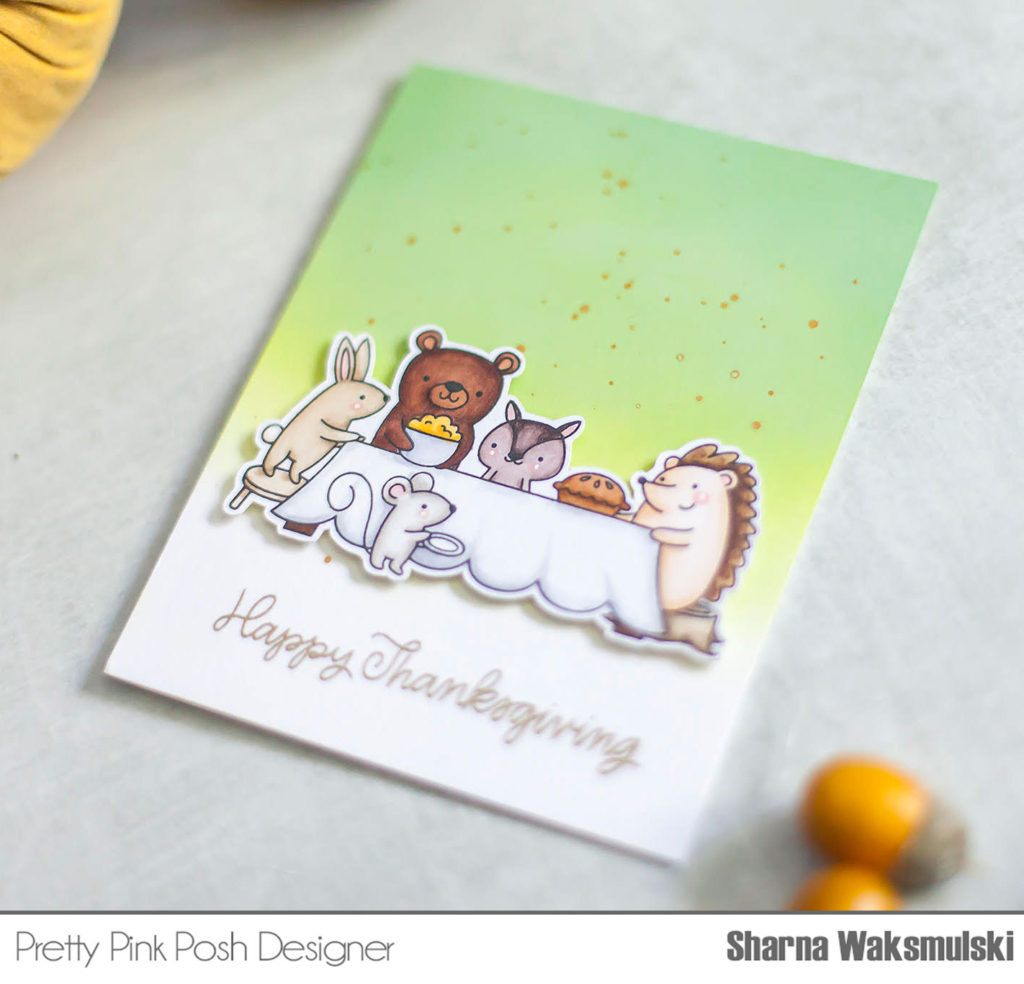
Hello everyone, Sharna here! So very glad to be joining during this fall theme week. Today I am using the new Thanksgiving Scene stamp set from the new release.
I started by stamping in copic safe black ink onto some Neenah 100 lb cardstock. After coloring I fussy cut the image out so I could pop it up on foam tape. Copics used: E47, E44, E43, E40; E21, E00; E29, E25, E23; E79, E74, E70; W1, W0; C3, C1; Y38, Y35
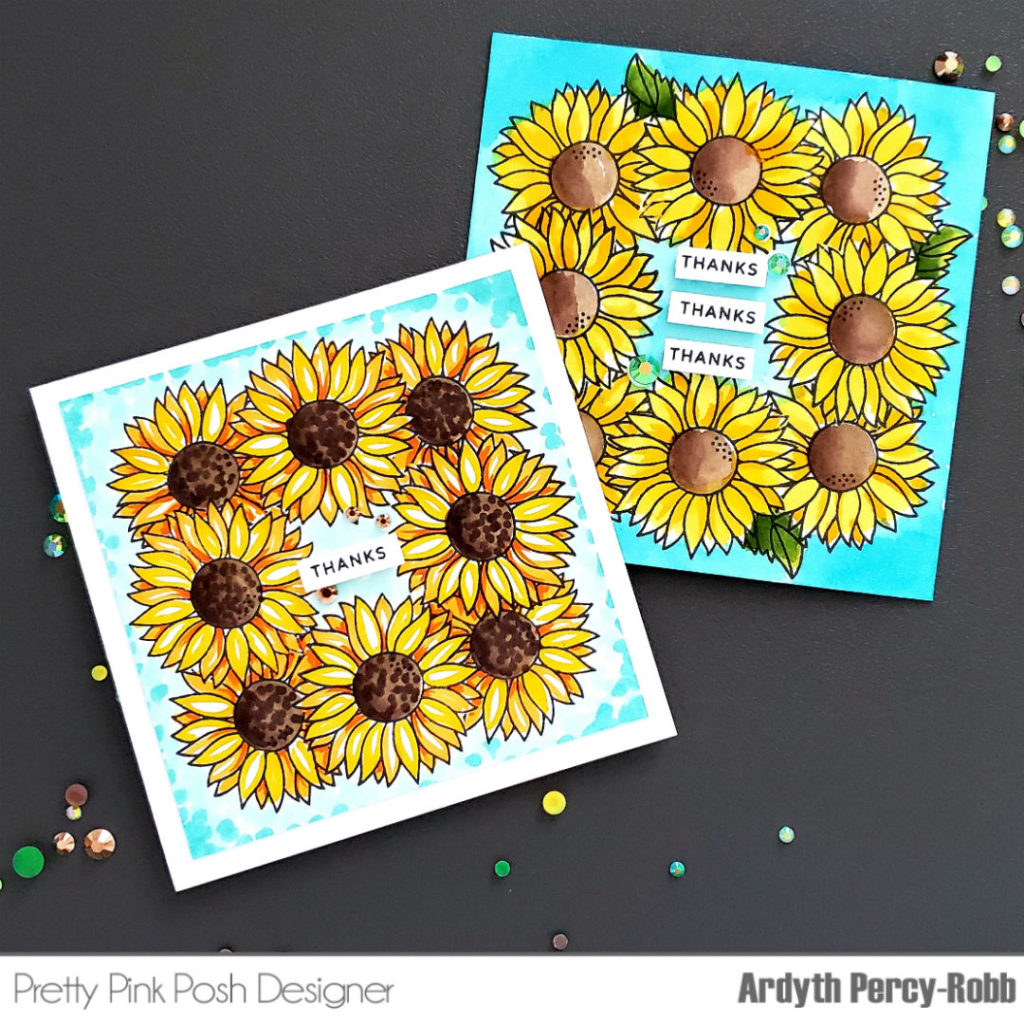
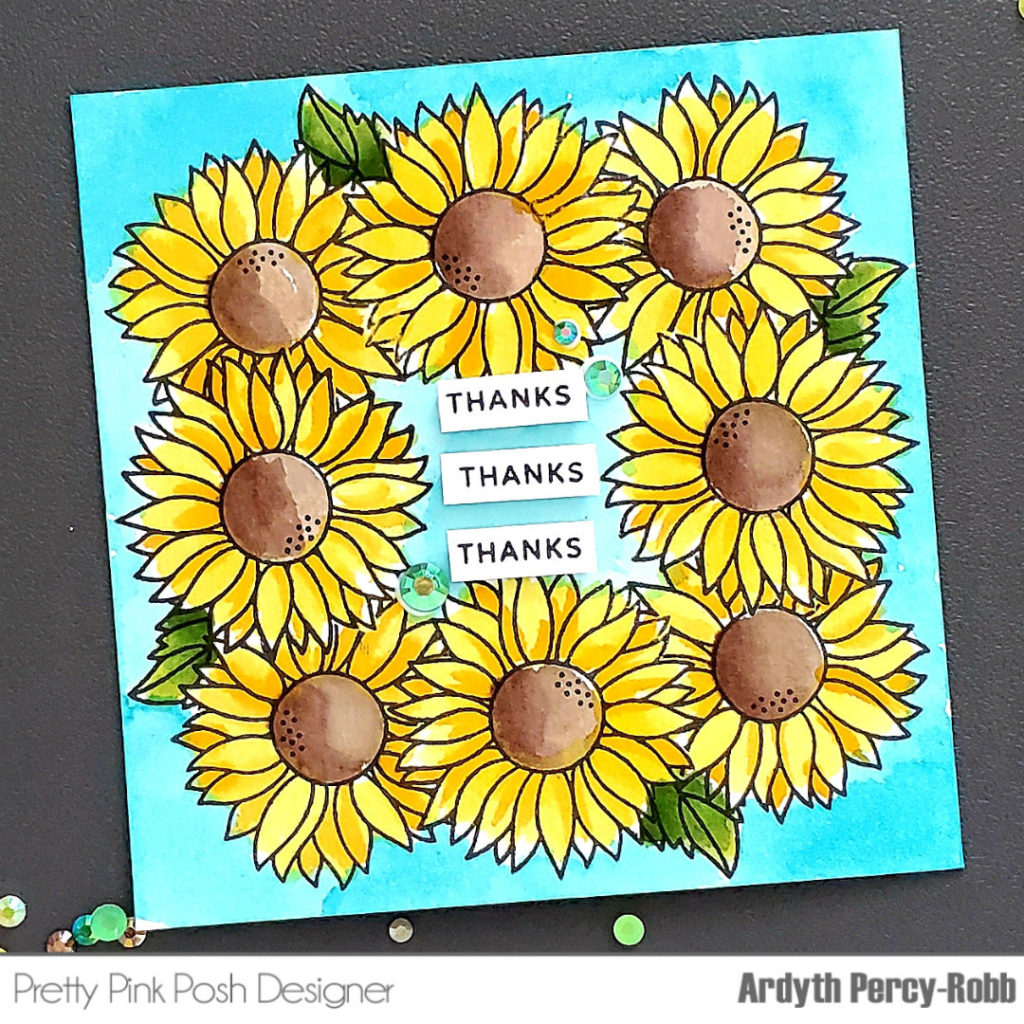
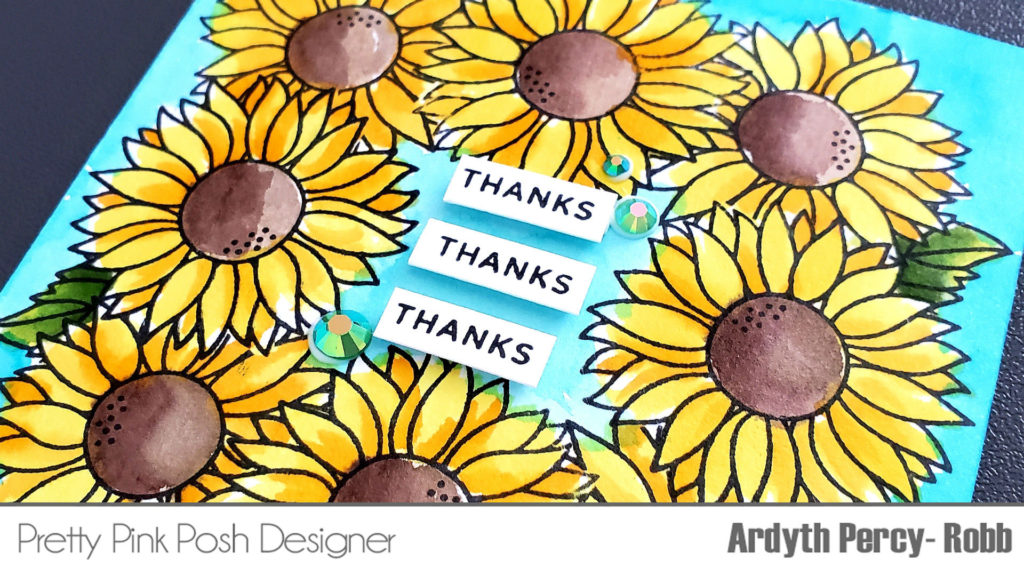
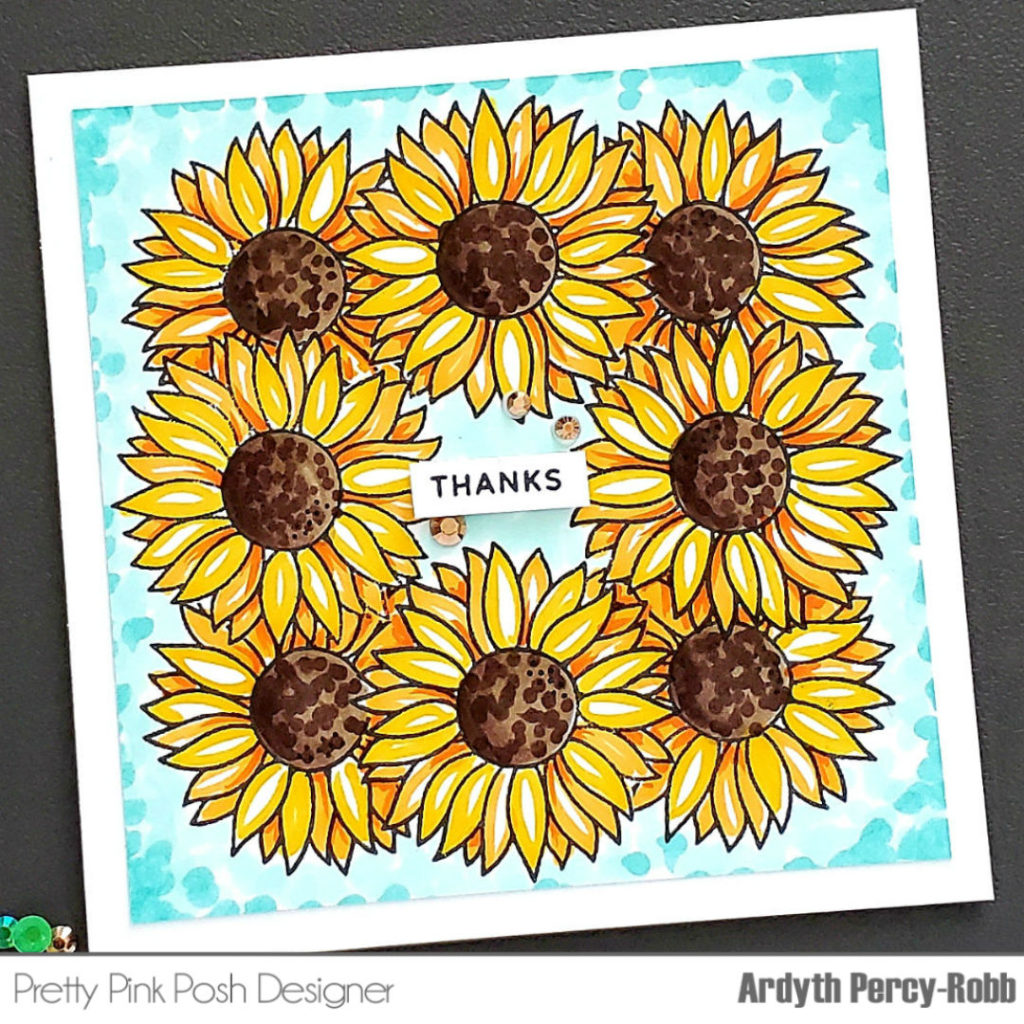
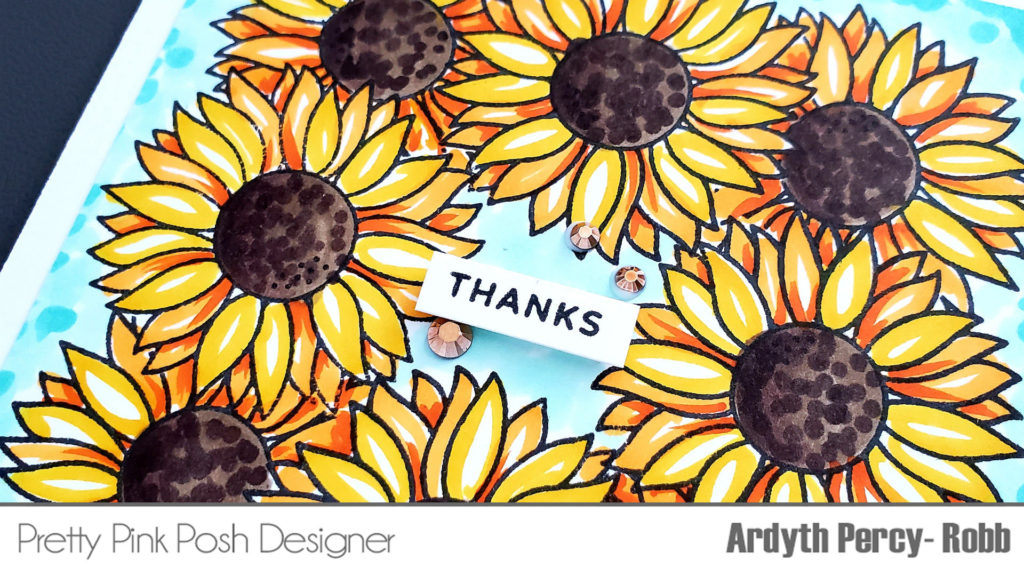
Hi everyone, it’s Ardyth! Welcome to our Fall Theme Week! We are celebrating our favourite season this week, and each day a different designer will be here on the blog with some inspiration for you, using products from the Fall Section.
My two cards may look very similar, but I used two different techniques to stamp the Sunflowers stamp setand two different techniques to colour them.
I wanted to build a wreath, but even the smallest sunflower is pretty big, so I knew that I would need to do some masking to fit more than 4 flowers on my cards. I used two different turning methods to create my wreath. The second method allowed me to use the full 4 1/4 inch square panel, so I had a bit more space in the centre, and room to add some leaves.
Then it was time for colouring. My go-to method is Copic colouring and while I’m not an expert, I do feel pretty comfortable that I know enough to get consistent results. I added a bit of drama and high-contrast to the flowers with a deep orange marker. Then I used a dot technique to add some texture and interest (as well as colour!) to the background and I love the artistic look of the result.
But sometimes a ‘go-to’ can start to feel like a rut, so on the second panel, I tried another colouring medium – watercolours. I am much less comfortable with this, but I gave it a good try, using a similar colouring strategy as my first card and am pretty happy with my results.
To finish off the card, I added sentiments from theFall Signs stamp set. These are small and easy to cut to fit your card!
I’ve made a video so you can see exactly how different these two cards really are.
Thank you for stopping by! Join us tomorrow for another day of fall inspiration!
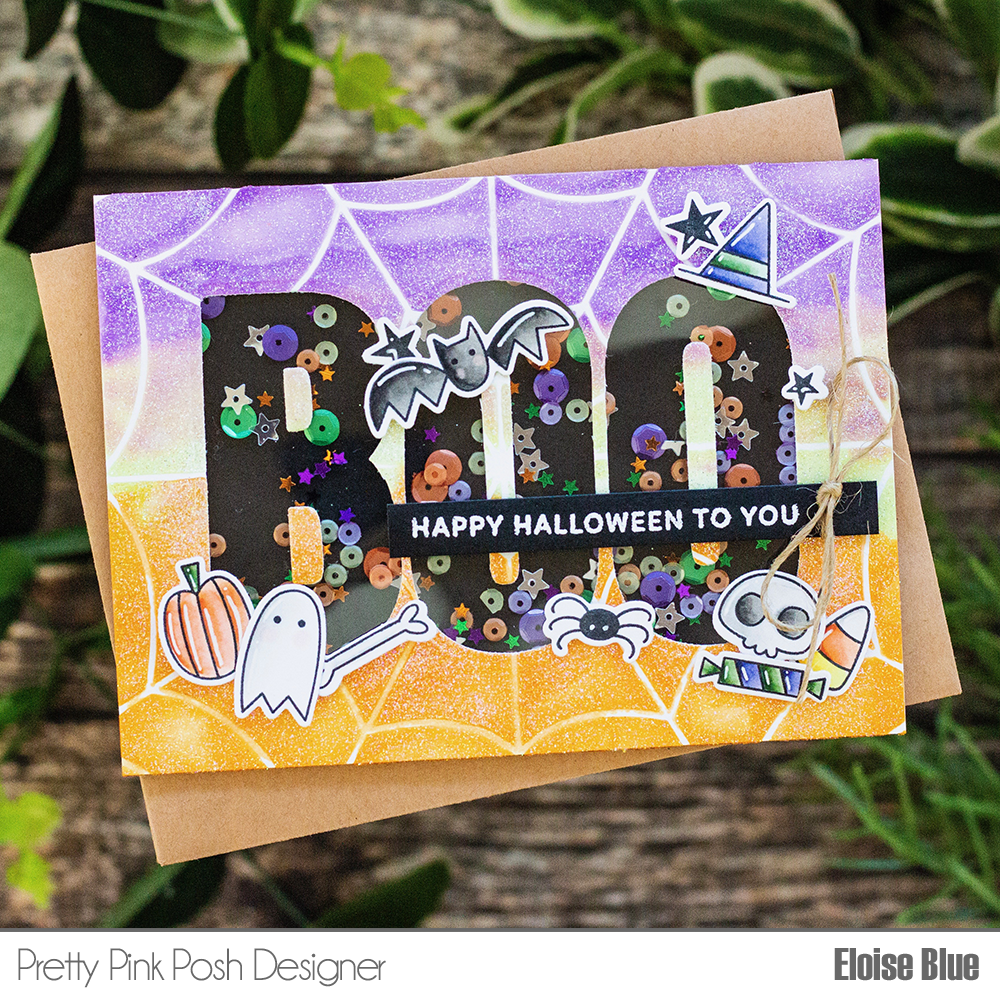
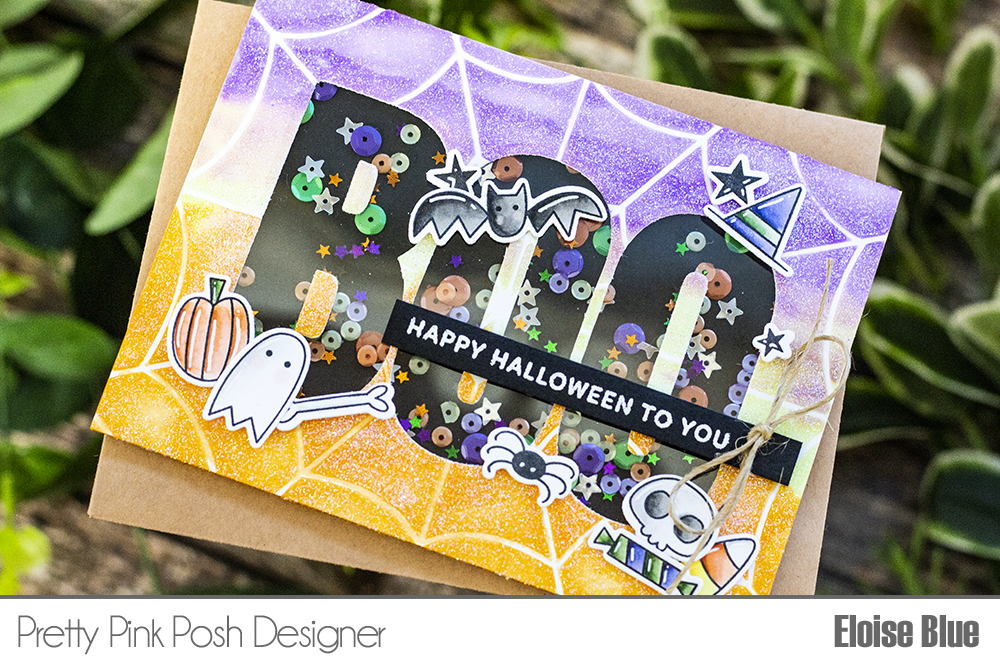
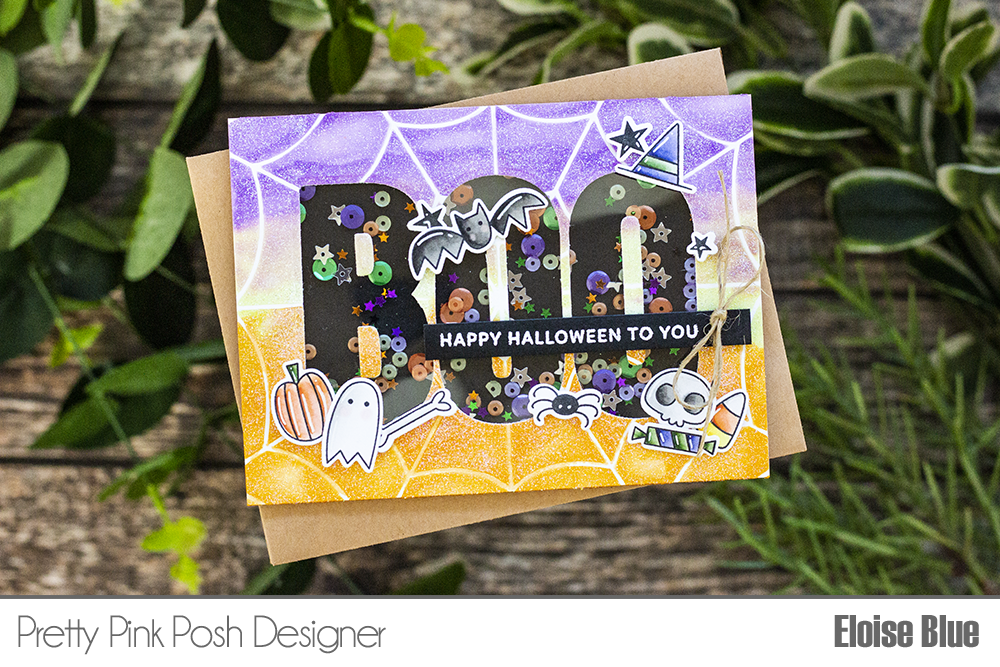
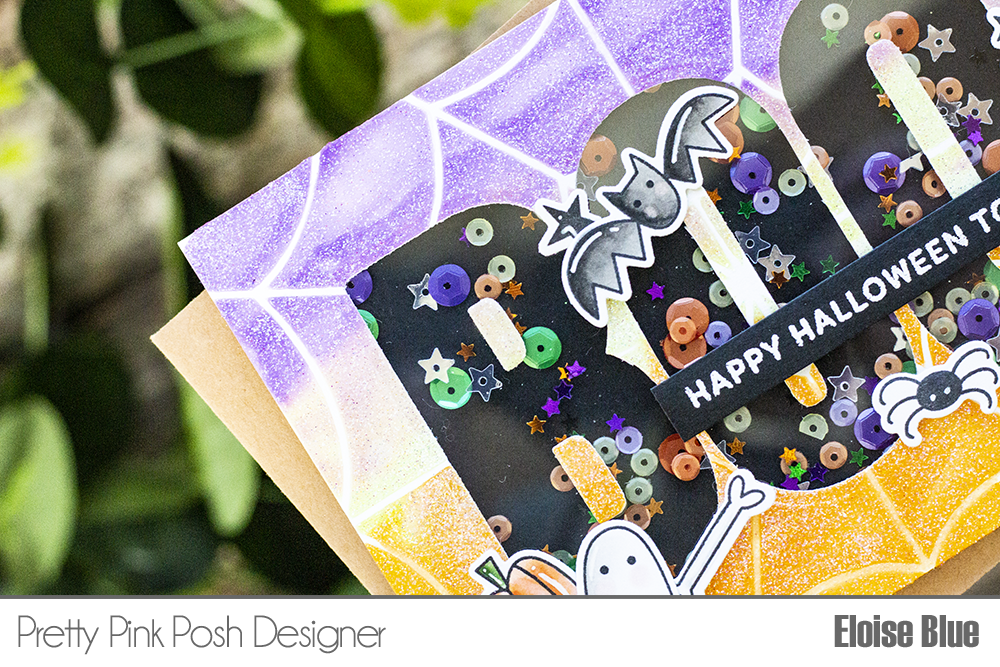
Hi everyone, Eloise here and today I have a shaker card to share with you all using the Boo stamp set. I’m pairing it with the Spider Web Stencil for my background.
I started off with stamping out my images and colouring them in with Copic Markers. Once they were coloured, I cut them out with the Boo coordinating dies. I also added white detail lines to each of the images as well.
I set the images to the side and worked on the background. I adhered down a piece of watercolour paper with washi tape and laid the stencil over the top. I then mixed up my own texture paste using Distress Inks, Glitter and Translucent Embossing Paste. I mixed up three colours and spread it over the stencil. I then sprinkled more glitter, dried it a little with a heat tool, peeled off the stencil and then let the piece dry.
Once the piece was dry, I cut the ‘Boo’
Word from the centre. I adhered acetate on the back and added foam tape around
the letters. I added in my sequins and star confetti and then added a black
piece of cardstock on the back. I flipped it over and adhered the middle of the
letters back in, too.
I adhered the images around the shaker
using foam tape. I also white heat embossed the ‘Happy Halloween To You’
sentiment onto a think black strip and adhered it down over the shaker. To
finish up I added a hemp cord bow to the right-hand side of my project.
That finished up my card for today, I hope you all enjoyed, and I’ll see you next time.
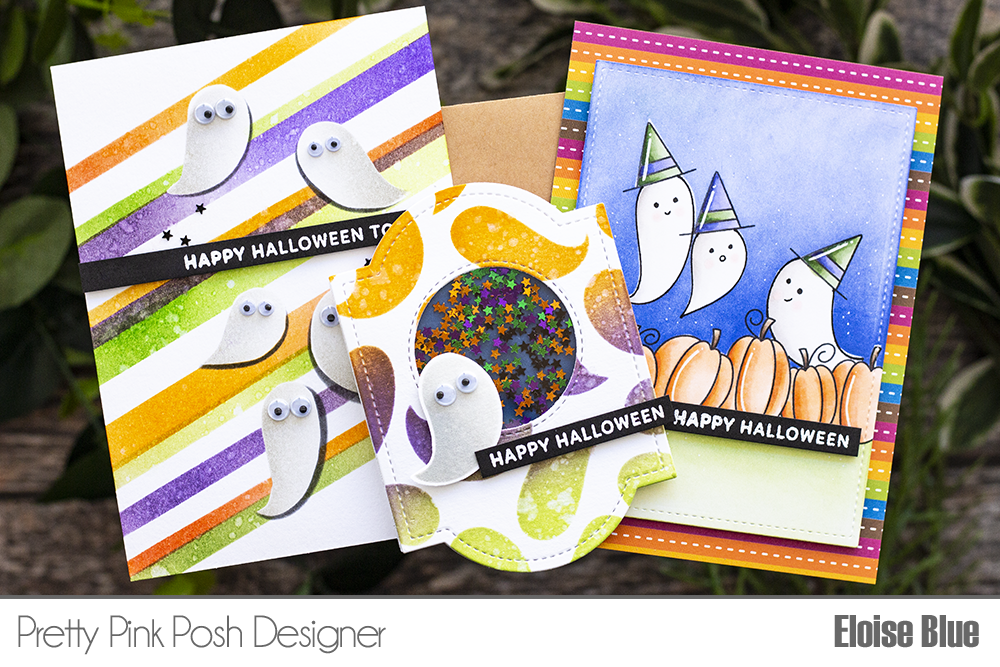
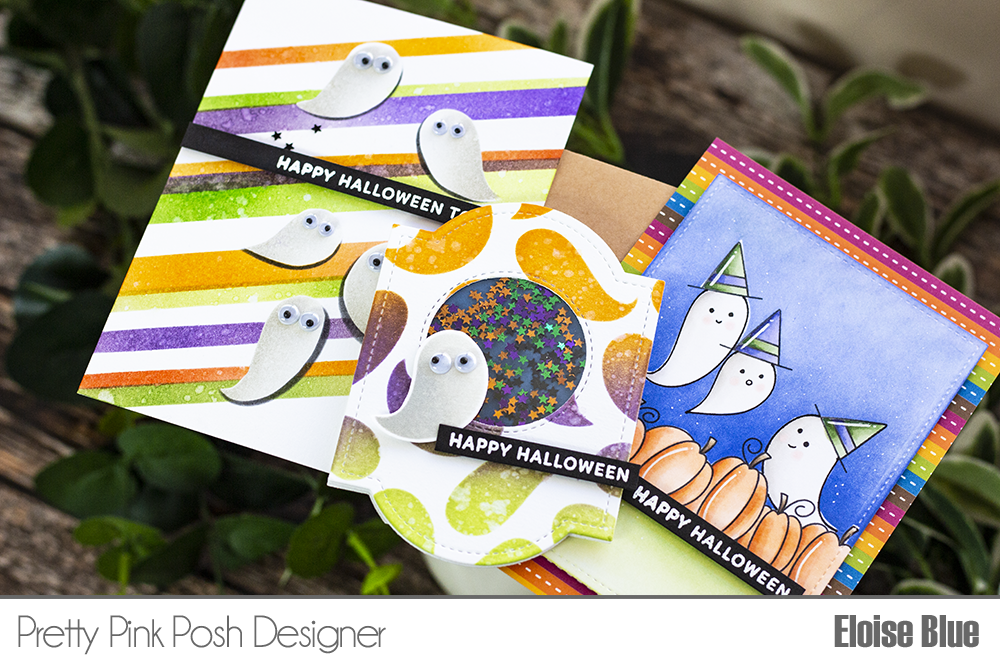
Hello friends, Eloise here and today I have three Halloween cards to share with you all using the Brush Strokes Stencil. I paired it with a few of the Halloween themed stamps in the most current release.
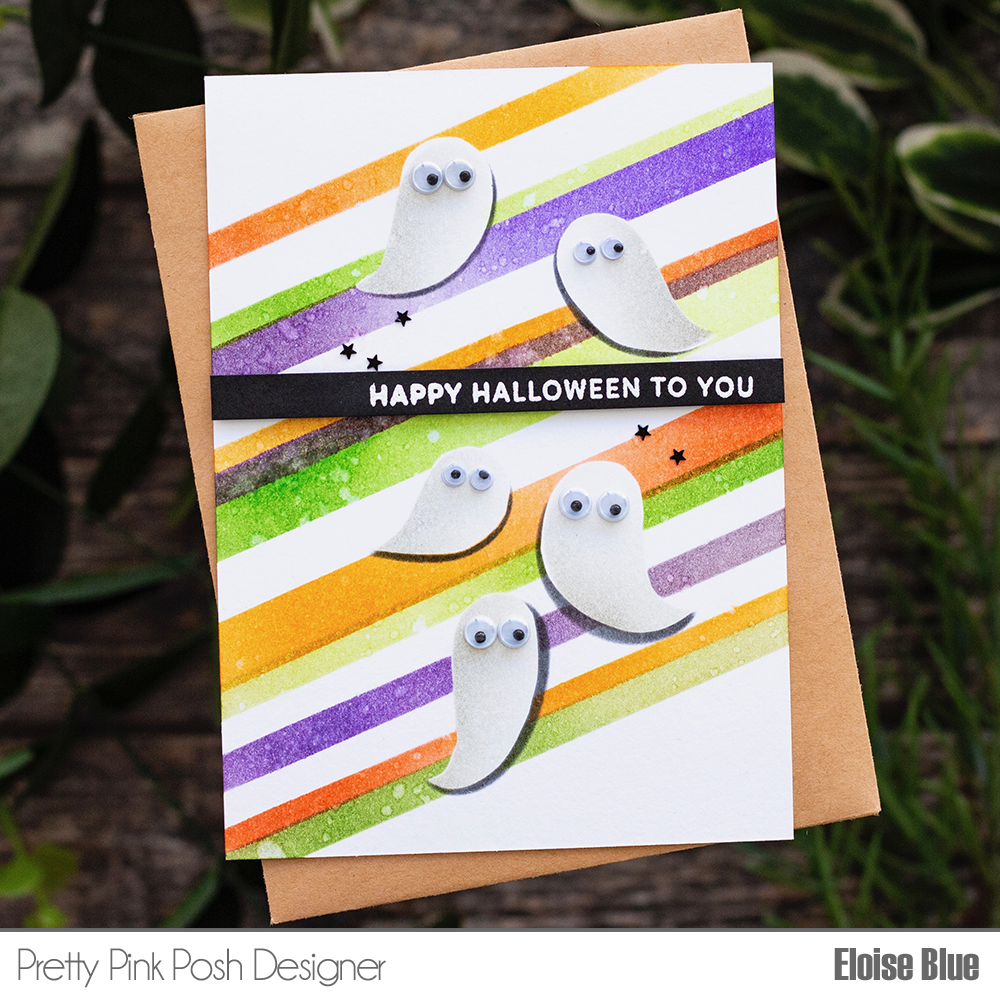
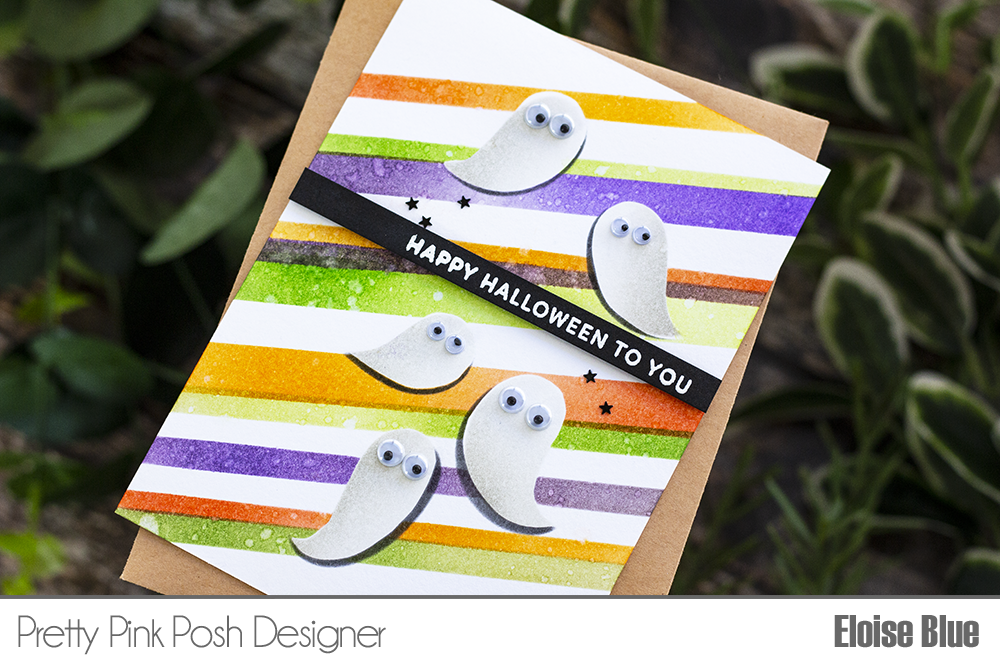
To start off my first card, I took a piece of watercolour cardstock and masked off individual “ghosts” from the Brush Strokes Stencil to ink blend onto the background. I used Pumice Stone Distress Ink and a little white pigment ink to blend them. Once they were all done, I made masks for them all using masking paper and adhered them over the top. I then used Washi Tape and the Wide Stripes Stencil to ink blend stripes over the background diagonally. I flicked on some water and dried it off with a heat tool.
I decided that the ghosts blended into the background too much, so I re-applied the masks and laid over the stencil and used some Black Soot Distress Ink to create a drop shadow on the each of them. Lastly, I adhered Silly Eyes to each of them using some glossy accents and white heat embossed the sentiment ‘Happy Halloween To You’ from the Boo Stamp Set onto a thin strip of black cardstock and adhered it straight across the card.
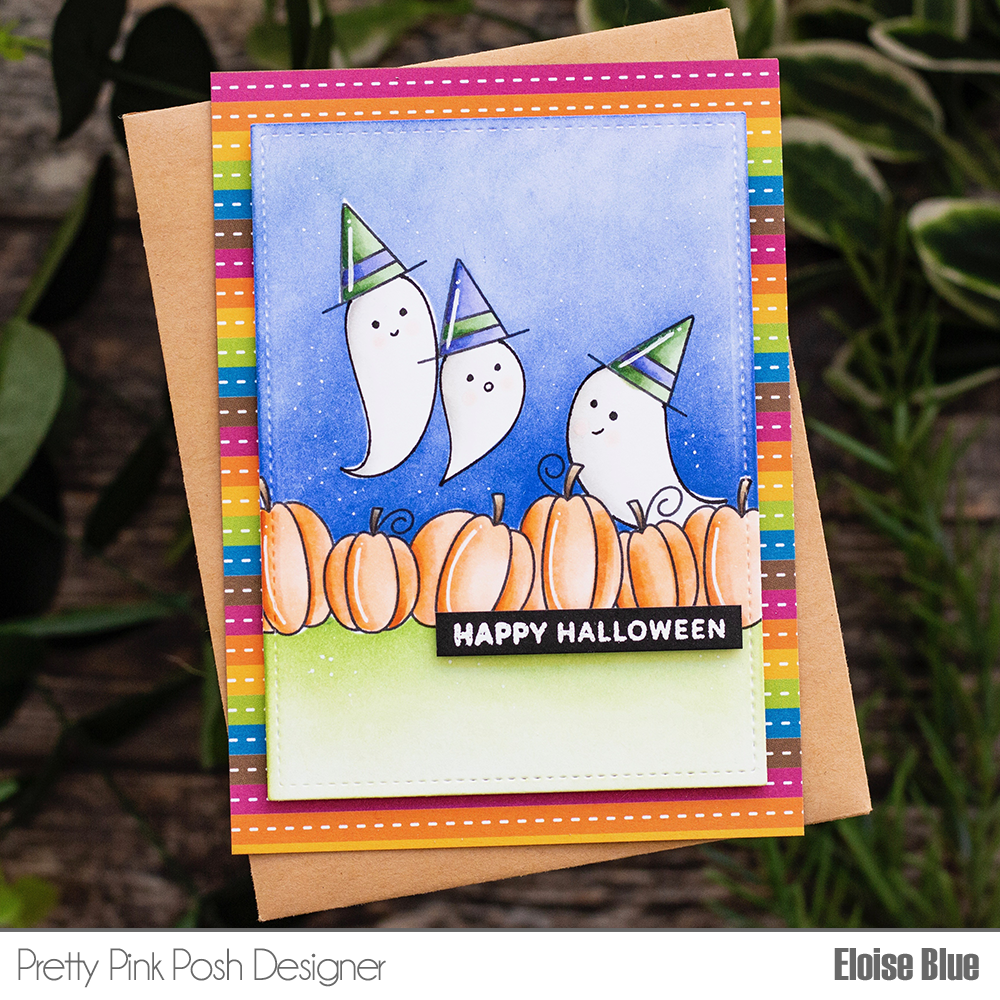
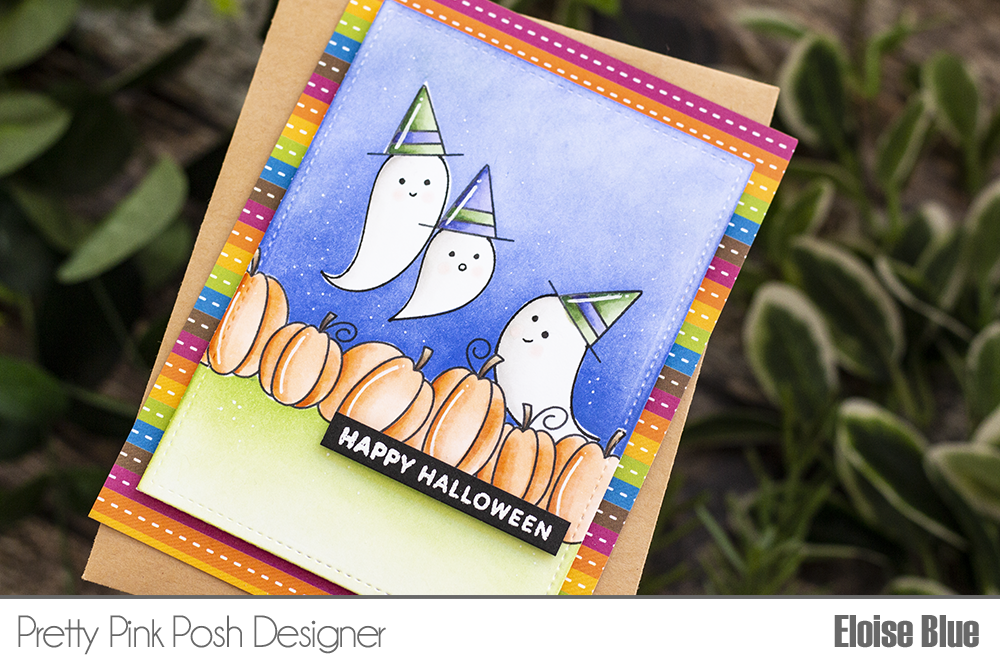
For the second card, I decided to turn the Brush Strokes Stencil into stamped images. I first took a piece of white cardstock and cut it down with the rectangle inStitched Notes Dies. I then used a stamping tool to stamp the pumpkin border from Fall Borders Stamp Set. I traced around the heads of the “ghosts” and then used the hat stamp from the Boo Stamp Set to stamp on the top of each of them. I erased the pencil lines, took the stencil and traced around each of the ghosts with a black marker. I then coloured everything in with Copic Markers.
After they were coloured, I drew faces on each of the ghosts using the same black marker. I then created masks for everything, adhered them on top and ink blended some Twisted Citron and Mowed Lawn onto the bottom and Blueprint Sketch for the top. I removed the masks and then white heat embossed the same ‘Happy Halloween’ sentiment from the Boo Stamp Set onto a thin strip of black cardstock. I adhered it to the card and then adhered the entire panel onto a piece of patterned paper.
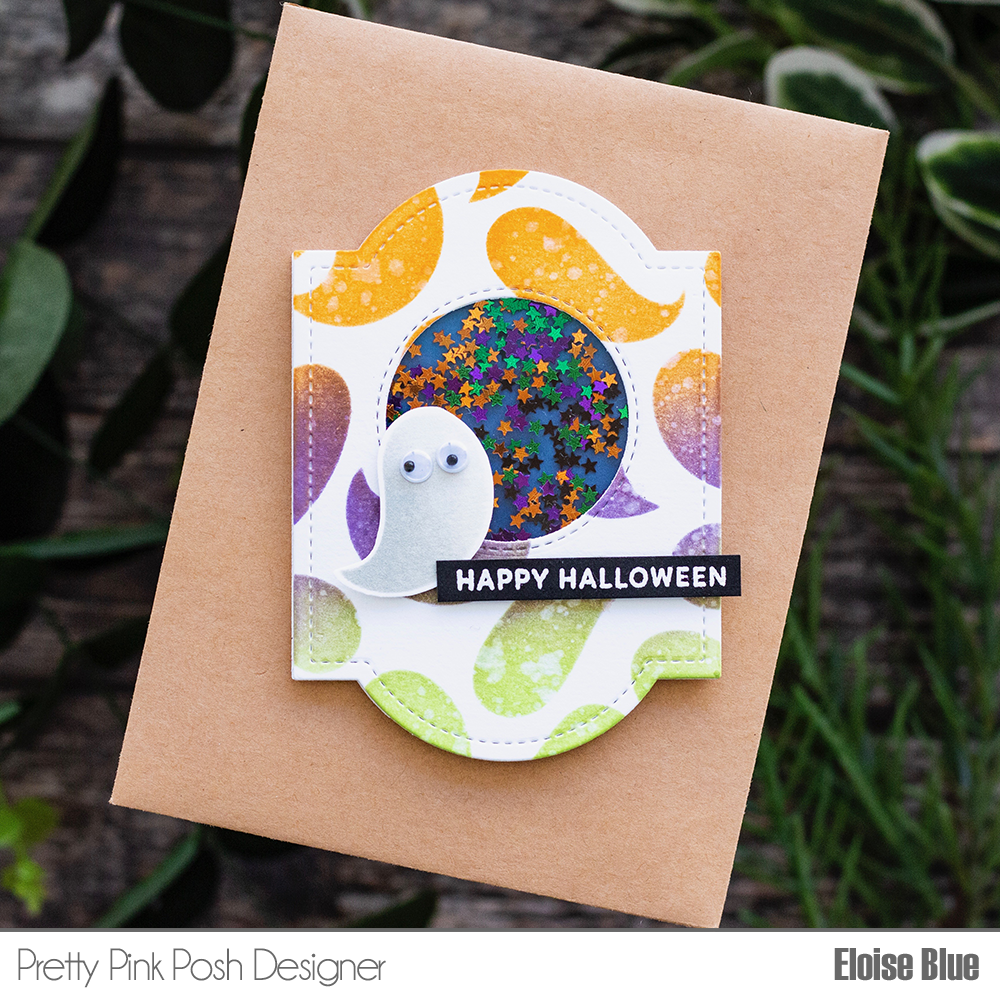
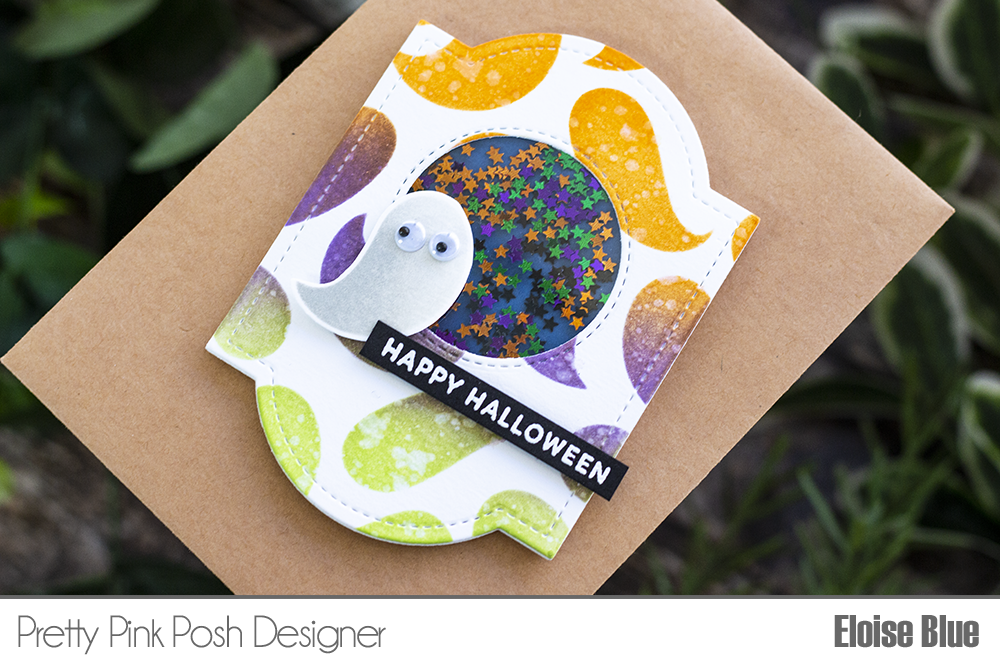
For my final card I wanted to create a mini shaker card. I started off with die cutting the Decorative Tag 2 three times, once from watercolour paper and twice from normal white cardstock. I used the Brush Strokes Stencil to ink blend some Wilted Violet, Carved Pumpkin and Twisted Citron Distress Inks over the top onto the watercolour cardstock tag. I flicked on some water and dried it off with a heat tool. I took a circle die and cut it from the centre and added acetate onto the back. I then took the one of the other white tags and adhered a piece of blue cardstock onto it. I added foam tape around the entire perimeter of the piece and added the star confetti’s inside. I then adhered my ink blended tag on top.
I then ink blended one of the “ghosts” from the Brush Strokes Stencil onto some more cardstock using Pumice Stone and white pigment ink, cut around it with scissors and adhered Silly Eyeson top. I then adhered it onto the front of my tag. I white heat embossed the same sentiment from the Boo Stamp Setonto a strip of black cardstock and adhered it into place. I then adhered the last tag I cut onto the back using a little bit of tape at the top and that finished off my third card.
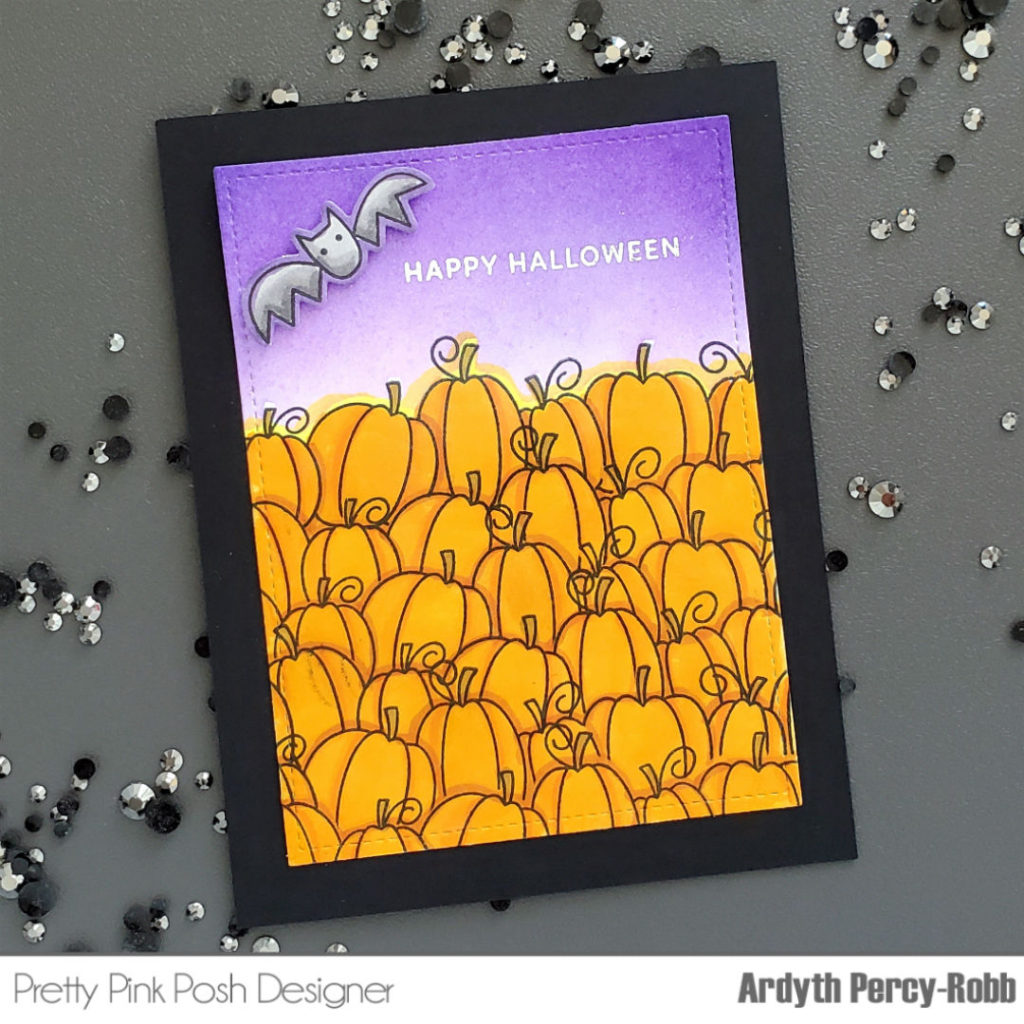
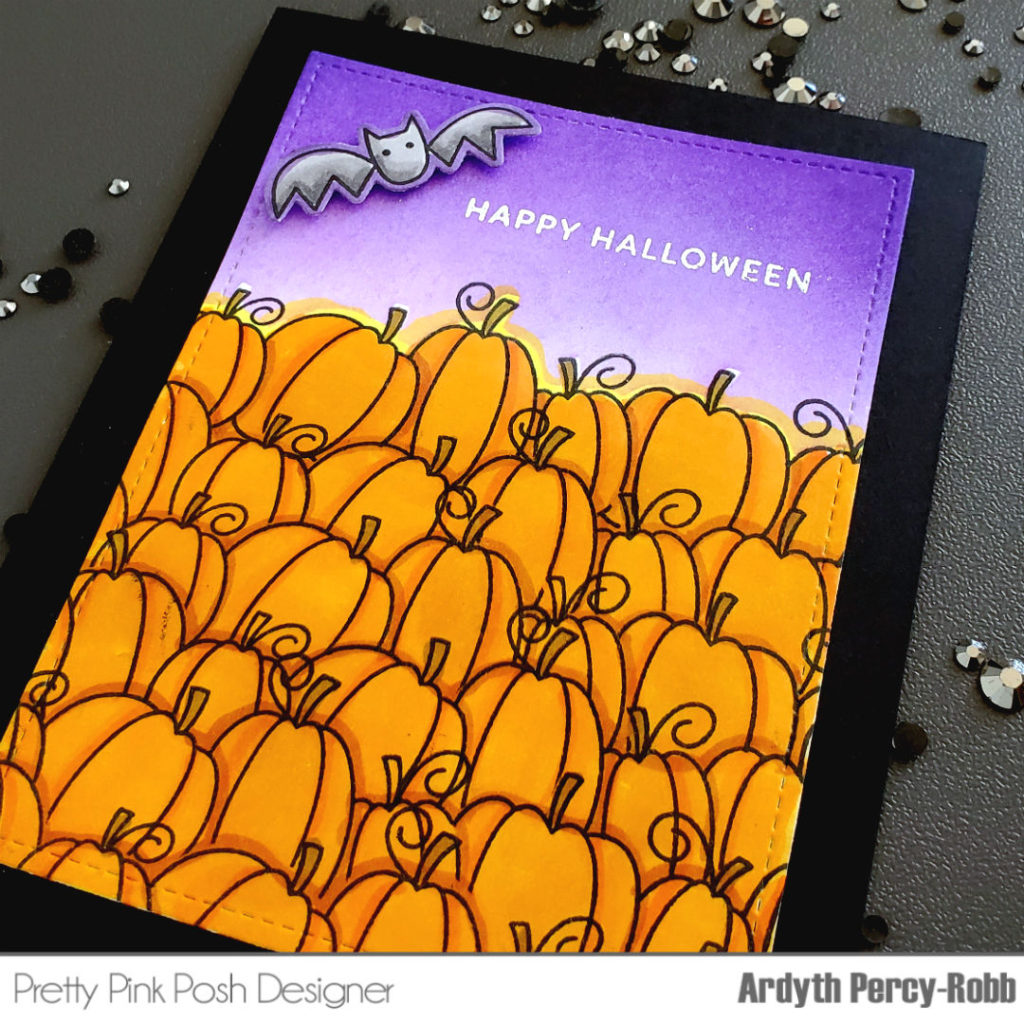
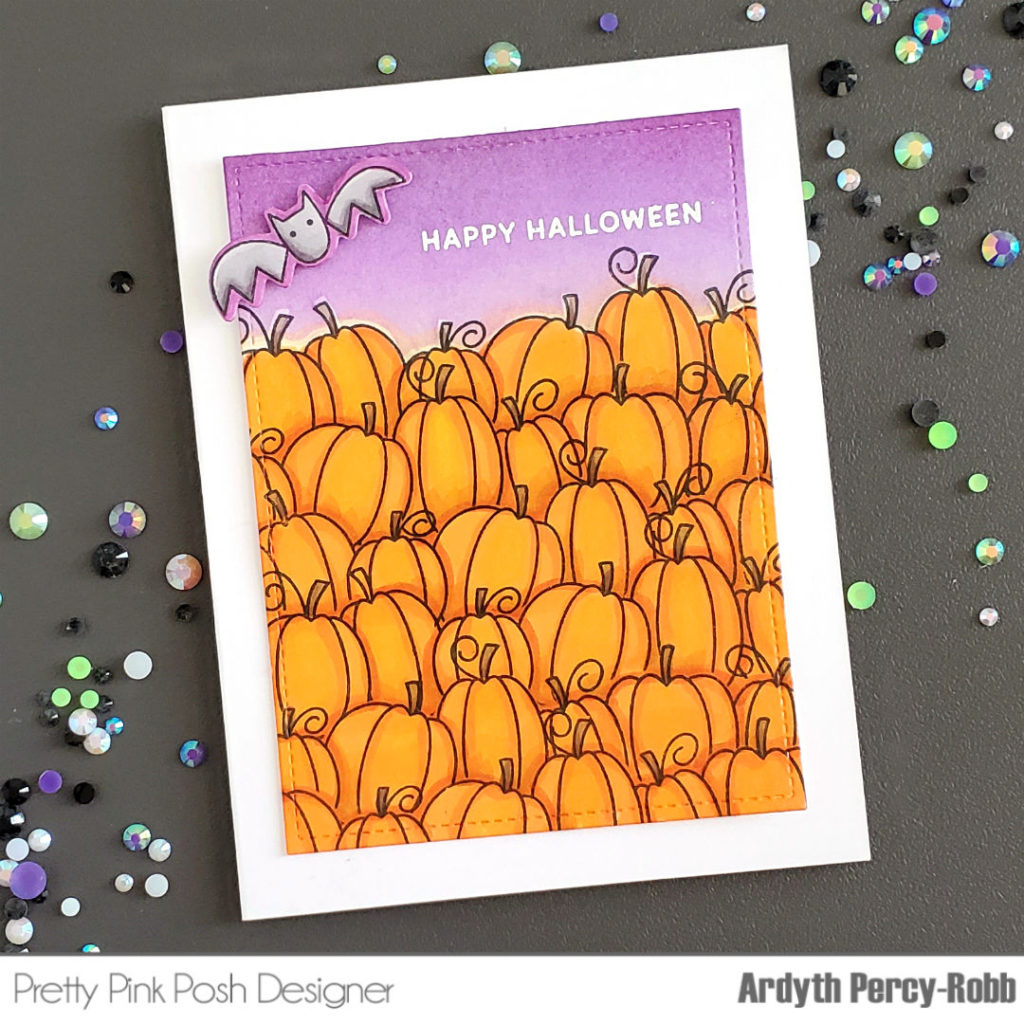
I started by stamping my pumpkin patch, using the row of pumpkins from Fall Borders, and my original sized MISTI, and some masking.
To quickly colour the card, I used the same mask and ink blended the sky and pumpkins. Then I added some optional, extra colouring to add more depth and shadows, but you can stop anywhere along the way, depending on how much time you’ve got.
I finished the card with a sentiment and the bat image from the Boo stamp set and then put the panel onto a black card base. I made another card, with a white base – see how different the cards feel, with that one small change?
I hope you enjoyed watching how I made these two cards!