Giveaway

|

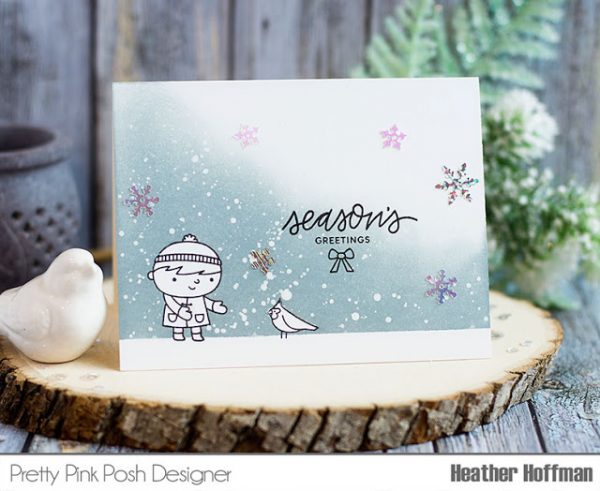
Organizing Your Embellishments + Giveaway

Hi, Friends! This is Caly and I’m really excited to share my new storage system for sequins, jewels, and all the tiny pretty things with you!  I know this system isn’t new for a lot of people, but it’s new to me and it’s exciting and so rewarding to complete.

Previously, I was storing my sequins and jewels in the Craftmates Lockables XL 14 compartment units.  While this is a beautiful system to store my sequins and jewels, I found adding new supplies difficult because I couldn’t easily rearrange the colors (because I love all things in rainbow order).

The Darice bead tray is sold 3 ways that are helpful for cardmakers – 82 piece (tray and lid with 78 “tiny” containers), 45 piece (tray and lid with 42 various sizes of containers), 2 piece tray and lid.  I bought an empty tray to customize my own based on need and here’s a picture of what it looks like with the different sizes side by side for you.

A lot of people like the consistency of having tiny containers throughout the unit and almost all Pretty Pink Posh sequins and jewels fit into the tiny containers for me.  If you don’t like the look of the bigger containers, you can spread the sequins/jewels/beads across more than 1 “tiny” container.

I love that with the new system, the containers are removable and you can rearrange at any time.  I couldn’t do that with my previous system. The kits come with labels, but I used my Brother label machine to make labels and instead of putting them on the top where I think they’re intended to go, I decided to put them on the back.

I can’t stress enough how being able to move things around makes me so happy.  There are always new colors and mixes to add to the ever-growing stash/collection so this system has been the best solution for that.

I sometimes use sequins or jewels as props – so this is also nice to be able to pull them out, use what I need, then put them away without disturbing a bigger storage unit full of other items.

I love my Pretty Pink Posh collection and am really pleased with this new organization set up.  I hope you found this information helpful!

Pretty Pink Posh Pretty Pink Posh
We wanted to have a giveaway in this post that both new sequin collectors, or ones who have been collecting a while, would enjoy. Enter the giveaway to win one of these storage trays and a $50 Pretty Pink Posh gift certificate (so you can fill those trays up even more)!

a Rafflecopter giveaway
 If you have any questions, please don’t hesitate to ask. Paulina or I will be happy to answer them for you! Thank you all for stopping by today!

Caly

| | | |

Masking & Layering Techniques + Gemini Junior Giveaway

Hey everyone! It’s Justine here showing off a fun die cutting technique that involved the Gemini Jr Die Cutting Machine that is super trendy right now! Pretty Pink Posh is also generously donating a Gemini Jr machine as a giveaway right now over on the Pretty Pink Posh YouTube Channel. Just leave a comment ON THE VIDEO for a chance to win.

This video is so full of techniques – Copic Colouring and how to add shadows, precise stamping, die cutting two panels, masking leaves and more! For this card I used the Cherry Blossoms stamp set. There are so many great elements in this set and it’s perfect for this technique.

Watch the video above  I  Watch the video in HD on YouTube
 

For this technique, it involved some precise stamping and die cutting so it’s best to use a stamping tool like the MISTI. I stamped the exact same formation of flowers onto two different card panels. I coloured one of those panels only.

I then stacked both of the card panels onto each other and used the Hello Friend Script die to die cut through BOTH sheets of paper. This would be difficult to do with a manual die cutting machine (not necessarily impossible) due to the intricacy of the die and cutting through that thick of a layer.

TIP: If you don’t have the machine and want to do this technique, it is possible. Cut one panel, layer that panel onto the second one, use the die cut area to line up the die, then die cut again.

Giveaway details: Leave a comment on THIS video for your chance to win this giveaway. One comment per person, please. Comments must be left by August 17, 2018 to qualify for the giveaway. Winner will be notified via a comment reply and sent a message on YouTube.

I then went ahead and glued both panels onto card bases. I placed the coloured sentiment into the black and white panel and the black and white sentiment into the coloured panel. I added in all the little pieces to give it a more cohesive look.


I hope you enjoyed today’s video and technique. If you haven’t already, be sure to visit the Pretty Pink Posh YouTube channel. There are a lot of different technique videos there and we also share videos when we have a new release (our next one is in September). Thanks for stopping by and joining us today!

|

Designer Announcement + Giveaway

I wanted to announce the new team for this upcoming design term. I have been so blessed by amazing designers the last 3.5 years and as seasons change, sometimes it’s necessary to change things up in a team as well. We are saying a very fond farewell to Amanda, Liz and Vera

We are welcoming three brand new Pretty Pink Posh designers to the team. Each of these gals have used my products on their creations for some time and I am thrilled to have them on the team! Please join me in welcoming Crystal, Maria and Thi to the Pretty Pink Posh team!

AmyK  
 Jeanne 
Joy  Lisa
Melody Shannon 
Yana Yoonsun
 
 
  Yana
In honor of the new team, let’s have a big $100 gift certificate giveaway! Leave a comment on THIS post sharing your requests for future Pretty Pink Posh products (stamps, dies, embellishments). One lucky comment left by June 17th will win a shopping spree. Congratulations to Zsofia Molnar on being the lucky winner! 

Thanks for joining us today. Be sure to give lots of love to the designers!


| | |

Spring Coffee Lovers Blog Hop + Giveaway

Hello everyone, Joni here sharing a card for the Spring Coffee Lovers Blog Hop using our new Friends Forever stamp set and the mugs from the Christmas Friends stamp set.

Today is the start of the Spring Coffee Lovers blog hop, and Pretty Pink Posh is one of the sponsors of this fun event. We also have a giveaway here on the blog as well, so make sure to read all the way to the bottom of this post to find out how you can win some goodies!

To begin, I first drew a cup image using my pencil.

Next, I used my Gansai Tambi watercolor to create some very simple flowers for my cup.

Next, I watercolor the cup. For the card base I watercolored the background using Tim Holtz Distress inks in Tattered Rose and Mustard Seed. Then stamped the sentiment from Friends Forever stamp set.

Next, I die-cut the whole card panel using the new Stitched Notes dies and added some foam tape on the frame for added dimension. As for the girls on this set they were colored with Copic markers. To finish the card, I added the new Friendship Sequins Mix.

Want to win these stamp sets, coordinating dies and embellishments? Enter below!

a Rafflecopter giveaway
We hope that you enjoyed today’s card and feel inspired to create coffee cards for the blog hop. We’ll be back tomorrow with a special post- see you then!

| | |

Watercolor Lilies + Giveaway

Today we’re in for a special treat. Jeanne is on the blog sharing a sweet card and we’re participating in a mini blog hop with our friends on the CardMaker blog, along with sponsoring a giveaway in this post!

Spring is in the air and everything is new again! Are you checking the new releases in the store? It’s fun and fresh and certain to make you want to start creating! I’m playing with the new Easter Blessings stamp set today!  It’s a set of three stamps, and there are coordinating dies to make cutting a breeze!

Today I’m showing the Easter lily stamp. It wouldn’t be Easter without them!  Our church always has hundreds of lilies on the altar – the sight and smell is amazing!  It’s traditional for me to buy one for my mom every year too! I was so tempted to color up this pretty image in pink – like a Stargazer Lily, but decided the traditional white was the way to go (this time anyway!). I snuck in a little hot pink on the pot so my color lust is satisfied. 

I made a simple ombre wash background for the potted lily.  I stamped the sentiment in Versamark ink directly on the watercolor paper and cut the panel with the new Stitched Notes Die.

The Stitched Notes die has stitching on the inside and outside of the die cut line.  I really love the size of the die cut!  It’s perfect for an A2 size card and leaves just enough edge around the sides to let your colored or pattern papers peek out!

I wanted to repeat the ombre watercolor wash colors on those peeking edges so I created a panel with three shades of aqua.

Some Sparkling Clear Sequins are like dew drops for our pretty flowers!  This image brings back lots of great memories and has me pining for one of my own.  Until they are back in season I will be satisfied with this pretty stamp!

As we mentioned earlier, we’re taking part in a mini blog hop and we’re the last stop. Here’s all the stops:

CardMaker Blog
Katie Gehring
Rebecca Keppel
Heather Pulvirenti
Kat Benjamin 
Stephanie Gold
Melissa Bickford
Heather Hoffman
Pretty Pink Posh << you are here

To celebrate this mini hop, I’m hosting a giveaway that features some of our brand new products!

a Rafflecopter giveaway
I hope that you all have a great start to your week! Thanks for spending some time with us today.

Christmas Theme & Giveaway Week Winners

I’m checking in with the SEVEN winners from our Christmas Theme & Giveaway Week! I hope you all enjoyed the week of inspiration and giveaways. Thank you all for joining in the festivities and leaving such fun comments!

Below are the winners of the giveaways. I have contacted each winner directly (if you’re a winner and didn’t get an email, please contact me) and I look forward to purchasing and shipping these items to each lucky person.

winners_giveaway

I know I’m technically on a hiatus, but I’m already gearing up for lots of fun things in the new year. For those prayer warriors, please continue to pray that my body heals so I can return sooner rather than later and carry out these fun ideas!

| | |

Christmas Theme & Giveaway Week- Day 7

Christmas Theme & Giveaway Week- Day 7

Good morning Pretty Pink Posh friends! Heather dropping by with a couple cards and a tutorial sharing a way to use some of the adorable Pretty Pink Posh images that doesn’t require any coloring! I love coloring, but sometimes it’s fun to do things a little differently and unexpectedly!

 Christmas Theme & Giveaway Week- Day 7
These are also super flat cards, and therefore very easy to mail – and yet they still have lots of the appearance of dimension, just without the bulk.
 Christmas Theme & Giveaway Week- Day 7

I started off by stamping my very simple scene directly on my cardbase using Christmas Friends Stamp Set. For this technique, I really love Simon Says Stamp 120lb cardstock – it is super smooth and seems to work beautifully for ink blending, and it is nice and sturdy so it holds up well as a cardbase.

 Christmas Theme & Giveaway Week- Day 7
Next, I stamped the images again on Simon Says Stamp masking paper, and carefully fussy cut them out and adhered over the top of the original image – then added a strip of masking tape along the bottom to give the illusion of a ground for them to stand on. Try to slightly cover the bottom of the girl/boy feet – that way it looks like they are standing on the “snow” – not floating above it.
 Christmas Theme & Giveaway Week- Day 7

Grab some distress inks and blending foam, and blend out a background! I picked two slightly unexpected colors – instead of just going with wintery blue – and started at the bottom and blended out. That way the deepest color is around the stamped images and bottom of the card.

 Christmas Theme & Giveaway Week- Day 7

Add some white paint splatters (I just mixed some white acrylic paint with water in a Mini Mister until I was happy with the consistency) and quickly and carefully remove the masks – always my favorites part of this technique!

Christmas Theme & Giveaway Week- Day 7

Once the paint dries, stamp your sentiment, and embellish with a few snowflakes from Snowflake Sequins Mix! Here is a closer look at each card:

Christmas Theme & Giveaway Week- Day 7

Christmas Theme & Giveaway Week- Day 7

Christmas Friends stamp setSSS Cardstock

Snowflake SequinsMini Mister SprayBlending Tool

Ready for our last giveaway of the week? We are giving away a mega craft pack filled with items valued at over $200! All you have to do is leave a comment sharing what you would like to see from Pretty Pink Posh in 2017. You can list posts or videos you would like, products, ideas from stamp sets…

a Rafflecopter giveaway
 

Thanks so much for stopping by today! Hope you are having a wonderful weekend!

| | | |

Christmas Theme & Giveaway Week- Day 6

Christmas Theme & Giveaway Week- Day 6

Hello crafty friends. It’s Vera Rhuhay here!

Today I’ll share a card with winter coffee themed card (which happens to go along with the brand new Winter Coffee Lovers Blog Hop). Here, I used Christmas Friends stamp set along with the coordinating dies.

Christmas Theme & Giveaway Week- Day 6

I create a coffee shop scene using Stitched Pieces Die and coffee cup and mug from Christmas Friends stamp for wall decorations. I used scallop border dies from Stitched Borders 4  to make a table, so the sweet couples can sitting in the cafe and enjoy their coffee latte.

Christmas Theme & Giveaway Week- Day 6

I added sentiment from Holiday Pals Stamp Set and finally I finished my card by added here and there with PPP sequins! Here I used Sparkling Clear Sequins and the Snowflake Sequins Mix.

 Christmas Theme & Giveaway Week- Day 6

Watch our video tutorial below to see how to create this card.

Watch the video above   I Watch the video in HD on YouTube

Today we have another big giveaway as part of our giveaway week. We are giving away a 60 pack of Zig Clean Color markers! Leave a comment below sharing your favorite Christmas or holiday memory.

a Rafflecopter giveaway
We hope you enjoyed today’s video and post. Join us tomorrow for our last day of holiday inspiration and giveaways!

| |

Christmas Theme & Giveaway Week- Day 5

Christmas Theme & Giveaway Week- Day 5

Hello Friends! It is Melody here on the blog today sharing my project for the Christmas Theme Week. If you are like me, you are finishing off those last few Christmas cards to give over the next few weeks. Here is my card I created with the Christmas Friends Stamp set.

Christmas Theme & Giveaway Week- Day 5

First I created the background of the card front. I stamped the snowflakes from the Winter Wonderland Stamp Set on white card stock in a white pigment ink and embossed with white embossing powder. Next I used a blending tool to ink the background with distress ink. I cut the smaller circle in the Scallop Circles Dies from kraft card stock. Inside the circle I stamped branches and a sentiment from the Holiday Greetings Stamp Set and added a few 4mm Metallic Gold Sequins and 3mm Clear Sparkling Sequins.

Christmas Theme & Giveaway Week- Day 5

The boy and girl are colored with Copic Markers and die cut with the Christmas Friends Coordinating Dies. The border is cut with one of the dies in the Stitched Borders 2 Die. I added a patterned paper below the border.

Christmas Theme & Giveaway Week- Day 5

Winter Wonderland stamp setChristmas Friends stamp set
Stitched Borders 23mm Sparkling Clear Sequins4mm Metallic Gold sequins
At this busy time of year I like to finish off the inside of my cards so that my cards are ready to go when I need them. I decided I wanted this card to hold a gift card. I used the Peekaboo Windows Die to create the pocket and stamped a sentiment from the Christmas Friends Stamp Set. Just remember when you adhere the inside panel to the inside of the card to leave the middle section open so that you can slide the gift card inside the pocket.

Now it’s time for our giveaway for today. Paulina is giving away a $25 Simon Says Stamp gift certificate! All you have to do is leave a comment sharing your favorite craft blogs to follow.

a Rafflecopter giveaway
Thanks for stopping by. We have another great giveaway tomorrow, along with a video and post!

| |

Christmas Theme & Giveaway Week- Day 4

Christmas Theme & Giveaway Week- Day 4

Hello Everyone, Joni here sharing a Christmas card for our special Christmas Theme & Giveaway Week.

Christmas Theme & Giveaway Week- Day 4

For this project, I used some Diamond Stickles to give sparkles on the die-cut images. I also added some of the ¼ Iridescent Star Confetti everywhere on my card, which is my new fave for this season.

Christmas Theme & Giveaway Week- Day 4

To begin, I distressed my card panel with Tim Holtz Distress Inks in Peacock Feather, Mowed Lawn, and Tattered Rose. Then I die-cut the panel using Scallop Frames Dies and die-cut some one white for dimension on the scallop frame. I Also heat embossed the sentiment “season’s greetings” from Christmas Friends stamp set using Liquid Platinum embossing powder.

Christmas Theme & Giveaway Week- Day 4

I also die-cut some medium and small stars from Stitched Stars Dies after distressing some scrap papers and adhered on the panel with foam tape. Every image is from the Christmas Friends stamp set except for the cute penguin, he is from the Winter Wonderland stamp set. The images where colored with Copic Markers.

Christmas Theme & Giveaway Week- Day 4

Here’s a closer look at the finished card.

Christmas Theme & Giveaway Week- Day 4

Winter Wonderland stamp setChristmas Friends stamp set
Stitched Stars Die setSticklesCopic Markers
Ready for today’s giveaway? It’s a big one! We’re giving away a Big Shot machine, along with three of our popular die sets! Leave a comment sharing your favorite way to embellish your cards and projects!

a Rafflecopter giveaway
 Thanks for joining us today! See you tomorrow for another day of inspiration and giveaways!

sig name