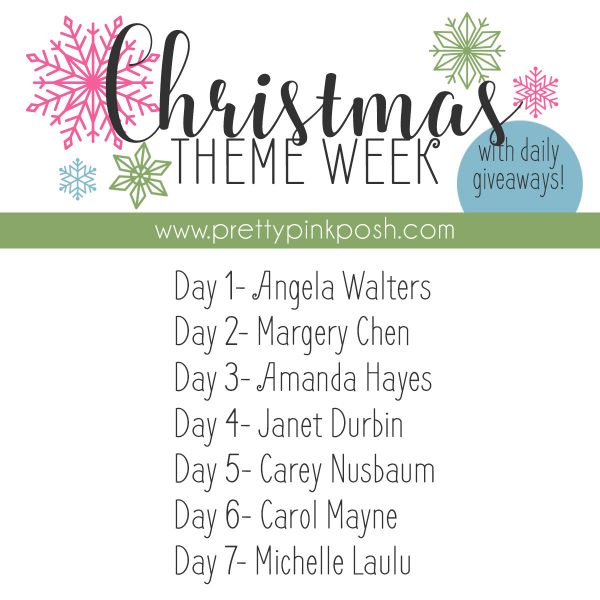
I’m checking in with the SEVEN winners from our Christmas Theme & Giveaway Week! I hope you all enjoyed the week of inspiration and giveaways. Thank you all for joining in the festivities and leaving such fun comments!
Below are the winners of the giveaways. I have contacted each winner directly (if you’re a winner and didn’t get an email, please contact me) and I look forward to purchasing and shipping these items to each lucky person.
I know I’m technically on a “break”, but I’m actually working behind the scenes on lots of things with the new release and birthday celebration that is happening in January. I can’t wait to share what is coming- it’s going to be fun!
I hope you all had a great holiday season. Until next time…
Hello, everyone ! Marge here today. Christmas is coming around, and I hope you are enjoying cardmaking for Christmas & Holiday. Today, I’m sharing clean and simple window cards with you. To make these, I used some of the brand new November Release products at Pretty Pink Posh.
First, I die cut small stitched holly leaves and berries from watercolor paper usingFestive Holly Dies, and watercolored them with Distress ink reinkers (Peeled Paint, Gathered Twigs, and Fired Brick). I found that coloring using reinkers give more bright and rich colors than blending with the same colored inks.
Then, I made an A2-sized top-folded card base, picked out a smaller frame die fromWindow Frames Dies set, and make a semi-round window on the front panel of the cardbase. To make patterned background, I stamped two snowflakes images fromHoliday Greetings Stamp Set on the front panel using Arctic dye ink cube. Next, I stamped sentiments and mini images fromHoliday Greetings Stamp Seton the inside panel , so that the sentiments could be seen through the die cut window.
In the first card, I made a one layer copic colored scene.
In the second card, I gave some dimension by adding diecut images on the front panel using foam tapes. I also gave it some color accent by using red-white twine as shown below.
In the third card, I used brown leaves, and I colored critters in gray tones to maintain overall neutral look.
So I could make three cards very quickly at one sitting. I really loved how the bright colored leaves and berries pop off the white background and I also loved shadowing of window frame on the sentiments that are shown through.
Tips:
1. Would be better if you use heavy-weight card stock (e.g. 110lb or more) to make these cards
2. For the one layer copic colored card, be sure to use heavy-weight copic friendly card stock .
3. Putting a 3mm sparkling sequin onto the sparkling snowflake sequin make the snowflake look really sparkling.
Now it’s time for our last giveaway of the week. Today we are giving away a MISTI stamping tool (or you can choose the Mini)!
That’s it for today. Thank you so much for reading this post. We hope you have enjoyed our week of Christmas holiday projects. If you haven’t already, be sure to leave comments on each point for your chance at the giveaway for that day!
Hello everyone! Lexa here today with a winter theme card, featuring some holiday stamp sets, Winter Woodland and Christmas Friends. Today I will play with watercolor for the background using Caran D’Ache Neocolor II.
Holiday stamp sets also can be used for everyday cards as well. I stamped all the images with Versafine black ink that works the best for watercoloring. My style of watercolor is always a little bit loose, I always use Distress Markers and damp brush for coloring. I mix blue and purple for the sky, blend the colors with lots of wate and left some white borders on the edges. I love to create a little scene, it just make me happy everytime I make up stories behind it.
After I finished with the background, I make a snow hill as the ground for the little boy and winter animals to stand. Aren’t they the cutest? It probably one of my most favorite stamp set from Pretty Pink Posh ever.
Here are some closer looks of my card. Sparkling Clear Sequins Mix is a perfect companion for this card, it creates snow drops from the sky as well as create dimensions. Somehow it makes the scene look so dreamy together with the pastel color sky.
Ready for our next giveaway? Today we’re giving away a $25 Simon Says Stamp gift certificate! All you have to do is leave a comment on this post sharing your favorite crafty blog(s) to follow!
Hi, everyone! Rina here with a video tutorial on how I made these simple gift card holders only using dies! Since the holidays are fast approaching, I wanted to make this project super easy and super-fast!
Watch our video tutorial below to see how to create these cards.
First, I cut the Merry Christmas Script die. The font on this die is one of my favorites! I wanted to use silver foil paper to make this die stand out even more. Since this is a very intricate die, I like to use wax paper in between the die and the paper I am die cutting. This will make the die cut pop out easily!
I love the look of die cut inlay and thought the Festive Holly dies would be perfect to pair with the script die. I cut the “Festive Holly” on different colors of paper (use scraps!) which I will use to inlay into my card base.
I cut out several 4¼ x 5½ card bases and placed the Festive Holly dies arranged around the “Merry Christmas” sentiment, I cut this sentiment out with scratch paper to use for the placement of the dies.
Once that is complete, I inlay the Festive Holly die cuts into my card base. I used post it note to ensure the die cuts will stay in place, flip over the paper and tape the die cuts in place. I just love how it comes together like puzzle pieces. My design had excess hanging over the edge which I trimmed with scissors.
Tip: I recommend using a Jewel Picker to adhere small embellishments. It makes things so much easier!
For the inside, I placed the gift card opening dies from the “Stitched Note” die set and cut out the openings. The die set comes with two sizes, you will see one is longer than the other, just use the one that fits your design the best. To ensure the gift card does not fall, I added a card base to the back of the card. Make sure you do not put adhesive near the opening, just at the bottom so the card can slip in and out easily. Alternatively, you can take a card base (a tad bit smaller than 4¼ x 5½ so the card closes nicely) cut the gift card opening and adhere it to the inside of the card.
Today our giveaway is the popular Embellishment storage system that we recommend, along with a $50 Pretty Pink Posh gift certificate!
Hi there! Marge here today. I’m so glad to share two cards featuring Angel Friends stamp setand Stacked Edges 1 Dies. Enjoying crafting for 3 years till now, I’ve never seen such unique and pretty stamps and dies like those I’m using today. I really had fun playing with them!
I used deep red and gold to express holiday color scheme. For this, you can use your own gold or glitter card stock, but I used gold glitter tapes to make a glitter card stock as shown in the picture.
To make zigzag patterned background, I used a chevron shape die included in Stacked Edges 1 Dies set. I first die cut a piece, and then cut again side by side, with some space between those two cuts to make negative diecut pieces in chevron shape.
You can control the width of negative diecuts simply by moving a die a little from side to side before cutting through on the paper. I made a little bit thicker negative cut with gold glitter one, and thinner cut with red one. Then I trimmed all the positive and negative cuts into 5.5 inch length to fit them into A2 sized card base.
I stamped cute Angel Friends stamp set on a copic friendly white cardstock using Memento black ink, then colored them with copic markers. You don’t have to choose specific colors for coloring these angels, just use any copic colors that you have in your stash.
I thought coloring is not a matter in these cards, you can also choose any types of coloring media that you like, including pencils, watercolors, other markers etc. I mostly used light colored copic markers here. For your interest, I used E21/E23/E25/E27, or E51/E53/E55/E57, or E11/E13/E15/E18 or YR7/YR4/Y17 in coloring hair of angels. Then, I cut them out using the Angel Friends Coordinating Dies.
Then I made the second card in horizontal layout using the similar way as in the first, vertical one. But, this time, I used Metallic Gold Confetti Mix as embellishment.
We’re continuing on with our week of giveaways and today we are giving away a $30 Ellen Hutson gift certificate. It’s super easy all you have to do is leave a comment sharing which craft item(s) are on your wish list!
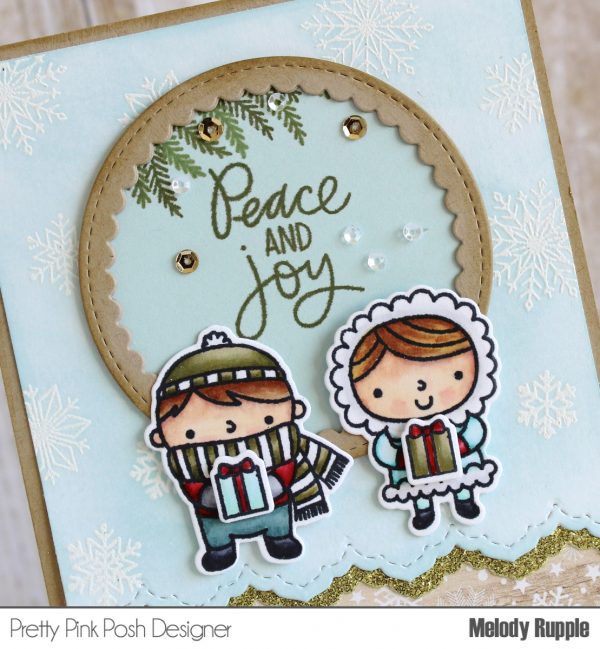
Hi Everyone! It’s Melody here on the blog today. I have a soft, elegant Christmas card to share with you created with the Joy Shaker Die and the Winter Woodland Stamp Set.
When I saw the holly branch in the Winter Woodland Stamp Set I just thought it was so beautiful. For me, it allows me to take a cute animal stamp set and give my card a more elegant feel. And the Joy Shaker Die is one of my favorite dies from the newest release.
To create the background I cut a piece of watercolor paper for the card front. I used the solid snow stamp and stamped snow several times in a white pigment ink and then embossed with white embossing powder. Then I used a blending tool to add Oxide Ink to the paper. I misted the paper with water and splattered on white paint with a paint brush.
I colored the stamped images from the Winter Woodland Stamp Set with Copic Markers and die cut with the Winter Woodland Coordinating Dies. I splattered a little white paint on the branches too. I cut the Joy Shaker Die twice, once from a glittered cardstock and again from a light weight chipboard, and then glued the two layers together. This gives the die cut a little more dimension. Behind the die cut I add a circle of vellum.
Today we have another fun giveaway as part of our giveaway week. We are giving away a 36 pack of Zig Clean Color markers! Leave a comment below sharing your favorite holiday song.
Good morning Pretty Pink Posh friends! Heather here this morning with a tutorial for a couple of spinner cards that I put together – my first spinner cards ever! Such an incredibly fun interactive card design!
The way these work: the reindeer is double sided and identical on both sides, suspended with thread in the center of the two images stuck together. You wind them up by twisting them several times before closing the cards, then when you open the cards, the reindeer twirls and dances! Interactive, yet they still fit easily in an envelope to give or mail!
First off, I was looking at the two jumping reindeer from the new Reindeer Friends and thought they looked pretty close. Turns out they are perfect mirror images! So I stamped and die cut two of each with the coordinating Reindeer Friends Dies to put together my two cards.
I colored the reindeer up nice and simple using these Copic markers, then adhered them carefully together with sturdy tape, placing two strands of white thread through the center of the sandwich.
Next, I used Stitched Diamonds Dies to create my windows. I used a blue and green cardbase for my cards, and die cut a window from the front. Using the two largest dies I also cut a white frame shape to go around the outside window. I then carefully taped the centers of the diamonds that I die cut from my card fronts in the opposite centers of my cards, but inside the card. This functions for two purposes – it gives more interest to the cards when they are closed, and also makes it nice and clear where to NOT write when signing your card – in case you don’t want the writing in the card to show through the window!
Then, very carefully adhere the ends of the thread to the back of the white window frame, using tape to make certain it is secure. Trim the excess thread, and then (again using sturdy adhesive) adhere over the window on the front of the card. This suspends the reindeer over the window!
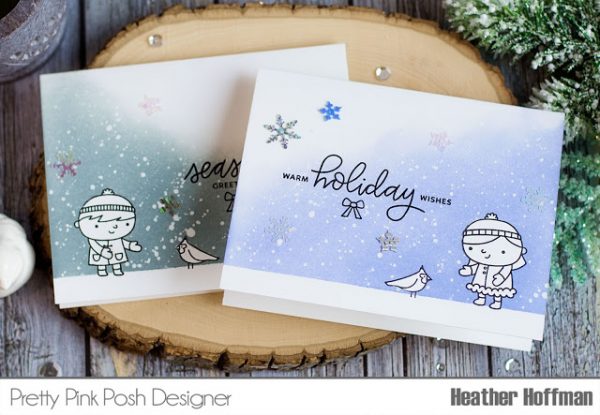
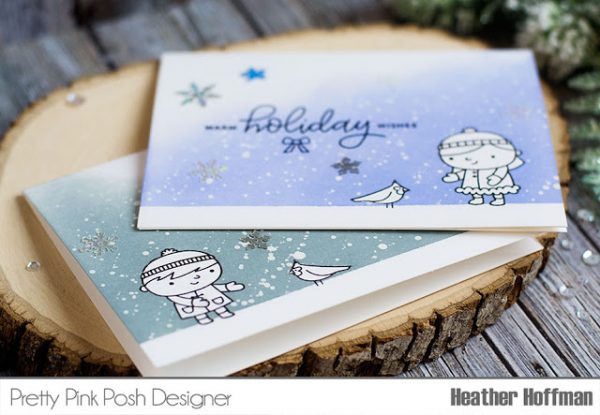
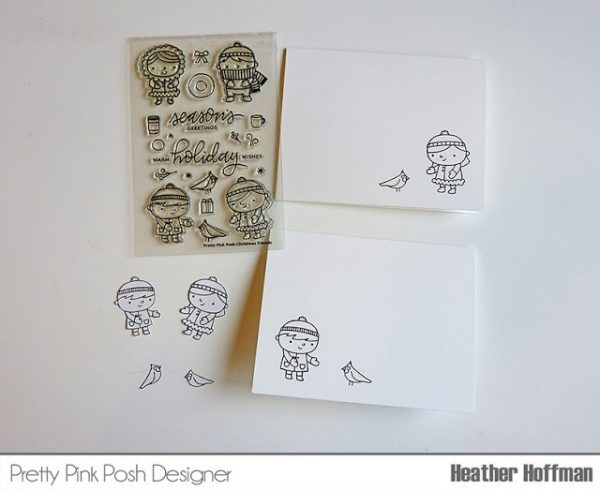
Good morning Pretty Pink Posh friends! Heather dropping by with a couple cards and a tutorial sharing a way to use some of the adorable Pretty Pink Posh images that doesn’t require any coloring! I love coloring, but sometimes it’s fun to do things a little differently and unexpectedly!
These are also super flat cards, and therefore very easy to mail – and yet they still have lots of the appearance of dimension, just without the bulk.
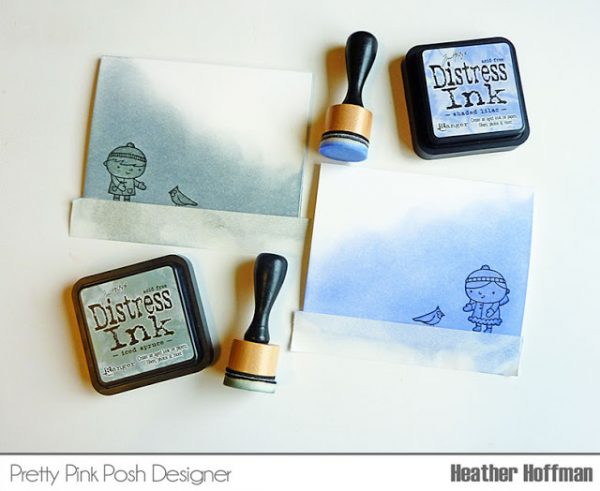
I started off by stamping my very simple scene directly on my cardbase using Christmas Friends Stamp Set. For this technique, I really love Simon Says Stamp 120lb cardstock – it is super smooth and seems to work beautifully for ink blending, and it is nice and sturdy so it holds up well as a cardbase.
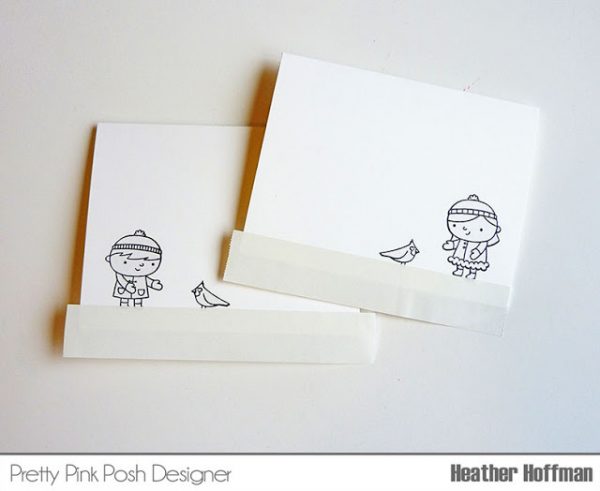
Next, I stamped the images again on Simon Says Stamp masking paper, and carefully fussy cut them out and adhered over the top of the original image – then added a strip of masking tape along the bottom to give the illusion of a ground for them to stand on. Try to slightly cover the bottom of the girl/boy feet – that way it looks like they are standing on the “snow” – not floating above it.
Grab some distress inks and blending foam, and blend out a background! I picked two slightly unexpected colors – instead of just going with wintery blue – and started at the bottom and blended out. That way the deepest color is around the stamped images and bottom of the card.
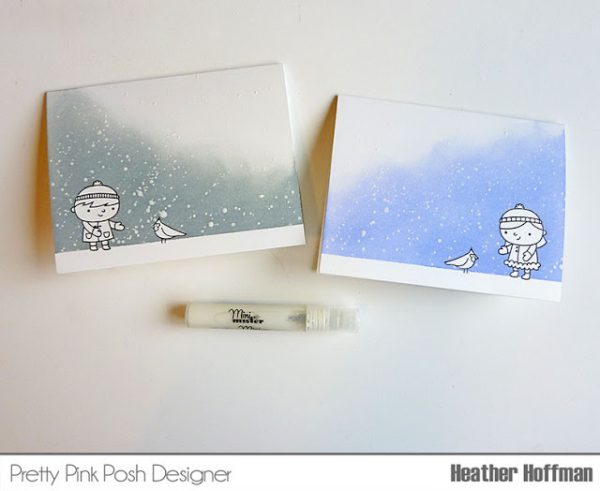
Add some white paint splatters (I just mixed some white acrylic paint with water in a Mini Mister until I was happy with the consistency) and quickly and carefully remove the masks – always my favorites part of this technique!
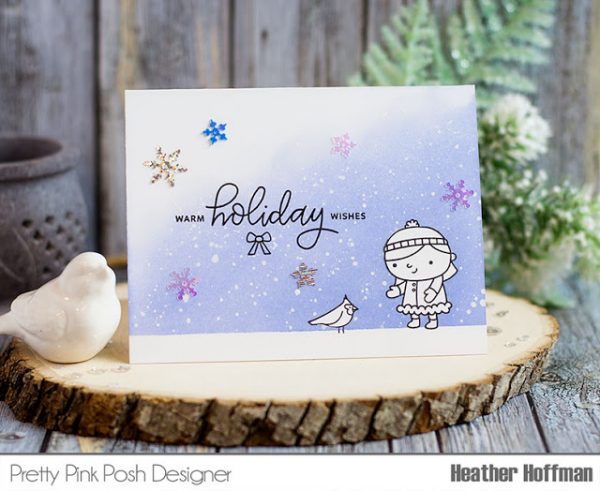
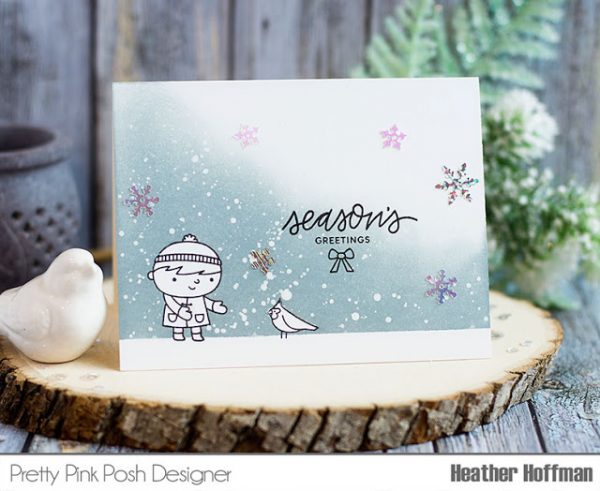
Once the paint dries, stamp your sentiment, and embellish with a few snowflakes from Snowflake Sequins Mix! Here is a closer look at each card:
Ready for our last giveaway of the week? We are giving away a mega craft pack filled with items valued at over $200! All you have to do is leave a comment sharing what you would like to see from Pretty Pink Posh in 2017. You can list posts or videos you would like, products, ideas from stamp sets…
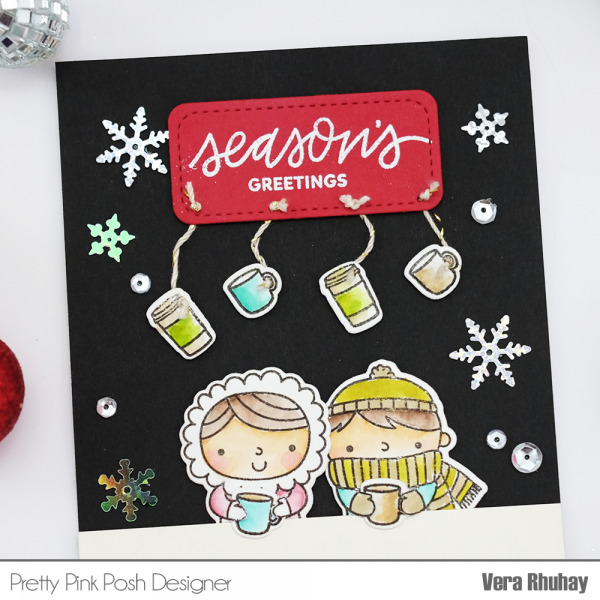
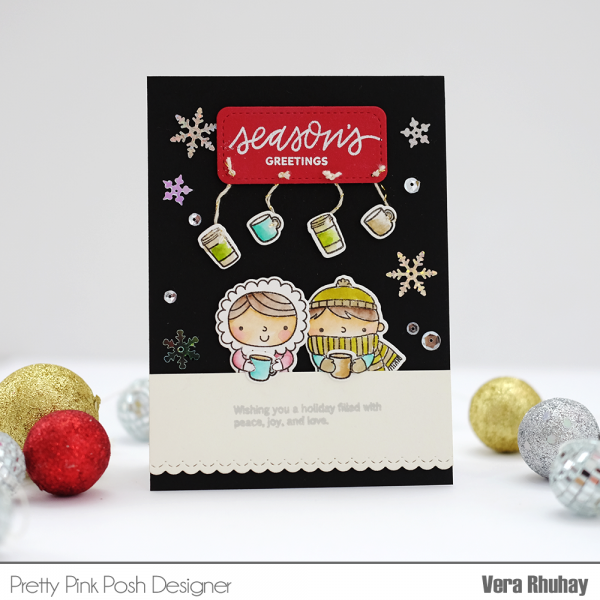
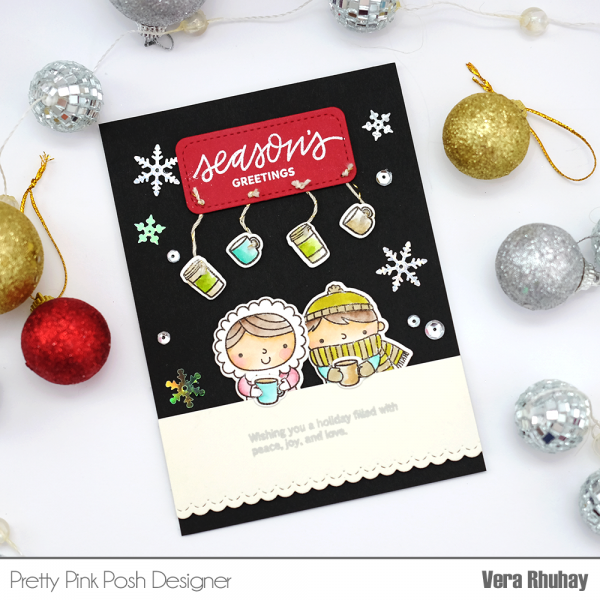
I create a coffee shop scene using Stitched Pieces Die and coffee cup and mug from Christmas Friends stamp for wall decorations. I used scallop border dies from Stitched Borders 4 to make a table, so the sweet couples can sitting in the cafe and enjoy their coffee latte.
Today we have another big giveaway as part of our giveaway week. We are giving away a 60 pack of Zig Clean Color markers! Leave a comment below sharing your favorite Christmas or holiday memory.
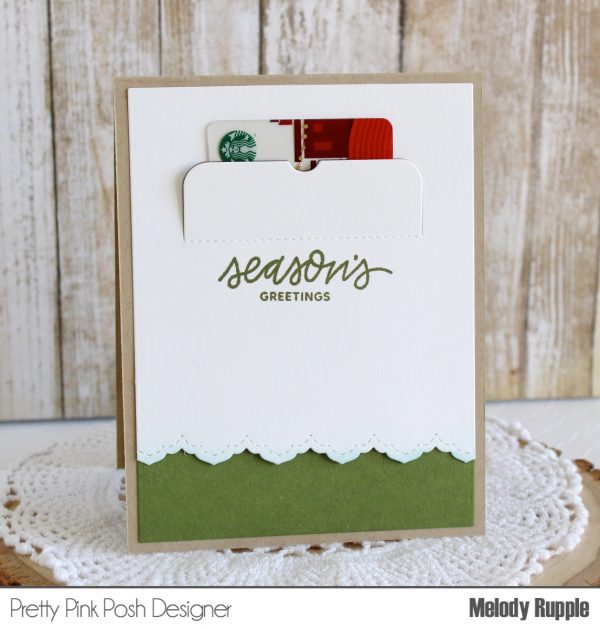
Hello Friends! It is Melody here on the blog today sharing my project for the Christmas Theme Week. If you are like me, you are finishing off those last few Christmas cards to give over the next few weeks. Here is my card I created with the Christmas Friends Stamp set.
First I created the background of the card front. I stamped the snowflakes from the Winter Wonderland Stamp Set on white card stock in a white pigment ink and embossed with white embossing powder. Next I used a blending tool to ink the background with distress ink. I cut the smaller circle in the Scallop Circles Dies from kraft card stock. Inside the circle I stamped branches and a sentiment from the Holiday Greetings Stamp Set and added a few 4mm Metallic Gold Sequins and 3mm Clear Sparkling Sequins.
At this busy time of year I like to finish off the inside of my cards so that my cards are ready to go when I need them. I decided I wanted this card to hold a gift card. I used the Peekaboo Windows Die to create the pocket and stamped a sentiment from the Christmas Friends Stamp Set. Just remember when you adhere the inside panel to the inside of the card to leave the middle section open so that you can slide the gift card inside the pocket.
Now it’s time for our giveaway for today. Paulina is giving away a $25 Simon Says Stamp gift certificate! All you have to do is leave a comment sharing your favorite craft blogs to follow.


 To make zigzag patterned background, I used a chevron shape die included in
  I stamped cute
  For the first card, I adhered red and gold chevron cuts onto white cardbase, then foam mounted angels. To give more interest, I added some left-over pieces of