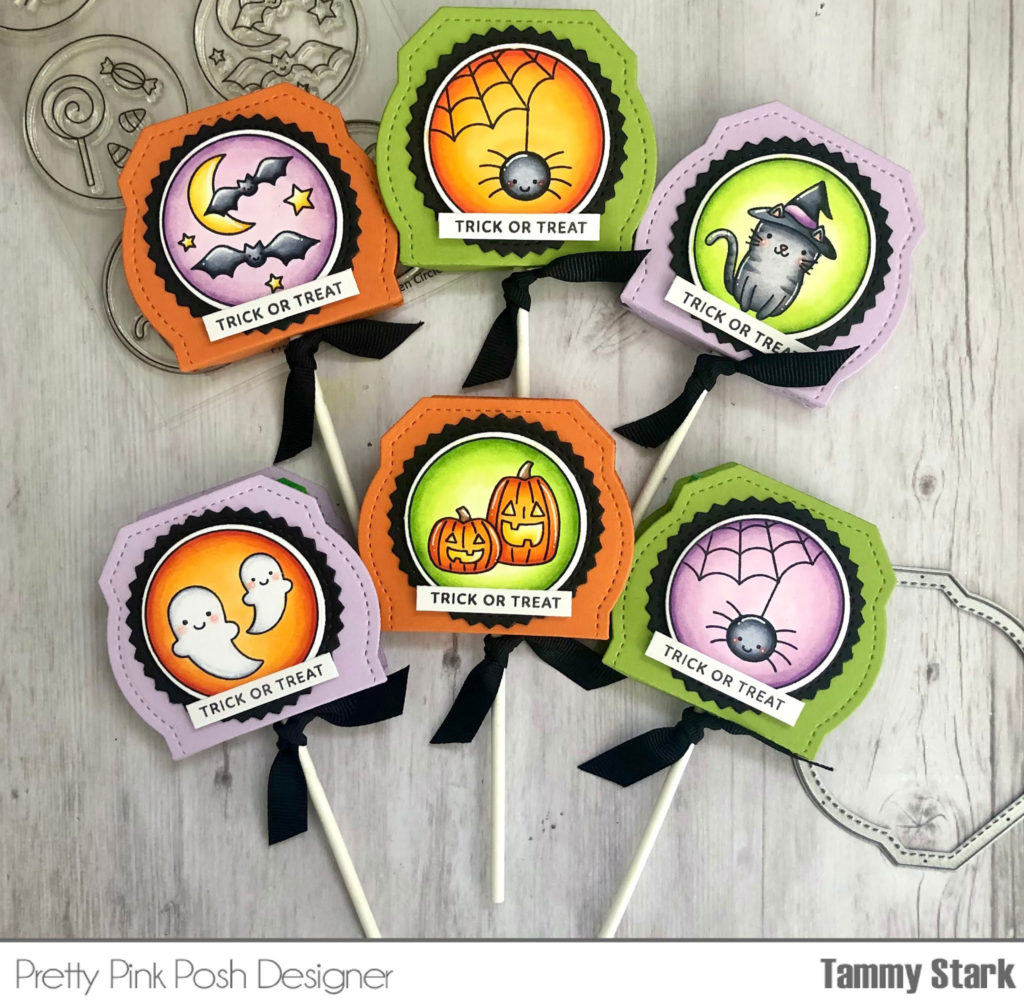
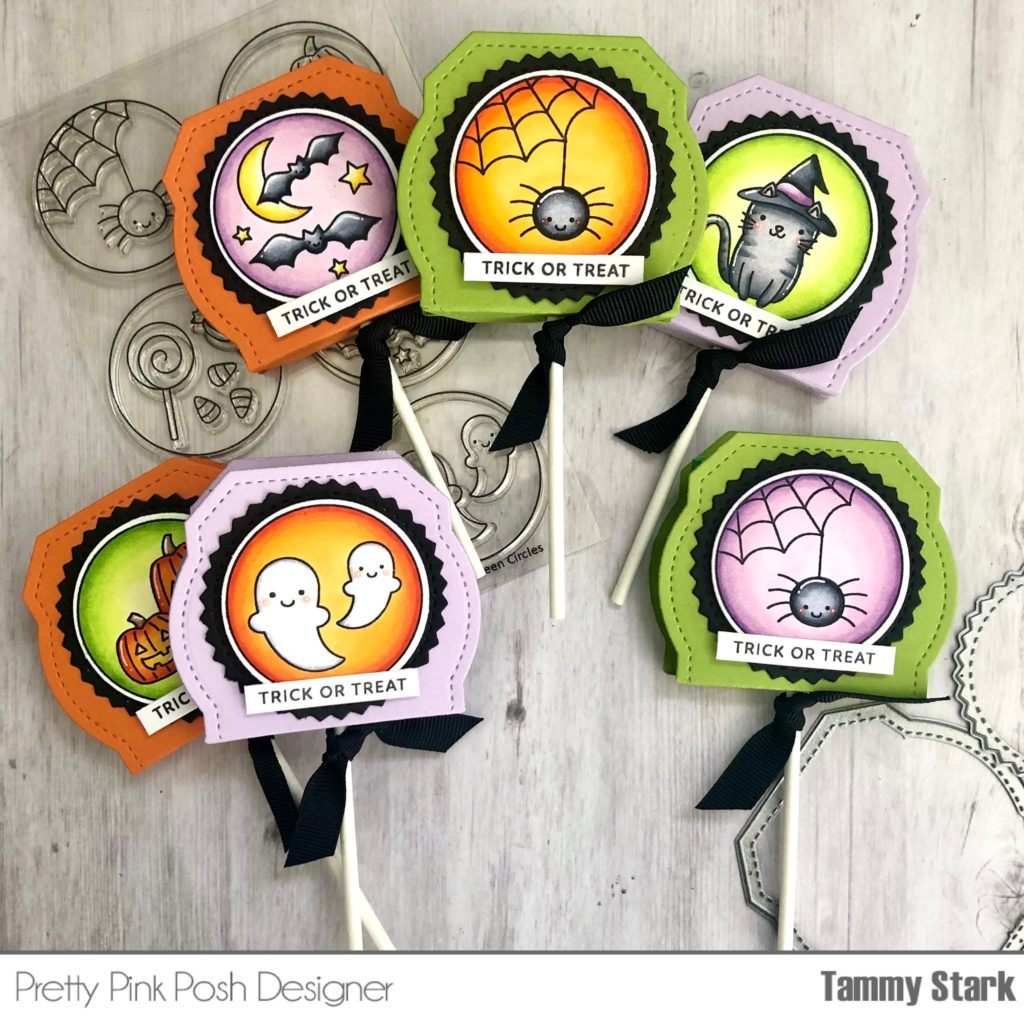
Hi friends, it’s Tammy here and I’m excited to be wrapping up Halloween Theme Week over at Pretty Pink Posh! I have a fun project to share, using the new Halloween Circles stamp set.
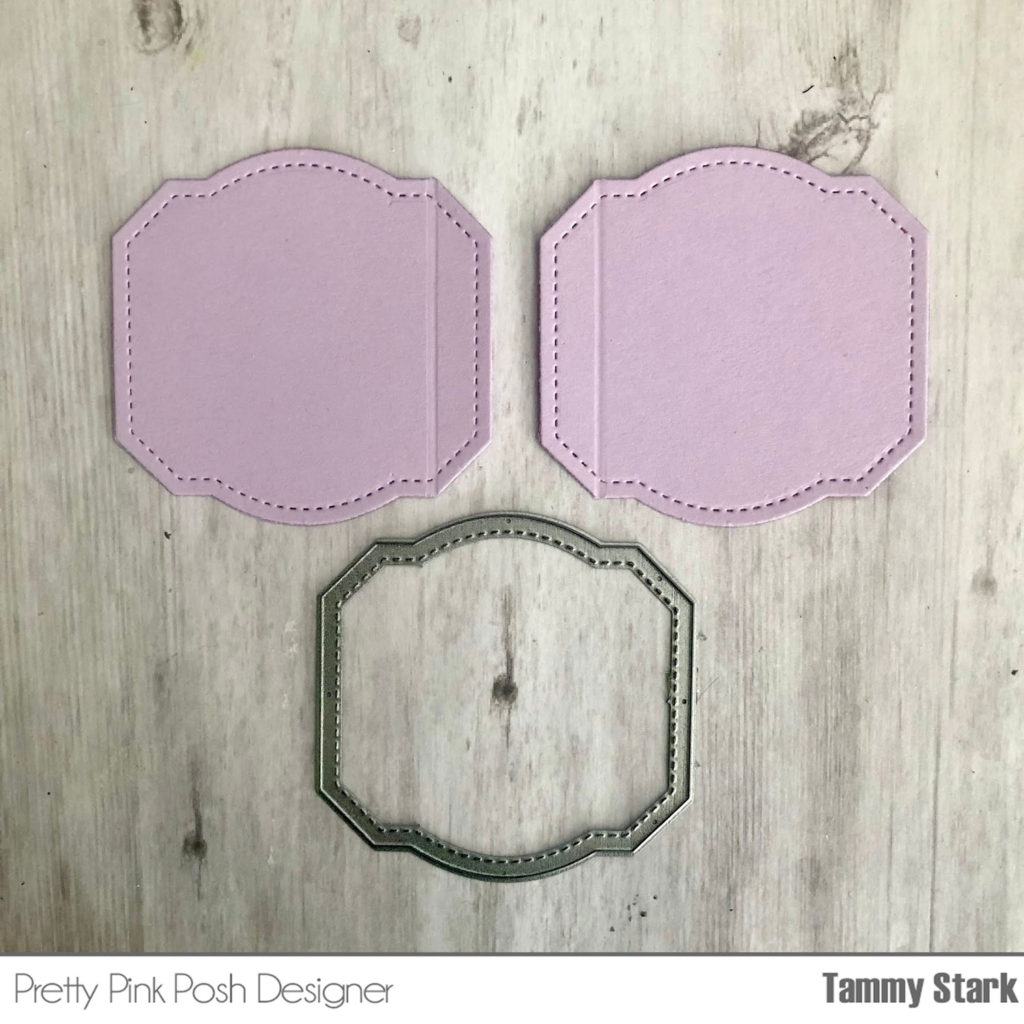
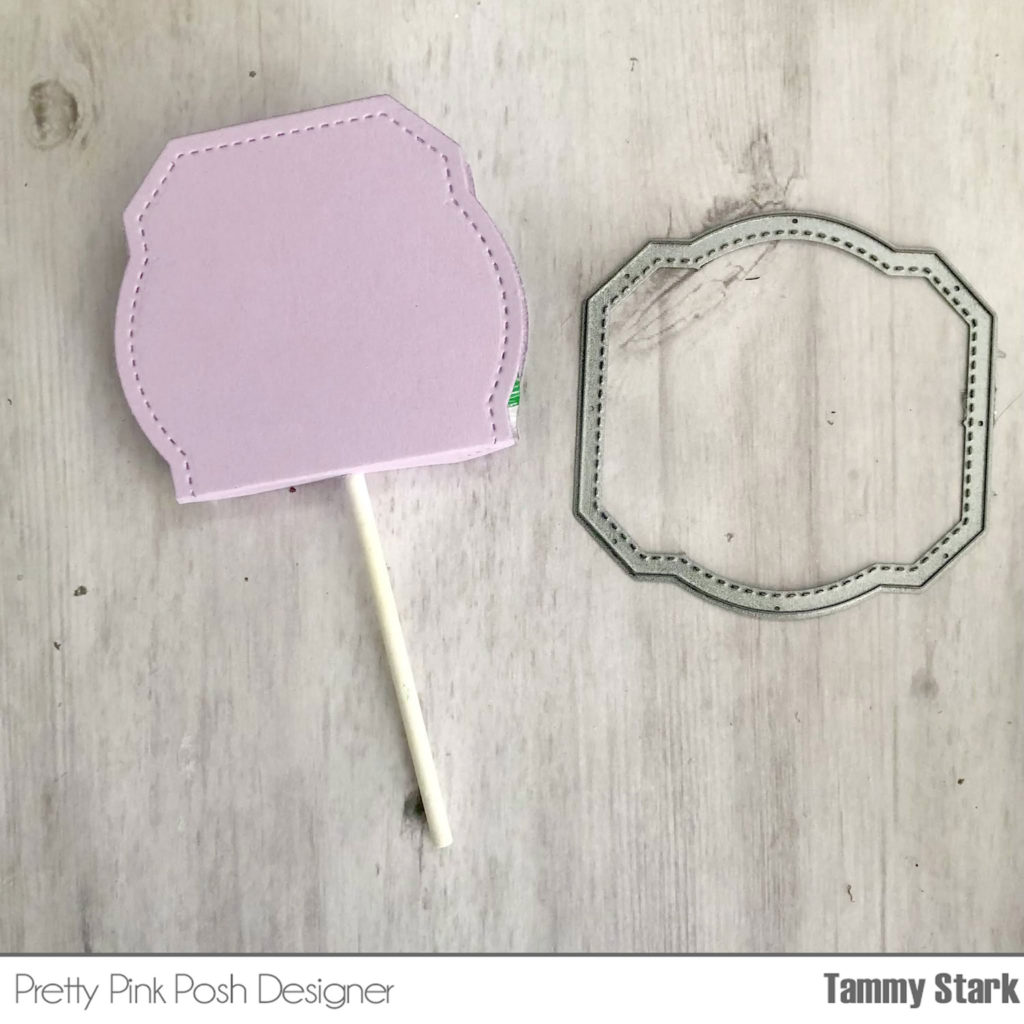
I LOVE creating little favors and gifts, so I had fun creating these little Halloween Lollipops! To begin, I stamped the images from Halloween Circles, colored with Copic markers, and die cut with the coordinating dies. I then attached the die cut images onto the black cardstock pinked circles. Next, I created the lollipop covers…you guys, they are sooo easy! You could easily mass produce these for the kiddos Halloween class parties, trick-or-treaters, or even co-workers!
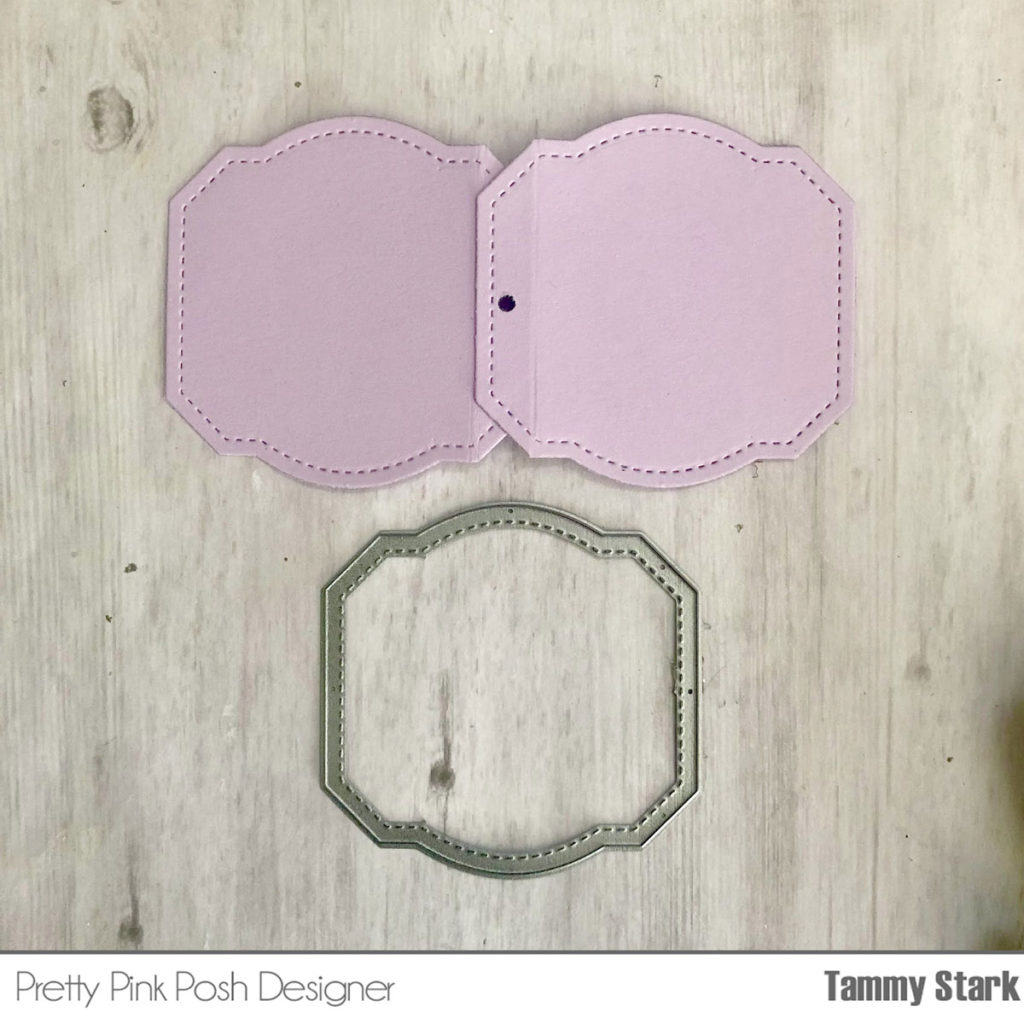
Next, attach them together, lining it up with the score line as shown. Punch a hole in the center and fold towards the center so it makes a little tent.
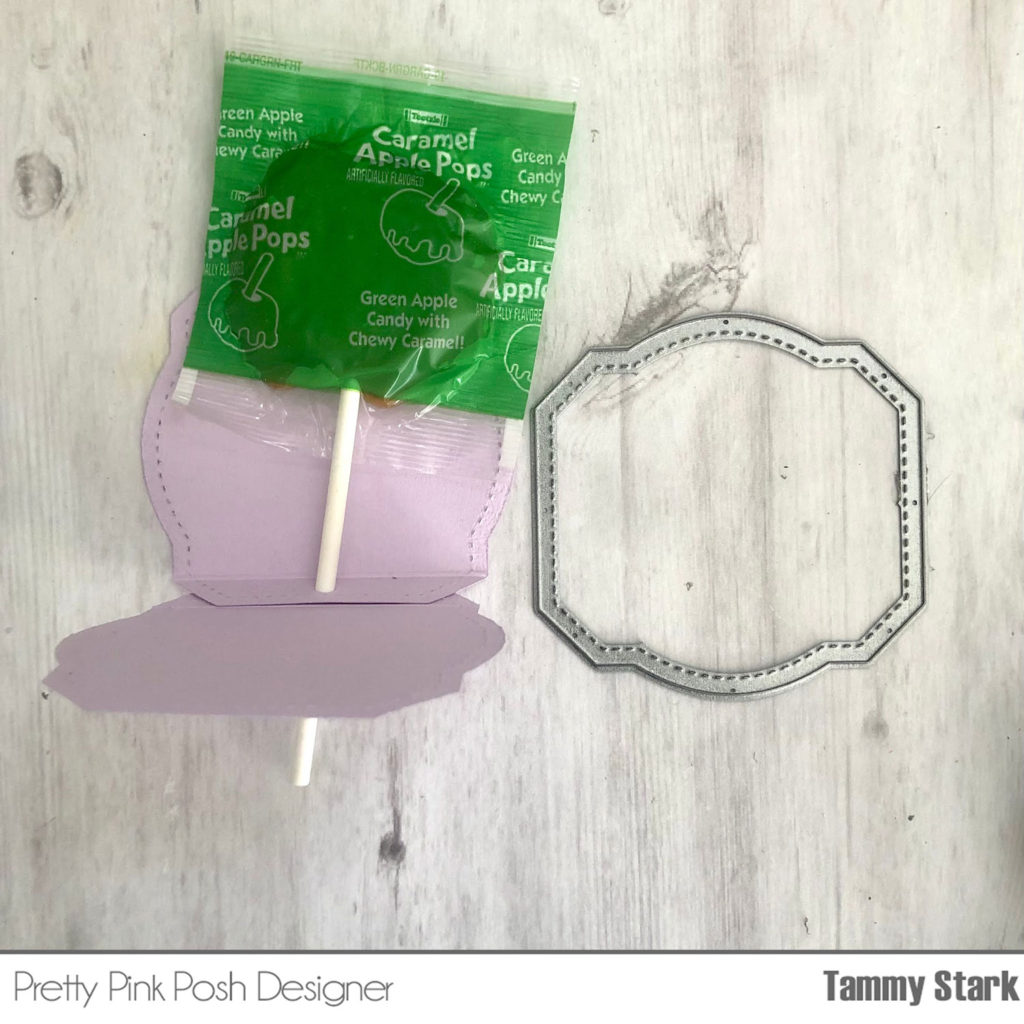
Insert the lollipop through the punched hole. Just a note: these lollipops were a bit too large in diameter, so I folded down the edges so they didn’t peek out the sides.
Put a glue dot on both sides of the lollipop and fold it up to close.
Once all the lollipop holders were made, I added the Halloween Circles to each one with foam tape. Next, I stamped the sentiment from Monster Hugs onto a white cardstock strip and attached to the front of the lollipop. Lastly, I tied a piece of black ribbon to each lollipop to add a special touch!
Thanks so much for stopping by! I hope you enjoyed Halloween Theme Week and you are inspired to make some “spooky” treats!
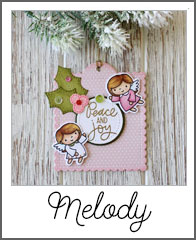
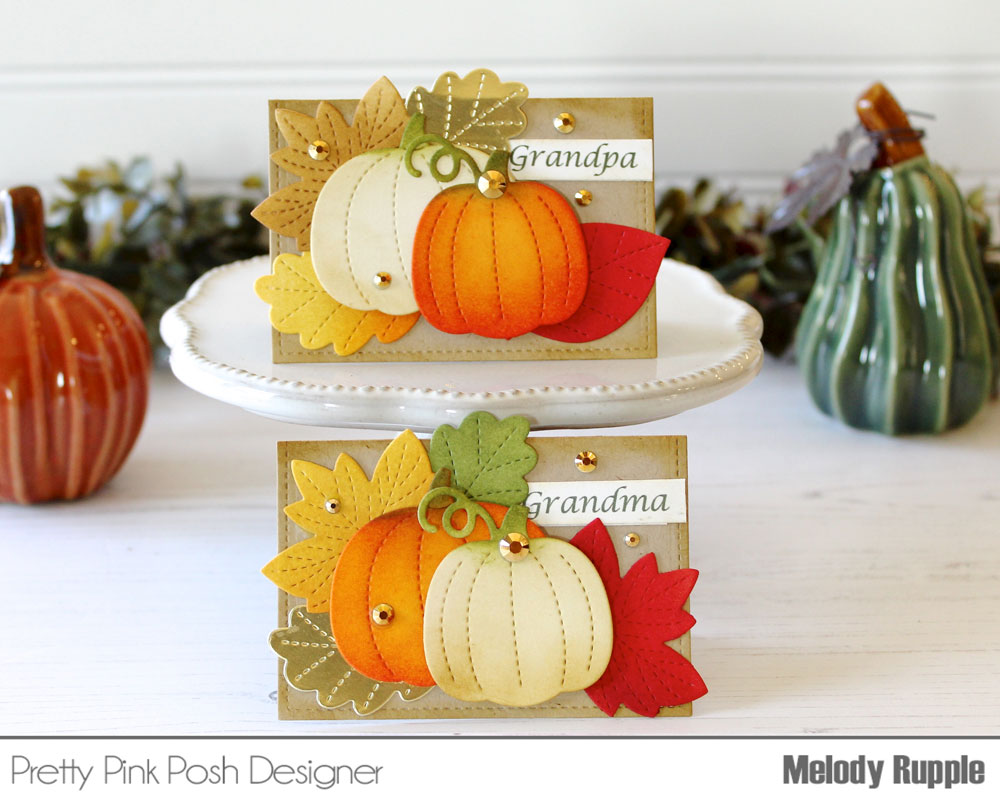
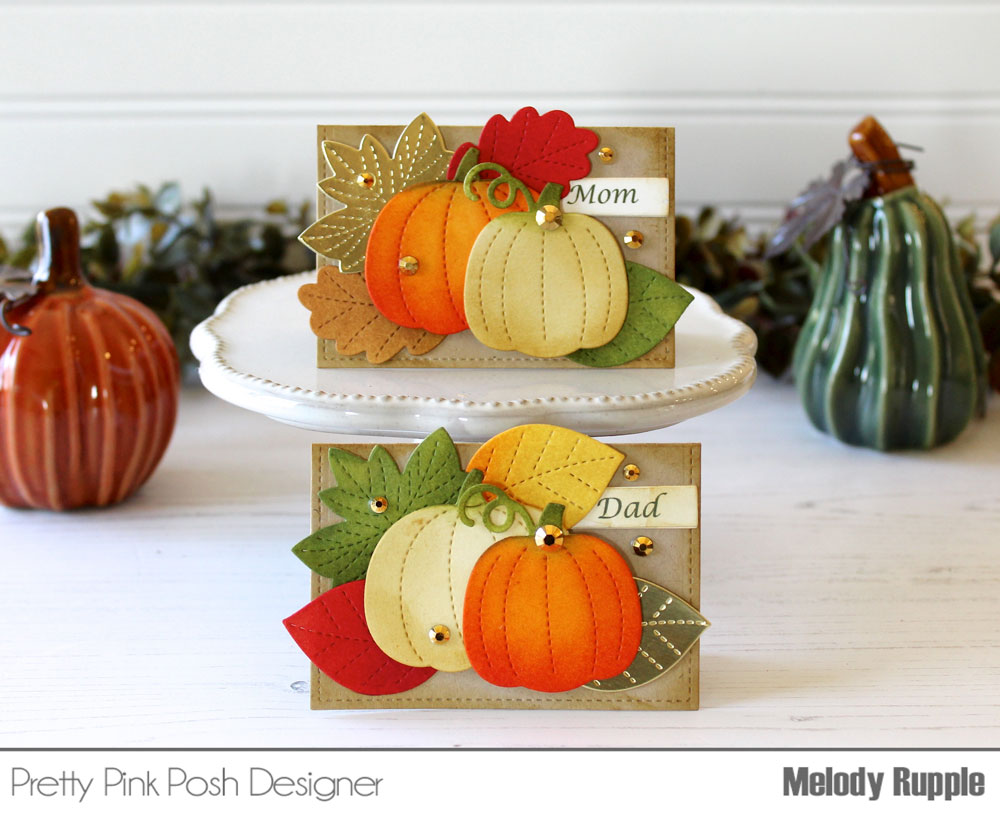
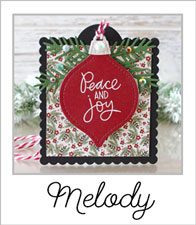
Hi all, it’s Melody here on the blog today. With Thanksgiving just around the corner I wanted to share an idea I have for some quick and easy place cards for your Thanksgiving table. The place cards make your table just a little more special by adding that handmade touch!
I created four place cards for my post, but the cards can be put together quickly for however many people you have sitting at your holiday table. I started by creating the base for the place cards from Kraft cardstock. I used the stitched rectangle that you get when you die cut the largest die in the Stitched Notes Dies. I scored the Kraft rectangle in the middle then folded the card in half to form a tent card.
I attached the foliage to the place cards, adhering the pumpkins with foam dots to add dimension. The names on the card are computer generated. I finished off the place card with Metallic Gold Jewels.
Thanks for stopping by! I hope I have given you a handmade idea for your Thanksgiving Table.
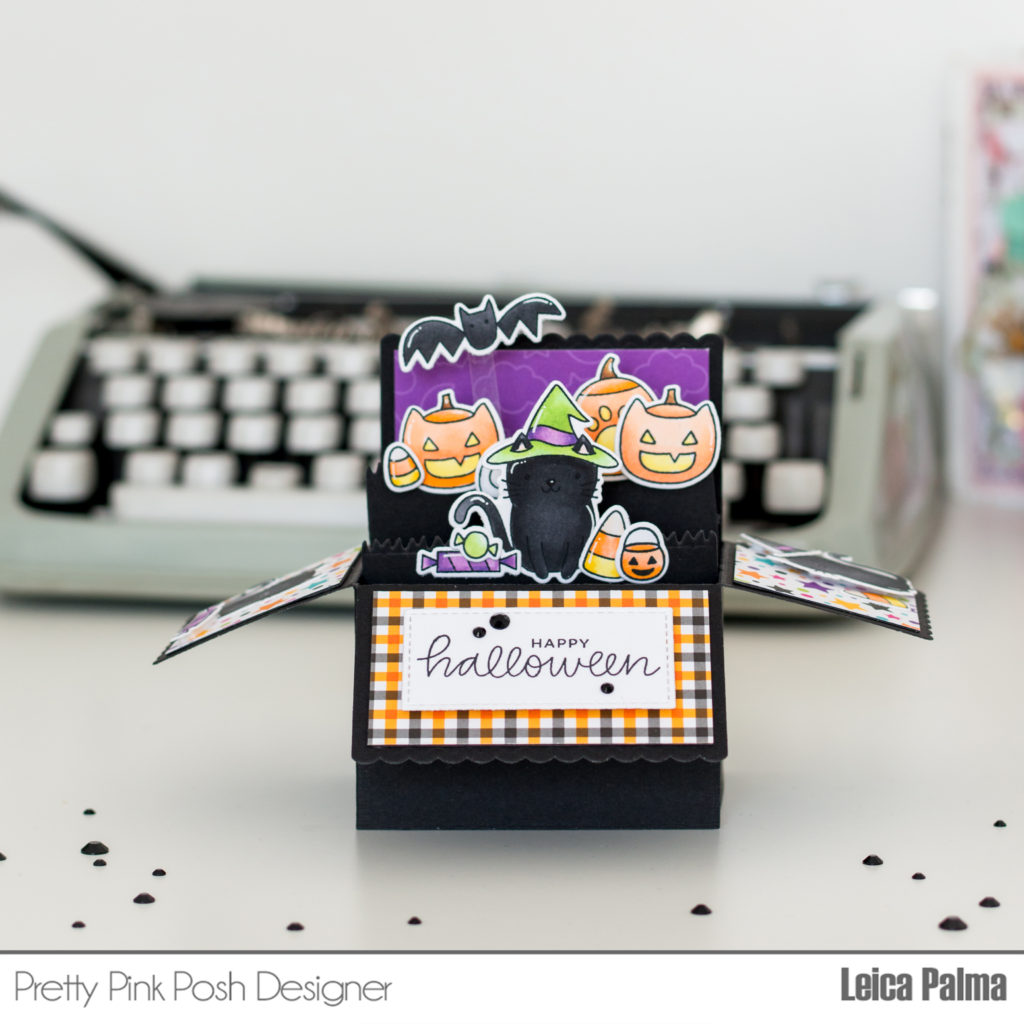
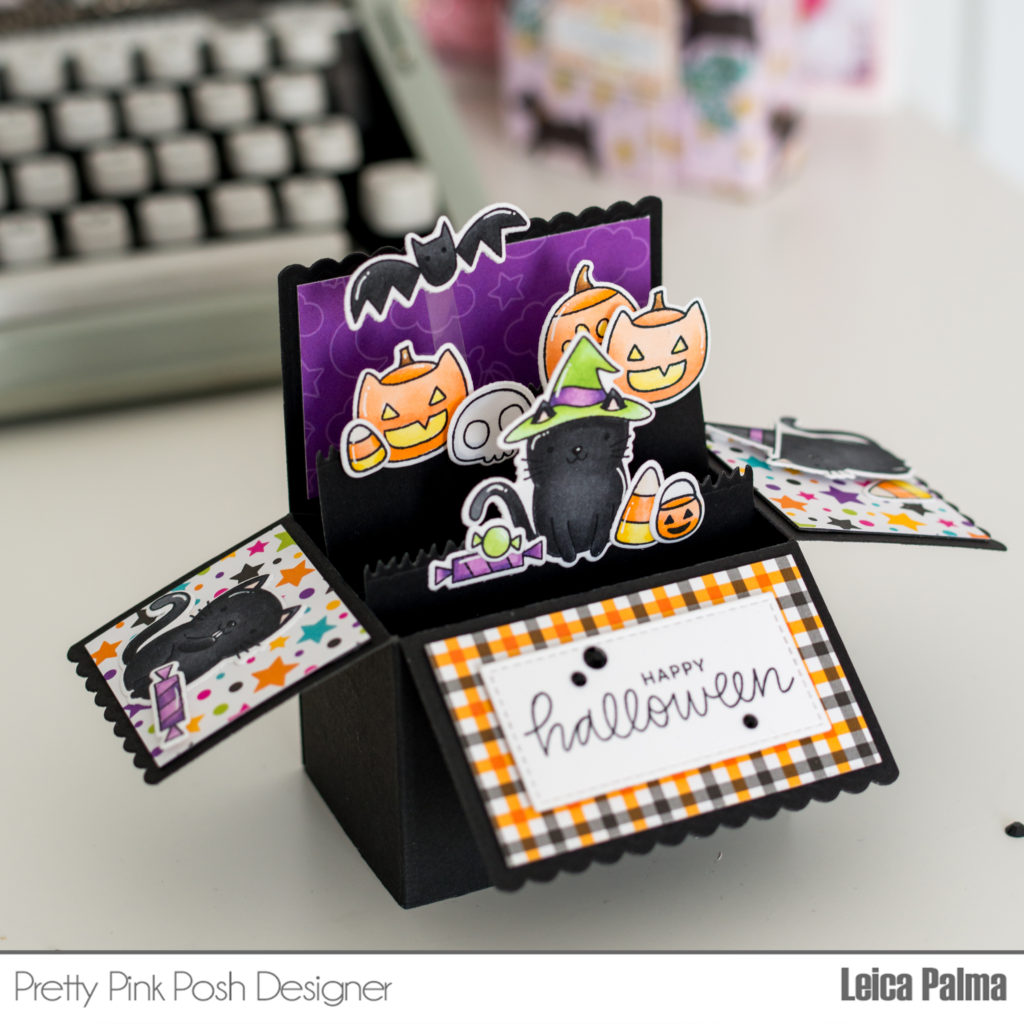
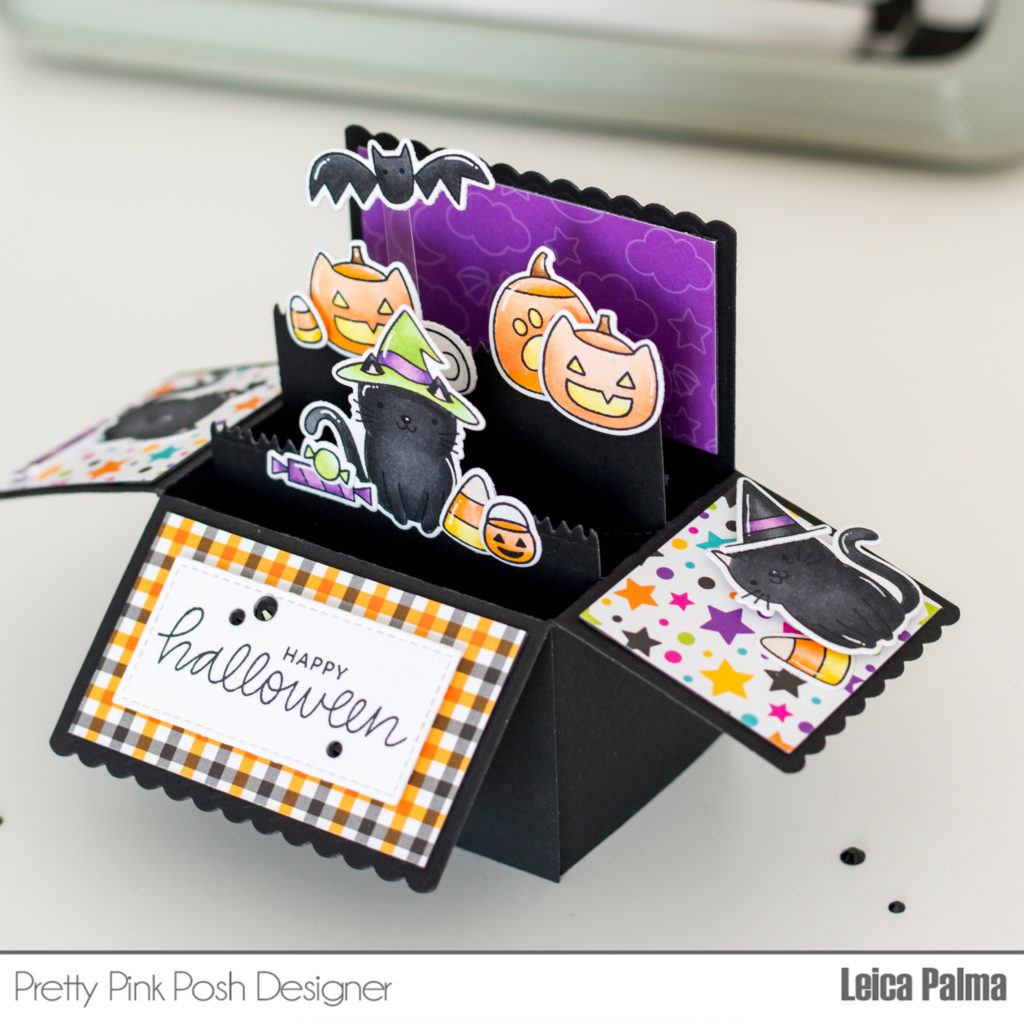
Hello! Leica here. Today I am sharing a box card using older stamp sets that I have combined together to make this adorably haunting Halloween card.
To start, I created the Lawn Fawn pop-up box as directed, in black 80lb cardstock. Next, I die cut panels for the box, using papers from Doodlebug Candy Carnival collection. For the box inserts, I used a grass die cut in black cardstock.
Next, I stamped images onto 110lb cardstock, colored with Copic markers, and cut with their coordinating dies. The cat and pumpkins are from the Halloween Pals stamp set. The bat, skeleton head, and candies are from the Boo stamp set. The little candies and pumpkin treat bag is from the Halloween Friends stamp set.
I used the following Copic markers: N9/7/5, YR04/02/00, V17/15/12, YG23/13. The fun part is creating the scene. Some of the elements are adhered directly onto the inserts and some are foam mounted to add dimension to the scene.
Next, I stamped the “Happy Halloween” sentiment from the Halloween Pals stamp set onto a white rectangular cardstock and foam mounted on the front flap of the box card. Lastly, I added Glossy Black Jewels to add texture to the card.
Thank you so much for visiting the blog today and I hope you are inspired to create and send Halloween cards to your friends and loved ones this year. Stay safe and healthy!
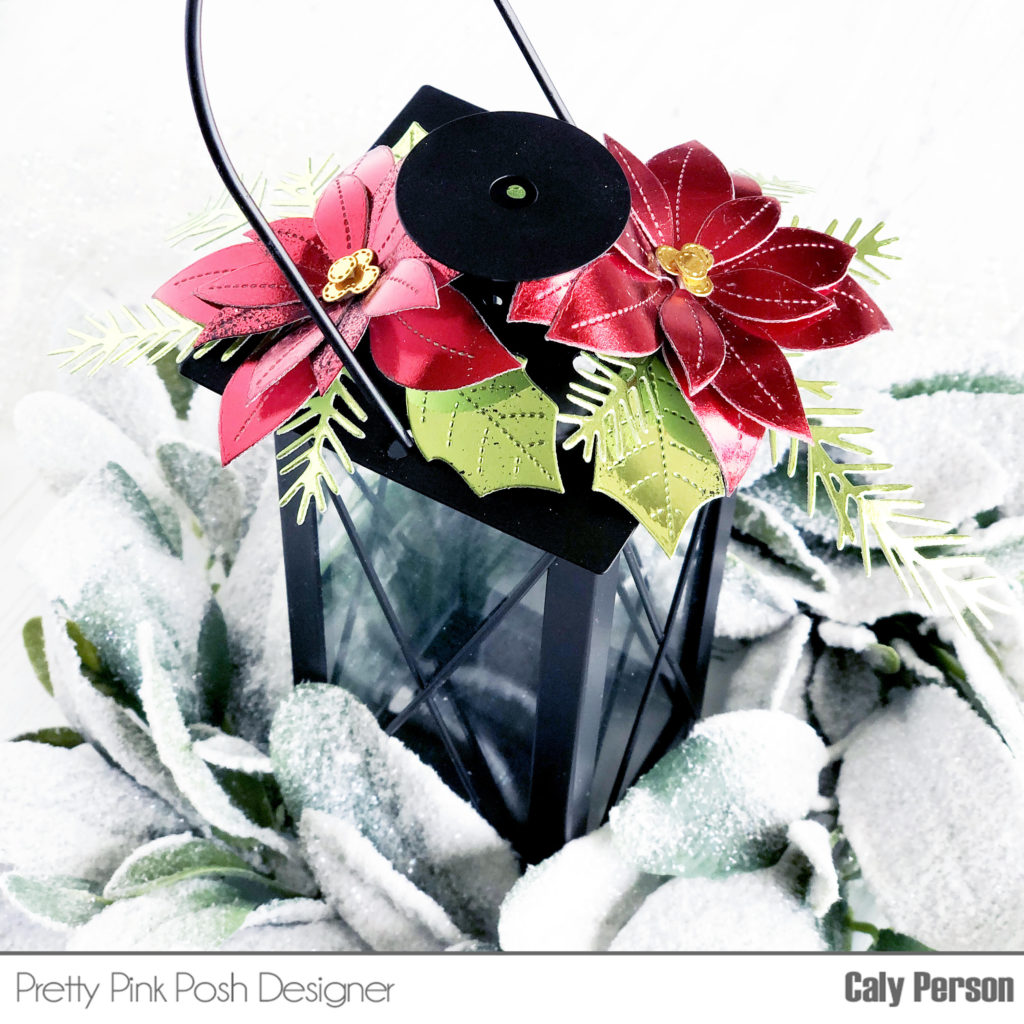
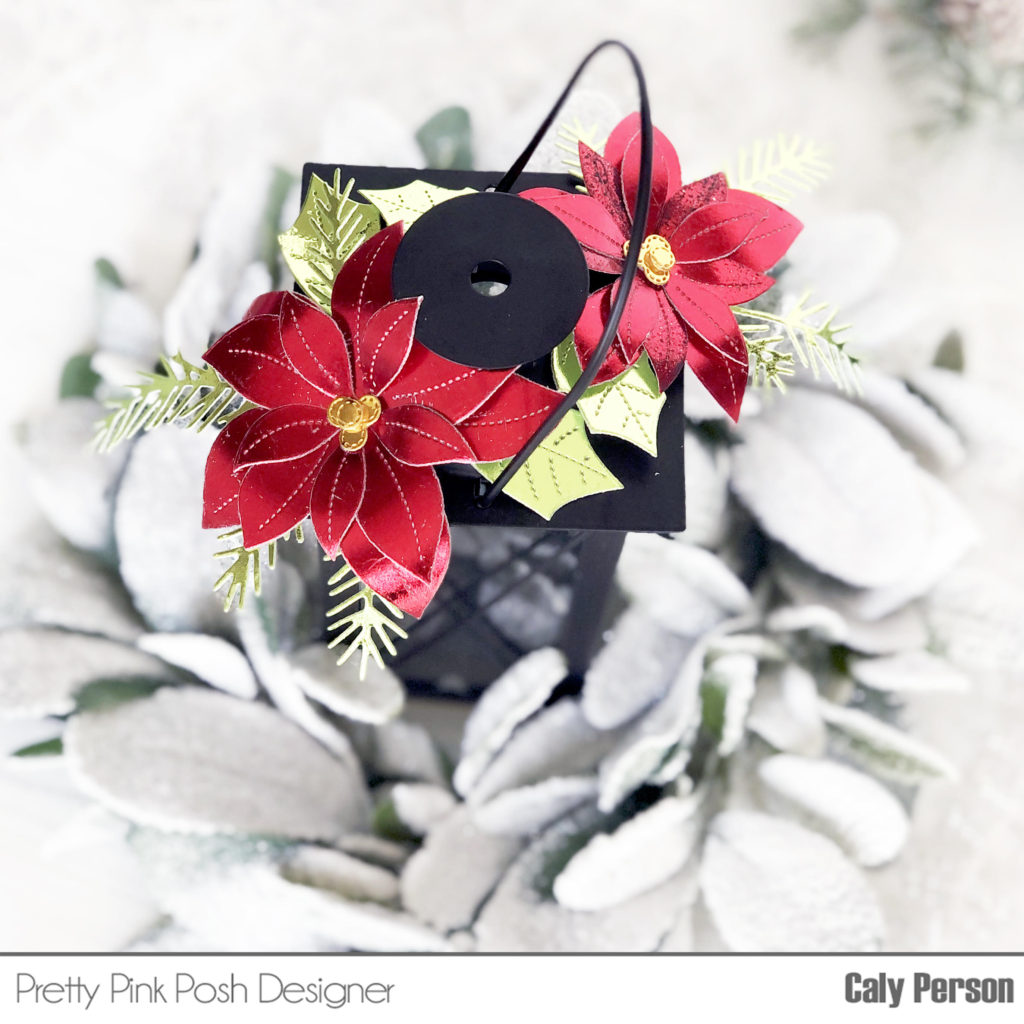
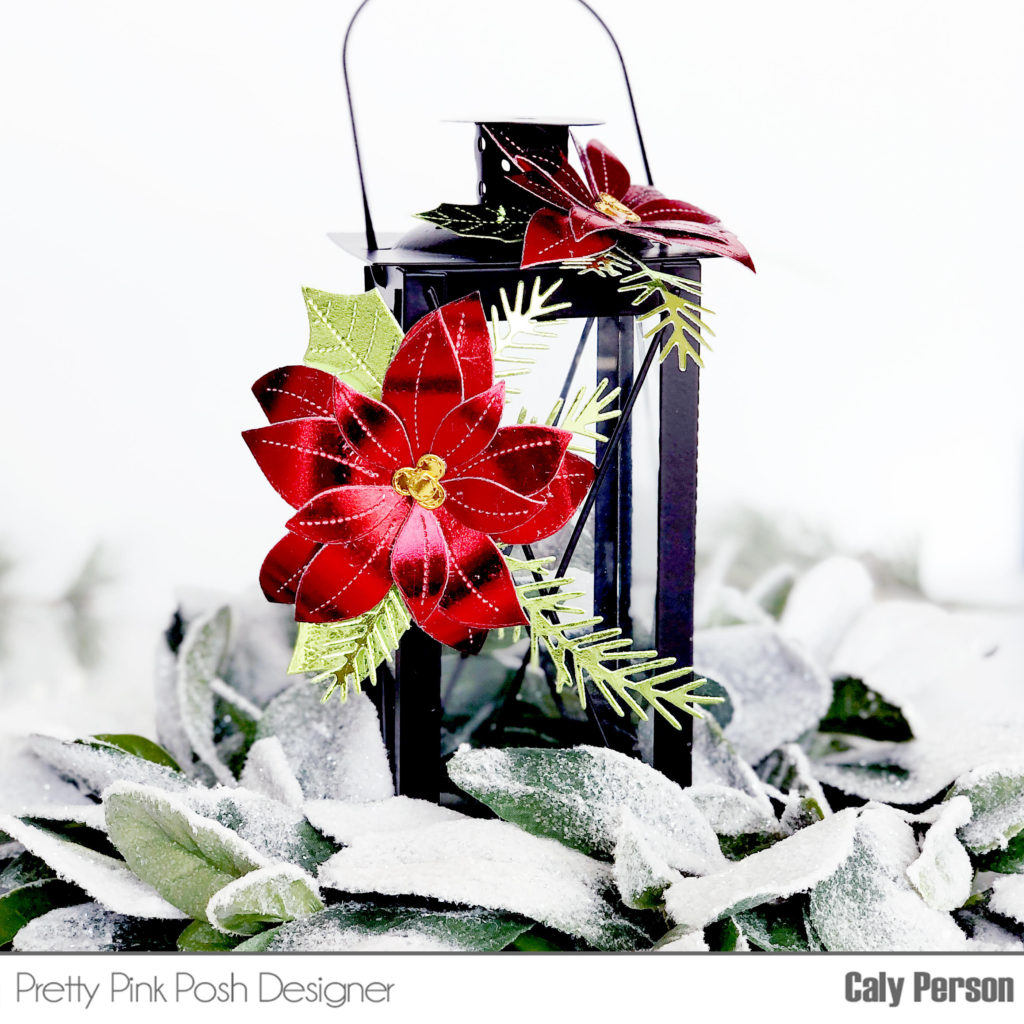
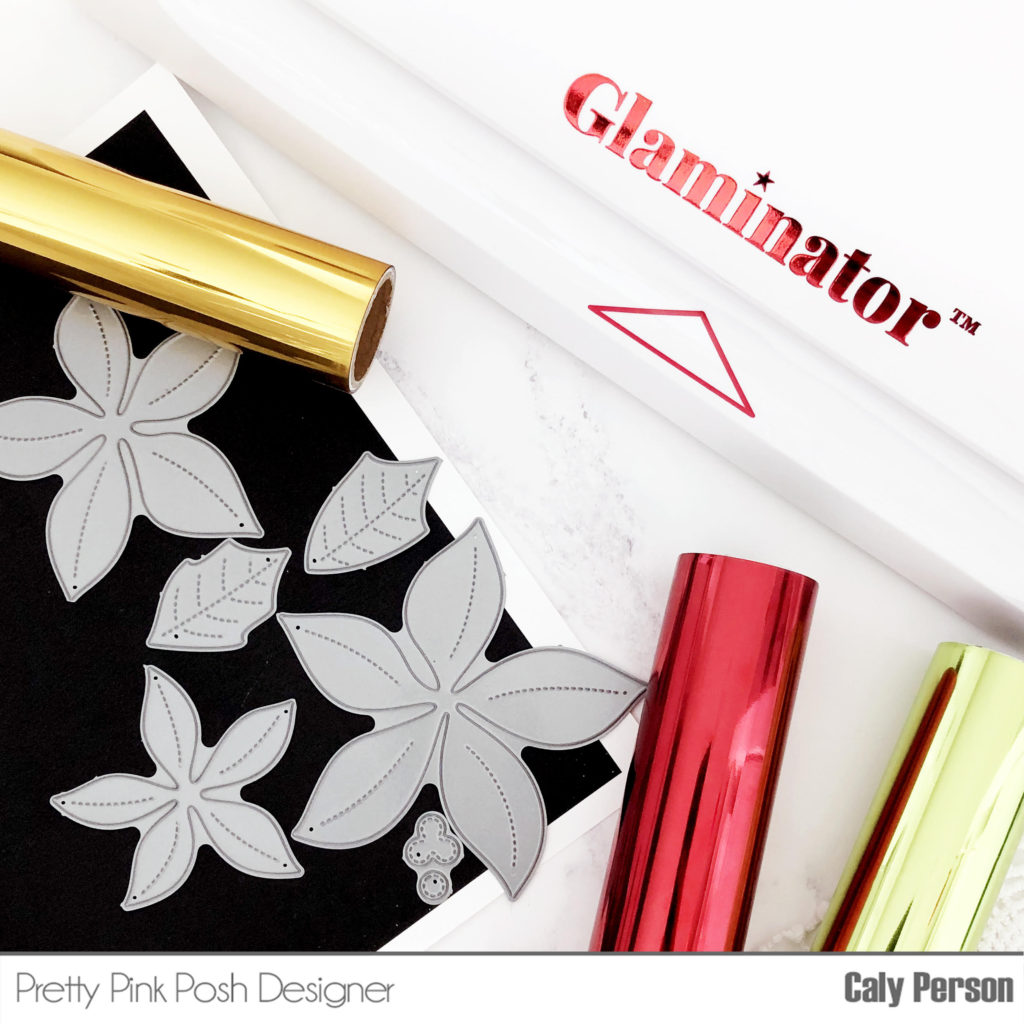
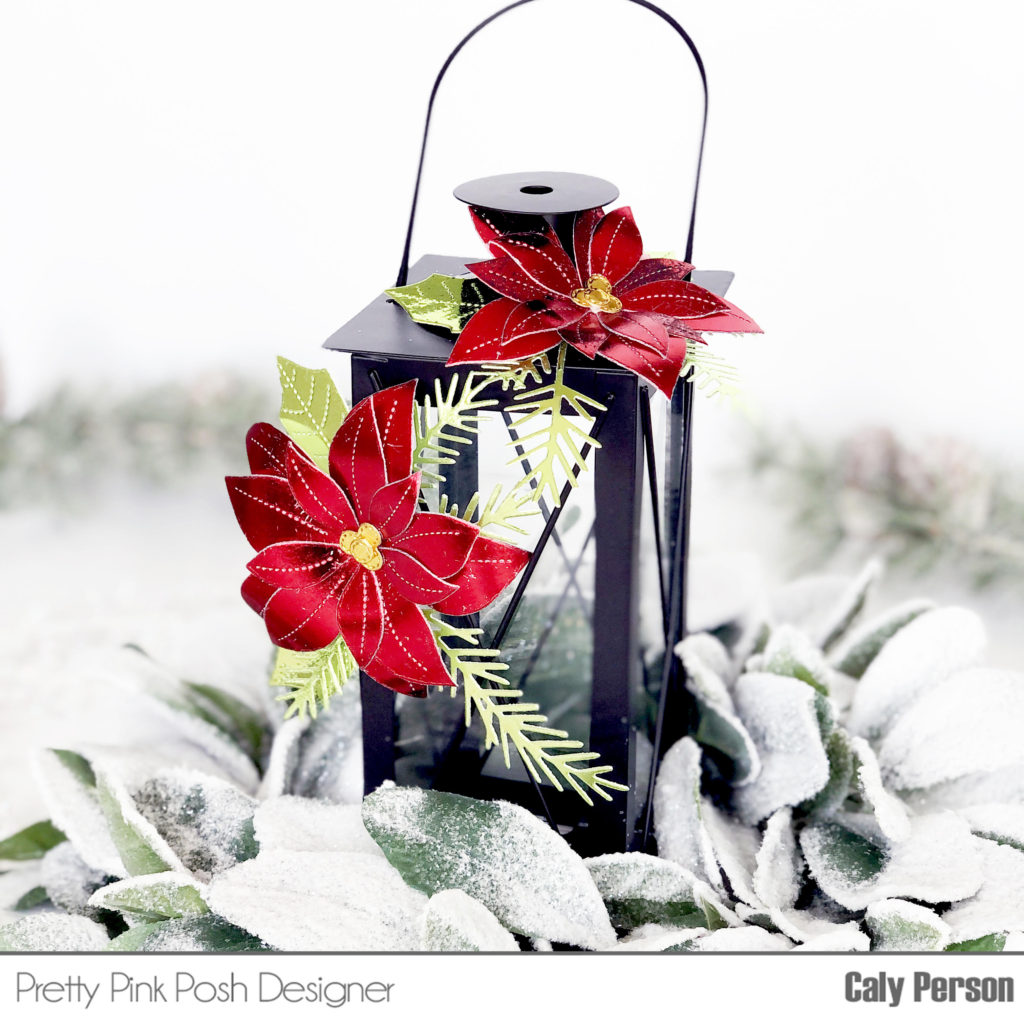
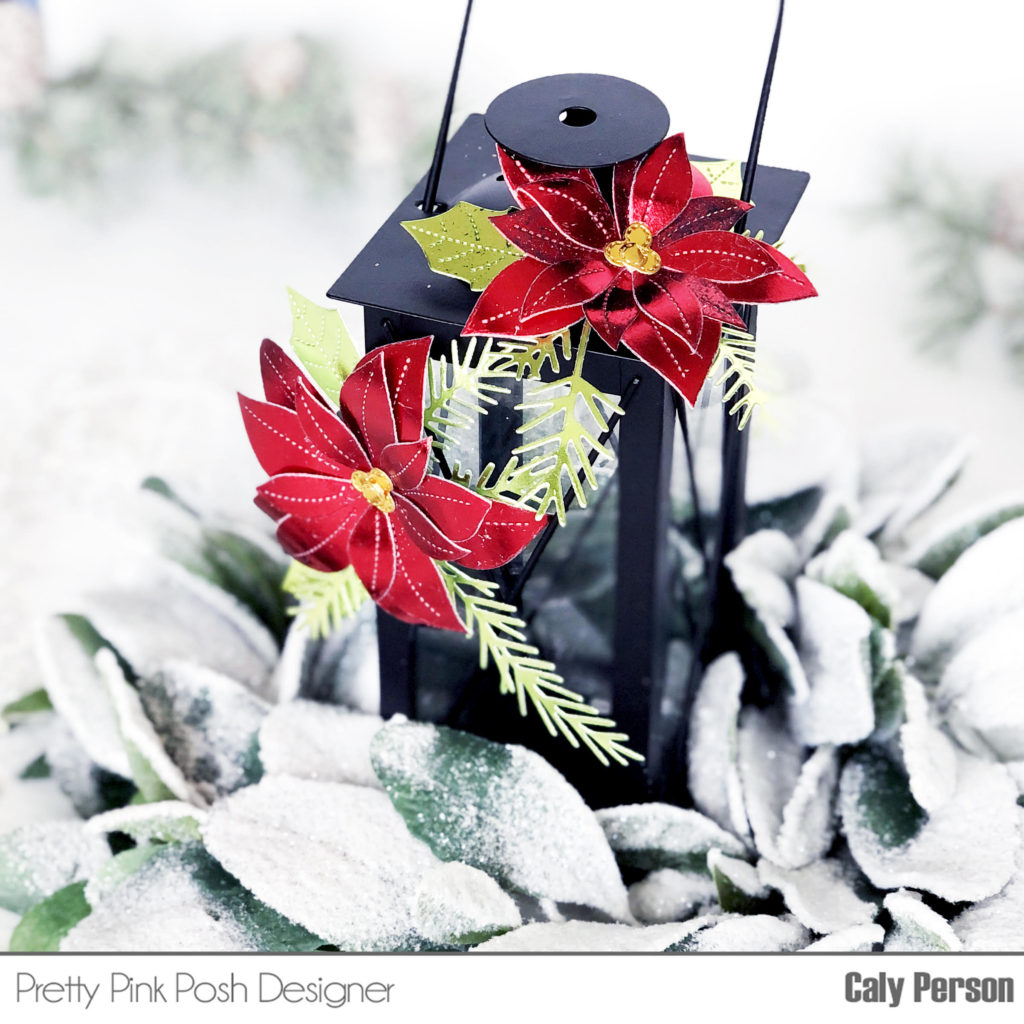
Hi, friends! We’re excited to be collaborating with Xyron today, sharing foiled projects for the holidays! This is Caly and I have a decorative lantern to share with you using the Stitched Poinsettias and Pine Springs dies!
I started by printing a big sheet of toner-filled cardstock to have a base for my foil to stick to to run through the Xyron Glaminator foil machine. After printing, I cut pieces of red, gold, and green foil to cover the entire space, put them in my carrier sheet and ran them through the Glaminator.
Once I had my foiled cardstock, I cut the different colored
sections and then placed my dies over them to run through my die-cutting
machine to get my poinsettia and foliage.
They are so pretty!
I adhered all the foiled pieces together to create my
poinsettia and then adhered the leaves and pine springs with foam adhesive and
then decorated my lantern. I decorated
my lantern two ways – heavy at the top as well as top and front.
GIVEAWAY: be sure to head to the Pretty Pink Posh Instagram for a chance to win a complete Glaminator prize pack!
These make for beautiful center pieces or just decorative pieces around your home. I hope you’ve enjoyed this project! Make your holidays shiny with foil and holiday dies from Pretty Pink Posh!
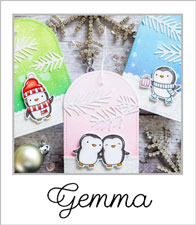
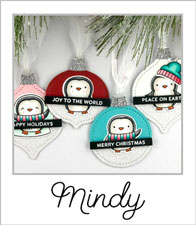
Hello friends… Angelica here, and I’m so excited to be part of the 25 Days Of Christmas Tags with Pretty Pink Posh. I made two shaker tags with products from the new release for this fun event.
To construct the shaker tags, I used coordinating heavyweight cardstock and acetate, as well as double-sided adhesive. I added the adhesive to the cardstock before die-cutting with the Ornament Shaker Die. I die-cut once with the adhesive on the backside, and once with the adhesive on the front side.
I snipped the word out of the ornament with adhesive on the front side, since this was going to be the backside of my see-through tag. I trimmed two pieces of acetate the same size as the ornaments. I attached the acetate to each cardstock side with adhesive. On the ornament for the front, I wrapped Darice Double-sided Foam Sticky Strips around the edge. I filled the window with Berry Bright Confetti Mix.
I carefully used my finger to make the confetti even height, then closed the window with the back ornament. I die cut a gold topper, and used liquid glue to attach it to the ornament.
For the blue ornament, I did the same steps, using Winter Days Confetti Mix in the window, and silver glitter paper for the topper.
These ornaments were quick to make. If you like making shaker cards, I definitely recommend giving this project a try. They’re a perfect touch for wrapped presents.
Plus, more inspiration from these designers! Click photos to visit their blog posts.
Thanks for stopping by! I hope you were inspired by these pretty tags.
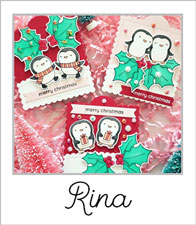
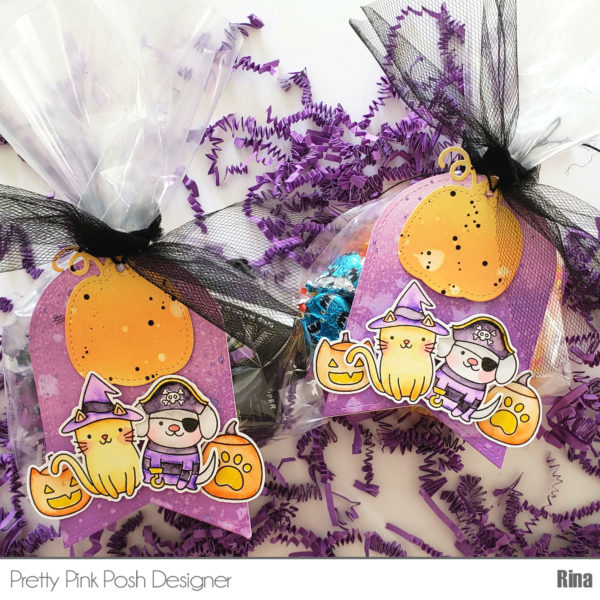
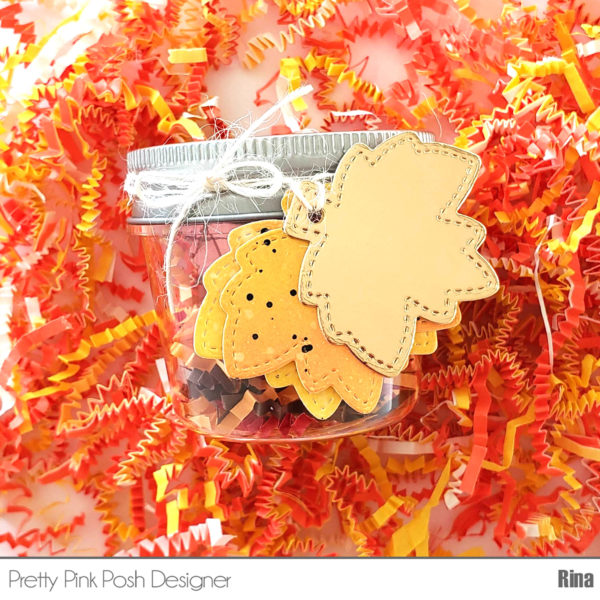
Hi everyone, Rina here! I wanted to create some treats for friends. I decided to do make some Halloween and Fall tags to add to some delicious chocolate goodies.
Since I was making more than one, I decided to use my Zig Real Clean Color Brush markers to color with a water brush. I used Versafine Onyx Black ink on Bristol smooth cardstock. I like the easy watercolor feel these markers leave behind. I used traditional fall colors:
I cut out all my images and put my tags together. To create the treat bags, I used clear bags that you can get anywhere, I get mine at Target and Walmart. I also like to add paper shred, I get mine from the dollar store. I really like being super themed during the fall and holiday season so I had a lot of fun coordinating everything.
Hope you give these a try people love receiving them!
Jeanne here today and I can’t tell you how excited I am to share the Pretty Pink Posh new release dies with you! You’re going to FALL in love them all! Paulina’s got a little something for everyone! Do you love bling and sequins? Then the Thanks Leaf Shaker die is for you. Of course it’s ideal for shakers full of shiny sequins but you’ll find lots of great ways to use this pretty maple leaf die.
If you say “fall” I say “color”! And color blocking is one of my favorite techniques. No one makes this technique easier than Pretty Pink Posh. The unique Stacked Edges stitched border dies fit together perfectly so you can add lots of layers without a lot of thickness. To save time I cut three different borders at a time so I have several to use on other projects. I adhere the borders together on their reverse side and then cut them into a panel for the cover of my card.
The new Thankful For You Script die is a great way to add a sentiment to any project. I love the loopy letters of the hand written font. This color block panel was created with die cut squares from the Storybook 3 and stitched strips from Stitched Borders 3.
The squares are topped with die cut leaves and pumpkin from the new Small Stitched Foliage.
As the weather turns cooler baking season will begin again for me. I can always use a pretty tag to dress up a loaf up pumpkin bread or a bag of cookies. I created panels of colorful chevrons using the Stacked Edges 2 and die cut them with the Stitched Duo 1 Tag.
I embellished the tags with die cut Fall Tags and Small Stitched Foliage (in case you’re wondering yes.. they can be stacked on top of each other) cut from white card stock.
The “thanks” sentiment is cut from the Thanks Leaf Shaker and yes, there are new colorful jewels this release too! I used the new Midnight Black, Raspberry, Blue Lagoon Jewels to add the perfect finishing touch to these tags today.
A big thank you to YOU for joining me today! Be sure to join us tomorrow for the reveal of the release and a chance to buy the bundle of all the new release items a day early at a discount!
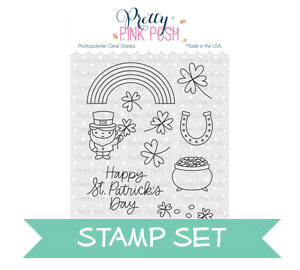
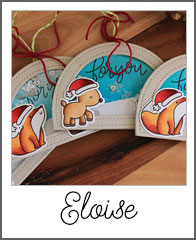
Hi friends, Eloise here and today I have some St Patrick’s Day little gift boxes to share with you all. These would be perfect for little gifts for co-workers or even children, just a little gift to give someone to give them a little luck and a sweet treat, or whatever you decide to put in them. I’ll be using the Best of Luck stamp set to help theme these DIY gift boxes.
To begin my boxes today, I first cut down two pieces of green cardstock to 5 ½” wide by 8 ½” tall. This means you can get two boxes from one sheet of 8 ½” x 11 cardstock, which is great. Once they were cut down in half, it’s time to score. I pulled my large scoring board out, you can use a small one but you’ll need to turn the cardstock around every time to get the full length. My first score line is going to be on the short side at ¼”, then at 1 ¼”, then at 4 ¼” and lastly at 5 ¼”, then turn your cardstock 90 degrees and then on the long side, you’re going to score at 3”, then at 4”, again at 7” and again at 8”. This will be the base for your box.
Next take your box base over to your trimmer and you’re going to cut out a few rectangles. On the short side, you’re going to cut down vertically the 1 ¼” score line, all the way down to the 3” horizontal score line. Then, do the same for the 4 ¼” score line. At the bottom of your box, still on the short side. Cut up from the 1 ¼” score line again, to the 8” score line and repeat for the 4 ¼” score line. Then rotate your box 90 degrees, making sure you have the longer cut lines to the left of your trimmer and at the 3” score line, cut down to the cut you made earlier. Then, move your cardstock down, and do the same at the 8” score line. Then, flip your cardstock 180 degrees, and repeat. For the last cut, move your cardstock long ways and cut at the 4” score line, to the score line of the long cut you made earlier, flip the cardstock around 180 degrees again and repeat. This will be the base for your box all ready to go. If it’s easier for you, you can use scissors – but I personally liked using the trimmer, especially with a wire guide. Also – this will be explained and shown in the video so if you’re a visual learner, check that out above!
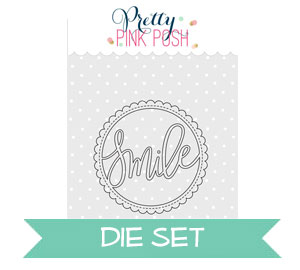
Now that my boxes were all ready before I moved onto anything else, I flipped it over to the front of the box, and ink blended some Lucky Clover Distress Ink at the bottom of which will be the top of the box, just to give my box a little gradient of colour. I repeated this for all four boxes, then turned over my box so it’s the inside and then stamped ‘Happy St. Patricks Day’ on the inside at the top with black ink on all four boxes as well. Then, I used my bone folder and scored along all the edges. I then set my boxes off to the side and worked on the decorations. I stamped out all my images from Best of Luck onto some white cardstock and used my Copic Markers to colour them all in. I then used the coordinating dies and cut them all out. While I was die cutting, I used the Smile Shaker Die and cut that out four times of white cardstock also. Since I just wanted the frames I used an exacto knife and cut away the ‘Smile’ word. Now I have all my frames, I can decorate my boxes.
To finish up my boxes, I first punched a hole at the top flap, and punched two smaller holes on the ½” flap. This will be for the string. Then, I used foam squares around the circle frames and adhered them to the front flaps of my boxes. I also added foam tape to my images and adhered them in place also. I then opened the box and adhered the four leaf lover images around the sentiment. For the little gift inside the boxes, I adhered four green foiled heart chocolates on the inside to create a four leaf clover, it’s super cute! To finish up the boxes, I folded in all the sides, added green twine into the punched holes and tied a bow to hold the top and bottom of the box together. Then for the sides, I added small strips of adhesive on each of the ¼” flaps and adhered them to the top of the box.
So that finished up my DIY gift boxes project today. I hope you enjoyed! These little boxes are super cute and easy to make with a half sheet of cardstock and can be decorated with any occasioned stamps. These would be perfect for small gifts as well.
Thank you so much for stopping by today and I’ll catch you all next time.
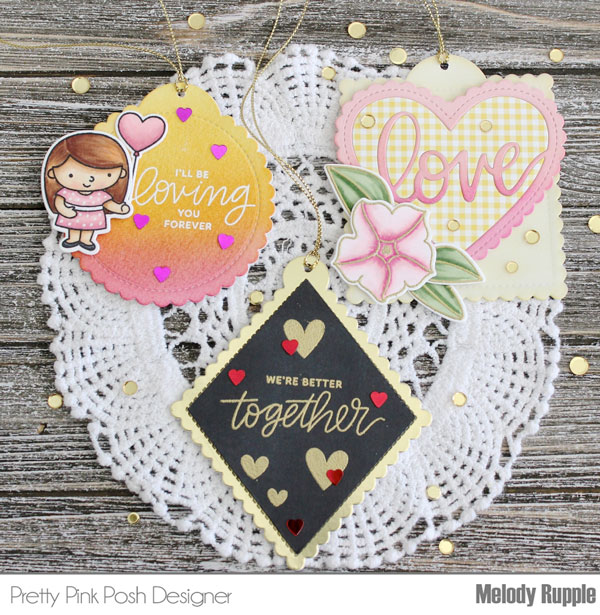
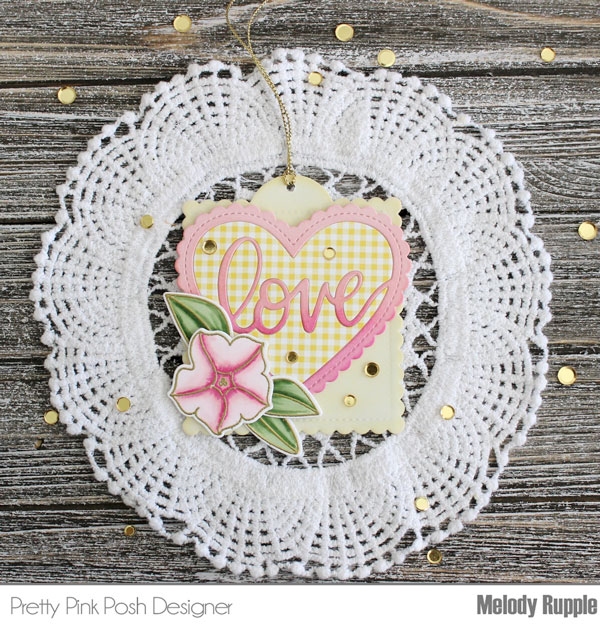
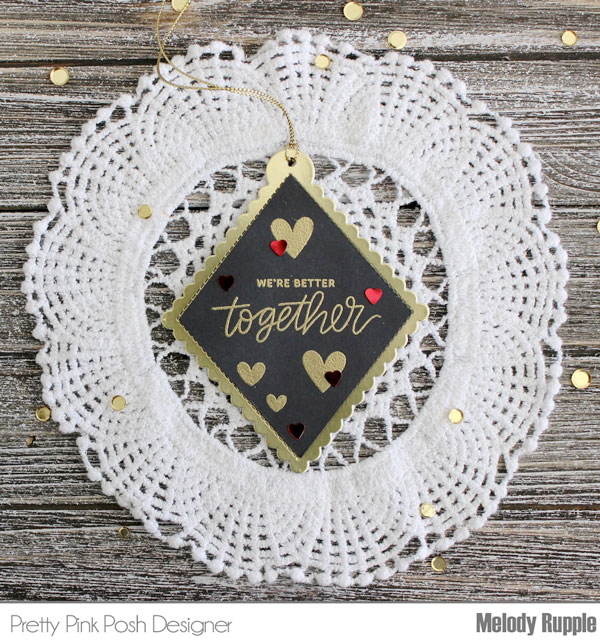
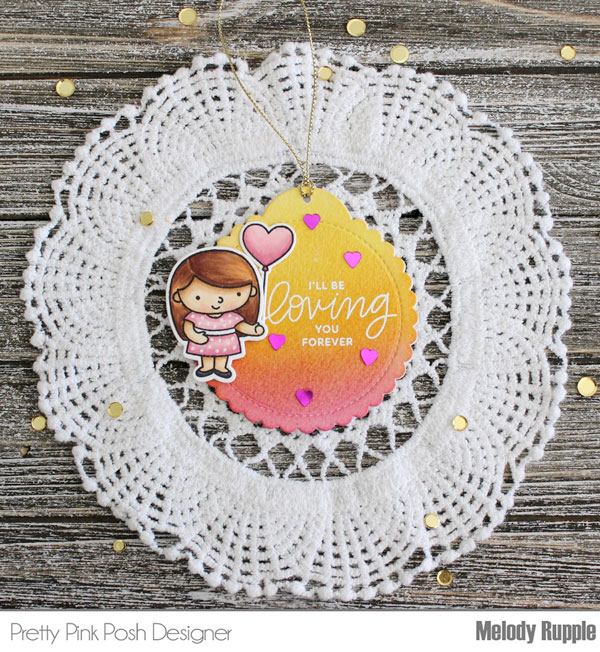
Hi everyone! It’s Melody here today and I have some ideas for Valentine’s Day Tags to share with you for everyone on your list. I create a masculine tag for my husband, a tag for a special little girl, and a tag for one of my daughters.
I like having tags ready to go in my stash. A handmade tag dresses up the simplest package!
My first tag is for one of my daughters who is a young adult. For the base of the tag I used the largest die in the Scallop Square Tags Dies. Next I die cut the Love Shaker Die twice, once from pink cardstock and once from patterned paper. I inlayed the pattern paper into the pink heart and used double sided tape to hold the pieces in the heart and then attached the heart to the tag. The flower is created with the Pretty Petunias Stamp Set and the Pretty Petunias Coordinating Dies. The last step is to attached a few sequins from the Metallic Gold Confetti Mix.
My next tag was created with my husband in mind. Valentine’s Day always includes a box of his favorite Sees Candies and this tags will be perfect attached to the box. I used the Scallop Diamond Tags Dies as the base for the tag. I stamped the sentiment and the hearts with the Love Sentiments Stamp Set in gold ink and embossed with gold embossing powder. The final touch is a few red heart sequins from theAssorted Heart Confetti Mix.
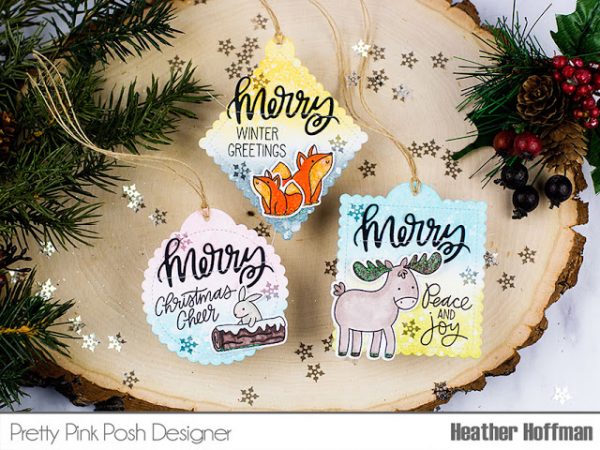
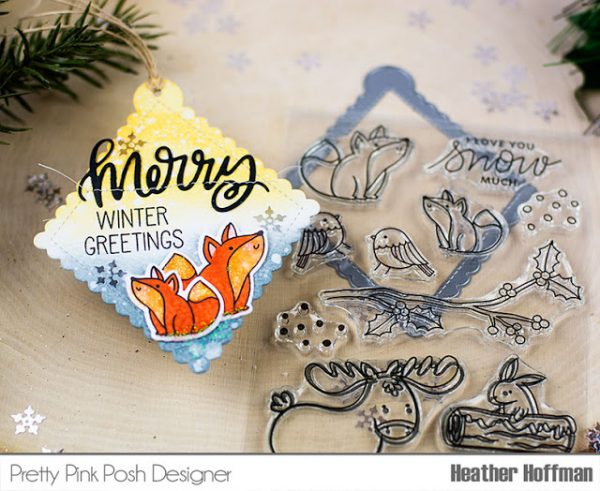
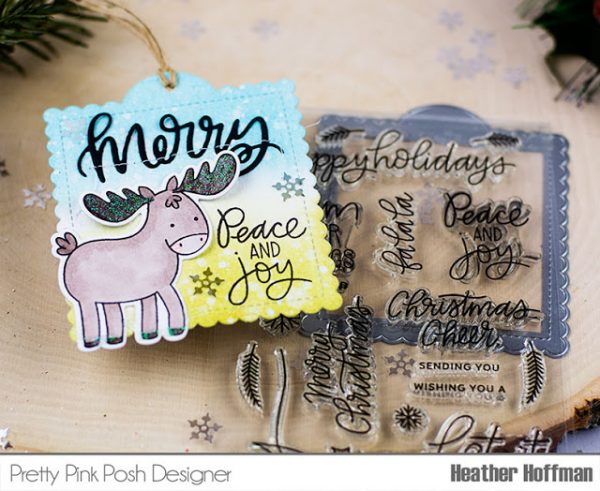
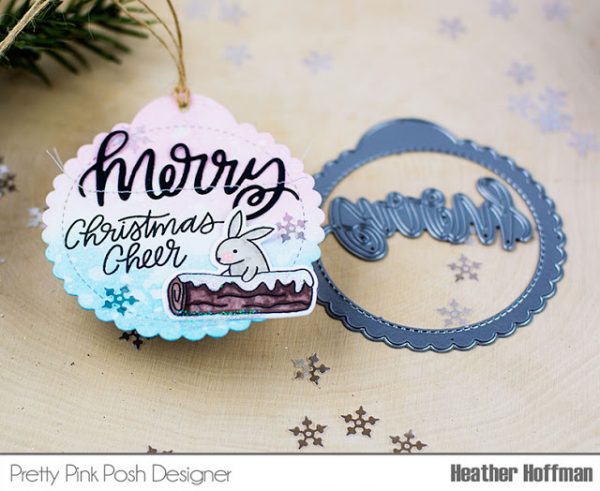
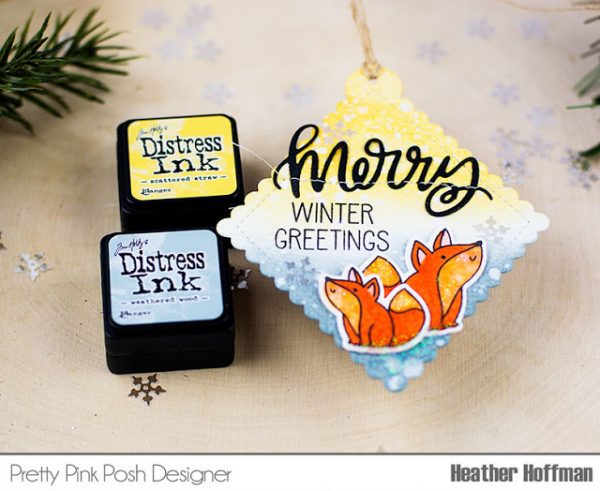
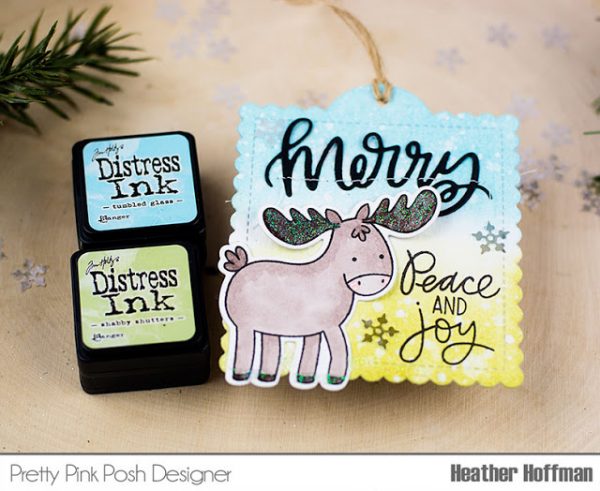
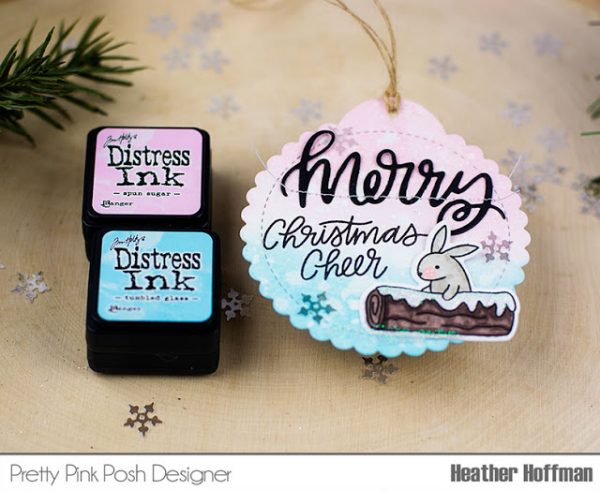
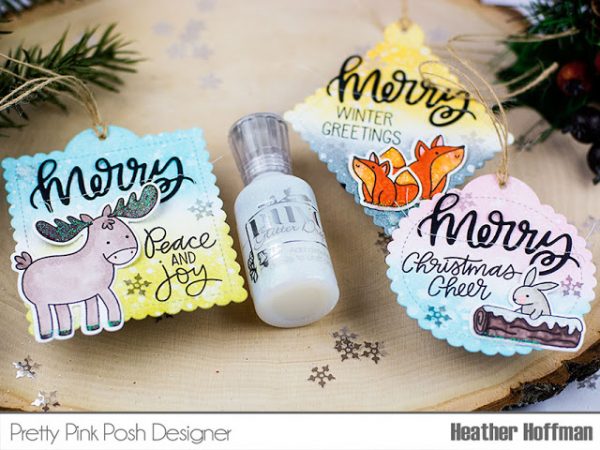
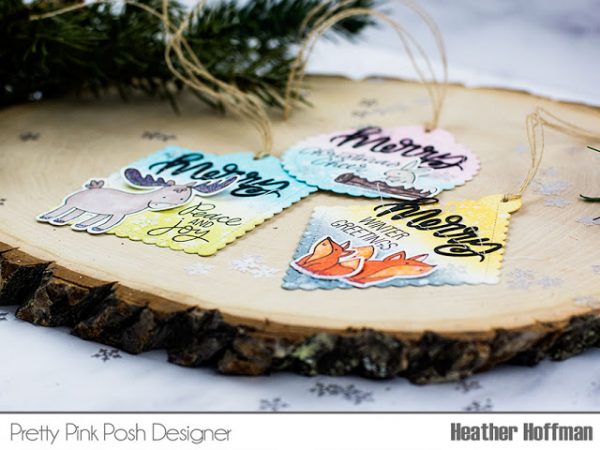
I colored in the critters using these Copic markers:
I cut all the tags from watercolor cardstock, then blended two colors of distress inks onto them.
I added some splatters of water that I mopped up with a clean dry paper towel, then I also added some white paint splatters for an even more snowy effect.
I used my sewing machine to attach the “merry” to the top, stamped my additional sentiments, then adhered my colored critters to the tags.
Punched a hole at the top of each tag and threaded through some jute twine, then used my fingers to curl up some of the edges of the animals – the antlers on the moose, the ears and tails on the foxes, and the ears on the bunny. Just a little thing to add a touch more dimension to these!
So fun to make three at once! Which one is your favorite?
Plus, more inspiration from these designers! Click photos to visit their blog posts.
Be sure to hop along and leave comments on the other designer’s blog. Each of them did such a great job with their holiday tags! We hope you were inspired by our Christmas tags!


 Plus, more inspiration from these designers! Click photos to visit their blog posts.
 I used Distress Oxide inks to create orange paper where I can cut out some of the


 Next take your box base over to your trimmer and you’re going to cut out a few rectangles. On the short side, you’re going to cut down vertically the 1 ¼” score line, all the way down to the 3” horizontal score line. Then, do the same for the 4 ¼” score line. At the bottom of your box, still on the short side. Cut up from the 1 ¼” score line again, to the 8” score line and repeat for the 4 ¼” score line. Then rotate your box 90 degrees, making sure you have the longer cut lines to the left of your trimmer and at the 3” score line, cut down to the cut you made earlier. Then, move your cardstock down, and do the same at the 8” score line. Then, flip your cardstock 180 degrees, and repeat. For the last cut, move your cardstock long ways and cut at the 4” score line, to the score line of the long cut you made earlier, flip the cardstock around 180 degrees again and repeat. This will be the base for your box all ready to go. If it’s easier for you, you can use scissors – but I personally liked using the trimmer, especially with a wire guide. Also – this will be explained and shown in the