
Tutorial: DIY Candy Treat Boxes
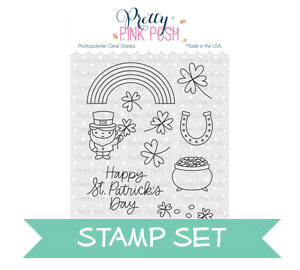
Hi friends, Eloise here and today I have some St Patrick’s Day little gift boxes to share with you all. These would be perfect for little gifts for co-workers or even children, just a little gift to give someone to give them a little luck and a sweet treat, or whatever you decide to put in them. I’ll be using the Best of Luck stamp set to help theme these DIY gift boxes.
 Next take your box base over to your trimmer and you’re going to cut out a few rectangles. On the short side, you’re going to cut down vertically the 1 ¼” score line, all the way down to the 3” horizontal score line. Then, do the same for the 4 ¼” score line. At the bottom of your box, still on the short side. Cut up from the 1 ¼” score line again, to the 8” score line and repeat for the 4 ¼” score line. Then rotate your box 90 degrees, making sure you have the longer cut lines to the left of your trimmer and at the 3” score line, cut down to the cut you made earlier. Then, move your cardstock down, and do the same at the 8” score line. Then, flip your cardstock 180 degrees, and repeat. For the last cut, move your cardstock long ways and cut at the 4” score line, to the score line of the long cut you made earlier, flip the cardstock around 180 degrees again and repeat. This will be the base for your box all ready to go. If it’s easier for you, you can use scissors – but I personally liked using the trimmer, especially with a wire guide. Also – this will be explained and shown in the video so if you’re a visual learner, check that out above!

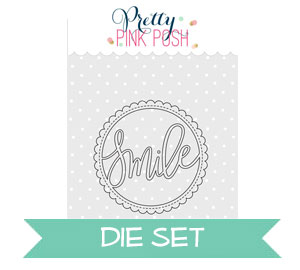
Now that my boxes were all ready before I moved onto anything else, I flipped it over to the front of the box, and ink blended some Lucky Clover Distress Ink at the bottom of which will be the top of the box, just to give my box a little gradient of colour. I repeated this for all four boxes, then turned over my box so it’s the inside and then stamped ‘Happy St. Patricks Day’ on the inside at the top with black ink on all four boxes as well. Then, I used my bone folder and scored along all the edges. I then set my boxes off to the side and worked on the decorations. I stamped out all my images from Best of Luck onto some white cardstock and used my Copic Markers to colour them all in. I then used the coordinating dies and cut them all out. While I was die cutting, I used the Smile Shaker Die and cut that out four times of white cardstock also. Since I just wanted the frames I used an exacto knife and cut away the ‘Smile’ word. Now I have all my frames, I can decorate my boxes.

Copic Colours Used: R14, R24, R29 / Y21, YR12, YR18 / Y11, Y15, Y38 / YG21, YG23, YG17 / B000, B41, B34 / Y21, YR21, YR24 / YR24, E99, E07 / RV10 / C3, C5, C7 / E000, E00, E21
To finish up my boxes, I first punched a hole at the top flap, and punched two smaller holes on the ½” flap. This will be for the string. Then, I used foam squares around the circle frames and adhered them to the front flaps of my boxes. I also added foam tape to my images and adhered them in place also. I then opened the box and adhered the four leaf lover images around the sentiment. For the little gift inside the boxes, I adhered four green foiled heart chocolates on the inside to create a four leaf clover, it’s super cute! To finish up the boxes, I folded in all the sides, added green twine into the punched holes and tied a bow to hold the top and bottom of the box together. Then for the sides, I added small strips of adhesive on each of the ¼” flaps and adhered them to the top of the box.

So that finished up my DIY gift boxes project today. I hope you enjoyed! These little boxes are super cute and easy to make with a half sheet of cardstock and can be decorated with any occasioned stamps. These would be perfect for small gifts as well.
Thank you so much for stopping by today and I’ll catch you all next time.
That’s a wonderful gift idea :)
Sweet box and cute stamp and front of the box. I love the candy shaped like a shamrock. Cute.
I love this stamp set. Eloise your treat boxes are just sweet.
Love this fun St. Pat’s treat box…super cute!!!