For this card, I first assembled the box card in white cardstock. The panels and grass inserts are ink blended with Distress Oxide Inks in Mustard Seed, Peeled Paint, and Tumbled Glass.
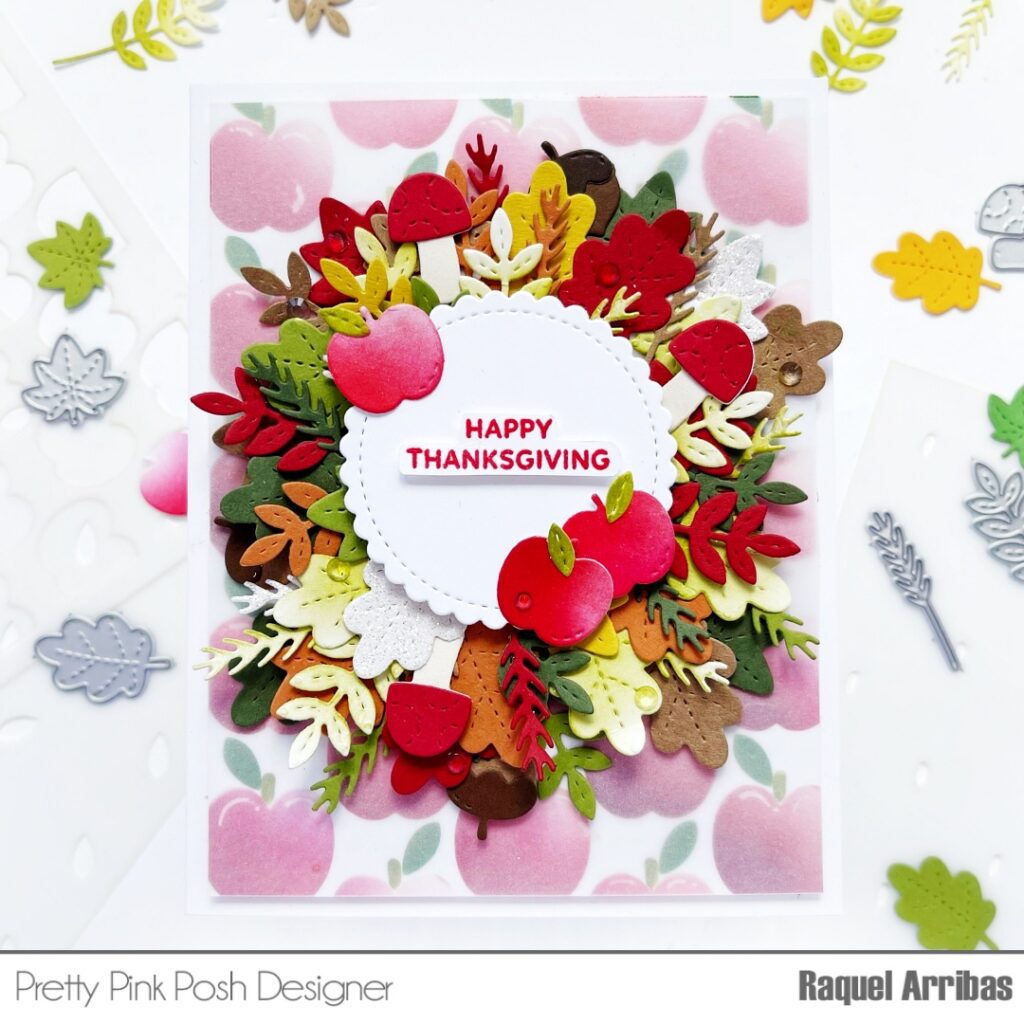
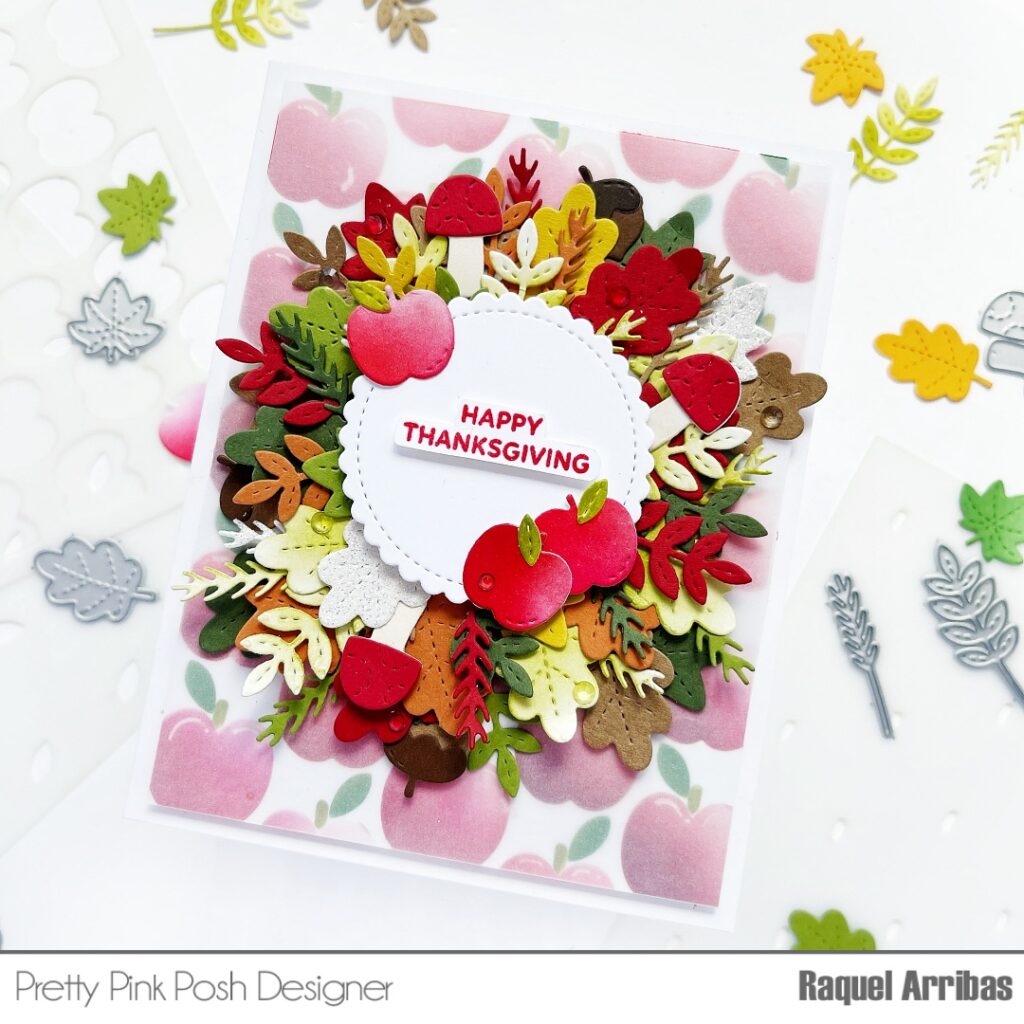
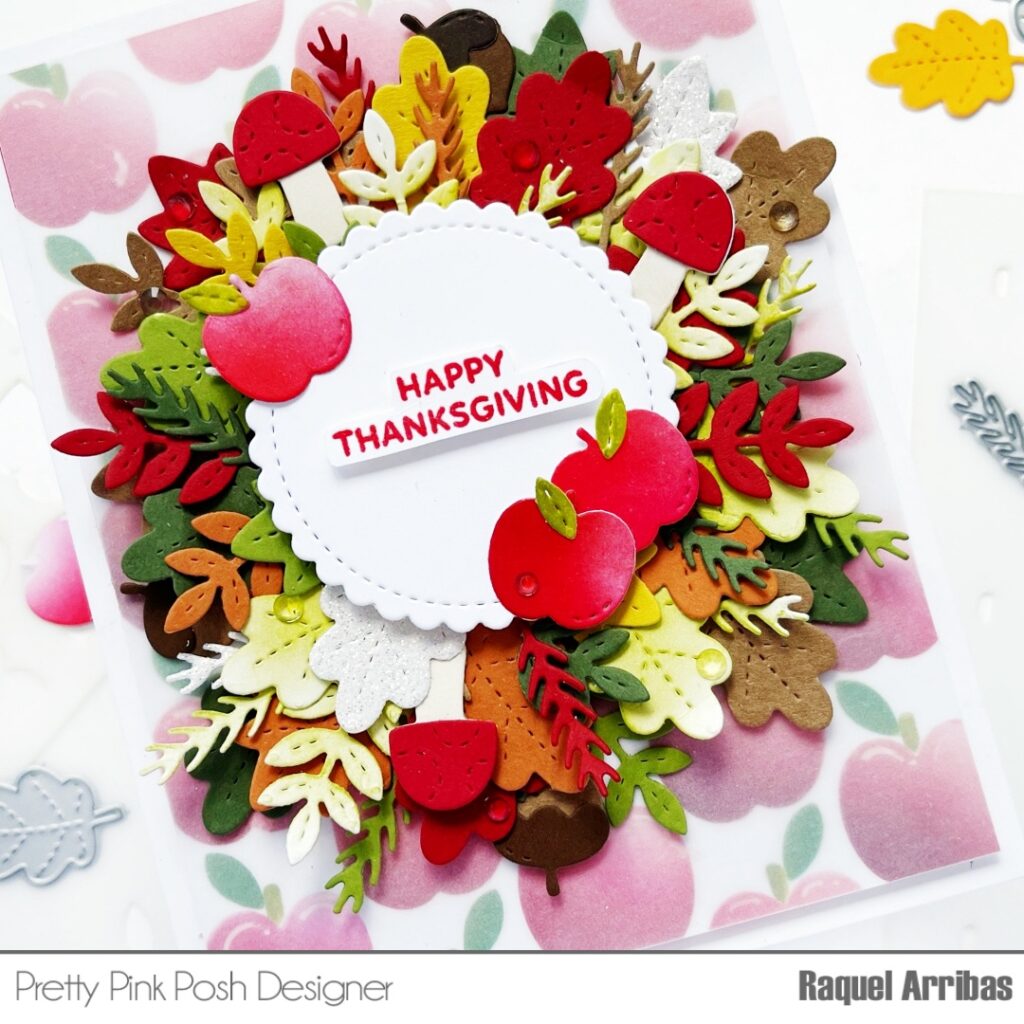
Hello crafty friends, Raquel here today! I want to share a colorful project I made using the recently released Layered Apples Stencil.
I must admit, I felt in love with all the layered stencils from this release. They are simply perfect to create colorful designs in no time. I particularly love the process of choosing colors, mixing and matching and lifting the stencil for the final reveal!
I wanted to create a monochromatic background with red and pink apples. I used Moroccan Spice, Fire Coral and Poppin’ Pink ins from MFT.
First, I applied Moroccan Spice on the left-hand side of each apple. I went in a diagonal order to save some time. Then I applied Fire coral and Poppin’ Pink making sure I left a small spot white so I could have some high lights on the apples.
Next up I colored the leaves and the small stem using Jalapeño Popper and Vintage Photo Distress Ink. Once my background was ready I decided to use and A2 size piece of vellum onto the background to create a wreath.
I used the Valentine Circles coordinating die as the center of my wreath. Then I stamped the Happy Thanksgiving sentiment and foam mounted it in the center. I used several dies from the Fall Basket set to create my wreath in different colors and arranged them all around the circle:
I hope this card inspires you to create with these fun, unique and gorgeous products! Thank you so much for stopping by!
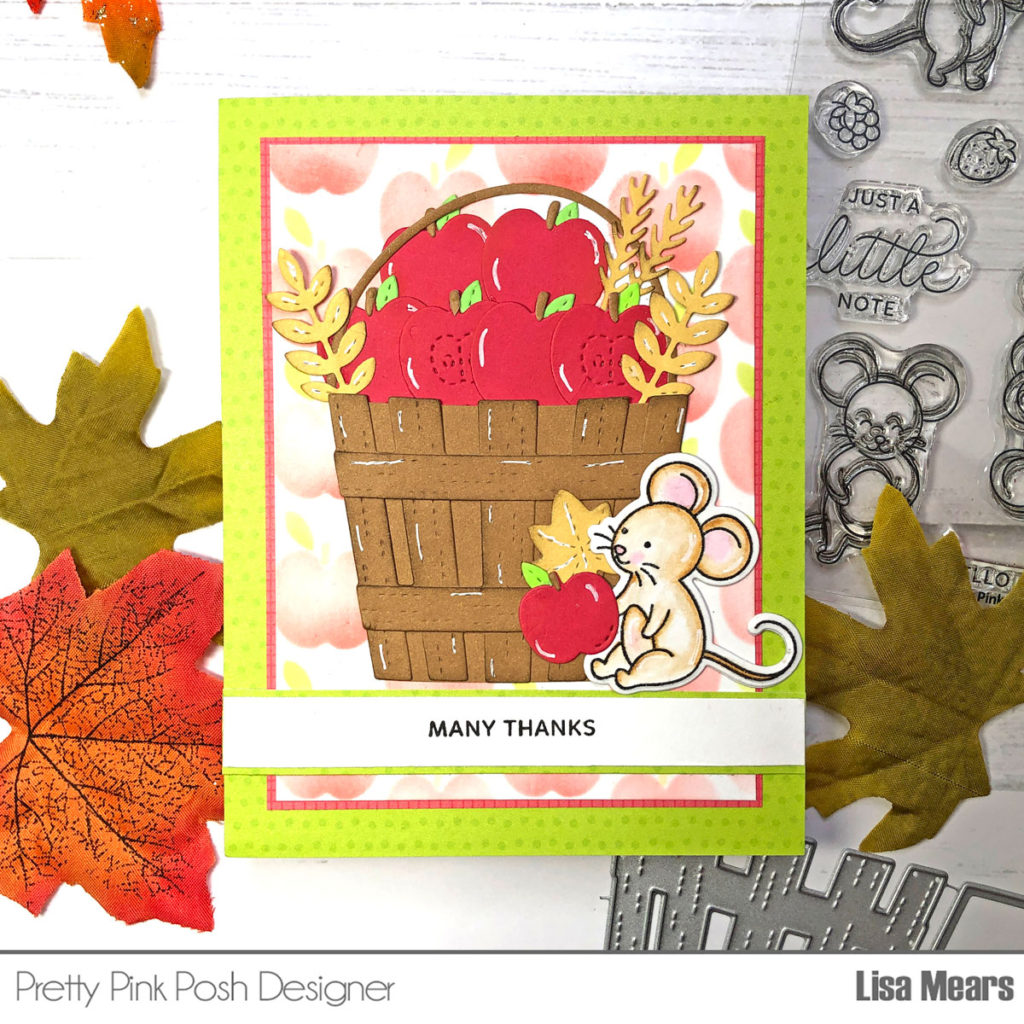
First, I worked on my card background by adding Candied Apple Distress Oxide ink to Layer A of theLayered Apples stencil. I used a light hand to add the ink to get a lighter color for my apples. For Layer B of the stencil, I used Twisted Citron Distress Oxide ink. This added the leaves to my apples. Next, I used Layer C of the stencil and added Antique Linen Distress Oxide ink which gave me the apple stems.
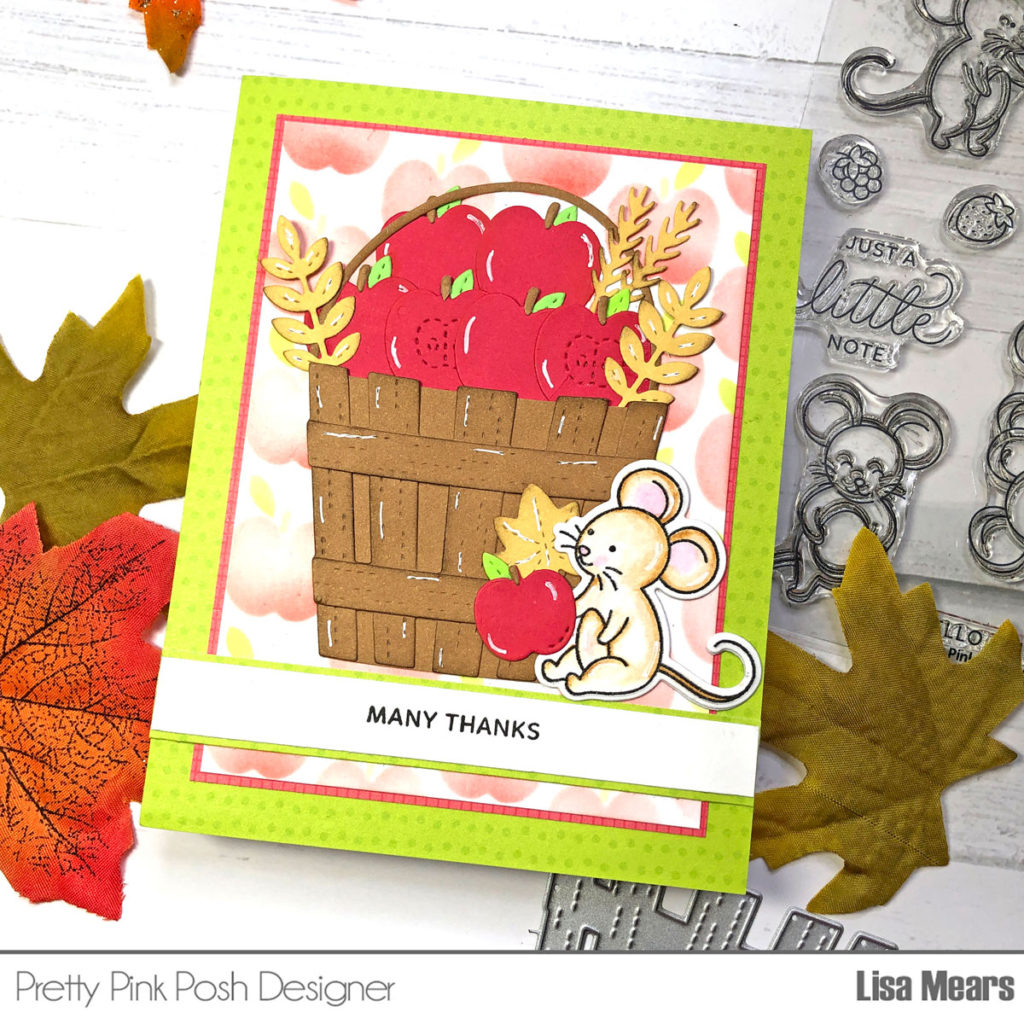
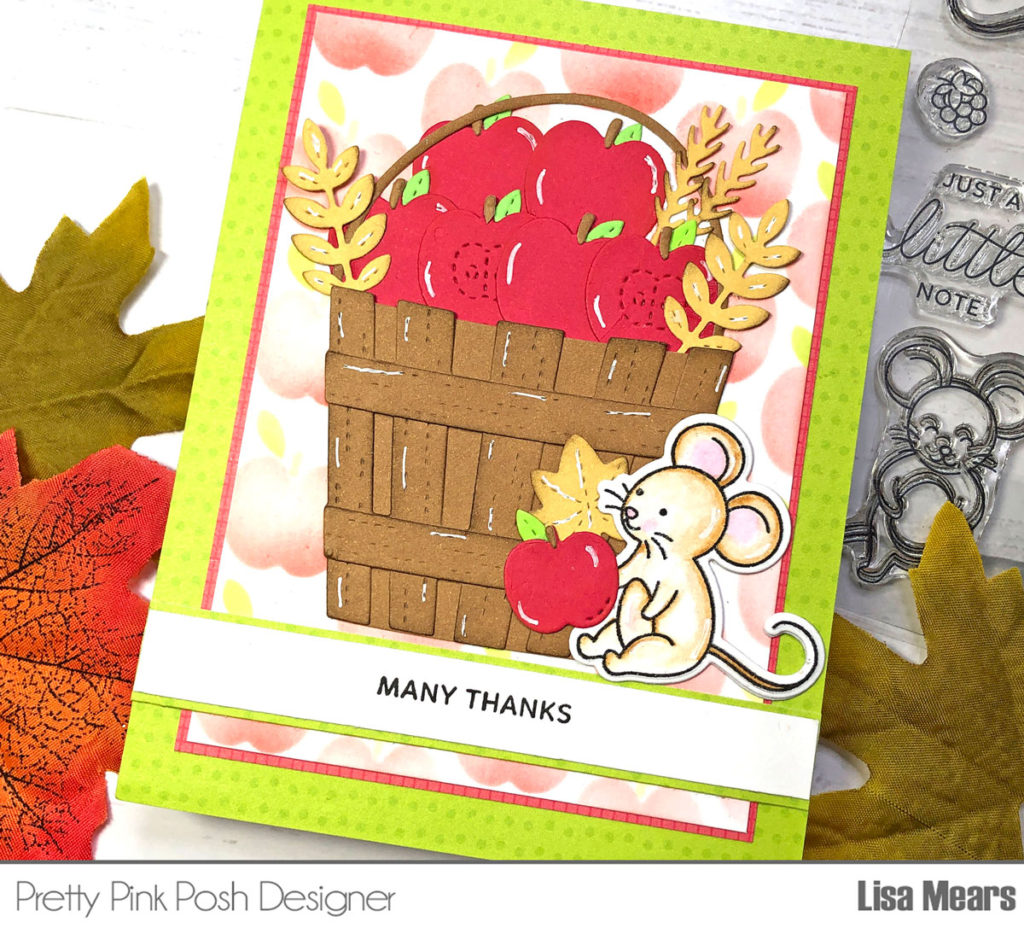
I colored a mouse from the Mouse Friends stamp set using Zig Clean Color Real Brush pens in the following colors: Mustard, Sugar Almond Pink, and the Blender.
I used pattern paper for the layering pieces of my card and added the stenciled apple layer on top. I added the basket dies, arranged the apples in the basket, and added some leaves. Finally, I added the mouse with an apple in its hand.
Thank you so much for stopping by today. Have a wonderful day!
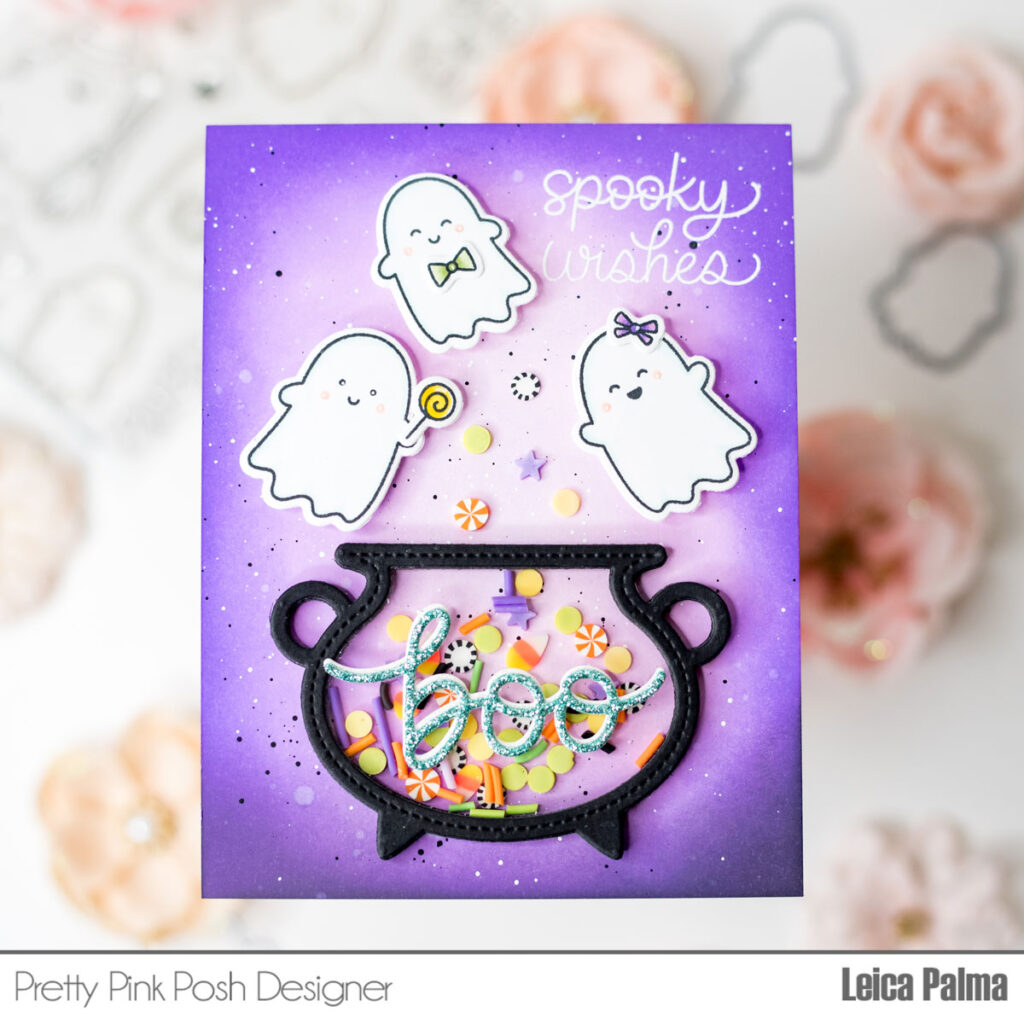
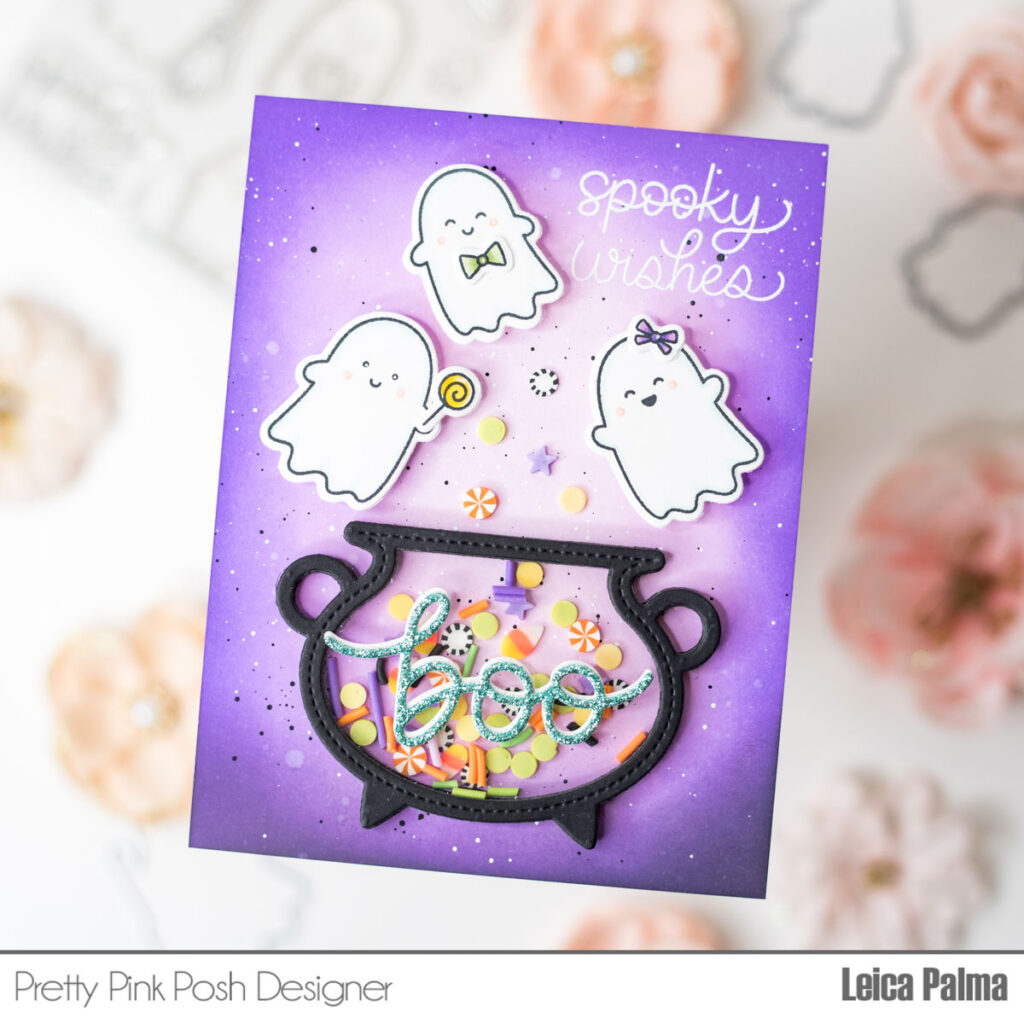
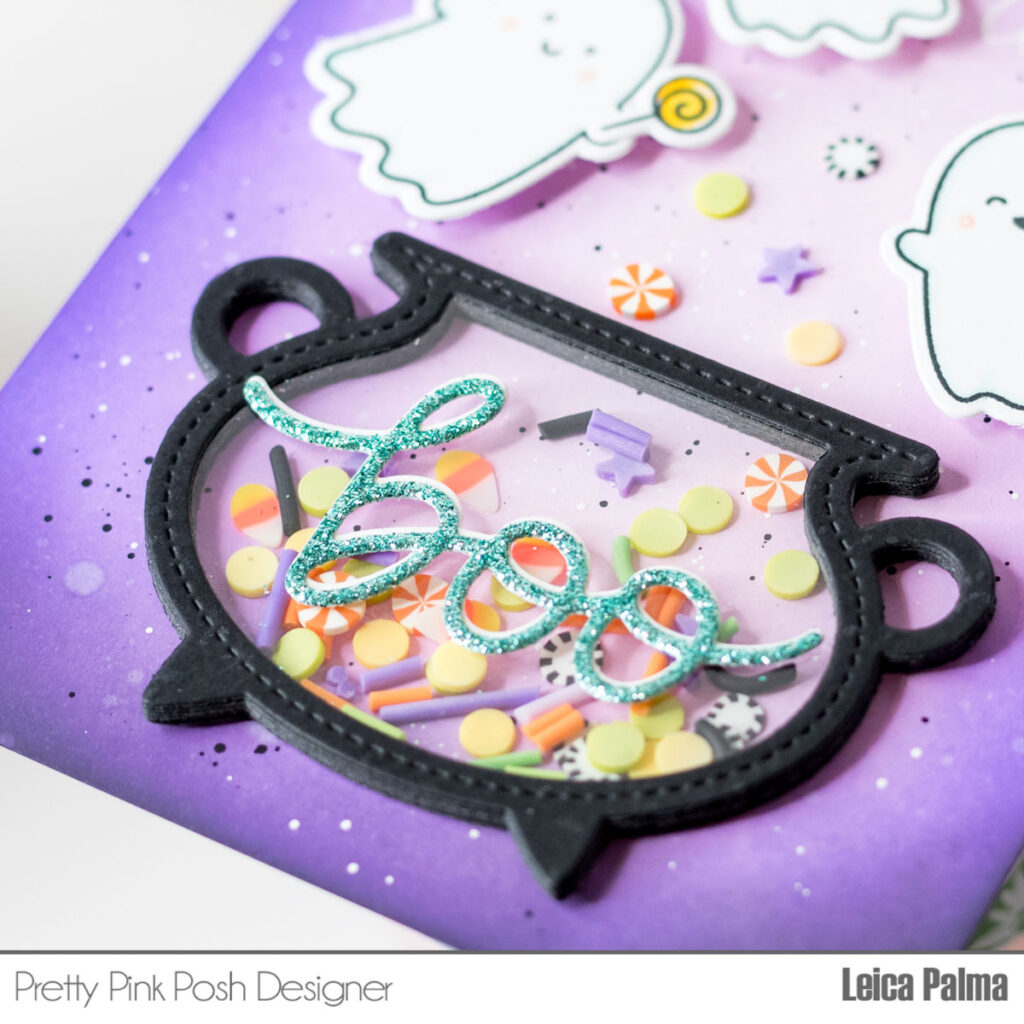
Hello crafty friends! It’s Leica here with a Halloween card, featuring the Ghost Friends stamp set. If you’re not into the scary Halloween stuff (like I am), you’re gonna love these adorable friendly ghosts! The best part is there is not a lot of coloring involved. Let’s get started!
I first cut an A2-sized panel in white cardstock and ink blended the border with Wilted Violet Distress Oxide Ink, Milled Lavender in the center, and Black Soot on the bottom. I splattered black and white acrylic paint for interest. I then white heat embossed the sentiment on the top right corner of the card panel.
Next, I stamped, colored, and cut the ghosts from the Ghost Friends stamp set. I then cut the Cauldron Shaker in black cardstock. I cut a few and stack them together to make a well for the shaker element. For the shaker bits, I used a combination of clay confetti – Monster Mash Mix and Halloween Party Mix.
I then cut the Boo Script in teal glitter cardstock and another one in white for a shadow effect. I glued the cauldron shaker, foam mounted the ghosts, and also adhered some clay confettis on the card panel. Lastly, I adhered the panel onto an A2-sized card base.
I hope that you enjoyed today’s card share! Thanks so much for stopping by!
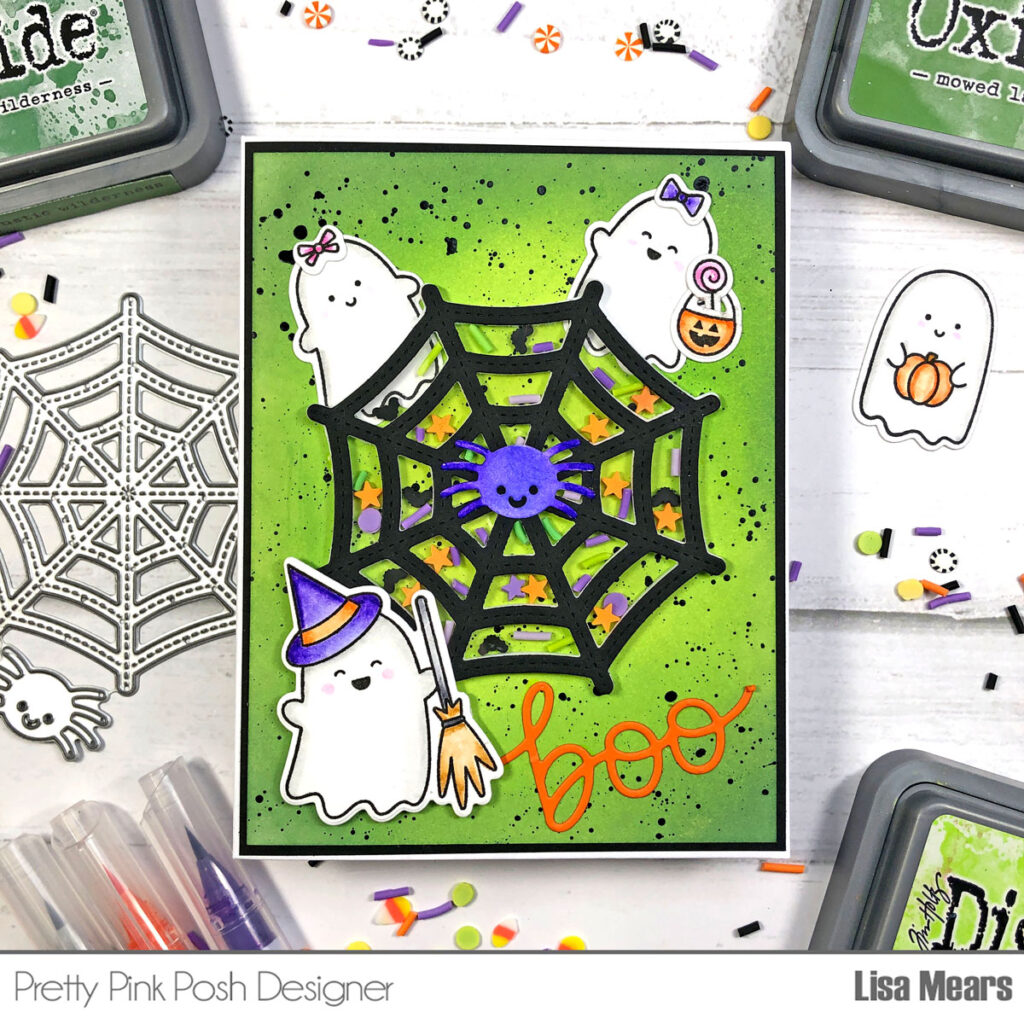
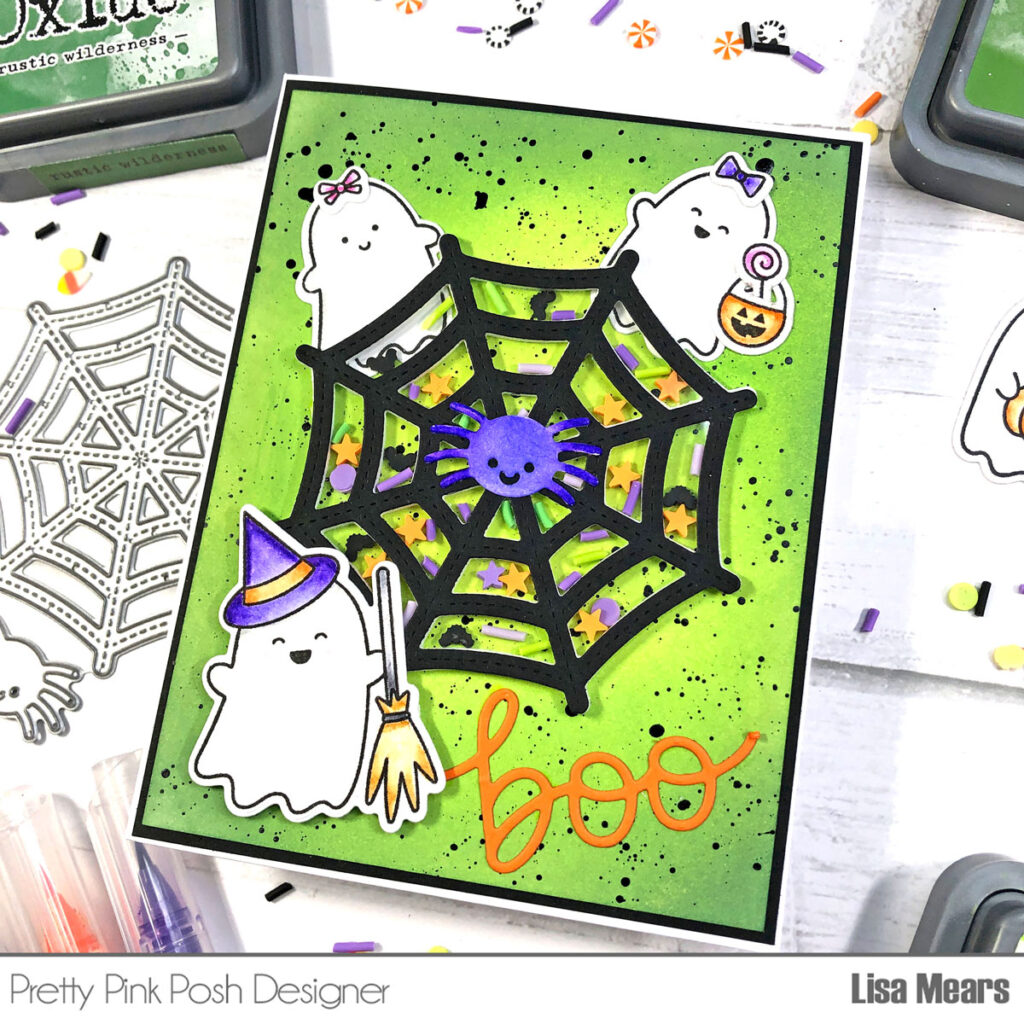
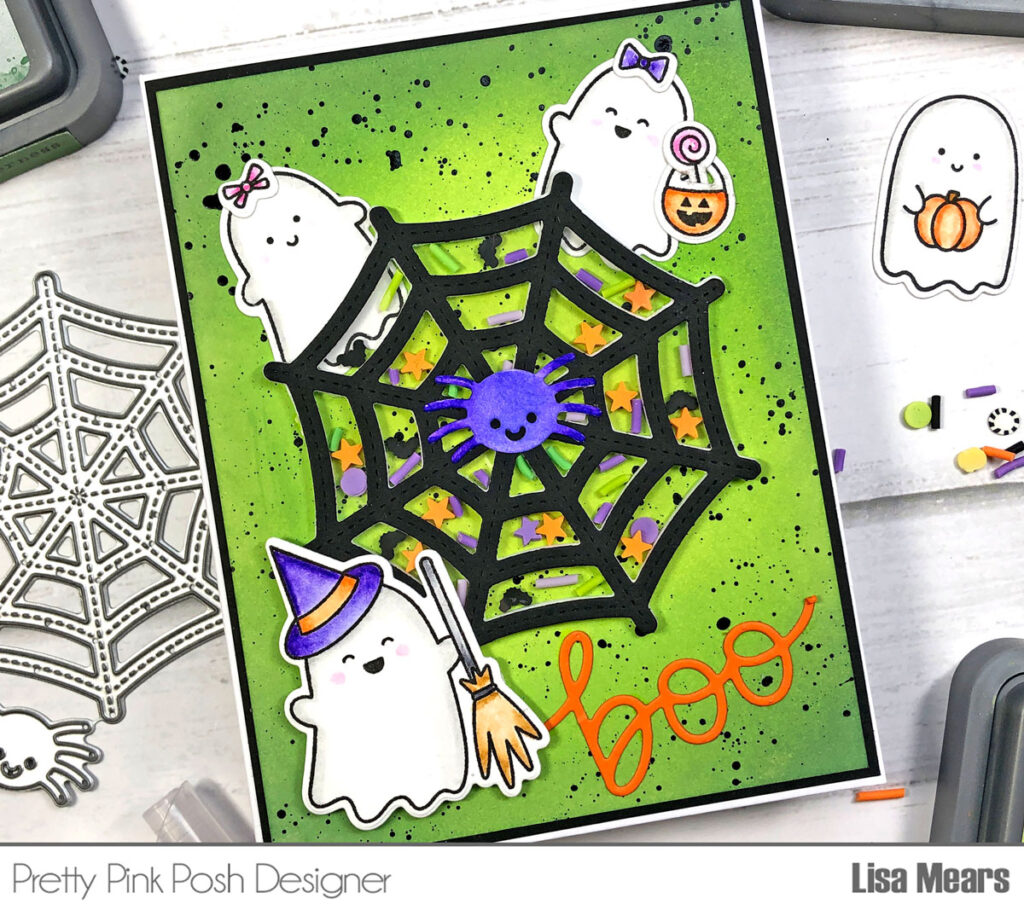
Hi crafty friends. It’s Lisa Mears here. I’m back with a Halloween shaker card featuring the Spider Web die set and some other fun Halloween sets from Pretty Pink Posh.
For the card background, I cut a piece of white cardstock to 4″ x 5 1/4″. I inked the cardstock with Distress Oxide inks. I used Twisted Citron in the center, followed by Mowed Lawn, and then Rustic Wilderness along the outside edges. Next, I mixed some black acrylic paint with water to thin it out and then flicked some of the paint onto the background. I set this aside to dry.
Next, I stamped the ghosts from the Ghost Friends stamp set and colored them with Zig Clean Color Real Brush Pens. The colors I used are as follows:
Ghosts – Light Gray/Blender (body), Sugar Almond Pink (cheeks) Hat – Deep Violet, Violet, English Lavender Hat Stripe – Orange, Blender Pumpkin – Orange, Blender Broom – Beige, Gray, Blender Lollypop – Sugar Almond Pink, Peach Pink Bow – Violet, English Lavender Bow – Peach Pink, Blender
I die cut the spider web with double-sided adhesive foam. I placed the spider web foam piece in the center of the card layer making sure to add two ghosts slightly behind the spider web foam piece before fully adhering it to the card.
I also die cut the Spider Web Die with black cardstock and glued it to a piece of acetate. I cut the acetate along the outside edges of the black spider web until all of the excess acetate was removed from the spider web. I set this piece aside and then filled the spider web foam piece with the Spooky Night Clay Confetti and the Monster Mash Clay Confetti. Once the spider web was filled with confetti, I glued the black spider web acetate piece to the top of the spider web foam piece to enclose all of the shaker pieces. Be sure to watch my video to see this process in action.
I added die cut the spider from the die that comes with the spider web die and colored it with Violet and English Lavender Zig Clean Color Real Brush Pens. I added the spider to the center of the web.
I added the sentiment “boo” from the Boo Script die set and then added this card layer to a piece of black cardstock that measures 4 1/8″ x 5 3/8″. I added the final layer to an A2 size card base.
Thank you so much for stopping by today. Have a bootiful day!
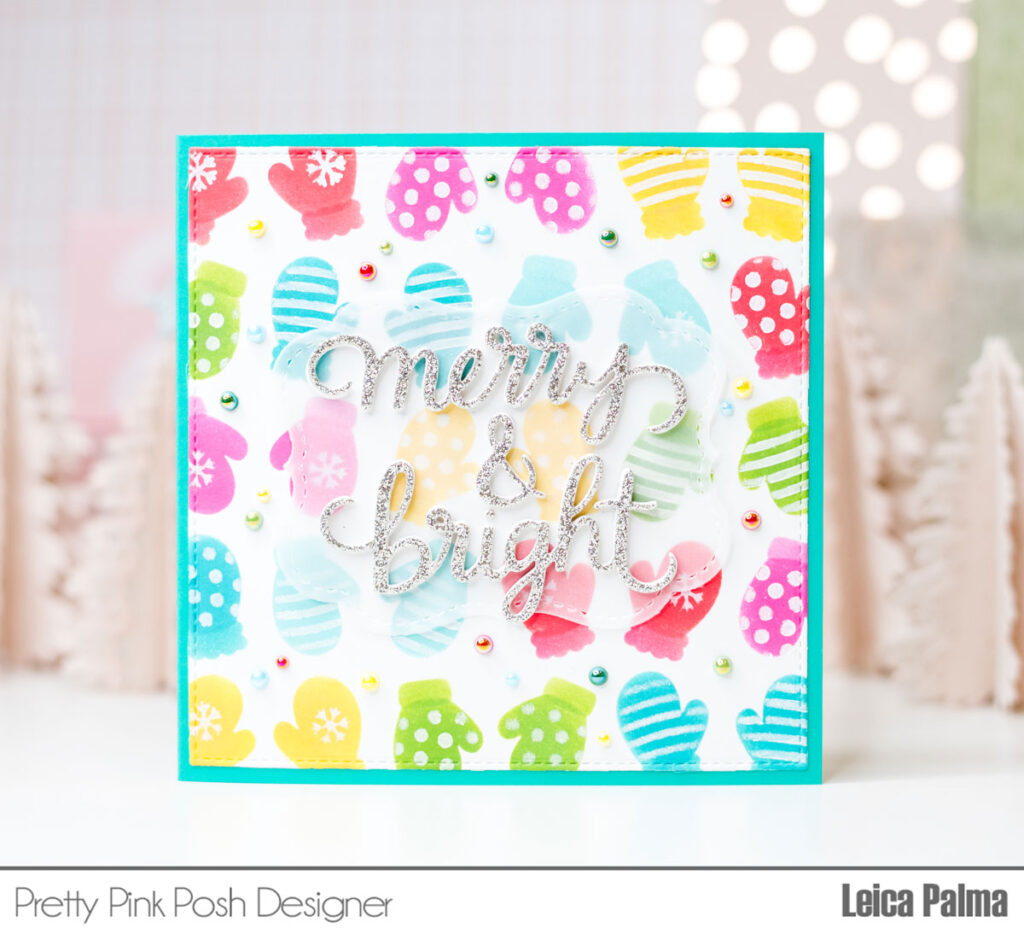
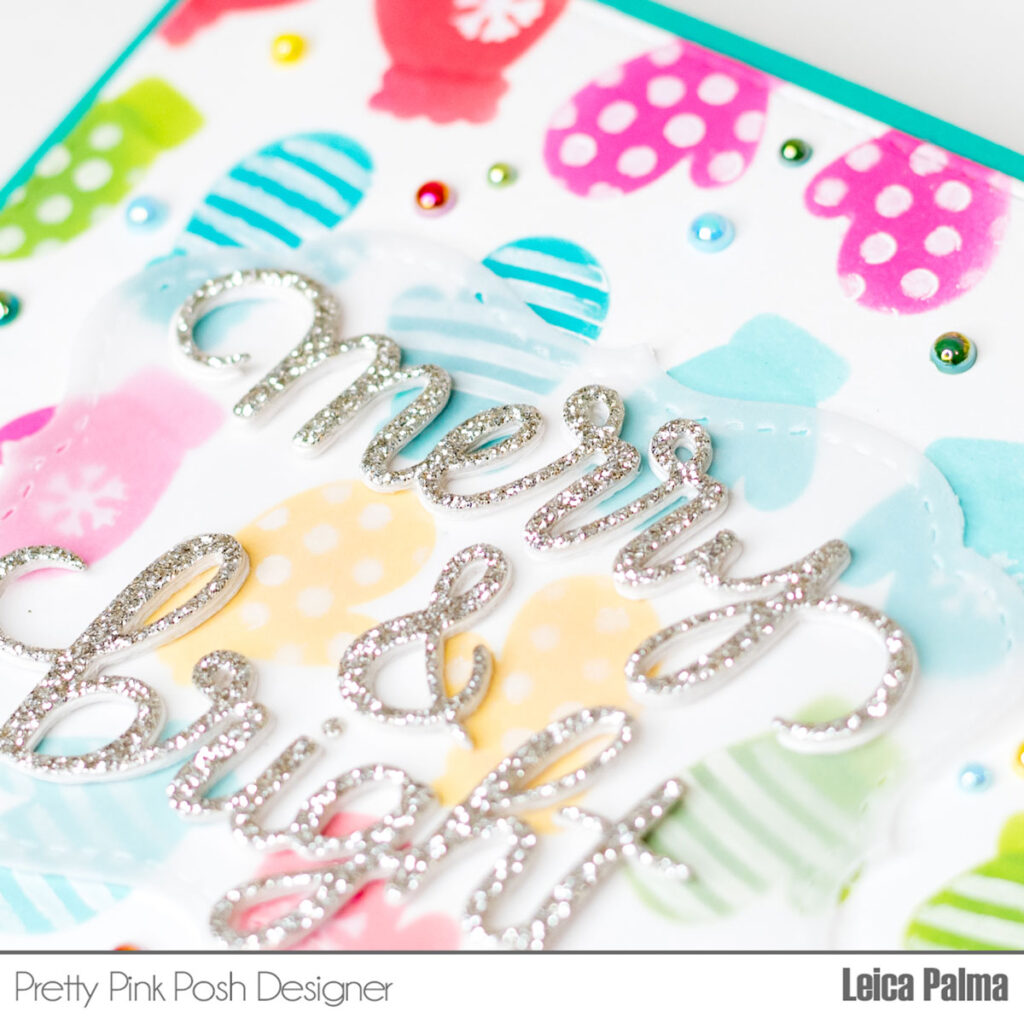
Hello and welcome to the PPP blog. It’s Leica here today with a merry and bright Christmas card. I went for a colorful and fun vibe for this card to match the sentiment and I love the way it turned out.
To begin, I cut a panel in white cardstock and inked blended through the A layer of the Layered Mittens Stencils with Distress Oxide Inks in Festive Berries, Fossilized Amber, Mowed Lawn Peacock Feathers, Picked Raspberry, and Salvaged Patina. With a lighter hand, I ink blended through Layer B in the same colors mentioned above. For the last layer, I used white ink.
The stencils measure 6×6 inches and I usually start with a larger panel (6.25 square) and cut it down after ink blending through all the stencil layers.
I ended up cutting the panel to 5” square and glued it onto a teal colored card base. I also added a 5” square white cardstock inside the card since the card base is a dark color.
I then cut the Merry and Bright Script in silver glitter cardstock and 4 times in white cardstock. I stacked them up for dimension (except for the tittles because it’s too small) and glued it onto a sheet of vellum before gluing it onto the card panel. Lastly, I added some pearls to make the card even more merrier!
That’s all for this fun Christmas card. I hope that you’ve enjoyed today’s card share and that I’ve inspired you to create a merry and bright card!
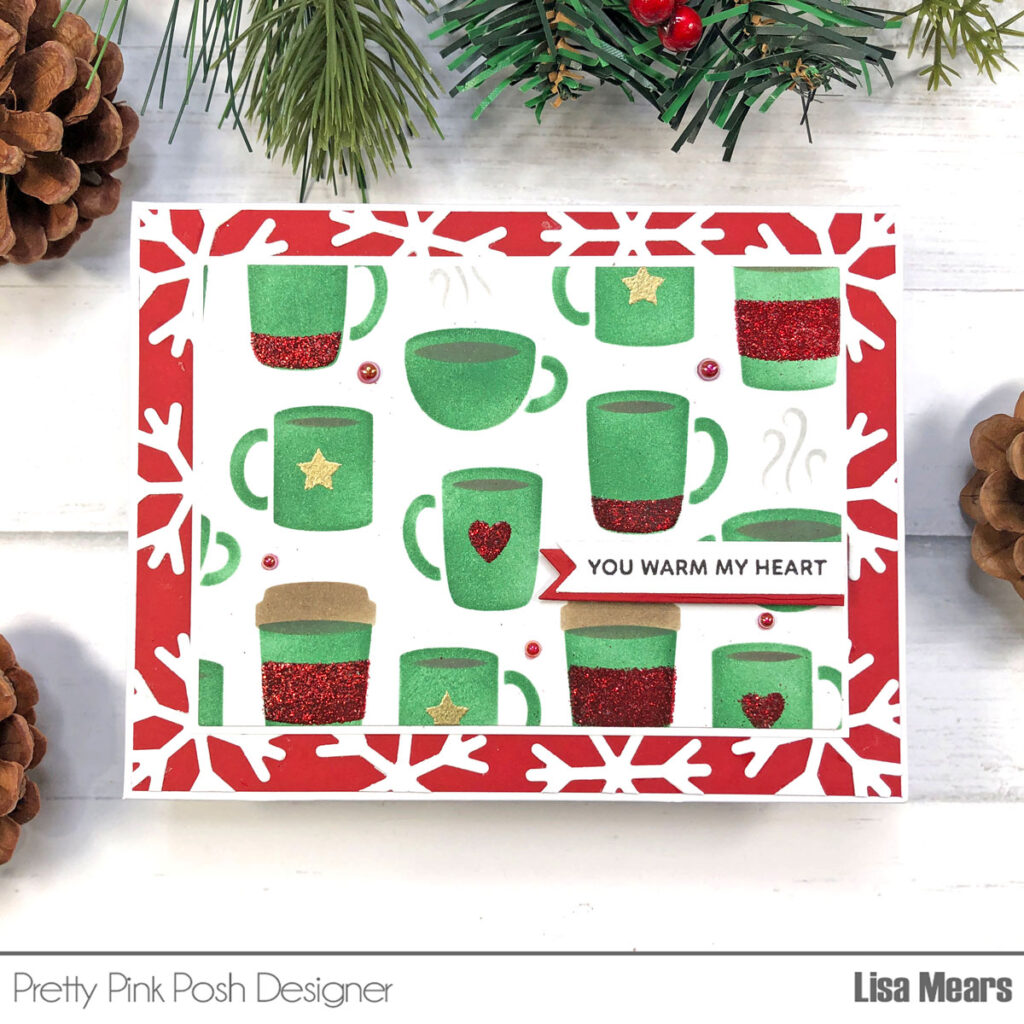
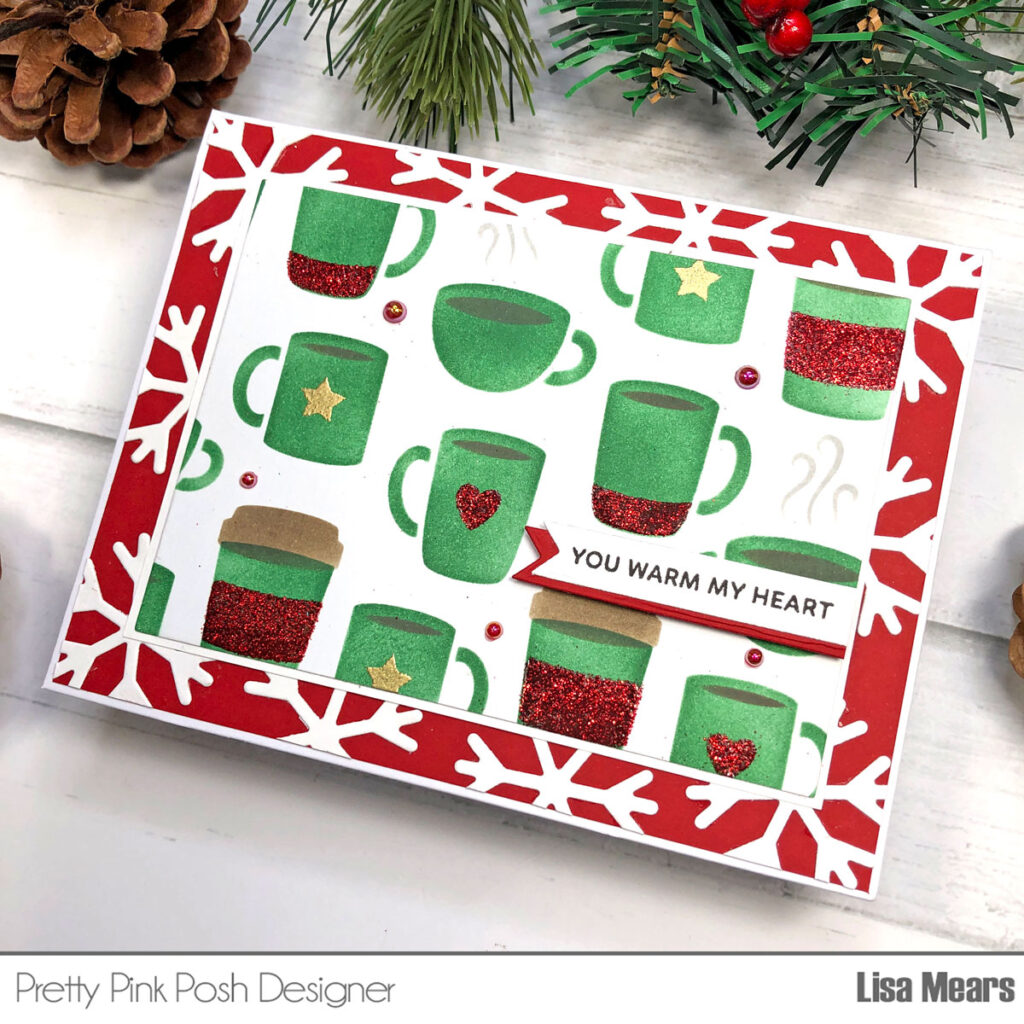
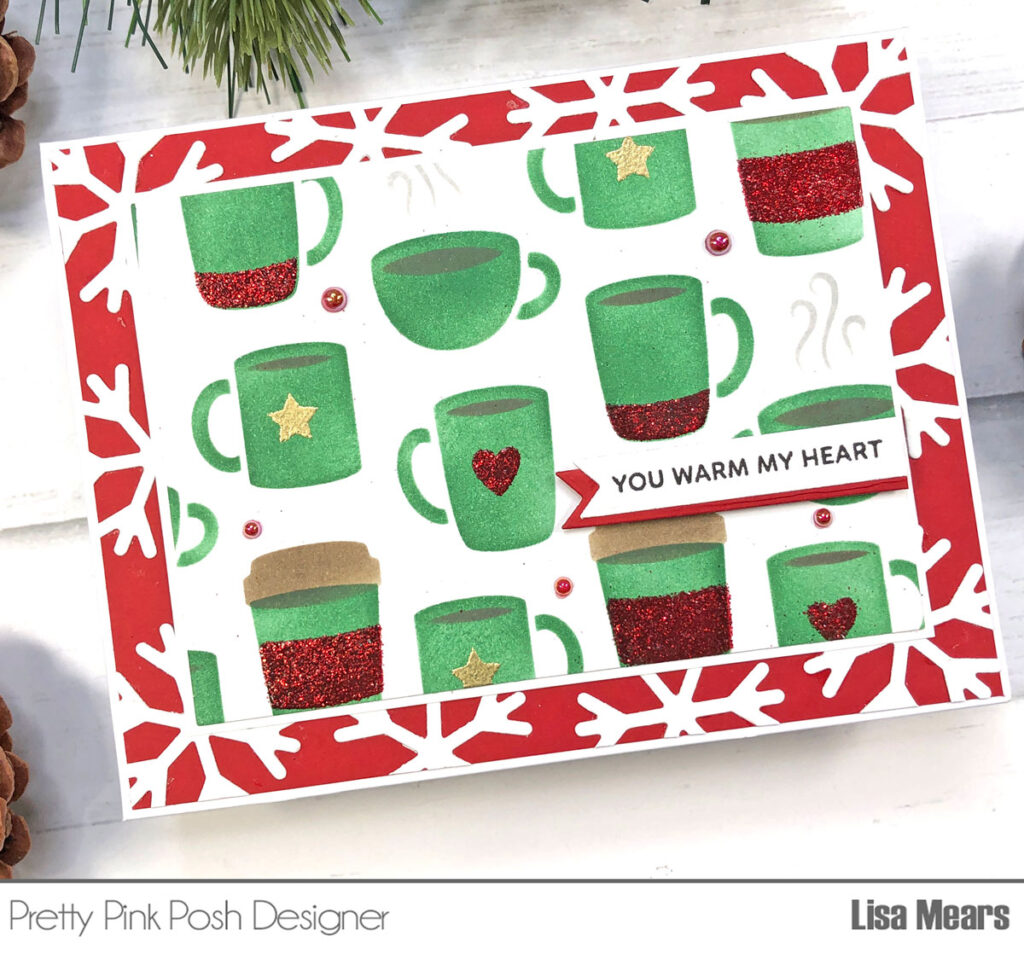
Hi crafty friends, Lisa Mears here. For my card today, I used some stepped-up stenciling techniques to add sparkle and shine to a stenciled card. Today I’ll be using the new Layered Coffee Cups stencil.
I used the Layered Coffee Cups Stencil. I inked Layer A using a green ink for the shape of the coffee cups. I inked Layer B with a brown ink to everything except for the coffee cup sleeve. I added Versamark ink for the coffee cup sleeve and then I sprinkle red embossing powder over the sleeves of the coffee cups and heat set them.
For Layer C, I inked the coffee steam with a light gray ink. Next, I added Versarmark ink to the hearts and bottom of the coffee mugs. I use red embossing powder to cover these areas and then heat set them. Next, I reapplied stencil Layer C, adding Versamark ink to the stars followed by a gold embossing powder and then heat set them. I just love the look of the embossing powder on the stenciled background. It adds such a pretty shine to the stenciled background. I used a rectangle die to cut the coffee cup background and added it to a piece of white cardstock.
Using the snowflake die from the Mitten Shaker die set, I die cut 10 white snowflakes and glued them around the outside edge of a piece of red cardstock. I added the coffee cup layer to the top of the red snowflake paper.
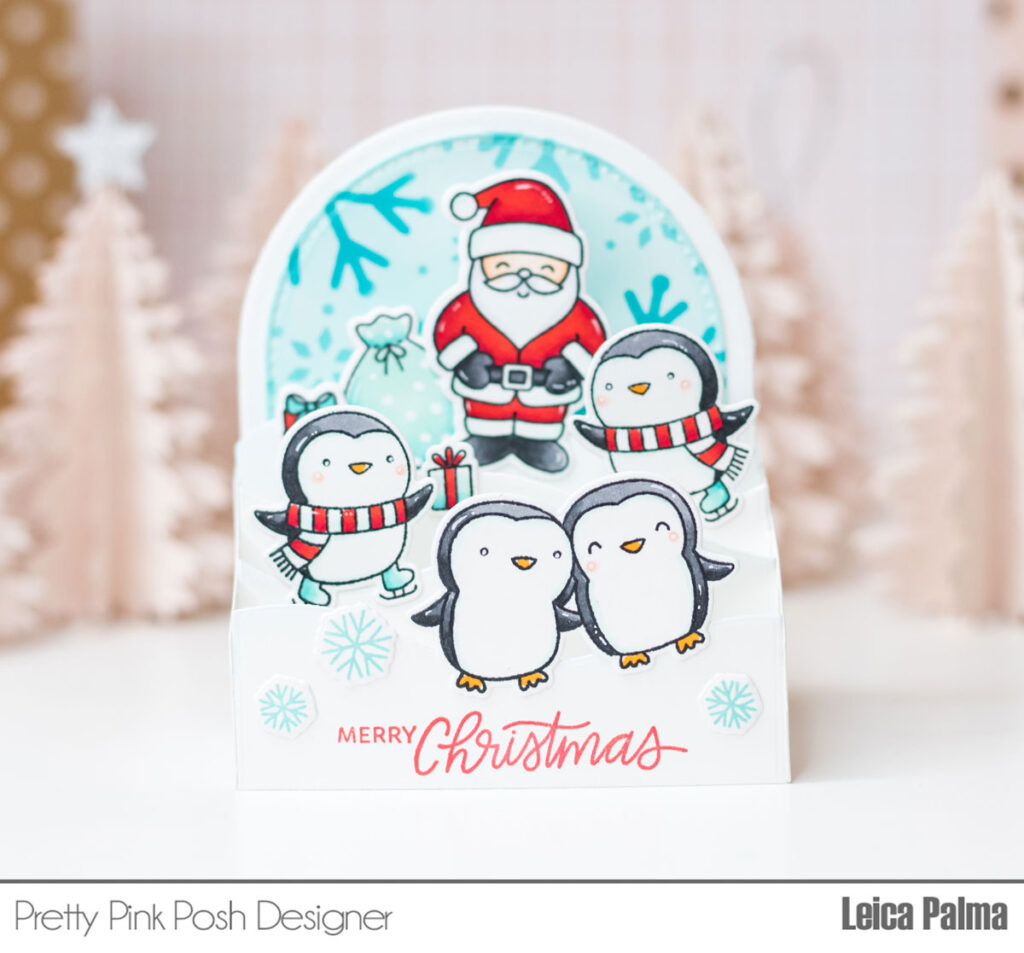
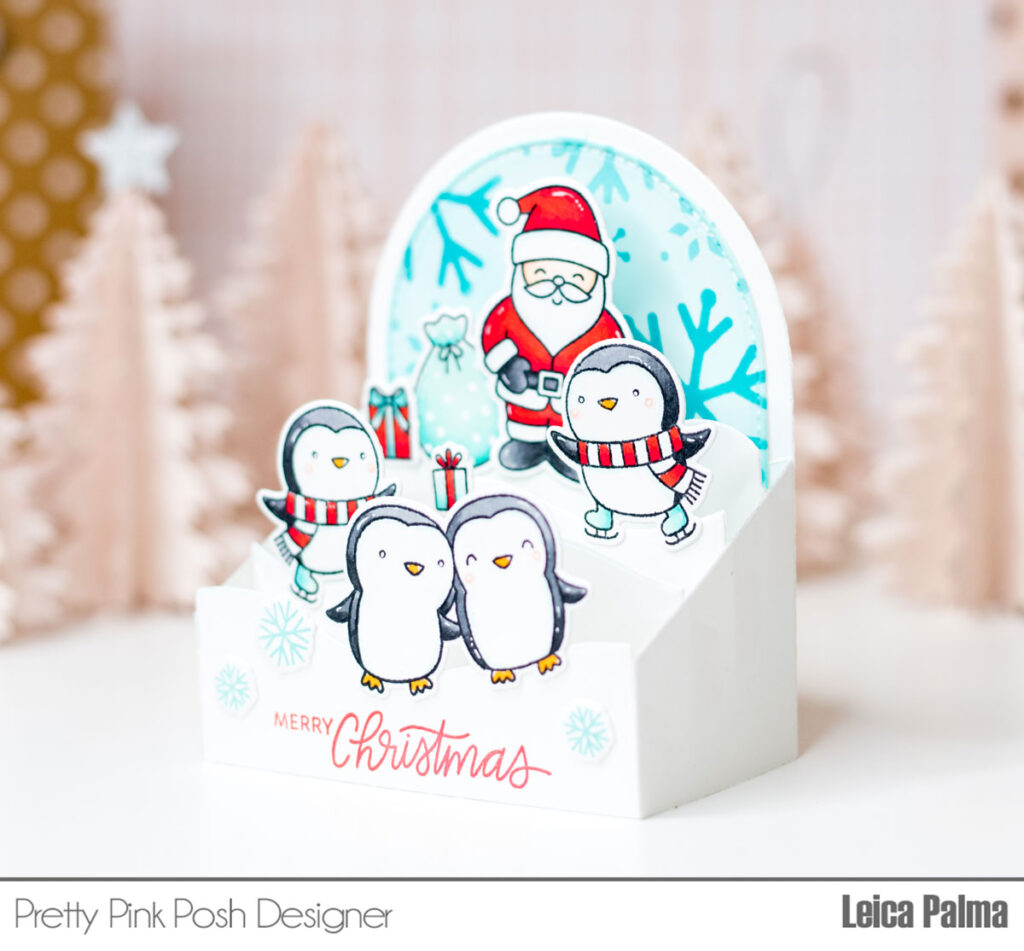
Hello friends! It’s Leica here today and I am sharing a fun Christmas box card. For this card, I used the new Happy Santastamp set and also added the cutest penguins from the previously-released Penguin Pals stamp set.
I first assembled the box card in white cardstock and added snow drifts as inserts. For the background panel, I ink blended through the Layered SnowflakesStencilsin Peacock Feathers and Salvaged Patina Distress Oxide Inks. Using the same brush, I lightly ink blended on the panel to have a colored background.
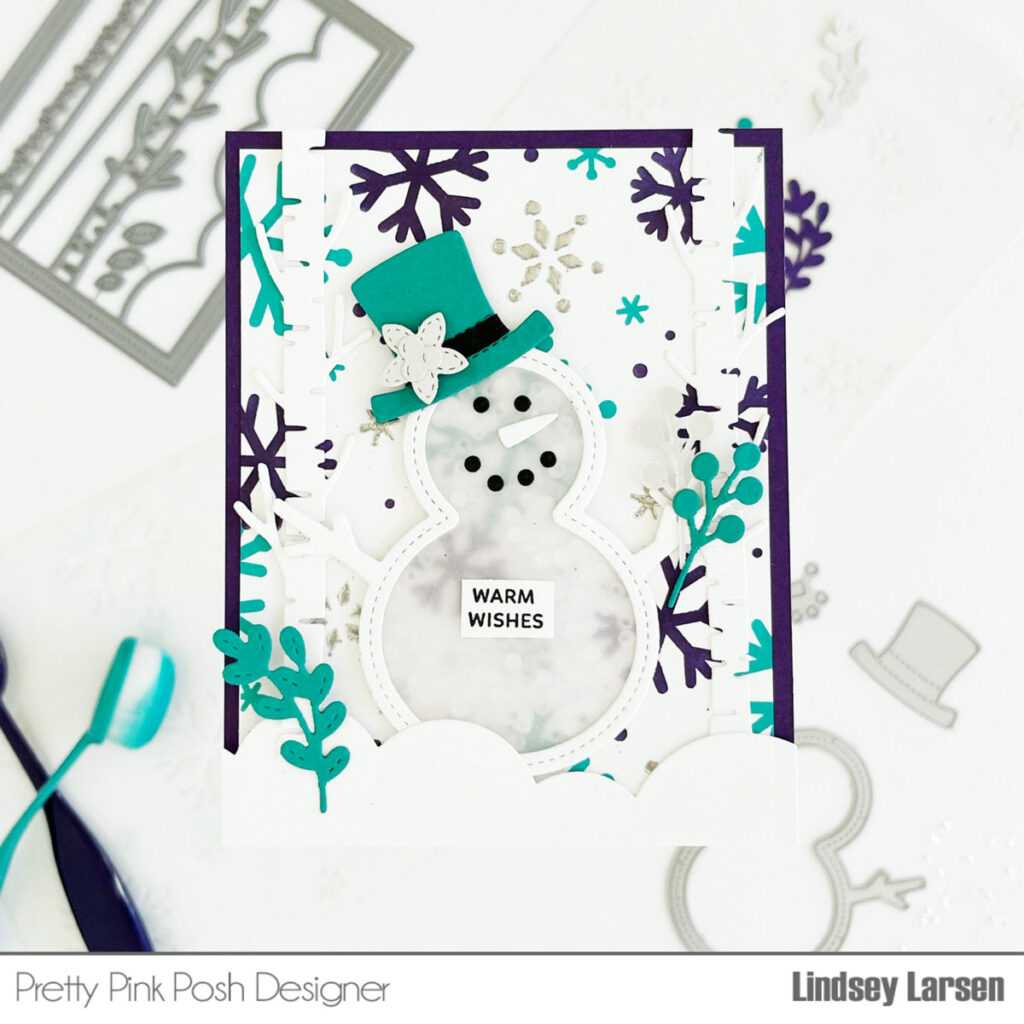
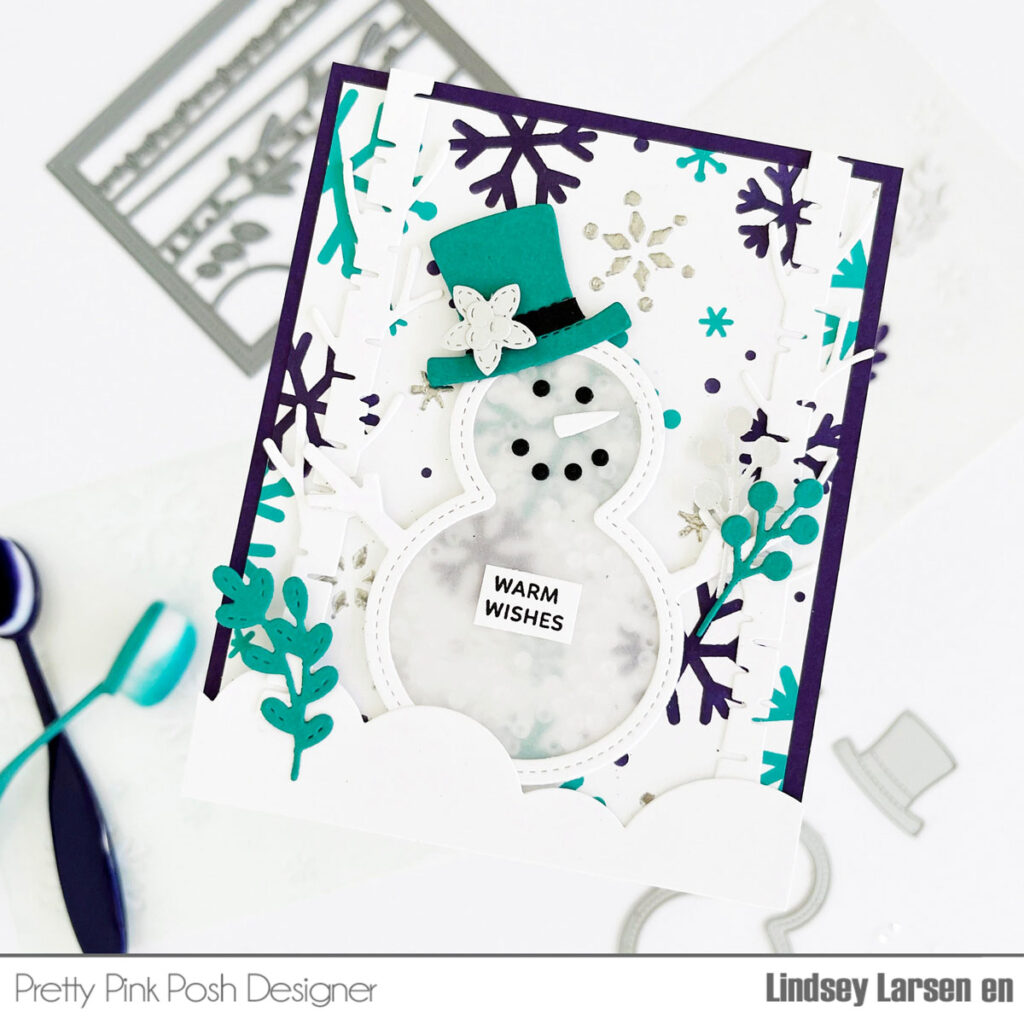
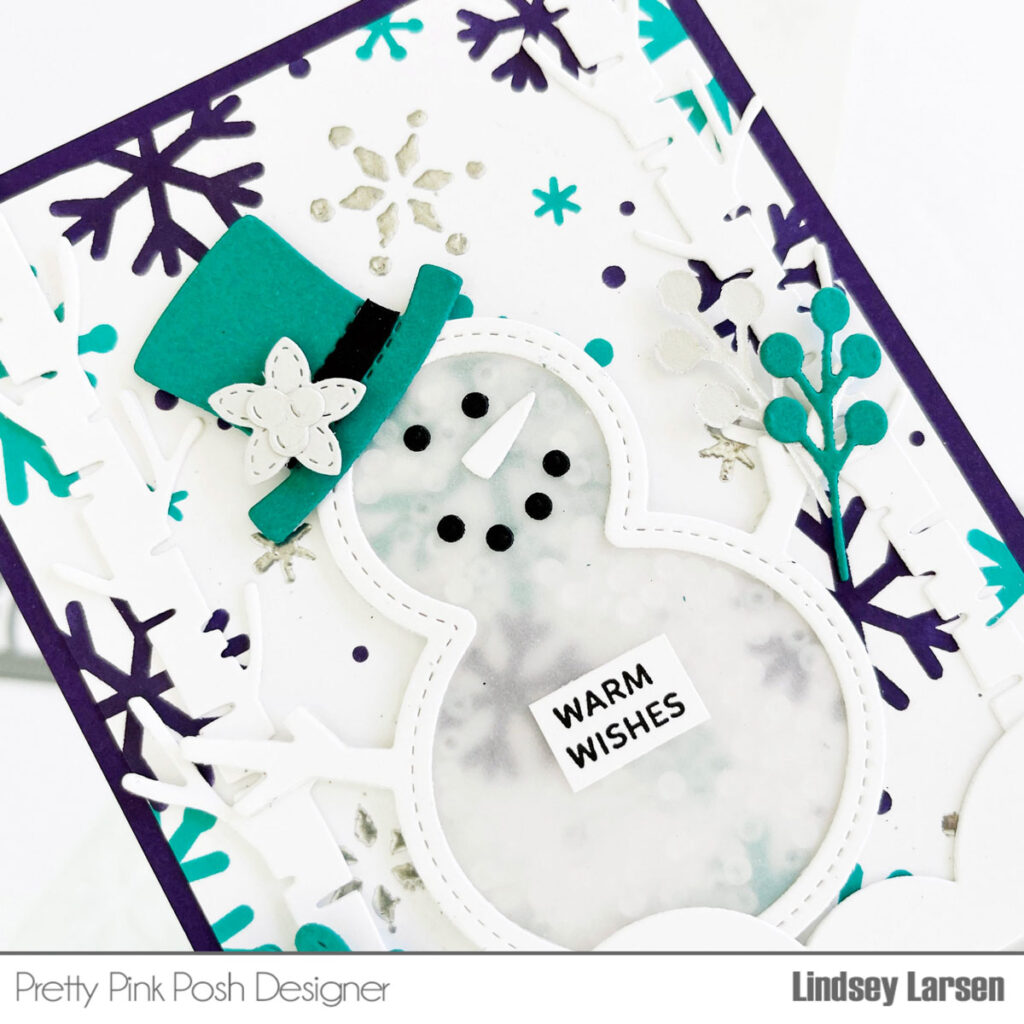
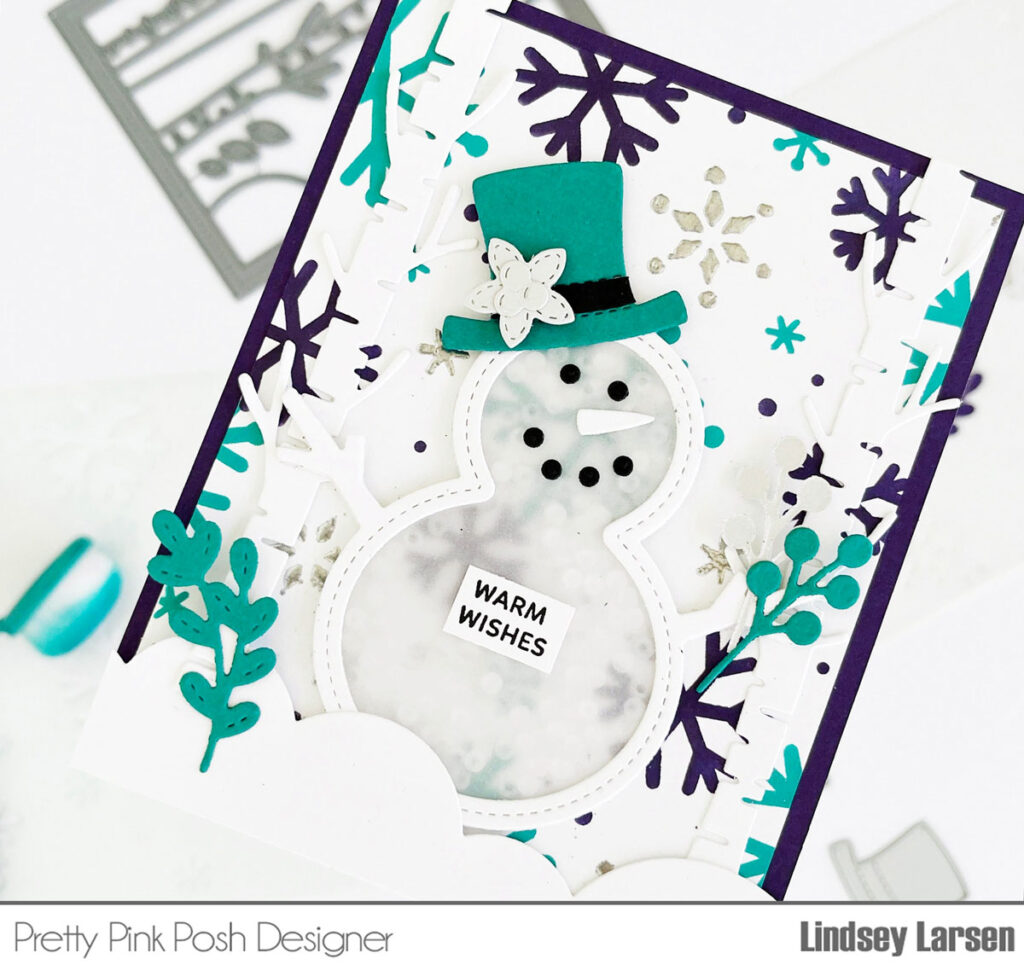
Good morning, friends! It’s Lindsey here, and I’m excited to share a card with you today. One thing I love about Pretty Pink Posh products is how seamlessly the old and the new blend together. I’ve done just that today as I built this cute little scene on my card.
I started with the new Layered Snowflakes Stencil. I love it! It includes a really fun variety of shapes. I blended two layers with ink and embossed the third layer in silver. The embossing adds just a little something special and a bit of shine to the card.
Next, I pulled out the previously released Snowman Shaker Dies. I had so much fun with them last winter and couldn’t wait to use them again! I die cut several snowmen in white and layered them all together. Under the top layer I added a layer of vellum and filled my snowman with 4mm Sparkling Clear Sequins. With the vellum on top and clear sequins inside, it gives a fun snowy effect.
Next I assembled the rest of the snowman. I added his face and a hat with trim and a tiny flower that I cut with the Winter Foliage Dies. On his belly I placed a sentiment from the Holiday Sentiments stamp set.
I imagined this darling snowman in a forest, so I set out to create one. The Nature Essentials dies were perfect for this. I used the cloud border to make a puffy layer of snow on the ground and framed the snowman on either side with trees from the same dies. Finally, I added just a few leaf and berry sprigs from the Winter Foliage dies to add some foliage on the ground as well as for the snowman to hold.
I adhered the entire scene onto a deep eggplant card base, which essentially framed the scene. And then I sat back and smiled. :)
I hope this card makes you smile, too! Thanks so much for stopping by today, and make sure you keep coming back. You are going to love all the projects the team has made with this amazing new release!
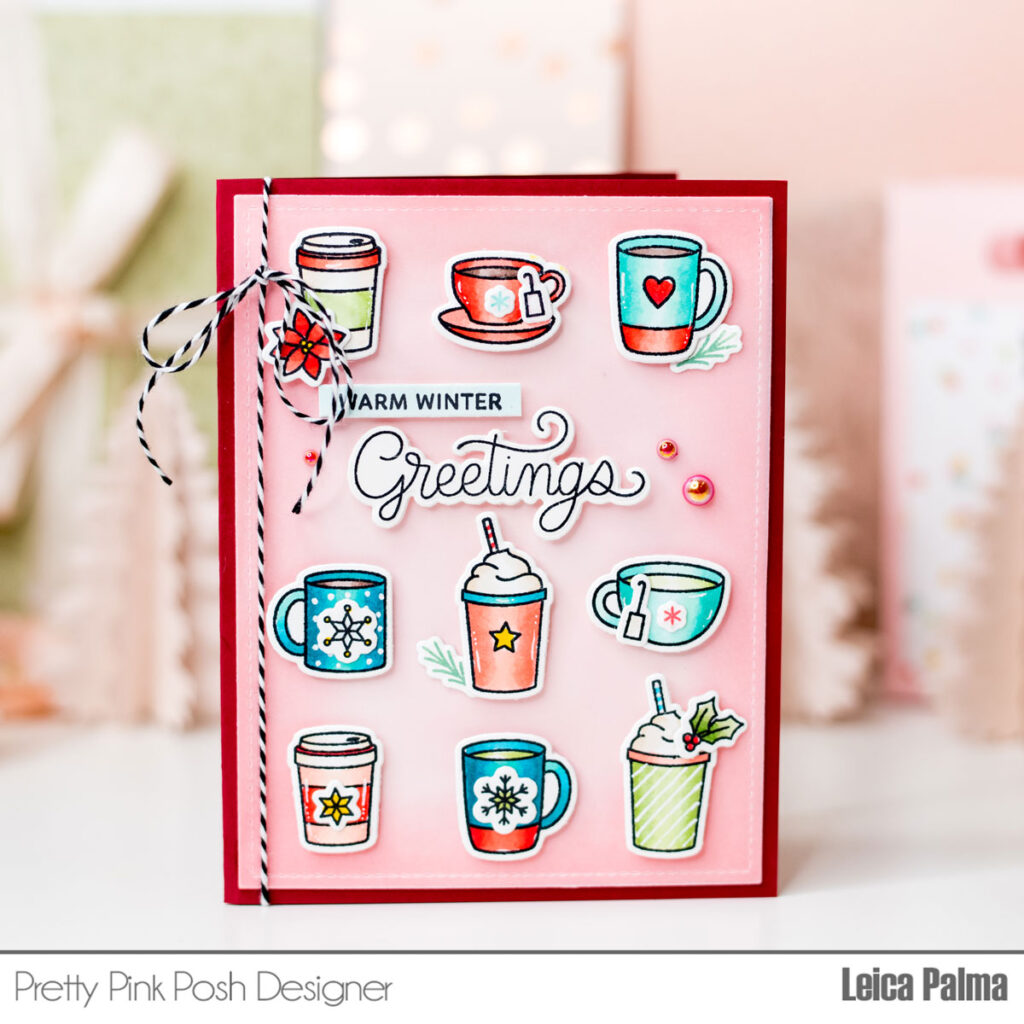
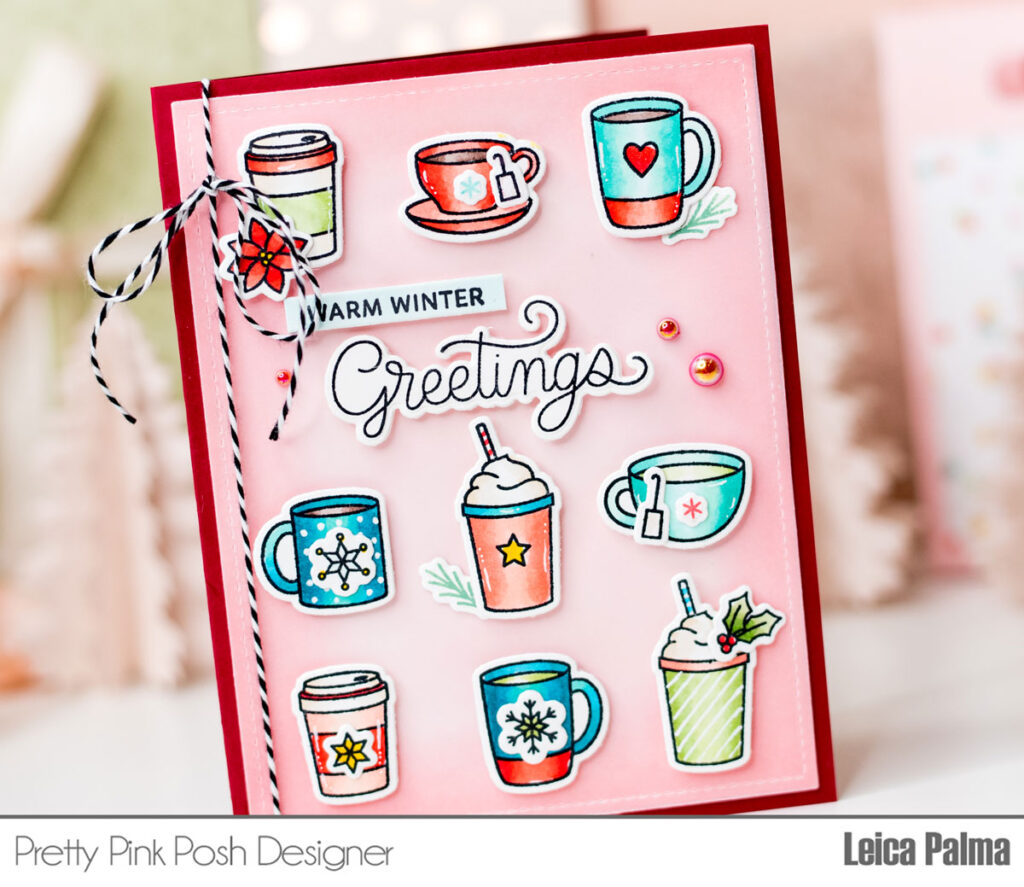
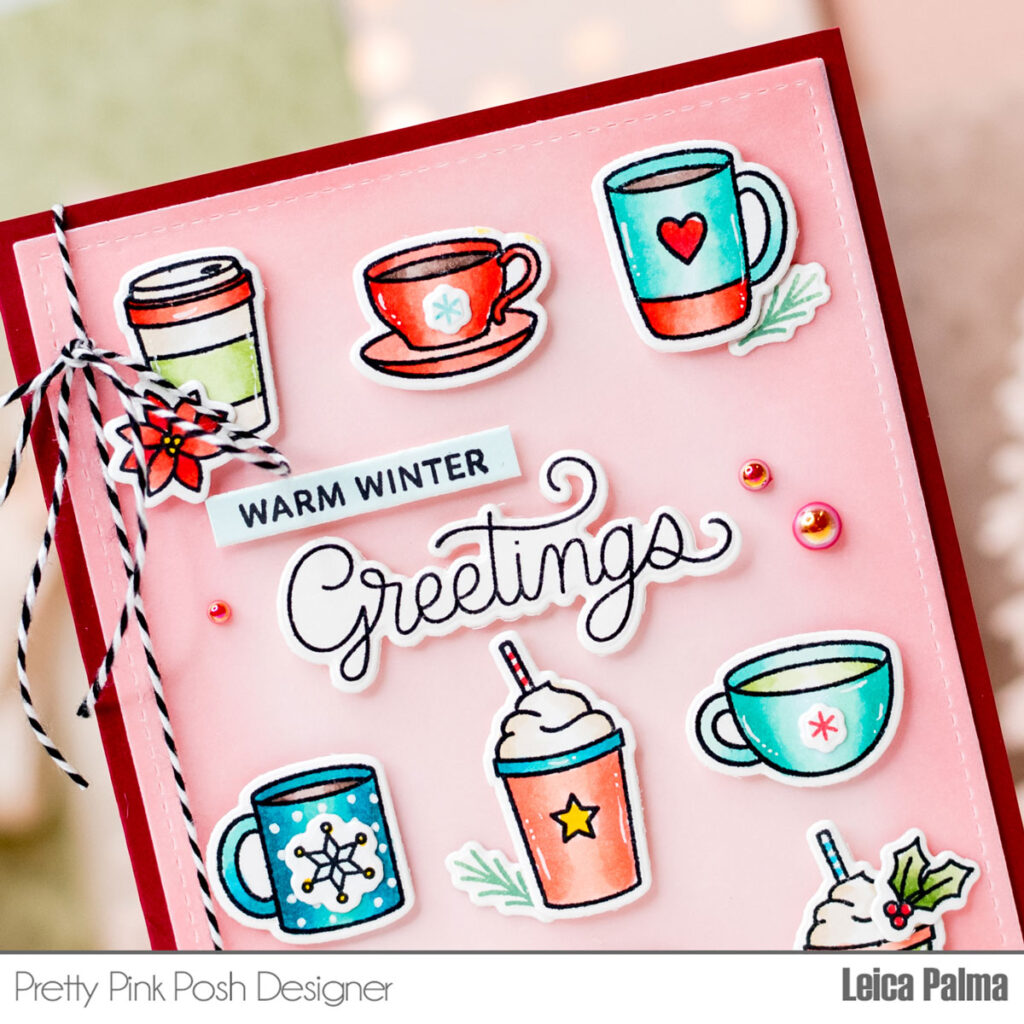
Hello crafty friends! It’s Leica here today with a holiday card featuring the Winter Drinks stamp set. I’ve been waiting for a coffee-themed stamp set from Pretty Pink Posh and finally it’s here! If you were lucky enough to grab the Stamptember exclusive, this set would pair nicely on a card or any coffee-themed project. If you are a coffee lover like me or have coffee-loving friends, this set is perfect to have in your stash.
To start, I ink blended a 4” x 5.25” white cardstock in Spun Sugar Distress Oxide on the center and Worn Lipstick along the border of the card panel. Next, I stamped, colored, and cut the images from the Winter Drinks stamp set and small accessories from the Holiday Envelopes stamp set.
I foam mounted the coffee cups and mugs on a sheet of vellum and glued it onto the card panel. The sentiment is from the Holiday Scripts stamp set. I love that the script has coordinating dies! “Warm winter” is stamped on a strip of white cardstock that I colored in BG000.
For embellishments, I’ve added pearls in Ruby Red and tied a black and white twine on the side of the card. Lastly, I went for a red card base for this card and added white cardstock panel inside for writing space.
Thanks for stopping by! I hope that you like my card and that I’ve inspired you to craft with this stamp set.