
Day 3: 10th Birthday Celebration Hop
If you missed Day 1 CLICK HERE // If you missed Day 2 CLICK HERE
Hello crafty friends, Marine here. I’m thrilled to be sharing with you this card featuring the new Interactive Cake die set. I love interactive cards, they’re so fun to make, so I was over the moon when this new die was released!
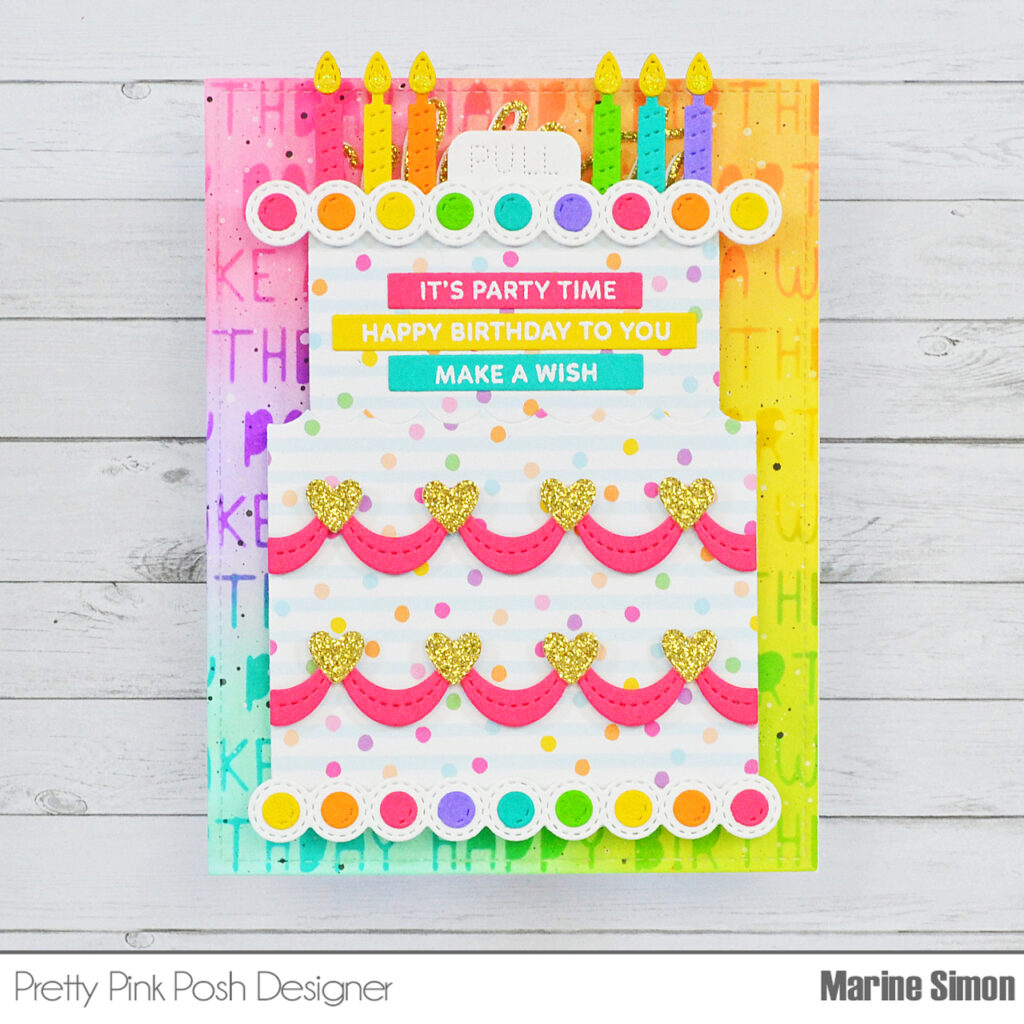
I started off by creating a fun rainbow background on a 5,5 x 4,25 inches Strathmore bristol smooth panel. I first applied and blended oxide inks in a clockwise direction, starting from the top left hand corner: kitsch flamingo, dried marigold, squeezed lemonade, twisted citron, salvaged patina and shaded lilac. Next I used the Birthday Words stencil and more oxide inks to bring more interest to my panel, creating a tone on tone look, using picked raspberry, spiced marmalade, mustard seed, mowed lawn, peacock feathers and wilted violet. And as always I added texture: I mixed some black soot oxide ink with water and used a small brush to make splatters all over the panel, and then did the same with copic opaque white ink.
I knew that I wanted to add multiple greetings inside the cake, but I still wanted to have a bold sentiment right above my Interactive Cake, so I cut “Celebrate” from the Gift Card Bag die set out of gold glitter cardstock and out of white cardstock. I glued the gold glitter word on top of the white one, but shifted it a tiny bit to the right to create a white border, and then attached my “Celebrate” at the very top of my panel using liquid glue.
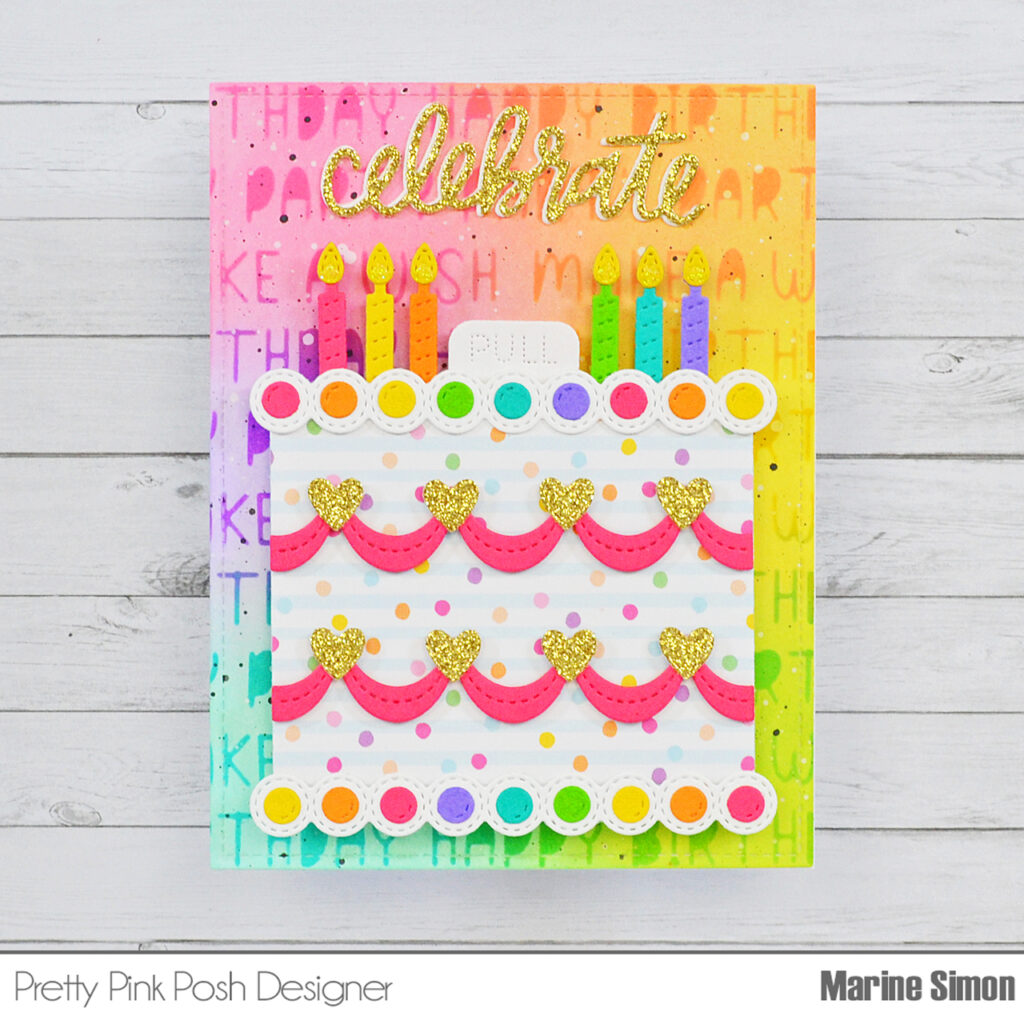
Next I moved on to the Interactive Cake, and started off by working on the upper part. I cut the top piece out of a fun polka dot pattern paper, as well as a white circle border and multiple colored circles that I glued on the circle border in a rainbow order using liquid glue. Next I attached this border at the very top of my cake panel using 1mm foam squares, and then cut more elements such as the white pull tab and six colorful candles and lights. I attached those different pieces at the top of my cake panel: the pull tab in the center and three candles on either side. I also white heat embossed three different Sentiment Strips: Birthday greetings on colored cardstock, trimmed them into slim banners using Sentiment Strips dies, and attached them on my cake panel right below the rainbow circle border using liquid glue.
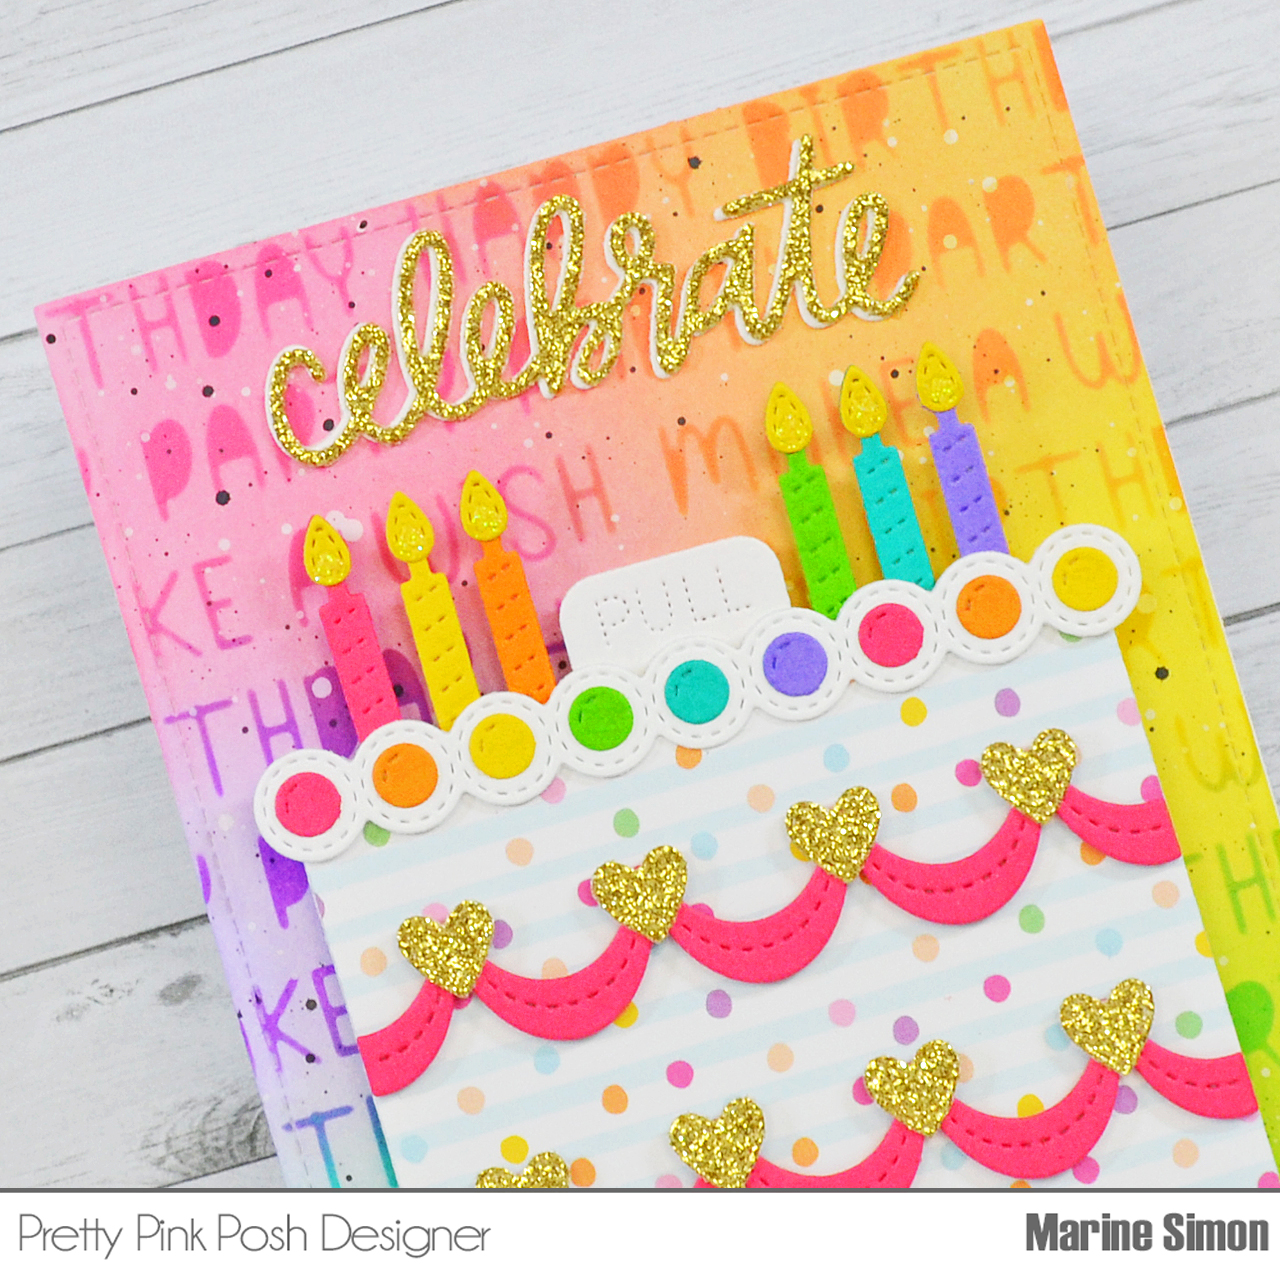
Next I moved on to the lower part of my Interactive Cake. I cut the bottom piece out of the same polka dot pattern paper as before. I also cut another white circle border, as well as colorful circles that, again, I glued on the white border in a rainbow order using liquid glue. I attached this circle border at the very bottom of my cake panel, and then cut more items such as a couple of pink scallop decorative pieces and six gold glitter hearts that I attached on the cake using 1mm foam squares.
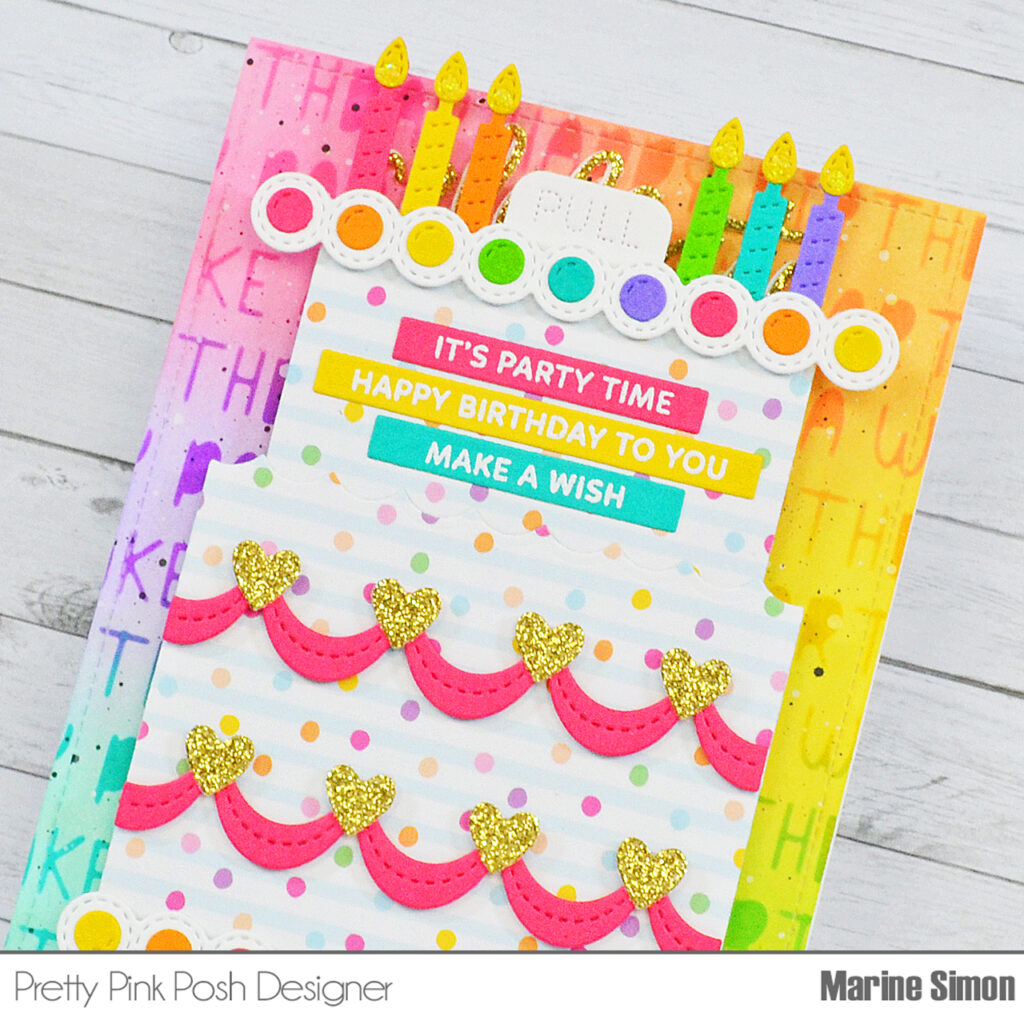
To build my cake, I first added 1/8″ (= 3mm) foam strips at the back on the bottom piece of cake, along the very left and right edges and along the very bottom edge as well, leaving the scallop shaped top edge with no foam. I placed the top piece of cake behind the bottom piece, right between the foam strips, peeled the backing papers off the foam, and attached my cake on another bottom panel I had cut before, creating this way some sort of a pocket in which the top part of the cake can slide in and slide out.
The last thing I did was to add some morning dew nuvo drops on each candle to make them sparkle. And that’s it! I had a blast creating this bright rainbow Interactive Cake card, and I hope you enjoy the result.
We are having a special gift offer and discount code to celebrate the birthday festivities!

PRIZES: be sure to leave comments on each stop. We are giving away 5 $30 gift certificates to random comments (1 winner each day) left before February 16, 2024 at 11:59 PM PST. We’ll be announcing the winners on the PPP blog, so be sure to return and see if you are one of the winners and/ or sign up for our blog posts to your email!
Pretty Pink Posh blog << you are here
Laura Bassen
Carissa Wiley
Raquel Arribas
Lauren Taylor
Sindhu Prajay
Dana Kirby
Thank you for celebrating with us! We’re looking forward to the upcoming year and bringing you new products and inspiration.
Gorgeous! Love the fun bright colors. Very cheerful birthday card! Thanks for sharing!
I ADORE this release! This card is fabulous with the rainbow background!
These colors and card design are perfect!
I am so excited for this interactive cake. I have absolutely loved all the samples I’ve seen with it. Jen McGuire’s video with it sold me on it as a ‘must own’! I can’t wait for my order to arrive so I can play with it.
The years go by so fast. Doesn’t seem like
10 years. Best wishes for many more.
Love the big birthday cake.
I love how bright and cheery the cards have been! Great release.
What a fun and festive card! I love the gold glittery hearts and sentiment!
The inspiration just keeps the happiness flowing!
I love your pretty cake with the added glitter hearts!
Wow, this card from Marine is a real showstopper! Gorgeous!
Lori S in PA
Fantastic card! Love the interactive feature!
How cute. I love the polka dot paper you used for this great design of a cake.
so colorful!
Your card made me smile – it is so colourful and cheerful!
Such a fun card using such fun products from an awesome release 😍
Fun, festive card! Love the cheerful colors and interactive element.
Gorgeous card! I love the way that you decorated the cake! The background looks amazing!
Love this pretty cake card! Such fun colors!
I love this wonderfulinteractive die cut cake! One of the amazing items in this great new release. Super inspiration from the team! Congratualtions again!! :)
Beautiful card! Great release!
Fun big cake! Happy Birthday Pretty Pink Posh!
This card screams Party!! Love, love all the layers of bright colors. Everything in this release is on the wish list.
This interactive cake die is wonderful! I love the bright, happy colors on this card.
Such a bright and cheerful background for this yummy cake!
Wow! That card is a party in and of itself!
Pretty Pink Posh has nailed Birthdays with this release! Love your card. My older kiddos would love it! Nicely done. It is a star!
I like a background with words. Great cards
I like the gold hearts on this card!
I love this card. It’s just so fun and colorful and sparkly. There just isn’t enough sparkle out in the world anymore!
Especially pretty in all the pinks and bright colors. You can never have enough birthday cards on hand. I also love that birthday stencil. Great job!
What a perfect card for a birthday! Love all the bright, beautiful color!!!
Happy 10th birthday to Pretty Pink Posh! Congratulations!
Oh I LOVE this colorful design!
Congratulations 🎊 wonderful hop ❤️
Very special cake with these fun colors and the sparkle.
Super special release! This interactive cake card is fabulous!
This is such a fun interactive card die! Lovely card.