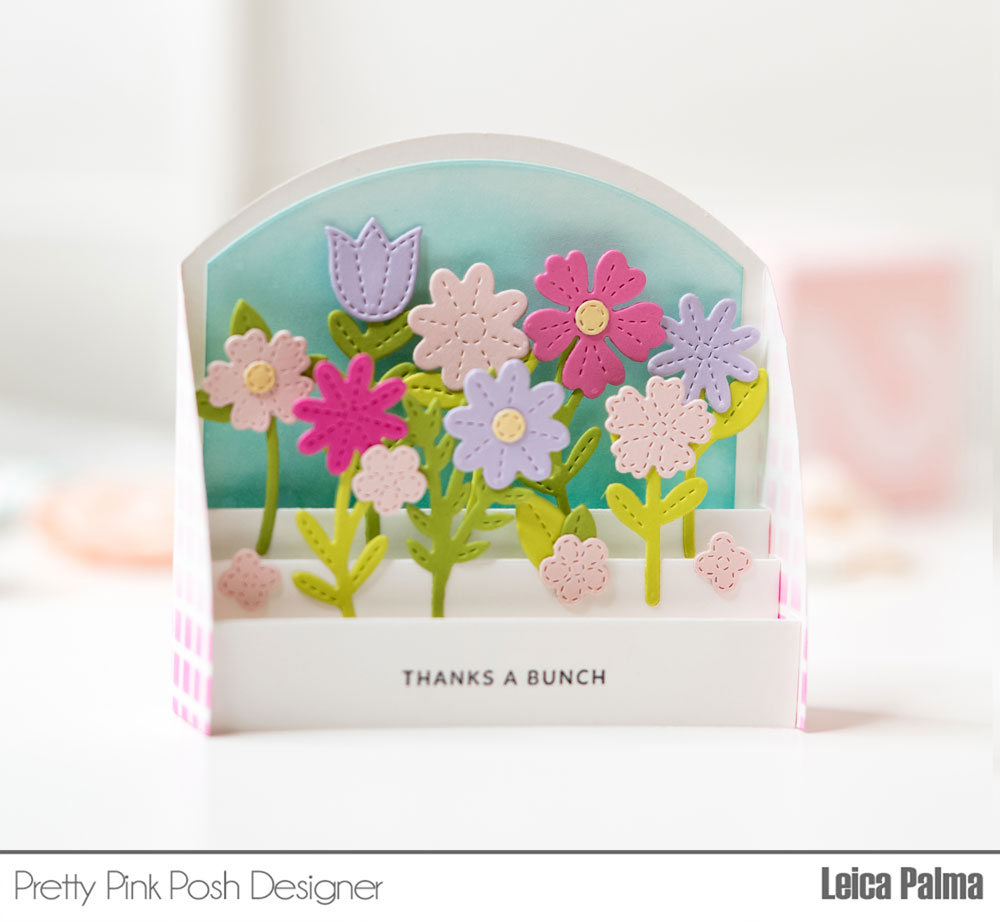
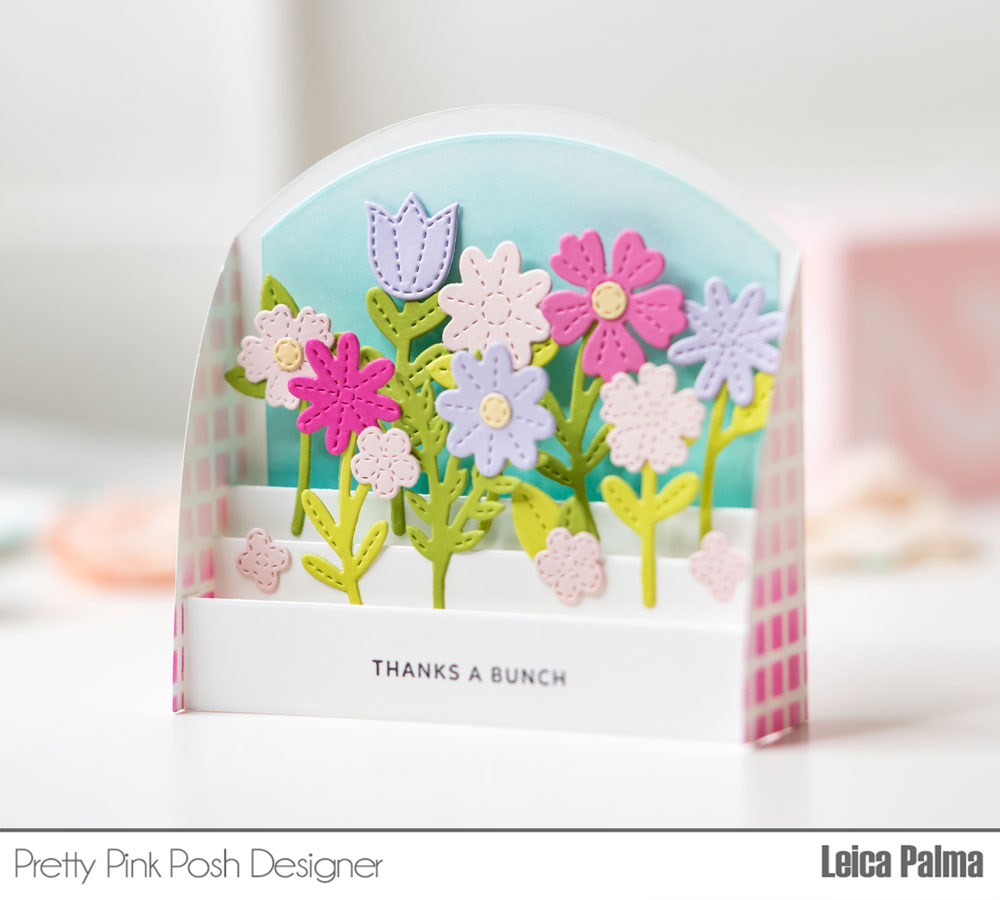
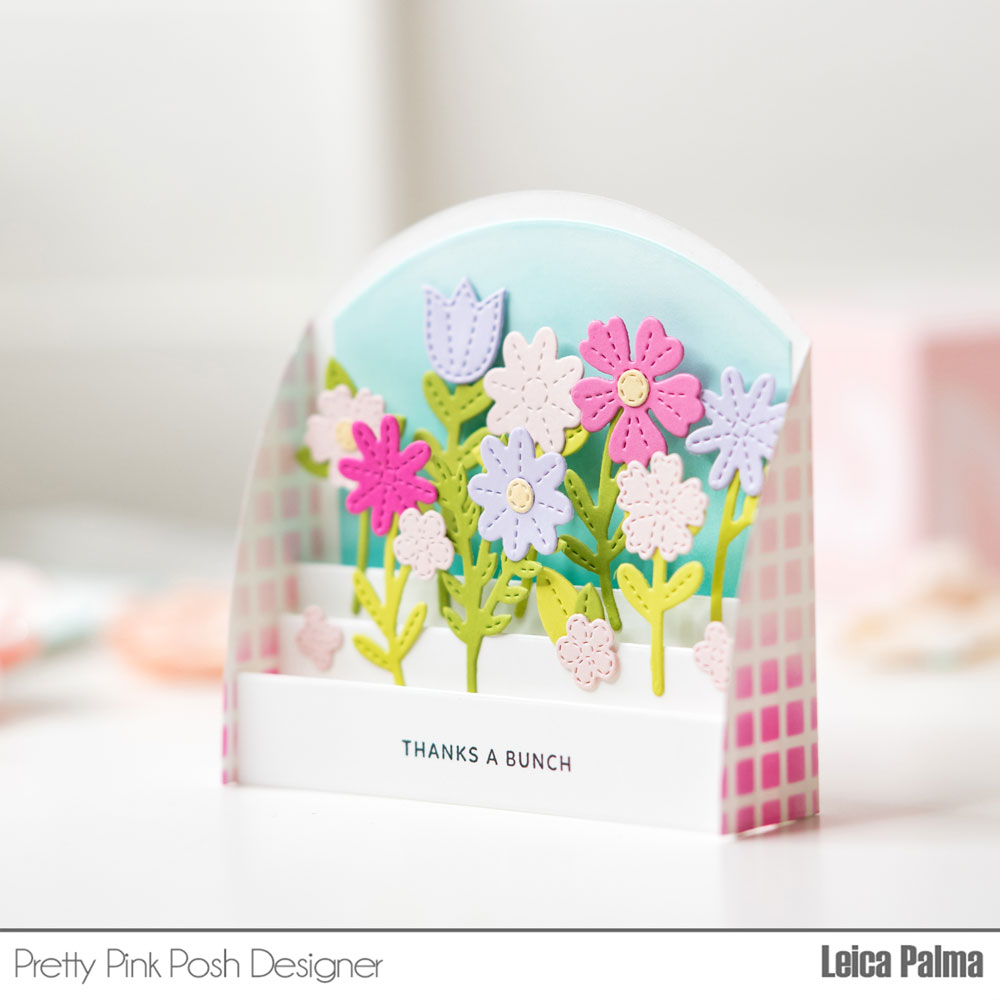
Hello crafty friends! It’s Leica here today with a floral card stack type of card. It’s super simple to make and I hope that you will try this style.
I first cut the Card Stack Base Dies (by Concord and 9th) in white cardstock. I added design and color to the side panels by inking Picked Raspberry and Spun Sugar Distress Oxide Inks through the Mini Grid Stencil. I also added a background panel and ink blended it with Salvaged Patina Distress Oxide Ink.
I stamped thesentiment with black ink onto the front strip before putting the card stack together. Then I cut some flowers and stems from the Spring Foliage Dies in pink, purple, and green cardstock. I glued them onto the inserts of the Card Stack. And this completes the card! Wasn’t that so easy?
For the flowers, you can always add contrast by inkling the edges or adding colors with Copic markers. Anything goes!
That’s all for today’s card share. Thanks so much for stopping by!
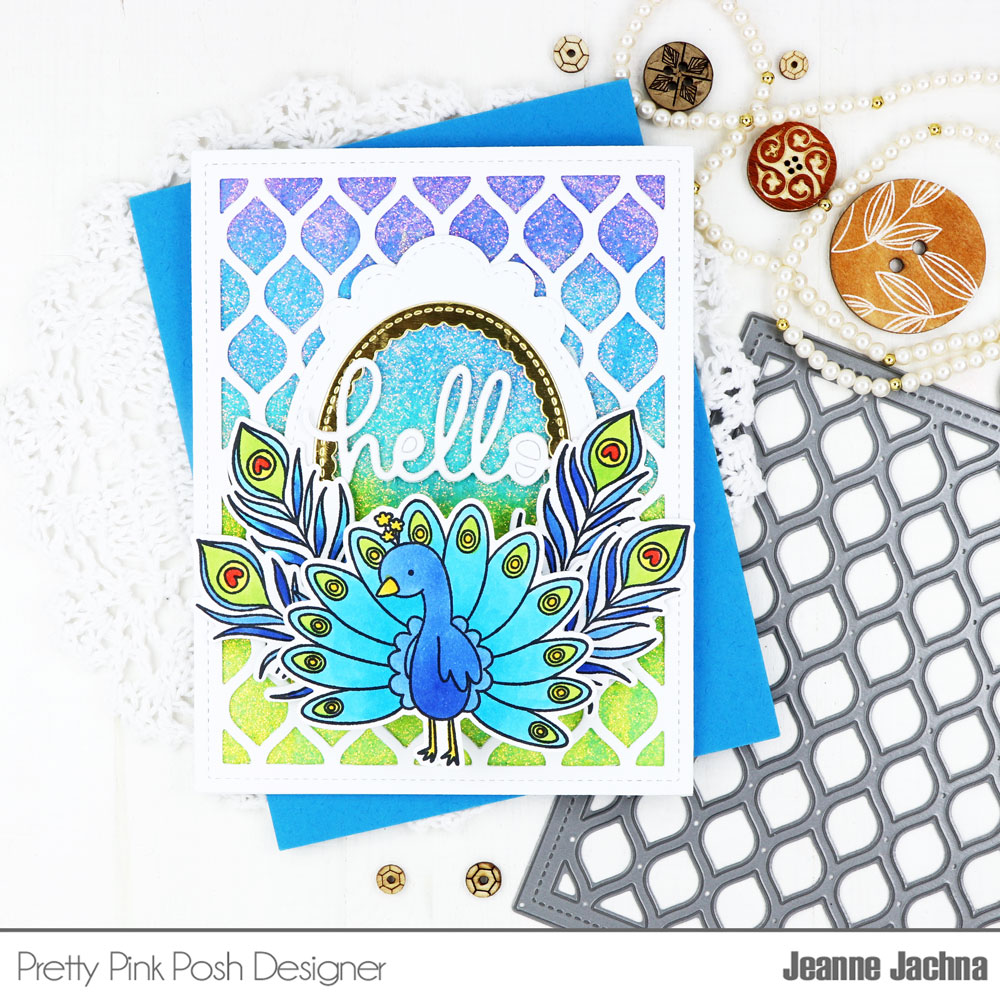
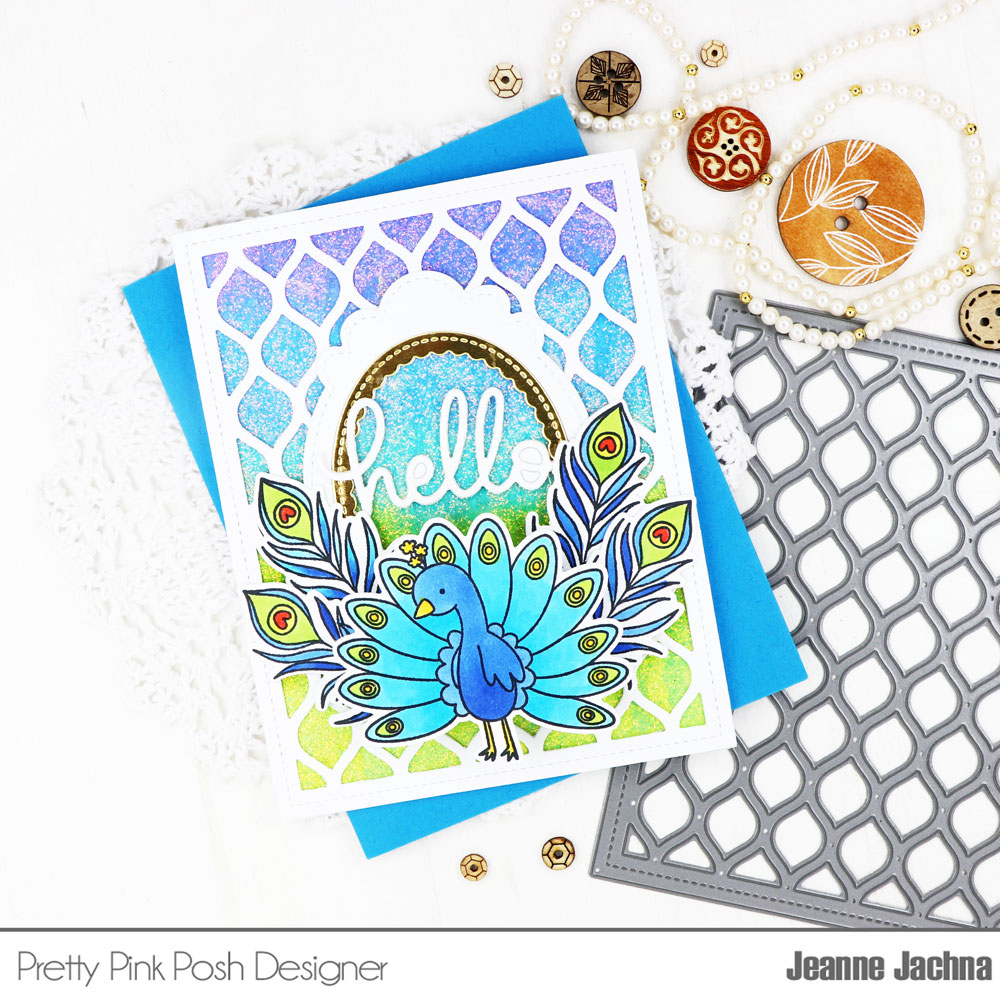
Hello, Jeanne here for the last day of the Thermoweb collaboration week.
I just love to select stamp sets and dies that make my heart happy so I can send smiles across the miles. Today I wanted to demonstrate that behind all the cute images and detailed dies there’s great adhesives and bling that make every detail just right. This week we’re collaborating with Thermoweb and sharing a little “behind the image” products that can make your crafting time easier and more satisfying.
Affiliate links are used for products that are not sold in the Pretty Pink Posh Shop.
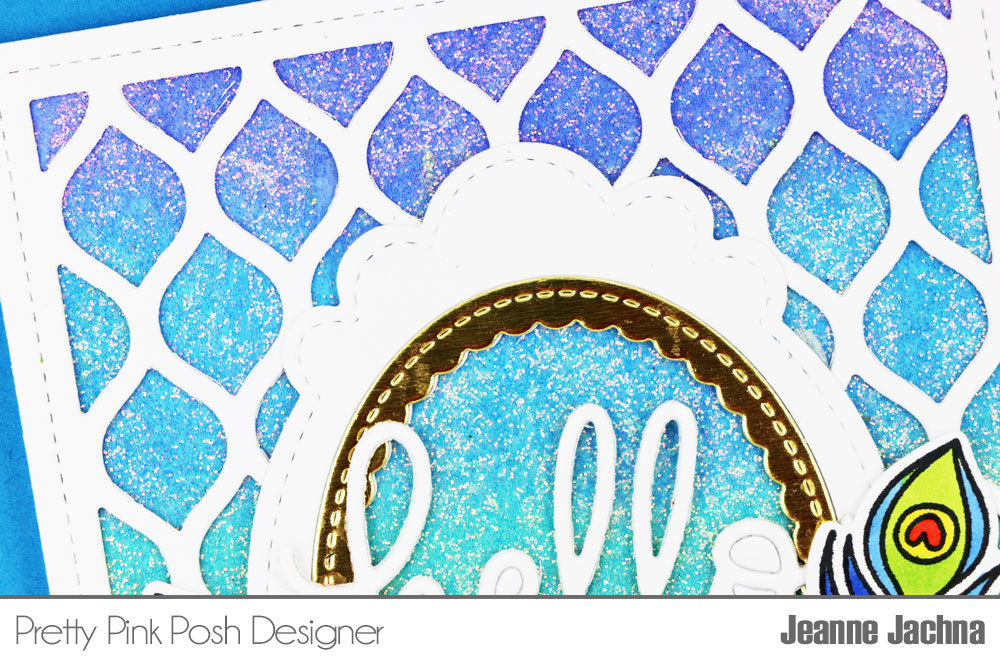
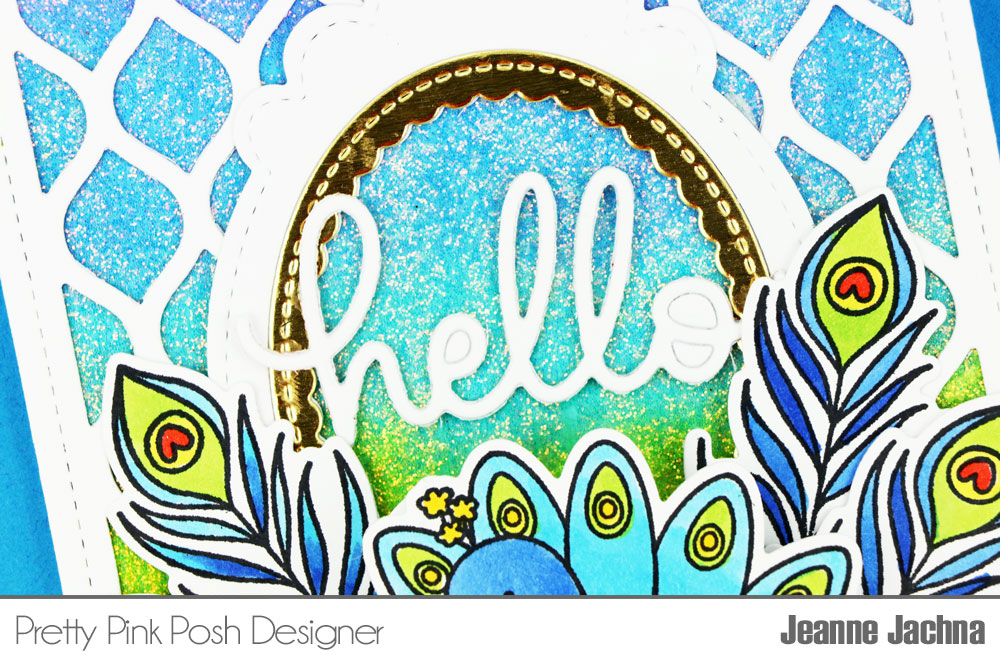
This card starts with a Distress Oxide inky panel in shades of blues and greens and that would be gorgeous alone… but how about kicking it up a notch? I applied Gina K Glitz Gel in Iridescent over the entire panel for a glamourous glittery upgrade. I love to use iridescent because I can smear it over any solid color background… ink or colored cardstock for some added sparkle.
I topped the sparkly panel with a Pretty Petals cover die using Mixed Media Multi-Purpose Adhesive. Liquid adhesive is great because you have a little “wiggle room” allowing you to adjust the die cut before it dries for perfect positioning every time. I cut a window in the center of the cover panel using the oval shape from the Decorative Tag 1 set.
Did you know you can add foil to your projects without having a foiler machine? To add gold to the oval insert on the frame I cut a piece Deco Foil Foam Adhesive Sheets, peeled the coating off one side and adhered some gold Deco Foil and then ran the piece through my die cut machine. I recommend applying the foil BEFORE you cut your die because the pressure from the die cut machine gives a smooth finish to the gold foil.
The finished assembled background is elegant and sparkly perfect for a proud peacock. Remember that behind every beautiful project you’ll find reliable Thermoweb adhesives and elegant bling.
Thank you for joining us this week for a fun collaboration. We hope you’ve been inspired by all the projects featuring Pretty Pink Posh + Therm O Web!
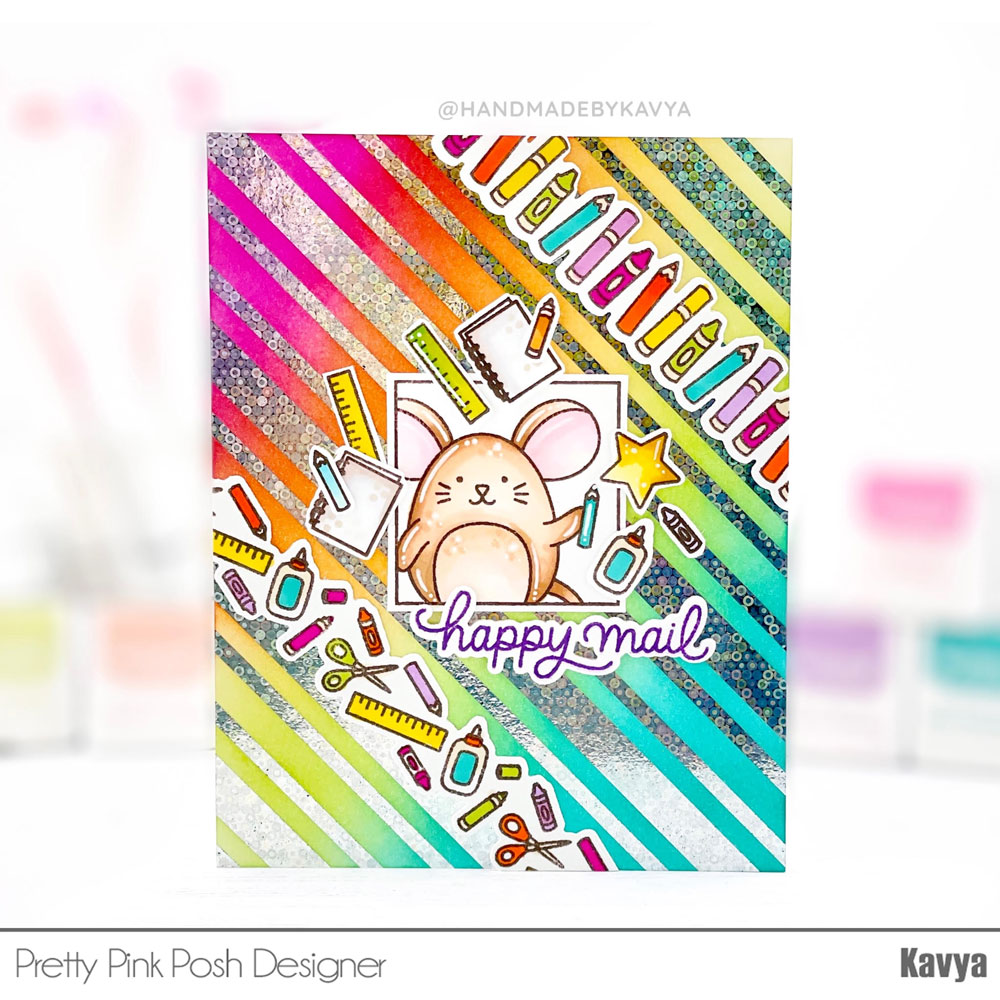
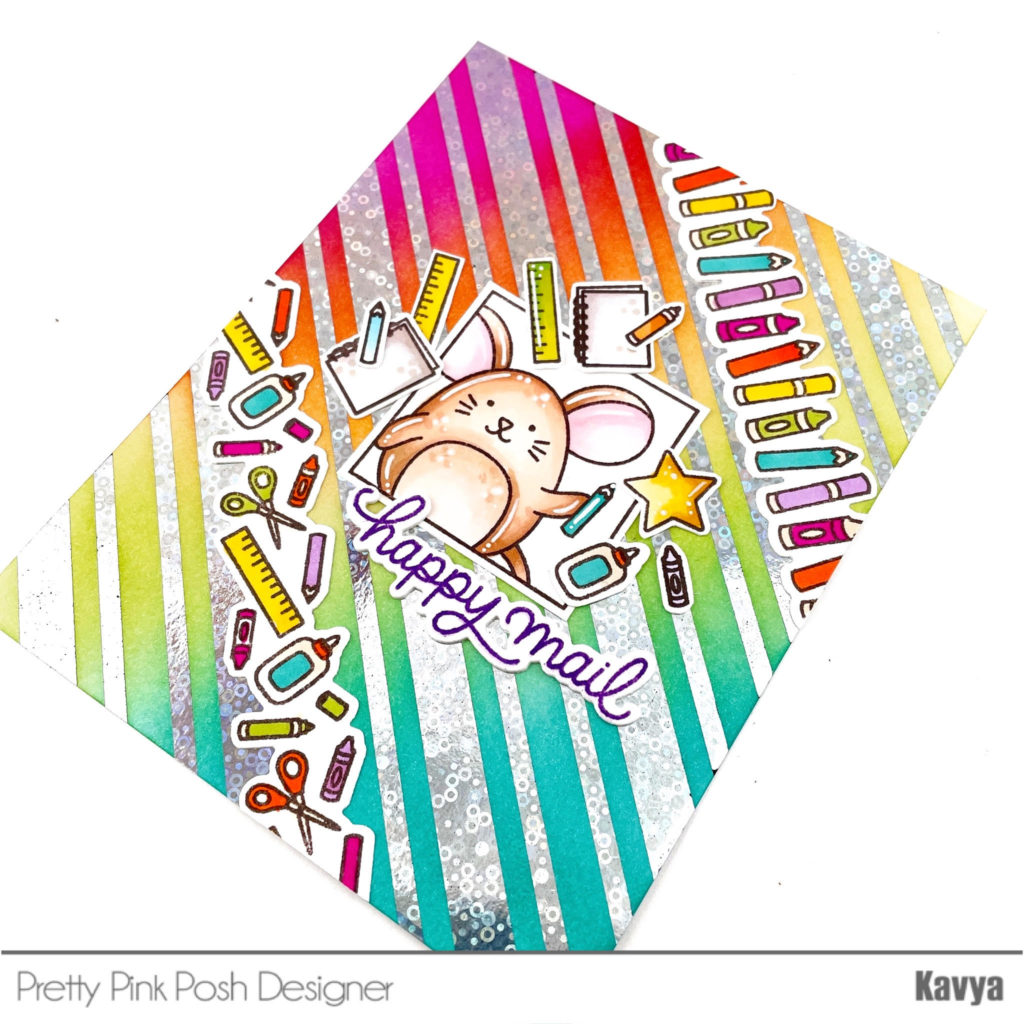
Hello, Kavya here and welcome to another day of the Pretty Pink Posh + Thermoweb collaboration!
Foiling is the new fad in cardmaking and I am all for it! If you like critters like me, it can be a bit difficult to incorporate foiling into cardmaking. One easy way to do so is to add foiled backgrounds!
Affiliate links are used for products that are not sold in the Pretty Pink Posh Shop.
Thermoweb has a bunch of toner card fronts in simple designs that make it super easy to foil. For today’s card, I used the Candy Stripes toner card front with their stunning Fancy Foils Silver Sequins foil that has a beautiful rainbow glimmer when viewed from the side! After foiling it using my minc (heat seating 3), I ink blended the background using dye inks in shades of pink, orange, yellow, green and teal.
Finally, I stamped and colored images from Pretty Pink Posh’s Crafty Days and Sending Love sets and adhered them on the foiled background to create a fun card for a crafty best friend!
I hope this card inspires you to try out foiling with some critters!
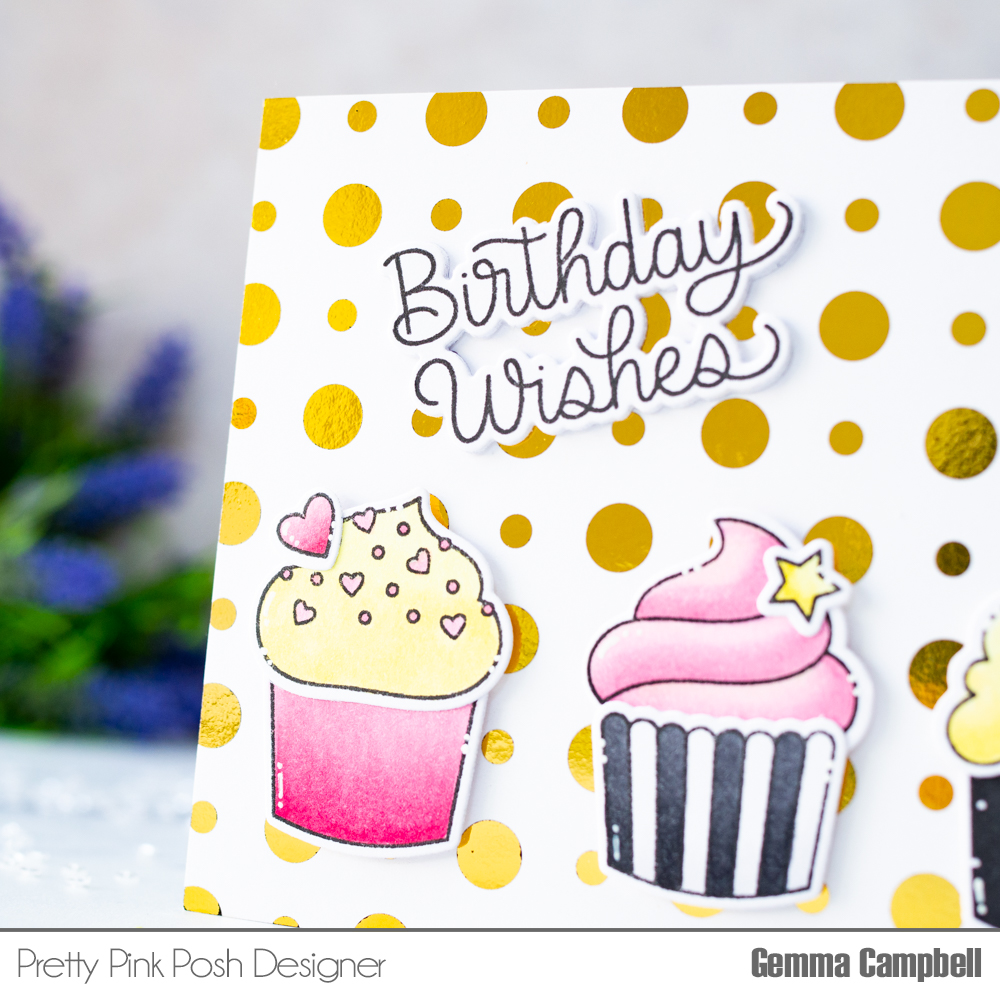
Hello, Gemma here today to share a fun foiled birthday card featuring Pretty Pink Posh and ThermoWeb products. I’m a huge fan of foiling. I think it adds an extra special touch to a card and a wow factor for the recipient.
Affiliate links are used for products that are not sold in the Pretty Pink Posh Shop.
For my foiled background, I used a ‘Lots of Dots’ Deco Foil Toner Card Front. These are A2 sized and come in a pack of 8. There are lots of other fun design packs to choose from, perfect for quick foiled backgrounds.
I covered the card front with a sheet of Deco Transfer Gold Foil, then placed them both inside a piece of folded parchment paper. I ran them through my laminator, following the instructions on the card fronts packet. The results are beautiful – it’s difficult to capture the full effect on camera.
Next, I stamped images from the Pretty Pink Posh Build a Cupcake stamp set. This is a great set for creating different styles of cupcakes. I used copic markers to colour them and die cut them with the coordinating dies.
I added the foiled card front to an A2 card base, then added the cupcakes popped up with foam tape. The sentiment is also from the Build a Cupcake stamp set. I added extra die cut layers behind the word, which I find is the easiest way to add dimension.
To finish, I added some white gel pen highlight details to the cupcakes.
Be sure to stop by the Therm O Web blog as well for inspiration using both companies and a chance for a mini shopping sprees by leaving comments!
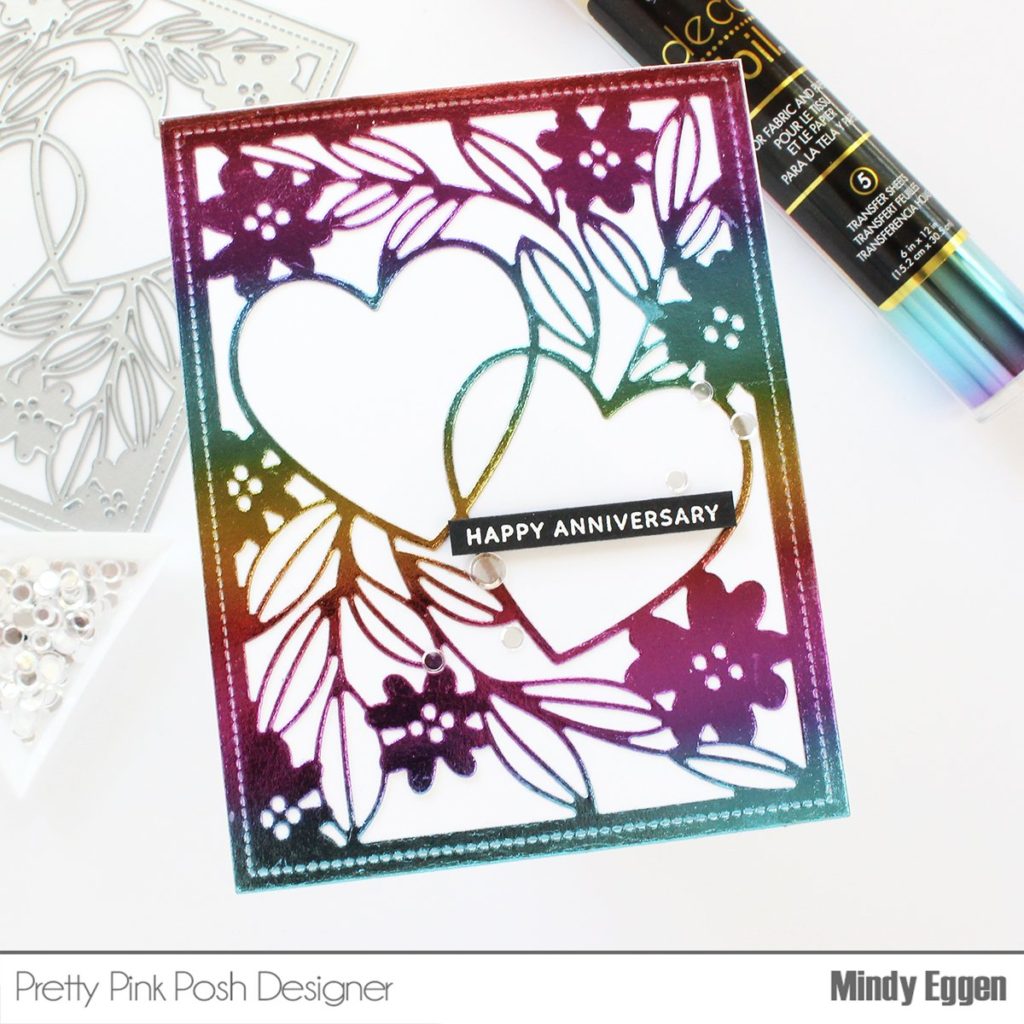
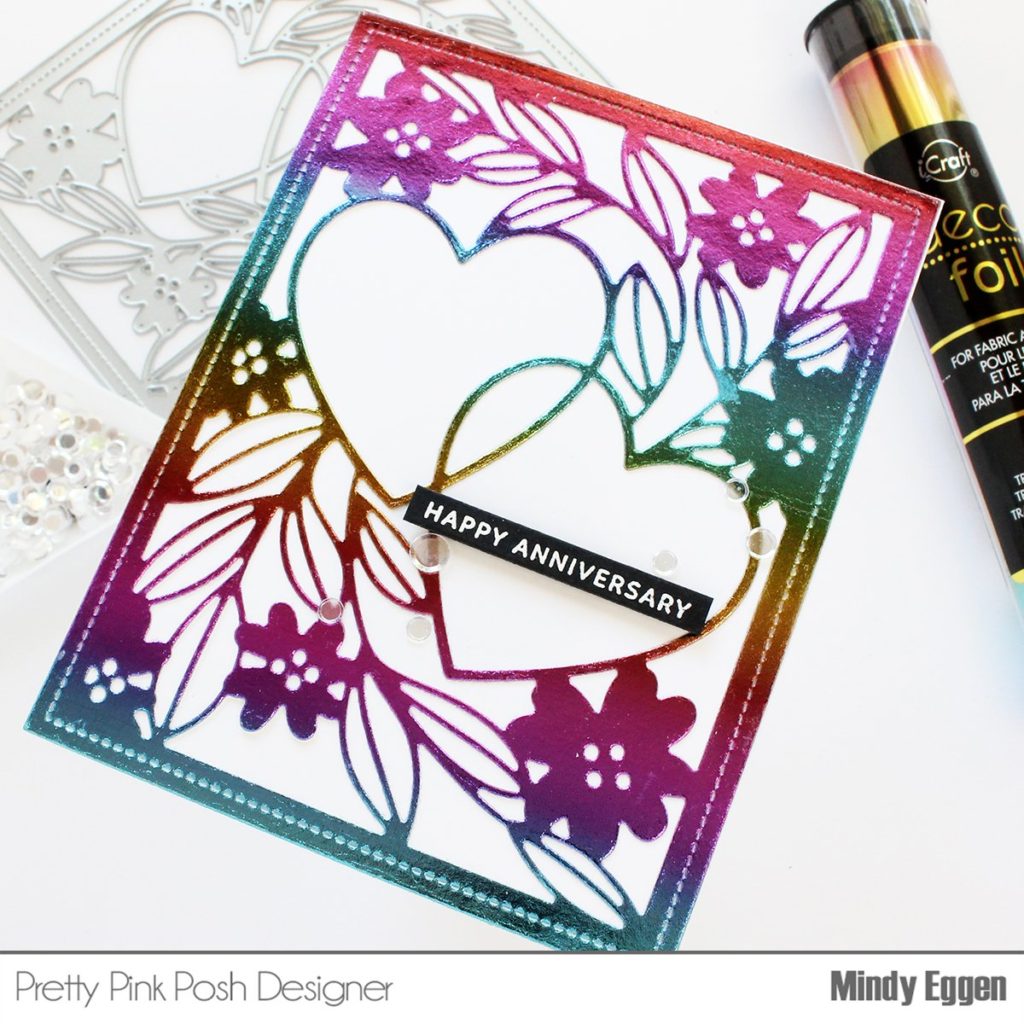
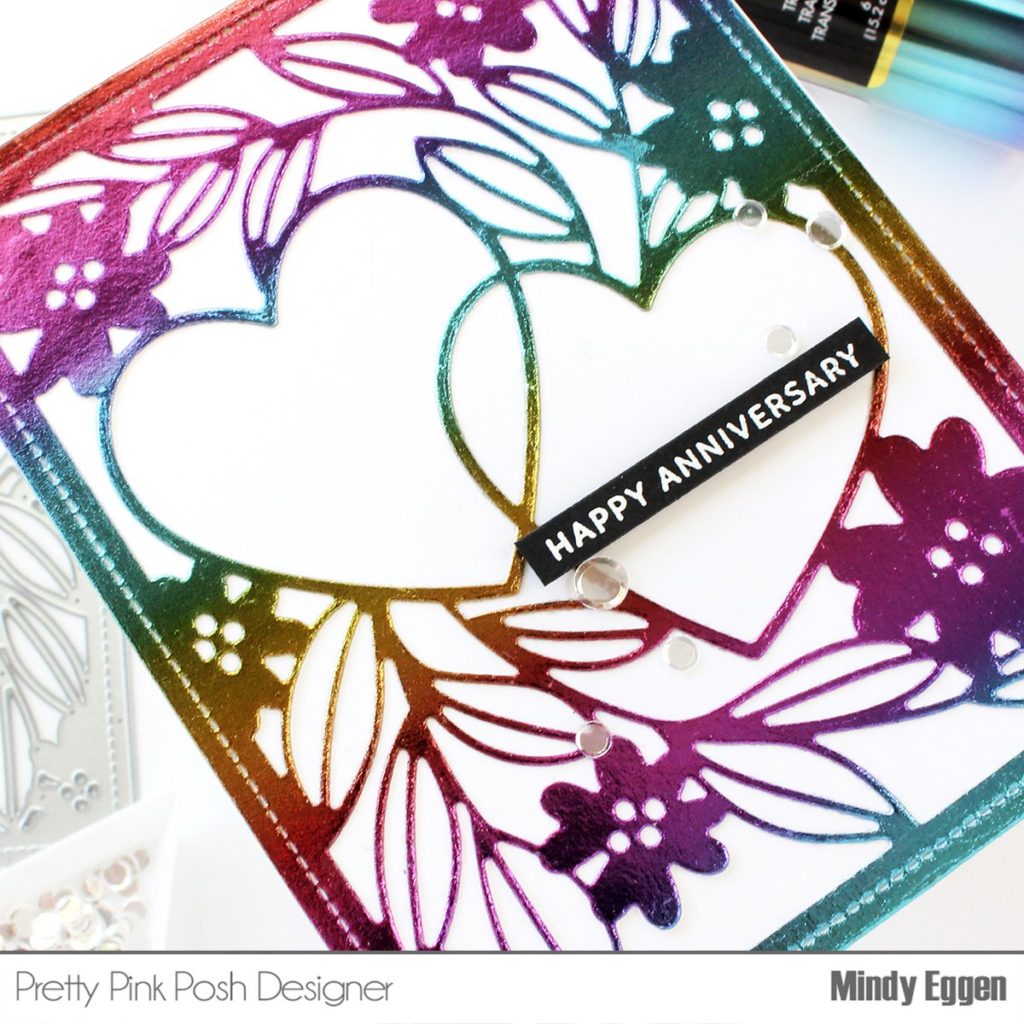
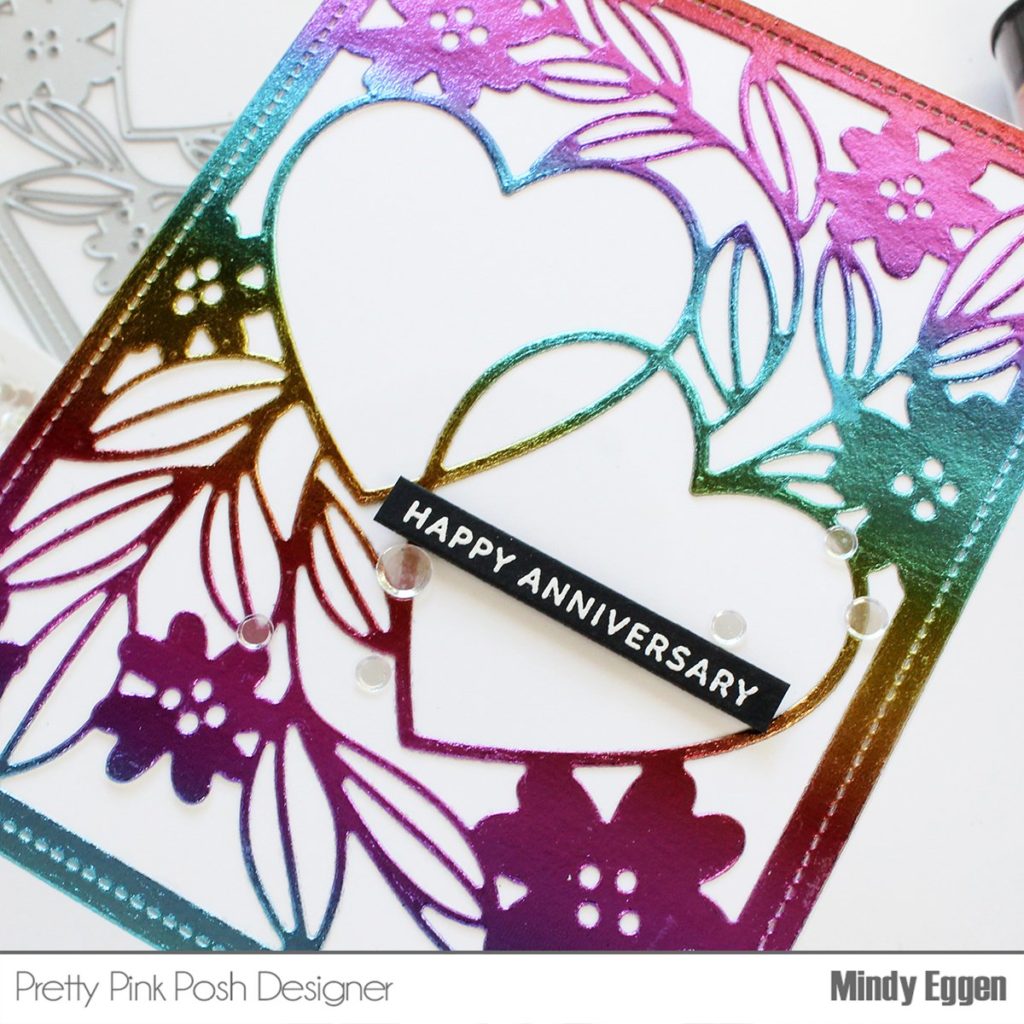
Quickly create amazing backgrounds using the Thermoweb Deco foil! Mindy here for a collaboration post for Pretty Pink Posh and Therm O Web. For my card today, I’m using the gorgeous Mystic Rainbow foilwhich is a multi-color roll of foil.
Affiliate links are used for products that are not sold in the Pretty Pink Posh Shop.
I put a piece of double sided adhesive onto a white card panel measuring 4 1/5″ x 5 3/4″ to leave room for die cutting. I made sure to push down really well all over the panel.
I removed the backing of the double sided adhesive sheet and added a piece of the Mystic Rainbow foil measuring about the same size. Once this is burnished down really well, I can peel up the clear liner to reveal a full panel of foil cardstock. Quick and easy!
Then all you need to do is die cut out what ever you are working on for your project. I’ll be using the Love Hearts die. The shine…. the colors…. it’s all too amazing!
I didn’t need to add much more to the card front except for a small sentiment which is from the Simple Sentiments stamp set heat embossed in white onto black cardstock.
I topped it off with a few Sparkling Clear Confetti and now we have this stunningly foiled card that literally took me minutes to make!
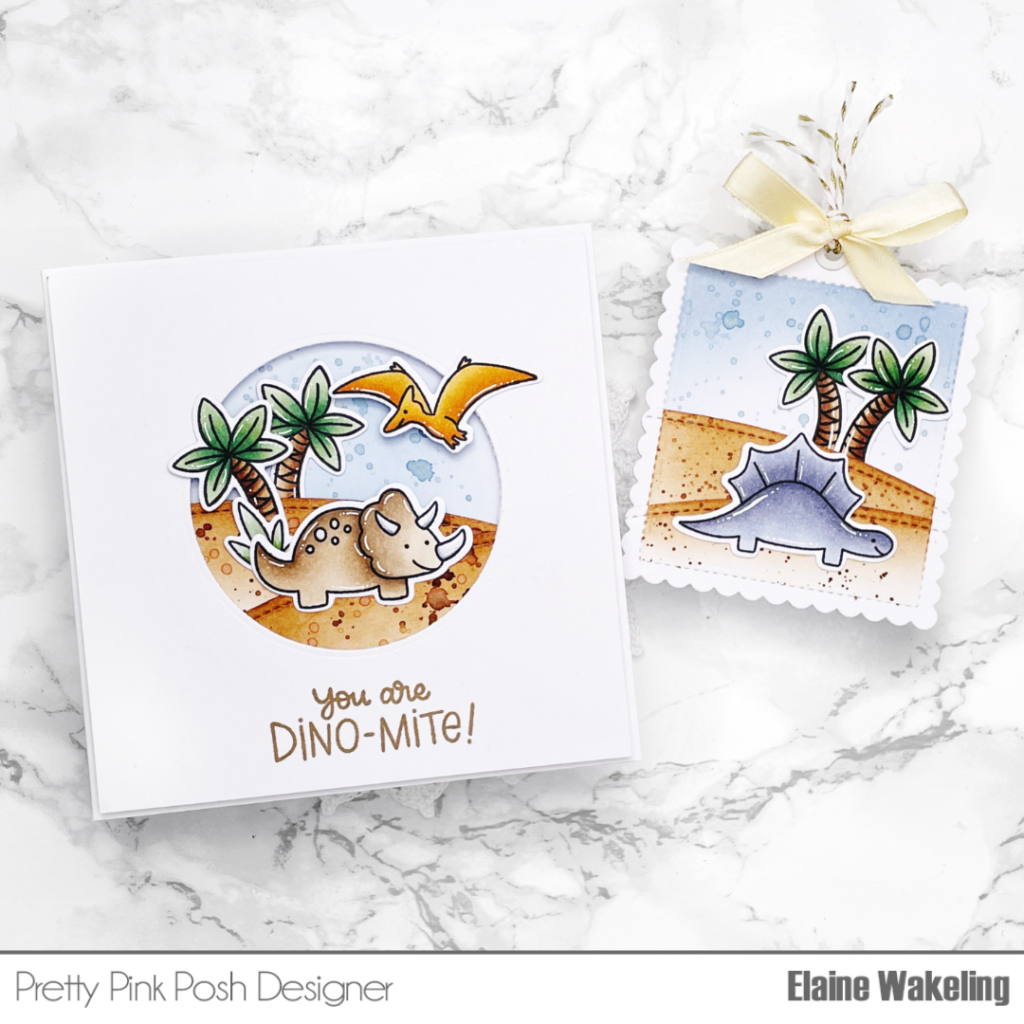
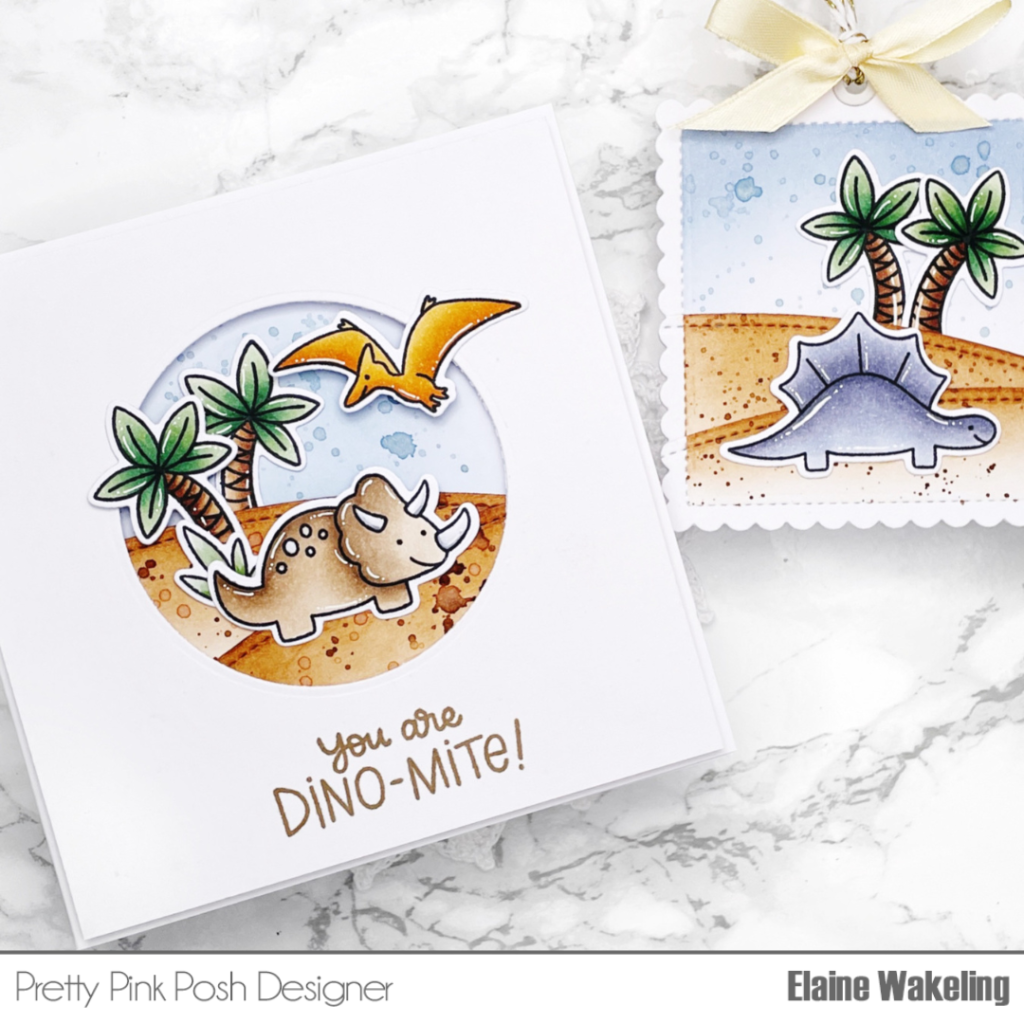
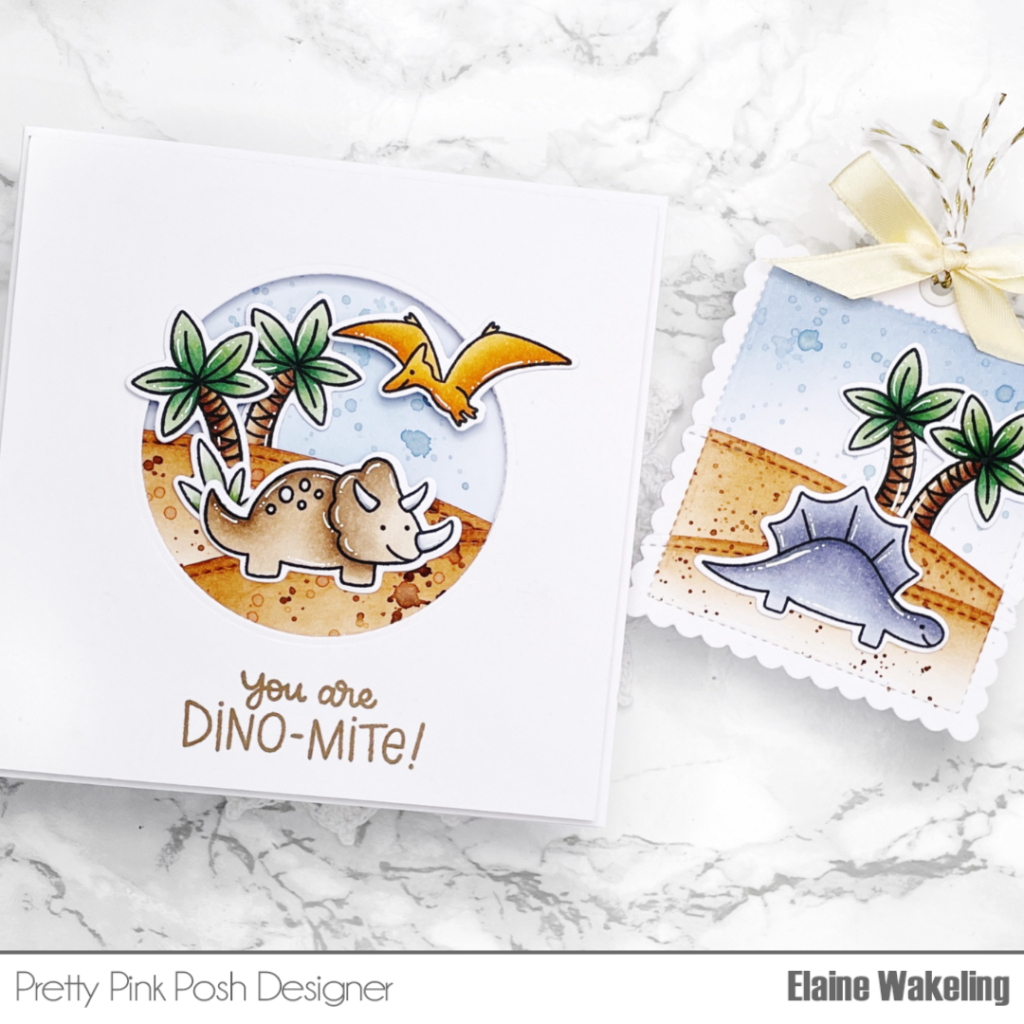
Hey friends! Elaine here to share another project featuring the adorable dinosaurs from the June release. I’ve fallen completely in love with these sets, and I hope you like this card and tag combo!
I created a white 5” x 5” card base from heavyweight white card and set aside. The front panel was cut from more heavyweight white card measuring 4.75” x 4.75”. Using the largest circle die from Let’s Party coordinating dies I cut a window from the front of the card panel and stamped the sentiment using a brown pigment ink. To create the hills to sit behind the circular opening I used the curved die from Stitched Borders 1 Dies and used Vintage Photo Distress Ink to add colour and dimension. I secured them to the back of the card panel at different angles to help give the illusion of desert landscape.
Taking the card base, I applied a light layer of Stormy Sky Distress Ink directly to the base to give the scene some sky; being careful not to go too near the edges. The front panel was secured centrally to the card base with foam tape. Lastly, I secured the dinosaurs and palm trees from Dinosaur Friends and Dinosaur Additions with liquid adhesive to the scene.
I’d previously colored a big batch of images so I knew I had enough to create a tag to go with the card. I cut the large tag from the Scalloped Square Tag die, three times. I then used the same curved stitched border die to create two hills. Masking the scalloped edges, I applied Vintage Photo Distress Ink to the hills and Stormy Sky to the base tag. All three layers were then secured together with liquid adhesive.
To finish the tag, I glued on my dinosaur and palm trees, punched a hole, added some ribbon and voila….we have a matching card and tag set that will put a smile on anyone’s face!
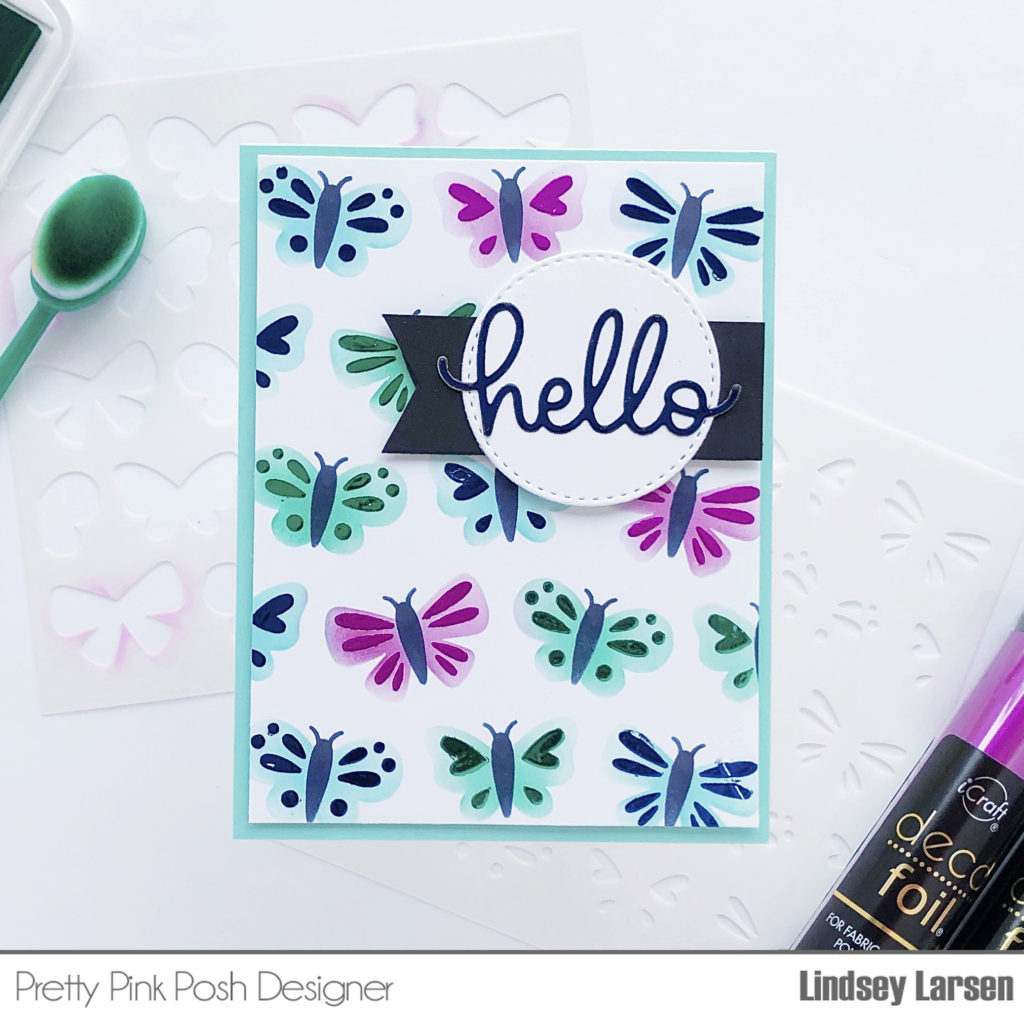
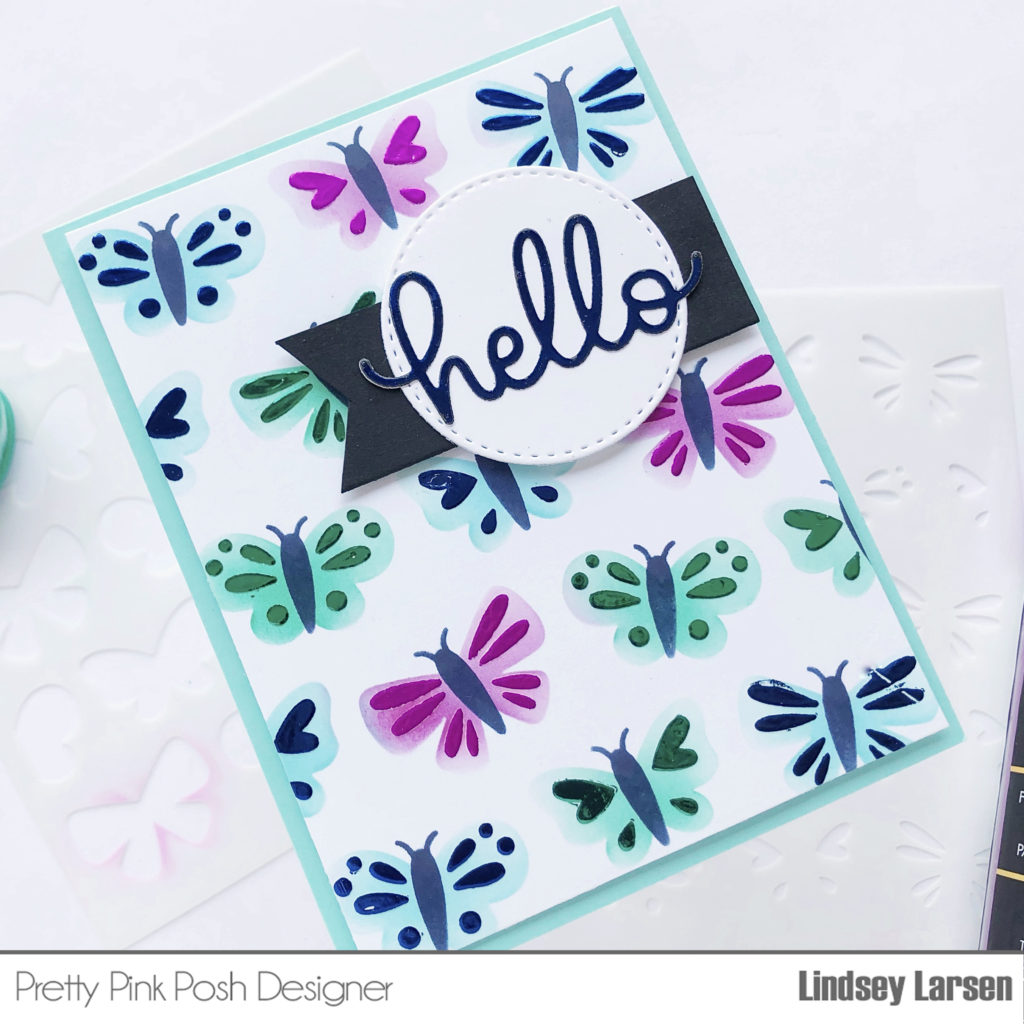
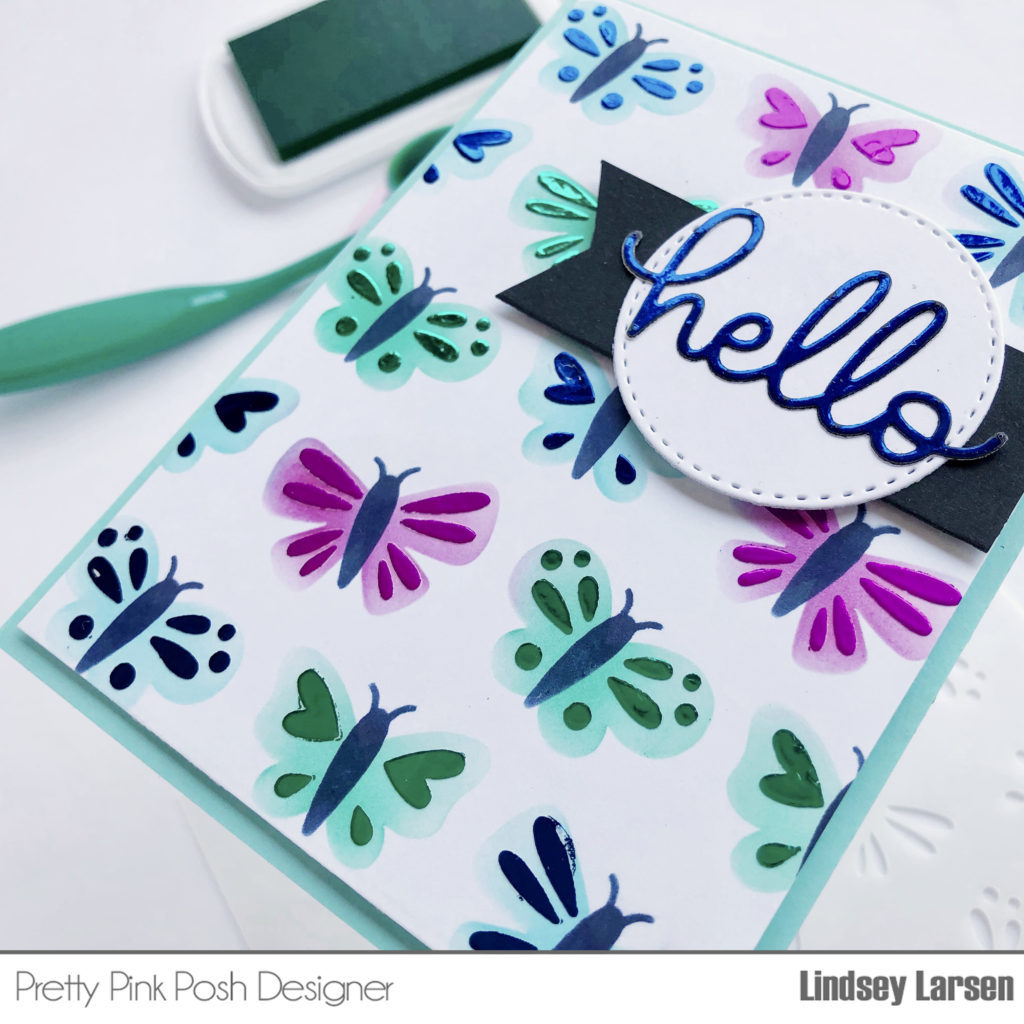
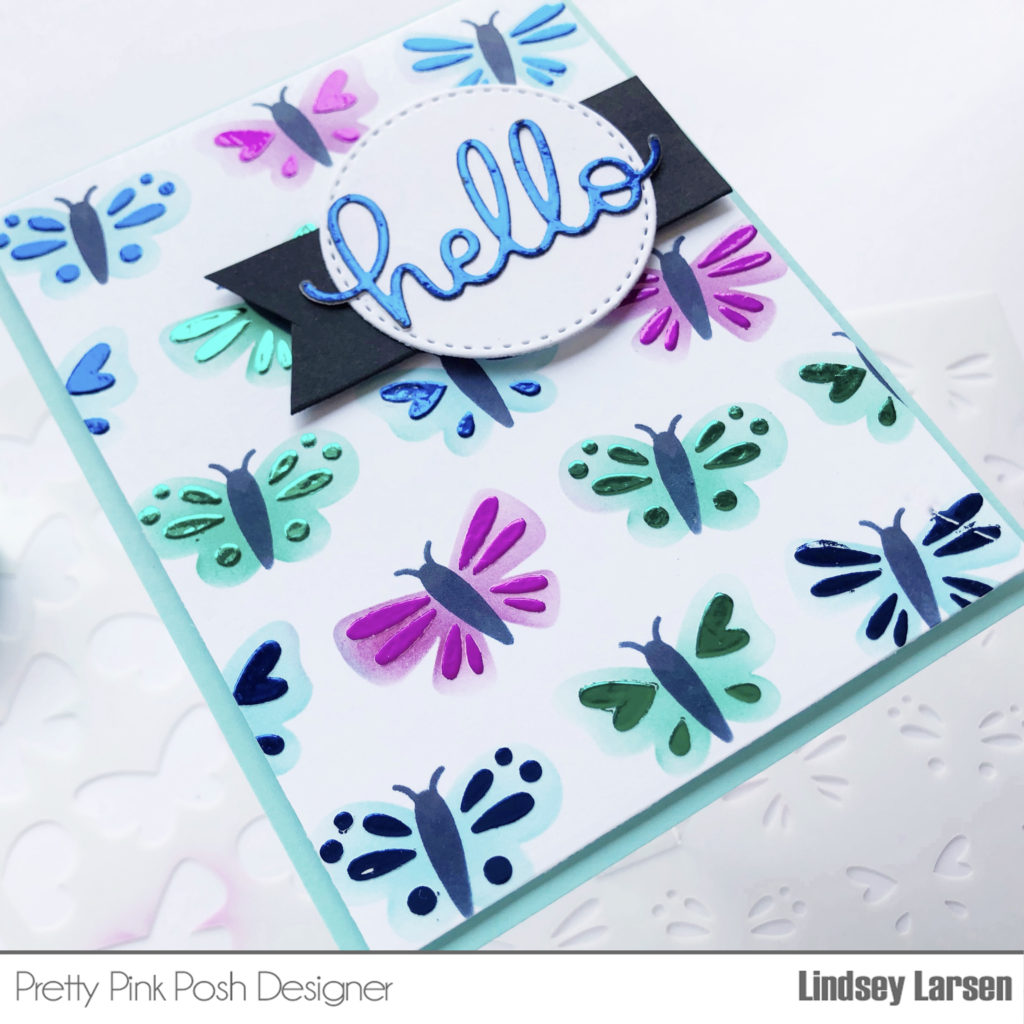
Good morning! It’s Lindsey here today with a fun project combining some fabulous products from Pretty Pink Posh and Thermoweb. Using Deco Foil Transfer Sheets really adds a fun “wow” factor to this otherwise simple card.
Affiliate links are used for products that are not sold in the Pretty Pink Posh Shop.
For my project I used the Deco Foil Transfer Sheets in Jade, Deep Blue, and Magenta. I pulled out my ink pads, found matching colors, and then lightly blended on the ink using theLayered Butterfly Stencils. I blended ink on just the first two stencil layers and on the third and final layer, I used Deco Foil Transer Gel Blanco. This layer shows the details on the butterfly wings. The Transfer Gel takes about an hour to dry, so while I waited I worked on a second foiling project. (More on that to come!)
Once the gel was dry, I cut small squares of the Jade, Deep Blue, and Magenta transfer sheets and laid them on top of the dried gel. Next, I placed the entire card inside a folded piece of parchment paper and ran it through my laminating machine. You don’t have to have a fancy laminator for this. Mine is “as old as the hills” as my grandma would say (I think it’s about 15 years old!), and it did the trick just fine to adhere the foil to my card.
I kept the card layout simple, so the background could really shine…hee hee (pun intended ;) ). I simply placed my butterfly background on top of a light blue card base, trimmed a flag to ground the sentiment, and cut a circle using theBirthday Circles Coordinating Dies.
And that’s it my friends! These products were so easy and fun to work with, and I can’t stop smiling at the beautiful shine on my card. I hope you’ll give them a try!
And if you are interested in seeing the second project I made while the Transfer Gel Blanco was drying, you can pop on over to my blog HERE. I’ll give you a peek below.
Want to win a gift card to Pretty Pink Posh and Therm O Web? Enter below!
We’ll see you tomorrow for another day of inspiration using both companies. Thanks for stopping by! I hope you were inspired by my project.
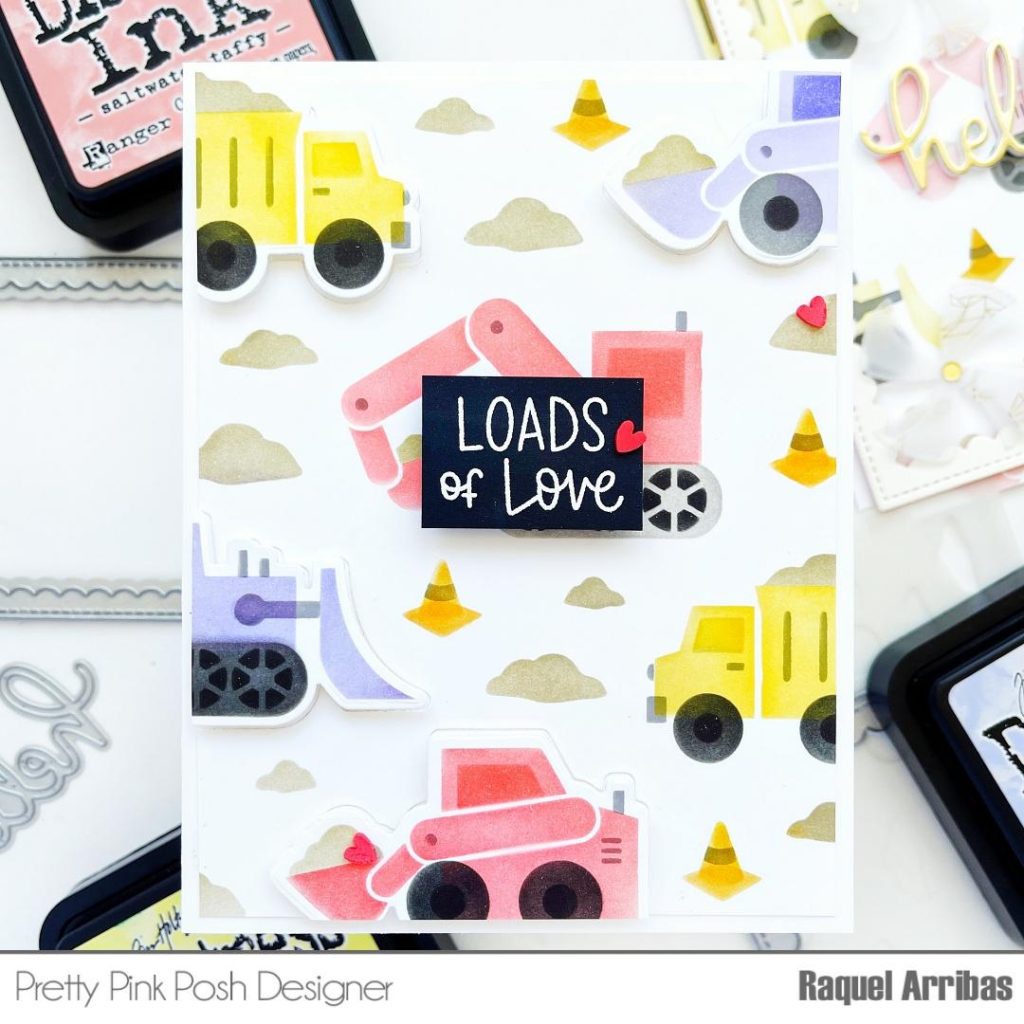
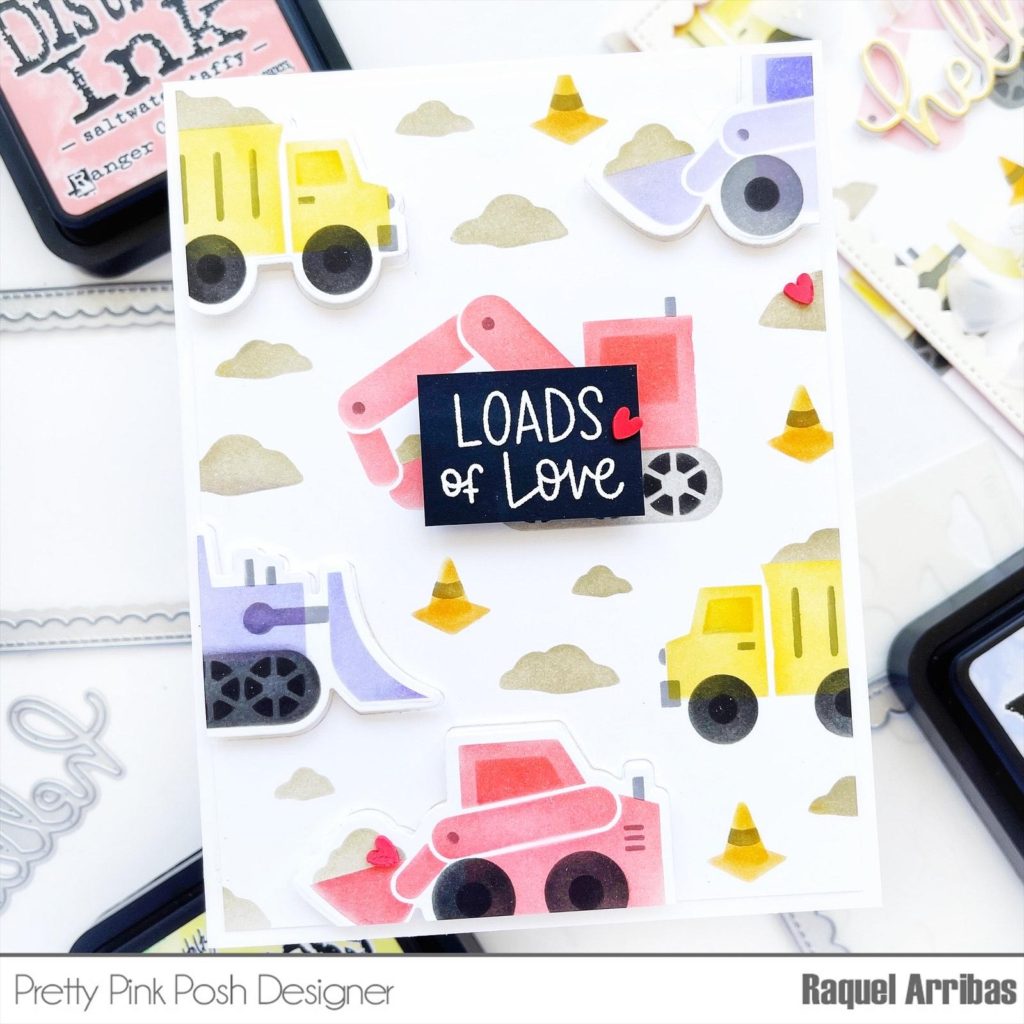
I have always loved layered stencils and these ones are no exception. These trucks are so much and unique to “play” with!!! I started off by choosing my color combo, something that really takes me some time as I’m always drawn to use all sorts of shades and in the end I need to narrow down my selection. So for this first design, I chose to use Saltwater Taffy, Squeezed Lemonade and Shaded Lilac Distress Inks along with Black Shoot for the wheels and Gathered Twigs for the sand.
I’m amazed at how easy these came together. Each layer adds more depth and detail to the final design and the alignment is super easy.
I wanted to add some dimension to these tracks so I die cut some of them using the Construction Trucks coordinating dies which worked like a charm with some trucks.
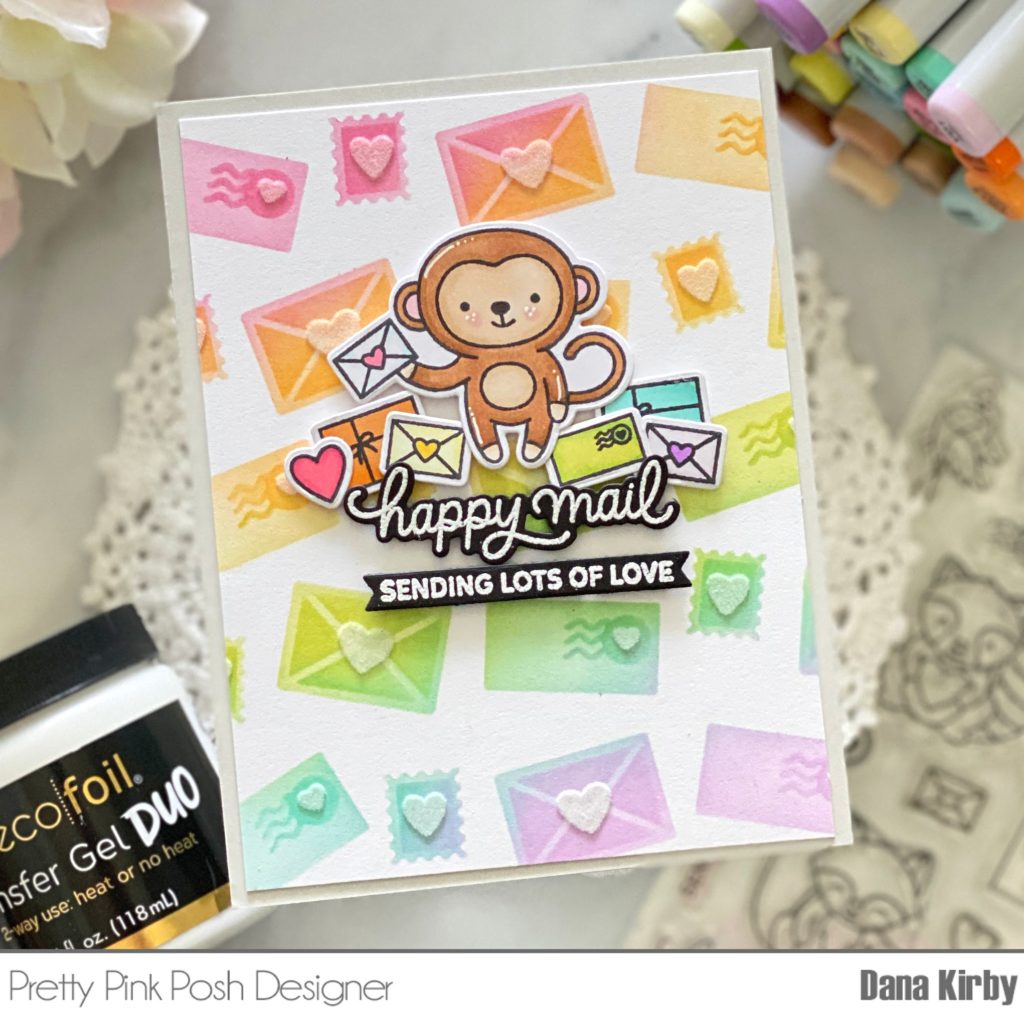
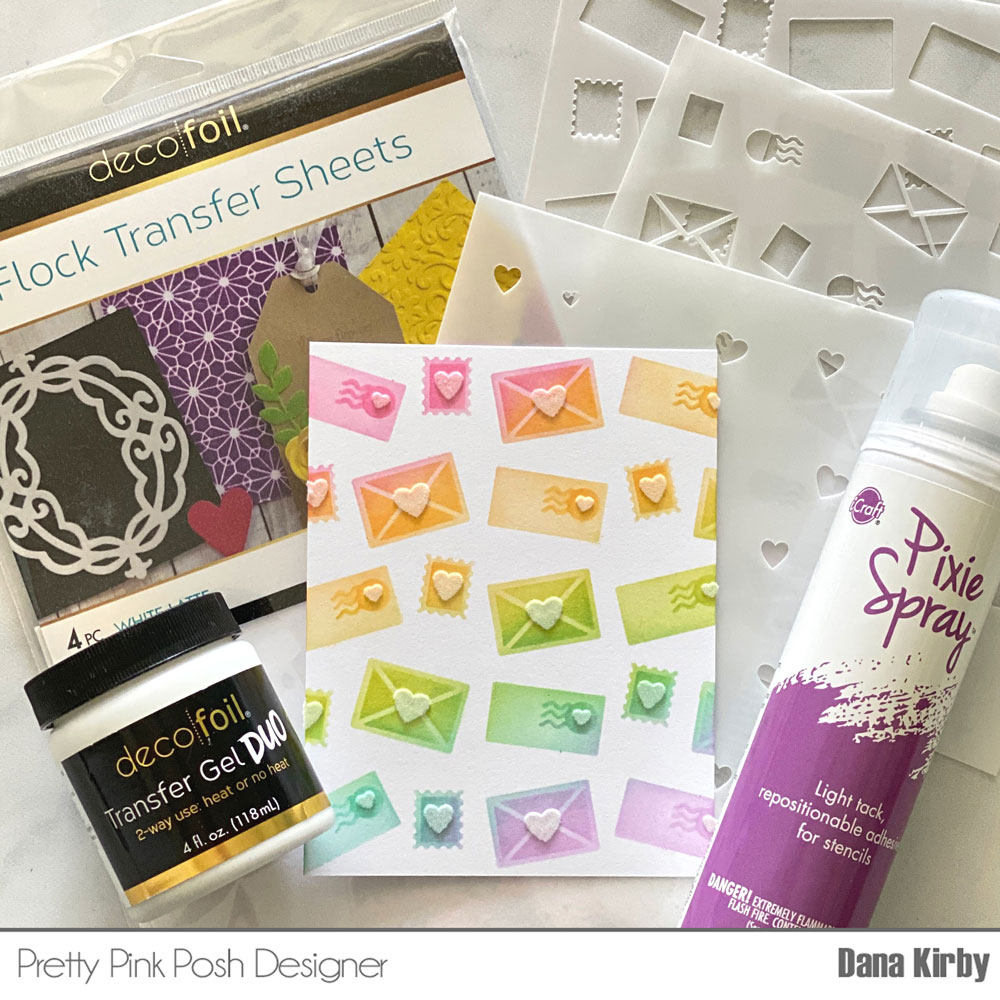
Hi friends! It’s Dana here today and I am so excited to be sharing a project for the Pretty Pink Posh and Therm O Web collaboration. My card uses the Flock Transfer Sheets from Therm O Web to add a fun texture to my card panel.
Affiliate links are used for products that are not sold in the Pretty Pink Posh Shop.
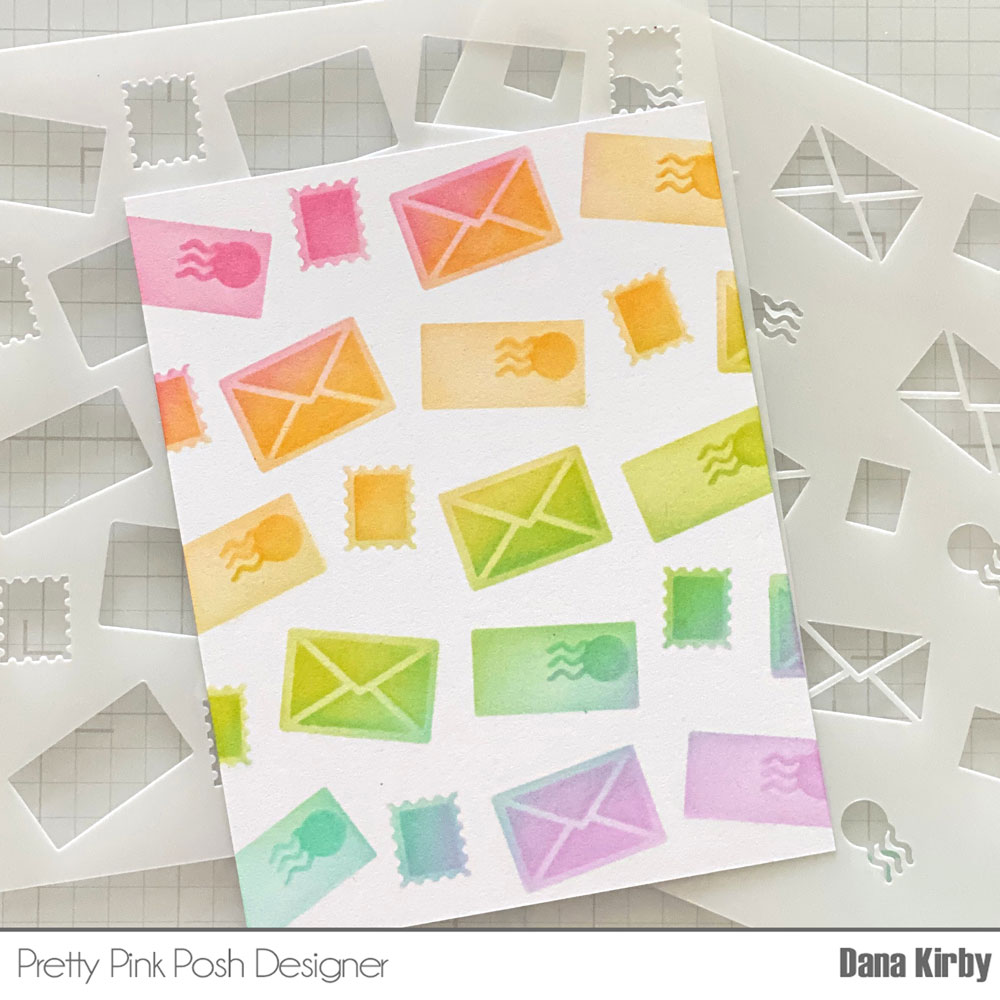
I started my card by using the Layered Letters stencils and dye ink to create my card panel. I lightly sprayed the back of the stencils with Pixie Spray, and used a blending brush to lightly add ink to both stencil A and B.
Next, I used stencil C (the hearts) and added Deco Foil Transfer Gel across the stencil with a palette knife. I let the gel dry until it was clear and then ran it through my laminator with a Flock Transfer Sheet in White Latte. The flock adheres to the gel and you are left with a fun velvety texture on your card panel.
Next, I used the Sending Love set for my stamped images and sentiment. I stamped the images, colored them with Copic markers and used the Sending Love coordinating dies to cut them out. I then attached the images and sentiments to my card panel with foam adhesive. I love that Therm O Web carries the jumbo rolls of foam adhesive in both white and black. The black is perfect to mount behind a sentiment strip so you don’t see the white edge. I have been using their foam adhesive for a little over a year now and I am very happy with its strength, dimension and price.
I hope I inspired you to try using some of the fun products that Therm O Web offers. Come back tomorrow for another day of inspiration!
Next, Layer B with the following colours of distress oxide ink:
Hickory Smoke, Mowed Lawn, Candied Apple, Black Soot
With the last layer, Layer A, I added some of the details with distress oxide ink:
Hickory Smoke, Black Soot, Carved Pumpkin
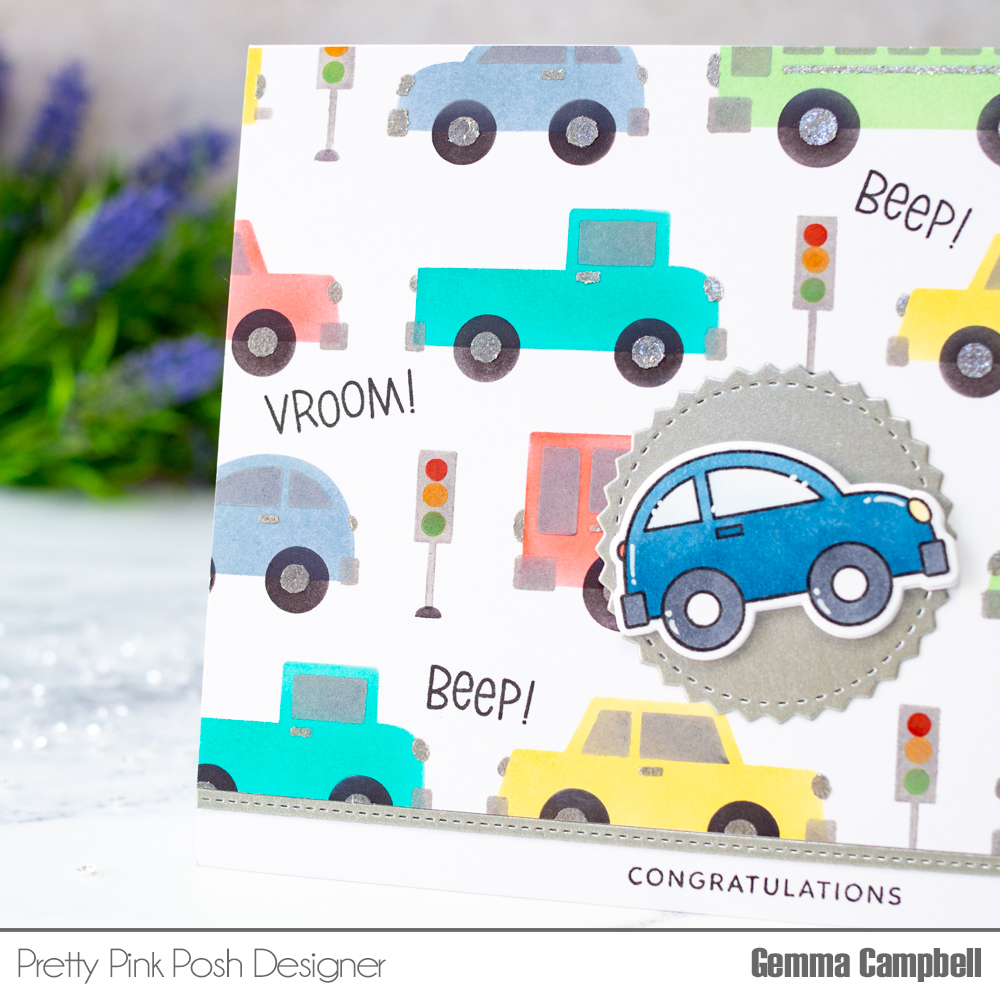
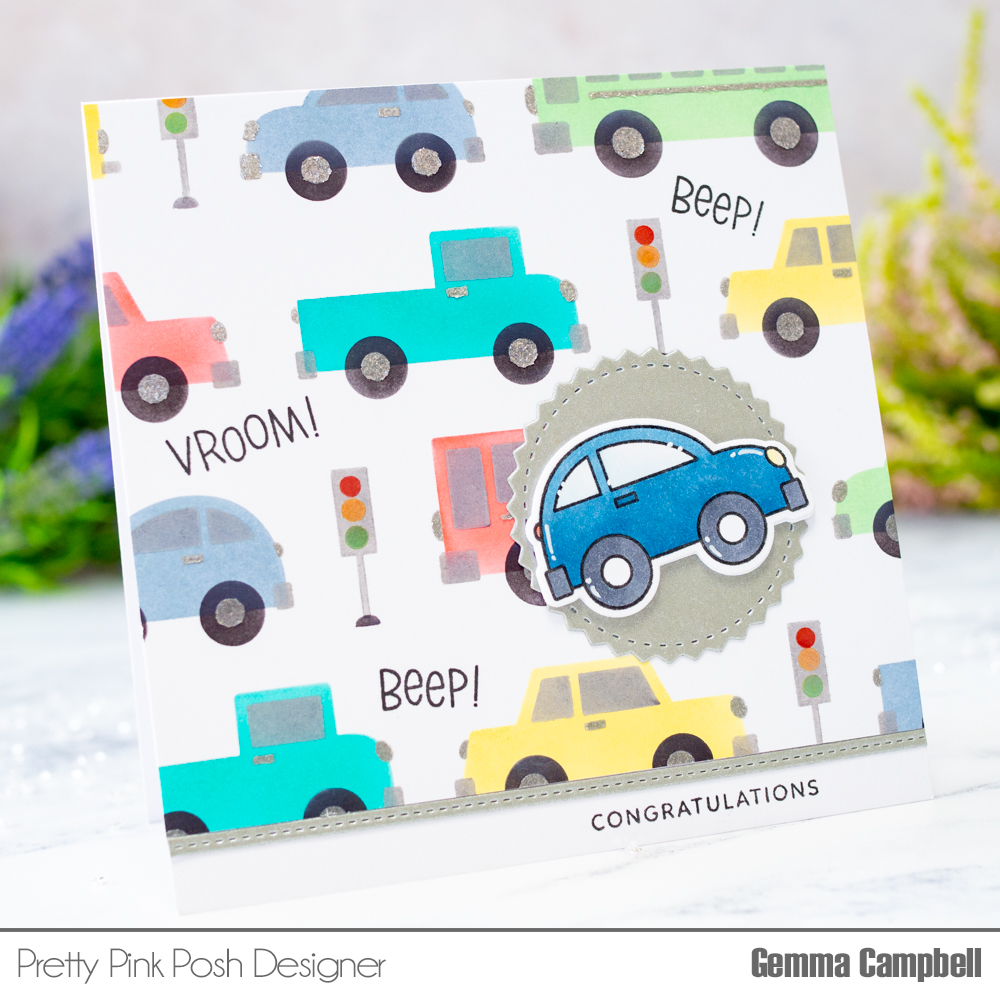
I cleaned the stencil, then repositioned it over the background. I then applied Nuvo Glacier Paste in Quicksilver for the wheel hubcaps, lights and handles. I covered any areas of the stencil with washi tape where I didn’t want to add the paste. Remember to clean the stencil well after using any kind of paste.
In a few areas of the background, I stamped some fun sentiments from the Across the Miles stamp set. Once the paste had dried, I trimmed down the background and added it to a 5.25” square card base. I left space underneath for a die cut silver card stock Stitched Strip, and a Congratulations sentiment from theSimple Sentiments stamp set.
Next, I stamped a car from the Across the Miles stamp set and coloured it with copic markers: B93-97, C5, R22, Y11, BG70 BG000.
I die cut the image with the coordinating die and added two layers behind for dimension. I adhered it on to a die cut silver card circle, using a die from the Halloween Circles coordinating die set. I then added them both to the card to finish.
I hope you enjoyed these cards. Thank you for stopping by!