Hello, Pretty Pink Posh fans! This is Yana and today I am sharing a video tutorial showing how to create a summer sandcastle pattern featuring colored pencils on kraft.
I started working on my card by heat embossing sandcastles in white embossing powder onto kraft cardstock. The reason I picked this particular paper and not white is because kraft, among other things, resembles sand. You can by all means create identical pattern on white, but you’ll have to do a lot more coloring to achieve this look.
Watch my video tutorial below to learn how I made this card.
I started stamping images the center and worked my way out creating rows of perfectly build sandcastles. After my pattern was complete (I heat embossed them in white embossing powder) I adhere it onto an A2 side folding card base.
I also heat embossed a “Happy Summer” sentiment in Antique Gold embossing powder onto a strip of white cardstock and foam mounted it on top.
To add a bit of coloring to my piece I used Prismacolor pencils. First, I highlighted the inside of each castle outline with white – this added some dimension and interest to my images.
To create the look and feel of sand I adhered Gold Shimmer seed beads at the base of 3 castles on my card forming a visual triangle. This added a bit of much needed texture to this project.
Finally, I used a Light Aqua Prismacolor pencil and added lots of color. I colored the flags and windows and later created ombre looking sky in between the rows of my castles.
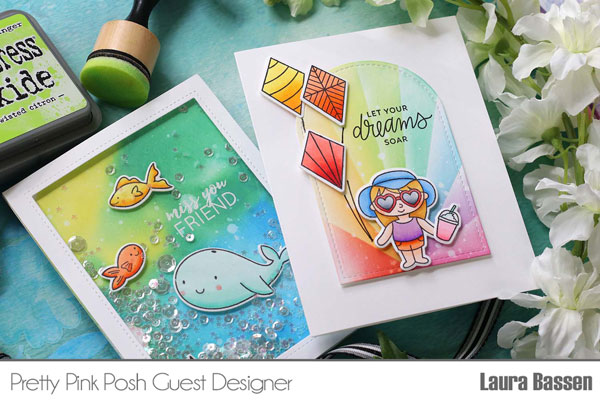
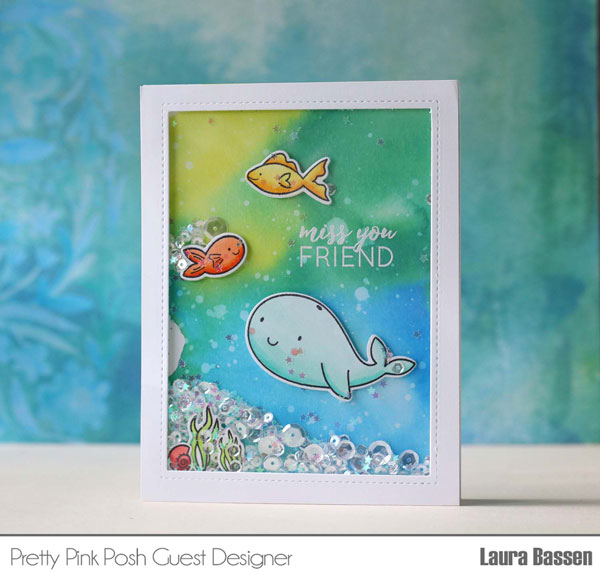
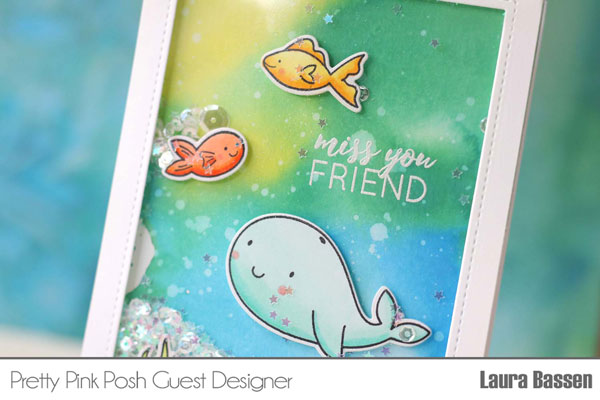
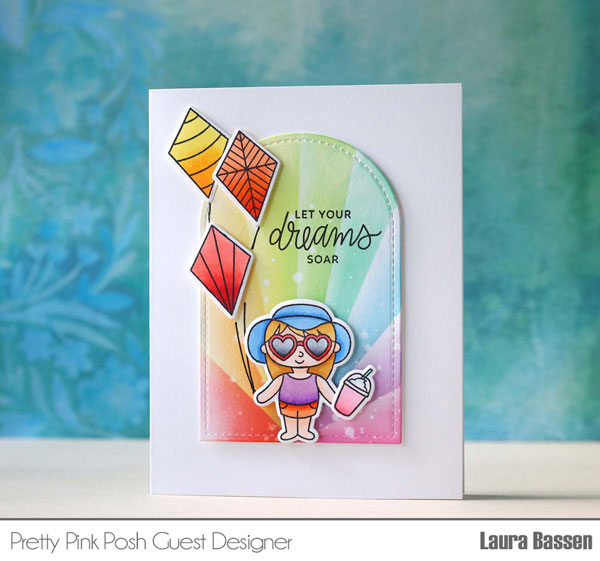
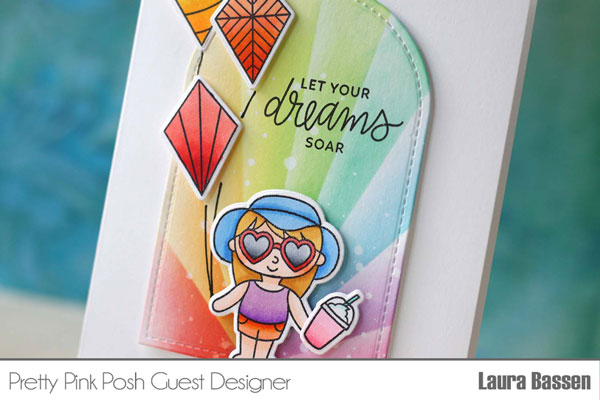
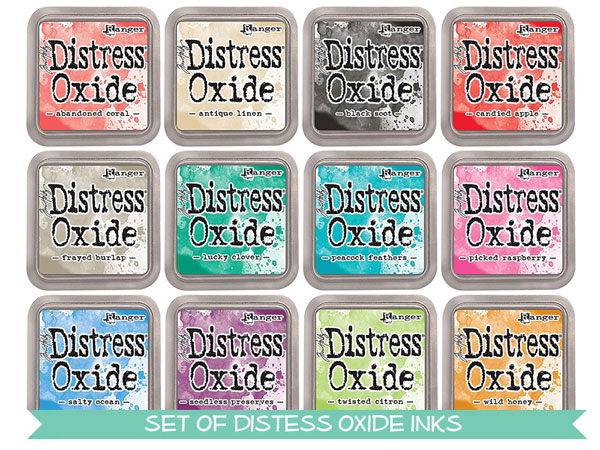
Hi there! Laura here and today I’m excited to share a couple of project using several of the new Pretty Pink Posh stamps and dies as well as several of the new Distress Oxide Inks.
It’s no secret why the Distress Oxide inks are such a hit! First of all, they blend like buttah! The 12 new colors are bright, happy and right up my alley! I created two colorful backgrounds with the Distress Oxide inks using two of my favorite techniques: ink smooshing & ink blending.
For the first card I wanted to create a deep sea type of feel so I smooshed Twisted Citron, Lucky Clover, Peacock Feathers & Salty ocean onto my craft mat and smooshed my Watercolor cardstock into the wet, spritzed inks. I added images from the adorable Sea Friends and an embossed sentiment from Birdie Friends. I turned the card into a full size shaker by making a window using the Stitched Notes die and filling the shaker with Iridescent Star Confetti & Sparkling Clear Sequins.
For my next card I used the Stitched Duo 3 die to make the arch shape panel. Then using scrap paper, I masked off “rays” and blended in a rainbow of Distress Oxide inks.
For the images I added the cute little girl from Summer Friends. I used the Fly a Kite set for the sentiment as well as a few kites. Such sweet images that pair perfectly with the cheerful colors of the new Distress Oxide inks.
GIVEAWAY: Want to win your own set of 12 Distress Oxide Inks? Paulina is giving one away to one lucky person! Leave a comment on this post sharing your top 3 current favorite products from the Pretty Pink Posh product line. Comments must be left by August 27th at 11:59pm, PDT. Winner will be announced later that week.
Thank you so much to Pretty Pink Posh for having me. Thanks so much for stopping by!
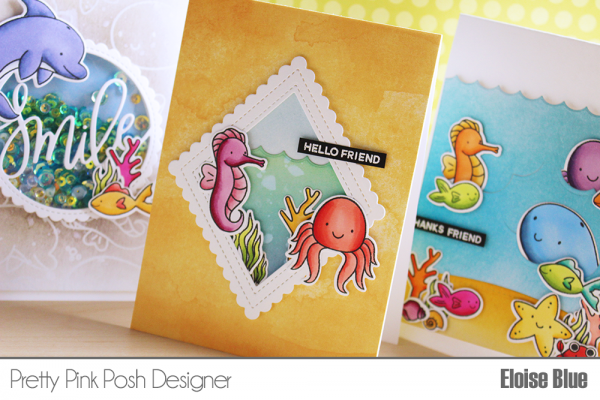
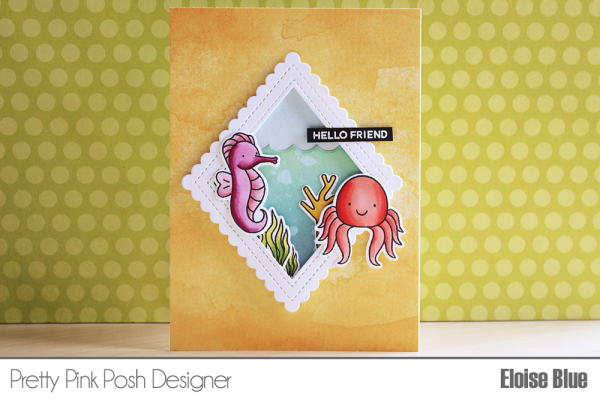
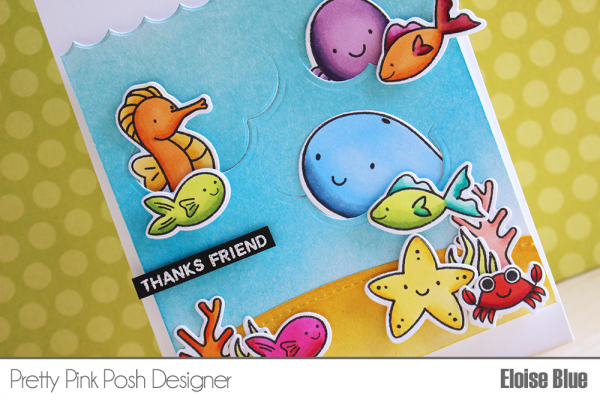
Hello everyone, Eloise here and today I have another 3 cards 1 stamp set video for you all using the Sea Friends stamp set along with several other dies from Pretty Pink Posh also. This stamp set is absolutely perfect, with the large variety of sea animals, I just love it!
To first begin my cards I stamped a ton of images from the Sea Friends stamp set and coloured them with Copic markers then die cut them all out using the coordinating dies.
To begin my first card, I used the Scallop Diamond Tags Dies along with the Stitched Diamonds Dies, I first cut the largest tag die from some white cardstock, flipped the die around on top of the previously die cut tag (180 degree turn) and ran it through again. This way I altered the die so I didn’t have that tag piece at the top anymore. I then took the 2nd largest diamond die from the Stitched Diamonds die set and placed that on the middle and ran it through again to create a frame. Once my frame was created I took some watercolour cardstock and used the Stitched Border 1 Dies and cut out the scallop from the paper. I then used the negative piece as it looked like waves and ink blended some colour onto that piece using Distress Oxide inks in Broken China, Cracked Pistachio and Faded Jeans to colour in the piece. Once that piece was coloured I used some of the scrap paper to ink blend on a little Tumbled Glass ink to use as a sky. Once I had coloured all my pieces, it was time to assemble.
I used some of the images I had previously coloured and cut out and arranged them over my scene to make sure they fit well. I then adhered my sky and ocean to the back of the frame with foam tape. Added in my images using flat adhesive and foam tape and then adhered the panel to a yellow piece of watercolour cardstock from Lawn Fawn and then adhered that piece onto a white card base. For my sentiment I white heat embossed the ‘Hello Friend’ sentiment onto a strip of black cardstock and adhered that also.
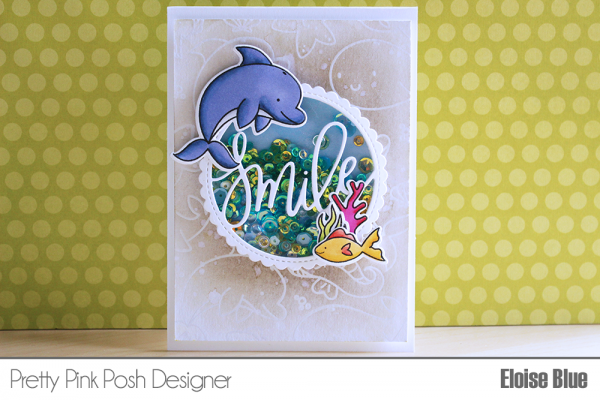
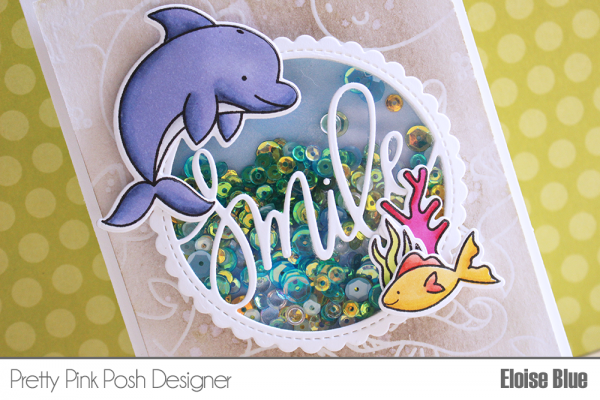
For my second card I first pulled the Sea Friends stamp set and stamped a lot of the images onto another piece of watercolour cardstock with Versamark Ink and then clear heat embossed over the images. I took some Pumice Stone Distress Ink and ink blended over the top of the images and then I used some water to fade it out and make the piece light and more blended. I dried it off and moved on to my focus piece. I die cut the Smile Shaker die from some white cardstock and added two layers of foam tape around it. I used the Mermaid Mix as well as Cornflower sequins to fill my shaker and then I added a piece of blue cardstock behind it. I then adhered to the centre of my card with some tape adhesive.
I pulled some images I had previously coloured in and adhered them around the shaker panel. Lastly I added my panel onto some fun foam and then onto a white card base and that finished up card number two.
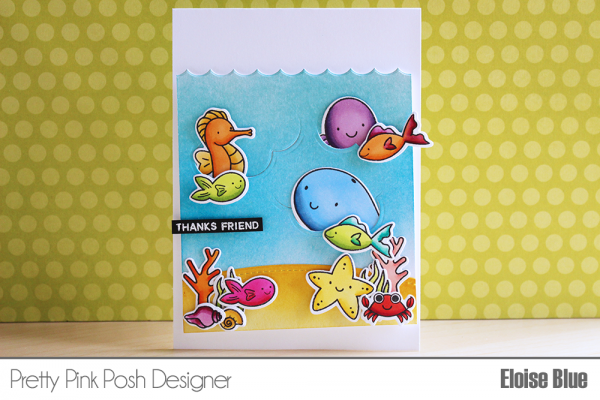
For my final card I went ahead and used a piece of watercolour cardstock as well as the Stitched Borders 1 dies once again. I used the scalloped border on the top of the cardstock and the curved die in the set at the bottom of the cardstock. I used Distress Inks to colour both pieces in. Using Mustard Seed and Fossilized Amber for the sand and Tumbled Glass and Salty Ocean for the ocean piece. Once both pieces were coloured I went ahead and used the cloud dies included in the Fly A Kite coordinating dies set and partially die cut some of the bottoms of the clouds as waves into my ocean piece so I could slip some critters inside.
I then used the images I previously coloured and cut before hand and adhered them to my panel. I added some fun foam onto the back and adhered my panel on angle onto a white card base. I then white heat embossed the ‘Thanks Friend’ sentiment from Sea Friends and added it onto my card with foam tape also and that finished up my last card.
I hope you enjoyed all three cards today and were inspired. I love doing these types of videos because I get to push myself even more and show you so many more ways of using one stamp set.
Thanks so much for stopping by and I’ll catch you all next time!
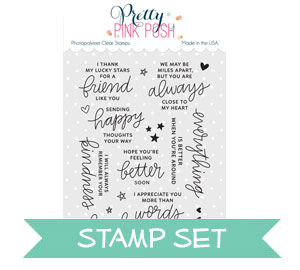
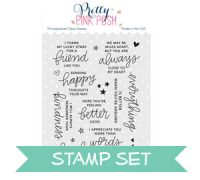
The Thoughtful Greetings stamp set I am using for my card today contains messages for a variety of different occasions. I picked just one of them, Sending Happy Thoughts Your Way, to stamp a background pattern for my card.
Watch my video tutorial below to learn how I made this card.
I used a light pink ink color for my stamping, but you can go with any color you like. I was going for a soft and feminine card. I started stamping in the center of my panel, first stamped the middle row and later added rows on the left and right hand side to make sure my stamping was centered.
You can combine multiple messages to create a background like this, but I always like to use just one. If you feel your pattern is lacking you can always add additional elements such as hearts or stars. I used a large and small heart images and stamped them in between my messages. You can also take your background even further – use several colors of ink for stamping and/or incorporate heat embossing. After stamping large hearts I heat embossed them in Antique Gold embossing powder.
To highlight one of the messages and create the main sentiment for this card I stamped same message over the already stamped area in black ink. Here’s a close up of that – I love the pop of pink behind black.
Finally I embellished my card with a number of Sparkling Clear sequins and later used a black pigment pen and added tiny black dots here and there to ground the black stamped sentiment
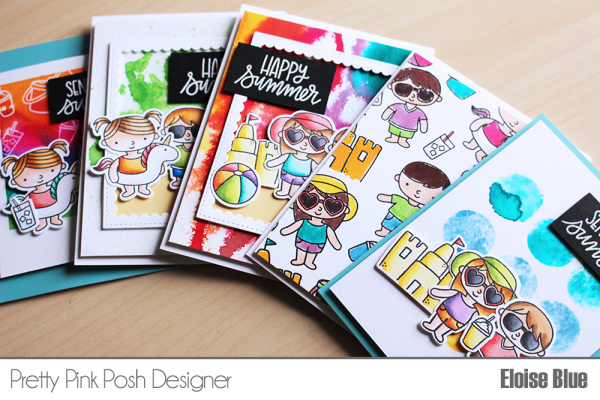
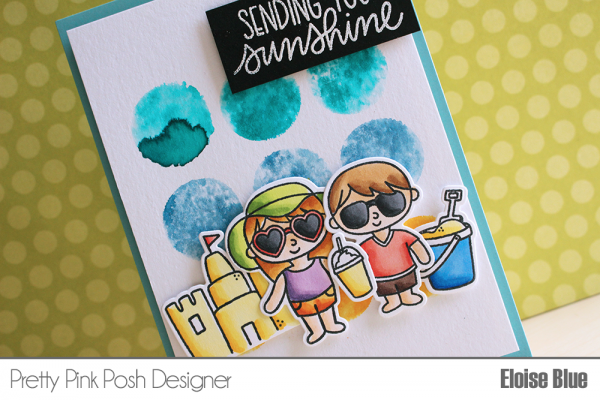
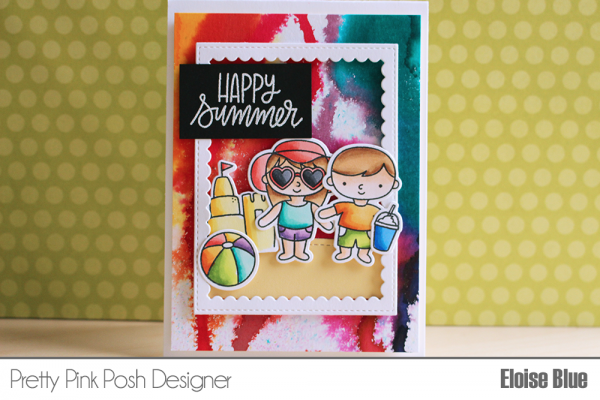
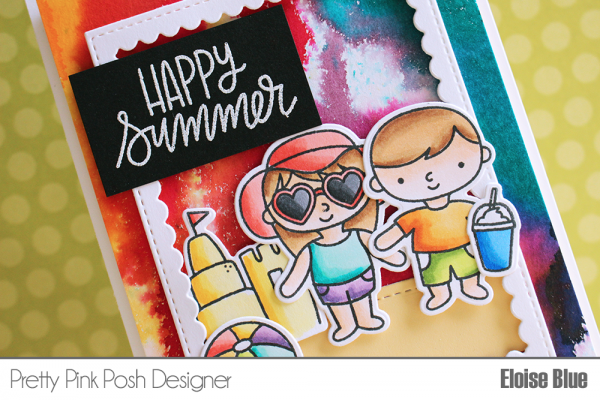
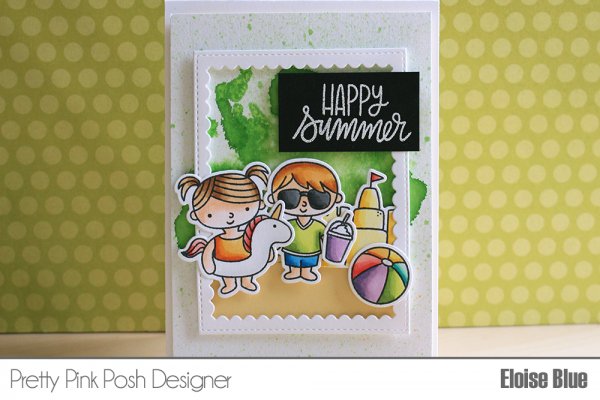
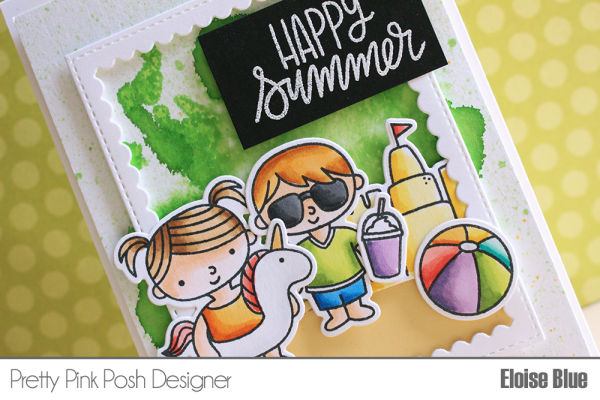
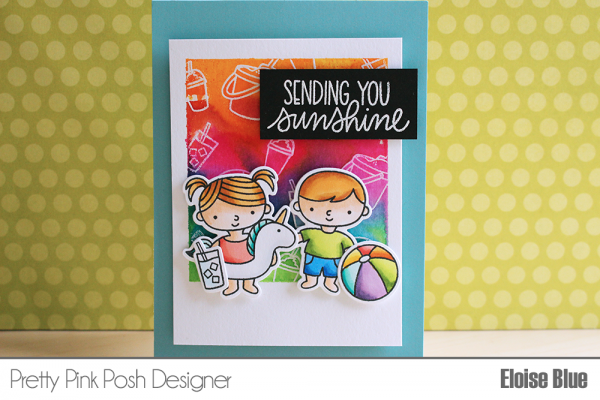
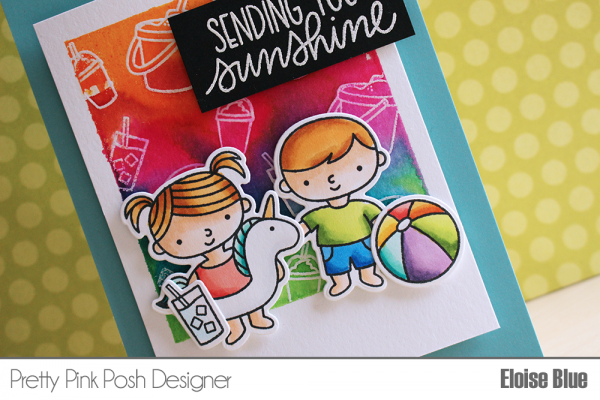
Hello everyone, Eloise here today and for today’s cards and video I decided to try out the new Jane Davenport Mermaid Markers along with using the Summer Friends stamp set from the brand new release! This new release is so much fun, I love everything so so much and there really is something for everyone here. So in addition to using the new stamps I decided to use my new Jane Davenport Mermaid Markers. I just received these in the mail and could not wait to try them out. Watercolour is one of my most favourite things and I’m so excited to use these markers in five ways today to make five very different, but yet coordinating cards at the same time.
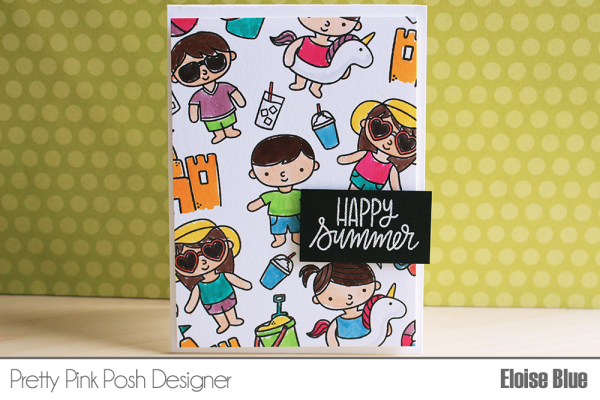
For my first card, I decided to just use the markers for simple water colouring – which is the most obvious way to use them. But to get the full use from the markers, I decided to make my own patterned paper with the Summer Friends stamp set. I first stamped all my images and the water coloured them in with the markers. These markers are already in liquid form, so I used no water with them at all. I love how the colours moved and honestly, to colour this entire background was so super fast and took no time at all. My colouring isn’t perfect, but I love how vibrant and fun this background is!
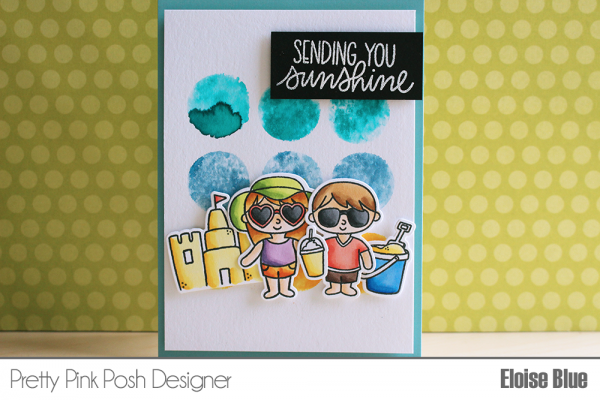
For my next card, I decided to do some stamping with these markers. I took the ball image from the Summer Fun stamp set, flipped it upside down on my block so the lined part is adhered to the block and then coloured on some of the marker onto the stamp, spritzed it with water and stamped down onto my paper. I used two blues and a yellow to resemble the sky and sand and I loved stamping with these markers. You get a different look every time with how the watercolour dries, I love all the harsh lines you get when a pool of water dries next to a less wet part of the image, it looks so fun – I love this.
Next up for my third card, I decided to try the dripping watercolour. I was completely inspired by the melting crayon art for this, but tried to replicate it with watercolours. I tilted my paper on the side, pressed on the marker to let the colour drip down the panel. This for sure didn’t work the way I pictured it at all, so I helped the colour move with spritzing on a little bit of water and this worked, but it also made the colour spread around like spider veins, which in the end, once I repeated all the colours I wanted to use actually looked pretty cool. I did like how this turned out in the end, but perhaps it would have worked better if I sprayed the entire panel first and then let the colours do their thing.
For my fourth idea, I decided to try watercolour with alcohol. I’ve never tried to use alcohol with watercolours before, but I thought the reaction would be fun. I first took a piece of watercolour cardstock and dripped some of the green marker on top. I then added a little water to help the colour move and spread around and then began to spritz it with rubbing alcohol solution. You could also have used Copic blender re-inker if you didn’t have rubbing alcohol. I loved how this looked, the bleached look you get in the centre of your concentrated colour and then the small green splatter that you get from the pressure of the spritz on your paper looks so amazing! Moving watercolour with alcohol gives a whole different look rather than just regular water and I will definitely be doing this again.
For my final way of using these watercolour markers I decided to do a simple watercolour resist. I love the look of watercolour resist, so I decided to make my own patterned paper again, masking off a square first with painter’s tape, stamping out the ball, drinks and bucket images all over with Versamark ink and then clear heat embossing the images. I then proceeded to take the different colours of markers and paint over the background. The colours blended seamlessly between each other and created a nice blended background overtop of those images peeking through. A simple resist is sometimes all you need to create a fun subtle background.
To finish up the cards I just used various dies from Pretty Pink Posh, the Stitched Borders 1 Dies and Scallop Frames Dies also to create different layouts on my cards. I also stamped and coloured all the images from Summer Friends with Copic Markers and cut them out using the coordinating dies. I arranged them all on my different cards and then to finish them up I used the sentiments in the stamp set to white heat emboss them on black cardstock and then adhered them to the cards accordingly.
I really hope you enjoyed my cards and video today. I loved playing with these markers, they are a lot of fun. I also sort of created a five cards with one stamp video for you too, which I didn’t plan it just worked out this way!
Thanks so much for watching and stopping by today. Make sure you check out the brand new release if you haven’t already and I’ll catch you all next time!
Hello, Pretty Pink Posh fans! This is Yana and today I am sharing a video tutorial showing how create a dreamy watercolor scene using stamps from the new Fly A Kite set.
I started working on my card by stamping 2 clouds and a sentiment from the Fly A Kite stamp set in Versafine Onyx Black Ink onto Distress Watercolor Paper (in my video I am using Arches Hot Pressed Paper). Next, I stamped 3 kites and kite strings as well as a number of tiny florals and leaves from the Bold Blooms stamp set onto a separate panel.
Watch my video tutorial below to learn how I made this card.
I’ve been slowly growing my Daniel Smith watercolor collection and I was anxious to play with new colors so I used them to color this card. I went with Cobalt Teal Blue to watercolor the sky as well as one of the kites and some flowers. I also used Quinacridone Rose and Magenta colors to color the two other kites and the rest of the flowers and finally Sap Green to color the leaves. For this card I used the Silver Black Velvet Brush Size 8.
I did my coloring a several layers – after I had applied the first, light, wash of color I intensified the areas I wanted to appear darker. After my coloring was done I used coordinating dies and cut these images out in my Platinum 6 die cutting machine.
I used a lot of foam adhesive and also a bit of glue to adhere my die cuts onto the card. I foam mounted the kites and flowers and used glue to adhere the leaves.
To add a bit of sparkle and shine I used sequins from the Mermaid Sequin Mix and adhered them onto my card. Lastly, I coated several flowers with Wink Of Stella glitter pen and Nuvo Crystal Glaze to make them dimensional and shiny.
Happy cardmaking! I hope you enjoyed today’s video and post.
Hi everyone, Eloise here and today I have another 3 cards 1 stamp set video for you all. It was a big hit last time and people seemed to really enjoy it so I thought I would do another one using the Woodland Critters stamp set which definitely seemed to be a favourite from the May release!
To begin my cards today I first stamped and coloured in all my images in with Copic Markers and used the coordinating dies to cut them out.
To begin my first card I pulled out the Stitched Borders 1 dies and used the curved stitched border to cut out two sections of my white cardstock panel. I only needed the top and bottom of my panel left so the middle section could be open for colour and my scene. I then took another piece of cardstock and blended some Broken China and Peeled Paint Distress Oxide Inks onto the background, to make sky and land. Once I blended on my colour I sprinkled over some water and heat set it with my heat tool.
I then added adhesive to the back of the inked panel and adhered it down to a scrap piece of paper cut to the same size as my final panel. I then added foam tape onto the back of my white panel piece and adhered it to the same scrap paper piece leaving the opening for the colour to show through. I then added adhesive onto the back of my critters that I was using and added them into the scene. I stamped the ‘Friends Forever’ sentiment from the set with some black ink onto the top right hand side of my panel and finally adhered my panel to a kraft card base.
For my second card I pulled the Storybook 1 die to use as the focal point on my card. I then took the same Stitched Borders 1 dies and used the same curved die to cut a piece of green cardstock. Once my piece was cut I also grabbed some blue cardstock and cut it down to size. I used some Mowed Lawn Distress Ink and ink blended a little on the top of the green cardstock piece to give it some shading and used Broken China Distress Ink to ink the blue piece the same way. This is a way to give a little extra to your flat colours of cardstock. I then die cut the Storybook die from some white cardstock.
I then adhered together my background and hill piece and then adhered down the Storybook frame onto my panel. I used foam tape and flat adhesive to adhere down all the critters I chose to use also. I then stamped the ‘You Are Wonderful’ sentiment onto the bottom of the panel and finally adhered the piece to a white card base.
For my final card I used the Scallop Circle Tags dies to cut a white tag. I then used a circle die to also cut out an additional two circles to fit inside my tag. I cut one circle down to a small hill and coloured that using Mowed Lawn and then used Broken China for the full circle. I adhered the two together and then used foam tape to adhered the coloured circles to my tag. I arranged a small scene using a few of the critters that were left onto the circle and adhered them down into place. For my background of my card I used some plaid paper from Lawn Fawn and adhered it down to a white card base. Then to make the tag feel like it fit with the card I poked a hole through the top centre of the card and also cut a slit in the fold of the card so I could thread some hemp cord through and tie it in a bow, anchoring the tag to the card.
I added some adhesive to the back of the tag so it would sit in place instead of moving around and then for the sentiment I white heat embossed the ‘Friends Forever’ sentiment onto some black cardstock, heat set it, trimmed it down and foam mounted it onto the bottom right hand side of the card.
To completely finish off all the cards, I pulled some Sparkling Clear Sequins out of my stash and scattered them around each of my cards to pull them altogether.
Thanks so much for stopping by today, I hope you enjoyed the three cards I made today. I always have a lot of fun making these videos as I love to create multiple cards especially when you have most of the supplies out already. They’re all quite simple cards, but have a similar vibe I feel.
Anyway, thanks again, I hope you got inspired and I’ll catch you all next time!
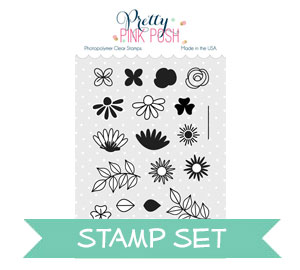
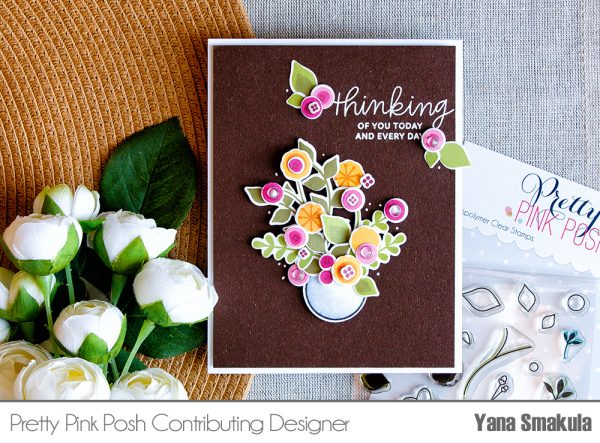
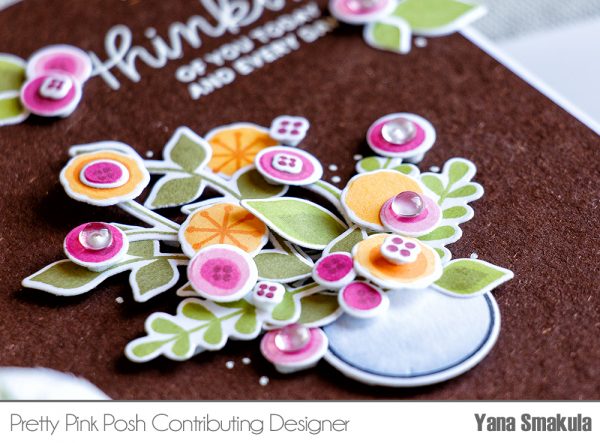
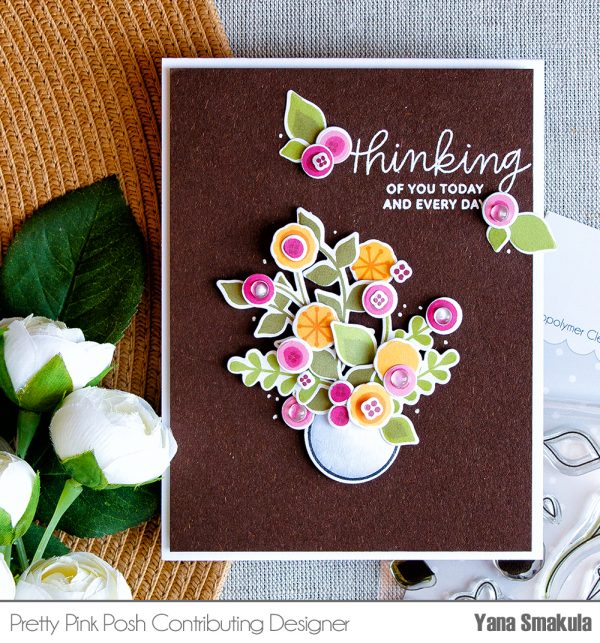
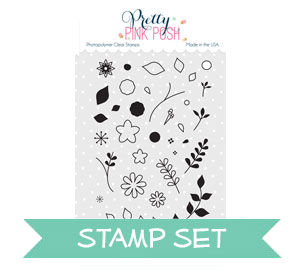
Hello, Pretty Pink Posh fans! This is Yana and today I want to share a floral card using the Build A Bloom stamp set.
This set features a number of parts and pieces to create your own unique flowers, leaves and floral arrangements. There are outline and corresponding solid images and also just outline and just solid images that don’t necessarily go together. So with this set you can chose to stamp your flowers and leaves outlines and color them using your favorite coloring mediums or stamp solid images using colored ink and have instant flowers and leaves. You can also combine a lot of these to have an outline and solid stamped color.
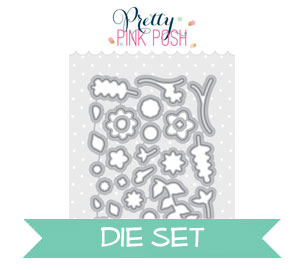
So quite a lot you can do and many different looks you can have. There is a set of coordinating dies available and these cut pretty much each and every shape out.
Watch my video tutorial below to learn how I made this card.
I started working on my card by die cutting the shapes out first. With tiny dies like these I prefer to keep them connected and cut them all at once first and do my stamping later. I feel this way I am saving a lot of time as for me it is easier to align a stamp over a small die cut shape versus align a die over a small stamped image.
I die cut a number of shapes out, I think I cut all of them 2 or 3 times and later had additional florals cut to have more flowers for my card.
Next I used various colors of ink and stamped my images. I picked 2 shades of green, 2 shades of yellow and 3 shades of pink for my stamping. I first stamped layers using lighter color of ink and later came in added a detail layer onto some of my images using a darker shade. So in a way this stamp set can be used as a color layering one where you build your flower using individual layers and different colors of ink.
To create a vase for my floral arrangement I used a Christmas ornament from the Winter Friends stamp set. I turned it upside down and colored using C3, C1 and colorless blender Copic markers.
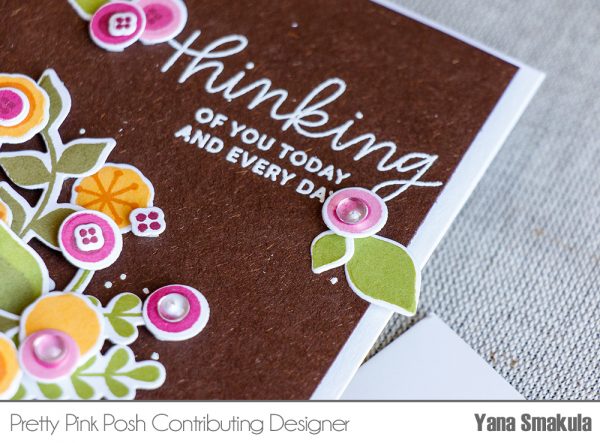
I made my floral arrangement heavy on one side as I wanted to add a sentiment to the other side. I went with “Thinking Of You Today and Every Day”from the Thoughtful Greetings stamp set, but of course you can go with any other message you like.
Next I foam mounted my panel onto an A2 top folding card base and since I had some additional die cuts left I used them to add some flowers and leaves around the message. I also used small clear droplets and adhered those onto some of the flower centers for additional interest.
To begin my card today I first decided to do my background. I took four colours of my Nuvo Mousses – Aquamarine, Peony Pink, Pink Flambe and Citrus Green and then some sponges. I just used the foam ink blender sponges, but make-up sponges or anything like that would work. I dipped in my sponge into the mousse and then spread it across the top of my cardstock panel. I then repeated the steps with the other three colours to create my swiped coloured background. A little bit of a different background for me, but I love the swiped painted look it gives and these mousses have the best shimmer to them!
Next up I stamped out my images from the Bold Blooms stamp set onto some more watercolour cardstock. I used Versafine Onyx Black Ink and then clear heat embossed the images so it would be easier to watercolour them. To mix up my paint, I used a palette knife to take out a little colour out of each of the jars, popped it into a palette and sprayed the colour with water and mixed it around with a paint brush. This mixed up the colour nicely and it keeps that shimmer which is amazing.
I water coloured in my images like normal with each of the colours of mousse. I also pulled the Antique Gold colour to colour in the centre of the flowers. I loved water-colouring with these as it was so super easy, they moved just like regular watercolours and really the only thing you don’t get is the shading but, like I mentioned before – the shimmer is amazing, so it makes up for it! It’s like using metallic watercolours. I could have done that, but I like getting many uses out of my products. Once all my images were coloured and dried I die cut them out using the coordinating dies.
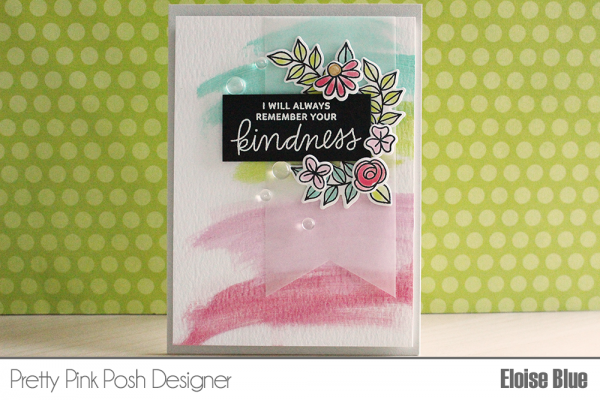
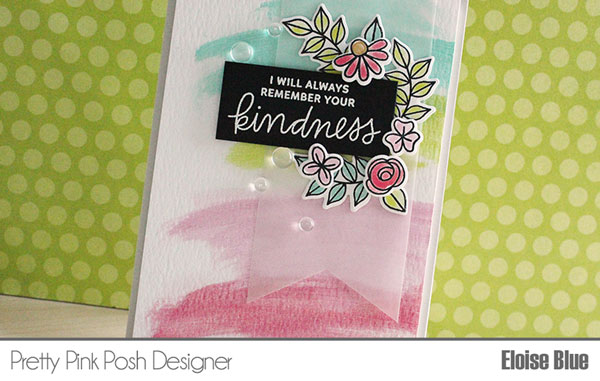
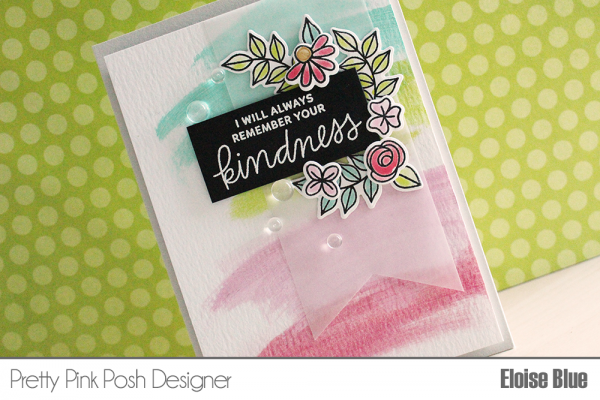
Next up I white heat embossed a sentiment from the Thoughtful Greetings stamp set onto some black cardstock and trimmed it out into a rectangle. I also used the Scallop Hexagon Dies to cut a banner edge into a piece of vellum. I first adhered down the sentiment strip onto the banner, overhanging the edge a little and then arranged my flowers around it, popping some of them up and leaving some flat. I then adhered my banner down to the coloured panel I created earlier.
To completely finish up the card I adhered my panel onto a grey card base with some fun foam and then scattered some 4mm Clear Droplets and 6mm Clear Droplets to finish it up.
Thanks so much for stopping by today and I hope you got inspired.
For my card today I’m going to be using the watercolour stamping technique with Distress Inks to create a fun wreath using the flowers in both of the new stamp sets.
To begin my card today I first stamped out all my outline images with Versafine Onyx Black Ink onto some watercolour paper. I stamped out a ton of images since my wreath that I’m going to be making is going to be super full. I then pulled some colours of Distress Inks out and began my watercolour stamping. I first found the coordinating solid stamp, pressed it down into the ink pad and then spritzed it with a little water to reactivate that ink and then stamped it down onto the coordinating image. I repeated this step until I had coloured all my images. I love this technique, it’s super fast and I love how it never looks the same. You get dark and light spots, spots that aren’t always covered completely, it’s really fun!
Now that all my images had been stamped and dried completely, I cut them out using both sets of coordinating dies and set them to the side for later. I then took a piece of watercolour cardstock, and die cut the edge of it using the rounded die in the Scallop Border 2 die set. The mini scallops are so cute!
Now my panel was ready to assemble. I first traced around a circle (I used a bowl) with a pencil so it was easier to make my wreath circular. I then laid down all my images around the circle to make my wreath. When arranging all the images I worked in odd numbers and a triangle pattern, to make it appealing to the eye. It’s rule of thumb that things looks better in odd numbers and threes, so that’s what I went for. Once all my images were laid out around my wreath with all the colours spread out evenly, I could stamp my sentiment. I needed to lay down all my images first to see how much space I had left. I used the Thoughtful Greetings stamp set and used the sentiment ‘Thank You For Everything You Do’ and stamped it in the center of my wreath with Versafine Onyx Black Ink. Now my sentiment had been stamps, I could adhere down my images. For all my leaves I used liquid adhesive and then used the foam tape for the flowers.
Once everything was adhered down I took a piece of yellow patterned paper and adhered it to the bottom of my card base. I then took a piece of fun foam and adhered it down to my panel and then to my card base so it could have some dimension. To finish up my card completely I used some Wink of Stella in the clear and also some Clear Droplets in the 4mm and 6mm size.


 I used a light pink ink color for my stamping, but you can go with any color you like. I was going for a soft and feminine card. I started stamping in the center of my panel, first stamped the middle row and later added rows on the left and right hand side to make sure my stamping was centered.
 You can combine multiple messages to create a background like this, but I always like to use just one. If you feel your pattern is lacking you can always add additional elements such as hearts or stars. I used a large and small heart images and stamped them in between my messages. You can also take your background even further – use several colors of ink for stamping and/or incorporate heat embossing. After stamping large hearts I heat embossed them in