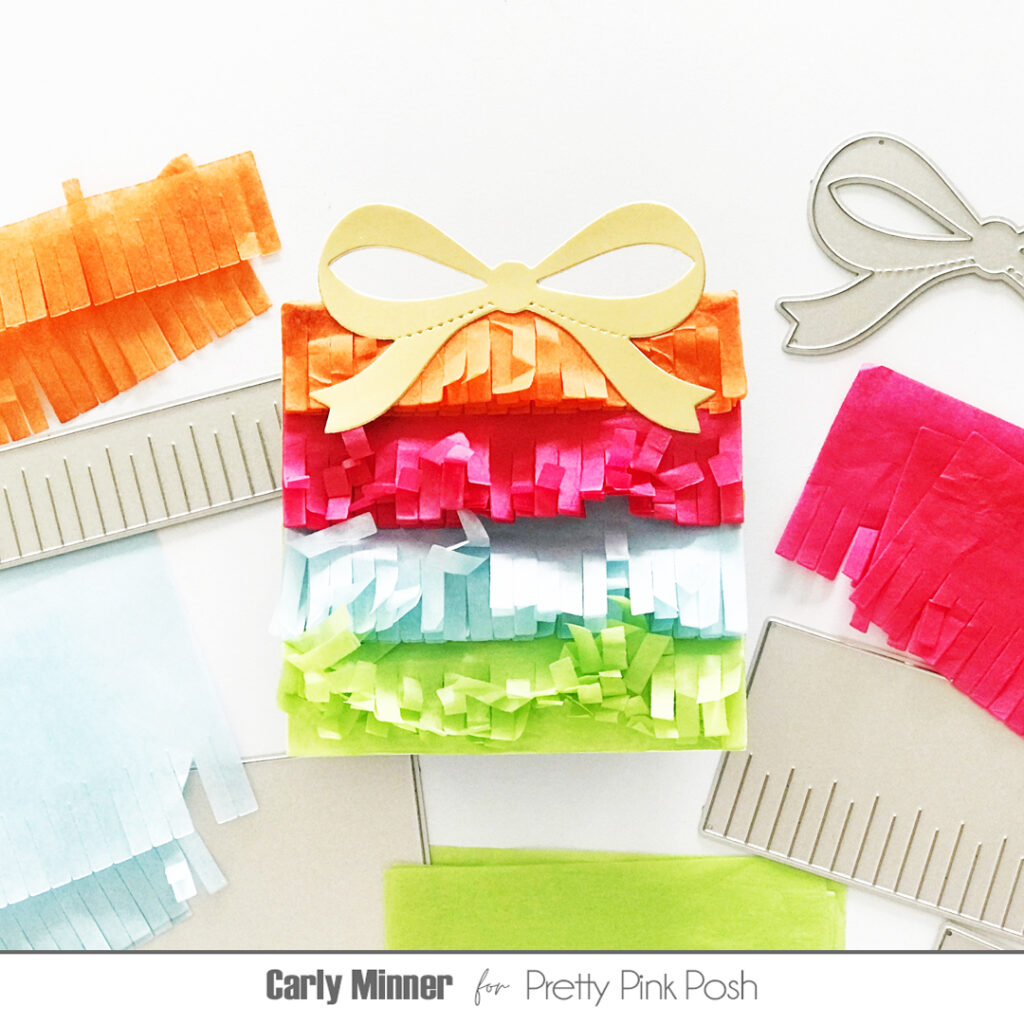
Hi Crafty Friends! Carly here and I love fringe! I think it is so festive & fun so of course I was over the moon when Pretty Pink Posh released the Fringe Present die set! Truly I’ve been smitten with all the Fringe Hearts and Fringe Trees too!
I love to use tissue paper with the fringe dies for lots of fluffy texture and I think it makes this mini card EXTRA in all the right ways!
And how cute is this mini card?!! The small size of the card allows the bow to hang over the edge but still fit nicely in an envelope. Or it makes a really fun card to add to a gift bag because the reinforced bow makes it sturdy enough to hang!
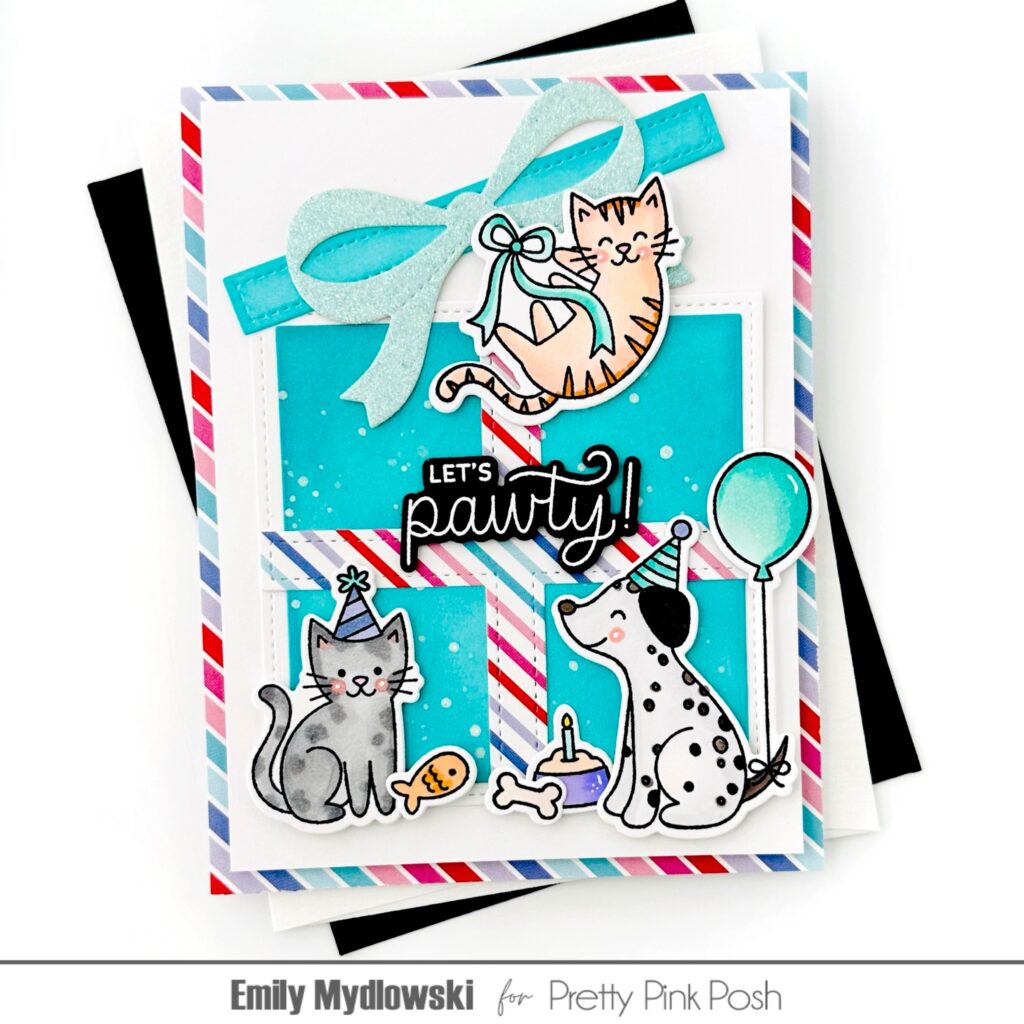
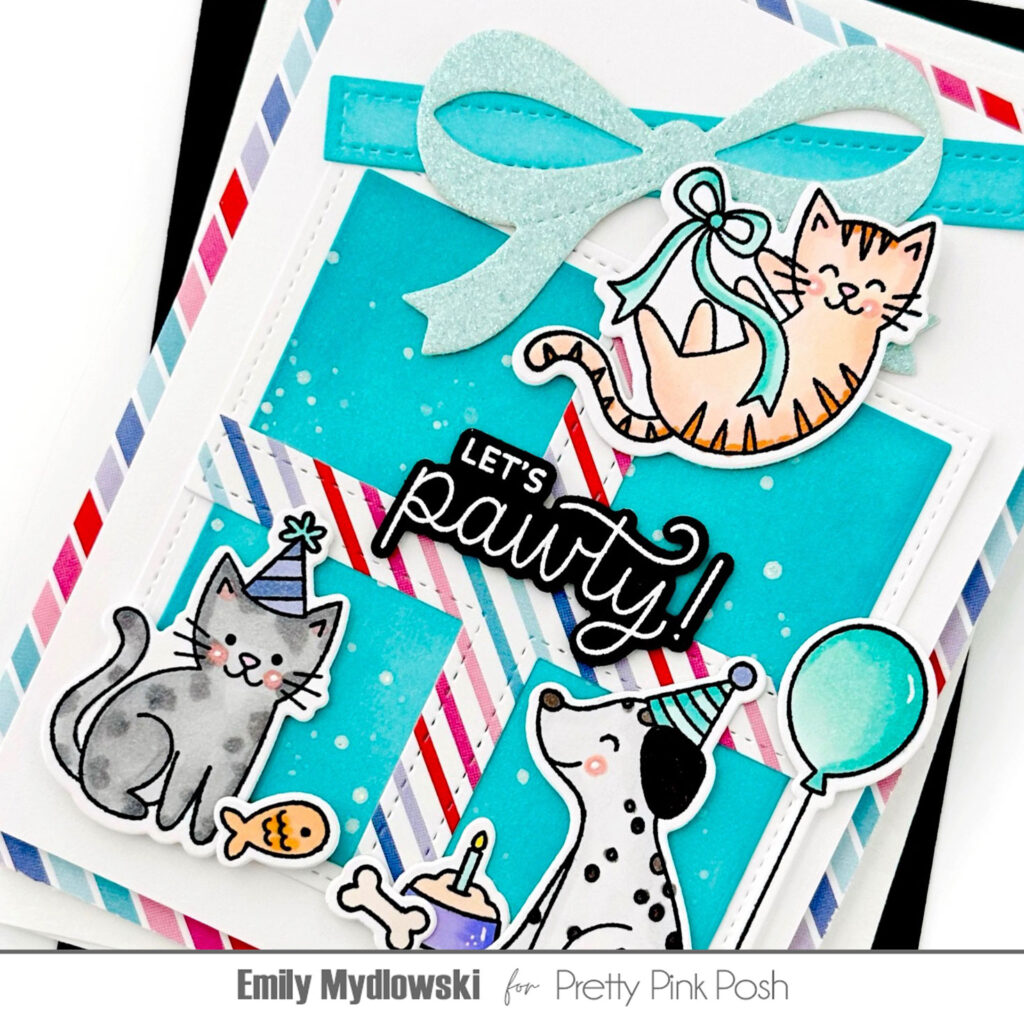
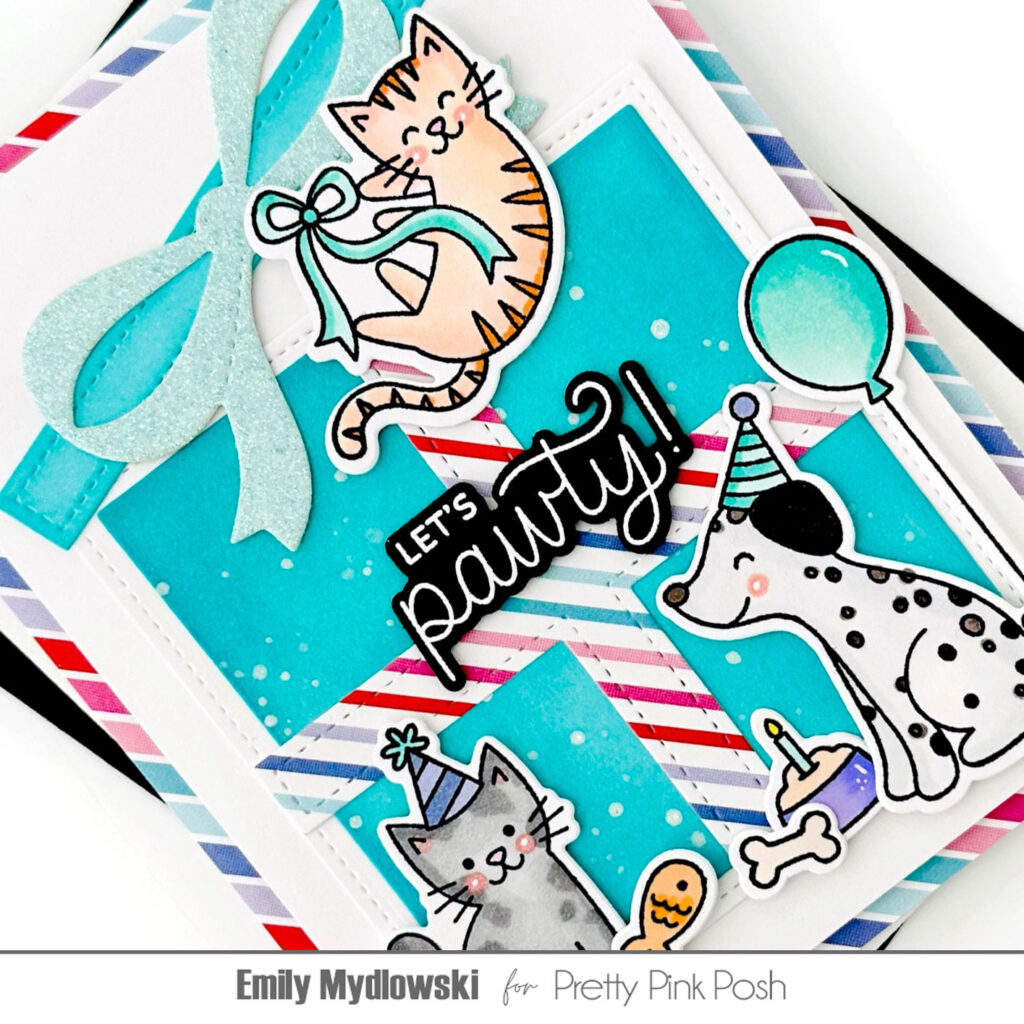
To get started, I stamped all the images with Memento Tuxedo black ink and colored the images with an assortment of Copic & OLO markers. I can’t get over how pawsitively cute the cats and dogs are in this set…with their party hats, bows and balloons.
For the BIG present background, I cut all the pieces using the Present Shaker in white cardstock & pattered paper. I ink blended the inside of the box and topper with a teal inks and finished with white paint splatters.
I adhered all the present pieces together and added a glitter bow to the box top. I angled the box top as if it is about to pop open with a great big birthday surprise.
I adhered all the party animals and their accessories to the present background making sure the kitty had his fish and the puppy had her bowl and bone. To finish the card, I added the black and white heat embossed “It’s Pawty Time” sentiment to the center of the present.
So there we are friends, a playful birthday card using the Present Shaker(not as a shaker) combined with the cutest party animals! Thanks for stopping by and Big Paper Hugs!
Hello friends, Christina here sharing a card that’s perfect for celebrating a birthday or any occasion that calls for a celebration! I used the new Alphabet Candles Stamp set and the Coordinating Dies to create a bright and fun design. Keep reading to find a list of supplies and the steps I took to create my latest project. Let’s get started!
I started by stenciling my background using just the sprinkle layer and a white stencil paste on a chartreuse-colored cardstock panel. Then I die cut the scallop frame from the same cardstock two times and stacked them for some added dimension before adhering them to the background panel.
With the background done, I got to work on the other elements of my card design. I started with stamping the letters on fuchsia, teal, jade, and chartreuse-colored cardstock with clear embossing ink and heat embossing them with white embossing powder. Next, I die cut the letters with the coordinating dies and then added a chunky glitter to the candle flames with a little liquid adhesive. It’s hard to tell in the photos, but they look like little jewels sitting on top of the letters. So pretty!
To finish up my card design, I attached the alphabet letters to my card panel with liquid adhesive and then added a scattering of confetti that I die cut from the same colored cardstock as the letters.
And that’s all there is to this bright and fun card, perfect for any occasion you might be celebrating! Thanks so much for reading about my latest project. See you again soon!
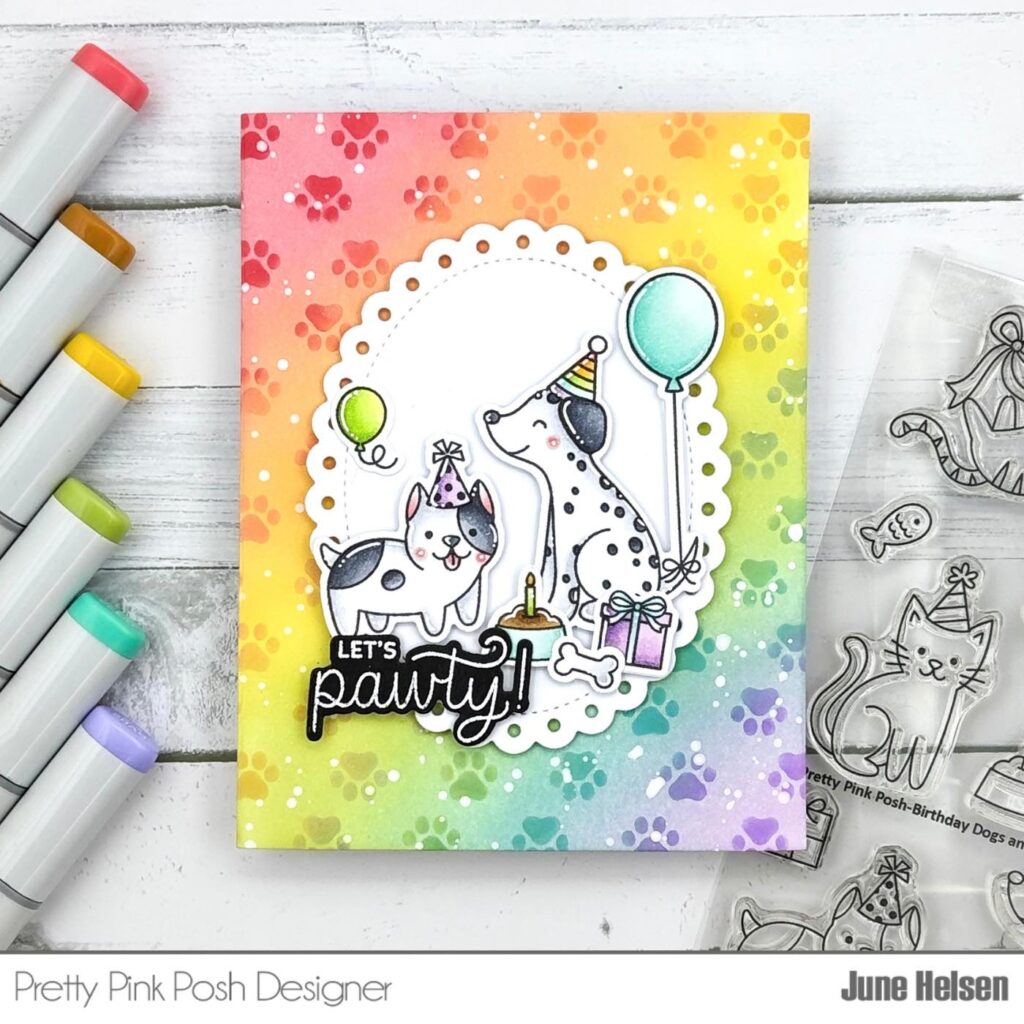
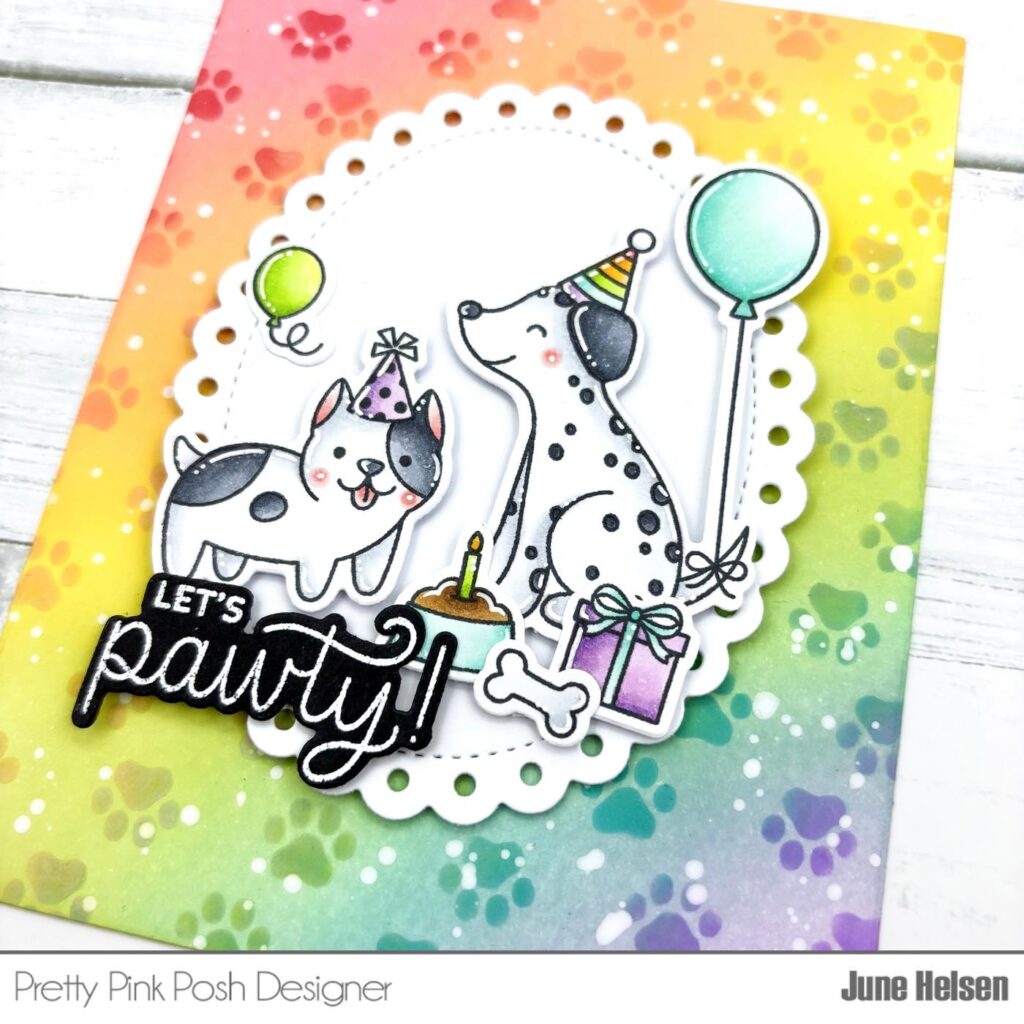
Hello crafty friends, June here! Today I’m sharing a very colorful card I made using some of the newly released products. Let’s get started!
I wanted to create a little scene using the cute pets from the new Birthday Dogs and Cats stamp set, so I colored in my images in various different colors because I knew I wanted to go with a rainbow theme. Ironically, I ended up using just the 2 dogs that I colored in grey tones… But there’s still lots of opportunity to use the other images on a different card .
In addition to the pet bowl and bone I used from this set, I also used a couple of theBirthday Icons to fill my scene. There were so many to choose from that I had a hard time narrowing it down, but I ended up going for one of the presents and that adorable mini balloon (which is my favorite icon for sure!)
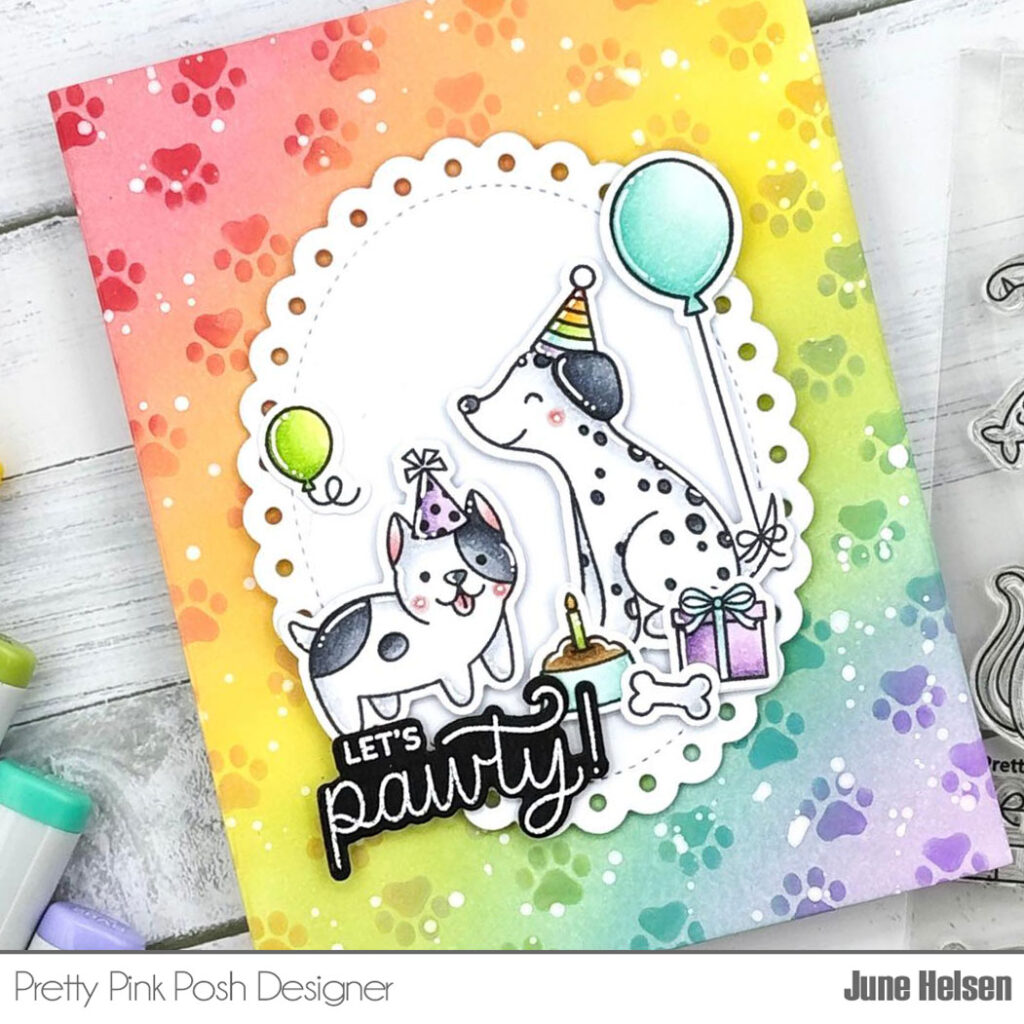
I arranged my scene onto the largest Eyelet Oval, which I cut out of some white cardstock. For my background, I wanted to go for a tone-on-tone rainbow blend using various Distress Oxides. Starting in the corner, I blended 6 light rainbow shades:
I used the new Paw Prints stencil and darker shades of each color to get that tone-on-tone look. I used a tiny brush to make sure I had a lot of control over the color placement. I used these colors:
I carefully lifted my stencil once in a while to check if my color placement was okay and if my colors contrasted enough. I really took my time, but it was so worth it! I was almost sad that I had to cover most of it up with my oval. I also splattered some white paint onto my panel like usual.
Finally, to finish off my card, I embossed the scripted sentiment from the Birthday Dogs and Cats set onto some black cardstock. I love the way this contrasts against all the bright colors!
Even though I don’t use this much color often, I’m so pleased with how this card turned out! I can’t wait to make even more rainbow cards soon, they just instantly put a smile on your face, right? Anyway, I’ll be back soon with another card. Bye for now!
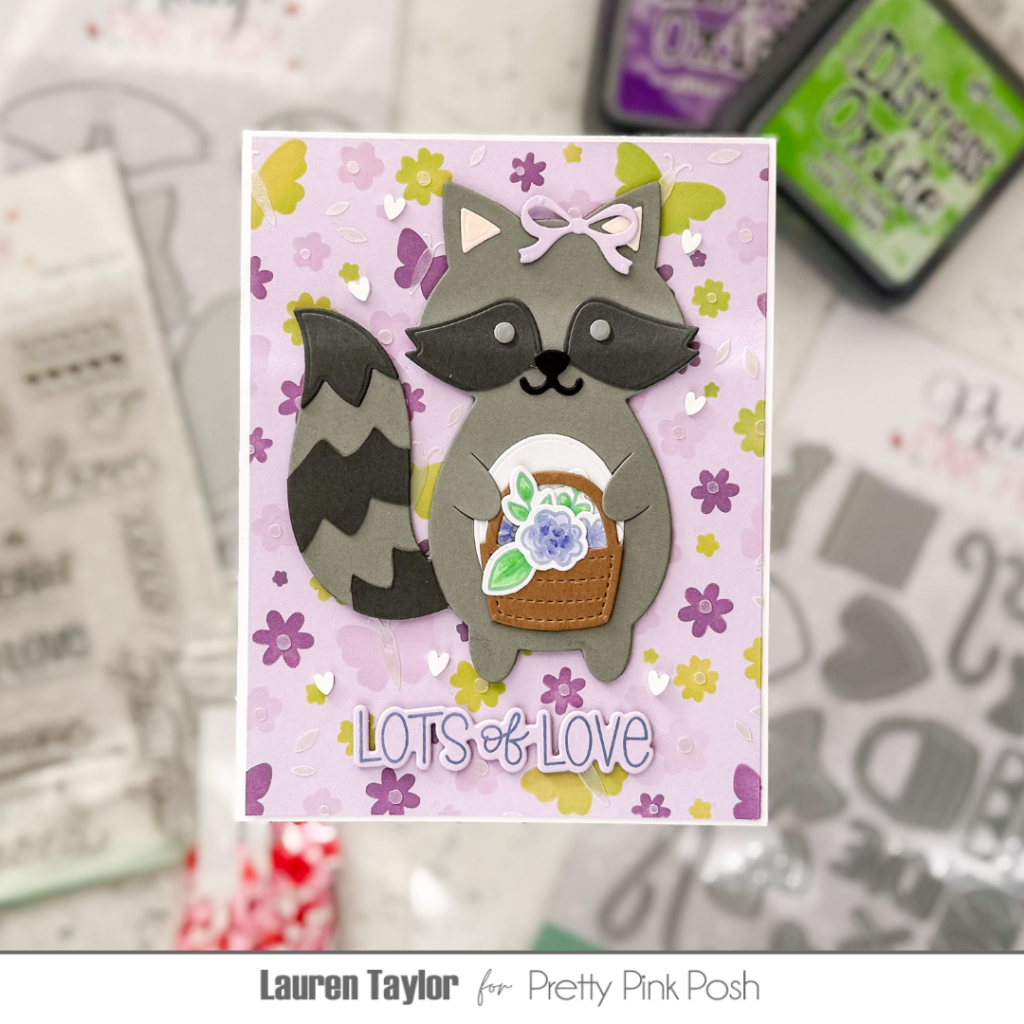
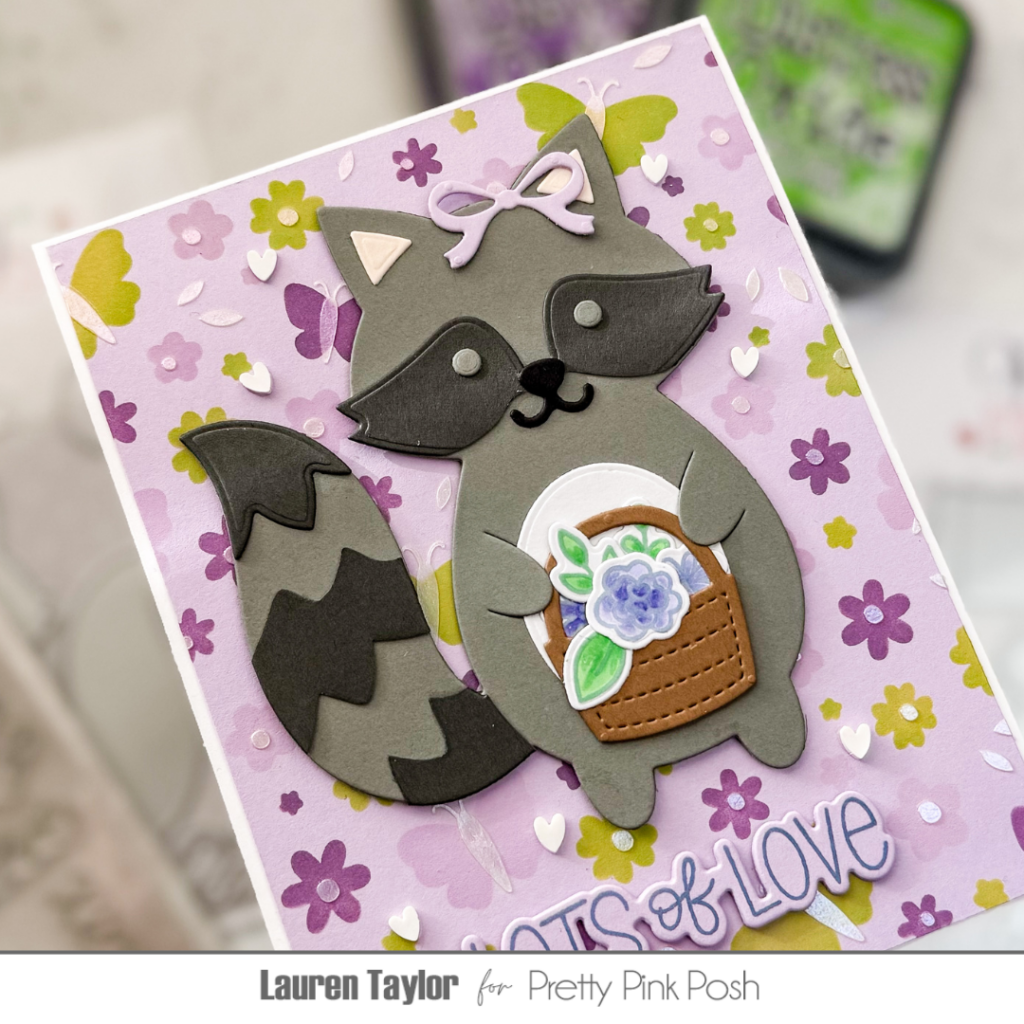
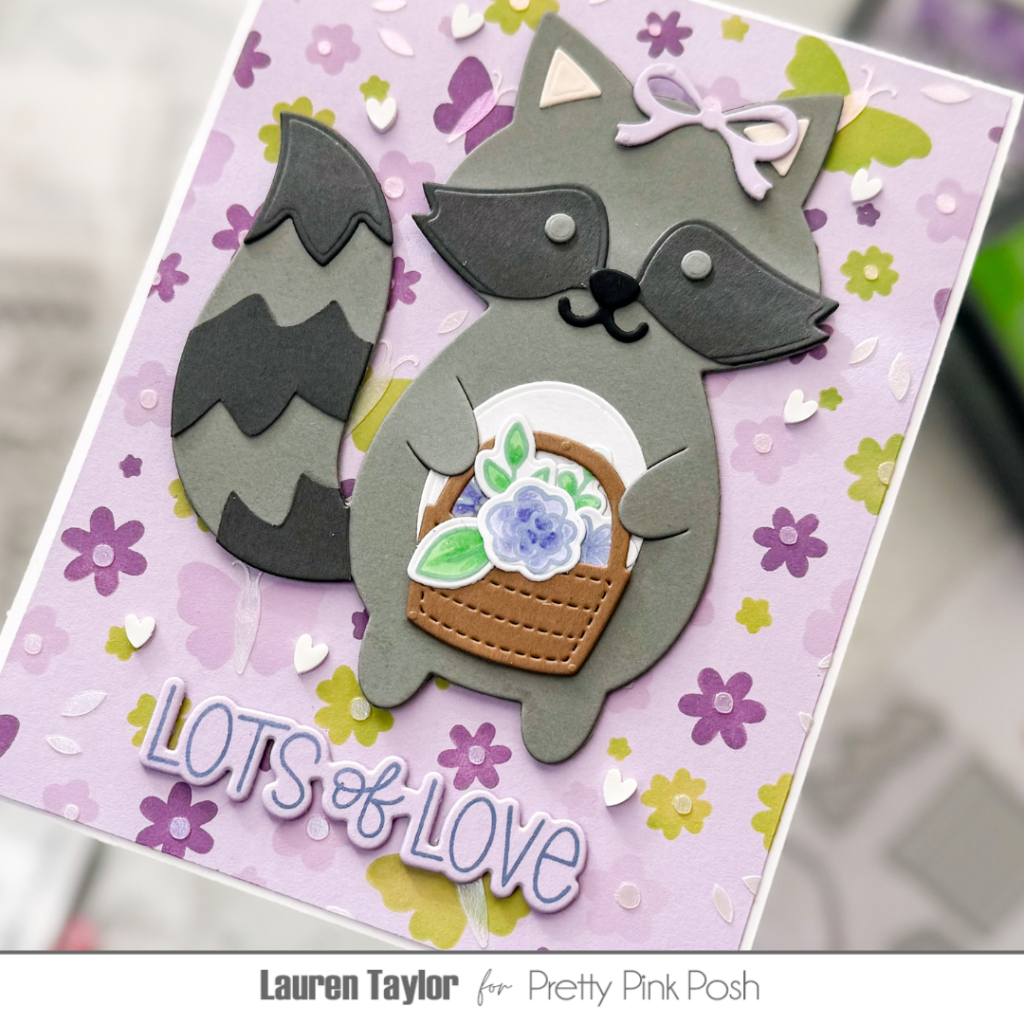
Hi, friends! Lauren Taylor here and I’m so excited that Spring will be here soon, and what better way to celebrate the season than with an adorable handmade card featuring a sweet little raccoon? Today, I’m showing you how to transform the Fox Holder Die Set into a charming raccoon, perfect for a fun and cheerful spring-themed card. I’ll also be using the Valentine Holder Additions Dies, Flower Garden Stamp Setand Coordinating Dies, and the Layered Butterfly Floral Stencils to bring this card to life with soft florals and bright spring colors.
To start, I stamped and colored floral images from the Flower Garden Stamp Set using alcohol markers in shades of purple and blue-violet for the flowers and fresh greens for the leaves. To achieve a crisp and colorful outline, I stamped over the colored images again using VersaFine Clair Inks in Very Peri and Grass Green. Then, I cut all my floral elements with the Flower Garden Coordinating Dies and set them aside.
Next up, the star of the show—our adorable raccoon! I cut the Fox Holder Dies from shades of gray cardstock and customized it by trimming the face piece into a raccoon’s signature bandit mask using darker gray cardstock. I added all the details, including the ears, eyes, and a striped tail, by layering cardstock elements and using liquid adhesive to assemble this little critter. For a sweet finishing touch, I added a bow (originally meant for the basket) to the raccoon’s ear—so cute!
For the background, I ink-blended the Layered Butterfly Floral Stencils onto lilac cardstock using Distress Oxide Inks in Twisted Citron, Dusty Concord, and Milled Lavender. For an extra bit of shine, I added a final layer with Lunar Paste in Royal Flush for a pearlescent effect. Once dry, I assembled my card by attaching the raccoon and floral basket with foam adhesive for dimension. A sentiment from the Valentine Greetings Stamp Set, die-cut with the Valentine Greetings Coordinating Dies and layered for sturdiness, completed the card. For a final touch, I sprinkled a few white heart embellishments from the Valentine’s Day Clay Confetti for added charm.
I absolutely love how this springtime raccoon turned out, and I hope you do too! Happy crafting, and may your spring be filled with creativity and joy!
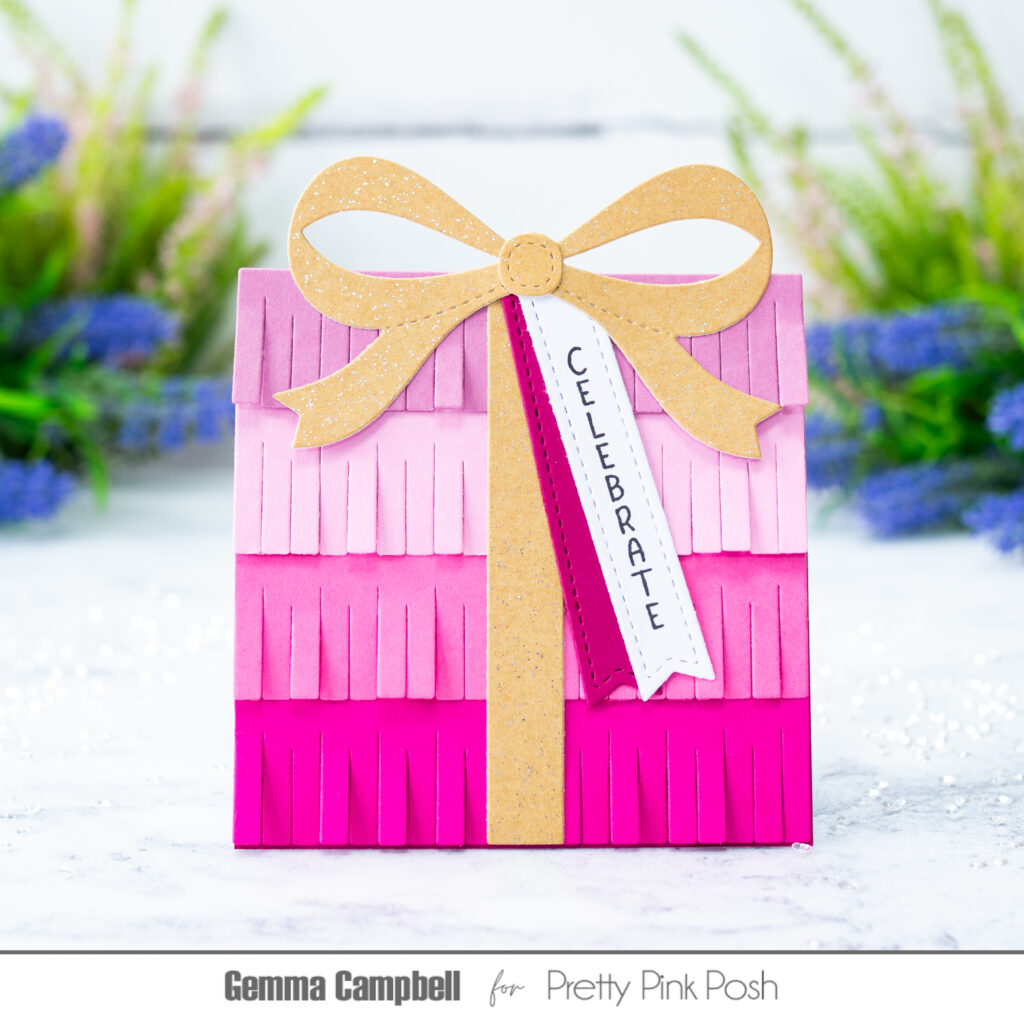
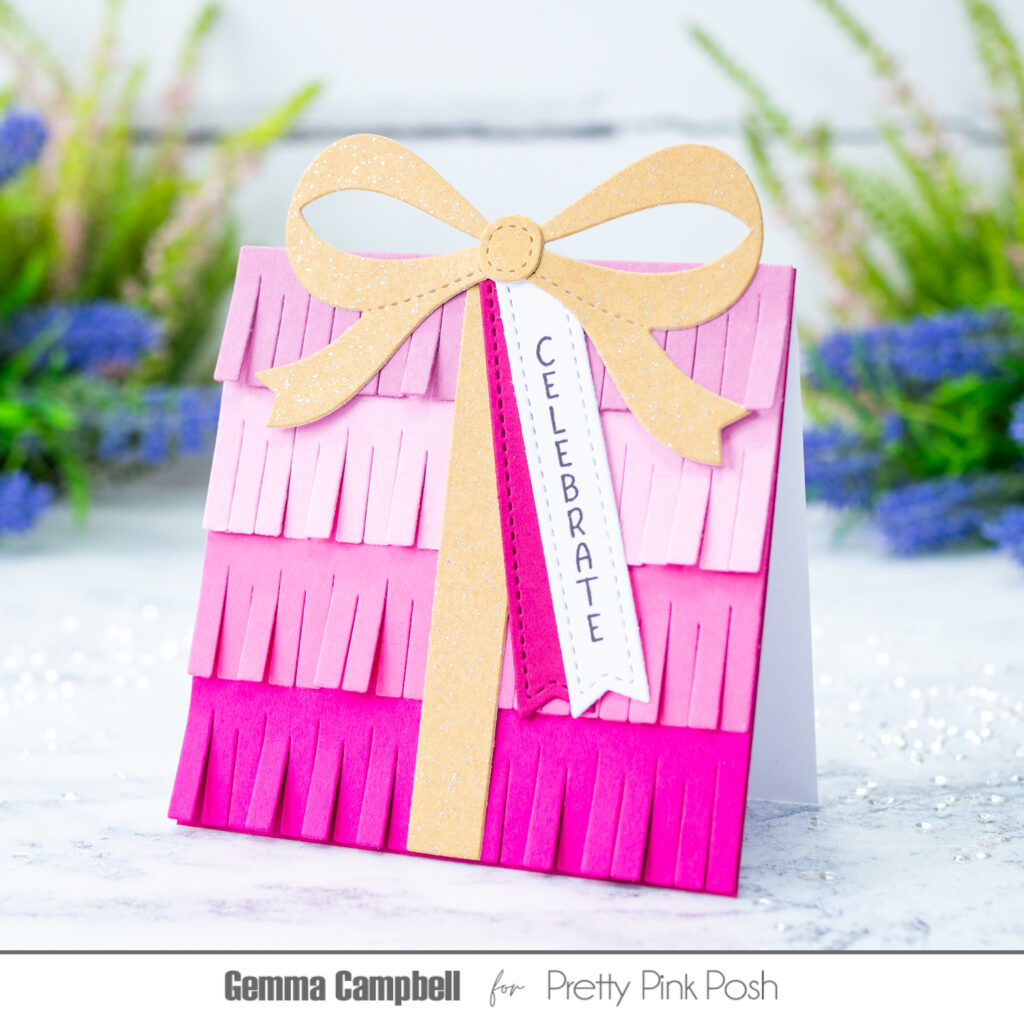
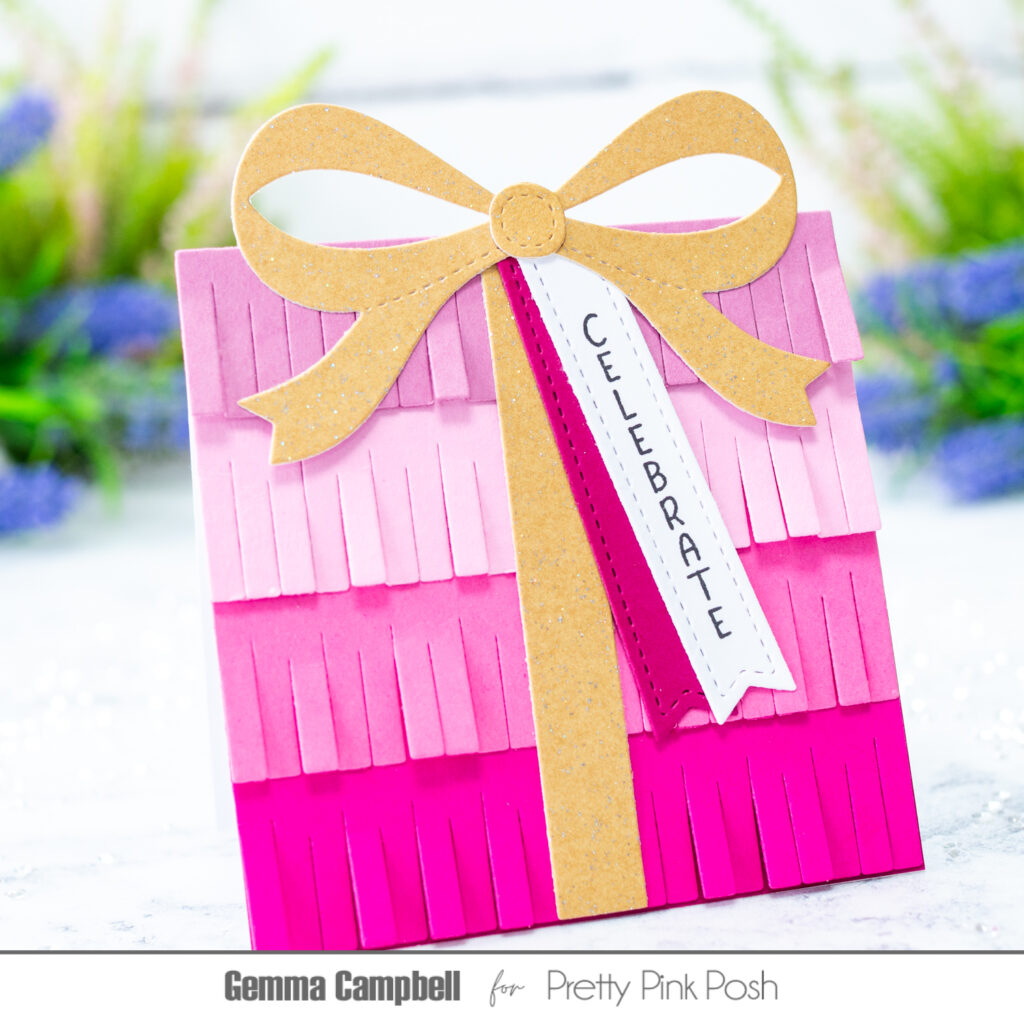
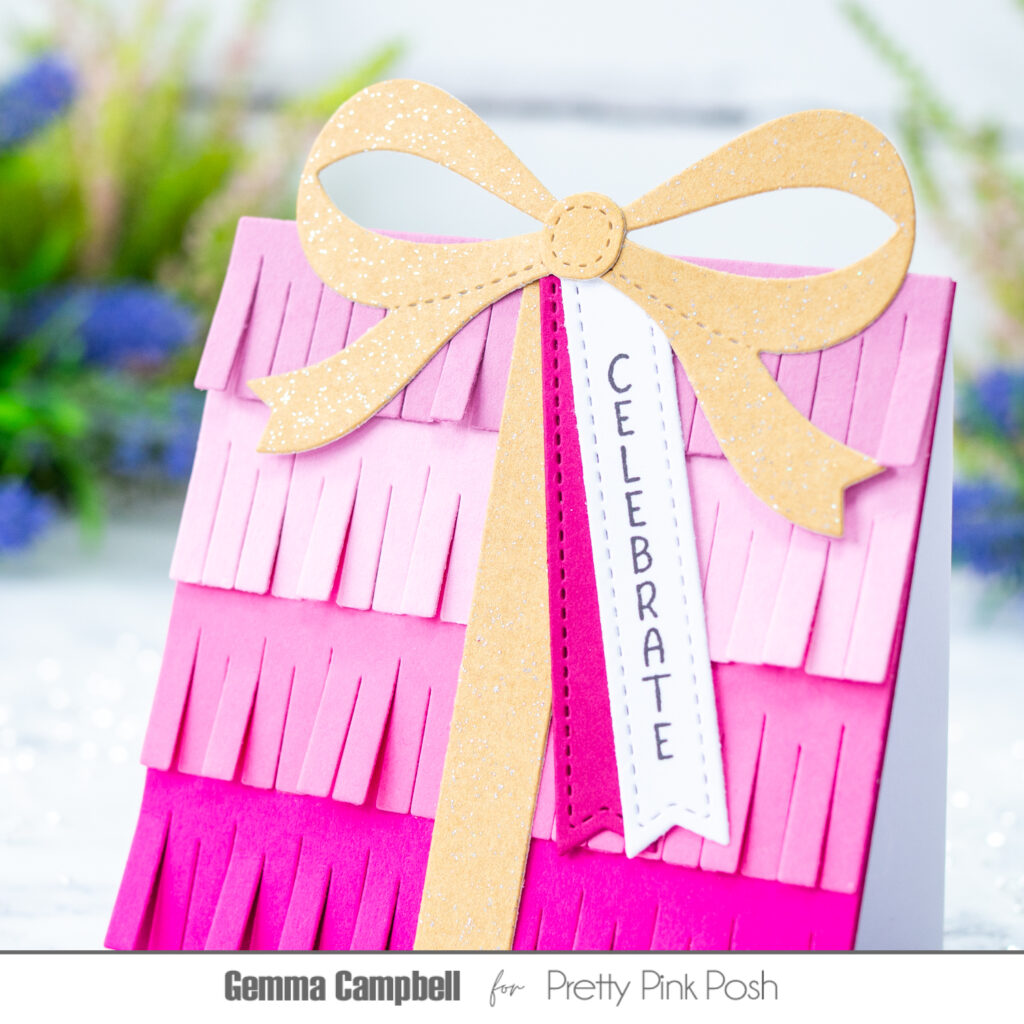
Hello, Gemma here today to share a birthday card featuring the new Fringe Present die set from the February release.
I began by die cutting all the fringe present pieces from an ombré of pink card stock. For the ribbon and bow, I used some gold sparkle card.
To add a centre to my bow, I used a die from the previously released Beautiful Bows die set. You could also use another die cut shape or even an embellishment.
For this card, I wanted the card base to be the same size as the present, so I cut a 3.75” square top folding white card base. I then adhered a darker pink layer on top, so the white card doesn’t show underneath the fringe.
Next, I adhered the fringe layers to the card base. Make sure not to add adhesive to the fringe part of the layers, so they can be fluffed out later.
I added the ribbon down the centre of the present, then the sentiment strips at the top. Trim away the top of the banners, if needed. I then added the gold sparkle bow to finish.
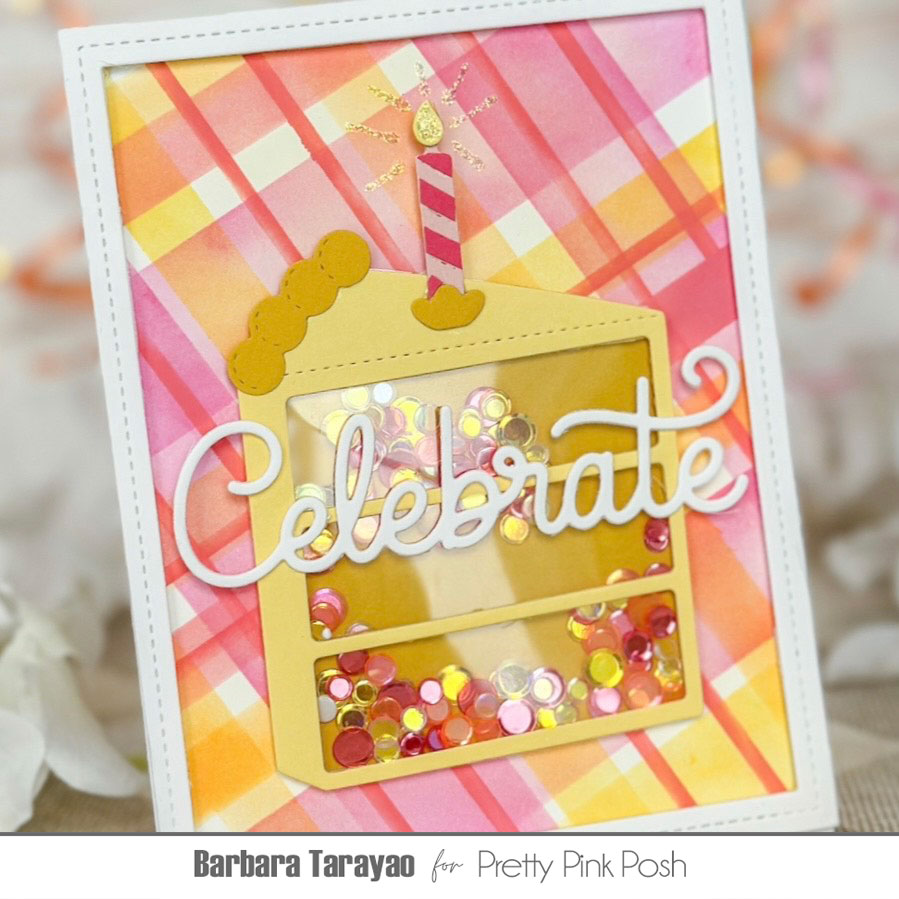
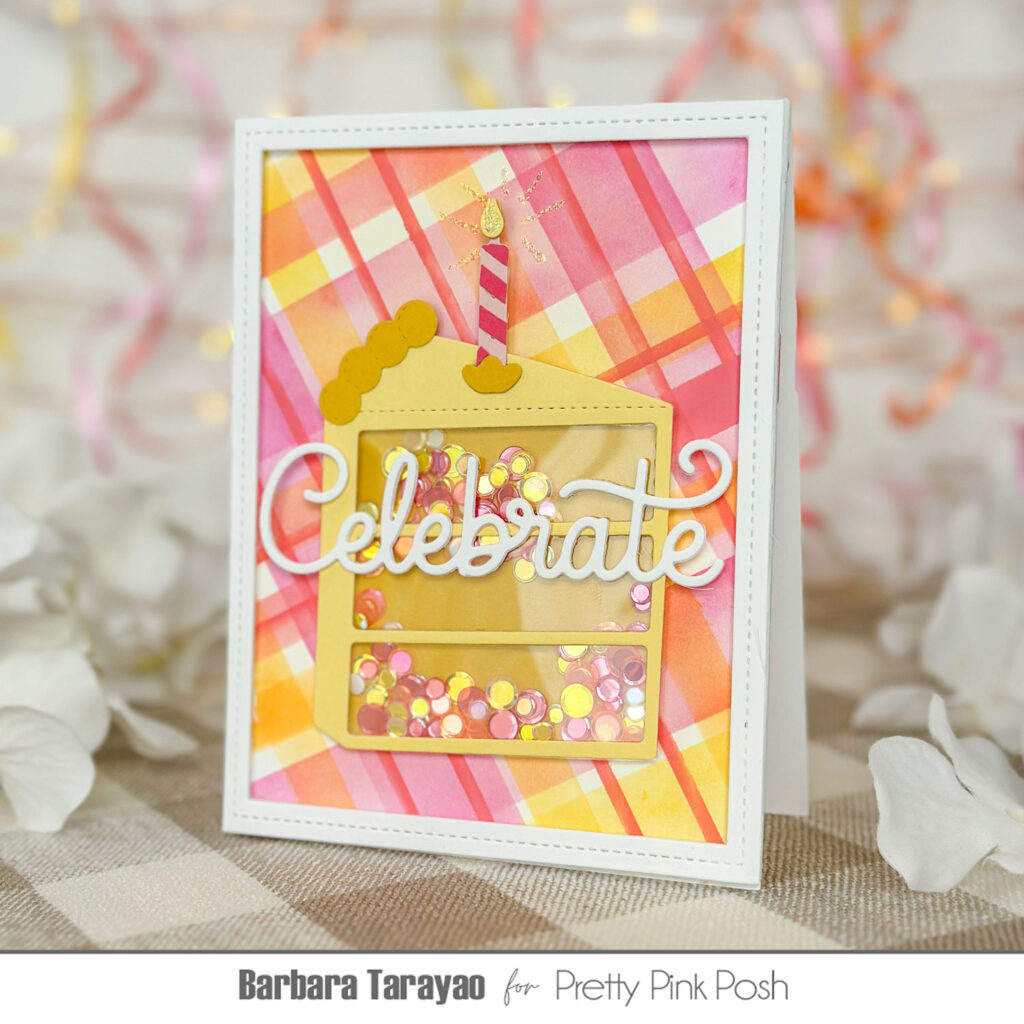
Hello crafty friends, Barbara here sharing a fun project I made featuring theCake Slice Shaker die set from Pretty Pink Posh’s new release.
I have to admit I am a little obsessed with their shaker dies sets! I began with an A2 size card base made from smooth white cardstock. I then created a plaid background using distress inks and post-it tape. I used the frame die from an older die set called Fancy Cake die set.
I cut that from white cardstock and added it to the card base with foam adhesive. I then cut the Cake Slice elements from colored cardstock. I used acetate and foam tape to create the shaker element. I added the sequins and the back to the Cake Slice die to adhere to the card base. I then cut the Celebrate sentiment die from more white cardstock and glued it to the center of the cake. I used some stickles to add a bit of sparkle to the candle flame.
I hope you enjoyed this project I made for this special birthday celebration and got some inspiration. Thanks for stopping by and happy hopping!
Hi friends, It’s Christina, and I have a little something sweet for you! Pretty Pink Posh followed up their super popular Valentine Cake Pops with Birthday Cake Pops, and I was so excited to use them for today’s project. I decorated my cake pops in pastel ice cream colors and mounted them on a Wavy Stripes background complete with a sparkly text overlay.
Below you’ll find a supply list and the steps I took to create this sweet pastel card design. Let’s get started!
My first step was to create the background. I started by trimming a piece of white cardstock to fit inside the stitched detail of the largest eyelet rectangle. Then, using the Wavy Stripe Stencil and a teal ink, I stenciled a wavy stripe across the panel. To finish the panel, I stenciled over the wavy stripes using the Birthday Words Stencil and a sparkly white stencil paste. The last step to creating my background was to mount the stenciled panel to an eyelet rectangle die cut from turquoise cardstock.
With the background completed, I got to work on the other elements of my card design. I started with die cutting all the components for the cake pops from pastel-colored cardstock. I assembled the cake pops and added clay confetti pieces for sprinkles and sticks die cut from glitter cardstock. I attached these to my background panel with foam squares and then added the sentiment, which I also die cut from glitter cardstock. I chose a turquoise shadow for the sentiment to coordinate with the eyelet rectangle and then finally attached the entire panel to a teal A2 cardstock panel.
And that’s all there is to creating this sweet pastel card design. Thanks so much for reading about my latest project. See you again soon!
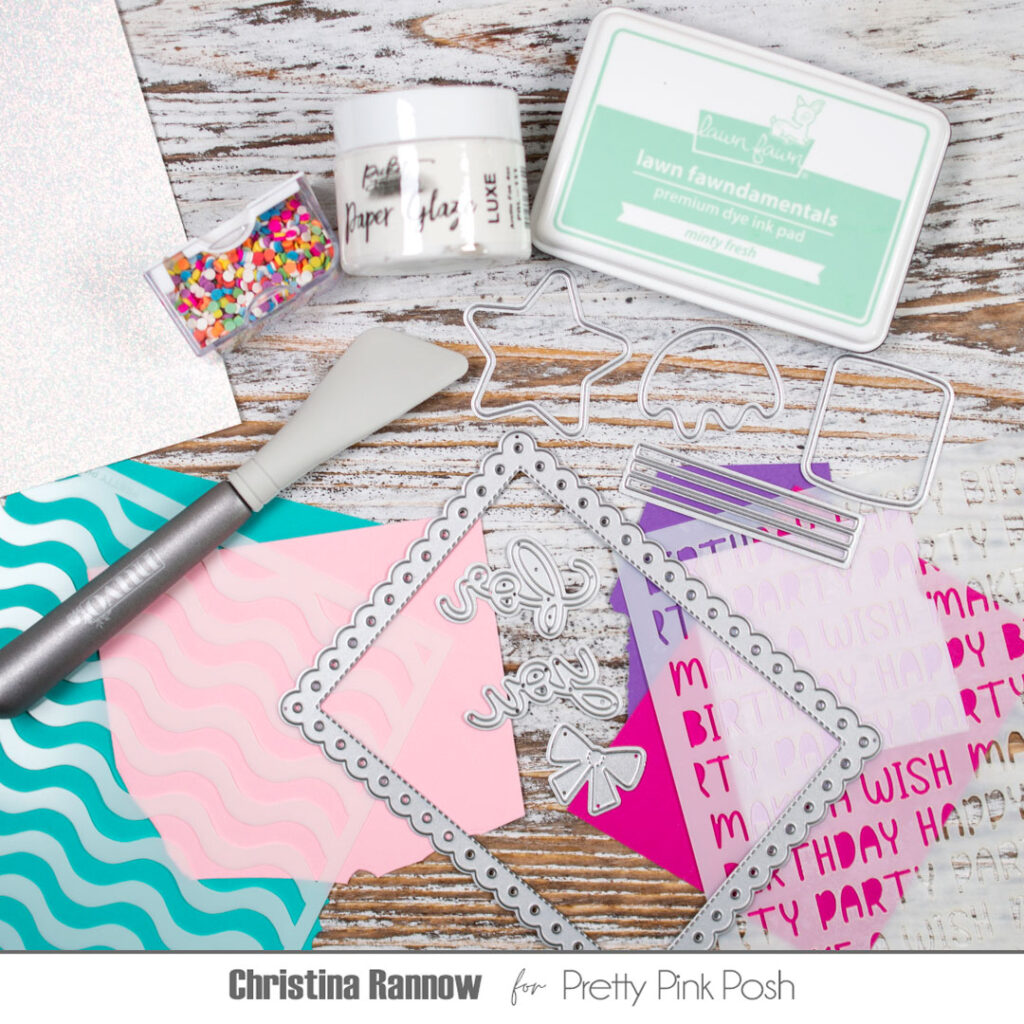
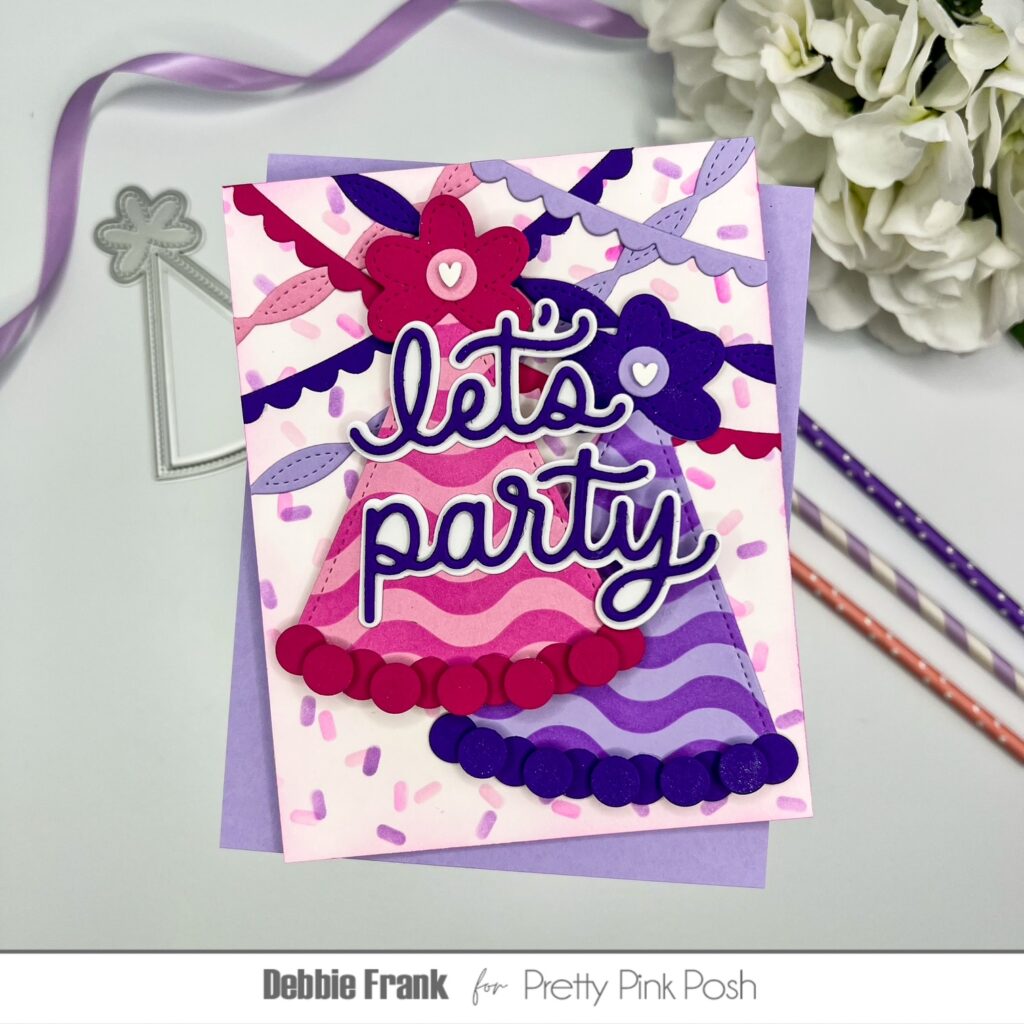
Hi Friends, Debbie here with the super fun Party Hat Dies from the new birthday release.
Let’s get started with the party hats! Rather than doing the shaker, I wanted to use the Wavy Stripes Stencil. So with a light Pink and Lavender Card stock from my stash, and a little dark inks. Placing the two panels onto a grip mat I inked blended the Wavy Stripes stencil. Next I die cut out the Party Hat dies from both of the Striped panels.
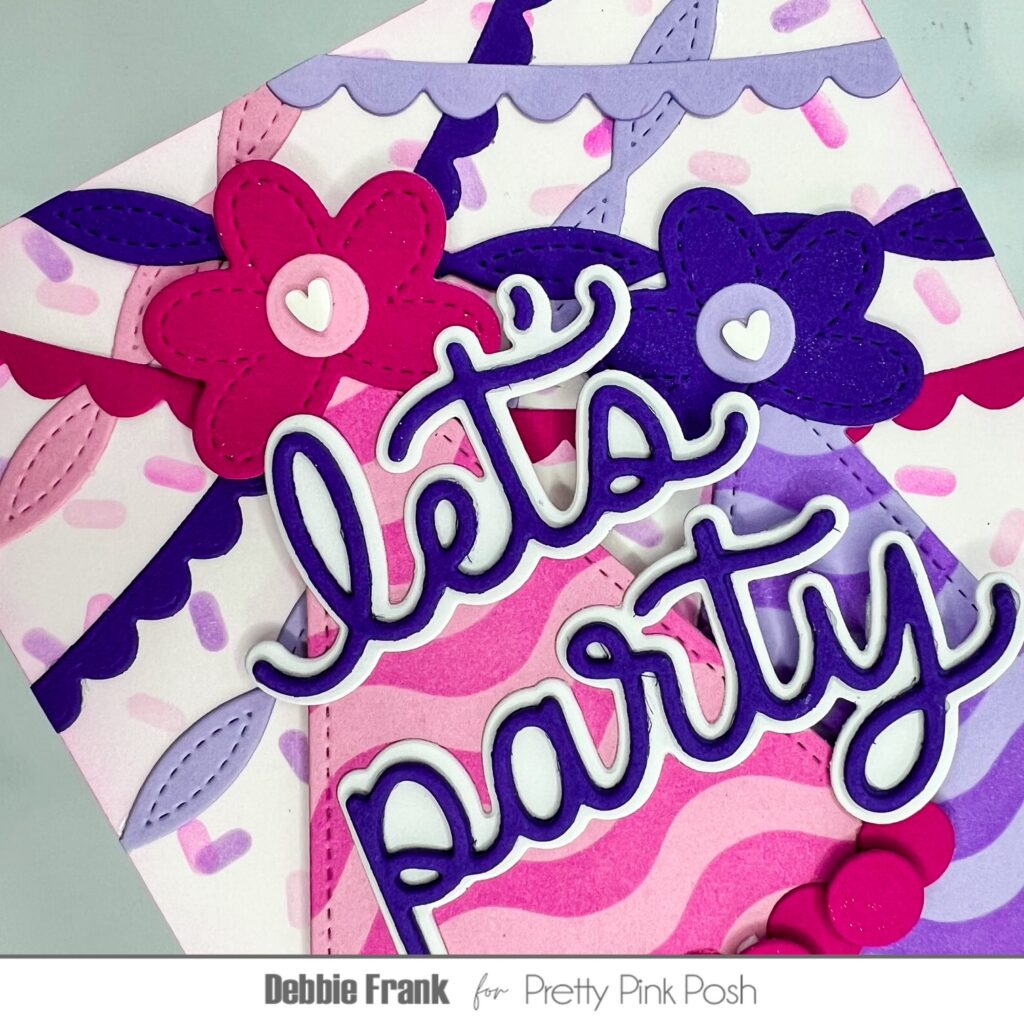
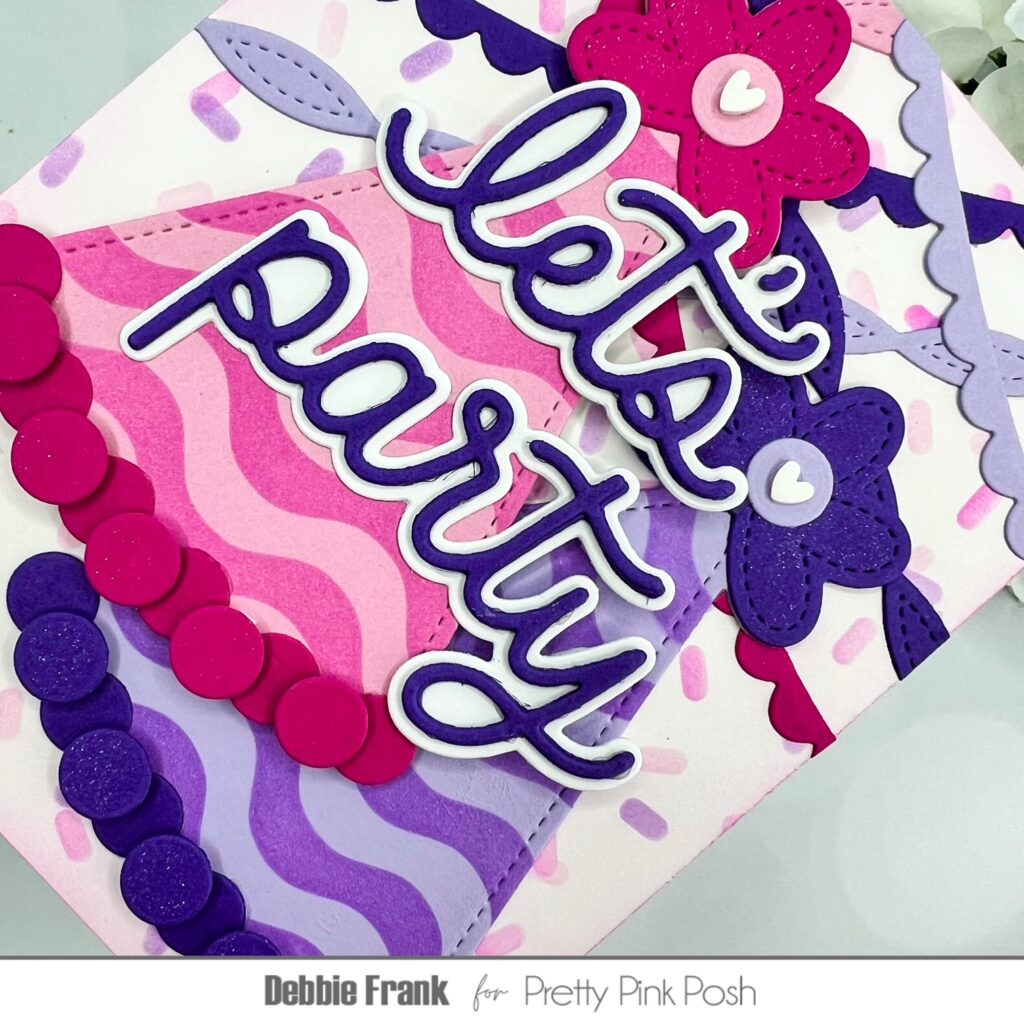
Then with dark bright pink and dark purple card stock I die cut out the Pom-Poms and the toppers to the hats. Also two extra Pom-Poms from the original panel colors for the center of the toppers. Attaching the bottom Pom-Poms with liquid glue to the Party Hat base. And in between them add 1/2 of a small foam square to pop up the top layer of Pom-Poms.
Next up I die cut out the Streamers from the four colors of Pink and Purples.
For the background panel, I started off with a white standard A2 panel. Using the previously released Layered Confetti Stencil I ink blended on the two shades of pink ink with the layers A and C. And the layer B was the purple ink.
Attaching the Streamers criss crossing on the top of the Confetti Panel. Popped up the Party Hats and over lapping them, so there is no foam squares on the right side of the Pink Party Hat.
Die cutting out the Let’s Party Shadow from White and Dark Purple card stock. With the Party Hats having dimension, I added foam to the back of the right side of the sentiment to make it flush.
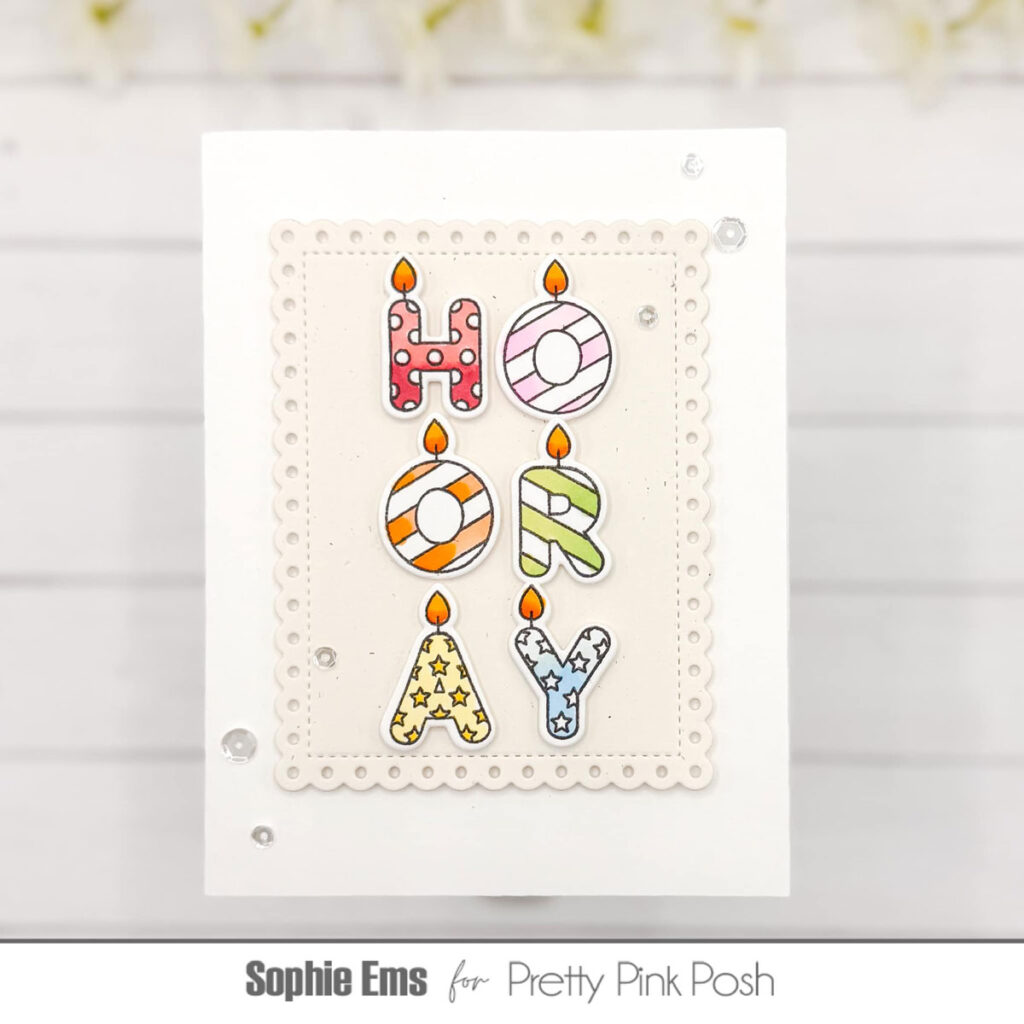
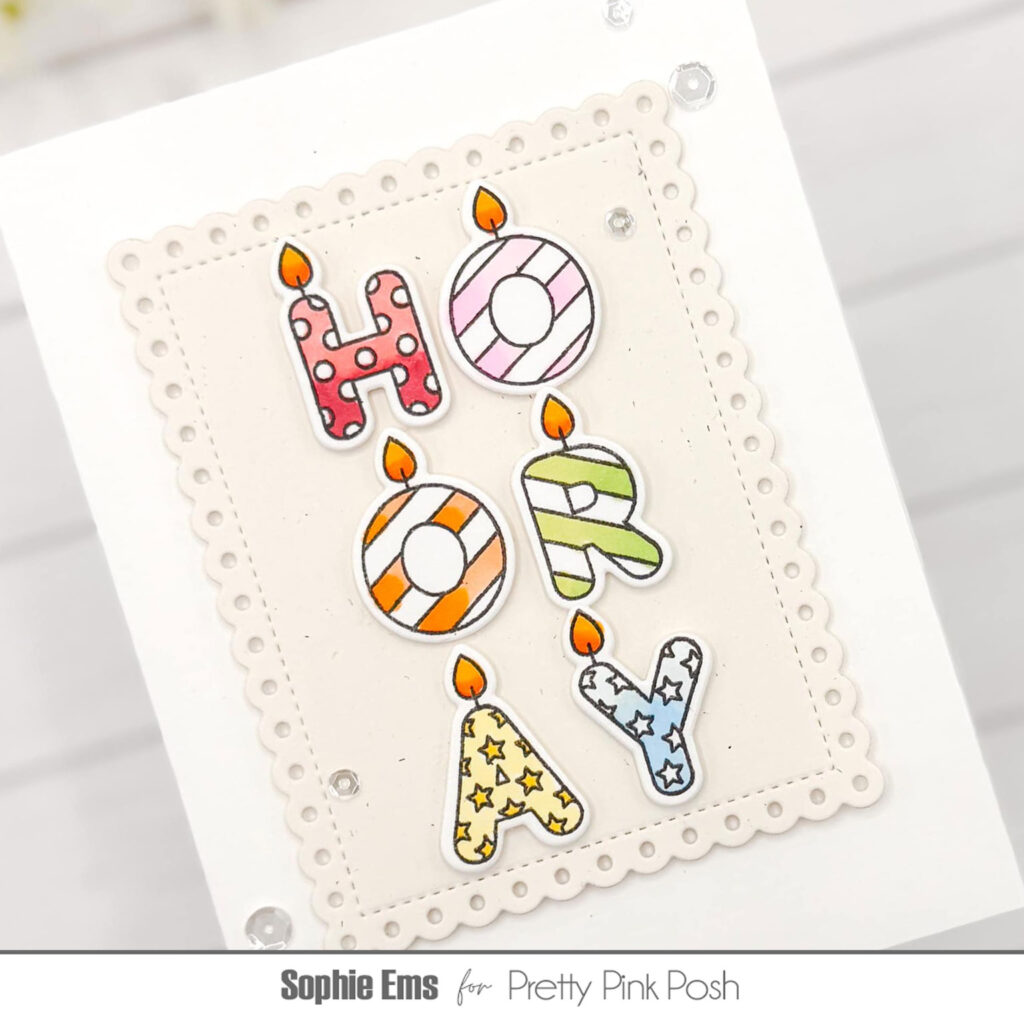
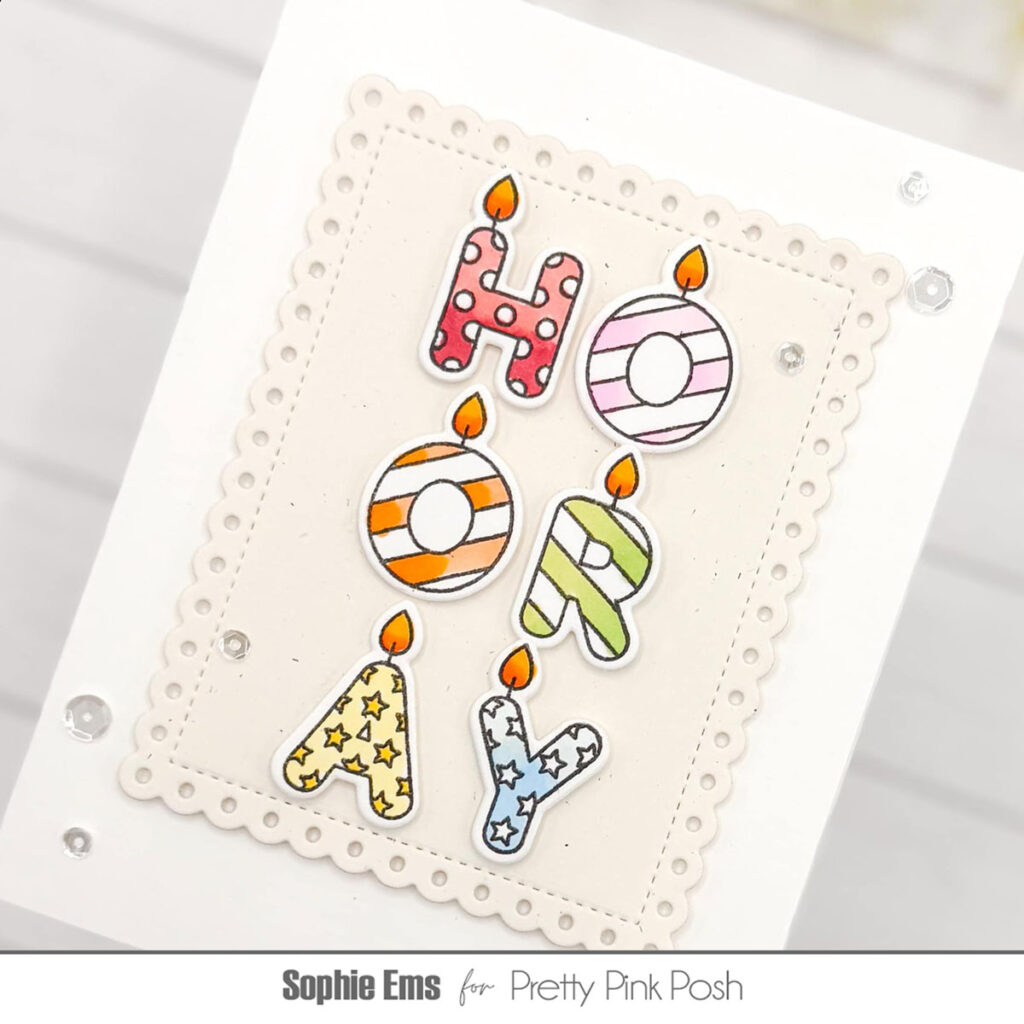
Hi crafty friends! Sophie here sharing a card I made featuring the new Alphabet Candles stamps and coordinating dies. I LOVE this set – it is so versatile! I love the possibilities of really customizing cards and projects with this set. You could spell out anything – a name, a phrase, whatever! Let’s take a look at the project I made below…
I first stamped out the letters to spell HOORAY on some white cardstock using alcohol marker friendly black ink. I used my Copic markers to color these letters in a rainbow of colors, listed below. I tried to do a shaded look where the color was more intense at the bottom of the letters.
I used the Eyelet Rectangles dies to cut a piece of ivory cardstock to serve as a focal point for my letters which I arranged playfully in a grid fashion. The eyelet series of dies are some of the most used dies in my collections – I especially love the rectangles, circles, and ovals!
I finished this card off with a few Sparkling Clear sequins – my favorite embellishments. I hope you found this project inspiring! I’ll be back soon to share more projects with you! :)