
Christmas Theme Week: Day 3

Hello everyone, it’s June here! I’m so exited to make my first blog post ever as a Guest Designer for Pretty Pink Posh! Today is Day 3 of the Christmas Theme Week and I have this fun festive card featuring a lot of the new holiday products to share with you.
Save 15% on all items in our Christmas section during theme week!
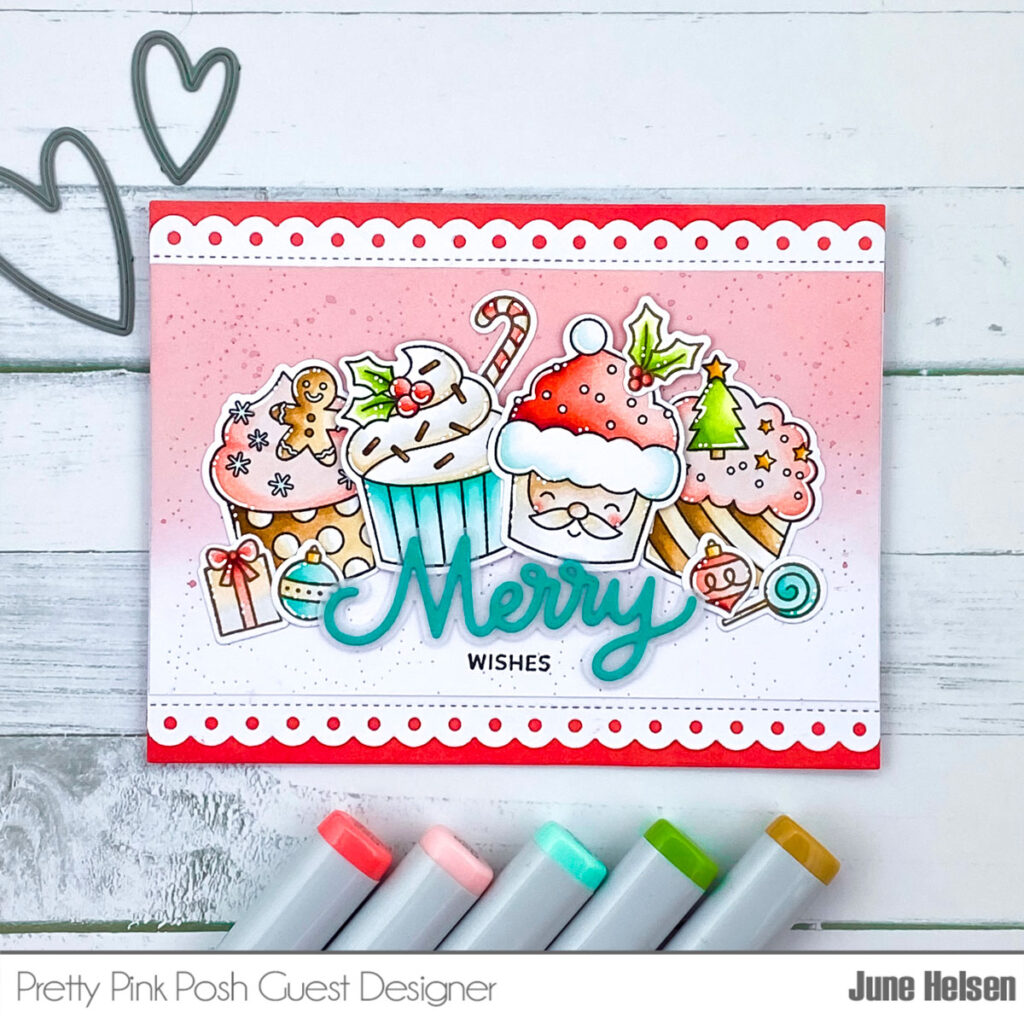
To start off, I picked 4 images from the Christmas Cupcakes stamp set to color with my Copic Markers. I decided to add some of the small images from the Holiday Stockings stamp set to fill up the space of my card a bit more. I stamped them using brown ink instead to give a more subtle look.
When I saw the new Eyelet Rectangles dies I knew exactly what I wanted to do with them, which is using one of my favorite die cutting techniques: extending. I placed my paper and die onto my cutting plate, but didn’t roll it all the way through. I extended my die cut by lining it up again on the side I didn’t cut, and the result is an elongated rectangle, which I then cut down to 5 1/2 inch to fit my card base. I love getting more use out of my dies like this!
To make the main background of my card I cut out a panel to fit onto my scalloped piece. I blended a simple pink ombre background using Tattered Rose Distress Ink and added just a tad of Worn Lipstick on the top to brighten it up. I also splattered some Victorian Velvet onto it. When the panel was dry, I used the new Pierced Snowflakes plate to add some interest.
A thing I like to do when I can’t find the perfect cardstock color is making my own using ink. I only needed some small strips on the side of my panel, so I blended some Distress Oxide in the color Festive Berries onto some white paper to get that perfect shade I had in mind.
I wanted to bring some extra blue into my card, so I cut the ‘Merry’ from the Merry Christmas Shadow dies out of turquoise cardstock and mounted it onto its shadow backing piece, which I cut out of vellum.
To put to card together, I glued the panel down directly onto my card base and used foam strips to add some dimension to the cupcakes. I stacked some ‘Merry’ die cuts on top of each other to act as a substitute for the foam strips behind the sentiment. It can be tricky to hide foam behind a thin die cut, so this is the way I like to do it. I finished off my sentiment by adding the ‘wishes’ part of a sentiment that’s in the same Holiday Stockings stamp set I used before.
And that’s it for today! Be sure to check out the blog the rest of the week as well, you don’t want to miss out on all the fun projects the Design Team has prepared :)
I ADORE these cupcakes!!!
Omg omg 😍 what an amazing card design and coloring 😍😍