
One Stamp Set // Three Cards + Video
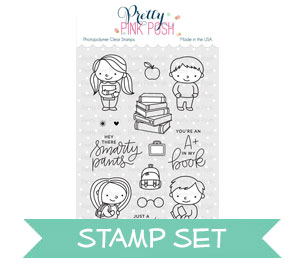
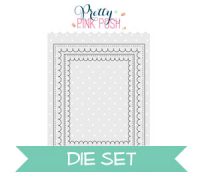
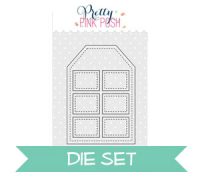
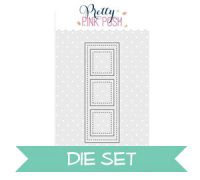
Hello everyone, Eloise here and for today’s video I’ll be sharing another 3 Cards 1 Stamp set video, using the brand new School Friends stamp set. This set was perfect because it had a ton of images and also included 3 sentiments. I also tried to keep these cards quite simple, so I just used three small die sets; Scallop Frames, Stitched Duo 1 and Stitched Film Strip and then I also just pulled in a few colours of Distress Inks to make my backgrounds as well.

To begin my cards today, I first started off with stamping, colouring and die cutting all my images. I stamped pretty much two of everything and used a colour combo I found on Pinterest for my colour inspiration. Once they were all coloured and die cut, I could assemble my cards together.
For my first card today, I die cut two of the Stitched Film Strip from some white cardstock. Then I added foam tape to the backs and set them off to the side. For my background, I used Evergreen Bough, Peacock Feathers and Cracked Pistachio and ink blended a gradient onto some watercolour cardstock. I then flicked some water onto my background, picked it up with a paper towel and dried it off with a heat tool.

Next, I arranged all my images onto the base, figured out where I wanted the sentiment and stamped the ‘Hey There Smarty Pants’ into one of the gaps with black ink. I then adhered down my frames over top and adhered the images inside with foam tape as well and that finished off my first card.

For my second card, I pulled out the Scallop Frames and cut them twice out of some white cardstock. I then adhered some foam tape onto the backs of the frames. For my background I again went for a simple ink blended look. This time I used Lucky Clover, Mowed Lawn and Twisted Citron and repeated the same steps as before. I dried it off with a heat tool and adhered my frames at an angle into place.

I then took out a few images and arranged them into place as well. I adhered them down with flat adhesive. For my sentiment I used the ‘You’re An A+ In My Book’ sentiment with more black ink onto the background as well and that finished up my second card.

For my final card, I wanted to make a mini card; something that would be perfect to put into your kids lunchbox with a little note for their day, or what have you. So I took the Stitched Duo 1 and cut out two tag shapes; one from watercolour cardstock and one from plain white cardstock. I ink blended some Carved Pumpkin and Spiced Marmalade ink onto the bottom of the watercolour tag and then ran it through my Big Shot Machine with the geometric embossing folder from We R Memory Keepers. I then took the second tag, and scored the top edge with my scoring tool. I added adhesive onto the flap and adhered it to my coloured tag and that created my mini card base.

To finish up, I adhered down the remaining images with some foam tape onto the bottom and then for the sentiment, I white heat embossed the ‘Just A Note’ sentiment onto some black cardstock. I cut it down to a strip and adhered it on the right hand side of my card and that finished off the last card.


These are great encouragement cards. Thanks for sharing the technique video.
Love the creative cards you showed. Great video and love how you did the frames and cut off what was hanging over. Great look. Thanks for showing.
These are so sweet!!