Cards

Sneak Peek: June 2019 Stencils

Hi, everyone! Marge here with you to share my cards featuring the new stencils along with other new stamps/dies from the June 10th Release. We have four new stencils and I’m going to use three of them which are Tropical Leaves, Tropical Background, and Triangles to show you how you can use stenciled patterns as a background for your cards. 

Pretty Pink Posh: Sneak Peek- June 2019 Stencils

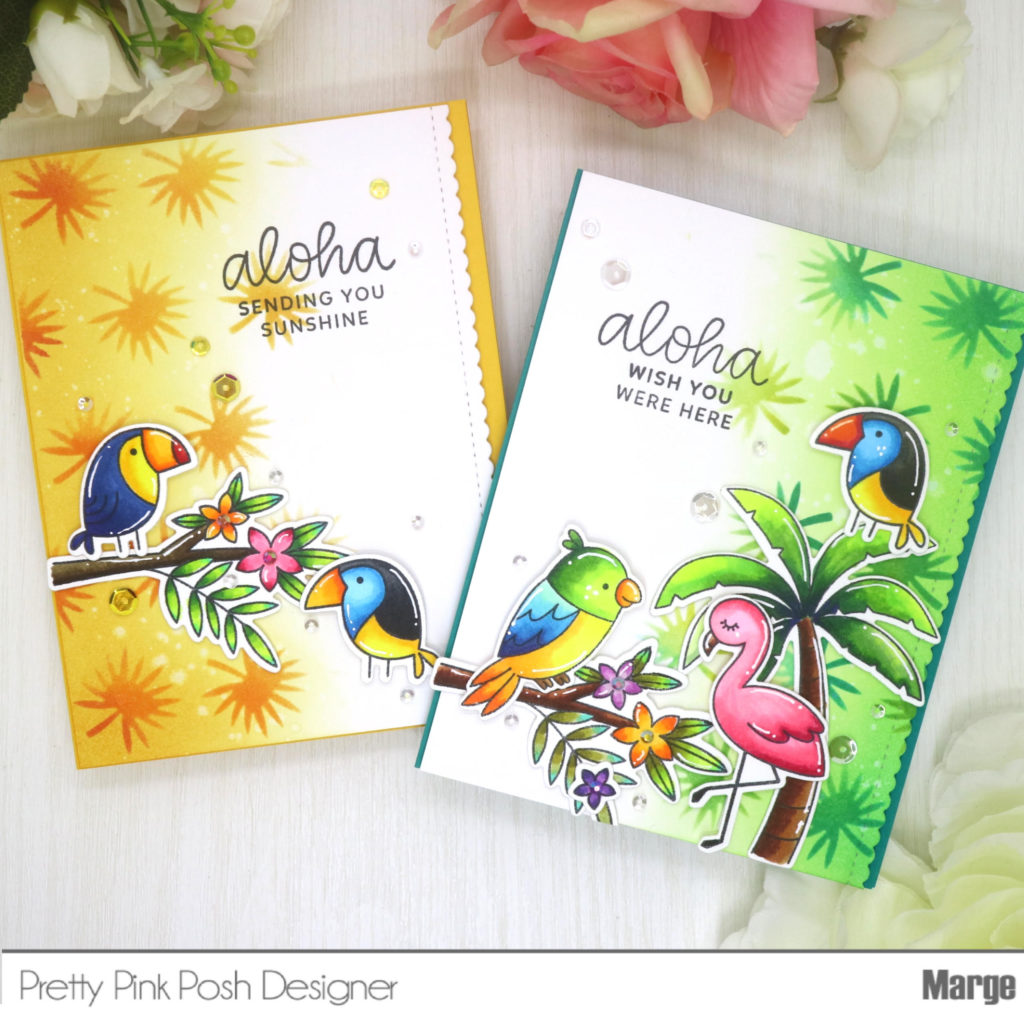
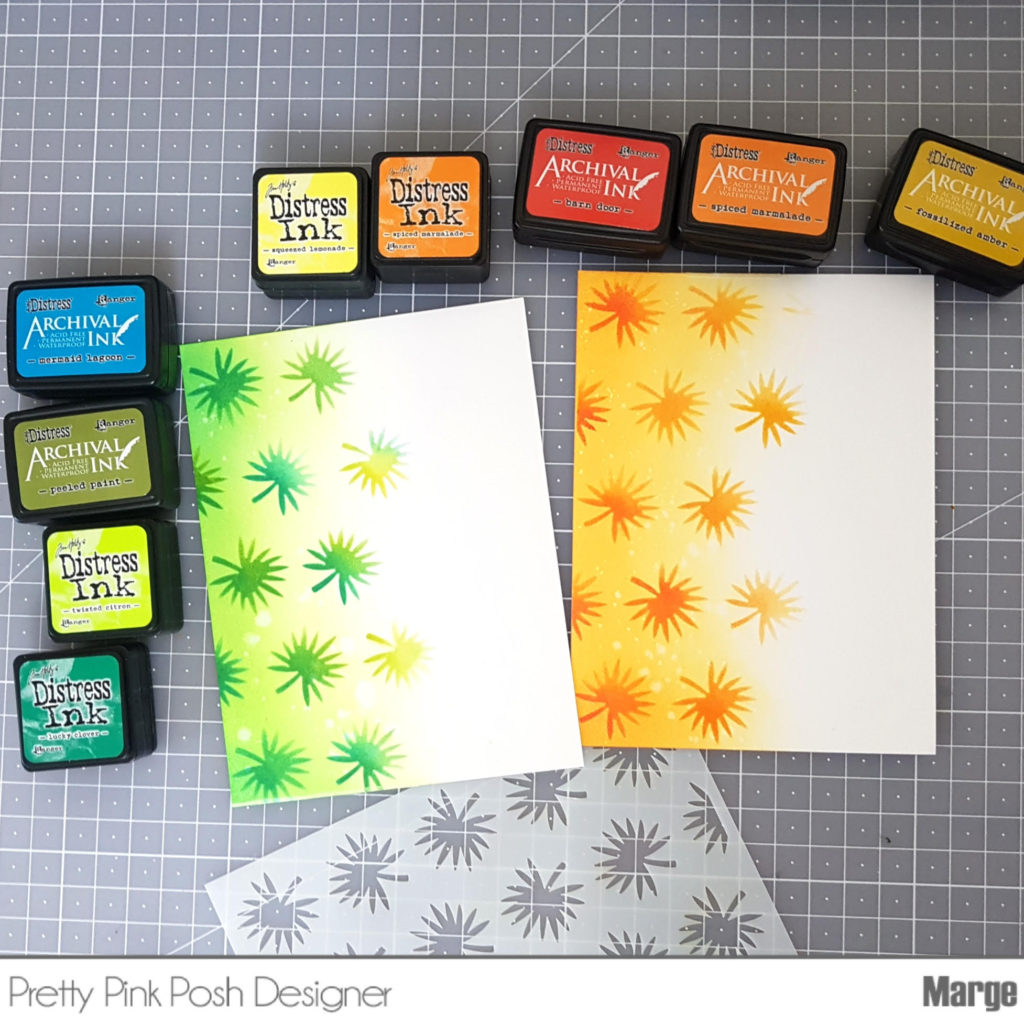
First, I ink-blended a piece of A2 sized Bristol paper partially using regular distress inks. I put the Tropical Leaves Stencil on the paper, then I sponged similar colored archival dye inks over the stencil, and then I splattered with water. I created two panels with different color themes as shown in the picture to use them as backgrounds for tropical scenes. 

Pretty Pink Posh: Sneak Peek- June 2019 Stencils

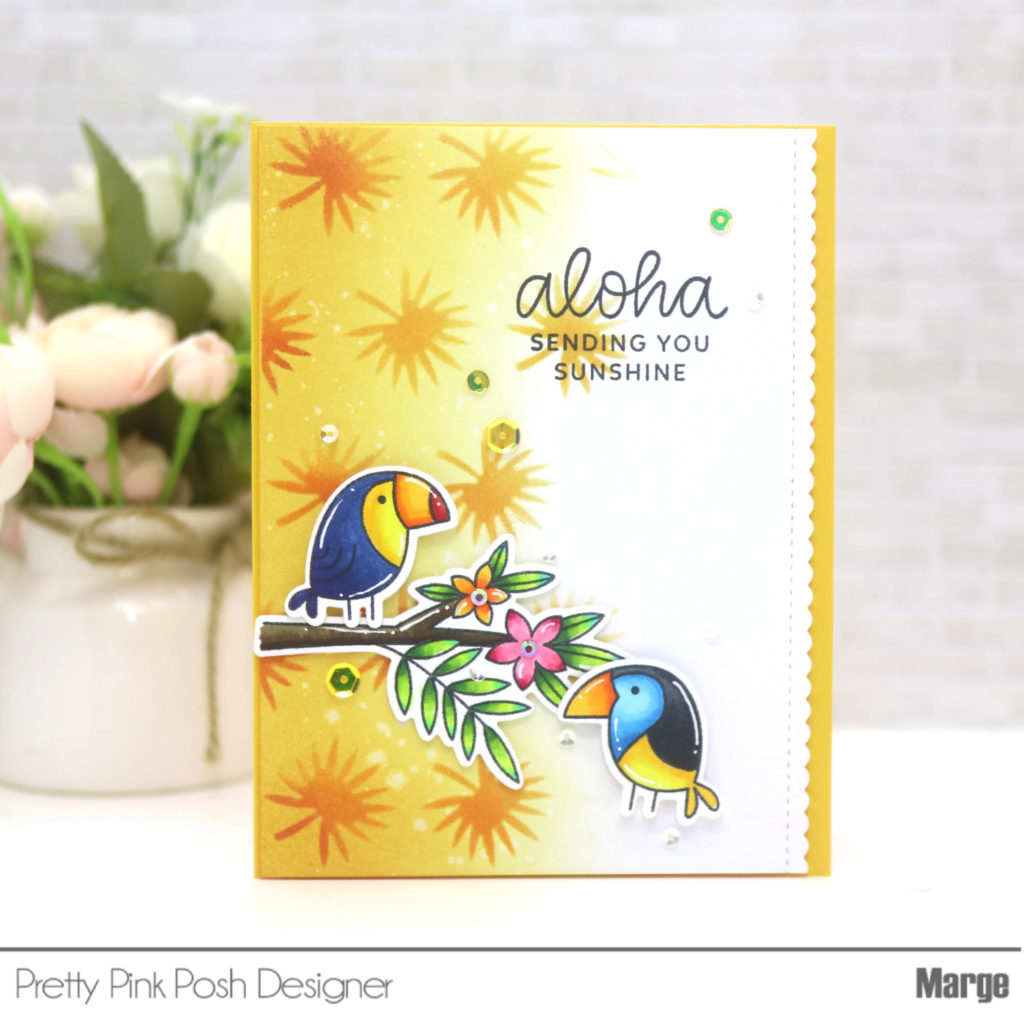
With the yellow one, I made a scene with toucans using the new Tropical Toucans Stamp and Tropical Toucans Coordinating Dies. I used Glue Dots and Square Foam Adhesives to adhere the images, and the sentiment was chosen from Tropical Birds Stamp set. I also cut one edge of the panel using Scallop Borders Dies to give some visual interest. Embellishments I used are 6mm Sunshine Glow4mm Sunshine Glow, and 3mm Sparkling Clear Sequins.

Pretty Pink Posh: Sneak Peek- June 2019 Stencils

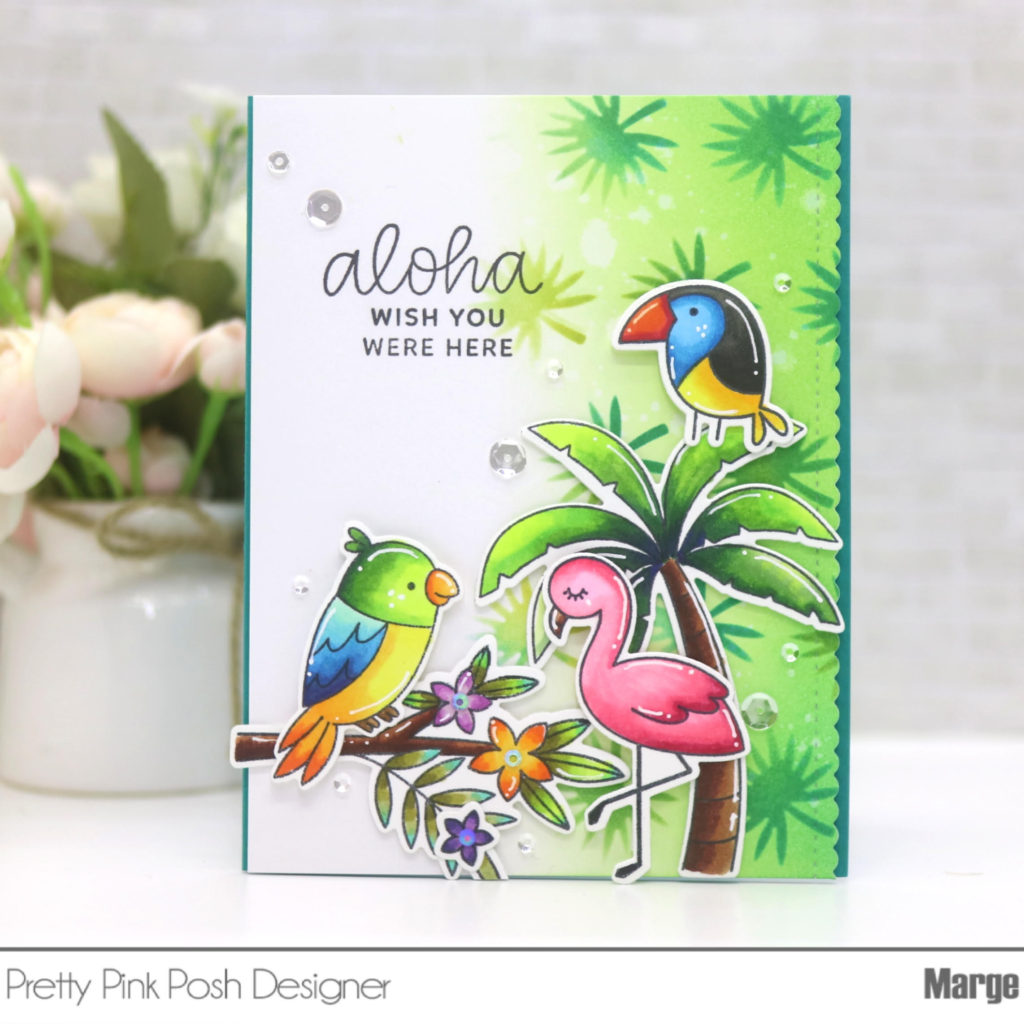
For the green one, I used Tropical Birds Set and Tropical Toucans Set to compose a scene. Then, I adhered Sparkling Clear Sequins Mix and 3mm Sparkling Clear Sequins for a touch of sparkle.

Pretty Pink Posh: Sneak Peek- June 2019 Stencils

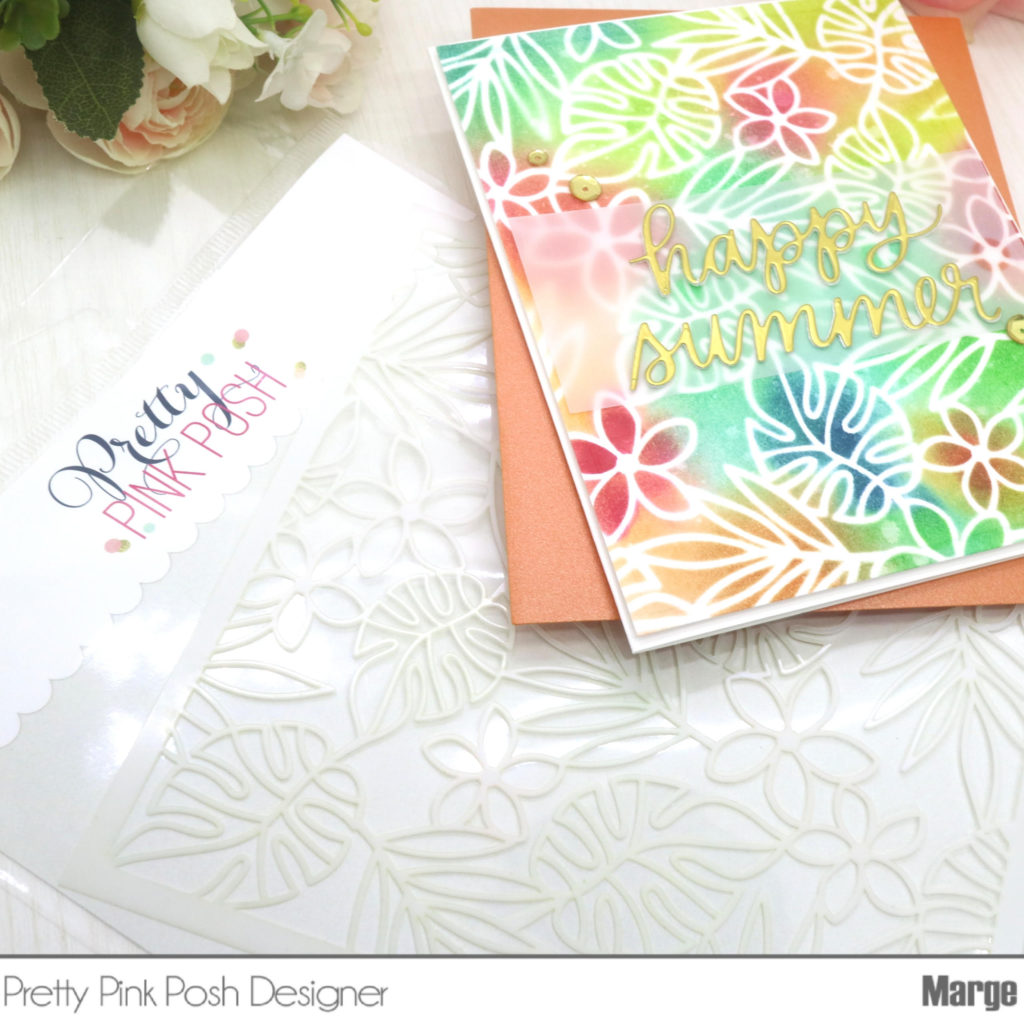
Here’s my third card featuring Tropical Background Stencil. I simply put the stencil onto a piece of  Bristol paper, then I colored it in with distress inks using regular- and mini-blending tools.

Pretty Pink Posh: Sneak Peek- June 2019 Stencils

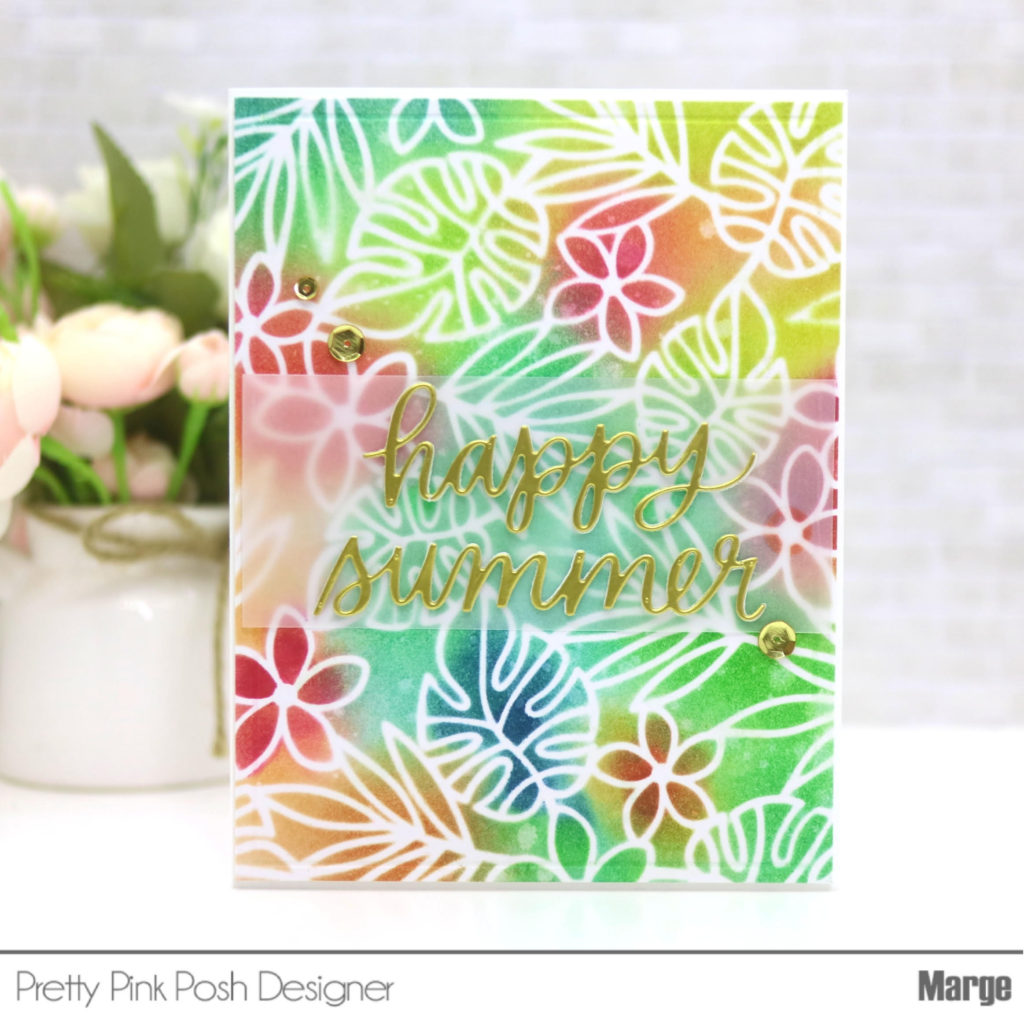
By doing this, you can make a quick and easy pattern background full of tropical moods. I added Happy Summer Script Die cuts made of gold mirror card stock on the center with a sheet of vellum paper under the scripts. For embellishing I used 6mm Metallic Gold Sequins and 4mm Metallic Gold Sequins.

Pretty Pink Posh: Sneak Peek- June 2019 Stencils

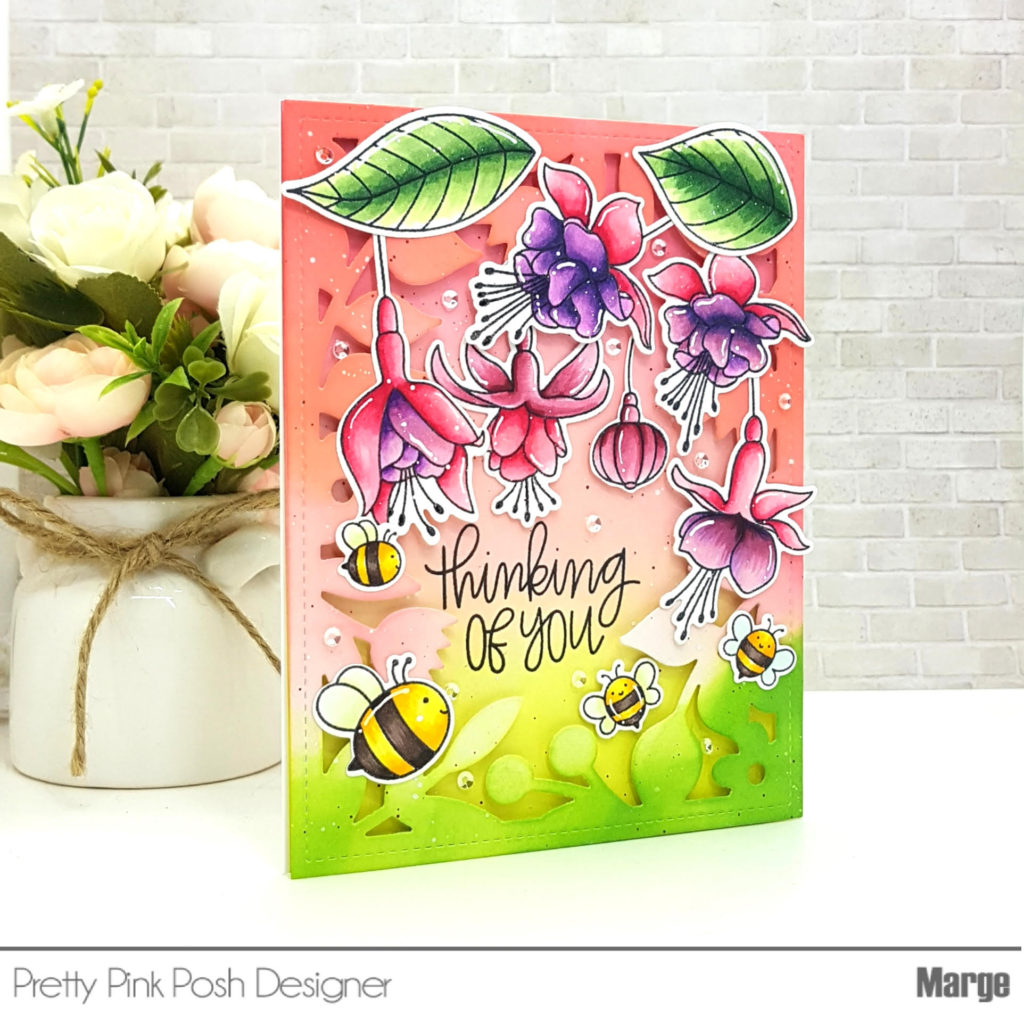
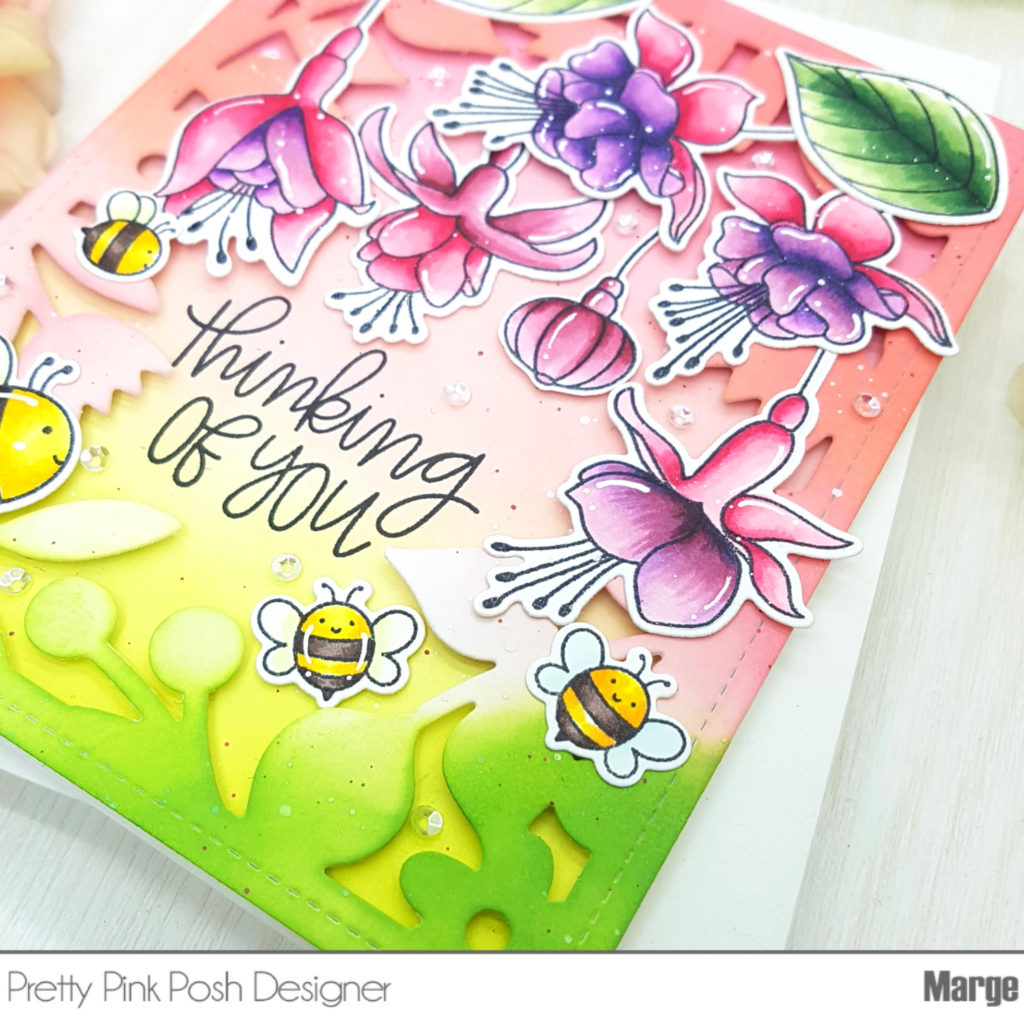
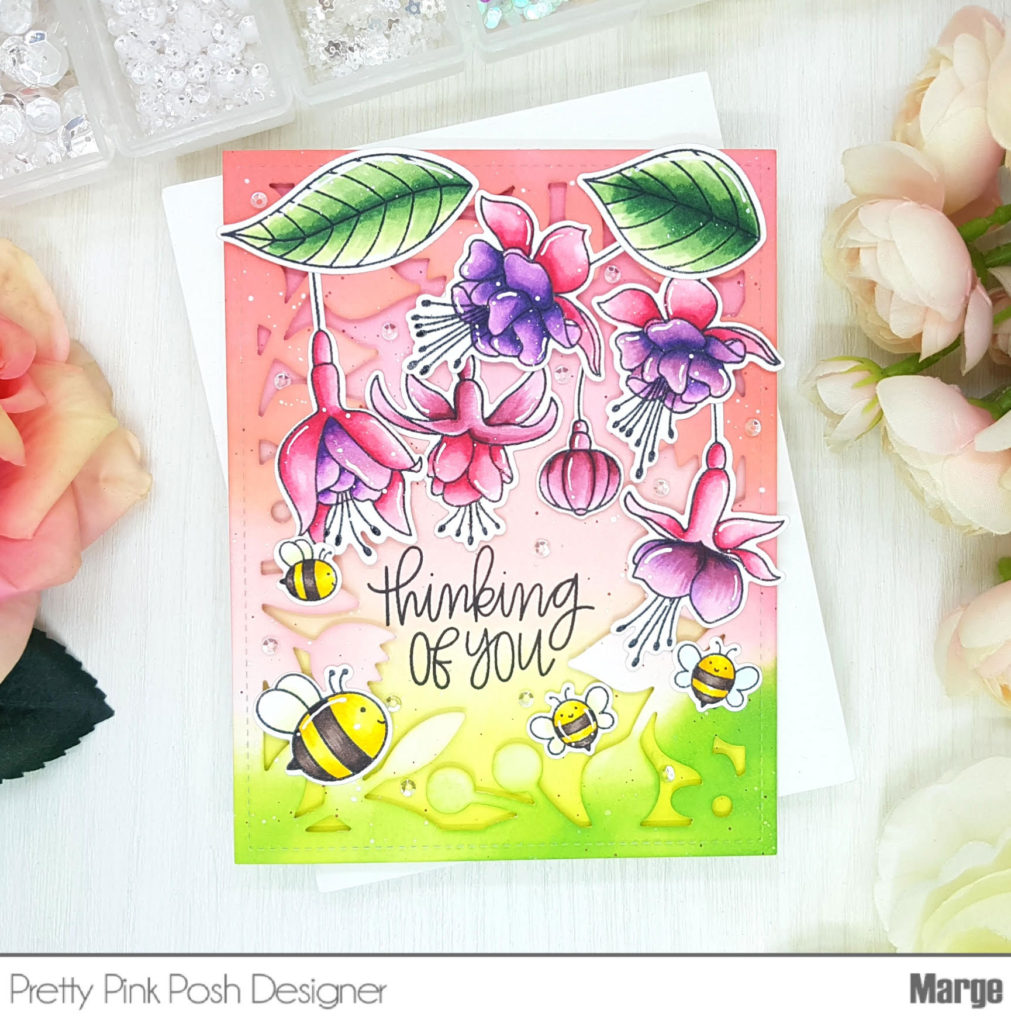
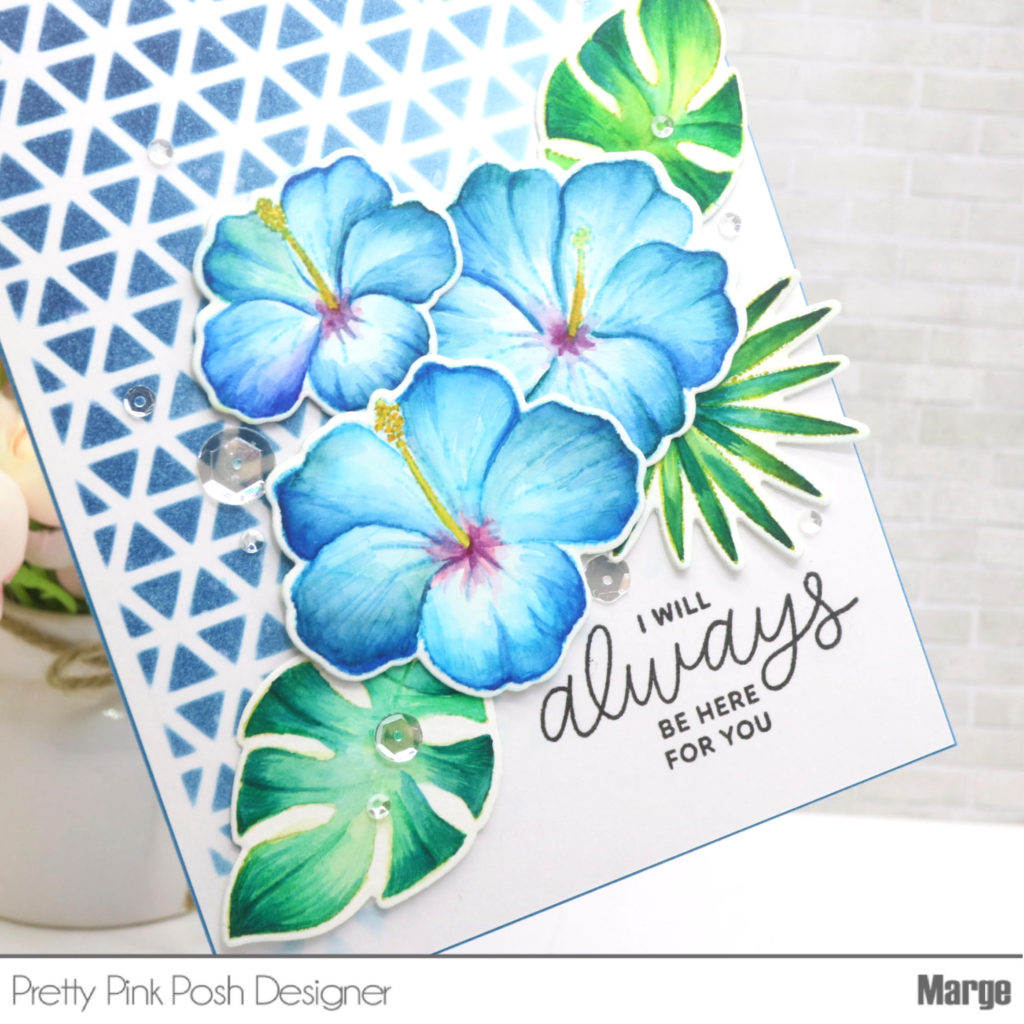
Lastly, one more card with a stenciled background where I used the brand new Triangles Stencil. Again, I did partial stenciling which covers half part of the panel in diagonal direction by using blue dye inks. 

Pretty Pink Posh: Sneak Peek- June 2019 Stencils

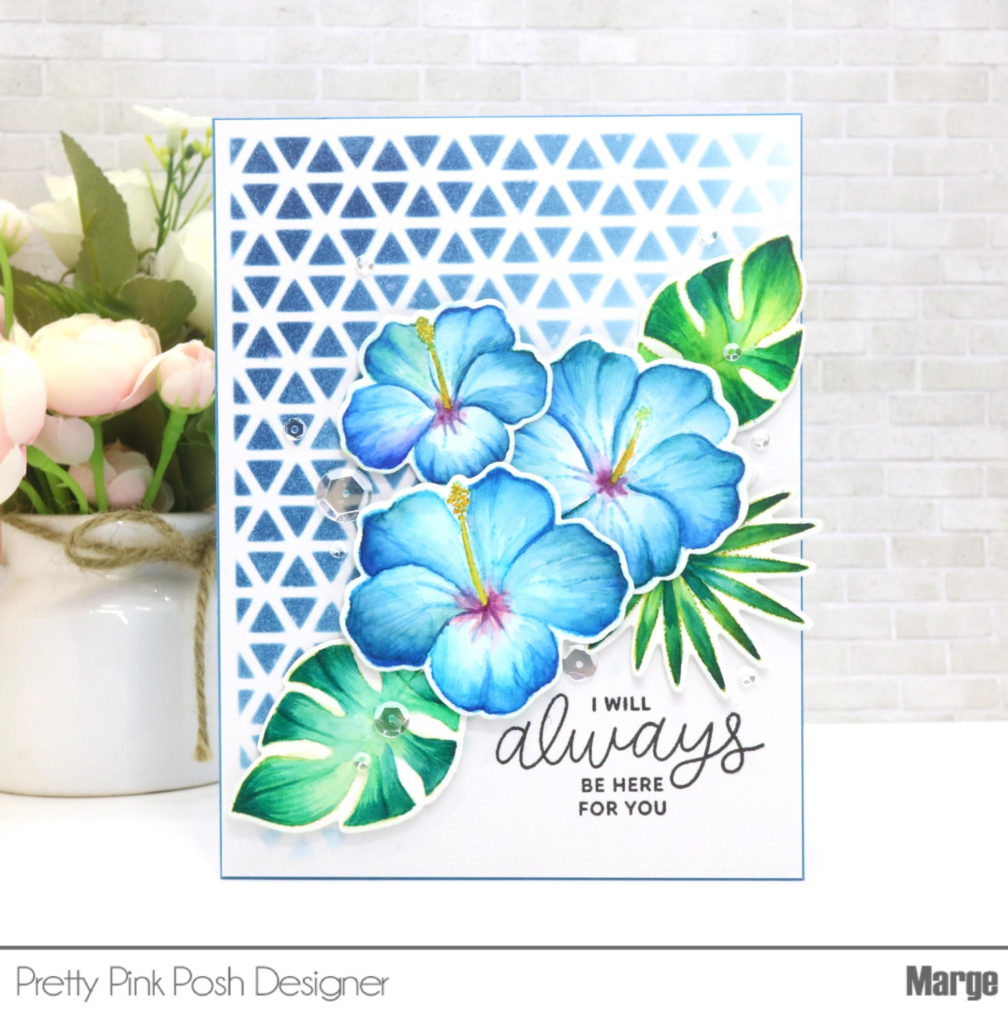
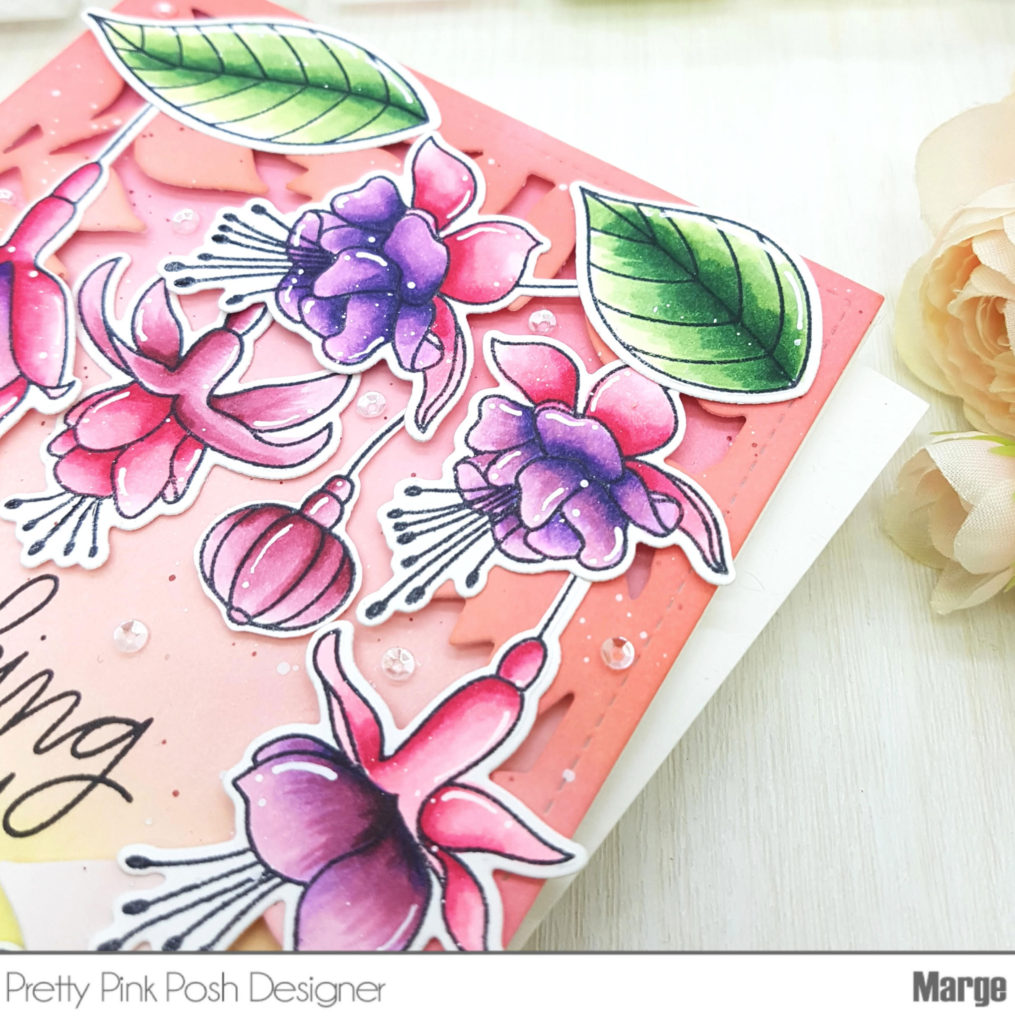
I did no-line water-coloring on Hibiscus Flowers Stamp Set which is also a part of the new release, then I cut the images using Hibiscus Flowers coordinating dies. A sentiment from Encouraging Greetings Set was stamped, and I finished off my card by adding Sparkling Clear Sequins Mix and 3mm Sparkling Clear Sequins.

Pretty Pink Posh: Sneak Peek- June 2019 Stencils

Thanks for reading this post. Stop by tomorrow for a look at more of the new release!

Spring Bee Wreath

Good Morning! Dana here sharing a card using the adorable Spring Wreath and Bee Friends stamp sets.

I started my card by stamping the wreath from the Spring Wreath stamp set, along with the smaller bees from the Bee Friends stamp set. I then colored my images with Copic markers and used the coordinating dies, Spring Wreath and Bee Friends, to die cut the images.

Next, I started working on my card panel. I began by ink blending Distress Oxide Ink in Tumbled Glass to create my background. I then used the Scallop Frames Die Set to die cut my background and a white frame. I attached this to a sunny yellow cardstock mat before attaching it to my A2 card base.

To finish my card, I stamped my sentiment from the Everyday Greetings Stamp Set in the center of my card. Lastly, I attached my wreath and the fun little bees with foam adhesive to my card front. 

If you missed the post last week featuring lots more bee inspiration, you can find it HERE. This stamp set is really fun and can be used in a lot of ways.

Enjoy your day!

Father’s Day Card

Hi there, Gemma here. Pretty Pink Posh recently released a new product, stencils, in their latest release. I love the Wide Stripes stencil and know I will be reaching for it often.

Pretty Pink Posh: Father's Day Card

For my card today, I inked Blueprint Sketch distress oxide ink with the Wide Stripes stencil to add the pattern to my card base. 

Pretty Pink Posh: Father's Day Card

Next, I die cut a stitched rectangle, using a die from the previously released Stitched Notes die set. I stamped the sentiment from the new Father’s Day stamp set onto the panel

Pretty Pink Posh: Father's Day Card

I stamped out five of the tie image from the set, coloured them with copic markers, then die cut them with the coordinating die.

I cut a length of silver thread, securing with tape behind the stitched panel. I then adhered the panel to the card base with foam tape. Finally, I added the ties to the card with foam tape to finish.

Pretty Pink Posh: Father's Day Card

I hope you were inspired by this fun Father’s Day card. Thanks for stopping by!

Floral Theme & Sale Week- Day 7

Pretty Pink Posh: Floral Theme & Sale Week- Day 7

Hello crafty friends, Yoonsun here with you sharing couple of watercolored floral cards using so beautiful Peonies Stamp & Die Set. Today is the last day of Floral Theme Week and I bet you guys are really enjoying Pretty Pink Posh’s flowers each day this week! All products in the floral section are 15% off May 20-26.

Pretty Pink Posh: Floral Theme & Sale Week- Day 7

I started by stamping peonies & leaves on watercolor paper using light colored dye ink. I then watercolored all stamped images, die cut them with the Peonies Coordinating Dies.

Pretty Pink Posh: Floral Theme & Sale Week- Day 7

I die cut the Spring Frame from white card stock, then mounted it on white card base using double-sided tape – it’s tone-on-tone background base.

Pretty Pink Posh: Floral Theme & Sale Week- Day 7

For the sentiment, I die cut the Love You Script from white card stock. I then added all watercolored peonies & sentiment die cut on the bottom right side of the card front using foam tape. I embellished with some Valentine Jewels Mix.

Pretty Pink Posh: Floral Theme & Sale Week- Day 7

Here is another card with the Peonies Stamp Set. It is a so simple watercolor card. I stamped peonies & leaves (from the Peonies Set), sentiment (from the Encouraging Greetings Set) on watercolor paper panel using black pigment ink first. I used Post-It Notes for masking.

Pretty Pink Posh: Floral Theme & Sale Week- Day 7

I then freely watercolored on stamped images! :D

Pretty Pink Posh: Floral Theme & Sale Week- Day 7

Thank you so much for stopping by. I hope you enjoyed the floral theme week!

Hugs, Yoonsun

Floral Theme & Sale Week- Day 6

Pretty Pink Posh: Floral Theme & Sale Week- Day 6

Welcome to Day 6 of Pretty Pink Posh Floral Theme Week! Alix here using my bright and pretty spring colors to inspire you today! We are having a 15% discount on all items in our Floral section during this week! 

Pretty Pink Posh: Floral Theme & Sale Week- Day 6

To start with my card, I stamped my flower and leaf images from Crocus Flower stamps set  using versafine onyx black ink onto a piece of Bristol smooth paper and die cut them using the Crocus Flowers coordinating dies. I pulled out Zig Clean color real brush markers to color them in layers. I set them aside for later use.

Pretty Pink Posh: Floral Theme & Sale Week- Day 6

To build my background, I cut my lattice panel by using  Lattice Background Die out of a piece of white card stock paper, then I hand cut the center to create a diamond shaped opening. I layered it over a piece of A2 sized card base as a template so I could mark the area with pencil. I removed the lattice die cut and masked the background with washi tape. I ink blended it the unmasked area with TIm Holtz Distress oxide ink in Squeezed Lemonade and Mustard Seed, and stamped the sentiment I chose form Thoughtful Greeting stamp set. I lined up and glued the lattice panel to the card base.

Pretty Pink Posh: Floral Theme & Sale Week- Day 6

I arranged my stamped images around the diamond window using Multi Medium Matte. Then I embellished my card with Sugar Plum Mix Jewels

Do you feel the Spring inspiration now? The sale ends tomorrow. Don’t hesitate to grab a few floral sets and start to plant your flowers on your cards!

Floral Theme & Sale Week- Day 5

Hi Friends! Welcome to another day of Floral Theme Week! It is Melody here today and I have a card to share that I created with the Geraniums Stamp Set and the Geraniums Coordinating Dies.

Have you purchased any of our florals? This week they are 15% off!

The Geraniums along with the Hugs Shaker makes this card perfect for a number of different occasions.

My first step was to create the checked backgrounds. I cut a piece of white card stock to fit the card front and attached the Wide Stripes Stencil to the paper horizontally across the card front. I used a pale green ink and a ink blending tool to stencil the stripes.

Next I used the stencil again changing the direction so that the stripes run vertically. In two steps I have a cute gingham pattern!

To add the sentiment I cut the Hugs Shaker Die twice, once directly into the card front to cut out the circle from the card front, and again from purple cardstock. Then I inlayed the purple die cut into the front of the card. Behind the circle I added vellum and then yellow cardstock.

I arranged the flowers and leaves around the sentiment. The images are colored with Copic Markers and the accented with a white gel pen. I finished off the card with a scattering of Pearl White Jewels.

Thanks so much for stopping by today! Be sure to stop by tomorrow for more floral inspiration.

Floral Theme & Sale Week- Day 4

Pretty Pink Posh: Floral Theme & Sale Week- Day 4

Hi friends, Eloise here and today I have a card to share with you all. I used the Anemones stamp set along with some alcohol inks to make a simple missing you card.

All items in the Floral section are 15% off this week!

Watch the video above  I  Watch the video in HD on YouTube

Pretty Pink Posh: Floral Theme & Sale Week- Day 4

I started off with stamping out the anemones onto some watercolour paper with black ink and clear heat embossed over it. I then used my Mijello Mission Gold Watercolour palette and coloured them in with shades of purple as well as colouring the leaves green. Once they were coloured, I cut them out using the Anemones coordinating dies and set them off to the side.

Pretty Pink Posh: Floral Theme & Sale Week- Day 4

Next, I decided to do my striped alcohol ink background. I pulled several shades of blue alcohol inks out and used them to create a striped background. I used a paint brush along with water to help create the stripes today. I went from lightest to darkest down a piece of Yupo paper to create the background. I then dried it with a heat tool.

Pretty Pink Posh: Floral Theme & Sale Week- Day 4

Lastly, I adhered all my flowers to the centre of the inked panel and then used the Camping Friends stamp set for the ‘Missing You’ sentiment. I white heat embossed it on a strip of black cardstock and adhered it onto my card as well.

Pretty Pink Posh: Floral Theme & Sale Week- Day 4

Thanks so much for stopping by today, I hope you guys enjoyed and I’ll see you next time.

Eloise

Floral Theme & Sale Week- Day 3

Hi, everyone! Marge here with you for the day 3 of Floral Theme Week featuring the Flourishing Fuchsias stamp set. Today, I’m going to share my Copic coloring of the fuchsias on Distress Oxide ink blended background. 

All items in the Floral section are 15% off this week!

Pretty Pink Posh: Floral Theme & Sale Week- Day 3

I started by stamping  Flourishing Fuchsias and Bee Friends on 80lb Neenah White paper using Memento Black ink and colored the images using my Copic Markers. I cut them all using Flourishing Fuchsias coordinating dies and Bee Friends coordinating dies

Pretty Pink Posh: Floral Theme & Sale Week- Day 3

Next, I prepared two pieces of A2 sized Bristol paper, ink-blended them using Distress Oxide Inks: Worn LipstickTattered Rose, and Twisted Citron. I cut one panel using Spring Frame Die, and then I gave more shades to the frame by adding a little bit of Abandoned Coral on the top and Mowed Lawn on the bottom. 

Pretty Pink Posh: Floral Theme & Sale Week- Day 3

I layered the frame to the bottom panel followed by fuchsias and bees around the frame, then I stamped Thinking of You from Bee Friends stamp set through the frame using my Mini MISTI. I splattered with white and dark pink ink over the panel and let them dry. 

Pretty Pink Posh: Floral Theme & Sale Week- Day 3

Next, I adhered the frame onto the bottom panel with dimensions using Square Foam Adhesives and Strips Foam Adhesives, and then I adhered Flourishing Fuchsias and Bees on the background. For this, I used Strips Foam Adhesives and Glue Dots. After I was satisfied with all the arrangement, I added white details using a white gel pen. I then adhered 3mm Sparkling Clear Sequins here and there and finished off the card.

Pretty Pink Posh: Floral Theme & Sale Week- Day 3

Copic Markers I used are as follows:

Purple: BV08-V17-V15-V12-V01

Bright Pink: RV29-RV25-RV23-RV21-RV00

Purple Pink: R89-R85-R83-R81, I mixed R89-R85-R83-R81 and BV08-V17-V15-V12-V01 on the same petals for unique color expressions.

 Green: G29-G28-G24-G21-G00 

Bees: E79-E77-E74-E71, Y17-Y15-Y11, G20

Pretty Pink Posh: Floral Theme & Sale Week- Day 3

Thanks for stopping today. I hope you enjoyed the post. Come back tomorrow for another day of floral inspiration!

Floral Theme & Sale Week- Day 2

Hi everyone, Ardyth here and it’s my turn to highlight one of Pretty Pink Posh’s floral stamp sets for Floral Theme week. Be sure to check back because we will have new inspiration each day this week. All products in the floral section are 15% off May 20-26. 

Cherry blossoms are the perfect sign that spring has arrived (finally!) and I wanted to recreate their soft pretty colours.

I started by stamping all the Cherry Blossom stamps in the set onto some watercolour cardstock, with embossing ink, before embossing them with Silver Pearl embossing powder. This powder is white, but it also has a beautiful shimmer.

I taped the panel to a board and watercoloured them with some of my ink pads. I used a water brush to fill each flower with water before bringing a small amount of colour to the centre, allowing the water to carry the colour out to the edges, fading out as it travelled. The embossed outlines kept the colour from going too far.

I followed a similar process for the leaves, using a fresh, spring green that I knew would contrast well with the flowers. To add a bit more interest and sophistication, I went back in with a second colour – a more muted lavender for the blossoms and a deeper green for the leaves.

I used the coordinating dies to cut all the flowers and leaves out and then it was time to create my background. 

As a cardmaker, I tend to use bold bright colours. Whenever I try to make something soft and pretty, I find myself reaching for something ‘else’ to punch it up a bit. This time I did some ink smooshing on my background, in the same fresh green colour that I had used on the leaves. This increased contrast helped the blossoms pop! I trimmed this panel with the stitched rectangle from Stitched Notes.

For my sentiment, I used the Happy Birthday Script die. I cut it once from white cardstock and then again from the centre of the green ink-smooshed panel. Before inlaying the white sentiment into the panel, I coated it with embossing ink and embossed it with the same Silver Pearl embossing powder that I used for my images, so that everything would tie together.
I added the flowers and leaves to the panel, allowing parts to extend over the edge for added interest. I used foam tape to pop up some of the elements, and others were glued directly to the panel.

To finish the card, I glued the panel to an oyster card base. I have some leftover flowers for another card; I will store them in the pocket with the stamp set until I need them. 

Thanks for joining us today. Stop by tomorrow for a card using our Flourishing Fuchsias!

To Bee Or Not To Bee Blog Hop

Hello, crafty friends! Thi here for a fun blog hop and today I am sharing a BEE-autiful shaker card for World Bee Day and using the adorable Bee Friends stamp set! Pretty Pink Posh is participating today to support bees and raise awareness for the importance of bees. It’s a great cause and we have the perfect stamp set to celebrate these amazing insects!

Pretty Pink Posh: To Bee Or Not To Bee Blog Hop

Let’s start the card making! I first stamped the images from Bee Friends and Spring Wreath with brown ink and colored with Copic markers. I cut these little guys out and set aside to work on my background and shaker elements.

Pretty Pink Posh: To Bee Or Not To Bee Blog Hop

For the front panel, I freehand watercolored some light teal stripes onto watercolor paper and let this dry. After it dried, I die cut a circle and taped acetate to the back of this panel. Next, I used foam tape and built a well for my sequins to go in. For this card, I used Valentine Confetti Mix and filled the entire well. I then backed it with some white card stock. I adhered this panel onto an A2 top-folding card piece and moved on to decorate the front of my card.

Pretty Pink Posh: To Bee Or Not To Bee Blog Hop

I put some foam tape behind the wreath and adhered it over the shaker window. For more dimension, I also put my little bees on with foam tape so it would stand out. Basically, I was trying to make a bee wreath.

For my sentiment, I die cut just “hello” from the Hello Friend Script die three times on white card stock. I glued them together and glued to my card front. I finished this off with two of my little bee images and my card is finished.

Pretty Pink Posh: To Bee Or Not To Bee Blog Hop

Some of the Pretty Pink Posh team have also created inspiration with our Bee Friends set. You don’t want to miss them!


Here’s a list of the sponsors for this fun blog hop. There are lots of great prizes you can win if you leave comments!

Ready to hop along and see lots of great bee inspiration and possibly win some prizes?

Blog hop list:

  1. Milka Gubo
  2. Alexandra Suta
  3. Alice Huang
  4. Amy Tsuruta
  5. Donna Mikasa
  6. Kathy Curry
  7. Ksenija Rizova
  8. Larissa Walgemoed
  9. Neha Bhatt
  10. Nonni Niskanen
  11. Samantha Mann
  12. Sonja Kerkhoffs
  13. Tina Pavlovic
  14. Valentina Bizjak
  15. Gerda Steiner Designs
  16. Honey Bee Stamps
  17. Lawn Fawn
  18. Newton’s Nook Designs
  19. Paper Smooches
  20. Pretty Pink Posh <—you are here
  21. Uniko
  22. Your Next Stamp
  23. Milka Gubo (InLinkz – return after commenting and add your name to InLinkz)
Pretty Pink Posh: To Bee Or Not To Bee Blog Hop

Thanks so much for stopping by. I hope you enjoyed all the cute bee inspiration!