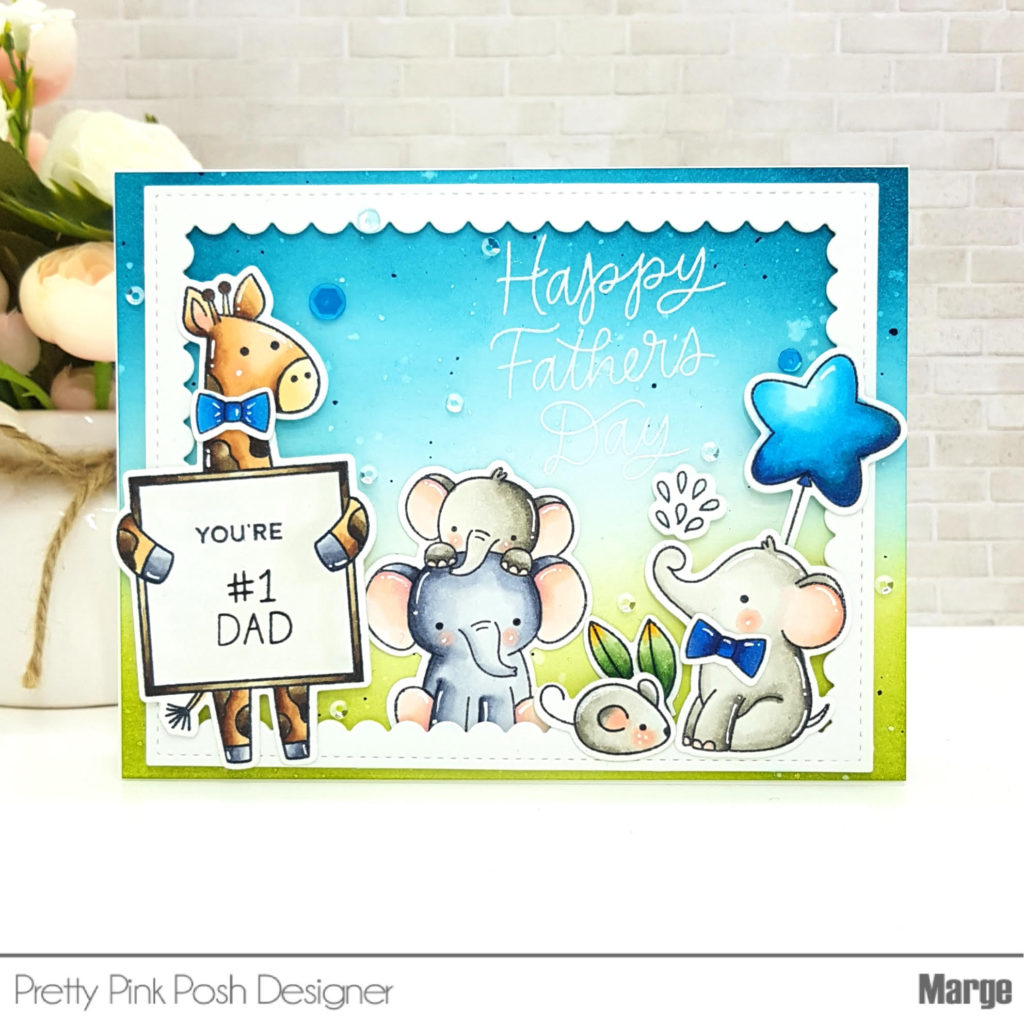
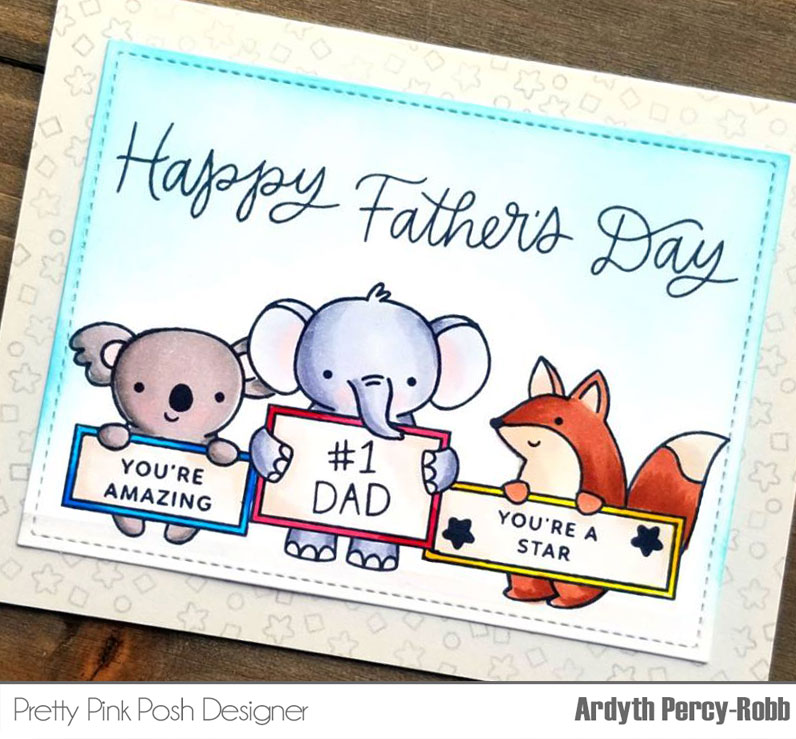
Hi, everyone! It’s Marge here and today I’m going to share a Father’s Day card design which is not that much masculine but with cute critters selected from various stamps sets.
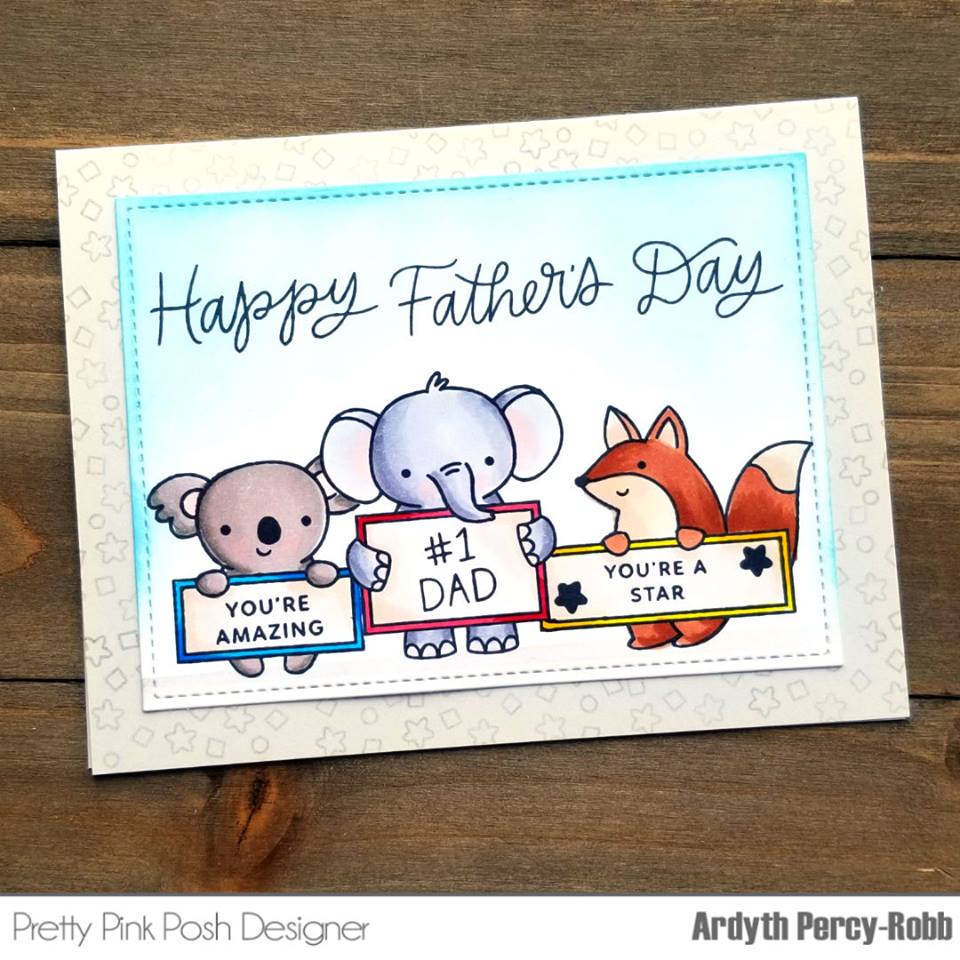
Next, I trimmed a piece of A2 sized Bristol Paper, and then I ink blended it in teal blue and olive green using my cube dye inks ( Teal Cave and Galactic Stream, Olive and Moss). For visual interest, I splattered with water, white acrylic ink, and deep navy colored inks onto my panel and let them dry. After my panel was dry enough, I stamped a sentiment from Father’s Day stamp setwith Versamark Ink on the top of the panel using my MISTI, then I heat embossed it in white.
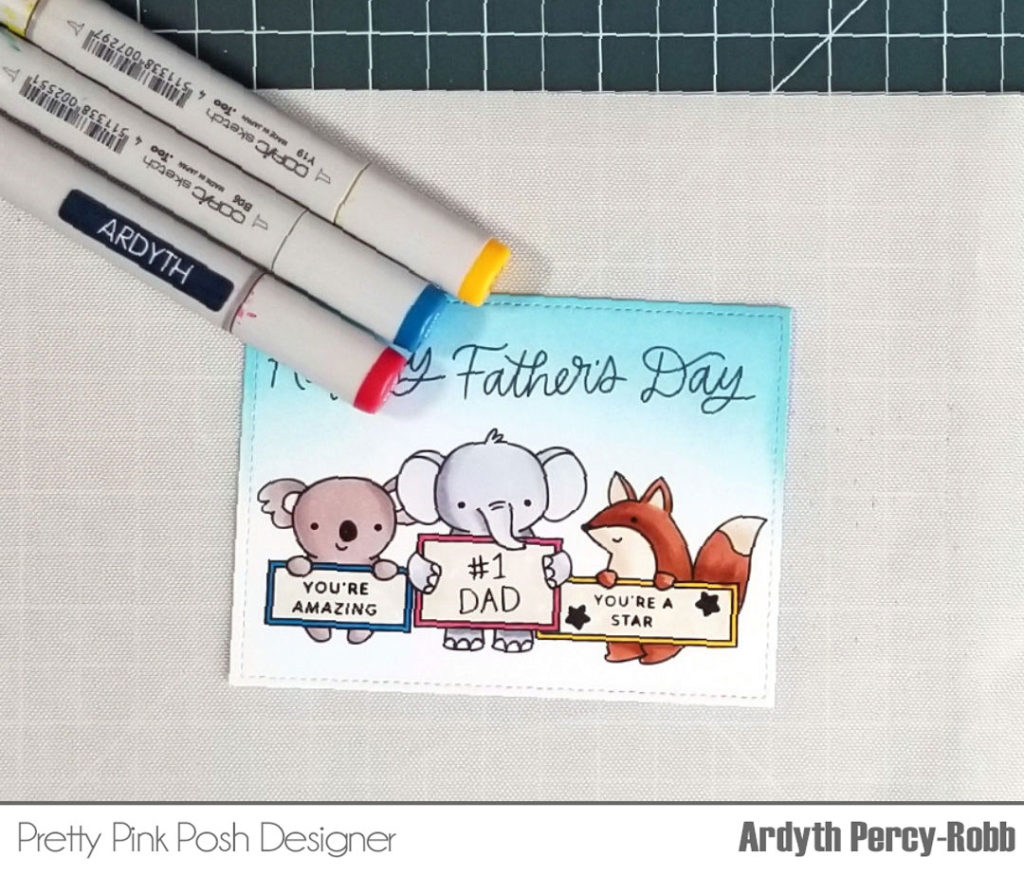
Copic markers I used: E27-E25-E23-E21 and E47-E44-E42 for Giraffe, Warm Gray and Cool Gray for Elephants, RV13-R20-R30-R000 for ear, B37-B34-BG07-BG05-BG02 for balloon,
That’s it from me for today. Thanks for stopping by.
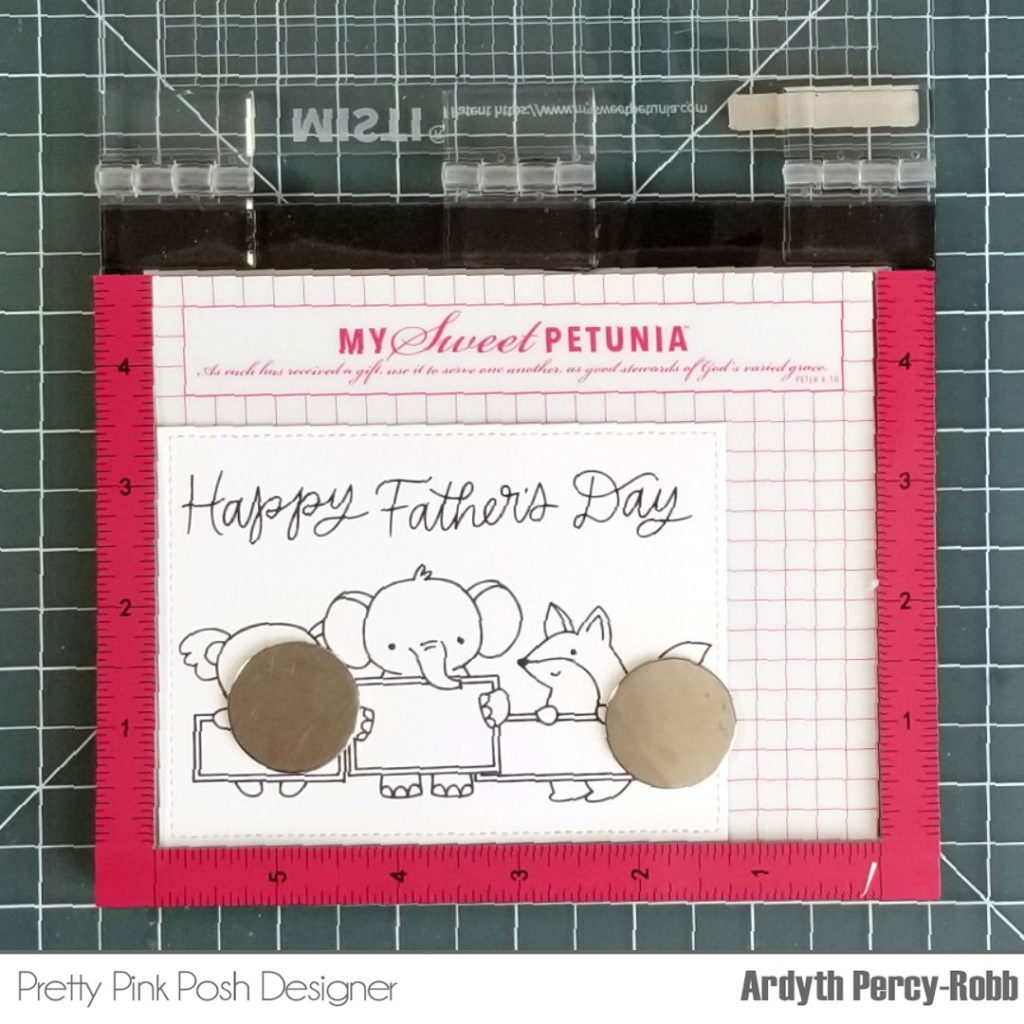
I started by die cutting the stitched rectangle from the Stitched Notes die set– this meant that I knew exactly how much space I had for my adorable critters!
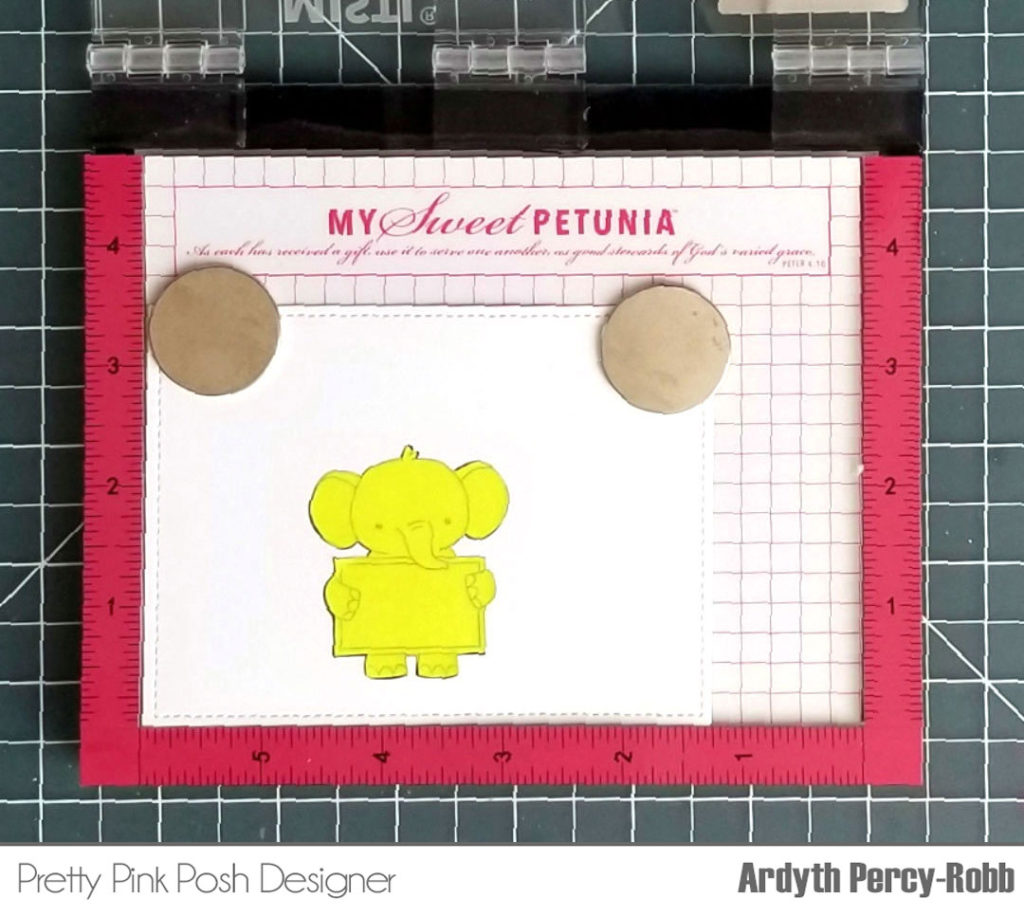
I stamped the elephant first, slightly off-centre. I knew I wanted the fox to the right, facing the elephant, and his sign is longer, so I needed a bit more space on that side for him.
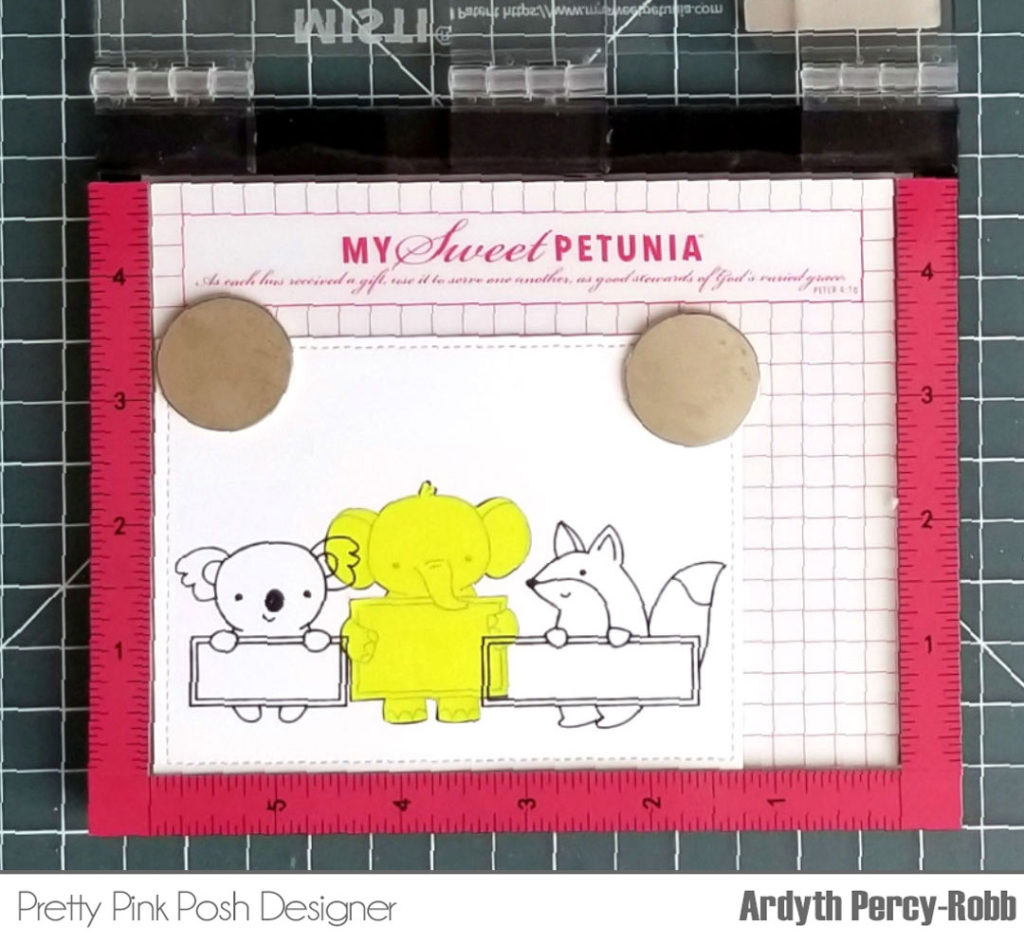
Next, I cut a mask for the elephant before stamping the koala on the left and the fox on the right. This gives just a little bit of overlap and makes them look like they are one larger image. I made sure that all their feet were lined up, so that they are ‘standing’ on the same level.
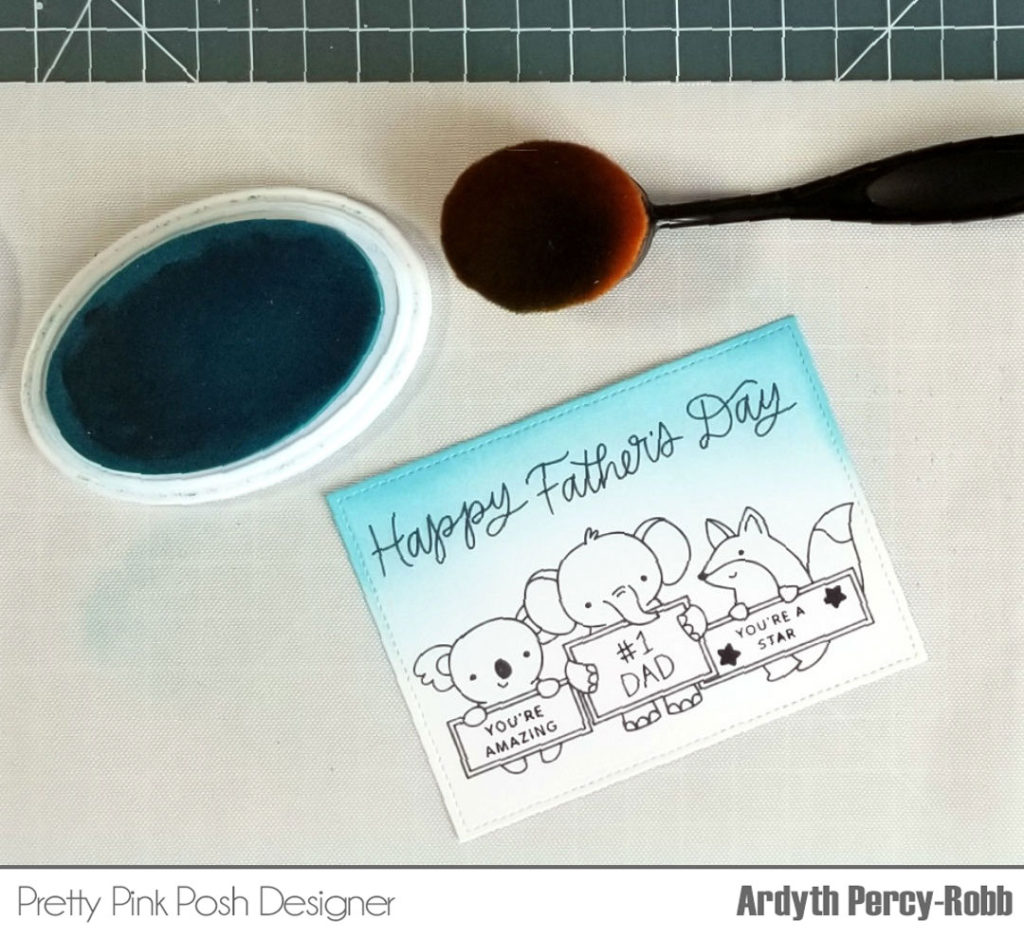
I stamped the sentiments from Animal Signs, Father’s Day andElephant Friends into the signs and then coloured the animals with Copic markers, using minimal shading.
To create the sentiment, I used sharp scissors to perform ‘stamp surgery’ on the Happy Father’s Day sentiment from Father’s Day . If this is not your thing, you can carefully mask it and stamp it 3 separate times – make sure you clean it completely each time so you don’t get any ghosting!
To add a bit of colour, I blended light blue ink over the top half of the card, fading out towards the animals, so I didn’t have to do any more masking!
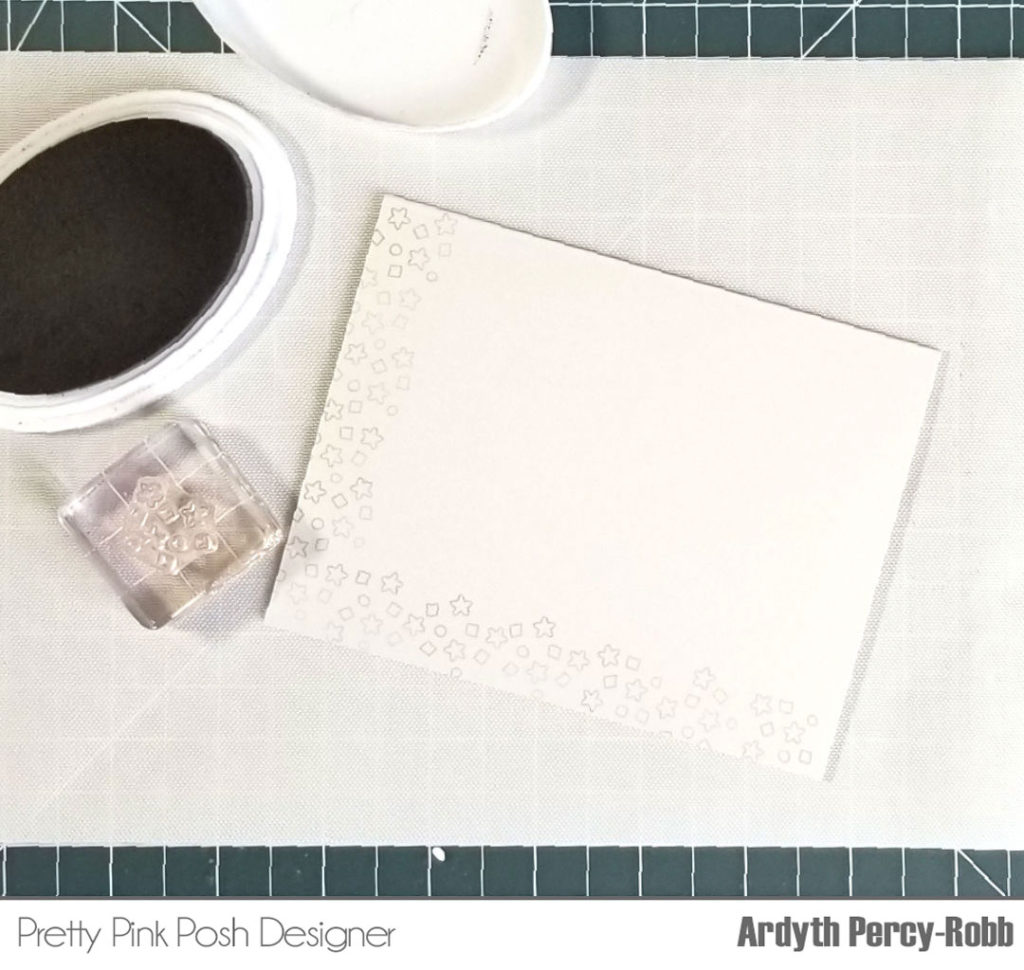
To finish the card, I created an oyster-gray card base and stamped the confetti from Congrats Grad all around the edge to create a little texture and interest around my scene.
The Animal Signs set is great for so many occasions! Since the sign spaces are open, you can really customize it for the recipient.
I hope you were inspired by this card. Thanks for stopping by!
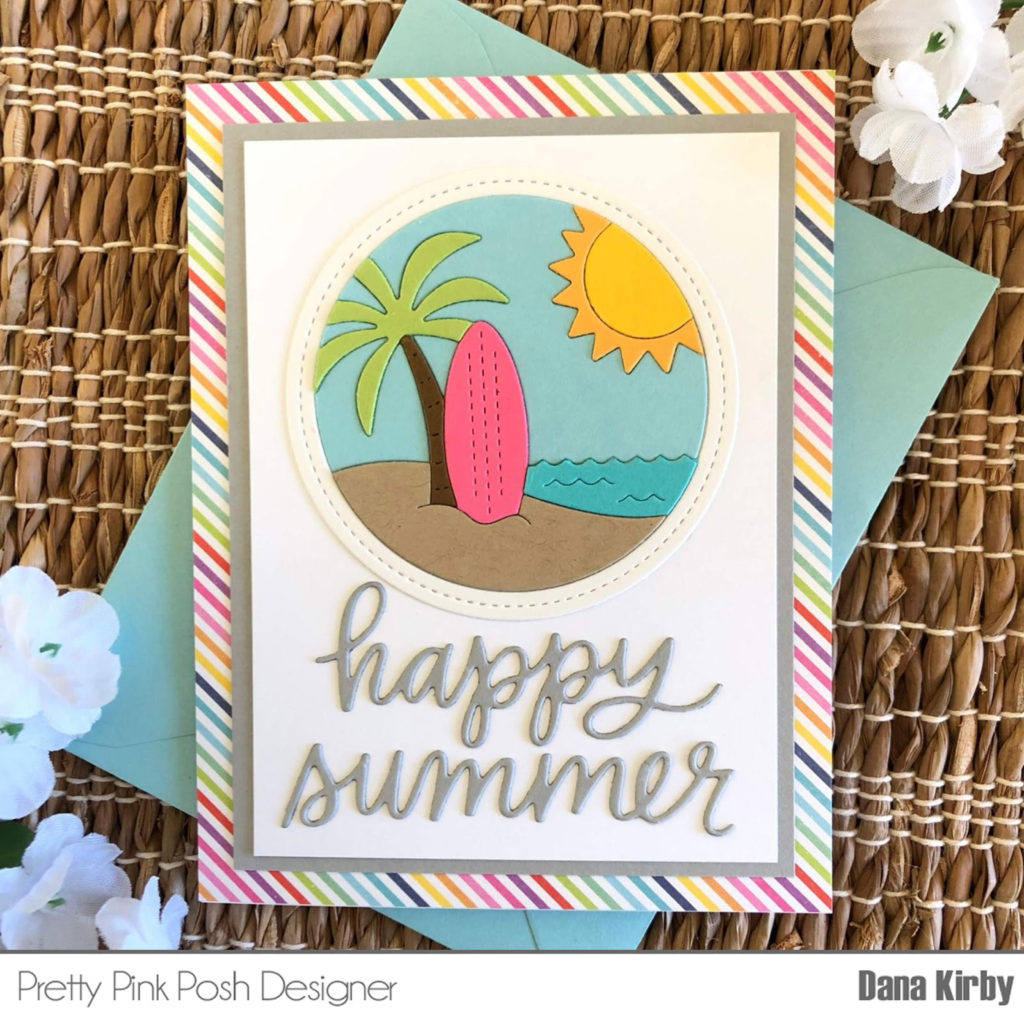
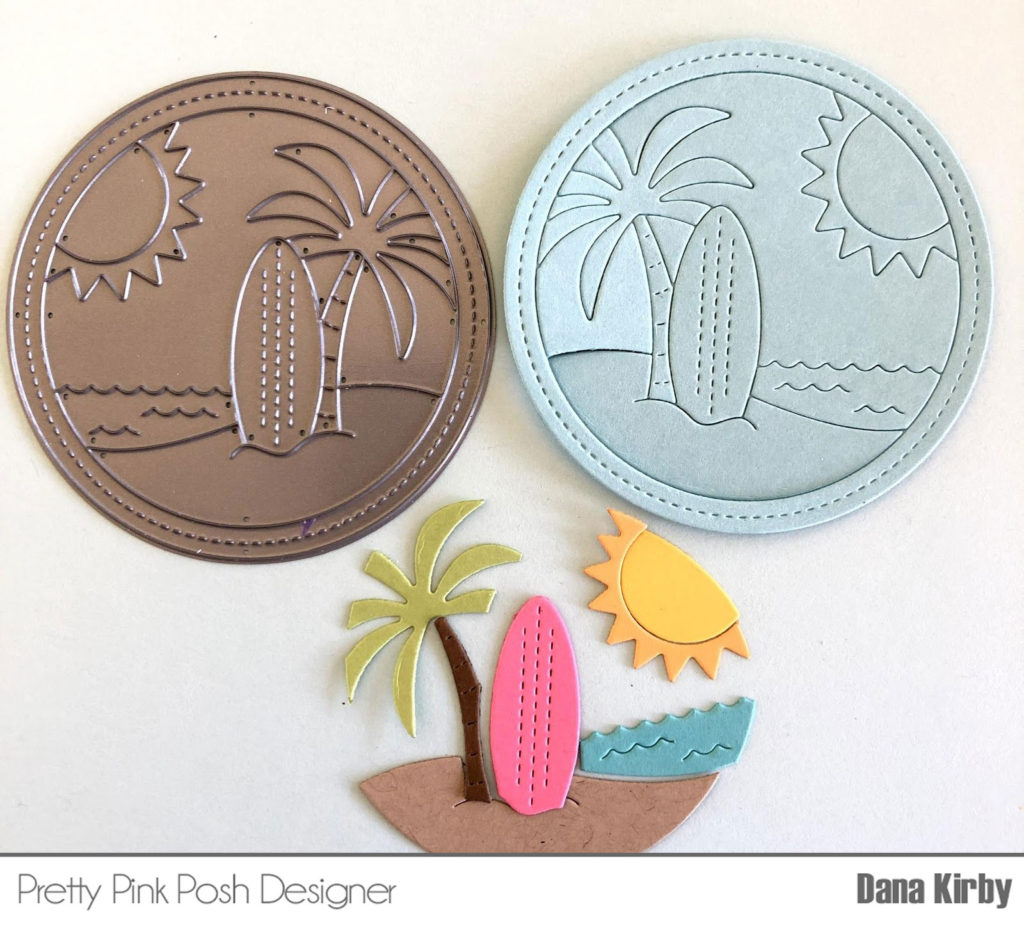
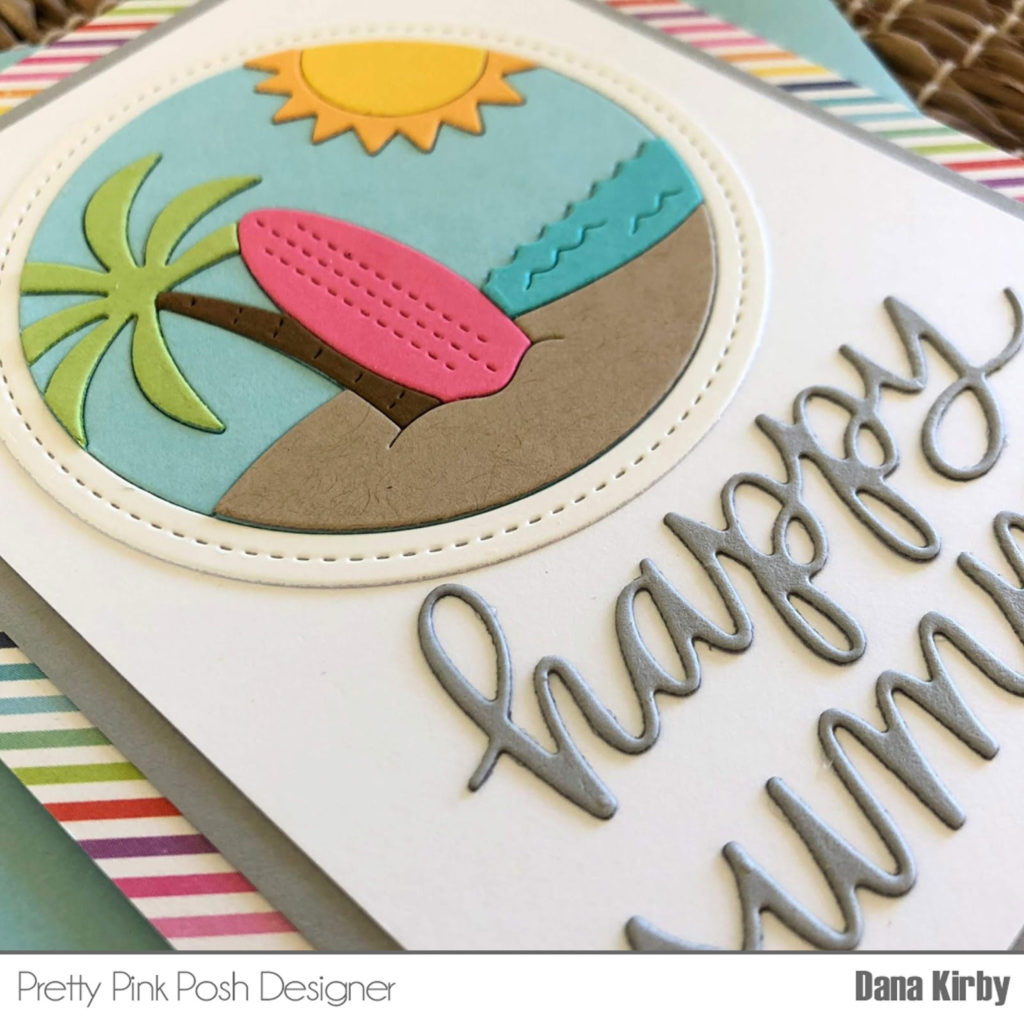
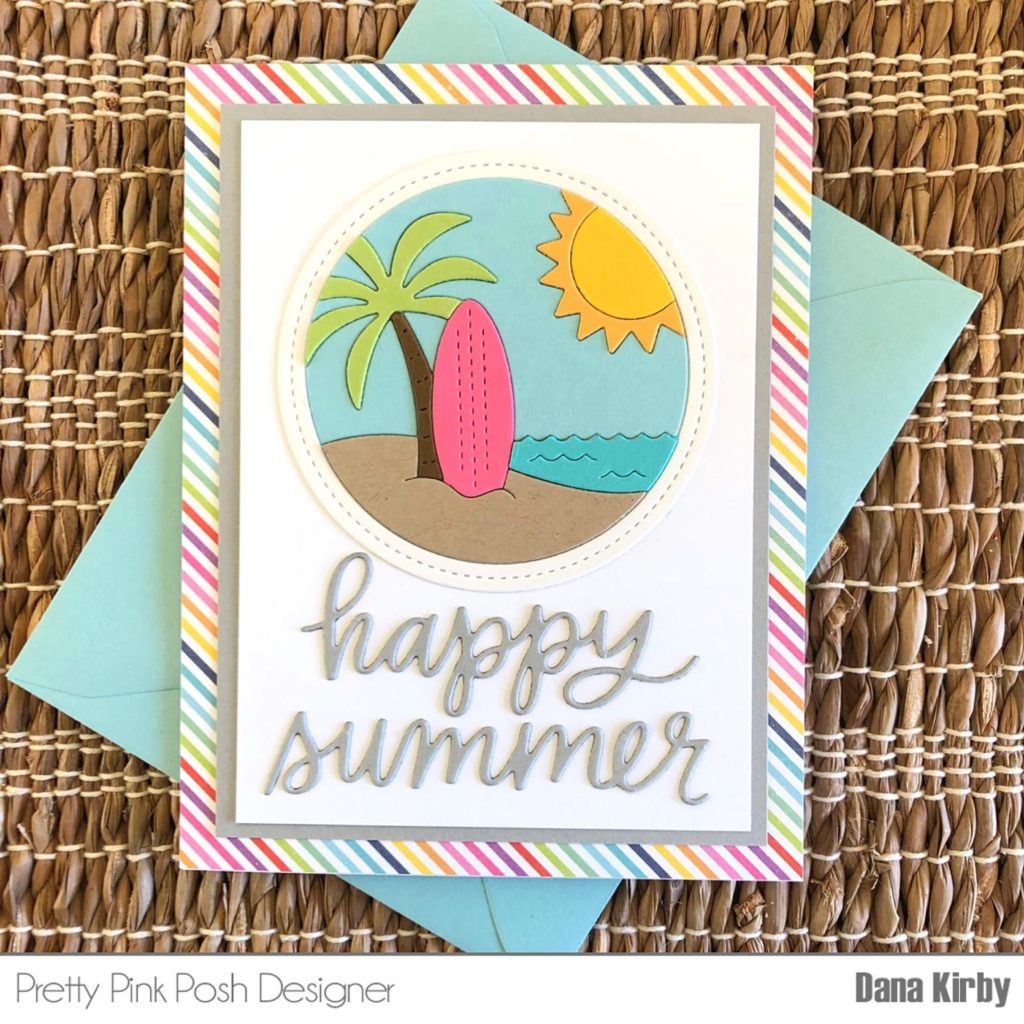
Hi Friends! It is Dana here today sharing a Tropical themed card from the New Release at Pretty Pink Posh. My card today uses the most creative and fun die called Beach Scene. It is one die that cuts all of the pieces to create your beach scene.
To create myBeach Scene, I began by die cutting the scene from a sky blue piece of cardstock. I kept this piece together and attached it to my card panel. Next, I used little scraps of cardstock and I die cut the small little pieces for the scene. I then layed the small pieces on top of my die cut matching the lines. It was really easy to do because everything matches up perfectly with my original cut.
Next, I used the Happy Summer Script die. I die cut it from a piece of cement gray cardstock and attached it to the bottom of my card panel. This die is perfect for an end of the school year card… perfect for a student, teacher or even the office staff.
To finish my card, I mounted my card front onto a cement gray cardstock mat and attached everything to a rainbow panel of patterned paper. Lastly, I attached everything to my A2 card base.
PRIZES: be sure to leave comments on each stop. We are giving away 4 $25 gift certificates to four random comments (2 winners each day) left before June 17, 2019 at 11:59 PM PST. I’ll be announcing the winners next week, so be sure to return and see if you are one of the winners!
PRIZES: be sure to leave comments on each stop. We are giving away 4 $25 gift certificates to four random comments (2 winners each day) left before June 17, 2019 at 11:59 PM PST. I’ll be announcing the winners next week, so be sure to return and see if you are one of the winners!
The June 2019 Release is now available in the Pretty Pink Posh Shop and select retailers that carry our products. Yesterday we revealed all of the products in picture form, but if you would like to see them in a video, Ardyth has that for you today!
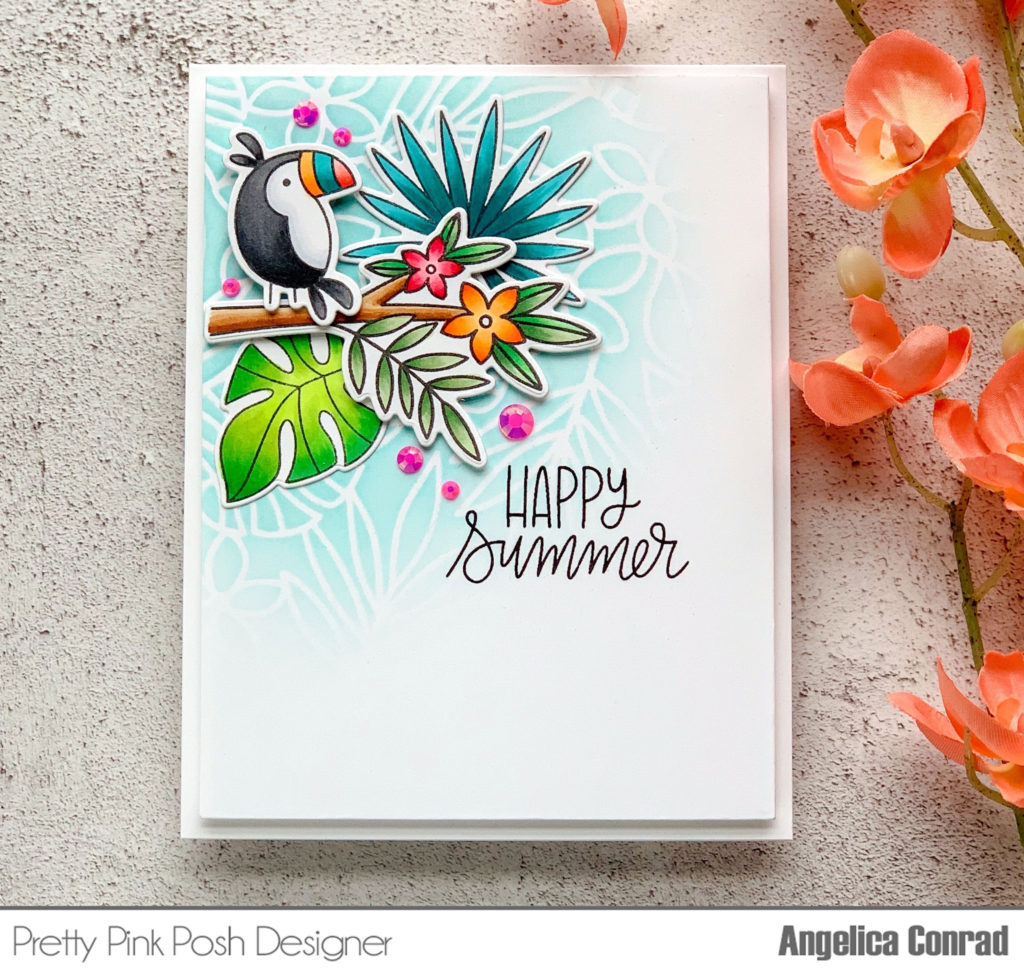
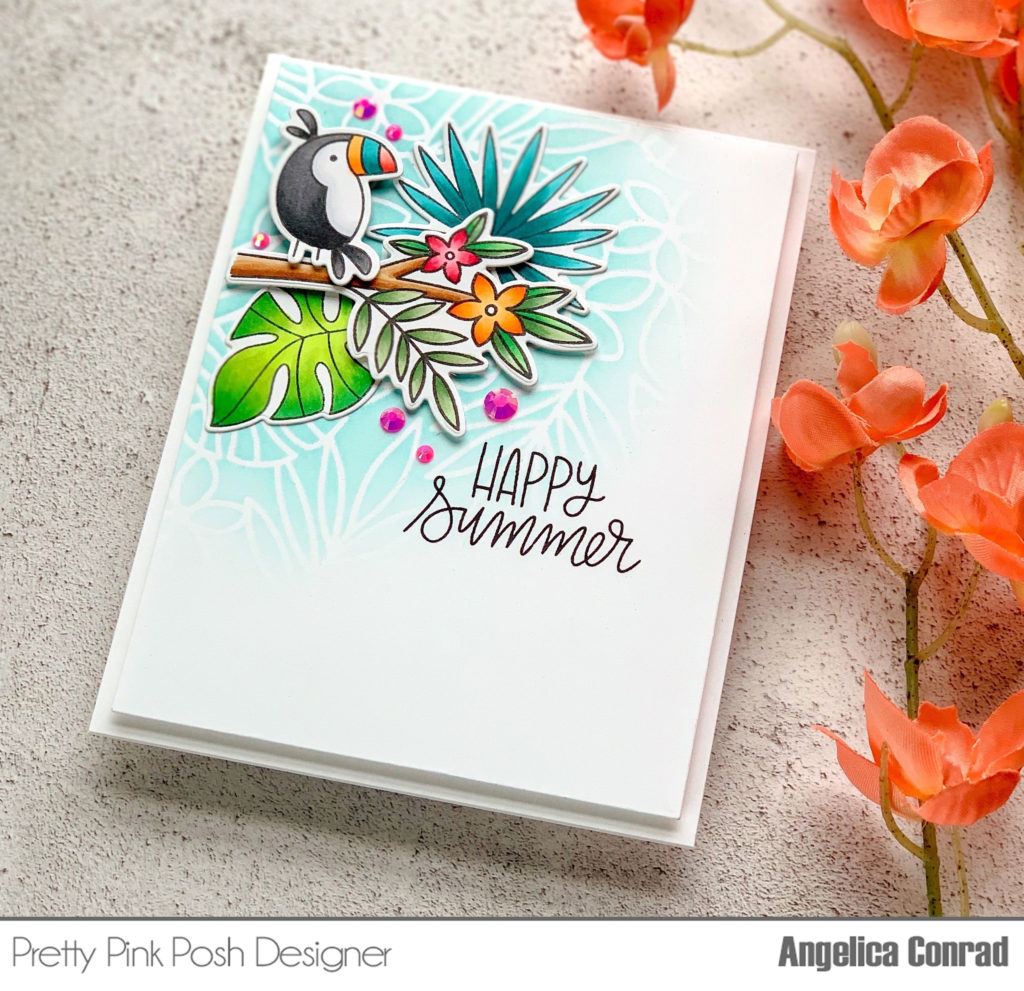
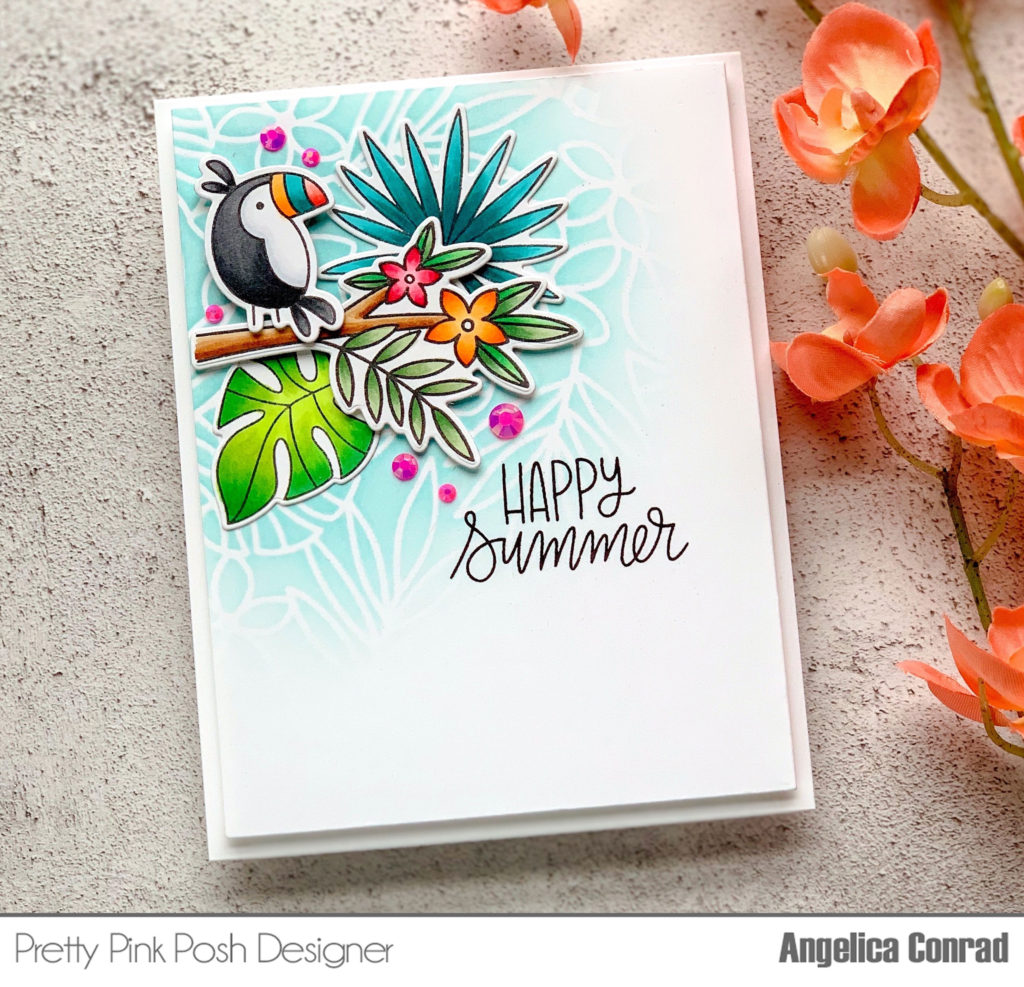
Hi friends, Angelica here with a fabulous Happy Summer card. This cards so bright and cheerful, and makes me so happy to know sunny days are finally here!
I used the new Tropical Background stencil to make the background. I attached the stencil to a white card panel, and blended MFT Summer Splash ink, starting from the left upper corner, and blending down. I lightened my touch to blend the ink out towards the bottom. I stamped a sentiment from the Summer Friends stamp set, then added the colored images with glue and foam squares. I attached the panel to a card base with foam adhesive, and added new Flamingo Pink Jewels for my final touch.
Such a simple card, with vibrant colors that will definitely brighten anyone’s day. Thanks for stopping by!
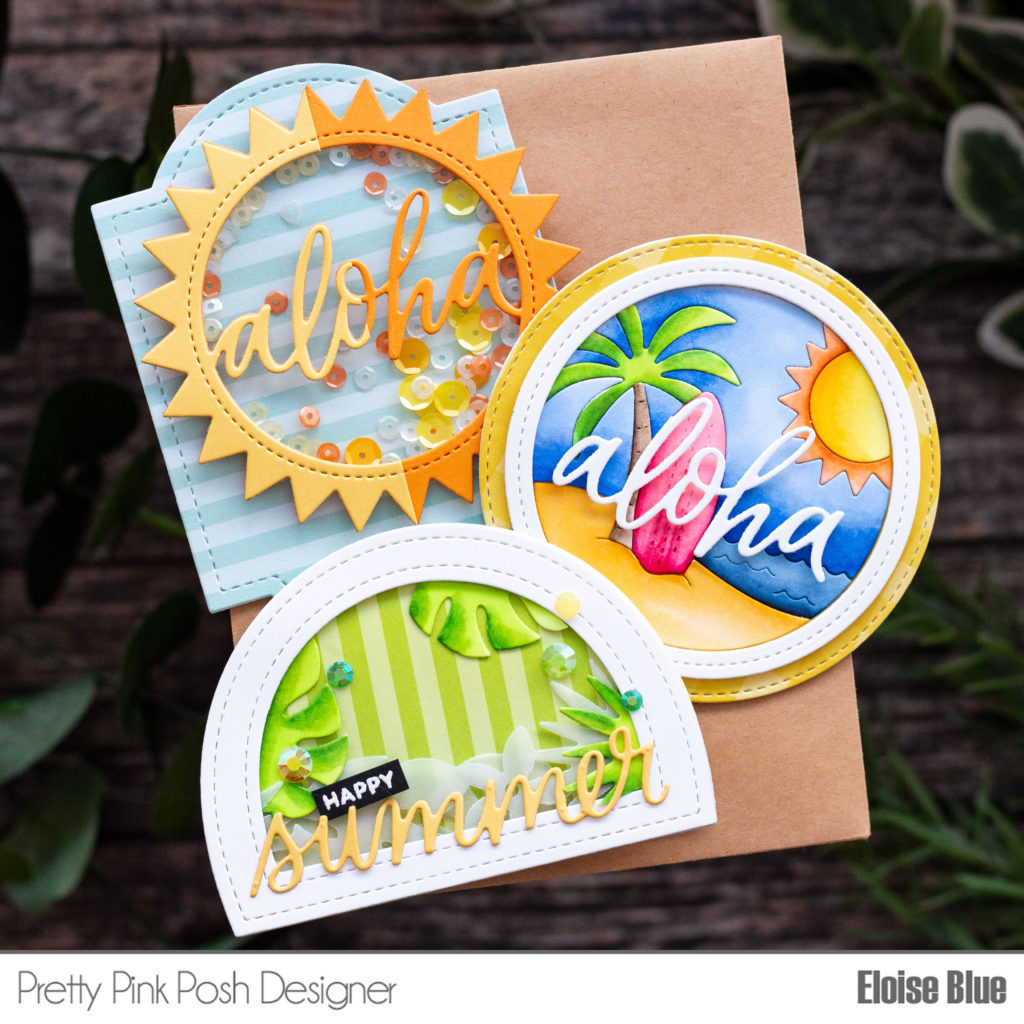
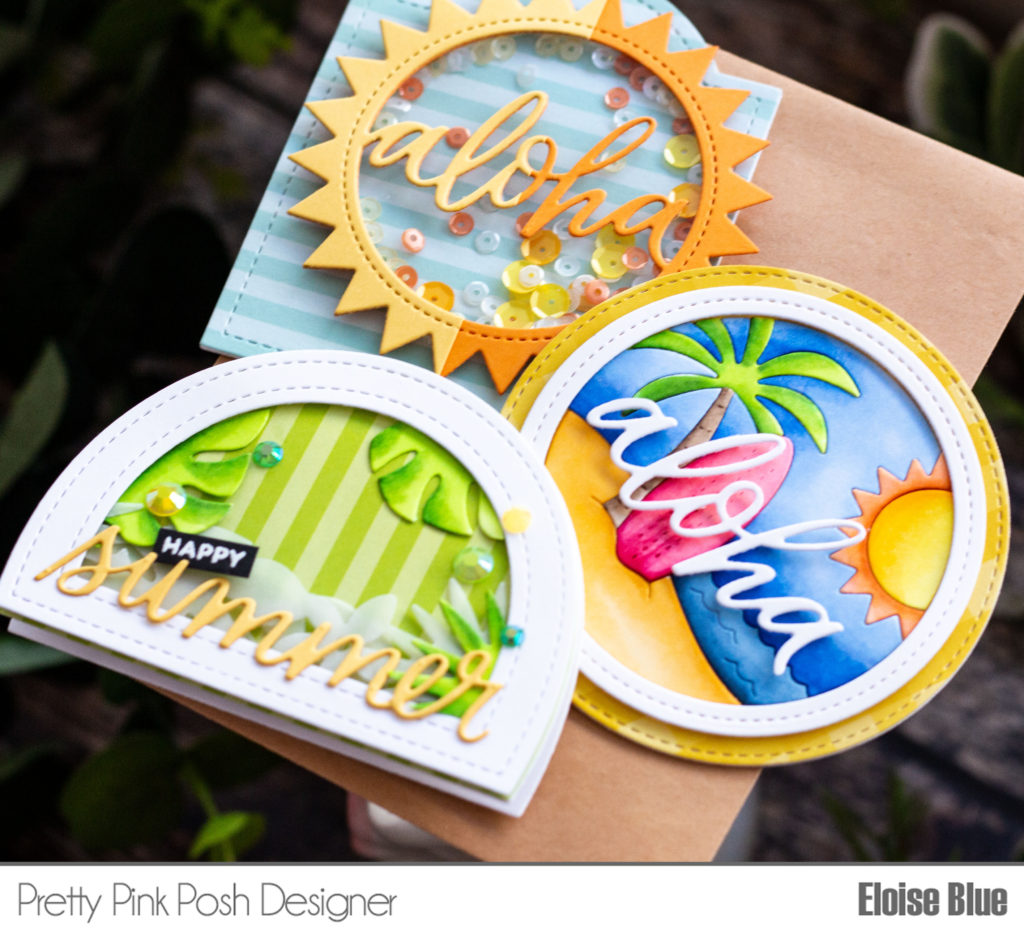
Hello friends, Eloise here and today I’m sharing some mini shaped cards using some of the brand-new items in the upcoming release. I’m using four of the brand-new dies being released as well as a couple of oldies.
Before I started making any of my cards, I
die cut all of my elements first. This made creating these mini cards
super-fast.
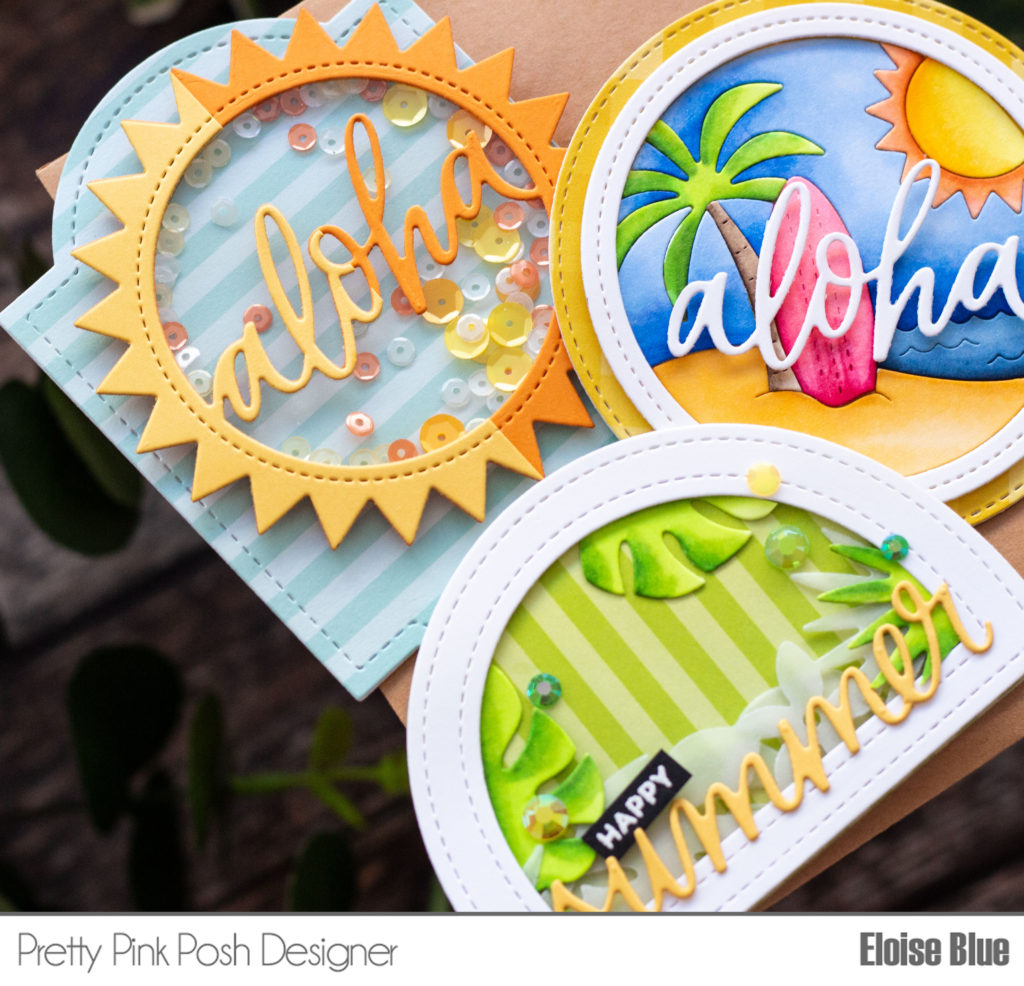
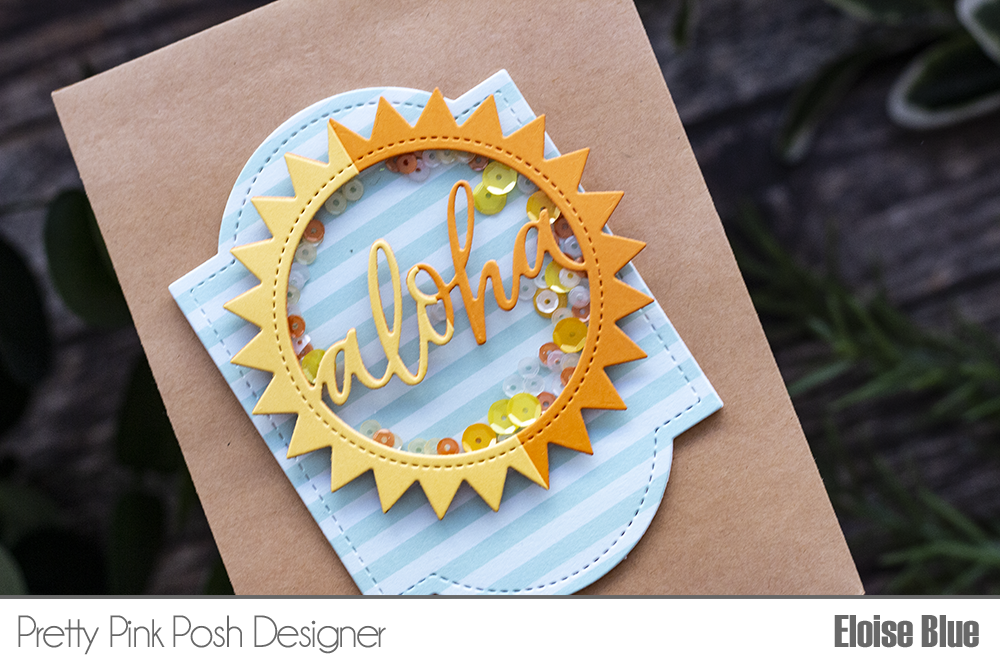
Card #1 – Aloha Shaker – 1x Yellow and 1x Orange Cardstock / Decorative Tag #2 Dies – 2x White Cardstock, 1x Blue Striped Patterned Paper
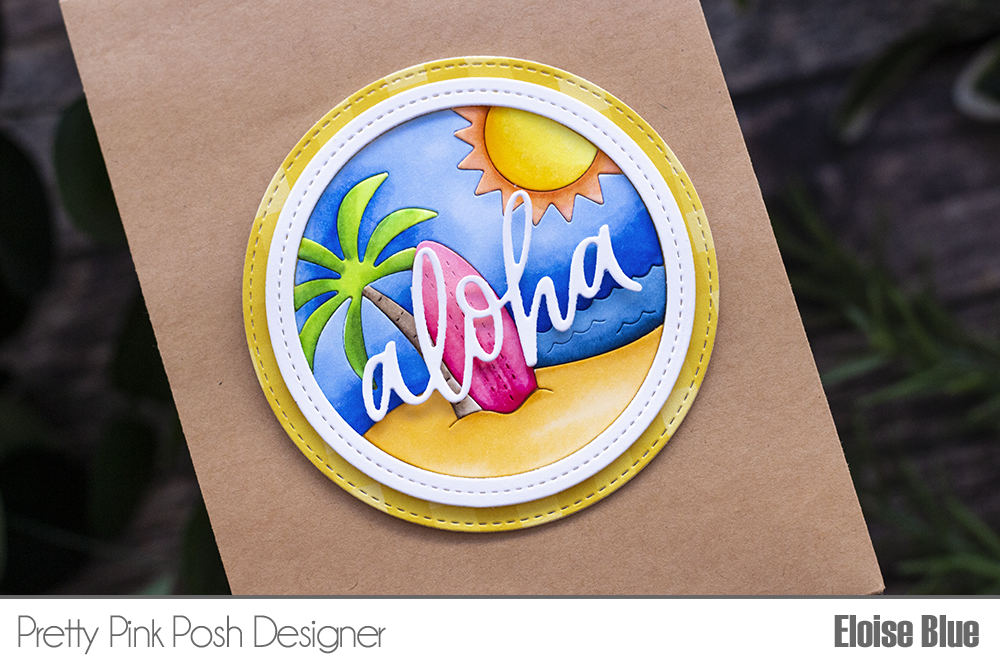
Card #2 – Beach Scene – 1x White Cardstock
/ Aloha Shaker – 1x White Cardstock / 2x White Cardstock and 1x Yellow Plaid
Patterned Paper from a Circle Die.
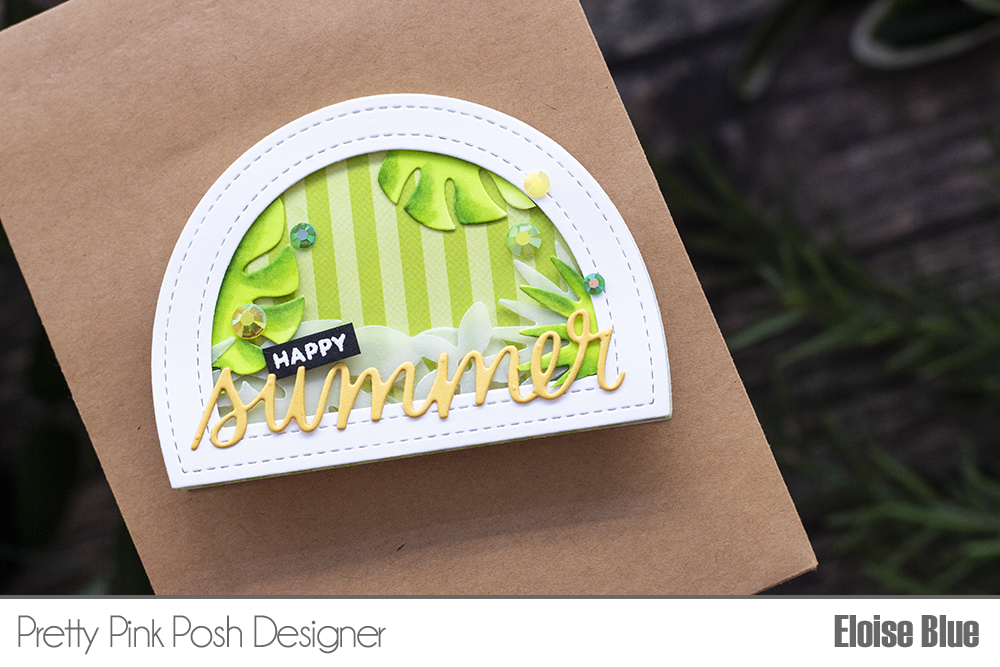
Card #3 – Tropical Frame – 1x Vellum and 1x White Cardstock / Happy Summer Script – 1x Yellow Cardstock / Window Frames Dies – 3x White Cardstock and 1x Green Striped Patterned Paper
To create the card bases, I take both of the white shaped die cuts (Decorative Tag 2, Circle and Window Frames), take one, score one side of them about ½” from the top and then add adhesive to them. I adhere the other blank panel on top to create the card bases. With the Decorative Tag 2 and Circle ones I did slice off the bottom of the back panel, so they sit correctly. Now that everything is die cut and the card bases are assembled, let’s move onto the cards.
For my first card I’m using the new Aloha Shaker Die as well as the Decorative Tag 2 Dies. I adhered the blue striped patterned paper onto the card base first, I then took a piece of acetate and adhered it behind the orange Aloha Shaker Die Cut. I added a double layer of foam tape around the perimeter and then added some sequins to the card base. I removed the backers and adhered the die cut into place. I then took the yellow Aloha Shaker Die Cut, sliced it in half using my paper trimmer and adhered it on the right-hand side of my orange piece. I love this two-tone effect.
For my second card, I used the Beach Scene and Aloha Shaker Die. I started off with lightly adhering down all my pieces from the Beach Scene Die onto some black cardstock. I then coloured all the pieces in with Copic Markers. I adhered the yellow plaid patterned paper to the circle card base and adhered the white frame from Beach Scene with foam tape. I then added flat adhesive to the backs of all the pieces and adhered them into place. Lastly, I took the Aloha Shaker Die Cut, cut out the Aloha, added foam tape onto the back and adhered it into the centre of my scene.
For my final card, I used the Tropical Frame Die as well as the Happy Summer Script Dies. I adhered my green striped patterned paper onto the Window Frames card base. I then took my vellum Tropical Frame and cut off the top of bottom pieces. I adhered one down directly onto my card, and then one onto the back of my extra window frame piece that had been die cut from the centre as well. I added foam tape onto the back and adhered it into place. I then took the white Tropical Frame Die and coloured in a few of the leaves with green Copic Markers. I then cut them out from the frame and adhered them randomly around the card for more interest. Lastly, I adhered the ‘Summer’ part of the sentiment onto the bottom and then used the Halloween Pals Stamp Set for the tiny ‘Happy’ which I white heat embossed onto a thin strip of black.
Copic Markers Used: YG01, YG23, YG07, YG67
Thanks so much for stopping by today. The entire release is on June 10th and be sure to visit the blog tomorrow for the full reveal and bundle information!
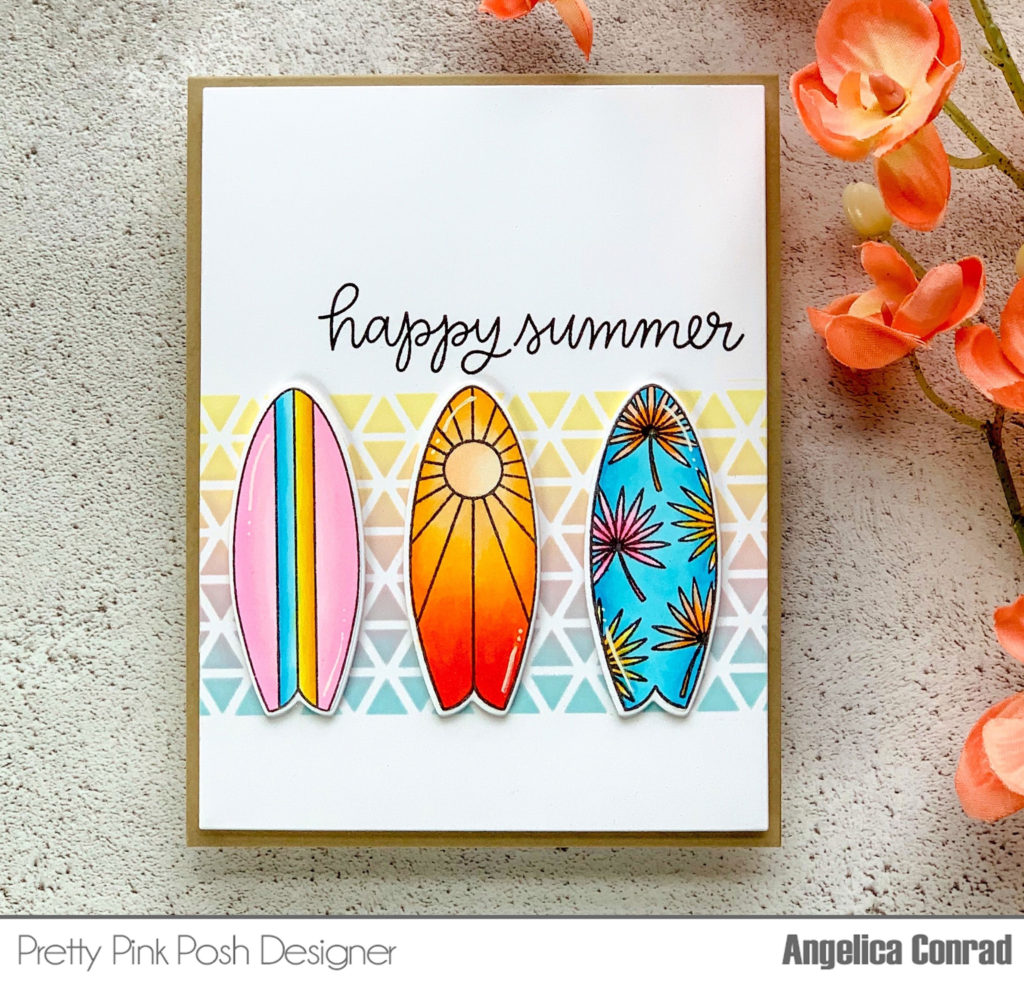
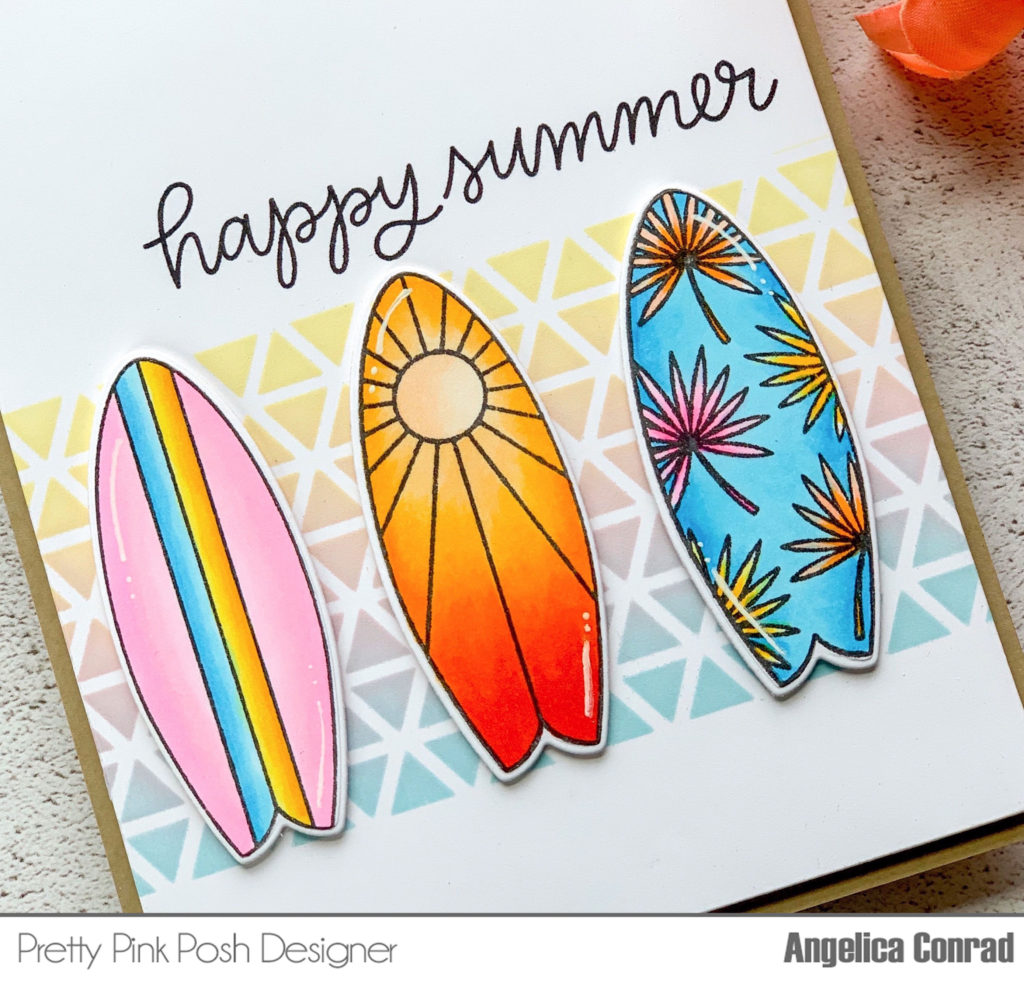
Hi friends, Angelica here excited to show off the new Summer Surfboards stamp set. This stamp set screams summer fun! I have a couple cards to share today using this stamp set, as well as a few other PPP products.
I picked three boards to stamp onto white card stock. I used Copic markers to color them, added white gel pen highlights, then cut them out with the coordinating dies. I used the new Triangle Stencil to make the background. I sprayed the back of the stencil with iCraft Pixie Spray for a good temporary hold, and attached it to a card front panel. I masked the top and the bottom of the stencil, then ink-blended MFT Summer Splash (Blue), Tickled Pink, and Lemon Chiffon inks in a rainbow order. I stamped the sentiment from the Summer Surfboards stamp set above the triangles, I added the card panel to a card base with foam adhesive. My last step was adding the surfboards with thin foam squares.
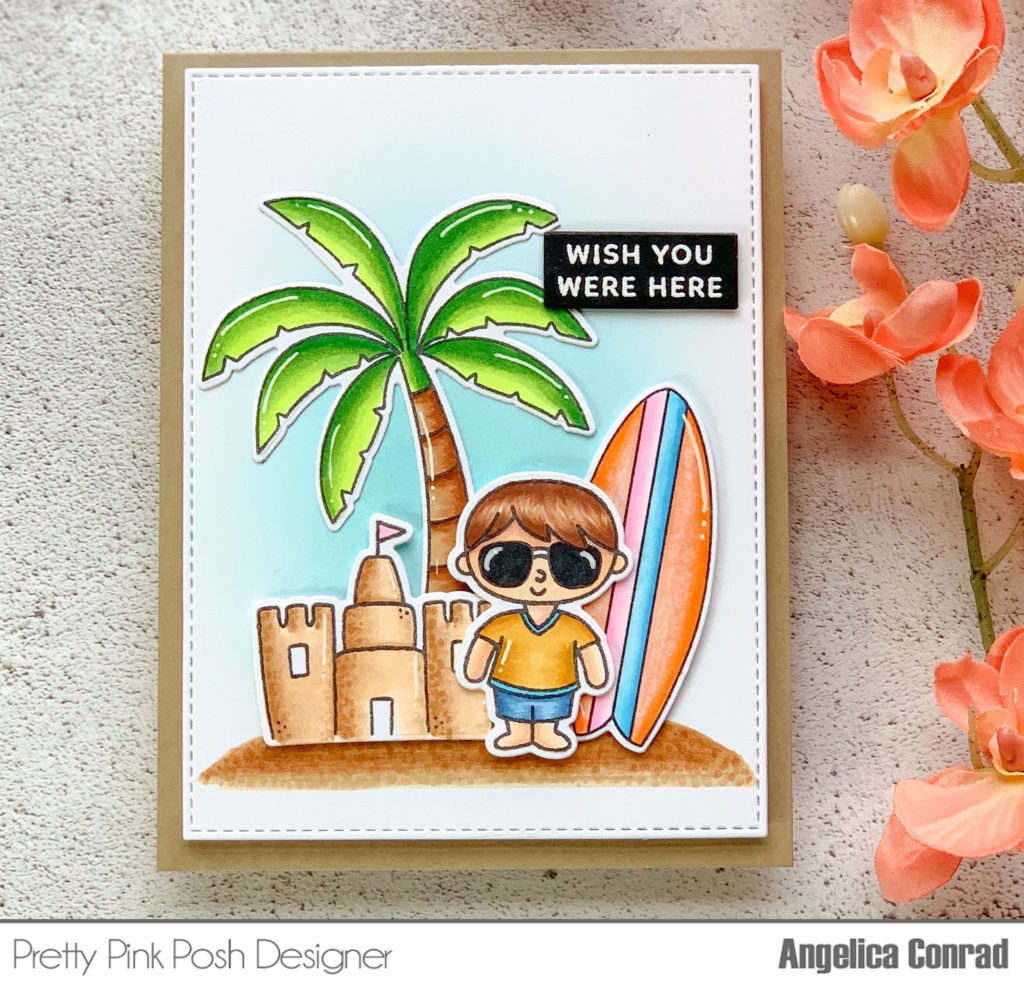
For my next card, I mixed a few stamp sets together to make a beach scene.
I picked the palm tree and sentiment from the new Tropical Birds stamp set, and the sandcastle and boy from the Summer Friends stamp set. I also picked one surf board to use. I stamped the characters out, and used Copic markers to color them, and a white gel pen to add highlights. To give the surfboard a distressed/beachy look, I used my Colorless Blender marker towards the middle of the board to lighten the colors. I used the coordinating dies for Summer Friends,Summer Surfboards, and Tropical Birds to die-cut the images. For the card front, I trimmed a panel of white card stock with a stitched rectangle die, then used Copic markers to hand draw a quick sand bar. I ink-blended a blue sky with Summer Splash ink, then glued the palm tree to the panel. I used different sizes of foam squares to add the rest of the images and a white heat-embossed sentiment, then attached it to a card base.
I hope these cards have given you ideas about the new release that is available on June 10th. Thanks for stopping by!
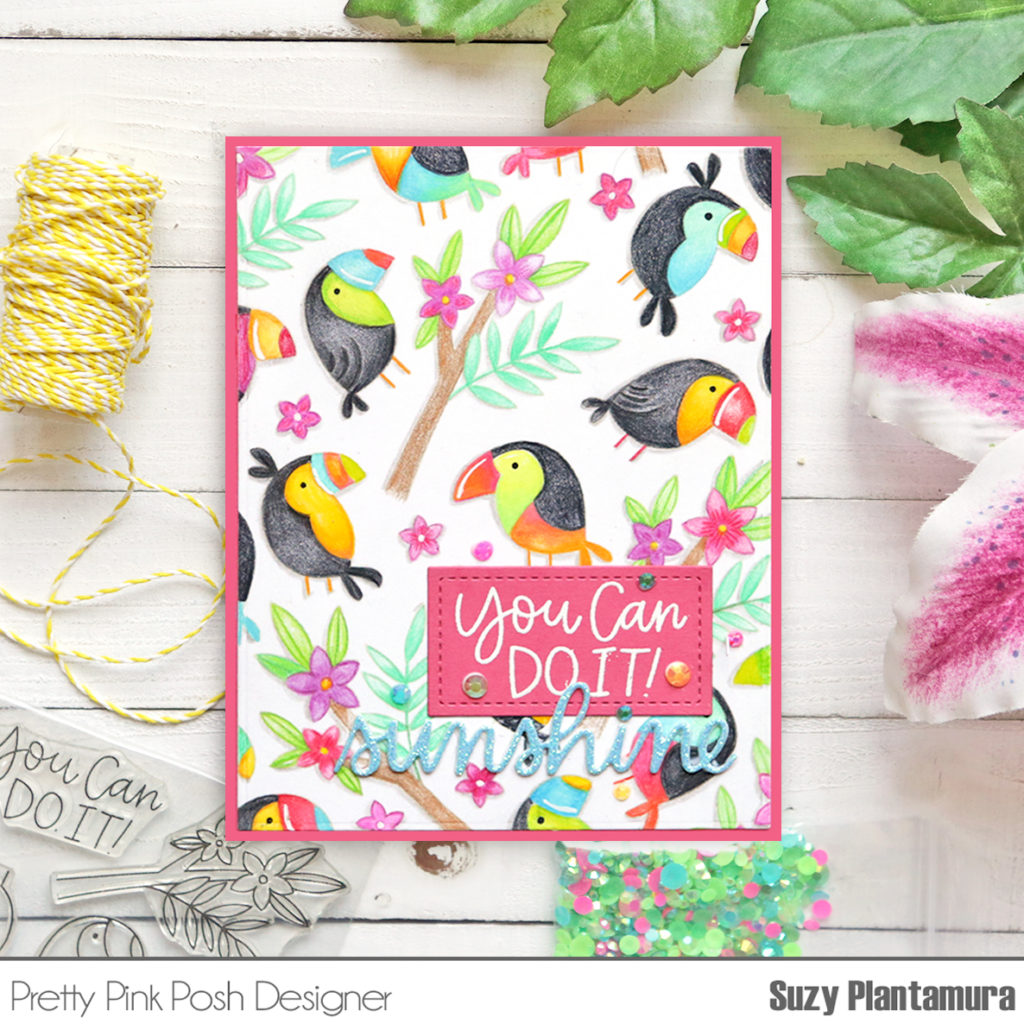
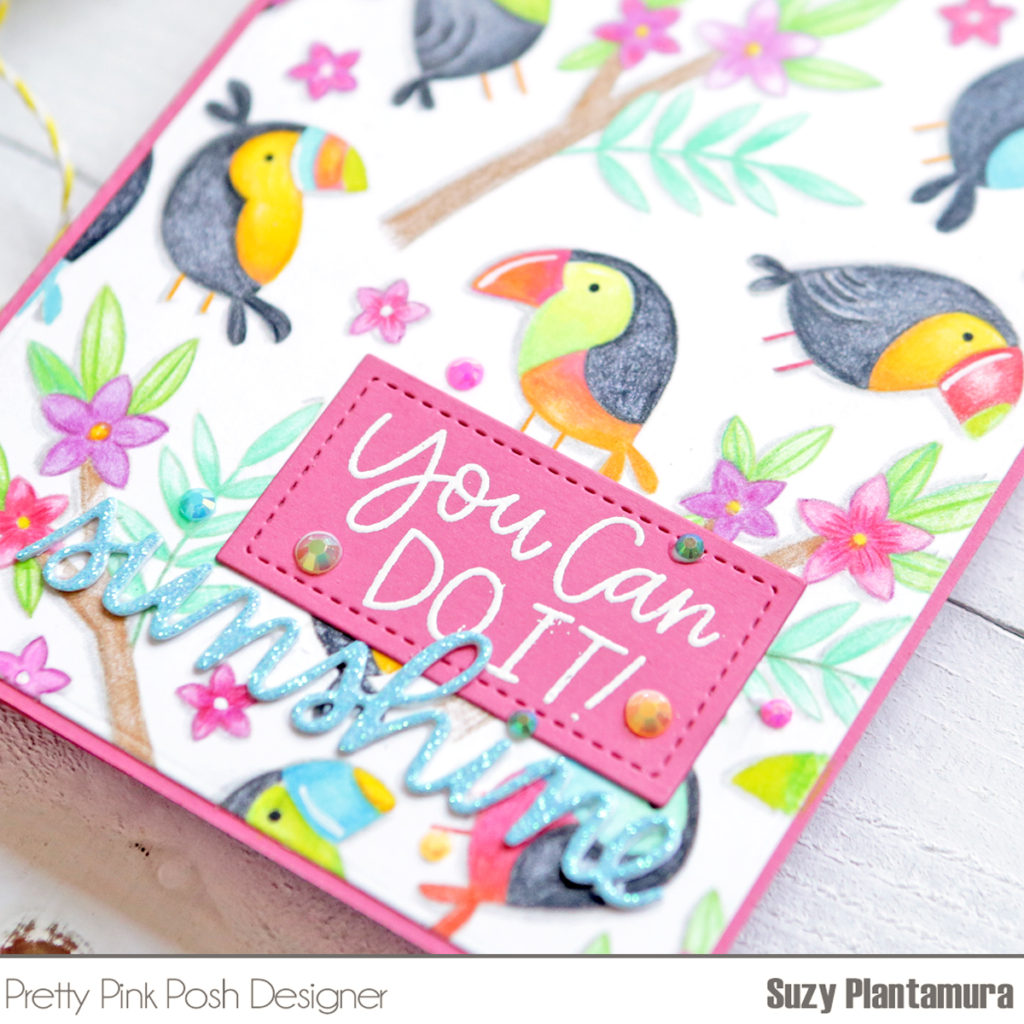
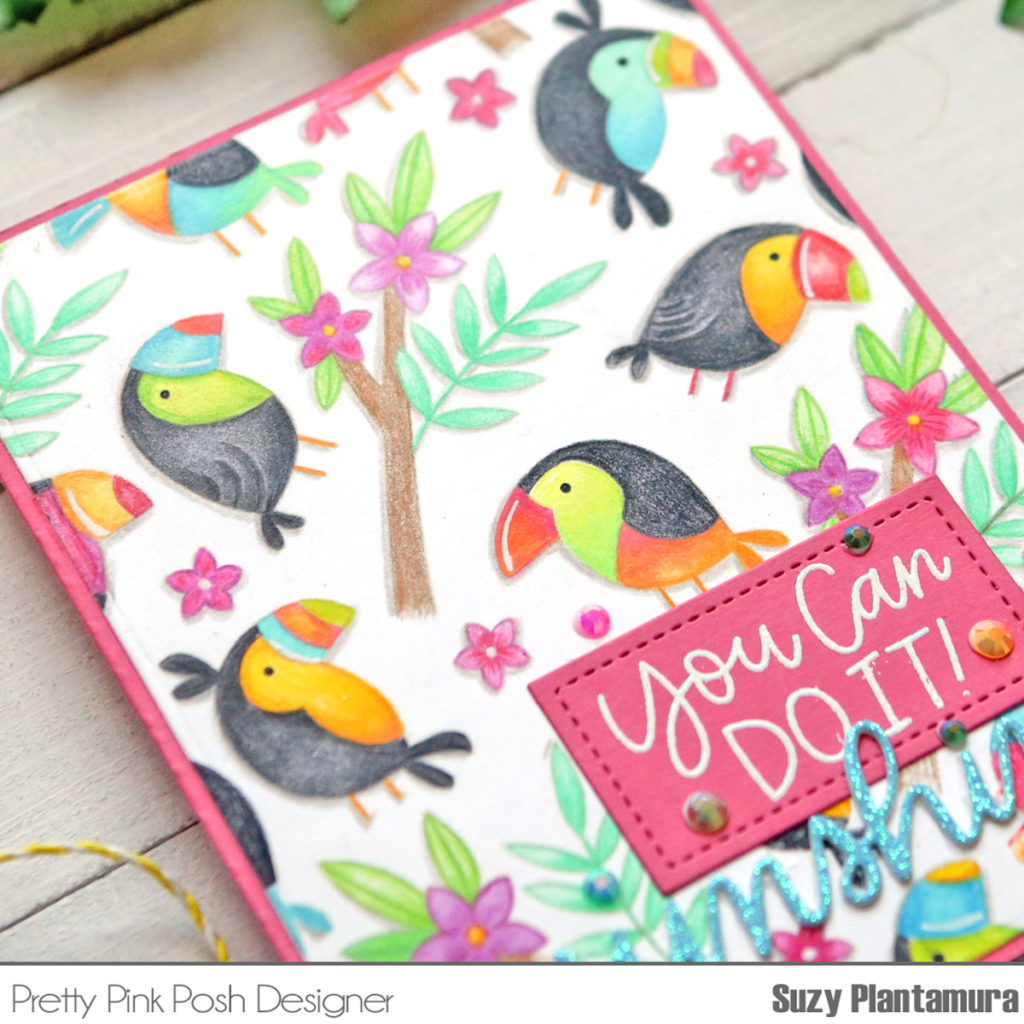
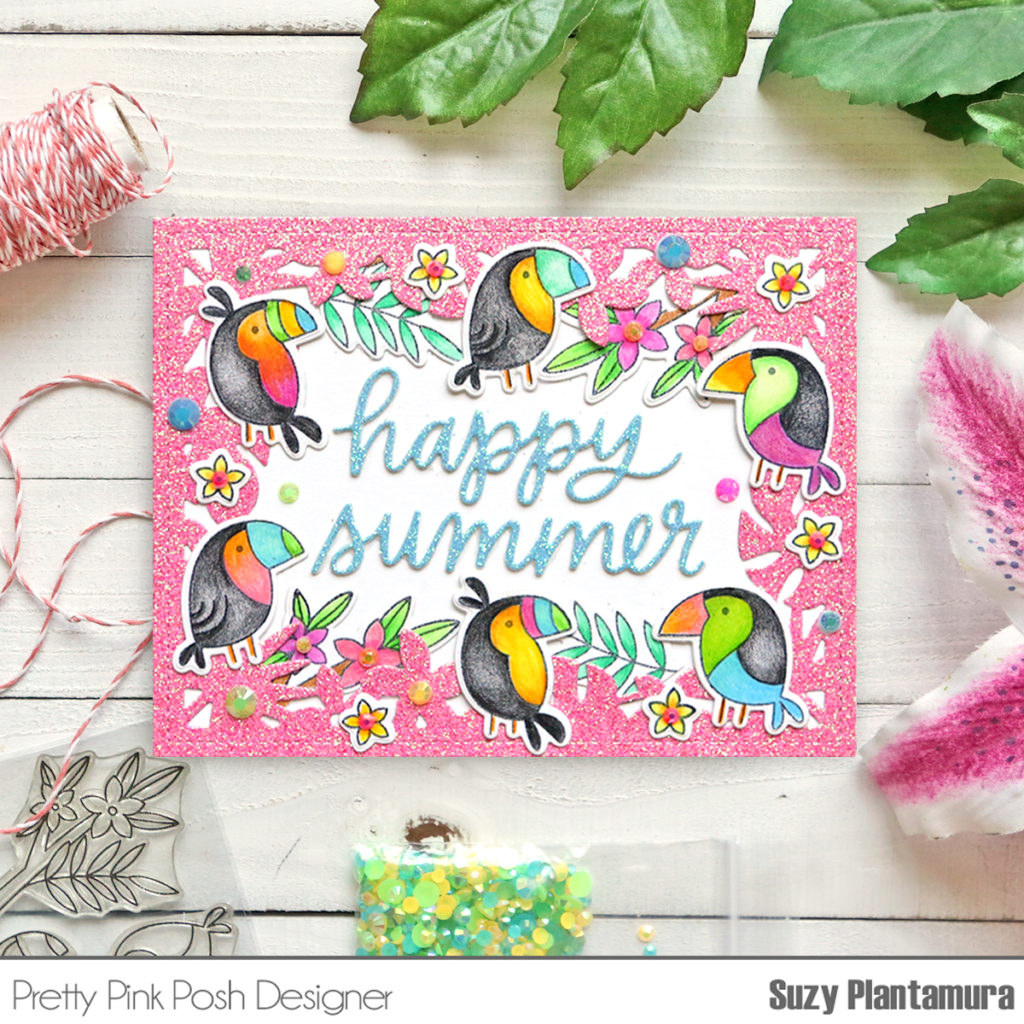
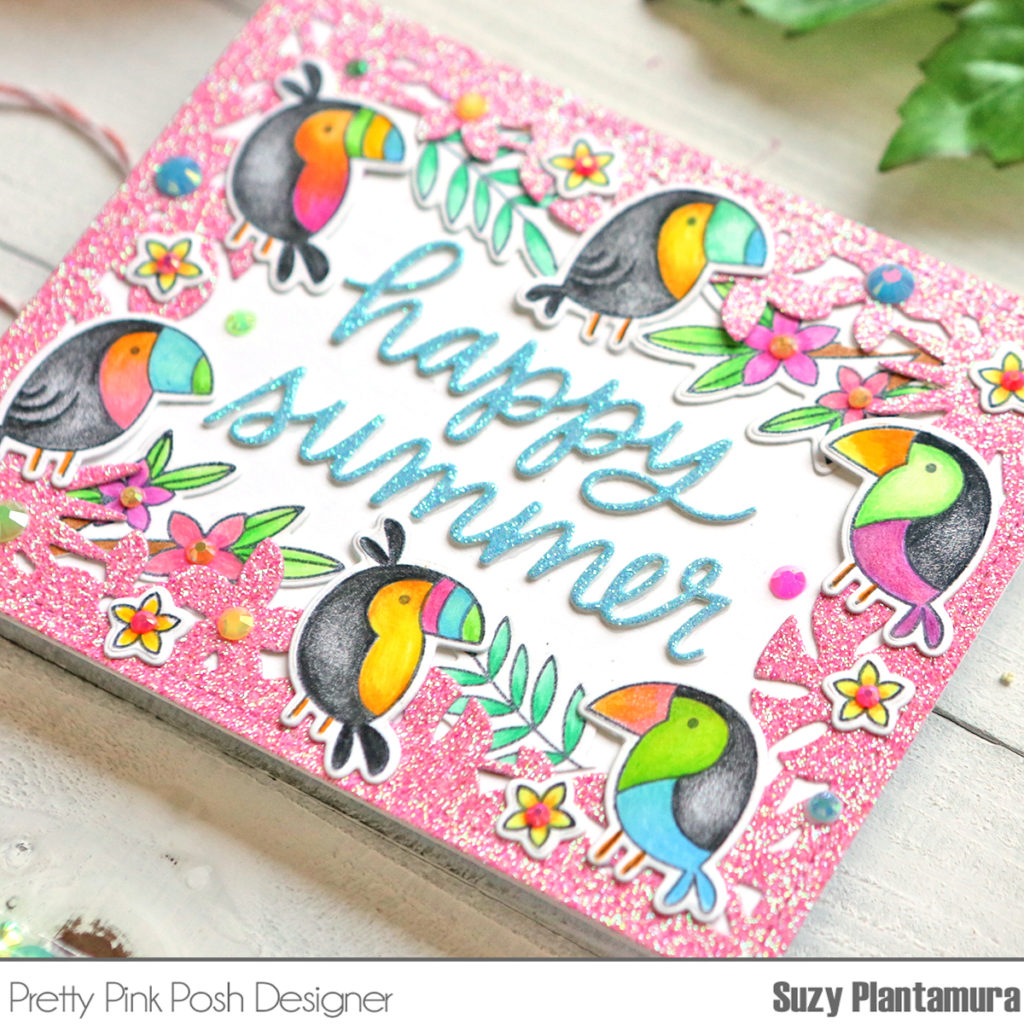
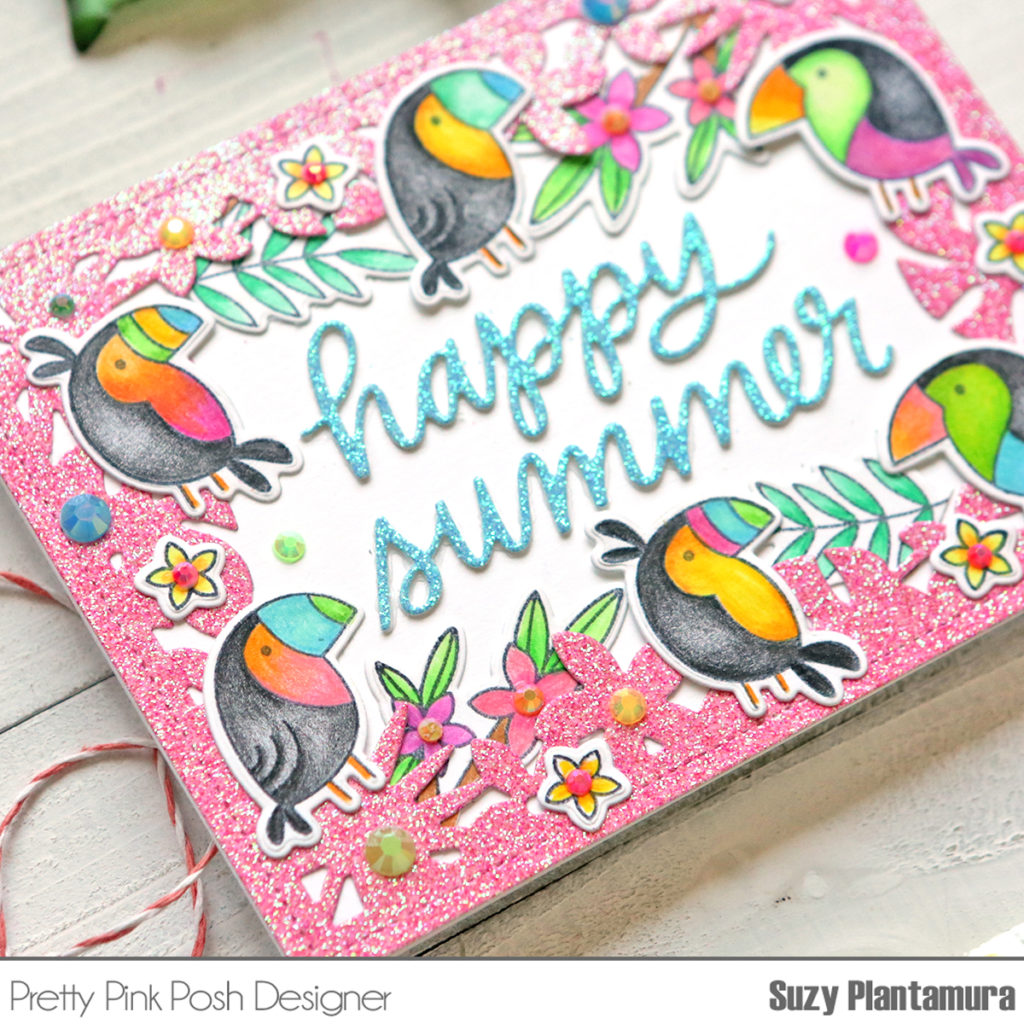
Hello Pretty Pink Posh friends! Suzy here and today I get to show you one of the brand new stamp and die sets called Tropical Toucans. This is one of the smaller sets which means it costs less and you get a lot of bang for the buck! I have two cards to share with you where I’ll also be using the new Tropical Frame die, some of the stand alone word dies, and the new jewel mixes.
I call this technique random stamping and I love to do it with all the PPP stamps since they have small images. I stamp them all with my Misti stamping tool using a light color of ink for no-line coloring. I then color them all in with colored pencils. If you like making puzzles, you will love doing this with your stamps!
I stamped the sentiment in the set with white embossing powder on a rectangle from the Storybook 6 die. I die-cut the new Sunshine Script Die die-cut from turquoise glitter paper and attached it under the sentiment just because it looked so pretty!
When coloring the toucans, I used black for their bodies, but then used all different bright colors for the rest of them – not technically how they look, but more fun to look at! I added some of the new Luau Jewel Mix around the sentiment.
This card uses the new Tropical Frame die which I die-cut from pink glitter paper and attached to a white card base. I die-cut the Happy Summer Script word dies from turquoise glitter paper and attached them to a second set from white cardstock so they had more dimension.
I stamped all of the images from the Tropical Toucans stamp set with black ink and colored them in with colored pencils. Again, I used lots of bright colors along with black so the colors really pop. I cut two of the flower branches apart and used those pieces tucked under the frame. I also used a bunch of the small flowers around the frame.
Last I used the new Citrus Mix and Luau Mix jewels around the frame and inside the middle of the flowers. The bright color of these jewels go so perfectly with all my brightly colored stamped images!
Thanks for visiting today and make sure to come back for all of the sneaks this week. This is my favorite release from PPP ever and it all works so perfectly together. It will make you want to book a tropical summer vacation!
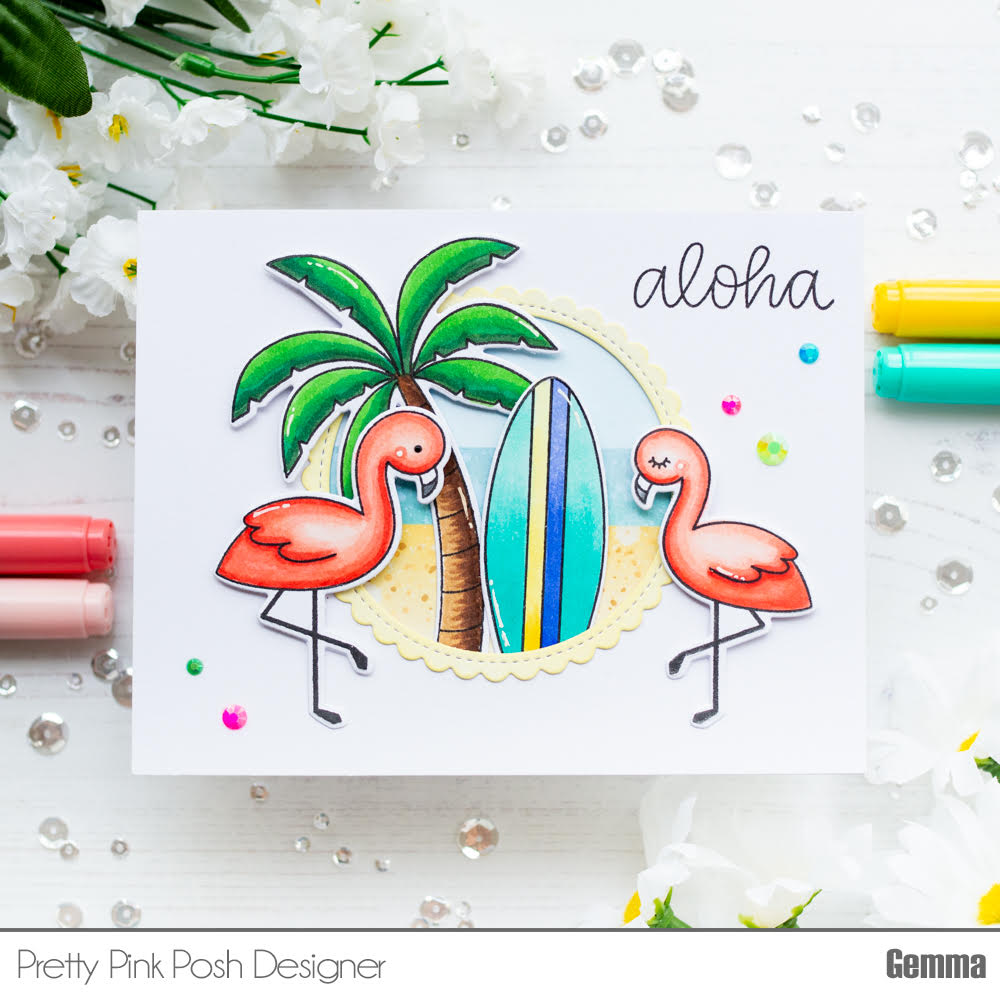
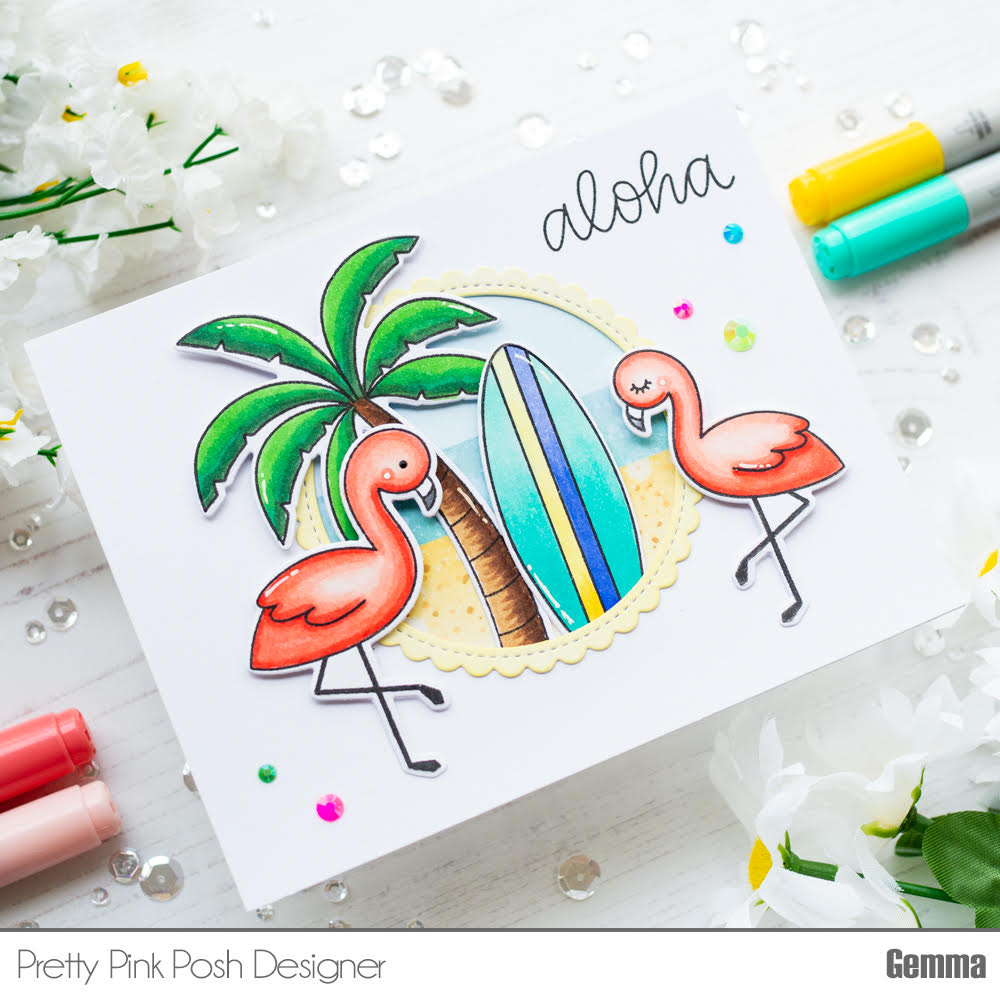
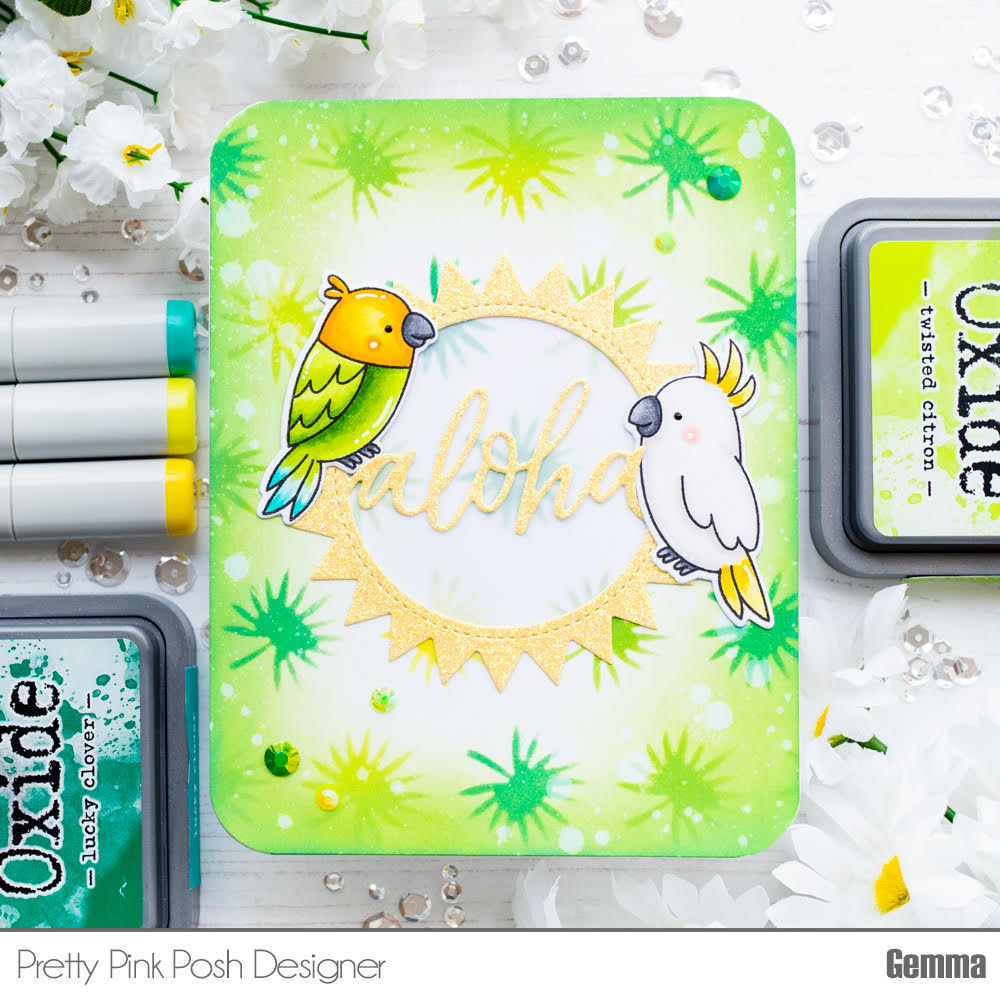
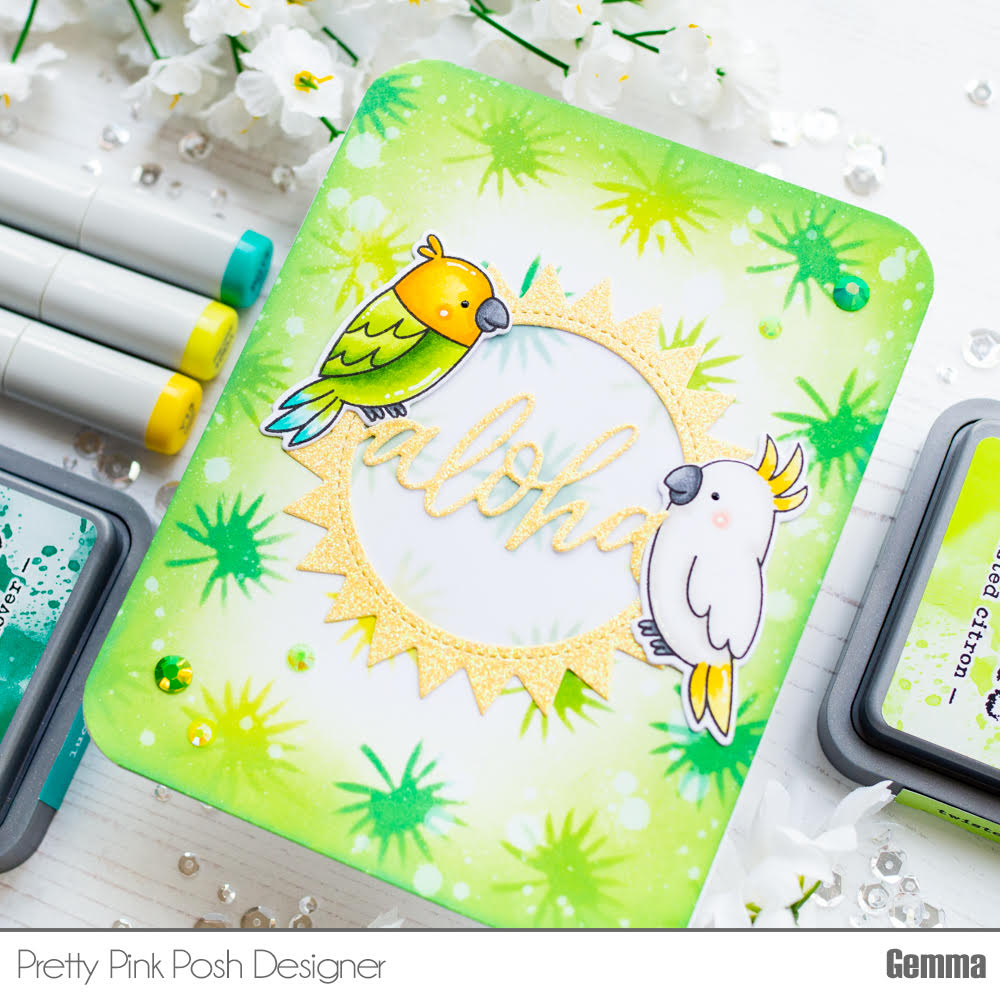
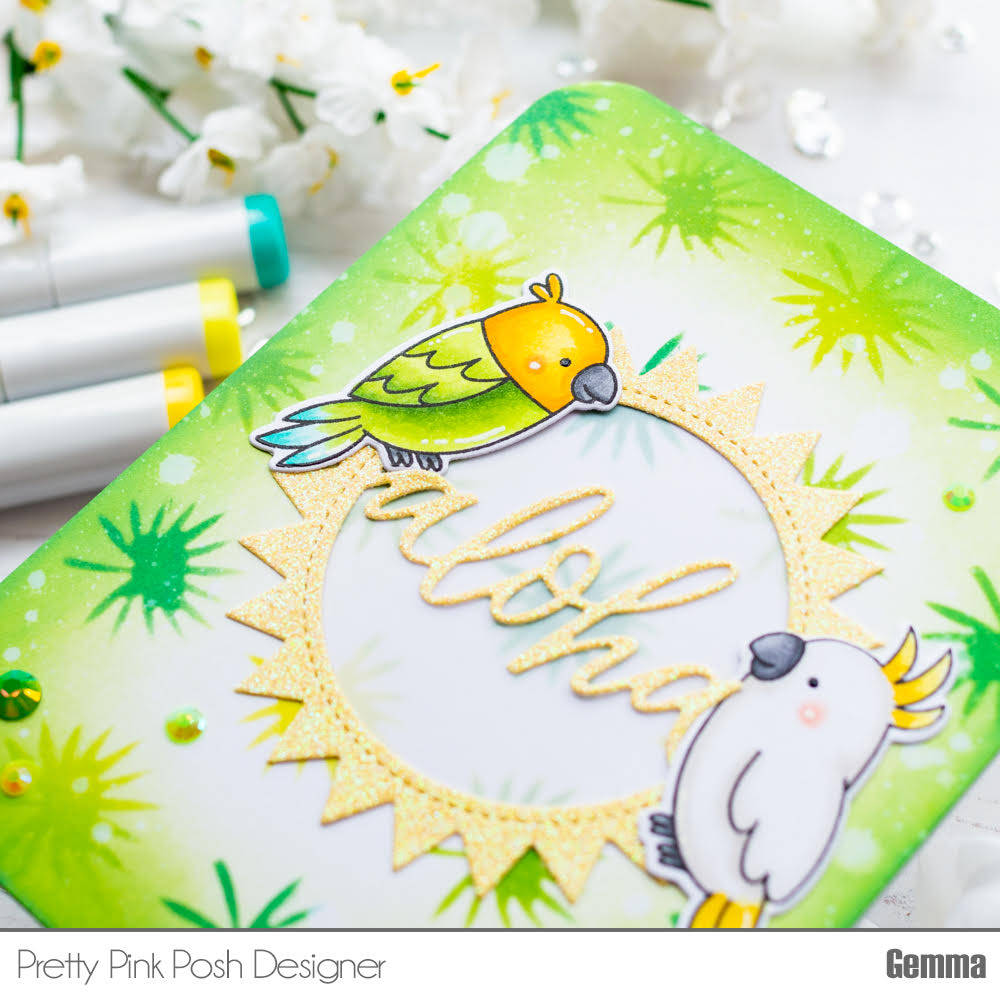
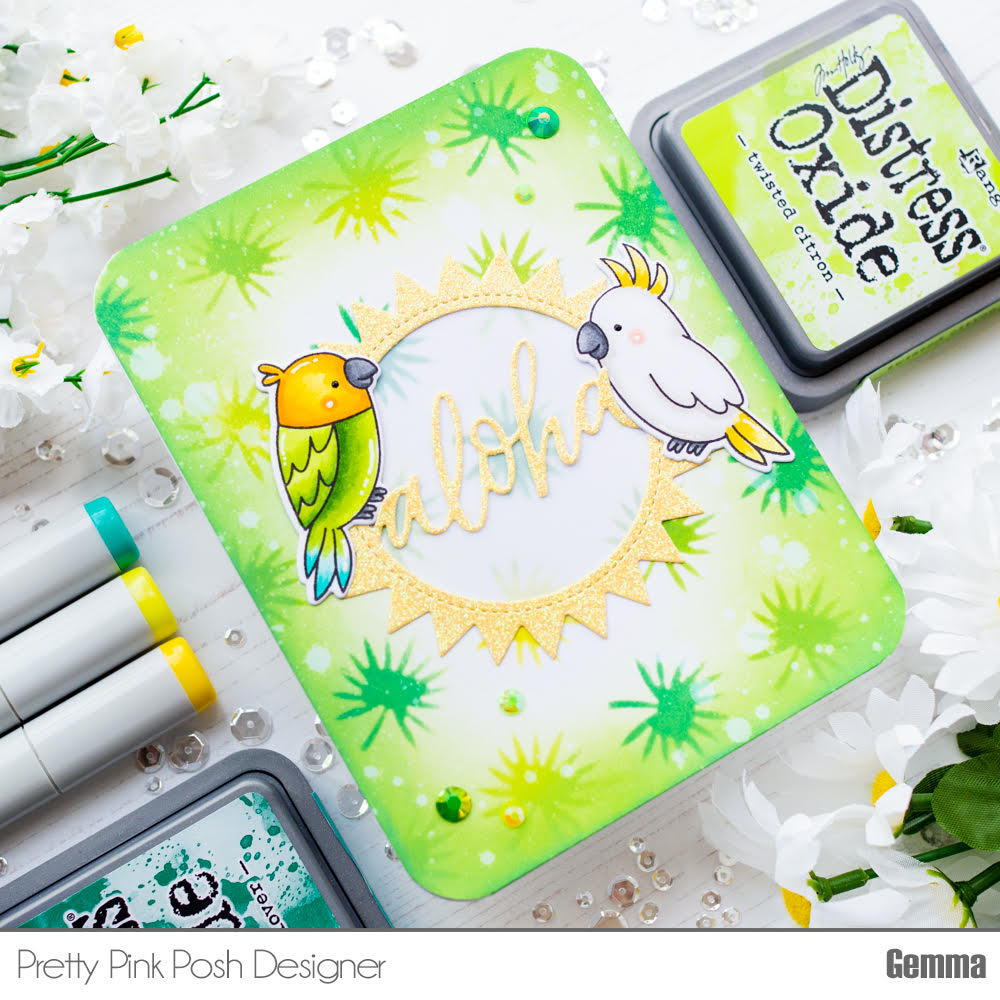
Hello, Gemma here with a sneak peek to share with you all. Today I have two cards featuring the new Tropical Birds set, which is perfect for summer.
For my first card, I created a window beach scene with the flamingos. On my card base, I added distress oxide inks to create areas for sand, ocean and sky. Next, I die cut a scallop circle from the centre of a piece of white card. I adhered the panel over my card base, so the beach scene shows through the window.
To give the scallop circle some dimension, I layered two circles together, adding some squeezed lemonade distress oxide ink to the top layer. I stamped and coloured some images from the Tropical Birds stamp set, along with a fun surfboard from the new Summer Surfboards stamp set. I coloured everything with copic markers, then die cut them with the coordinating dies.
I arranged the images and adhered to my card, using foam tape behind the leaves of the palm tree and the flamingos. I tucked the bottom of the palm tree and surfboard under the window, adhering with liquid glue I finished my card by stamping a sentiment from the Tropical Birds stamp set, then adhering a few jewels from the new Luau Mix around the card.
For my second card, I used two more birds from the Tropical Birds stamp set. I coloured them with copics and die cut with the coordinating dies.
I created a stencilled background with the new Tropical Leaves stencil and distress oxide inks in Twisted Citron, Mowed Lawn and Lucky Clover. I inked some more of the two darker colours around the edge, to create a vignette effect. I also spritzed the panel with water to get droplet details.
Next, I die cut the new Aloha Shaker die from yellow glitter card. I layered some vellum behind the die before adhering to my card. This helps the word to show up against the background.
I added the two Tropical Birds around the die cut, then added some jewels from the new Citrus Mix around to finish.
We hope you’ve been enjoying the sneak peeks so far. See you tomorrow for a look at another new stamp set!
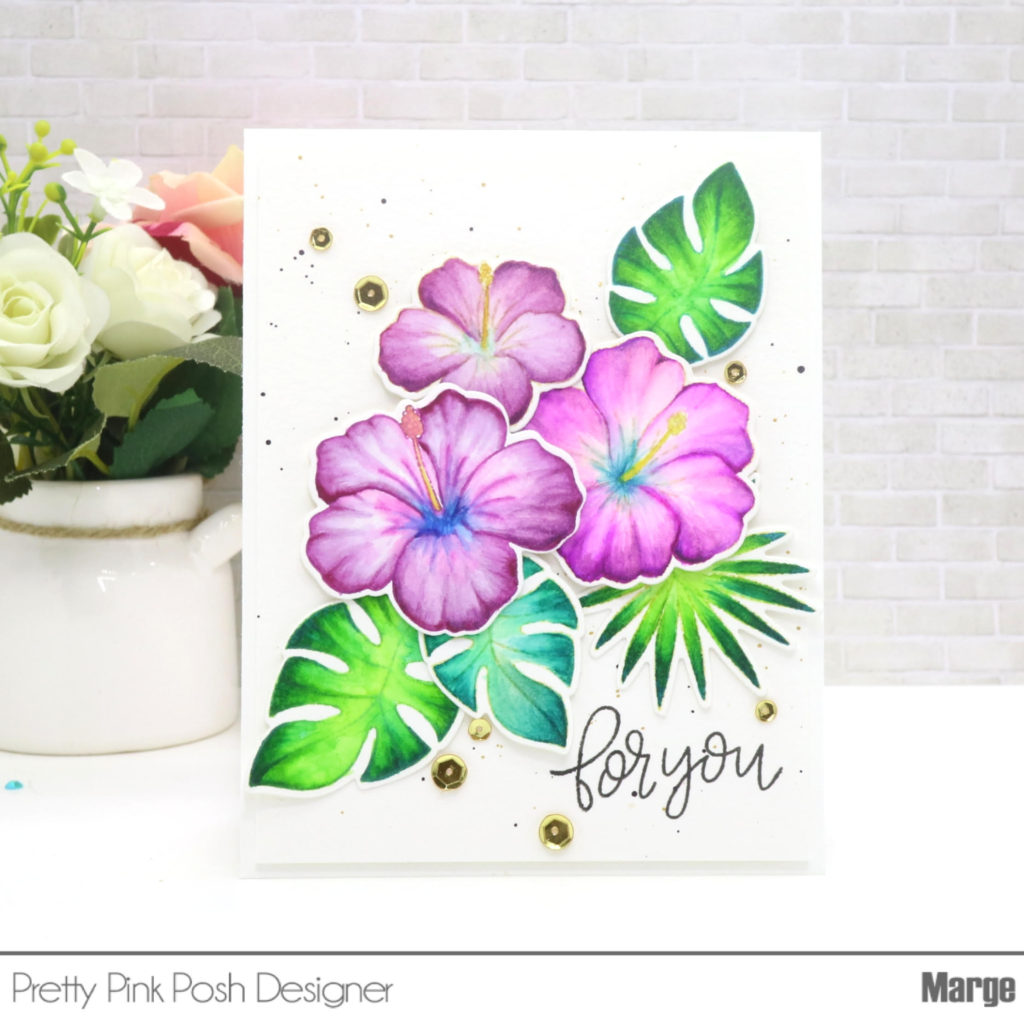
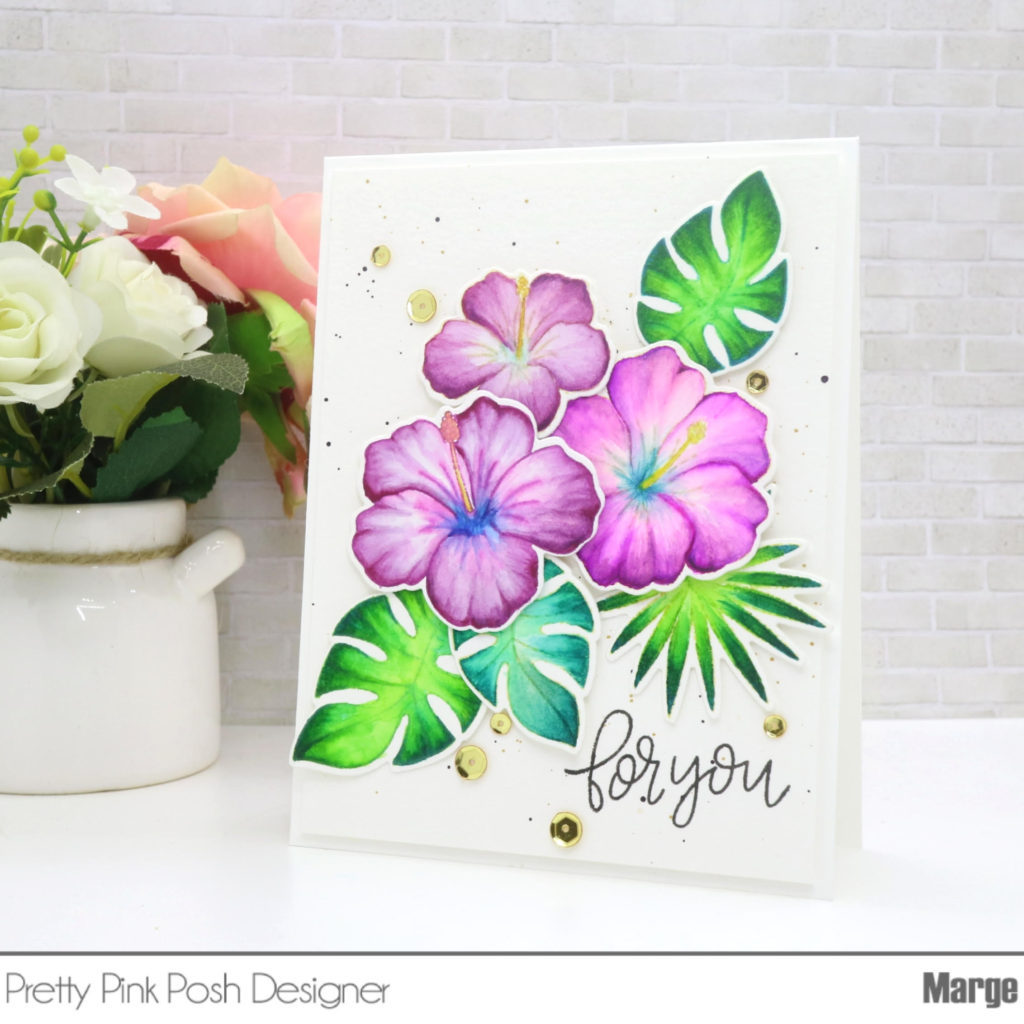
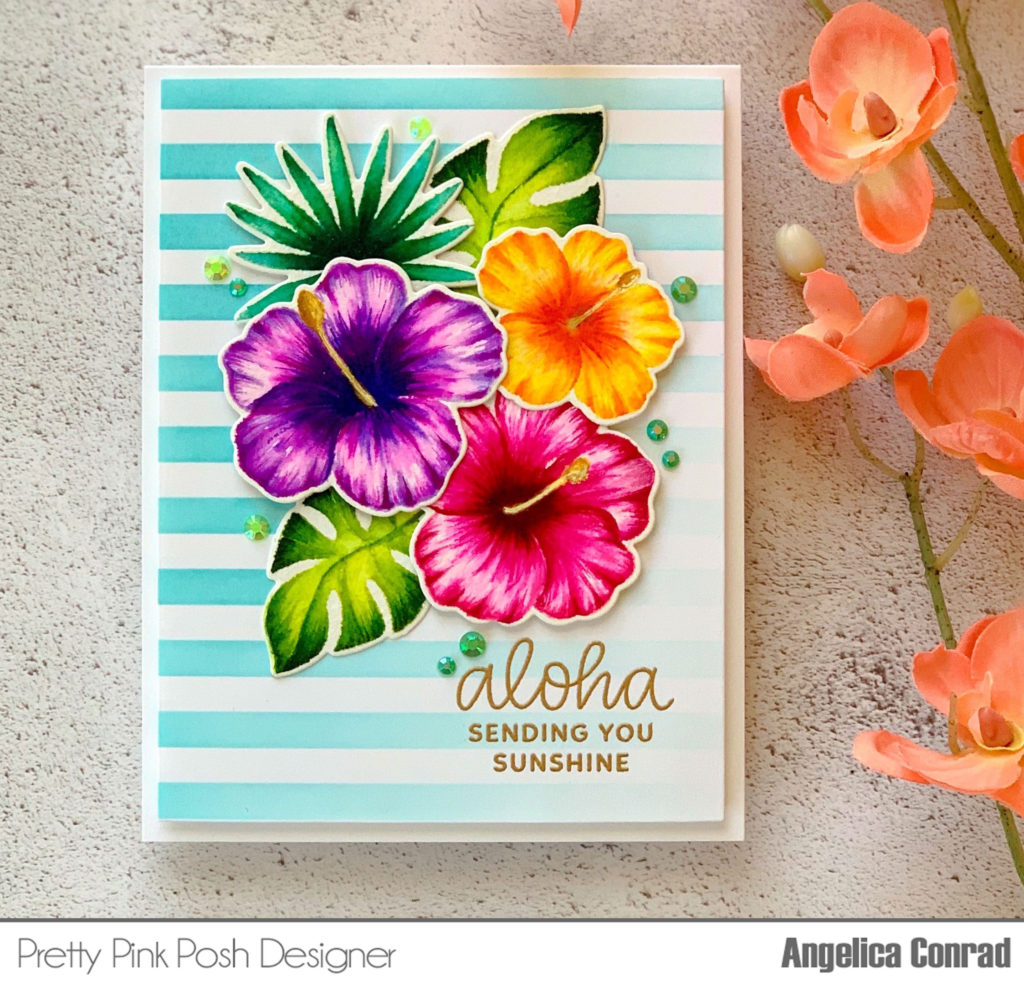
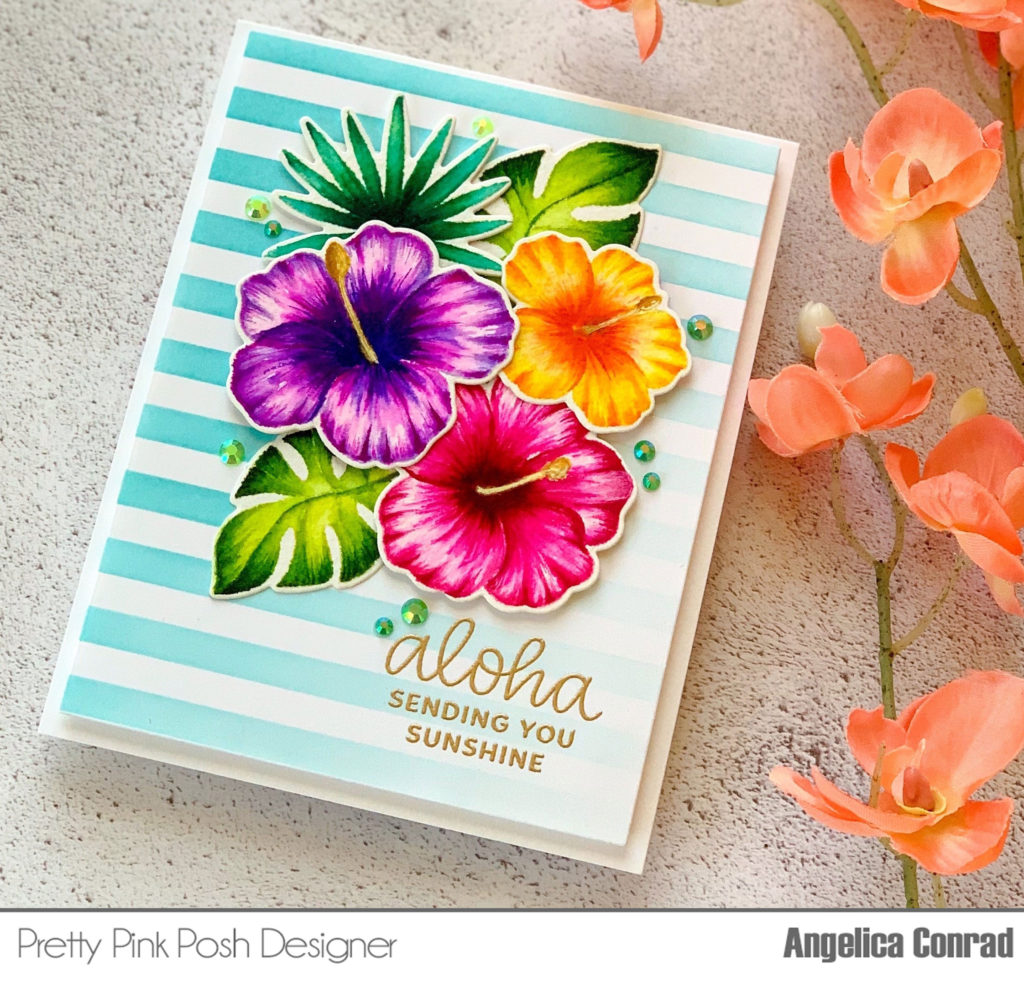
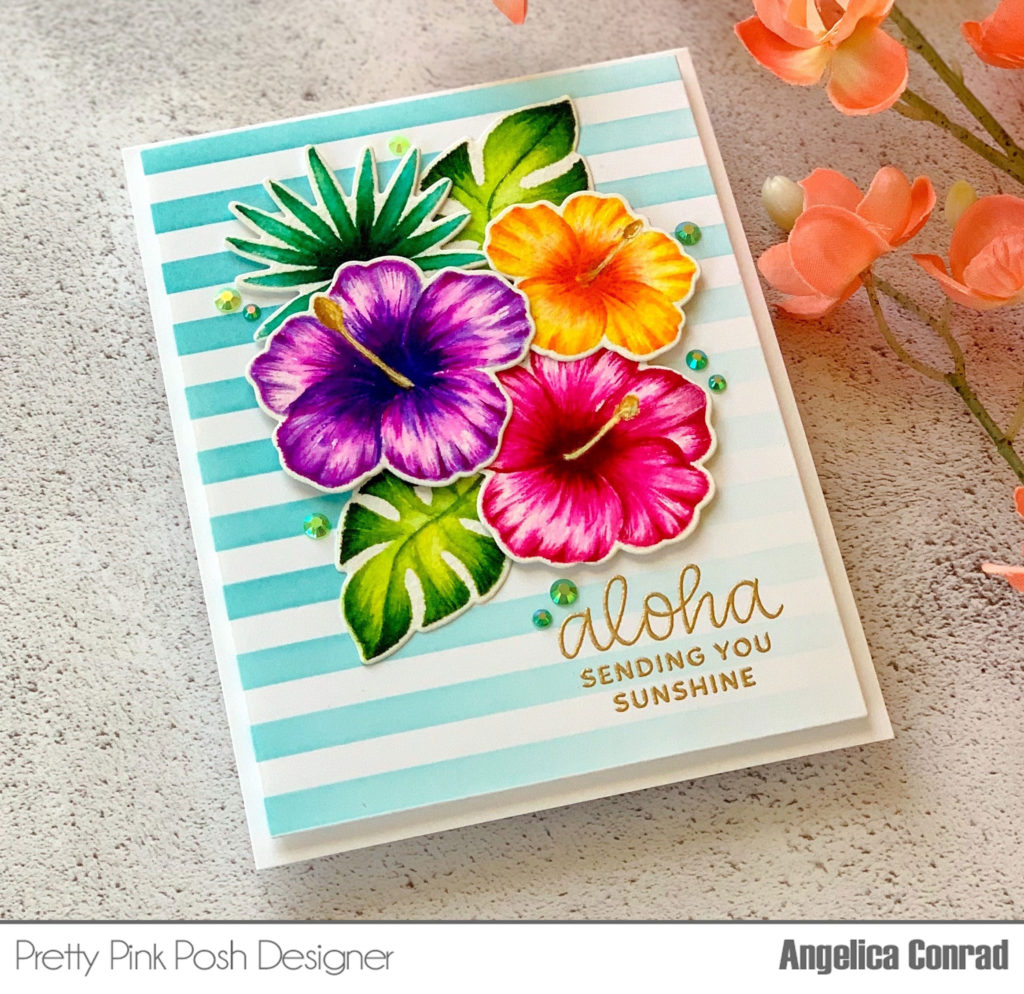
Hi friends, Angelica here kicking off our sneak peeks with a card showcasing the fabulous new Hibiscus Flowers stamp set that releases on June 10th.
I started this card by stamping the hibiscus images onto Fabriano Extra White watercolor paper with distress inks. For the purple and pink flowers, I used Spun Sugar, and the rest I used Antique Linen. I colored the images with a rainbow of Zig Clean Color Real Brush Markers, a #4 round watercolor brush, and clean water. I kept a paper towel next to me to clean my brush off frequently. I started by adding darkest colors first, moving the pigments around with my lightly damp paintbrush. I then went back with the markers alone to add fine details. Once the paper was completely dry, I used the coordinating dies to cut them out.
For the card front, I ink-blended turquoise stripes using the Wide Stripes Stencil. I stamped two sentiments from the new Tropical Birds stamp set with embossing ink, then heat-embossed with gold embossing powder. I attached the panel to an A2 size card base with craft foam, then added the floral arrangement with foam squares. My final touch was adding Citrus Mix Jewels around the flowers with Ranger Multi-Media Matte.
I hope I have helped inspire you with ideas for these gorgeous stamp sets. Join us tomorrow for another look at the new June 10th release!