
Thanks For All You Do
Hey craft friends, Elaine on the Pretty Pink Posh blog today sharing a sweet colorful appreciation card featuring the new Spring Circles stamps.

To start I cut a piece of pink card stock to 6”x 6.5” and scored at 3.25” on the longest edge. Using a bone folder, I burnished along the fold line to create a card base that measured 6”x3.25”.
To add some detail on the front panel I used the Mini Polka Dots stencil and lightly blended on some Distress Ink in Wilted Violet. Due to the size of the card base I had to stencil in two sections. This was easily done by lining up the dots to create a seamless pattern.
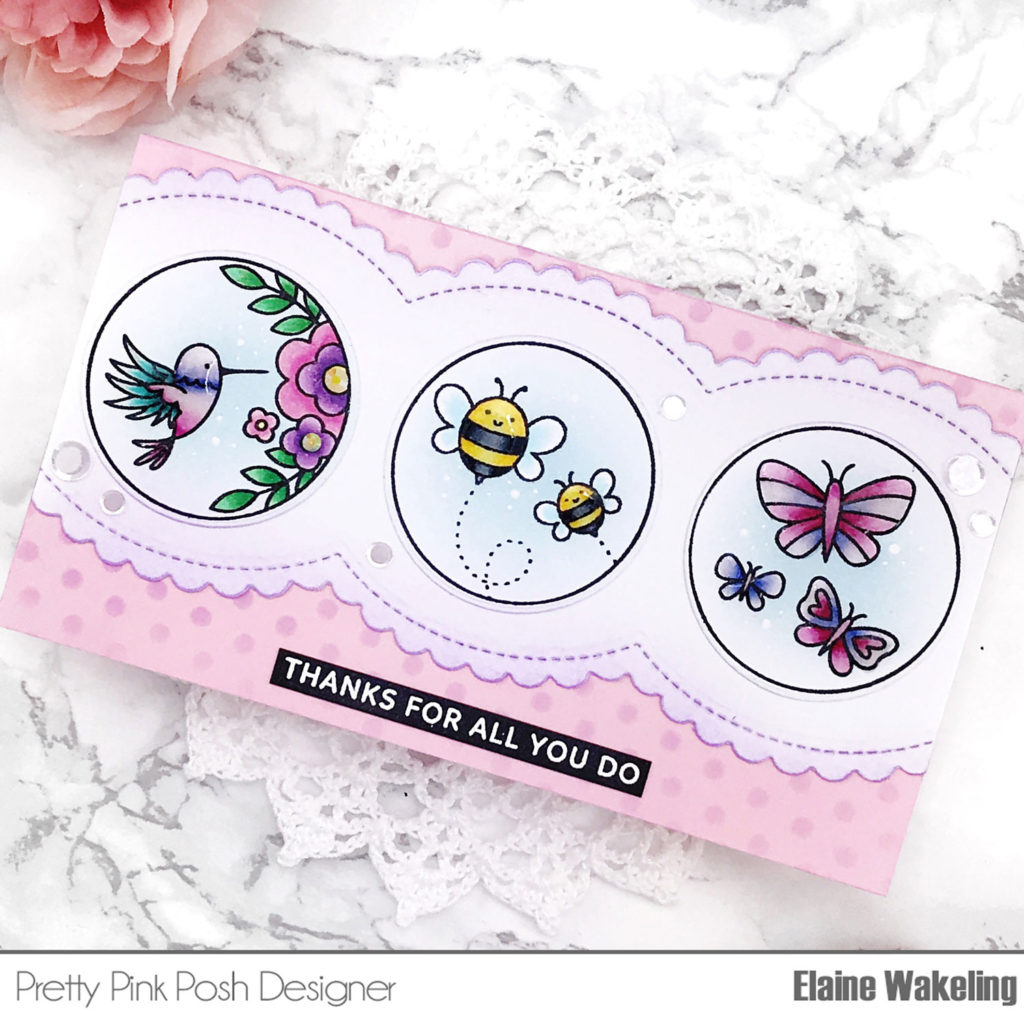
Setting the card base aside, I began to work on the base for the circle images. I cut a piece of white card stock to 6”x2.75” and used one of the Scallop Border dies to create a scalloped edge on both long sides. Again, I used the Wilted Violet Distress Ink to lightly blend on some colour to the edges on the panel. I then adhered this panel to the card base, ensuring it was placed so that there was room for a sentiment below.
I stamped the circle images on to copic friendly cardstock and used a variety of markers to color each of them. The markers I used were:
- Pink 1: RV66, RV63, RV10
- Pink 2: RV14, RV13, RV11
- Blue: B66, B63, B60
- Purple: V15, V12, V01
- Green 1: G07, G05, G02
- Teal: BG15. BG13, BG11
- Yellow: Y15, Y13, Y11
- Black: C7, C5, C3
- Blue: B01, B000
I cut out masks for all the images and used them to cover the images before applying a light layer of Distress Ink in Tumbled Glass. I used small blending brush to help my concentrate the color in the centre of the circle and gently pulled the color out to give a soft blend from blue in the centre slowly fading out to white. I used the Spring Circles coordinating die to cut out the images and then adhered them to the card.
The sentiment was taken from Mom stamp set, and white heat embossed on to black card stock. I trimmed this out using a guillotine trimmer and adhered to the front of the card.
To add some sparkle, I used liquid adhesive to secure some Sparkling Clear Confetti around the card front and added some Lemon Jewels to the centres of the flowers.
For the last touch I added some Wink of Stella on all the coloured images and coated some of the elements with Glossy Accents; I love the raised shiny look.
Thank you for joining me today, I cannot wait to see what everyone else creates with this beautiful stamp set!