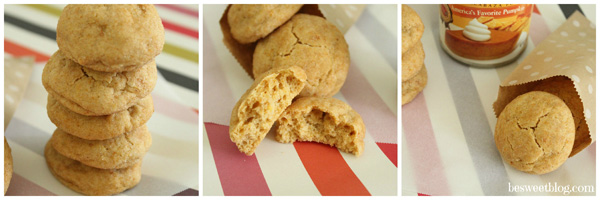
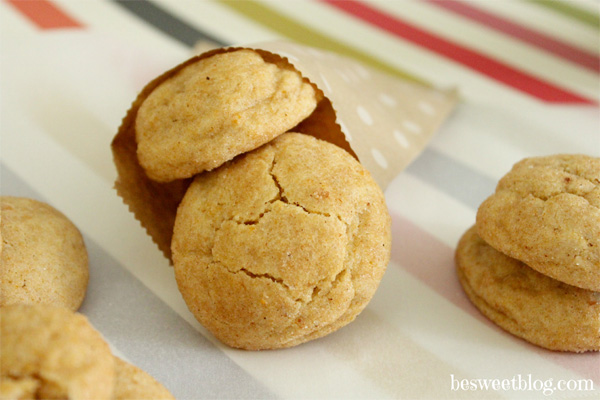
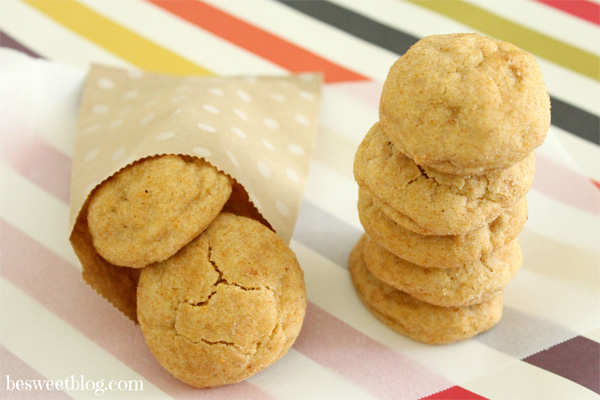
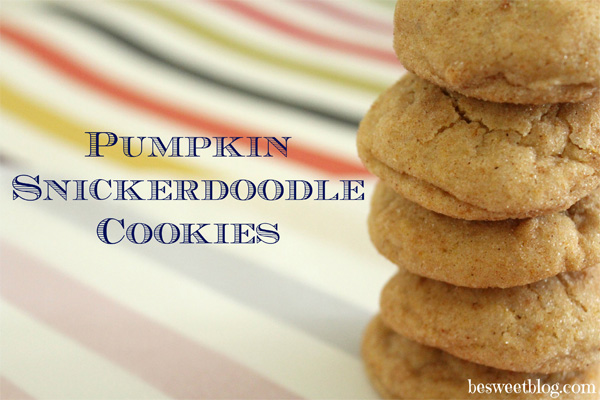
Oh my! If you love pumpkin, you will love this recipe for Pumpkin Snickerdoodle Cookies. This time of year, I feel like I’m making them every week!
So m-o-i-s-t, a little chewy, and a whole lotta fall flavor! Even if you don’t like pumpkin, you might want to try these. I have a friend who doesn’t like pumpkin… she still loved these cookies. The flavor isn’t overwhelming at all, it’s more soothing and comforting.
Bonus? Your house will smell so amazing you’ll never want to leave. The neighbors might even come over if they get even a teeny whiff of this goodness! And, what’s more? These are Grant’s all time favorite cookies. That’s saying something given the fact that he’s my taste-tester and usually tries 2-3 new sweets each week :)
Pumpkin Snickerdoodles
Recipe Type: Dessert
Serves: 36-48
Ingredients
COOKIES:
3 3/4 c. flour
1 1/2 tsp. baking powder
dash of salt
1 tsp. ground cinnamon
1/4 tsp. ground nutmeg
2 sticks unsalted butter (softened to room temperature)
1 c. sugar
1/2 c. brown sugar
3/4 c. Libby’s pumpkin puree
1 egg
2 tsp. vanilla extract
COATING:
1/2 c. sugar
1 1/2 tsp. ground cinnamon
1/2 tsp. ground ginger
1/2 tsp. allspire
Instructions
Combine flour, baking powder, salt, cinnamon, and nutmeg in a medium bowl. Set aside.
Using an electric mixer, beat butter, sugar, and brown sugar until well-blended and fluffy, about 2.5 minutes.
Add the pumpkin puree and mix until smooth.
Blend in the egg and vanilla until well-incorporated, making sure to scrape the sides of the bowl as you go.
Place the mixer on low speed and gradually add the dry mixture to the wet ingredients. Mix until just incorporated.
Cover with plastic wrap and chill for 3 hours.
While dough is chilling, make your coating mixture in a small bowl. Simply combine sugar and spices.
Preheat oven to 350 degrees and line baking sheet with parchment paper.
Form dough into balls, about 1.5-2 inches in diameter.
Roll each ball in the sugar mixture, adding a sweet coating to each.
Bake cookies for 9-11 minutes, or until just set (a faint crack may appear on the top of each cookie). Cookies may appear a bit underdone, but will finish cooking through once removed from oven.
Cool for 3 minutes on baking sheet and transfer to a cooling rack.
Repeat process until all dough is used up (make sure dough stays in fridge in between baking process- keep it cold!)
Notes
Cookies can be stored in airtight container for up to 3 days, and in freezer for up to 3 months.
Happy Monday and more importantly, HAPPY FALL, Y’ALL!
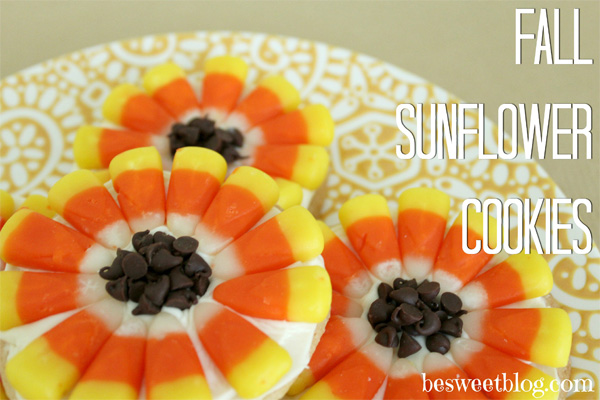
I hope you’re all enjoying the start to this new, wonderful season. This past weekend was incredibly busy, full of lots of great food at Music City Eats, time spent with family, and of course, a little {okay, maybe a lot} of football watching! Of course, I also made time to bake, whipping up these Fall Sunflower Cookies.
Today, I am bringing you an adorable AND easy recipe for Fall Sunflower Cookies. I hope you love these as much as I do… I can’t seem to get enough of these sugary treats, and know my friends will love the little burst of fall when I deliver them later today.
Fall Sunflower Cookies
Recipe Type: Dessert
Serves: 24
Ingredients
1 package Pillsbury “break-n-bake” Sugar Cookies {refrigerated}
1 tub of Vanilla Frosting
1 bag of Mini Chocolate Chips
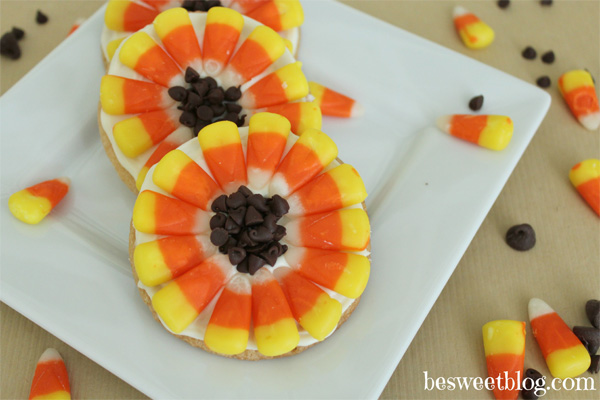
1 bag of Candy Corn
Instructions
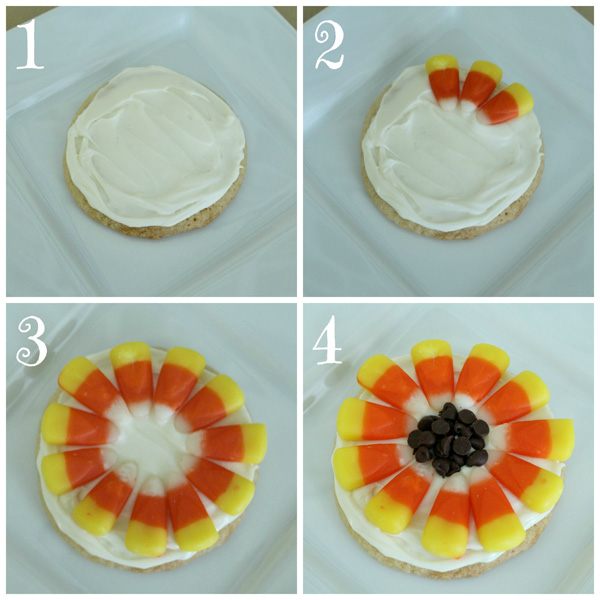
Bake sugar cookies according to package directions.
Let cool until room temperature.
Frost each cookie with a layer of vanilla frosting {you could also make your own frosting, but I like to keep it easy}.
Place individual candy corn pieces in a circle around the outside of the cookie, with the pointy end toward the center. Repeat this until you have an entire ring around the cookie. These make up the flower petals.
Place mini chocolate chips in the center of the candy corn circle, to serve as the center of the flower. Really press them into the icing to ensure they don’t fall out- you might even need a few layers.
Let the frosting set for about 1-2 hours.
Package in individual cello bags and tie with ribbon, or keep in an air-tight container for up to 3 days.
3.2.2124
*What would y’all like to see more of in the coming weeks? Cookies? Muffins? Healthy? Easy? Just let me know, and I will do my best to come up with something yummy! Make it a marvelous Monday!
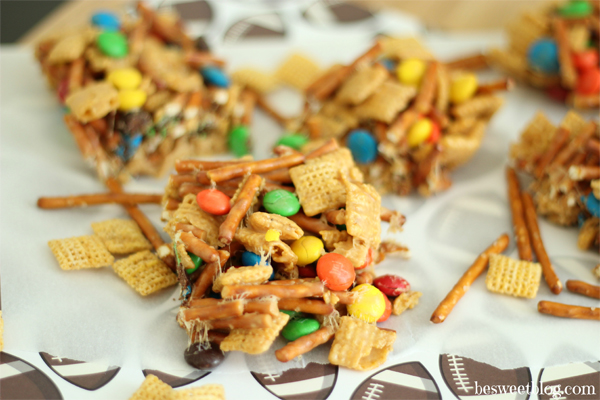
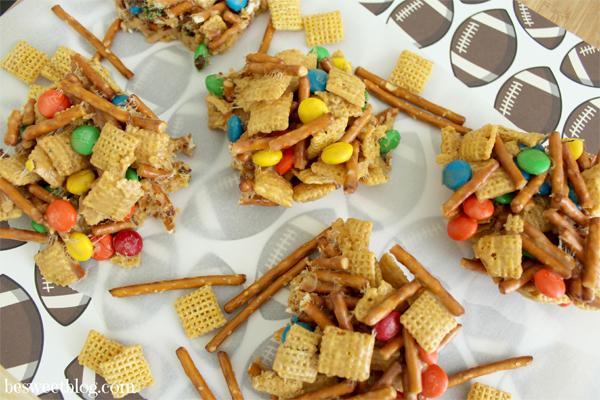
Football season is finally here! I am so, so excited about this. You can bet that each weekend from now until the Superbowl, I’ll be watching as many games as I can. Friends, family, football, and yummy food makes for an awesome weekend!
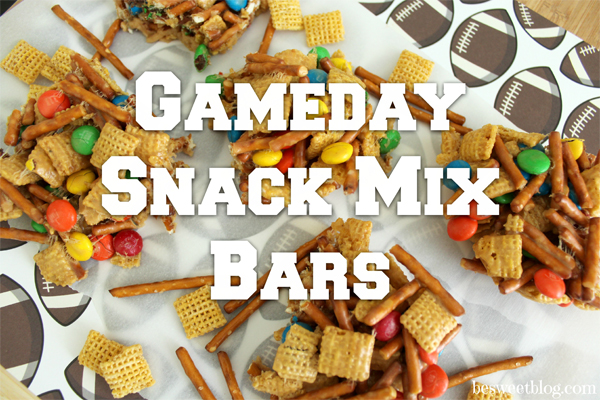
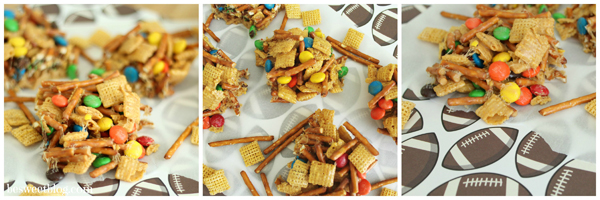
This past weekend was no different! We rang in the start of this glorious season with a viewing party, and of course, I had to bring treats! I think you will LOVE these Gameday Snack Mix Bars!
With only 6 ingredients and 10 minutes needed to whip these up, you won’t even believe it! These bars combine everything I love (and I hope you do too) – sweet, salty, crunchy, and gooey, plus peanut butter and chocolate deliciousness. YUM!
I have been making these bars for years (thanks to my mom’s recipe from my childhood) and every time I make them, they are a HUGE hit. Be prepared to hand out the recipe, because everyone will be asking! :)
They are perfect for lunchbox treats, after school snacks, party treats, or even favors. If I bring them to a party, I like to package them in a clear cellophane bag and tie with a coordinating ribbon. To increase the cuteness factor, simply switch out regular M&Ms for whatever M&Ms are in season. For example, I used the “Touchdown Mix” M&Ms in these Gameday bars!
Gameday Snack Mix Bars!
Recipe Type: Dessert
Prep time: 10 mins
Total time: 10 mins
Serves: 12-20
Ingredients
2 c. corn Chex
2 1/2 c. halved pretzel sticks
1 1/2 {or 2} c. M&Ms {if you want more chocolate goodness, use 2 cups}
1/2 c. butter
1/3 c. peanut butter
5 c. {10.5 oz. bag} mini marshmallows
Instructions
Prepare a 9×13 pan using Pam spray.
In a large bowl, combine M&Ms, halved pretzels, and Chex.
In a microwave safe bowl, melt butter and peanut butter.
Once melted, add mini marshmallows and coat thoroughly.
Return to microwave and heat until marshmallows are melted and well-combined with butter/peanut butter mixture. {Be sure you stir frequently!!}
Once marshmallow mixture is smooth, pour into dry ingredient mixture.
Combine everything and pour into greased pan.
Cover pan, and let bars harden. For faster cooling, place in refrigerator for 1 hour, or until they are able to be cut into pieces.
Cut pan of bars into individual pieces, and wrap each piece in plastic wrap. This way, they’re individually ready to eat, and can easily be transported anywhere! This also keeps them fresh longer.
Enjoy!
Notes
You can also heat marshmallow mixture on stove. Substitute holiday M&Ms when appropriate to change up the theme!
3.2.2124
I hope you enjoy these as much as my family and I do! Go team!
*Note: 1- For the gluten free version of these bars, substitute regular pretzels for gluten free pretzels. 2- This recipe yields 12-20 bars depending on how big you cut them!
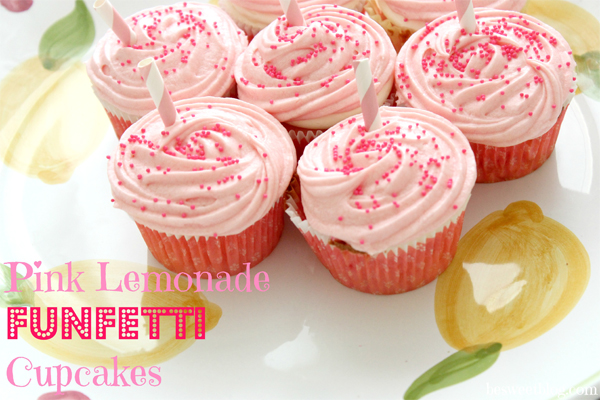
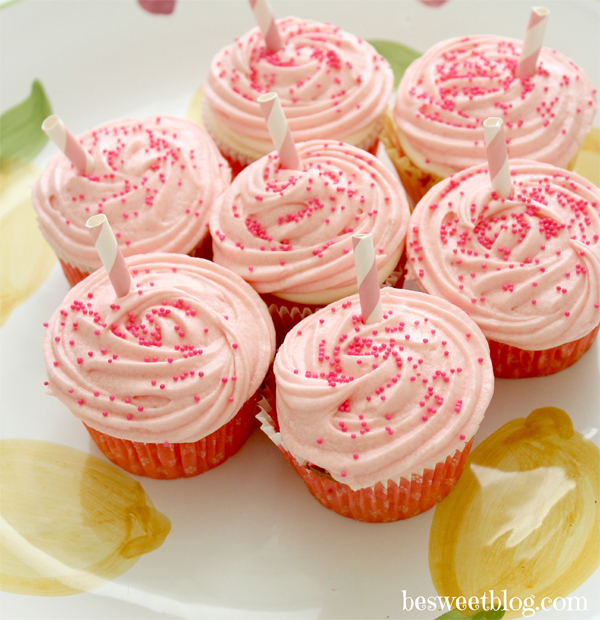
Hi friends! I am so excited to be back with you on Mondays, sharing a delicious {and easy!} sweet treat recipe. It’s been such a whirlwind, as I’m sure many of you can relate, and in all the craziness of these past few days, I had just enough time to whip up these easy peasy Pink Lemonade Funfetti Cupcakes!
These are perfect for end of summer celebrations, first day of school sweets, or just to brighten your day!
Sprinkles + Pink Lemonade = a refreshing sweet and summery treat!
Pink Lemonade Funfetti Cupcakes
Prep time: 30 mins
Cook time: 22 mins
Total time: 52 mins
Serves: 24
Ingredients
1 box vanilla cake mix
1/2 c. sprinkles (I used pink, white, and red)
2 Crystal Light Pink Lemonade drink mix packs (not the individual servings, but the ones that make a large amount)
3/4 c. softened butter
4 c. powdered sugar
3 tbsp. almond milk (or regular)
Cupcake Liners
Straws
Instructions
Preheat oven to temperature according to the box.
Prepare the mix, as directed.
Add in 1 packet of pink lemonade mix and the sprinkles into the batter. Stir well.
Divide batter into cupcake pans.
Bake until cupcakes spring back to the touch.
Let cupcakes cool on wire racks.
For icing, combine butter, lemon extract, and remaining pack of pink lemonade mix.
Add 1 cup powdered sugar and 1 tbsp. milk.
Mix well.
Repeat this process until you have achieved the desired consistency. I used 4 cups of powdered sugar and 3.5 tablespoons of milk to achieve a thick icing that has strong peaks and won’t wilt.
Frost cupcakes.
Top with sprinkles and a small piece of straw to add even more cuteness!
Friends! Hello! I feel like it’s been a while since I’ve been over here, and I’m so glad I’m back!
I’ve been staying really busy in NYC, with so many visitors and adventures. I spent a weekend in The Hamptons at the end of June, G came to visit for a long weekend over the 4th of July, my friend Alex was here in the city last weekend, and my parents come on Thursday! I absolutely love being surrounded by loved ones, and in such a big city, familiar faces are always welcome :)
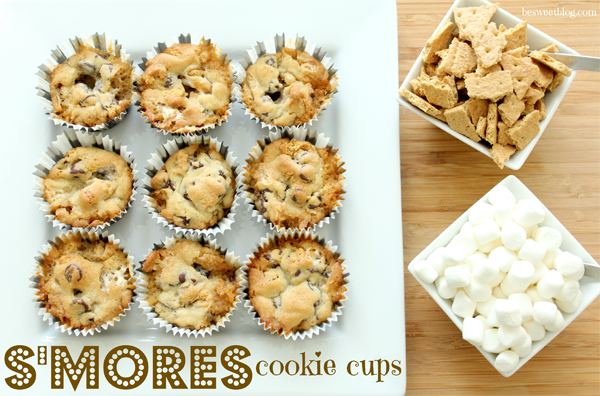
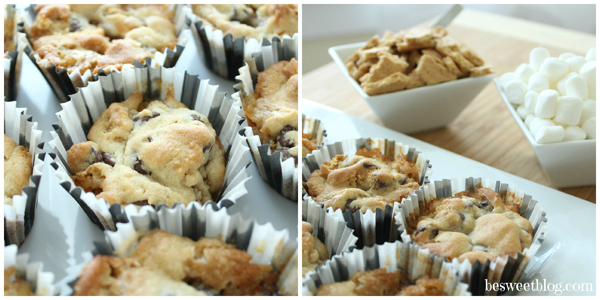
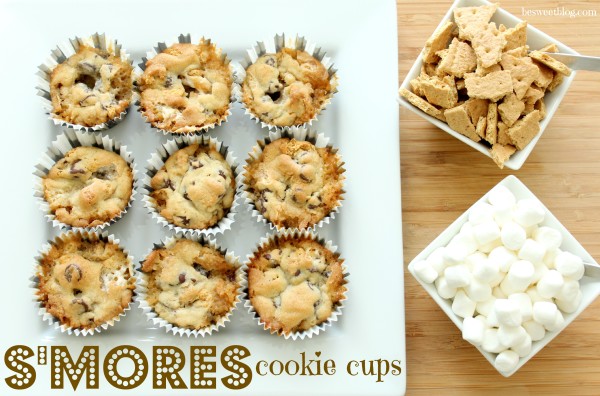
Onto this week’s recipe… S’Mores Cookie Cups! I love anything chocolately, and in summer, not much is more perfect than a roasty toasty s’more. What I don’t like are sticky fingers and a mess, so if you aren’t outside, s’mores can be really tricky!! Because of this, I decided to whip up S’Mores Cookie Cups – s’mores cookies baked in a cupcake tin {with liners}. It was a completely new concoction for me, but let me tell you, they were SO worth it! They stayed m-o-i-s-t {does anyone else hate that word?} and the texture was consistent throughout, sometimes hard to achieve when baking in a cupcake tin. I’m so glad they turned out, because I have so many wonderful memories of sitting around a fire all snuggled up in PJs roasting marshmallows to perfection. But, a perfect fire and the ability to spend a whole day in the country just isn’t happening for me this summer, so these will have to suffice :)
S’Mores Cookie Cups
Recipe Type: Dessert
Prep time: 20 mins
Cook time: 17 mins
Total time: 37 mins
Serves: 24
Ingredients
1 c. butter, softened
3/4 c. sugar
3/4 c. brown sugar
2 eggs
1 tsp. vanilla
2 1/4 c. flour
1 tsp. baking soda
1 tsp. salt
2 c. chocolate chips
1 1/2 c. mini marshmallows
1 1/2 c. crushed graham crackers
Instructions
With an electric mixer, cream butter and sugar until smooth.
Add eggs, 1 at a time, and vanilla.
Gradually add flour, baking soda, and salt.
Using a wooden spoon, mix chocolate chips into dough.
Add mini marshmallows and crushed graham crackers.
Refrigerate for 30 minutes, or until slightly chilled.
Preheat oven to 375 degrees.
Line a cupcake tin with liners.
Drop balls of dough into each liner.
Bake for 15-17 minutes or until lightly browned on top.
Cool and enjoy!
3.2.2089
I hope you and your loved ones enjoy these as much as we do! I think they’re going to become a year-round staple, reminding us of the wonderful long and lazy days of the summertime, even in the dead of winter.
What reminds you of summer? Any particular foods, smells, or memories come to mind?
Make it a GREAT Monday, and I’ll visit again soon!
xo, Hilari
PS: Remember you can always catch up on my NYC adventures {or southern living starting August 17} by following me on Instagram – my favorite!, Pinterest, Facebook, or Twitter! Come say hello :)
Hey y’all! I am so happy to be sharing another recipe on this beautiful Monday!
As you know, I’m living in NYC for the summer, and I’m loving every minute of it. There is so much to do, and I feel like every moment is busy, busy, busy. I’m gearing up for lots of visitors in the weeks ahead, including next weekend for the 4th of July! Grant is coming for the long weekend, and we have so much to see, explore, and taste. Luckily, he’s a foodie like me, so you can bet our days will absolutely be revolving around food!
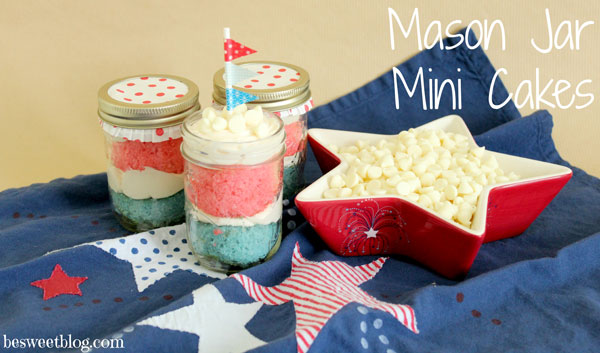
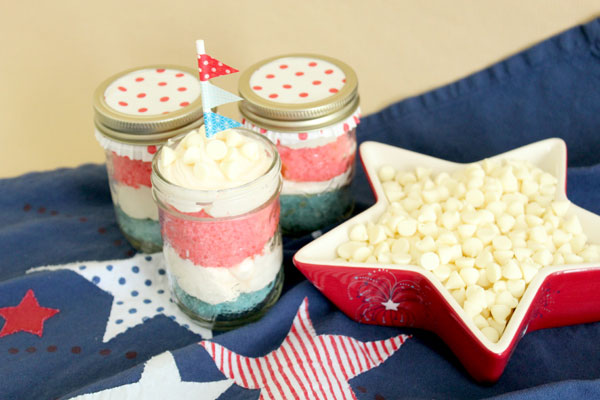
In honor of my second favorite holiday that’s just 10 days away (Thanksgiving is my all time fave), I am sharing my recipe/DIY for Mason Jar Mini Cakes! Some of you may have seen these on my blog, and I hope you enjoy them as much as I do!
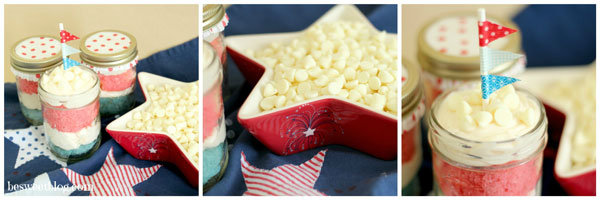
I’m not sure about you, but I need something super simple and just as cute to bring along to picnics and parties next Thursday! You can’t go wrong with cupcakes, but I wanted to step it up a notch, while still keeping it easy. I’ve also been wanting to do something with mason jars for the longest time, so this was the perfect opportunity! These mason jar mini cakes will be sure to wow your guests and keep the kids happy!
How-To: Mini Mason Jar Cakes
{Disclaimer: Yes, I am using boxed cake mix, and yes, sometimes you just need to keep it semi-homemade. There is nothing wrong with it!}
Step 1– If you’re using boxed cake like I did, prepare the batter according to the directions. However, if you have a favorite cake recipe, by all means, make it!
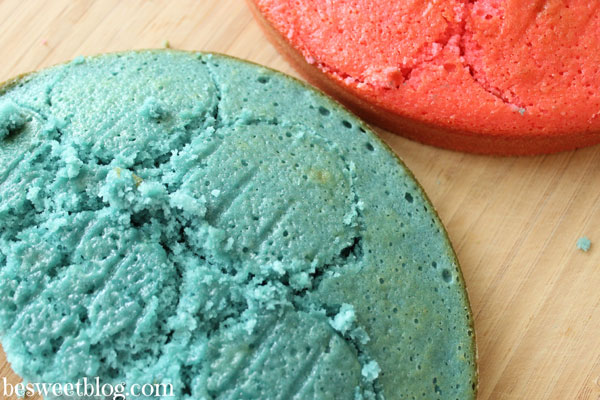
Step 2– Divide the batter into 2 bowls. Using food coloring, color one bowl red and the other bowl blue.
Step 3– Bake accordingly.
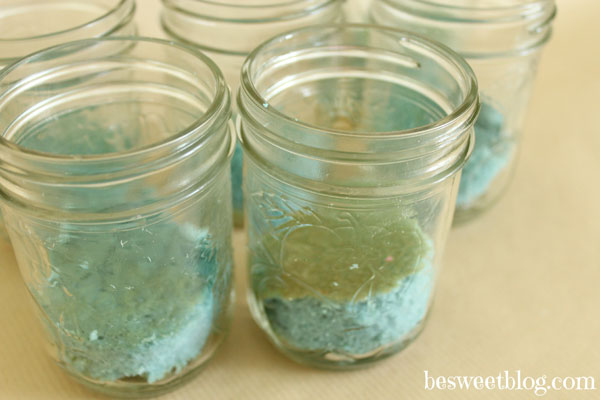
Step 4– Let cool completely. Once cool, place both cakes onto a cutting board or countertop. Using a circle cookie cutter that fits into the mason jar opening {or knife}, cut out circles of each colored cake. I used a measuring cup to trace a knife around because none of my cookie cutters were small enough. Be sure the cookie cutter fits into the jar, otherwise the cake circles won’t fit! You will need an even number of both.
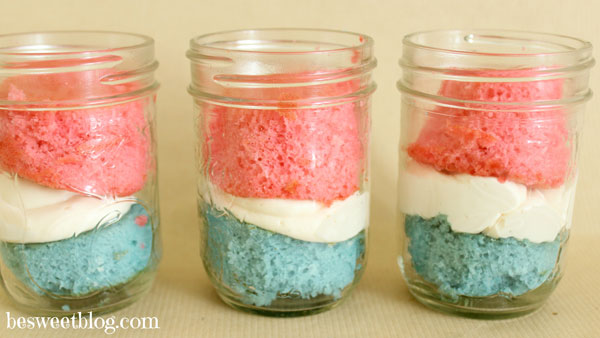
Step 5– Place one cake circle in the bottom of each jar. I chose blue as my base color.
Step 6– Make icing, or use store bought. I made a cream cheese icing, but any kind will do! Vanilla buttercream would be delish! I simply used a Ziploc bag and cut the corner off to pipe the icing on top of the blue cake. Use enough icing to make a complete white layer.
Step 7– Place the other cake circle {red} on top of the icing layer.
Step 8– Pipe icing on top of the second layer. In my case, this filled the jar to the top. If you’re using larger cups, continue this pattern until you reach the top of the jars.
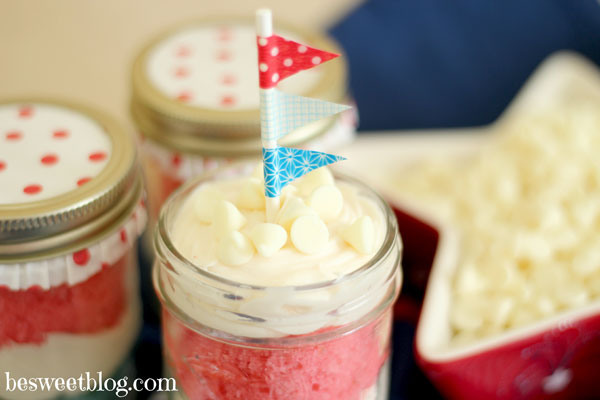
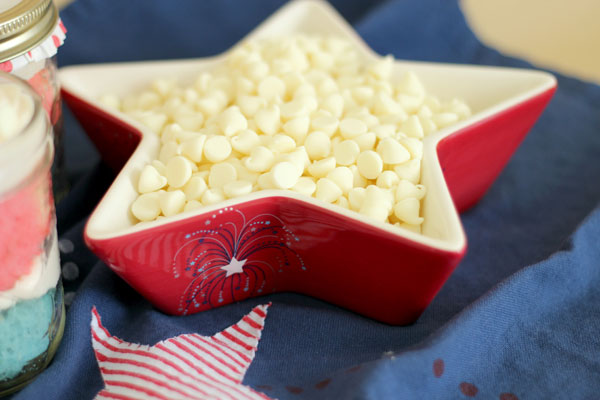
Step 9– Add sprinkles, white chocolate chips, or any decorations you’d like! I used washi tape to create the cute cupcake topper.
Step 10– If traveling, place the mason jar lids on top, and store in the fridge until you’re ready to go.
Tip: These can be made 1-2 days in advance! Keep the stress and rushing around down by prepping these a couple days ahead of time! To make them even cuter, I placed the top on, then a matching cupcake liner, then the twisty part of the lid. That way, you don’t see the shiny metal, but they still look pretty!
What are your 4th of July plans? I love that the holiday falls on a Thursday – I lucked out and have Friday off, do you? Don’t forget to follow me for a sneak peek into my world of sweets, entertaining, crafting, and NYC living! I’ll be back to my southern ways in just 7 weeks!
Summer is officially here! With the change in season, I’ve made a 360 change in life plans. It’s been a whirlwind throughout these past few weeks, but I am excited to announce that I am settled and LOVING life in New York City! There is just so much to do, every hour of the day, and it’s been really fun to create my own little space in such a HUGE city. I will be here for the next 10 weeks working for Martha Stewart Living! {My grad school program requires an internship… I reached for the stars, and well, here I am!}
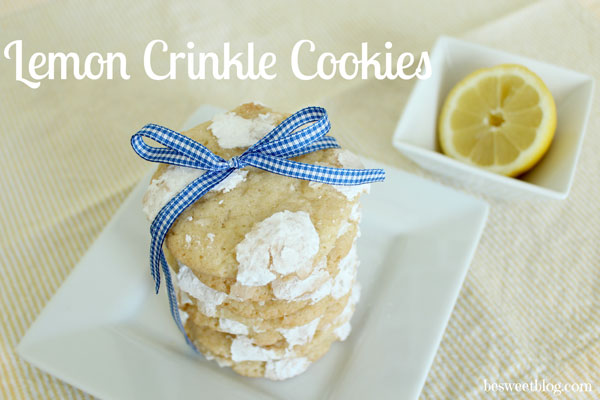
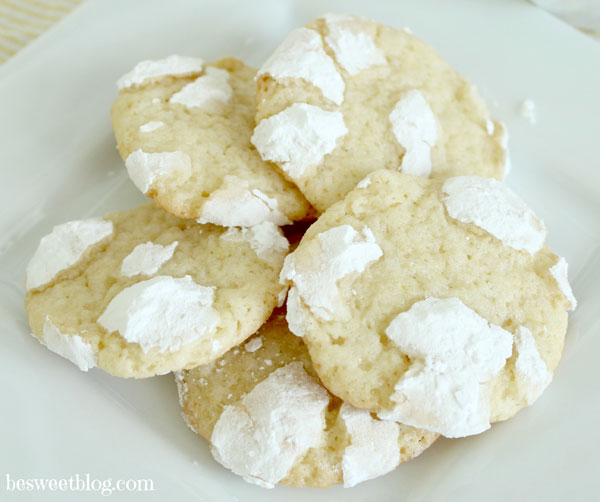
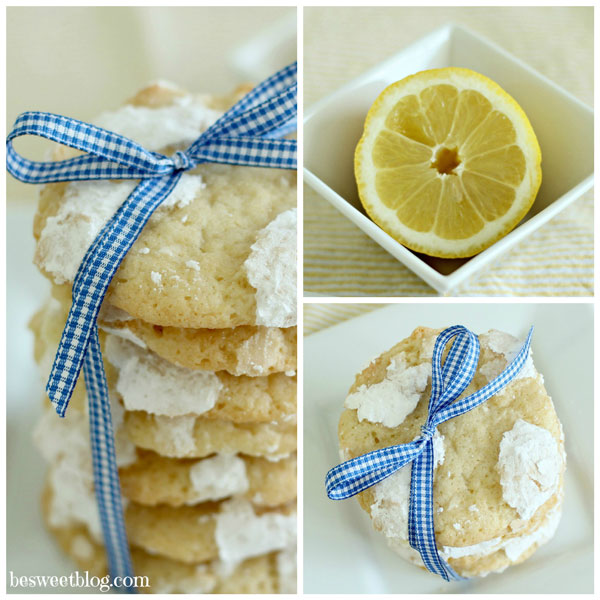
Onto the sweets… Lemon Bars are some of my absolute favorite. But, they have to be served chilly to really taste the goodness. Check here for the best lemon bar recipe you will ever taste {I might be a little bias :) } So, why not take a lemon bar and turn it into a cookie for the hot summer months? I did just that, and it worked! Randomly last week, I had been reflecting on my absolute favorite Christmas cookie – chocolate crinkles – and thought that texture combined with a lemon flavor would be melt in your mouth amazing. It is!
Lemon Crinkle Cookies
Recipe Type: Dessert
Ingredients
1 c. sugar
1/2 c. (1 stick) butter, softened
1/2 tsp. vanilla extract
1 tsp. lemon zest
1 T fresh lemon juice
1 egg
1/4 tsp. baking powder
1/4 tsp. baking soda
1/4 tsp. salt
1 1/2 c. all purpose flour
1 c. powdered sugar {for rolling}
Instructions
Cream butter and sugar in a large mixing bowl until light and fluffy {4 minutes-ish}.
Mix in vanilla, zest, juice, and egg until well combined and consistent in texture.
Add baking powder, baking soda, and salt. Mix well.
Stir in flour.
Cover dough and chill in fridge for 4 hours {or overnight}.
Preheat oven to 350 degrees.
Put 1 c. powdered sugar in a small bowl.
Form balls of dough in your hand {the dough will warm up from the heat of your hands} and completely coat in powdered sugar.
On parchment or silpat lined baking sheets, place cookies 2 inches apart.
Bake for 8-11 minutes {depending on size of cookies} until bottoms are just slightly browned.
Cool for 3 minutes, then transfer to cooling rack.
Enjoy!
3.2.1753
These are perfect for summertime picnics, play dates, camp care packages, hubby’s work lunches, even breakfast..! I hope you enjoy these as much as I do!
I was just so thrilled with the positive response from my very first recipe! Thank you all for such a warm welcome, I know I’m going to love contributing recipes to y’all… get ready!
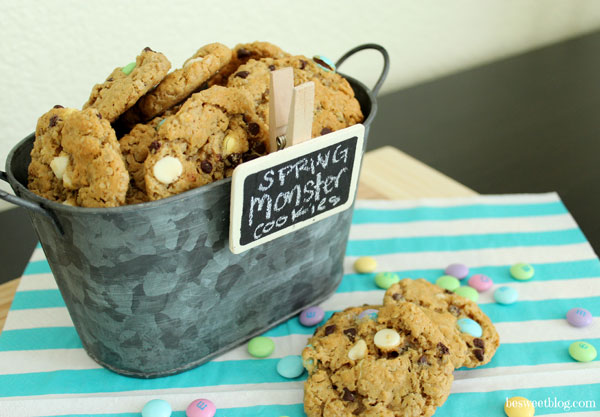
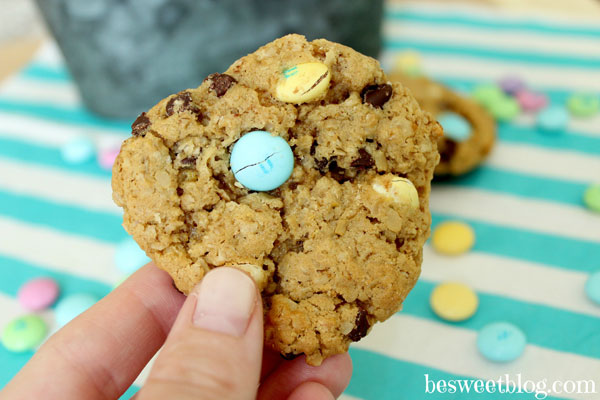
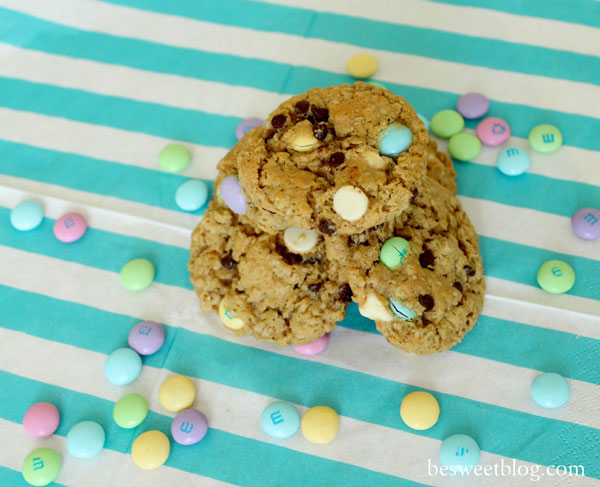
I couldn’t wait to create something just as delicious, and exclusive, for Pretty Pink Posh readers! The classic monster cookie recipe is one of my favorites, and is something that I grew up with. I have fond memories of coming home from school to a house smelling of fresh baked “monsters” and an icy cold glass of milk waiting for me on the counter. Those were the days :)
Today, I’m sharing a “spring-y” version of monster cookies with you. There are just a few minor changes that make them brighter and more enticing for those hot summer days! They are perfect for picnics, hikes, after school snacks, BBQ treats, or just because. Everyone LOVES them, and they’ll be the hit of the party! Mini or “monstrous,” the size doesn’t make any difference in taste! Bonus: they’re gluten free! {You can ensure this by using gluten free oats}
Tip: At my house, we freeze cookies after baking them, and can enjoy them for up to 6 months! On a regular basis, I’ll find Grant munching on some frozen cookies- a nice and chilly treat for when the days really heat up!
Enjoy – I hope you have a fun-filled day with friends and family ahead!
Spring Mini Monster Cookies
Recipe Type: Dessert
Ingredients
3 eggs
1 1/4 c. packed light brown sugar
1 c. sugar
1/2 tsp. salt
1 tsp. vanilla extract
1 1/2 c. creamy peanut butter
1 stick butter, softened
1 c. Spring M&Ms {or regular, only the color changes!}
1 c. white chocolate chips
2 1/2 tsp. baking soda
4 1/2 c. quick cook oats {not instant}
Instructions
In the biggest mixing bowl you have, combine the eggs, brown sugar, and sugar. Mix until smooth.
Add salt, vanilla, peanut butter, and butter. Mix well until fully incorporated.
Add baking soda and oats. Stir well.
Mix in M&Ms and white chocolate chips.
Cover and refrigerate 1-2 hours.
Preheat oven to 350 degrees F.
Roll dough in your hand to form a ball, about 1 tablespoon in size.
Bake for 6 to 8 minutes, or until just slightly golden brown. Don’t overbake! {They will continue to cook on cooling rack}.
Let stand 2 minutes and transfer to cooling rack.
When cool, freeze in Ziploc bags for up to 6 months, or keep at room temperature in an airtight container for 4 to 5 days.
Enjoy!
Notes
This recipe will make LOTS of mini cookies! If you’d prefer larger cookies, or the typical “monster,” simply increase baking time.
At the beginning of the year, I shared that 2013 was going to filled with new and exciting things here on the blog. I’ve had new sponsors, giveaways, hit some record breaking numbers and added my sister, Krista, as a contributor to the blog. As some of you know, she got an amazing job offer in San Francisco a couple months ago and has been living there ever since. She was optimistic that she would still be able to join me occasionally for posts, but alas, her schedule it quite busy. She gave me her blessing to start looking for a new contributor and that led me in the direction of my good friend, Tawsha {the ultimate networking person }. A rundown of information, a couple emails and I became connected with the amazing lady I’m featuring today.
I’m thrilled to be announcing that Hilari from Be Sweet will be joining me as a contributor here at Pretty Pink Posh. The moment I saw her blog, I fell in love. You can tell she’s passionate about what she does, and her recipes all sound so delish {and relatively easy}! I wanted to take the time to allow you all to get to know her and also share a few of her recipes that caught my eye.
Tell us about your blog. When and why did you start it?
My blog is called Be Sweet, and its essentially a compilation of everything that makes me smile… which is a lot of things! I used to have a smaller, personal blog, and so many people told me I should make it bigger, better! So that’s what I’m trying to do. My goal is to fill life with joy through all of the things that make me happy. I blog about sweet treats, simplified entertaining, and tips and tricks for adding joy to everyday living! On my site, you will find creative ideas that add joy to my life… and I hope yours, too! Ranging from kitchen to friends, from family to home, and travel to photography, I will share what makes me smile each day. It is my dream to spread joy to others, and by stopping by, I hope Be Sweet can put a smile on your face, if only for a few minutes out of your busy day! I’ve been officially blogging on Be Sweet since January, and I’ve learned so, so much along the way, and continue to learn and soak up as much as I can throughout this adventure!
When you first started your blog, did you have any specific goals or dreams for the future of your blog? If so, what were they?
I still feel like I’m first starting! I think my goals were (and still are) to simply make people happy. I’d love to see where this takes me, book writing, photo styling, magazine editing… the possibilities are limitless. But, I do want to stay true to me, my core, and what fires me up when choosing which future ventures to embark on- I want wherever this might take me to make me and others happy!
You bake so many delicious looking items….is there a specific recipe that’s your favorite?
Without a doubt, my favorite recipe is for Mrs. Schae bars {Here, they’re called Be Sweet Bars}! Growing up, my mom made these for skating competitions, school parties, lunch treats, and so many other wonderful activities. It’s these fabulous memories combined with the sweet and salty flavors that make this hands down, my favorite recipe!
Do you visit other blogs? If so, what are a few of your favorites?
I love to blog-hop, and so value the time, effort, and dedication blogging takes! A few of my favorites are The Be Present Project {Jessica provides such an honest and hopeful view of parenting, raising a family, and staying true to values}, Pomp & Circumstance {a gem I’ve recently discovered!}, and Amber Housley {one of my favorite lifestyle blogs that is incredibly well done!}, just to name a few!
How much time each week to you dedicate to your blog {approximately}?
Weekly, I spend anywhere from 15-20 hours a week dedicated to my blog. This varies depending on if I’m baking, recipe testing, or actively working on a craft or DIY project. All of this, combined with the writing, editing, and photography aspects can really add up! Oh, and social media… enough said :)
What has been your favorite part about blogging?
Definitely connecting with other bloggers! I have been fortunate enough to meet some of my favorite bloggers in person, form wonderful friendships, and really connect on a personal level that is more than just “screen deep.” It’s amazing to me the talent and skills so many women {and men!} have, and I feel lucky to be part of a community surrounded by all of this positivity.
Okay, now onto some fun questions that are non-relevant to blogging…..
What do you enjoy doing in your spare time?
Well, I love to bake. But I think you got that message! My family means the world to me, so we love spending time together, playing games, cooking, and going on adventures. I love to travel and explore the world. I love to run, and am starting to get really into half marathons {thank goodness, otherwise all of those desserts are going to catch up with me!}. I also love just the simplicities of daily life, which include cleaning, laundry, and all of the “boring” things. To me, being organized and ready for the day ahead is one of the things I enjoy most!
You have a free Friday night, how would you spend it?
I’d head to my favorite restaurant, Local Taco, sit outside and enjoy a margarita, chips and salsa, and fish tacos. Then, Grant {the most incredible person in the world} and I would go for a walk, try a new dessert spot, and head home to watch a movie or catch up on our endless TiVo-ed shows! Not too exciting, but so wonderful!
If you could be a celebrity for a day, who would it be? Why?
Reese Witherspoon. I have always considered her a role model of mine {classy, put together, and always cheery!}, and her wardrobe… FAB!
You get to spend an unlimited amount at three stores, which stores would you pick?
1: Nordstrom. My goodness I could {and usually do} go crazy there! 2: Michael’s. I love to craft, use ribbon and glitter, and bake. The perfect store. 3: Sur la Table. Fortunately, there isn’t one in Nashville, otherwise I really would be in trouble! I love their cooking utensils, linens, and fun bakeware!
Name 5 things that you are most passionate about:
Relationships
Healthy Living
Organization
Exploring and seeing all the world has to offer
Positivity and making the most out of each day!
As promised, I have some Be Sweet recipes links to share with you. Beware: you shouldn’t look at her site on an empty stomach. It’s dangerous! :)
As soon as I got connected with Hilari, I followed her everywhere and have loved every single thing I’ve seen. She’s super sweet and I know you all will really enjoy getting to know her.
In addition to all of this, Hilari is part of a great link-up party each week and has many more recipes that I couldn’t include in this post. Stay tuned, her very first contributing post will go live NEXT Monday. In the meantime, be sure to visit her blog and other social media sites!

 Oh my! If you love pumpkin, you will love this recipe for Pumpkin Snickerdoodle Cookies. This time of year, I feel like I’m making them every week!